1
DIS
AS
The ·Ultimate ·Disk· Utili
PROGREJ.fiVE
P&ERIPI-IERALJ
JOFTWARE
464 Kalamath Street
Denver, Colorado 80204-5020
Phone: (303) 825-4144
Fax: (303) 893-6938
___ __
__.
.......
-----------------~-,y~
IJisklVfaster 2.0
Program Written By Greg Cunningham
User Manual Written by Roy E. Brothwell
Desktop Publishing by Roy E. Brothwell
Copyright Notice:
Copyright 1991 by Nomad Development, Inc. Reproduction or publication of the contents by any means without the espress written permission of Nomad Development, Inc. is prohibited. NO liability assumed
with respect to the use of the information contained herein.
Published by:
Progressive Peripherals & Software, Inc.
464 Kalamath Street
Denver, Colorado 80204
Disclaimer:
No warranty is made with respect to the DiskMaster 2.0 software, its
quality or performance. Any and all warranties for merchantability
and I or fitness for a particular purpose are expressly excluded.
In no event shall Progressive Peripherals & Software, Inc. be liable or
responsible to the purchaser or any other ~rson or entity for direct,
indirect, special, incidental, or consequential damages, including but
not limited to interruption of service and loss of business or anticipatory
profits, resulting from any defect in or misunderstanding of the software or its documentation, even if Progressive Peripherals, & Software,
Inc. has been advised of the possibility of such damages.
The warranty and remedies set out above are exclusive and in lieu of all
others, oral or written, expressed or implied.
111
Table Of Contents
1.
Introduction 1
1.1. What Is DiskMaster? 1
1.2. System Requirements 1
1.3. System Extras 1
1.4. Input Devices 2
1.5. The Amiga Mouse 2
1.6. Other Input Devices 4
1.7. Copying the DiskMaster Program to Your Hard Drive 4
1.8. Mal<ing a Working Copy of DiskMaster 4
2.
The Default DiskMaster 6
2.1. DiskMaster Screen Elements 7
2.2. Using DiskMaster 9
The Amiga Directory Structure 10
2.2.1.
2.2.2.
Exploring the Directory Structure 11
2.2.3.
DiskMaster Default Commands 13
2.2.4.
DiskMaster's Default AutoCommands 18
2.2.5.
DiskMaster's Default Menus 19
2.2.5.1. Project Menu 19
2.2.5.2. Tools Menu 21
2.2.5.3. Archive Menu 22
2.2.5.4. Disk Menu 24
2.2.5.5. Control Menu 26
3.
The Custom DiskMaster 28
3.1 . Configuration (script) Files 28
3.2. Adding Commands 30
3.3. Adding Menu Commands 33
3.4. Custom Information Display 35
3.4.1.
Display Format 35
3.4.2.
Display Font 37
3.5. Ex~ loring the Configuration File 38
3.6. Editing the Configuration File 39
3.7. Multiple Command Windows 41
3.7.1.
Replacing Menus with Command Windows 42
4.
DiskMaster Requesters and Screens 45
4.1. Confirmation Requester 45
4.2. String Requester 46
4.3. Palette Requester 47
4.4. File Reader 48
4.5. Printer Setup Requester 51
4.6. Disk Format Requester 54
4.7. DiskCopy Requester 56
5.
DiskMaster I ARexx Commands 57
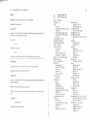
6.
INDEX 93
1
1. Introduction
1.1. What Is DiskMaster?
DiskMaster is a disk utility program which combines the
most used disk commands in an easy to use point and
click mouse environment. DiskMaster can also make use
of external programs such as archive programs, text editors, file editors, ILBM or animation viewing programs,
etc., making them easier to use.
DiskMaster 2.0 has the ability to communicate with other
programs using its ARexxtm port, and exectue complex
ARexx scripts which can automate multi-step disk operations.
1.2. System Requirements
DiskMaster will run on any Amiga 500, 1000, 2000 series
or 3000 series computer running under Kickstart 1.2 or
higher, including AmigaOOS 2.0.
1.3. System Extras
To make full use of DiskMaster's ability to use external
programs, you must obtain the following programs:
Archive Programs - The public domain programs ARC,
LHARC, and Amiga ZOO will are necessary to make use
of the file archive commands.
ARexx- Although DiskMaster can execute scripts using
its own set of built in commands, including DiskMaster's
commands in an ARexx script can result in much more
I
2
-r
I1
DiskMaster 2.0 User Manual
powerful commands. ARexx allows DiskMaster to
communicate with other ARexx compatible programs
through ARexx scripts.
ScreenShare - The ScreenShare library allows you to
open windows and requesters on a screen belonging to
another program.
Text Editor- While DiskMaster contains its own powerful text reader, it has no built-in facilities to edit text files.
We recommend that you have available, a text editor that
you find comfortable to use. We also recommend that
your text editor have "Cut", "Copy'', and "Paste" operations.
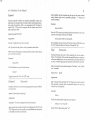
1.4. Input Devices
In addition to the keyboard, the computer's standard
input device, the Amiga has an alternate input devicethe mouse. The mouse has proven useful for graphic applications such as painting and drawing. It also provides
an easy-to-use method of issuing commands to the computer. DiskMaster was designed to make full use of the
Amiga's mouse-driven interface.
1.5. The Anziga Mouse
3
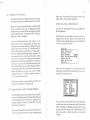
The Menu Button (the right
mouse button) is normally used
to display the available PullDown menus at the top of the
screen. Move the mouse pointer
over the information bar and
press-and-hold the Menu Button. If the pointer is positioned
directly over a menu header, the
menu will appear. While holdingdown the Menu Button, move
the pointer over each of the menu
headers to view each menu. Still
holding down the Menu Button,
move the mouse down one the
of the menus. As the pointer
moves down the menu, menu
items will become highlighted.
Ul
<1)
<1)
0
r+
on t:ro 1
ew Window
ew Cnd Windo~1
~N
~C
Swap S<->D
Run DH Sc11 ip t
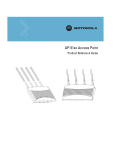
Pictured below is a standard Amiga style mouse.
DiskMaster's mouse pointer is controlled by the movement of the mouse across a table or mouse pad.
The Amiga mouse has two buttons. The Select Button (the
left mouse button) is used to select an icon or screen
position. Pressing on the Select Button will select the icon,
gadget, or drag bar that is presently under the mouse
pointer.
Note: This manual will represent a particular menu item bt;
listing the path taken to reach the menu item. The path will be
in bold face, and each path level will be separated with a ~lash
mark (\). For instance, MenuHeader\Menuitem.
= ---·-I.
I
i
4
DiskMaster 2.0 User Manual
1.6. Other Input Devices
SeveralalternateinputdevicesareavailablefortheArniga,
including Light Pens, Digitizing TabG, Track Balls, etc.
DiskMaster will work with any of these alternate input
devices as long as they completely emulate the standard
Amiga mouse. They must have a Select Button, and a
Menu Button, in addition to a method of positioning the
pointer on the screen.
1. 7. Copying the DislcMaster Program to
Your Hard Drive
We recommend that you copy the DiskMaster to your
hard drive and place the original distribution disk in a
save place to be used as a "backup". Simply open the
DiskMaster distribution disk by double-clicking on its
icon. When the DiskMaster window opens, click on and
drag the DiskMaster icon to the desired window on your
hard drive. No other files must be present in order for
DiskMaster to run. However, you may want to move
some of the example project files over to your hard drive
as well. These are copied in the same manner as DiskMaster.
1.8. Making a Working Copy of
DiskMaster
Before extensively using with your original DiskMaster
distribution disk, we recommend that you make a working copy to be used on a daily basis, and place the original
disk in a safe place to be used as a "backup".
DiskMaster can make this copy for you. Load DiskMaster by double-clicking on its icon. After DiskMaster loads
5
and the credits window closes, select the Disk\Copy
DFO: DFO: menu command. Insert the DiskMaster distribution disk into DFO: (make sure the disk is write pntected orthediskcopy willnotproceed). When prompted
(messages are displayed in the DiskMaster title bar),
remove the DiskMaster distribution disk, and insert a
blank floppy disk into DFO:. When all feedback and drire
activity stops, remove your working copy of DiskMastu.
If your system has a second floppy drive designated
"DF1:, you may use the Disk\Copy DFO: DFl: merLU
command to avoid the need to swap disks.
Note: If you have an Amiga 500 or 1000, "DFO:" is the
internal floppy drive, while "DF1:" is the first external floppy
drive. If you have an Amiga 2000 or 3000 series computer, beth
"DFO:" and "DF1:" are internal floppy drives. If your Amiga
2000 or 3000 series computer does not have a second interr.al
floppy drive, but does have an external floppy drive, the nane
of the first external floppy drive is "DF2:".
"1~·:::
~ ~:l-,t -
1 ..
- - ------ - -
I
- -
I
DiskMaster 2.0 User Manual
6
7
2 .1. DiskMaster Screen Elements
2. The Default DiskMaster
DiskMaster 2.0 is a completely new verstion of the orignal Disk.Master program. However a "default mode" is
provided which is similar in look and feel to the original.
Later in the manual we will explore the many ways in
which DiskMaster can be customized.
Start Disk.Master by double-clicking on its icon. A custom four color screen will open and three windows will
open on the custom screen. Notice that the four colors
used by DiskMaster are the first four colors of your
Workbench screen. A "credits" window will appear
displaying information about Disk.Master. Click anywhere on the credits window to close it. This "credits"
window appears automatically only if DiskMaster is
running in its default mode. Once a configuration file has
been saved, this window will be opened only on command.
DiskHastta' 2.8 11:24AIUI1ll 25A!il'91 ClliP!868112 Fast:5568664 Total:6428? 6"'
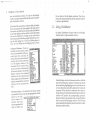
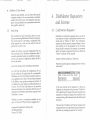
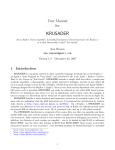
There are four main elements of the DiskMaster scnen.
They are:
Title Bar- The title bar is used as a feedback wind)w.
When no operation is taking place, it displays the program name, the current time and date, and infonna lion
about ram availability.
IDiskHaster
2.8 11:24N1 Thu 25Apr91 Chip:868112 Fast:5568664 Total :64287!6•1{)11
However, when an operation is taking place, infornation about that operation is displayed in this area. For
instance, when copying files, the name of the file mrrently being copied will be displayed.
File Display Windows - These are resizable wind<»ws
which display information about the files in the current
directory such as file name, file size, time and date the
file was last changed, protection bits, and file comm:mt.
Each file display window can be in one of ~lfl®®ftiM: : : : : : : : :t:: ti:i:tt[i 1!1
SYSTEM:
three states: Source (infiJPS~l'ipts
12:42M
dicated by an "S" just .
1:19P.
llbs
9:27M
below the depth gadget), Ne
twol'k
19: 11M
Destination (indicated P:reis
2: 96P•
s
19:37M
by a "D'' just below the SysteM
9:21N
depth gadget), and Neu- tt . . .
11 :5BM,
111t1es
3:18Pf
tral (indicated by dis- U
.inio
115 19:14M
playing nothing just be- Disk. info
379 2:82Pt
58848 4 :47PI
low the depth gadget). DiskHastel'
DH14. txt
3197 2:99PI
By default, clicking into DH2
66644 3: 44M
DH2. info
539 2:45PI
any window will cause DU.info
894 18:47M
it to become the source DUDATA.info
894 19:47M
ExPansion. info
894 18:47M ""
window, changing the Netwol'k.
inio
894 2:39Pf 1previous source window
:-J1
~VPSCI'ipts
12:42~
I ibs
Ne twot~k
P1•efs
9:27~
18:11~
1: 18PH
2:86PH
18:37~
9:21~
11:58~
5
Syste11
t
Utilities
. info
Disk.info
Di skHas ter
DH14. txt
DH2
DH2.info
DU. info
DUDATA. into
E~ansion. info
Ne work.info
115
378
3:18PH
18: 14~
2: 82PH
4:47PH
2:88PH
58848
3197
66644 3:44~
538 2:45PM
894 18:47~
894 18:47~
894 18:47~
894 2:39PM
Root
Parent
All
Cl m
Select
Exclude
Copy
Copy Hmr
Hove
Delete
Renane
Protect
Co1111ent
Find
Read
HexRead
ShowPic
Hakebil'
Print
DF8:
DF1:
DHB:
DH1:
PUB8:
JWol:
HARDDISK:
JWol DISK:
RB:
SYSTEM:
3DDAI:
3dpro:
c:
CGCache:
CGFonts:
Data:
DEVS:
DL:
DU:
<DEV>
<DEV)
<DEVl
<DEVl
<DEV)
<DEV)
(VOL)
(VOL)
<VOL>
<VOL)
<ASNl
<ASHl
<ASNl
<ASH)
<ASH)
<ASH>
<ASH)
<ASH)
<ASH)
I
t-:'":?!fi.r ·- - - -~--·---- -·- ---
1
I
8
I
DiskMaster 2.0 User Manual
9
into the destination window. If only two file display
windows are open, there will always be a source window
and a destination window.
If the list of files exceeds the windows ability to display
them, the proportional slider gadget at the right side of
the window will indicate the amount of the total list that
is currently displayed in the window. Currently hidden
files can be displayed by clicking on the scroll arrows
below the proportional slider gadget. Alternatively, moving the slider gadget up or down by clicking above or
below it, or by clicking on and dragging it up or down.
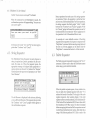
Command Windows - These are
resizable windows which contain
a list of commands that will be executed upon their activation. By
default, there is only one command
window which is located between
two file display windows. The
commands in the window affect
the source window or files selected
in the source window. Like the file
display windows, the command
windows also have proportional
slider gadgets and scroll arrows to
display commands that cannot be
displayed in the command window.
Root
Parent
All
Clear
Select
Exclude
Copy
Copy Newe:r
Hove
Delete
RenaMe
Protect
CoMMent
Find
Re.ad
HexRe.ad
ShowPic
HakeDir
Print
Size Check
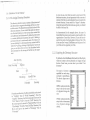
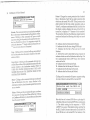
Pull-Down Menus- The default set of menus contain
commands that may not always be appropriate to be displayed in the com- !ProJect Tools Archives Disk Contl'ol
mand window. For
Run Se 1ected
Change Font
instance, they may
Hew Window
~H
start an operation that
New Ctld Window ~C
does not affect any
Swap S<->D
Run DH Sc!'ipt
file, or either of the file display windows. Their placement in the menus rather than in the command window
is purely organizational.
2.2. Using DiskMaster
By default, DiskMaster will open with two file display
windows and a single command window.
DiskHaste1• 2.8 11:24Mf lim 25Ap!•91 Chip:868112 Fast:5568664 Total:64287 6. ~I
~
Iii•
SYSTEM:
12:42,6Joj
DF8:
<DEVl
yvpscl'ipts
(DEVl
1:18PH
DFl:
9:27,6Joj
(DEVl
libs
DH8:
lB:ll,AJoj
Netwol'k
DHl:
<DEVl
Pl'efs
2:86PM
PUB&:
<DEVl
1B:37,6Joj
JI.,AJoj:
s
<DEVl
SysteH
9:21,6Joj
HARDDISK:
<VOLl
11:58,6Joj
JI.,AJoj DISK:
<VOL)
t
<VOL)
Utili ties
3:18PH
RB:
• info
115 1B:14N4
SYSTEH:
<VOL>
Disk. info
378 2:82PM
3DDAI:
<ASNl
DiskHastel'
58848 4:47PH
3dp!'o:
(ASH>
c:
DM14. txt
3197 2:88PM
<.A.SNl
DM2
66644 3:44,6Joj
CGCache:
<ASH>
(ASNl
DM2.info
538 2:45PH
CGFonts:
894 18 :47,6Joj
DU. info
Data:
<.A.SN>
(.A.SNl
DUDATA. info
894 18:47N4
DEVS:
(ASH)
894 18:47,6Joj
DL:
E~ansion. info
He wol'k. info
DU:
894 2:39PH
<.A.SH>
I
One file display window is the source window while the
other is the destination window. Commands are issued
by first selecting (highlighting) one or more files, or one
or more directories that will be affected by the desired
command. When the files or directories have been selected, clicking on the desired command in the command
window will perform the corresponding operation.
However, before you can select a file, you must be able to
find it in one of the file display windows. The follo¥\'ing
section describes the directory structure and how to view
directories and their files.
........- - -·-
l'::>'>~,..--~~-
- - -- . -
I
11
10 DiskMaster 2.0 User Manual
2.2.1. The Amiga Directory Structure
The directory structure uses a system of directories and
sub-directories to organize the storage of files in a hierarchial manner. The Root directory is the first level of the
directory structure. lt can contain files and sub-directories. Each sub-directory of the root can also contain files
and additional sub-directories. By allowing directories
to contain additional directories, the task of finding a
particular file can be made much easier. For instance, if
you are looking for a drawing that was created with the
IntroCADtm packlge, looking at the directory names can
give you an idea where to look. The illustration below
demonstrates how the storage of the file may be organized.
A_s dem?nstrated in the example above, ·the use of a
h1erar~h1~l file system can be used to great benefit in the
orgaruzatwn of your files. However, it can also be mis~sed to the point of not being able to find any file. If this
lS the ~ase don't worry, DiskMaster can help you to find
your files and re-organize your files.
2.2.2. Exploring the Directory Structure
B~ default, whe~ Dis~aster first loads both file
wm~ows contam a list of physical and logical
display
storage
d~v1ces. From here you can select your initial "root
directory".
Root Directory
Word Processing
A.s you can see, every time you enter a new level cf the
drr~tory struc~re, you are presented with a new set of
options. If the file you are looking for does not exist in the
cu~ent directory, it may exist in a "deeper'' directory.
Usmg the names of the directories as a guide you should
be able to find any file.
'
Graphics
CAD
Paint
UltraDesign
IntroCAD Plus
Postscript
Drawings
From the root directory, the file is more likely to be stored
in "Graphics" than in ''Word Processing". From the
"Graphics" directory, the file is more apt to be stored in
"CAD" than in "Paint". From the "CAD" directory, the
file is more apt to be stored in "IntroCAD Plus" than in
"Ultra Design". From the "IntroCAD Plus" directory, the
file is more apt to be stored in "Drawings" than in
"Postscript".
The type of device is
specified for each entry,
enclosed in parentheses.
The device types are as
follows:
DF9:
DFl:
DH9:
DH1:
PUB&:
RAH:
HARDDISK:
RAM DISK:
RB:
SYSTEM:
3DDAI:
3dpro:
c:
CGCache:
(VOL)- Indicates that the CGFonts:
entry is the volume name Data:
DEVS:
of a physical storage DL:
DU:
device.
(DEV)- Indicates that the
entry is the device name
of a physical storage device.
ilfl
~
<DEV)
<DEV>
<DEV>
<DEV>
<DEV)
<DEV>
(VOL)
(VOL)
<VOL>
(VOL)
<ASN)
<ASN>
<ASN>
<ASN)
<ASN>
(ASti)
(ASN>
<ASN>
<ASN)
I
~
1-1
I
----r
I
12 DiskMaster 2.0 User Manual
(ASN) -Indicates that the entry is the name of an assignment made to a storage device, or a sub-directory of a
storage device.
Double-clicking on one of these entries will read the root
directory of that device or assignment. Once the root
directory has been read, files and sub-directories contained within that directory will be displayed in the file
display window.
Note: The colors used to display files and directories depend on
the palette used by your WorkBench screen. Since even the
default colors of Workbench 1.3 and 2.0 differ greatly, we :Viii
refer to the colors used by their Workbench color regzster
number.
Directories- Directories are displayed at the top of the
file display window. They can be distinguished from
files by the fact that they show no file size, and they are
displayed in a different color. By default, they will be
dis pia yed in Workbench Color 3. Single-clickin~ a ~irec
tory will select (highlight) it, while double-clicking a
directory will read that directory and display its contents. Single-clicking on a selected directory will deselect
it.
Files- Files are displayed below the directories in the file
display window. They can be distinguished from directories by the fact that the file size is displayed, and .they
are displayed in a different color. By default, they will be
displayed in Workbench Color 1. Single-clicking a f~le
will select (highlight) it. Single-clicking on a selected file
will deselect it.
Note: Double-clicking a file will invoke an "AutoCommand".
This new feature of DiskMaster will be discussed in Section
2.2.4. of tf1is manual.
I
I
I
13
By double-clicking on directories, you can read the cont~nts of a directory, or"enter'' a directory. To returnto the
drrectory level above the current directory, click en the
;,~ent command,~ ~he command window. Altermtely,
S (source) and D' (destination) indicators will act as
"parent" buttons. Clicking on these indicators will also
return you .to the parent directory. Clicking on the Root
command ill the command window will return you to
the root directory of the current path.
2.2.3. DiskMaster Default Commands
Root- Clicking on this command will
cause the source window to display
the root directory of its current path.
No file or directory selection is required.
Parent - Clicking on this command
will cause the source window to display the contents of the parent directory in the current path. No file or
directory selection is required.
I•IEJ[iil •
Root
Pal"ent
All
C 1 eal"
Select
Exclude
Copy
Copy Newell:'
Move
Delete
RenaMe
PJ:>otect
CoMMent
Find
Read
HexRead
ShowPic
MakeDir
Print
Size Check
~11- Clicki.ng on ~his. command will select (highlight) all
files and d1rectones m the source window.
Clear - Clicking on this command will deselect all files
and directories in the source window.
~elect- This command allows you to select multiplefiles
the so~rc: window based on the pattern of !heir
ill
names. Clicking on this command will open a small
requester asking for the pattern to be used for file selection (~ee illustration on next page). The requester accepts
the wild card characters"?" (single unknown character)
an d
one or more unknown characters).
11'/rll (
~:~·.'"'";n.;;::;...._,a5&-r:w
·1
I
I
u
snit
¥
1 ~•
cczr rrnnrn
I
15
14 Disk.Master 2.0 User Manual
D i skHas tel' II ::=:3~~
Please speci£y pattern.
I*II
!continue!
I Cancel!
Exclude- This command allows you to deselect multiple
files in the source window based on the pattern of their
names. Clicking on this command will open a small
requ es ter asking for the pattern to be used for file selection (see illustration above). The requester accepts the
wild card characters"?" (single unknown character) and
"*" (one or more unknown characters).
Copy- Clicking on this command wil~ copy any selecte~
files or directories from the source wmdow to the destination window.
Copy Newer- Clicking on this comm~nd w~ll copy any
selected files or files within selected drrectones from the
source window to the destination window ONLY IF
THEIR FILE DATES INDICATE THAT THEY ARE
NEWER FILES THAN THE EXISTING FILES IN THE
DESTINATION WINDOW.
Move- Clicking on this command will copy any selected
files and directories from the source window to the
destination window, then delete the copied files from the
source window.
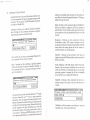
Delete- Clicking on this command will open a confirmation requester warning that all files ~11 be lost..Clicki~g
on Continue will delete any selected f1les and d1rectones
from the source window.
D i skHas tel' II ~31E:n::!il
All £iles will be lost.
!continue!
I Cancel I
Protect - Changes the current protection bits of sele( ted
files or directories. Each file has eight protection bits
which may be turned ON or OFF. These protection bits
either protect the file from certain operations sud as
"delete", or indicate an attribute of the file. Each file in the
file display window displays the name of the bit if lt is
turned on, or displays a"-" character if it is tumedoff.
The protection bits have the following single chara::ter
names and indicate the following when they are turned
ON:
H - Indicates that the file should be Hidden.
S- Indicates that the file is an AmigaDOS Script.
P - Indicates that the file is Pure and can be rrade
Resident.
A - Archive Bit; used by hard disk backup program> to
indicate whether or not the file has been backed up. ':'his
bit is automatically reset to OFF if any other tool has
written to the file.
R- Indicates that the file may be Read.
W - Indicates that the file may be Written to.
E - Indicates that the file may be Executed.
D - Indicates that the file may be Deleted.
Clicking on this command will open a requester ashng
for a list of bits to be turned ON or turned OFF.
DiskHastel' II E.:::==:==:3 LE:]~
Protection Mask £or DH14.txt
1-HSPA +RWED.
I Continue II Abort I
I Cancel I
Bits which are to be turned ON follow a plus sign ( +),
while bits which are to be turned OFF follow a minus sign
(-). The default setting for this requester is "-HSP A
+RWED" (no quotes). This default setting specifies that
the H, S, P, and A bits are to be turned off, and the R, W,
E, and D bits are to be turned ON. For instance, if the
. -~
c
J7
16 DiskMaster 2.0 User Manual
delete bit (D) were to be turned off, but the other bits were
to be left untouched, the protect requester string would
be simply" -D" (no quotes). It is NOT necessary to specify
the status of all eight bits.
Comment- Allows you to edit the comment of selected
files. Clicking on this command will open a requester
displaying the current comment (if any).
Dis Haster.- I:I :=:=::::3e:l~
Enter coMMent £or TextFile
I•
I Continue II AboJ:'t I
!cancel
I
After editing the comment and pressing [Return], the
n ew comment will be written to the file.
Find - Searches for files matching a specified pattern
within the selected directories or devices. Clicking on
lhis con1mand will open a requester asking for the pattern to be matched.
~~~~UE:=:=3e:l~
Please enter search pattern
I*II
I Continue II Abort I
I Cancel I
Clicking on Continue will proceed with the search lor
more files which match the specified pattern. Clicking Dn
Abort will stop the search.
Read- Clicking on this command will use DiskMaster's
built-in text reader to display in ASCII, the contents of
selected files. The file reader is quite powerful and bas
several options which are described in Section 4.4. of this
manual.
HexRead - Clicking on this command will use
DiskMaster's built-in HEX reader to display in Hexadecimal and ASCIT, the contents of selected files. The Hex
reader allows the same options as the file reader C.escribed in Section 4.4. of this manual.
ShowPic - Clicking on this command will read and
display any selected IFF picture files, or play any selected
8SVX sound files.
Note: Disk:Master will NOT display IFF24 format fil~s.
B~ca~se of the vast array of resolutions that can be st01ed
wzthm ?n IFF24 file, w~ recommend that you use an image
processmg program to mterpret the file into a displayable
format and save it as a standard IFF format file.
MakeDir- _Clicking on this command will open a requester asking for the name of the new directory to be
created.
DiskHaste1,· II E.::E.::E.::E.::3lE:II:!i!l
Please enter new directory naMe
The requester accepts the wild card characters"?" (single
unknown character) and "*" (one or more unknown
characters). After the pattern has been specified, DiskMaster will search the selected devices or directories for
any file which matches that pattern. When a file is found,
another requester will open, informing you of the file
that has been found, and asking if you want to open a
new window. Clicking on OPEN will open a new window displaying the directory in which the file was found.
IRAM DISJ< =
•
I continue!
ICancel I
Dis~aster will_then create a new directory, using he
spee1f1ed name, m the source directory.
----~----· ------·-~--
18 DiskMaster 2.0 User Manual
Print- Clicking on this command will print the selected
files, according to their structure. Text files will be printed
as ASCII, binary files (including program and sound
files) will be printed in HEX, and IFF picture files (not
1FF24) will be printed using the printer's graphic mode.
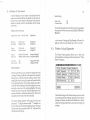
Size Check- Clicking on this command will calculate the
disk space needed to copy the selected ~les.and ~irecto
ries from the source directory to the destmatlon directory
and infonn you whether there is enough space to do so.
If there IS enough room, DiskMaster will also tell you
how many bytes will be copied and how much free space
will be left in the destination directory.
Total:
Total:
1255936
1255936
Leaving 15881344
t4o t enough :rooM.
19
Archived Files:
Files recognized as ARC, ZOO or LHARC files will call
the appropriate archive program to decompress the file.
The decompressed file(s) will be located in the same
directory as the original archive file.
Text Files:
Files recognized as text will be read using DiskMaster's
built in file reader.
Other Files:
Any file that cannot be identified as any of the abo•e file
types, will be read using the file reader's hexadecimal
option.
2.2.4. DiskMaster's Default AutoCommands
A new feature of DiskMaster 2.0 is its ability to evaluate
files and perform predefined commands on them simply
by double-clicking on them. ~or i~t~nce, doubl,~-chck
ing on an IFF ILBM (picture) f1le ~111 mvoke the ShowPic" command to display the picture. The AutoCommands that are part of DiskMaster's default configuration are as follows:
IFF Files:
ILI3M ACBM and 8SVX files will invoke DiskMaster's
built-in "ShowPic" command. This command will show
ILBM and ACBM pictures, and play 8SVX sound files.
ANIM files will invoke an external command called
"View". View is a flexible program written, and released
into the public domain by Michael W. Hartman, author
of Animation Stationtm.
2.2.5. DiskMaster's Default Menus
By default, DiskMaster has five pull-down menus. They
are Project, Tools, Archive, Disk, and Control. Several
commands found in the menus are designed to customize the way DiskMaster appears and operates. These
customizing commands identified by the word ''Custom", will be discussed in the Section 3., The Custom
DiskMaster.
2.2.5.1. Project Menu
Display Format- Custom
Add Command - Custom
Add Menu Item - Custom
P:rojectl
Display Fo:rMat ~F
Add CoMMand
Add Menu IteM
Palette
P:rinte:r Setup
Change CoMMand
Save Conris
~s
Save CMd Window
About
Quit
~Q
·~:~ · ~ttt "''
.. ._""""_ _ _ _ _ _ _ __ _
1
-----------------------,~
20 DiskMaster 2.0 User Manual
21
Palette- Selecting this command will open the DiskMaster Palette requester.
u:::::n::!il
r---lr-lr---lr---1 8-84a
lal
L___.II.___JL___.IL___.I Can c
Rl..
Gl
Bl
e1
I
I
I
..
..
IFile
Heade:r
lE:I~
II Page
NuMbe:rs
116
I
1Le£t Ma:r.gi n
<<
I Right Ma:r.gi n
<<
85>> II Pica
I Lines/Page
<<
66> > II D:r a£ t I
IG£x Density
<<
5}}
... b ... l<alamath Street
Denve•-, CO 8020 ...
( 303) 825-..........
Quit - Selecting this command will open a confirmation
requester asking if you are sure you want to quit at this
time.
D i skMas te:t' I I :::::::::::::::::::::::::::::::::3lE:I ~
Are you sure you want to quit?
IYes I
I
4>>1
l
I
by
Greg Cunnmgham
Copyright® 1'l'l1
LPII
I
I DONE
~li~btn- .2.. 0
6 .fOFTll JARIF
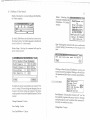
Printer Setup - Selecting this command will open the
printer setup requester.
.
iskHastea• I I =
PROGRE.f.fi'V'E
PERIPHERAL.f
By default, DiskMaster uses the first four colors of your
Workbench palette. The Palette requester is described in
detail in Section 4.3. of this manual.
11!-·-~I:ST~il'·T
About - Selecting this
command will display the
DiskMaster 2.0 credits
window.
I CANCEL
I
By default, the printer setup mimics your current "Preference" settings. If these settings are adequate, then no
change to the printer settings are required: The print~r
setup requester is described in detail in Section 4.5 of thiS
manual.
Clicking on Yes will close all DiskMaster windows and
screens and exit the program. Clicking on No will close
the requester and allow you to continue using DiskMaster.
2.2.5.2. Tools Menu
Tools I
Run Selected
Change Font
New W i ndo\'1
~N
New CMd Window ~c
Swap S<->D
Run DM Sc:ript
Change Command - Custom
Run Selected - Selecting this command will "run" the
first selected program in the source window. Although
multiple programs may be selected, this command affects only one selection at a time.
Save Config - Custom
Change Font - Custom
Save Cmd Window -Custom
"":i'l'm1 ----------·----·---------·
I
~,·~,• • f
.. .
22
Disk.Master 2.0 User Manual
23
New Window- Selecting this command will open a new
file display window. This new window can be used as the
source directory, the destination directory, or a neutral
display directory. Any nu~ber of .windows can be
opened, each displaying a different directory.
New CMD Window- Custom
Swap S<->D - Selecting this comman~ will sv:ap the
directory paths between ~he ~wo fil.e display '::'mdow~
the~tweremost recently active (ifnowmdowsare locked
these will be the source and destination directory). For
insle~nce if the source window is displaying the contents
of DFl: 'and the destination window is displaying the
contents of DFO:, this command will cause the source to
display DFO: and the destination to display DFl:.
When multiple source and destination windo.ws are
open, the swap will take place between the two wmdows
that were most recently active.
Run DM Script- Custom
2.2.5.3. Arcllive Menu
Ar-chives(
Lharoc Add
Ave
Add
z0 o
Add
Lharoc Ext:rac t
Ave
Ext:rac t
Zoo
Ext:rac t
Lharoc List
Ave
LL ~ s tt
Before using these commands
You must have the appropriate archive program available. These archive programs
are available either as "pub1 s
lie domain" or as , s h are- Zoo
ware". They are NOT included as part of the DiskMaster
program. These programs may be obtained through
your local dealer, Bulletin Board Systems, or through
your local user group.
LHARCAdd
ARC Add
ZOO Add
The three "Add" commands perform in much thesame
manner. A requester will appear asking for the path and
file name to be used for the archive file. The archive
program is activated and told to create a new archive file,
or add to an existing archive file using the selected files
in the source window. During the archive process, a
console window will be opened on the DiskMaster screen,
allowing you to observe or interact with the process (as
the individual program allows).
LHARC Extract
ARC Extract
ZOO Extract
The three "Extract" commands perform in much the
same manner. The archive program is activated and told
to extract the archived files from the selected files in the
source window. During the extract process, a console
window will be opened on the DiskMaster screen, allowing you to observe or interact with the process (as he individual program allows).
LHARC List
ARC List
ZOO List
The three "List" commands perform in much the same
manner. The archive program is activated and told :o list
the archived files contained within the selected fi les in
the source window. During the listing process, a console
window will be opened on the DiskMaster screen, aU owing you to observe or interact with the process (as the
individual program allows).
···--·- -·----
-· ---·-----~----------~
24 DiskMaster 2.0 User Manual
25
2.2.5.4. Disk Meuu
Disk I
For-Mat
DiskCopy
For-Mat DF9:
For-Mat DFl.:
Clear- DF9:
Copy DF9: DF9:
Copy DF9: DFl.:
Format - Selecting this command will open the Disk
Format requester.
DiskHastel~
II
IDF&:II~E~~~~~t~y~====================~
I»Ft.:I~IE~~~~~t~y~====================~
IDF2:I~IE~MP~t~y~==================~
I DF3: IIEtwty
~ I QUICH II VERIFY II INSTALL II CANCEL I
Using this requester you can format up to ~our ~oppy
disks at one time, providing that your system IS eqmpped
with four floppy drives. The Format requester is described in detail in Section 4.6. of this manual.
DiskCopy - Selecting this command will open the
DiskCopy requester.
DiskHaste1~ :
II=
I DF8: II Multi Copy 1.------.
IDF8: IIDFl.: IIDF2: IIDF3: I
~
ICAHCELI
Using this requester, you can make a single or multiple
copies of a disk using one, two, ~hree,. or four. floppy
drives, providing that your system IS eqm~ped WI.th fo:U
floppy drives. The DiskCopy requester IS descnbed m
detail in Section 4.7 of this manual.
Note: The following four commands are examples of cwiom
commands, using various aspects of the Format and DiskCopy
commands.
Format DFO: - This is a shortcur to using the Fom1at
requester. A confirmation requester will appear askin.g if
you are sure you want to format the disk in DFO:. Clicking
on Yes will close the requester and proceed with the
format. All feedback during the format will appear in the
DiskMaster title bar. Clicking on No will close therequester and abort the format process. The default name
used when formatting disks using this command is
"Empty:".
Format DF1: - This command is very similar to the
Format DFO: command except that in this example, no
confirmation requester will appear. The format process
begins immediately after selecting the command. All
feedback during the format will appear in the DiskMaster title bar. The name specified by this command is
"WorkDisk:".
Clear DFO:- This command is similar to the Format DFO:
command except that in this example, no confirmation
requester will appear, and thediskisnotactually foma tted. Instead, the "Quick" option is used, which simply
clears the directory of the disk. This only takes a Jew
moments to complete instead of the normal time required to fully format a disk. The "clear" process begins
immediately after selecting the command. All feedback
during the format will appear in the DiskMaster title ltar.
The default name used when clearing d isks using lhis
command is "Empty:".
Copy DFO: DFO: - This command calls the DiskCopy
function and tells it to use the DFO: drive as both the
source and destination drive. All feedback during the
copy process is displayed in the DiskMaster title bar. The
source disk MUST be copy protected before DiskMaster
26
27
DiskMaster 2.0 User Manual
will attempt to read it. After reading the source disk, the
message "Insert Destination Disk in DFO:" will appear in
the title bar. Remove the source disk and replace it with
the destination disk. The contents of the source disk will
be written to the destination disk.
Copy DFO: DFl: This command is similar to the Copy
DFO: DFO: command, except that the source drive is DFO:
and the destination drive is DFl:. Again, the source disk
must be write protected before the diskcopy can proceed.
Using this command will read one track from the source
disk and then write it to the destination disk. This will
proceed until all eighty tracks have been read and written. All feedback during the copy process is displayed in
the DiskMaster title bar.
2.2.5.5. Coutrol Menu
Con t:ro 1 I
Lock a.s Sou:rce
Lock a.s Des t
UnLock
UnLock a.ll
The following commands
are new to DiskMaster
users, and can be considered customization commands. However, we will discuss them here because they can make DiskMaster operate in a mode that is more familiar to previous CLimate1m
users.
Lock as Source- Locks active window as a source window.
Lock as Dest - Locks active window as a destination
window.
Using these commands, a file display window can be
locked as either a source window or a destination window. When a window is locked, clicking into it or into
another window will not change the status of the window. When only two windows exist, locking one of them
effectively locks the other as the opposite status. However, when more than two file display windows are
opened, the locking of a window as either source or
destination can allow you to have multiple source ,vindows or multiple destination windows.
These multiple source and destination windows -work
~ust as you would expect. Using the copy command, for
mstance, all files selected in multiple source windows
will each be copied to each of the multiple destination
windows.
Unlock -Unlocks the active window.
Unlock All - Unlocks all windows.
Toggle Expand - Specifies whether or not Diskmaster
will expand device names such as DFO: into full volume
names. This also affects the use of logical devices such as
"Fonts:" as root directories. For intance, with expand ON,
the "Fonts:" designation will be expanded to the volume
name of its physical device. However, with expand turned
OFF, the directory assigned to the "Fonts:" designation
will be used as the root.
Note: Expand must be toggled OFF if you are working with
two storage devices which have identical volume names.
28 DiskMaster 2.0 User Manual
3. The Custom DiskMaster
DiskMaster's default settings make it quite powerful yet
easy to use. Without changing one thing, DiskMaster is
a very usable program. However, DiskMaster can be
adapted to your specific needs quite easily. This adaptation, or configuration is stored as a script file that can be
executed by DiskMaster on startup.
notice that the credits window did not appear when you
loaded DiskMaster?
To further demonstrate this, move and resize the ille
display windows and the command window so that they
appear as below:
DiskHaste1• 2.8 11: 38AH Jhu 25Apl•91 Clup: 861128 Fast:5578768 Iota! :6431888i
I§J!:r.4:ij:@J:rfJ:u:u
SYSTEM:
t
If no script is available, DiskMaster will use its internal
(default) script. However, if a script file called
"Startup.DM" is available in the S: directory or in
DiskMaster's current directory, it will be read and executed.
Note: When DiskMaster runs a script at startup, the credits
window will not automatically appear.
3 .1. Configuration (script) Files
Let's start the customization of DiskMaster by duplicating the default script externally. Select the Project\Save
Config command. When the requester appears asking
the path and name to give the script file, type
"Starlup.DM" (no quotes) and press [Return]. The current settings of DiskMaster will be written into a script
file, located in the same directory as the DiskMaster
program. Because we named the file "Startup.DM",
DiskMaster will execute the script each time DiskMaster
is loaded. To demonstrate this, exit DiskMaster by
selecting Project\Quit and clicking on Yes on the confirmation requester.
Now load DiskMaster again by double-clicking on its
icon. DiskMaster will load and execute the saved
"Startup.DM" script, so that DiskMaster is set up in the
same way as when the script file was saved. Did you
Utilities
.info
Disk. info
DiskHaster
DH2
DH2.info
115
378
58848
66644
538
11:58AH
3:18PH
18!14AH
2:82PH
4:47PH
3:44AH
2:4SPH
24APr91
9Apr91
25Apr91
4Dtc98
38H~91
24Apr91
8Feb91
----RWED
----RWED
----RWED
----RWED Icon for Disk
----RWED
----RWED
----RWED
~
W DISK:
CoMMand-88-Til
disk, info
PositionHode
PositionHode.info
SetPriori tv
SetPriorit~.info
Udi tToolTypes
55 11:89AH
371 11:12AH
1 18:12AH
442 l8:12AH
1 8:12AH
484 18:12AH
2976 18:12AH
25Apr91
2~r91
2SApr91
25Apr91
25Apr91
25Apr91
25Apr91
----RWED
----RUED
----R-E----RWED
----R-E----RWED
----R-E-
Now save the configuration file again. Notice that when
you select Project\Save Config, that the requester appears with the name of the configuration file already
entered. Click on Continue or press [Return] to accEpt
the current name and save the file.
Now exit and reload DiskMaster to observe how tts
window placement was saved to the configuration file.If
either window was displaying a directory when the
configuration file was saved, that directory will be aulomatically read and displayed at startup. This can be quite
useful if you often work with a 'particular directory.
30 DiskMaster 2.0 User Manual
31
3.2. Adding Commands
Let's make our first real change to the default DiskMaster
by adding a command to the command window. Because of the variety of powerful public domain and
commercial text editors available, DiskMaster does not
contain a text editor of its own. Following these instructions will add a command to the command window that
will load the text editor ''ED" that comes with your
Amiga.
Select Project\Add Command. A string requester will
appear showing a command template in its title bar.
!continue!
I Cancel I
command with arguments, a command requiring file
selection, a command requiring confirmation, a command requiring user input through a requester, or multiple commands separated by semicolons (;) to be executed one after another. The command string can also
include external commands, which are actually separate
programs that can be called from within DiskMaster.
The command we are going to enter is of medium complexity. Since "Ed" is a separate program, it is called an
"external" command. The "Ed" program also requires an
argument, the name of a file to be edited or created. In this
case we want "Ed" to use a name that we select from the
source window.
Enter the following text into the requester then press
[Return] or click on Continue:
Edit, 10, External C:Ed o/os
The command template is as follows:
Title,##,<command string>
Title - This is the text that will be displayed in the
command window to identify the command string. The
title is followed by a comma (,).
## - This is a two digit number specifying the colors used
to display the command title. The first digit is the foreground color and the second digit is the background
color. The numbers entered here are the color register
numbers as displayed in DiskMaster's palette requester.
The color specification is followed by another comma (,).
Remember that the first color on a 4-color screen is color
0, and the last color is color 3.
<command string> - This is the actual command that
will be executed when the command is activated. The
command string can be a simple one word command, a
Edit is the name of the command, 10 specifies that the text
will use color register 1 as the text color, and color register
0 (the background color) as its background. The DiskMaster command External tells DiskMaster that the next
series of characters specifies a program that is to be run.
The path and name of that program is C:Ed (the "Ed"
program located in the C: directory). Finally, the %stells
DiskMaster to use the first selected entry in the source
window as an argument for the "Ed" program.
As soon as the command was accepted by pressing
[Return] or by clicking on Continue, it was added to the
command window, at the bottom of the list of commands. Use the command window scroll gadge!s to
verify that the command is indeed at the bottom of the
command list.
Let's try out the new command by loading a text file into
the "Ed" text editor. Insert the working copy of the
--
...
t
--------------
------------------------------------- - ---- --
--- --
I
32
33
DislcMaster 2.0 User Manual
DiskMaster disk into a floppy drive and display the
contents of its root directory in the source window. Find
the file called "TextFile", and click on it to select it. Now
click on the Edit command. DiskMaster will start the
"Ed" program and tell it to load "TextFile" from the
working copy of the DiskMaster disk. However, because
"Ed" opens its window on the Workbench screen and the
DiskMaster screen is in front of the Workbench screen we
cannot see the "Ed" program running. Click on the
DiskMaster screen depth gadget at the upper right corner of the DiskMaster screen to push the DiskMaster
screen to the back. We can now see the "Ed" program
running.
As you can see, our "Edit" command worked, but the
way in which it worked was inconvenient in that we had
Lo manually push the DiskMaster screen to the back to
get to the "Ed" program. We can do better!
Abort the editing of the text file by clicking into the ''Ed"
window and pressing and releasing the [Esc] key then
pressing and releasing the [Q] key, and finally pressing
[Return]. Now use the screen depth gadgets to bring the
DiskMaster screen to the front.
Let's change our "Edit" command so that it automatica11y pushes the DiskMaster screen to the back before
running "Ed", then brings the DiskMaster screen to the
front after "Ed" is exited. Select the Project\Change
Command menu item. When the message in the title bar
prompts you to select a command to change, click on the
Edit command.
The requester u sed to change a command is identical to
the requester used to add a new command except that the
command to be edited has been entered for you. Change
the text in the requester so that it reads:
Edit, 10, ScrBack; External C:Ed o/os; ScrFront
Here we added two more commands to the command
string, making it a multi-command string. The one-word
command ScrBack pushes the DiskMaster screen to the
back before proceeding with the "Ed" command. The
one word command ScrFront following the "Ed" command will bring the DiskMaster screen to the front, but
not until the "Ed" program is closed. Notice that the three
commands are separated with semicolons(;). If you have
not already done so, accept the altered command by
clicking on Continue or by pressing [Return].
Try the altered command by selecting "TextFile' and
clicking on the Edit command. This time DiskMaster
should move to the back, so that the Workbench Eereen
can be seen. The "Ed" program will open and read and
display the text file. When we exit the "Ed" program
(press [Esc] then [Q] then [Return]) DiskMaster will pop
to the front.
Save the command to the configuration file by selecting
Project\Save Config, and responding to the requester
by pressing [Return] or clicking on Continue.
Congratulations! You have just entered and saved your
first complex command. Most of DiskMaster' scommands
are just as easy to use. A complete list of DiskMaster's
commands can be found in Section 5. of this manual.
3.3. Adding Menu Commands
In the previous section, we added a complex command
to the command window. This complex command was
actually three commands linked together to be performed
sequentially. In this section, we will be adding the same
complex command string to a custom pull-down menu.
If DiskMaster is not already loaded, load it at this time.
-~-·
I
34
Disk.Master 2.0 User Manual
35
Adding a menu item is quite similar to adding a command to the command window. The command strings
for both are nearly identical, with only a few minor
differences. When adding a menu item, you must decide
whether to add the new item to an existing menu or
create a new menu for the item. Also, menu items are all
displayed in the sam ecolor. However, you can assign a
keyboard equivalent to the menu item. To add a menu
item, select Project\Add Menu Item. A string requester
will appear showing a command template in its title bar.
,:!•JE[!Uln3c:DIIEE=::==:~~~=¥~~:=¥~lE::JI:!!!l
Connand
~t .
te ..wlate:
Edit,
E,
Henu,Title,A,<cot'OM<O.nd string>
ScrBack;
External C:Ed xs;
!continue!
ScrFttl
l
jcancell
The command template is as follows:
Menu, Title, A, <command string>
Menu- This is the name of an existing menu to which the
new item is to be added, or the name of an entirely new
menu. The menu is followed by a comma (,).
Title- This is the text that will be displayed as the menu
itenl to identify the command string. The title is followed
by a comma(,).
A- This is an optional keyboard equivalent. Almost any
printable character can be used in conjunction with the
[Right Amiga] key to invoke the menu command.
<command string> - This is identical to the command
string used when adding commands to the command
window. Any command that can be added to the command window can also be added to a pull-down menu,
and vice versa.
Note: The entire command, including menu, title, command
string, etc. , can be no longer than 255 characters.
Enter the following text into the string requester then
press [Return] or click on Continue.
Text, Edit, E, ScrBack; External C:Ed %s; ScrFront
Text is the name of a new menu to be added to the
DiskMaster menus. Edit is the name of the command
itself, and E is the keyboard equivalent that will be US2d
to invoke this menu command without using the mouse.
The remainder of the command is the same command 1ve
used in the previous section.
Check to see that the command has been added to the list
of menus by pressing the Menu Button. The menu Text
should appear at the end of the list of menus. Pull dmvn
the Text menu. The only entry in this menu is Edit with
a keyboard equivalent of [Right Amiga] + [E]. Select the
file called "TextFile" and invoke the Text\Edit command using the mouse. It should operate identically to
the Edit command we placed in the command window.
Exit the "Ed" program (press [Esc] then [Q] then [Return]), then select "TextFile" again and invoke the command again using the keyboard equivalent. When yDu
are satisfied that it works as advertised, exit "Ed", and
save the new menu command to the "Startup.DM" file.
3.4. Custom Information Display
3.4.1. Display Format
DiskMaster displays information about each file and
directory displayed in its file display windows. The
information often exceeds the windows ability to display
it (horizontally). Your particular application may require
that you be able to see certain information without scrolling the display to the right.
36
37
Disk.Master 2.0 User Manual
DiskMaster 2.0 allows you to suppress unwanted information, or shuffle the order in which the information is
displayed. We alter this information using the Project/
Display Format menu command. After selecting this
command, a requester will appear, displaying current
fon11at.
DiskHastel" . II ~:::::31E:l~
Please enter new CorMat.
INs
T DMV A
Icontinue I
c•
I Cancel I
The string window of the requester displays several
format symbols. The meaning of each symbol is as follows:
N
s
T
D
M
y
w
A
c
File name
File size
Time
Date
Month
Year
Day of week
File Attributes (protection bits)
File comment
Let's move the file attributes (protection bits) to the left of
the file name. Edit the fonnat string so that it reads as
follows:
ANSTDMYC
You will not have to exit and reload DiskMaster to see the
effect of this change. As soon as you click on Continue or
press [Return], the file information will be displayed in
the newly designated order.
Note that spaces are placed between file information that
you want to be separated visually.
~.~•:t~~·~·wm:p~t:E"~•~·ta•~nE::=:=:=:=:=:=:=:=:=:=:=:=:=:=3•~r.n
SYSTEM:
-~~~
•
Saving the configuration file at this point will save the
new information format. Change the file information
display format to suit your own preferences, then save
the configuration file. To restore the default file display,
exit DiskMaster without saving the configuration file.
3.4.2. Display Font
In addition to being able to change which informatlon,
and in what order it is displayed in the file display
windows, you can also change the text font and text size
used to display this information.
Select the Tools\ Change Font menu command. A simple
requester will appear displaying the current font and
size (topaz/8).
.D i skHas tel" :ti:I =::=::::::::::3lE:l~
Enter new Font descriptor.
ltopaz/8•
I continue I
I Cancel I
Change the "8" to a "9", and press [Return]. The size of
the text in the display and command windows will
become slightly larger. Any non-proportional (fixedwidth) font may be used with DiskMaster.
Note: Proportional fonts are not allCJWed in DiskMaster because they create alignment problems.
?.
l
38 DiskMaster 2.0 User Manual
39
i
I·
3.5. Exploring the Configuration File
Now that we have entered both menu commands and
window commands, let's take a look at the actual configuration file that we have altered.
I
Locate the "Startup. DM" file and select, then click on the
Read command.
l
I
t
Note: If you have a printer, you may want to print the
co11[igumtion file by selecting the file then clicking on Print.
At first glance, this script seems formidable. However,
closer examination of individual commands reveals that
we already know quite a bit about this script.
The first several commands begin with the "AddMenu"
command. Each of these commands follows the format
that we used to add menu commands to the existing
m.enus. The menus appear in the same order on the menu
bar as they are introduced in this configuration file. Find
the last "AddMenu" command. This is the menu item
that we added earlier.
Now locate the "AddCmd" commands and notice how
they follow the fonnat we used to add commands to the
command window. Find the last "AddCmd" command.
This is the "Edit" command that we added earlier. If you
look at the other "AddCmd" commands, you will see
that the command we added is more complicated than
the majority of the others.
Much can be learned by simply reading through a previously saved configuration file. For instance, look at the
"Quit" menu command. The command string (minus the
menu, command text and keyboard assignment), reads
as follows:
[
I
I
Confinn "Are you sure you want to quit?" Yes No; Quit
Notice that the actual command to quit appears at :he
very end of the command string. The command which
precedes the "quit" command is the "confirm" command. This command opens a confirmation requester
which displays the text" Are you sure you want to quit?".
~he requester has two buttons which provide two posSible responses to that question. The first button is affirmative and the second button is negative. The text
which appears in these two buttons (Yes and No) follows
the displayed text in the command string. If the requester
receives an affirmative response, the remainder of 1he
command string will be executed. However if the requester receives a negative response, the remainder of
the command string will be disregarded.
Each individual command in the configuration file can
be dissected in the same manner. So you see, even the
complicated commands aren't so complicated when
broken down.
Section 5. of this manual lists all DiskMaster commands.
Refer to this section to interpret each command in the
configuration file and predict its operation when a< tivated. Take a few moments to look over some of the
commands and see if you can do with them as we c.id
with the "Quit" command.
3.6. Editing the Configuration File
Once you have looked over the various commands th.at
can be used in the configuration file, you may want to
make a few changes to the "Startup.DM" file.
Locate and select the "Startup .OM" file which we saV2d
earlier. Now click on Edit or select the menu command
-----------------.-1
y2'tf;c ···
I
1
I
40 DiskMaster 2.0 User Manual
Text\Edit. Locate the "OpenScreen" command and edit
it so that it reads:
OpenScreen 3 Lace
This command will cause DiskMaster to open on an eight
(8) color screen in interlace.
Now if you like, you can change the order in which the
commands are displayed in the command window. If
you want to place blank spaces between groups of commands you can insert blank "AddCmd" command between the groups:
41
As you can see, changing DiskMaster to meet your needs
or tastes is really quite easy. Before turning you loo;e to
completely re-configure DiskMaster let's make one more
change...
3.7. Multiple Command Windows
DiskMaster allows you to have more than one command
window open at any one time. This can be useful to split
up the types of commands, or to break a large set of
commands into two separate windows so that all commands can be seen without scrolling.
AddCmd,,
Note: The two commas are separated with a single space.
Some other changes you may like to make include changing the foreground and background colors of the commands, or adding keyboard equivalents to some of the
menu commands.
You can also add, remove, or consolidate menu commands. Do whatever you like! When you have made a
few of your own changes, save the configuration file by
pressing [Esc] then [X] then [Return].
Now exit DiskMaster, then re-load it. All of your changes
should appear. Open the palette requester to verify that
DiskMaster is on an eight (8) color screen.
t::::::u:~
tal
DDDDDDDD~;~::~
ruGl
Bl
1
-
-
I
I
3.7.1. Creating a New Command Window
Tocreateanewcommand window,selecttheTools\New
Cmd Window menu command. A new command Nindow will be opened, and an "Add Command" requester
will open, allowing you to enter the first command. let's
add yet another "Edit" command to this window. Enter
the following string into the "Add Command" requester
and press [Return].
Edit, 10, ScrBack; External C:Ed %s; ScrFront
Test the new "Edit" on the "Startup. OM" file, as we have
before. When you are satisfied that it works properly,
resize the new command window and move it so tllat it
does not interfere too much with the other windows.
This new command window can be saved in one oftwo
ways. It can be saved as part of the "Startup.DM" file
using the Project\Save Config command, but the11 the
window would be opened each time DiskMaster was
loaded, and could not be re-opened if closed. The second
(and more flexible) method of saving this window is as a
separate script file. Using this method, a command can
I
""'~(¥;''4
J
43
42 DiskMaster 2.0 User Manual
delete them. Now add the following command to the
bottom of the "Tools" menu commands:
be added to the current configuration that will execute
the script, and open the window whenever it is needed.
AddMenu Tools, Archive, A, Batch S:Archive.DM
Make sure the new command window is selected (title
bar is not ghosted), and select the Project\Save Cmd
Window menu command. When the requester appears
with the default name "CmdWindow.DM" and press
[Retum], or click on Continue.
Now save the "Startup.DM" file by pressing [Esc] then
[X] then [Return].
Exit Diskmaster, then re-load it and view your menus by
holding down the Menu Button. There should be no
"Archive" menu. Instead, there is a new command in the
"Tools" menu called "Archive".
Now we will demonstrate how this window can be
opened after the main configuration has taken place.
Close the new command window by clicking on its close
gadget. Now locate and select the "CmdWindow.DM"
file (it will be in the same directory as "Startup.DM").
Select the Tools\Run DM Script menu command. The
new command window will open exactly in the location
from which it was saved. By creating several command
windows, each containing commands that are similar in
nature, you can make your DiskMaster extremely powerful without cluttering your single command window
with commands that will only be used in certain circumstances. For instance, you may want to have a "Disk"
command window, a "Graphic" command window, a
"Text" command window, etc.
Tools I
Run Selected
Change Font
New Window
New CMd Window
Swap S<->D
Run DM Sc:ript
Archive
Select this new command. A new command window
will appear with all of the commands that were previously in the "Archive" menu.
lall
Note: Several example command window scripts have been
Replacing Menus with Command Windows
On the DiskMaster distribution disk we have included a
number of DiskMaster script files. Each of these files was
created using the "Save Cmd Window" command. One
of these script files is named "Archive.DM". Copy this
file into yourS: directory.
Now select "Startup.DM" and invoke your "Edit" command. Locate all of the "Archive" menu commands, and
ll:E:J
SYSTEM:s/Archi
Lha:rc List
Arc
List
Zoo
List
Lha:rc Ext:rac t
A:rc
Ext:rac t
Zoo
Ext:rac t
Lha:rc Add
included on the Disk.Master distribution disk.
3.7.2.
~N
~C
I
Ii you "read" the" Archive.DM" file (in the S: directory),
you will notice that the commands you find there and the
menu commands you deleted are quite similar. Look at
the top of the file to see how the "OpenWindow" command was used to initially open the new command
window.
--- - - ---------r--1
44
3.8.
I
I
45
DiskMaster 2.0 User Manual
Using this same method, you can create other special
command windows. You can even create a command
window that will run your most frequently used programs. You may decide to set up command windows for
text, graphics, games, etc.
4. DiskMaster Requesters
and Screens
Keep Going
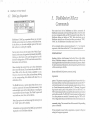
4.1. Confirmation Requester
This concluded our short tutorial (yes, this was a tutorial), on customizing DiskMaster 2.0. But don't stop here.
The whole purpose of providing a configurable disk
utility program is so that you can make it look and
operate the way YOU want.
Explore the various script and configuration files we
have provided on the DiskMaster distribution disk. If
you find a particular feature you would like to incorpo-:
rate into your personal configuration, dissect the file to
find out its secrets.
DO NOT BE SATISFIED WITH THE DEFAULT SETIINGSII!
I
I
Confirm "All files will be lost."; Delete %s
l
When the requester appears, it displays the text" All Jiles
will be lost.".
I
I
I
You will find that editing the configuration file can
become addicting. The applications for a configurable
DiskMaster are vast. If you think of one that is unique to
your application, let us know. We are always interested
in the different ways people are using our products. If
you find that you can't perform a desired operation, let
us know. We will often add features to our products
based on the desires of our end users. After all, many of
the features in DiskMaster came from the requests of our
DiskMaster 1.x users.
Whether you want to complement, complain, or suggest... Let us know!!! Please mail your suggestions to:
Progressive Peripherals & Software, Inc.
464 Kalamath Street
Denver, CO 80204
DiskMaster' s confirmation requester allows you add an
extra measure of safety to potentially destructive commands such as "Delete" or "Quit". The confirmation
requester is used as part of a command string, to daerrnine whether or not the remainder of the commmd
string should be executed. For example, the command
below will require a response from the user before the
"Delete" conunand will be executed.
DiskMas.te.-. , II =:=3[E]~
All £iles will be lost.
I continue I
I Cancel I
If the user responds to the requester by clicking on
Continue, the remainder of the command "Delete %s"
will be performed. However, if the user responds to the
requester by clicking on Cancel, the remainder of the
command string will be aborted, and no file deletion will
take place.
The text in the "Continue" and "Cancel" gadgets cafl be
changed to allow you to provide the proper responses to
just about any message or question. For example:
46 DiskMaster 2.0 User Manual
47
Confirm "Are you sure you want to quit?" Yes No;Quit
When the command to exit DiskMaster is issued, the
confim1ation requester will appear asking" Are you sure
you want to quit?'' .
=======::::::::~lE::J~
Al•e you su.ve you \'lant
to quit?
lvesl
In this case, the words "Yes" and "No" are more appropriate than "Continue" and "Cancel".
4.2. String Requester
An example of a user definable version of the string
requester is the requester which opens in response to the
"ReqPattem" command. In this case the prompt text, md
the text in all three gadgets can be altered (see the
"ReqPattern" command in Section 5. of this manual•.
4.3. Palette Requester
The DiskMaster String Requester is used whenever a
string is required as a pattern, protection bit, file comment, file name, etc. When the requester opens, the
appropriate message is displayed and appropriate response options are allowed. For instance the "Rename"
function opens the requester and prompts you to "Enter
New Filename".
D i skH a~ tel":_. :r I:- ===:3lE::J [i!]
Entev new £ilenaMe.
I
I Continue II Abo:rt I I Cancel I
!sYSTEM: s/Bandi
Many operations that make use of the string reque~ter
are recursive. That is, the operation is performed over
and over on all of the selected files. For these operatims,
the string requester has third gadget "Abort", located
between the "Continue" and "Cancel" gadgets. While
the "Cancel" gadget will cancel the operation on each of
the selected files one at a time, the" Abort" gadget cancels
the operation for all of the selected files at once.
The Palette requester is opened in response to the "Co:or''
command. It allows you to alter the DiskMaster sCJeen
colors using a point and click method.
IE:]~
lal
DDDDDDDD~~~~:.
ruGl
Bl
1
-
I
I
t .Con£i.sll
The old filename is displayed in the text area, allowing
you to edit the old filename. This requester also provides
the "Continue" and "Cancel" gadgets which appear on
the confirmation requester.
When the palette requester opens, it may contain two,
four, or eight color registers (squares) with color "C" is
selected and ready to be edited. To the right of the CJlor
registers (squares), four numbers display 1) the mlor
register number currently selected, 2) the hexidecirnal (OF) Red value 3) the hexidecimal (0-F) Green value ard 4)
the hexidecimal (0-F) Blue value. The three horizontal
sliders occupying the lower half of the requester are used
to alter these hexidecimal color values. Each slider llas a
range of 16 different positions (0-F). Click on each oi the
,...
,.~
49
48 DiskMaster 2.0 User Manual
Read %sHalf
color registers (squares) at the top of the requester. As
each register is selected, its number is displayed as the
left most digit of the four numbers at the right. The color
register's current color (RGB) value is displayed numerically by the remaining three digits, and also displayed
graphically by the position of the three slider knobs
below. The color of the selected register is altered by
altering the position of these slider knobs. They are
manipulated by clicking on, and dragging the knob to the
left or right, or by clicking to the left or right of the knob.
Clicking on the word Cancel will abort the color change,
restore the previous colors and close the requester. Clicking on the close gadget a the upper left of the requester
will accept the changes and close the requester. At any
time while the requester is open, pressing the Menu
Button of the mouse will cause the requester to mimic the
current Workbench colors.
4.4. File Reader
Screen Options
The DiskMaster file reader provides a number of viewing options. When reading a file, the reader screen can be
interlaced, non-interlaced, or interlaced half screen. The
screen options are specified by the "Read" command.
For instance:
Read %s
Opens the reader screen in non-interlace.
Read %s Lace
Opens the reader screen in interlace.
Opens the reader as an interlaced half screen.
In addition to the screen resolutions, the file reader al'{)
allow you to view text or binary files in hexadecimal.
Using this screen option, the hexidecimal information
will be displayed on the left portion of the screen, with ils
corresponding ASCIT display to the right. Again, th!.s
option is activated as part of the "Read" command.
Read %s Lace Hex
Opens the reader in interlace and in hexadecimal display
mode.
Scrolling Options
Once the reader has loaded the file and opened its screen,
the first page of text is displayed. The file reader does not
wrap the text. I£ a line of text is greater in length than what
can be displayed on your monitor, pressing the [Right
Cursor] key will move the display window to the right by
eight (8) columns. Likewise, pressing the [Left Cursor]
key will move the display window to the left eight (8)
columns.
Scrolling the display window up or down can be accomplished using two methods. The "Jump" method is associated with keyboard commands to move the display up
or down line by line, or page by page. The "Smooth"
method smoothly scrolls the text up or down, depending
on the position of the pointer.
Pressing the [Space Bar] or clicking the Select Button on
the mouse toggles between "Jump" mode and "Smooth"
mode. When in "Smooth" mode, placing the pointer in
the center of the screen will pause the scroll. Moving the
pointer a short distance up or down from center will
50 DiskMaster 2.0 User Manual
51
cause the display to move slowly in the direction of the
pointer movement. Moving the pointer up or down to
the near top or near bottom of the screen will cause the
display to quickly scroll in the direction of the mouse
movement.
Search Keys:
[S]
[C)
Begin search
Continue search
To exit the file reader you can click on the close gadgetat
the upper left of the screen, or press [Q], [Esc], [Enter], or
Display Movement Keys:
[Return].
Toggle "jump" mode I "Smooth" mode
[Space Bar]
Move Left
Move Right
[Left Cursor]
(Right Cursor]
[Keypad 4]
[Keypad 6]
Line up
Line down
[Up Cursor]
[Down Cursor]
[Keypad 8]
[Keypad 2]
P<~ge up
Page down
[Shift] + [Up Cursor]
[Shift]+ [Down Cursor]
[Keypad 9 (PgUp)]
[Keypad 3 (PgDn)J
Top of File
Bottom of File
[T]
[B]
[Keypad 7 (Home)]
[Keypad 1 (End)]
Search Options
The fil e reader allows you to search for a particular word
or string. Pressing the [S] key will open a text requester
asking you to enter the string for which to search. After
entering the search string, the reader will search the file
for the specified string. If the string is found, the portion
of the file will be displayed where the string first occurs,
with each occurrence of the string highlighted. Pressing
the [C] key will continue the search, displaying the next
portion of the file in which the string occurs. This can be
repeated until the end of the file is reached.
The search string requester will accept the wild card
characters "?" (single unknown) and "*" (multiple unknown). When in hexadecimal display mode, entering a
hexadecimal value preceded with a "$" will search for
that hexadecimal string.
or the mouse. Pressing the [Up Cursor] or [Down C\lisor] keys will move the display up or down one line.
4.5. Printer Setup Requester
The Printer Setup requester allows you to alter your
printer preference settings without entering the "Preferencestm" program.
DM II
!File
P:t~
in te:t~ Setup= I:E:l~
Heade~I~IP=-ag--e---N-u_M_b
__e-~-s~l
ILe£t M~sin
!Right M~sin
I Lines/Page
IG£x Density
I DONE I
<<
<<
<<
<<
5>>116 LPII
85>>11Pica I
66>> II D~a£t I
4>>1
I cANCEL I
The default settings of the Printer Setup requester mimic
your printer preference settings. Alterations to the prinler
settings will remain in effect until DiskMaster is closed,
unless the configuration file is saved after changing the
settings.
I
52
Disk.Master 2.0 User Manual
The Printer settings and options available in the Printer
Setup requester are as follows:
File Header- Activating this button will cause DiskMaster to print the name of the file at the top of the first page.
Page Numbers- Activating this button will cause DiskMaster to print page numbers at the bottom of each page.
This function will only take effect if the "Lines/Page"
selting is greater than zero (0).
Left Margin- This value sets the left margin of the page
(in columns). This value is altered by clicking on the left
arrows "<<" to lower the value, and the right arrows
">>" to raise the value.
Right Margin - This value sets the right margin of the
page (in columns). This value is altered by clicking on the
left arrows"<<" to lower the value, and the right arrows
">>" to raise the value.
Lines/Page - This value specifies how many text lines
will be printed on each page before performing a "Perf
Skip" (perforation skip). Used with the "Lines per Inch"
setting (below), this setting effectively sets the length of
the page on which you are printing. If you are using a
"Cut Sheet Feeder" with your printer, or you do not want
DiskMaster to perform a "perf skip", set this value to zero
(0). This value is altered by clicking on the left arrows
"<<" to lower the value, and the right arrows ">>" to
raise the value.
6/ 8 LPI- This setting specifies if the text is to be printed
at six (6) lines per inch, or at eight (8) lines per inch. This
setting varies the amount of vertical space that is used
between each line of text. On an eleven (11) inch sheet of
paper, "6 LPI" will print 66lines of text, while "8 LPI" will
print 88lines of text. This value is altered by clicking on
the button itself. The value will toggle between "6 LPI"
and "8 LPI".
53
Pica I Elite I Fine- This setting specifies one of three fairly
standard character pitch settings. "Pica" refers to a character pitch of ten (1 0) (about 80 characters wide on a letter
sized page). "Elite" refers to a character pitch of twelve
(12) (about 96 characters wide on a letter sized page).
"Fine" refers to a character pitch of fifteen (15) (aboul120
characters wide on a letter sized page). This setting is
altered by clicking on the button itself. The settingwill
cycle through the three values as it is clicked on.
Draft I NLQ- Most dot matrix printers have two character quality settings. "Draft" renders a lower quality printed
character but is quicker than "NLQ". "NLQ" (Near Letter Quality" renders a nicer character, but slower printing. On most "9 pin" printers, NLQ mode requires two
passes of the print head for each line. This setting is
altered by clicking on the button itself. The value will
toggle between "Draft" and "NLQ".
Gfx Density- This setting is identical to the "Graphic 2"
"Density" setting in the "Preferences1m" program. The
range of values used by this setting determines the
graphic density, with a value of "1" being the lowest
density, and a value of "7" being the highest density. This
value is altered by clicking on the left arrows "<<"to
lower the value, and the right arrows ">>" to raise the
value.
Command - The blank field below the "Gfx Dernity"
setting is a text field which allows you to enter a Sf€Cial
printer command to be issued by DiskMaster at the
beginning of each print job.
Done - Clicking on this button will accept the printer
settings and close the requester.
~
54 Disk.Master 2.0 User Manual
55
Cancel- Clicking on this button will ignore any changes
made, and close the requester.
but you can edit the names, so that each formatted dbk
will be given a different name.
A few notes on printing:
The format process can be changed using up to three
format options. They are:
U the text line being printed is greater in length than the
space available, the text will be wrapped around to the
next line. DiskMasterdoes not automatically "word wrap"
files, so if the margin right margin is reached in the
middle of a word, that word will be broken and the
remainder will be printed on the next line. Also, DiskMaster responds to "carriage returns", so if the wrapped
line contains a carriage return at the end, only a few
characters may be printed on alternating lines.
Quick- Tells DiskMaster to not perform a full format. Instead, the directory of each disk will be cleared, and the
disk will be given the specified name. This option will
only work on previously formatted disks, and can sa'!e
quite a bit of time. However, if any errors exist in the
format of the disk, they will not be removed from the
disk.
4.6. Disk Format Requester
~t!l,~!]iw:=l~'~~~"~"''-'-~~lil~il""J:li1XIIIaiCI!•E=======3~~
IDFO: IIEr--.p ty
I»F1:I~IE~r-=-.p~t=y======================~
IDF2: IIE~ty
IDF3:li~E~~~t=y====================~l
~I QUICK
II VERIFY II INSTALL II CNiCEL I
The Disk.Master Format requester allows you to format
or clear up to four (4) floppy disks at one time (providing
you have four floppy drives). The four buttons down the
left side of the requester labeled DFO:, DFl:, DF2:, and
DF3:; represent the four floppy drives. To select one or
more drives for the format operation, simply click on
their corresponding button. The selected buttons will
become highlighted.
The text fields to the right of each drive button is the disk
name field . The default name of each disk is "Empty",
Verify- Tells DiskMaster to verify each formatted track
after it is formatted. This function takes place only when
a full format is performed. If the "Quick" option is in
effect, disk verification will not take place.
Install- Tells DiskMaster to "install" the disk after it is
formatted or cleared. This option will write the necessary
information to the "boot block" of the disk so that the
Amiga computer is able to "boot" from this disk.
After selecting the appropriate options, clicking on GO
will perform the specified format operations on the specified disks. Alternately, clicking on Cancel will abort the
format operation and close the requester. All feedback
during the format operation is displayed in DiskMaster' s
title bar.
..
~· ·.··~\"if"~
{
56
DiskMaster 2.0 User Manual
57
4.7. DiskCopy Requester
DiskHa.stel~
5. DiskMasterIARexx
II=
IDFO: II Hulti Copyl
DF8: II DF 1: II DF2: I D-F---3---:--.1
I
~
Commands
r--1
lcANCELI
DiskMaster' s DiskCopy requester allows you to make
full disk copies using one, two, three, or four disk drives.
It also allows you to make multiple copies of the same
disk without re-reading the original.
The first drive button (to the right of the "Multi Copy"
button), is the source designation. By default, this is DFO:.
Clicking on this button will cycle through the four (4)
disk drive designations. If DFO: is to be the source drive,
this button can be left alone.
After selecting the source drive, up to four destination
drives must be selected. If you have only one disk drive,
then DFO: will be the only choice available to you.
However, if you have two, three, or four drives, clicking
on the corresponding drive button will select it as a
destination drive.
The Multi button is a special option that allows you to
read the contents of the source disk into memory, then
make multiple copies of that disk without re-reading the
source disk for each set of copies. The "Multi" option will
work with one, two, three, or four drives.
Note: If you system does not have enough free memory to use
the "Multi" option will be disabled.
All feedback and prompts for the DiskCopy operation is
displayed in the DiskMaster title bar.
This section list all of the DiskMaster and ARexx commands. All
DiskMaster commands can be issued through ARexx. However, tllere
are a few commands which can ONLY be issued through ARexx. The
DiskMaster ARexx port address is "DM". Each subsequent copv of
DiskMaster which is run will have the ARexx port name of "Dt-.12",
"DM3", etc. The DiskMaster ScreenShare name is also "DM".
In the commands below, arguments enclosed in "< >" are required
arguments, while those enclosed in "[ ]" are optional arguments.
Add.AutoCmd
Function: Adds an AutoCommand to the list. When a file doubleclicked, DiskMaster attempts to determine what type of file it i> by
rna tching the first few bytes of the file to a list of known patterns. If tll.ose
few bytes match any of the patterns, the corresponding Au toComrnand
will be executed upon that file.
Syntax: AddAutoCmd [pattern,command_string]
Arguments:
pattern- The pattern compared against the first few bytes of the fie, to
determine whether or not this AutoCommand is to be executed. Th~ "?"
wild card character may be used to represent a single unknown chcracter. Control characters are preceded by the "IV' character. Two special
flags may be used in place of the pattern; TEXT and DEFAULT. The
TEXT AutoCornmand will be executed if no other patterns are rna tched
and the file is a text file. The DEFAULT Au toCommand will be executed
if no other patterns are matched. Commands using the TEXT or DEFAULT flags should be placed at the bottom of the AutoCommand List.
command_string- The command that will be executed if the preceding
pattern is matched.
If this command is issued with no arguments, a requester will ap::>ear
asking for the proper arguments.
59
58 Disk.Master 2.0 User Manual
Arguments:
Example:
menu_name -The name of an existing menu to which to add the new
menu item, or the name of a new menu heading to be added for this
menu item.
AddAutoCmd FORM????ILBM, ShowPic %s
After double-clicking on a file, DiskMaster will read the first few bytes
of the file and attempt to match it with the pattern "FORM????ILBM",
which is the pattern for IFF ILBM pictures. If the pattern is matched, the
command string "Show Pic %s" will be executed.
title- The text that will appear in the menu to identify this command.
key - A single printable character to be used in conjunction with the
[Right Amiga] key to activate this command from the keyboard. The
character used is not case sensitive. However, special characters such as
"&" or "rt." will require the use of the [Shift] or [Alt] keys to invoke the
command.
AddCmd
Function: Adds a command to the current command window.
Syntax: AddCmd [Title, 1111, command_string]
command_string- The DiskMaster command(s) that will be executed
when this command is activated.
Arguments:
Example:
AddMenuCmd Project, DiskCopy, D, DiskCopy DFO: DFl:
title- The text that will appear in the command window to identify this
command .
Adds an item called "DiskCopy'' under the ''Project" menu, which can
be activated by pressing [Right Amiga] + [D] . When activated, will
copy the contents of the floppy disk in drive DFO: to the floppy disk in
drive DFl:
##-A two digit number, specifying the foreground and background
colors to be used to display the "title" text. The two numbers used are
DiskMaster color palette register values.
command_string- The DiskMastcr command(s) that will be executed
when this command is activated.
Example:
AddCmd SYS:Libs, 12, NcwDir SYS:Libs
r
Note: In the script, adding menus prior to opening any windows will
substantially increase the speed of tlze script execution.
I
Archive
I
I
•I
Adds a command called "SYS:Libs" to the current command window,
which when activated, changes the current window directory to
SYS:Libs. The text "SYS:Libs" will be displayed using color 1 as its
foreground color and color 2 as its background color.
I
l
Function: Allows multiple source selections to be used with a single
execution of a command. This command is tailor made to be used wi th
archive programs during their" Add" function.
!
I
Syntax: Archive [ArcCommand]
I
Arguments:
AddMenuCmd
Function: Adds a new menu or menu entry to the current menu strip.
Syntax: AddMcnuCmd [menu_name,title,key,command_string]
\
I
t
I
I
I
I
ArcCommand- The external archive command with its normal" Add"
arguments.
f".;;,.
I
60
61
Disk.Master 2.0 User Manual
Arguments:
Example:
Archive "Lharc <" -r a"
Opens a requester asking for the archive name, then ~dd~ all selected
files to the existing archive file, or creates a new archtve file.
file- The name of the DiskMaster script file to be executed. The "%s"
flag may be used in place of this argument to specify that all select~d
files the source window are to be executed.
Example:
BarFormat
Function: Specifies which information and in what order it is to appear
in the title bar of the Workbench or DiskMaster screen.
Syntax: BarFormat [text] [%C) [%F] [%P] [%T] [%D] [%M] [%Y] [%W]
Batch %s
Executes the selected files in the source window as DiskMaster script
files.
Button
Arguments:
text- Any text which is to be displayed.in the title bar.
o/oC- Numeric value indicating the avatlable CHIP RAM.
%F- Numeric value indicating the available FAST RAM.
%P -Numeric value indicating the total (public) available RAM.
%T - Displays the current time.
%D -Displays the current date.
.
%M- Displays the current month (abbreviated).
o/o Y- Displays the current year.
.
% W - Displays the current weekday (abbreviated).
Function: Assigns a function to the S (source) and D (destination)
gadgets. Clicking on the S or D gadget will invoke the command.
Syntax: Button <command_string>
Arguments:
command_string- The DiskMaster command(s) that will be executed
when this command is activated.
Example:
Example:
Button "Parent"
BarFormat DiskMastcr 2.0 o/oM o/oD,% Y o/oP Bytes Available %T
Specifies that a mixture of text and system informatio~ will be ~is
played in the title bar. Below is an example of what that mtght look hke.
DiskMastcr 2.0 Apr 20,91 5905880 Bytes Available 1:54PM
Batch
Function: Executes a DiskMaster batch file .
When the S or D gadget is selected, the "Parent'' function is performEd.
Check
Function: Totals the number of bytes is the specified files or pa th and
determines whether or not there is room on the destination d evice to
hold the files if copied. If there is enough room, the amount of storage
space that will be left is displayed. If there is not enough room, you will
be informed. All feedback is displayed in the DiskMaster screen tiUe
bar.
Syntax: Batch [file)
Syntax: Check <path>
62
DiskMaster 2.0 User Manual
Arguments:
path- The AmigaDOS path which is to be totaled and compared to the
destination.
63
Example:
Close Window
Closes the current window.
Example:
Check o/os
Totals the byte count of the selected files and directories and indicates
whether or not they will fit in the destination directory.
ClzgCmd
Color
Function: Sets the RGB values (in hexadecimal) of each color register.
Syntax: Color [colors]
Arguments:
Function: Requests that you select a command to be altered, then opens
a requester allowing you to edit the command without editing the
configuration file directly.
(no arg) -Opens the palette requester allowing you to visually change
the color palette.
Arguments:
colors- The set ~f hexadecimal values specifying the RGB value oft he
color palette registers. The color registers are set from left to right \\'i th
each RGB value separated with a space.
NONE
Example:
Syntax: ChgCmd
Example:
ChgCmd
Requests that you select a command to be altered, then opens a
requester allowing you to edit the command without editing the
configuration file directly.
CloseWindow
Function: Closes the current window.
Color
Opens the color palette
Color 0 FFF F 985
Sets the first 4 colors:
O=RO GO BO; l=RF GF BF; 2=RO GO BF; 3=R9 G8 BS
Comment
(Recursive)
Syntax: CloseWindow
Function: Changes the comment text of the specified file.
Arguments:
Syntax: Comment file ["text"]
NONE
Arguments:
(no arg)- Opens a requester with the current comment to be edited.
64 Disk.Master 2.0 User Manual
file- The name of the file whose comment is to be changed. The "%s"
flag may be used in place of this argument to specify that all selected
files the source window are to be changed.
Example:
Comment o/os
65
(Recursive/ Auto-Makedir)
Copy
Function: Copies the specified file(s) to the specified destination.
Syntax: Copy <source> <dest> [NEWER]
Arguments:
Opens a requester with the current comment to be edited.
Comment o/os ''This is a comment"
source- The name of the file or path to be copied. The "%s;, flag may be
used in place of this argument to specify that all selected files the source
window are to be copied.
Sets the comment "This is a comment" for each selected file.
Confirm
Function: Opens a requester displaying a message, a "Continue"
gadget and a "Stop" gadget. All text in this requester can be customized.
If the user selects the "Continue" gadget the requester will disappear
and the remainder of the command string will be executed. If the user
selects the "Stop" gadget, the requester will disappear and the remainder of the command string will be disregarded.
Syntax: Confirm <" text" > [Continue] [Stop]
Arguments:
dest- The destination path. The "%d" flag may be used in place of this
argument to specify that the path specified by the destination window
is to be used.
NEWER -This flag specified that file will be copied only if the source
file is newer than the file of the same name in the destination directory,
or if the file does not exist.
Example:
Copyo/os o/od
Copies selected source files to the destination directory.
Copy DFO: DFl:
text -1l1e text that will appear in the requester. If the text is to contain
spaces, it must be enclosed in quotes.
Copies all files from DFO: to DFl :.
Continue- The text that will be displayed in the "Continue" gadget.
Delete
Stop -ll1e text that will be displayed in the "Stop" gadget. If this text is
specified, the "Continue" text must also be specified.
Function: Deletes the specified file(s).
Example:
Syntax: Delete <file>
Confirm" Arc you sure" "Yes" "No"
Displays a requester displaying the message" Are you sure", a "Yes"
gadget and a "No" gadget. If the user selects the "Yes" gadget the
requester will disappear and the remainder of the command string will
be executed. If the user selects the "No" gadget, the requester will
disappear and the remainder of the command string will be disregarded.
Arguments:
file - The name of the file or path to be deleted. The "%s" flag may be
used in place of this argument to specify that all selected files in the
source window are to be deleted.
66
DiskMaster 2.0 User Manual
Example:
67
Example:
Delete %s
Deletes selected files and directories in the source window.
Deselect
Address OM
DirUst Ust
do i=l to List.O
parse var List.i name +30 size +8 time +9 date +7 prot +9 crnt +80 dirO +1 sel
say name size time date prot dir sel
end
Function: Deselects files and directories based on pattern matching.
Displays directory of current window in console window.
Syntax: Deselect [patternl
DiskCopy
Arguments:
Function: Performs sector copy from source floppy disk to destination
floppy disk(s). Multiple copies may be made using the "Multi" function.
(no arg)- Opens a requester asking for a pattern to match.
pattern - Any printable text may be used as the pattern to be matched.
The wild card characters "?" (single unknown) and "*" (multiple
unknown) may also be used.
Syntax:
Example:
Arguments:
Deselect,.
Deselects all files and directories in the current window.
(no arg) - Opens a diskcopy requester allowing you to visually set all
diskcopy options.
source- The floppy drive to be used at the source drive.
Deselect
Opens a requester asking for a pattern to match.
des tO- The first floppy drive to be used as the destination drive.
destl, dest2, dest3- Optional destination drives.
Deselect *.info
Deselects all files and directories ending with ".info".
DirList
DiskCopy <source> <destO> [destl) [dest2] [dest3] [MULTil
(ARexx only)
Function: Gets the contents of the current window with selected/
deselected status.
Syntax: DirList [variable]
Arguments:
variable- Name of the list variable to be used by the ARexx program for
the information obtained from the DiskMaster window.
MULTI- Multiple Copy flag allowing more than one set of copies lo be
made from a single reading of the source disk.
Example:.
DiskCopy DFU: DFO: DFl: MULTI
Reads the disk in DFO: into memory, then writes to DFO: and DF1: (with
prompts). Nter each set of copies is complete, you will be promptfd to
insert additional disks into DFO: and DF1: to make additional copies.
Pressing [ESC] will abort the operation.
68 Disk.Master 2.0 User Manual
Expand
Function: Specifies whether the expanded AmigaDOS volume and
path names or unexpanded device names will be used to display directory paths. For instance, DFO: is an unexpanded path. If Expand is
turned "ON", "DFO: would be replaced with the volume name of the
disk within drive DFO:.
Syntax: Expand [ON IOFF)
69
Note: Multiple external commands may be run from the same commarul
string. However, they must be separated by placing a "\" between erch
external command.
Example:
External C:Ed %s
Runs the "Ed" command providing the first selected file in the sou1ce
window as the name of the file to be edited.
Arguments:
External Stack 15000\C:Ed Startup.DM
(no arg)- Toggles between the two modes
Runs multiple external commands. First sets stack to 15000, then runs
the "Ed" program telling it to load the "Startup.DM" file.
ON -Specifics that all paths arc to be expanded to their fullest.
OFF- Specifies that physical and logical device names will be used as
part of the directory path.
Example:
Expand ON
Tells DiskMaster to expand all path names.
Expand
Find
(Recursive)
Function: Searches the path for files containing the current pattem.
When a file is found which matches the specified pattern, a reques:er
will appear asking if you want to continue the search, abort the search
or open a window displaying the directory where the file was found.
Note: A new pattern can be obtained using the "SetPattern" or the "ReqP2t-
tern" commands.
Syntax: Find
[path]
Toggles between the "ON" and "OFF' state.
Arguments:
External
path- The path to be searched. The "%s" flag may be used in place of
this argument to specify that all selected directories in the somce
window are to be searched.
(Recursive)
Function: Allows the use of external programs to be used as DiskMaster commands.
Example:
Syntax: External [command] [args]
Arguments:
command- The external program that is to be executed.
args- Arguments normally used by the external program. The "%s" and
"%d" flags may be used to specify source and destination directories,
or selected source files or directories.
Find %s
Search the selected paths using the current pattern.
SetPattern "*.txt"; Find DFD:
Search DFO: for files ending with ".txt".
71
70 DiskMaster 2.0 User Manual
Font
options- Specifies that one or more of the following format options are
to be used:
Function: Changes the font to be used for file and command display.
Note: The use of proportional fonts is NOT recommended as they will cause
alignment problems.
INSTALL- Makes the newly formatted disk "bootable".
QUICK- Specifies that the directory of the disk will be cleared instead
of a full format being performed.
VERIFY- Specifies that the disk is to be verified during format.
Syntax: Font [name/size]
Arguments:
Example:
Format
name/size -The name and size of the non-proportional (fixed-width)
font to be used for file and command display. The font must be located
in the "Fonts:" directory.
If the font is not found, the default font is used.
Example:
Opens DiskMaster's format requester.
Format DRJ: EmptyO DF1: Emptyl DF2: Empty2 INSTALL QUICK
Formats disks in DFO:, DFl: and DF2: with different names, installing
each, and using the QUICK option.
Font clcan/8
Set font to clean.font, 8 point.
Font %s
Set font to selected file (i.e. SYS:Fonts/topaz/8, or Fonts:topaz.font).
Format
Function: Formats one or more floppy disks.
Syntax: Format <DFx:> [name] [DFx:l] [name] ... [options]
Lock
Function: Locks a window as either a source or destination window.
This function allows for the use of multiple source and/ or d estination
windows.
Syntax: Lock [SID]
Arguments:
S - Locks window as source window.
D- Locks window as destination window.
Arguments:
(no arg)- Opens the Format requester, allowing you to visually set the
format options.
DFx:- The first or only drive to be used to format a disk.
name- Name to be given to the disk being formatted in the previously
specified drive.
DFx:l - Optional second, third, or fourth drive to be used to format
disks.
Example:
LockS
Locks last selected window as a SOURCE window.
LockD
Locks last selected window as a DESTINATION window.
·- --·
72
----------- ---- -- - --- -- -- -,
I
I
I
I
Disk.Master 2.0 User Manual
73
Example:
MakeDir
Moveo/oso/od
Function: Creates a new directory.
Moves selected files from the source window to the destination window.
Syntax: MakeDir [name]
Arguments:
Moveo/osRAM:
name- The name to be given to the new directory.
Moves selected files from the source window to the RAM: directory.
Move o/os
Example:
Requests the destination directory, then moves selected files fran the
source window to that destination.
MakcDir
Opens a requester asking for the name of the new directory.
Msg
Makc Dir RAM:T
Function: Displays text in the DiskMaster screen title bar.
Makes a directory in RAM: called "T".
Syntax: Msg "text"
Move
(Recursive)
Arguments:
Function: Copies the specified file(s) from the source to the destination
then deletes the specified file(s) from the source.
text- Any text which is to be displayed in the DiskMaster screen title
·
bar.
Syntax: Move source dest [NEWER]
Example:
Arguments:
Msg "Do something!"
source- The file to be moved. The "%s" flag may be used in place of this
argument to specify that all selected files the source window are to be
moved.
Displays the message "Do something!" in the DiskMaster screm title
bar.
NewDir
dest- The destination file or directory. The "%d" flag may be used in
place of this argument to specify that the file(s) will be moved to the
directory specified by the destination window.
Function: Changes the directory path of the source window.
Syntax: NewDir [path Idmfile]
NEWER- This flag specifies that only files of like names which have a
newer file date than the existing files are to be moved.
Arguments:
path- AmigaDOS path name .
..
75
74 Disk.Master 2.0 User Manual
dmfile - DiskMaster script file to be executed in lieu of reading a new
directory.
Example:
Syntax: OpenWindow [left top width height [path I dmfile I CMD] I
Arguments:
left- The pixel coordinate for the left boundary of the window.
NewDir
top- The pixel coordinate for the top boundary of the window.
Changes the path of the current window to "none" which displays the
device list.
NewDir RAM:•.info
width- The width of the window (in pixels).
height- The height of the window (in pixels).
Changes the path of the current window to RAM: (displays only .info
files).
path - The DOS path to be read and displayed in the newly opened
window.
OpenS ere en
dmfile- The file name of a DiskMaster script file that will be executed
upon the opening of the new window.
Function: Opens a custom screen.
Syntax: OpenScreen [planes] [LACE I HALF]
CMD - Command Flag. This flag specifies that the newly opened
window will take over as the current command window.
Arguments:
Example:
planes - The number of bitplanes to use for the custom screen. This
dete1mincs how many colors will be available for that screen. One (1)
bitplane will provide two (2) colors, Two (2) bitplanes will provide four
(4) colors, and three (3) bit planes will provide eight (8) colors.
LACE - Specifics that the custom screen is to be opened in interlace
mode.
HALF- lf interlace mode is used, specifies that the custom screen is to
open on the lower half of the screen only.
Example:
OpcnScrccn 3 LACE
Open Window 100150 200 50 RAM:
Opens a new window which will load and display the directory
"RAM:".
Open Window 100150 200 50 C:s•
Opens a new window which will display only files which start with "S"
in the C: directory.
Open Window 100150 200 50
Opens a new window which will display the device list.
Open Window 100150 200 50 CMD
Opens an eight (8) color interlaced screen.
Opens a new window which will take over as a new command window.
Open Window
Parent
Function: Opens a file display or command window on the current
DiskMastcr screen.
Function: Displays the contents of the parent directory in the current
directory path of the source window.
~
I
76
77
DiskMaster 2.0 User Manual
Example:
Syntax: Parent
Pens 0 1 1 0 2 1 3 0 1
Arguments:
Ass~~s color
NONE
registers 0-3 to AmigaDOS 2.0 pens, as specified by :heir
pos1tion.
Example:
Print
Parent
Displays the contents of the parent directory in the current directory
path of the source window.
Function: Prints specified file(s) (text or picture).
Syntax: Print <file> [HEX]
Pens
Arguments:
Function: Allows you to customize which color register is used for each
AmigaDOS 2.0 pen.
file- Name of the file to be printed. The "%s" flag may be used in place
of this argument to specify that all selected files the source windovr are
to be printed.
Syntax:
Pens
[color)
Arguments:
color- This is the DiskMaster palette register number to be used for the
specific AmigaOOS 2.0 pen. Ther~ may be as few as two: and as m~ny
as eight register numbers, dependmg on the number ofb1tplanes bemg
used.
The position of the color numbers specifies which AmigaDOS 2.0 pen
will be assigned tha t color. The positions are as follows:
1 = Detail Pen
2 = Block Pen
3 = Text Pen
4 =Shine Pen
5 = Shadow Pen
6 = HighFill Pen
7 =HighFill Text Pen
8 = Background Pen
9 = High1ight Text Pen
Note: Refer to your AmigaDOS 2.0 manual for a description of the purpose of
each of these pen attributes.
HEX- Specifies that the file is to be printed in hexadecimal format rather
than in text or graphic format.
Example:
Print%s
Prints all selected files in the source window.
Priority
Function; Change the current AmigaDOS priority of DiskMa;ter.
Changing this priority value can have an effect on other ruming
programs. We recommend that unless you are familiar with the effects
of changing program priorities, you should leave the DiskMaster
priority at its default setting.
Syntax: Priority[#]
Arguments:
(no arg)- Selecting this command will open a requester, allowing you
to edit the current priority value.
#-The new priority value.
I -
~
t
78 Disk.Master 2.0 User Manual
Example:
79
Example:
Priority 0
Protect o/o s
Sets the DiskMaster priority to 0.
Protect
Opens a requester, asking for protection bits to be edited for each
selected file.
(Recursive)
Function: Changes protection/ attribute bits on specified file(s).
Protect o/os RWED
Sets each file to "--RWED"
Syntax: Protect <file>["[+)(-] [hsparwed] [G]"]
Arguments:
file -Name of the file whose protect bits are to be changed. The "%s"
flag may be used in place of this argument to specify that all selected
files the source window arc to be changed.
+-Specifics that the following bits are to be turned ON.
- -Specifies that the following bits arc to be turned OFF.
hsparwed -Optionallistofbits to be turned ON orc:>FFw~en preceded
by a plus(+) sign or minus(-) sign. If the plus ~r mmus s1g_ns are NOT
used, the list will specify the absolute bit settmgs. The b1ts have the
following meanings:
H -Indicates that the file should be Hidden.
S- Indicates that the file is an AmigaDOS Script.
.
p -Indicates that the file is Pure ana can be made Res1d~nt..
A- Archive Bit; used by hard disk ?ac~u.P progra~s to md1cate whet~er or
not the file has been backed up. Th1s b1t 1s automatically reset to OFF 1f any
other tool has written to the file.
R- Indicates that the file may be Read.
W- Indicates that the file may be Written to.
E- Indicates that the file may be Executed.
D- Indicates that the file may be Deleted.
Note: If bits to be turned on or off are not specified, a requester will appear
displaying the current protect bit settings, allow you to edit them.
G- Global flag. When this flag is present, the requester will not appear
for each selected file. Instead, the current bit setting are used for all
selected file.
Protect o/os "+S -P''
Turns the script bit ON and turns the pure bit OFF on each selected file.
Quit
Function: Exits DiskMaster
Syntax: Quit
Arguments:
NONE
Example:
Quit
Exits DiskMaster
Read
(Recursive)
Function: Opens DiskMaster's built-in file reader to read the specified
file(s). The file reader has several key board commands that make this
reader quite powerful. Refer to Section 4.4. of this manual for a detailed
description of the text reader and its options.
Syntax: Read
<file> [HEX] [LACE I HALF] [SEARCH ["Text"]]
Arguments:
file- Name of the file to be read. The "%s" flag may be used in place of
this argument to specify that all selected files the source window a1e to
be read.
·--------- - - -
,
I
80 Disk.Master 2.0 User Manual
HEX- Specifies that the file reader is to use its "Hexadecimal" mode. In
this mode, the file will be displayed in both Hexidecimal and ASCII.
81
Syntax: Recursion ON I OFF
Arguments:
LACE- Specifies that the file reader is to be opened in interlace mode.
ON - Enables recursion.
HALF -If interlace mode is used, specifies that the file reader is to open
on the lower half of the screen only.
OFF- Disables recursion.
SEARCH- Specifics that a search is to be made on the specified file(s).
Example:
Text -lf a search is to take place, specifics the search string. If SEARCH
is specified, but this argument is omitted, a requester will appear prior
to the search asking for the search string.
Example:
Read %s LACE
Read selected text fil e(s) using an interlaced screen.
Recursion OFF;Renarne %s
This will allow you to rename a directory, and will not attempt to
rename any files within that directory.
Rename
Function: Renames specified files and/or directories.
Syntax: Rename <file> [new]
Reset
Arguments:
Function: Resets DiskMaster to a primitive state in which is contains no
windows or menus. By placing this command at the beginning of a
script, a running DiskMaster can be completely re-configured.
file- ~arne of the fil~ or directory to be renamed. The "%s" flag rna y be
u~ m _rl~ce of th1s argument to specify that all selected files and
d1rectones m the source window are to be renamed.
Syntax: Reset
Arguments:
new- The file's or directory's new name. If this argument is omitt~d, a
requester will open asking for the new name.
NONE
Example:
Example:
Reset
Rename %s
Resets DiskMastcr to a primitive state in which is contains no windows
or menus.
Opens a requester asking for the new name of each selected file. The
requester uses the old name as a default, allowing you to edit it.
Recursion
ReqPattern
Function: Enables or disables recursion, allowing for functions to be
performed on a directory without having it performed on the files
within that directory.
F?nctio~: Opens a requester asking for a pattern to be matched when
d1rectones are selected. A default pattern, and custom text in the title
gar and gadgets may be included.
~
.I
Itt'
82 Disk.Master 2.0 User Manual
83
Syntax: ReqPattern "text" [pattern] [Okay Abort Cancel]
Root
Arguments:
Function: Displays the root directory of the current window path.
text- Text to be displayed in the requester's title bar.lf the text included
spaces, it must be enclosed in quotes.
Syntax: Root
pattern- Any printable text may be used as the pattern to be matched.
The wild card characters "?" (single unknown) and "*" (multiple
unknown) may also be used.
Arguments:
Okay Abort Cancel- This requester is used for both recursive and nonrecursive operations, and contains three gadgets. The first gadget
accepts the pattern and closes the requester' the second gadget aborts
the entire (recursive) operation and the third aborts the current operation. The text for each of the gadgets can be changed, however their
functions will remain the same. If the default text is not to be changed,
this argument does not need to be included.
Example:
NONE
Root
Displayes the root directory of the current window path.
SaveConfig
Example:
Function: Saves a batch file that will recreate the current enviromnent
exactly.
RcqPattcrn "Please enter pattern" •.info
Syntax: SaveConfig [file] [ICON]
Requests pattern to be used in the current operation with "*.info" as
the default.
Arguments:
REXX
Function: Executes the specified ARexx program or string.
Syntax: REXX [file I "string"]
Arguments:
file- Name of ARexx program to be executed.
string- ARcxx command(s) to be executed. The ARexx string must be
enclosed in quotes.
Example:
REXX "parse arg x;say x" o/os
Echoes each selected filename to the console window previously opened
with the "StdiO" command.
•
I
f
ir
f
(no arg)- Opens a requester asking for the name of the file to be wr,tten
or overwritten with the environment information. The file will beswed
with an icon.
file- Name of file to be written or overwritten with the environment
information.
ICON- Specifies that an icon is to be provided for the saved file.
Example:
SaveConfig Startup.DM ICON
Saves the file as "Startup. OM" (with an icon).
'f
85
84 Disk.Master 2.0 User Manual
ScrBack
Example:
Select*
Function: Pushes the DiskMaster screen behind other existing screens.
Selects all files and directories in the current window.
Syntax: ScrBack
Arguments:
NONE
Select
Opens a requester asking for the pattern for the selection.
Select •.info
Example:
ScrBack
Selects all files and directories in the current window which end with
".info".
Pushes the DiskMasler screen behind other existing screens.
SetDate
ScrFront
Function: Changes the file date and time of the specified file(s).
Function: Brings the DiskMaster screen to the front of other existing
screens.
Syntax: SetDate [file] [date]
Syntax: ScrFront
Arguments:
NONE
Example:
(Recursive)
Arguments:
file- Name of the file whose date is to be changed. The "%s" flag may
be used in place of this argument to specify all selected files in the source
window.
date- The date to be written to the specified file(s). The date must be
specified in the format hh:mm:ss ddmmmyy.lf no date is supplied, the
current date and time will be used.
ScrFront
Example:
Brings the DiskMaster screen to the front of other existing screens.
SetDate %s
Select
Format: Selects file in the source window using the specified pattern.
Syntax: Select (pattern]
Sets thedateofall selected files in the source window to the current time
and date.
SetFormat
Arguments:
Function: Specifies which, and in what order information is displayed
in the file display windows.
pattern- Any printable text may be used as the pattern to be matched.
The wild card characters "?" (single unknown) and "*" (multiple
unknown) may also be used.
Syntax: SetFormat (N] (S] (T] (D] [M] [Y] [W] (A] [C)
f
'
86 Disk.Master 2.0 User Manual
B7
Arguments:
Example:
(no arg)- Opens a requester allowing you to edit the current format.
N- File name
S- File size
T-Time
D- Date
M-Month
Y- Year
W- Day of week
A- File Attributes (protection bits)
C - File comment
Text- Any text that is to be displayed along with the file information.
I
Example:
t
SetList SList
Displays the items in "SList" in the current file display window.
f
I
Syntax: SetPattem pattern
Arguments:
e wild card characters "?" (single unknown) and "*" ( If I ·
unknown) may also be used.
mu 1p e
Opens a requester allowing you to edit the current format.
SetFormat "S NAT W 0-M-Y C"
Changesfom\atto SIZE NAME AITRlBUTES TIME WWW DD-MMMYYCOMMENT
(ARexx Only)
Function: Displays items in a list in a file display window, allowing you
to use it as an ARexx item selection window. Using the "GetDir"
command, the status of this list (selected/ deselected) is returned to the
ARexx program.
Syntax: SetList <stem_name>
Arguments:
stem_name -The stem name of the llst (defined in an ARexx program)
to be displayed. The list must be defined prior to issuing this command
and must be in the following format:
SList.l ='One' SList.2='Two' SList.3='Three'
.,
Function:~~ the pattern for the current operation, overriding !he
pattern speaf1ed by "ReqPattern".
~tte~- Any printable text may be used as the pattern to be matched
Set Format
SetList
SetPattern
'
I
I
I
Example:
SetPattem •.c
Sets pattern for current operation to
SetPrinter
~:nction: ~ns the printer option requester, allowing you to chanv-e
e current pnnter setup.
Syntax: SetPrinter
l
NONE
f;
Example:
l
•.c.
Arguments: .
SetPrinter
~
I'
91
90 Disk.Master 2.0 User Manual
Note: The I/0 window opened by DiskMaster is NOT a CU window. It. is
available to provide a method of program interaction fo; th?se program whlch
such, but do not supply their own method of commumcatwn.
Displays a mixture of text and system information resulting in a
window title bar that may appear as below:
Selected: 5 of 20 Files totaling 24675 Bytes
UnLock
Swap
Function:
Swaps the directory paths between the t~o most recently active windows. If only two windows are open, w11l swap the
directory paths between the two.
Function: Unlocks the selected window, or all windows.
Syntax:
UnLock [ALL]
Syntax: Swap
Arguments:
NONE
Arguments:
(no arg)- Unlocks the currently selected window.
ALL - Unlocks all windows.
Example:
Example:
Swap
UnLock ALL
Swaps the directory paths between the two most recently active windows.
Unlocks all locked windows.
TitleFormat
UnMark
Function: Specifics which, and in what order information is displayed
in the file display window title bar.
Syntax: TitlcFormat [%C) [%F] [%1] [%!] [%B] [Text]
Function: Enables or Disables automatic deselection of files duiing
operations. This feature allows multiple operations to be perforrnec on
a set of selected files without the need of re-selecting them after eachoperation.
Arguments:
Syntax: UnMark [ON I OFF]
Text _ Any text that you may want to display in the window title bar.
%C- Number of files in directory.
%F- Amount of available (free) space on the disk.
%1- Number of files selected in the window.
%B -Total number of bytes in the selected files.
Arguments:
Example:
Example:
TitlcFormat Selected: %1 of %C Files totaling %B Bytes
ON- Enables deselection.
OFF- Disables deselection.
UnMark OFF;Copy o/os o/od
Copies all selected files without deselecting selected them.
92
DiskMaster 2.0 User Manual
93
Wait
6. INDEX
Function: Causes a timed delay or a cued delay.
8SVX 17, 18,88
ACBM 18
Add
Arc 23
Command 19, 30, 32, 41,43
Lharc 23
Menu Command 33, 35
Menu Item 19, 33, 34,38
Zoo 23
Addautocmd 57, 58
Addcmd 38, 40, 58
Addmenucmd 58, 59
ARC 1, 19,23
Archive 59,60
Bit 15,78
File 23
Menu 19,22,42,43
Program 1, 19,22,23
ARexx 1, 2, 57, 66, 82, 86, 89
BarFormat 60
Batch 43, 60, 61, 83
Button 61
Destination 5
Menu 3, 35, 43, 48
Mouse 2
Parent 13
Select 2, 4, 49
Check 61,62
Size 18
ChgCmd 62
Close
Credits 6
DiskMaster 21
Gadget 42, 48, 51
Requester 25, 48, 53, 55, 82
StdiO 89
Window 42, 62, 89
CloseWindow 62, 63
Color 63
2.0 Pen 76
Command 30, 31, 40, 58
Directory 12
File 12
Palette 12, 20, 47, 63
Syntax: Wait [seconds]
Arguments:
seconds- the number of seconds to wait before proceeding with the
remainder of the command string.
Example:
Wait 4
Wails for 4 seconds
Wait
Asks user to press (Return] (A StdiO window must be open).
Wi11dow
!~unction:
Selects a window, making it the source window.
Syntax: Window <Pa th I DEST I NEXT>
Arguments:
path- AnAmigaDOS path. The window that matches the specified path
will be selected.
DEST- Selects the destination window.
NEXT- Selects the window which appears as the next window in the
list.
Example:
,,
'
WindowDEST
Selects destination window
Color (cont)
Screen 6,40,74
Workbench 6,48
Comment 63, 64
File 7, 16,36,46,86
Configure 41,80
Confirm 39, 46,64
Requester 21,25,28,31,39,45,
46
Control
Characters 57
Menu 19,26
Copy 65
Backup 4
Disk 5, 25, 26, 27, 67
File 7, 14
Hard Drive 4
Multi 56
Credits 5, 6
Window 21, 28, 29
Date
BarFormat 60
Current 7
Display Format 36
File 7, 14
SetDate 85
SetFormat 86
Delete 14, 65, 66
Bit 16
Confirm 45
Move 14,72
Protect 15, 78
Deselect 66
Clear 13
Exclude 14
UnMark 91
Destination 5, 7, 8, 9, 13, 14, 18, 22,
25, 26, 27, 56, 61, 62, 65, 67, 67,
68,71,72,73,92
Directory 12, 13, 16, 68
Current 7, 11
Display Format 35
MakeDir 17, 72
Names 10
I
I
95
94 Disk.Master 2.0 User Manual
Directory (cont)
NewDir 74
Root 10, 11, 12, 13
Structure 9, 10, 11
Sub 10, 12
Swap 22
DirList 66, 67
Disk
Clear 25
Copy 67
Copy DFO: DFO: 25
Copy DFO: DF1: 26
Format 24,25,54,70
Menu 19,24
DiskCopy 5, 24, 25, 26, 56, 59,67
Requester 56, 67
Draft 53
Ed 31,32,33,35,41
Elite 53
Error 55
Execute
Au toCommand 57
Bit 15,78
Command String 30, 39,45
Script 1, 28, 61
Expand 68
External 31,32,35,41,68,69
Archive Program 59
Command 31
Drive 5
Program 1, 18
StdiO 89
Extract 23
ARC 23
LHARC 23
zoo 23
File display 7, 8, 9, 11, 12, 15,22,26,
29, 35, 37, 74, 85, 86, Lharc 23
87, 89,90
Find 16,69
Fine 53
Font 70
Change 21, 37
Display 37
Format 24,25,36,54,55,70,71
Clear 25
Display 19,35
Requester 54
Half 49, 74, 79,80
Screen 48
Height 75
Hex 17,18,49,77,79,80
IFF 17, 18, 58, 88
ILBM 1, 18, 58, 88
Kickstart 1
Lace 40,48,49,74,79,80
LHARC 1, 19, 23
List 8, 11, 15, 23, 31, 33, 35, 39, 57,
66,75,78,86,92
ARC23
LHARC 23
zoo 23
Lock 22, 26, 71
MakeDir 17, 72
Memory 56, 67
Mouse 2,4,35,48,49,50,51
Move 14, 72, 73
Msg 73
NewDir 58, 73, 74
NLQ 53
OpenScreen 40,74
OpenWindow 43, 74, 75
Page 49,52
Down 50
Lines per 52
Numbers 52
Up 50
Palette 12, 20, 30, 40, 47, 58, 63, 76
Parent 13,61,75,76
Pattern 13, 14, 16, 17,46,57,58,66,
69,70,81,82,84,85,87
Pens 76,77
Light 4
Pica 53
Play 17,18
Print 18, 20, 77
Setup 20,51
Priority 77, 78
Project
Add Command 30
Add Menu Item 34
Change Command 32
Display Format 36
Files 4
Menu 19,59
Quit 28
Project (cont)
Save Command Window 42
Save Config 28, 29, 33, 41
Protect 15, 78, 79
Bit 7, 15, 46,86
Bits 36,78
Quit 21, 28, 38, 39, 45, 46, 79
Read 17,38,43,48,49,50,51, 79,80
Bit 15
File Reader 48, 79
Hexadecimal 17
Recursion 80, 81
Rename 46,81
ReqPattern 47, 69, 70, 81, 82, 87
Reset 80
Rexx 82
Root 10, 11, 12, 13, 32, 83
Run 1, 4, 21, 31, 44, 57, 69
DM Script 22, 42
Selected 21
Save config
Menu 20
Project 29, 41
SaveConfig 83
ScrBack 32,33,35,41,84
ScrFront 32,33,35,41,84
Select 12, 13, 84, 85
Button 2, 4
SetDate 85
SetFormat 85, 86
SetList 86, 87
SetPattern 69, 87
SetPrinter 87
Show Pic 17, 18, 58, 88
Single 88
Sound
8SVX 17,18
ShowPic 88
Source 5, 7, 8, 9, 13, 14, 17, 18, 21,
22,23,25,26,27,31,32,33,35
56, 56, 59, 61, 64,
65,66,67,68,69,71,72,73,75,
76,77,78,79,81,84,85,88,89,
92
Status 89
Protection 16
StdiO 82, 89,92
Swap 22,90
Time
BarFormat 60
Current 7
Display Format 36
File 7
SetDate 85
SetFormat 86
Wait 92
TitleFormat 90
Tools
Change Font 37
Menu 19,21,43
New Cmd Window 41
Run DM Script 42
Unlock 27, 91
Unmark 91
Wait 92
Width 75
Window 92
Active 26, 27
Command 8, 13,20,22,30,33,
35, 38, 41, 42, 44
Console 23,89
Credits 5, 6, 28, 29
Destination 14
Distination 8
Feedback 7
File Display 7, 9, 11, 12, 15, 22,
26,35,37
Lock 26,71
Multiple Command 41
Multiple Destination 27
Multiple source 27
New 16,22
Placement 29
ScreenShare 2
Source 7, 13, 14, 21, 23, 31, 32
Swap 90
Unlock 91
Workbench
Color 6, 12, 20, 48
Screen 12,32,33,60
zoo 1,19,23