1
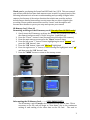
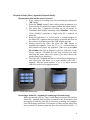
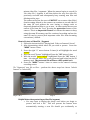
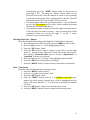
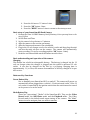
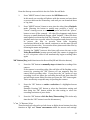
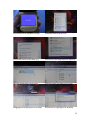
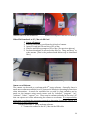
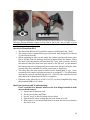
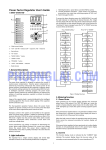
SmartCam HD2 Dash Cam DVR User Manual © 2013 Smart DashCam Products 1 Thank you for purchasing the SmartCam HD2 Dash Cam / DVR. This user manual was written with the first time dash camera owner in mind. In general much of the following information is relevant to understanding and operating all digital video cameras, but because of the unique function that a dash cam provides we have included more detailed instructions to assist users that are new to digital video recording. Please read the manual first and the “terms” used throughout will become more familiar to you as you setup and operate your camera. SD Memory Card / Class 10 Formatting and Usage of the SD memory card. (Use only Class 10 SDHC cards) 1. Gently insert the SD memory card into the SD card slot (located in the back of the camera) and press until it “clicks” into place. (card label up) 2. Press the “Power” button 1 time (forward button left side of the camera.) 3. From the main startup screen press the "Menu" button 2 times 4. Press the left arrow “<” button 3 times highlighting the word "Format" and press the "OK" button 1 time 5. Press the "OK" button 1 time with "SD Card" highlighted 6. Press the right arrow “>” button 1 time selecting the highlighted word “ok” and then press the “OK” button 1 time 7. Press the “MENU” button to return to the startup screen. Step 1 Step 4 Step 6 Step 6 Reformatting the SD Memory Card -‐-‐-‐-‐-‐-‐-‐-‐ (VERY IMPORTANT!) The SD memory card will need to be reformatted from time to time. This is necessary as the SD card will begin to “slow down” due to the continuous writing to and reading of the video data on the SD Card. The need to 2 reformat a SD Memory card will generally present itself by the camera’s screen showing irregularities such as a grainy, streaked or checkered pattern. The camera may may “freeze”, turn itself off and on, or exhibit other signs demonstrating that it can no longer write data to a slowing SD memory card. Caution: Formatting the SD card will delete all files including protected files that are stored on the SD card. To be safe remove all protected video files before reformatting. Consider reformatting on a regular basis to avoid recording and data storage issues. Camera Loop or Cycle setting Loop or looping is the important feature that allows the SmartCam HD to continuously record video (hour after hour) to the same SD memory card. As the camera records in the “loop” or “cycle” setting it is creating video files or segments in 2, 5 or 10 minute lengths. These files are recorded and saved consecutively (one after another) to the SD memory card. When a camera fills up a SD memory card (with many files) it must "loop" or "cycle" back to the earliest video segment / file it saved to the SD card and it must overwrite that file so that it can record and save the most current file. The camera does this automatically when the Loop feature is on. This allows the SD card to always have stored the most recent video file/segment that the camera has recorded. You only have to determine how long of a video file you want the camera to make and then save to the card. Your choices are files that are 2 minutes, 5 minutes, and 10 minutes long. There are different reasons to choose different file sizes. The 5 minute file size is a good one to start with. Selecting the length in time of the Loop video file From Main Recording Screen 1. Press the “MENU” button 1 time 2. Press the right arrow “>” button 2 times 3. Press the “OK” button 1 time 4. Press the right arrow “>” button to highlight the 2, 5, or 10 minute file length that is best for you. 5. Press the “OK” button to make your selection. 6. Press the “MENU” button to return to the startup screen Step 2 Steps 4 and 5 3 Playback of Video Files / Segments (Playback Mode) Playing back video on the camera’s screen 1. If the camera is recording; stop the recording by pushing the “OK” button. 2. Press the “Mode” button 2 times with a pause in between. It is located on the left side of the camera behind the power button. 3. The video files / segments will show up on the screen as thumbnail sized images commonly called “thumbs”. Each one of the “thumbs” represents a single video file / segment or photo file. 4. Using the right arrow “<” or left arrow “>” button navigate to the video file / segment that you wish to playback and view on the camera’s screen and press the “OK” button one time 5. Having selected the video file press the “OK” button to playback the segment. Press the “<” or “>” arrow buttons to fast forward or reverse the playback. (Take note of the video file number that will be located in the top right part of the screen example: 100-‐0008 this will help prevent you from watching the same video over again if you have chosen the wrong video file for playback.) 6. The video file / segment will have to viewed from beginning to end before you can move on to view another video file / segment. Use the arrow buttons “<” or “>” to select another video file to view in the playback mode. Step 3 – Screen with thumb files. Step 5 Protecting a video file / segment (or removing it from the loop) When the camera is set to “Loop” it will always overwrite the earliest video file / segment that has been recorded to the SD memory card and replace it with the video file it is actively recording. For example if the SD Memory card holds 115 minutes of video, and the video files are recorded in 5 minute segments, then the card will hold (23) – 5 4 minute video files / segments. When the camera begins to record it’s 24th video file / segment it will then delete the very first video file previously recorded and subsequently keep creating new files and deleting earlier ones. The camera will allow the user to PROTECT one or more video file(s) from becoming deleted so the camera can continue to record video to the same SD card without the user having to change cards or frequently download files to a pc or mac. In other words the user can remove a file from the “loop” by using the protection feature of the camera. This is an Important Feature as it allows the camera to keep using the same SD memory card for continued recording and use the same SD card to protect/lock important video files from becoming overwritten / deleted. How to Protect a Video File / Segment 1. Follow the instructions for “Playing back Video on Camera’s Screen” 2. After determining which video file you wish to protect. Press the “MENU” button 1 time. 3. Press the right “>” arrow button 2 times (it will highlight the word protect) 4. With the word “Protect” highlighted Press the “OK” button 1 time 5. With the words “Lock Current” highlighted Press the “OK” button 1 time – the selected video file is now protected and locked on the SD memory card. The protected file will have a KEY symbol on it. 6. Press the “MODE” button 1 time to return to the camera’s startup recording screen. (To “Unprotect” any file or files – perform the above steps but choose “unlock current” or “unlock all”) Steps 3 & 4 Step 5 Helpful hints when protecting a video file/segment • You may want to unplug the power cord before you begin to protect and lock a file. This will prevent the camera from automatically starting a new file should you accidentally or 5 • • intentionally press the “MODE” button while in the process of protecting a file. (Pressing the “Mode” button while on the playback screen will cause the camera to return to the recording screen and automatically start creating another video file. This will add another video file to the “thumb” selection screen. If in doubt about which file you should protect – you should take note of the file’s number as you select it and consider protecting the files that are before and after it. If you need to replay / watch the video file segment to make sure it is the one that you want to protect – then you must play it back completely before you can use the right “>” or left “<” arrow buttons to move on to another file. Deleting Video Files / Photos From the Playback Mode (Begin with Playback of Video File or Segment) 1. After having selected a file “thumb” press the “MENU” button 1 time. 2. Press the Right Arrow “>” 1 time (highlighting ‘delete’) 3. Press the “OK” button 1 time 4. Press the “OK” button 1 time to “delete current” file or use the right arrow “> “ button to select “Delete all” if you want all the unprotected files deleted. (Protected files have to become “Unprotected” or “unlocked” in order to be deleted. 5. Press the right arrow “>” button 1 time highlighting the word OK 6. Press the “OK button 1 time (files are deleted) 7. Press the “MODE” button 1 time to return to the video record mode. Date / Time Setup From the camera’s main startup recording screen 1. Press the “MENU” button 2 times 2. Press the “>” right arrow button 1 time 3. Press the “OK” button 1 time 4. Press the “MENU” button and use it to highlight each field (year, month, day, hour, minute, second) once a field is highlighted use the right or left arrow buttons “<” “>” to increase or decrease the number in a field. 5. Press the “OK” button 1 time to exit the date/time setup 6. Press the “MENU” button 1 time to return to the startup screen 6 Steps 2 and 3 Step 4 Setting the Camera Resolution Resolution is how clear the image / video is defined and recorded. In general if you set a higher recording resolution -‐ the more clearer the image or video will appear when played back and viewed on a pc or tv. However, a higher resolution setting will use more memory space on a SD card than a lower resolution. An example of this is that 16GB SDHC Memory Card will hold 1hr 50+ min of video when the resolution is set at 720P, but if the resolution is set at FHD 1080p then a 16GB SD card will hold about 1hr 30+ minutes of video files. From Main Recording Screen 1. Press the “MENU” button 1 time 2. Press the right arrow “>” button 1 time 3. Press the “OK” button 1 time 4. Press the left arrow “<” or right arrow “>” buttons to highlight your choice of video resolution. (720p HD is the default setting and is the recommended resolution for most users) 5. Press the “OK” button 1 time 6. Press the “MENU” button 1 time to return to the startup screen Steps 2 and 3 Steps 4 and 5 7 Motion Detection (Do not drive vehicle with motion detection turned on) Basic motion detection is available on this camera. The use of the motion detection feature is for when the vehicle is sitting still. With the motion detection “MD” turned on it will detect graphic or image changes within in its field of view and start recording a small video file. When motion is not detected it will stop the recording. In MD most video files will be under 1 minute in length. Setting the motion detection will override the camera’s “Loop” setting so make sure that MD is turned off before driving. The effectiveness of this feature varies with conditions outside and inside of the vehicle. The user should experiment with this feature to determine how it might work best in their particular vehicle. Using MD may result in a “SD card is Full” message. A deletion of all files or reformat may be necessary. From the startup screen 1. Press the "Menu" button 1 time 2. Press the right arrow “>” button 4 times 3. Press the "OK" button 1 time 4. Press the right arrow “>” button 1 time 5. Press the "OK" button 1 time 6. Press the "Menu" button 1 time to return back to the startup recording screen. Steps 2 and 3 Steps 4 and 5 Lamp Setting (Night Vision) The lamp setting of the camera works best if there is ambient light (traffic or lamp posts etc) around the camera. “Photo” means light and a camera must have light entering its aperture to capture an image. Use of this setting is recommended to bring greater image detail to video where outside sources of light are present (heavier traffic, lighted roadways, city driving). From the start up screen (Video Mode) 1. Press the “MENU” button 2 times 2. Press the “>” button 4 times 3. Press the “OK” button 1 time 4. Press the “>” button 1 time 8 5. Press the “OK” button 1 time 6. Press the “MENU” button 1 time to return back to the video record mode / startup screen. Steps 2 and 3 Lamp setting symbol Moon and Star Date Stamp on/off The time/date stamp that appears on the recorded video files can be set to on or off. The default setting is “on”. We recommend leaving it on. If you wish to turn it off follow these instructions. From the startup screen. 1. Press the “MENU” button 1 time. 2. Press left arrow “<” button 1 time 3. Press the “OK” button 1 time 4. Press the left arrow “<” button 1 time 5. Press the “OK” button 1 time 6. Press the “MENU” button 1 time to return to the startup screen. Audio on/off (The camera has an internal microphone that can record in-‐cab audio) The audio or internal microphone is on by default, but can be turned off. It is the responsibility of the user to understand the varied consent laws that pertain to audio recording. Informing all parties that the camera is recording both video and audio may be necessary. Audio recording is subject to local, state and federal laws. To turn off the audio / microphone follow these steps. From the startup screen. 1. Press the “MENU” button 1 time 2. Press the left arrow “<” button 2 times 3. Press the “OK” button 1 time 9 4. Press the left arrow “<” button 1 time 5. Press the “OK” button 1 time 6. Press the “MENU” button 1 time to return to the startup screen. Basic setup of your SmartCam HD Dash Camera 1. Format the Class 10 SDHC Memory Card (if battery is low you may have to do step (6) first. 2. Set the Date and Time 3. Set the camera’s loop feature to 5 minutes 4. Affix the camera to the suction pad mount 5. Affix the Camera and mount to the windshield. 6. Plug in the 12 volt charger cord to the vehicle’s outlet and then plug the mini usb into the mini usb port on the camera. The camera will automatically start recording. (To stop a recording push the “OK” button 1 time) 7. Read the user manual and watch the online tutorial videos. Basic understanding and operation of the camera. Charging The camera has a built-‐in rechargeable battery. The battery is charged via the 12 volt car charger when the charger is plugged into the vehicle’s universal 12 volt outlet. It can also be charged via the usb by a pc/laptop. Charging time is approximately 1 ½ to 2hrs, the camera does not have to be fully charged to be put into service. Button or Key Functions Power Button/Key Use to manually turn SmartCam HD 2 on and off. The camera will power on automatically when plugged into a vehicle’s 12 volt universal outlet. If the 12 volt outlet is controlled by the ignition switch then the switch must be turned on for power to be at the outlet. Mode Button/Key There are 3 operational “Modes” of the SmartCam HD. They are the Video Record mode, the Still Photo mode and the Playback mode. The Video Record mode is the default mode upon startup of the camera. The “Mode” button is used to navigate from one mode to another. 10 From the Startup screen which is also the Video Record Mode 1. Press “MODE” button 1 time to enter the Still Photo mode In this mode you can take still photos with the camera and save them or protect them on the SD memory card until you can download them to a pc/mac. 2. Press “MODE” button 2 times to enter into the video/photo Playback mode (Pressing the button to quickly may produce a “noisy” or “frozen” viewing screen to correct this press and hold the “power” button to turn off the camera). All video files/segments and photos show up as small thumbnail images called “thumbs”. Video files have small symbols on them that look like “filmstrip”. In this mode you can playback and view recorded video files/segments and photos as well as protect the files to prevent them from becoming overwritten/deleted as the camera continues to use the same SD card to record current video. You can also delete photos and video files by following the menu and prompts. 3. Pressing the “MODE” button a third time will return the user to the Video Record Mode (startup screen) and if the camera is plugged in to a 12 volt power outlet it will automatically begin recording video again. “OK” Button/Key (multi-‐function as the Record On/Off and Selection button) 1. Press the “OK” button to manually stop and start the recording of the camera. If the camera is recording video (the red light will be flashing on the screen) by pressing the “OK” button you can manually stop the camera from recording video. If you press the “ok” button to stop recording it will not pause the recording but will end that video file and will begin a new video file when you press the “OK” button again. This is an entirely acceptable way of operating the camera. 2. Press the “OK” button to make a selection of a highlighted menu setting. Example: Pressing “OK” button to select the Resolution setting and then using the “OK” button within the that setting to select the recording resolution of your choice. 3. Press the “OK” button to Exit the Date/Time setting (This is the only time that the ”OK” button is used in this manner.) “<” or “>” Buttons / Keys These buttons are referred to as Left Arrow or Right Arrow buttons, but they function as “Up” and “Down” movements within the menus and settings. 11 They also function to raise or lower numerical values within settings as well as move to a selection by going left or right as the names imply. In general these are directional buttons within any mode, menu or setting. “MENU” Button / Key The “menu” button is used to navigate into and out of the different menus. 1. In the “Video” mode (the startup screen) press the “menu” button 1 time to enter into the video settings menu and 2 times to enter into the camera’s tool setup menu. 2. In the “Photo” mode (from the startup screen the photo mode is accessed by pressing the “MODE” button once) press the “menu” button once to enter into the still photo settings menu and 2 times to enter into the camera’s tool setup menu. 3. In the “Playback” mode (from the startup screen the playback mode is accessed by pressing the “Mode” button 2 times and the “OK” button once on any selected file) the “menu” button is pressed 1 time to access the playback settings menu and 2 times to enter the camera’s tool setup menu. The camera’s tool setup menu can be accessed in all 3 modes. Digital Zoom The digital zoom is activated by pressing the left arrow “<” button while in video recording and still photo modes. The “<” button increases the digital zoom (zoom in) while “>” button is used to decrease the digital zoom (zoom out). When using the Zoom feature keep in mind that increasing the zoom lowers the video and photo resolutions resulting in poorer image quality. Video File Download via USB 1. Connect the SmartCam HD to the device with the supplied USB cable. 2. Once connected the SmartCam HD will ask/prompt how you want the SmartCam to be used – select “Mass Storage”. 3. Drag and drop files as you wish from the SmartCam to the PC or Mac. The photos show a connection with a PC Widows 7 operating system Camera to PC via USB connection Data Connection Menu 12 Screen after selecting Mass Storage Windows menu screen on PC Screen shot Removeable Disk (D:) Screen shot Selecting Windows Explorer Opening DCIM folder on SD Card Selecting video file folder on SD Card Dragging and dropping file to Desktop Screen shot of copying file to desktop 13 Camera USB to PC file download Download complete Video file on Desktop Video File Download to PC / Mac via SD Card 1. Power off camera 2. Remove SD memory card from slot in back of camera. 3. Insert SD card into SD card slot of PC or Mac 4. Wait for and follow prompts of PC or Mac. (See previous photos) 5. Perform download of selected video files by “drag and drop” or other means. (This is the preferred and fastest way to download files.) Step 3 Insert SD card into PC’s SD card slot Step 4 Window showing SD as “D” drive Camera as a Webcam The camera can be used as a webcam with 3rd party software. Generally, there is much more software available for a PC that uses a Window’s Operating System than other alternatives. A search for available free or paid 3rd party software can be made on the internet using search terms such as “webcam”, “program”, “avi”, “software”, “video”, “capture”, etc. There may be software already on the user’s PC that can capture .avi video when using the camera as a webcam. It is responsibility of the user to perform the necessary research to determine if using the camera as a webcam is to their benefit or not. Having located the 3rd party webcam software. 1. Connect the camera to the PC / Mac via the USB cable 14 2. Select with the right arrow “>” button “PC Camera” 3. Press the “OK” button to make the selection. 4. Launch software to use the camera as an external webcam. (Camera may not be compatible with all Windows or alternative operatings systems when used as a webcam) We do not endorse any webcam or remote viewing software – use of third party software is at the user’s discretion. Attaching the SmartCam HD to the Suction Cup Mount 1. When correctly attached to the SmartCam the suction pad of the mount will face in the same direction as the camera lens and the pad will attach directly to the windshield. This is the 12 o’clock position. 2. Turn the compression wheel that is on the mount’s bolt so that it is slightly snug (but not tight) against the Suction Mount. 3. Thread the suction mount bolt into the tripod hole on top of the SmartCam HD until it stops. 4. Generally the mount and pad will go past the 12 o’clock position and will have to be turned/rotated back counter clockwise past the lens or 12 o’clock position so that the pad will end up facing the same direction as the camera’s lens. 5. Turn the camera mount “counter clockwise” taking the suction pad back past the 12 o’clock to the 10 or 11 o’clock position -‐ loosen the compression wheel by turning it clockwise until it feels some resistance in tightening and then you can finish by turning both the wheel and the suction mount at the same time resting the pad at the 12 o clock position directly over the camera’s lens. Step 3 Step 4 and 5 15 Step 5 Completed alignment as mount/pad & lens face forward -‐12 o’clock position Finish by placing mounted camera to area that is not in the “line of sight” of your visual field when operating a vehicle Overview of SmartCam HD 2 • The SmartCam HD is a self-‐contained compact portable dash cam / DVR. • The camera and it’s internal battery are powered and charged by a vehicles 12 volt electrical outlet. • When operating in video record mode the camera records and saves video files to a SDHC Class 10 memory card that is inserted into the camera. When the card is full the camera will automatically “loop” and overwrite (delete) the earliest video files that have been saved to the SD card. In this manner the camera can record continuously hour upon hour always having the most current video files available for review, protection, or download. • The video files that have been recorded can be downloaded to a pc / mac, reviewed on the camera’s playback screen or on a digital TV. The SD memory card can be removed and inserted into a PC / Mac for video download or the video data can be download via USB to a computer. • Playback of the video files to a LED / LCD TV can be accomplished by using the provided HDMI or AV cables. Dash Cam Questions and Troubleshooting: I have read the User Manual; what are the first things I should do with my new dash camera? 1. Format the SD memory card. 2. Set the correct Date and Time. 3. Set the “Loop” to the file length of your choice. 4. Determine the other settings that the user wants on or off. 5. Affix camera to the mount and then to an area that does not obstruct the user’s view. 16 Why “use only class 10” SDHC Memory Cards? Class 10 cards have the fastest “write” speeds for capturing HD video. A lower class card has slower write speeds and may result in recording problems or storage issues causing the camera to “stumble” or “freeze” or turn itself off as it tries to write data to a SD card that is incapable of capturing and storing HD video. *Class 10 cards also SLOW down with continued use and need to be REFORMATTED to prevent memory errors. If camera “freezes” press & hold Power button until it shuts down. Not all class 10 cards are equal in speed or compatibility. (Class 10 PNY, Polaroid and Transcend SD cards are most generally compatible. IF CAMERA SHUTS DOWN AND WILL NOT POWER ON 1) UNPLUG CAMERA FROM POWER SOURCE (CHARGER) 2) REMOVE SD CARD FROM THE CAMERA 3) MANUALLY POWER ON CAMERA 4) INSERT SD CARD AND REFORMAT CARD 5) MANUALLY TURN OFF CAMERA 6) PLUG BACK IN POWER SOURCE (CHARGER) Why do dash cameras occasionally shut down, restart, or have screen issues? (Reformating your card keeps the camera operating smoothly) Again, this is mainly due to a slow or slowing card. This is normal and periodically reformatting the SD memory card before it begins to exhibit these behaviors will help to keep the files free from corruption and the camera from having memory errors. Remember, reformatting an SD card will delete files that have been protected on the card. Do’s and Don’ts • Do keep the lens of the camera clean with microfiber or lens cloth • Do not “manually” operate the camera while driving • Do reformat the SD memory card when needed • Don’t forget to keep the windshield clean • Do start an online video channel and post your interesting clips • Don’t video or audio record if in doubt about laws or privacy concerns • Do become familiar with the all the settings and features of the camera • Don’t put off purchasing a “backup” SD memory card for emergencies. There are SmartCam HD2 video tutorials available online. You can find them at http://dashcamusa.com/videos.php or on the YouTube channel: SmartCamHD2 Enjoy your new SmartCam HD2 Dash Cam. Once you experience the security in owning a personal and portable dash cam you will never want to drive without one again. Video, is total recall in any driving related incident or accident. Having “Your Video EyeWitness” is having the truth recorded and ready when you need it. 17 Screen Symbol Identification 1. Date 2. Time (24 Hour Clock) 3. Battery Charge Indicator (Will change to flashing electric plug when Camera is powered by a 12 volt outlet) 4. SD Memory Card – indicating SD card is in camera 5. Resolution setting 6. Video Time Counter 7. Daytime setting indicator (Will be a moon/star with Night Vision ON) 8. Audio On indicator (Will have a red stripe across when audio is OFF) 9. Red Flashing Light indicates that the camera IS recording video. 10. Video Record Mode Symbol 11. LOOP indicator with the number of recording minutes for each file. 12. Exposure value setting • When Motion Detection is set there will be a symbol in between symbols (11) and (12). The camera’s screen is always on and cannot be turned off. It will continue to record when the screen is in the closed position. 18 Limited Warranty Smart DashCam Products warrants this product to be free from defects in material and manufacture for a period of (180) days from the date of purchase (sales receipt is required for proof of purchase and registered warranty card or email must be submitted within 30 days from date of purchase). If this product is defective within the warranty period stated above, your exclusive remedy and Smart DashCam Products sole obligation shall be, at Smart DashCam Products option, to replace or repair the product or prorated refund of the purchase price of the product. This warranty does not cover normal wear and tear, or damage resulting from accident, misuse, altercation, modifications, loss of use of the product, loss of time, interrupted operation, commercial loss, failure to follow instructions, improper assembly lack of reasonable care. This warranty gives you specific legal rights, and you may have other rights which may vary from state to state. Limitation of Liability Smart DashCam Products will not be liable for any loss or damage arising from this product, whether direct, indirect, special, incidental or consequential, regardless of the legal theory asserted, including warranty contract, negligence or strict liability. The Limited Warranty extends only to the original retail purchaser of the product and is not transferable to anyone who obtains possession or ownership other than the original retail purchaser. All accessories included with the SmartCam HD2 Dash Camera are not covered under the product warranty. This warranty does not apply to damage due directly or indirectly, to misuse, abuse, negligence or accidents, repairs or alterations outside our facilities, criminal activity, improper installation, normal wear and tear, or to lack of maintenance. We shall in no event be liable for death, injuries to persons or property, or for incidental, contingent, special or consequential damages arising from the use of our product. Some states do not allow the exclusion or limitation of incidental or consequential damages, so the above limitation of exclusion may not apply to you. THIS WARRANTY IS EXPRESSLY IN LIEU OF ALL OTHER WARRANTIES, EXPRESS OR IMPLIED, INCLUDING THE WARRANTIES OF MERCHANTABILITY AND FITNESS. To take advantage of this warranty, the product must be returned to us with transportation charges prepaid. Proof of purchase date and an explanation of the complaint must accompany the merchandise. If our inspection verifies the defect, we will either repair or replace the product at our election or we may elect to refund the prorated purchase price if we cannot readily and quickly provide you with a replacement. We will return repaired products at our expense, but if we determine there is no defect, or that the defect resulted from causes not within the scope of our warranty, then you must bear the cost of returning the product. 19 To obtain warranty service contact: Smart DashCam Products 2101 W Chesterfield Blvd C100 Box 78 Springfield, MO 65807 855-‐432-‐7422 [email protected] 20