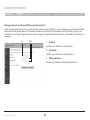
1
Double N+
Wireless Router
User Manual
8820-00267ea
F6D6230xx4
English
Français
Deutsch
Nederl ands
Español
Italiano
Table of Contents
Table of Contents
sections
1
2
3
4
1 Introduction���������������������������������������������������������������������������������������� 1
5
6
7
8
9
10
3 Knowing your Router ������������������������������������������������������������������������ 7
WEP Setup . . . . . . . . . . . . . . . . . . . . . . . . . . . . . . . . . . . . . . . . . . . . . .
Setting WEP Encryption . . . . . . . . . . . . . . . . . . . . . . . . . . . . . . . . . . . .
Using the Access Point Mode . . . . . . . . . . . . . . . . . . . . . . . . . . . . . . .
BitTorrent . . . . . . . . . . . . . . . . . . . . . . . . . . . . . . . . . . . . . . . . . . . . . . .
QoS . . . . . . . . . . . . . . . . . . . . . . . . . . . . . . . . . . . . . . . . . . . . . . . . . . . .
UPnP AV MediaServer . . . . . . . . . . . . . . . . . . . . . . . . . . . . . . . . . . . . .
Configuring the Firewall . . . . . . . . . . . . . . . . . . . . . . . . . . . . . . . . . . .
Access Control . . . . . . . . . . . . . . . . . . . . . . . . . . . . . . . . . . . . . . . . . . .
Using Dynamic DNS . . . . . . . . . . . . . . . . . . . . . . . . . . . . . . . . . . . . . . .
Utilities. . . . . . . . . . . . . . . . . . . . . . . . . . . . . . . . . . . . . . . . . . . . . . . .
Restarting the Router . . . . . . . . . . . . . . . . . . . . . . . . . . . . . . . . . . . . .
Updating the Firmware . . . . . . . . . . . . . . . . . . . . . . . . . . . . . . . . . . . .
Package Contents ���������������������������������������������������������������������������������� 7
System Requirements ���������������������������������������������������������������������������� 7
Setup Assistant Software System Requirements���������������������������������� 7
7 Manually Configuring Network Settings�������������������������������������� 71
Advantages of a Double N+ Wireless Networks������������������������������������ 1
Placement of your Double N+ Wireless Router. . . . . . . . . . . . . . . . . . 2
2 Product Overview ���������������������������������������������������������������������������� 5
Product Features������������������������������������������������������������������������������������ 5
4 Connecting and Configuring your Router ���������������������������������� 11
8 Recommended Web Browser Settings���������������������������������������� 76
5 Alternate Setup Method������������������������������������������������������������������ 22
9 Troubleshooting ������������������������������������������������������������������������������ 78
6 Using the Web-Based Advanced User Interface������������������������ 35
10 Information�������������������������������������������������������������������������������������� 87
Changing LAN Settings������������������������������������������������������������������������ 35
Viewing the DHCP Client List Page������������������������������������������������������ 37
Configuring the Wireless Network Settings ���������������������������������������� 38
Setting WPA/WPA2-Personal (PSK). . . . . . . . . . . . . . . . . . . . . . . . . 43
Double N+ Wireless Router
44
44
46
50
51
51
52
54
57
58
59
64
i
Introduction
Table of Contents
sections
1
2
3
4
5
6
7
8
9
10
Thank you for purchasing the Belkin Double N+ Wireless Router (the Router). Following are two short sections—the first discusses
the benefits of home networking, and the other outlines best practices that maximize your wireless home network range and
performance. Please be sure to read through this User Manual completely, and pay special attention to the section entitled
“Placement of your Wireless Networking Hardware for Optimal Performance” on the next page. By following our simple setup
instructions you will be able to use your Belkin Home Network to:
•
Share one high-speed Internet connection with all the computers in
your home
•
Share a USB storage device (not included) within your network
•
Share documents, music, video, and digital pictures
•
Store, retrieve, and copy files from one computer to another
•
Simultaneously play games online, check Internet email, and chat
Double N+ Wireless Router
1
Introduction
Table of Contents
sections
1
2
3
4
5
6
7
8
9
Advantages of Double N+ Wireless Networks
Placement of your Double N+ Wireless Router
For more bandwidth, the Belkin Double N+ Wireless Router broadcasts
two Wireless N signals simultaneously, one in the 2.4GHz band and
the other in the 5GHz band. Most Wi-Fi devices today can only use the
2.4GHz band, but many new laptops and media devices can run on both
2.4GHz and 5GHz bands. The 5GHz band usually allows the device to
run at higher speeds because there is less interference in this band. For
example, connect your netbook or smart phones to the 2.4GHz network
to surf the net, email, and access simple web applications, and then
connect your computer to the 5GHz network to enjoy higher speeds for
gaming, streaming videos, etc. If your computer can’t use the 5GHz band,
please use the Belkin Double N+ Wireless USB Adapter (F6D6050).
Important Factors for Placement and Setup
10
Your wireless connection will be stronger the closer your computer is
to your Router. Typical indoor operating range for wireless devices is
between 100 and 200 feet.
In the same way, your wireless connection and performance will
degrade somewhat as the distance between your Router and connected
devices increases. This may or may not be noticeable to you. As you
move further from your Router, connection speed may decrease. Factors
that can weaken signals simply by getting in the way of your network’s
radio waves are metal appliances or obstructions, and walls.
If you have concerns about your network’s performance that might
be related to range or obstruction factors, try moving the computer to
a position between five and 10 feet from the Router in order to see if
distance is the problem. If difficulties persist even at close range, please
contact Belkin Technical Support.
The 5GHz band can offer higher speeds, but, due to the laws of
physics, the signal will not be able to travel as far as 2.4GHz. If you are
experiencing connection issues when farther away from the Router,
please connect your device to the 2.4GHz band instead.
Note: While some of the items listed below can affect network
performance, they will not prohibit your wireless network from
functioning; if you are concerned that your network is not operating at
its maximum effectiveness, this checklist may help.
Double N+ Wireless Router
2
Introduction
Table of Contents
sections
1
2
3
4
1. Router Placement
6
7
8
9
10
If your wireless signal seems weak in some spots, make sure that
objects such as these are not blocking the signal’s path (between your
computers and Router).
Place your Router, the central connection point of your network, as
close as possible to the center of your wireless network devices.
To achieve the best wireless network coverage for your “wireless clients”
(i.e., computers enabled by Belkin Wireless Notebook Network Cards,
Wireless Desktop Network Cards, and Wireless USB Adapters):
•
5
3. Cordless Phones
If the performance of your wireless network is impaired after attending
to the above issues, and you have a cordless phone:
Ensure that your Router’s networking antennas are parallel to each
other, and are positioned vertically (toward the ceiling). If your
Router itself is positioned vertically, point the antennas as much as
possible in an upward direction.
•
Try moving cordless phones away from your Router and your
wireless-enabled computers.
•
In multistory homes, place the Router on a floor that is as close
to the center of the home as possible. This may mean placing the
Router on an upper floor.
•
Unplug and remove the battery from any cordless phone that
operates on the 2.4GHz band (check manufacturer’s information). If
this fixes the problem, your phone may be interfering.
•
Try not to place the Router near a cordless 2.4GHz phone or
microwave oven.
•
If your phone supports channel selection, change the channel on
the phone to the farthest channel from your wireless network. For
example, change the phone to channel 1 and move your Router to
channel 11. See your phone’s user manual for detailed instructions.
•
If necessary, consider switching to a 900MHz cordless phone.
2. Avoid Obstacles and Interference
Avoid placing your Router near devices that may emit radio “noise,”
such as microwave ovens. Dense objects that can inhibit wireless
communication include:
•
Refrigerators
•
Washers and/or dryers
•
Metal cabinets
•
Large aquariums
•
Metallic-based, UV-tinted windows
•
Microwave ovens
Double N+ Wireless Router
3
Introduction
Table of Contents
sections
1
2
3
4
5
6
7
8
9
10
4. Choose the “Quietest” Channel for your Wireless Network
5. Secure Connections, VPNs, and AOL
In locations where homes or offices are close together, such as
apartment buildings or office complexes, there may be wireless
networks nearby that can conflict with yours.
Secure connections typically require a user name and password, and
are used where security is important. Secure connections include:
Use the Site Survey capabilities found in the Wireless Utility of your
wireless adapter to locate any other wireless networks that are available
(see your wireless adapter’s user manual), and move your Router and
computers to a channel as far away from other networks as possible.
•
•
Experiment with more than one of the available channels, in
order to find the clearest connection and avoid interference from
neighboring cordless phones or other wireless devices.
For Belkin wireless networking products, use the detailed Site
Survey and wireless channel information included with your
wireless network card. See your network card’s user guide for
more information.
•
Virtual Private Network (VPN) connections, often used to connect
remotely to an office network
•
The “Bring Your Own Access” program from America Online (AOL),
which lets you use AOL through broadband provided by another
cable or DSL service
•
Most online banking websites
•
Many commercial websites that require a user name and password
to access your account
Secure connections can be interrupted by a computer’s power
management setting, which causes it to “go to sleep.” The simplest
solution to avoid this is to simply reconnect by rerunning the VPN or
AOL software, or by re-logging into the secure website.
These guidelines should allow you to cover the maximum possible area
with your Router. Should you need to cover an even wider area, we
suggest the Belkin Wireless Range Extender/Access Point.
A second alternative is to change your computer’s power management
settings so it does not go to sleep; however, this may not be appropriate
for portable computers. To change your power management setting
under Windows, see the “Power Options” item in the Control Panel.
If you continue to have difficulty with Secure Connections, VPNs, and
AOL, please review the steps above to be sure you have addressed
these issues.
For more information regarding our networking products, visit our
website at www.belkin.com/networking
Double N+ Wireless Router
4
Product Overview
Table of Contents
sections
1
2
3
4
Product Features
6
7
8
9
10
operation. You’ll know at-a-glance whether your Router is connected to
the Internet. This feature eliminates the need for advanced software and
status-monitoring procedures.
In minutes you will be able to share your Internet connection and
network your computers. The following is a list of features that make
your new Belkin N+ Wireless Router an ideal solution for your home or
small office network.
Web-Based Advanced User Interface
You can set up the Router’s advanced functions easily through your web
browser, without having to install additional software onto the computer.
There are no disks to install or keep track of and, best of all, you can
make changes and perform setup functions from any computer on the
network quickly and easily.
Works with Both PCs and Mac® Computers
The Router supports a variety of networking environments including
Mac OS® 8.x, 9.x, X v10.x, Linux®, Windows® 98, Me, NT®, 2000, XP,
Vista™, Windows 7 and others. All that is needed is an Internet browser
and a network adapter that supports TCP/IP (the standard language of
the Internet).
NAT IP Address Sharing
Your Router employs Network Address Translation (NAT) to share the
single IP address assigned to you by your Internet Service Provider while
saving the cost of adding additional IP addresses to your Internet service
account.
Simultaneous Dual-Band Networks
Two separate networks with one in the 2.4GHz band and one in the
5GHz band. Increased bandwidth allows you to connect more devices
on your network with less interference.
SPI Firewall
USB Port for External Storage Devices
Your Router is equipped with a firewall that will protect your network
from a wide array of common hacker attacks including IP Spoofing, Land
Attack, Ping of Death (PoD), Denial of Service (DoS), IP with zero length,
Smurf Attack, TCP Null Scan, SYN flood, UDP flooding, Tear Drop
Attack, ICMP defect, RIP defect, and fragment flooding.
The Router includes a USB port in the back panel for one storage device
(flash drive or external hard drive). You can now have network-attached
storage capabilities without having to purchase an expensive NAS.
UPnP AV MediaServer
Easily share the media contents, such as photographs, movies, or
music, stored in your USB storage device with other digital media
players, such as Microsoft® Xbox®, Sony® PS3™, etc., that support the
UPnP protocols.
Patent-Pending Network Status Display
Integrated 10/100/1000 4-Port Switch
The Router has a built-in, Gigabit Ethernet, four-port network switch to allow
your wired computers to share data, MP3 files, digital photos, and much
more. The switch features automatic detection so it will adjust to the speed of
connected devices. The switch will transfer data between computers and the
Internet simultaneously without interrupting or consuming resources.
Lighted LEDs on the front of the Router indicate which functions are in
Double N+ Wireless Router
5
5
Product Overview
Table of Contents
sections
1
2
3
4
5
6
7
8
9
10
Universal Plug and Play (UPnP)
Integrated N+ Wireless Access Point
UPnP is a technology that offers seamless operation of voice
messaging, video messaging, games, and other applications that are
UPnP-compliant.
N MIMO is an exciting new wireless technology based on the IEEE
802.11n draft 2.0 specifications. It employs MIMO (Multiple Input Multiple
Output) smart-antenna technology that achieves data rates of up to
300Mbps.* Actual throughput is typically lower than the connected data
rate and will vary depending on your networking environment.
Support for VPN Pass-Through
*NOTE: The standard transmission rate—300Mbps—is the physical data
rate. Actual data throughput will be lower.
If you connect to your office network from home using a VPN
connection, your Router will allow your VPN-equipped computer to pass
through the Router and to your office network.
MAC Address Filtering
For added security, you can set up a list of MAC addresses (unique
client identifiers) that are allowed access to your network. Every
computer has its own MAC address. Simply enter these MAC addresses
into a list using the Web-Based Advanced User Interface and you can
control access to your network.
Built-In Dynamic Host Configuration Protocol (DHCP)
Built-In Dynamic Host Configuration Protocol (DHCP) on-board makes
for the easiest possible connection of a network. The DHCP server will
assign IP addresses to each computer automatically so there is no need
for a complicated networking setup.
Setup Assistant
The Setup Assistant, second generation of Belkin’s renowned Easy
Install Wizard, takes the guesswork out of setting up your Router. This
automatic software determines your network settings for you and sets
up the Router for connection to your Internet Service Provider (ISP). In a
matter of minutes, your Router will be up and running on the Internet.
NOTE: Setup Assistant software is compatible with Windows 2000,
XP, Vista and Windows 7; and Mac OS X v10.x. If you are using another
operating system, the Router can be set up using the Alternate Setup
Method described in this User Manual (see page 22).
Double N+ Wireless Router
6
Knowing your Router
Table of Contents
sections
1
2
3
4
Package Contents
•
•
•
•
•
•
•
5
6
Belkin Double N+ Wireless Router
Quick Installation Guide
Belkin Setup Assistant Software CD
RJ45 Ethernet Networking Cable
Power Supply
User Manual on the Setup Assistant CD
Network Status Display Guide
(A)
•
•
•
•
Broadband Internet connection such as a cable or DSL modem
with RJ45 (Ethernet) connection
At least one computer with an installed network interface adapter
TCP/IP networking protocol installed on each computer
RJ45 Ethernet networking cable
Internet browser
(B)
(C)
(D)
(E)
(F)
(G)
(H)
(I)
(J)
Setup Assistant Software System Requirements
(including Storage Manager)
•
•
•
A computer running Windows® 2000, XP, Vista® or 7; or Mac OS® X
v10.x
Minimum 1GHz processor and 128MB RAM
Internet browser
Double N+ Wireless Router
8
9
10
The Router has been designed to be placed on a desktop. All of the
cables exit from the rear of the Router for better organization and utility.
The LED indicators are easily visible on the front of the Router to provide
you with information about network activity and status.
System Requirements
•
7
7
Knowing your Router
Table of Contents
sections
1
2
3
4
A. Broadband Download Speedometer
These lights will display a graphic representation of the current
download speed being transferred through the Internet connection. The
speed will be measured on the speedometer against the fastest speed
that has been measured by the Router since being activated.
These lights will display a graphic representation of the current
download speed being transferred through the Internet connection. The
speed will be measured on the speedometer against the fastest speed
that has been measured by the N+ since being activated.
Wireless security is off
Blinking Blue
WPS handshaking in process
Solid Blue
Wireless security is on
6
7
8
9
10
D. Wireless-Computer Status
B. Wireless Security
Off
5
Off
Wireless computer is not present
Solid Blue
Wireless computer is connected
to the Router
Blinking Amber
Problem with wireless computer
connecting properly to the Router
E. Wired-Computer Status
Off
Wired computer is not present
Solid Blue
Wired computer is connected to
the Router
Blinking Amber
Problem with wired computer
connecting properly to the Router
F. USB Port Status
C. WPS Push Button
Off
This button is used for the Wi-Fi Protected Setup feature. Refer to the
“Changing the Wireless Security Settings” section for more details.
No device is plugged into the
USB port
Flashing Blue
Data is being read/written to the
storage device
Flashing Amber
Unsupported device is plugged
into the USB port
Solid Blue
Storage device is plugged in and
ready to be accessed
Double N+ Wireless Router
8
Knowing your Router
Table of Contents
sections
1
2
3
4
5
6
7
8
9
10
G. Router/Power Status
J. Internet Status
When you apply power to the Router or restart it, a short period of time
elapses while the Router boots up. During this time, the “router” icon
blinks. When the Router has completely booted up, the “router” icon
becomes a solid light, indicating the Router is ready for use.
This unique icon shows you when the Router is connected to the
Internet. When the light is off, the Router is NOT connected to the
Internet. When the light is blinking amber, the Router is attempting
to connect to the Internet. When the light is solid blue, the Router is
connected to the Internet. When using the “Disconnect after x minutes”
feature, this icon becomes extremely useful in monitoring the status of
your Router’s connection.
Off
Router is off
Blinking Blue
Router is booting up
Solid Blue
Router is on and ready
H. Wireless Status
Off
Wireless is off
Solid Blue
Wireless is on
I. Modem Status
This icon lights in blue to indicate that your Router is connected properly
to the modem. It turns amber when a problem is detected.
Off
Router is NOT connected to
modem
Solid Blue
Router is connected to modem
and functioning properly
Blinking Amber
Problem with modem
Double N+ Wireless Router
9
Off
Router is NOT connected to the
Internet
Blinking Blue
Router is attempting to connect
to the Internet
Solid Blue
Router is connected to the
Internet
Blinking Amber
Problem with connecting to the
Internet
Knowing your Router
Table of Contents
sections
1
2
3
4
5
6
7
8
9
10
K. Connections to Wired Computers
ii. Restoring the Factory Defaults
Connect your wired (non-wireless) computers to these ports. These
ports are RJ45, 10/100/1000 auto-negotiation, auto-uplinking ports for
standard UTP category 5 or 6 Ethernet cable. The ports are labeled 1
through 4.
Press and hold the “Reset” button for at least 10 seconds, then
release it. The lights on the Router will momentarily flash. The
“Power/Router” light will begin to blink. When the “Power/Router”
light becomes solid again, the restore is complete.
O. Power Jack – Black
L. USB Port
Connect the included 15V/1.25A DC power supply to this jack.
Plug in your USB storage device here.
P. “Reconnect” Button
M. Connection to Modem
The “Reconnect” button provides a
simple way to alleviate wireless and
Internet-connection difficulties. Upon
pushing this button, the Router will
automatically scan and set itself on the
cleanest channel, turn on high-speed
mode (20/40MHz mode), and renegotiate
your connection with your ISP (Internet
Service Provider). Please note that any
devices connected to the Router will be
intermittently disconnected while the
Router performs these tasks.
This port is for connection to your cable or DSL modem. Use the cable
that was provided with the modem to connect the modem to this port.
Use of a cable other than the one supplied with the cable modem may
not work properly.
N. Reset Button
The “Reset” button is used in rare cases when the Router may function
improperly. Resetting the Router will restore the Router’s normal
operation while maintaining the programmed settings. You can also
restore the factory default settings by using the “Reset” button. Use the
restore option in instances where you may have forgotten your custom
password.
Common issues that “Reconnect” will fix:
• Slow or inconsistent download
speeds due to interferences from other
devices on the 2.4GHz band.
i. Resetting the Router
Push and release the “Reset” button. The lights on the Router will
momentarily flash. The “Power/Router” light will begin to blink. When
the “Power/Router” light becomes solid again, the reset is complete.
Double N+ Wireless Router
• Lost Internet connection, which can
be caused by problems with the ISP or
modem. Please also reset your modem
before using “Reconnect” to regain
connection to your ISP.
10
(K)
(L)
(M)
(N)
(O)
Connecting and Configuring your Router
Table of Contents
sections
1
2
3
4
5
6
7
8
9
10
Verify the contents of your box. You should have the following:
Setup Assistant
•
Belkin Double N+ Wireless Router
•
RJ45 Ethernet Networking Cable
•
Power Supply
•
Belkin Setup Assistant Software CD
•
User Manual on the Setup Assistant CD
•
Network Status Display Guide
Belkin has provided our Setup Assistant software to make installing your
Router a simple and easy task. You can use it to get your Router up and
running in minutes. The Setup Assistant requires that your computer be
connected directly to your cable or DSL modem and that the Internet
connection is active and working at the time of installation. If it is not,
you must use the “Alternate Setup Method” section of this User Manual
to configure your Router. Additionally, if you are using an operating
system other than Windows 2000, XP, Vista or Windows 7, or Mac OS X
v10.x, you must set up the Router using the “Alternate Setup Method”
section of this User Manual.
Modem Requirements
Your cable or DSL modem must be equipped with an RJ45 Ethernet
port. Many modems have both an RJ45 Ethernet port and a USB
connection. If you have a modem with both Ethernet and USB, and are
using the USB connection at this time, you will be instructed to use the
RJ45 Ethernet port during the installation procedure. If your modem has
only a USB port, you can request a different type of modem from your
ISP, or you can, in some cases, purchase a modem that has an RJ45
Ethernet port on it.
Ethernet USB
Double N+ Wireless Router
11
Connecting and Configuring your Router
Table of Contents
sections
1
2
3
4
5
6
7
8
9
10
Step 1: Hardware Connections
4
WAN
3
LAN
3
1
2
1
3
1.
Find the cable connecting your modem and computer*. Unplug it
from the computer and plug it into the yellow port on the Belkin
Router.
2.
Connect the new cable (provided in the box) to any gray port on
the Router. Plug the other end into a network (Ethernet) port on
your computer.
3.
Plug the power supply into a wall outlet, and the other end into the
black port on the Belkin Router. As the Router wakes up, lights will
come on; recheck your connections if the “Wired” and “Router”
lights are not a steady blue after 20 seconds.
4.
Rotate the antennas up.
Double N+ Wireless Router
5.
Locate the CD in this guide and insert it into your computer. The
Setup Wizard should appear automatically. If it doesn’t, open
the CD in My Computer (Windows) or the Finder (Mac OS X) and
double-click the “Router Setup” icon.
*If you are replacing an existing router, find the cable connecting the modem and old router.
Disconnect it from the old router and plug it into the yellow port on the new router.
12
Connecting and Configuring your Router
Table of Contents
sections
1
2
3
4
5
6
7
8
9
10
Step 2: Set Up the Router – Run the Setup Assistant Software
A.
Shut down any programs that are running on your computer at this
time. Turn off any firewall or Internet-connection-sharing software
on your computer.
B.
Insert the CD into your computer. The Setup Assistant will
automatically appear on your computer’s screen within 15 seconds.
Click on “Go” to run the Setup Assistant. Follow the instructions
there.
IMPORTANT: Run the Setup Assistant from the computer that is
directly connected to the Router from Step 1 – B.
Note for Windows Users: If the Setup Assistant does not start up
automatically, select your CD-ROM drive from “My Computer” and
double-click on the file named “SetupAssistant” to start the Setup
Assistant.
Double N+ Wireless Router
13
Connecting and Configuring your Router
Table of Contents
sections
1
2
3
4
5
6
7
8
9
10
Select Country
Confirmation Screen
Select your country from the drop-down box. Click “Begin” to continue.
Verify that you have completed all QIG steps by checking the box to the
right of the arrow. Click “Next” to continue.
Double N+ Wireless Router
14
Connecting and Configuring your Router
Table of Contents
sections
1
2
3
4
5
6
7
8
9
10
Progress Screen
1.1 Checking Settings
Setup Assistant will show you a progress screen each time a step in the
setup has been completed.
The Setup Assistant will now examine your computer’s network settings
and gather information needed to complete the Router’s connection to
the Internet.
Double N+ Wireless Router
15
Connecting and Configuring your Router
Table of Contents
sections
1
2
3
4
5
6
7
8
9
10
1.2 Verifying Hardware Connections
1.3 Naming your Wireless Network
The Setup Assistant will now verify your hardware connection.
The Setup Assistant will display the default wireless network name or
Service Set Identifier (SSID). This is the name of your wireless network
to which your computers or devices with wireless network adapters will
connect. You can either use the default or change it to something unique.
Write down this name for future reference. Click “Next” to continue.
Double N+ Wireless Router
16
Connecting and Configuring your Router
Table of Contents
sections
1
2
3
4
5
6
7
8
9
10
1.4 Requesting Internet Account Info (if needed)
1.5 Configuring the Router
If your Internet account requires a login and password, you will be
prompted with a screen similar to the illustration below. Select your
country or ISP from the drop-down boxes.
The Setup Assistant will now configure your Router by sending data to
the Router and restarting it. Wait for the on-screen instructions.
Note: Do not disconnect any cable or power off the Router while the
Router is rebooting. Doing so will render your Router inoperable.
Double N+ Wireless Router
17
Connecting and Configuring your Router
Table of Contents
sections
1
2
3
4
5
6
7
8
9
10
1.6 Checking Internet Connection
Congratulations
We are almost done. The Setup Assistant will now check your
connection to the Internet.
You have finished installing your new Belkin Router. You will see the
Congratulations screen when your Router can connect to the Internet.
You can begin surfing by opening your browser and going to any
website.
You can use the Setup Assistant to set up your other wired and wireless
computers to connect to the Internet by clicking “Next”. If you decide to
add computers to your Router later, select “Exit the Assistant” and then
click “Next”.
Double N+ Wireless Router
18
Connecting and Configuring your Router
Table of Contents
sections
1
2
3
4
5
6
7
8
9
10
Troubleshooting
1.7 Optional: Assistance Connecting Other Computers
If the Setup Assistant is not able to connect to the Internet, you will see
the following screen. Follow the on-screen instructions to go through the
troubleshooting steps.
This optional step will help you to connect additional wired and wireless
computers to your network. Follow the on-screen instructions.
Double N+ Wireless Router
19
Connecting and Configuring your Router
Table of Contents
sections
1
2
3
4
5
6
7
8
9
10
Congratulations
Storage Manager
Once you have verified that your other wired and wireless computers are
properly connected, your network is set up and working. You can now
surf the Internet. Click “Next” to take you back to the main menu.
The Storage Manager is an application that provides easy access to
your USB storage device. Once this is installed, your storage device
will appear as a drive letter (e.g., D:\) in your “My Computer” folder. You
may read and write to this drive as if it were directly attached to your
computer. Note that the Router currently supports FAT, FAT32, and
NTFS file systems.
Click “Next” to install the Storage Manager application.
Double N+ Wireless Router
20
Connecting and Configuring your Router
Table of Contents
sections
1
2
3
4
5
6
7
8
9
10
Storage Manager also allows you to safely eject the storage device
before unplugging it from your Router. This is recommended before
unplugging the USB storage device as there might be another user
on your network who is accessing the drive. Simply right-click on the
“Storage Manager” icon in the system tray and select the appropriate
button.
Alternatively, you do not need to install the Storage Manager in order to
access your storage device. Open a file explorer window and type in the
address field:
\\192.168.2.1\
Your Belkin Double N+ Wireless Router supports up to four USB
storage devices through a separate USB hub (not included). Note that
the Router can supply a maximum of 500mA of current to the port, so
it is recommended that the hub be externally powered. Additionally,
some USB hard drives require more than 500mA and must be externally
powered to function.
Click “Finish” to go back to the main menu. You may now access the
drive as if it were directly attached to your computer. Once installed,
please use the CD to install this application on all computers on which
you wish to access the storage device.
Double N+ Wireless Router
21
Alternate Setup Method
Table of Contents
sections
1
2
3
4
Step 1: Hardware Connections – Follow the Quick
Installation Guide
5
6
7
8
9
10
Logging into the Router
You will see the Router’s home page in your browser window. The home
page is visible to any user who wants to see it. To make any changes
to the Router’s settings, you have to log in. Clicking the “Login” button
or clicking on any one of the links on the home page will take you to the
login screen. The Router ships with no password entered. In the login
screen, leave the password blank and click the “Submit” button to log in.
See the QIG: Hardware Connections from the previous section.
Step 2: Set your Computer’s Network Settings to
Work with a DHCP Server
See the section in this User Manual called “Manually Configuring
Network Settings” for directions.
Step 3: Configuring the Router Using the Web-Based
Advanced User Interface
Using your Internet browser, you can access the Router’s Web-Based
Advanced User Interface. In your browser, type “192.168.2.1” (do not
type in anything else such as “http://” or “www”). Then press the “Enter”
key.
Double N+ Wireless Router
Logging out of the Router
One computer at a time can log into the Router for the purposes of
making changes to the settings of the Router. Once a user has logged in
to make changes, there are two ways that the computer can be logged
out. Clicking the “Logout” button will log the computer out. The second
method is automatic. The login will time out after a specified period of
time. The default login time-out is 10 minutes. This can be changed from
one to 99 minutes. For more information, see the section in this manual
titled “Changing the Login Time-Out Setting”.
22
Alternate Setup Method
sections
Table of Contents
1
2
3
4
5
6
7
8
9
10
Understanding the Web-Based Advanced User Interface
The home page is the first page you will see when you access the Advanced User Interface (UI). The home page shows you
a quick view of the Router’s status and settings. All advanced setup pages can be reached from this page.
(12)
(2)
(5)
(4)
(3)
(6)
(1)
(7)
(11)
(10)
(9)
(8)
Double N+ Wireless Router
23
Alternate Setup Method
Table of Contents
1.
sections
1
2
3
4
Quick-Navigation Links
7
8
9
10
This indicator is visible in all pages of the Router, indicating the
connection status of the Router. When the indicator says “Connected”
in blue, the Router is connected to the Internet. When the Router is not
connected to the Internet, the indicator will read “No Connection” in
RED. The indicator is automatically updated when you make changes to
the settings of the Router.
Home Button
5.
The home button is available in every page of the UI. Pressing this
button will take you back to the home page.
3.
6
4.Login/Logout Button
You can go directly to any of the Router’s advanced UI pages by clicking
directly on these links. The links are divided into logical categories
and grouped by tabs to make finding a particular setting easier to
find. Clicking on the purple header of each tab will show you a short
description of the tab’s function.
2.
5
Internet-Status Indicator
The “Help” button gives you access to the Router’s help pages. Help
is also available on many pages by clicking “more info” next to certain
sections of each page.
Help Button
The “Help” button gives you access to the Router’s help pages. Help
is also available on many pages by clicking “more info” next to certain
sections of each page.
Double N+ Wireless Router
6.Language
Shows the active language for the Advanced User Interface. Select a
desirable language by clicking one of the available languages.
24
Alternate Setup Method
Table of Contents
7.
sections
1
2
3
4
Version Info
7
8
9
10
Shows the settings of the Internet/WAN side of the Router that
connects to the Internet. Changes to any of these settings can be made
by clicking on the links or by clicking on the “Internet/WAN” quicknavigation link on the left side of the screen.
8.LAN Settings
11. Router Status
The “Help” button gives you access to the Router’s help pages. Help
is also available on many pages by clicking “more info” next to certain
sections of each page.
Shows the status of the Router’s firewall and wireless features. Changes
can be made to the settings by clicking on any one of the links or by
clicking the quick-navigation links on the left side of the screen.
WLAN Settings
12. Page Name
Shows the settings of the Wireless Local Area Network (WLAN) side of
the Router, including the SSID and security settings.
Double N+ Wireless Router
6
10. Internet Settings
The “Help” button gives you access to the Router’s help pages. Help
is also available on many pages by clicking “more info” next to certain
sections of each page.
9.
5
The page you are on can be identified by this name. This User Manual
will sometimes refer to pages by name. For instance “LAN > LAN
Settings” refers to the “LAN Settings” page.
25
Alternate Setup Method
Table of Contents
sections
1
2
3
4
5
6
7
8
9
10
Step 4 Configuring your Router for Connection to your
Internet Service Provider (ISP)
Setting your Connection Type
The “Internet/WAN” tab is where you will set up your Router to connect
to your Internet Service Provider (ISP). The Router is capable of
connecting to virtually any ISP’s system provided you have correctly
configured the Router’s settings for your ISP’s connection type. Your ISP
connection settings are provided to you by your ISP. To configure the
Router with the settings that your ISP gave you, click “Connection Type”
(A) on the left side of the screen. Select the connection type you use. If
your ISP gave you DNS settings, clicking “DNS” (B) allows you to enter
DNS address entries for ISPs that require specific settings. Clicking
“MAC Address” (C) will let you clone your computer’s MAC address or
type in a specific WAN MAC address, if required by your ISP. When you
have finished making settings, the “Internet Status” indicator will read
“connection OK” if your Router is set up properly.
From the “Connection Type” page, you can select the type of connection
you use. Select the type of connection you use by clicking the button (1)
next to your connection type and then clicking “Next” (2).
(1)
(A)
(B)
(C)
(2)
Double N+ Wireless Router
26
Alternate Setup Method
sections
Table of Contents
1
2
3
4
5
6
7
8
9
10
Setting your Internet Service Provider (ISP) Connection Type to Dynamic IP
A dynamic connection type is the most common connection type found with cable modems. Setting the connection type to “dynamic” in many cases
is enough to complete the connection to your ISP. Some dynamic connection types may require a host name. You can enter your host name in the
space provided if you were assigned one. Your host name is assigned by your ISP. Some dynamic connections may require that you clone the MAC
address of the PC that was originally connected to the modem.
(1)
(2)
(3)
1.
Host Name (1)
This space is provided to enter a host name that needs to be visible to
your ISP. Enter your host name here and click “Apply Changes” (3). If
your ISP did not assign you a host name, or you are not sure, leave this
blank.
2.
Change WAN MAC Address (2)
If your ISP requires a specific MAC address to connect to the service,
you can enter a specific MAC address or clone the current computer’s
MAC address through this link.
Double N+ Wireless Router
27
Alternate Setup Method
Table of Contents
sections
1
2
3
4
5
6
7
8
9
10
Setting your Internet Service Provider (ISP) Connection Type to Static IP
A static IP address connection type is less common than other connection types. If your ISP uses static IP addressing, you will need your IP address,
subnet mask, and ISP gateway address. This information is available from your ISP or on the paperwork that your ISP left with you. Type in your
information, then click “Apply Changes” (4). After you apply the changes, the Internet Status indicator will read “connection OK” if your Router is set
up properly.
(1)
(2)(3)
1.
IP Address
Provided by your ISP. Enter your IP address here.
2.Subnet Mask
Provided by your ISP. Enter your subnet mask here.
3.
ISP Gateway Address
Provided by your ISP. Enter the ISP gateway address here.
Double N+ Wireless Router
28
Alternate Setup Method
Table of Contents
sections
1
2
3
4
5
6
7
8
9
10
Setting your ISP Connection Type to PPPoE
Most DSL providers use PPPoE as the connection type. If you use a DSL modem to connect to the Internet, your ISP may use PPPoE to log you into
the service. If you have an Internet connection in your home or small office that doesn’t require a modem, you may also use PPPoE.
1.
User Name
This space is provided to type in your user name that was assigned by
your ISP.
2.
(1)
(2)
Password
Type in your password and retype it into the “Retype Password” box to
confirm it.
(3)
3.Service Name
(4)
A service name is rarely required by an ISP. If you are not sure if your
ISP requires a service name, leave this blank.
(5)
4.
MTU
The MTU setting should never be changed unless your ISP gives you
a specific MTU setting. Making changes to the MTU setting can cause
problems with your Internet connection including disconnection from the
Internet, slow Internet access, and problems with Internet applications
working properly.
Your connection type is PPPoE if:
5.
1)
Your ISP gave you a user name and password, which is required to
connect to the Internet.
2)
Your ISP gave you software such as WinPOET or Enternet300 that
you use to connect to the Internet.
3)
You have to double-click on a desktop icon other than your
browser to get on the Internet.
The “Disconnect” feature is used to automatically disconnect the Router
from your ISP when there is no activity for a specified period of time. For
instance, placing a check mark next to this option and entering “5” into
the minute field will cause the Router to disconnect from the Internet
after five minutes of no Internet activity. This option should be used if
you pay for your Internet service by the minute.
Double N+ Wireless Router
29
Disconnect after X...
Alternate Setup Method
Table of Contents
sections
1
2
3
4
5
6
7
8
9
10
Setting your Internet Service Provider (ISP) Connection Type to Point-to-Point Tunneling Protocol (PPTP) [European Countries Only].
Some ISPs require a connection using PPTP protocol, a type of connection most common in European countries. This sets up a direct connection to
the ISP’s system. Type in the information provided by your ISP in the space provided. When you have finished, click “Apply Changes” (9). After you
apply the changes, the Internet Status indicator will read “connection OK” if your Router is set up properly.
(1)
(2)
(3)
(4)
(5)
(6)
(7)
(8)
Double N+ Wireless Router
30
Alternate Setup Method
Table of Contents
1.
sections
1
2
3
4
PPTP Account
5
6.
6
7
8
10
My Subnet Mask
Provided by your ISP. Enter your PPTP account name here.
Provided by your ISP. Enter the IP address here.
2.
7.
PPTP Password
9
Default Gateway
Type in your password and retype it into the “Retype Password” box to
confirm it.
Provided by your ISP. If your ISP did not give you a connection ID
(default gateway), leave this blank.
3.
8.
Host Name
Provided by your ISP. Enter your host name here.
The following becomes visible when you deselect “Get IP by DHCP”.
4.Service IP Address
Provided by your ISP. Enter your service IP address here.
5.
My IP Address
Provided by your ISP. Enter the IP address here.
Double N+ Wireless Router
Disconnect after X…
The “Disconnect” feature is used to automatically disconnect the Router
from your ISP when there is no activity for a specified period of time. For
instance, placing a check mark next to this option and entering “5” into
the minute field will cause the Router to disconnect from the Internet
after five minutes of no Internet activity. This option should be used if
you pay for your Internet service by the minute.
31
Alternate Setup Method
Table of Contents
sections
1
2
3
4
5
Setting your Connection Type if You Are a Telstra® BigPond/OptusNet Cable User
Australia Only] Follow the on-screen steps and click “Apply Changes” to complete your setup.
Double N+ Wireless Router
32
6
7
8
9
10
Alternate Setup Method
Table of Contents
sections
1
2
3
4
5
6
7
8
9
10
Setting Custom Domain Name Server (DNS) Settings
A “Domain Name Server” is a server located on the Internet that translates Universal Resource Locaters (URLs) like “www.belkin.com” to IP
addresses. Many Internet Service Providers (ISPs) do not require you to enter this information into the Router. The “Automatic from ISP” box (1)
should be checked if your ISP did not give you a specific DNS address. If you are using a static IP connection type, then you may need to enter a
specific DNS address and secondary DNS address for your connection to work properly. If your connection type is dynamic or PPPoE, it is likely that
you do not have to enter a DNS address. Leave the “Automatic from ISP” box checked. To enter the DNS address settings, uncheck the “Automatic
from ISP” box and enter your DNS entries in the spaces provided. Click “Apply Changes” (2) to save the settings.
(1)
(2)
Double N+ Wireless Router
33
Alternate Setup Method
Table of Contents
sections
1
2
3
4
5
6
7
8
9
10
Configuring your WAN Media Access Controller (MAC) Address
Entering a Specific MAC Address
All network components including cards, adapters, and routers, have
a unique “serial number” called a MAC address. Your Internet Service
Provider (ISP) may record the MAC address of your computer’s adapter
and only let that particular computer connect to the Internet service.
When you install the Router, its own MAC address will be “seen” by the
ISP and may cause the connection not to work. Belkin has provided
the ability to clone (copy) the MAC address of the computer into the
Router. This MAC address, in turn, will be seen by the ISP’s system as
the original MAC address and will allow the connection to work. If you
are not sure whether your ISP needs to see the original MAC address,
simply clone the MAC address of the computer that was originally
connected to the modem. Cloning the address will not cause any
problems with your network.
In certain circumstances you may need a specific WAN MAC address.
You can manually enter one in the “MAC Address” page. Type in a MAC
address in the spaces provided (2) and click “Apply Changes” (3) to
save the changes. The Router’s WAN MAC address will now be changed
to the MAC address you specified.
(2)
(1)
Cloning your MAC Address
(3)
To clone your MAC address, make sure that you are using the computer
that was ORIGINALLY CONNECTED to your modem before the Router
was installed. Click the “Clone” button (1). Click “Apply Changes” (3).
Your MAC address is now cloned to the Router.
Double N+ Wireless Router
34
Using the Web-Based Advanced User Interface
Table of Contents
sections
1
2
3
4
5
6
7
8
9
10
Viewing the LAN Settings
Changing LAN Settings
Clicking on the header of the LAN tab (1) will take you to the LAN tab’s
header page. A quick description of the functions can be found here. To
view the settings or make changes to any of the LAN settings, click on
“LAN Settings” (2) or to view the list of connected computers, click on
“DHCP client list” (3).
All settings for the internal LAN setup of the Router can be viewed and
changed here.
(1)
(2)
(3)
(1)
(2)
(3)
(4)
(5)
(6)
Double N+ Wireless Router
35
Using the Web-Based Advanced User Interface
Table of Contents
1.
sections
1
2
3
4
IP Address
5
4.
The “IP address” is the internal IP address of the Router. The default IP
address is “192.168.2.1”. To access the advanced setup interface, type
this IP address into the address bar of your browser. This address can
be changed if needed. To change the IP address, type in the new IP
address and click “Apply Changes”. The IP address you choose should
be a non-routable IP. Examples of a non-routable IP are:
6
7
8
9
10
IP Pool
10.x.x.x (where x is anything between 0 and 255)
The range of IP addresses set aside for dynamic assignment to the
computers on your network. The default is 2–100 (99 computers). If you
want to change this number, you can do so by entering a new starting
and ending IP address and clicking on “Apply Changes”. The DHCP
server can assign 100 IP addresses automatically. This means that
you cannot specify an IP address pool larger than 100 computers. For
example, starting at 50 means you have to end at 150 or lower so as not
to exceed the 100-client limit. The starting IP address must be lower in
number than the ending IP address.
2.Subnet Mask
5. Lease Time
There is no need to change the subnet mask. This is a unique, advanced
feature of your Belkin Router. It is possible to change the subnet mask
if necessary; however, do NOT make changes to the subnet mask
unless you have a specific reason to do so. The default setting is
“255.255.255.0”.
The length of time the DHCP server will reserve the IP address for each
computer. We recommend that you leave the lease time set to “Forever”.
The default setting is “Forever”, meaning that any time a computer is
assigned an IP address by the DHCP server, the IP address will not
change for that particular computer. Setting lease times for shorter
intervals such as one day or one hour frees IP addresses after the
specified period of time. This also means that a particular computer’s
IP address may change over time. If you have set any of the other
advanced features of the Router such as DMZ or client IP filters, these
are dependent on the IP address. For this reason, you will not want the
IP address to change.
192.168.x.x (where x is anything between 0 and 255)
3.
DHCP Server
The DHCP server function makes setting up a network very easy by
assigning IP addresses to each computer on the network automatically.
The default setting is “On”. The DHCP server can be turned OFF if
necessary; however, in order to do so you must manually set a static
IP address for each computer on your network. To turn off the DHCP
server, select “Off” and click “Apply Changes”.
Double N+ Wireless Router
6. Local Domain Name
The default setting is “Belkin”. You can set a local domain name
(network name) for your network. There is no need to change this setting
unless you have a specific advanced need to do so. You can name the
network anything you want such as “MY NETWORK”.
36
Using the Web-Based Advanced User Interface
Table of Contents
sections
1
2
3
4
5
6
7
8
9
10
Viewing the DHCP Client List Page
You can view a list of the computers (known as clients), which are connected to your network. You are able to view the IP address (1) of the computer,
the host name (2) (if the computer has been assigned one), and the MAC address (3) of the computer’s network interface card (NIC). Pressing the
“Reserve” button will tie up the assigned IP address to the current MAC address. The “Reserved IP Database” section will show the linked IP and
MAC addresses. Pressing the “Refresh” (4) button will update the list. If there have been any changes, the list will be updated.
(2)
(1)
(3)
(4)
The “Network Address” section defines the local IP address or range. The “Subnet Mask and Gateway” section defines the mask and gateway for the
addresses above.
Double N+ Wireless Router
37
Using the Web-Based Advanced User Interface
Table of Contents
sections
1
2
3
4
5
6
7
8
9
10
Configuring the Wireless Network Settings
The “Wireless” tab lets you make changes to the wireless network
settings. From this tab you can make changes to the wireless network
name or Service Set Identifier (SSID), operating channel, encryption
security settings, and configure the Router to be used as an access
point.
(1)
Changing the Wireless Network Name (SSID)
To identify your wireless network, a name called the SSID is used.
The SSID is your network name. The default network name of the
Router is “Belkin” followed by six digits that are unique to your Router.
Your network name will look something like “Belkin 123456”. You can
change this to anything you choose, or you can leave it unchanged.
Keep in mind, if you decide to change your wireless network name, and
there are other wireless networks operating in your area, your network
name needs to be different from other wireless networks that may be
operating in your area. To change the SSID, type in the SSID that you
want to use in the SSID field (1) and click “Apply Changes” (2). The
change is immediate. If you make a change to the SSID, your wirelessequipped computers may also need to be reconfigured to connect to
your new network name. Refer to the documentation of your wireless
network adapter for information on making this change.
Double N+ Wireless Router
(2)
Note: Please periodically check for new Router firmware updates
from the “Utilities > Firmware update” page. Newer firmware can fix
problems, add wireless features, and/or improve wireless performance
(see page 57)
38
Using the Web-Based Advanced User Interface
Table of Contents
sections
1
2
3
4
5
6
7
8
9
10
Changing the Wireless Channel
2.
There are a number of operating channels from which you can choose.
Your Router is configured to operate on the proper channels for the
country in which you reside. The channel can be changed if needed. If
there are other wireless networks operating in your area, your network
should be set to operate on a channel that is different than the other
wireless networks.
Setting the Router to this mode will allow only 802.11b- and g-compliant
devices to join the network
3.
802.11b&802.11g&802.11n
Setting the Router to this mode will allow 802.11b-, 802.11g-, and
802.11n-compliant devices to join the network.
Extension Channel
The IEEE 802.11n specification allows the use of a secondary channel
to double the bandwidth (see “Using the Bandwidth Switch” below).
An appropriate extension channel will be displayed when operating
in 20/40MHz mode (see “Using the Bandwidth Switch” below). The
extension channel can be changed if needed.
4.
802.11n only
Setting the Router to this mode will allow draft 802.11n-compliant
devices to join the network, keeping out 802.11g and 802.11b devices.
Using the Wireless Mode Switch
This switch allows you to set the Router’s wireless modes. There are
several modes.
Note: Some modes may require firmware updates to be enabled.
For 2.4GHz networks
1.Off
This mode will turn OFF the Router’s access point, so no wireless
devices can join the network. Turning off the wireless function of your
Router is a great way to secure your network when you are away from
home for a long period of time, or don’t want to use the wireless feature
of the Router at a certain time.
Double N+ Wireless Router
802.11b&802.11g
39
Using the Web-Based Advanced User Interface
Table of Contents
sections
1
2
3
4
For 5GHz networks:
1) Off
This mode will turn OFF the Router’s access point, so no wireless
devices can join the network. Turning off the wireless function of your
Router is a great way to secure your network when you are away from
home for a long period of time or don’t want to use the wireless feature
of the Router at a certain time.
2) 802.11a
Setting the Router to this mode will allow only 802.11a-compliant
devices to join the network.
3) 802.11a&802.11n
Setting the Router to this mode will allow 802.11a- and
802.11n-compliant devices to join the network.
4) 802.11n
Setting the Router to this mode will allow only draft 802.11n-compliant
devices to join the network, keeping out 802.11a devices.
Double N+ Wireless Router
40
5
6
7
8
9
10
Using the Web-Based Advanced User Interface
Table of Contents
sections
1
2
3
4
Using the Bandwidth Switch
5
6
7
8
9
10
immediate. Each computer now needs to be set to connect to your
specific SSID. Refer to the documentation of your wireless network
adapter for information on making this change.
This switch allows you to set the Router’s wireless bandwidth modes.
There are several modes available:
Protected Mode Switch
1.
20MHz only
Protected mode ensures proper operation of draft 802.11n-compliant
devices on your wireless network when 802.11g or 802.11b devices are
present or when there is heavy 802.11g or 802.11b traffic in the operating
environment. Use protected mode if your network consists of a mix of
Belkin Double N+ Wireless Cards and 802.11g or 802.11b cards on your
network. If you are in an environment that includes little to no 802.11g
or 802.11b wireless network traffic, you will achieve the best wireless
performance with protected mode OFF. Conversely, in an environment
with HEAVY 802.11g or 802.11b traffic or interference, you will achieve
the best wireless performance with protected mode ON. This will ensure
wireless performance is not affected.
Setting the Router to this mode allows only 20MHz operation. This
mode is compatible with, draft 802.11n-, 802.11a, 802.11g-, and
802.11b-compliant devices, but will limit N, draft 802.11n-compliant
devices’ bandwidth by half. Reducing bandwidth to 20MHz-only
operation might solve some wireless problems.
2)
20MHz/40MHz Auto
Setting the Router to this mode allows it to switch automatically
between 20MHz and 40MHz operation. This mode enables 40MHz
operation, to maximize speed for, draft 802.11n-compliant devices when
conditions permit. When a legacy 802.11g access point is presented
and occupies an adjacent secondary channel, the Router automatically
reverts to 20MHz operation to maximize compatibility. We recommend
using this as the default mode.
802.11e/WMM (Wi-Fi® Multimedia) QoS
WMM, based on 802.11e QoS (Quality of Service), prioritizes important
data on your network, such as multimedia content and voice-over-IP
(VoIP), so it will not be interfered with by other data being sent over the
wireless network. This feature requires other wireless devices, such as
Wi-Fi phones or wireless laptops, to support WMM for best results.
Using the Broadcast SSID Feature
Note: This advanced feature should be employed by advanced users
only. For security, you can choose not to broadcast your network’s
SSID. Doing so will keep your network name hidden from computers
that are scanning for the presence of wireless networks. To turn off
the broadcast of the SSID, remove the check mark from the box next
to “Broadcast SSID”, and then click “Apply Changes”. The change is
Double N+ Wireless Router
41
Using the Web-Based Advanced User Interface
Table of Contents
sections
1
2
3
4
Changing the Wireless Security Settings
6
7
8
9
10
PIN: The client device has a WPS PIN number (eight digits) that will be
provided to you when you initiate the connection to the Router. Enable
WPS through the screen illustrated to the right. Enter the client’s PIN
into the Router’s internal registrar (accessed through this screen). The
client will be securely enrolled into your wireless network within two
minutes.
Your Double N+ Wireless Router is equipped with the latest security
standard called Wi-Fi Protected Access™ 2 (WPA2™) and the legacy
security standard called Wired Equivalent Privacy (WEP). Your Router
also supports the Wi-Fi Protected Setup™ (WPS) specification,
which simplifies the setup of a wireless network. WPS uses familiar
methodologies, such as typing in a Personal Identification Number (PIN)
or pushing a button, to enable users to automatically configure network
names and strong WPA™/WPA2 data encryption and authentication. By
default, wireless security is disabled. To enable security, you will need
to determine which standard you want to use. To access the security
settings, click “Security” on the “Wireless” tab.
Using Wi-Fi Protected Setup
WPS recommends that you set up WPA2 (described on page xx) as your
wireless security. WPS does not provide additional security, but rather
simplifies the addition of wireless devices to your wireless network.
You may use either the Push Button Configuration (PBC) method or PIN
method to allow a device access to your wireless network:
PBC: Push and hold the WPS button located on the front of your Router
for two seconds and the security LED will flash, indicating that WPS
has been initiated. Then, initiate WPS on the client device within two
minutes (refer to your client’s documentation on this procedure). The
wireless device and Router will automatically exchange a security key
and establish a secure connection.
Double N+ Wireless Router
5
42
Using the Web-Based Advanced User Interface
Table of Contents
1.
sections
1
2
3
4
Wi-Fi Protected Setup (WPS)
5
6
7
8
9
10
WPA2 Requirements
Enabled or Disabled.
2.
IMPORTANT: In order to use WPA2 security, all your computers and
wireless client adapters must be upgraded with patches, driver, and
client utility software that supported WPA2. At the time of this User
Manual’s publication, a couple security patches are available, for free
download, from Microsoft®. These patches work only with the Windows
XP operating system. Other operating systems are not supported at this
time.
Personal Identification Number (PIN) Method:
In this method, a wireless client wishing to access your network must
supply an 8-digit PIN to the Router. Start the WPS PIN handshaking
procedure from the client, and you will be provided an 8-digit PIN. Enter
it in the box and click “Enroll”.
3.
For Windows XP computers that do not have Service Pack 2 (SP2),
a file from Microsoft called “Windows XP Support Patch for Wireless
Protected Access (KB 826942)” is available for free download at
http://support.microsoft.com/kb/826942
Router PIN
If an external registrar is available, you may enter in the Router’s PIN
to the registrar. Click “Generate New PIN” to change the PIN from the
default value. Click “Restore Default PIN” to reset the PIN value.
4.
For Windows XP with Service Pack 2, Microsoft has released a
free download to update the wireless client components to support
WPA2 (KB971021). The update is available from: http://support.
microsoft.com/kb/917021
Push Button Configuration (PBC) Method
These steps are not necessary for Windows XP SP3 and above.
PBC is an alternate method to connect to a WPS network. Push the
PBC button located on the front of the Router for two seconds, and
then initiate WPS PBC on the client device. Alternatively, push the “Start
PBC” soft button to start this process.
5.
IMPORTANT: You also need to ensure that all your wireless client cards/
adapters support WPA2, and that you have downloaded and installed
the latest driver. Most of the Belkin wireless cards have driver updates
available for download from the Belkin support site: www.belkin.com/
networking.
Manual Configuration Method
This section lists the current security settings to be set up if not using
WPS.
Double N+ Wireless Router
43
Using the Web-Based Advanced User Interface
Table of Contents
sections
1
2
3
4
5
6
7
8
9
10
Setting WPA/WPA2-Personal (PSK)
1. After you’ve set up your Router, go to the “Security” page under
“Wireless” and select “WPA/WPA2-Personal (PSK)” from the “Security
Mode” drop-down menu.
2. For “Authentication”, select “WPA-PSK”, “WPA2-PSK”, or “WPAPSK + WPA2-PSK”. This setting will have to be identical on the wireless
clients that you set up. “WPA-PSK + WPA2-PSK” mode will allow the
Router to support clients running either WPA or WPA2 security.
3. For “Encryption Technique” will auto-fill depending on the
authentication type above. This setting will have to be identical on the
wireless clients that you set up.
4. Enter your pre-shared key (PSK). This can be from eight to 63
characters and can be letters, numbers, or symbols. This same key must
be used on all of the wireless clients that you set up. For example, your
PSK might be something like: “Smith family network key”. Click “Apply
Changes” to finish. You must now set all wireless clients to match these
settings.
IMPORTANT: Make sure your wireless computers are updated to work
with WPA2 and have the correct settings to get proper connection to the
Router.
Double N+ Wireless Router
44
Using the Web-Based Advanced User Interface
Table of Contents
sections
1
2
3
4
5
6
7
8
9
10
Setting WEP Encryption
Using a Hexadecimal Key
Note to Mac users: The “Passphrase” option will not operate with
Apple® AirPort®. To configure encryption for your Mac computer, set
the encryption using the manual method described in the next section.
A hexadecimal key is a mixture of numbers and letters from A–F and
0–9. 64-bit keys are 10 digits long and can be divided into five two-digit
numbers. 128-bit keys are 26 digits long and can be divided into 13 twodigit numbers.
1. Select “128-bit WEP” or “64-bit WEP” from the drop-down menu.
2. After selecting your WEP encryption mode, you can enter you WEP
key manually by typing in the hex WEP key manually, or you can
type a passphrase in the “PassPhrase” field and click “Generate” to
create a WEP key from the passphrase. Click “Apply Changes” to
finish. You must now set all of your clients to match these settings.
For instance:
AF 0F 4B C3 D4 = 64-bit key
C3 03 0F AF 0F 4B B2 C3 D4 4B C3 D4 E7 = 128-bit key
In the boxes below, make up your key by writing in two characters
between A–F and 0–9. You will use this key to program the encryption
settings on your Router and your wireless computers.
Note to Mac users: Original Apple AirPort products support 64-bit
encryption only. Apple AirPort 2 products can support 64-bit or 128-bit
encryption. Please check your product to see which version you are
using. If you cannot configure your network with 128-bit encryption, try
64-bit encryption.
3. Encryption in the Router is now set. Each of your computers on
your wireless network will now need to be configured with the same
passphrase. Refer to the documentation of your wireless network
adapter for information on making this change.
Double N+ Wireless Router
45
Using the Web-Based Advanced User Interface
Table of Contents
sections
1
2
3
4
Guest Access: This option allows guest users access to the Internet
while keeping them away from your private network. By default, this
option is enabled. Guest users should connect to the Belkin Double N+
Guest network.
5
6
7
8
9
10
Security options for Guest Access:
Hotel Style: Users will be redirected to a hotel-style landing page when
they first try to access the Internet. They must correctly enter in the
passphrase to log in.
WPA/WPA2-PSK: This option is similar to the security mode for the main
router network. Users must correctly enter the PSK in order to join the
guest network.
Double N+ Wireless Router
46
Using the Web-Based Advanced User Interface
Table of Contents
sections
1
2
3
4
Using the Access Point Mode
Note: This advanced feature should be employed by advanced users
only. The Router can be configured to work as a wireless network
access point. Using this mode will defeat the NAT IP sharing feature and
DHCP server. In AP mode, the Router will need to be configured with an
IP address that is in the same subnet as the rest of the network that you
will bridge to. The default IP address is 192.168.2.254 and subnet mask
is 255.255.255.0. These can be customized for your need.
1. Enable the AP mode my selecting “Enable” in the “Use as Access
Point only” page. When you select this option, you will be able to
change the IP settings.
2. Set your IP settings to match your network. Click “Apply Changes”.
3. Connect a cable from the WAN port on the Router to your existing
network.
The Router is now acting as an access point. To access the Router
advanced user interface again, type the IP address you specified into
your browser’s navigation bar. You can set the encryption settings, MAC
address filtering, SSID, and channel normally.
Double N+ Wireless Router
47
5
6
7
8
9
10
Using the Web-Based Advanced User Interface
Table of Contents
sections
1
2
3
4
5
6
7
8
9
10
Setting MAC Address Control
Setting Up an Allow Access List
The MAC address filter is a powerful security feature that allows you to
specify which computers are allowed on the wireless network. Note:
This list applies only to wireless computers. This list can be configured
so any computer attempting to access the wireless network that is not
specified in the filter list will be denied access. When you enable this
feature, you must enter the MAC address of each client (computer) to
which you want to allow network access.
1. Select the “Allow” radio button to begin setting up a list of computers
allowed to connect to the wireless network.
2. Next, in the “MAC Address” field that is blank, type in the MAC
address of the wireless computer to which you want to allow access to
the wireless network, and then click “Add”.
3. Continue to do this until all of the computers you want to add have
been entered.
4. Click “Apply Changes” to finish.
Setting Up a Deny Access List
The “Deny” list lets you specify computers to which you DO NOT want
to allow access to the network. Any computer in the list will not be
allowed access to the wireless network, while all others will.
1. Select the “Deny” radio button to begin setting up a list of computers
to be denied access to the wireless network.
2. Next, in the “MAC Address” field that is blank, type in the MAC
address of the wireless computer to which you want to deny access to
the wireless network, and then click “Add”.
3. Continue to do this until all of the computers to which you want to
deny access have been entered.
4. Click “Apply Changes” to finish.
Double N+ Wireless Router
48
Using the Web-Based Advanced User Interface
Table of Contents
sections
1
2
3
4
Setting Up a Deny Access List
The “Deny” list lets you specify computers to which you DO NOT want
to allow access to the network. Any computer in the list will not be
allowed access to the wireless network, while all others will.
1. Select the “Deny” radio button to begin setting up a list of computers
to be denied access to the wireless network.
2. Next, in the “MAC Address” field that is blank, type in the MAC
address of the wireless computer to which you want to deny access to
the wireless network, and then click “Add”.
3. Continue to do this until all of the computers to which you want to
deny access have been entered.
4. Click “Apply Changes” to finish.
Double N+ Wireless Router
49
5
6
7
8
9
10
Using the Web-Based Advanced User Interface
Table of Contents
sections
1
2
3
4
5
6
7
8
9
10
BitTorrent®
The Belkin Double N+ Wireless Router can download files using the popular peer-to-peer, file-transfer protocol, BitTorrent. The Router will download
files on to the attached USB storage device so you won’t need to leave your computer on.
To start a download, simply double-click on the torrent file you would like to download and Belkin’s torrent helper will start the download
automatically. You can also do this manually by clicking on the “+” button.
Hover your cursor over each part of the user interface and it will provide a brief description of its function.
Double N+ Wireless Router
50
Using the Web-Based Advanced User Interface
Table of Contents
sections
1
2
3
4
5
6
7
8
9
10
QoS
UPnP AV MediaServer
QoS (Quality of Service) will automatically prioritize the traffic to and
from the internet so you get an interruption-free Internet experience.
The Router’s QoS will automatically prioritize the type of traffic that is
more time-critical, such as VoIP, online games, and streaming video.
We recommend that you leave this function enabled and the profile on
“auto”.
Easily share the media contents, such as photographs, movies, or
music, stored in your USB storage device with other digital media
players, such as Microsoft Xbox, Sony PS3, etc., that support the
UPnP protocols. You can disable this function by unchecking the box
provided.
Double N+ Wireless Router
51
Using the Web-Based Advanced User Interface
Table of Contents
sections
1
2
3
4
Configuring the Firewall
Your Router is equipped with a firewall that will protect your network
from a wide array of common hacker attacks including:
•
IP Spoofing
•
Land Attack Ping of Death (PoD)
•
Denial of Service (DoS)
•
IP with zero length
•
Smurf Attack
•
TCP Null Scan
•
SYN flood
•
UDP flooding
•
Tear Drop Attack
•
ICMP defect
•
RIP defect
•
Fragment flooding
The firewall also masks common ports that are frequently used to
attack networks. These ports appear to be “stealth” meaning that for
all intents and purposes, they do not exist to a would-be hacker. You
can turn the firewall function off if needed; however, it is recommended
that you leave the firewall enabled. Disabling the firewall protection will
not leave your network completely vulnerable to hacker attacks, but it is
recommended that you leave the firewall enabled.
Double N+ Wireless Router
52
5
6
7
8
9
10
Using the Web-Based Advanced User Interface
Table of Contents
sections
1
2
3
4
5
6
7
8
9
10
Configuring Internal Forwarding Settings
Choosing an Application
The Virtual Servers function will allow you to route external (Internet)
calls for services such as a web server (port 80), FTP server (Port 21), or
other applications through your Router to your internal network. Since
your internal computers are protected by a firewall, computers outside
your network (over the Internet) cannot get to them because they cannot
be “seen”. A list of common applications has been provided in case you
need to configure the Virtual Server function for a specific application.
If your application is not listed, you will need to contact the application
vendor to find out which port settings you need.
Select your application from the drop-down list. Click “Add”. The
settings will be transferred to the next available space in the screen.
Click “Apply Changes” to save the setting for that application. To remove
an application, select the number of the row that you want to remove
then click “Clear”.
Double N+ Wireless Router
Manually Entering Settings into the Virtual Server
To manually enter settings, enter the IP address in the space provided
for the internal (server) machine, the port(s) required to pass (use a
comma between multiple ports), select the port type (TCP or UDP),
and click “Apply Changes”. You can only pass one port per internal IP
address. Opening ports in your firewall can pose a security risk. You can
enable and disable settings very quickly. It is recommended that you
disable the settings when you are not using a specific application.
53
Using the Web-Based Advanced User Interface
Table of Contents
sections
1
2
3
4
Access Control
The Router can be configured to restrict access to the Internet, email,
or other network services at specific days and times. Restriction can be
set for a single computer, a range of computers, or multiple computers.
Select the “Enable” radio button to use this feature.
To restrict Internet access to a single computer, for example, click the
“Add” button and select the appropriate entry. This entry will deny
access as a default according the specified criteria. Users can also add
a particular MAC address of a device manually and press the “Add”
button. They can also create a blanket rule for all the devices that are
connecting via the Guest Access feature.
Double N+ Wireless Router
54
5
6
7
8
9
10
Using the Web-Based Advanced User Interface
Table of Contents
sections
1
2
3
4
The Access Control rule can be removed by clicking the “Delete” button.
Click on the entry number for the configuration options.
5
6
7
8
9
10
There are four main configurations for Access Control lists. The first one
is “Schedule” for that rule. The second is “Service” for the services to
be blocked for that rule. The third is “URL Blocking” for the URL access
restrictions, and the fourth is “URL Keyword Blocking” for certain
keywords to be blocked in the URL address.
“Everyday” is the default for the days of the week that this rule will be
implemented on the “Schedule” page.
The second configuration for the Access Control list is the “service” that
is to be blocked or allowed. Users can choose to “Block All Services”,
“Allow All Services”, or configure from a list of predefined popular
services.
The third configuration for the Access Control list is the “URL List” for
the URL addresses that are to be blocked or allowed. Users can choose
to “Block All URLs”, “Allow All URLs”, or configure their own list of URLs.
The fourth configuration for the Access Control list is the “URL Keyword
List” for the URL address keywords that are to be blocked or allowed.
The default value is blank for this list and the user can configure a list of
URL address keywords.
Double N+ Wireless Router
55
Using the Web-Based Advanced User Interface
Table of Contents
sections
1
2
3
4
5
6
7
8
9
10
Enabling the Demilitarized Zone (DMZ)
The DMZ feature allows you to specify one computer on your network to be placed outside of the firewall. This may be necessary if the firewall is
causing problems with an application such as a game or video conferencing application. Use this feature on a temporary basis. The computer in the
DMZ is NOT protected from hacker attacks.
To put a computer in the DMZ, enter the last digits of its IP address in the IP field and select “Enable”. Click “Apply Changes” for the change to take
effect. If you are using multiple static WAN IP addresses, it is possible to select which WAN IP address the DMZ host will be directed to. Type in the
WAN IP address you wish the DMZ host to direct to, enter the last two digits of the IP address of the DMZ host computer, select “Enable” and click
“Apply Changes”.
Double N+ Wireless Router
56
Using the Web-Based Advanced User Interface
Table of Contents
sections
1
2
3
4
Using Dynamic DNS
6
7
8
9
10
Whenever your IP address assigned by your ISP changes, the Router will
automatically update DynDNS.org’s servers with your new IP address.
You can also do this manually by clicking the “Update Dynamic DNS”
button (5).
The Dynamic DNS service allows you to alias a dynamic IP address
to a static host name in any of the many domains DynDNS.org offers,
allowing your network computers to be more easily accessed from
various locations on the Internet. DynDNS.org provides this service, for
up to five host names, free to the Internet community.
The Dynamic DNS SM service is ideal for a home website, file server, or
to make it easy to access your home PC and stored files while you’re at
work. Using the service can ensure that your host name always points to
your IP address, no matter how often your ISP changes it. When your IP
address changes, your friends and associates can always locate you by
visiting yourname.dyndns.org instead!
(1)
(2)
(3)
(4)
To register free for your Dynamic DNS host name, please visit http://
www.dyndns.org.
Setting up the Router’s Dynamic DNS Update Client
(5)
You must register with DynDNS.org’s free update service before using
this feature. Once you have your registration, follow the directions below.
1. Select DynDNS as the “DDNS Service” (1).
2. Enter your DynDNS.org user name in the “User Name” field (2).
3. Enter your DynDNS.org password in the “Password” field (3).
4. Enter the DynDNS.org domain name you set up with DynDNS.org in
the “Domain Name” field (4).
5. Click “Update Dynamic DNS” (5) to update your IP address.
Double N+ Wireless Router
5
57
Using the Web-Based Advanced User Interface
Table of Contents
sections
1
2
3
4
5
6
7
8
9
10
Blocking an ICMP Ping
Security Log
Computer hackers use what is known as “pinging” to find potential
victims on the Internet. By pinging a specific IP address and receiving a
response from the IP address, a hacker can determine that something of
interest might be there. The Router can be set up so it will not respond
to an ICMP ping from the outside. This heightens your Router’s security
level.
This page keeps a log of router activity, such as computers logging in to
and out of the Router, as well as attempts from the Internet to connect
to the Router. This log file can be saved and cleared.
Utilities
The “Utilities” screen lets you manage different parameters of the Router
and perform certain administrative functions.
(1)
To turn off the ping response, select “Block ICMP Ping” (1) and click
“Apply Changes”. The Router will not respond to an ICMP ping.
Double N+ Wireless Router
58
Using the Web-Based Advanced User Interface
Table of Contents
sections
1
2
3
4
5
6
7
8
9
Restarting the Router
Restarting the Router to Restore Normal Operation
Sometimes it may be necessary to restart or reboot the Router if it
begins working improperly. Restarting or rebooting the Router will NOT
delete any of your configuration settings.
1. Click the “Restart Router” button.
10
2. The following message will appear. Click “OK”.
3. The following message will appear. Restarting the Router can take
up to 60 seconds. It is important not to turn off the power to the
Router during the restart.
4. A 60-second countdown will appear on the screen. When the
countdown reaches zero, the Router will be restarted. The Router
home page should appear automatically. If not, type in the Router’s
address (default = 192.168.2.1) into the navigation bar of your
browser.
Double N+ Wireless Router
59
Using the Web-Based Advanced User Interface
Table of Contents
sections
1
2
3
4
5
6
7
8
Restoring Factory Default Settings
1. Click the “Restore Defaults” button.
Using this option will restore all of the settings in the Router to the
factory (default) settings. It is recommended that you back up your
settings before you restore all of the defaults.
2. The following message will appear. Click “OK”.
9
10
3. The following message will appear. Restoring the defaults includes
restarting the Router. It can take up to 60 seconds. It is important
not to turn the power to the Router off during the restart.
4. A 60-second countdown will appear on the screen. When the
countdown reaches zero, the Router’s defaults will be restored. The
Router home page should appear automatically. If it does not, type
in the Router’s address (default = 192.168.2.1) into the navigation bar
of your browser.
Double N+ Wireless Router
60
Using the Web-Based Advanced User Interface
Table of Contents
sections
1
2
3
4
5
6
7
8
9
10
Saving a Current Configuration
You can save your current configuration by using this feature. Saving
your configuration will allow you to restore it later if your settings are
lost or changed. It is recommended that you back up your current
configuration before performing a firmware update.
2. A window will open that allows you to select the location where you
want to save the configuration file. Select a location. You can name
the file anything you want, or use the default name “user.conf”. Be
sure to name the file so you can locate it yourself later. When you
have selected the location and name of the file, click “Save”.
1. Click “Save”. A window called “File Download” will open. Click
“Save”.
3. When the save is complete, you will see the window below. Click
“Close”.
The configuration is now saved.
Double N+ Wireless Router
61
Using the Web-Based Advanced User Interface
Table of Contents
sections
1
2
3
4
Restoring a Previous Configuration
6
7
8
9
10
1. Click “Browse”. A window will open that allows you to select the
location of the configuration file. All configuration files end with a
“.conf”. Locate the configuration file you want to restore and doubleclick on it.
This option will allow you to restore a previously saved configuration.
Double N+ Wireless Router
5
62
Using the Web-Based Advanced User Interface
Table of Contents
sections
1
2
3
4
2. You will be asked if you want to continue. Click “OK”.
6
7
8
9
10
4. A 60-second countdown will appear on the screen. When the
countdown reaches zero, the Router’s configuration will be restored.
The Router’s home page should appear automatically. If not, type in
the Router’s address (default = 192.168.2.1) into the navigation bar of
your browser.
3. A reminder window will appear. It will take up to 60 seconds for the
configuration restoration to complete. Click “OK”.
Double N+ Wireless Router
5
63
Using the Web-Based Advanced User Interface
Table of Contents
sections
1
2
3
4
5
6
7
8
9
10
Updating the Firmware
Checking for a New Version of Firmware
From time to time, Belkin may release new versions of the Router’s
firmware. Firmware updates contain feature improvements and fixes to
problems that may have existed. When Belkin releases new firmware,
you can download the firmware from the Belkin update website and
update your Router’s firmware to the latest version.
The “Check Firmware” (1) button allows you to instantly check for a new
version of firmware. When you click the button, a new browser window
will appear informing you that either no new firmware is available or that
there is a new version available. If a new version is available, you will
have the option to download it.
(1)
Double N+ Wireless Router
64
Using the Web-Based Advanced User Interface
Table of Contents
sections
1
2
3
4
5
6
7
8
9
10
Downloading a New Version of Firmware
1.
To download the new version of firmware, click “Download”.
If you click the “Check Firmware” button and a new version of firmware
is available, you will see a screen similar to the one on the right:
2.
A window will open that allows you to select the location where you
want to save the firmware file. Select a location. You can name the
file anything you want, or use the default name. Be sure to locate
the file in a place where you can locate it yourself later. When you
have selected the location, click “Save”.
3.
When the save is complete, you will see the following window. Click
“Close”.
The download of the firmware is complete. To update the firmware,
follow the next steps in “Updating the Router’s Firmware”.
Double N+ Wireless Router
65
Using the Web-Based Advanced User Interface
Table of Contents
sections
1
2
3
4
Updating the Router’s Firmware
1. In the “Firmware Update” page, click “Browse”. A window will open
that allows you to select the location of the firmware update file.
Double N+ Wireless Router
66
5
6
7
8
9
10
2.
Browse to the firmware file you downloaded. Select the file by
double-clicking on the file name.
3.
The “Update Firmware” box will now display the location and name
of the firmware file you just selected. Click “Update”.
Using the Web-Based Advanced User Interface
Table of Contents
sections
1
2
3
4.
You will be asked if you are sure you want to continue. Click “OK”.
5.
You will see one more message. This message tells you that the
Router may not respond for as long as one minute as the firmware
is loaded into the Router and the Router is rebooted. Click “OK”.
Double N+ Wireless Router
4
5
6.
67
6
7
8
9
10
A 60-second countdown will appear on the screen. When the
countdown reaches zero, the Router firmware update will be
complete. The Router home page should appear automatically. If
not, type in the Router’s address (default = 192.168.2.1) into the
navigation bar of your browser.
Using the Web-Based Advanced User Interface
Table of Contents
sections
1
2
3
4
5
6
7
8
9
10
Changing System Settings
Setting the Time and Time Zone
The “System Settings” page is where you can enter a new administrator
password, set the time zone, or enable remote management.
The Router keeps time by connecting to a Simple Network Time
Protocol (SNTP) server. This allows the Router to synchronize the system
clock to the global Internet. The synchronized clock in the Router is
used to record the security log and control client filtering. Select the
time zone that you reside in. You have the option to select a primary and
a backup NTP server to keep your Router’s clock synchronized. Select
your desired NPT server from the drop-down box, or simply keep it as is.
Setting or Changing the Administrator Password
The Router ships with NO password entered. If you wish to add a
password for greater security, you can set a password here. Write down
your password and keep it in a safe place, as you will need it if you need
to log into the Router in the future. It is also recommended that you set a
password if you plan to use the remote management feature of your Router.
If you reside in an area that observes daylight saving, then place a check
mark in the box next to “Enable Daylight Saving”. The system clock
may not update immediately. Allow at least 15 minutes for the Router to
contact the time servers on the Internet and get a response. You cannot
set the clock yourself.
Changing the Login Time-Out Setting
The login time-out option allows you to set the period of time that you can be
logged into the Router’s advanced setup interface. The timer starts when there
has been no activity. For example, imagine you have made some changes in
the advanced setup interface, then left your computer alone without clicking
“Logout”. Assuming the time-out is set to 10 minutes, 10 minutes after you
leave, the login session will expire. You will have to log into the Router again
to make any more changes. The login time-out option is for security purposes
and the default is set to 10 minutes. Note: Only one computer can be logged
into the Router’s advanced setup interface at one time.
Double N+ Wireless Router
68
Using the Web-Based Advanced User Interface
Table of Contents
sections
1
2
3
4
5
6
7
8
9
10
Enabling Remote Management
Enabling/Disabling UPnP
Before you enable this advanced feature of your Belkin Router, MAKE
SURE YOU HAVE SET THE ADMINISTRATOR PASSWORD. Remote
management allows you to make changes to your Router’s settings from
anywhere on the Internet. There are two methods of remotely managing
the Router. The first is to allow access to the Router from anywhere
on the Internet by selecting “Any IP address can remotely manage the
Router”. By typing in your WAN IP address from any computer on the
Internet, you will be presented with a login screen where you need to
type in the password of your Router.
UPnP (Universal Plug-and-Play) is yet another advanced feature offered
by your Belkin Router. It is a technology that offers seamless operation
of voice messaging, video messaging, games, and other applications
that are UPnP-compliant. Some applications require the Router’s firewall
to be configured in a specific way to operate properly. This usually
requires opening TCP and UDP ports, and in some instances, setting
trigger ports. An application that is UPnP-compliant has the ability to
communicate with the Router, basically “telling” the Router which way
it needs the firewall configured. The Router ships with the UPnP feature
enabled.
The second method is to allow a specific IP address only to remotely
manage the Router. This is more secure, but less convenient. To use
this method, enter the IP address you know you will be accessing the
Router from in the space provided and select “Only this IP address
can remotely manage the Router”. Before you enable this function, it is
STRONGLY RECOMMENDED that you set your administrator password.
Leaving the password empty will potentially open your Router to
intrusion.
Advanced Feature: The “Remote Access Port” option allows you to
configure the desired “Remote Access Port for Remote Management”
feature. The default access port is set to port 80.
Double N+ Wireless Router
69
Using the Web-Based Advanced User Interface
Table of Contents
sections
1
2
3
4
Enabling/Disabling Auto Firmware Update
6
7
8
9
10
ECO Mode: This option allows you to turn off the wireless radio
automatically at set periods of time in order to save power. Click the
check box to turn off the radio at the times shown in the drop-down
boxes.
This innovation provides the Router with the built-in capability to
automatically check for a new version of firmware and alert you that
the new firmware is available. When you log into the Router’s advanced
interface, the Router will perform a check to see if new firmware is
available. If so, you will be notified. You can choose to download the
new version or ignore it.
Double N+ Wireless Router
5
70
Manually Configuring Network Settings
Table of Contents
sections
1
2
3
4
Manually Configuring Network Settings
5
6
7
8
9
10
3.
Next to “Configure” (2), if “Manually” is selected, your Router
will need to be set up for a static IP connection type. Write the
address information in the table below. You will need to enter this
information into the Router).
4.
If not already set, at “Configure:”, choose “Using DHCP Server”.
This will tell the computer to obtain an IP address from the Router.
5.
Close the window. If you made any changes, the following window
will appear. Click “Save”.
Set up the computer that is connected to the cable or DSL modem FIRST
using these steps. You can also use these steps to add computers to
your Router after the Router has been set up to connect to the Internet.
Manually Configuring Network Settings in Mac OS up to 9.x
1.
Pull down the Apple menu. Select “Control Panels” and select
“TCP/IP”.
2.
You will see the TCP/IP control panel. Select “Ethernet Built-In” or
“Ethernet” in the “Connect via:” drop-down menu (1).
(1)
(2)
Restart the computer. When the computer restarts, your network
settings are now configured for use with the Router.
Double N+ Wireless Router
71
Manually Configuring Network Settings
Table of Contents
sections
1
2
3
4
Manually Configuring Network Settings in Mac OS X
1.
5
3.
6
7
8
9
10
Select “Built-in Ethernet” (2) next to “Show” in the Network menu.
Click on the “System Preferences” icon.
(2)
(3)
(4)
(5)
2.
Select “Network” (1) from the “System Preferences” menu.
(1)
Double N+ Wireless Router
4.
72
Select the “TCP/IP” tab (3). Next to “Configure” (4), you should see
“Manually” or “Using DHCP”. If you do not, check the PPPoE tab (5)
to make sure that “Connect using PPPoE” is NOT selected. If it is,
you will need to configure your Router for a PPPoE connection type
using your user name and password.
Manually Configuring Network Settings
Table of Contents
sections
1
2
3
5.
If “Manually” is selected, your Router will need to be set up for a
static IP connection type. Write the address information in the table
below. You will need to enter this information into the Router.
6.
If not already selected, select “Using DHCP” next to “Configure” (4),
then click “Apply Now”.
4
Your network settings are now configured for use with the Router.
Double N+ Wireless Router
73
5
6
7
8
9
10
Manually Configuring Network Settings
Table of Contents
sections
1
2
3
4
5
6
7
8
9
10
Manually Configuring Network Settings in Windows 2000, NT, or XP
1.
Click “Start”, “Settings”, then “Control Panel”.
2.
Double-click on the “Network and dial-up connections” icon
(Windows 2000) or the “Network” icon (Windows XP).
3.
Right-click on the “Local Area Connection” associated with your
network adapter and select “Properties” from the drop-down
menu.
4.
In the “Local Area Connection Properties” window, click “Internet
Protocol (TCP/IP)” and click the “Properties” button. The following
screen will appear:
(1)
(2)
5.
If “Use the following IP address” (2) is selected, your Router will
need to be set up for a static IP connection type. Write the address
information the table below. You will need to enter this information
into the Router.
6.
If not already selected, select “Obtain an IP address automatically”
(1) and “Obtain DNS server address automatically” (3). Click “OK”.
Your network settings are now configured for use with the Router.
(3)
Double N+ Wireless Router
74
Manually Configuring Network Settings
Table of Contents
sections
1
2
3
4
Manually Configuring Network Settings in Windows 98 or Me
1.
Right-click on “My Network Neighborhood” and select “Properties”
from the drop-down menu.
2.
Select “TCP/IP -> settings” for your installed network adapter. You
will see the following window
(2)
(1)
(3)
5
6
7
8
9
10
3.
If “Specify and IP address” is selected, your Router will need
to be set up for a static IP connection type. Write the address
information in the table below. You will need to enter this
information into the Router.
4.
Write the IP address and subnet mask from the “IP Address” tab
(3).
5.
Click the “Gateway” tab (2). Write the gateway address down in the
chart.
6.
Click the “DNS Configuration” tab (1). Write the DNS address(es) in
the chart
7.
If not already selected, select “Obtain IP address automatically” on
the IP address tab. Click “OK”.
Restart the computer. When the computer restarts, your network
settings are now configured for use with the Router.
Double N+ Wireless Router
75
Recommended Web Browser Settings
Table of Contents
sections
1
2
3
4
5
6
7
8
9
10
Recommended Web Browser Settings
In most cases, you will not need to make any changes to your web browser’s settings. If you are having trouble accessing the Internet or the WebBased Advanced User Interface, then change your browser’s settings to the recommended settings in this section.
2.
Microsoft® Internet Explorer 4.0 or Higher
1.
Start your web browser. Select “Tools” then “Internet Options”.
Double N+ Wireless Router
76
In the “Internet Options” screen, there are three selections: “Never
dial a connection”, “Dial whenever a network connection is not
present”, and “Always dial my default connection”. If you can make
a selection, select “Never dial a connection”. If you cannot make a
selection, go to the next step.
Recommended Web Browser Settings
Table of Contents
sections
1
2
3
3.
Under the “Internet Options” screen, click on “Connections” and
select “LAN Settings…”.
4.
Make sure there are no check marks next to any of the displayed
options: “Automatically detect settings”, “Use automatic
configuration script”, and “Use a proxy server”. Click “OK”. Then
click “OK” again in the “Internet Options” page.
Double N+ Wireless Router
4
5
6
7
8
9
10
Netscape® Navigator® 4.0 or Higher
77
1.
Start Netscape. Click on “Edit” then “Preferences”.
2.
In the “Preferences” window, click on “Advanced” then select
“Proxies”. In the “Proxies” window, select “Direct connection to the
Internet”.
Troubleshooting
Table of Contents
sections
1
2
3
4
Troubleshooting
5
2.
Next, double-click on the CD-ROM drive that the Setup Assistant
CD has been placed in to start the installation.
3.
The Setup Assistant should start within a few seconds. If, instead,
a window appears showing the files on the CD, double-click on the
icon labeled “SetupAssistant”.
4.
If the Setup Assistant still does not start, reference the section
titled “Manually Configuring Network Settings” (page 67) of this
User Manual for an alternative setup method).
8
9
10
If the Setup Assistant is not able to find the Router during the
installation process, there may be third-party firewall software
installed on the computer attempting to access the Internet.
Examples of third-party firewall software are ZoneAlarm, BlackICE
PC Protection, McAfee Personal Firewall, and Norton Personal
Firewall. If you do have firewall software installed on your
computer, please make sure that you properly configure it. You can
determine if the firewall software is preventing Internet access by
temporarily turning it off. If, while the firewall is disabled, Internet
access works properly, you will need to change the firewall settings
to function properly when it is turned on. Please refer to the
instructions provided by the publisher of your firewall software for
instructions on configuring the firewall to allow Internet access.
2.
Unplug power to the Router for 10 seconds, and then plug the
power back into the Router. Ensure that the Router’s “router” LED
is on; it should be solid BLUE. If not, check to make sure that the
AC adapter is connected to the Router and plugged into a wall
outlet.
3.
Ensure that you have a cable connected between the network
(Ethernet) port on the back of the computer and one of the “to
Wired Computers” ports on the back of the Router.
If the CD-ROM does not start the Setup Assistant automatically, it could
be that the computer is running other applications that are interfering
with the CD drive.
If the Setup Assistant Welcome screen does not appear within
15-20 seconds, open up your CD-ROM drive by double-clicking on
the “My Computer” icon that is located on your desktop.
7
1.
Setup Assistant CD does not automatically start.
1.
6
Note: The computer should NOT be connected to the port labeled “to
Modem” on the back of the Router.
Setup Assistant cannot find my Router.
If the Setup Assistant is not able to find the Router during the installation
process, please check the following items:
4.
Try shutting down and restarting your computer, then rerunning the
Setup Assistant.
If the Setup Assistant is still unable to find the Router, reference the
section titled “Manually Configuring Network Settings” for installation
steps.
Double N+ Wireless Router
78
Troubleshooting
Table of Contents
sections
1
2
3
4
Setup Assistant cannot connect my Router to the Internet.
5
Use the troubleshooting suggestions within the Setup Assistant.
2.
If your ISP requires a user name and password, make sure that
you have typed in your user name and password correctly. Some
user names require that the ISP’s domain may be at the end of the
name. Example: “[email protected]”. The “@myisp.com” part of
the user name may need to be typed as well as your user name.
If you continue to have no Internet connection, reference the section
titled “Manually Configuring Network Settings” (page xx of this User
Manual for an alternative setup method).
•
The Setup Assistant completed installation, but my web
browser doesn’t work.
•
I am unable to connect to the Internet. The “modem” LED on
my Router is off, and the “internet” LED is blinking.
If you cannot connect to the Internet, and the “modem” LED is off, and
the “internet” LED is blinking, the problem may be that your modem and
Router are not connected properly.
1.
Make sure the network cable between the modem and the Router
is connected. The cable should be connected at one end to the
Router’s “to Modem” port, and at the other end to the network port
on your modem.
Double N+ Wireless Router
79
7
8
9
10
2.
Unplug the cable or DSL modem from its power source for three
minutes. After three minutes, plug the modem back into its power
source. This may force the modem to properly recognize the Router.
3.
Unplug the power to your Router, wait 10 seconds, and then
reconnect the power. This will cause the Router to reattempt
communication with the modem. If the “modem” LED on the
Router is not lit after completing these steps, please contact Belkin
Technical Support.
4.
Try shutting down and restarting your computer.
•
The Setup Assistant completed installation, but my web
browser doesn’t work.
•
I am unable to connect to the Internet. The “modem” LED on
my Router is on, and the “internet” LED is blinking.
1.
If you cannot connect to the Internet, the “modem” LED is on,
and the “internet” LED is blinking, the problem may be that your
connection type may not match the ISP’s connection.
2.
If you have a “static IP address” connection, your ISP must assign
you the IP address, subnet mask, and gateway address. Please
refer to the section entitled “Alternate Setup Method” for details on
changing this setting.
3.
If you have a “PPPoE” connection, your ISP will assign you a user
name and password and sometimes a service name. Make sure the
Router’s connection type is configured to PPPoE and the settings
are entered properly. Please refer to the section entitled “Alternate
Setup Method” for details on changing this setting.
If the Setup Assistant is not able to connect the Router to the Internet,
please check the following items:
1.
6
Troubleshooting
Table of Contents
4.
sections
1
2
3
4
5
6
7
8
9
10
I can’t connect to the Internet wirelessly.
You may need to configure your Router to meet the specific
requirements of your ISP. To search our knowledge base for ISPspecific issues, go to: http://web.belkin.com/support and type in
“ISP”.
If you are unable to connect to the Internet from a wireless computer,
please check the following items:
If you are still unable to access the Internet after verifying these settings,
please contact Belkin Technical Support.
1.
•
The Setup Assistant completed, but my web browser doesn’t
work.
• The “router” LED should be on.
•
I am unable to connect to the Internet. The “modem” LED on
my Router is blinking, and the “internet” LED is solid.
• The “internet” LED should be on, and not blinking.
1.
If the “modem” LED is blinking, and the “internet” LED is solid,
but you are unable to access the Internet, there may be thirdparty firewall software installed on the computer attempting to
access the Internet. Examples of third-party firewall software are
ZoneAlarm, BlackICE PC Protection, McAfee Personal Firewall, and
Norton Personal Firewall.
2.
Open your wireless utility software by clicking on the icon in the
system tray at the bottom, right-hand corner of the screen.
3.
The exact window that opens will vary depending on the model of
wireless card you have; however, any of the utilities should have
a list of “Available Networks”—those wireless networks it can
connect to.
2.
3.
• The “modem” light should be on, and not blinking.
• The “Wireless” light should be on, not blinking
If you do have firewall software installed on your computer, please
make sure that you properly configure it. You can determine if
the firewall software is preventing Internet access by temporarily
turning it off. If, while the firewall is disabled, Internet access works
properly, you will need to change the firewall settings to function
properly when it is turned on.
Does the name of your wireless network appear in the results?
Yes, my network name is listed—go to the troubleshooting solution
titled “I can’t connect to the Internet wirelessly, but my network name is
listed”.
No, my network name is not listed—go to the troubleshooting solution
titled “I can’t connect to the Internet wirelessly, and my network name is
not listed”.
Please refer to the instructions provided by the publisher of your
firewall software for instructions on configuring the firewall to allow
Internet access.
If you are still unable to access the Internet after disabling any firewall
software, please contact Belkin Technical Support.
Double N+ Wireless Router
Look at the lights on your Router. If you’re using a Belkin Router,
the lights should be as follows:
80
Troubleshooting
Table of Contents
sections
1
2
3
4
I can’t connect to the Internet wirelessly, but my network name is listed.
5
6
7
8
9
10
If you are still unable to access the Internet after completing these steps,
please contact Belkin Technical Support.
If the name of your network is listed in the “Available Networks” list,
please follow the steps below to connect wirelessly:
1.
Click on the correct network name in the “Available Networks” list.
•
My wireless network performance is inconsistent.
2.
If the network has security (encryption) enabled, you will need to
enter the network key. For more information regarding security, see
the section entitled “Changing the Wireless Security Settings”.
•
Data transfer is sometimes slow.
•
Signal strength is poor.
3.
Within a few seconds, the tray icon in the lower, left-hand corner
of your screen should turn green, indication of a successful
connection to the network.
•
Difficulty establishing and/or maintaining a Virtual Private
Network (VPN) connection.
Wireless technology is radio-based, which means connectivity and
the throughput performance between devices decreases when the
distance between devices increases. Other factors that will cause signal
degradation (metal is generally the worst culprit) are obstructions such
as walls and metal appliances. Note also that connection speed may
decrease as you move farther away from the Router.
I can’t connect to the Internet wirelessly, and my network name is
not listed.
If the correct network name is not listed under “Available Networks” in
the wireless utility, please attempt the following troubleshooting steps:
1.
2.
In order to determine if wireless issues are related to range, we suggest
temporarily moving the computer, if possible, five to 10 feet from the
Router.
Temporarily move computer, if possible, five to 10 feet from the
Router. Close the wireless utility, and reopen it. If the correct
network name now appears under “Available Networks”, you may
have a range or interference problem. Please see the suggestions
discussed in the section titled “Placement of your N+ Wireless
Router” of this User Manual.
Changing the wireless channel—Depending on local wireless traffic
and interference, switching the wireless channel of your network can
improve performance and reliability. The default channel the Router
is shipped with is channel 11; you may choose from several other
channels depending on your region. See the section on page 39 entitled
“Changing the Wireless Channel” for instructions on how to choose
other channels.
Using a computer that is connected to the Router via a network
cable (as opposed to wirelessly), ensure that “Broadcast SSID” is
enabled. This setting is found on the Router’s wireless “Channel
and SSID” configuration page.
Double N+ Wireless Router
81
Troubleshooting
Table of Contents
sections
1
2
3
4
Limiting the wireless transmit rate—Limiting the wireless transmit rate
can help improve the maximum wireless range and connection stability.
Most wireless cards have the ability to limit the transmission rate. To
change this property, go to the Windows Control Panel, open “Network
Connections” and double-click on your wireless card’s connection. In
the properties dialog, select the “Configure” button on the “General” tab
(Windows 98 users will have to select the wireless card in the list box
and then click “Properties”), then choose the “Advanced” tab and select
the rate property.
Wireless client cards are usually set to automatically adjust the wireless
transmit rate for you, but doing so can cause periodic disconnects when
the wireless signal is too weak; as a rule, slower transmission rates are
more stable. Experiment with different connection rates until you find the
best one for your environment. Note that all available transmission rates
should be acceptable for browsing the Internet. For more assistance,
see your wireless card’s user manual.
Log into your Router. Open your web browser and type in the IP
address of the Router. (The Router’s default is 192.168.2.1.) Log into
your Router by clicking on the “Login” button in the top right-hand
corner of the screen. You will be asked to enter your password. If
you never set a password, leave the “Password” field blank and
click “Submit”. Click the “Wireless” tab on the left of your screen.
Select the “Encryption” or “Security” tab to get to the security
settings page.
2.
Select “128-bit WEP” from the drop-down menu.
Double N+ Wireless Router
6
7
8
9
10
3.
After selecting your WEP encryption mode, you can type in your
hex WEP key manually, or you can type in a passphrase in the
“Passphrase” field and click “Generate” to create a WEP key from
the passphrase. Click “Apply Changes” to finish. You must now set
all of your clients to match these settings. A hex (hexadecimal) key
is a mixture of numbers and letters from A-F and 0-9. For 128-bit
WEP, you need to enter 26 hex keys. For example: C3 03 0F AF 4B
B2 C3 D4 4B C3 D4 E7 E4 = 128-bit key
4.
Click “Apply Changes” to finish. Encryption in the Router is now
set. Each of your computers on your wireless network will now
need to be configured with the same security settings.
WARNING: If you are configuring the Router from a computer with a
wireless client, you will need to ensure that security is turned on for this
wireless client. If this is not done, you will lose your wireless connection.
Note to Mac Users: Original Apple AirPort products support 64-bit
encryption only. Apple AirPort 2 products can support 64-bit or 128bit encryption. Please check your Apple AirPort product to see which
version you are using. If you cannot configure your network with 128-bit
encryption, try 64-bit encryption.
I am having difficulty setting up Wired Equivalent Privacy (WEP)
security on my Belkin Router.
1.
5
82
Troubleshooting
Table of Contents
sections
1
2
3
4
I am having difficulty setting up Wired Equivalent Privacy (WEP)
security on a Belkin client card.
Double-click the Signal Indicator icon to bring up the “Wireless
Network” screen.
2.
The “Advanced” button will allow you to view and configure more
options of your card.
3.
Once the “Advanced” button is clicked, the Belkin Wireless LAN
Utility will appear. This Utility will allow you to manage all the
advanced features of the Belkin Wireless Card.
4.
Under the “Wireless Network Properties” tab, select a network
name from the “Available Networks” list and click the “Properties”
button.
5.
Under “Data Encryption”, select “WEP”.
6.
Ensure that the check box “The key is provided for me
automatically” at the bottom is unchecked. If you are using this
computer to connect to a corporate network, please consult your
network administrator if this box needs to be checked.
7.
6
7
8
9
For example:
C3 03 0F AF 4B B2 C3 D4 4B C3 D4 E7 E4 = 128-bit key
8. Click “OK”, and then “Apply” to save the settings.
If you are not using a Belkin wireless client card, please consult the
manufacturer’s user manual for that wireless client card.
Do Belkin products support WPA/WPA2?
Note: To use WPA security, all your clients must be upgraded to drivers
and software that support it. At the time of this FAQ publication, a
security patch download is available, for free, from Microsoft. This patch
works only with the Windows XP operating system.
Download the patch here: http://support.microsoft.com/?kbid=826942
You also need to download the latest driver for your Belkin 802.11g
Wireless Desktop or Notebook Network Card from the Belkin support
site. Other operating systems are not supported at this time. Microsoft’s
patch only supports devices with WPA-enabled drivers such as Belkin
802.11g products.
Type your WEP key in the “Network key” box.
Download the latest driver at http://www.belkin.com/support
Double N+ Wireless Router
10
Important: A WEP key is a mixture of numbers and letters from A-F and
0-9. For 128-bit WEP, you need to enter 26 keys. This network key needs
to match the key you assign to your Router.
The client card must use the same key as the Router. For instance, if
your Router uses the key 00112233445566778899AABBCC, then the
client card must be set to the exact same key.
1.
5
83
Troubleshooting
Table of Contents
sections
1
2
3
4
I am having difficulty setting up Wireless Protected Access (WPA)
security on my Belkin Router for a home network.
1.
From the “Security Mode” drop-down menu, select “WPA-PSK (no
server)”.
2.
For “Encryption Technique”, select “TKIP” or “AES”. This setting
will have to be identical on the clients that you set up.
3.
4.
I am having difficulty setting up Wireless Protected Access (WPA)
security on a Belkin wireless client card for a home network.
Clients must use the same key that the Router uses. For instance, if the
key is “Smith Family Network Key” in the Router, the clients must also
use that same key.
2.
Once the “Advanced” button is clicked, the Belkin Wireless Utility
will appear. This Utility will allow you to manage all the advanced
features of the Belkin Wireless Card.
Double N+ Wireless Router
7
8
9
10
3.
Under the “Wireless Network Properties” tab, select a network
name from the “Available Networks” list and click the “Properties”
button.
4.
Under “Network Authentication”, select “WPA-PSK (no server).
5.
Type your WPA key in the “Network key” box.
6.
Click “Apply Changes” to finish. You must now set all clients to
match these settings.
Double-click the Signal Indicator icon to bring up the “Wireless
Network” screen. The “Advanced” button will allow you to view and
configure more options of your card.
6
Important: WPA-PSK is a mixture of numbers and letters from A-Z and
0-9. For WPA-PSK you can enter eight to 63 characters. This network
key needs to match the key you assign to your Router.
Enter your pre-shared key. This can be from eight to 63 characters
and can be letters, numbers, symbols, or spaces. This same key
must be used on all of the clients that you set up. For example,
your PSK might be something like: “Smith family network key”.
1.
5
84
Click “OK, then “Apply” to save the settings.
Troubleshooting
Table of Contents
sections
1
2
3
4
I am NOT using a Belkin client card for a home network and I am
having difficulty setting up Wireless Protected Access (WPA)
security.
5
4.
If you are not using a Belkin Wireless Desktop or Wireless Notebook
Network Card that is not equipped with WPA-enabled software, a
file from Microsoft called “Windows XP Support Patch for Wireless
Protected Access” is available for free download. Download the patch
from Microsoft by searching the knowledge base for Windows XP WPA.
6
7
8
9
10
For a home or small business user, select “WPA-PSK” under
“Network Administration”.
Note: Select WPA (with radius server) if you are using this computer to
connect to a corporate network that supports an authentication server
such as a radius server. Please consult your network administrator for
further information.
Note: The file that Microsoft has made available works only with
Windows XP. Other operating systems are not supported at this time.
You also need to ensure that the wireless card’s manufacturer supports
WPA and that you have downloaded and installed the latest driver from
their support site.
5.
Select “TKIP” or “AES” under “Date Encryption”. This setting will
have to be identical to the Router that you set up.
6.
Type in your encryption key in the “Network key” box.
Supported Operating Systems:
• Windows XP Home Edition
Important: Enter your pre-shared key. This can be from eight to 63
characters and can be letters, numbers, or symbols. This same key
must be used on all of the clients that you set up.
1.
Under Windows XP, click “Start > Control Panel > Network
Connections”.
7.
2.
Right-clicking on the “Wireless Networks” tab will display the
following screen. Ensure the “Use Windows to configure my
wireless network settings” check box is checked. [need image]
3.
Under the “Wireless Networks” tab, click the “Configure” button
and you will see the following screen. [need image]
• Windows XP Professional
Double N+ Wireless Router
85
Click “OK” to apply settings.
Troubleshooting
sections
Table of Contents
1
2
3
4
5
6
7
8
9
10
What’s the difference between 802.11g and draft 802.11n?
Currently there are three commonly used wireless networking standards, which transmit data at very different maximum speeds. Each is based on
the designation for certifying network standards. The most common wireless networking standard, 802.11g, can transmit information up to 54Mbps;
802.11a also supports up to 54Mbps, but in the 5GHz frequency; and 802.11n draft specification can connect at up to 300Mbps. See the following
chart for more detailed information.
Belkin Wireless Comparison Chart
Wireless Technology
G
Enhanced
N MIMO
N1 MIMO
(802.11g)
(1x1 draft 802.11n)
(draft 802.11n with MIMO)
(draft 802.11n with MIMO)
Speed/Data Rate*
Up to 54Mbps*
Up to 150Mbps*
Up to 300Mbps*
Up to 300Mbps*
Frequency
Common household devices such
as cordless phones and microwave
ovens may interfere with the
unlicensed band 2.4GHz
Common household devices such
as cordless phones and microwave
ovens may interfere with the
unlicensed band 2.4GHz
Common household devices
such as cordless phones and
microwave ovens may interfere
with the unlicensed band 2.4GHz
Common household devices such
as cordless phones and microwave
ovens may interfere with the
unlicensed band 2.4GHz
Compatibility
Compatible with 802.11b/g
Compatible with 802.11b/g, draft
802.11n, and Belkin G+ MIMO
Compatible with draft 802.11n**
and 802.11b/g
Compatible with draft 802.11n** and
802.11b/g
Coverage*
Up to 400 ft.*
Up to 600 ft.*
Up to 1,200 ft.*
Up to 1,400 ft.*
Advantage
Common—widespread use for
Internet sharing
Better coverage and consistent
speed and range
Enhanced speed and coverage
Leading edge— best coverage and
throughput
*Distance and connection speeds will vary depending on your networking environment.
**This Router is compatible with products based on the same version of the draft 802.11n specifications and may require a software upgrade for best results.
Double N+ Wireless Router
86
Information
Table of Contents
sections
1
2
3
4
Information
FCC Statement
DECLARATION OF CONFORMITY WITH FCC RULES FOR
ELECTROMAGNETIC COMPATIBILITY
We, Belkin International, Inc., of 501 West Walnut Street, Compton, CA
90220, declare under our sole responsibility that the device,
F6D6230-4 V1
complies with Part 15 of the FCC Rules. Operation is subject to
the following two conditions: (1) this device may not cause harmful
interference, and (2) this device must accept any interference received,
including interference that may cause undesired operation.
Double N+ Wireless Router
87
5
6
7
8
9
10
Information
Table of Contents
sections
1
2
3
4
EU DECLARATION OF CONFORMITY
5
6
7
8
9
10
[Slovak]
ustanovenia Smernice 1999/5/ES.
ýesky
[Czech]
[Belkin Ltd] tímto prohlašuje, že tento [F6D6230-4 V1] je ve shodČ se základními požadavky a
dalšími pĜíslušnými ustanoveními smČrnice 1999/5/ES.
Suomi
[Finnish]
[Belkin Ltd] vakuuttaa täten että [F6D6230-4 V1] tyyppinen laite on direktiivin 1999/5/EY
oleellisten vaatimusten ja sitä koskevien direktiivin muiden ehtojen mukainen.
Dansk
[Danish]
Undertegnede [Belkin Ltd] erklærer herved, at følgende udstyr [F6D6230-4 V1] overholder de
væsentlige krav og øvrige relevante krav i direktiv 1999/5/EF.
Svenska
[Swedish]
Härmed intygar Belkin Ltd] att denna [F6D6230-4 V1] står I överensstämmelse med de
väsentliga egenskapskrav och övriga relevanta bestämmelser som framgår av direktiv
1999/5/EG.
Hiermit erklärt [Belkin Ltd], dass sich das Gerät [F6D6230-4 V1] in Übereinstimmung mit den
grundlegenden Anforderungen und den übrigen einschlägigen Bestimmungen der Richtlinie
1999/5/EG befindet.
Íslenska
[Icelandic]
Hér með lýsir [Belkin Ltd] yfir því að [F6D6230-4 V1] er í samræmi við grunnkröfur og aðrar
kröfur, sem gerðar eru í tilskipun 1999/5/EC.
Käesolevaga kinnitab [Belkin Ltd] seadme [F6D6230-4 V1] vastavust direktiivi 1999/5/EÜ
põhinõuetele ja nimetatud direktiivist tulenevatele teistele asjakohastele sätetele.
Norsk
[Norwegian]
[Belkin Ltd] erklærer herved at utstyret [F6D6230-4 V1] er i samsvar med de grunnleggende
krav og øvrige relevante krav i direktiv 1999/5/EF.
Deutsch
[German]
Eesti
[Estonian]
English
Hereby, [Belkin Ltd], declares that this product [F6D6230-4 V1] is in compliance with the
essential requirements and other relevant provisions of Directive 1999/5/EC.
Español
[Spanish]
Por medio de la presente [Belkin Ltd] declara que el [F6D6230-4 V1] cumple con los requisitos
esenciales y cualesquiera otras disposiciones aplicables o exigibles de la Directiva 1999/5/CE.
ǼȜȜȘȞȚțȒ
[Greek]
ȂǼ ȉǾȃ ȆǹȇȅȊȈǹ [Belkin Ltd] ǻǾȁȍȃǼǿ ȅȉǿ [F6D6230-4 V1] ȈȊȂȂȅȇĭȍȃǼȉǹǿ ȆȇȅȈ ȉǿȈ
ȅȊȈǿȍǻǼǿȈ ǹȆǹǿȉǾȈǼǿȈ Ȁǹǿ ȉǿȈ ȁȅǿȆǼȈ ȈȋǼȉǿȀǼȈ ǻǿǹȉǹȄǼǿȈ ȉǾȈ ȅǻǾīǿǹȈ 1999/5/ǼȀ.
Français
[French]
Par la présente [Belkin Ltd] déclare que l'appareil [F6D6230-4 V1] est conforme aux exigences
essentielles et aux autres dispositions pertinentes de la directive 1999/5/CE.
Italiano
[Italian]
Con la presente [Belkin Ltd] dichiara che questo [F6D6230-4 V1] è conforme ai requisiti
essenziali ed alle altre disposizioni pertinenti stabilite dalla direttiva 1999/5/CE.
Latviski
[Latvian]
Ar šo [Belkin Ltd Belkin Ltd ] deklarƝ, ka [F6D6230-4 V1] / iekƗrtas tips] atbilst DirektƯvas
1999/5/EK bnjtiskajƗm prasƯbƗm un citiem ar to saistƯtajiem noteikumiem.
Lietuviǐ
[Lithuanian]
Šiuo [Belkin Ltd] deklaruoja, kad šis [F6D6230-4 V1] atitinka esminius reikalavimus ir kitas
1999/5/EB Direktyvos nuostatas.
Nederlands
[Dutch]
For information on product disposal please refer to
http://environmental.belkin.com
Hierbij verklaart [Belkin Ltd] dat het toestel [F6D6230-4 V1] in overeenstemming is met de
essentiële eisen en de andere relevante bepalingen van richtlijn 1999/5/EG.
Malti
[Maltese]
Hawnhekk, [Belkin Ltd], jiddikjara li dan [F6D6230-4 V1] jikkonforma mal-ƫtiƥijiet essenzjali u
ma provvedimenti oƫrajn relevanti li hemm fid-Dirrettiva 1999/5/EC.
Magyar
[Hungarian]
Alulírott, [Belkin Ltd] nyilatkozom, hogy a [F6D6230-4 V1] megfelel a vonatkozó alapvetõ
követelményeknek és az 1999/5/EC irányelv egyéb elõírásainak.
Polski
[Polish]
Niniejszym [Belkin Ltd] oĞwiadcza, Īe [F6D6230-4 V1] jest zgodny z zasadniczymi wymogami
oraz pozostaáymi stosownymi postanowieniami Dyrektywy 1999/5/EC.
Português
[Portuguese]
[Belkin Ltd] declara que este [F6D6230-4 V1] está conforme com os requisitos essenciais e
outras disposições da Directiva 1999/5/CE.
Slovensko
[Slovenian]
[I Belkin Ltd] izjavlja, da je ta [F6D6230-4 V1] v skladu z bistvenimi zahtevami in ostalimi
relevantnimi doloþili direktive 1999/5/ES.
Slovensky
http://www.belkin.com/doc/
FOR USE IN
[Belkin Ltd] týmto vyhlasuje, že [F6D6230-4 V1] spĎĖa základné požiadavky a všetky príslušné
Double N+ Wireless Router
AT
BE
CY
CZ
DK
EE
FI
FR
DE
GR
HU
IE
IT
LV
LT
LU
MT
NL
PL
PT
SK
SI
ES
SE
GB
IS
LI
NO
CH
BG
RO
TR
Restricted Use in Certain Countries
88
OPERATES ON CHANNELS 1-13
Class 2 Equipment
Information
Table of Contents
sections
1
2
3
4
5
6
7
8
9
10
Caution: Exposure to Radio Frequency Radiation.
which the receiver is connected.
The device shall be used in such a manner that the potential for human
contact normal operation is minimized.
• Consult the dealer or an experienced radio/TV technician for help.
This equipment complies with FCC radiation exposure limits set forth for
an uncontrolled environment. This equipment should be installed and
operated with a minimum distance of 20cm between the radiator and
your body.
For IEEE 802.11b/g/n products in the USA market, only channels 1
through 11 can be operated. Selection of other channels is not possible.
This device and its antenna(s) must not be co-located or operating
in conjunction with any other antenna or transmitter.
Federal Communications Commission Notice
This equipment has been tested and found to comply with the limits for
a Class B digital device, pursuant to Part 15 of the FCC Rules. These
limits are designed to provide reasonable protection against harmful
interference in a residential installation.
Modifications
The FCC requires the user to be notified that any changes or
modifications to this device that are not expressly approved by
Belkin International, Inc., may void the user’s authority to operate the
equipment.
This equipment generates, uses, and can radiate radio frequency
energy, and if not installed and used in accordance with the instructions,
may cause harmful interference to radio communications. However,
there is no guarantee that interference will not occur in a particular
installation. If this equipment does cause harmful interference to radio or
television reception, which can be determined by turning the equipment
off and on, the user is encouraged to try and correct the interference by
one or more of the following measures:
Canada-Industry Canada (IC)
The wireless radio of this device complies with RSS 139 & RSS 210
Industry Canada. This Class B digital apparatus complies with Canadian
ICES-003.
• Reorient or relocate the receiving antenna.
• Increase the distance between the equipment and the receiver.
• Connect the equipment to an outlet on a circuit different from that to
Double N+ Wireless Router
89
Information
Table of Contents
sections
1
2
3
4
Operation is subject to the following two conditions: (1) this device may
not cause interference, and (2) this device must accept any interference,
including interference that may cause undesired operation of the device.
Cet appareil numérique de la classe B conforme á la norme NMB-003 du
Canada.
Double N+ Wireless Router
90
5
6
7
8
9
10
Information
Table of Contents
sections
1
2
3
4
5
6
7
8
9
10
Belkin International, Inc., Limited Lifetime Product Warranty
What this warranty covers.
What is not covered by this warranty?
Belkin International, Inc. (“Belkin”) warrants to the original purchaser of
this Belkin product that the product shall be free of defects in design,
assembly, material, or workmanship.
All above warranties are null and void if the Belkin product is not
provided to Belkin for inspection upon Belkin’s request at the sole
expense of the purchaser, or if Belkin determines that the Belkin product
has been improperly installed, altered in any way, or tampered with.
The Belkin Product Warranty does not protect against acts of God such
as flood, earthquake, lightning, war, vandalism, theft, normal-use wear
and tear, erosion, depletion, obsolescence, abuse, damage due to low
voltage disturbances (i.e. brownouts or sags), non-authorized program,
or system equipment modification or alteration.
What the period of coverage is.
Belkin warrants the Belkin product for the lifetime of the product.
What will we do to correct problems?
Product Warranty.
Belkin will repair or replace, at its option, any defective product free of
charge (except for shipping charges for the product). Belkin reserves the
right to discontinue any of its products without notice, and disclaims any
limited warranty to repair or replace any such discontinued products.
In the event that Belkin is unable to repair or replace the product (for
example, because it has been discontinued), Belkin will offer either a
refund or a credit toward the purchase of another product from Belkin.
com in an amount equal to the purchase price of the product as
evidenced on the original purchase receipt as discounted by its natural
use.
Double N+ Wireless Router
91
Information
Table of Contents
sections
1
2
3
4
Belkin reserves the right to review the damaged Belkin product. All
costs of shipping the Belkin product to Belkin for inspection shall be
borne solely by the purchaser. If Belkin determines, in its sole discretion,
that it is impractical to ship the damaged equipment to Belkin, Belkin
may designate, in its sole discretion, an equipment repair facility to
inspect and estimate the cost to repair such equipment. The cost, if any,
of shipping the equipment to and from such repair facility and of such
estimate shall be borne solely by the purchaser. Damaged equipment
must remain available for inspection until the claim is finalized.
Whenever claims are settled, Belkin reserves the right to be subrogated
under any existing insurance policies the purchaser may have.
6
7
8
9
10
This warranty gives you specific legal rights, and you may also have
other rights, which may vary from state to state. Some states do not
allow the exclusion or limitation of incidental, consequential, or other
damages, so the above limitations may not apply to you.
How state law relates to the warranty.
THIS WARRANTY CONTAINS THE SOLE WARRANTY OF BELKIN.
THERE ARE NO OTHER WARRANTIES, EXPRESSED OR, EXCEPT AS
REQUIRED BY LAW, IMPLIED, INCLUDING THE IMPLIED WARRANTY
OR CONDITION OF QUALITY, MERCHANTABILITY OR FITNESS FOR A
PARTICULAR PURPOSE, AND SUCH IMPLIED WARRANTIES, IF ANY,
ARE LIMITED IN DURATION TO THE TERM OF THIS WARRANTY.
Some states do not allow limitations on how long an implied warranty
lasts, so the above limitations may not apply to you.
IN NO EVENT SHALL BELKIN BE LIABLE FOR INCIDENTAL, SPECIAL,
DIRECT, INDIRECT, CONSEQUENTIAL OR MULTIPLE DAMAGES SUCH
AS, BUT NOT LIMITED TO, LOST BUSINESS OR PROFITS ARISING
OUT OF THE SALE OR USE OF ANY BELKIN PRODUCT, EVEN IF
ADVISED OF THE POSSIBILITY OF SUCH DAMAGES.
Double N+ Wireless Router
5
92
Information
Table of Contents
sections
1
2
3
Technical Support
You can find technical-support information on our website, www.
belkin.com, by navigating to the tech-support section.
If you want to contact technical support by phone, please call the
number you need from the list below*:
*Local rates apply.
Double N+ Wireless Router
4
5
6
7
8
9
10
Country
Number
Internet adress
AUSTRIA
0820 200766
www.belkin.com/de/networking/
BELGIUM
07 07 00 073
www.belkin.com/nl/networking/
www.belkin.com/fr/networking/
CZECH REPUBLIC
239 000 406
www.belkin.com/uk/networking/
DENMARK
701 22 403
www.belkin.com/uk/networking/
FINLAND
0972519123
www.belkin.com/uk/networking/
FRANCE
08 - 25 54 00 26
www.belkin.com/fr/networking/
GERMANY
0180 - 500 57 09
www.belkin.com/de/networking/
GREECE
00800 - 44 14 23 90
www.belkin.com/uk/networking/
HUNGARY
06 - 17 77 49 06
www.belkin.com/uk/networking/
ICELAND
800 8534
www.belkin.com/uk/networking/
IRELAND
0818 55 50 06
www.belkin.com/uk/networking/
ITALY
02 - 69 43 02 51
www.belkin.com/it/networking/
LUXEMBOURG
34 20 80 85 60
NETHERLANDS
0900 - 040 07 90
NORWAY
81 50 0287
www.belkin.com/uk/networking/
POLAND
00800 - 441 17 37
www.belkin.com/uk/networking/
PORTUGAL
707 200 676
www.belkin.com/uk/networking/
RUSSIA
495 580 9541
www.belkin.com/networking/
SOUTH AFRICA
0800 - 99 15 21
www.belkin.com/uk/networking/
SPAIN
902 - 02 43 66
www.belkin.com/es/networking/
SWEDEN
07 - 71 40 04 53
www.belkin.com/uk/networking/
SWITZERLAND
08 - 48 00 02 19
www.belkin.com/de/networking/
www.belkin.com/fr/networking/
UNITED KINGDOM
0845 - 607 77 87
www.belkin.com/uk/networking/
OTHER COUNTRIES
+44 - 1933 35 20 00
93
www.belkin.com/uk/networking/
€0.10 per minute
www.belkin.com/nl/networking/
Belkin Ltd.
Express Business Park
Shipton Way, Rushden
NN10 6GL, United Kingdom
Belkin SAS
130 rue de Silly
92100 Boulogne-Billancourt,
France
Belkin GmbH
Hanebergstrasse 2
80637 Munich
Germany
Belkin Iberia
C/ Anabel Segura, 10 planta baja, Of. 2
28108, Alcobendas, Madrid
Spain
Belkin Italy & Greece
Via Carducci, 7
Milano 20123
Italy
Belkin B.V.
Boeing Avenue 333
1119 PH Schiphol-Rijk,
Netherlands
© 2009 Belkin International, Inc. All rights reserved. All trade names are
registered trademarks of respective manufacturers listed. Mac, Mac OS, Apple, and AirPort are
trademarks of Apple Inc., registered in the U.S. and other countries. Windows, NT, Microsoft, and
Windows Vista are either registered trademarks or trademarks of Microsoft Corporation in the United
States and/or other countries. BitTorrent® and Torrent® are registered trademarks of BitTorrent, Inc.
8820-00267ea
F6D6230xx4