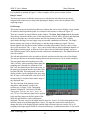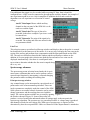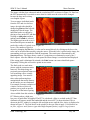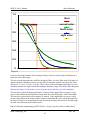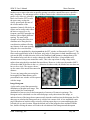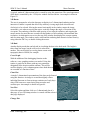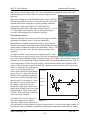
1
SPM 32
Version 2002
SPM 100 Control Software
User's Guide
Document Version 1.6
© 1999-2002 RHK Technology, Inc.
Last revision 6/13/2002
Table of Contents
Introduction . . . . . . . . . . . . . . . . . . . . . . . . . . . . . . . . . . . . . . . . . . . . . . . . . . . . . . . . . . . . . . . . . . 5
Software Installation . . . . . . . . . . . . . . . . . . . . . . . . . . . . . . . . . . . . . . . . . . . . . . . . . . . . . . . . . . . 7
Hardware requirements . . . . . . . . . . . . . . . . . . . . . . . . . . . . . . . . . . . . . . . . . . . . . . . . . . . 8
Installation . . . . . . . . . . . . . . . . . . . . . . . . . . . . . . . . . . . . . . . . . . . . . . . . . . . . . . . . . . . . . 9
Networking Setup . . . . . . . . . . . . . . . . . . . . . . . . . . . . . . . . . . . . . . . . . . . . . . . . . . . . . . 10
Standalone configuration . . . . . . . . . . . . . . . . . . . . . . . . . . . . . . . . . . . . . . . . . . . 10
Menu Functions . . . . . . . . . . . . . . . . . . . . . . . . . . . . . . . . . . . . . . . . . . . . . . . . . . . . . . . . . . . . . . 13
Acquire . . . . . . . . . . . . . . . . . . . . . . . . . . . . . . . . . . . . . . . . . . . . . . . . . . . . . . . . . . . . . . . 14
Image Control window . . . . . . . . . . . . . . . . . . . . . . . . . . . . . . . . . . . . . . . . . . . . 14
Spectroscopy submenu . . . . . . . . . . . . . . . . . . . . . . . . . . . . . . . . . . . . . . . . . . . . . 29
Atomic Manipulation and Lithography . . . . . . . . . . . . . . . . . . . . . . . . . . . . . . . . 49
Analyze . . . . . . . . . . . . . . . . . . . . . . . . . . . . . . . . . . . . . . . . . . . . . . . . . . . . . . . . . . . . . . 53
Approach . . . . . . . . . . . . . . . . . . . . . . . . . . . . . . . . . . . . . . . . . . . . . . . . . . . . . . . . . . . . . 65
Kinetic approach systems . . . . . . . . . . . . . . . . . . . . . . . . . . . . . . . . . . . . . . . . . . 72
Stepper motor approach . . . . . . . . . . . . . . . . . . . . . . . . . . . . . . . . . . . . . . . . . . . . 74
Phi UHV approach motor . . . . . . . . . . . . . . . . . . . . . . . . . . . . . . . . . . . . . . . . . . 75
RHK IWC 100 InchwormTM Controller . . . . . . . . . . . . . . . . . . . . . . . . . . . . . . . . 75
Data . . . . . . . . . . . . . . . . . . . . . . . . . . . . . . . . . . . . . . . . . . . . . . . . . . . . . . . . . . . . . . . . . 78
Files . . . . . . . . . . . . . . . . . . . . . . . . . . . . . . . . . . . . . . . . . . . . . . . . . . . . . . . . . . . . . . . . . 79
Output . . . . . . . . . . . . . . . . . . . . . . . . . . . . . . . . . . . . . . . . . . . . . . . . . . . . . . . . . . . . . . . 82
Plot . . . . . . . . . . . . . . . . . . . . . . . . . . . . . . . . . . . . . . . . . . . . . . . . . . . . . . . . . . . . . . . . . . 86
Process . . . . . . . . . . . . . . . . . . . . . . . . . . . . . . . . . . . . . . . . . . . . . . . . . . . . . . . . . . . . . . . 96
Background . . . . . . . . . . . . . . . . . . . . . . . . . . . . . . . . . . . . . . . . . . . . . . . . . . . . . 98
Define Back . . . . . . . . . . . . . . . . . . . . . . . . . . . . . . . . . . . . . . . . . . . . . . . . . . . . . 99
Settings . . . . . . . . . . . . . . . . . . . . . . . . . . . . . . . . . . . . . . . . . . . . . . . . . . . . . . . . . . . . . . 101
System . . . . . . . . . . . . . . . . . . . . . . . . . . . . . . . . . . . . . . . . . . . . . . . . . . . . . . . . . . . . . . 110
Getting Started . . . . . . . . . . . . . . . . . . . . . . . . . . . . . . . . . . . . . . . . . . . . . . . . . . . . . . . . . . . . . . 122
Importing initial software settings . . . . . . . . . . . . . . . . . . . . . . . . . . . . . . . . . . . . . . . . . 123
Software Settings in the SPM 32 Program . . . . . . . . . . . . . . . . . . . . . . . . . . . . . . . . . . 123
Main Screen . . . . . . . . . . . . . . . . . . . . . . . . . . . . . . . . . . . . . . . . . . . . . . . . . . . . . . . . . . 124
Initial approach . . . . . . . . . . . . . . . . . . . . . . . . . . . . . . . . . . . . . . . . . . . . . . . . . . . . . . . 125
Scanning . . . . . . . . . . . . . . . . . . . . . . . . . . . . . . . . . . . . . . . . . . . . . . . . . . . . . . . . . . . . . 125
Acquisition window . . . . . . . . . . . . . . . . . . . . . . . . . . . . . . . . . . . . . . . . . . . . . . 125
Scan Area window . . . . . . . . . . . . . . . . . . . . . . . . . . . . . . . . . . . . . . . . . . . . . . . 127
Calibration . . . . . . . . . . . . . . . . . . . . . . . . . . . . . . . . . . . . . . . . . . . . . . . . . . . . . . . . . . . 128
Vertical calibration . . . . . . . . . . . . . . . . . . . . . . . . . . . . . . . . . . . . . . . . . . . . . . 129
Experimental procedures . . . . . . . . . . . . . . . . . . . . . . . . . . . . . . . . . . . . . . . . . . . . . . . . . . . . . . 132
Current-Voltage spectroscopy . . . . . . . . . . . . . . . . . . . . . . . . . . . . . . . . . . . . . . . . . . . . 133
Variable Gap I-V spectroscopy . . . . . . . . . . . . . . . . . . . . . . . . . . . . . . . . . . . . . . . . . . . 135
Current-Distance Spectroscopy . . . . . . . . . . . . . . . . . . . . . . . . . . . . . . . . . . . . . . . . . . . 137
Barrier Height Map . . . . . . . . . . . . . . . . . . . . . . . . . . . . . . . . . . . . . . . . . . . . . . . . . . . . 138
Converting Lock-in Output to Barrier Height . . . . . . . . . . . . . . . . . . . . . . . . . . 138
Input/Output Image Spectroscopy . . . . . . . . . . . . . . . . . . . . . . . . . . . . . . . . . . . . . . . . . 141
Setpoint Determination When Using a Commercial AFM . . . . . . . . . . . . . . . . . . . . . . 142
Force-distance curves . . . . . . . . . . . . . . . . . . . . . . . . . . . . . . . . . . . . . . . . . . . . . . . . . . 143
Integrating IEEE devices with SPM 32 . . . . . . . . . . . . . . . . . . . . . . . . . . . . . . . . . . . . . 146
Using CITS Handshake mode for data acquisition . . . . . . . . . . . . . . . . . . . . . . . . . . . . 148
Atomic manipulation . . . . . . . . . . . . . . . . . . . . . . . . . . . . . . . . . . . . . . . . . . . . . . . . . . . 149
Automatic drift compensation . . . . . . . . . . . . . . . . . . . . . . . . . . . . . . . . . . . . . . . . . . . . 150
Appendices . . . . . . . . . . . . . . . . . . . . . . . . . . . . . . . . . . . . . . . . . . . . . . . . . . . . . . . . . . . . . . . . . 154
SPM32 Data File Format . . . . . . . . . . . . . . . . . . . . . . . . . . . . . . . . . . . . . . . . . . . . . . . 155
DSP Scan Board Commands . . . . . . . . . . . . . . . . . . . . . . . . . . . . . . . . . . . . . . . . . . . . . 162
SPM 32 User’s Manual
Introduction
1
Introduction
RHK Technology, Inc.
Troy, MI
5
SPM 32 User’s Manual
Introduction
This manual will describe the operation and use of the SPM 32 software that is used in the SPM
1000 system. A more detailed description is provided than in the SPM 1000 manual which only
contains information pertaining to getting a system up and running. This manual is a companion
to the SPM 1000 manual which should have accompanied the SPM 100 electronics when
purchased from RHK Technology. Please refer to Chapter 4 of that manual for the instructions
needed to install and configure the software. The software can also be used to control the new
VSCAN 100 DSP based auxiliary control electronics. In many places throughout the manual, a
reference is made to the SPM 100. In almost all cases, the same statement also applied is using a
VSCAN. For older electronics without a DSP scan board, the system can be controlled using the
new software, however all of the features related to utilizing the DSP capabilities cannot be used.
There are three main sections to this manual. First is a detailed description of all menu items in
the software. Much of this information is also available while using the program through the use
of the context sensitive help. This is accessed by using the ‘?’ key. On standard US keyboards,
this key is coupled with the ‘/’, however it is not necessary to press the shift key to specifically
type a question mark symbol. On non-US keyboards, it may be necessary to explicitly use the
shift key so the program activates the help system through the reading of the question mark
symbol.
The next section of the manual provides an overview of general probe microscopy concepts
specifically related to the design of the RHK system. This will aid new users in learning how to
get started with the initial testing of the SPM 100 and control software as well as what to expect
when the first few experimental tests are performed. This can also help familiarize users of other
SPM products with the technology and terms that RHK uses to describe various functions. The
section will repeat many of the items covered in the previous section but with less detail and
only highlight the most relevant points related to normal interaction with the program.
The final section is meant to be an overview of selected experimental techniques that are used to
acquire SPM data besides the standard topographic imaging mode. There are discussions of what
can be learned when gathering different kinds of data and detailed instructions describing how to
acquire the data using RHK equipment Hopefully, these examples will broaden the portfolio of
techniques that are used in a research program and allow a more thorough interpretation of the
experimental data from the SPM to be gained.
RHK Technology, Inc.
Troy, MI
6
SPM 32 User’s Manual
Introduction
2
Software Installation
RHK Technology, Inc.
Troy, MI
7
SPM 32 User’s Manual
Software Installaion
With the introduction of the new DSP-based scan board that is used in the SPM 100 revision 8 or
the VSCAN 100, the communication between the electronics and the host computer running
SPM 32 now primarily takes place over an Ethernet cable. This requires the use of the Winsock2
networking layer built-into Windows 98. For older computers running Windows 95, an update to
Winsock2 can be downloaded from
http://www.microsoft.com/Windows95/downloads/contents/WUAdminTools/S_WUNetworking
Tools/W95Sockets2/Default.asp
Type this all on one line in a browser window. If this is not installed and the software attempts to
connect to a DSP scan board, an error message will be presented explaining WS2_32.DLL is
missing. If this error message is not seen, then the required networking is installed.Some of the
following information is redundant with the SPM 100 User’s Guide. Refer to the liner of the CD
case for additional installation instructions.
Hardware requirements
COMPUTER:
Any Pentium-based computer, or a reasonably fast 486DX -based personal
computer, can be used. If scans faster than one frame per second are
desired, a minimum 200 MHz Pentium computer should be used. The
main consideration in selecting a computer is to assure that the additional
boards that will be required for use with the system can fit into the
motherboard. The data acquisition board is a full length, full height ISAbus board. Some poorly designed motherboards put the CPU with its fan
in the middle of the card cage which prevents a full length board from
being inserted. Depending on options used, additional half-length 16 bit
ISA cards that may be required are a pulse counting board for NSOM-type
applications, the GPIB controller board, and the Digital Input/Output
(DIO) that is used with the AFM 100 and several of the auxiliary approach
systems. A DIO board is not required for scan heads that utilize the
inertial slip/stick type of approach method, such as the RHK UHV 300
STM. A network card is also required but this can be either a PCI or ISA
card.
VIDEO:
Almost any graphics board made since 1996 should be able to be used.
The SPM 32 program utilizes a graphics board’s VESA 2.0 drivers. As
long as the board supplier correctly implemented the VESA 2.0 standard,
the graphics board should run without problems. The SPM32 can support
monitor resolutions from 640x480 up to 1600x1200. 2 MB of graphics
memory is required for 1600x1200 display resolution.
RAM:
8 MB minimum. 256 MB or more will provide a significant increase in
system performance especially when working with large dat sets such as
spectroscopy curves or multiple channels.
HARD DRIVE:
About 4MB of disk space is required to load all of the program and demo
image files. Depending on data array size, images can take up many MB
of disk space. Purchase as large of hard drive as possible so as to not fill
up the drive too fast. An archival storage system, such as tape or optical
drive is highly recommended.
RHK Technology, Inc.
Troy, MI
8
SPM 32 User’s Manual
Software Installaion
MONITOR:
VGA-640x480, SVGA 800x600, 1024x768, 1280x1024 and 1600x1200
resolutions are supported. It is recommended to purchase the best monitor
possible. For high resolutions, make sure the monitor can support 70 Hz
or greater refresh rate to eliminate flicker. As the software may have
many windows open at once, a large (17" or greater) monitor will greatly
improve the system's ease of use.
SOFTWARE:
The latest version of the SPM 32 software will require running in a DOS
box under Windows 95/98. This is required because of the TCP/IP stack
used to communicate with the new scan board over a network connection
uses the networking interface provided by Windows.
MOUSE:
Microsoft compatible Bus or Serial
NETWORK:
An ethernet card is needed with the networking software setup properly
installed under Windows for communication with the control electronics.
Installation
a)
Create a working directory for the SPM 32 program, for example C:\SPM32.
b)
Copy all the files from the appropriate CDROM directory to your working
directory. The following files should be copied
SPM32.EXE -
main program
SPM32.HLP -
online help file
SPM32.EPS
-
file used in creating encapsulated postscript output plots
RHK2DSP.EXE -
program to download DSP scan code to SPM 100
RHK2k*.COF -
Scan code to download to DSP controller
c)
Create a directory for the image data, for example C:\SPMDATA. Note, if you
use a different directory name, you will need to change the default path in the File
Parameters list under FILES/FILE SETUP menu.
d)
Copy all of the "Demonstration Images" (DEMO##.SM2) files to this directory.
f)
This program uses disk space for virtual memory if there is insufficient RAM. If
you work with a large amount of images and data, you may need 5 to 10
megabytes of free RAM or disk space. The program uses the same hard drive that
the program files are on by default. If a user wants to utilize a different hard drive
due to storage space limitations, a different disk can be indicated with an
environment variable. Adding the following line to your AUTOEXEC.BAT file,
tells the program to use disk 'D:' for virtual memory: SET SPM_MEM=-swd D:
Windows hints and problems
There are three files included with the software on the CDROM
distribution to help setup SPM 32 to operate in a Windows operating
RHK Technology, Inc.
Troy, MI
9
SPM 32 User’s Manual
Software Installaion
system environment. These are named win95notes.txt, win95conflicts.txt
and win95spm.txt. Please refer to them for help in eliminating address
conflict errors that can occur with the ISA cards that are part of the SPM
1000 system. There are also memory allocation hints that can help the
program’s operation.
Networking Setup
There are three possible configurations for connecting the host computer and the SPM 100 Rev.
8 (or VSCAN 100) to facilitate communication over the network. (1) A standalone situation
where the computer and SPM 100 are directly connected via the supplied crossover cable. (2) A
networked setup where the computer and the SPM 100 are both connected to a LAN either
through a single hub or two separate Ethernet wall jacks that are tied to the same LAN. (3) The
computer contains two network cards. The first is for communication between the computer and
the LAN. The second is a separate intranet consisting only of the network card and the SPM 100.
Each of these situations has advantages and disadvantages. The final choice is left up to the
customer and should be made in consultation with the local
networking personnel. A brief outline of the steps for each setup is
presented below along with some short comments about the merits
of the configuration. For maximum reliability during
communication it is recommended to isolate the SPM 100 from
any LAN. This is achieved by using either the crossover cable in a
standalone configuration or using a computer with two Ethernet
cards. One is connected to the LAN and the other uses a crossover
cable connected to the SPM 100.
Standalone configuration
The simplest setup is to use the crossover cable to directly connect
the network card in the computer to the transceiver on the SPM
100. In this case, the IP addresses can be chosen to be any
Figure 1
arbitrary settings with one condition outlined below. The
disadvantage is that the computer cannot exchange data files with other machines via a fast
network link.
IP address settings
After installing the network card and loading the appropriate drivers for the card. Bind the
TCP/IP settings to this adapter. Open the Network control panel and select the TCP/IP protocol
that is associated with the network card. Select Properties and the window shown in Figure 1
will appear. If an IP address is already entered into the window, then write this number down. If
no address is entered, almost any number is fine in a standalone installation. A good
recommendation is something like 192.168.0.10.
Now start the SPM 32 program and open the Configure System window. Select the SPM 100 tab
and choose SPM version 8 DSP scan control. Then click the DSP tab and enter a number for the
SPM 100 IP address. The address here must have the same first 3 sets of numbers and then a
different final number. If the computer address is the one given above (192.168.254.21), then a
RHK Technology, Inc.
Troy, MI
10
SPM 32 User’s Manual
Software Installaion
suggestion for the SPM 100 address is 192.168.254.11. Now the computer and the SPM 100
should communicate fine when this address is assigned to the scan board by SPM 32 either
starting the program or using the Reboot DSP command.
Local LAN installation
If contact with other computers is desired, then the installation is slightly different. With only
one network port in the lab, an Ethernet hub or Ethernet switch is needed. Connect a cable from
the wall to the hub and then connect the computer to one of the ports and the SPM 100 to another
port. Both of these connections should use standard Ethernet cables (one of which is supplied
with the electronics). Now selection of IP address cannot be arbitrary as described above. The
user must contact the local network administrators and request two IP addresses (if the host
computer has not been installed on the LAN yet). Only one additional IP address is needed if the
computer has already been installed on the LAN. The user cannot randomly select an IP address
for the SPM 100 because there is a possibility that a computer will already exist on the network
with this address and a great deal of confusion and network problems will arise. When the
second IP address has been assigned, enter its value in the SPM 100 IP Address entry as
described above.
When using a hub on a LAN with large amounts of traffic, the communication between the
computer and the DSP board can be lost. In these situations, a switch will be needed because it
acts as an intelligent traffic controller and the only IP traffic the DSP card will see are packets
specifically destined to its IP address. This effectively isolates the DSP card and the computer
running SPM32 from being overwhelmed by extraneous traffic on the LAN.
Local LAN installation with RHK intranet
If the user wants to maintain contact with the outside world but cannot get allocated another IP
address, the final option is to install a second network card in the host computer. Then the first
card will be used to contact other computers and the second card will only communicate with the
SPM 100.
Refer to the Windows documentation for additional information on configuring a computer with
two network adapters. One will be bound to the LAN with an assigned IP address and the other
will be assigned to the communication with the SPM 100 similar to the standalone configuration
outlined above. The crossover cable will be used between the second adapter and the transceiver.
Also the IP address associated with the second card can be selected more freely. Just make sure
to enter an address in the SPM 32 window that has the first three sets of numbers the same as the
computer’s address.
RHK Technology, Inc.
Troy, MI
11
SPM 32 User’s Manual
Software Installaion
RHK Technology, Inc.
Troy, MI
12
SPM 32 User’s Manual
Software Installaion
3
Menu Functions
RHK Technology, Inc.
Troy, MI
13
SPM 32 User’s Manual
Menu Functions
The SPM 32 program is organized such that similar functions are grouped under a descriptive
initial menu item. The main menu of the SPM 32 program is accessed by clicking the
CONTROL key (left mouse button by default) when the cursor is placed anywhere on the
background screen. This menu is shown in Figure 1. An arrow on the right side of a menu item
indicates that a submenu will be opened when this selection is clicked. There are also menu
items listed that have a diamond on the right side and this symbol indicates a configuration
window will be opened where a large number of related parameters are grouped together and
selections can be made.
Hotkeys
A particularly useful feature of the software is the ability to assign any
menu item to a hotkey. This would eliminate the need for many mouse
keystrokes to accomplish a task. Open the menu to the selection that is to
be assigned a hotkey and then press CTRL-H. A window will be displayed
prompting for the keystroke to be assigned to this menu item. It will then
be saved in the parameter file. To view a list of all currently assigned
hotkeys, use the menu item Help/Help Resources/User Hot Keys. An
example of when this could be useful is to assign the item
Acquire/Spectroscopy/Lithography which applies the voltage pulse
specified in the Lithography tab, thereby enabling a quick pulse to be
applied while scanning.
The latest version has added many new menu items simply to allow users
complete freedom in deciding what keystrokes should be used to perform
some tasks. The adjustment of color scale while imaging used to be done
using the ‘<‘ and ‘>’ keys. Now, menu items have been added so a user
Figure 2
can assign a hotkey to this menu selection and the color adjustment can
then be performed in realtime using any assigned key combination. All
default keystrokes still work so no definitions are required.
Acquire
The Acquire menu is used mainly to provide the interface with the SPM 100 and any other
equipment controlled by the SPM 32 software. It is used to acquire the data and to set various
scan parameters such as what data channels to read and any spectroscopy modes to be used
during an image. This also provides the option to have some interactive information windows on
the screen during data acquisition that can be used to monitor signals using the built-in digital
oscilloscope, or provide a navigational map of the current scan frame location over the surface,
or open a status window that reads the current settings of many of the knobs on the SPM 100.
Image Control window
The window shown in Figure 2 is opened and all parameters effecting the data acquisition are
determined here. There are five tabs that group together functions.
Scan/Size tab
RHK Technology, Inc.
Troy, MI
14
SPM 32 User’s Manual
Menu Functions
Use this tab (Figure 2) to set the scan sizes and pixel density. Rectangular scans (both in pixel
density and area) are possible with this scan board. However, the user should avoid scanning
over areas that do not have the same X and Y dimension if the scan is to be rotated.
Beginning with version 2000 of SPM32, there are fundamental changes in how the surface
should be navigated using the combination of the front panel knobs and the DSP output voltages.
This is only the case of the Rev. 8 controller has been selected or a VSCAN upgrade is installed.
For any older electronics versions, all controls remain the same and any tabs that refer to DSP
settings can be ignored.
It is now possible to shift the scan frame a small amount without
using the front panel Offset knobs. The DSP board can apply a DC
offset to the X or Y direction and image a different part of the
surface. Also, this can be used to precisely center an interesting
feature within the scan frame.
Scan size Use this to change the scan size without turning
the front panel knobs. Starting with version 2000 of
SPM32 this is how the scan size should be changed!
This alters the maximum scan voltage output by the DSP
board.
Figure 3
Image pixels Number of pixels along the X and Y axis.
Initially, this must be a power of 2. A future revision of the software will allow any pixel
values.
Image aspect ratio Beginning with Revision 8 of the SPM 100, the DSP scan board
generates the voltage ramps. The front panel ‘Ganged/Separate’ switch should always be
in the Ganged position. If rectangular areas are desired, then this parameter should be
changed to a value other than 1. The size will be set by the X range knob and the Y axis
will be scaled by this value. A setting larger than 1 will create a rectangular area
elongated along the Y axis, whereas a setting less than 1 will create an image shortened
along the Y axis. If the switch is placed in the ‘Separate’ position, scan rotation at
arbitrary angles will result in a skewed image that will not represent the true
surface geometry.
Move speed Any time the tip is moved to a new origin, it will move across the surface at
the same speed as the current scan speed selection by default. This can lead to very slow
tip motion if the scan size is rather small and the line/ms knobs on the SPM 100 are set to
a slow value. If very slow motion is taking place, use the ESC key to stop the motion and
then adjust this value to something that is considered safe for the current feedback
bandwidth settings. If this parameter is a nonzero value, it will be adopted as the speed to
move the tip in all cases. Be careful to not set this too large or the feedback loop may not
be able to keep up with the topography and tip-sample contact may result. Keep in mind
this parameter is stored in the PRM file so if the feedback bandwidth is changed from the
previous time the software was stopped, the stored Move Speed may be inappropriate and
tip contact can again occur. Use this parameter with caution.
Scan speed Many times it is more advantageous to maintain a constant linear scan speed
RHK Technology, Inc.
Troy, MI
15
SPM 32 User’s Manual
Menu Functions
(defined as the velocity of the tip over the surface) instead of a constant line time
(defined as the amount of time to complete one scan line). If this parameter is set to a
nonzero value, then it will have precedence. Any change in scan size will also change the
line time in order to maintain a constant tip velocity.
Line time Time for one scan line to be completed. The scan line is defined as one trip
across the surface(forward or reverse); therefore, the total time to return to the original
location is twice this value (plus a small latency before the tip reverses direction). As
soon as a speed is entered here, it will take effect. When this is the case, the Override
LED on the front of the SPM 100 will be lit. If this value is set to zero, then the knobs
will ALWAYS determine the time to scan one line (unless the Scan Speed is a nonzero
value in which case the knobs and this parameter are both ignored.
Actual speed As the knobs or the Line Time value are changed, this reading
updates to always provide the actual tip velocity across the surface.
Actual line time Changes to provide the precise line time that can be scanned.
Rounding in the SPM100 makes the knobs readings not always be precisely
correct, but this reading will give the line time currently in use.
X offset Enter a value to offset the current scan origin along the X axis using the DSP
scan board.
Y offset Enter a value to offset the current scan origin along the Y axis using the DSP
scan board.
Scan rotation Enter the angle to scan the tip at with respect to the nominal x and y axis.
Can be changed in 0.1° increments. This can be handy to align certain physical features
on the surface with the fast scan direction.
Scan/Options tab Use this tab (Figure 3) to configure how many consecutive images to scan as
well as the direction and a few other parameters.
Scan count The number of images saved when Autosave has been turned on before
continuous scanning is halted. This can be used for unattended scanning without risking
running out of memory or storage space (depending on the Page save mode status). A
fixed number of data scans are acquired and then scanning is stopped. Set to zero for
unlimited continuous scanning.
Fast image mode This can be turned ON to allow for maximum data acquisition rates.
There is no realtime image display. The image window is only updated after an entire
scan frame has been acquired. Also, the scan can not be paused with either the ESC key
or with mouse interaction, but the F2 key still works.
Scan direction Set whether the scan frame is acquired by scanning left to right (X scan)
or up and down (Y scan). When scanning in the x direction, the tip is moved from the top
of the image towards the bottom, whereas the y scan moves from the left side of the
image to the right.
Scan delay Amount of time to pause before starting the next scan frame when in
continuous mode. Piezo creep effects usually present in the first few scan lines of an
RHK Technology, Inc.
Troy, MI
16
SPM 32 User’s Manual
Menu Functions
image after the tip returns to its origin from the previous frame can be eliminated by
increasing this value. This effect can also be avoided using the new scan board features
present in Rev. 8 of the SPM 100. The user now has the
option of starting the next scan at the current tip location
instead of returning to the origin. In this manner, scans are
taken from top to bottom and then the successive scan is
acquired from bottom to top. This can also be set to a large
value if unattended imaging of the same area of the sample
is desired, e.g. when studying reactions on a surface that
change the morphology as a function of time. Using this
parameter allows a time series to be acquired that are
spread over a very long time without user intervention.
Alternating slow scan Previous revisions of the SPM 100
returned the tip to the origin after completion of the scan
frame. This rapid return along the y axis can produce
image skewing during the first few lines of the subsequent
scan because of piezo creep. To change the scan behavior
such that it starts the subsequent scan at the same line as
Figure 4
the end of the previous scan, turn this parameter ON.
Instead of scanning top-to-bottom and returning for another top-to-bottom scan, the user
can choose to scan top-to-bottom and then bottom-to-top for the successive scan frame.
This way, large traverses across the surface are avoided.
Slow scan disabled When this is ON, the same line scan is repeated over an over with no
motion along the orthogonal axis. This would typically only be used for diagnostics and
testing purposes as the reproducibility of a single linescan can be ascertained.
Autoscale image If ON, the colorscale of the real-time image display is automatically
adjusted at the end of each scan to completely fill the full dynamic range of the displayed
image. If OFF, the image display contrast is constant unless changed by the user.
Line display An XY plot window is opened similar to the oscilloscope window that will
display each line scan as it is acquired when this is set to ON. This can help recognize
SPM performance problems, but will lead to a slightly decreased data acquisition rate due
to the overhead of displaying each line scan The parameters to setup the
Page save mode Determines what happens when save is selected (via F4 key or mouse)
during interactive data acquisition. Save to screen creates a data page and plot. You must
then save the data page to disk if you want to keep it permanently. Screen and disk will
create a data page and save it to disk permanently. Disk only writes the page to disk, but
does not keep a copy in memory for display or processing. This can be useful in
automatic data acquisition (Autosave ON) but may create a large number of undesired
RHK Technology, Inc.
Troy, MI
17
SPM 32 User’s Manual
Menu Functions
files on the drive wasting space. Index only will add the data file to the data index
display, but will not create a full sized plot until you request it. This can be useful for
keeping the screen from being filled up by windows during data acquisition (if save to
screen is selected). Index and disk will automatically write the page to the disk when it is
placed in the data index, while Index only does not. It is critical to realize that an image
displayed on the screen has NOT been written to disk unless explicitly selected in
the Files menu or the Autosave
option is ON. If the program is
exited before data is saved to
disk, it will be lost.
The data index (opened via F12 key) is a
window that displays thumbnail images
of all data currently held in memory. An
example with a few images is shown in
Figure 5. All of the images in the index
are currently available for image
processing procedures. Images with a
yellow border have not yet been saved to
disk while pages with a blue border have
been saved to disk. This provides a quick
visual clue as to whether any nice data
has still not been saved to the disk
permanently.
Figure 5
Scan autosave If this is ON, every data set acquired (image, linescan, oscilloscope data
etc.) is saved. This can generate an enormous amount of data if the oscilloscope window
is present. Use this setting with caution. But, this can be set to ON for unattended
scanning where all the images acquired can be reviewed at a later time to decide if they
should be permanently stored on the hard drive. To avoid the overload of data, no
oscilloscope or linescan screens should be open.
Save contrast When this is turned ON, the images are saved to disk along with the extra
information of how the colorscale was adjusted when it is saved. Otherwise, files recalled
from the disk are displayed with the default colorscale currently in use in the real-time
data acquisition window.
Scan/Advanced tab Many of the more sophisticated scan algorithms and techniques available
with a DSP-based scanner can be accessed with this tab Figure 5.
Reset range If the front panel Range and Offset knobs are changed, this option must be
clicked in order to ensure the correct scan sizes are recorded. The software will read the
knob settings and update the tip position as well as the current scan size. This option is
automatically activated when the Range button is clicked in the Scan Area window and
the knobs can be changed. More details on this functionality are presented in Chapter 4.
RHK Technology, Inc.
Troy, MI
18
SPM 32 User’s Manual
Menu Functions
Test Range at Startup During the SPM100 initialization routine, the scan voltages are
instructed to move to the upper right corner of the scan
frame. This provides SPM32 the opportunity to read the
current position of all front panel Range and Offset
knobs. However, this also means the tip is moved
(sometimes slowly) and may not be necessary. If the
user is confident that the knobs have not been moved
from the previous invocation of SPM 32, then this can
be turned OFF and the extraneous motion will not
occur. However, if the knobs have been moved, the scan
size and scaling of all data will be incorrect.
Set range tip retract Before the Scan Range or Offset
knobs can be changed when using the DSP controller,
the Range button is selected in the Scan Area Window.
Normally, the tip is retracted after the button is pushed Figure 6
in order to eliminate the possibility of a tip crash since
the speed of motion across the surface will be determined by the speed at which the
knobs are turned. If it is undesirable to have the tip retracted (due to hysteresis or Z
motion coupling with lateral motion) then this can be ON. The behavior is then like the
old electronics and extreme caution must be exercised while turning the knobs as real tip
motion will be occurring. If the feedback loop is set to low, a crash can occur. Never
change the x1/x0.1/x0.01 switch if this is turned ON unless the Range knob has been
turned to zero first. A tip crash WILL occur due to the sudden motion of the tip
when the switch is changed
Standby action Determines what the tip should be doing when no image acquisition is
taking place. Valid choices are Image start which returns the tip to the corner of the
previous image, Image center where the tip is placed in the center of the scan frame
Other choices include scanner zero where the output voltages are set to zero so the scan
head is placed in the middle of its range, first line in order to have the tip scan the first
line of the image frame continuously, and free scan where the entire image frame will be
scanned repeatedly, but without any ADC conversions taking place.
Scan type With the new DSP scan board, it is no longer necessary to ramp the tip using a
linear (triangle) waveform. For fast scan speeds, there are advantages to using a
sinusoidal waveform. Since the sinusoidal waveform is also a single frequency compared
to the triangle made up of many frequencies there is a reduced possibility of exciting a
resonance in the scan head.
Image shift increment The scan area can be shifted via keyboard in the new software
using the DSP board. This motion can be done while imaging by using the keyboard,
similar to the old electronics where the Offset knobs could be turned while acquiring
images. The amount to shift for each keystroke is a ratio of the total scan range and this
percentage is entered here. For example, if the value is 5% and the scan size is 50 nm,
each time the key is pressed, the frame will be shifted 2.5 nm. If the image is later
changed to 200 nm, each key pressed will move the frame 10 nm. More details of this
RHK Technology, Inc.
Troy, MI
19
SPM 32 User’s Manual
Menu Functions
navigation aid are presented in a later section.
Image rotation increment The scan angle can now be any arbitrary value. To rotate
while imaging, use the keyboard to change the value without typing in a value directly.
The amount of rotation that each key produces is entered here.
Input tab
The second item under the image control menu is to configure what inputs are recorded during
an image scan(Figure 7). Up to 7 channels of data can be read during each image scan. Any
channel turned ON will be monitored by the SPM 32 software and images can be displayed on
the screen. Only 4 channels can be displayed in real-time while the sample is being scanned but
if the data is written to a file all channels that are ON in this window will be saved. Be careful
about what inputs are turned on and do not save excess channels that have no relevant data in
them. In conventional SPM operation only the
Topography channel is usually on.
The data range of each channel can be changed in the
software independently of all others. The four choices
are ±10 V, ±5 V, ±2.5 V, ±1.25 V. This spreads the
bits of the ADC board over a smaller range, which will
increase resolution. The gain on the board will be
changed before each reading so additional sensitivity
can be achieved if it is known the signal level itself
will not exceed certain values. This is most useful for
the feedback signal channel which usually remains
close to constant by the feedback loop so if the setpoint
is not too large, more resolution can be obtained by
increasing the gain on that channel.
Record one scan direction When this is turned
ON, data will only be acquired during the
Figure 7
forward scan. This can be advantageous for
slow acquisition modes such as NSOM. The tip will be returned to the origin at the set
scan speed, but no additional overhead due to data sampling or photon counting will take
place. Also the updating of the screen will be performed during the reverse scan so there
will be no delay at the end of the scan line normally needed to update the screen. Care
must be taken when using this mode since there will be no confirming reverse scan image
to eliminate scan artifacts.
Spectroscopy tab
Use this tab (Figure 7) to setup the data acquisition routines to obtain spectroscopic information.
Spectroscopy mode If set to None, no spectroscopy data is acquired. Other selections are
Spectra, Lithography, MCA acquisition, CITS, and GPIB. Selecting Spectra will open the
feedback loop and ramp a voltage while recording as many as three channels of data as a
function of the applied voltage. Lithography is used to pulse the bias voltage to create
features on the surface at designated points. MCA acquisition utilizes the optional Ortec
RHK Technology, Inc.
Troy, MI
20
SPM 32 User’s Manual
Menu Functions
921 multi-channel buffer to acquire data from an optical spectrometer and correlate it
with features on the surface. CITS is current imaging tunneling spectroscopy and this can
be used to form images of the current fluctuations across the surface for a given applied
bias while maintaining a constant tip height above the surface. GPIB is an option to
interrupt the feedback loop at specified
locations over the surface and then
communicate with a GPIB device to
synchronize changing other parameters that
affect the feedback signal while recording
the changes with the SPM 32 software.
These changes can also be correlated with
specific locations on the surface with a
much higher precision than can typically be
achieved using conventional broad area
Figure 8
probes.
Multi volt mode Allows an area of the image to be scanned with more than one bias
voltage. In multi page mode, the probe is scanned in the forward and reverse direction
with one bias applied, then it is changed to a new setting and the same area is scanned
again. Up to four different bias voltages can be used to acquire data over the same area of
the surface. Assuming negligible drift, the two images can then be compared to correlate
features imaged under different tunneling conditions. Another option is split mode where
part of the scan frame is imaged under one set of conditions and another part of the frame
is taken under different scan parameters. Note that in this mode, the two areas imaged
under different conditions are not the same physical section of the sample.
Image out spectroscopy When this is turned ON, the DAC is used to change a voltage
during scanning. This voltage can be used to take images at various bias conditions, or
control other equipment to change imaging conditions. The details of the measurement
are set in the Acquire/Spectrosopy/Image Spec window.
Spec location Determine where spectroscopy data should be acquired within a given
scan frame. Options are 4x4, 8x8, 16x16, 32x32, 64x64, interactive, center line or every
pixel. For any of the options involving a subset of
pixels instead of every pixel, the grid is overlaid on
the image centered in the scan frame. The
spectroscopy mode set above should be turned on
in conjunction with this parameter setting.
Drift tab
The window to setup and use the automatic drift
Figure 9
correction is shown in Figure 9. A section of the image
can be selected in the realtime acquisition window(RTAW). Then after each subsequent image,
the designated area will be searched for the selected feature and a small correction offset applied
to the X and Y scan voltages to maintain a constant position of the feature. More details and
examples will be provided in Chapter 5.
RHK Technology, Inc.
Troy, MI
21
SPM 32 User’s Manual
Menu Functions
Reset drift correction Click on this and then select a new feature for a search. Even if
the drift correction has been turned OFF. To select a new feature and reactivate the
algorithm, this will have to be selected as the old location is stored in memory even when
the correction has been deactivated.
Enable drift correction Turn this ON to activate the algorithm. This should be turned
OFF when the scan area will be resized, shifted laterally, or rotated. Failure to do so will
produce an error message after the subsequent scan as the algorithm searches for the
feature.
Reference radius Enter the size in pixels of the defined feature. All pixels inside the
square will be fit in all acquired images.
Search range The size in pixels to search within to find the selected feature. The larger
the number entered here, the longer the fit will take between images.
AFM tab under Setup tab
The settings to control an AFM measurement are located in the AFM tab. If an RHK AFM 100 is
integrated into the system, then this tab should be used to set the parameters specific to AFM,
such as cantilever constants etc. If an AFM is used with an
AIM MI or AIM DI, then the only significant parameters to set
here are the lever k value and the two sensitivities. When these
are entered the force error will be displayed in newtons instead
of volts. The window is shown in Figure 9.
Lever k value This is specific to the particular
cantilever mounted in the AFM head. There are a wide
variety of cantilevers available from vendors that are
suitable for different samples being studied. The value
to enter here should be specified by the manufacturer
when the levers are purchased. When a nonzero value
is entered, this is automatically included in the
comment when data is saved. To avoid this being
saved (in case the value is not correct) set this
parameter to zero.
Deflection sensitivity Determined by the calibration of
Figure 10
the particular scan head in use. This is calculated
empirically using force-distance curves for each
individual scan head and relates the vertical deflection of the cantilever to the movement
of the reflected laser spot on the position sensitive detector (PSD). The procedure to
perform the calibration is outlined in Chapter 3.
Lateral sensitivity Relates the sideways twisting of the cantilever and the motion of the
laser spot across the PSD. This value also needs to be determined empirically for each
individual scan head arrangement. If set to zero, the lateral deflection is recorded in Volts
and can be converted later when the calibration factor is known.
Normalize AFM PSD If turned ON, the set-point, normal force, and lateral force
RHK Technology, Inc.
Troy, MI
22
SPM 32 User’s Manual
Menu Functions
voltages are divided by the Total PSD signal voltage. This has the advantage that the
calibrations of normal and lateral forces are independent of the laser output power, lever
reflectivity, etc.
Mux 1 data Select the type of data to read from the Mux 1 output of the AFM 100. The
choice set here will also appear in the list of possible inputs when displaying data in
oscilloscope or image windows. Valid choices are Normal Force, Lateral Force, Total
Signal, OFF.
Mux 2 data Select the type of data to read from the Mux 2 output of the AFM 100. The
choice set here will also appear in the list of possible inputs when displaying data. This
can be set to any of the same choices described above for Mux 1.
Laser current gain Laser drive current per output volt from the AFM 100. This is set
inside the AFM 100 at the factory to be 10mA/V.
PSD Threshold Minimum output signal from the scan head to consider the laser “on”.
Can be used to indicate whether the cantilever is aligned well enough to have the laser
reflected onto the PSD.
Laser Power Multiplier The output current from the PSD is multiplied by this factor
inside the AFM 100. Default jumper setting inside the AFM 100 is 10.
Photocurrent/Laser mW Unique for each laser diode model. Used to determine the
output laser power by using the photodiode sensor integrated with the laser. Typical
values are 150 or 200 mA. Refer to documentation supplied with the laser diode for
correct setting.
Error Output Gain The signal from the AFM 100 is (normal force - setpoint) multiplied
by this factor. Factory default configuration of the AFM 100 is 50.
Ext Signal Label When using the AFM 100 in Ext/lockin mode to perform intermittent
contact experiments, this can be used to enter the correct label for the data being read.
Examples of this type of data acquisition is discussed in Chapter 3.
Ext. Signal Units The units of the data being read when in Ext/lockin mode.
Ext. Signal/input volt Calibration of the feedback signal when the AFM 100 is operating
in Ext/lockin mode.
Mux 1 Input Lets SPM 32 know how the AFM 100 is connected to the SPM 100. At
least one of the signals from the AFM 100 labeled Mux must be connected to one of the
three auxiliary inputs on the rear panel (Aux/lockin, Aux1, Aux2). This setting indicates
which auxiliary input BNC of the SPM 100 is connected to the Mux 1 output of the AFM
100.
Mux 2 Input Indicates which BNC input on the rear panel of the SPM 100 is connected
to the second Mux output of the AFM 100 (if used. Connecting both the Mux 1 and Mux
2 outputs provides additional flexibility for AFM operation.
The Mux 1 and Mux 2 settings must be configured correctly for proper operation of an AFM.
RHK Technology, Inc.
Troy, MI
23
SPM 32 User’s Manual
Menu Functions
Count tab under Setup tab
This window (Figure 10) is used to setup the operation of the accessory board available from
RHK to perform experiments that involve photon counting or similar data acquisition.
Count Interval Amount of time to read the data
from the counter board at each pixel. This time is in
addition to the interval spent averaging readings
from other data acquisition channels such as
topography and current.
Monitor Rates This can be turned OFF to prevent
the DT 2817 card from sending TTL pulses when
not imaging if this causes undesirable effects and
the data is only to be acquired when actually
scanning. These are normally present even when not
imaging in order to update the current count rates
for the SPM Status window.
Channel A1 Label A label for the data from the A1
channel of the counter board can be entered here.
Channel A1 Units The units of the data from the
A1 channel. Usually Hz.
Figure 11
A1 Units/Input Count If the signal is amplified before being input to the A1 channel of
the counter board, this value gives the appropriate scaling factor.
Channel A2 Label A label for the data from the A2 channel of the counter board can be
entered here.
Channel A2 Units The units of the data from the A2 channel. Usually Hz.
A2 Units/Input Count If the signal is amplified before being input to the A2 channel of
the counter board, this value gives the appropriate scaling factor.
Sim tab under Setup tab
The SPM 32 software has a built-in data acquisition simulation feature
that can be used to help familiarize a user with the acquisition routines
and navigation. The settings in this window are self-explanatory and
only have a use when running the simulation routine.
Image Scan
Num
Lock
/
*
7
8
9
4
5
6
1
2
3
-
+
Enter
This item is used to start a scan of the surface. The same functionality
can be achieved by using the F6 keyboard shortcut.
.
0
Figure 12
Image Shift
The selections under this menu allow for the current scan frame to be changed without stopping
the scan and entering values into the Image Control window. These can be assigned to any
hotkey for complete flexibility. By default the navigation keys use the keypad of a standard 101
RHK Technology, Inc.
Troy, MI
24
SPM 32 User’s Manual
Menu Functions
key keyboard as outlined in Figure 12. More examples will be given in a later section.
Image Control
This new menu item was added to permit users to redefine the tasks that were previously
assigned to the function keys along with adjusting the display color scale in realtime while
acquiring images.
Oscilloscope
This menu item opens the digital oscilloscope window that can be used to display a large number
of control or data acquisition signals. An example of this window is shown in Figure 12.
There are a number of control buttons in this window. The Start, Stop, Single buttons determine
when data is acquired with the scope. If the Start button is clicked, data is acquired and displayed
on the oscilloscope one scan after another until the stop button is pressed. This would be
equivalent to having a free run trigger setup on a normal, standalone oscilloscope. The Single
button acquires one sweep of data, displays it, and then stops reading any signal. The Save
button transfers the data shown in the window to another plot window where it can be written
out to a file and saved. The ‘+’ and ‘-’ keys can be used to add (or delete) additional channels of
data displayed on the graph. A different color is shown for each individual channel, and up to
four different signals can be displayed on the oscilloscope simultaneously. The Close button will
close the window.
The left and right arrows in the second row decrease and increase the time scale of the display.
The time per division is the number displayed between the two arrows (10 ms in this example).
The next panel shows the sampling rate of the
ADC (10 kHz); when acquiring counter data, the
sampling rate is limited to a maximum of 40
kHz. It is also limited by the horizontal scale, so
the points per spectrum must be more than 5 but
less than 200,000. The background color of the
display window can be changed in the next entry
box. If Auto is clicked then the vertical axis will
automatically be scaled to fit the entire range of
any displayed data.
The first selection in the bottom section
determines what channel is read by the
oscilloscope; in Figure 12 the Topography
channel is displayed. Valid choices include
Topography, Current, Aux, Aux 1, Aux 2, A1
rate, A2 rate. Note that any signal can be applied
Figure 13
to the auxiliary inputs on the back panel of the
SPM 100 and therefore can be subsequently
displayed. The only caveat is the signal must be between -10 and +10 Volts when applied to the
auxiliary inputs to avoid damaging these circuits. The input box next to this can be used to
change the color of the displayed graph, and the final selection in this row sets the DC or AC
coupling of the input signal similar to a normal oscilloscope. A third selection here is Flat which
RHK Technology, Inc.
Troy, MI
25
SPM 32 User’s Manual
Menu Functions
performs a best-plane fit background subtraction to the signal before it is displayed on the
oscilloscope. The up and down arrows on the left side of the bottom row are used to change the
vertical scale, and the number between the arrows displays the value per division. The units
displayed here will change depending on which input channel is being displayed. The next
selection determines the range of the ADC, x1 sets the range to ±10 V. Other choices are ±5 V,
±2.5 V, and ±1.25 V. The final set of up and down can be used to change the offset of the graph
when using DC coupling or change the center of the displayed signal when using AC or Flat
coupling.
Data logging
A new feature to the software starting with version 99 is the data logging function. This can be
very useful for acquiring data over a long time scale such as cyclic voltammograms during
electrochemistry or the fluorescence decay of single molecules when studying it with NSOM.
This will be covered in greater detail in the spectroscopy section.
Electrochemistry
The interface to the electrochemistry control is shown in 26.To configure the parameters that
effect EC acquisition, click the Setup button. Any voltage can be entered directly by clicking on
the appropriate entry box. To increment/decrement the voltage by a small amount, click on the
up/down arrows to the right of each entry box.
The “Setup” button in the electrochemistry data acquisition window opens the electrochemistry
configuration dialog box, which is organized in four separate tabs. The main tab is shown in
Figure 15.
EC Control Active Turn
this ON to activate the
electrochemistry software
Picostat Control Mode
Used to select the PicoStat
for either POTENTIOSTAT
or GALVANOSTAT
operation.
Iec Turn ON to record the
Iec data from the Picostat
Vec Turn ON to record the
Vec data from the Picostat
Auxec This can be used to
turn ON an Aux channel
connected to a generic
Potentiostat/Galvanostat.
Figure 14
STM Tip I Turn ON to record the STM tunneling current during EC STM.
EC Plot Mode Designate the plot mode for the EC acquisition window. For C-V curves,
RHK Technology, Inc.
Troy, MI
26
SPM 32 User’s Manual
Menu Functions
the typical display mode is PLOT vs. EC SETPOINT.
Autosave If ON, then data is automattically saved after each
sweep. Similar to saving each data page after a scan is
complete.
Page save mode Choose where to save the data. Save to
screen creates a data page and plot. You must then save the
data page to disk if you want to keep it permanently. Screen
and disk will create a data page and save it to disk
permanently. Disk only writes the page to disk, but does not
keep a copy in memory for display or processing. This can
be useful in automatic data acquisition (Autosave ON) but
may create a large number of undesired files on the drive
Figure 15
wasting space. Index only will add the data file to the data
index display, but will not create a full sized plot until you request it. This can be useful
for keeping the screen from being filled up by windows during data acquisition (if save to
screen is selected). Index and disk will automatically
write the page to the disk when it is placed in the data
index, while Index only does not. It is critical to
realize that an image displayed on the screen has
NOT been written to disk unless explicitly selected
in the Files menu or the Autosave option is ON. If
the program is exited before data is saved to disk,
it will be lost.
The “Experiment” tab, shown in Figure 16 details the
experimental conditions, including the potential or current
limits not to be exceeded. The type of reference electrode
and its potential versus the normal hydrogen electrode, as
well as the working electrode area, may be recorded there.
Figure 16
Ref Electrode Type Enter the electrode material here
and the value will be automatically saved with the data
comment.
Ref Electrode potential (vs NHE) Enter the
difference of the electrode with respect to a standard
hydrogen electrode.
Sample area Enter the area of the electrode here so it
can be saved with the data file.
The entry boxes in SPM 32 are such that a larger number then
intended could be accidentally entered. If limits are entered
here, then SPM 32 will perform a check to ensure the entered Figure 17
value is not outside the limits which could potentially damage
the cell. It is highly recommended that reasonable values are entered here to avoid
accidentally altering the cell.
RHK Technology, Inc.
Troy, MI
27
SPM 32 User’s Manual
Menu Functions
Voltage Control Increment When changing the voltage values via the up/down arrows
in the EC window, the value here will determine how much each mouse click changes the
voltage.
Non-voltage Control Percentage Enter a percent that clicking on an arrow will change
the value as a percentage instead of a fixed amount. This only applies to arrows that do
NOT control voltages. Most of these are the arrows that adjust the axes in the EC display
window.
The configuration panels (Config and Adv Config) are where infrequently changed parameters
are grouped together. Once an experiment is setup, usually nothing needs to be changed here
unless the cabling is altered or a different potentiostat is installed.
Potentiostat Choose what EC electronics is used. SPM 32 can interface to the MI
Picostat, a generic Potentiostat or a generic Galvanostat.
Control DAC Select which DAC is coupled to the EC Ref Set BNC of the AIM MI.
WE Current Data Input Which Auxiliary channel is measuring the Iec signal. One of
the channels on the rear panel of the SPM 100 must be connected to the output from the
EC controller. If cabled according to the diagram above, then AUX1 should be selected.
We Potential Data Input Which Auxiliary channel is measuring the Vec signal. One of
the channels on the rear panel of the SPM 100 must be connected to the output from the
EC controller. If cabled according to the diagram above, then AUX2 should be selected.
WE Potential Control Gain Enter the change in the reference electrode that 1 Volt
output from the DAC will produce. The sign is significant. Usually a value of 1 is used.
However, is some external attenuator is installed to decrease the step size, then this value
must be changed to produce accurate voltage ramps.
Potential Control Offset The value of the electrode potential when the DAC output is
zero. Will be zero in most cases unless the external EC controller adds an offset to the
DAC value before it reaches the electrode.
Sample Iec Gain The scaling of the voltage out of the EC controller for the
electrochemical current signal. As the gain is changed on the front of the Picostat, the
new value MUST be entered here to ensure accurate recording of the data.
Sample Vec Gain The scaling of the voltage out of the EC controller for the
electrochemical voltage signal. As the gain is changed on the front of the Picostat, the
new value MUST be entered here to ensure accurate recording of the data.
WE Current Control Gain The change in galvanostat current for each change in DAC
voltage.
The Advanced Config tab is used to setup the display of the EC data.
Data update rate The update rate of the EC plot is determined by the internal PC timer.
The fundamental unit is 54.9 ms. The value entered here will divide the fundamental
interval into smaller increments. For accurate readings, this parameter should not exceed
5. Lower value means longer time between updates.
RHK Technology, Inc.
Troy, MI
28
SPM 32 User’s Manual
Menu Functions
If an additional data signal is to be recorded while acquiring EC data, then it should be
configured here. A BNC must be connected to the appropriate auxiliary channel. An example of
one experiment would be to use a lock in amplifier to modulate the bias and record the
dependence on cell capacitance as a function of control
voltage.
Aux EC Data Input Choose which auxiliary
channel on the rear panel of the SPM 100 is to be
used to record the signal.
Aux EC Data Label The type of data to be
recorded. In the above example Capacitance could
be entered here.
Aux EC Data units The units of the signal to be
recorded. The scaling and offset are entered in the
Figure 18
two parameters below.
Line Test
This selection opens a specialized oscilloscope window and displays data as the probe is scanned
back and forth over the same area of the surface. It is an easy way to display the line scans in the
region of the surface and perform slope compensation with the front panel knobs on the SPM
100. The only two differences between this window and the oscilloscope window are the
addition of an extra graph color selection one both the forward and reverse scans can be
displayed simultaneously. Also there is a small panel in the
top section to determine whether the fast scan is ramped along
the x or y axis.
Spectroscopy submenu
The spectroscopy menu selection located under the Acquire
menu opens a submenu that can be used to perform various
spectroscopic functions by interrupting a scan and changing
one parameter while recording the resulting data.
Point spectroscopy window
Any scanned image can be interrupted at a preselected set of
points and a series of measurements performed. These can
involve parameters completely under the control of the SPM
1000 system or an external control electronics can be used to
change a parameter and the resulting data saved with the
image. The various options available are accessed by opening Figure 19
the window shown in Figure 19 Some of these tabs will
produce a series of nested tabs underneath where all settings apply to the one particular
spectroscopy algorithm. The spectroscopy is a generalized routine. A voltage ramp is produced
and channels recorded at each voltage step. What type of spectroscopy is acquired will be
determined by how the rear panel BNC cables are connected. If the output channel is attached to
RHK Technology, Inc.
Troy, MI
29
SPM 32 User’s Manual
Menu Functions
a bias modulation input, then I-V curves will be acquired when operating a STM. If the output is
sent to one of the z modulation inputs then I-z curves will be acquired in STM or F-z curves in
AFM. This flexibility lets the user have complete control over the type of data to acquire. With
no internal connections, the output DAC can be sent to any equipment and the response to this
signal be recorded as a function of output voltage. Feel free to be very creative in the uses of this
point spectroscopy routine.
Input/Output tab
The first tab to configure when initially setting up a spectroscopy routine is the Input/Output tab.
Here is where the units of the ramp are set along with which channels should be recorded at each
voltage step. When ramping the output voltage, many different channels of data can be read at
each step to study the interplay between output and other physical phenomena. This window
(Figure 19) is used to designate which input channels on the SPM 100 should be read at each
voltage step.
Channels to acquire Number of different input channels to read at each step. Up to three
channels of data can be read at each voltage step.
Channel 1 First signal to read. Valid choices are Current, Aux, Aux 1, Aux 2,
Topography. For a conventional I-V measurement, this should be Current.
Range 1 Range of input to be read on channel 1. Depends on what rear panel input is
used for the signal. Valid choices are ±10 V, ±5 V, ±2.5 V, ±1.25 V. This can be changed
to increase the resolution of the measurement. When the feedback is interrupted to
acquire spectroscopic data, the gain of the A/D board is increased via software and the
tunneling current data acquired. It is then switched back to its value specified in the
Image Control window to acquire the normal images.
Channel 2 Second signal to read. Valid choices are Current, Aux, Aux 1, Aux 2,
Topography.
Range 2 Range of input to be read on channel 2. Depends on what rear panel input is
used for the signal. Valid choices are ±10 V, ±5 V, ±2.5 V, ±1.25 V. This can be changed
to increase the resolution of the measurement. When the feedback is interrupted to
acquire spectroscopic data, the gain of the A/D board is increased via software and the
tunneling current data acquired. It is then switched back to its value specified in the
Image Control window to acquire the normal images.
Channel 3 Third signal to read. Valid choices are Current, Aux, Aux 1, Aux 2,
Topography.
Range 3 Range of input to be read on channel 3. Depends on what rear panel input is
used for the signal. Valid choices are ±10 V, ±5 V, ±2.5 V, ±1.25 V. This can be changed
to increase the resolution of the measurement. When the feedback is interrupted to
acquire spectroscopic data, the gain of the A/D board is increased via software and the
tunneling current data acquired. It is then switched back to its value specified in the
Image Control window to acquire the normal images.
Output channel The output channel on the rear panel of the SPM 100 connected by a
RHK Technology, Inc.
Troy, MI
30
SPM 32 User’s Manual
Menu Functions
BNC-BNC jumper to the appropriate input. Valid choices are OFF, DAC 1, DAC 2, and
DSP DAC. Note: This must be properly setup and a BNC-BNC cable connected for
correct data to be acquired.
STM Bias Mode Can be set ON or OFF. Should be ON when acquiring conventional I-V
data in STM. Should probably be turned OFF if performing spectroscopy that involves
ramping a voltage and monitoring a signal when using other SPM techniques such as
AFM, NSOM, etc. When ON, the voltage ramp is created by reading the feedback bias
set by the front panel knob and creating an additional voltage with the DAC that will be
added to this voltage such that the final sum has the desired value. Since the front panel
bias knob does not mean the same thing as when operating a STM, the DAC should
ignore the knob setting when interfacing with another SPM and directly produce the
desired voltage setting.
Output volts per D/A volt Determines change in physical units when changing the DAC
voltage. If using a direct BNC-BNC jumper cable to one of the Bias modulation inputs,
this should be 1 V. If performing I-z or F-z, then the value here will depend on the
calibration of the z piezo. If using a Rev. 8 electronics, then Z modulation #1 has an
overall gain such that 1 volt applied to the modulation input will result in a larger voltage
to the head. In this case, the correct calibration here will be 13 times the Z motion per
piezo volt when a low voltage unit is used or 21.5 times the z motion per piezo volt when
a high voltage unit is used. If there are other external gains (such as with an HVA900)
then a different value will be needed. It is simple to determine how much 1 volt applied
to the modulation input will change the voltage applied to the piezo. Additional
information about the gain of the rear panel modulation inputs is contained in the SPM
100 manual. The sign is also significant. If the ramp direction is opposite of what was
anticipated, then reverse the sign here.
Spectrum units The units of the voltage ramp. For STM I-V, this will remain volts. If
the voltage is summed into a Z modulation input (for I-z in STM or F-z in AFM), then
this should be changed to m for meters. If a voltage is sent to a magnet (for example) the
units would be changed to H for Henry, or it could be sent to a temperature controller
where the units would be changed to K for Kelvin. Then the values on the tab to set the
limits will be displayed in the physical units.
Control tab
The main tab is displayed in Figure 19. Here the beginning and ending voltages are entered, the
increment is selected along with the averaging mode.
RHK Technology, Inc.
Troy, MI
31
SPM 32 User’s Manual
Menu Functions
During most spectroscopy routines, the feedback loop is interrupted and a voltage is then ramped
while recording the resultant signal. For STM I-V data, the bias is ramped and the tunneling
current is recorded as a function of tunneling bias. The data that is acquired will be related to the
density of states of the surface. This method can be adapted to other SPM modes to obtain
similar data. Be careful to avoid having the feedback loop off for a long time when setting up
these measurements as a large amount of drift could conceivably make the tip crash into the
sample since there is no feedback circuit to constantly adjust the tip-sample separation.
Additionally, a critical assumption made when interpreting I-V data is that it was acquired at a
constant gap width, and large amounts of drift can also render this assumption invalid. The data
should be acquired as quickly as possible without compromising its integrity by introducing
artifacts as a result of changing the bias too fast. A more detailed discussion of the procedure is
presented in Chapter 4.
An additional feature added to version 2002 is the ability to monitor a second signal while
ramping the voltage. If the signal gets over a threshold value, then the ramp can be stopped
immediately to avoid possible adverse effects. An example of this is reducing the possibility of
tip and/or sample damage when the bias reaches a large value which can produce a large
tunneling current. Oftentimes, high current densities can produce undesired damage. This can
also be used to make sure a cantilever is not bent too far during AFM measurements.
Control Loop In most cases this should be OFF so the
tip height is not adjusted as the voltage is changed and
the data is therefore gathered at a constant height above
the surface.
Monitor test Enable this to have a channel monitored to
insure a predefined threshold value is not exceeded. This
can be helpful in avoiding damage to the tip or sample in
STM when high current densities can be produced at
large bias voltages. The particulars of the channel and
threshold is set in the Advanced tab.
Variable Gap mode The effective dynamic range of the
I-V data can be increased by taking advantage of the
exponential relationship between the tunneling gap
width and the current. Under clean vacuum conditions,
the current decays about an order of magnitude for every
1 Angstrom increase in the gap width. This can be
turned ON to move the tip closer to the surface a fixed
amount and then acquire data with increased sensitivity.
When the data is normalized to the original distance, the
smallest detectable current can easily be as small as
1x10⁻⁶ nA. More details on this measurement mode will
be presented in Chapter 4.
Figure 20
Output range section
Initial value The first value of the output voltage. This will be in physically meaningful
RHK Technology, Inc.
Troy, MI
32
SPM 32 User’s Manual
Menu Functions
units when the Input/Output tab has been setup correctly.
Final value The last point in the voltage ramp.
Alternate scan direction If ON and multiple curves are acquired, then the ramp will be
from initial to final on the first one and then final to initial value on the next one and
continue to alternate. When acquiring F-z curves this should be ON. When taking I-V
curves in STM, turning this ON can help uncover capacitive coupling in a scan head that
leads to extra current due to a large dV/dt value during the ramp. If the two curves are
offset from each other, then a slower ramp will allow them to overlap better as the
spurious current will be reduced due to a lower dV/dt value.
Output increment Equal to the difference between successive steps in the voltage ramp.
A small value can give a denser data set and higher resolution of features, but will also
lead to a larger number of steps in the ramp and therefore longer acquisition times.
Points/spectrum Automatically calculated as (Vfinal-Vinitial)/(voltage increment). Useful to
understand how many data points are in the ramp.
Samples/point At each voltage step multiple readings of the channel can be taken and
averaged to reduce noise. The sampling rate will be fixed by the sampling rate of the
DT2821 board installed. In most cases this is 150 kHz (or 6.75 microseconds/sample).
Timing section
Sweep rate The rate of change for the voltage ramp. This determines how long the ramp
remains at each voltage step. It will probably require some experimentation with the rates
to determine the best value here as there is a balance between reducing coupling and
having the feedback loop off for a long time.
Setup rate The rate at which the voltage should be changed from its nominal value to the
first voltage step in the ramp. Normally it would be expected that the DAC will be at zero
volts and then when the spectroscopy routine is started, it will change to the first value
and start taking data. If this voltage change is extremely fast and over a significant range,
transients can be produced in the scan head that need to decay before acquisition is
started. A slower rate can be used to lessen the effect of the transient.
Pre-sample delay Amount of time to wait after each voltage step for transients to decay
away. These transients are due to capacitive coupling between the sample bias and the
feedback circuit. A very fast oscilloscope can be used to monitor the feedback current at
each voltage step and determine the time for the transient to decay. Note if the voltage
increment is increased, usually this value should also be increased. Refer to Chapter 4 for
additional information on this parameter.
Spectrum delay Period to wait after changing the bias to its initial value before data
sampling is commenced. The delay is also used after the voltage is returned to its
imaging value before the feedback loop is turned on again to move the tip to the next
pixel. A non-zero value allows the transients to decay that are introduced when changing
the applied bias by large amounts as is typically done at the beginning and end of each
ramp. This timing value is also discussed in more detail in Chapter 4. With a slower
RHK Technology, Inc.
Troy, MI
33
SPM 32 User’s Manual
Menu Functions
Setup Rate as discussed above, this delay can usually be reduced.
Time/spectrum Value is automatically calculated and depends on number of steps,
averages/step, sampling rate, and delay times. Avoid making this value too large if the
feedback loop will be OFF during the spec routine..
Spectra to acquire Number of complete voltage ramps to perform at each pixel. The
output is ramped from its initial to final values while recording the data. If this is set to a
value greater than 1, the process is repeated and a separate curve is acquired at the same
point. This can also be used to decrease noise. Many times it is preferable to average
many curves each taken with a small samples/point value compared to taking one curve
with a large number of readings at each voltage step averaged together.
Page save mode Sets how the data is
stored. Save to screen creates a data page
and plot. You must then choose to save
the data to disk if you want to keep it.
Screen and disk will both create a data
page and save it permanently. Disk only
writes the page to disk, but does not keep
a copy in memory for display or
Figure 21
processing. This can be useful in
automatic data acquisition, but can also create a large number of data files on the hard
drive if the user is not careful. Index and disk or Index only will add the data file to the
data index display window, but will not create a full sized plot until you request it. This
can be useful for keeping the screen from being filled up by windows during data
acquisition. Index and disk will automatically write the page to the disk as well as adding
it to the index.
Instead of using one of the DACs on the DT2821 board in the computer to generate the voltage
sweep, the builtin DAC on the DSP scan board can be used. The advantage to using the 16-bit
DAC on the scan board is illustrated in Figure 21. When using either DAC1 or DAC2, the
voltage steps are made in a single jump. This large ∆V over a short time will produce a large
spike in the current due to unavoidable capacitive coupling. Normally the Pre-sample delay
would be used to give the spike time to decay away. With the DSP DAC, the voltage increment
can be broken into many small steps and taken slowly enough that no current spike is produced
and the total acquisition time (and thus the time the feedback loop is open) can be shortened. The
smallest step possible with the DSP DAC is 20 V/65535 or 0.305 mV. When the next
spectroscopy voltage step is reached, SPM32 is notified and all requested channels are then read.
Acquire spectrum Set this to ON to start data acquisition at the current location. This is
useful to determine the optimum parameters of the measurement by initiating the voltage
ramp and then studying the current to see what transients are present. The parameters can
then be readjusted until they are set to optimize the inherent tradeoff between
maximizing the speed of acquisition while maintaining its integrity.
Advanced modes tab under I-V tab
RHK Technology, Inc.
Troy, MI
34
SPM 32 User’s Manual
Menu Functions
Handshake External equipment can be controlled via pseudo-TTL handshaking during
the point spectroscopy routines. More detail outlining the handshaking routine will be
provided in a later section when the Handshaking tab is discussed. The handshaking can
be used to activate an external piece of equipment BEFORE acquiring the spec ramp.
This means a condition can be changed (like turning on a laser, or adding an additional
bias to the sample) and the spectra acquired under the conditions NOT active during
imaging.
Stabilize feedback If acquiring more than one curve at each pixel, the feedback loop can
be turned on between voltage ramps to make any small adjustments necessary to maintain
a fixed initial tip-sample separation. This is used to compensate for drift while the loop is
off.
Stabilization interval Amount of time to have feedback active to reestablish imaging
conditions. A very fast oscilloscope can be used to determine the time it takes the
feedback current to recover to its setpoint value after the feedback loop is turned back on.
Monitor mode
The ability to watch a channel and stop the ramp if the input value exceeds a certain threshold
was added in 2002.06. This section determines what action the software should take if
monitoring is ON and the condition is met.
Monitor response What should be done if the channel exceeds its limits. Valid choices
are Stop ramp, stop ramp and send message, end acquisition.
Monitor test Valid choices are disabled (ignore limits), outside limits (condition is met
when signal goes outside limits), within limits (acquisition stops if signal goes between
the defined limits).
Monitor channel Which of the five analog channels
should be watched.
Monitor max Largest value the signal should be
permitted to have before stopping the ramp.
Monitor min Smallest value the signal should be
permitted to have before stopping the ramp.
Variable gap mode
In STM I-V spectroscopy it is possible to greatly increase the
sensitivity to the band edges of a semiconductor by
exploiting the exponential dependence on the current with
gap width. When the tip is pushed closer to the surface the
current rises and this increased current can be renormalized
to data taken at the normal gap separation and thus a larger
effective dynamic range is realized. More details are
Figure 22
presented in Chapter 5.
Z offset before spectrum Amount the gap is changed before the ramp is started. This is
RHK Technology, Inc.
Troy, MI
35
SPM 32 User’s Manual
Menu Functions
only used if Variable gap mode is ON. Positive value pulls the tip back from the surface,
negative value pushes tip towards the surface. Be careful not to push the tip too close or
contact with the surface may occur and tip and/or sample damage could result.
Z change per Bias volt The amount to change the gap as the bias voltage is ramped
when using variable gap mode. This value is multiplied by the absolute value of the
voltage and then applied to the Z piezo. To achieve the desired result, this value may
require adjustment quite often as the relationship between applied bias, tunneling gap,
and the tunneling current is very complicated and depends on many factors such as tip
and sample cleanliness, the basic characteristics of the material being studied, etc.
Z attenuation length The exponential relationship between the current and width of the
gap is given by this term. This depends on the work
function of the tip and sample which can change
dramatically as a function of their condition. For typical
vacuum tunneling this is approximately equal to 1.0
angstrom. This is most easily determined by performing
an I-z measurement as discussed in Chapter 4. If this
value is incorrect, the normalized spectra calculated in
variable gap mode will be wrong. This value also can
require frequent adjustment since the tunneling
conditions can change over time. The actual calculation
performed is Iactual=Imeasurede-2z/L where L is the value
entered here.
Z change per D/A volt Only used in variable gap mode.
This sets how much the tip is moved per 1 Volt DAC
output when applied to the Z modulation input. The sign Figure 23
is also significant. If an SPM 100 with serial number
larger than 600 Is used, there are two different gains for the Z modulation input #1 and #2
located on the rear panel. When performing typical STM measurements, Z mod. Input #2
should be used. In this case, the value to input here is the same number entered for the Z
piezo scan calibration that is found under System Settings/Scan Head tab. If Input #1 is
used, a value 13 times the calibration should be used here
FFT tab
SPM 32 has a built-in spectrum analyzer capability that can be useful when trying to debug
imaging problems. A Fast Fourier Transform (FFT) can be calculated from any input signal and
this will show the frequency peaks of any excessive noise present in the data. Electrical noise
will always produce peaks at either 60 Hz (in the USA) or harmonics of this value, while
vibrational noise can be present at any frequency. The values for the resonances present in the
data determine what steps should be taken to try to uncover the source of the noise. This control
window is shown in Figure 23.
Data source The channel to calculate the FFT from. If noise is apparent in topographic
images, Topography should be selected here. This will show the noise in the feedback
signal below the bandwidth setting which the feedback loop is trying to compensate for.
RHK Technology, Inc.
Troy, MI
36
SPM 32 User’s Manual
Menu Functions
Other choices here are Current, Aux, Aux 1, Aux 2, A1 rate, A2 rate.
Control status The feedback loop can be ON or OFF when the data is acquired prior to
calculating the FFT. The correct setting will be determined by what data is being sampled
and what the purpose of the FFT is. For topography, the loop should be on.
Data range Total range of the input signal. Depends on what rear panel input is used for
the signal. Valid choices are ±10 V, ±5 V, ±2.5 V, ±1.25 V. This can be changed to
increase the resolution of the measurement. If this is changed from the default of ±10 V,
the proper scaling of the signal may also have to be changed in the Define Inputs tab in
the Image Control window described above.
Sampling rate Bandwidth of the frequency spectrum acquired. Valid choices can be
from 125 Hz up to 250 kHz. Use this to narrow down the data to include only the
frequency range of interest.
Points to Sum Can be used to remove “aliasing” effects present in FFT calculations. A
power spectrum will show errors if the sampling frequency is not at least twice the
highest frequency of the incoming data. If you are only interested in low frequency
components, you can sum points together after acquisition and before analysis to reduce
the bandwidth and increase the speed of the FFT.
Points to acquire Determine the number of points to acquire in the data before
calculating the FFT. A larger number of points will result in smaller frequency bins
(given by the interval entry below it), and therefore better peak resolution.
Spectrum delay Time to wait before starting to sample the data to calculate the FFT.
Can be set to zero in almost all cases with no adverse effects.
Spectra to acquire Number of FFT’s to average together. A higher number will decrease
the signal/noise ratio and give better results.
Display mode The y-axis scale when displaying the FFT can be set to either linear or
logarithmic. A logarithmic scale can help see peaks at smaller magnitudes.
Convert acceleration to height With the builtin FFT function of SPM 32, it can be a
simple spectrum analyzer to study any input signal applied to an auxiliary input. If an
accelerometer is connected, then the ambient vibrational environment can be recorded.
To convert the data into units of displacement, each value is divided by (2πf)2 where f is
the frequency when this setting is ON. If the displayed spectra is then multiplied by the
sensitivity of the accelerometer (usually designated G), the final answer will be the
amplitude of motion (in meters) as a function of frequency.
Acquire noise spectrum Initiates an FFT acquisition with the configured parameters.
Acquire autocorrelation Initiates the acquisition of an autocorrelation spectrum. This
can be useful when tracking noise sources.
Page save mode Sets how the data is stored. Save to screen creates a data page and plot.
You must then choose to save the data to disk if you want to keep it. Screen and disk will
both create a data page and save it to disk. Disk only writes the page to disk, but does not
RHK Technology, Inc.
Troy, MI
37
SPM 32 User’s Manual
Menu Functions
keep a copy in memory for display or processing. This can be useful in automatic data
acquisition, but can also create a large number of data files on the hard drive if the user is
not careful. Index and disk or Index only will add the data file to the data index display
window, but will not create a full sized plot until you request it. This can be useful for
keeping the screen from being filled up by windows during data acquisition. Index and
disk will automatically write the page to the disk as well as adding it to the index.
Scope tab
This selection opens the window (Figure 23) to control the built-in digital oscilloscope available
in the program.
Scope data save mode Used to determine how oscilloscope data is saved when that
option is selected in the display window. Save to screen creates a data page and plot. You
must then save the data page to disk if you want to keep it. Screen and disk will both
create a data page and save it permanently to disk. Disk only writes the page to disk, but
does not keep a copy in memory for display or processing. This can be useful in
automatic data acquisition, but can also create a large number of data files on the hard
drive if the user is not careful. Index and disk or Index only will add the data file to the
data index display window, but will not create a full sized plot until you request it. This
can be useful for keeping the screen from being filled up by windows during data
acquisition. Index and disk will automatically write the page to the disk as well as adding
it to the index.
Scope Autosave If this option is ON, then
every scan of data is saved to disk or index or
screen depending on the status of the Scope
data save mode described above. This can
potentially fill all data buffers and hard drives
with undesired data if not used wisely.
Line test data save mode Used to determine
how data displayed in the linescan window is
saved when that option is selected in the
display window. The options here are identical Figure 24
to the ones described in the Scope data save
mode above.
Line Test Autosave If this option is ON, then every linescan taken is saved according to
the Line test data save mode described in the previous paragraph. This can have an
undesirable effect where every linescan in an image is stored in an individual page,
thereby creating an enormous amount of redundant data.
High pass range The high pass filter range, as a % of image width or data range used to
perform a background subtraction on an image in high-pass mode before display. Small
values attenuate large features more quickly. Values of 5% to 20% are often useful.
A new feature added in this version of SPM 32 is the datalogging routine. This can be used to
acquire cyclic voltammograms during electrochemical STM. Other uses for this include
RHK Technology, Inc.
Troy, MI
38
SPM 32 User’s Manual
Menu Functions
determination of an AFM cantilever resonance or the study of fluorescence decay of molecules
using an NSOM. An output signal can be generated and this can be recorded along with any
input channel or simply a long time record of one signal can be recorded in a chart recorder
fashion. The two signals will then be displayed as they are acquired point-by-point either as a
function of time or with the output along the abscissa and the input signal along the ordinate.
Therefore, a direct correlation between the exciting signal and the system response can be
recorded and studied. The sampling rate of the signal can vary from very short (10's of ms) to
very long (minutes). With this type of variability, very long time
studies can be recorded and saved.
The window to control this data acquisition are shown in Figure
24. There are separate menus to control the acquisition rate, what
channels are read, if an output excitation signal is used, and how
to display the data on a graph.
Control tab under Datalog tab
The first tab is used to enter the data acquisition rate.
Sampling interval The amount of time to sample for
each data point. Since the data acquisition routine relies
on the PC timer, the value here must me an integer
multiple of its fundamental unit, which is 55 ms.
Figure 25
Interrupt acceleration factor Each data channel can be read multiple times during the
sampling interval as long as the Data Translation board in use can keep up with the
sampling rate. The sampling interval selected above will be divided by this integer to
calculate the actual sampling rate. For example, a value of 2 here with an interval of 55
ms means the data channels are read every 27.5 ms. A 150 kHz DT2821 card can reliably
read this data and perhaps can even work with a value as high as 5 (11 ms sampling rate).
The speed of the computer will also play a part in determining how fast the data can be
handled when read.
Total acquisition time Enter the length of time that the data should be recorded and the
number of periods will be automatically updated.
Total acquisition periods Enter the total number of readings to record and the total
acquisition time will automatically be updated.
Enable output If a correlated data set is to be recorded where a voltage is applied to one
of the rear panel DAC’s and the response is read from one or more data channels, then
turn this parameter ON. If only a time record of an input channel is to be recorded, this
channel can be turned OFF.
Display/save output When using the output channel, if the value of the voltage should be
saved along with the response, then turn this ON.
Autosave Turn this ON to have every dataset automatically stored either to screen or disk
(depending on the setting of the next parameter) If this is turned ON, a large amount of
undesirable data may be saved to memory or disk.
RHK Technology, Inc.
Troy, MI
39
SPM 32 User’s Manual
Menu Functions
Page save mode Determines what happens when save is selected (via F4 key or mouse)
during interactive data acquisition. Save to screen creates a data page and plot. You must
then save the data page to disk if you want to keep it permanently. Screen and disk will
create a data page and save it to disk permanently. Disk only writes the page to disk, but
does not keep a copy in memory for display or processing. This
can be useful in automatic data acquisition (Autosave ON) but
may create a large number of undesired files on the drive
wasting space. Index only will add the data file to the data
index display, but will not create a full sized plot until you
request it. This can be useful for keeping the screen from being
filled up by windows during data acquisition (if save to screen
is selected). Index and disk will automatically write the page to
the disk when it is placed in the data index, while Index only
does not. It is critical to realize that an image displayed on the
screen has NOT been written to disk unless explicitly selected
in the Files menu or the Autosave option is ON. If the program
Figure 26
is exited before data is saved to disk, it will be lost.
Input tab under Datalog tab
Any of the input channels can be read as a function of time. All channels turned ON in this
window (Figure 26) will be recorded during each sampling interval. If more than one channel is
ON, then all channels turned on above will be sampled within that time span.
The data range of each channel can be changed in the software independently of all others. The
four choices are ±10 V, ±5 V, ±2.5 V, ±1.25 V. This spreads the bits of the ADC board over a
smaller range, which will increase resolution. The gain on the board will be changed before each
reading so additional sensitivity can be achieved if it is known the signal level itself will not
exceed certain values. This is most useful for a channel which usually remains close to a
constant value so more resolution can be obtained by increasing the gain on that channel.
Output tab under Datalog tab
If a voltage is to be applied to one of the rear panel DACs in order to
stimulate a response to be saved, then the parameters determining the
shape of the voltage are set in this tab Figure 27.
Waveform Select the shape of the output waveform. Valid
choices are Sine, Triangle, Sawtooth Rise, Sawtooth Fall, and
Square.
Wave period The period of the output waveform. Since the
output is tied to the minimum sampling interval of 55 ms, the
period should be at least a few seconds or it will not be very
smooth. The waveform can vary rather slowly and the response Figure 27
channel be read many times as the output voltage changes.
Also, a measurement can be setup where there are many periods of the repeating
waveform during the total acquisition time and the repeatability of the response be
recorded and analyzed. This could be an excellent method to measure transient responses
RHK Technology, Inc.
Troy, MI
40
SPM 32 User’s Manual
Menu Functions
to a step function when using the square waveform.
Initial phase The output waveform does not have to start at zero degrees when the
acquisition routine is initiated. Enter a phase offset here if desired. For a square and
triangle wave, zero degrees is defined as the when the signal is at its minimum.
High limit The maximum value of the output voltage.
Low limit The minimum value of the output voltage.
Data points per output step If this is set to 1, the
smoothest possible waveform is generated. This can be
set to integer multiples of 1 to facilitate sampling the
input channels more than one time per waveform step.
Output label The label to use for the x axis when the
graph is drawn plotting channel response vs. output
voltage. This can be set to any string in order to create a Figure 28
more meaningful graph. For example, if a cantilever
resonance is being explored with a frequency to voltage converter, then the label
‘frequency’ could be entered here.
Output units The units to display along the x axis. Default is simply V. For the
cantilever example, ‘Hz’ or kHz’ would be entered here.
Units/output volt The conversion factor for the output signal. If the signal is applied
directly to the sample (through a Bias modulation rear panel BNC, for example), then this
would be 1. The cantilever example would require the Hz/voltage calibration of the
voltage-to-frequency converter.
Offset The voltage value of the excitation signal when the DAC is set to zero volts. May
be a nonzero value depending on the experimental setup.
Output DAC Turn this ON when data acquisition is desired. Should normally be set to
OFF, to avoid accidental application of a DAC voltage.
Display tab under Datalog tab
The appearance of the graph will be set by the parameters in this window (Figure 28).
Plot mode If multiple lines are plotted on the graph, each will be a different color when
in overlay mode.
Background color The color of the graph window. Can be set to one of a variety of
choices to facilitate easier viewing or printing.
High pass time constant If the high pass display has been selected, then this time
constant determines the bandwidth of the data when displayed. Filtering out low
frequency components may aid the visualization of the data.
Image spectroscopy window
RHK Technology, Inc.
Troy, MI
41
SPM 32 User’s Manual
Menu Functions
The versatility of the SPM 100 also allows for another type of data acquisition that can be very
useful when studying certain materials. A measurement can be setup to scan a single line and
then before incrementing in the y direction, the sample bias can be changed and the linescan
repeated over the same area of the surface. Up to four images can be acquired at a single location
on the surface, and the settings to use in this acquisition method are changed in the window
displayed in Figure 29. The various images acquired in this manner can then be compared and
features seen in the two images can easily be correlated with each other. A good example of the
usefulness of this techniques is when imaging the cleaved (110) face of any III-V semiconductor.
Both anion and cation dangling bonds are present on the surface and the anion sites are imaged
with a negative sample bias while the cation sites are imaged with a positive sample bias.
It can prove to be difficult to correlate features if the images are obtained successively one after
the other and there is substantial drift between the two scans. By scanning the same area of the
surface one line after another, the drift effects are effectively eliminated except in the most
extreme cases of very large drift. Therefore, the images can be overlaid and the correlation is
quite easy to do. The only effect remaining is in piezo non-linearities which are minimized if
scanning is performed slowly enough or over small areas.
Multi tab
The first tab is shown in Figure 29 and this window can be used to set the different imaging
conditions needed to obtain a related set of images.
Image voltage count The number of different voltage images to be acquired in
multi-voltage imaging. Two, three or four voltages may be set. The first voltage is
usually the bias set on the electronics unit.
Voltage change delay After the voltage is changed, a delay can be introduced before the
subsequent linescan is started to allow any transients to decay that are induced into the
feedback loop by the sudden change in voltage. For the fastest scanning possible, this
delay should be as short as feasible; the optimal
value can be determined by looking at the z signal
with an oscilloscope and noting the duration of the
transient signal.
First page voltage Usually the value determined
by the front panel knob.
Second page voltage Set this to whatever bias is
desired for the second image formed when the
linescan is repeated.
Third page voltage Set this to whatever bias is
desired for the third image formed when the
linescan is repeated. If Image voltage count is set
to less than 3, this setting is ignored.
Figure 29
Fourth page voltage Set this to whatever bias is desired for the fourth image formed
when the linescan is repeated. If Image voltage count is set to less than 4, this setting is
ignored.
RHK Technology, Inc.
Troy, MI
42
SPM 32 User’s Manual
Menu Functions
Standby voltage When the STM Bias Mode is turned OFF the voltage returns to this
value when no image is being acquired. There may be a reason to not have this set to zero
for some applications.
STM Bias Mode Can be set ON or OFF. Should be ON when acquiring data in STM.
The applied voltage is created by reading the bias knob set by the front panel knob and
creating an additional voltage with the DAC that will be added to this voltage such that
the final sum has the desired value. Should probably be turned OFF if performing
spectroscopy that involves ramping a voltage and monitoring a signal when using other
SPM techniques such as AFM, NSOM, etc. Since the front panel bias knob does not
mean the same thing as when operating a STM, the DAC should ignore the knob setting
when interfacing with another SPM and directly produce the desired voltage setting.
Output volts per D/A volt In a conventional SPM 100, both bias modulation inputs have
a gain of 1. However, for some applications, there
may be an advantage to decreasing the smallest
voltage step to be taken by changing the gain of one
input. If this is done, then this value needs to be
adjusted to reflect the new circuit gain. If the gain is
changed to 0.1 then 1 Volt DAC output will only add
0.1 Volt to the actual sample bias.
Output DAC Sets which rear panel DAC will be
used. A BNC-BNC jumper MUST be connected
from this DAC to the appropriate input for proper
operation.
Control tab under CITS tab
A particularly useful technique of data acquisition is Current
Imaging Tunneling Spectroscopy (CITS). This is related to Figure 30
normal I-V spectroscopy when operating a STM, but for
added flexibility it has a separate control window compared to conventional I-V spectroscopy.
The feedback loop is interrupted at every pixel and the sample voltage (if using a STM) or
another external parameter is stepped through a series of values while recording the feedback
signal. For STM, the value of the current for each bias setting at every pixel can then be used to
form an image. This allows electronic features to be more easily seen since the feedback loop is
off and the tip height will not be adjusted if the current deviates from the setpoint value. In this
manner, the variations across the surface in tunneling probability for a given tip height can be
explored as a function of sample bias. An additional feature added here is the handshaking
capability which can be used to communicate with external equipment and acquire data at
precisely specified pixel locations under various external conditions and compare to images
taken under nominal settings. This can be very useful in NSOM applications. The window is
shown in Figure 30.
Pre-sample delay The interval between setting a voltage and reading the channel data.
This will allow any transients in the system to decay. The time should be determined by
monitoring the feedback signal with a fast oscilloscope and measuring the time
RHK Technology, Inc.
Troy, MI
43
SPM 32 User’s Manual
Menu Functions
loop pre-stabilize delay Time required to allow the feedback loop to reach equilibrium.
This is the delay after scanning stops and before CITS acquisition. The feedback loop is
on during this period.
loop post-stabilize delay The post-stabilize delay allows the feedback conditions to
stabilize before resuming the scan. If the feedback was disabled, it will be enabled at the
midpoint of the stabilization interval and the rest of the time is used to wait for any
subsequent transient signals to decay before the tip is moved to the next pixel.
Control loop The feedback loop can be OFF or ON while the signal (such as tunneling
bias) is ramped and the feedback signal recorded.
STM Bias Mode As above, this can be set ON or OFF. Should be ON when acquiring
data in STM. The voltage ramp is created by reading the
feedback bias set by the front panel knob and creating an
additional voltage with the DAC that will be added to this
voltage such that the final sum has the desired value. Should
probably be turned OFF if performing spectroscopy that
involves ramping a voltage and monitoring a signal when
using other SPM techniques such as AFM, NSOM, etc (or
when the voltage is summed into something other than the
tunneling bias when doing STM). Since the front panel bias
knob does not mean the same thing as when operating a STM,
the DAC should ignore the knob setting when interfacing with
another SPM and directly produce the desired voltage setting.
No CITS output Used if no voltages are ramped when
acquiring the data at each pixel. An example would be NSOM
acquisition where no sample bias is generated by the SPM
100, instead only sampling delays and the handshaking need
to be configured.
CITS image size Selecting 1:1 gives a CITS image the same
size as the normal scanned image. Selecting 1:4 gives a
Figure 31
smaller image as CITS data is acquired at every fourth pixel.
This can be used to reduce image acquisition time when the CITS data acquisition is
slow. It is one way to record NSOM data, for example, on a reduced grid.
CITS handshaking Can be ON or OFF. An advanced application of CITS mode is to
coordinate data acquisition with other equipment and/or computers. This is done by
"handshaking". The scan is stopped at each CITS pixel, the first voltage is set, then the
SPM32 program will wait until the handshake channel voltage is on the correct side of
the handshake threshold, set by handshake level, before it reads the CITS data.
Handshake timeout sets a limit on how long SPM32 will wait for data. The CITS standby
and data voltages set in the CITS Inputs Window can be used to send signals.
In/Out tab under CITS tab
The voltages to acquire the current images are set in this window (Figure 31) along with what
RHK Technology, Inc.
Troy, MI
44
SPM 32 User’s Manual
Menu Functions
channels to form an image from during the scan.
CITS voltage count Number of different voltage steps to use at each pixel. A maximum
of four is permitted at this time, but this will increase in the future.
First voltage The first voltage setting after opening the feedback loop.
Second voltage The second voltage setting after opening the
feedback loop.
Third voltage The third voltage setting after opening the
feedback loop.
Fourth voltage The fourth voltage setting after opening the
feedback loop.
Standby voltage The control voltage is set to this value when
CITS data is not being collected. If operating a STM, the
STM Bias Mode (see above) should be ON with a standby
voltage of 0 since the bias voltage for imaging is set from the
front panel knob. This is also the control voltage to use for
handshaking communication to indicate no CITS data is
being acquired.
Output channel The rear panel output that the voltage
should be applied to. A BNC-BNC jumper must be connected Figure 32
between this DAC and one of the Bias modulation inputs for
proper operation of the CITS mode during STM. This DAC can be connected to any
equipment for different data acquisition routines.
The SPM 100 can acquire data from 5 different channels simultaneously. The Topography,
(User), Aux, Aux 1, Aux 2, A1 rate, A2 rate channels can all be ON or OFF while CITS data is
being acquired. If taking STM data, the (User) channel will be named Current in the
configuration window (see later section) and should be ON. If using an AFM, this will be Force
Error.
Control tab under In/Out tab
The final form of image spectroscopy that can be used is termed “Input/Output”. Here, there is a
facility to ramp scan parameters as each line is scanned or after a fixed number of lines. This is
typically used in AFM to acquire friction measurements or other similar data by changing the
cantilever force in successive lines. When coupled with setting the Y frame to zero, the same
area of the surface is scanned repeatedly while changing other settings so the “image” formed is
not over a physical area of the surface but instead gives information related to the tip-sample
interaction over the same sample area. Another use would be to change the sample bias while
scanning over an area of the surface and take a large number of images at different settings in an
unattended fashion. The configuration tab is shown in Figure 32.
Data mode Three different options are possible for data acquisition when using the
“In/Out’ imaging mode. Input only simply records data as the acquisition parameters
dictate. This would be useful to perform time evolution studies, for example, where a
RHK Technology, Inc.
Troy, MI
45
SPM 32 User’s Manual
Menu Functions
long delay can be introduced between images. No imaging conditions necessarily have to
be changed, but the user wants to take a long series of images in unattended manner.
Input/output is used to record the images along with changing some condition using one
of the DAC’s. Output will change a parameter as designated use the settings in the
window.
Ramp mode The scan parameter can be ramped on a line-by-line basis or the ramp can
be slowly varied on an image-by-image basis. If line-by-line is selected the entire
parameter range is ramped over during each linescan. If image-by-image is chosen, a
series of images are acquired with the ramp slowly varied during the entire sequence of
images.
Ramp high limit Maximum value of the voltage ramp.
Ramp low limit Minimum value of voltage ramp.
Ramp standby value Value of output voltage when no scanning ramp is applied or when
the data acquisition is interrupted.
Ramp type Determines the direction of the ramp during the course of either a single line
or a series of lines. Valid choices are low to high, high to low, low to high to low, high to
low to high.
Update after Number of lines to scan before incrementing the ramp another step. Valid
choices are from 1 to 128 in powers of 2. If the setting is 128 lines, then in a 256 line data
frame half of the data will be at one setting, and the second half of the frame will be
taken with the next step of the ramp.
Image count Number of images to acquire over the course of ramping the voltage from
one limit to the other. This would allow for unattended data acquisition. The series can be
manually interrupted at any time.
Output change delay The period of time to wait after changing the voltage ramp before
the next scan is started. This allows transients present in the signal after the abrupt
change in a imaging parameter to decay away.
Output label The label of the parameter that is being changed. This would be Volts if
operating a STM or perhaps Force if an AFM friction measurement is performed.
Units/output volt This is how much the parameter changes for each volt applied to the
DAC. For a changing STM bias measurement the value would be 1. If operating an
AFM, the conversion is related to the cantilever constant and the calibration of the scan
head.
Offset The DC offset of the applied ramp. In a force measurement, the total force at any
ramp point would be (initial force + ramped force).
Output units The units to store with the data that indicates what was changed.
Output DAC The rear panel DAC that the voltage ramp is applied to. The experiment
RHK Technology, Inc.
Troy, MI
46
SPM 32 User’s Manual
Menu Functions
that will be performed is ultimately determined by which input this voltage is applied to.
One example would be using the Bias modulation input for
STM imaging at different sample biases or AFM imaging at
different force setpoints.
Channels tab under In/Out tab
Any of the seven input channels can be recorded during the data
acquisition by turning each channel setting ON. This is done in the
window shown in Figure 33.
Record output The value of the output DAC is recorded once
per line/image during data acquisition.
Record time The actual time from the computer clock can be
recorded once per line/image (with about a one second
accuracy). This can be useful when acquiring time evolution
data in input mode.
Figure 33
Handshake tab
All spectroscopy modes now implement the handshaking routine that was previously only
implemented in CITS. The scan can be stopped at a regular grid of points or at interactively
selected points, and external equipment can be used to acquires data. This allows the exact
location of the data to be synchronized with the image
features. A voltage is output one of the rear panel DACs
and this will activate the external data acquisition. When
the acquisition routine is completed, it returns a signal to
one of the auxiliary channels to indicate to SPM32 that the
routine is finished and the tip can be moved to the next
pixel.
Handshake output channel The input data channel
used for CITS handshaking. Normally this channel
will not be used for normal or CITS image
acquisition. Any of the DACs on the rear panel can
be selected.
Handshake ready voltage The voltage level to apply to the DAC to trigger the external
equipment to start its acquisition.
Handshake standby voltage The voltage level to use when normal acquisition is taking
place. Usually this would be zero, but it could be held at a non-zero voltage level if this
can be understood by the external equipment to mean something like keeping equipment
in ready mode to avoid delays when the equipment is first turning on.
Handshake input channel The auxiliary channel to read for the DONE signal. A BNC
from the external equipment to the aux channel must be connected.
Handshake threshold The value that the Control voltage setpoint has to reach before the
feedback signal data is acquired at each pixel.
RHK Technology, Inc.
Troy, MI
47
SPM 32 User’s Manual
Menu Functions
Handshake condition Valid settings are above threshold or below threshold. If the
threshold (see previous entry) is +3.0 V and
above threshold is selected, then CITS data
will not be recorded until the handshake
channel voltage is greater than +3.0 volts.
Handshake timeout Sets the maximum
time the SPM32 program will wait before it
stops data acquisition and issues an error
message. This will prevent data acquisition
from stopping if there are problems with
external equipment. You may want to
choose a timeout value that will not leave
the feedback loop open for too long an
interval in case of problems. If a long
amount of time is placed in here and the
Figure 34
acquisition needs to be interrupted, use the
ESC key.
Noise Power
Used for diagnostic purposes. A Fast Fourier Transform (FFT) of the input signal is calculated to
look for large peaks at specific resonances. If peaks are present at 60 Hz or harmonics of this
frequency ( in the United States), this usually indicates problems related to electrical pickup or
ground loops. Peaks at other values (particularly low frequencies) are typical when the
microscope is coupled to external vibrations. An example with a large amount of 60 Hz noise is
shown in Figure 1. To extract the precise frequency of a peak, the Cursor mode should be used to
slide over the plot and have the exact position displayed. More details are provided in the
Analysis section.
Spectrum
A single sweep spectrum is acquired at the current location of the tip. The voltage sweep and
resulting data will be dependent upon the parameters in the point spectroscopy control window
discussed above.
Autocorrelate
An autocorrelation analysis of one of the input channels can be calculated using this selection.
The data displayed is actually the square root of the autocorrelation, normalized for the number
of data points collected. This analysis is controlled by the same set of parameters as the power
spectrum, but usually does not require as large of a number of data points for a useful spectra.
Often 1 or 2 thousand is enough. Too many data points (> 16,000) may cause the results to
exceed the floating point data range of the PC, producing a flat output.
Lithography 1 and Lithography 2
Features can be produced on the surface by the application of voltage pulses to the bias output.
These are induced by the large electric field present between the tip and sample. This technique
can also prove useful for improving the performance of a STM tip by inducing field emission
RHK Technology, Inc.
Troy, MI
48
SPM 32 User’s Manual
Menu Functions
from the tip to the sample and thereby expelling material (either contamination or spurious tip
material) from the end of the tip. Two different pulse conditions can be defined in the
Lithography tab.
MCA spectrum
Acquires a multi-channel analyzer spectrum utilizing an Ortec 921 multi channel buffer. The
equipment to interface with this analyzer can be purchased as an accessory with the SPM 1000
system.
Atomic Manipulation and Lithography
The new DSP scan board has opened a large number of
new data acquisition possibilities. Version 2000 of SPM32
introduces a new method for selecting spectroscopy
points. The Acquire tab can be used to immediately aquire
(Figure 34) spectra at a defined location of points. This
method can be very useful to acquire an image and then
immediately move the tip to a location on the surface
where an interesting feature is present. Spectroscopy data Figure 35
can then be acquired directly over the desired location without scanning an entire image over
again. Single point spectroscopy over an extended period of time can now be achieved with this
feature.
Spectral type What spectroscopy algorithm is to be executed at the selected points. Valid
choices are spectrum, GPIB, and MCA.
Spectral data save mode As the data is acquired, choose the mode for automatically
saving the data. Save to screen creates a data page and plot. You must then save the data
page to disk if you want to keep it permanently. Screen and disk will create a data page
and save it to disk permanently. Disk only writes the page to disk, but does not keep a
copy in memory for display or processing. This can be useful in automatic data
acquisition (Autosave ON) but may create a large number of undesired files on the drive
wasting space. Index only will add the data file to the data index display, but will not
create a full sized plot until you request it. This can be useful for keeping the screen from
being filled up by windows during data acquisition (if save to screen is selected). Index
and disk will automatically write the page to the disk when it is placed in the data index,
while Index only does not.
Mark path As the cursor is dragged across the surface, the path that it traces out will be
shown on the Scan Area window when this is ON. Otherwise, the history will not be
recorded on the screen. Also, when spectra are acquired at a set of points, the path the tip
took when moving to each point is recorded with a line.
Acquire relative spectra When a grid of relative points are selected interactively using
the Scan Area window, click this setting to immediately have the tip move to each
selected location and acquire the spectral data designated in Spectral Type.
Acquire absolute spectra When a grid of absolute points are selected interactively in the
RHK Technology, Inc.
Troy, MI
49
SPM 32 User’s Manual
Menu Functions
Scan Area window, click this setting to immediately have the tip move to each selected
location and acquire the spectral data designated in Spectral Type. This can ensure
always acquiring a spectra over a feature on the surface even if it moves within the frame.
If pixel 25,13 is selected for spectroscopy and then the frame shifted 5 pixels to the right,
in the new frame the spectrum will be acquired at the pixel 20,13.
Draw relative lines Features can be ‘drawn’ on the surface by selecting two points and
when the tip is moved between the points, conditions are changed to alter the surface.
When laying out the lines in the Scan Area window, the endpoints will move with the
scan frame when this is ON.
Draw absolute lines Features can be ‘drawn’ on the
surface by selecting two points and when the tip is moved
between the points, conditions are changed to alter the
surface. When designing the lines to be drawn, turn this
parameter ON so the lines remain fixed over the surface if
the scan frame is moved.
A major new feature of SPM 32 is designed for tip manipulation
of individual atoms. A bias can be applied to pick up or drop an
atom and then the mouse used to designate the new tip location.
When this location is reached, the bias can be changed to reverse
the process. Several examples of experiments to be used with this
feature are discussed in Chapter 5.
There are two ways to move the tip with the new software, it can
either be “dragged” to a new location or the new origin can be
Figure 36
selected by clicking on the location and the tip will then move
there at the speed set in the window shown in Figure 35. To move an atom or produce some
lithographic feature on the surface, the Drag function should be used. While the mouse cursor is
being dragged, the conditions can be changed to either move an atom on the surface or perhaps
create features on the surface through a lithographic technique. The move conditions should
generally be kept the same as the nominal tunneling conditions. It should only be used to
relocate the tip on the surface to begin another step of lithography or move another atom.
Define tab
The first step when setting up atomic manipulation experiments is to define what the conditions
should be when “moving” and “dragging” objects. These are entered in the Define tab shown in
Figure 36. Two different set of output conditions can be defined and utilized during
manipulation experiments. In order for the bias or setpoint to be applied a BNC-BNC cable
must be connected from the appropriate DAC to the modulation input on the rear panel of
the SPM 100.
Output channel This can be turned OFF to avoid accidental application of a voltage
when normal tip motion is being used (simple scan and offset navigation to image a
different area of the sample).
Label The label to apply to the signal. This is determined by what modulation input the
RHK Technology, Inc.
Troy, MI
50
SPM 32 User’s Manual
Menu Functions
signal is connected to.
Units The units of the modulation input. This would be V if connected to a Bias
modulation input, m (for meters) if connected to a Z
modulation, or A (for Amps) if connected to a setpoint
modulation.
Units/output volt If a standard Bias modulation is used,
the 1 V output will result in 1 V added to the bias. Use
the value of the Z calibration or 13 times the value
depending on which Z input modulation is used. The
setpoint value depends on the serial number of the unit
and the current monitor value for the preamps in use. For
units with serial number less than 960, 1 V applied to the
rear panel Setpoint modualtion changed the actual
setpoint by 100 mV. After 960, 1 V on the rear panel
output changed the setpoint by 1 V. The amount of
current this voltage corresponds to depends on the
preamp gain and is the inverse of the STM Current per
monitor volt value entered in the Gains page of the SPM Figure 37
100 setup tab.
Offset When no motion is taking place an offset can be applied.
Move tab
Tip move speed When the new origin has been selected by clicking in the navigation
window, the tip moves to this origin at the designated speed. Be careful not to set this too
fast for a given feedback loop setting as tip crashes can occur if the speed of the tip is too
fast to allow the feedback loop to retract it when a large feature is encountered.
Tip drag speed When the tip is moved by selecting the origin and holding the control
button of the mouse while dragging the diamond in the navigation window, the tip will
follow the mouse cursor. Setting this parameter allows an upper limit of the speed to be
set and if the mouse exceeds this value, the tip will move at this speed and eventually
catch up to the cursor.
Tip move delay Before the tip motion is commenced, a delay can be set to allow the
output voltage to be set and the tip can “capture” an atom. This can also be used to allow
any transients to decay that may be present from changing the feedback conditions
through the application of an external voltage.
Tip drag delay Before the tip is “dragged” a delay can be set to make the output voltage
take effect and an atom can be picked up. This can also be used to allow any transients to
decay that may be present from changing the feedback conditions through the application
of an external voltage.
Output 1 and 2 section
The labels that were entered in the Define tab will be shown here and the channels can be turned
RHK Technology, Inc.
Troy, MI
51
SPM 32 User’s Manual
Menu Functions
ON to activate these while “moving” or “dragging”.
Move level Set the output level to be summed into the bias while the tip is moved to the
new origin. After the motion is finished this bias is NOT reset to zero. This means the tip
can still have an extra bias applied when resting at its new location. Be careful when
setting this parameter.
Drag level The output voltage to be summed into the bias while the tip is “dragged”.
SPM32 now features sophisticated lithography routines that take advantage of the DSP
capabilities. The window used to enter lithography parameters is shown in Figure 38. Two
different lithography pulses can be defined and used simultaneously or separately under different
conditions. The settings are identical for each pulse and will be discussed generically below.
Output channel The rear panel DAC to apply the voltage pulses. To properly use the
lithography routine, a BNC-BNC jumper must be placed between this output channel and
the appropriate modulation input (in most cases Bias modulation or setpoint).
Image spectroscopy pulse Two different pulses can be defined in this window. If
Lithography is selected for the Spectroscopy mode, then this determines which pulse
(one or two) is applied at the selected array of points.
Pulse Type options Define the shape of the individual pulses here.
Lithography On voltage The height of the voltage pulse to apply
Lithography Off voltage The nominal DAC output to apply when no lithography is
taking place. This should normally be set to zero.
Use bias voltage If this is ON, then the DAC output voltage
will be adjusted with respect to the applied bias voltage.
This should be used in STM mode. For example, if the Bias
knob on the SPM 100 is set to +1.0 Volt and the pulse
height selected above is +3.3 V, then the DAC voltage will
be set to +2.3 V such that the final voltage applied to the
sample is +3.3 V.
Voltage on The duration of the voltage pulse.
Delay The time delay from when the lithography pulse is
selected until the time it is actually applied.
Repeat count The number of times the pulse should be
applied in succession each time the Lithography pulse menu
item is selected.
Control loop Determines whether the feedback loop is ON
or OFF while the pulse is applied.
Generate Lithography pulse Clicking this option will
immediately apply a pulse. Identical to the menu function
Acquire/Spectroscopy/Lithography1
RHK Technology, Inc.
Figure 38
Troy, MI
52
SPM 32 User’s Manual
Menu Functions
SPM Status
This selection under the Acquire menu opens the status window (Figure 39) that displays the
current knob positions of the SPM 100. This is useful for converting the digital volt meter
readings on the front panel into Angstroms (or
nanometers) for easier tracking of tip position, scan size,
etc. Changing the knob settings on the SPM 100 will
appear as immediate updates in the status window.
Scan Area
Opens the navigational window to help track the relative
location of the tip within the entire accessible area of the
sample. This can be useful to form mosaic images where Figure 39
large composite images of the surface are formed by
combining smaller images together and also can be used to easily zoom in on certain features
found in large area scans to acquire higher resolution images for increased detail. A more
detailed description of this window is contained in Chapter 4. It can also be opened using the
F10 keyboard shortcut
Analyze
Image analysis is now carried out using the image display window directly. The menu options
discussed below are still present, but a quicker and easier way to analyze data is to utilize the
small green rectangle in the upper left corner of each image window. An example of this is
shown in Figure 40. Clicking on the red box in the
upper right corner will close an image window.
Formerly this was done using a double click of the
mouse. When the mouse cursor is placed over the
green box and clicked, a menu appears with five
options, Single point, Point/line, Section/view,
Angle/lattice, Spectra/view, Fourier. The following
section illustrate the purpose of each one. How they
act is determined by the Analyze Control window.
The Analyze menu is the main menu to use when
trying to extract quantitative data from acquired
images. The functions described here can operate on
any data page selected by clicking on the image.
These pages can be data files already saved and then
retrieved from the disk or new data just acquired that
is only stored on the screen and/or the data index.
Figure 40
Analyze control
The main window where the parameters are set that control how the analysis functions are used
is shown in Figure 40.
RHK Technology, Inc.
Troy, MI
53
SPM 32 User’s Manual
Menu Functions
Analysis tab
The first grouping is used mainly to determine the behavior of the program when taking cross
sections through images.
Live cross section display When this is turned ON, the
cursor can be moved across the image and the display
window with the section plot is updated continually. Turn
this setting OFF if using a slow computer where the
processor cannot update the plot quickly.
Dual scan cross sections If this parameter is ON and both
a forward and reverse scan are collected together, then
taking a section in an image will produce a graph that plots
the data taken from the identical area of both images. This
can be useful for checking friction loops when acquiring
AFM data or to get an idea of how much non-linearity is
present in the images due to piezo hysteresis found in most Figure 41
scan head configurations. In an ideal case, when the
images are taken with identical tunneling conditions on the forward and reverse scans,
the features on the surface should exactly match. This can also be used as a check to see
if the scan speed is too fast for the given feedback conditions. Features that appear to be
asymmetric between the two sections would be indicative of this condition.
Related page cross sections When this parameter is
ON, taking a section from any data page of a set
acquired simultaneously will produce plots of the
section taken at the identical locations for every
page. For example, if the forward and reverse scans
of 4 channels acquired simultaneously are saved (for
a total of eight separate pages), then taking a section
in any of the images will produce four plots when
Dual Scan cross sections is OFF or eight plots
when Dual Scan cross sections is ON.
Cross section points This determines the number of Figure 42
local pixels to smooth over when taking a section
through the data. Valid choices are 1, 5, 9, 25. A higher number will produce smoother
data plots.
Slope image points When the local x or y slope are calculated using the menu item
described above, a Savitzky-Golay algorithm is performed. The number of points to use
in the calculation is set by this parameter. Valid choices are any odd number from 3 to
25. If 3 or 5 is selected, then a 2nd order algorithm is used, for any higher settings here,
the 4th order algorithm is used.
Histogram bar graph The histogram produced by the Analyze/Image Histogram menu
item described above can be displayed as either a bar graph or a conventional X-Y line
plot.
RHK Technology, Inc.
Troy, MI
54
SPM 32 User’s Manual
Menu Functions
Histogram plot colors A particularly nice feature is displaying the histogram plot with
the same variable color scale as the image used to calculate the data. In this way, the z
height along the abscissa of the graph is directly correlated to the varying color of the
graph (see Figure 42). If a normal single color line is desired (either for printing purposes
or visual aesthetics), then turn this OFF.
2D histogram grid This determines the image size of the 2D histogram. Valid choices
are 32x32, 64x64, 128x128, 256x256, 512x512.
A + cB scale Value of c used in the scaled sum calculation.
XY average mode When performing an image x average or image y average, all of the
points in the section can be used or alternatively, only the local maxima or local minima
would be used. The last two options can be useful when analyzing AFM friction images.
Local min/max range The value entered here is used to determine where the local
minima or maxima are when calculating a local x or local y average. For example if 5 is
entered here, then the local minima is considered to be anywhere that no pixel is lower
within 5 pixels on each side. This would need to be adjusted to different values
depending on the area the image covers and the size of the
relevant features in the image.
FFT tab
The control tab used to govern the behavior of the Fourier filter
routine is shown Figure 43. The Fourier filter first calculates an
FFT of the data page and then performs some processing to the
Figure 43
result. This can be used to eliminate some peaks from the FFT or
other similar functions. They are best used to abolish periodic noise from the data caused by
electrical interference or vibrations.
FFT Window Mapping Set the scale used to display the FFT data when the Image 2D
FFT item is selected under the Analyze menu. Valid choices are linear, limited,
equalized, light shade, physical, and logarithmic. In almost all cases, a logarithmic scale
should be used in the data display window.
Power Display Range Use this to control the limit of spatial frequencies displayed in the
2D FFT when the Image 2D FFT item is selected under the Analysis menu. Since lateral
resolution is limited in SPM to ~1-2 angstroms at best, there is not much point in
displaying the power spectrum at frequencies below this resolution. The parameter can be
set to zero if no limiting is desired.
Image analysis and fourier processing
The efficiency in accessing simple image anlysis functions has been greatly increased in version
2002 of SPM32. The choices are accessed using the drop down menu opened when clinking on
the green box as discussed above.
RHK Technology, Inc.
Troy, MI
55
SPM 32 User’s Manual
Menu Functions
The first choice from the green box is Single Point. This can be used to get a quick reading of
which pixel a particular feature is located at and also what its
height is. As the cursor is moved over the image the
information bar displays the pixel value and the height. An
example is shown in Figure 45. The second selection in the
green box is Point/line to be used to obtain quick
measurements of lateral features. The endpoint is chosen and
a line stretched across the image. The information var then
displays the length of the line, the pixel endpoints, and the
height difference between the two endpoints. An example of
this display is shown in Figure 46.
Data Sections
The third choice Section/view and can be used to extract
sections of data from the image. A beginning point is picked Figure 44
and as the line is moved around the image, the section is displayed in realtime in the adjacent
window (Figure 46). When the appropriate cut has been
selected, pressing the “section” button in the window
writes the two dimensional data to a new data page that
can then be manipulated. To smooth the section as it is
converted to a data page, choose the number of points
in the button next to the Section button. A label can be
added to the image by pressing the “Label” button. It
will be printed over the image at the current cursor
position. To clear all labels from the image, press the
“Clear” button.
To extract quantitative information from a graph, the
Cursor option available from the direct access menu
Figure 46
should be used. This menu is opened by clicking the
CONTROL button when the mouse cursor is in the upper left corner of the window. A section
will be displayed in a window as shown in Figure 46. The yellow line is drawn between the two
endpoints and an X marks the active endpoint to br dragged by the mouse cursor. To select the
other endpoint of the line, click the mouse with the cursor
over the second endpoint. As the cursor is moved, the
statistics of the two positions are updated in the window.
When the desired two points have been selected, clicking on
the Stat button will produce a window as shown in Figure 46
Lattice spacing
The next selection from the green box is angle/lattice. An
image can be analyzed to obtain the unit cell dimensions and
also visualize how much drift and creep are in the image by
using this selection. A small set of axes are placed in the
center of the image (Figure 47). The origin can be moved by Figure 45
clicking the control button on it and while holding the button
RHK Technology, Inc.
Troy, MI
56
SPM 32 User’s Manual
Menu Functions
down, drag it to a new location. Better results can be achieved by stretching the lines as long as
possible and centering them over the atomic site. The length of each line and the angle between
them is displayed in the information box.
An easy method to check for non-linear effects such as
drift and piezo hysteresis is to click the Lattice button
and then input the number of atomic sites covered by
each line. An array of crosses will then be place over
the image at each calculated lattice position. This is also Figure 47
a useful technique to perform the initial calibration of
the piezo sensitivities which is covered in detail in Chapter 3.
Spectroscopy curves
If spectroscopy data is acquired during a scan, the Spectra
view menu item can be used to display the image as shown in
Figure 49.
If the grid button is clicked, a cross will be drawn at every
pixel where the feedback loop was interrupted and
spectroscopy data was taken. An example where data was
acquired on a 4x4 grid is shown in the figure. The cursor can
be moved close to any cross and then upon selecting the
spectra button a plot will be drawn showing the family of
curves taken at that location. In the example shown, the
voltage ramp was repeated 16 times at each pixel location
and 16 separate curves were then acquired and stored at each Figure 48
spectroscopy location.
The area spec button places a blue box on the image that can be resized to include as many
pixels as desired where I-V curves were acquired. This box
can be resized; and after double clicking the mouse to close
the window, all spectroscopy curves acquired inside this
box are displayed on a new data plot. These can then be
averaged together or manipulated in any fashion as a
separate data set. This provides a convenient method to
collect a set of curves acquired over a relevant feature on
the surface.
With a plot on the screen displaying spectroscopy data, the
cursor can be placed in the upper left corner of the window,
and clicking the CONTROL button of the mouse will
popup the direct access menu for plot windows. One choice
on the menu is Select lines and selecting this will create a Figure 49
spectroscopy window as shown in Figure 51. The window
can be used to delete curves from the window before an average is computed. If, for example,
one curve in a family of 24 curves had a single anomalous current spike, the dataset should be
eliminated so the average is not skewed at the one voltage value from the isolated, large current
RHK Technology, Inc.
Troy, MI
57
SPM 32 User’s Manual
Menu Functions
reading. As the up and down arrow keys are pressed, a different curve is highlighted in yellow
and the curve number is displayed at the bottom of the window. Pressing the Hide button will
eliminate this curve from the display. Curves that were hidden can be retrieved to be displayed
again by choosing the correct number and the button will
read Show. Selecting this will return this I-V curve to the
graph. The individual color of each curve can also be
selected with the color selector box. If a user wants to
redisplay all plots after a large number have been hidden to
start the selection process over again, the all button can be
clicked. Choosing the X button will exit the selection
window and redraw the plot in a conventional plot
window. To display the average of only the selected
curves, pick selected ave + data or selected ave only.
A group of spectroscopy curves from different images can
be averaged together by combining all of the I-V curves
into one plot. This is done using the Add plot function in
the direct access menu. All other graphs should be shown
on the screen and then clicking on each window will draw Figure 50
all plots from the selected window in the current graph.
After the different graphs have been combined, all normal functions available for a single plot
window are available (show/hide curves, average curves, write to file, etc.).
Image processing
The interface for image processing has changed dramatically
in version 2002. Now sophisticated image processing
routines are accessed easily through a new combined
interface. Useful FFT filtering routines are now performed
through the new interface which is opened by selecting
fourier from the drop down opened when clicking on the
green box. A pictorial view of the actual filter applied can be
displayed and a second pane provides an immediate display
of the resulting image. The two dimensional FFT can be
displayed and specific noise components can be singly
deleted to eliminate noise in the image that is present at a
fixed frequency. Pre-processing functions like background
Figure 51
subtraction as well as power spectrum windowing routines
are also available.
An example image with some obvious periodic noise is shown in Figure 52. This noise can be
easily removed by specifically deleting the features with this observed periodicity.
The new window will first as appear as shown in Figure 57 With the calculated FFT on the right
and the raw image on the left. In this figure the image may not appear as noisy as the previous
display due to printing phenomena. On the right side of the window are the image processing
routines that can be applied. The choices are prepare, notch, point, filter, and MFM.
RHK Technology, Inc.
Troy, MI
58
SPM 32 User’s Manual
Menu Functions
The most obvious feature of the FFT is the large, bright dots in the upper right and lower left
quadrants. These are the frequencies of the various periodic noise structures present in the image.
The long horizontal strip in the middle of the image is the power that is due to the long
wavelength overall slope in the
image. This can be eliminated
using the Prepare section of the
window. Three choices for the
treatment of sample slope and
three choices for FFT
windowing are available.
Sample slope
The overall slope of the image
can be subtracted before the
FFT is calculated. This will
eliminate most of the power at Figure 52
the long wavelengths. As soon as a new choice is made the power spectrum will be recalculated
and redisplayed, The three choices are keep slope, sub slope, no slope. To see the change in the
image as each option is tried select the button below the left pane and change from original
image to pre-processed image. Now the data will be shown with the slope and windowing
function applied. To have the
slope subtracted choose sub
slope, to have the raw data used
choose no slope, and to have
the slope subtracted the FFT
calculated and then the overall
slope added back to the image
choose keep slope. After
selecting how the slope should
be handled, the second choice
is to decide what window
should be applied to the FFT.
There are three options here
and each have a slightly
Figure 53
different effect. Applying a
window function (Parzen type window) smoothly drops the image intensity to zero at the edges
and minimizes Fourier artifacts due to the finite size of the image. However, special note should
be taken and the left image should display the pre-processed image is any window function is
chosen. Note that the edges of the image are then attenuated and only the central region of the
image still contains data. The Parzen window does optimize the FFT of the image to produce the
best possible resolution in fourier space. Choosing Clipped will not alter the image much but will
convolve a trapezoid with it in order to slightly minimize edge effects. The size of the trapezoid
is set in the window below the option. The larger the number the wider the area of the data that
will be eliminated near the border. Selecting none will leave the entire image size untouched.
RHK Technology, Inc.
Troy, MI
59
SPM 32 User’s Manual
Menu Functions
The image with the slope subtracted and the recalculated FFT are shown in Figure 54. Note how
the FFT automatically is rescaled so more detial is visible once the color scale is changed
because the huge noise at long
wavelengths is gone.
To now remove individual peaks
from the FFT and view the new
image, the right side should be
changed to point and the left side
changed to Filtered image. The
individual peaks are chosen by
placing a cross on the FFT and then
clicking on Add point and then
making sure Exclude is selected .
The highest peak near the cross is
located and all power around the
peak with a radius of x pixels is set Figure 54
to zero. The number of pixels is
chosen by changing the Size box. A value can be entered directly by clicking on the box or the
value can be increased/decreased by using the arrows. When the cross is placed on the image, the
surrounding pixels are searched to find the maximum. The search area is determined by the
Search parameter. The figure shows a total of 5 peaks that were eliminated as seen by the 5
black squares. After the addition of each square the filtered image is recalculated and displayed.
If the wrong peak is eliminated by mistake, the Undo button can remove that black square.
Repeatedly clicking this will remove points in succession.
The final result is a much nicer
picture with the extraneous noise
removed. This helps bring out
previously unrecognized features as
well as making a more visually
appealing image. Care must be
taken when preforming these
manipulations that actual features
on the surface are not eliminated.
For example if atomic resolution of
a lattice is achieved, this will
produce power peaks at specific
frequencies of the lattice spacing.
Also available from this window is Figure 55
FFT filtering where a high pass,
low pass, or notch filter are applied. The FFT is calculated, a filter is overlaid on the FFT that
eliminates all features outside the bandwidth and the inverse FFT is then calculated. This is
chosen in the FFT window by using the left and right arrows until the filter choice is displayed as
shown in Figure 55. The first choice in the window is the type filter to apply. Valid choices are
no filter, suppress small features (gets rid of high frequency noise), suppress large features
RHK Technology, Inc.
Troy, MI
60
SPM 32 User’s Manual
Menu Functions
1.2
Ideal
1
second order
fourth order
0.8
eigth order
0.6
0.4
0.2
0
Figure 56
(removes long range features such as image bowing), band pass (only features within the two
limits are seen in the image).
The next section determines the cutoff for the applied filter. An ideal filter cutoff will make all
signals outside the bandpass exactly zero, but this can introduce artifacts into the result. Other
choices are 2nd order, 4th order, 8th order. These refer to what order Butterworth filters to use to
smoothly attenuate the signal outside the bandpass frequency range. The various filter shapes are
illustrated in Figure 55 where the x axis is frequency space and the y axis is the multiplier.
The next box is where the high pass distance is entered. If the applied filter is suppress large
features then all data in the image that is larger than the value entered here will be attenuated.
The next box is where the low pass distance is entered. If the applied filter is suppress small
features then all data in the image smaller in lateral extent than this value will be attenuated by
the filter. If bandpass is chosen then the only features in the image that will be left in the image
are with a size between the Hi and Lo limits.
Instead of directly manipulating the FFT filter by “erasing” specific peaks as outline above,
RHK Technology, Inc.
Troy, MI
61
SPM 32 User’s Manual
Menu Functions
another way to remove the noise at specific spacing is to utilize a notch filter set to a specific x
and y frequency. The advantage to this is if there is noise in the x direction and an important
peak is very close to it, placing a
black circle on the FFT to erase
the power may overlap the
closely spaced peak because of
the circular nature of the
attenuator. Instead, effectively an
ellipse can be used to only reduce
the noise at a specific x or y
frequency and NOT attenuate any
features with a slightly different
spacing. The most useful
example of using this filter is to
eliminate noise along the fast
scan direction without effecting
any features of the same spacing
Figure 57
along the slow scan direction.
This can be accomplished by choosing notch in the FFT window as illustrated in Figure 57. The
filter can be applied only in the X direction, only in the Y direction or in both simultaneously. To
activate the filter in either direction click no the X off and y off buttons to change them to ON.
The number below each box is used to change the width of the filter. A large number will
attenuate more of the power around the center. This is the equivalent of using a large circle
radius when using the direct method discussed above. However, in this case the number ONLY
effects the width of the filter in the x or y direction. In other words, the blacked out area does not
have to be a circle. The next two boxes
are the center of the notch filter entered in
distance.
To save any image after processing has
been applied, the Save button can be
pressed and a new window will be opened
with the image
Image histogram
A plot can be created that presents the
distribution of heights in an image. This Figure 58
can be helpful for visualizing the
distribution of terrace sizes or the homogeneity of an array of features in an image. The
histogram can be calculated over the entire data page or any subsection of the image, so
undesired areas of the image do not unnecessarily introduce artifacts into the histogram plot. The
data page to calculate the histogram from is selected via a mouse click. A box around the entire
page is then drawn, but this can be resized by clicking on an edge or a corner and dragging the
selected side to a new location. When the desired area of the image has been outlined with the
box, double clicking the mouse will lead to the calculation of the histogram and subsequent
RHK Technology, Inc.
Troy, MI
62
SPM 32 User’s Manual
Menu Functions
display.
An example of a histogram plot is
presented in Figure 58b. The area
that was used to calculate the data is
shown by the dashed box in the
image in Figure 58a. Note the
histogram exhibits a definite
quantization in the z heights. This is
due to the large terrace sizes present
in this region. Since the page has
been properly background subtracted
to produce very flat regions, almost
all of the data in a single terrace is at Figure 59
the same z value. This produces
sharp peaks in the histogram because there is a large percentage of the pixels at the values given
by the vertical separation of the atomic height steps and very few pixels at other heights. This
illustrates an important point about the histograms: many times to extract the desired data the
background subtraction must be able to produce a page with almost no residual slope or the
histogram will show smeared out features because of the gradual change in z values across the
slope. A good illustration of this point is shown in Figure 58.
Image Statistics
Another quantitative tool that can be calculated
from a data page is accessed by the Image
Statistics menu item. The selected page has a box
drawn in it similar to the histogram box and it can
be moved and resized in the same manner as
Figure 60
described above until the region of interest has
been chosen. Then the CONTROL button is double clicked and an information panel is opened
that presents the results. The overall slope of the area is calculated along with the maximum and
minimum z values. Additional information involving the deviation of the z values and the
effective volume above a standard plane is also shown. An example of a statistics box is shown
in Figure 59. What the routine does is subtract a plane from the whole
image, then in the box selected, it finds min, max and mean, also the plane slope and the RMS error
RELATIVE TO the fit plane. This is the "rms error" number. The "average and standard dev"
numbers are absolute rms (ie unrelated to the fit plane). The "standard def" is the "typical" RMS
roughness. This value will give a non-zero RMS for an absolutely flat, but sloped, plane. For a flat
tilted surface, the "rms error" is closer to the "real" roughness. For a not-flat or stepped surface, the
fit plane is not really useful
Image 2D FFT
A two dimensional Fast Fourier Transform can be calculated from any data page. This provides a
spatial power spectrum of the data and therefore provides information on the spacing of the lattice
in atomic resolution images. Additionally this can show the presence of any non-linear effects in the
RHK Technology, Inc.
Troy, MI
63
SPM 32 User’s Manual
Menu Functions
data since the orientation of the peaks in the 2D FFT will also reflect the shape of the unit cell. For
example, an image of highly oriented pyrolytic graphite (HOPG) has a hexagonal unit cell and the
FFT peaks should also be hexagonal in shape and centered around zero with no distortion. The unit
cell of a 2x1 reconstruction of Si(001) will be rectangular so the FFT of this data would also show
a rectangular array of peaks. The default display option is to present the peaks on a logarithmic scale
which helps see the smaller peaks of the lattice that often cannot be seen on a linear scale.
Correlate
This function is used to analyze images with periodic or repeated regions, such as atomic resolution
images. A bitmap with a box cursor is created after an image is selected. Use the box cursor to select
a "kernel", a "good" region, including one or more well-resolved unit cells, then double click the
Control button. The routine will move this sub-region over the image and measure how well it "fits".
A new, interactive "correlation" image page is created which shows the degree of fit across the
image. The correlation page will correspond to the atomic lattice, and is a good way to resolve
domain boundaries, etc. Also, all the regions with a correlation above a threshold (set in the
correlation window) are averaged together to produce an optimized kernel. (Since this can require
over 10 million calculations, this routine is slow even on fast processors. ESC will interrupt.) Each
local maxima in the correlation that is used in the average is indicated by a '+' in both the original
image and the correlation image.
Once the correlation page is created, you can interactively modify the averaging process. Use '?' to
get the on-line help for the correlation page buttons.
Image X Average
After the data page is selected via mouse click, another window is opened with a box as described
above for the histogram and statistics menu items. The user selects an area to average by dragging
the sides of the box with the mouse, and then all of the horizontal sections in that box are averaged
together to produce one section. This can prove useful to help see atomic resolution features if there
is still quite a bit of noise in each line scan. The averaging will help reduce the random noise
fluctuations and make the atomic-scale, repeatable features stand out. Note this is only useful if the
features of interest lie exactly along the y-axis in the image. Otherwise, the averaging will either
smear them out laterally or average them away completely. If the slow scan has been disabled than
it can be a very powerful technique for getting a better signal to noise ratio for some quantitative
values.
Image Y Average
The procedure for selecting the area of interest is identical to Image X Average above. The only
difference is the averaging is now performed by combining all the sections taken in the y direction.
Image X slope
A data page is selected when prompted by clicking in the window, and the local slope in the x
direction is then calculated on a point-by-point basis. This is particularly useful in AFM friction
measurements to see the boundary between regions of local variations in the frictional coefficient.
A one dimensional local Savitzky-Golay algorithm is used for the calculation. (See below).
Image Y slope
RHK Technology, Inc.
Troy, MI
64
SPM 32 User’s Manual
Menu Functions
A data page is selected when prompted by clicking in the window, and the local slope in the y
direction is then calculated on a point-by-point basis. A one dimensional local Savitzky-Golay
algorithm is used for the calculation. (See below)
Image Difference
Two images can be subtracted to look for differences between them. The two images must have the
same units (both topography, both current, etc.) as well as identical pixel resolution (you cannot
subtract a 256x256 image from a 512x512 image). This can be very useful to notice the change in
the surface as a function of time or to subtract the left and right scans from each other when
acquiring friction data to visualize the different cantilever response in going from region 1 to region
2 instead of region 2 to region 1.
Image Scaled Sum
Two images can be combined in any fashion using this function. The calculation is performed on
a pixel-by-pixel basis so the two images must be the same size in pixels and have the same units
(both topography, both current, etc.). The user selects image A and image B when prompted by
clicking anywhere in the data frame. The result is then equal to A+cB where the constant c is entered
in the Analyze Control window described above. If c=1, then a simple addition is performed, and
c=-1 would be equivalent to image subtraction described previously.
2D Histogram
This function produces a 2-D Histogram, or cross distribution, of any two images of the same size.
This tool is most useful for correlating contrast between multiple images of the same area, such as
friction and topography, or tunnel current and conductance, or left and right scans. The Z values of
the first data page are plotted along the X axis, and the Z values of the second image are plotted
along the Y axis. The Z values of the result correspond to the number of pixels having the
corresponding pair of Z values in the original images. All the points in the 2D correlation of an
image with itself will lie on the diagonal, indicating perfect correlation. The size of the 2D histogram
grid is selected in the process parameter window.
Convert to page
Some of the graphs produced by the analysis functions are dynamic. If an image processing routine
is applied to a data set, then the results of some analysis routines (histogram, section, angle, etc.) will
also change (a data section will not have the same z values if the image is smoothed, for example).
When the data in the plot changes, the plot will also be updated. To save a data set permanently as
its own page, use this function. This will convert the graph to another separate page that can be
stored; additionally, applying an image processing routine will then not change the plot.
Approach
There are numerous types of approach system used in the many designs of Scanning Probe
Microscopes. The SPM 1000 supports many types of approach systems including: Stepper motors
(Digital Instruments, Molecular Imaging) Kinetic (Inertial), Omicron's Microslide, Phi's UHV
approach motor, Burleigh SPM, InchwormTM motor, and external manual types.
RHK Technology, Inc.
Troy, MI
65
SPM 32 User’s Manual
Menu Functions
Some of the approach systems will require additional hardware. For instance the stepper motor,
Omicron, and Phi motors require the DT-2817 interface card along with some minor support
circuitry which RHK can provide. If you need additional information on any of these interfaces or
if you have an approach system that is not directly supported, please contact our customer service
department for assistance.
The Approach control menu sets parameters that are common to all types of approach systems.
There are different menus that are specific to each type of approach system that can be set after the
approach system is set in the Approach/Approach Control menu shown in Figure 61 where the Main
tab is shown. The specific options unique to each approach type will be discussed in the next
section.
These unique items will be accessed through the Approach menu. After opening it up, there will be
an entry that is designated by the approach type selected, and these individual windows will be
discussed below.
The appearance of the approach menu depends on what type of mechanism is used for the coarse
approach of the tip or sample in each particular scan head design. There are a large number of
methods available; two examples are stepper motors and inertial systems. All of the particular
settings for each system is covered in the SPM 1000 Users Manual. Regardless of the menu
appearance, there are always some items in the menu to start and stop an approach.
Approach system. This parameter configures the software for what type of approach
system the scan head uses. Depending on what type of scan head is selected, additional
menu choices will be presented on the Approach menu. The new Dual Kinetic waveform
allows two waveforms to be simultaneously applied to different piezo segments.
Approach mode. The SPM 32 program has five methods
for determining when a probe has come close enough to the
surface to begin imaging.
Tip Retract mode is the safest and slowest method. The
program fully retracts the probe, makes a motion cycle, then
with the feedback loop active, releases the probe, allowing
the probe to approach the sample. The software monitors the
Z axis motion to determine if it stabilized above the
threshold value (defined as the percentage of full range the
tip has been retracted). Depending on the settings of the
feedback loop’s gain and time constants, each cycle typically
takes about 0.1 second. The tip retract mode is the preferred
mode for STM operation to assure no tip sample contact
occurs when approaching. Only SPM 100 Version 5 and
later models can utilize this mode.
Feedback detect mode monitors the position of the feedback
loop while the probe approaches the sample. In this case, Figure 61
instead of extending and retracting the tip after each step, the tip is always extended and the
feedback loop is constantly monitored for a reaction to the surface. The motion automatically
stops when the Z position has been retracted past the threshold setting. This mode is
RHK Technology, Inc.
Troy, MI
66
SPM 32 User’s Manual
Menu Functions
recommended for contact mode AFM where the tip will normally contact the sample and no
damage will be done to the cantilever due to its flexibility. This mode is also appropriate for
techniques that have long range surface interactions, such as NSOM.
Signal detect mode is similar to the feedback detect mode except the software monitors the
input signal channel rather than the Z axis motion. The danger of the probe crashing is less
than for Feedback Detect, since the signal circuit responds faster than the feedback loop.
However, if avoiding a probe crash is of prime importance, the Tip Retract mode is
recommended. Signal Detect mode must be used carefully with kinetic approach systems.
It will work with linear motions along the Z direction, but CANNOT AVOID TIP
CRASHES WITH A HELICAL RAMP KINETIC APPROACH AND SHOULD NOT BE
USED FOR STM. It is important to have the Signal Threshold set below the setpoint knob
value or a crash will occur because the approach will continue even after the SPM100 is in
feedback because the signal will still not exceed the threshold
until the z piezo is fully retracted and a crash occurs.
Tip Retract/Signal is a new mode added in version 2001. It acts
like the Tip Retract mode discussed above but instead of
monitoring the Z position level, it monitors the feedback
channel and stops the approach if the level gets above a
threshold. It uses the same Signal Threshold parameter as the
Signal Detect method. When the threshold is exceeded the
approach is stopped and the tip can then be held fully retracted
and a message printed on the screen indicating the threshold
level has been reached. The user can then release the tip and
establish feedback. By default, when this mode is selected, the
Retract tip after approach setting is turned ON.
Figure 62
Open Loop Ramp This mode takes advantage of the fact that the
bandwidth of most preamplifiers is larger than the bandwidth of the feedback loop.
Therefore, decreased approach times can be achieved with this method. The feedback
electronics of the SPM 100 is bypassed and the tip is ramped towards the sample through
direct control using the DT2821 card. The tip is ramped forward very quickly between
coarse motion steps, and the feedback channel is monitored for a non-zero signal. The
response time will depend on the bandwidth of the signal circuit. For STM, the response can
easily be as fast as 20 ms (50 kHz bandwidth setting of the IVP-PGA). When the signal goes
over a preset threshold indicating a response to the surface has been detected, the ramp is
stopped. The tip is then retracted and reapproached at a decreased speed to establish
feedback.
An output ramp voltage is generated by the DT2821 card and applied to the appropriate rear
panel DAC output of the SPM 100. This BNC is attached to one of the Z position modulation
inputs and the waveform is then amplified and applied directly to the z piezo.
The tab that controls the Open Loop parameters is shown in Figure 62.
Advance ramp speed This sets the speed that the tip is advanced to establish
feedback in the last step discussed above. This approach is used only after a response
RHK Technology, Inc.
Troy, MI
67
SPM 32 User’s Manual
Menu Functions
has been detected on the feedback signal and the tip is fully retracted to reapproach
the surface under more controlled conditions. Be careful not to make this too large
such that the tip will be driven into the surface by the time the ramp can be stopped
after a response signal is detected. This must be slower than the response of the
feedback loop to insure no crash when the tip is ramped.
Retract ramp speed This sets the speed that the tip is retracted if no response was
detected during the tip ramp. It can be set to a higher value than approach since no
monitoring is necessary and a faster approach cycle can be achieved.
Retract distance If mechanical constraints require a smaller tip extension/retraction
than the full range of motion, use this value to limit how far the tip is extended from
its fully retracted position. The distance must be larger than the smallest possible
coarse step, otherwise a tip crash will occur. The undesirable circumstance can
result where the tip cannot reach the surface at its maximum selected extension and
then next coarse step is so large the sample strikes the fully retracted tip.
Motion per D/A volt This will depend on the vertical calibration of the Z piezo. This
value must be known relatively accurately along with the size of a single coarse step
or tip crashes can occur.
Offset piezo Turn this ON if the analog ramp is applied a piezo other then the
element that the feedback signal is connected. Some head designs can actually utilize
an improved approach algorithm if the ramp is applied to a piezo different then the
Z scan element. However, be sure to fully understand how the head performs and
what the advantages are before turning this on as a tip crash can occur if the software
is misconfigured.
Z Control DAC The output DAC on the rear panel of the SPM 100 connected to the
Z modulation input. The voltage ramp to move the piezo is applied to this channel.
Approach test ramp speed Set the speed of tip approach after each coarse step. This
can be quite high since the feedback signal will be detected very quickly with the
loop open. Set the practical upper limit that the actual ramp speed can be. This
depends on the particular head design as well as the typical feedback loop settings.
The maximum speed will depend on the total distance that can be traveled between
the height where a signal can be detected and a tip crash. The current depends
exponentially on the distance above the surface in STM so a reasonable value may
be 1 nm. If the tip is more than 1 nm above the surface, the current will be zero. If
the height reaches zero, the tip is crashed. Therefore, the speed cannot be greater
than traveling this 1 nm distance in less than the 20 ms response of a typical current
to voltage circuit. This means the speed should be less than 1 nm/20 ms which is ~50
mm/s. For NSOM or AFM where the interactions are longer ranged (maybe 2 nm),
but the signal circuit is also usually slower (time constant of a lock-in amplifier of
3 ms), a ramp speed of 0.33 mm/s is possible.
Use distance limits If you want to restrict the range over which the Z piezo is
ramped, then turn this ON. This may be useful if there are resonances present in the
scan head design which are excited when the Z piezo is near full extension or full
RHK Technology, Inc.
Troy, MI
68
SPM 32 User’s Manual
Menu Functions
retraction. In this case, the range can be centered about zero volts or the piezo
elements equilibrium length.
Min and Max limits Enter the distance to restrict the motion. The Z calibration of
the piezo element must be reasonably accurate or the actual distance will differ from
the entered values.
Offset step mode When using the new Tip Retract/Signal mode, after each large
step, the Z Offset piezo can be stepped and a feedback signal searched for after each
step. This is only useful if the Z Offset piezo is separate from the Z feedback peizo
and also the distance the Z Offset can travel is much larger than the feedback piezo,
but still smaller than a coarse step. To step the Z Offset piezo and test for signal
between steps, turn this ON.
Offset step count The number of Z Offset steps (checking for feedback signal
between each step) to take before another coarse step is taken.
Approach Threshold During a Tip Retract or Feedback Detect approach, the probe is
advanced until the control loop stabilizes above the threshold value. The range is -100% to
+100%, where -100% is just barely within range, and +100% is almost crashing. A value
of 0% would mean the probe advances until it is just past the midpoint of the feedback range.
Initially, this value should be set to something conservative like -50%. After measuring the
step size of the coarse approach relative to the total range of the Z piezo, this can be set to
something close to 0% to avoid manual adjustment (via the ‘+’ and ‘-‘ keys) of the coarse
approach in order to center the z piezo within its range.
Feedback Delay If Feedback detect or Tip Retract are selected for the approach mode item,
this sets the amount of time to test if the position of the z piezo is above some threshold
value. If the signal remains above the threshold after this amount of time, the controller stops
the approach and assumes the approach is complete. As the feedback loop response time is
lowered, this value should be set higher because the SPM 100 will require more time to fully
extend the tip while probing for the surface if Tip Retract is used. Values as high as 5 sec.
may be needed when the feedback loop is set very low as typically used in NSOM.
Signal Threshold During a Signal Detect approach, the probe is advanced until the input
signal exceeds the value set in the Signal Threshold. The value can be set to any value
within the input range of the feedback signal. With an STM preamplfier with a gain of
100mv/nA, the maximum value that the feedback loop can be set to is 10 nA. A typical
value for the Signal Detect is 1 nA.
It is important to note that this parameter should always be set lower than the value set
on the front panel current set point potentiometer. If this is not done, the computer will
continue to try to move the sample closer to the tip, even after the tip is fully retracted,
causing a crash.
Approach Steps During the probe-to-sample approach sequence, this number of steps will
be made between in-range tests. These steps should cover between 10 - 30% of the range
of the motion of the probe in the Z axis. This parameter is only used for approach types that
use discrete steps, such as stepper motors, kinetic slip-stick, etc.
RHK Technology, Inc.
Troy, MI
69
SPM 32 User’s Manual
Menu Functions
Adjust Steps During adjustments of the probe-sample distance made by using the ‘+’ and
‘-’ keys, this number of steps will be made each time one of these keys is pressed. This
parameter is only used for approach types that use discrete steps, such as stepper motors,
kinetic slip-stick, etc. A typical value would be ‘one’.
Retract Steps This is the number of cycles that the probe will retract each time that the
Approach/Tip Retract menu option is selected. This parameter is only used for approach
types that use discrete steps, such as stepper motors, kinetic slip-stick, etc.
Tip control section
Tip Back in Motion This menu option allows the probe to be automatically retracted
whenever the software is about to move the probe in any direction. This option should
always be set to YES when used with an STM as an extra precaution when trying to avoid
tip damage. If the system is used with an AFM that can only move in the Z direction under
software control, this parameter can be safely set to NO as long as each approach step will
not cause damage to the probe if the feedback loop is slow to respond. This means that the
cantilever can flex enough between steps as to prevent damage.
Tip retract mode Determines what method is used to retract the tip. TTL-Feedback will
apply a +10 V signal into the feedback circuit to simulate a large signal. This will cause the
feedback loop to fully retract the tip in an attempt to reduce the signal. Analog ramp is
similar to the new Open Loop approach mode. A DAC output is applied to one of the Z
modulation inputs and this will retract the tip.
Tip retract delay Enter a time delay to allow the decay of transients that are induced by the
tip retracting. This will be the time between the tip becoming fully retracted and the coarse
step is initialized.
Tip restore delay Enter an interval to allow transients to decay that are induced by the
coarse step. This is a pause between the time the coarse step is finished and when the tip is
released to start ramping forward searching for the surface.
Tip back after approach Turn this ON to have the tip be fully retracted after an approach
is completed. This can be useful for an unattended long approach when a user walks away
from the controller. Rather than having the tip be in tunneling range after an approach and
taking a chance that a tip crash could occur if the head is accidentally exposed to an
impulsive force when unattended, a precautionary step can be taken and the tip will remain
fully retracted until released by the user. The tip will remain a reasonably safe distance from
the surface assuming a relatively large ranged Z piezo is in use. This can also be used to
change settings on the SPM 100 before establishing feedback. The feedback loop gain could
be reduced, the setpoint or bias voltage increased/decreased, or the Z Offset can be changed.
The freedom to have the approach done under a completely different set of conditions and
then changing them before releasing the tip to establish feedback is available. Delicate
samples can be approached in AFM and only very light contact required to stop the feedback
and the tip can then be retracted so the probe is not sitting in contact with the surface until
the user is ready to establish feedback. Very delicate tips (NSOM, STM) can be preserved
using this method and insure no tip/sample contact takes place. To release the tip, the user
can respond YES to the dialog box that appears after the approach is done. If the user
RHK Technology, Inc.
Troy, MI
70
SPM 32 User’s Manual
Menu Functions
answers NO, then the tip can be released at a later time by using the
Settlings/CTRL/Withdraw tip parameter.
The basic timing of a Tip Retract mode is illustrated in Figure 63. The tip begins fully extended and
the software sends a signal to the SPM 100 to retract the tip. The time it takes to fully retract the tip,
t1 is determined by the Gain and Time Constant of the feedback loop. When the software detects the
tip is fully retracted, it waits time t2 the Tip Retract Delay. Then the software performs whatever is
necessary to take the requested number of coarse steps (Approach Steps). The amount of time
needed here will vary widely depending on the setup for the selected approach method (Kinetic,
stepper motor, etc.) After the final step is taken, the software will wait for a delay, t3, specified by
Tip Restore Delay and then send a signal to the SPM 100 to start ramping the tip forward to search
for a feedback signal while the software monitors the Z position. If the software senses the Z piezo
has extended to the Approach Threshold value, it sends a signal to retract the tip and the process is
repeated. The amount of time it takes for the tip to be ramped forward to the threshold, t4, and to be
retracted from the threshold level, t5, will also depend on the Gain and Time Constant settings. If
the tip does not reach the threshold by the time interval t6 then it is assumed the surface has been
detected and the SPM 100 is maintaining a constant feedback signal. The amount of time to wait is
specified by Feedback Delay.
There are two possible situations that can happen as the tip is ramped forward and their order will
be determined by the Gain and Time
Constant settings. The first one is illustrated
in the figure; the second possibility is the
feedback delay will occur before the
threshold while the tip is still ramping
forward. This can happen if the feedback
bandwidth is so small that the tip is ramped
forward very slowly. Then it will take a
longer time t4 to reach the threshold and the
feedback delay t6 may elapse before the
threshold is reached. In this case, SPM32
will erroneously conclude the feedback Figure 63
signal has been detected and stop the
approach. This will give a ‘false engage’ and probably occur after only one step is taken. It is
important to have the feedback bandwidth large enough such that the time to reach the requested
threshold t4 is shorter than the feedback delay setting. Alternatively, the approach threshold can be
set to a more negative value so the tip does not get extended as far before SPM 32 stops the extend
cycle and instructs the SPM 100 to retract the tip as SPM 32 wants to take another coarse step. The
final option is to increase the feedback delay to allow sufficient time for the tip to extend to the
threshold each cycle.
The new Tip Retract/Signal mode uses the same general timing diagram, but instead of monitoring
the Z Feedback signal, it will look at the feedback signal itself and if the threshold is surpassed, then
the approach is stopped. This means the Gain can be turned up quite a bit higher and the
approach/retract ramps from the feedback controller will be much faster. This leads to faster
approaches compared to conventional Tip Retract.
RHK Technology, Inc.
Troy, MI
71
SPM 32 User’s Manual
Menu Functions
Secondary approach test section
For some systems there are two signals that may change and if
either one shifts dramatically the approach should stop. An
example is noncontact AFM where the frequency can shift and
the amplitude can decrease. Since the feedback loop can only
monitor one of these, this feature provides a second level of tip
protection. A second signal can be sent to an Aux channel and
be checked after each step. A ‘safe’ range can be designated
and if the signal goes outside these boundaries, the approach
should be stopped and adjustments made to return the
monitored signal to its normal condition.
Channel What channel should be monitored. The
output of the signal should be connected to this rear
panel BNC on the SPM 100.
Secondary condition Choose Enable to have the
approach monitor two signals between each coarse step.
Secondary Max Upper boundary of the secondary
signal
Figure 64
Secondary Min Lower boundary of the secondary
signal.
Kinetic approach systems
Kinetic approach systems, also called inertial or slip-stick approach systems , utilize a sawtoothshaped waveform to drive a piezo tube, shear-mode piezo stack, or walker-type SPMs. By slowly
expanding and then quickly contracting their length, they can produce translations in one or more
axes. Two parameter windows are used to define the necessary functions for kinetic approach heads.
After selecting the Kinetic Waveform option in the window shown in Figure 61, select the kinetic
tab and then fill out the parameters for the kinetic approach waveform using the Wave1 tab,
illustrated in Figure 64
If the Dual kinetic waveform is selected then the same set of parameters can be specified in the
Wave2 tab. These two signals will be output on different DAC channels and can be then be summed
into different piezo segments depending on what BNC the DAC output is applied to. All of the
settings for Wave1 are present for Wave2 along with the additional parameter to introduce a phase
shift between the two signals (Offset from primary).
Waveform The SPM 32 software allows five different waveforms to be defined for different
applications. The ramp height refers to the distance, in Å or nanometers, of the rapid piezo
"jerk" during kinetic approach/retraction. For horizontal motions, approach and retract
parameters may be identical, while for vertical motions different advance and retract
parameters may give better results. The parameter for steps defines the number of steps, or
parts, the slower piezo expansion/contraction is divided into. The distance of each step is the
ramp height divided by the number of steps.
RHK Technology, Inc.
Troy, MI
72
SPM 32 User’s Manual
Menu Functions
Approach amplitude. Used when the tip is close to the surface. The approach ramp uses
the in-range detection as defined in the previous section. It is designed to prevent tip
crashes, but is relatively slow. The setting is also usually configured to be less than half the
length of the range of the Z scan piezo.
Retract amplitude Used for the first few steps away from the surface after the head has
been in imaging range. Small steps are usually made because large steps can set off
resonances in the head and make the tip crash before the sample has retracted far from the
sample.
Fast Approach and retract. Used for moving large (mm) distances. There are no delays
and no checking of threshold levels. For horizontal motions, approach and retract parameters
may be identical, while for vertical motions different advance and retract parameters may
give better results. The motion is stopped by hitting a key or mouse button.
Adjust amplitude This entry is used when the scan head is already within imaging range
of the surface but the user wants to make small steps to better center the z piezo extension
about its equilibrium position. The signal height is normally very small, typically no more
than 5-10% of the Z scan range. This allows the kinetic approach system to bring the Z
signal to the center of its range before beginning to
image the surface. The software allows this ramp to
be used to move the tip closer or farther from the
surface. Some kinetic system can produce only very
small movement with each jerk, such as when using
shear-mode piezo translators. The cycles parameter
defines the number of steps made in this mode each
time the few steps function is selected. One is often a
reasonable value.
Period. This is the amount of time one complete
approach waveform signal takes.
Filter Period The waveform output can be high pass
filtered in order to reduce the sharpness of some edges.
This can be necessary for certain microscope head
designs that have high resonance frequencies. The high Figure 65
frequency components of the waveforms can be
filtered out to avoid unnecessary shaking of the head that can lead to tip crashes and other
undesirable results when approaching. The filtering capability for channel 1 can provide the
same functionality as the Inertial Filter knob on the front panel of the SPM 100.
Asymmetry. Variation from “ideal” sawtooth waveform if this option is selected. A value
of 0 means the shape is a “perfect” sawtooth with an instantaneous drop to 0, while a setting
of 10% means 10% of the period is taken on the falling edge and 90% is on the rise section.
Signal test. If using the Signal detect approach method (see above), when the feedback
exceeds the threshold value the waveform is stopped and the DAC output value is held
constant.
RHK Technology, Inc.
Troy, MI
73
SPM 32 User’s Manual
Menu Functions
Output channel. This is the D/A output channel on the rear panel used to drive the coarse
approach. A BNC-BNC JUMPER MUST BE ATTACHED BETWEEN THIS OUTPUT
CHANNEL AND THE INERTIAL INPUT ON THE REAR PANEL OF THE SPM 100.
Motion per D/A volt. This is the decrease in tip-sample separation created by a +1 volt
change in the DAC output. The sign is significant.
Enable bipolar waveform. Turning this ON can
create larger steps and faster approach times, but
greatly increases the danger in crashing. It is
recommended this is set to OFF unless there are
difficulties in getting efficient motion down the ramp
combined with a SPM 100 unit revision 5 or earlier.
If the step size requested is larger than can be
produced by ramping from 0 V to +130 V, then this
parameter will allow the voltage to swing fully from
-130 V to +130 for larger steps.
Approach tip now. Clicking on this will initiate a
Figure 66
kinetic approach sequence as defined in the parameter
windows.
View window
The kinetic waveform that will be applied to the DAC(s) is illustrated in this window (Figure 65)
is an example where the dual kinetic waveform has been selected and Wave1 is set to a Sawtooth
wave and Wave2 is a Double Parabola.
The new capability of using two waveforms simultaneously can provide an improved approach
mode when using a “Beetle” type microscope. The output of the first channel is routed through the
Inertial Input BNC as usual and then gets directed to all outer quadrants via the PPC 100. The
second channel can be summed into the Z Position Offset BNC and will therefore unilaterally extend
all three outer piezo legs when the SPM 100 is jumpered such that Z Offset is applied to the inner
electrode of the three piezo that form the tripod. This can be used to lift the entire head up as the legs
are bent and more reproducible walking is achieved with smaller voltages. The second channel is
NOT inverted when the coarse motion is used to retract the tip from the sample.
Stepper motor approach
If a stepper motor approach is selected in the configuration menu above, these parameters are set
using the Step tab (Figure 66). The software generates the waveforms to trigger the individual coils
of the stepper motor in conjunction with the DT2817 DIO board.
CW tip approach. If true, a CW (clockwise) rotation of the stepper motor corresponds to
tip approach. Otherwise CCW (counter-clockwise) is tip approach. This is determined by the
design of your SPM head.
Step time. This is the minimum time per step for your stepper motor. If this time is too
short, the motor may malfunction. Reasonable values are 10-100 ms.
RHK Technology, Inc.
Troy, MI
74
SPM 32 User’s Manual
Menu Functions
Use half steps. If true, the stepper motor will use half-steps for approach and single-step
motions (+ and - keys). If false, full steps are used. Full steps are faster, and half-steps give
more precise motions.
2 phase motor. Turn this parameter ON to control a 2 phase motor such as various vacuum
and cryogenic models. Turn OFF when using a 4 phase motor such as in a Nanoscope.
Coil energized at rest. If true, power is applied to the stepper motor coils when at rest. If
false, power to the motor is shut off once motion is complete. If the stepper motor coils are
left energized, heating of the motor may cause thermal drift in the scan head.
Approach now. If selected, a stepper motor approach is made.
Phi UHV approach motor
There is a Phi tab (Figure 67) that is used to set the parameters
for a Phi UHV motor entry under the Approach menu after
selecting this type of approach as outlined above. This
parameter window is for setting the parameters unique to the
motor used in a Phi UHV STM.
Tip approach hi. This parameter configures the Phi
UHV STM motor control. If the tip approach and retract
motions are reversed, change this parameter.
Start pulse. A brief (~ 1 msec) 'fast' pulse is often
needed to start slow approach motions. This parameter
controls the length of the start pulse, and a zero value Figure 68
disables the start pulse. If this pulse is too long, it will
cause the controller to lose track of the step count, but if it is too short, slow motions may
not work. This can vary from system to system.
Stop pulse. In some situations, the motor must be run briefly in reverse to accurately stop
its motion. This parameter controls the length of the reverse stop pulse, and a zero value
disables the stop pulse. A typical value is ~ 1 msec. If the reverse pulse is too long, it will
actually cause the motor to move in a direction opposite to that intended. If you are having
problems with motions, try reducing the stop pulse time.
Fast step delay. This parameter slows down the
approach when using a UHV motor from Phi. A zero
delay gives no slow down. Try a value around 10 - 100
msec.
RHK IWC 100 InchwormTM Controller
An approach system that utilizes an InchwormTM motor from
Burleigh Instruments can be interfaced with the SPM 100 Figure 67
through the use of the IWC 100. Additional information on this
unit is available in the IWC 100 User’s Manual. The parameters that control the speed of the motor
are set using the Inch tab (Figure 68). This same window is used to set the parameters if a Burleigh
RHK Technology, Inc.
Troy, MI
75
SPM 32 User’s Manual
Menu Functions
controller is used.
Pulse Width This is the pulse width for the IWC 100. A
step is twice this amount of time, and 50 us is a typical
value.
Fast Pulse Width This is the pulse width for the IWC
100 when in fast approach or fast retract mode. This
width may be shorter than the setting above for a higher
speed in Fast Retract and Fast Approach.
Reverse Direction If the motor moves reverse when tip
approach is selected and forward when tip retract is
selected, change this setting from its current value.
Pre-set direction Use this to enable the direction line at
least one clock cycle before the start line is set. This may
be necessary to induce motion for some cotnrollers.
HI enable/ LO stop If the inchworm controller uses HI
to start the motion and LO to stop, turn this parameter
ON. This should be OFF for Burleigh controllers and has Figure 69
no effect with an IWC 100.
Reverse Reposition Many times an inchworm will drift slightly due to piezo creep when
motion is stopped. This can be turned ON to have the motor take some steps backwards so
the drift will be lessened and a tip crash is less likely.
Back off step count The number of steps to take if reverse reposition is ON.
Omicron MSCU
The second generation microslide controller features greater capability and an enriched user
interface. The first method to control it is to place the unit in External mode using their handset and
then use TTL pulses sent with the DT2817 card to the external BNCs on the back of the MSCU.
Instead of using a TTL card, the rear panel DAC could be used to send out the sync pulse. This can
have the advantage of not tying up an ISA slot in the computer with the DT2817 card. The third
option is to use the external program now shipped as part of SPM32.. This will pass commands from
SPM32 to the serial port which should be connected to the rear panel of the MSCU. The tab to set
parameters related to the new control capability is shown in Figure 70.
Step voltage This determines the step size. The actual displacement of the slide will need
to be calibrated.
Step rate The speed of approach is set here. Steps per second.
Move channel Which of the eight channels should be active. Change this number to change
the axis of motion. The user must know which channel moves which axis for this to be
correctly defined.
Move steps Number of steps to take.
RHK Technology, Inc.
Troy, MI
76
SPM 32 User’s Manual
Menu Functions
MSCU control mode There are three choices as discussed above. TTL control uses the
DT2817 card, Analog DAC control should be selected when using a rear panel DAC, and
Serail interface should be chosen when using the external program. The last choice is the
most flexible. The other two choices require the MSCU be placed in external mode before
motion is commenced.
MSCU connected Status line indicating serial communication has been established.
COM port Serial port that is plugged into the MSCU
Approach channel Which of the eight output channels is connected to the Z microslide.
This must be correct or when starting an approach, sideways motion (or no motion at all)
will be produced.
Invert approach motion If starting an approach produces motion backwards, change this
setting.
Open XYZ control When this is clicked, the panel shown in Figure 70 is opened. The top
set of controls operate channels 1-3 and the bottom set operate channels 4-6. Click a button
to move the slide a fixed number of steps. Hold the mouse cursor down over the button for
continuous motion.
Steps per click Enter the number of slider steps to take every time one of the control buttons
is pressed.
MSCU control channel When using the legacy TTL card or rear panel DAC, enter the
channel being controlled here.
Single step time The width of the TTL pulse applied to the rear
panel to produce a single step.
Various approach menu options
Tip Approach Click on this item to initiate a coarse approach. The actual
series of steps performed as the tip is approached to the sample to avoid a
crash will depend on the setting of the item Approach/Approach
Control/Approach mode. This is also covered in more detail in the SPM
1000 Users Manual.
Tip Retract
Figure 70
When data acquisition is finished, the tip should be retracted from the surface a reasonable amount
to avoid any kind of possible damage to the tip or sample. The simplest method to achieve this is
to click on this menu item. The coarse motion is reversed for an amount of time determined by the
settings under the Approach/Approach Control window. Before removing a sample or tip by hand,
this item should be selected two or three times and then the Tip Fast Out (see below) used to insure
a macroscopic distance exists between the tip and sample.
When the tip is withing tunneling range of the sample, a single coarse step of the approach
mechanism can be performed by using the ‘+’ and ‘-’ keys on the keyboard. This can be useful to
move the z scan piezo into the center of its range of motion in order to optimize its ability to adjust
to surface features without saturating at one extreme. Another benefit is this avoids having a large
RHK Technology, Inc.
Troy, MI
77
SPM 32 User’s Manual
Menu Functions
negative or positive voltage applied to the scanner that would be necessary to either have it almost
fully extended or almost fully retracted.
Tip Fast In
Select this item to very quickly reduce the tip-sample separation. There is no monitoring of the
feedback signal so this WILL produce a tip crash if not stopped manually by hitting the ESC key.
This technique is most useful to get the tip and sample very close to each other by viewing the
separation under an optical microscope and approaching manually until the distance is very small.
A computer controlled approach is then initiated. This can lower the amount of time spent waiting
for the tip and sample to reach feedback range.
Tip Fast Out
This quickly moves the tip and sample away from each other and can be stopped with the ESC key.
After using the Tip Retract item described above it is safe to then use this selection to quickly create
a macroscopic separation between the tip and sample.
Data
The data menu is used to perform functions related to the memory use of the program. Every data
page that has been saved to the screen or the index is using memory until it is explicitly deleted.
Also, all stored files retrieved from the hard drive are consuming memory. Use of this menu will be
necessary to efficiently manage the memory management, and ultimately, the performance of the
SPM 32 program. As more pages are stored into memory, the performance of the program may
degrade slightly. Eventually, all available memory will be used and no more data can be acquired.
Note the term “memory” used here is not just determined by the amount of random access memory
(RAM) in the computer. The SPM 32 program also allocates “virtual memory” from empty space
on the hard drive. It can utilize this extra memory by exchanging, or swapping, data from the drive
as if it was stored in RAM.
An important point to remember is that if a page is deleted that has not been explicitly stored to the
disk, that data is lost forever. Be sure to write all data to disk that you want permanently saved
before deleting the data page.!!
A few comments should be made here about the terminology used by this manual and SPM 32. A
single scan across the surface is called a scan frame. During this single trip across the surface, up
to five channels of analog data (and two counting channels) can be read simultaneously as well as
spectroscopy data at preselected points. A user option exists to have the program display both the
forward and reverse portions of the scan line, thereby creating two images for every channel per scan
frame. If all seven channels of data are sampled during a scan frame, 14 data pages would be
created. Up to four of these windows can be displayed in real-time as the data is acquired. Even if
only one real-time acquisition window (RTAW) is displayed on the screen, all channels selected
under the Acquire/Setup Image/Image Inputs are sampled and stored as a data page. This means
memory is used up quickly and with only one RTAW on the screen, the memory may seem to be
decreasing much quicker than the user expects. This would be due to having additional images saved
from sampling other channels during the scan frame. When an image is selected to be saved to disk,
all data pages acquired simultaneously during this scan frame are also saved in the file. This can
RHK Technology, Inc.
Troy, MI
78
SPM 32 User’s Manual
Menu Functions
result in having unexpectedly large files being written to the disk so exercise care when selecting
what channels to monitor during data acquisition. With the ability to sample as many channels as
described above, up to 14 pages of data could be saved in a single file.
Page Info
A window can be opened that presents a vast array of information concerning the time and date the
data was acquired, the settings on the SPM 100 used to collect the data, as well as any user
comments attached to the file. An example of a typical information window is shown in Figure 70.
Page Copy
Creates a duplicate of a selected page. This consumes
memory because the data in the page is copied and
displayed again. This is useful to compare a ‘before’ and
‘after’ version of an image when a data processing step is
performed on an image.
Page Delete
A data page is deleted from memory. If it has not been
saved, the data is lost. This can be used to free up Figure 71
memory by removing unwanted pages of saved data. It
can also be used to delete channels of data that the user does not want to save to disk before writing
a file. For example, if during imaging both the topography and current channels are sampled, two
data pages are formed in each scan direction, the current image may not be very interesting so it is
unnecessary to waste hard drive space with this data. These pages can be deleted before writing the
topography data to the disk, and the size of the file would then be cut by approximately a factor of
two. Also, if a file is recalled from a disk that contains a few channels of data, but the user only
wants to process one particular image from the set, the others can be immediately deleted from
memory with this function.
File Delete
The collection of all pages acquired during one scan frame is known as a ‘file’ whether it has been
saved to disk or not. Using this function will delete the entire collection of pages acquired during
one scan. If the ‘file’ has not been saved to disk, all of this data will be lost.
All Delete
Removes all data stored in memory at once. Use with caution, as all deleted data that was not
permanently saved to disk will be lost.
Files
The primary set of functions used to store, retrieve, and manage files are grouped under the Files
menu. SPM 32 has a built-in automatic file naming convention that can be used to eliminate the
need to create a name for every file when it is written to disk as well as make it simple to read in
a large series of files with one click. This auto-naming function will use a default file name of
"ROOT+INDEX" (without the ‘+’sign and no quotes). For example, if the ROOT is "DEMO"
RHK Technology, Inc.
Troy, MI
79
SPM 32 User’s Manual
Menu Functions
and the INDEX is "1", the program will suggest the file name DEMO1". Next time a file is read
or written, the default name will be DEMO2, then DEMO 3, 4, 5 ... 9. After DEMO9 the name
"wraps around" to DEMO0 so if a large number of files
are expected to be stored, a two or three digit index should
be initially specified. If the index was "01", it would run
up to 99 then wrap to zero, likewise "A" goes to Z" and
"A1" goes to "A9" then "B0" up to "Z9". Anytime a
filename is specified, the default suggested name can be
overridden by editing the entry in the dialog box with the
BACKSPACE and/or the DELETE key. The default
extension for all SPM 32 files is .SM2 and does not need
to be specified when entering a new filename in any dialog
box.
The setup tab with the parameters controlling file
manipulation is shown in Figure 71. Autonaming can be
turned on and off and how files are retrieved from a disk
are also set in this window.
Default Disk The default drive where files will be
read and written
Default Path The default directory where files will
be read and written to. If a path is entered that does
not exist, SPM32 will prompt to create it. Because Figure 72
of a DOS limitation, a non-existing directory
cannot be entered that is more than two layers deep.
Default Comment A text string to be saved with all files. This can be used to specify
sample preparation parameters, operator information, external parameters that effect
acquisition conditions, etc. Saves typing the same information into the comment window
for every saved file.
Open files in index only When retrieving files from the hard drive, they can be opened
in only the index instead of consuming screen space by turning this parameter ON.
Read auto name When a series of files are stored in a directory with sequential names,
they can all be read into SPM32 at once with a single click by turning this ON.
Root The base part of the filenames to be automatically read in.
Index The index part of the files to be read in.
Ext The extension of the file names
Save auto name Files can be automatically named in a meaningful convention by turning
this ON. SPM32 will suggest a filename for each Save action, but it can be overridden at
any time by typing in an alternate name.
Root The base part of the filenames to be automatically named.
RHK Technology, Inc.
Troy, MI
80
SPM 32 User’s Manual
Menu Functions
Index The index part of the files to be written.
Ext The extension of the file names
Autoincrement ext Instead of incrementing the index part of the name, the extension
could be incremented and files can be named in a manner like filename.001,
filename.002, etc. Turn this ON to increment the extension instead of the index.
Comment question For each save operation if an individual note is to be added to the
file, then turn this ON. The default comment will be present in the comment box, but
additional notes can be added on a file by file basis. To only have the default comment
added to each file and skip being asked to add more, turn this OFF.
Auto input page limit Set the number of consecutive files to read in before stopping. If a
very large number of files are all in a directory with no breaks in the filenames, they will
all be read in unless an upper limit is set.
Index plots in color Turn ON to have the images in the data index shown in a colorscale.
If OFF, they will de displayed in greyscale.
Index plot mode What image processing should be performed in the data set when they
are shown in the index. Valid choices are raw, line slope subtract, line dZ subtract, high
pass, smoothed, and derivative.
Index plot size Set the relative size of each page in the index. The best option will
depend on screen resolution, monitor size, etc. Choices are small, medium, and large.
Get File
To retrieve a file from the disk, this menu item is used. Specify the name in the dialog box when
prompted or accept the default. The directory to read the file from is entered in the File Control
window described below. Keep in mind that all pages of data stored in this file are read in and
displayed in individual windows.
Auto Get File
A very powerful and easy way to read in a large number of sequential files utilizes the auto-name
function described above. When this function is selected, data files are read in one after another
from the default directory, until the page limit set in the File Control window is reached. In this
way a large number of files from a series of experiments can be read in with a single command.
(Use the ESC key to interrupt the auto-input process)
Save Group
The entire set of image pages acquired during one scan constitutes a group. An automatic
filename is specified in the dialog box, but this can be changed to any valid DOS filename. The
user is prompted to click on a page to save, and all pages of data in memory that were acquired
during a single scan frame are written to disk in a single file. After the selection is made, a dialog
box is presented to enter a filename. The next filename in the automatic filename function is
presented by default. If the specified filename exists, the user is prompted before overwriting the
file.
RHK Technology, Inc.
Troy, MI
81
SPM 32 User’s Manual
Menu Functions
Save Pages
Any set of pages can be written into a file. The pages are selected by clicking in each individual
data page and then a double-click indicates the selection process is complete. The user is then
prompted for a filename. This would be a way to individually pick and choose what pages to
save from a simultaneously acquired collection of channels without saving all of them. Therefore
it is unnecessary to delete certain pages of data to avoid possibly saving unwanted data when the
Save File item is selected which automatically saves all pages in memory acquired during one
scan frame.
Directory
A list box is opened showing the DOS listing of all files in
the current working directory. Clicking on a filename loads
the data contained in the file from disk into memory. An
example of the window is shown in Figure 73.
The top bar displays the current directory and the file
specification of the listing. This can be changed by clicking
on the bar, and a dialog box is produced where a new
directory and/or file specification can be entered. Wildcards
are accepted in this dialog box to control what files in the
directory are hidden and which are shown.
Clicking on the Set Default button makes the listed
directory the new default directory specified in the File
Control window.
Data Index
Opens up the index window where thumbnail views of all Figure 73
currently stored data pages are displayed. The F12
keyboard shortcut opens the same index display. This window was also shown in Figure 5 at the
beginning of the chapter.
Draw Disk Map
This produces a graphical tree starting with the specified directory. This can help elucidate the
layout of various subdirectories to help specify the path to the appropriate directory for data
storage or retrieval. This can take awhile when a complicated subdirectory structure is present on
the drive.
Output
There are a number of ways to get data and images out of the program for external processing
and integration into manuscripts. Any data page on the screen can be saved in a variety of image
formats or written as an ASCII data list to be imported into other programs.
The exporting of data is controlled from the Settings/Out tab, illustrated in Figure 74.
RHK Technology, Inc.
Troy, MI
82
SPM 32 User’s Manual
Menu Functions
The first set of options is contained in the Type tab.
Graphical Output Type Set the format of
output files written by the screen save,
window save, or region save menu options.
Valid choices are Raw, PCX, SUN Rasterfile,
EPS, Color EPS, BMP, TIF. The Tagged
Image File Format (TIFF) files generated
follow the 6.0 specification of the format. The
BMP files are Windows Bitmaps whereas the
RAW files are the 12 bit ADC values written
Figure 74
sequentially with no header information as
found in a SM2 file. Most modern publication software should have no problems with the
PCX, EPS, or TIF files. As a point of reference, almost all windows (images and control)
shown in this manual were saved in PCX format.
Remove window frames Set this to ON to save the image without the title bar of the
window as well as the black box around the outer perimeter of the data.
Save with white background Turn this ON to save a 3D image with a white background
instead of black for better printing reproduction.
Postscript mode There are four options for postscript output in SPM32. Landscape full
page will orient the EPS file in landscape mode and scale the output to fill the entire
sheet size. Portrait full page will orient the image in portrait mode and also scale the
image to fill the entire page. Landscape scaled will create an image in landscape mode
and it will be the same size as the image on the screen, the larger the image is expanded
on the screen, the larger it will appear on the page.
Portrait scaled will create an EPS file in portrait
orientation with the image the same size as shown on
the screen.
The next set of options are contained in the Files tab. (Figure
75)
Default Disk The default hard drive to write the output
files.
Default Path The directory on the drive specified
above that all output files are written. If this directory
does not exist, the program will prompt if the user
wants it to be created.
Figure 75
Overwrite graphics files. When ON, the output files will be overwritten without
prompting.
Autoname Output The output files can also use the auto-name function as described
above in the section on the Files menu.
Root The first part of the filename automatically generated for screen output by the autoRHK Technology, Inc.
Troy, MI
83
SPM 32 User’s Manual
Menu Functions
name function.
Index The second part of the filename automatically generated for screen output.
Autoprint Output If creating EPS files, the result can be sent to a postscript file for
printing directly from the SPM 32 program for immediate output. Turn this ON to take
advantage of this feature.
Auto Delete After Print To save hard drive space, the EPS files created can be
automatically deleted after they are printed when the autoprint item is ON. If this is a
desirable option, set this value to ON.
Print Command The command used to dump the EPS files directly to a printer. In most
cases, this should be the COPY command since using the DOS PRINT command often
does not work because the printer misinterprets the file it receives. Some printers also
require the data to be sent in binary format. If COPY does not work for a particular
printer, and many pages of characters are produced, try changing this entry to COPY /B.
Note there is a space between the word COPY and the optional flag /B. An alternative is
to print to a networked printer connected to a Unix machine using the free utility lpr. In
this case, the command would most likely be lpr -l. Note the space between the string lpr
and the optional flag -l.
Print Command Trailer This is usually the port the printer is connected to such as
LPT1:. In the case of a networked printer, the trailer would be the name of the printer.
This usually has the form \\servername\printername.
In the case given above for the two entries, the command piped to DOS to produce the hardcopy
output would be “COPY filename.eps LPT1:”. A quick test to determine the proper parameters
is to open a DOS command window in a directory containing an EPS file and then try different
command lines until the correct image is produced by the printer. The appropriate command and
trailer is then entered in the parameter box.
The Direct tab can be used to setup simple batch processing and insure all output images are
exactly the same pixel size. This can make the creation of
movies much simpler since all images are guaranteed to be
equivalent.
Image X size Sets the pixels in the x direction for
all output images, irrespective of their size on the
screen.
Image Y size Sets the pixels in the y direction for
all output images, irrespective of their size on the
screen.
Background color Choose the color to use in the
background of all images (such as 3D or rotated
images).
Display rotated If this is ON, then all images are rotated with respect to the scan angle in
order to have all images be displayed with the same fixed coordinate system in realspace.
RHK Technology, Inc.
Troy, MI
84
SPM 32 User’s Manual
Menu Functions
Batch filter When Output/Save all images is chosen, then graphics files for all current
images in memory are created. This provides a simple method to output a very large
number of files (in order to create a movie) without needing to save each file one at a
time. If this parameter is turned ON, then only the scan direction and channel specified
below will be output. Otherwise all channels and both
scan directions will be exported which may not be
necessary.
Filter direction Select whether the forward or reverse
scan data should be exported.
Filter z units Choose which channel to export.
Figure 76
Whichever channel has the units entered here, this will
be the images exported. To export the Z channel, m (for meters) would be entered here.
The spreadsheet export feature is controlled by the settings in the Sheet tab. (Figure 76)
Spreadsheet delimiter When exporting a list of data for inclusion into external plotting
packages, the spreadhseet format will produce a file in columnar form with a specified
delimiter. The user has a choice as to what character to use.
Spreadsheet no header If this is turned ON, then only the columns of data are written.
Otherwise additional information like the filename, acquisition parameters, date and time,
etc. are included.
Spreadsheet column tags Turn ON if the file should
also contain labels of the data in the first row of the file
to automatically fill in spreadsheet labels.
ASCII Data List
A file appropriate for import into external analysis programs
can be generated from any data set. This is most commonly
used to output the values displayed on spectroscopy curves or
section cuts taken from images. In the case of multiple
spectroscopy curves displayed on the same plot, a separate list
is made for each curve. They are not combined into one
average curve. Also, only the curves actually plotted on the
graph are listed even if a larger number of curves were actually
acquired during the scan frame. It is also possible to make an
ASCII list of the height for every pixel in an image, but this file
will be much larger than the equivalent SM2 file because all of Figure 77
the data values must then be converted to integers. It is preferable to either write a separate
program to transform the SM2 file directly or to configure the external program to read the
proper data format for importing. Information related to this second procedure is presented in the
Appendix.
Spreadsheet
A more useful data export format can be accessed by the spreadsheet menu item. Many times,
RHK Technology, Inc.
Troy, MI
85
SPM 32 User’s Manual
Menu Functions
the data is easier to handle in this format. The data is placed into columnar format. The choice of
delimiter can be made by the user.
Screen Save
A “snapshot” of the entire display screen can be saved at any time. The popup menu used to
access this item is not shown, and the output format is determined by the entry in the Output
Control window described below. The user is prompted for a filename after selecting this option.
Window Save
Any window displayed on the screen can be saved at any time by selecting this option and then
clicking in that window when prompted. The user is then asked for a filename. As with the
Screen Save item, the output format is determined by the entry in the control window.
Region Save
Any section of the screen can also be written to a graphics format at any time. After selecting
this menu item, a box is drawn around the entire perimeter of the screen. This can be resized to
any location by dragging the corners or sides with the mouse. It can also be moved in the same
manner. The user then double-clicks the mouse to indicate the selection has been made. A dialog
box is then used to prompt for a filename.
Postscript Plot
An Encapsulated Postscript (EPS) plot is generated from any data page. The page is selected by
clicking in the display window, and the user is prompted for a filename and also a comment to
include on the printed page. If an image window is selected, then a top view of the data is written
to a file along with some of the page information. A 2D plot of data such as spectroscopy or
sections can also be output in this format. These can then be printed directly to any postscript
printer or imported into other publication software that can read EPS files. The postscript code
will print at the current default resolution of the printer. An example of this type of output is
shown in Figure 77.
Make Comment
The Make Comment function allows the user to create a message window with several lines of
text. This can be used to add information to a screen dump. A multiple line input window is
opened, and text can be typed into the window. The user can type past the end of a line and it
will automatically be wrapped within the box. If separate lines of text are desired, use the
ENTER key to start a new line both in the text window and the same will happen when the text
is displayed. The CTRL-ENTER combination must be used to close the input window and have
the text displayed on the screen.
List PRM file
The file that contains all of the configuration information for SPM 32 has the .PRM extension.
This item can be used to create a text file listing of all the current settings for the PRM file in
use.
Plot
RHK Technology, Inc.
Troy, MI
86
SPM 32 User’s Manual
Menu Functions
The functions to display images in 3-dimensional representations are accessed from the Plot
menu. There is a considerable amount of power and flexibility built into the program and a
dazzling array of images can be produced to help aid in the interpretation of the data.
Plot Control
All parameters used to determine the default appearance of the various formats that can be used
for data display are accessed through this control window (Figure 78).
Topview tab
The most common way to display images is the bitmap, where the color value in the image
conveys height information.
Plots per row This will determine the default size of a data page when saved to the
screen or read from a file. The images will be sized such that the number entered here fit
across the width of the screen. A larger number will result in each page taking up a
smaller amount of screen space.
Display rotated If a SPM 100 or VSCAN is used then the scan frame can be taken at any
arbitrary angle. If this parameter is turned ON, the images will be displayed on the screen
at the rotated angle. This can aid in the visualization of the relative positions of various
features among images with varying angles.
Cursor display When images are saved to the screen, the default mode the display
window should be in is picked here. Options are none, single point, point/line,
section/view, angle/lattice.
Default bitmap size Select the screen size of a data
window. This is the number of screen pixels an image
will take up. For a given screen resolution (640x480,
800x600, etc.) The larger the size selected here, the
more of the screen the bitmap will take up. Valid
choices are 32x32, 64x64, 128x128, 256x256, 512x512.
Data mode Set whether any processing is performed
before displaying the data. Raw will form an image of
the stored data values with no processing. Line dZ
subtract will set the average value of each individual
line to the same height. This helps eliminate effects due
to piezo creep and thermal drift in the z direction. Line
slope subtract performs a best fit line to each individual
linescan and subtracts this and also sets the average
Figure 78
value of z the same for all lines. High pass will filter
the data using a high pass filter with a bandwidth determined by high pass range setting
(see below). The type of filtering (if any) performed on the data before display can be
seen visually in the title bar of the window. A minus sign on the far left edge of the title
bar indicates the data is displayed in line subtract mode, an equal sign means slope
subtract is used, and a backslash indicates the high pass filter was used.
RHK Technology, Inc.
Troy, MI
87
SPM 32 User’s Manual
Menu Functions
Color map mode Use this to designate how the physical data (height, current, force, etc.)
should be mapped into color values. In linear mode, the display scale runs from the
minimum to the maximum pixel value. If there are a few spurious noise spikes in the
image, these can use up a good portion of the dynamic range of the color scale. A
solution to this is using the limited mode where a few pixels with extreme values can be
rejected. In equalized mode, the display scale is non-linear, so that there is an
approximately equal amount of each color in the image. In light shade mode, the
brightness of each pixel depends on the angle of each part of the image surface relative to
the light source. In physical, a specified range of Z values are mapped. This is good for
comparing groups of images by having identical color
scales for the entire group. In logarithmic, the color is
proportional to the log of the Z value. This is good for
Fourier Power spectrum images.
Display in Color The bitmap image can be displayed in
Grayscale, Full color, a split mode, or Masked. The
division of color/gray is determined in the transform
window. A range of heights are shown in color and
everything above or below that is gray when in
color/gray, whereas using gray/color/gray allows a
Figure 79
middle range of values to be in color while the data at
each end is gray. The masked option is only useful for
images that are generated from operations that utilize a mask such as Define Background
or Step Flatten. The subregion of the image is displayed in color.
Z Offset Enter a multiplier of the entire range of values to exclude from the color table.
This can help many times when there is noise in the image that consumes much of the
available colors.
Z Offset mode A variety of modes are available to have SPM 32 determine the optimal
reference that should be used for the mapping of the ADC values. Absolute takes the
actual value entered above under Z reference. The other options designate that the
program should determine the reference point. Center sets the midpoint of the minimum
to maximum data values to color 128. Mean sets the average of the data to the middle of
the color scale. Median uses the ADC value at the center of the histogram as the middle
of the color range. Mode uses the most common ADC value (the peak of the histogram)
as color 128.
High Z Limit When the physical mapping mode is selected, this parameter sets the ADC
value that color 256 should correspond to.
Low Z Limit When the physical mapping mode is selected, this parameter sets the ADC
value that color zero should correspond to.
Light Source Tilt When displaying data in a 3-D rendering, this parameter sets the angle
of elevation for the light source. Moving this around can help emphasize certain features
like step edges and isolated tall structures.
Light Rotate Sets the azimuthal angle of the light source in a 3-D rendering.
RHK Technology, Inc.
Troy, MI
88
SPM 32 User’s Manual
Menu Functions
High Pass Range Enter a percentage to use as the ‘bandpass’ of the high pass filter
applied to the data when displayed in high pass mode. A value of 5% to 20% will be
sufficient in most cases.
3-D tab
The appearance of a 3-dimensional rendering of an image is
determined by the settings in Figure 79.
Plot size Select the screen size of a data window. This is
the number of screen pixels an image will take up. For a
given screen resolution (640x480, 800x600, etc.) The
larger the size selected here, the more of the screen the
bitmap will take up. Valid choices are 32x32, 64x64,
128x128, 256x256, 512x512.
Tilt Enter the default angle of elevation for the viewer
location.
Rotate The default azimuthal angle the viewer is rotated
with respect to the y axis.
Figure 80
Z Scale Multiply the ADC values by this to increase or decrease the vertical scale with
respect to the lateral size of the scan frame. Very small vertical features like atomic
corrugation or atomic steps might make better images if this number is greater than 1. An
image with very tall features with a high aspect ratio may look better if this factor is less
than 1.
Mode Set the default type of rendering to create. X line draws a wireframe model using
lines along the x axis. Y line draws a model with lines along the y axis. Mesh will create a
surface with lines in both the x and y direction. Solid will create a surface that looks solid
and has the color scale overlaid so lower features also look darker. The light source can
then be added to help create more visual impact.
Line Skip For faster rendering and plotting increase this value.
X-Y tab
The control window used to set the default parameters for XY graphs of data such as
spectroscopy and data sections is shown in Figure 79.
Plots per row This will determine the default size of a data plot when saved to the screen
or read from a file. The graphs will be sized such that the number entered here fit across
the width of the screen. A larger number will result in each page taking up a smaller
amount of screen space.
Default graph size Select the screen size of the graph window. This is the number of
screen pixels an image will take up. For a given screen resolution (640x480, 800x600,
etc.) The larger the size selected here, the more of the screen the bitmap will take up.
Valid choices are 32x32, 64x64, 128x128, 256x256, 512x512.
RHK Technology, Inc.
Troy, MI
89
SPM 32 User’s Manual
Menu Functions
X Axis Logarithmic Turn ON to have all plots be drawn with a logarithmic x axis.
Y Axis Logarithmic Turn ON to have all plots be
drawn with a logarithmic y axis.
Plot First n Lines n= Multiple data sets can be
plotted on the same graph. Enter the maximum
number of plots to display on any single graph. Larger
numbers may make the plot difficult to interpret
because of too much data all with very similar values.
Figure 82
Line Color With multiple data sets displayed on a
single graph, it is a good idea to use different colors for each plot easily differentiate
different data sets. Use the color entry items to select different colors for each plotted
line. Valid colors for each item are Black, Blue, Green, Cyan, Red, Magenta, Brown,
White, Grey, Light Blue, Light Green, Light Cyan, Light Red, Light Magenta, Yellow,
Bright White.
Tag tab
Two features can be adjusted with the tab shown in Figure 81.
Lattice color The color of the crosses used to denote the atomic sites when an angle plot
(Figure 34) is shown can be changed here.
Label font Two different fonts are available for the labels and the numbers displayed on
the axes of an X-Y plot.
Chart tab
The control window used to determine the default mode for creating chart plots is shown in
Figure 81. Chart plots are reminiscent of early STM data when it was displayed on storage
oscilloscopes or chart recorders.
Default chart size Select the screen size of the chart
plot window. This is the number of screen pixels an
image will take up. For a given screen resolution
(640x480, 800x600, etc.) The larger the size selected
here, the more of the screen the bitmap will take up.
Valid choices are 32x32, 64x64, 128x128, 256x256,
512x512.
Figure 81
Chart Z Scale Expand the vertical display of the
chart plot by increasing this number. Similar in affect to the Z scale setting for 3-D plots,
very small vertical features like atomic corrugation or atomic steps might make better
images if this number is greater than 1. An image with very tall features with a high
aspect ratio may look better if this factor is less than 1.
Chart Line Skip For faster plotting increase this value.
3-D Plot
RHK Technology, Inc.
Troy, MI
90
SPM 32 User’s Manual
Menu Functions
A typical, rendered 3-dimensional plot is created by using this menu item. The actual appearance
of the data is controlled by the 3-D defaults window discussed below. An example is shown in
Figure 82.
3-D Rotate
The user is prompted to select the data page to display in a 3-dimensional rendering and an
interactive window is opened that allows any arbitrary viewing angle (both elevation and
clockwise) to be selected. Moving the mouse horizontally in the window rotates the image
around the z axis whereas moving the mouse vertically changes the angle of elevation of the
viewpoint. The rendering of the data while moving is at a reduced resolution, and stopping the
mouse motion for more than one second will then produce a full rendering with maximum data
resolution. An information screen is at the top of the window that displays the current rotation
and elevation angle. The window can be exited and the rendering then drawn in its final form by
using either the ESC key or double clicking the mouse.
3-D Dual
Another display mode that can help aid in visualizing the data is the dual mode. The height is
taken from one image, but the color scale is taken from
another. This can be useful to overlay photon counts with
topography data in NSOM, for example.
Cross Graph
With the addition of the datalogging function to the
software, a new graphing routine was needed. Using this
routine, a graph can be drawn with any two parameters
designated as the abscissa and the ordinate. This will be
useful to display cyclic voltammograms where both datasets
are recorded as a function of time.
Chart Plot
Figure 83
A simple 3-dimensional representation of the data can be formed
using this function. An image is created that slightly offsets
individual linescans to form an image reminiscent of early days
when STM scans were stored using chart recorders and
oscilloscopes. An example is shown in Figure 84.
New Plot
Select this option and then click on a 3-dimensional plot of a
data page. A new 2D bitmap window is created with the selected
data page displayed.
Change Plot
Figure 84
RHK Technology, Inc.
Troy, MI
91
SPM 32 User’s Manual
Menu Functions
Any plot can be selected and the window shown 91. The options that are available in the window
depend on whether a bitmap image was selected or a x-y graph.
Bitmap plot
Data mode Set whether any processing is performed before
displaying the data. Raw will form an image of the stored data
values with no processing. Line dZ subtract will set the average
value of each individual line to the same height. This helps
eliminate effects due to piezo creep and thermal drift in the z
direction. Line slope subtract performs a best fit line to each
individual linescan and subtracts this and also sets the average
value of z the same for all lines. High pass will filter the data
using a high pass filter with a bandwidth determined by high
pass range setting (see below). The type of filtering (if any)
performed on the data before display can be seen visually in the
title bar of the window. A minus sign on the far left edge of the
title bar indicates the data is displayed in line subtract mode, an
equal sign means slope subtract is used, and a backslash
indicates the high pass filter was used.
Figure 85
Color map mode Use this to designate how the physical data
(height, current, force, etc.) should be mapped into color values. In linear mode, the
display scale runs from the minimum to the maximum pixel value. If there are a few
spurious noise spikes in the image, these can use up a good portion of the dynamic range
of the color scale. A solution to this is using the limited mode where a few pixels with
extreme values can be rejected. In equalized mode, the display scale is non-linear, so that
there is an approximately equal amount of each color in the image. In light shade mode,
the brightness of each pixel depends on the angle of each part of the image surface
relative to the light source. In physical, a specified range of Z values are mapped. This is
good for comparing groups of images by having identical color scales for the entire
group. In logarithmic, the color is proportional to the log of the Z value. This is good for
Fourier Power spectrum images.
Display in Color The bitmap image can be displayed in Grayscale, Full color, a split
mode, or Masked. The division of color/gray is determined in the transform window. A
range of heights are shown in color and everything above or below that is gray when in
color/gray, whereas using gray/color/gray allows a middle range of values to be in color
while the data at each end is gray. The masked option is only useful for images that are
generated from operations that utilize a mask such as Define Background or Step Flatten.
The subregion of the image is displayed in color.
Color table Select a builtin color scale to use when displaying the image. Valid choices
are Thermal Scale, Multicolor, Blue-Yellow, Blue, Green.
Z Exclude Enter a percentage of the entire range of values to exclude from the color
table. This can help many times when there is noise in the image that consumes much of
the available colors.
RHK Technology, Inc.
Troy, MI
92
SPM 32 User’s Manual
Menu Functions
High Z Limit When the physical mapping mode is selected, this parameter sets the ADC
value that color 256 should correspond to.
Low Z Limit When the physical mapping mode is selected, this parameter sets the ADC
value that color zero should correspond to.
Z reference Enter the percentage of the entire range of values to exclude from the color
table. This can help many times when there is noise in the image that absorbs much of the
available colors.
Z ref mode A variety of modes are available to have SPM 32 determine the optimal
reference that should be used for the mapping of the ADC values. Absolute takes the
actual value entered above under Z reference. The other options designate that the
program should determine the reference point. Center sets the midpoint of the minimum
to maximum data values to color 128. Mean sets the average of the data to the middle of
the color scale. Median uses the ADC value at the center of the histogram as the middle
of the color range. Mode uses the most common ADC value (the peak of the histogram)
as color 128.
Z Autoscale Turn this ON to have all selected plots be displayed with exactly the same
physical mapping mode. All of the selected data pages must have the same units of data
(all topography, current, force, etc.).
Light Tilt When displaying data in a 3-D rendering, this parameter sets the angle of
elevation for the light source. Moving this around can help emphasize certain features
like step edges and isolated tall structures.
Light Rotate Sets the azimuthal angle of the light source in a 3-D rendering.
Interactive Light Shade This can be set to ON to
open an interactive window with a surface
displayed in it similar to the 3-D Rotate window
described above. However, this time the
orientation of the surface is fixed but the light
source shining on it can be moved around. Sliding
the mouse vertically increase/decrease the
elevation of the light, whereas sliding the mouse
horizontally changes the azimuthal angle. An
example of gold terraces on mica is shown in
Figure 86.
High Pass Range Enter a percentage to use as the
‘bandpass’ of the high pass filter applied to the
data when displayed in high pass mode. A value Figure 86
of 5% to 20% will be sufficient in most cases.
Resize If this is ON, then all selected plots are redrawn to the new frame size when one is
resized. This can be useful to make comparisons of various 3-D plots because they will
then be displayed with the same screen size.
RHK Technology, Inc.
Troy, MI
93
SPM 32 User’s Manual
Menu Functions
Change Determines whether the changes entered in this control window effect only a
single plot (This Plot) a group of selected plots or all plots. This would be most useful
when a large number of images are on the screen that should be compared, but the valid
comparison is when all are displayed with the same absolute color mapping.
Replot Turn this setting ON to have the plot(s) redrawn after changing any settings in
this window.
Line plot
If a two-dimensional graph is selected, then a different window is presented to change the
appearance of the graph. An example is shown in Figure 87 for a spectroscopy window. The
underlying data set is not changed, only the way in which it is displayed in the graph. After any
settings are changed, the Replot function should be selected to
redraw the plot window with the new display parameters. It is
possible to have a dual-Y axis plot where two sets of curves are
plotted on the same graph with two different Y-axis scales. The
second scale will be drawn on the right side of the figure.
Autoscale Plot As data is added/removed from a graph, the
Y axis will adjust
Min X value This determines the value for the left of the
graph.
Max X value This determines the value for the right of the
graph.
Min Y value This determines the value for the bottom of the
left hand axis when autoscale is turned off.
Max Y value This determines the value for the top of the
left hand axis when autoscale is turned off.
Min Y2 value This determines the value for the bottom of
the second y axis when in dual y-axis mode.
Max Y2 value This determines the value for the top of the
second y axis in a dual axis mode.
Figure 87
Display mode When raw is selected, the actual data is shown. The data can also be
smoothed before display, and a Savitzky-Golay algorithm is used whose width is
determined by the default setting described below in the section on data processing. A
derivative or 2nd derivative can also be calculated and graphed using a Savitzky-Golay
algorithm. The integral of the data can also be shown.
Average mode When more than one curve is shown on the same graph (such as a family
of spectroscopy data acquired at the same pixel) and data only is chosen, all of the curves
are shown using different colors. The average of all the curves can be superimposed on
the graph if ave+data is selected. The average of the data is plotted using a bold (thick)
line. Only the average of all the curves is shown when this option is chosen. The last two
RHK Technology, Inc.
Troy, MI
94
SPM 32 User’s Manual
Menu Functions
options are when only specific curves are averaged together. They are select ave and
select ave + data.
X axis logarithmic Turn this ON to display the data with a logarithmic X axis.
Y axis logarithmic Turn this ON to display the data with a logarithmic Y axis.
Bar graph The data can be displayed using a bar graph instead of a conventional line
plot if this is turned ON. Certain data sets may have features more discernible when
displayed in this mode.
Bold lines Turn this ON to use thicker lines that are easier to see. This cannot be used
when the average of the data is also shown because the average is plotted with a bold line
to differentiate it from the other data.
Resize If the selected plots or all plots options are set (see below), then this parameter
can be turned ON to force all currently displayed plots to be redrawn with the new
settings when any parameter in this window is changed. This can be useful to insure the
same scales are used on all plots for accurate comparison of different data.
Change Determines whether the parameters set in this window effect this plot, selected
plots or all plots. Useful when a number of plots are all displayed and they can then be
rescaled so the all plots re displayed with the same X and Y axis limits, etc.
Replot Click this to force a redraw of the graph after the settings have been changed.
Transform
The colormap for any image can be adjusted with this option. An interactive window is opened
as shown in Figure 88. The mouse can be used to drag the mapping function around and the
resulting image will be updated in realtime. The X axis can be thought of as data values (lowest
on left, highest on right), and the Y axis is from color 0 to color 256. The buttons over on the
right side can be used to perform some standard
transformations.
Gamma The type of color transform can be
changed. Valid choices are linear transformation,
gamma correction, double gamma.
Grey Use this button to select either a grayscale
image or color scale.
Invert Select this button to invert the color map
(high values become color 0, low values become
color 256).
Figure 88
Wrap The color map can be ‘wrapped’ multiple times. This is useful when a large range
in z values is present but it is desired to also make small features distinguishable.
This Choose whether the colormap effects This plot only, all selected, all image plots, or
all image plots drawn from now on (set new plot transform).
Reset Undo all changes and return image to default color mapping.
RHK Technology, Inc.
Troy, MI
95
SPM 32 User’s Manual
Menu Functions
Done Click on this button to close the transform window and have the mapping changes
take effect.
Snapshot
If the user wants to compare a ‘before’ and ‘after’ representation of a data page, a picture of the
current page display can be taken and saved on the screen to compare with after a series of
options have been selected to redisplay the image. This is different from the Copy Page option
described earlier which actually duplicates the data set and consumes additional memory. Here,
the display window is captured and displayed and then options such as lighting or color mapping
etc. can be changed and the new data representation compared to the previous one.
Zoom Plot
Select this item to display only a subsection of the image in the window. The underlying data is
not changed, only a smaller portion of it is shown in the display window. The process can easily
be undone at any time and the user return to showing the entire data set in the window. The user
is prompted to select an image and it is drawn in a new window with a large box surrounding it,
drag the border of the box to the desired location and the remaining part of the image inside the
box is then displayed in the original data window.
Windows
There are occasions when the screen becomes very crowded with informational boxes, plots, and
images. This submenu provides an easy way to clear up some screen clutter without closing each
window individually by a double click.
Clear Text
Use this choice to delete all text boxes (such as help and error messages) from the screen at once.
The keyboard shortcut Ctrl-t also can be used.
Clear Plots
All plots are deleted with this menu choice. The data is still resident in memory and the data
index.
Clear All
Eliminates all windows (text and data) from the screen. No data is lost, only the current screen
display is cleared up.
Reset Plots
This can be used to delete all enlarged plots. It deletes all bitmaps and graphs from the screen
and then redisplays all resident data in thumbnail form.
Process
All of the functions to permanently alter a data page are accessed under the Process submenu.
They perform calculations that create a new data page which is then displayed in the same data
window. These new data pages can be saved to the disk instead of the raw data if that is
RHK Technology, Inc.
Troy, MI
96
SPM 32 User’s Manual
Menu Functions
desirable, however they must be explicitly saved using the Files menu. The processing routines
are done on the original data and not sequentially. This means you cannot take a derivative of an
image and then take the derivative of the derivative image for example.
Process Control
Use this menu selection to change the parameters used to
perform data processing calculations. It opens the same
window as the Analyze/Analyze Control menu item, simply
different tabs are used to set the processing parameters.
Processing tab
There are a number of settings that can give the user a vast
array of processing capabilities to completely understand any
set of data. Noise removal and peak accentuation are two
examples where the calculation parameters should be adjusted
until optimal results are achieved. The window to set these
parameters is shown in Figure 84.
Page Process Mode Use this to set whether the images
to process are selected by Cursor Mode (Cursor Pick) Figure 89
and calculated one at a time. Alternatives are to perform
the processing routine on all pages or only on selected pages. In the last method, the
images are chosen using Cursor Mode but are not processed until that mode is exited
with the double click. Then the calculation is performed on each image and the results
displayed.
Background Subtract messages Turn this OFF if the user does not want an
informational window displayed while performing a calculation.
Background Zero Mode Use this entry to select what ADC value to set to zero. Valid
choices are center(the midway value between the maximum and minimum), mean(the
arithmetic average of all ADC values), median(the value in the center of the histogram),
mode(the most common value), minimum(the lowest ADC value), maximum(the highest
ADC value).
Resample cropped images When Process/Crop Image is selected, the user can cut out a
section of the image. If this parameter is ON, the new data page is interpolated using a
bilinear regression and the pixel density maintained at a power of 2. If the data does not
have pixels that are a power of 2, the FFT routines have to pad the data and the result will
not be as attractive. If this is OFF, the new data page contains exactly the number of
pixels that were cropped. For example, a 512x512 image could be cropped to any
arbitrary pixel size such as 500x234, 180x290, etc.
Step Flatten Threshold The first parameter used in the Step Flatten routine that can
produce flat terraces. The optimal value here will depend on each individual image and
probably requires some tweaking. This number determines how flat a “flat” terrace must
be in order to contribute to the calculation. Too small of a value here will result in an
unstable calculation, but too large will not achieve the desired result. For images with
RHK Technology, Inc.
Troy, MI
97
SPM 32 User’s Manual
Menu Functions
broad terraces and few steps, try a value greater than one.
Step Flatten Smooth The number of pixels to use to determine if a region of the surface
is smooth or lies at a step. The smaller the number, the longer the calculation time.
Rescale All Related Pages If this is turned ON, then all data pages saved from one scan
frame will have the identical processing routine applied to it when any single page is
selected. This can produce undesired effects so use it carefully. For example, it is
unlikely that a Current image needs background
subtraction to remove residual slope from it compared to
the Topography image.
Fast Scan Smoothing The number of points used to
smooth the individual scan lines when performing this
routine. Valid choices are any odd number between 3 and
25.
High Pass Smooth Effective “bandpass” of the high pass
filter applied to the image when the High Pass Subtract
routine is selected. The value is expressed as a percentage Figure 90
of the total lateral image size. Typical values should be
5% to 20%.
Line Smoothing The amount of smoothing to apply to an XY data graph when the
smoothing function is selected for it. Large numbers will lead to smoother graphs but
potentially average away small, but physically meaningful, features present in the data.
Valid choices are any odd number between 3 and 25.
Line Derivative The number of points to use when calculating the numerical derivative
of a XY data set plotted on a graph. A Savitzky-Golay algorithm is used where a larger
number leads to less noise in the result but potentially small, but physically meaningful
features in the data may be lost.
User tab
Any external filtering routine can be called into the SPM 32 program and used for data
processing. The software will then display the result. The interface for this functionality is shown
in Figure 90.
User Routine The name of an external program written by the user that SPM 32 can call
process images.
User Arguments The command line parameters that need to be passed to the external
program for proper operation.
User File The name of the data file to temporarily create in order to pass the data from
the SPM 32 program to the external routine.
Analysis only If the external routine only performs processing and the user has no need
to have SPM 32 display the result, then this parameter can be turned OFF. This will
increase speed and efficiency of the operation.
RHK Technology, Inc.
Troy, MI
98
SPM 32 User’s Manual
Menu Functions
Background
All of the various algorithms to subtract a best fit plane from the entire set of data are accessed
under the Background menu. The function and specific coefficients used to determine the best fit
plane can be changed using menu items covered later in this section.
Plane Subtract
A simple linear plane is fit to the data using a least-squares algorithm is then subtracted from the
data. The equation used is ax+by+c.
Parabola Subtract
A two dimensional hyperboloid is fit to the data and then subtracted. This can help eliminate
effects present when scanning large distance using tube scanners. The equation used is
ax2+bxy+cy2+dx+ey+f.
Step Flatten
This can be used to get an image with flat terraces from an area of the surface containing steps.
A normal background subtraction routine to stepped data still leaves some residual slope on each
terrace seen by a gradual darkening of the data as the step is approached from below. This
routine fits a parabola to the flat terraces only. The parameters used to control this fit are
contained in the Process Control window covered later in this section, and they may require
some fine tuning for individual images to achieve optimal results. This algorithm was graciously
provided by Dr. James C. Dunphy.
X Offset Subtract
The mean value of each line is subtracted on a line-by-line basis for all data along the x axis, and
this can be used to reduce low frequency noise in the data. The average value of the entire data
page is kept constant though since there are cases where this value has physical meaning. This is
most commonly used to remove offset in an image due to an instantaneous tip change where the
z piezo then adjusts up or down a significant amount because the overall length of the tip has
changed when scanning along the x axis.
X Slope Subtract
A line-by-line best fit subtraction is performed on each line of data along the X axis. The
equation used is ax+b.
Y Offset Subtract
The mean value of each line is subtracted on a line-by-line basis for all data along the y axis. The
average value of the entire data page is kept constant though since there are cases where this
value has physical meaning. This is most commonly used to remove offset in an image due to an
instantaneous tip change where the z piezo then adjusts up or down a significant amount because
the overall length of the tip has changed when scanning along the x axis.
Y Slope Subtract
A line-by-line best fit subtraction is performed on each line of data along the Y axis. The
equation used is ax+b.
RHK Technology, Inc.
Troy, MI
99
SPM 32 User’s Manual
Menu Functions
High Pass Subtract
Filters the data by applying a high pass filter in the fast scan direction. The “bandwidth” of the
filter is set in the control window.
Background Zero
Use this function to set the value of the center, mean, median
or mode of the image ADC range to zero. The zero mode is set
in the control window discussed below. A selected region can
also be defined for the zero function. This function is useful for
comparing image heights in cross sections, setting a particular
terrace to zero, subtracting a background in NSOM images,
removing offsets in friction images, etc. It should not be used
on images where the absolute value of Z is significant, for
example STM current images.
Define Back
Instead of performing the fit and subsequent subtraction to the
whole data set, a small region of the data page can be chosen Figure 91
for the fit. The coefficients are then used to calculate the fit for the entire data region and the
subtraction is then performed. This can be useful if noisy regions are present in the data that
severely effect the quality of the fit when the whole image is used. This can also improve the fit
to the data if there are a large number of terraces in the image and the Step Flatten routine above
does not give satisfactory results. When an image is selected
for this type of subtraction, a window as shown in Figure 92
is opened. Use the mouse to drag a corner and outline an area
of the image. Select the Include or Exclude button to
determine whether the small area of the image is included or
excluded in the fit. If the box is to be included, a green
outline of the area is drawn on the image. An example is
shown in Figure 92. If the area is to be excluded, then a red
box is outlined. As many regions can be chosen to be
included or excluded as desired. When all regions have been
chosen, click the Done button and the result is shown in the
original data window. If the user changes his mind, the Quit
button can be clicked and the window is closed with no fit
performed. The Swap button simply reverses the role of the Figure 92
selected area. At least one area must be defined to be included or excluded or the entire image
will be fit when the Done button is chosen
The routines used are identical to the ones described above that are used for the entire data page.
Smooth Image
An image can be smoothed to eliminate some noise by simply replacing each pixel by a value
calculated using a two dimensional weighted average of the surrounding pixels.
Fast Scan Smooth
RHK Technology, Inc.
Troy, MI
100
SPM 32 User’s Manual
Menu Functions
The image is smoothed by performing the routine only along individual scan lines in the fast
scan direction. This can be preferable to the routine described above if the experiment involves
successive scan lines being considered pseudo-independent such as diffusion experiments where
the lines are a time dependent ‘snapshot’ of the local surface. This avoids mixing pixels in the y
direction where there should not be expected to be any relationship.
Sharpen Image
Edge features are enhanced by adding an amount equal to
the local slope (calculated using a Laplacian routine) to
each pixel.
Median Filter
Noise “spikes” in the data which are single, isolated pixels
that have spuriously large or small values are replaced by
the average of the neighboring pixels.
Expand Image
A new data page is created by selecting a subsection of an
image. The new image has the same number of pixels as the
original image. The values of the additional pixels are
determined using a bilinear interpolation scheme. This is
similar to the Zoom Plot function described above but this Figure 93
creates a completely new data page containing only the
region of interest.
Filter Image
An image can be processed using a variety of algorithms that operate in frequency space instead
of real space. An FFT of the data page is generated, the FFT is then processed using a specified
routine, then an inverse FFT is performed to produce the new image.
Change Page
Selecting this item places the program in Cursor Mode and an image is selected. A window is
then produced with all of the parameters for that data page that can be changed An example of
the window is shown in Figure 93
Most of the data is from the header file that stores the settings of the SPM 100 front panel knobs.
The stored values can be changed if a better piezo calibration becomes available at a later time
and all existing data then needs to be recalibrated to produce accurate dimensions. The data file
still needs to be saved again with the new information or it will be lost.
User Filter
The external processing program defined in the Process Control window described above is run
when this menu item is selected.
Undo Process
Any image processing routine can be undone if the final result does not have the desired effect.
RHK Technology, Inc.
Troy, MI
101
SPM 32 User’s Manual
Menu Functions
After viewing the new data page, this item can be selected and the displayed will revert to the
data page prior to the latest processing step. Only one step can be undone. All previous image
processing steps are lost so the undo process must be called immediately if the user wishes to
revert to the previous data.
Settings
The preferences of each individual user can be set in the entry box shown in Figure 94. This
window contains a variety of tabs to set options that help make the user interface as easy to use
as possible. The appearance and behavior of the program can be customized for each user and
saved in separate parameter files. The program can be started with these separate parameter files
using the command SPM32 filename.PRM.
Preferences tab
The first tab that can be accessed is shown in Figure 94.
Use angstroms Determines if the displayed images will be labeled in angstroms or
nanometers. Setting to ON will display angstroms. Setting to OFF will display
nanometers. This has no effect on how the data is acquired or stored in the data file.
Scale bars This determines if a scale bar should be displayed on images. The value
displayed in the bar for the X axis displays the actual length of the bar. This is similar to
how some types of SEM images are displayed.
Preserve Zoom If set to yes, when an image is zoomed, new plots, such as 3D, cursor
plots, are also zoomed. If set to no, new plots selected from the zoomed plot will go back
to the original unzoomed data.
Rotate mode Selects the type of display for
interactive rotation of 3-D images. For slower
computers (386, 486 without local bus) wireframe,
the fastest mode, is recommended. On faster systems
(Pentium, 486-66Mhz (or faster) with a VLB or PCI
video card) the mesh and solid modes give a nicer
display.
Interactive windows Sets the manner that windows
become active. Only the top-layer window can accept
interactive input or show graphics output. 'Mouse
select' means you must click the mouse in a lower
layer window to 'pop' it to the top of the stack. 'Auto
select' means windows will automatically pop to the Figure 94
top when the mouse enters. If you have a crowded
screen this choice will result in a lot of window movement.
Data acquisition delay During interactive data acquisition, SPM 32 will acquire scan
lines or spectra continuously when there is no mouse or keyboard input. When there is
mouse or keyboard input, the data acquisition halts while the program processes the new
RHK Technology, Inc.
Troy, MI
102
SPM 32 User’s Manual
Menu Functions
task. The program waits 'delay' after the last keystroke or mouse move before resuming
data acquisition. Typical range 1 - 2 seconds.
Debug messages Debug messages can be displayed on the status bar or stored in the
SPM32.LOG file that can help trace software bugs. Normally messages are off. If you
have software problems, you can select screen display with or without message logging.
These messages may help diagnose the problem. The screen message will end in a '!!'.
There may be 'left over' characters following the '!!', these are not meaningful. The
screen display is frequently useful. The message logging is only used in special
circumstances.
Pop acquisition pages When true, acquisition display pages are automatically popped so
new data can be displayed. When false, acquisition pages are not updated when partly
blocked by another window. When set to true, make sure that the acquisition display
pages do not overlay each other or they will continually flip back and forth.
Pop status window When ON, the hardware status windows automatically stay on top so
new data can be displayed. When OFF, the status windows are not updated when partly
blocked by another window.
Pop scan area window When ON, the scan area navigational window will automatically
stay on top. When OFF, this is not updated when partly blocked by another window.
Parameter increment Various parameter values can be changed by opening an input
box and typing a new value. A shortcut to change values is to use the PAGE UP or PAGE
DOWN key (or push the CONTROL mouse button and
"drag" up or down). The parameter will be
incremented or decremented by this percentage (or by
at least 1 for integers). A bigger percentage makes
faster value changes.
I/O-Define tab
Use this window (Figure 95) to setup the operating mode of
the SPM100. Also used to set in the software what kind of
instrument is being controlled as well as input appropriate
labels and units for the auxiliary channels (if used) such that
the data is displayed properly.
SPM Acquisition mode Valid choices are STM, AFM,
AFM-100, and User defined. This determines what
signal is used for feedback. Current is used in STM
mode, while lever deflection is used in both AFM
choices. Only select AFM-100 mode if using the AFM
100 accessory available from RHK to interface the
SPM 100 with an AFM head. User defined would
Figure 95
cover any other of the various scanned probe
microscopy techniques in use today such as NSOM.
User label Input the displayed label for the feedback signal. This would be “Current”
RHK Technology, Inc.
Troy, MI
103
SPM 32 User’s Manual
Menu Functions
when operating an STM, “Force” when using an AFM, and other appropriate entries for
other techniques.
User units The correct units for the feedback signal. If an SI unit is entered here (V, A,
N, etc.), then the correct prefix will also be shown in the display.
Units/monitor volt Physical units applied to input signal for proper display This setting
only has an effect if the acquisition mode above is User Defined, otherwise the STM
current per monitor volt setting located in System Settings window is used for scaling.
Lock-in/Aux label Descriptive label to use when displaying data read from the Lockin/Aux channel on the rear panel. Examples would be “Force”, “Counts”, etc.
Lock-in/Aux units The correct units for the signal read by the Lock-in/Aux channel on
the rear panel. If an SI unit is entered here (V, A, N, etc.), then the correct prefix will also
be displayed in the display. Typical values would be N (newtons) or V.
Units/input volt Physical units applied to the Lock-in/Aux input signal for proper
display.
Aux 1 label On revision 5B or later electronics, two additional input channels were
added to the rear panel. This is a descriptive label for the data applied to the Aux 1
channel that is used when displaying the data. Examples would be “Force”, “Counts”,
etc.
Aux 1 units The correct units for the signal read by the Aux 1 channel on the rear panel.
If an SI unit is entered here (V, A, N, etc.), then the correct prefix will also be displayed
in the display. Typical values would be N (newtons) or V.
Units/input volt Physical units applied to the Aux 1 input signal for proper display.
Aux 2 label Descriptive label to use when displaying data read from the Aux 2 channel
on the rear panel. Examples would be “Force”, “Counts”, etc.
Aux 2 units The correct units for the signal read by the Aux 2 channel on the rear panel.
If an SI unit is entered here (V, A, N, etc.), then the correct prefix will also be displayed
in the display. Typical values would be N (newtons) or V.
Units/input volt Physical units applied to the Aux 2 input signal for proper display.
DSP 1 & 2 label If a SPM 100 with a DSP board is used (VSCAN or SPM 100 revision
8 or later), then data acquisition using the builtin DACs can be performed in a limited
capacity. The type of signal that is being read by these channels can be entered here.
DSP 1 & 2 units The units of the signal
Units/input volt Physical units applied to the DSP auxiliary input signal for proper
display.
I/O-Ctrl tab
Direct control of the feeedback loop and the rear panel DACs can be achieved through the
window shown in Figure 95.
RHK Technology, Inc.
Troy, MI
104
SPM 32 User’s Manual
Menu Functions
Withdraw Tip Turn this ON to withdraw the tip from the sample regardless of the
feedback loop setting. This requires Revision 5 or later of
the SPM 100. This is used to release the tip after approach
when the Tip Retract after approach is ON.
Hold Feedback If this is turned ON, the feedback loop is
disabled and the tip position is held at its current height
above the surface. Be careful to not have this off for too
long of a time as thermal drift could cause a tip crash.
Since a crash is not as devastating of an event with an
AFM, this can be used more freely when operating in this
mode.
Figure 96
DAC 1 Output Enter a voltage to apply to the rear panel DAC 1 output. This voltage
will appear on the BNC output immediately. Note that the output will also be changed if
some spectroscopy routines are performed that utilize this output.
DAC 2 Output Enter a voltage to apply to the rear panel DAC 2 output. This voltage
will appear on the BNC output immediately. Note that the output will also be changed if
some spectroscopy routines are performed that utilize this output.
DSP Z DAC output The DSP scan board is capable of controlling all three axes of a
scanner. There is a Z DAC output available on the rear panel of the SPM 100 and this
parameter sets the voltage to be applied to that connector.
I/O-DAC tab
This tab (Figure 97) informs the SPM 32 program how the rear
panel BNC jumpers are connected and what function each of the
rear panel DAC outputs should perform. For proper acquisition
of any data involving the application of the additional voltages,
the BNC-BNC jumpers must be connected properly on the rear
panel.
Waveform Approach Primary/Secondary Which of
the two DAC outputs should the waveform needed for
various coarse approach mechanisms be applied.
Open loop control The DAC used to control the new
open loop approach feature. A BNC-BNC jumper must
be attached between this DAC and the Z piezo input
used for the approach. If a Kinetic waveform approach is
Figure 97
selected, this DAC cannot be the same as the one
designated above.
IV spectroscopy Which of the rear panel DACs is added to the bias voltage modulation
input when I-V spectroscopy is performed.
IV Variable Gap Mode When performing Variable gap spectroscopy, turn this setting
RHK Technology, Inc.
Troy, MI
105
SPM 32 User’s Manual
Menu Functions
ON. For proper operation, the DAC that is NOT being used to ramp the voltage must be
attached to a Z modulation input to move the tip. The z motion per D/A volt must also be
entered correctly in the scan head setup window.
Z Spectroscopy Out The rear panel DAC that is used to change the tip height above the
surface when the feedback loop is off.
Multivolt output Determines which DAC is used to sum into the bias when acquiring
multivolt images.
Image spec output The rear panel DAC to apply the voltages to that are used to make
multiple bias images during each scan frame.
Lithography output Voltage pulses to induce features on the surface are applied to this
DAC output.
CITS Output Which DAC should be used to ramp the bias when acquiring CITS
images.
Datalog output The rear panel DAC used for the driving voltage during datalogging
acquisition. This would be the voltage applied to the counter electrode if acquiring a
cyclic voltammogram during electrochemical STM. Another useful technique for this
feature is determining the resonance of an AFM cantilever. The procedure for this is
outlined in Chapter 4.
EC control DAC If electrochemical STM is performed, this is the rear panel DAC used
to set the voltage on the working electrode.
Tip Manipulation out 1-2 When using the tip manipulation routines, two parameters
(bias, setpoint, z height) can be changed at simultaneously. These two settings determine
which DAC performs which modulation.
Omicron MSCU out The new microslide control unit can use a TTL sync signal input to
control the steps. This signal can be provided by one of the rear panel DACs instead of
using a separate DT2817 TTL card if desired.
Handshake output channel If using the handshaking
routine to communicate with external equipment during
a spectroscopy routine, this sets which DAC will be
used for the output timing signal.
I/O Locks tab
Any of the two rear panel DAC’s can be locked to an exclusive
use. This prevents accidental application of an undesired
Figure 98
voltage when setting up other measurements. For instance, if
DAC1 is locked to coarse approach and the BNC jumper is attached to the inertial input, this
output cannot be selected to perform IV spectroscopy. If it is unlocked and an I-V measurement
is performed where the voltage ramp is mistakenly applied to DAC1, this voltage will ultimately
be summed into the high voltage X offsets BNC’s and undesired piezo motion may occur. If an
error message is produced about a DAC being prohibited from executing the current procedure,
RHK Technology, Inc.
Troy, MI
106
SPM 32 User’s Manual
Menu Functions
check of either of the DACs are locked. When any DAC is locked to a specific function, no
measurement can be performed of any kind which has the locked DAC set as the output channel.
Aux FB tab
A new feature in SPM32 is the ability to remove long-term drift in the z direction and eliminate
the need to periodically adjust the ADC gain when the feedback signal saturates the ADC. This
is done using a digital feedback loop that utilizes ADC #1 on the DSP scan board inside the SPM
100 (to sample the feedback signal) and the DAC to output a voltage signal (to apply to a piezo
that cancels out the drift).
Depending on head design, the output signal can be summed into the Z Scan signal using Z
Position Modulation Input #1 on the rear panel and be summed directly into the Z Scan signal.
Alternatively, it can be summed into the Z Offset signal which may be applied to a separate
piezo that can also elongate/contract to maintain a constant tip/sample separation. This is the
recommended configuration when using the RHK UHV 300 microscope where the Z Offset is
applied to the inner surface of the three walking piezo tubes (Head H in the SPM 100 manual).
As the analog feedback loop maintains a constant tip/sample separation, log term drift can
produce a slow extension/contraction of the tip piezo and make the signal eventually exceed the
minimum/maximum voltage that can be read by the ADC. With the second feedback loop active,
it can have a very long time constant and null out the slow variations caused by drift. The signal
will therefore always remain in the center of the ADC range. The Z Position monitor output
should be connected to the DSP DAC.
The remaining caution is when the correction voltage reaches
its saturation. For example, the Z Offset signal will eventually
reach +130 V which means the Z Offset piezo will not be able
to change its length anymore and the slow drift will now cause
the Z Scan signal to start deviating from zero. When this
occurs, a coarse step will need to be taken in order to allow the
Z Offset piezo to return ro its equilibrium length.
Enable Aux Feedback Turn this ON to activate the
long term integrator digital feedback loop.
Time Constant This sets the bandwidth of the digital
feedback loop. This MUST be a longer time then the
analog feedback loop in the SPM 100 (set by the Gain
and Time Constant knobs) or serious problems will
occur. Some experimentation will be needed to
determine the optimal value for a given set of
conditions. Too long will allow the feedback signal to
deviate from zero. After establishing feedback turn the
Z Offset knob some and note the how quickly the Z
Figure 99
scan signal returns to zero. If it takes more than a few
seconds, the Time Constant entered here should be lowered.
Setpoint To always maintain the Z Topography signal near zero, use a value of zero here.
To have a DC Offset in all images, a nonzero value should be entered.
RHK Technology, Inc.
Troy, MI
107
SPM 32 User’s Manual
Menu Functions
Change output value When this option is selected, a dialog box opens that permits the
user to enter a new output value. This can be used to offset the output signal. If the
auxiliary feedback is disabled, then the feedback signal will not be centered about zero
any longer, this can be used to artificially retract the tip. If the loop is still active, then it
will ramp the voltage (at a rate equal to 1/(time constant)) to make a correction and
recenter the feedback signal to zero.
The next three entries (aux fb status, input, output) provide a status report of the current
feedback loop. The output value should be carefully monitored to ensure it does not reach its
minimum/maximum value which means the piezo has reached its limit and either a tip crash or
loss of feedback signal may occur.
Aux feedback mode This second feedback loop can have uses other than canceling out z
piezo drift. It can be used in Kelvin force microscopy to keep the electric field between
tip and sample zero at all times. If being used for z piezo correction, then Z Offset control
should be chosen. Another choice is Q-MFM (quantitative magnetic force microscopy),
and the final choice is User defined.
Aux feedback Z offset invert If using the DSP DAC output to sum into the Z Offset
BNC, then the sign is significant. If the loop is activated and it immediately moves to one
saturation point, then this setting needs to be reversed. For a UHV 300 head with the Z
Offset applied to the inner surface of the three walking legs, this should be turned ON.
Disable Aux feedback during imaging When scanning an image, the long term
integrator can be disabled to eliminate any concerns about adding artifacts to the image.
An example of when this could cause problems is if the fast scan direction is exactly
aligned with terraces on the surface. In this case, as the tip moves along the image and
drops to the next terrace, the aux feedback loop will try to null out this change since the Z
is exactly aligned. In this output of the feedback loop will start to deviate away from
zero. case, at the end of each scan frame, the loop will be activated and a correction
voltage applied so the Z Scan signal returns to zero. In this case, a scan delay of
appropriate length to permit the feedback signal to return to zero should be entered for
Scan Delay located in the Acquire/Image Control/Options tab.
Re-enable aux feedback at startup When the software restart, if the Aux feedback loop
should automatically be activated, then turn this ON. Otherwise leave it OFF. If the aux
feedback is being used for Z control and the tip is retracted when the software starts, then
the Aux feedback loop will saturate trying to push the tip towards zero. To avoid this
possible problem, this is why the parameter should be OFF.
Units/input volt Units/output volt Enter the correct units for each signal. If using the Z
Offset control, then the proper values are automatically entered from the Z Offset motion
per piezo volt calibration entered for the scan head. The input value will update when the
Z Position A/D Gain is changed.
Feedback units For user defined feedback, the proper units can be entered here for
meaningful values to be displayed in their physical units.
Aux monitor
RHK Technology, Inc.
Troy, MI
108
SPM 32 User’s Manual
Menu Functions
When the DSP feedback loop is active, the second DSP ADC can also have a signal applied to it
and SPM32 will be monitoring it also. This will be for informational purposes only but can be
useful for sending an alert to the user if an important signal is reaching a user specified limit. It
was specifically added to monitor a fiber interferometer signal to insure the user is aware that the
signal drift is reaching a value too close to the specified limit and an abrupt jump in position may
occur. When this is about to happen, a red warning box and audible beep will be produced. If the
system remains within the specified limits, an informational message is written in the upper
menu area.
Monitor mode Switch this to safe between limits safe or outside limits to activate the
monitoring of the second DSP ADC.
Monitor maximum/minimum Enter the limits that the signal must remain within at all
times or the warning will be produced.
Pen up/pen down output Turn this ON to have the DSP pen bit (pin 2 of rear panel
digital I./O connector) go HI when the limits are exceeded and stay LO when within the
range. This can be used to add additional protection to the monitoring and have
something automatically happen if a user is not around to respond to the warning
message.
Units/monitor volt Provide scaling of input signal for display in physically meaningful
units.
Monitor units Units of input signal.
Screen tab
The final section that can be customized for each user’s own taste
is the screen appearance. The window shown in Figure 99 is used
for this purpose.
Resolution This sets the screen resolution used by the
display program. Choices range from 640x480 all the way
up to 1600x1200. The larger the monitor that is being
used, the higher the resolution that should be used to
maximize efficiency and appearance.
Disable VESA protected mode Starting in 1995-96,
Figure 100
many graphics cards had memory directly accessible to
32-bit protected mode programs (like SPM 32). If your graphics hardware supports the
protected mode, the opening comment will indicate the maximum VESA resolution.
Using protected mode graphics can be much faster (as much as 5-6 times for some
operations). The only reason not to use this mode is if your graphics board does not
correctly implement protected mode access. If you use CTRL-V to force low resolution
graphics because of compatibility problems then protected mode functions are disabled.
VESA graphics If OFF, direct hardware control is used for graphics, provided your
graphics board is based on a Tseng W32, ET-4000 or ET-3000 compatible chip.
Otherwise the VESA graphic interface is used. Direct hardware control may be faster on
RHK Technology, Inc.
Troy, MI
109
SPM 32 User’s Manual
Menu Functions
older systems with Tseng graphics chips. If your computer does not have a Tseng
graphics chip, the SPM 32 program will always use the VESA interface. VESA is also
required for all screen resolutions greater than 1024x768.
Mouse Sensitivity This setting controls the sensitivity of the mouse. Since the program
relies heavily on the use of a mouse, setting this to a value that is comfortable will
increase the program's ease of use. A positive value make the cursor move faster and
negative values slow it down. '1' is a good initial value, '5' is very fast and '-5' is very
slow.
Menu close range Determines how far the cursor can move off of a menu without
closing it. The units are in screen pixels. If the value is set to '0', the menu will close as
soon as the mouse cursor moves off the menu. This is the fastest way to operate the
menu system, but can be annoying when you close a menu by accidentally moving off of
it. Setting the value to a higher number allows you to move off of the menu without
closing it. Setting this to a large number makes it difficult to close a menu as you must
move off of the menu by a large distance. An initial setting of 20 is a good start.
CONTROL is left button The CONTROL button is the one to click when opening the
windows. This is useful for people who are used to using Windows. The default is ON,
so the left button on a mouse is the one to click to access all menu items.
Click delay When you click a mouse button, the program waits 'delay' to see if this is a
drag (mouse motion with the button depressed) or the first click of a double click. Start
with a slow value (0.5 to 1.0 sec) and later you can decrease to a fast value (0.15 to 0.25
sec) with practice using SPM 32.
System
The final main menu item is used to access the calibration of the scan head, the configuration of
the auxiliary boards installed in the host computer, the help files, and some DOS capabilities.
Config System
The main system configuration window is shown in Figure 101.
The scanner tab is used to enter the piezo sensitivities and
calibrate the microscope to the SPM 100 electronics.
Head tab
The first tab under the head information is the scanner tab. This
should be used to enter a text label for the scan head and the
calibration values.
Figure 101
Scan head description. Enter a name for the scan head being used. This is the name that
will be shown in the text window when the program is first started; it will also be stored
with all data files.
X, Y, Z motion per piezo volt. The X, Y, and Z motion piezo calibrations are the piezo
deformation per applied volt. The polarity is significant. A positive X deformation is
RHK Technology, Inc.
Troy, MI
110
SPM 32 User’s Manual
Menu Functions
defined as the tip moving to the right when seen from above the tip looking toward the
sample. A positive Y deformation is defined as the tip moving upward when seen from
above the tip looking toward the sample. If the polarity or calibration is incorrect the
offset distances will not agree with the scan dimensions. This will show up as the box
cursor moving in the wrong direction or by the wrong amount. A positive Z deformation
is defined as the tip moving away from the surface. (If the polarity is reversed then holes
will be turned into bumps in topographic images.)
Offsets summed with scan If the SPM 100 jumpers are set such that the offset signals
are summed into the scan signals, turn this parameter ON. The SPM 32 software can then
produce a warning message if the scan range and offset knobs are adjusted to values that
will exceed the maximum voltage produced by the SPM 100. This setting is identical to
the once contained under the SPM100 tab.
X, Y, Z offset per piezo volt. The X, Y, and Z piezo calibrations are the piezo
deformations per applied volt. The polarity is significant. A positive X deformation is
defined as the tip moving to the right when seen from above the tip looking toward the
sample. A positive Y deformation is defined as the tip moving upward when seen from
above the tip looking toward the sample (X+ is to the right). If the polarity is reversed
the image will be mirrored. This can be a problem if the chirality (handedness) is
significant, such as when studying biological specimens, or if the scan head is used with
an optical microscope. A positive Z deformation is defined as the tip moving away from
the surface. If the offset and scan signals are summed together (as in operating a single
tube scan head), then the values entered here will be equal to the calibration values
obtained when scanning a known sample with features of a known size.
Closed-loop scanning
A new feature implemented on the DSP scan board installed in revision 8 of the SPM 100 or a
VSCAN, is the ability to perform closed-loop scanning. The outputs from position sensors
(capacitance, laser interferometers, etc.) are fed into ADC’s on the scan board, and the scan
output voltages are then continuously adjusted to maintain the exact position. This insures that
the displacements are truly linear and no piezo nonlinearities or thermal drift are present in the
data. For example, as the stage shifts due to thermal effects, the output of the position sensors
will change, and the DSP board can then change the output voltages to maintain the correct
position. Also, as an image is scanned, if the next pixel is supposed to be 2.33 nm away and the
voltage returned from the stage indicates it moved 2.37 nm, the DSP board will reduce the output
voltage the appropriate amount until the displacement is exactly 2.33 nm.
This type of system relies on feedback so a bandwidth must be selected in order to insure proper
operation. The location must not be sampled too frequently or the feedback system will try to
correct the displacement too often and an unstable feedback loop will be present. When scanning
an image, the bandwidth of the closed-loop circuit should be at least a factor of 10 larger than the
scan speed. Otherwise, the DSP board will not have ample opportunity to make small corrections
before the image data is acquired and the tip is moved to the next pixel. This factor would
provide the scan board the chance to apply about 10 corrections to the displacement as the image
data is acquired. The bandwidth must also be below the resonant frequency of the scan stage or
RHK Technology, Inc.
Troy, MI
111
SPM 32 User’s Manual
Menu Functions
oscillations will occur. Most stages have a fundamental mode of less than a kHz or so. Therefore,
many users will have to reduce the image scan speed to take advantage of the closed loop
capabilities.
The calibration of the closed loop sensors must be carried out and the appropriate scale factors
then entered into the software. A known grating should be scanned and after the features are
measured, the known dimensions are compared to the output voltages from the displacement
sensors to provide a distance/voltage calibration. The second way to calibrate the position
sensors is with the new automatic calibration feature. The DSP scan board performs a series of
scans with specified dimensions and the output of the sensors measured with the ADC1 and
ADC2. Since a known distance was scanned, the sensor output per distance can be calculated
and the calibration factors will be automatically entered into the software in the advanced
feedback tab. Note that when SPM32 sets up the measurement series, it relies on knowing the
position of the front panel X Scan Range knob in order to specify the scan size to the DSP board.
The sensor calibration factors are therefore dependent on the X Scan Range knob position.
If the range knob is turned (to increase or decrease the available scan area) the automatic
calibration routine MUST be performed again.
Feedback tab
The parameters that determine the performance of the closed-loop scanning are entered in the
feedback tab as shown in Figure 102.
Enable positioning feedback When this is ON, the data
acquisition will be under closed loop control. All piezo
nonlinearities and drift should be eliminated. Do not
activate this feature unless the position sensors are
properly connected and the full concept is completely
understood as improper usage can result in scan head
damage.
Position sensors connected Turn this ON when the
outputs of the closed loop sensors are connected to DSP
ADC#1 (for X axis) and DSP ADC#2 (for Y axis).
Time constant / Bandwidth Use this to set the
performance of the closed-loop sensor circuit. Since
there is an inverse relationship between the two, setting
either of them determines the other. The user can set
whichever one is more comfortable to think about.
Figure 102
Automatic sensor calibration Select this to start an automatic calibration routine.
Automatic recalibration Turn this on to do another calibration if you feel something has
changed. There is no real difference between selecting the above parameter and
performing an entire sequence again.
X(Y) size ratio After calibrating the scanner, scan an sample with known dimensions and
use the Analyze/Angle Plot to check if the actual dimensions are measured along each
axis. If not, then enter the correction ratio here and recalibrate.
RHK Technology, Inc.
Troy, MI
112
SPM 32 User’s Manual
Menu Functions
XY Angle correction If the measured feature does not have the proper angle, enter the
correction here. This would be most easily measured for a feature that is know to have a
90 degree angle such as a square or rectangular grid.
Advanced Feedback tab
Increased precision can be gained by applying
higher order corrections to the closed-loop scan
algorithm. These are entered in the tab shown
in Figure 102.
X/Y detector offset If the position
sensor does not read exactly zero when
there is no physical displacement, enter
the voltage offset here.
X/Y detector sensitivity The voltage
output from the sensor as a function of
displacement. This is where the
calibration values will be entered.
Figure 103
Detector cross coupling Ideally the position sensors are perpendicular and independent
of each other, however in real systems many times there is crosstalk between the two
directions (a displacement precisely along the X axis also changes the voltage output of
the Y sensor a small amount.). The amount will be determined by the automatic
calibration routine.
XY square & cube sensitivity Used to correct for nonlinear terms in the sensor output
voltages.
SPM100 tab
Enter the type of electronics the SPM 32 program is communicating with in this window along
with other particular features of the unit. The window is shown in Figure 103.
Hardware tab under SPM100 tab
Electronics type. The first model
SPM 100 was produced over ten
years ago. Since that time there
have been seven major upgrades as
well as many minor ones. The
SPM 32 software is compatible
with all versions of the electronics,
though not all features of this
software release can be used with
older model electronics. The
Figure 104
current version of the electronics is
Version 8.
VSCAN-100 DSP upgrade installed Turn this ON if an old electronics is being used
RHK Technology, Inc.
Troy, MI
113
SPM 32 User’s Manual
Menu Functions
along with the VSCAN upgrade.
RHK AIM Interface The SPM 100 can accompany a variety of interface modules to
allow the control of various commercial microscopes. If an AIM is used with the
electronics, the correct model should be selected here in order to ensure maximum
compatibility. The various choices are AIM MI, AIM NSOM, AIM DI Nanoscope, AIM DI
Bioscope. The selection will automatically set other parameters in the program that are
compatible with the interface.
Offsets summed with scan If the SPM 100 jumpers are set such that the offset signals
are summed into the scan signals, turn this parameter ON. The SPM 32 software can then
produce a warning message if the scan range and offset knobs are adjusted to values that
will exceed the maximum voltage produced by the SPM 100. This setting is identical to
the one contained under the Scanner tab.
RHK Aux1/Aux2 installed. A new feature was added to the SPM 100 Version 5B at the
end of 1994 that increased the number of auxiliary input
channels that could be imaged during a scan. Before the
new circuitry was added, a maximum of three channels
could be imaged simultaneously during a scan. The new
circuit allows up to five channels to be imaged. Set this
parameter to ON if the analog multiplexer board was
installed in your SPM 100 Version 5 or earlier system.
All SPM 100 systems built since version 5B have
included this board.
Gains tab under SPM100 tab
Figure 105
Scan volts/monitor volts, Offset volts/monitor volts.
The SPM 100 contains ten high voltage amplifiers and each has a range of ±130 volts (or
±215 volts on the high voltage option). Each output is measured by the software using a
13:1 resistor divider connected to each output inside of the SPM 100. If this divider is
changed for any reason, or the gain of the high voltage amplifiers is changed for any
reason, the new ratio must be entered here so the software will record the correct value.
Some custom units have been made where the output is ± 10 volts, a value of 1 should be
entered here. If the 0-10 V board is installed and it drives an external stage that outputs 0100 V to the actual motion stage, then 5 should be entered here (20 V internal range
becomes 100 V at the piezo stage).
Sample bias per monitor volt. The SPM 100 has a bias voltage range of ± 10 volts.
This value is read directly by the A/D convertor. If the bias range is changed for any
reason, the new range must be entered here. For example, if the bias voltage was
connected to an amplifier with a gain of ten before it was applied to the sample, the new
bias voltage range would be ± 100 volts. You would then enter 10 for the new sample
bias per monitor volt so the software would know for each volt it measures on the output
of the SPM 100, ten volts is being applied to the sample.
A positive bias means the sample is biased so that electrons tunnel from tip to sample (empty
RHK Technology, Inc.
Troy, MI
114
SPM 32 User’s Manual
Menu Functions
state image). The sign of this ratio is significant. The program assumes the current pre-amp is
attached to the tunnel tip and the bias supply is attached to the sample. If this configuration is
reversed, the sign of the bias monitor gain should also be changed, so the data files will have the
correct bias voltage information.
STM current per monitor volt. This is the parameter that configures the software to
reflect the STM preamplifier gain. There are several different preamplifiers available, all
having a different gain. In addition, the RHK preamplifier’s second stage has multiple
gain settings. It is important to know the total gain of the first and second stage
preamplifiers so the correct value can be set in the software. The sign of this value is
important, the software has adopted the convention followed by Ohm’s law. A positive
bias will create a current with a positive sign even though the electronics actually move
in the opposite direction. This sign is simply used to display and store a current with a
positive value regardless of the sign of the bias. The value should always have a positive
value unless there is a good reason to want to designate current flow as negative when the
bias is considered positive.
The gain of the first stage preamplifiers are often stated in mV/nA. This must be converted to the
unit nA/monitor volt to be entered into this menu. A preamplifier with a gain of 100mV/nA is
entered as 10 nanoamp per monitor volt. This means a ten nA tunneling current sends a 1 volt
signal to the computer. The sign of this ratio is significant. Refer to the SPM 100 User’s Manual
for an explanation of what to enter here.
DSP tab under SPM100 tab
The IP address of the DSP controller is set in this window
(Figure 106) along with providing some informational
messages.
Serial number If a zero is entered here, the program
will give the first SPM 100 on the network it finds the
IP address specified. The serial number it is
communicating with will then be displayed here. If a
serial number is entered, SPM32 will only try to
Figure 106
communicate with an SPM 100 with this number. This
can be important if more than one SPM 100 is on a LAN in the same laboratory. In these
cases, it is important to make sure any concurrent version of SPM32 are controlling the
correct SPM 100 and there is no interference with SPM 32 sending commands to the
wrong SPM 100.
SPM 100 IP Enter the desired IP address of the SPM 100 scan board. This should be an
address that is not used anywhere else in the local area network (LAN), but is close to the
IP address of the host computer. The SPM 32 software will act as a BOOTP server and
assign the address shown in the window when the software is first started. The
electronics should be turned on first and the scan board will start sending out requests to
receive an address. When the software gets started, it will hear the request and send the
proper response so the address in this window is assigned to the SPM 100.
RHK Technology, Inc.
Troy, MI
115
SPM 32 User’s Manual
Menu Functions
SPM 100 scan code Enter the name of the file that contains the scan code to allow
communication between SPM 32 and the control electronics. This file should have been
provided with the software and will use the .COF extension. When the program is first
started, this code is downloaded to the scan board and remains resident as long as the unit
is not switched off. Pay attention to this parameter. Use the highest number version
provided with the software. Occasionally, two versions are provided in case the latest one
introduces undiscovered bugs. It is a simple matter to back level to a prior version by
changing this entry.
Reboot DSP scan program Use this to download a new .COF file to the SPM 100 unit.
Or if the scan board seems to start acting strange, this can be used to possibly resolve the
problem.
Restart DSP communication If the program loses communication with the SPM 100,
(the SPM status window title bar will probably turn yellow). Attempt to reestablish a
connection using this menu item.
Retract tip during DSP initialize When the DSP board is reinitialized, a TTL signal to
retract the tip can be sent to the feedback loop so the chance of tip damage is reduced.
DSP timeout When trying to establish communication with the DSP scan board, this
timeout value determines how long to wait for a response before the program stops
trying.
Debug status If problems are uncovered when operating the software, the user can turn
on these messages to potentially provide helpful information when communications
errors are present. Contact RHK support at [email protected] and send the error
messages along with what created the problem.
DSP hardware When communication is established the
SPM 100 hardware settings are read from the unit and
displayed here.
DSP software The current scan board software revision
is displayed here.
PC tab
The auxiliary boards installed into the computer are configured
here (Figure 106).
A/D Card type. Select which of the data acquisition
cards is being used with the SPM 1000. Three choice are
available DT-2821 (a 50 kHz board) DT-2821-F (a 150 Figure 107
kHz board), DT-2821-G (a 250 kHz board).WARNING:
If a FASTER card is selected than is actually installed, analog input data can be distorted,
and the system can crash during data acquisition.
Base Address. The base address shown is the default base address (240h) of the Data
Translation card. Unless there is an address conflict with other boards in the system, and
the jumpers were switched, there is no reason to change this setting. If this value was
RHK Technology, Inc.
Troy, MI
116
SPM 32 User’s Manual
Menu Functions
changed when the card was installed, make sure the address in the window matches the
one selected by the jumpers on the card.
DAC 1&2 range Jumpers can be set on the DT2821 board to limit the output voltage.
This spreads the 12 bit resolution over a smaller voltage range, thereby increasing the
resolution for performing some measurements like ramping the bias voltage or the z
piezo voltage. If these jumpers are changed, then the value should be set here.
Input Test Limit. This sets the number of times the computer checks the A/D board for
a completed conversion before the computer times out and produces an error message.
This would only happen in rare circumstances. If a display message ever appears that
says the acquisition has timed out, increase this value by a factor of ten.
DT-2817 TTL card installed. The DT-2817 card is a digital input/output (DIO) card
that is used when the SPM 1000 system is interfaced to the AFM 100 Control
Electronics, or if the SPM 1000 is controlling a scan head that uses a stepper motor,
Omicron Microslide, or a PHI UHV approach motor. If the card is present in the
controlling computer, turn this selection to ON.
TTL card base address. The setting shown in Figure 61 is the default value for the DT2817 DIO card. Similar to the case of the DT2821 board, unless there is an address
conflict with other boards in the system, and the base address (228h) was reconfigured,
there is no reason to change this setting. If this value was changed, make sure the new
setting in the window matches the selection made via the jumpers. If no card is present,
ignore this parameter.
RHK AFM 100 Installed. If the RHK AFM 100 interface is being used to interface an
AFM to the SPM 1000 control system, set this parameter to ON. The software will then
present additional menus that are specific to the AFM 100.
PC-TIO-10 counter installed. This board is a TTL pulse counting board. Some
microscopes, such as a Near-field Scanning Optical Microscope (NSOM) can use
detectors like photo-multiplier tubes (PMT) or avalanche photo detectors (APD) that
generate counts instead of an analog voltage. This board allows the digital pulses to be
directly counted instead of first converting it to an analog voltage.
Counter base address. The value shown is the default value for the PC-TIO-10 card.
As discussed previously, unless there is an address conflict with other boards in the
system, there is no reason to change this setting. If this value was changed, the new
setting should match the jumper settings on the card. If no card is present, ignore this
parameter. The factory preset value is 1A0h.
Ortec 921 MCA installed. This is used for some time-resolved photon counting
experiments. Set this to YES if this option is used.
GPIB tab
An additional option available to be purchased from RHK is the ability to have the SPM 32
RHK Technology, Inc.
Troy, MI
117
SPM 32 User’s Manual
Menu Functions
software acquire data while communicating with a GPIB instrument. This ability is configured in
the window shown in Figure 107.
GPIB enabled This needs to be ON if a GPIB card is installed. When this is selected if
the hardware key has not been upgraded for GPIB capability, the user will be prompted
for an upgrade password.
GPIB path The directory where the contents of the GPIB
directory were placed. This will contain spmgpib.exe and
the short document outlining how to use the function. All
GPIB scripts should also be placed in this directory.
GPIB address The address of the GPIB device that SPM
32 needs to communicate with. A typical default address
is 22. Refer to the manual provided with the GPIB device
for information on setting this address.
Device is SCPI compliant If the device understands the
basic SCPI command set then turn this ON and SPM32
will utilize these as part of its standard command set.
GPIB initialize Set what SPM 32 should do (if anything)
when initializing the device. Valid options are none, Send Figure 108
*RST;CLS, and send script.
Init script file The text file of commands to send to the unit if send script is selected
above. This should be in the GPIB directory specified in the second entry.
GPIB Status check enabled If ON, then before any measurement is performed the status
is read from the device and its response is then stored in the data file header. This can be
useful to insure storage of some experimental conditions is desired that are read with the
GPIB device.
Status script file If the above parameter is ON, then this is the string of commands to
send to the device to read its status.
Spectroscopy script file The file containing commands to perform a spectroscopy
routine with a GPIB device.
Spectroscopy control Determines if the GPIB spectroscopy script is executed with the
feedback ON or feedback OFF.
Spectroscopy data limit The size of the buffer (in kilobytes) to store the result of the
data acquisition.
Spectrum delay The delay from the time the scan is halted at a pixel and the GPIB data
acquisition is started..
Stabilization interval Delay after GPIB acquisition finishes before the tip is rastered to
the next data pixel.
MCA tab
RHK Technology, Inc.
Troy, MI
118
SPM 32 User’s Manual
Menu Functions
The SPM 32 program also has the built-in capability of performing optical experiments using an
Ortec 921 Multi-channel Analyzer (MCA). The setup for this special spectroscopy mode is done
using the window displayed in Figure 109.
Start acquisition The lower limit of data for MCA acquisition.
Stop acquisition Upper limit of data.
Time per spectrum Amount of time to spend collecting count data at each step.
Spectra to acquire Number of spectra to acquire. If more than one, the process is
repeated and another data set is collected. This can help
decrease the signal/noise ratio.
Channel binning The resolution of the MCA is 14 bit, if
lower resolution data can be collected, adjacent channels
can be binned together to reduce the amount of data
acquired. The resolution of the data acquired is
automatically calculated based on the upper and lower
limit combined with the binning.
MCA data label Enter a label to use when displaying
MCA data.
MCA input units The units for the data collected from
the MCA. (Joules, secs., etc.)
Figure 109
MCA signal/input volt The scale of the data from the
MCA.
MCA count units Units for the data acquired from the MCA related to counts. Usually
Hz.
MCA data/input count Scaling for the count data. In most cases this is 1.
System Status
An extensive information window can be opened that displays
the current amount of free memory and other operating
parameters of the program. An example is shown in Figure 110.
Change PRM File
A directory listing of all *.PRM files in the current directory is
shown in a window like the Files/Directory described above.
Any new PRM file can be loaded by selecting it with the
CONTROL button. This can allow separate users to easily
customize the interface for separate scan heads and individual
screen configuration.
Figure 110
Create New PRM File
All of the current settings are saved into a new parameter file. The user is prompted for a name.
RHK Technology, Inc.
Troy, MI
119
SPM 32 User’s Manual
Menu Functions
Set Screen Colors
Almost every color displayed on the screen can be adjusted to a user’s preference. Items such as
the background color, the background and text color of control windows, the colors of the
background and grid lines in a 2 D graph, etc. can all be changed to any value. The color picker
window is shown in Figure 111. Choose the color to change by
clicking on the top menu selection. Then slide the three color bars
to any RGB combination and the color will change in the bottom
window to the current value. The colors will be automatically
update in any currently open window. When satisfied with all
color changes, the window can be dismissed by double clicking
on it. If the user gets stuck in some strange combination that
makes many things unreadable, use the RESET DEFAULT
Figure 111
COLORS option to revert to the original colors of the program.
All changes will be lost and have to be reconfigured.
DOS Text
The user is prompted to enter a single DOS command which is then executed. Do not use this to
execute any command or program that generates a graphical screen output.
DOS Shell
A new DOS shell is loaded and commands can be executed as when operating in the normal
DOS command line. When all commands are completed, use EXIT to return to the SPM 32
program.
Exit SPM32
Use the exit command to quit the program and return to DOS or Windows.
Help
Help resourcesThe extensive help facilities integrated into SPM 32 are accessed using this
menu. The general description of how to access it and the definition of keyboard shortcuts is
accessed under the help menu. An extensive online tutorial is also available to help familiarize a
new user to the SPM 32 control interface. An additional feature under the Help submenu is the
ability to define other keyboard shortcuts.
RHK Technology, Inc.
Troy, MI
120
SPM 32 User’s Manual
Menu Functions
RHK Technology, Inc.
Troy, MI
121
SPM 32 User’s Manual
Menu Functions
4
Getting Started
RHK Technology, Inc.
Troy, MI
122
After thoroughly understanding the function of the front panel knobs and the interaction between
the SPM 100 and SPM 32, the first data acquisition experiments can proceed.
Importing initial software settings
The SPM32.PRM parameter file is saved every time the program is exited so all current settings
are recalled. It is a good idea to periodically copy this file to another filename in the same
directory. This way, if the parameter file gets corrupted for some reason, all settings (scan head
calibration, electronics type, storage directories, etc.) can be imported into the program again
without manual entry.
Software Settings in the SPM 32 Program
Before commencing the initial approach, make sure the correct coarse approach system for the
scan head being operated is selected. The correct settings for the different selections are also
outlined in the SPM 1000 User’s Manual.
There are some other critical parameters that need to be set in the SPM 32 software. Open the
Acquire/Image Control window and make sure the Spectroscopy mode setting is OFF in the Spec
tab since the initial scans should be only conventional images. Other settings that are important
for this page are Output mode should be None and Fast Image mode should be OFF. It is best to
have both the forward and reverse scans on the screen at the same time so obvious scan artifacts
can be easily distinguished. No files should be saved automatically because it is quite likely that
the first scan images will not be very good so Scan Autosave should be OFF. To have continuous
scanning, make sure Scan count is set to zero.
The main data page to be acquired regardless of the type of scan head controlled is topography.
Most of the other pages are only necessary in specific cases and specialized experiments. To
avoid sampling extra data, go to the Input tab in the Image Control window and turn OFF all
channels except Topography. To have the data displayed properly, the units must also be
correctly entered so the Define tab accessed by the menu item Acquire/Image Control should be
used to input the values. Make sure the first item, SPM acquisition mode is set for the type of
scan head in use. If operating a STM, the User label should be Current and the User units would
be set to A (for amps).
It is usually a good idea to have the feedback signal and the topography voltage displayed on an
oscilloscope for quick visual inspection while under feedback control. Visual inspection of these
signals can be a good indicator of signal quality and help to quickly deduce if any environmental
problems are present in the noise that need to be addressed before stable tunneling images will
be produced. Either use the built-in oscilloscope or connect the rear panel outputs of the SPM
100 to an external unit. If using the internal digital oscilloscope, it should be set to display both
the current and the topography.
RHK Technology, Inc.
Troy, MI
123
SPM 32 User's Manual
Getting Started
Main Screen
When taking data a main screen similar to Figure 112 can be used. At the top of the screen is the
Menu bar that displays the version number, memory information, and a quick summary of
keyboard shortcuts to perform some of the commonly used data acquisition tasks. These can be
redefined as discussed in Chapter 3, but the default settings are as follows. F1 opens the main
Figure 112
menu. F2 stops a scan immediately. F3 halts the scan after the current frame is finished. F4 saves
the current data page when finished and the next scan frame is automatically started. F5 adjusts
the color scale in all active acquisition windows. F6 initiates a scan. F7 toggles the fast scan
direction between the X and Y axes. This takes effect at the beginning of the subsequent scan
frame. F8 quits the program. F9 selects which acquisition windows is the active one which is
indicated by a white frame. F10 opens the scan area window and F12 opens the data index. Open
the Status window if it is not on the screen with the menu item Acquire/SPM status. It is also a
good idea to have the navigational map present on the screen to make moving the tip around on
the sample easier. This is opened by using the menu item Acquire/Scan Area or pressing the F10
key.
An informational message may be present on the screen indicating the video subsystem of the
RHK Technology, Inc.
Troy, MI
124
SPM 32 User's Manual
Getting Started
host computer is capable of supporting the VESA 2.0 standard. The user is then free to choose
any supported screen resolution accessed under the Settings. If an unsupported resolution is
selected and the screen is then corrupted, use CTRL-V to return to the 640x480 setting and try a
lower resolution. It is usually preferable to work at as high of a resolution as possible since more
windows can be present on the screen at any one time without having much overlap.
Initial approach
If the feedback signal appears to consist of low level white noise with no strong periodic
structure, then an approach can be initiated. Use the Approach/Tip approach menu item to start
the tip-sample approach and an informational box should appear on the screen indicating the
sequence has been initiated. After some period of time (which can depend on an enormous
number of factors) the message should disappear and the “out of range” LED on the SPM 100
should turn off because the tip and sample are within feedback range. The feedback and
topography signals should now look quite different
than before the approach was started. Typically they
would be noisier after an approach because of the
inherent noise in the system that is present when
within feedback range.
Scanning
Acquisition window
The simplest step to perform next is to start a scan by
using the F6 keyboard shortcut. The image of the
surface should start to appear at the top of the realtime acquisition window, and the green line that
shows the current position of the scan with respect to
the total frame to be scanned. After a few lines have
been drawn, press the F5 key to automatically adjust
the color scale to maximize the contrast of the image. Figure 113
A real-time acquisition window (RTAW) is shown in
Figure 113. The size of these windows can be changed like all data page display windows by
dragging the window to a new size.
The small arrow on the far left of the title bar indicates whether a forward or reverse scan is
displayed in the window and the arrow next to it is used to show the direction of the y scan in the
window. The channel that is currently displayed is the title of the window. The number next to it
designates which number RTAW this is. Up to four may be displayed on the screen at any time.
The control buttons are in the top row above the image. The first button turns the data display
ON or OFF. The plus sign next to it can be clicked on to open a list of all signals that are
currently ON in the Define tab in the Acquire/Image Control window and any of these can be
selected to open an additional RTAW; the minus sign is used to close this window, but at least
one RTAW must be open at all times. If the Source button is clicked, a list of all currently
sampled channels is produced to then select which signal to display in the window so any
window can be changed to display a different signal at any time. The number in the bar next to
RHK Technology, Inc.
Troy, MI
125
SPM 32 User's Manual
Getting Started
the Source button displays the total range of the displayed image. Each line of data can be
filtered before it is displayed by using the bandpass function. The DC setting means the raw data
is displayed in each line. AC mode means the average value of each line is set to zero. This can
help eliminate drift and slope in the slow scan direction from the image displayed in this
window. Note the actual data stored is still the raw data with no processing applied. Flat will
subtract the best fit line from each linescan and set the average value to zero. The next button
with a hatched appearance is used to switch the RTAW between a grayscale display and the
currently selected color scale. Click on the Trans button to open a window where the transfer
function of the current window can be changed. This determines the mapping of physical ADC
values into pixel color. Press the Auto button to automatically adjust the color scale to optimize
the currently displayed image. The same function can be achieved using the Shift-F5 key (or use
Image/Image Control/Autoscale Focus and the active RTAW will be adjusted. Which window is
active is indicated by the presence of a white border around the selected one, and the F9 key
scrolls through all open RTAW’s to change which one is currently selected. The menu item to
achieve the same result is Acquire/Image Control/Change Scan Focus. Pressing the F5 key by
itself automatically adjusts all RTAW’s currently displayed.
The color scale can be adjusted manually using the next set of buttons.
Clicking the up triangle will increase the sensitivity of the current color scale.
This means the 256 colors will be mapped over a smaller range of z values.
Clicking the down triangle will make the color scale span a broader range of
ADC values. Click on the up arrow to shift the offset of the color scale to a
new value. The total span stays the same, but instead of covering from 50 Å to
200 Å (for example), the scale can be adjusted to range from 80 Å to 230 Å.
The span of the color scale is expanded/contracted using the SHIFT key along
with the ‘<‘ and ‘>’ keys on a US keyboard. The color scale can be offset by
using the ‘<‘ and ‘>’ keys. These keys can be reassigned to any hotkey
combination since they are performed by the various menu items under
Acquire/Image Control.
Figure 114
The right margin of the window displays a great deal of information about the
current scale of the data and the mapping of the colors to ADC values. A zoomed in version of
this display is shown in Figure 114. The colored bars graphically display the data range and
contrast during image acquisition. The left side bar shows a dark bar against a green background.
The length of the bar (C to D) corresponds to the range of data in the acquisition window which
is displayed in the top margin of the RTAW. The total length (A to B) is the maximum possible
Z range. A short bar shows the input signal is using only a small part of the possible data range,
and that it may be useful to increase the channel gain. Ideally, the colored bar should almost
reach the top and bottom of the green background (make C to D ~ A to B). This would indicate
the entire 12 bit range of the ADC is being used to cover the range of values being read. This
insures optimum ADC resolution. If the bar touches one end of the scale, the signal may be
going out of range and the ADC gain on the SPM100 should be decreased. The right bar shows
the display color range (E to F) relative to the physically possible range of values. If the color
range is much larger or smaller than the data range, use the autoscale button to redefine the
colors. When the image is in DC mode color values and data values correspond directly. If the
image data is displayed after line or slope subtraction, the color range may be much smaller than
RHK Technology, Inc.
Troy, MI
126
SPM 32 User's Manual
Getting Started
the raw data range. The scale bars are updated by rescaling or at the end of each image scan.
Scan Area window
With the introduction of the DSP scan board and the ability to move the tip using either the front
panel knobs or the DSP output voltages themselves. In previous versions of the SPM 100, the
scan board always output a full 10 V signal and the scan
range was determined by the front panel knob acting as an
attenuator to change the scan size. The new scan board can
change DAC outputs digitally to any voltage value. Since
the front panel range and offset knobs are still present, the
attenuator is still present in the circuit. This means there are
two ways to move the tip and two ways to set the scan
range. For a fixed scan board DAC output, if the range knob
is increased the scan size will increase. Also, if an offset
knob is moved, the tip will physically move across the
surface. The scan DACs can also provide an offset to move
the scan origin to another location on the surface and the
scan would no longer be centered about 0 V.
This added flexibility has made the scan area window
Figure 115
(Figure 115) even more critical as a navigational tool than
in the past. For any given position of the Range and Offset knobs, the reachable area is displayed
as a red box. The Scan Area as well as the X Offset and Y Offset parameters in the Acquire Image
can be changed to move the yellow box within the region of the red box. The yellow box will
represent the actual area of the sample that will be imaged at any time. The tail of the green
arrow seen in Figure 115 designates the origin of the scan. The arrow points along the direction
of the first scanned line. The yellow box can now be changed in incremental fashion using the
menu items under Acquire/Image Shift. The key pad also can be used to make these changes in
realtime while an image is being scanned similar to turning the knobs when using an older
electronics. The offset shifts should be immediately visible in the RTAW as features will be
“split” and offset laterally between subsequent line scans.
The Load button allows the user to place any image in the scan area window for reference
purposes. Any image window or RTAW can be selected to be loaded into the map. The
horizontal and vertical lines represent the center of the possible tip scan area (offsets set to zero)
and are used as a reference to track how much tip motion there is when the front panel offset
knobs are turned. The In and Out buttons are used to zoom in or out the total area covered by the
map. If the user wants to move the scan frame a very precise amount on an atomic scale to scan a
specific feature, it would be best to zoom in quite a bit so the map area is rather small and the
scan frame outline will be controlled very accurately across the image loaded into the map.
The Set and Clr buttons allow the user to select specific points to perform spectroscopy
measurements when the tip reaches these positions in a subsequent scan. This is the easiest
possible method to perform spectroscopy over specific features found on the surface in order to
understand the change in the tunneling characteristics induced by various surface defects. Up to
128 separate points can be selected to acquire data at during each scan frame. When finished
selecting points, double click the mouse to exit cursor mode. When clicking the Set button, a
RHK Technology, Inc.
Troy, MI
127
SPM 32 User's Manual
Getting Started
variety of options are presented.: Relative points, Absolute points, Relative lines, Physical lines,
Save point/line file, Load point/line file. Picking relative points means the pixels to perform
spectroscopy move with the yellow scan area frame. Spectra will always be acquired at
spectroscopy pixel 45,23 (for example). Absolute points means the pixels are with respect to the
red square. This means the spectroscopy points do not move if the scan frame is shifted. This can
be beneficial to always return to a fixed location (assuming no drift) and perform a spectroscopy
acquisition over the same feature regardless of how the current scan frame has been shifted.
Relative lines means a series of lines are drawn that move with the yellow scan frame, and
Absolute lines will NOT move when the scan frame is shifted. A set of points can be saved and
recalled at any time in the future to preserve a pattern of points/lines and always acquire
spectroscopy data using the same pixels. This can also be used to recall the same pattern to
induce the features into the sample many times.
If the user wants to move to a different region of the surface, the Range button should be clicked.
The tip is retracted from the surface, the cursor changes to green, and a message is presented in
the top area indicating it is now possible to use the knobs. As the range knob is turned, the size
of the red box will change. If the X and Y Offset knobs are moved, the location of the red box
will shift. When the knobs have been changed, press the Enter key to return to imaging mode and
the tip will reapproach the surface. This is the only time the front panel knobs should be used
to shift the imaging area when a DSP scan board is in use. If the Range button has not been
clicked and the knobs are moved, then the Scan Area window will no longer be accurate as the
software will not realize the knobs have been changed. If a very small scan area is desired that
covers less than ~ 5% of the area of the red box, the size of the red box should be decreased
using the Range knob to improve the data acquisition.
When the red box is shifted, the DSP offsets (under Acquire/Image Control/DSP/X (Y) Offset)
are adjusted so the scan region (yellow box) does not move with respect to the surface, the same
area of the sample will be imaged again after the Offset knobs are changed. This can be noted as
the DSP offsets will change value when Enter is pressed to exit the Range function. If the red
box is shifted by a large amount such that the previous scan area is completely outside the red
box, the scan area will be shifted as little as possible and it will then lie at one edge of the red
box.
The Scan Area window can also be used to Move the tip to various locations on the surface. This
allows atom manipulation as well as lithography features to be produced. More details of this
will be presented in Chapter 5.
Calibration
Each individual scan head has its own unique properties and must be calibrated to insure
accurate dimensions can be extracted from the data. This requires a calibration where data is
acquired over a surface with features of a known distance and then measuring this distance using
the software. If the two values do not agree, the scaling factors are adjusted until the known and
measured values agree. This scaling factor is necessary because the SPM 100 outputs a voltage
that moves the tip due to piezo expansion/contraction. The SPM 32 program simply reads these
voltages and then scales the voltage into a distance by use of the calibration factors. If the factor
is off, the program will display a data page with dimensions that are not correct. If for instance,
the software thinks the SPM 100 moves the tip 100 angstroms when a 2 Volt signal is applied,
RHK Technology, Inc.
Troy, MI
128
SPM 32 User's Manual
Getting Started
but the tip actually moves 86 angstroms, then all features on the surface will appear to be bigger
then they actually are. The program will form the image and have the pixels that are 2 V apart be
separated by 100 Å.
The calibration procedure is a relatively simple procedure. After gaining familiarity with the
operation of the scan head and the control electronics, the calibration can be performed. A
sample with known dimensions such as any crystal where atomic resolution is achieved can be
used. On a larger scale, samples with a known grating that was formed on the surface using
lithographic techniques can be used. The calibration procedure should be repeated periodically to
insure that the physical characteristics of the scan head have not changed significantly over time.
Vertical calibration
If a sample is scanned with atomic resolution that has atomic-height steps visible (such as Gold,
Silicon, or any other semiconductor) the lattice constant of the crystal can be used to determine
the height of the monatomic steps, and this value will be compared to the measured value from
the data. The ratio of the measured height over the actual height can be calculated. If this is over
1, then the Å/Volt value in the software is too large. (The software thinks that 1 Volt moves the
tip more than it actually does). If this value is less than 1, the Å/Volt in the software is too small
(The software thinks that 1 Volt moves the tip less than it actually does). To correct this factor,
the current calibration factor (found under the Scan Cal nested tab under the Scanner tab) must
be divided by this ratio to decrease or increase the conversion by the proper amount. Therefore,
the new calibration will be given by
CalibrationCurrent (Å / V)
CalibrationNew (Å / V)=
{
HeightMeasured (Å )
HeightActual (Å )
}
This CalibrationNew should be entered into the software in the System/Config System window
This value should be entered into both Z motion per piezo volt and Z offset per piezo volt if the
same piezo element is used to provide the z scan and z offset signals such as the case for a tube
scanner. An important point to emphasize here is exercise caution when measuring the height of
steps on a surface. Many times the steps will not be one atomic layer high but instead they will
consist of two (or more) layers stacked together. Try to make sure the steps themselves are a
known number of atomic layers high. This can prove to be difficult on some samples. It is
usually a good idea to image large parts of the area and then acquire a distribution of step heights
and then make the assumption the smallest value is the single height steps. Also, be sure to
understand the geometry of the crystal being used as the index planes of some materials will only
produce steps that are an even number of atomic spacings apart. In this case, the base
measurement to use is an integer multiple of the smallest possible step height.
Lateral calibration
RHK Technology, Inc.
Troy, MI
129
SPM 32 User's Manual
Getting Started
Acquire a high quality image that is large enough to show many of the evenly spaced features on
the surface (either unit cells if atomic resolution is achieved or grating features if that sort of
sample is being used). After the data acquisition is complete, a long cross-section through the
data should be taken by accessing the menu selection Analyze/Cursor Plot and drawing a long
section along a crystallographic direction as shown in Figure 34 in chapter 2. The measured
distance between a pair of features can be calculated in the software and compared to the actual
value it should be given the crystal lattice spacing (if atomic resolution) or specification data
supplied with the known calibration grating. The result of the new calibration calculation
performed as above (except with lateral features instead) will be entered into the same window
as above but in the X motion per piezo volt and X offset per piezo volt entries as well as for the
Y entry. Initially, the assumption should be made with a tube scanner that the X and Y factors
are identical though this can be fine tuned at a later time.
The ideal situation would be to have a known crystallographic direction exactly lie along the X
or Y axis. The cross-section would then be exactly along the fast scan direction so any thermal
drift and mixing between X and Y scans can be ignored and the two calibration numbers would
be derived independently. This requires having the freedom to arbitrarily rotate the sample in the
holder and can prove difficult to get the precise alignment with scan direction.
The Analysis/Angle menu entry can also be used to rescale the features to the correct
crystallographic dimensions and the calculated % change in X and Y then entered into the
calibration factors, but care must be taken to not have large thermal drift as that effect will also
enter into the correction factor and lead to erroneous results as thermal drift is not consistent.
RHK Technology, Inc.
Troy, MI
130
SPM 32 User's Manual
Getting Started
RHK Technology, Inc.
Troy, MI
131
SPM 32 User's Manual
Getting Started
5
Experimental procedures
RHK Technology, Inc.
Troy, MI
132
SPM 32 User's Manual
Experimental Procedures
In this chapter a discussion of various data acquisition methods are presented to aid in the
investigation of various materials. Many of these
procedures are covered very explicitly in
publications and books on SPM. Only an overview
that describes how to take the data with RHK
equipment is presented here. For in-depth details of
certain experiments, other references should be
explored.
Current-Voltage spectroscopy
One of the fundamental techniques used to
investigate surface electronic structure is to acquire
I-V spectroscopy. This is accomplished by
interrupting the feedback loop and ramping the
applied bias while recording the tunneling current.
The resulting behavior of the junction can provide
Figure 116
insight into the surface density of states as well as
other interesting phenomena related to the tunneling process itself.
There are some important precautionary steps that must be taken to
insure that the data does not contain any artifacts introduced by the
acquisition routine itself. Because of unavoidable capacitive
coupling between the bias and the tunneling current, whenever the
bias is changed, the rate of change dV/dt will induce a transient
current in the system. The typical behavior is depicted in Figure 117.
The lower graph is a display of the bias voltage as a function of time.
The large constant value at the far left is while the feedback loop is
on and the topographic data is acquired. The feedback loop is then
opened and the bias changed to the first value of the ramp. This can
sometimes be a large ∆V in a short ∆t so the transient has a large
magnitude. It is a good idea to make the first voltage step as close as
possible to the feedback bias so the initial transient signal is
minimized. After this decays away, the current reaches its
equilibrium value that is solely a function of the magnitude of the
bias. After the current is sampled for a fixed amount of time, the bias
is changed to the next point on the ramp. The current is read at the
end of the Time/Sample interval. If multiple samples/point are
specified then another time interval elapses (Time/Sample) and the
current is sampled again. Therefore the t3 interval shown above is
determined by (Time/Sample * Samples/point). The small ∆V at
Figure 117
each voltage step induces a smaller, but still significant, transient
signal on the current. Every point along the voltage ramp will have this small transient signal.
After the current has been read at the last voltage step, another (usually) large ∆V is applied to
return the bias to the feedback condition which in turn induces a large transient. The loop is then
turned on again and the tip moved to the next pixel location.
RHK Technology, Inc.
Troy, MI
133
SPM 32 User's Manual
Experimental Procedures
The magnitude of the peak that each transient produces can be lowered by making smaller
voltage steps since this will create a smaller ∆V, but the signal will still be there and the
measurement parameters must be adjusted to account for the effect. Taking smaller steps is one
tactic that can be used to allow smaller delay times, but they rarely can be set to zero.
Because of these undesirable transient signals present in the current sensing circuit, a series of
fixed delay times are entered into the control window used to setup the I-V parameters. This
window is reproduced in Figure 117. It is very important to carefully study the response of the
current signal to the voltage changes in order to make sure the delay times are long enough to let
all transients decay to zero before sampling the data and ramping the voltage to the next point. If
the transients do not completely decay away, not only will the data have an extra offset at each
voltage step, but potentially the offset could change at each step as the transients slowly add up
more and more as the ramp progresses. This situation is illustrated in Figure 117. The dotted line
indicates the nominal current that should be present for a given tip-sample bias but the solid line
represents the actual data. Notice how the signal level deviates by a progressively larger amount
at each voltage step since the equilibrium condition is not met at each ramp value, and the next
transient is added to whatever value the signal has decayed to instead of the baseline, equilibrium
value.
The curve should be checked to see whether the tunneling current when the voltage step is close
to the feedback bias is close to the feedback setpoint. If this
is not the case, the two most likely causes are either there is
significant drift in the z direction in the time the feedback
loop is off or the delay times are not long enough and an
artifact related to the addition of the transient signals as
shown in Figure 117 is present.
The three time parameters shown in Figure 117 should be
adjusted in the V Spectrum Control window. The first
delay, t1, is determined by the Spectrum delay setting. The
delay at each individual voltage step (t2) is set using the
Pre-sample delay, and the amount of time to spend
averaging the current reading at each step (t3) is determined
by both the Time/sample and Samples/point parameters.
A particularly useful feature available in SPM 32 is the
Figure 118
ability to examine the individual I-V curves acquired at
each pixel. Occasionally, a large current spike may appear in a single curve because of some
anomalous event. This curve should therefore be eliminated from the rest of the acquired curves
that are selected to average. Many times, the reading at a single voltage step along a single curve
is so large that averaging the rest of the curves together still does not completely eliminate the
effect, but simply throwing that curve out and using the rest of the data to average away random
noise can dramatically improve the signal/noise ratio and the quality of the data.
Increasing resolution
The SPM 1000 system uses a 12 bit A/D board to read the data, and this limits the dynamic
range of any measurement. However, the resolution of any single measurement can be increased
RHK Technology, Inc.
Troy, MI
134
SPM 32 User's Manual
Experimental Procedures
if the current will vary over only a small range.
The overall gain of the system is determined by the first and
second stage preamplifiers to convert the tunneling current to
a voltage. The largest voltage range that can be input to the
electronics is ±10 V. The preamplifier gain and this voltage
together determine the maximum current that can be detected.
For an overall gain of 108, the
maximum current is 100 nA and if the gain of the ADC board
is not increased, the least significant bit (LSB) when acquiring
I-V data would be ~50 pA. The resolution of a measurement
can be increased by changing the gain of the ADC board prior
to starting the voltage sweep.
The window controlling the gains is shown in Figure 119. The
maximum voltage range to read for any channel can be
changed by setting the appropriate range parameter as shown
in the window. Valid choices for any channel are ±10 V, ±5 V,
Figure 119
±2.5 V, ±1.25 V. If the current will be changing over a
reduced range, then it is advantageous to increasing the gain in
the measurement by changing this setting during the I-V acquisition. If the range is changed to
the smallest setting of ±1.25 V and an overall gain of 108 is in use, the LSB will be changed from
~50 pA to ~6 pA because the 12 bit resolution will now range over readings from -12.5 nA to
+12.5 nA.
As long as the maximum current will not exceed these values and saturate the ADC, then
increased resolution is well worth changing the parameter. Even if a large tunneling current is
used, high resolution spectroscopic data can be acquired by using a voltage sweep where the
maximum value is below the bias voltage used when
imaging. Very high resolution I-z data can also be
acquired using this functionality and this can be very
important given the exponential dependence of the
current on the distance the tip is moved. The tip can be
retracted from the sample and the decay of the current
accurately recorded since it is known a priori that the
tunneling current will only decrease as the tip is pulled
away from the surface.
Variable Gap I-V spectroscopy
One of the main problems associated with acquiring IV spectroscopy, particularly when studying
semiconductors, is sensitivity to very small currents.
Figure 120
In the case of semiconductors, the current will
approach zero as the bias nears either edge of the bandgap; while for other materials, the current
will be small near zero bias. This sensitivity limit can hinder the detection of features near the
band edges (or in the bandgap) and even the precise location of the band edges themselves. For
RHK Technology, Inc.
Troy, MI
135
SPM 32 User's Manual
Experimental Procedures
example, if the maximum detectable current is 10nA (a typical figure for most microscopes), for
a 16 bit ADC, the least significant bit (LSB) will be equal to a value of 0.153 pA. One way to
increase the lowest detectable current is to increase the gain in the first stage amplifier, which
can be accomplished using the IVP-300 preamplifier from RHK. This leads to an increased gain
in the circuit but the maximum detectable current would then be equal to only 1 nA. When this is
spread over a 16 bit ADC, the LSB is then 0.0153 pA, but no increase in dynamic range is
realized since the maximum current has been decreased by a factor of 10 in order to gain a factor
of 10 increase in the smallest detectable current.
This limitation can, however, be surmounted by taking advantage of the exponential dependence
on the current and the width of the tunneling gap. For a typical vacuum barrier under clean
conditions, the current will increase by about an order of magnitude for every 1 Å decrease in the
tip-sample separation. This means that if the feedback loop is opened and the tip moved towards
the sample as the bias is lowered, the minimum detectable current will effectively be increased.
The maximum current would still be 10 nA at any particular time, however, since the current
gets very small as the bias is decreased, the tip can be moved towards the surface. This will lead
to an increase in the measured current. After the data has been acquired, it can then be
renormalized to represent a set acquired at a single gap width by dividing the measured readings
by a number related to the amount the tip was moved towards the sample at each voltage step.
Since this number will be larger than 1, the current readings at the low voltages will decrease in
value. Because of the exponential relationship, moving the tip 2 Å towards the surface will mean
the current readings acquired at that separation need to be divided by a factor ~100 to be
compared to the values acquired at the nominal tip-sample separation under feedback conditions.
If the current readings are around 0.5 pA (still above 1 LSB), the normalized current will
actually be equal to 0.005 pA or 5 fA. When the entire data set is combined into one curve the
data can easily range from the maximum near 10 nA down to a few femtoamps or lower. This
represents a total dynamic range of 6 or 7 orders of magnitude, which would normally require an
ADC with about 22 bits.
The voltage applied to the z piezo as the bias voltage is ramped is shown in Figure 120. The
lower graph is the bias ramp and the upper curve is the voltage added to the z piezo with the
convention that a positive voltage pushes the tip towards the sample. The magnitude of the
voltage applied to the Z piezo is determined by the Z change per bias volt. This, in effect,
determines the overall slope of the upper graph. A large number will push the tip towards the
surface very quickly as the voltage is lowered, whereas a small number changes the gap very
little as the voltage approaches zero. There is a delicate balance that requires some
experimentation to determine the best settings for any particular situation. If the number is too
large, the current will increase too rapidly as the tip approaches the sample and there is a danger
of damaging the tip and/or sample by creating too large of a current density. Potentially, the
current could be above the ADC maximum which will lead to useless data since the readings will
saturate. If the number is too small, the current will continue to decrease towards the LSB and an
insufficient gain in sensitivity may be achieved. A good rule of thumb would be to start with a
slope such that the difference between the feedback bias and the voltage where the current will
be near zero (the band edge for a semiconductor, zero for other conductors) produces about 2-3
Å of motion towards the surface. For example, if the tunneling bias on a Silicon surface is -1.5
V, to produce a 3 angstrom decrease in the gap width would require the Z change per bias volt
RHK Technology, Inc.
Troy, MI
136
SPM 32 User's Manual
Experimental Procedures
be set to 2.
For proper normalization, it is critical to have an accurate number entered for the Z attenuation
length; otherwise the calculation performed when presenting the entire data set will be incorrect
since the current will be divided by too large or too small of a number. For example, if the
physical gap has an attenuation length of ~1/2 decade for every angstrom and the typical value of
1 was entered here, the current readings will be divided by too large of a number at each voltage
step and the I-V curve will show artificially high currents than what would actually be measured
given a constant gap. It is a good idea to measure some I-V curves using conventional means and
then setup the variable gap measurement. The two sets of resulting data should be very close to
each other at all values where the first curve has values above 1 LSB. If this is not the case, then
the normalization constant is incorrect.
The proper series of steps to perform when setting up spectroscopy data acquisition would be to
acquire some I-z spectroscopy curves to measure the attenuation length of the current tip-sample
combination. Then obtain some I-V data with a fixed tip-sample distance over the entire voltage
range, and finally, acquire the variable gap data and compare it to the first set of I-V curves to
check for close agreement between the current readings at large values of the applied bias (the
beginning and end of the voltage sweep).
Current-Distance Spectroscopy
The quantum mechanical nature of the tunneling phenomenon results in an exponential
relationship between the tunneling current and the gap width. This is usually expressed as
I%e &2κz
where k is a constant that depends on some physical constants as well as the mean barrier height
of the gap and z is the tunneling gap distance. The value of k, and hence the barrier height itself
can be determined by obtaining spectroscopy data. In this routine, the feedback loop is opened
and the tip is moved away from the surface while recording the current at each step. This data
will exhibit an exponential decay equal to 2k.
This data usually does not have the transient signals present compared to the I-V data because
there is little reason for coupling between the current and the z piezo position given a good scan
head design where the two signals are isolated reasonably well from each other. It is usually a
good idea to still use a small delay in the Z Spectrum Control window to allow the piezo tube to
settle for a small amount of time after the sharp step function has been applied to it, but large
peaks as seen in the I-V section above are rarely seen.
The slope of an I-z curve when plotted on a linear (z)-logarithmic (I) scale can be determined by
a simple fitting routine and this would be used to calculate the barrier height. Once the slope, m,
is known; the barrier height is calculated using this equation
RHK Technology, Inc.
Troy, MI
137
SPM 32 User's Manual
Experimental Procedures
Φ'(
m 2
)
1.025
Various features on the surface such as contamination or defects can create a local variation in
the barrier height and this can be seen by acquiring I-z curves in two distinct regions and
comparing the value of F derived from the two sets of data.
Additionally, as described above this data also is used to determine the attenuation length that is
needed for proper normalization of variable gap I-V spectroscopy data. The correct value can be
ascertained by simply looking at a plot of the I-z data and noting the ratio of two current readings
that are separated by a given distance. Select any current value and then find the value that is e-2
times smaller. The distance the tip moved between these two current readings should be entered
into the Z attenuation length setting in the V Spectrum Control window.
Barrier Height Map
As discussed in the previous section, features on the surface can change the local work function,
and this can be measured with a STM. A direct correlation between the topographic structure and
the work function can then be obtained. The best method to acquire this type of data is to apply a
small oscillation to the z piezo so the tip-sample distance oscillates a small amount. If the
modulation frequency is high enough that the feedback loop cannot compensate for it, then there
will be an oscillatory signal superimposed on the tunneling current at the same frequency. This
can be monitored by a lock-in amplifier and the signal from the lock-in would then be
proportional to the local work function. If an image is formed of this signal along with a
topographic image, common features in both images can be correlated.
Some additional cables are required to connect the lock-in amplifier properly. The oscillation
signal out of the lock-in amplifier should be connected to Z modulation input #2, and the current
monitor output on the rear panel of the SPM 100 should be connected to the input of the lock-in.
The amplitude output of the lock-in should then be connected to one of the rear panel auxiliary
inputs. To simultaneously acquire the topographic image along with the output of the lock-in, the
auxiliary channel connected to the lock-in output should be turned ON in the Define tab
contained in the Acquire/Image Control window. For a more meaningful display of the barrier
height image, the label of the auxiliary channel being used could be changed in the same window
to something more descriptive like “barrier height” or “amplitude”.
While the tip is scanned, the two input channels will each be sampled for an equal amount of
time before the tip is moved to the next pixel. Both the topography and lock-in signal should also
be saved in the data files. The signal stored from the lock-in output then has to be converted
from Vout of the lock-in into eV of mean barrier height. The derivation of this scaling factor is
presented below.
Converting Lock-in Output to Barrier Height
From basic tunneling theory, we know the current is an exponential function with the form
RHK Technology, Inc.
Troy, MI
138
SPM 32 User's Manual
Experimental Procedures
I%e &2κz
where k is constant that includes the barrier height and z is the tunneling gap distance. A typical
value gives a decay of about an order of magnitude in current for every 1 Angstrom change in
the gap distance.
If we modulate the gap distance by a small amount Dz using a sinusoidal function, then the gap
width will have the form
z'z0%∆zcosωt
and the tunneling current then has this form
I%e
&2κ(z0%∆zcosωt)
which can be rewritten as
I%e
&2κz0 &2κ∆zcosωt
e
If the modulation frequency is well above the bandwidth of the feedback loop, the first part of
the expression is simply the normal feedback tunneling current, If. If the modulation amplitude is
small, then the exponential can be expanded via Taylor’s series to be
I%If(1&2κ∆zcosωt)
A lock-in amplifier operates by taking the input signal and detecting the portion of it that is at
the same frequency as the output frequency (which in this case is being used to modulate the
height). Most lock-in amplifiers will output a signal that is equal to the rms value of the cos term.
For this situation, the amplitude of the signal is
&If2κ∆z
RHK Technology, Inc.
Troy, MI
139
SPM 32 User's Manual
Experimental Procedures
This rms introduces an additional square root of 2 into the expression so the output signal will be
related to the modulated current detected by the lock-in amplifier by
&If2κ∆z/ 2
Solving for k gives the expression
κ'&
Ilockin
If∆z
1/ 2
From a quantum mechanical derivation tunneling, k will involve some constants related to the
electron and the mean barrier height Fbarrier which becomes
2κ'1.025 Φ
substituting this expression into the derivation of k above yields
Φ'(
Ilockin 2
If∆z1.025
)2
When the modulation is set on most lock-in amplifiers, the voltage selected is actually the rms
voltage applied to the z modulation, and this means the Dz amplitude can be expressed as the
rms value of the modulation which is
∆z'
zlockin
2
If we substitute this into the above expression, the (rather confusing) square roots cancel and the
final expression is
RHK Technology, Inc.
Troy, MI
140
SPM 32 User's Manual
Experimental Procedures
Φ'(
Ilockin
Ifzrms1.025
2
)
Measurement parameters
For some starting numbers, set the modulation voltage on the lock-in to 100 mV which should
correspond to shaking the tip a tenth of an angstrom. As the signal is increased, some ripple on
the tunneling current should appear when displayed on an oscilloscope. A frequency of a few
kHz is a good starting point. When the oscillation amplitude is increased, the output signal of the
lock-in amplifier should also increase since the amplitude of the current modulation also
increases.
It is a good idea to make a quick calculation while not scanning to see if the value for the barrier
height makes sense given the tunneling conditions. The conversion from the output voltage of
the lock-in amplifier into tunneling current should be whatever gain is in the system. If an IVP
200 is used which provides 108 gain and the IVP-PGA is set to x10, the overall gain is 109 V/A
so 1 V output from the lock-in corresponds to 1 nA current. If the output signal from the lock-in
amplifier is 10 mV (for example), then the resulting modulation on the current due to the z dither
is 10 pA (0.01 V / 1 V/nA is 0.01 nA which is 10 pA).
To calculate the local change over certain features average the voltage output from the lock-in
that are over the feature to obtain one value. Then convert this to equivalent current as described
previously and this can then be converted to the mean barrier height using the final equation
above. This should be compared to the value obtained by averaging a large area over the normal
surface far from any defects.
Input/Output Image Spectroscopy
A particularly useful feature of SPM32 is the in/out image spectroscopy mode. Imaging
conditions can be changed on an image-by-image or line-by-line basis. There are a plethora of
experiments that can be performed using this capability.
The main use for this is to measure friction forces using an AFM. The normal force can be
changed every line and the slow scan axis is disabled so the same area of the surface is scanned
repeatedly. If lateral force data is acquired, then the acquired image will be a record of the lateral
force as the normal force increases.
However, there are many other potentially useful experiments that can be done. One example is
to use the output voltage to interface with a temperature controller. As the output voltage is
increased/decreased the sample temperature can change accordingly and an image then acquired
that records the change in surface character as a function of temperature. With the ability to
introduce an arbitrary time delay after the voltage change the sample can have time to reach a
new equilibrium temperature before data is acquired.
Another example is to use this in STM to quickly explore a large sample space of imaging
RHK Technology, Inc.
Troy, MI
141
SPM 32 User's Manual
Experimental Procedures
conditions. Figure 121 is an image where the DAC voltage is summed into the bias so and the
measurement was setup to change the bias every 16 lines. With the 512x512 pixel image, this
means the voltage was changed in 32 steps from 0V to -2.0 V. The initial bias (controlled via the
front panel knob) was -1.27 V so the top part of the image was taken at -1.27 V and the bottom
section was acquired at -3.27 V.
Notice the change in the
appearance of the faulted and
unfaulted sections of an individual
7x7 unit cell. At the lower bias
voltages (nearer the Fermi level)
the contrast is more dramatic and
as the bias voltage increases, the
contrast all but disappears. This
can be a great time saver as a
single image can be used to quickly
search for bias dependent features
on the surface that otherwise might
take a much longer time if
changing the bias using only the
front panel knob. Once an image
like Figure 121 is acquired, then
the bias knob can be adjusted to the
desired value to acquire entire
Figure 121
images that highlight the desired
voltage dependence. Another good
example of this would be to search for adsorbates and defects present on the surface that only
appear at certain voltages these could be missed if they change their appearance over a narrow
range of voltages.
Setpoint Determination When Using a Commercial AFM
The versatility of the SPM 100 allows for the control of commercial AFM’s such as the
Nanoscope® III controller from Digital Instruments or the PicoSPM® available from Molecular
Imaging. Both of these units require an extra unit to interface the coarse approach mechanism to
SPM 32.
A common source of confusion is how to use the “current” and “bias” settings on the SPM 100
along with SPM 32 to determine the appropriate setpoint for feedback conditions. As discussed
in the AIM-MI manual, the feedback signal out of either of these AFM heads is a voltage
proportional to the deviation of the laser spot from the center of the photodiode detector. The
“bias” signal is used as a control signal inside the head by comparing the output of the
photodiode to this input signal. The feedback signal out of the head is then the difference
between the position of the laser spot on the PSD and the “bias” voltage which would be equal to
a different location of the spot. Therefore, the “bias” can be adjusted to move the deflection of
the laser to any location on the PSD. As the laser spot is moved, the amount the cantilever is
deflected is changed, and since the cantilever acts as a spring, a larger a deflection also means a
RHK Technology, Inc.
Troy, MI
142
SPM 32 User's Manual
Experimental Procedures
larger force exerted on the surface. The “bias” should then be considered as how hard is the
probe pushing on the surface similar to what the setpoint would
represent.
When first learning to use the SPM1000 system with an AFM, the
Bias knob should be set to zero as well as the setpoint. This is the
simplest mode and is analogous to typical operating conditions
suggested by commercial suppliers of AFM heads who
recommend starting with a non contact output signal of ~-1.5 V to
-2 V and using 0 as the setpoint. After acquiring an initial F-z
curve the actual setpoint force can then be adjusted.
Force-distance curves
Adhesion and other forces can be studied when using an AFM by
obtaining force-distance curves. These are obtained by
interrupting the feedback loop and moving the z piezo a known
distance to alternately contact the surface and break the tip-sample
contact while recording the output of the photodiode. This Vout can
then be converted into a force given the spring constant of the
cantilever.
To acquire the data, a spectroscopy measurement must be setup.
Use the menu item Acquire/Spectroscopy/Point Spec to bring up the window that acquires an I-Z
curve. The settings should be similar to shown in Figure 122. A BNC cable should be connected
from one of the rear panel DAC Output channels to the Z Position Modulation Input #1 input. It
is most important to see the flat region at large z which indicates that the tip has pulled off the
surface. If the far distance region is still not flat, continue to increase the tip initial height value
until it is sufficiently flat. After taking
a few curves, the initial and final
Deflection(V)
values can be adjusted so the dynamic
range of the curve allows the relevant
features of the coupling/decoupling to
C
be seen. Be careful not to push the tip Repulsion
into the surface by too large of a value
A
(the negative tip final height entry) or Equilibrium
B
the cantilever and surface can be
E
damaged by applying too much force. Attraction
F
D
Input a large enough value for the final
height though so a large linear region
is visible. This is the most critical part
of the curve that is needed.
Z
An idealized F-Z curve is shown in ?
Figure 122
and can be understood as follows.
After the feedback loop is opened, the
tip is pulled back a large amount so it starts at large positive z (A) with no tip-sample contact. As
z is decreased, the tip suddenly is pulled towards the surface and makes contact (B) via various
RHK Technology, Inc.
Troy, MI
143
SPM 32 User's Manual
Experimental Procedures
attraction mechanisms so the deflection of the cantilever is down from its equilibrium position.
As z continues to decrease, the cantilever starts to deflect upwards (C) and the relationship
between z motion and detector voltage is recorded. This slope is the critical information needed
to convert the photodiode voltage into a z height. As z then reaches its minimum value and starts
to increase, the deflection starts to decrease (D) but the tip maintains contact with the surface for
a larger z because of capillary forces between tip and sample. The tip eventually breaks contact
(E) and snaps back to its equilibrium position. As the z increases to a large value, the tip and
sample are again separated by such a large amount that the cantilever remains at its equilibrium
position (F). Note the slope of the large separation part of the curve is shown flat in this idealized
picture, however in reality, there may be either an upwards or downwards trend to it as z
decreases due to longer range forces acting between tip and sample along with oscillations due to
laser interference with light scattered from the sample.
First, go to Acquire/Setup Image/AFM control and input the spring constant of the lever; then set
the deflection sensitivity to 0 V/m. The slope of the linear section of the curve ( C or D) can then
be used to determine the force setpoint. The slope will be
Deflection(V )
Z (nm )
and since the force constant of the cantilever is known in terms of N/m the amount of force
exerted on the surface as a function of z after contact can also be calculated. The selected voltage
will then serve as the setpoint for pushing on the surface so the “Bias” should be set to the value
(in V) on the y-axis where the user wishes to operate the AFM.
For example, if the D region in ? ranges from +500 Å to -150 Å and from 50 mV to 700 mV.
This gives a slope of 1 mV/Å (displayed as 10 MV/m in the software) for the detector sensitivity,
and if the cantilever spring constant is 0.1 N/m, then the probe will exert a force of 10nN for
every 1 Volt change in the setpoint. Keep in mind these numbers are for illustration purposes
only and may not closely represent any particular microscope design or specific cantilever. If the
calculated value for the slope is now entered into the deflection sensitivity setting in the window
described above, any F-z curves acquired after this will display the values in nN vs. nm.
Changing the setpoint force using the setpoint knob
Once an F-z curve is acquired and calibrated, the actual
setpoint can be changed and the different feedback
conditions will be apparent in a subsequent F-z curve.
Figure 123 illustrates an idealized F-z curve and the flat
region is at the level set before the approach (~-2 V
normally). Note the curve goes through the (0,0) point as Figure 123
expected. The horizontal axis is the relative z displacement from the piezo position when the
feedback loop was opened. This should be zero nm if the feedback is properly maintaining the
setpoint which is zero Volts to begin with as discussed above. Since the SPM100 setpoint knob
is restricted to a voltage between +1.0 V and -1.0 V, the range of possible setpoint forces is
denoted by the hatched region.
RHK Technology, Inc.
Troy, MI
144
SPM 32 User's Manual
Experimental Procedures
If a different setpoint force is desired, while in feedback the setpoint knob can be turned. The top
part of Figure 123 shows the setpoint moving down
towards the attractive regime. Since the knob will be
turned while in feedback, the z piezo will adjust to
maintain the changing feedback level. The F-z curve
itself is like an isogram showing the value of z for a
given setpoint and the X on the plot is meant to illustrate
the intersection of the desired setpoint with the known
F-z characteristics which then determines the new z
value. After the knob reaches the new value, the new z
position (relative to the former position) is
indicated in the figure by the vertical dashed line.
The subsequent F-z curve is shown in the bottom part of
Figure 123. Since all F-z curves are taken relative to the
Figure 124
z position when the feedback loop was opened, the
setpoint value will intersect the z=0 axis as always. The
X was reproduced on the second plot to illustrate the intersection of the new setpoint value with
the F-z curve and to easily visualize the effect of changing the setpoint. The F-z curve itself is
merely shifted left and right as the setpoint knob is changed because the feedback loop will move
the z piezo in order to maintain the new desired feedback value.
Changing the setpoint force using the bias knob
Due to the restricted range of possible voltages that can be used for the setpoint, the Bias knob is
necessary to select force setpoints outside the original region. If the noncontact voltage is set to 2.0 V as usual, a force setpoint in the attractive
regime, cannot be reached solely by using the
setpoint knob.
Turning the bias knob to change the setpoint will
have a slightly different effect. Since the actual
signal from the AFM head is effected by both the
position of the laser spot on the PSD and the bias
voltage (see AIM MI manual), as the bias is
increased (made more positive) the laser spot will
move across the PSD such that the voltage result
from the calculation circuitry decreases (spot moves
down). As the bias is decreased (made more
negative) the voltage from the PSD will increase
(spot moves up).
The effect of this would be to shift the F-z curve up
and down (top part of Figure 125) relative to its
Figure 125
original position as much as +10 V or -10 V when
the bias range knob is placed in the 10V position.
However, since the feedback loop is active as the bias knob is changed, the F-z curve will not
shift directly up or down because the setpoint and current z position no longer intersect at (0,0)
RHK Technology, Inc.
Troy, MI
145
SPM 32 User's Manual
Experimental Procedures
as marked by the X. As the F-z curve shifts up or down, it will also shift laterally such that the Fz curve always goes through the origin of the plot. A subsequent F-z curve after the adjustment
will appear as the bottom part of the figure where the X was left on the graph to indicate the
original force setpoint. The entire curve has moved up and over as the bias is moved.
In summary, the setpoint knob changes the working force by altering the desired setpoint
voltage. This results in a different cantilever deflection in order to have the reflected laser spot
fall on a different section of the PSD, and since the cantilever constant is the same, the total force
changes with the change in deflection. The bias knob changes the working force by altering how
much force the setpoint voltage of 0 V actually corresponds to. It does so by adding or
subtracting an offset to the actual voltage out of the PSD circuitry. Both are equally valid means
of selecting the working force, and each user may have an individual preference as to which
method is advantageous in various situations.
Integrating IEEE devices with SPM 32
The General Purpose Interface Bus (GPIB) is a system for interfacing a wide range of laboratory
instrumentation to different types of computer systems. Its origin was a proprietary system
introduced by Hewlett-Packard in 1965 that has since been widely adopted. Many modern lab
instruments (oscilloscopes, lock-in amplifiers, multimeters, etc.) can be purchased with a GPIB
interface. By 1975 the GPIB hardware was standardized as IEEE-488, and by 1987 the
communications format, or software, was specified for different instruments as IEEE-488.2.
Most GPIB commands are in plain ASCII text. Around 1990 SCPI (Standard Commands for
Programmable Instruments) was introduced. Prior to this standard each instrument manufacturer
invented their own unique set of commands. With SCPI the command “:
MEASure:VOLTage:AC?” will be understood by any SCPI compatible instrument, and will
instruct the instrument to measure an AC voltage and return the data, if the instrument is capable
of measuring voltages. SCPI also requires all devices to understand a small group of commands,
such as *RST which resets the device or *IDN? which asks the device to identify itself. All SCPI
commands that cause the device to return data end in a ‘?’ mark.
SPM-32 GPIB Functions
The SPM32 program supports a group of basic GPIB functions from the Acquire/GPIB menu.
Since each device is different, SPM32 communicates via user-supplied script files in plain
ASCII text. When GPIB support is enabled, SPM32 verifies the presence of the GPIB driver, the
GPIB interface board, and the device at the specified address. It can then initialize the device
either by sending the SCPI *RST command or by sending an initialization script.
The Acquire/GPIB menu/Dialog function opens a scrollable text window. You can type GPIB
commands which are then sent to your device. Commands and responses are displayed in the
dialog window. If the Status Check option is enabled in the GPIB parameter window, the script
of status check commands are sent to your device before each image scan and any response is
added to the image comment. This function can be used to record experimental parameters that
your device is capable of measuring image by image, such as temperature or partial pressure.
The Acquire/GPIB menu/Spectrum command sends the spectrum script file to your device and
RHK Technology, Inc.
Troy, MI
146
SPM 32 User's Manual
Experimental Procedures
saves any responses in a text data page. This data page can be saved in “.SM2” files with other
types of data (image or line). Since SPM32 does not understand the type or format of data
returned by your device, numerical data cannot be processed or displayed by SPM32. The text
data page can be listed to an ASCII file for processing by other applications.
Configuring SPM-32 for GPIB
To use the SPM32 GPIB support functions you must create a directory (for example
C:\RHK\GPIB) for any GPIB script files you use (initialize, status, spectrum) and for the GPIB
helper program SPMGPIB.EXE. The Acquire/GPIB menu/GPIB Control parameter window is
used to define the GPIB directory. You must also set the address of your GPIB device in the
parameter window.
GPIB support is an optional package for SPM-32. If you do not already have GPIB support, you
can activate it in the field using a password. Contact RHK at [email protected] or (248)
577-5426 to obtain an activation password. You must be running SPM32.EXE version 4.16 or
above to use the GPIB functions.
If you have a non-SCPI device, this must be selected in the parameter window, and any device
command that returns data must be prefaced with a ‘?’. See the online help for details.
SPM32.EXE cannot communicate directly with the GPIB driver since it is a 32-bit protected
mode DOS program. It calls a “helper program”, SPMGPIB.EXE, which is a standard DOS
program. SPMGPIB in turn communicates with the National Instruments DOS mode driver.
Under DOS or Windows 3.1 this is the GPIB.COM driver. Under Windows 95 the Win95 driver
can also support DOS mode GPIB requests if this option is enabled using the Win95 System
Properties/Device Manager.
Before SPM32 can use GPIB functions, the GPIB interface card must be correctly installed in
your PC and the NI-GPIB driver must be correctly configured. This includes setting the GPIB
card address, interrupt and DMA channels. This may involve setting jumpers on the card,
configuring the driver, and verifying the driver using National Instrument utility programs like
IBCONF and IBDIAG for DOS, or DIAGNOSTIC and DEVICE MANAGER for Win95. This
can be tricky, especially in “plug and play” systems with non-plug and play cards. To use the
Win95 driver you must have a NI-TNT series GPIB card. If you don’t have the latest driver or
documentation, this can be downloaded from the NI web site www.natinst.com.
One driver parameter that can be set is the device time-out. This is the amount of time the GPIB
driver waits for a response from the GPIB device. This time should be set no longer than
necessary. The NI default time out is typically 10 seconds. If several commands in sequence are
sent to a non-responding device, the program will appear to “freeze” for several timeouts. If your
device typically responds in a few milliseconds, there is no reason to have a time-out of many
seconds.
Hints and Troubleshooting
The SPM32 program will attempt to report GPIB problems such as device power off, no driver,
etc., however this may not be possible in all cases. If you have unidentified trouble, first verify
the GPIB installation as described above.
RHK Technology, Inc.
Troy, MI
147
SPM 32 User's Manual
Experimental Procedures
If you have trouble processing command scripts, try sending the commands one by one with the
dialog function. It may help to put only one command per line, especially commands returning
data, instead of combining several on one line using semicolons.
If SPM32 and a second application are both trying to communicate with the same GPIB device
this may cause conflicts. Attempting to use device front panel controls (or turning off the power)
may interfere with remote GPIB communications.
Using CITS Handshake mode for data acquisition
One of the most versatile techniques included in the SPM 1000 system is the ability to perform
simple data acquisition by utilizing a pseudo TTL type of control with external equipment. This
is achieved by using the CITS Handshake menu otpions as described above. The following
discussion gives more details on the technique and provides some specific examples of the sort
of experiments that can be done.
The external equipment to be used must
have two characteristics. First it must
provide an external input that will start
data acquisition when a voltage level
reaches a certain value. (A simple case is
some spectrometers that can be turned
on when a TTL input is moved to the
HIGH (+5 V) position.) It must also
provide a status line that it can change
the voltage level to indicate that the
equipment is finished with its data
acquisition. A TTL line that the device
places HIGH while acquiring data then Figure 126
changes back to LOW when the
measurement is complete is sufficient.
The communication is represented schematically in Figure 126 where the time scale and voltage
values are both arbitrary. The actual voltage values can be anything set in the parameter
windows.
At some time prior to point A, the tip has been moved to the proper pixel and all input channels
to be imaged have been read by the A/D board. The pre-selected D/A output channel is then
changed to a different voltage value (time A) as selected in the setup window. The example here
will work in a TTL type of communication so the voltage is set from 0 to +5 Volts.
The external equipment recognizes the voltage applied to its input has changed and interprets
this as the go ahead to commence data acquisition. At some time later, (the delay between A and
B depends on the equipments being used. For example, a laser may need some warmup time.)
The equipment changes its output voltage to a different value (point B) which the SPM 100 reads
on one of its Auxiliary channels and can interpret this to hold the tip position because the
external equipment is in the midst of taking data.
When the external data acquisition is over, the status line on the equipment is changed to its
RHK Technology, Inc.
Troy, MI
148
SPM 32 User's Manual
Experimental Procedures
original value (point C). The SPM 100 will understand that the external data acquisition is over
and it will change its D/A output voltage back to the original
value (point D).
The control electronics then will move the tip to the next pixel
and all channels will be read to form images. The external
acquisition routine is then repeated at every pixel.
Because of the flexibility of the D/A outputs and the auxiliary
inputs, the communication signals do not have to be TTL values.
The setup window allows the magnitude of the signals to be set
as well as whether the communication moves from LOW to
HIGH or HIGH to LOW. These options can be explored and
tuned to the particular piece of equipment that will be interfaced
to the SPM 1000.
Figure 127
Atomic manipulation
The Show button in the Scan Area window can be used to change the window into an atomic
manipulation control window. Click on the button and select Interactive Tip Motion. The tip can
be relocated to a new area by simply locating the mouse cursor and clicking the mouse control
button. The tip will then move to the
new location at the speed set in the
Manipulation window. The diamond
will then illustrate the new location
relative to the scan frame (yellow
box). This is shown in Figure 127.
A particularly nice way to utilize this
feature is to load an image into the
window to visualize the location of
isolated atoms on the surface. Now the
tip can be moved to lie directly over
one of the atoms. After experimenting
with the necessary conditions required
to capture an atom (either increasing
the bias or maybe reducing the tipsample separation), the control button
can be held and the cursor dragged to a
new location on the sample. While the Figure 128
tip is being dragged, the diamond will
be blue. When the atom has been
relocated to the correct spot, the control button can be released and the atom will be “dropped”
under the tip since the drag conditions will be reset to the nominal conditions. Now use the move
feature by simply clicking the mouse over a second atom and the tip will relocate to this position.
The drag procedure can be performed again to relocate another atom on the surface. It is a good
idea to have the move conditions set in the manipulation window to have no additional bias or
RHK Technology, Inc.
Troy, MI
149
SPM 32 User's Manual
Experimental Procedures
vertical tip motion while the tip is in motion. Use the move function to only relocate the tip to
capture another atom. The drag feature should be used to actually change the conditions and
produce motion of an atom.
Another useful idea for the move and drag functions are to
lithographically create features on the surface. If the surface
can be modified by altering the feedback conditions (either
increasing the bias or decreasing the tip-sample distance),
then features can be produced on the surface by dragging
the tip over the surface. While in motion, the conditions
will be applied that will produce lines on the surface. To
produce a break between features (separate letters or lines)
use the move function with nominal imaging conditions to
relocate the tip on the surface and then perform another
drag operation. The principle is illustrated in Figure 128
where the sequence is presented to carve out a simple
“RHK” on a surface.
A critical point to keep in mind is the speed of the tip. The
Figure 129
user could get ahead of the tip quite a bit if the line
segments are connected too quickly. At the end of each line segment a short delay should be
used to insure the tip has reached the endpoint and stopped motion. The next line can then be
drawn. The length of the delay will depend on the speed of the tip motion specified in the
parameter window.
When Acquire/Manipulation/Acquire/Mark Path is ON, then everywhere the tip was “dragged”
will be shown in the Scan Area window. This can be very useful if the interactive tip motion is
used to “draw” features into the surface by applying different conditions when dragging the tip
that will induce physical changes into the surface. The freeform motion available with the tip
dragging can be used to create any arbitrary shape or drawing on the surface with nanoscale
resolution. An example of the type of “sketches” that can be created is shown in Figure 129.
Automatic drift compensation
Lateral
SPM32 can automatically track a feature on the surface
and correct for any drift due to thermal or piezoelectric
effects. A distinctive feature on the surface is selected and
after each image acquisition an area of the scan is
searched for the same feature. Small offsets are then
applied by the DSP board in order to maintain the same
relative position within the scan frame. This means the
feature will not appear to move over the surface because
the scan frame is shifted between each image. The size of
the feature and also the size of the search area can both be
set to any value as long as the area does not fall outside
Figure 130
the current scan area. For example, if the search area is
RHK Technology, Inc.
Troy, MI
150
SPM 32 User's Manual
Experimental Procedures
defined to be 35 pixels, then the center of the area cannot be within 18 pixels of any edge.
When the tracking is turned on, the user will be asked to click on the area of the image where the
relevant feature is located. A small green box will then be drawn that represents the area to be
searched for each time. The larger green box represents the area of the image that will be
searched in to locate the desired feature. If the drift is so large that the feature moves outside the
search box during the scan, the algorithm will do its best to find the closest match and adjust the
offsets accordingly. Care must be exercised to make the search area large enough to assure the
object will be found, but not so large that multiple features that are very similar in appearance
are contained within the search area. Also, increasing the search area will also increase the
amount of time required to complete the search. For a search area of approximately 40 pixels, the
algorithm usually takes 2-3 seconds to complete on a 166 MHz Pentium computer.
After each fit, a blue square is drawn on the real-time acquisition window (RTAW) where the
selected feature was found (Figure 130). Since this feature was supposed to be located where the
small green box is drawn, offsets are applied to the X and Y scan signals to shift the frame the
amount of separation between the green and blue squares. This can be visualized in the Scan
Area window as the yellow scan area box will move a small amount and the next image will
start. In the subsequent frame, the two do not usually perfectly overlie because additional drift
has occurred during the scan frame in the time it takes to complete the scan frame and perform
the calculation.
An information bar is added to the RTAW that provides the number of images acquired since
tracking was activated as well as the total distance shifted along the X and Y axes. Given the
amount of time required to take each image is known, the actual lateral drift rate can be
calculated.
Z Direction
The auxiliary feedback loop provided by the DSP board can be used with a long time constant as
a supplemental correction signal compared to the analog feedback loop provided by the SPM
100. The DSP board can sample the topographic signal and output a voltage to maintain a
constant z value (usually zero). This can correct for slow drift effects due to thermal
expansion/contraction during variable temperature experiments. Connect a BNC from Z Position
monitor output to the DSP ADC #1. When activated, the signal is output from the DSP DAC and
summed into either Z Scan or Z Offset depending on which rear panel BNC is connected. If a
separate piezo element is used for Z Scan and Z Offset, then usually it is advantageous to sum
the output of the auxiliary loop into Z Offset to allow more of the maximum output voltage
available to the z scan signal itself.
The advantage to utilizing the second feedback loop is increased resolution because the
correction is applied in hardware before the topography signal is sampled. The same argument
outlined in the SPM 100 manual concerning hardware slope compensation is applicable here. If
the drift is quite large, the to keep from saturating the ADC during the course of a single scan,
the ADC gain must be decreased, which effectively decreases the resolution. Even if the vertical
RHK Technology, Inc.
Troy, MI
151
SPM 32 User's Manual
Experimental Procedures
surface features are only 0.1 nm in extent, but the total z drift is 50 nm during a single image, the
ADC gain must be adjusted so the dynamic range of the topographic signal does not exceed 50
nm which leads to a least significant bit of 0.012 nm. However,
with the second feedback loop slowly correcting for the drifting
absolute z value, the total extent of z signal the ADC will see can
be decreased to 0.1 nm so the effective resolution can be increased
by a factor of 500.
Actual images taken with the feedback loop on/off are presented in
Figure 131 The top image was taken while cooling the sample with
liquid nitrogen. The image was acquired in 51 seconds when the
auxiliary feedback loop was active. No image processing of any
kind was applied (not even a background subtraction). Immediately
after the image was acquired, the auxiliary feedback loop was
turned off and the bottom image acquired. It is clear that the
thermal drift caused the topography signal to saturate within 20
line scans and the rest of the image is outside the ADC range. To
obtain an image without the second feedback loop, the ADC gain
would need to be decreased by approximately a factor of eight or
sixteen to avoid saturating the ADC for the length of time it took to
scan the entire image, thereby sacrificing resolution.
Figure 131
RHK Technology, Inc.
Troy, MI
152
SPM 32 User's Manual
Appendices
RHK Technology, Inc.
Troy, MI
153
SPM 32 User's Manual
Appendices
6
Appendices
RHK Technology, Inc.
Troy, MI
154
SPM32 Data File Format
This is the "SM2" file format as of December 1, 1996. There may be extensions to this format, such
as the addition of new page types, but files following this format will continue to be readable by
SPM-32 version 5.x. A few additional parameters have been added to the SM2 format that were not
included in older versions (used since 1991-92), but any file header that starts with “STiMage 3.1”
will be readable by any future version of SPM-32.
File names typically end in “.SM2’, but this is not required. The program is able to read files with
any legal DOS name, such as ‘DATA0203.001’, for example.
The basic unit in a file is a “page”. Each "page" has a 512 byte ASCII text “header” that describes
the data, followed by some binary data. A page can be a single image, a single spectrum, or a group
of spectra. One file may have many pages, including combinations of image and spectral data. The
header for the second page starts immediately after the end of the data for the first page, etc.
The header is created by a “C” language routine and follows the I/O conventions of the C language
"printf()" function. The header is made up of strings or lines starting out on 32 byte boundaries. The
hexadecimal offsets of these strings are given in standard C notation: 0x20 means 20 hex bytes or
32 decimal bytes.
The header contains the following variables.
TEXT STRINGS
'date[9]' and 'time[9]' are strings like “05/01/93” and “12:01:30” -- the date and time the data
were acquired
'text[160]' is a comment describing the data
'label[20]' goes on the top of the plot window, like “Current Image”
'xunits[10]', etc. are the physical units of that axis, like “m” or “A”
INTEGER VALUES
Several integer values define the type of data in a page. Only certain values are recognized. The
identification of old types will not change, but new types may be added. The lists may also include
obsolete types no longer supported, or new types not yet supported.
type
The type of data stored with the page Three types are supported.
0 = image data
RHK Technology, Inc.
Troy, Michigan USA
155
1 = line/spectral data
2 = reserved
3 = annotated line/spectral data (see note below)
data_type The type of data values (numbers) stored in the data section. The supported types are:
0 = 4 byte floating point
1 = 2 byte signed integer
2 = 4 byte signed integer
3 = byte
All image data is stored as 16 bit signed integers, data_type = 1. Most spectral data is either
data_type = 1 (signed integers) or floating point (data_type = 0) such as power spectra and
autocorrelation spectra point,.
sub_type
This parameter provides additional information on the stored data page. If the data is an
image, sub-type is interpreted as image-type, or if the data is a line/spectra, sub-type is
interpreted as line-type.
image_type
Identifies what kind of data is represented by an image
0 = normal image
1 = autocorrelation image
line_type Identifies what kind of data is represented by a line or spectral page. The recognized
types are:
0 = not a line
1 = histogram
2 = cross section
3 = line test
4 = oscilloscope
5 = reserved
RHK Technology, Inc.
Troy, Michigan USA
156
6 = noise power spectrum
7 = I-V spectrum
8 = I-Z spectrum
9 = image X average
10 = image Y average
11 = noise autocorrelation spectrum
12 = multichannel analyzer data
13 = renormalized IV data from variable gap IV
14 = image histogram spectra
15 = image cross section
16 = image average
page_type Identifies what kind of data is represented by an image page. The possible types are:
0 = undefined
1 = topographic image
2 = current image
3 = aux image
4 = force image
5 = signal image
6 = image FFT transform
7 = noise power spectrum
8 = line test
9 = oscilloscope
10 = IV spectra
11 = image IV 4x4
12 = image IV 8x8
13 = image IV 16x16
RHK Technology, Inc.
Troy, Michigan USA
157
14 = image IV 32x32
15 = image IV center
16 = image interactive spectra
17 = autocorrelation page
18 = IZ spectra
19 = 4 gain topography
20 = 8 gain topography
21 = 4 gain current
22 = 8 gain current
23 = image IV 64x64
24 = autocorrelation spectrum
25 = counter data (usually NSOM)
26 = multichannel analyzer data (usually NSOM)
27 = AFM data using RHK AFM-100
x_size
The number of pixels or points in the X direction for an image page, or the
number of points per spectra/line for line pages.
y_size
The number of pixels or points in the Y direction for an image page, or the
number of spectra stored in the page
size
The total number of data bytes in the data section. It is equal to x_size *y_size * (size of each
number in bytes). For a 256x256 image this size is 256x256x2 = 131072. (See the special note
below for the “annotated data” type).
scan
The scan direction (direction of data acquisition) in an image. It is not meaningful for an I-V
curve, for example. On the computer screen X is horizontal and Y is vertical.
0 = right
1 = left
RHK Technology, Inc.
Troy, Michigan USA
158
2 = up
3 = down
file_id
This is a more or less unique number that is the same for all pages generated in
one data acquisition scan. In a normal image, the left and right scans have the same 'file_id'. In an
IV image the left and right scans and also the IV data page have the same 'file_id'. If you are
converting data, give a file ID of 0 and the SPM32 program will assign a file ID when in reads in
the page.
data_offsetThe size of the header. This should be 512. If it is blank or 0, 512 is assumed. In the
future the header size may be greater than 512 bytes.
There is a special type of spectral data called “annotated data” (type = 3) which is different from
normal line data (type = 1). Currently annotated data must have page_type = 16, “image interactive
spectra”. For this data type the data size is larger than normal - an additional 32 bytes per spectra,
i.e. 32 * y_size, are included after the normal x_size * y_size * (size of each number in bytes). These
32 bytes make up 8 integers (4 byte or long) for each spectra. Currently, the only use is to identify
the location where each spectra was recorded during an image. The first integer is the X pixel
coordinate, the second is the Y pixel coordinate, and the other 6 integers are reserved for future use.
FLOATING (PHYSICAL) VALUES
Physical parameters are stored in 'SI' units like meters, amps, seconds.
xscale
The X physical units per pixel or bit
xyscale
This is the change in X in physical units per Y line. This is used for drift
correction and is 0 for newly acquired images.
xoffset The origin of the X value, or the X coord of the image center. The physical unit is
'xoffset' + 'xscale' * (x number)
The Y and Z scale and offset are similar.
Z is the acquired data. X and Y are the image coordinates for 3D data. 2D data is plotted
as X-Z. The Y coordinate is just an index. For an I-V curve, for example, if 4 curves are
acquired, X is in Volts, Z in Amps and Y is 0, 1, 2 or 3. In a force image X and Y are
meters and Z is Newtons.
current The absolute value of the sample current in amps (not relevant for most AFM data).
bias.
The sample bias in volts (not relevant for most AFM data)
RHK Technology, Inc.
Troy, Michigan USA
159
period
The time to acquire each data point.
angle
The angle by which the image is rotated. (Normally 0)
A skeleton C program is included below that creates a header. The header is made up of strings or
lines starting out on 32 byte boundaries. The hexadecimal offsets of these strings are given in
standard C notation: 0x20 means 20 hex bytes or 32 decimal bytes. A ‘//’ starts a comment.
StmEncode creates a file header block from parameter values
char parameters[512];
StmEncode( char *parameters )
{
float xscale, yscale, zscale, xyscale, angle, xoffset, yoffset, zoffset, current, bias, period;
char date[9], time[9], xunits[10], yunits[10], zunits[10], label[20], text[160];
long int x_size, y_size, size, type, data_type, sub_type, line_type, image_type, page_type, scan,
file_id, data_offset;
// assign values to variables before they are written to the header
memset( parameters, 0x20, 512 ); // initialize header to blanks (spaces)
// the file header must start with 'STiMage 3.1' to identify the type.
// This id is also used for SPM-32 for backward compatibility of data files.
sprintf( parameters, "STiMage 3.1 %s %s", date, time );
// The data types are defined above
// sub_type is either line_type or image_type, depending on page
sprintf( parameters + 0x20, "%d %d %d %d %d %d %d",
sub_type, x_size, y_size, size, page_type );
type, data_type,
// if the 'unit' field is more than 9 letters, only the first 9 are used
sprintf( parameters + 0x40, "X %.3g %.3g %s", xscale, xoffset, xunits );
RHK Technology, Inc.
Troy, Michigan USA
160
sprintf( parameters + 0x60, "Y %.3g %.3g %s", yscale, yoffset, yunits );
sprintf( parameters + 0x80, "Z %.3g %.3g %s", zscale, zoffset, zunits );
sprintf( parameters + 0xA0, "XY %.3g q %.3g", xyscale, angle );
sprintf( parameters + 0xC0, "IV %.3g %.3g", current, bias );
sprintf( parameters + 0xE0, "scan %d %.3g", scan, period );
sprintf( parameters + 0x100, "id %d %d", file_id, data_offset );
// Only the first 19 letters of label are used, and only
// the first 160 characters of text
sprintf( parameters + 0x140, "%.20s", label );
strncpy( parameters + 0x160, text, 160 );
// get rid of NULL chars, replace with blanks for text editors
// which dislike NULLs
for( int i = 0; i < 512; i++ )
if( parameters[i] == 0 )
parameters[i] = ' ';
}
RHK Technology, Inc.
Troy, Michigan USA
161
DSP Scan Board Commands
The DSP-based scan board can be controlled without the use of SPM32. Any computer on the
network can send and receive information to the scan board if the IP address of the board is
known. Auxiliary programs to ease this will be included in future software distributions.
Here are the list of valid commands that the scan board can interpret at this time.
Please note that each command has a unique code that is written in capitals. The actual hex
number the COMMAND is converted to is given in commands.h. This hex number is then sent
over the Ethernet cable for communication. Each command also has a short name that is to be
used in lithography files or a C wrapper program. This name is written in lower case.
The meaning of the returned numbers might change. Therefore this document only gives the
symbolic constants as defined in scanner.h .
float means 32 bit floating point. u32 means 32 bit unsigned integer. Do not do any big/little
endian conversion, the network chips take care of that.
Command code:
IGNORE_SWITCH
Command name in Litho files: is
Number of parameters to send: 1
Parameters:
u32 which
Examples:
ignore speed front panel switch: is 1
consider speed front panel switch: is 0
Notes:
As soon as the speed gets set once by the control computer, the front panel line time and line
time multiplier switch no longer control the scan motion speed. However the switch settings can
be read at any time by the control computer using the GET_STATUS command
Command code:
WRITE_Z_DAC
Command name in Litho files: wzdac
Number of parameters to send: 1
Parameters:
float output_voltage
RHK Technology, Inc.
Troy, Michigan USA
162
Notes:
This command sets the output voltage of the Z DAC on the scan board. The parameter
output_voltage is clipped at ±10 V.
Command code:
BSET_DIO
Command name in Litho files: dioset
Number of parameters to send: 1
Parameters:
u32 bit_pattern_to_be_set
Notes:
All bits that are ONE in bit_pattern_to_be_set will be set in the DIO port of the scan board. The
bits are:
DIO_PAGE
DIO_LOOP_INVERT
DIO_Z_RETRACT
DIO_HOLD_INT
SCANNING_LED
PAGE signal for SPM100 electronics, not connected at this
moment...
LOOP INVERT signal for the SPM100 electronics, not connected at
this moment...
Z_RETRACT signal for the SPM100 electronics, not
connected at this moment...
HOLD_INT signal for the SPM100 electronics, not connected at this
moment...
"Scanning" - LED on the front of the SPM100
ADC_CONV_START
This starts the conversion of the 2 scan board ADCs
OVERRIDE_LED
"Override" LED on front of the unit
The coding of these values is defined in commands.h
Command code:
BCLR_DIO
Command name in Litho files: dioclr
Number of parameters to send: 1
Parameters:
u32 bit_pattern_to_be_cleared
Notes:
All bits that are ONE in bit_pattern_to_be_cleared will be cleared in the DIO port. See
RHK Technology, Inc.
Troy, Michigan USA
163
description of BSET_DIO for the bit functions.
Command code:
TRIGGER_ADC
Command name in Litho files: trigadc
Number of parameters to send: 0
Notes:
This triggers an A/D conversion on the two ADCs on the board. Use READ_ADC_BUF to get
the values. 15 data pairs of the two ADCs can be stored in a buffer on the board.
Command code:
READ_ADC_BUF
Command name in Litho files: gadc
Number of parameters to send: 0
Notes:
This command reads the on-board A/D conversion buffers. The A/D conversions can be
triggered via the external trigger input as well as via TRIGGER_ADC command. The data for
the first 15 trigger events after a READ_ADC_BUF are stored in the buffer. This command
uploads the data in the buffer and then empties it.
Command code:
GET_STATUS
Command name in Litho files: gs
Number of parameters to send: 0
Parameters:
none
Notes:
gs returns a block of status information to the IP address and port number where the command
originated. In detail the structure looks like this:
[0] u32 — the GET_STATUS command code
[1] u32 — machine state
an FFFF in the HI word means: arrived at spectro stop and waiting
The lower word is coded like this:
RHK Technology, Inc.
Troy, Michigan USA
164
IDLE idle
LITHO lithography running
SCAN scan generator running
PREPSCAN scan preparation in progress
SNGLESCN stop scanning after this frame is done
[2] float — scan speed in physunits/second
[3] float — line time in seconds
[4] u32 — the next line draw motion mode
C_SPEED
constant speed
SINE_SCAN sine wave speed
NL_LOOKUP nonlinearity table lookup
[5] float — scan rotation angle in deg
[6] float — X scanner position in physunits
[7] float — Y scanner position in physunits
[8] float — X scanner position in Volts
[9] float — Y scanner position in Volts
[10]
float — X scanner position offset in physunits
[11]
float — Y scanner position offset in physunits
The previous two items are offsets in the scan signal. This has nothing to do with the SPM1000
front panel offset knobs. They are separate channels.
[12]
u32 — actual image pixel number on the line
[13]
u32 — actual scan line number
The previous two items are calculated back from the tip position. When the tip is outside the
region defined by SET_BASE these numbers might be negative or bigger than the number of
pixels/lines defined by SET_NPIX_NLIN
[14]
u32 — state of the PEN bit right now
0 means up
0xFFFFFFFF means pen down
[15]
float — X piezo sensitivity as set by SET_MATRIX
[16]
float — Y piezo sensitivity as set by SET_MATRIX
[17]
float — X HV gain as set by SET_MATRIX
[18]
float — Y HV gain as set by SET_MATRIX
RHK Technology, Inc.
Troy, Michigan USA
165
[19]
u32 — line draw errors
This shows an error value of 1 when a line draw went off the DAC grid. GET_STATUS resets
this to zero after reading it. An error code of 2 means that one of the SET_MATRIX parameters
was zero and thus the SET_MATRIX has been ignored.
[20]
float — spectroscopy wait time
0 means the board is waiting for s SCAN_UNTIL to continue
positive values make the board continue after that many seconds
negative values cause FLAG_A <-> FLAG_B handshaking
[21]
u32 — internal flags These are defined in scanner.h as "used USTAT1 bits"
[22]
float — scan line length in physunits
[23]
scan — Y length in physunits
[24]
u32 — Number of pixels
[25]
u32 — Number of lines
[26]
u32 — number of repetitions for each scan line draw
[27]
u32 — On which scan line repetitions do AD triggers see SET_WHERE_AD
[28]
u32 — SCANNER_FLAGS see SET_SCANNER_FLAGS
[29]
u32 — number of triggers at each image pixel position
[30]
float — trigger period at each image pixel position in seconds
[31]
float — wait time at the end of a forward scan line [s]
[32]
float — wait time at the end of reverse scan line [s]
[33]
u32 — actual line repetition number
[34]
scanner errors Currently this is always 0. This will give a clue about scan generator
errors
[35]
u32 — Lithography instruction pointer value
[36]
u32 — Lithography error number
[37]
u32 — The last decoded Litho command In case of a bad command the code will be
shown here and [28] shows where in the buffer that happened
[38]
float — user gain setting from front panel switch
[39]
float — user line time setting from front panel switch These contain the front panel
switch settings. When the user changes the switches these variables will be updated.
The line time shown here is a user wish. When the scan program starts it will try its
best fulfilling this wish. The resulting line time and scan motion speed can be taken
from parameter [2] and [3] of this message. Sending IGNORE_SWITCH 1,
SET_SPEED, SET_LINE_TIME or PREPARE_SCAN command will uncouple the
RHK Technology, Inc.
Troy, Michigan USA
166
actual line speed from the front panel switch. An IGNORE_SPEED 0 will make the
board use the switches again...While the speed settings from the switches are ignored
the OVERRIDE LED will light.
[40]
u32 — Chassis serial number
[41]
u32 — scan board hardware revision number
[42]
u32 — Altera firmware revision number
[43]
u32 — Kernel revision number
[44]
u32 — Scan software revision number
Line draw operation commands
Command code:
POSITION_ABSOLUTE
Command name in Litho files: pa
Number of parameters to send: 2
Parameters:
float X
float Y
Examples:
pa 20.0 20.0
Notes:
For this to work in physical units the sensitivities using SET_MATRIX must be set.
Command code:
POSITION_RELATIVE
Command name in Litho files: pr
Number of parameters to send: 2
Parameters:
float X
float Y
Examples:
pr 20.0 20.0
Notes:
For this to work in physical units the sensitivities using SET_MATRIX must be set.
RHK Technology, Inc.
Troy, Michigan USA
167
Command code:
POSITION_ABS_EXTD
Command name in Litho files: pae
Number of parameters to send: 11
Parameters:
float X
float Y
float speed
float wait_time: Wait time at line end
u32 flags:
Bit1 PU/PD: 0 — PU
1 — PD,
Bit7 ADC:
1 — NO
0 — YES
Bit11 SCAN_LEFT DIO: 0 — LOW 1 — HI
u32 TRIGNUM: # AD triggers at each position
float TR_PERIOD: trigger period in seconds (a pretty
small number...)
u32 MotionMode: C_SPEED, SINE_SCAN or
NL_LOOKUP
u32 first_Ints/AD: where first AD
u32 other_Ints/AD: AD trig separation
i32 firstspec : first spectro stop after how many A/D
position updates
0 — never stop, don't use remainder of previous line
-1 — use remainder of counts from previous line
pae 20.0 20.0 120000.0 0.01 129 3 0.000001 0 3
50
Examples:
Notes:
This function is called by the scan generator. It is the general interface of the line draw section of
the program. Using this an external scan generator could take over the control of the board.
Please note that the X and Y are in internal scan grid units here.
Command code:
Command name in Litho files:
SET_WAIT_TIME
swt
RHK Technology, Inc.
Troy, Michigan USA
168
Number of parameters to send:
1
Parameters:
float wait time
Examples:
swt 0.2 -> 200ms wait at line draw ends
swt 0.0 -> no additional wait at line ends
Notes:
Internally this function gets called by POSITION_ABS_EXTD. A negative wait time results in
FLAG_A being set at the end of each line. Drawing continues when FLAG_B is set. Note that
the scanner sets this parameter internally. Use SET_FORWARD_WAIT_TIME and
SET_REVERSE_WAIT_TIME when scanning.
Command code:
SET_LINE_FLAGS
Command name in Litho files:
slf
Number of parameters to send:
1
Parameters:
u32 flags
Notes:
Internally this function gets called by POSITION_ABS_EXTD. See the
POSITION_ABS_EXTD description for more details on the flags.
Command code:
SET_TRIGNUM
Command name in Litho files:
stnum
Number of parameters to send:
1
Parameters:
u32 TRIGNUM
float TRIG_PERIOD
Notes:
This sets the number of triggers at each A/D position along the next lines. Do not use this for
setting the number of triggers for the next scan. Use SET_SC_TRIGNUM instead. Internally this
function gets called by POSITION_ABS_EXTD. TRIG_PERIOD is the time between trigger
events in seconds
Command code:
SET_MOTION_MODE
RHK Technology, Inc.
Troy, Michigan USA
169
Command name in Litho files:
smmod
Number of parameters to send:
1
Parameters:
u32 motion_mode
Notes:
Internally this function gets called by POSITION_ABS_EXTD. It sets the motion mode for the
next line to be drawn.
Command code:
SET_FIRST_INTS_AD
Command name in Litho files:
sfiad
Number of parameters to send:
1
Parameters:
u32 first Ints/AD
Notes:
This function sets the number of scanner position updates along the line before the first A/D
trigger sequence is generated. Internally this function gets called by POSITION_ABS_EXTD.
Command code:
SET_OTHER_INTS_AD
Command name in Litho files:
soiad
Number of parameters to send:
1
Parameters:
u32 other_Ints/AD
Notes:
This function sets the number of scanner position updates along the line between all other A/D
trigger positions. Internally this function gets called by POSITION_ABS_EXTD.
Command code:
PEN_UP
Command name in Litho files:
pu
Number of parameters to send:
0
Notes:
This will deactivate the PEN TTL output. Note that this does not happen until the beginning of
the next line draw.
RHK Technology, Inc.
Troy, Michigan USA
170
Command code:
PEN_DOWN
Command name in Litho files:
pd
Number of parameters to send:
0
Notes:
This will activate the PEN TTL output. Note that this does not happen until the beginning of the
next line draw.
Command code:
ROTATE_ABSOLUTE
Command name in Litho files:
ra
Number of parameters to send:
1
Parameters:
float angle
Examples:
ra 32.31 — rotation angle = 32.31 degree
Notes:
This sets the rotation angle of the image coordinate system with respect to the piezo coordinate
system. A positive angle means image rotation counterclockwise. The angle is given in degree.
This applies to all subsequent line draw actions including scanning.
Command code:
ROTATE_RELATIVE
Command name in Litho files:
rr
Number of parameters to send:
1
Parameters:
float angle_change
Examples:
rr 0.2 — rotate drawing ccw an additonal 0.2 degree
Notes:
This modifies the rotation angle of the image coordinate system with respect to the piezo
coordinate system. A positive angle means image rotation counterclockwise. The angle is given
in degree. This applies to all subsequent line draw actions including scanning.
Command code:
SET_SPEED
RHK Technology, Inc.
Troy, Michigan USA
171
Command name in Litho files:
ss
Number of parameters to send:
1
Parameters:
float speed ( in physunits/s )
Notes:
Internally this function gets called by POSITION_ABS_EXTD. Speed changes apply to all
subsequent line draws. Note that giving a line time in PREPARE_SCAN will overwrite the
speed setting.
Command code:
SET_MATRIX
Command name in Litho files:
sm
Number of parameters to send:
4
Parameters:
float X_Piezo_sens
float Y_Piezo_sens
float HV_Gain_X
float HV_Gain_Y
Examples:
sm 300.0 300.0 13.0 13.0
Notes:
This defines the meaning of "physunits" to the board. The piezo sensitivities are given in
physunits/V, the HV_Gains are dimensionless. All other operations are based on physunits so
this should be one of the first instructions given to the board.
Command code:
SET_OFFSET
Command name in Litho files:
so
Number of parameters to send:
2
Parameters:
float Xoffs
float Yoffs
Examples:
so 20.0 -30.0
Notes:
This moves the offset of the scan board. The offset coordinates are given in the unrotated
coordinate system (offset moves the center of rotation). Please note: changing the offset also
changes the offset for the current position. The result will be a line draw to the current position at
RHK Technology, Inc.
Troy, Michigan USA
172
the new offset. This line draw will be done using the current line parameters.
Command code:
SET_SPEC_WAIT_TIME
Command name in Litho files:
sswt
Number of parameters to send:
1
Parameters:
float spectro_wait_time
Notes:
This determines the wait time at each spectro position in table as well as in array mode. At a
spectro position FLAG_A is set. When the time expires, FLAG_A is cleared automatically for
positive wait times. For negative wait times FLAG_B has to be put high in order to make the
scanner continue.
Command code:
GET_TEST
Command name in Litho files:
debug
Number of parameters to send:
0
Notes:
This command returns an array of debugging information. This array can be filled with
debugging information. If unused all elements are zero.
Command code:
TRIGGER_SERIES
Command name in Litho files:
trs
Number of parameters to send:
2
Parameters:
float GROUP_PERIOD
float TRIG_PERIOD
u32 NGROUP
u32 TRIG_NUM
Examples:
trs 100e-6 10e-6 6 3
This will generate 6 trigger groups each containing 3 trigger pulses 1 ms apart. The trigger pulse
groups will have a period of 100 ms.
RHK Technology, Inc.
Troy, Michigan USA
173
Notes:
This command generates a sequence of trigger groups. GROUP_PERIOD defines the period
time of the trigger groups. NGROUP defines the number of groups. If this is zero triggers will be
generated until told to stop by STOP_SCAN 2. TR_NUM is the number of triggers in each
group. TRIG_PERIOD is the trigger period inside the group.
Scan layer commands
Command code:
PREPARE_SCAN
Command name in Litho files:
prepscan
Number of parameters to send:
13
Parameters:
float baselen scan line length in physunits
float basewidth — scan area height in physunits
float LineTime — scan line draw time (one way!)
float fwd_wait_tm — stop time after end of fwd line
float rev_wait_tm — stop time after end of rev line
u32 npix — number of image pixels on each line
u32 nlin — number of lines in the scan
u32 motionmode — C_SPEED/ SINE_SCAN/ NL_LOOKUP
u32 rept — # of repetitions for each scan line
u32 where_AD — A/D triggers on which repetitions
u32 SCANNER_FLAGS — see commands.h for coding
u32 TRIGNUM — # of triggers at each A/D position
float TRIG_PERIOD — trigger period in seconds
Example:
prepscan 12 12 0.002 0 0 200 200 0 1 3 4 1 7e-6
Notes:
This command sets the parameters for a scan. It then moves the tip position to the scan area
corner defined in SCANNER_FLAGS from where the scan is supposed to start. The motion
along this line will be the speed of the scan as set by LineTime. When the tip position arrives in
the start corner the scanner waits for wait_time_at_start_position seconds before further line
draws can be done. Use the SCAN_UNTIL command then to start a scan. Please note that the
speed of all line draws is set to the speed that corresponds to LineTime. A Linetime of 0.0 will
be ignored. The old scan speed will remain unchanged.
RHK Technology, Inc.
Troy, Michigan USA
174
Command code:
SET_REPETITIONS
Command name in Litho files:
srep
Number of parameters to send:
1
Parameters:
u32 rept
Notes:
Internally this function gets called by PREPARE_SCAN. It is intended mostly for testing
Command code:
SET_BASE
Command name in Litho files:
sbas
Number of parameters to send:
2
Parameters:
float base_length
float base_width
Notes:
Internally this function gets called by PREPARE_SCAN. It is intended mostly for testing. The
values base_length and base_width give the size of the scan area in physunits.
Command code:
SET_FWD_WAIT_TIME
Command name in Litho files:
sfwt
Number of parameters to send:
1
Parameters:
float wait time at the end of a fwd line [s]
Notes:
Internally this function gets called by PREPARE_SCAN. It is intended mostly for testing. The
time is given in seconds. Negative wait time results in FLAG_A being set at the end of each fwd
line. Scanning continues when FLAG_B is set.
Command code:
SET_REV_WAIT_TIME
Command name in Litho files:
srwt
Number of parameters to send:
1
RHK Technology, Inc.
Troy, Michigan USA
175
Parameters:
float wait time at the end of a rev line [s]
Notes:
Internally this function gets called by PREPARE_SCAN. It is intended mostly for testing. The
time is given in seconds. Negative wait time results in FLAG_A being set at the end of each rev
line. Scanning continues when FLAG_B is set.
Command code:
SET_NPIX_NLIN
Command name in Litho files:
snp
Number of parameters to send:
2
Parameters:
u32 npix
u32 nlin
Notes:
Internally this function gets called by PREPARE_SCAN. It is intended mostly for testing.
Command code:
SET_SC_MOTMOD
Command name in Litho files:
smm
Number of parameters to send:
1
Parameters:
u32 motion_mode
Notes:
This function sets the motion for the scan lines of all following scans. The connection lines will
be constant speed lines.
Command code:
SET_WHERE_AD
Command name in Litho files:
swad
Number of parameters to send:
1
Parameters:
u32 where_AD
Notes:
Internally this function gets called by PREPARE_SCAN. It is intended mostly for testing. In
RHK Technology, Inc.
Troy, Michigan USA
176
where_AD each bit allows AD trigger generation on a certain line repetition number. Bit 0
means first fwd line, bit 1 means 1st rev line etc. A value of where_AD of 2 means only generate
A/D trigger sequences at the first backward scan. The bits in here are only considered when the
line is drawn. That has to be set using SET_REPETITIONS.
Command code:
SET_SCANNER_FLAGS
Command name in Litho files:
ssf
Number of parameters to send:
1
Parameters:
u32 SCANNER_FLAGS
Notes:
Internally this function gets called by PREPARE_SCAN. It is intended mostly for testing. The
scanner flags describe:
Start corner:
Bit 0: 1 — lower
0 — upper
Bit 1: 1 — right
0 — left
Slow scan direction:
Bit 2: 1 — keep
0 — alternate
Command code:
SET_SC_TRIGNUM
Command name in Litho files:
sctnum
Number of parameters to send:
2
Parameters:
u32 TRIGNUM
float TRIG_PERIOD
Notes:
Internally this function gets called by PREPARE_SCAN. It is intended mostly for testing. It sets
the number of A/D triggers generated at each A/D position. Note that this is the value used by
the scan generator. If you set TRIGNUM by using SET_TRIGNUM this will be overwritten by
the SET_SC_TRIGNUM value at the begin of the next scan. TRIG_PERIOD is the time between
trigger events in seconds
RHK Technology, Inc.
Troy, Michigan USA
177
Command code:
MOVE_TO_SCAN_START
Command name in Litho files:
ms
Number of parameters to send:
0
Notes:
This moves the tip position to the scan area corner defined in SCANNER_FLAGS from where
the scan is supposed to start. The motion along this line will be the speed of the scan as set by
LineTime. Use the SCAN_UNTIL command then to start a scan. Internally this function gets
called by PREPARE_SCAN after all other parameters have been set. A
MOVE_TO_SCAN_START command can be issued at any time. It will then use the
configurations of the last PREPARE_SCAN. When a scan is running a
MOVE_TO_SCAN_START command will stop the current scan at the end of the next prepared
line and then move to the start corner. Please note that the scan generator works in the
background of the line draws that it has "ordered". Any line that got ordered will be drawn. This
means that when you issue a MOVE_TO_SCAN_START command the scanner might actually
draw another line after the current one before it responds.
Command code:
SCAN_UNTIL
Command name in Litho files:
su
Number of parameters to send:
1
Parameters:
Examples:
u32 #image_pixels
stpsc 1 ms su 0 — stops the old and starts a new
continuous scan
Notes:
SCAN_UNTIL is the command to use when the scanner should move further along the scan
lines. The value in #image_pixels will tell when the scan gets stopped again. A value of 0 means
continuous scanning. When the scan is stopped the high word of the machine state word in the
GET_STATUS reply is set to 0xffff. The low word still stays at SCAN. SCAN_UNTIL is the
command to use for spectroscopy. SCAN_UNTIL is also used to get a scan running after the
MOVE_TO_START command. When a SCAN_UNTIL is applied to a running line draw it sets
the number of A/D conversions from the moment the command came in to the next spectro stop.
Command code:
STOP_SCAN
Command name in Litho files:
stpsc
RHK Technology, Inc.
Troy, Michigan USA
178
Number of parameters to send:
1
u32 WHERE
Parameters:
Notes:
This command is used to stop the scan in a defined way. The parameter WHERE says where to
abort the scan. The coding is:
EOSCAN stops at the end of a scan frame. Note that this sets the machine state to SNGLESCN
for the rest of the frame
EOLN
stops the scan at the end of this scan line
STOP_NOW
stops the scan immediately, aborting the current line draw
After the STOP_SCAN command the tip position does NOT move to the start corner. You have
to use MOVE_TO_SCAN_START for that. Scans stopped at EOSCAN or EOLN can be
continued using SCAN_UNTIL. For a scan stoped at STOP_NOW this will give unpredictable
results. Use INTERRUPT_SCAN if you want to stop at a previously unknown position along a
scan line and then want to continue scanning.
Command code:
INTERRUPT_SCAN
Command name in Litho files:
intsc
Number of parameters to send:
0
Notes:
This command forces a spectroscopy stop at the position of the scanner. Using SCAN_UNTIL
the scan can be continued afterward. As on any spectro stop position the high word of the
machine_state variable is set to 0xffff while the scan is interrupted.
Command code:
STOP_Y_SCAN
Command name in Litho files:
stopy
Number of parameters to send:
1
Parameters:
u32 YES_NO — STOP Y = 1 RUN Y = 0
Notes:
This sets or clears a scan generator flag which tells whether the Y line position should be
changed during scanning. This allows to scan a whole image along one line. This might be
interesting for testing the SPM imaging conditions.
RHK Technology, Inc.
Troy, Michigan USA
179
Command code:
SET_WHERE_SPEC
Command name in Litho files:
sws
Number of parameters to send:
1
Parameters:
u32 where_spectro
Notes:
Each bit in where_spectro represents a line repetition during scanning. When the bit is set
automatic spectroscopy is allowed on that scan repetition.
Command code:
SPEC_ARRAY_MODE
Command name in Litho files:
sam
Number of parameters to send:
4
Parameters:
u32 first_pix, delta_pix, firstlin, deltalin
Notes:
This switches on array mode automatic spectroscopy during the scan line repetitions set by
SET_WHERE_SPEC. Please note that spectroscopy is only possible at points where A/D
conversions are taken. Disabling A/D conversions along a line automatically also disables
spectroscopy. The parameter first_pix gives the pixel position of the first spectroscopy position
from the line start point. The parameter delta_pix gives the separation of the spectro positions
along the line in A/D conversion steps. The parameter firstlin gives the first scan line that
contains spectro stops, counted from the begin of the scan. The parameter deltalin gives the
separation of spectro scan lines along the image. When firstlin < deltalin the spectro positions of
a downward scan and the following upward scan lie exactly on top of each other.
array spectro parameters are:
first_pix — (goes 0 ... npix-1)
delta_pix — (minimum 1)
firstlin — (goes 0 ... nlin-1)
deltalin — (minimum 1)
Command code:
SPEC_TABLE_MODE
Command name in Litho files:
stm
Number of parameters to send:
depends on table length
Parameters:
spectro position table
RHK Technology, Inc.
Troy, Michigan USA
180
Notes:
This command switches on table spectroscopy mode. This allows the placement of spectroscopy
positions on any A/D trigger position on the image. The table contains line numbers (which have
0x0000 in the high word) and position markers for the spectro position on that line. The position
markers are compressed. The Hi word contains a repetition counter and the lower word the
position difference to the previous position or to the line start. Note that there is a position
difference of 1 needed to reach position 0 on the line. A position difference of zero will shut off
spectroscopy for the rest of the line. The table is coded like this:
line number ( has 0x0000 in the high word)
entry 1, has repetition cntr in Hi word and position X difference in lo word
entry 2, has repetition cntr in Hi word and position X difference in lo word
entry 3, has repetition cntr in Hi word and position X difference in lo word
...
entry n, has repetition cntr in Hi word and position X difference in lo word
line number ( has 0x0000 in the high word)
entry 1, has repetition cntr in Hi word and position X difference in lo word
entry 2, has repetition cntr in Hi word and position X difference in lo word
.
.
.
Example:
0x0
0x00030001
0x05
0x00020003
0x00010004
0x0c
0x00030003
0x00020001
will place spectro stops on
line 0
at positions 0, 1, and 2
line 5
at A/D positions 2, 5, 9 and
RHK Technology, Inc.
Troy, Michigan USA
181
line 12 at A/D position 2, 5, 8, 9, 10
The pixel numbers start with 0 and are in decimal notation here.
Command code:
SPEC_NO_MODE
Command name in Litho files:
snm
Number of parameters to send:
0
Notes:
This shuts off automatic spectroscopy. SCAN_UNTIL will still do "manual" spectro positioning.
Lithography commands
Command code:
WRITE_LITHO_BUF
Command name in Litho files:
wlb
Number of parameters to send:
variable
Parameters:
Instructions to be put into litho buffer
Notes:
This command can not be put into the lithography buffer. That does not make sense. This is the
only command with a variable length. The user has to make sure that the sent packet size does
not exceed the ethernet packet size. Otherwise the packet will be split up by the IP layer of the
control computer and then ignored by the scan board IP routine. Longer instruction sequences
can be downloaded by subsequent WRITE_LITHO_BUF instructions. After the download has
succeeded the lithography pointer points to the first free memory cell after the downloaded
commands. This allows multiple WRITE_LITHO_BUF commands to write more instructions
than what fits into one ethernet buffer. The WRITE_LITHO_BUF instruction returns the
following data structure to the IP address and UDP port number that issued the command:
[0] WRITE_LITHO_BUF code
[1] number of written instructions
[2] remaining free spaces in litho buffer
This is mainly used to confirm that the packet arrived and got processed. (It might get lost in
UDP...)
RHK Technology, Inc.
Troy, Michigan USA
182
Command code:
RESET_LITHO_BUF
Command name in Litho files:
rlb
Number of parameters to send:
0
Notes:
This is used to stop a running lithography sequence and to set the lithography pointer back to the
begin of the buffer. Please note that the lithography buffer controls both where instructions get
written to by WRITE_LITHO_BUF and where they are read from during execution.
Command code:
JUMP_BUF
Command name in Litho files:
jlb
Number of parameters to send:
1
Parameters:
u32 position
Examples:
jlb 0 jumps back to the begin and continues
Notes:
This command simply changes the lithography pointer. This way loops are possible. Conditional
jumps are not supported in this version.
Command code:
DO_LITHO
Command name in Litho files:
dl
Number of parameters to send:
0
Notes:
This executes the commands in the lithography buffer starting at where the lithography pointer
points to. During lithography execution the lower word of the machine_state word is set to
LITHO.
RHK Technology, Inc.
Troy, Michigan USA
183