1
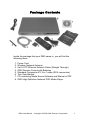
High Definition
Network DVD Media Player
User Manual
www.z500series.com
Contents
Package Contents ...............................................................................
Safety Precautions ..............................................................................
Introduction ........................................................................................
Important Notes .................................................................................
Specifications .....................................................................................
Front and Rear Panel Layout .............................................................
Front Panel Display (VFD) ................................................................
Remote Control – Layout .................................................................
Remote Control – Option Selector .....................................................
Remote Control – Zooming, Panning, Navigation ............................
Remote Control – Text Entry, Display ..............................................
Connection Guide – Video – HDMI ................................................
Connection Guide – Video – Component ..........................................
Connection Guide – Video – SCART ................................................
Connection Guide – Video – S-Video and Composite ......................
Connection Guide – Audio – Digital Audio ......................................
Connection Guide – Audio – Analog Audio ......................................
Connection Guide – Network ............................................................
Setting Up .........................................................................................
Language Setting ...............................................................................
Audio Settings ....................................................................................
Video Settings and Supported Modes ................................................
Network Setup ...................................................................................
Active Network Selection ..................................................................
Wired (Ethernet) Network Setup .......................................................
Wireless (802.11g) Network Setup ....................................................
Windows Network (SMB) Settings ...................................................
DVD Setup Options ...........................................................................
General Settings .................................................................................
Firmware Updates ..............................................................................
Additional Setup Options ...................................................................
Z500 User Manual - Copyright © 2005-2006 Zensonic Corporation
3
4
5
6
7
9
10
11
12
13
14
15
16
17
18
19
20
21
22
23
24
25
28
29
30
31
33
35
37
38
39
1
Using Your Z500 ..............................................................................
40
Options -
Music ............................................................................................
Videos ...........................................................................................
Pictures .........................................................................................
Extras ............................................................................................
UPnP Media Servers ..........................................................................
UPnP Media Server Browsing ...........................................................
Browsing SMB Network Shares ........................................................
SHOUTcast Radio .............................................................................
USB Port ............................................................................................
Seek and Search Functions ................................................................
Trouble Shooting (Help) ....................................................................
Glossary .............................................................................................
Technical Specifications ....................................................................
FCC Regulations ................................................................................
Warranty, Limitation of Liability ......................................................
Version 1.4.1
2
Z500 User Manual - Copyright © 2005-2006 Zensonic Corporation
41
43
44
45
46
47
48
49
50
51
52
54
55
56
57
Package Contents
Inside the package that your Z500 came in, you will find the
following items.
1.
2.
3.
4.
5.
6.
7.
8.
Power Cord
Wireless Network Antenna
Cat.5-UTP Ethernet Network Cable (Straight Through)
Z500 Remote Control with Batteries
Standard Composite A/V 3-in-1 cable (RCA connectors)
This User Manual
CD containing Media Server Software and Manual in PDF
Z500 High Definition Network DVD Media Player
Z500 User Manual - Copyright © 2005-2006 Zensonic Corporation
3
Safety Precautions
Please note the following safety precautions.
•
•
•
•
•
•
•
•
•
•
•
•
•
•
•
•
•
•
4
To avoid risk of electric shock, do not use or expose this player to wet or moist
environments
Do not place objects containing fluids above or on top of the player
It is recommended to disconnect this device during electrical storms
There are no user serviceable parts inside the player, all internal maintenance or
servicing should be carried out by qualified service personnel authorised by Zensonic
Do not insert objects into the ventilation slots on the player
This player has a laser device inside, looking at a laser can seriously damage your
eyes
Place the unit in or on a safe and stable cabinet
Avoid exposure to extreme heat, extreme cold or direct sunlight
Do not drop the player, or subject it to strong shocks
Unplug the unit and remove the remote control batteries if it is not to be used for a
long time
Do not place the unit near sources of strong magnetism
Disconnect the power when cleaning
Clean only with a damp cloth
Keep the unit away from dust and sand
If the unit is moved from a very cold environment to a warm one, or placed in a humid
place, the laser lens may get moisture condensing on it, if so leave the unit powered
on for about an hour for the moisture to evaporate
Ensure that you use this device with a properly grounded power cord
Do not place the player on top of heat sources (including amplifiers that get hot)
Please ensure adequate ventilation around the player
Z500 User Manual - Copyright © 2005-2006 Zensonic Corporation
Introduction
Congratulations and thank you for purchasing the Z500 High Definition
Network DVD Media Player.
This player is a state-of-the-art media and DVD player utilising the Sigma
Designs EM8620L multimedia processor for unparalleled media playback and
picture quality capabilities, and is powered by software by Sliceware.
The Zensonic Z500 networked digital media player gives users four
connectivity options in one unit: wireless networking, Ethernet wired
networking, optical disc playback and a USB 2.0 connection.
The Z500 not only supports High Definition media content, but also has the
ability to up scale media content for playback on high definition TV’s and
screens, whilst also maintaining compatibility with standard definition TV’s.
(Up scaling of protected DVD content is only available via the HDMI™
interface to devices that are HDCP compliant)
The Z500 has unprecedented file format support including high definition
Windows Media® Video 9 and MPEG4 playback
The Z500's music playback capability handles all the formats enthusiasts
have longed for, including the high definition FLAC lossless compressed
format, OGG, AAC (commonly used in Apple iTunes), MP3, Windows Media
Audio 9 (including digitally rights managed WMA9*), CD Audio and others.
Video playback is also astonishingly comprehensive. The Z500 handles
playback in Windows Media Video 9, XviD, Nero Digital™, MPEG-4,
QuickTime MPEG-4, MPEG-2, MPEG-1, DVD, and other formats.
The Z500 is engineered from the ground up for high performance networking,
with 100Mbit Ethernet and 54Mbit/s 802.11G wireless networking integrated.
The Internet is just a button away on the Z500, with instant access to features
such as local weather and support for streaming Internet radio stations.
Included with the player are two options for media servers: TwonkyVision and
Windows Media Connect. These programs make sorting and streaming digital
media files from multiple PCs simple.
TwonkyVision supports Windows, Mac OSX and Linux.
SMB network shares can also be accessed via the Z500, for even greater
network connectivity.
We are sure that you will enjoy your new player and that it will be an integral
part of your home entertainment system.
* Firmware Upgrade required for Digital Rights Managed media
Z500 User Manual - Copyright © 2005-2006 Zensonic Corporation
5
Important Notes
6
•
Apple and iPod are trademarks of Apple Computer. Nero Digital™ is a trademark of
Nero Software. Microsoft, Windows, Windows XP and Windows Media are
Trademarks of Microsoft Corporation. HDMI, the HDMI logo and High-Definition
Multimedia Interface are trademarks or registered trademarks of HDMI Licensing
LLC. Manufactured under licence from Dolby Laboratories. Dolby® and the Double-D
symbol are trademarks of Dolby Laboratories. All Rights Reserved. All other products
and companies referred to herein are trademarks or registered trademarks of their
respective companies.
•
This product is covered by certain intellectual property rights of Microsoft and cannot
be used or further distributed without a license from Microsoft.
•
This product incorporates copyright protection technology that is protected by U.S.
patents and other intellectual property rights. Use of this copyright protection
technology must be authorized by Macrovision, and is intended for home and other
limited viewing uses only unless otherwise authorized by Macrovision. Reverse
engineering or disassembly is prohibited.
•
AAC support does not include Apple Fairplay digitally rights managed AAC files.
iPod must be formatted for Windows. Mac formatted iPods are not compatible with
the Zensonic Z500.
•
54Mbit/s is the theoretical maximum of the 802.11G wireless networking standard.
Real life speeds vary depending on the environment and are typically around
20Mbit/s.
If wireless networking reception is poor, users may need to reposition their wireless
base station to achieve optimum media playback performance.
•
Source files with Global Motion Compensation encoding applied cannot be played
back at 1080i.
•
The Z500 player supports many types of file formats, but due to encoding differences,
not all files may play.
Please ensure that any files you wish to play on this player are properly encoded with
settings that are compatible with the player.
(e.g. do not use 3 warp point GMC, or other formats that the player does not support)
•
A file extension on a file (such as .avi) does not mean that the data within that file is
compatible with the player. Many file formats use similar file extensions, and it is not
necessarily an indication of what the file encoding format contained in that file is.
•
Product specifications and features are subject to change without notice.
Z500 User Manual - Copyright © 2005-2006 Zensonic Corporation
Specifications
1. Audio Formats Supported
o MPEG 1 Layers I,II and III
o WAV
o CD Audio (With Freedb Support)
o OGG Vorbis
o FLAC
o WMA
o AAC
2. Video Formats Supported
o MPEG-1, MPEG-2 MP@HL, MPEG-4
o ASP@L5 (720p), WMV9 MP@ML (720p)
o XviD
o Nero Digital™
o QuickTime with MPEG4 encoding. .MP4 extension
o DVD ISO/IFO *
3. Picture Formats Supported
o JPG/JPEG2000
o BMP
o GIF
o PNG
4. Play lists Supported
o M3U
o PLS
o ASX
5. Network Support
o Ethernet 10/100 Mbps
o Wireless 802.11b/g
o SMB support -- access Windows shares directly
6. USB 2 device Support
(if the device appears as a mass storage device)
o USB Thumb Drives
o USB HDD Drives
7. Internet Radio Support
o Integrated Internet Radio Player with preinstalled library of
stations
o Stations streaming MP3 or ASX are supported
Z500 User Manual - Copyright © 2005-2006 Zensonic Corporation
7
8. Media Streaming Software
o TwonkyVision (Full Version)*** and
Windows Media Connect
o TwonkyVision supports Windows, MacOS X & Linux
o Share Pictures, Audio and Video Files
o UPnP enabled
9. DVD Player
o DVD-Video, SVCD, VCD 1.x and 2.0
o DVD-R/-RW/+R/+RW
o CD/-R/-RW
10. Extras
o
o
o
o
o
o
o
o
o
o
Subtitle support - SRT, SMI, SSA formats
Online Weather Panel
HDCP Support
Digital Rights Management: Windows Media DRM 10 **
EL backlit remote
Multi-purpose joystick for quick and easy navigation
ID3 Tag and display on VFD panel on player
Incremental Pan & Zoom (fine grained control of zoom)
Firmware updates from OSD. Check for new updates.
WEP encryption support on Wireless 802.11g (64 and 128 bit)
o
o
o
o
o
SCART output
HDMI™ output
S-Video output
Composite Video output
Component output
11. I/O
12. Audio
o
o
o
o
Stereo output
Coaxial output
Optical output
Analog 5.1 output
13. Connectors
o 10/100 Ethernet
o USB 2.0
o Wireless 802.11g
14. TV Types
o NTSC (480i / 480p)
o PAL (576i / 576p)
o HDTV (720p50 / 720p60 / 1080i50 / 1080i60)
*
**
***
8
New experimental feature
Features will be available in a firmware update
The bundled Twonkyvision software does not include free upgrades. A discount voucher is available.
Z500 User Manual - Copyright © 2005-2006 Zensonic Corporation
Front Panel
1.
2.
3.
4.
5.
6.
7.
Power LED
Power Button
USB 2.0 Connector
Disc Tray
Eject Button
Volume Up
Previous Chapter / Item
8.
9.
10.
11.
12.
13.
14.
Rewind
Forward
Next Chapter / Item
Volume Down
Play / Pause
Stop
Display Window
The Power LED is green when the unit is active, and red when the unit is in stand-by.
Rear Panel
1.
2.
3.
4.
Wireless Antenna Connector
Ethernet Network Connection
HDMI™ Digital A/V Output
CVBS Standard Composite
Video Output
5. S-VIDEO Output
6.
7.
8.
9.
10.
11.
Component Video Output
Coaxial Digital Audio Output
Optical Digital Audio Output
Analog 5.1ch Audio Output
SCART A/V Output
IEC Power Input
Z500 User Manual - Copyright © 2005-2006 Zensonic Corporation
9
Front Panel Display
The Z500 incorporates a Vacuum Fluorescent Display (VFD) that can display
12 characters of both Alpha and Numeric data.
This aids in such things as menu navigation, as well as the ability to display
the currently playing file, current playing time etc.
1. 802.11 (Wireless) network signal strength
2. Disc indicator
3. 12 Digit Alpha-Numeric Display
4. DTS audio present
5. DVD disc present
6. SVCD or VCD disc present
7. Dolby Digital (AC3) audio
8. Video file playing
9. Image file playing
10. Audio file playing
11. Network connection to active network
12. Play indicator
13. Pause indicator
The front panel display will display the item that is currently selected on your
display device (such as menu item, file name etc.)
This provides you with the ability to make file selections and to make settings
changes without the user needing to have a display device (such as a TV)
switched on.
You can select and play music and Internet radio using an external amplifier
without having to turn on your screen.
You can also navigate the settings of the player (such as the video settings),
without a display screen. This is very useful if you have accidentally set the
player to a display mode that your display device does not support.
10
Z500 User Manual - Copyright © 2005-2006 Zensonic Corporation
Remote Control
1
2
3
4
6
5
8
9
7
12
10
11
13
14
15
17
18
16
21
23
25
19
20
22
24
1.
2.
3.
4.
5.
6.
7.
8.
9.
10.
11.
12.
13.
14.
15.
16.
17.
18.
19.
20.
21.
22.
23.
Eject Disc Tray
Standby On / Off
Alpha / Numeric Keyboard
Mute Sound
Joystick Option Selector
Volume Up
Volume Down
Up Arrow
Left Arrow
Right Arrow
Down Arrow
OK – Select Menu Option
Exit Current Screen
Go to Menu Screen
Rewind
Forward
Play / Pause
Previous Chapter / Item
Next Chapter / Item
Stop
Subtitle Selection
Slow Forward / Rewind
Display – toggle play time
/ filename display
24. Search – Time based
seek function
25. Illuminate Remote Buttons
Z500 User Manual - Copyright © 2005-2006 Zensonic Corporation
11
Remote Control - The Option Selector
On your Z500’s remote control is a
small joystick type controller for
accessing many of the options that are
available while using your Z500.
The advantage of having this stick
controller is that it can perform
different operations, depending on
what the Z500 is doing at the time.
The option joystick controller has four directions of movement, as well as
being a button that can be pressed to put you into the various options modes.
Some of the selections that the option button is used for include:
adjust volume
adjust brightness
adjust contrast
adjust colour saturation
select DVD angles
(on DVDs with alternate angles)
select subtitles
select audio tracks
set zoom level
adjust the pan when the picture is zoomed
All of these things can be accessed just by clicking on the option selector.
Click the option button to get to the option you want, and then move the option
stick left / right or up / down to make the changes.
12
Z500 User Manual - Copyright © 2005-2006 Zensonic Corporation
Zooming and Panning with the option stick
Press the option button until you see the Zoom option, then press left or right
to adjust the zoom level.
While zoomed in you can also pan the screen around to see the rest of the
picture. Press the option button until you see the Pan option, then the option
stick can be moved in all four directions to move the zoomed-in section
around.
Remote Control – Navigation
To navigate through the Z500’s menu and through file selection, you can use
either the option stick, or the arrow keys.
While in menu and file navigation mode, the option stick performs the same
function as the up, down, left and right arrow keys.
Pressing down on the option stick performs the same as pressing the ‘ok’
button on the remote control. (That is, the item is selected).
If you are playing a DVD, then the option stick performs other functions, such
as the zoom and colour controls as listed above.
For this reason, when navigating through DVD menus, you cannot use the
option stick for menu selection, only the arrow keys and the ‘ok’ button can be
used.
Using the letters on the remote for navigating a file list
The numbers on the remote keypad have letters assigned to them also.
These letters can be used for entering text (see next page).
The letters can also be used for a faster navigation method while in a file list.
For example, you can press the number ‘8’ to move to the first file in a list that
starts with the letter ‘T’.
Z500 User Manual - Copyright © 2005-2006 Zensonic Corporation
13
Remote Control - Entering Text
When using your Z500 remote control, there may be places in which you need
to enter text.
The Z500 has incorporated an alphanumeric style keypad so that you can
enter text when needed.
Text is entered via the remote control
in much the same way as you would
enter text using a mobile phone
keypad.
Keys need to be pressed multiple
times to enter the letter corresponding
to that key.
For example, to enter the letter “h”,
you would press the “4” button twice.
If you have a place to enter text while using your Z500, you would enter it the
following way.
To enter the text “test 5”, you would
• Press “8” once
- “t” is displayed
• Press “3” twice
- “e” is displayed
• Press “7” four times - “s” is displayed
• Press “8” once
- “t” is displayed
• Press “1” once
- a space is inserted
• Press “5” four times - “5” is displayed
• Press “OK” to accept the text
If you make a mistake at any point, you can use the “backspace” key to go
back and correct your input.
You can also use the “exit” button to exit from an input screen without
accepting the inputted text.
The DISPLAY button
You can bring up a pop up window while playing back video to see information
about the file and time elapsed by pressing the ‘display’ button on the remote
control.
14
Z500 User Manual - Copyright © 2005-2006 Zensonic Corporation
Connection Guide - Video
HDMI™
If your display device has a HDMI input, then for the best quality picture use
the HDMI interface output on the Z500.
The HDMI connector transports the video and audio streams as digital data
from the Z500 to your display device.
The HDMI interface is the only display output that will upscale protected DVD
content for high resolution display. (Display device must be HDCP compliant
to upscale protected DVD content)
With just one connector both high resolution video and audio can be delivered
to your display device.
Z500 User Manual - Copyright © 2005-2006 Zensonic Corporation
15
COMPONENT
The next best video display output after HDMI is Component Video.
Component Video is an analog video format and can be either Progressive
scan, or Interlaced.
Progressive Scan is the better of the output types, as every line on the display
device is drawn one after the other. With Interlaced, every alternate line on the
display is drawn on the first screen draw, and every other line is drawn on the
next screen draw.
Component Video splits the colour and brightness video signals into three
separate cables, giving a better picture quality.
If your display device supports Progressive Scan, then choose this as the
picture will appear clearer, particularly with moving objects.
Both Progressive Scan and Interlaced Component output use the three plugs
on the back of the player, marked as “COMP. VIDEO”.
Ensure that you match the colour coded cables with the colour coded
connectors on both the back of the player and the inputs to your display
device.
16
Z500 User Manual - Copyright © 2005-2006 Zensonic Corporation
SCART
(Syndicat des Constructeurs d'Appareils Radiorécepteurs et Téléviseurs)
The SCART connector is a combined analog audio and video connector.
If you wish to use the SCART output on the Z500, plug your SCART plug into
the SCART connector on the back of the Z500.
The SCART output on the Z500 supports RGB and component video outputs.
For best results with SCART, it is recommended to use a SCART to SCART
cable.
Z500 User Manual - Copyright © 2005-2006 Zensonic Corporation
17
S-VIDEO
S-Video is a video format that works by separating the colour and brightness
video signals into two parts, this results in less interference than you get with
the two combined (as is the case with Composite video).
If your display device has only Composite or S-Video inputs, then for the best
display results, it is recommended that you use the S-Video input.
COMPOSITE VIDEO
Composite Video is the standard video connector format.
It gets its name from the fact that all the colour and brightness video signals
are combined and passed through a single cable.
18
Z500 User Manual - Copyright © 2005-2006 Zensonic Corporation
Connection Guide – Audio
DIGITAL AUDIO
The Z500 supports Digital Audio output via either Coaxial or Optical Digital
Audio outputs on the rear of the player.
Digital audio can also be delivered via the HDMI interface.
If you have a Digital Audio Amplifier, supporting either Dolby Digital (AC3) or
DTS decoding, then using either of the Digital Audio outputs will provide you
with the best quality of sound to your amplifier.
With the Digital Audio outputs, the audio data is sent directly from the Z500 to
your amplifier as a digital data stream, and this is then decoded by your
amplifier with no loss of sound quality between the Z500 and your amplifier.
Z500 User Manual - Copyright © 2005-2006 Zensonic Corporation
19
ANALOG 5.1CH AUDIO
The Z500 provides for 5.1 channel analog audio outputs for analog audio
amplifiers that do not have digital audio inputs available.
The Z500 can decode Dolby Digital (AC3) and DTS audio and output it as 6
discrete audio channels to go to an amplifier that supports 5.1 channel inputs.
When connecting the cables, ensure that the cables are connected to the
same inputs on both the Z500 and the amplifier.
STEREO – 2CH AUDIO
The Z500 can down mix digital audio to an analog stereo audio output.
This can be fed to a stereo amplifier or your television.
20
Z500 User Manual - Copyright © 2005-2006 Zensonic Corporation
Connection Guide – Network
The Z500 provides the ability to connect to your home network via either a
wired network connection (RJ-45 Ethernet connector) or a wireless network
connection (802.11b or g).
For best network bandwidth, use the Ethernet connector on a 100Mbit
network.
WIRELESS
If using a wireless network connection, the best network bandwidth is
achieved over an 802.11g wireless network.
Locate your supplied wireless antenna, and screw it into the antenna
connector on the back of the Z500 making sure it is secure.
Then carefully turn the antenna so that it can be positioned in an upright
position.
Z500 User Manual - Copyright © 2005-2006 Zensonic Corporation
21
Setting Up
After you have plugged your Z500 into your display and audio devices, you
will need to make sure that the settings are configured correctly to ensure that
you get the best possible video and audio output.
Ensure that you have your display device switched on, then turn your Z500
High Definition Network DVD Player on.
You will be presented with the following screen:
Using the arrow keys on your remote control, navigate down to the “Settings”
button, and press “OK” on the remote.
You will then be presented with the Z500 Settings screen.
The “SETTINGS” menu allows you to set up all of the settings on the Z500.
22
Z500 User Manual - Copyright © 2005-2006 Zensonic Corporation
Language Setting
The first option in the settings menu is “Language”.
This allows you to choose the language that you want the Z500 to display in.
Choose “Language”, and then press “ok” on the remote control.
The currently selected language choice is shown in as boxed.
Using the arrow keys on the remote control, move the highlight bar down to
select the language of your choice, then press ‘ok’ on the remote control.
After you have made your choice, move the highlight bar down to “Apply
Settings” and press “ok” on the remote control.
This will save your setting to the player and return you to the “Settings” page.
If you wish to discard your changes, or simply exit this menu, just press “exit”
on the remote control, and your changes will be discarded.
You will then be returned to the “SETTINGS” page.
Z500 User Manual - Copyright © 2005-2006 Zensonic Corporation
23
Audio Settings
The Audio setting page allows you to configure how you want the Z500 to
treat audio streams on the player.
From the “SETTINGS” page, select “AUDIO” and press “ok” on the remote
control.
You can change each of the settings by highlighting an option (using the
arrow keys on the remote control, and pressing the ‘ok’ button to toggle the
selections.
Below are some examples of audio output settings.
Set the Output to 5.1 Surround and the Spdif
output to “Encoded Digital” to pass the audio to
an external digital audio amplifier as encoded
digital data via one of the digital audio outputs
on the Z500.
Set the Output to 5.1 Surround and the
Spdif output to “Analog / DPCM” to use
the Analog audio outputs on the back of
the Z500, or to send the audio as a PCM
stream from one of the digital audio
outputs on the Z500.
The Z500 can also down mix the audio to
stereo. Select Output, and press “ok” to toggle
the output setting to “Stereo (Downmixed)”
This screen shows the Z500 set to stereo output
on the analog audio output.
If you wish to discard your changes, or
simply exit this menu, just press “exit” on
the remote control.
If you have made any changes, you will be
prompted to confirm if you wish to discard
your changes.
When you have made your selections, highlight “Apply Settings” and press
“ok” on the remote control.
You will be returned to the previous menu.
24
Z500 User Manual - Copyright © 2005-2006 Zensonic Corporation
Video Settings
The Video settings page allows you to choose what video mode you wish the
Z500 player to output in.
Please be aware, that if you select resolutions higher than standard DVD
settings, the player will not be able to upscale the output of commercial copy
protected DVDs on the analog video outputs.
It will only be able to do upscaling of commercial DVDs via the HDMI port to a
HDCP compliant device. This is due to copy protection requirements.
Upscaling of all other video types can be done on both the analog and HDMI
video outputs.
To modify video settings, choose ‘Settings’ from the main menu, then select
‘Video’.
Video Output Resolution
You can select the output resolution for the player in the Video Settings page,
by highlighting the ‘TV Standard’ option at the top of the menu and pressing
the ‘ok’ button to toggle through the video modes.
The available video modes that the Z500 supports are…
Mode Setting
Output Resolution
Frames per Second
PAL
NTSC
NTSC Progressive
720x576
720x480
720x480
50 interlaced
60 interlaced
60 progressive scan
PAL Progressive
720x576
50 progressive scan
720p50
720p60
1080i50
1280x720
1280x720
1920x1080
50 progressive scan
60 progressive scan
50 interlaced
1080i60
1920x1080
60 interlaced
Please ensure that your TV supports the mode that you select.
If you cannot see a picture on your screen due to having selected a mode that
your screen does not support, you can still navigate to this menu using the
display on the front of the player.
Z500 User Manual - Copyright © 2005-2006 Zensonic Corporation
25
Video Settings – Continued
You can choose the TV screen setting type for correct aspect ratio playback of
video files.
Set TV Type to Wide Screen (16:9) if you
have a widescreen monitor.
This will ensure that 16x9 file types fill your
screen, and 4x3 files are pillar boxed.
Set TV Type to Standard (4:3) if you have a
standard shaped monitor.
This will ensure that 4x3 files fill your screen,
and 16x9 files are letterboxed.
This setting is to set the Color Space to RGB
mode.
This setting is to set the Color Space to YUV
mode.
The aspect ratio can be set for widescreen (16x9) or standard (4x3) TV types.
HDMI Mode
If you are using the HDMI output on the Z500, you can either let the player
auto detect the HDMI output resolution, or manually set it.
To manually set the mode highlight the ‘HDMI Mode’ option and press ok until
you get the resolution you want.
This option is only available if you are using the HDMI output port.
26
Z500 User Manual - Copyright © 2005-2006 Zensonic Corporation
Video Settings – Continued
Saving Your Settings
When you have finished making your selections, down arrow to “Apply
Settings” and press “ok” on the remote control.
The Z500 will pop up a window asking you to confirm that you wish to accept
the changes.
The player has a 10 second time out on the confirmation window, so if your
display device does not support the video mode that you have selected and
you see a blank or corrupted screen, you can wait for this timer to expire and
the player will revert back to the previous video mode.
Pressing “ok” on the remote control will also revert back to the previous video
mode, as the default answer to the confirmation window is “NO”.
Selecting “Yes” at the confirmation window will save the setting, and return
you to the “SETTINGS” page.
Discarding Your Settings
If at any stage during this process you wish to discard your changes press the
‘exit’ button on the remote control.
The player will ask you to confirm that you wish to discard your changes and
take you back to the previous screen.
Z500 User Manual - Copyright © 2005-2006 Zensonic Corporation
27
Network Setup
To access files or internet based media over your network, you will need to
connect your Z500 to a network and configure it.
The Z500 supports the automatic acquisition of IP addresses from DHCP
server devices to make setting up your player easy.
If you leave the network settings to “Auto”, the player will attempt to acquire
the network settings from a DHCP server in your local network.
A DHCP server is a server or device that is designed to make TCP/IP network
configuration easy.
Most Broadband Internet routers also act as DHCP servers on a local
network. Consult your routers manual if you are unsure if it supports this
function, and for instructions on how to set it up.
If you wish, you can also enter the IP address manually.
You can choose whether you wish to use the Wired or Wireless network.
(To use a wireless network, you will need a wireless access point on your
network)
28
Z500 User Manual - Copyright © 2005-2006 Zensonic Corporation
Choosing the Active Network Device
You will need to set the network that you wish to use.
This can be…
Wired
Wireless
None
10/100 Mbit/s Ethernet connection
802.11b/g Wireless connection
No network connection
To choose your network...
1. From the “SETTINGS” page, choose
“Network” then press “ok” on the remote
control.
2. Select “Active Network” and press “ok” on
the remote control.
3. Choose the network type you wish to use.
The currently selected network is outlined.
4. Arrow down to “Apply Settings” and press
“ok” on the remote control.
You will be returned to the “SETTINGS”
screen.
If you change the Active Network Interface from Wired to Wireless, or
Wireless to Wired, you will be required to restart your player.
The player will prompt you for this.
Z500 User Manual - Copyright © 2005-2006 Zensonic Corporation
29
Wired Network Setup
1. Select “Settings” from the start screen
2. Choose “Network”
3. Choose “Wired Network”
4. All settings default to “Auto”.
To manually change a setting, highlight the
selection and press “OK” on the remote.
5. A pop up window will appear.
Using the keys on your remote control, enter
your desired IP address.
6. Configure your other network settings,
such as the Subnet Mask, Gateway and DNS
Server settings
7. Select “Apply Settings” to save.
30
Z500 User Manual - Copyright © 2005-2006 Zensonic Corporation
Wireless Network Setup
To work in a wireless network your Z500 you will need to configure a few
things such as the name of your wireless access point and your WEP key.
WEP (Wired Equivalent Privacy) uses keys at both the access point, and the
device connecting to the access point to provide a means of data encryption
between the wireless network devices.
The Z500 can use either 64bit or 128bit WEP protection.
Apart from the WEP Key and the access point, IP configuration for the
Wireless Network is the same as it is for the Wired Network.
Use “Auto” for the IP settings to acquire an IP address from a DHCP server,
or manually configure them.
Below is how to set the WEP key and access point in the wireless setup…
1. Select “Settings” at the start screen
2. Select “Network”
3. Select “Wireless Network”
4. Highlight “WEP Key” and press “OK”
A pop up window will appear.
Enter your WEP key matching the one set at
your wireless access point using the keys on
your remote control.
Z500 User Manual - Copyright © 2005-2006 Zensonic Corporation
31
Wireless Network Setup - continued
In the Wireless Network setup screen you can scan for wireless access points or type
in your access points SSID name.
Highlight “Access Points” and press ‘ok’ to
enter the Access Point sub menu.
The player will list nearby access points and
their signal strength. Highlight one and press
‘ok’ to select it.
Choose ‘Any’ to have the player automatically
select the nearest access point.
Highlight “Custom” and press ‘ok’ if you wish
to type in your access points SSID name.
(SSID names are case sensitive).
Use your remote keypad to enter the name
and press ‘ok’ to save it.
Press ‘exit’ to cancel.
Select “Apply Settings” to save your settings.
32
Z500 User Manual - Copyright © 2005-2006 Zensonic Corporation
Windows Network (SMB) Setup
Before you can browse a SMB network, you need to configure your computer
and workgroup names.
Your workgroup name needs to be the same as is set on your computers in
your local network. Your computer name must be unique on the network.
To set your computer and network names:
1. Choose “Settings” from the start menu
2. Choose “Windows Network”
3. Highlight “Computer Name”, and using
your remote control, enter a name for your
Z500 that is unique on the network.
4. Highlight “Workgroup” and enter your
workgroup name.
This needs to be the same as your local
network setting. (see next box)
Z500 User Manual - Copyright © 2005-2006 Zensonic Corporation
33
Windows Network (SMB) Setup - continued
Ensure your workgroup name matches what
you have set on your computers in your
network.
This example is from a Windows XP
computer.
5. Select “Apply Settings” to save your
settings and exit.
Your Z500 player is now configured for network access, and may access files
that are shared on your local network and access internet content.
Using SMB Network Shares
•
•
34
The maximum size of a file to be played back via a SMB network share is
2GB.
Please use a UPnP media server (such as the supplied TwonkyVision) if
you wish to playback files greater than 2GB in size.
Also, please use a UPnP media server to play back high definition, high
bitrate video streams due to SMB bandwidth limitations.
Z500 User Manual - Copyright © 2005-2006 Zensonic Corporation
DVD Setup Options
In the “Settings” page, you can also set options for how the player will treat
DVDs that are inserted into the player.
These settings are to select such things as the default aspect ratio, subtitle
format etc.
1. From the “SETTINGS” page, select
“DVD Setup” and press “ok”
2. Choose “Aspect Ratio”, press “ok” to
select the aspect ratio you desire.
Options are “Widescreen”, “Pan and
Scan” and “Letter box”
3. Select “Subtitles” and press “ok” to select
the default subtitle language to be displayed
when playing a DVD.
4. If you wish to apply a Parental Ratings
Level Lock on what content can be played on
the player, select “Parental Level” and press
“ok” to select the highest content ratings level
that can be played without using the Parental
Key.
Z500 User Manual - Copyright © 2005-2006 Zensonic Corporation
35
DVD Setup Options - continued
5. If you set the “Parental Level” to a setting
other than “Off”, and you put a DVD disc in
with a higher rating than that specified, you
will be prompted to type in a key to override
the level selection.
To set this key, highlight “Parental Key” and
press “ok”.
You will then have the ability to enter the
override key.
6. The “Region” option is to display what
region DVD discs your player can play.
This is for your information only and cannot
be changed.
7. When you have made all of your
selections, arrow down to “Apply Settings”
and press “ok” to save them and exit.
If you press “exit” on the remote control at any time in this screen, you will exit
this setup screen.
If you have made any changes, you will be prompted to confirm that you wish
to discard the changes before exiting.
An additional menu setting has also been added – “Override TV Standard”.
The options are “yes” or “no”.
Set to “Yes”, if you would like the aspect ratio setting in the DVD setup section
to override the TV Type setting made in the “Video” settings section of the
main settings menu.
Set to “No” if you would like the player to just follow the TV Type setting.
36
Z500 User Manual - Copyright © 2005-2006 Zensonic Corporation
General Settings
Options not covered by the previous settings pages are accessible from the
“General” settings page.
From the “SETTINGS” page, select “General” and press “ok” on the remote.
Available options are:
•
CD/DVD/VCD Autoplay
To choose to have the player Automatically play these discs when they are
inserted, set this option to “On”
•
Volume Controller
You can choose whether you want the Volume Controller turned On or Off.
Set this option to off if you are going to use the volume controls only on your
amplifier or display device.
Setting to on means that the Z500 volume controls can be used to reduce the
volume of the signal output from the Z500 to your amplifier or display device.
•
GUI Animations
Select ‘Disabled’ if you would like to turn off the animation of pop up windows
and the user interface.
•
Picture Slideshow Interval
Use to set the amount of time you wish for pictures to be displayed while doing a
slideshow.
•
Statusbar
Allows you to set what messages will appear on the screen while using you
player.
You can use ‘None’ if you want no messages displayed, or one of ‘All’, ‘System
Messages’, ‘Track Info’
Screen Saver
The Screen Saver option allows you to select the timeout interval for when the
screen saver will activate.
Set to “Off” to disable the screen saver, or select a time interval for it to activate
at. (The options are Off, 1, 2, 3, 4, 5, 10, 15 or 20 minutes)
The screen saver will not activate while video is being played, but will activate if
the video playback is paused for the amount of time selected here.
If the screen saver is active, you can press any key on the remote or front panel
to deactivate it.
•
If you press “exit” on the remote control at any time in this screen, you will exit
this setup screen.
If you have made any changes, you will be prompted to confirm that you wish
to discard the changes before exiting.
Z500 User Manual - Copyright © 2005-2006 Zensonic Corporation
37
Firmware Updates
The Z500 supports the ability to upgrade the firmware for updates to the
player’s firmware.
These updates can be installed from disc, network file or directly from
Zensonic via the Internet (with a working network and Internet connection).
From the Firmware Update selection on the “SETTINGS” page, you can view
the current firmware version, or perform the upgrade.
Performing Firmware Upgrades
Available firmware upgrade methods are via Internet (Web) or Disc.
Please make sure you have a stable Internet connection if updating from Web.
You can press “exit” on the remote if you wish to exit this page without
performing any functions.
Important Firmware Upgrade Notes
•
•
•
•
•
•
•
38
It is very important to read and correctly follow all instructions when
upgrading the firmware on your player. Failure to follow the instructions
could render your player unusable. Please ensure you check and
follow the instructions and any on screen prompts when doing this.
Do not under any circumstances disconnect power from the player
during a firmware upgrade. To do so will cause the player to no longer
function.
Always wait for the player to fully complete the firmware upgrade
before restarting the player.
The firmware update can take anywhere between 3 and 25 minutes
depending on the size of the update.
When erasing parts of the firmware the screen will flash green, this is
normal.
If you are using the HDMI video output, the screen may go blank during
the update.
If in any doubt about this process, you can submit a support ticket at
the Zensonic Online Helpdesk: www.zensonic.com/helpdesk
Z500 User Manual - Copyright © 2005-2006 Zensonic Corporation
Additional Setup Items
Information Screen
You can bring up information regarding your player by choosing ‘Info’ from the
Settings screen.
This lists information like the current firmware revision, current active network
card, IP address of the player etc.
Restore Factory Default Settings
In the Settings page you can choose to Restore the factory default settings for
the setup options.
1. Go to ‘Settings’
2. Scroll down to ‘Restore Factory Defaults’
3. Press ‘ok’
4. Choose ‘yes’ to confirm.
Z500 User Manual - Copyright © 2005-2006 Zensonic Corporation
39
Using Your Z500
Turning on the Z500 will present you with the following screen.
This is the main screen from which you can choose your options.
From here you may use the arrow keys on your remote control or the option
stick to select the type of media you wish to play, change your player’s
settings, or access some extra features.
You can use the arrow keys or the option stick to move through any of the
menus or to navigate the file lists.
40
Z500 User Manual - Copyright © 2005-2006 Zensonic Corporation
MUSIC
Pressing the “OK” button on the remote control when “MUSIC” is highlighted
will take you into the music section.
From here you can select from what source you would like to access your
music.
• CD/DVDROM drive
• USB Device (mass storage devices only)
• Windows Network Style Shares (SMB)
• Web Radio (SHOUTcast)
• Media Servers (UPnP)
Using the arrow keys on the remote control, select your music source.
(In this case, the CD/DVDROM drive was selected)
Z500 User Manual - Copyright © 2005-2006 Zensonic Corporation
41
MUSIC - continued
You may then navigate through the file structure of the selected source to find
what music you wish to play.
Only music files with supported file extensions will be listed.
Highlight the file, and press “OK” on the remote control.
The selected file will then play.
You can press “exit” on the remote control at any time to take you back one
layer at a time, or press “menu” to take you back to the start screen.
You can start music playing and continue to have it playing while navigating
through the folders to find a different song.
You can also start a music track playing and the music will keep playing while
you view photos. (If you select to play a video, the music will stop playing.)
If there is more than one file in a folder, the player will automatically move on
to the next file and start playback of that file.
You can press the stop button to stop music playback from any menu screen.
42
Z500 User Manual - Copyright © 2005-2006 Zensonic Corporation
VIDEOS
Playing back video is just as simple as selecting an audio file.
At the home menu screen, just choose “Videos”.
Once “VIDEOS” is selected, press “OK” on the remote control.
You will be asked to choose the source that you will be playing your files from,
and then navigate through until you select the file you wish to play.
Only video files with filename extensions that are supported will be listed.
If there is more than one file in a folder, the player will automatically move on
to the next file and start playback of that file.
Z500 User Manual - Copyright © 2005-2006 Zensonic Corporation
43
PICTURES
You can display digital pictures by selecting “Pictures” from the home start
screen.
Once you have highlighted “Pictures”, press “OK” on the remote control.
Choose the source device, and then navigate the file system to your photos.
Pressing “OK” on a file will display it.
In “Pictures” mode, only files with supported picture type file extensions will be
listed.
If there is more than one picture in a folder, the player will automatically move
on to the next picture and display it. (Time delay is set in the settings menu)
44
Z500 User Manual - Copyright © 2005-2006 Zensonic Corporation
EXTRAS
If your Z500 is connected to a home network with access to the Internet you
can make use of some useful extra features.
Just select “Extras” from the home start menu and press “OK” on the remote
control.
You will then be presented with the Weather Channel weather forecast.
You can highlight “edit” and press “ok” to type in your location.
You can also choose what measurement format you wish the readings to be
displayed in.
Z500 User Manual - Copyright © 2005-2006 Zensonic Corporation
45
UPnP Media Servers
Your Z500 comes shipped with two popular UPnP based Media Server
utilities.
These include:
•
•
Twonkyvision
Windows Media Connect
By using your Zensonic Z500 High Definition Network DVD Player in
conjunction with a UPnP media server, you can deliver more media content to
your Z500 than the player can play on its own.
Depending on the UPnP server software you use, you can deliver additional
streaming audio and video, transcode video formats that the Z500 cannot
natively support into a format it can play and gain access to additional
functionality.
The UPnP media server software needs to be installed and configured on a
PC on your local network.
Then all you need to do is tell the UPnP software what you want to make
available to your UPnP device.
When you are given a choice of sources all you need to do is select “Media
Servers (UPnP)”.
You will then be given a list of available UPnP media servers in your network.
Choose the one you wish to connect to, and start accessing its resources.
The content available is limited to what your UPnP media server can deliver.
Please note:
If you are using any firewall software on the PC that is acting as a UPnP
media server please ensure that the firewall software allows the passage of
network traffic for the port that the UPnP is serving the data on.
If you do not do this, the player may not see the UPnP server due to the
firewall software blocking the network data.
Examples of firewall software are programs such as Sygate Personal Firewall,
ZoneAlarm and (in Windows XP SP2 and higher) Windows Firewall.
You may need to consult the manual for your firewall software if you need to
do this.
46
Z500 User Manual - Copyright © 2005-2006 Zensonic Corporation
UPnP Media Server Browsing
Below is an example of using a UPnP server to browse for music.
1. From the main screen, select music,
then at the “Choose Source” screen
choose “Media Servers(UPnP)” and press
“ok”
2. You will be presented with a list of UPnP
media servers on your network.
Choose one and press “ok”
3. The UPnP server will then give you a list
of options to choose from. The list is sent
by the UPnP server software.
In this example, choose “Music” and “ok”
4. The UPnP server will then present you with a
list to choose from. The types of items available
will depend on the UPnP server software that
you are using.
Here, we chose to browse by folders.
5. Once you have browsed and selected
the folder that you wish to play, choose
your song and press “ok” to play it.
Z500 User Manual - Copyright © 2005-2006 Zensonic Corporation
47
Browsing SMB Network Shares
Your Z500 has the ability to browse SMB network shares to make it easy for
you to play content that you have stored on computers on your network.
Once your network is configured and you are connected to your local network,
all you have to do is choose “Windows Network (SMB)” when you are
choosing your media source.
1. Select “Videos” from the start screen
2. When prompted for a source,
choose “Windows Network(SMB)”
3. A list of your “Neighbour” computers on
your local network will be shown.
Choose the computer you wish to browse.
4. A list of available shares on that computer
will be shown.
Choose the share that has your files on it.
5. Browse the folder list, choose the file you
wish to play, and press “OK” to play it.
Please note that some High Bandwidth Video may not play smoothly from
SMB shares. It is recommended to use a UPnP server for this content.
48
Z500 User Manual - Copyright © 2005-2006 Zensonic Corporation
SHOUTcast Radio
Your Z500 High Definition Network DVD Player comes with some
preconfigured SHOUTcast Internet radio stations, so you can start accessing
Internet radio straight away.
All you need is your Z500 connected to your local network that has Internet
access.
1. Choose “Music” from the start screen.
2. When prompted for a source,
Choose “Web Radio(SHOUTcast)
3. You will be given a choice of categories to
choose from. Choose one and press “OK”
4. Choose a radio station and press “OK”
The chosen radio station will start streaming.
Please note that you must have the Z500 connected to network with access to
a working Internet connection for SHOUTcast radio to work.
If you are using a firewall on your network, to use Shoutcast Radio you may
need to open the ports on your firewall for the radio stations to work.
For example EYE97 is fs-eye97.fast-serv.com:80 (port 80)
Please check the stations web site to check what port they use.
This does not affect normal users with standard routers and NAT, only those
using specific firewall devices.
Please be aware that when you are using Internet based functions like
SHOUTcast radio the player is downloading data from the Internet.
A typical 128kb/s radio stream will use 45Mbytes per hour or more.
If you are on an Internet plan with a set data download limit that involves
excess charges or speed shaping please be aware of what your limits are
when utilising these features.
Z500 User Manual - Copyright © 2005-2006 Zensonic Corporation
49
USB Port
The Z500 incorporates a USB 2.0 connection on the front of the player for
your convenience.
The USB port supports USB thumb drives and USB Hard Disc Drives.
The devices must appear as a mass storage device.
Once you have plugged your USB mass storage device into your Z500, you
may use it simply by selecting it in the “Choose Source” section after you have
chosen the type of media you wish to play.
Highlight the “USB Device” selection and press “OK”.
You will then be able to browse your mass storage device.
The USB device must be in FAT or NTFS format, and must be a USB mass
storage device.
Please note that the NTFS support is experimental and there is no official
support for it, use at your own risk.
Please note that the USB port on the Z500 supports USB 2.0 mass storage
devices only.
50
Z500 User Manual - Copyright © 2005-2006 Zensonic Corporation
Seek and Search Functions
The Z500 incorporates some seek and search functions for navigating within
your video files.
These are different depending on what type of video is being played, and can
be accessed via either the option stick (not with avi) or the ‘search’ button on
the remote control.
With video files the Z500 provides a time based seek function.
• start the file playing
• press ‘search’
• enter the time to go to and press ‘ok’
With certain video formats (eg WMV) you can use the option stick to do a
percentage based seek (via the option stick).
With DVDs you can do a time based seek (via the option stick or the
‘search’ button).
Z500 User Manual - Copyright © 2005-2006 Zensonic Corporation
51
Troubleshooting
Problem
No Picture
Possible Cause
• Z500 not plugged in
• Z500 not switched on
• Video cables not
connected
Network Not
Working
Wireless Network
Not Working
Z500 cannot obtain
IP address
52
•
•
•
•
Wrong network type
selected
•
•
IP address settings
incorrect
•
•
Cable not plugged in
•
•
Wireless access point
not working
•
•
WEP encryption is
enabled and the WEP
key is incorrect
•
•
Incompatible wireless
adapter
•
•
Wireless signal is too
weak
•
•
DHCP server not
running
•
Check power cable
Check power switches
Ensure the video cables
are connected between
the player and the Z500
Ensure that you have
selected the correct
network type
Check your IP settings in
the Network settings
page
If using wired network,
check the network cable
is plugged in on both the
Z500 and your network
hub. A link light should
show up on the Z500 if
the cable is connected
correctly
If using wireless
network, check that your
wireless access point is
powered on
Ensure that you have
entered the correct WEP
key for you access
router
Ensure that your
wireless router supports
802.11b/g
Adjust the wireless
antennas for better
signal, or move either
your wireless router or
Z500 for better reception
Ensure that there is a
server or device that
acts as a DHCP server if
using the auto setting in
the network settings
page.
Z500 User Manual - Copyright © 2005-2006 Zensonic Corporation
Troubleshooting continued
Problem
Possible Cause
Remote Control Not
• No batteries, or flat
Working
batteries
•
Infra Red Receiver on
Z500 obstructed
File does not play
•
Encoding problem
Cannot find UPnP
Server
•
UPnP Server not
running
Some files do not
display
•
File format is not
supported
No Sound
•
Audio cables not
connected
•
Wrong output type
selected
•
Non supported device
•
Non supported
partition type
USB device not
found
Solution
• Ensure that there are 4
AA size batteries in the
remote control and they
are inserted the correct
way around
• Replace the batteries
with a fresh set
• Ensure that the display
on the front of the Z500
is not obstructed by any
objects, as the IR
receiver for the remote
control is in there
• Check that the file you
are attempting to play is
encoded in a format that
is supported by the Z500
• Ensure that the PC
running the UPnP server
software is powered on
and that the UPnP
server software is
running
• Check that the file you
are trying to find has a
supported file extension
and is a format that the
Z500 supports
• Ensure that the audio
cables are connected
correctly between your
Z500 and your audio
device
• Ensure that you have
selected the correct
output type for your
audio connections
• Ensure that the device
you are connecting is a
“Mass Storage Device”
• Ensure that your device
is formatted as either
FAT32 or NTFS
Z500 User Manual - Copyright © 2005-2006 Zensonic Corporation
53
Glossary
Term
TCP/IP
Description
Network data transmission format using unique numbers to identify
devices on the network
IP address
Term for referring to the unique number used for a device on a TCP/IP
network
WEP
Wired Equivalent Privacy – an encryption method for wireless network
communications
UPnP
Universal Plug and Play
DHCP
Dynamic Host Configuration Protocol – a method for automatically
configuring devices using TCP/IP network protocol
SHOUTcast A Winamp based distributed audio system for Internet radio
broadcasting. A trademark of www.shoutcast.com
MP3
A file extension for MPEG1 audio layer 3 – sometimes also used to
refer to a digital audio file
WAV
A file extension for a sound file format developed by IBM and Microsoft
AIFF
Audio Interchange File Format
WMA
Windows Media Audio file
WMV
Windows Media Video file
M3U
A play list file supported by Winamp software
PLS
A play list used by SHOUTcast and other audio streams
AVI
Audio Video Interleave – a file extension (as in .avi) used by a number
of different encoding programs. Sometimes used to refer to a file
encoded with any number of Mpeg 4 formats
JPG
Joint Photographic Experts Group a format used for compressing
digital pictures – sometimes used to refer to a digital photograph
GIF
Graphics Interchange Format – a format used for compressing digital
pictures
BMP
Image Bitmapped graphics Format – an uncompressed picture format
PNG
Portable Network Graphics – another picture format
TIFF
Tagged Image File Format – another picture format
XviD
A video format that is MPEG 4 complaint
MPEG
Moving Picture Experts Group
MPEG-1
A video encoding format – relatively low in compression and quality,
used for VCDs
MPEG-2
A video encoding format – used in DVDs and other formats (such as
Digital TV transmission) better quality and compression than MPEG-1
MPEG-4
A video encoding format – depending on the encoding method, can
produce a good quality video file with a much better compression than
MPEG-2, resulting in a much smaller file size
QuickTime
A video compression format developed by Apple Computer
Access
A term used in wireless network communications to refer to the device
Point
that acts as a hub for wireless data communications
WEP key
A 64 or 128 bit key number that is set on both the wireless access
point and the wireless device to ensure that the device is allowed to
use the wireless network
ISO
ISO 9660 is the file system format of a CD-ROM. An ISO file is an
‘image’ file that represents the contents of a CD-ROM.
IFO
DVD information file containing details about chapters, titles and audio
tracks.
54
Z500 User Manual - Copyright © 2005-2006 Zensonic Corporation
Technical Specifications
Environmental:
•
Operating Temperature: 0°C – 45°C
•
Storage Temperature: -25°C – 55°C
•
Operating Humidity: 10% to 95% non condensing
•
Operating Voltage: Auto switching 110V 60Hz / 240V 50Hz
Outputs:
•
HDMI™ Digital Audio and Video with HDCP
•
RCA Video
•
RCA Audio
•
S-Video
•
Component Video
•
SCART Analog Audio and Video
•
Optical Digital Audio
•
Coax Digital Audio
Network:
•
802.11g Wireless (supporting up to 54Mbps transfer rate)
•
10/100Mbps Ethernet port
•
DHCP assigned or Static IP addresses
Wireless Security:
•
Hardware based WEP (wired Equivalent Privacy)
•
64bit or 128bit WEP encryption
Z500 User Manual - Copyright © 2005-2006 Zensonic Corporation
55
FCC Regulations
FCC Class B Statement
This device complies with Part 15 of the FCC Rules. Operation is subject to the following two
conditions:
•
•
This device may not cause harmful interference.
This device must accept any interference received, including interference that may
cause undesired operation.
Warning: This equipment has been tested and found to comply with the limits for a Class B
digital device, pursuant to Part 15 of the FCC Rules. These limits are designed to provide
reasonable protection. This equipment generates, uses and can radiate radio frequency
energy and, if not installed and used in accordance with the instructions, may cause
interference to radio communications. However, there is no guarantee that interference will
not occur in a particular installation. If this equipment does cause harmful interference to radio
or television reception, which can be determined by turning the equipment off and on, the
user is encouraged to try to correct the interference by one or more of the following
measures:
•
•
•
•
Reorient or relocate the receiving antenna.
Increase the separation between the equipment and receiver.
Connect the equipment into an outlet on a circuit different from that to which the
receiver is connected.
Consult the dealer or an experienced radio/TV technician for help.
FCC RF Radiation Exposure Statement
The antenna used for this transmitter must be installed to provide a separation distance of at
least 20 cm from all persons and must not be co-located or operating in conjunction with any
other antenna or transmitter.
Notice: Changes or modification not expressly approved by the party responsible for
compliance could void the user’s authority to operate the equipment.
FCC ID: T3AZ500
56
Z500 User Manual - Copyright © 2005-2006 Zensonic Corporation
Warranty
Zensonic Corporation warrants that the product is free of defects in material and workmanship
for a period of 12 months from the date of purchase. Zensonic does not cover damage or
failure due to misuse, abuse, faulty installation or modification. This warranty does not extend
to defects resulting from normal wear and tear.
All express and implied warranties for the product including, but not limited to, the warranties
of merchantability and fitness of a particular purpose are limited in duration to the above
period.
The standard software supplied with this product is provided “as is”, and Zensonic does not
guarantee that the software is free of defects. The software supplied may not be suitable for
all intended uses by the end user.
Limitation of Liability
So far as the law permits Zensonic Corporation and its distributors shall not be liable in any
way whatsoever for any indirect or consequential loss, or loss of profit or any liability for
damage to property or death or injury to persons howsoever caused including, but not limited
to, any loss by reason of delay, defective or faulty products or workmanship, negligence or
any act, matter or thing, done permitted or omitted by Zensonic Corporation and its
distributors.
For more information, Forum support and updates please visit us at www.z500series.com
Zensonic technical support is available online: www.zensonic.com/helpdesk
© 2005-2006 Zensonic Corporation.
All Rights Reserved. All Trademarks or Trade names are those of their respective owners.
This product is covered by certain intellectual property rights of Microsoft and cannot be used
or further distributed without a license from Microsoft.
Z500 User Manual - Copyright © 2005-2006 Zensonic Corporation
57