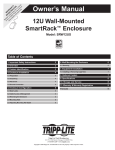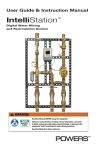
1
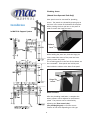
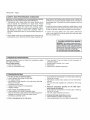
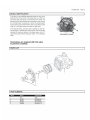
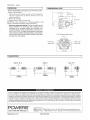
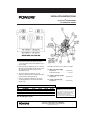
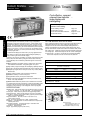
SURGICAL SCRUB SINKS
INSTALATION-OPERATION-MAINTENANCE
USER MANUAL
California OSHPD
Pre-approved
Mac Medical
820 S Mulberry St.
Millstadt, IL 62260
(618) 476-3550 phone
(618) 476-3337 fax
November 2007
WARNINGS AND CAUTIONS
Following is a list of the safety precautions, which must be observed when operating this
equipment. WARNINGS indicate the potential for danger to personnel, and CAUTIONS
indicate the potential for damage to equipment. These precautions are repeated (in whole
or in part), where applicable, throughout the manual. It is important to review these
precautions before using the equipment.
WARNING-INJURY HAZARD:
REPAIRS AND ADJUSTMENTS should be only attempted by experienced mechanics fully
acquainted with this equipment. Use of inexperienced, unqualified persons to work on the
equipment or the installation of unauthorized parts could cause serious personal injury or
result in costly damage.
TWO PEOPLE ARE REQUIRED to mount the sink to the wall.
________________________________________________________________________
WARNING-BURN HAZARD:
DO NOT CHANGE Temperature settings on thermostatic mixing valve, unless you are a
trained mechanic.
ANY REPAIR or modification of mixing valve may affect the high temperature setting.
The installer must check operating temperature before sink is back in operation.
________________________________________________________________________
CAUTION-POSSIBLED EQUIPMENT DAMAGE:
When cleaning the sink, use a non-abrasive polish. Rub in a back and forth motion in the
same direction of the surface grain.
1
GENERAL SPECIFICATIONS
1.
MATERIAL:
SINK BASIN: 14 GAUGE, 304 STAINLESS STEEL
SINK SKIRT: 18 GAUGE, 304 STAINLESS STEEL
2.
ALL PLUMBING ½” COPPER OR BRASS PIPE.
THE SINK WILL BE FURNISHED WITH IN LINE CHECK VALVES ON SUPPLY LINES.
3.
UTILITY REQUIREMENTS:
* COLD WATER: 20 TO 50 PSIG 70 DEG F MAX
* HOT WATER:
20 TO 50 PSIG 120 DEG F TO 140 DEG F
* IT SHALL BE THE CUSTOMERS RESPONSIBILITY TO INSURE BY USE OF PRESSURE
REQULATORS OR OTHER MEANS THAT MAXIMUM SPECIFIED PRESSURES ARE NOT
EXCEEDED.
* WATER LINES SHOULD BE FLUSHED CLEAN BEFORE WATER CONNECTIONS ARE MADE.
* IT SHALL BE THE CUSTOMERS RESPOSIBILITY TO ENSURE THAT WATER SUPPLIES ARE
PROPERLY PROTECTED FOR INTERNAL CROSS CONNECTION CONTROL IN ACCORDANCE
WITH LOCAL BUILDING AND PLUMBING REQUIREMENTS.
* IT SHALL BE THE CUSTOMERS RESPONSIBILITY TO ELIMINATE WATER HAMMER
CONDITIONS SHOULD THEY OCCUR IN THE SERVICE PIPING.
4.
POWER REQUIREMENTS (FOR SENSOR OPERATIONS):
120 VOLT, 60 Hz, SINGLE PHASE, 15 AMP GFIC PROTECED ELECTRICAL OUTLET (BY
OTHERS), INSTALLED PER LOCAL BUILDING CODES.
5.
6.
NET WEIGHT OF SINK IS 130 LBS SINGLE BASIN, 230 LBS DOUBLE BASIN,
320 LBS TRIPPLE BASIN.
SINK IS “UL” AND “CUL” RECOGNIZED.
7. SINK IS CALIFORNIA “OSHPD” PRE-APPROVED WHEN MOUNTED ON A STRUCTUALLY
SOUND WALL.
2
Installation
1. Carefully uncrate the scrub sink.
The mounting hardware is under the sink, secured
to the shipping materials. Be sure to remove all
hardware before discarding packaging.
2. Install “Z” bracket(s) to wall.
Recommended mounting specifications shown to
right.
Note: For wall-mounted units the wall structure
must be capable of supporting the load. The inwall support system is recommended for
installation in areas where wall stregnth is
insufficient. (See Next Page)
3. Install sink support brackets.
Hint: With the help of an assistant hang the sink
from the “Z” brackets before drilling for the wall
support brackets. With the sink in place mark the
proper position for the brackets. Remove sink and
finish installation of brackets.
4. Check supply and waste terminal location.
Be sure all connections are safely accessible and in
proper working condition.
(See Supply Location Diagram/Page 5)
NOTE: For proper sink operation the hot water
temperature must be 120 degrees F.
5. Install the soap spout. (See page 7)
6. Install the sink body.
With the help of an assistant slide the sink back
down over the “Z” bracket until it locks securely
into place.
3
Plumbing Access
(Manual Knee Operated Sinks Only)
Knee panels must be removed for plumbing
access. The panels are released by pressing up on
the lever in the center of the bottom of the panel.
While pressing the lever pull out on the panel in
order to access the hinge pin levers.
Installation
In-Wall Sink Support System
Release
Lever
While holding the panel out, slide the hinge pin
levers toward the center of the panel and completely remove the panel.
The remaining panels in the face of the cabinet are
also removable. These panels are held by two
bolts inside the cabinet at the base of the panel.
Hinge Pin
Levers
Water Pressure
After the plumbing installation is complete the
water pressure can be adjusted to avoid excess
splash. The pressure can be controlled by
adjusting the (flow control valve).
(See plumbing diagram) to find the correct
location of the valve depending on sink type.
4
Plumbing Diagram
Infra Red Self-Activated Sinks
Manual Knee Operated Sinks
3
9
6
3
1
2
7
2
1
6
11
7
4
5
10
5
4
Water Supply Locations
8
For double and triple sinks all dimensions are
equal to diagram, relative to sink basin.
5
Replacement Parts
ItemNo.
1
2
3
4
5
6
7
8
9
10
11
Description
ThermostaticMixingValve
ValveHandle
CheckStopStrainer
FlowControlValve
CheckValve
Spout
SwivelAerator
KneeOperatedWaterValve
SolenoidValveForInfraRed
InfraRedSensor
TimerSolenoid
KneeOperatedSoapPump
ThighOperatedSoapPump
SoapDispensorSpout
SinkDividers
ScrubTimers
6
PartNo.
S0009
S0010
S0011
S0024
S0131
S0132M
S0032
S0029
S0013
S0012
S0130
S0028
S0030
S0041
S0034
S0050
Soap Dispenser Install
To prevent damage the soap dispenser is stored
inside the rear of the sink cabinet during shipping.
The dispenser head should be installed before
hanging the sink.
Infra Red Controls
Installation
The sink is supplied with a 24V Power
transformer that connects to a standard duplex
outlet. (110/120 V outlet required). Plug the
transformer into the outlet. A red led will flash
in the sensor window. It is important to not
interrupt the sensor beam until the light turns
off.
Spout
during
shipping
Infra red sensor centered on
spout on each sink bay
Optional thigh operated
soap pump
Operation
Spout installed
To Install:
The sensors are pre set and equipped with a
logic board. The sensor determines the range
during the initialization period. (The time after
initial power until the light turns off.
Approximately 5 minutes) the range is
approximately 12-14" in front of the sensor and
is 25 degree at peak.
During the initialization period, the sensor
allows for fixed objects that may be within the
sensors range. The sensors are equipped with a
2 second on/off delay and no time out feature.
This prevents the sink from turning on when
walking past at a normal pace and no time out
allows for an uninterrupted scrub.
Remove the nut from the spout. Feed the spout
through the hole in the header from inside the
cabinet and reinstall the nut. Attach soap tubing
as seen below.
7
INSTALLATION INSTRUCTIONS
HydroGuard® ACCESSORIES
1/2" CHECKSTOP VALVES
Form II129-028 v4
INSTALLATION INSTRUCTIONS
1. Connect the stop valves to the mixing valve with a
1-1/16" (27mm) wrench. Be sure the adjustment screw
(2) is accessible.
2. Before inspecting or replacing the disc (3), or seal rings
(6), and (7), the water supplies must be shut off at some
other point. Remove the bonnet (4) with a 15/16"
(23.8 mm) hex wrench.
3. The bonnet seal ring (7) and the disc (3) can be
inspected or replaced. The disc retaining screw (5) must
be removed before replacing the disc (3).
4. To inspect or replace the adjustment screw ring (6),
unscrew the adjustment screw (2) from the bottom of
the bonnet (4).
Part numbers shown below are for a pair of checkstops:
1/2" NPT screwed inlet straight:
Rough Bronze . . . . . . . . . . . . . . . . . .P/N 141-176
Polished Chrome Plate . . . . . . . . . . . . . . .141-177
1/2" Copper solder inlet straight:
Rough Bronze . . . . . . . . . . . . . . . . . .P/N 141-187
1/2" Copper solder inlet angle:
Rough Bronze . . . . . . . . . . . . . . . . . .P/N 141-326
REPAIR KITS
ITEM
1
2, 4
3, 5, 6, 7, 8,9
DESCRIPTION
Body
Stem and Bonnet Kit
Internal Parts Kit
PRODUCT NUMBERS
141-176
141-177
N/A
N/A
230-337
230-337A
141-845
141-845
141-187
N/A
230 337
141-845
Above kit contains parts for one pair.
141-326
N/A
230-337
141-845
CALIFORNIA PROPOSITION 65 WARNING
WARNING: This product contains chemicals
known to the State of California to cause cancer
and birth defects or other reproductive harm.
(California law requires this warning to be given
to customers in the State of California.)
For more information: www.wattsind.com/prop65
© 2004 Powers, a division of Watts Water Technologies, Inc.
USA Phone: 1.800.669.5430 • Fax 1.847.824.0627
Canada Phone: 1.888.208.8927 • Fax 1.888.882.1979
www.powerscontrols.com
Form II 129-028 v4 0401
EDP# 6512200
Printed in U.S.A.
EAGLE
EAGLESIGNAL
SIGNAL
brand
brand
A103 Timers
Electronic
Timers
Electronic
Timers
Cost effective, compact
elapsed time indicator …
large display with
backlighting
All in the family - Other matching A103 series
products in this catalog:
A103 Totalizing Counters:
A103 Preset Counters:
A103 Tachometers/Rate Indicators:
A103 Preset Timers:
Page 1.02
Page 2.07
Page 4.04 - 4.06
Page 5.05
5
E
L
ET
CI
TM
RE
OR
N ST
I I
CM
E
R
S
The A103 Elapsed Time Indicators provide a range of capabilities
unequaled in products of similar size and cost. A single model can be
programmed to display in seconds, minutes, hours, or hours: minutes:
seconds. The A103 series also includes matching indicators for count
totalization and rate metering, as well as models with a preset output for
control by count or time. All are in a uniform 36 x 72 millimeters bezel
size package, enhancing your control panel with a family of devices that
look and program alike.
A supertwist LCD display with thick 12mm (.47") high digits allows for
easy viewing at a glance and feature display-backlight capability by
simply connecting an external 12VDC supply.
Powered by an internal 3 volt battery, the A103's unique design has two
battery slots; this allows battery changeover without loss of memory.
Timing start/stop can be initiated by solid-state signals or mechanical
switches.
■ Matching totalizing and preset counters, preset timers, tachometer/
rate indicators are available – look great together on a panel
■ High visibility 7-digit LCD display with backlighting capability standard
■ Long life 3 Volt lithium battery eliminates the need for external power
OPTION MODULE SPECIFICATIONS
Option modules accessories provide a convenient integrated solution to
applications that require AC or high voltage DC signals, and/or a
voltage source for use with the A103's display backlight feature or
external. Specifications for each option module feature follow, while
specific combinations of features are listed in the "Models" table, below.
High Voltage Input: Allows A103 to accept 100 to 260 Volt AC/DC as timing input
Low Voltage Input: Allows A103 to accept 5 to 30 VAC or VDC as timing input
AC Power Supply: Provides 10 - 20 VDC @ 50 mA for display backlighting
and/or sensor. Requires connection to 115 or 230 VAC, 50/60 Hz
Model No.
A103-006
Description
A103 Elapsed Time Indicator
The following option modules attach
to the rear of A103 timers:
Model No.
AC Power
Supply
A103-A12
A103-A17
X
X
■ Programmable security of front panel reset button
A103-A19
A103-A10
■ Option modules provide additional functionality and added conve-
A103-A14
X
■ Accepts input signals from a variety of sources: Dry Contact, PNP or
NPN Sensors
■ Single multirange model covers popular time resolutions
■ Resettable remotely or from the front panel
nience – fast, easy installation
■ NEMA 4X/IP65 rated front panel for use in washdown environments
The A103 timers are further enhanced by a series of quick-attach option
modules. These can provide a power supply for sensors and display
backlighting, and accept high or low voltage AC or DC input signals.
Low Voltage
Input
High Voltage
Input
X
X
X
X
Replacement Battery: 605472-0001
Panel Hole Punch: A103-A40
Dimensions:
SPECIFICATIONS
Start/Stop Input: NPN, Contact Closure; Accumulates time when connected
to common; Low State: < 1.0 VDC, High State: > 2.0 VDC (28VDC max)
Security Input: Allows access to panel reset and programming features
Remote Reset Input: NPN or Contact Closure to common; level sensitive
Power Source: Single or dual 3V Lithium battery; typical 5 years life w/single
battery, 10 years w/dual batteries
Ranges & Resolution: Seconds, minutes to 1/10, hours to 1/10,
hours: minutes: seconds
Display: 12mm high, Supertwist LCD; 7 digits; "Low Bat" indicator
Backlighting: Green Illumination over whole viewable area. Requires 10 to
28 VDC power source
Dimensions & Mounting: See dimensions figure. Panel Mount with
supplied mounting bracket and gasket
Connections: Screw terminals
Weight: Approximately 64 grams (2.25 ounces)
5.44 DANAHER INDUSTRIAL CONTROLS
72mm (2.83")
68mm (2.66")
36mm
(1.42")
33mm
(1.30")
4
5
3
6
2
7
1
8
Option Module
Rear View
A103 Rear View
Depth Behind Panel
Without Adaptor Module: 39mm (1.54")
With Adaptor Module: 89mm (3.50")
Panel Cutout:33mm x 68mm(1.30" x 2.66")