1
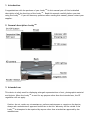
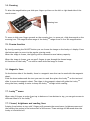
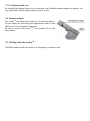
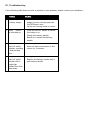
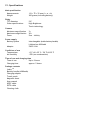
Manual Looky HD Touch Screen Iris Hjälpmedel AB • Sandsborgsvägen 52 • 122 88 Enskede • Tel: 08 39 94 00 • www.ebutiken.iris.se Table of Contents 1. Introduction ......................................................... 5 HD 2. General description Looky ..................................... 5 3. Intended use ......................................................... 6 4. Safety and Maintenance ........................................... 6 HD 5. Installing the Looky ............................................. 7 6. Instructions for charging ........................................... 7 7. Battery handle maintenance ...................................... 8 8. Folding handle ...................................................... 8 HD 9. Switching the Looky on or off .................................. 9 HD 10. Focusing the Looky ............................................ 9 11. Far View function ................................................. 9 12. Switching off the LED ............................................. 9 13. Display modes .................................................... 10 14. Zooming........................................................... 10 15. Freeze function .................................................. 11 16. Magnetic lines.................................................... 11 17. Looky HD menu ................................................... 11 17.1 Sound, brightness and reading lines ........................ 12 17.1.1 Sound icon .................................................... 12 17.1.2 Brightness icon ............................................... 12 17.1.3 Reading lines ................................................. 13 17.2 Display modes and battery ................................... 13 17.2.1 Battery icon .................................................. 13 17.2.2 Display mode icon ........................................... 14 18. Picture output ................................................... 14 19. Writing with the Looky HD ..................................... 14 20. Troubleshooting ................................................. 15 21. Specifications .................................................... 16 22. Warnings .......................................................... 17 HD 23. Discarding the Looky or battery............................ 17 24. Warranty regulations ........................................... 17 25. Regulations ....................................................... 17 1. Introduction HD Congratulations with the purchase of your Looky ! In this manual you will find a detailed HD description of all the functions of the Looky . Read this manual carefully before you start HD using the Looky . If you still have any questions after reading this manual, please contact your supplier. 2. General description Looky HD 3. Intended use This device is solely used for displaying enlarged representations of text, photographic material HD and objects. When the Looky is used for any purpose other than the intended use, the CE regulation will not apply. Caution: do not, under any circumstances, perform maintenance or repairs on the device; always ask a manufacturer approved technician to do this. Warranty will be voided if the HD Looky is attempted to be repaired by anyone other than a technician approved by the manufacturer. 4. Safety and Maintenance Before use, be sure to comply to with the following safety and maintenance instructions: Protect the device and its batteries from moisture, rain, sand or extreme temperatures like radiators or direct sunlight. Do not use cleaning products that contain alcohol, methylated spirits, ammonia or abrasives. These can damage the device or its touch screen. Only use accessories that the manufacturer supplies you with, or approves of. Never throw batteries into a fire. Batteries and chargers that are defect are considered chemical waste. They therefore need to be disposed of at a refuse/recycling centre of your choice. Note that the use of a screen protector might influence the functioning of the touch screen. 5. Installing the Looky HD HD Connect the battery handle of the Looky by sliding it onto the connector until you hear it HD clicking into place. This battery handle also functions as the Looky ’s handle. To replace the battery handle push the 2 purple battery release buttons on the side of the battery handle, and slide on the replacement battery handle. Charge the battery handle completely before using the Looky Please read the charging instructions carefully. HD . 6. Instructions for charging Put the adaptor in the wall socket and connect its plug to the HD charging adaptor port of the Looky . LED burning constantly LED off LED blinking batteries are being charged batteries are fully charged error / batteries are defect HD Charge the batteries in a well ventilated environment. Remove the Looky from its carrying case when charging. Don’t place it in direct sunlight or near a radiator whilst charging. When the battery is empty, the Looky that fades away. 7. Battery handle maintenance HD will switch itself off. You will hear a high pitched tone HD Remove the battery handle from the Looky if you do not intend to use it for an extended period of time. This will improve the longevity of the battery handle. Batteries are sensitive to overcharging. It is recommended to only charge the battery handle when it is completely drained. Chargeable Lithium-Ion batteries have an auto discharge that strongly depends on the temperature of the environment (e.g. never leave the battery handle in a car that is parked in direct sunlight). New Lithium-Ion batteries must be charged several times before reaching their nominal capacity. Charge Lithium-Ion batteries at least once every 6 months. The average lifespan of the battery handle is usually 300 charging cycles, but this depends on the use. Total capacity will slowly decrease after multiple charging cycles. 8. Folding handle HD The Looky comes with a replaceable foldable handle with a built-in battery. This handle can be used in several positions. When the handle is extended, you can use the Looky as a magnifier. The closer you get to the HD object, the bigger the magnification will be. You can also hold the Looky up to see distant HD objects as the Looky can focus from 5cm to infinity. HD It is also possible to use the Looky with the handle folded in. You can easily set the device on the table and it will automatically stand at an angle. The magnification will then be about 8x. This is easier when you want some stability during the reading of texts. 9. Switching the Looky HD on or off HD To switch the Looky on, press the ON/OFF button once. You will hear a scaled sound increasing in pitch. HD To switch the Looky off, press the ON/OFF button for 3 seconds. You will hear a scaled sound decreasing in pitch. HD When you have the Looky switched on, and it doesn’t detect any movement on the screen, it will switch itself off after 3 minutes. A two-pitched signal will be heard. 10. Focusing the Looky HD HD The Looky uses a push-to-focus method to focus the image on the screen. Simply touch the HD screen on the section where you want the Looky to focus; the camera will focus on that area. 11. Far View function HD The camera of the Looky can focus on objects from 5 cm. distance to infinity. Just hold the device up to view the object. Remember to touch the screen in order to focus the camera on the object you are viewing. 12. Switching off the LED By touching the centre of the screen for 3 seconds you can switch off the LED at the back of the LookyHD. You will hear a beeping sound indicating that the LED is switched off. Touch the centre of the screen again for 3 seconds to turn the LED back on. Another beeping sound will be heard. 13. Display modes By swiping from the top to the bottom of the screen, or vice versa you can cycle through multiple colour modes. Or 14. Zooming To alter the magnification you slide your finger up/down on the left or right hand side of the touch screen. Zooming icon To zoom in slide your finger upwards on the zooming icon, to zoom out, slide downwards on the HD zooming icon. The magnification range of the Looky ranges from 2x to a 20x magnification. 15. Freeze function By shortly pressing the ON/OFF button you can freeze the image on the Looky HD’s display. Press the button again to revert to the regular viewing mode. When the image is frozen, the lighting will be dimmed to save battery capacity. When the image is frozen, you can use 2 fingers to pan through the frozen image. All functions of the Looky HD can still be used while the image is frozen. 16. Magnetic lines On the bottom side of the handle, there is a magnetic area that can be used with the magnetic sheet. Slide the sheet underneath the text you want to read. Now place the Looky HD on the text and slide it across the magnetic sheet. The ridges in the magnetic sheet will guide the Looky HD along the lines; making it easier to keep the Looky HD straight while reading. 17. Looky HD menu When using 3 fingers to swipe from top to bottom or from bottom to top, you can gain access to different menu’s of the Looky HD. 17.1 Sound, brightness and reading lines Swiping from bottom to top with 3 fingers will generate the sound menu, brightness menu and the reading line option in the bottom half of the screen. These settings will be saved when the Looky HD is switched off. 17.1.1 Sound icon With this icon you can switch the sound on or off. Sound on sound off 17.1.2 Brightness icon With this icon you can set the brightness of the screen. There are 5 different intensity settings. least brightness most brightness 17.1.3 Reading lines By tapping this icon you can generate a horizontal or vertical reading line on the screen. 17.2 Display modes and battery Swiping from top to bottom with 3 fingers will generate the battery and display mode menu in the top half of the screen. 17.2.1 Battery icon This icon indicates the remaining battery life. There are 5 different icons to indicate this. Battery empty battery full When the battery is charging, the menu will display the charging icon. When the adaptor is connected, but the battery is not connected, this icon will appear. 17.2.2 Display mode icon By touching the display mode icon, an overview of all available display modes will appear. You can easily select which display mode you want to use. 18. Picture output The Looky HD can output the picture to an external display. Do this simply by connecting the appropriate cable to the HDTV port or the Composite Video port. HD Be sure to connect the Looky to an earthed TV for the best results. 19. Writing with the Looky HD Fold the handle inwards and place it on the paper you want to sign. 20. Troubleshooting If the following table does not offer a solution to your problem, please contact your distributor. HD 1 No picture, dark or blurry image. Switch the Looky on. Image is frozen, shortly press the ON/OFFbutton once. Switch the viewing mode to colour. 2 Looky HD cannot be switched on. Press the ON/OFF button to switch HD the Looky on. Charge the battery handle. Reinsert or replace the battery handle. 3 Looky HD switches itself off within minutes, sounding a dual-pitched tone. The Looky switches itself off if it does not detect movement on the screen for 3 minutes. 4 Looky HD switches itself off within minutes with a single high pitched tone that fades away. Charge the battery handle. Replace the battery handle with a new battery handle. HD 21. Specifications Main specification Measurements Weight Dislay TFT diameter Other specifications Camera Minimum magnification Maximum magnifitation Focus Power supply Battery system Adaptor Conditions of use Temperature Air humidity 131 × 75 × 32 mm (l × w × h) 300 grams (including battery) 5.0” High Brightness Touch technology 2× 20× 5cm - infinity Interchangable (inside battery handle) Lithium-Ion 4000mAh 5VDC/1.8A +5°C till +35°C / 50°F till 95°F <70% (no condensation) Time of use and charging time Time of use Up to 3 hours Charging time approx. 5 hours Package contents HD Looky Battery handle (4000mAh) Charging adapter Travel pouch Magnetic sheet User manual HDTV cable SDTV cable Cleaning cloth 22. Warnings This icon indicates that users with pacemakers should take care with the HD magnetic area of the handle on the Looky as this might, depending on your pacemaker, interfere with the pacemaker. Please contact your surgeon to inform yourself on the effects of magnets with your pacemaker. 23. Discarding the Looky HD or battery This symbol of the crossed out wheelie bin indicates that the product must not be disposed of with your other household waste. Check local regulations for proper disposal of electronic products. 24. Warranty regulations This device is subject to the warranty regulations of your supplier. For futher information regarding these regulations, please contact your supplier. 25. Regulations Products with CE marking comply with EMC Directive (2004/108/EC), and the Low Voltage Directive (2006/95/EC) issued by the Commission of the European Community. Compliance with these directives implies conformity to the following standards: EMC: EN 55022; EN 55024 FCC: part 15 Class B Safety: EN 60950