1
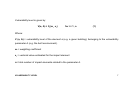
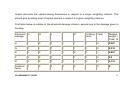
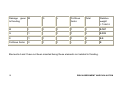
RISK ASSESSMENT AND EVALUATION ArcGIS® toolbox
USER’S MANUAL
CRATER
COASTAL RISK ANALYSIS OF TSUNAMIS AND ENVIRONMENTAL REMEDIATION
RISK ASSESSMENT AND EVALUATION ArcGIS® toolbox
USER’S MANUAL
CRATER
COASTAL RISK ANALYSIS OF TSUNAMIS AND ENVIRONMENTAL REMEDIATION
Italian Ministry for the Environment and Territory
Via Cristoforo Colombo 44
00147 Roma
Asian Disaster Prepardness Center
P.O. Box 4, Klong Luang,
Pathumthani 12120
Italy
Thailand
CONTRIBUTING AUTHORS
Dr. Filippo Dall’Osso
Alessandra Cavalletti. PhD
Eng. Paolo Polo
Contact: [email protected]
CONTENTS:
1.
Tsunami vulnerability and risk analysis...................................................................................... 1
1.1
2
Introduction ......................................................................................................................... 1
Vulnerability level ....................................................................................................................... 5
2.1
Multi-criteria analysis .......................................................................................................... 8
2.2
TUTORIAL: Creating
2.3
Creating a “population” vulnerability map ......................................................................... 50
2.4
Creating a “socio-economic aspects” vulnerability map................................................... 55
2.5
Creating an “environment” vulnerability map .................................................................... 60
a “built environment” vulnerability map .............................................. 16
3
Hazard mapping....................................................................................................................... 65
4
Risk level.................................................................................................................................. 69
4.1
TUTORIAL: Creating
a “built environment” risk map............................................................ 70
1. TSUNAMI VULNERABILITY AND RISK ANALYSIS
1.1
Introduction
The tsunami event occurred on 26th December 2004 in South Eastern Asia caused more than
200.000 casualties along the coasts of Indonesia, Thailand, Malaysia, India, Sri Lanka and other
countries facing the Indian Ocean.
Tsunami was initiated by an extremely high magnitude earthquake (9.3 on the Richter scale)
localized a few kilometers eastward of the Sumatra coasts, along the subductive system
characterized by the Sunda Arc.
Because of the presence of this active tectonic margin a new Tsunami event can not be excluded
in the future.
TSUNAMI VULNERABILITY AND RISK ANALYSIS
1
In order to better face any future occurrence of Tsunamis, the SAVE module of the CRATER
project focuses on the risk analysis method.
In the last years a number of International and National associations, such as UNDP (United
Nations Development Program), NOAA (National Oceanic and Atmospheric Administration, U.S.)
and FEMA (Federal Emergency Management Agency, U.S.) suggested guidelines for extreme
natural events risk analysis.
CRATER project started from these guidelines and from data
gathered after the Tsunami of 26th December 2004. One of the main aims of the CRATER project
was to create a complete tool for Tsunami risk analysis in coastal areas.
A risk to a natural event is defined as the mathematical product between vulnerability and hazard;
it refers to the expected loss from a given hazard to a given element at risk.
Vulnerability is defined as the potential for damage while hazard, for a Tsunami event, is defined
as the wave height.
Risk management is a two parts process involving risk assessment and risk evaluation.
2
RISK ASSESSMENT AND EVALUATION
Risk assessment is mainly a scientific and quantitative exercise out coming from analysis of field
and-or experimental data (e.g. modeled tsunami wave height) and from an overall understanding of
the nature of the hazard and of vulnerable parameters (UNDP, 1994).
Risk evaluation joins perceived risk to a more enlarged qualitative analysis including, for example,
cost benefit trade off and socio economic impact.
Main vulnerable parameters -in the case of a Tsunami event- are: population, built environment,
infrastructures, ecosystem and environment.
Understanding vulnerability and hazard level, identification of possible mitigation measures, of the
socio-economic impact caused by the event and the cost-benefit trade off they all give information
needed to evaluate the level of risk. Decision makers and end users such as local authorities,
NGO, disaster and prevention officers will be able to decide the level of risk and plan which
protection level is needed to put in place proposed mitigation measures.
TSUNAMI VULNERABILITY AND RISK ANALYSIS
3
4
RISK ASSESSMENT AND EVALUATION
2. VULNERABILITY LEVEL
Vulnerability parameters identifies for the study are:
-
population
-
built environment
-
socio-economic aspects
-
environment
For each of these parameters a list of impact elements have been made. Impact elements are
those characteristics of the parameter considered that could be mostly affected by the tsunami
wave. Summation of the impact elements defines the vulnerability of a chosen parameter.
VULNERABILITY LEVEL
5
For example, in the case of built environment the impacts elements are:
-
building material “m”
-
description of ground floor “g”
-
number of stories “s”
-
design “d”
-
foundations “f”
For every building we assigned a numeric value to each impact elements.
These values are integer numbers ranging between 1 and 5, where 5 stands for the maximum
contribution given by the impact element to the total building vulnerability. A building made of
concrete will have a low value of “m”, for example m=1, because it is supposed to be more
resistant to the Tsunami wave. If the building material is wood the value of “m” will be higher, for
example m=5. As for the impacts elements, a level of vulnerability ranging between 1 and 5 has
been chosen for each vulnerable parameter.
6
RISK ASSESSMENT AND EVALUATION
Vulnerability level is given by:
V(a, A) = Si (wi · ei)
for i = 1, n
(1)
Where:
V (a, A) = vulnerability level of the element a (e.g. a given building), belonging to the vulnerability
parameter A (e.g. the built environment).
wi = weighting coefficient
ei = vectorial value estimated for the impact element
n= total number of impact elements related to the parameter A.
VULNERABILITY LEVEL
7
2.1
Multi-criteria analysis
Multi-criteria analysis is a decision making process. CRATER team experts have optimized this
technique and applied it for the first time to a vulnerability problem.
Outcome of the multi-criteria analysis are the weighting coefficients wi of the relation (1).
The practical example given below, in which multi-criteria analysis is applied to the “built
environment” vulnerable parameter, would help the understanding of this process.
First step: to identify the impact elements that need to be weighted:
Impact elements:
8
•
Building material (m)
•
Description of ground floor (g)
•
Number of stories (s)
RISK ASSESSMENT AND EVALUATION
•
Design (d)
•
Foundations (f)
Second step: identify the weighting criteria:
Weighting Criteria:
•
Structural damage
•
Damage given to flooding
Weighting criteria are identifying the type of damage the parameter would be subject to.
VULNERABILITY LEVEL
9
Third step is a pair wise comparison between weighting criteria.
Structural
damage
Damage
Fictitious
given
to factor
flooding
Total
\
1
1
2
0.667
to 0
\
1
1
0.333
0
0
\
0
0
Structural damage
Damage
flooding
given
Fictitious factor
Weight
(= Total/3)
In the matrix above the weighting criteria have been compared with pair wise matches. Introduction
of a so called fictitious factor is needed for obvious calculation reasons.
From the above table is clear that in this case a structural damage has more weight than the
damage given to flooding.
10
RISK ASSESSMENT AND EVALUATION
Impact elements are valued among themselves in respect to a single weighting criterion. This
should give a ranking level of impact element in respect to a given weighting criterion.
First table below is relative to the structural damage criterion, second one to the damage given to
flooding.
Structural m
damage
G
s
f
D
Fictitious Total
factor
Relative
weight =
Total/ 15
m
\
0
1
1
1
1
4
0.267
G
1
\
1
1
1
1
5
0.333
S
0
0
\
0
0
1
1
0.067
F
0
0
1
\
1
1
3
0.2
D
0
0
1
0
\
1
2
0.133
Fictitious
factor
0
0
0
0
0
\
0
0
VULNERABILITY LEVEL
11
Damage given M
to flooding
G
s
Fictitious
factor
Total
Relative
weight
= Total/ 6
M
\
0
0
1
1
0.167
G
1
\
0
1
2
0.333
S
1
1
\
1
3
0.5
Fictitious factor
0
0
0
\
0
0
Elements d and t have not been inserted being these elements not related to flooding.
12
RISK ASSESSMENT AND EVALUATION
Summarizing the above results, we obtain:
Weight
criterion
of Relative
weight m
Relative
weight g
Relative
weight s
Relative
weight d
Relative
weight f
0.667
0.267
0.333
0.067
0.133
0.2
Damage
0.333
given
to
flooding
0.167
0.333
0.5
0
0
Structural
damage
VULNERABILITY LEVEL
13
Total weight calculation:
Total
weight m
Total
weight g
Total
weight s
Total
weight d
Total
weight f
Structural
damage
0.178
0.222
0.045
0.089
0.133
Damage
given
to
flooding
0.056
0.111
0.166
0
0
TOTAL
0.234
0.333
0.211
0.089
0.133
NB. Total weight of each impact element, in respect to both criteria, is calculated as product
between the criterion weight and the relative weight of the impact element considered.
Final calculation of building vulnerability will be then given by:
V(a, built environment) = 0.234 m + 0.333 g +0.211 s + 0.089 d + 0.133 f
14
RISK ASSESSMENT AND EVALUATION
Single values of impact elements m, g, s, d, f are ranging between 1 and 5 as previously stated.
This method could be applied to any of the other vulnerability parameters.
Once vulnerability level is calculated it will be possible to insert these values in a vulnerability map.
Next paragraph describes how to create a built environment vulnerability map using GIS software.
The method shown can be applied also to all others vulnerable parameters.
VULNERABILITY LEVEL
15
2.2
TUTORIAL: Creating a “built environment” vulnerability map
In this paragraph we present a list of all the steps required to create a built environment
vulnerability map of the study area using the ArcGis ArcMap 9.0 software by ESRI. The aim is to
assign to each building in the pilot area a vulnerability level value, as an integer number between 1
and 5.
The CD-Rom included with the manual contains all the files needed to perform the case study
simulation.
Starting Data:
1.
We
A geo-referenced shape file representing all the buildings of the study area as polygons.
will
call
it
“buildings”.
This
shape
file
for
the
pilot
area
is
located
in
“Buildings_Vulnerability_tutorial/Shapefile”.
16
RISK ASSESSMENT AND EVALUATION
2.
The attribute table of the “buildings” shape file must contain one field for each impact
element related to the built environment. These impact elements are:
a)
Building material -------- field name: “Build_mat”
b)
Description of ground floor -------- field name: “g_floor”
c)
Foundations -------- field name: “foundat”
d)
Design -------- field name: “design”
e)
Number of stories -------- field name: “BL_NSTOREY”
You should have data for any impact element for each building.
The five fields containing the impact elements must be filled with all these data. For example, if a
building is made of concrete, the user will have to write “concrete” in the field “Build_mat”, at the
line related to that building.
VULNERABILITY LEVEL
17
In the case that you miss information about any of the impact elements of a particular
building you just have to write “unknown” in the relative field, at the line related to that
building.
Steps required:
1.
Open
ArcGis
ArcMap
9.0.
Import
all
shape
files
in
the
“Building_vulnerability_tutorial/Shapefile” folder and the aerial photo located in the “Aerial_Photo”
folder.
2.
Create 5 new fields (short integer) in the attribute table of “buildings” shape file, one for
each impact element, and call them:
18
•
“m” for the building material
•
“g” for description of ground floor
•
“s” for the number of stories
RISK ASSESSMENT AND EVALUATION
•
“d” for the design
•
“f” for the foundations
Each of these fields must be filled with the impact elements value that will be introduced at step 3.
To create a new field:
a) Open the “buildings” attribute table and click on “Options”, then choose “Add field”
(Figure 1).
VULNERABILITY LEVEL
19
Figure 1
20
RISK ASSESSMENT AND EVALUATION
b) In the window that appeared type “m” in the “Name” box and select “Short Integer” in the
“Type” box, then click “Ok” (Figure 2).
Figure 2
VULNERABILITY LEVEL
21
c) Do the same for “g”, “s”, “d”, “f”, obtaining (Figure 3):
Figure 3
22
RISK ASSESSMENT AND EVALUATION
3.
Choose an integer numeric value between 1 and 5 for each impact element, where 5
stands for maximum vulnerability and 1 for minimum vulnerability. For example, the impact element
value for building material (that is “m”) will be 5 if the structure is made of wood (high vulnerability),
3 if it is made of bricks (mean vulnerability) and 1 if it is made of reinforced concrete (low
vulnerability). Suggested impact element’s values are listed in Table 1.
VULNERABILITY LEVEL
23
IMPACT
Suggested impact element’s value:
ELEMENT
=1
=2
=3
=4
=5
m
Reinforced
concrete
Bricks or wood +
concrete
Wood
g
Open plan without
movable objects
Open plan with
movable objects
No open plan
s
5 stories
4 stories
3 stories
2 stories
1 story
f
deep pile
foundations
mean foundations
surface spread
foundations
d
long building side
perpendicular to
the coast line
long building side
oblique to the
coast line
long building
side parallel to
le coast line
Table 1
24
RISK ASSESSMENT AND EVALUATION
4.
Put the numeric value chosen for each impact element in the relative field (“m”, “g”, “s”, “d”,
“f”) following these instructions:
a)
Open the attribute table of the “buildings” layer
b)
Click on “Options” and then on “Select by attributes”
c)
Double click on the field “build_mat”
d)
Click on the symbol “=”
e)
Click on the button “Get Unique Values”. A list of all the buildings materials will
appear in the box on the right.
f)
Double click on the first material of the list, for example “concrete” (Figure 4)
VULNERABILITY LEVEL
25
Figure 4
g)
26
Click on “Apply”. All buildings made of concrete are now selected.
RISK ASSESSMENT AND EVALUATION
h)
Close the attribute table
i)
Click on the “editor” button and choose “start editing”
j)
Select the “buildings” layer in the “Target” box
k)
Click on the attribute button, on the left of the “Target” box (Figure 5). A new
window called “attributes” will appear (Figure 6)
VULNERABILITY LEVEL
27
Figure 5
28
RISK ASSESSMENT AND EVALUATION
Figure 6
VULNERABILITY LEVEL
29
l)
Double click on “buildings” group in the box on the left
m)
In the box on the right, click on the “m” field in the “Property” column. The line of the
“m” field will be selected.
n)
Click in the “m” line you have selected, under the “Value” column
o)
Type the numeric value you want to assign to the impact element “m”, for all
buildings made of concrete (for example if m=1 type 1)(Figure 7).
30
RISK ASSESSMENT AND EVALUATION
Figure 7
VULNERABILITY LEVEL
31
p)
Press enter. Now all buildings made of concrete have an impact element value
equivalent to 1 (m=1).
q)
Save your edits (Click on “editor” button and choose “Save Edits”)
r)
Repeat all from line a), choosing the subsequent building material at line f). When
all building materials have been considered it could remain only some buildings with
“unkown” material: assign them the maximum impact element’s value, that is 5.
s)
Repeat all changing impact element at line c). Finally you will obtain an attribute
table looking like the one in Figure 8.
32
RISK ASSESSMENT AND EVALUATION
Figure 8
VULNERABILITY LEVEL
33
5.
Calculate the vulnerability level of every building.
a)
Stop editing clicking on “Editor” and select “Stop editing”.
b)
Open the “buildings” attribute table and click on “Options”, then choose “Add field”
c)
In the window that appears type “BV1” in the “Name” box and select “Float” in the
“Type” box. Then put both “precision” and “scale” equal to 2 (Figure 9). Click “Ok”.
34
RISK ASSESSMENT AND EVALUATION
Figure 9
VULNERABILITY LEVEL
35
d)
Restart editing
e)
In the attribute table select the BV1 field clicking on the name of the field.
f)
Right click on the field name BV1 in the attribute table and select “Calculate
values…” (Figure 10)
36
RISK ASSESSMENT AND EVALUATION
Figure 10
VULNERABILITY LEVEL
37
g)
Insert the relation for the computation of the building vulnerability level in the box
under “BV1=”. The relation is:
BV1= 0.234 m + 0.333 g +0.211 s + 0.089 d + 0.133 f
Click on m,g,s,d,f in the “Fields” box and on the mathematical operators buttons to
insert them in the relation above (Figure 11).
This relation comes from the general vulnerability level relation, in which weighting
factors have been calculated using multi-criteria analysis.
38
RISK ASSESSMENT AND EVALUATION
Figure 11
VULNERABILITY LEVEL
39
f)
Click “Ok”. In the field “BV1” you have calculated the vulnerability level of each
building as a floating number (Figure 12). In order to obtain integer numbers you
must approximate them all.
40
RISK ASSESSMENT AND EVALUATION
Figure 12
VULNERABILITY LEVEL
41
g)
Close the attribute table. Save your edits and stop editing
h)
Open the attribute table. Add a new field called BV_MAX (short integer).
i)
Select by attributes (“Options”- “Select by Attributes”) all buildings with a “BV1”
value included in the [0;1] interval (BV1>0 and BV1<=1). You can do this by typing:
"BV1" >0 AND "BV1" <=1 (Figure 13)
Click “Apply”.
42
RISK ASSESSMENT AND EVALUATION
Figure 13
VULNERABILITY LEVEL
43
j)
Close the attribute table and Restart editing
k)
Click on the attribute button, on the left of the “Target” box. A new window called
“attributes” will appear
h)
Double click on “buildings” group in the box on the left
i)
In the box on the right, click on the “BV1” field in the “Property” column. The line of
the “BV1” field will be selected.
l)
m)
Click in the “BV1” line you have selected, under the “Value” column
Type the integer value of 1 and press Enter. In this way you have assigned to all
buildings with a BV1 included between 0 and 1 a BV_MAX value of 1, converting all
floating numbers into integer, and approximating them to 1.
44
RISK ASSESSMENT AND EVALUATION
n)
Repeat steps i) to m) assigning BV_MAX = 2, 3, 4, 5 to buildings having BV1
respectively included in [1;2] (BV1>1 and BV1<=2); [2;3] (BV1>2 and BV1<=3); [3;4]
(BV1>3 and BV1<=4); and [4;5] (BV1>4 and BV1<=5), interval.
o)
Save your edits. Now every building in your study area has a Vulnerability level
(BV_MAX) in the attribute table of “buildings” layer. This value is an integer number
between 1 and 5 (Figure 14).
VULNERABILITY LEVEL
45
Figure 14
46
RISK ASSESSMENT AND EVALUATION
6.
Plot the 5 vulnerability levels on the map assigning different colors to buildings having
different vulnerability levels (BV_MAX).
a)
Right click on the “buildings” layer in the layer box.
b)
Select “Properties”, then “Symbology”. In the “Show” Box select “Categories” and
then “Unique values” (Figure 15).
c)
In the “value field” box select “BV_MAX” and click “Add all values”. All the BV_MAX
values appear with different colors. Click “Apply” and then “Ok”. Your vulnerability
map is finished (Figure 16).
d)
Save your project.
VULNERABILITY LEVEL
47
Figure 15
48
RISK ASSESSMENT AND EVALUATION
Figure 16
VULNERABILITY LEVEL
49
2.3
Creating a “Population” vulnerability map
The method for creating risk and vulnerability maps for population using ArcGis ArcMap 9.0 is the
same we presented in the paragraph above.
Impact elements for population are:
1.
Density (total number of people)
2.
Number of children, senior citizens and invalids.
3.
Gender (number of women)
4.
Mean income
All data about these impact elements must refer to a particular reference unit. Population risk and
vulnerability will be calculated for this reference unit. The smallest reference unit for population is a
building, but if you don’t have population data so detailed you should choose a bigger reference
50
RISK ASSESSMENT AND EVALUATION
unit (for example a neighborhood, or a village, or even a district) according to the resolution of data
you have available.
For every reference unit you must also know:
-
High season and low season density
-
Mean time for evacuation
Reference unit must be imported in the GIS project as a geo-referenced polygons shape file.
The relation for calculating population vulnerability of a chosen reference unit is:
PV (Population Vulnerability) = KE {SDN SH [PVH] + SDN SL [PVL] }
Where:
VULNERABILITY LEVEL
51
•
KE is a factor that takes into account the mean time for evacuation of the reference unit you
chose, under the assumption that the launch of the Tsunami alarm would happen 15 minutes
before the wave arrival. Suggested values of KE are listed in the following table. If the early warning
system would be faster or slower you should consequently modify the suggested KE values.
Suggested KE values (with a Tsunami alarm 15 minutes Mean time for evacuation
before the wave arrival)
KE
(minutes)
AREA 1
<5
AREA 2
between 5 and 10
0.4
0.6
AREA 3
between 10 and 15
AREA 4
> 15
0.8
1
52
RISK ASSESSMENT AND EVALUATION
•
SDN depends on the time arrival of the tsunami wave (day or night), and:
SDN = BV/5
if the Tsunami happens during the night
(all the people are inside buildings)
SDN = (1/2 + BV/10)
if the Tsunami happens during the day (people are for a half
inside buildings and for a half outside)
If the chosen reference area is bigger than a building (for example a village) the BV
value is the mean of all buildings inside the reference unit.
•
SH is a switch taking into account the high tourist season, and:
SH = 1 if the Tsunami occurs in high tourist season
SH = 0 if the Tsunami occurs in low tourist season
VULNERABILITY LEVEL
53
•
SL is a switch taking into account the low tourist season, and:
SL = 1 if the Tsunami occurs in low tourist season
SL = 0 if the Tsunami occurs in high tourist season
•
PVH (population vulnerability in High season) is the population vulnerability level in the
reference unit, calculated for high season using relation (1) and the population impact elements
listed above.
PVH = [w1 (density)H + w2 (gender)H + w3 (children/seniors/Invalids)H + w4 (mean income)H]
Weights must be calculated with multi-criteria analysis. To calculate weights, chose as first the
population weighting criteria and follow the example given for buildings vulnerability.
•
PVL (population vulnerability in Low season) is the population vulnerability level in the
reference unit, calculated for low season.
54
RISK ASSESSMENT AND EVALUATION
PVH = [w1 (density)L + w2 (gender)L + w3 (children/seniors/Invalids)L + w4 (mean income)L]
2.4
Creating a “Socio-Economic Aspects” vulnerability map
Expressed in the simplest terms, a disaster affects assets (direct damages) and the flow for the
production of goods and services (indirect losses) (ECLAC, 2003). In this way socio-economic
aspects can suffer both direct and indirect damages.
Only vulnerability to direct damages can be plotted on maps, because indirect damages are not
linked to any particular location on the territory. Indirect damages must be considered from a
qualitative-descriptive point of view.
A direct damages vulnerability map can be created following the method presented above.
VULNERABILITY LEVEL
55
For buildings the only socio-economic impact element is the “buildings use”. The relation (1) is
reduced to:
SEV (Socio-Economic Vulnerability) = (e1 x BV)/5
where e1 is the value given to the impact element “building use”. Suggested values for e1 are
shown in the following table:
56
RISK ASSESSMENT AND EVALUATION
Socio-economic vulnerability of buildings
Building use
e1
PUBLIC HEALTH
5
EDUCATION
3
DRINKING WATER AND SANITATION
4
TRANSPORTS
3
ENERGY
3
INDUSTRY AND COMMERCIAL
2
AGRICOLTURE AND LIVESTOCK
3
TOURISM
4
AUTHORITIES
5
RELIGIOUS/HISTORICAL
2
LIVING HOUSE
1
VULNERABILITY LEVEL
57
For land use the relation (1) becomes:
SEV = (e1)
Suggested e1 values for land use are shown in the following table:
58
RISK ASSESSMENT AND EVALUATION
Socio-economic vulnerability of land use
Building use
e1
TRANSPORTS
3
RIVER AND CHANNELS
1
LAKES AND WET LANDS
2
NOT CULTIVATED LANDS
1
AGRICOLTURE: ANNUAL CROPS
2
AGRICOLTURE: PERMANENT PLANTATIONS
3
BEACH
2
FISHING POOLS
3
VULNERABILITY LEVEL
59
2.5
Creating an “Environment” vulnerability map
For a more specific analysis we have divided the “Environment” into four sub-parameters:
60
1.
Surface water
2.
Ground water
3.
Coastal zone
4.
Internal areas
RISK ASSESSMENT AND EVALUATION
Impacts elements are:
1. Surface water
a)
the river capacity
b)
rainfall/evaporation
2. Ground water
a)
presence of low lying areas, eroded pockets, restricted drainage canals
b)
number of wells
c)
tide effect on rivers mouths
VULNERABILITY LEVEL
61
d)
rainfall/evaporation
e)
soil permeability
f)
depth of the aquifer
g)
the hydraulic conductivity of the aquifer
3. Coastal zone
62
a)
Coastal features (sandy beach, sandy beach with dunes, coast with rocks)
b)
Artificial coastal defenses (walls behind the beach)
c)
Topography (flat area= high vulnerability)
d)
Wetlands extent, protected wetlands
RISK ASSESSMENT AND EVALUATION
e)
Submerged and intertidal zones features (coral reef extent and depth, mangroves
forests extent, Posydonia praires extent)
VULNERABILITY LEVEL
63
4. Internal areas
a)
protected areas extent (high vulnerability)
b)
extent of zones of ecological interest (mean vulnerability)
c)
extent of agricultural areas (low vulnerability)
Every sub-parameter must be divided into a number of reference units, for example following the
administrative boundaries. Reference unit must be imported in the GIS project as a geo-referenced
polygons shape file. For each reference unit you have to calculate the vulnerability level, using
relation (1).
64
RISK ASSESSMENT AND EVALUATION
3. HAZARD MAPPING
In the case of a Tsunami risk, hazard has been defined as the maximum height of the water
column reached in each point of the study area during the flooding of the 26 December 2004. To
obtain these values, CRATER experts simulated the inundation and the consequential flooding
using two different numerical models. The first, starting from the record of the tide level gauges,
transferred the waves from offshore to the coast line. The second one, starting from the waves
heights on the coast line, simulated the flooding of the study area, giving as output the maximum
water height reached in each point inland. In order to give a prompt vision of how many floors of
each building got inundated, assuming the height of each floor equal to 3 meters, the water height
values have been divided in 4 intervals:
-
From zero to 3 meters
H=1
-
From 3 to 6 meters
H=2
HAZARD MAPPING
65
-
From 6 to 9 meters
H=3
-
More than 9 meters
H=4
Where “H” stands for the hazard level. H will be used in the computation of the risk level. Using a
GIS software, these four intervals have been plotted on an hazard map, identifying 4 different
areas (Figure 17).
66
RISK ASSESSMENT AND EVALUATION
Figure 17. Hazard map of the Khao Lak study area, Thailand.
HAZARD MAPPING
67
Users can obtain an approximated evaluation of the hazard map imaging that the study area will be
flooded until the topography level curve having the same height of the Tsunami wave on the coast
line. In this way users can calculate the maximum water level reached in each position of the study
area as the difference between the Tsunami wave height on the coastline and the ground
topographic elevation in that point inland.
68
RISK ASSESSMENT AND EVALUATION
4. RISK LEVEL
As previously stated, the numeric value of risk can be calculated as the product between
vulnerability and hazard level. Since vulnerability level ranges from 1 to 5 and hazard level ranges
from 1 to 4, risk level of each vulnerable element will be given by:
R=VxH/4
R must be an integer number ranging from 1 to 5, where 5 stands for the maximum risk level. Once
risk level has been calculated it will be possible to plot it on a risk map, using a GIS software. The
following paragraph shows how to create a risk map for the built environment vulnerable
parameter. The same method allows to calculate the risk level for all others vulnerable parameters.
RISK LEVEL
69
4.1
TUTORIAL: Creating a “built environment” risk map
Now we are going to list all the steps required to create a built environment risk map of the study
area, using the ArcGis ArcMap 9.0 software by ESRI. This tutorial starts from the results given
above. The main aim is to assign to each building a risk level value as an integer number between
1 (minimum risk) and 5 (maximum risk).
The CD-Rom included with the manual contains all the files needed to perform this tutorial.
Starting data:
The risk level of each building is given by the product between vulnerability level and hazard level,
so data required for creating a buildings risk map are:
•
The “buildings” shape file obtained resulting from the “building vulnerability tutorial”. In the
attribute table of this shape file there is a field called “BV_MAX” reporting the vulnerability
70
RISK ASSESSMENT AND EVALUATION
level of each building of the pilot area. This shape file is located in the
“Building_risk_tutorial /Shapefile” folder, with the name of “buildings”.
•
The Hazard map of the pilot area. Hazard map is a polygons shape file called “hazard map”
located in the “Building_risk_tutorial /Shapefile” folder. Every polygon represents an area
with constant maximum water level reached during the Tsunami of December 26, 2004.The
“buildings” attribute table reports in the field “HAZARD” the hazard level value for each
polygon.
Steps required:
1.
Open
ArcGis
ArcMap
9.0.
“Building_risk_tutorial/Shapefile”
Import
folder
all
and
shape
the
aerial
files
photo
present
located
in
in
the
the
“Aerial_Photo” folder of the CD Rom.
2.
RISK LEVEL
Open the Arc Toolbox.
71
3.
Double click on “Analysis Tools”
4.
Double click on “Overlay”
5.
Double click on “Intersect”. The “Intersect” window appears.
6.
In the “Input Features“ box select the “buildings” layer and the “hazard_map” layer.
7.
In the “Output Feature Class” box select the folder in which you want the output shape
file of the intersection to be saved (Figure 18)
72
RISK ASSESSMENT AND EVALUATION
Figure 18
RISK LEVEL
73
8.
Click “OK”. A new polygons shape file called “buildings_Intersect” appears in your
layer’s list (Figure 19). This shape file is the intersection between “buildings” shape file
and “hazard_map” shape file. His attributes table contains both “buildings” fields and
“hazard_map” fields (Figure 20).
74
RISK ASSESSMENT AND EVALUATION
Figure 19
RISK LEVEL
75
Figure 20. The “buildings_Intersect” attribute table contains both “buildings” fields and
“hazard_map” fields
76
RISK ASSESSMENT AND EVALUATION
9.
Open the “buildings_Intersect” attribute table. Add a new field and call it R1 (Type:
Float,
Field
properties:
Precision
=2,
Scale=2)
(
Figure 21). Click “OK”
RISK LEVEL
77
Figure 21
10.
Start editing
11.
In the “buildings_Intersect” attribute table select the R1 field clicking on the name of the
field.
12.
Right click on the field name R1 in the attribute table and select “Calculate values…”
(Figure 22)
78
RISK ASSESSMENT AND EVALUATION
Figure 22
RISK LEVEL
79
13.
Insert the relation for the computation of the building risk level in the box under “R1=”.
The relation is:
R1 = BV_MAX * HAZARD / 4
Click on “BV_MAX” and on “HAZARD” in the “Fields” box and on the mathematical
operators buttons to insert them in the relation above (Figure 23).
80
RISK ASSESSMENT AND EVALUATION
Figure 23
RISK LEVEL
81
14.
Click “Ok”. In the field “R1” you have just calculated the risk level of each building, but
not as integer numbers (Figure 24). In order to obtain integer numbers you must
approximate them all.
Figure 24
82
RISK ASSESSMENT AND EVALUATION
15.
Close the attribute table. Save your edits and stop editing
16.
Open the “buildings_Intersect” attribute table. Add a new field and call it RISK_MAX
(short integer).
17.
Select by attributes (“Options”- “Select by Attributes”) all buildings with a “R1” value
included in the ]0;1] interval (R1>0 and R1<=1). You can do this by typing:
"R1" >0 AND "R1" <=1
Click “Apply” (Figure 25).
RISK LEVEL
83
Figure 25
84
RISK ASSESSMENT AND EVALUATION
18.
Close the “buildings_Intersect” attribute table and Restart editing
19.
Click on the attribute button, on the left of the “Target” box. A new window called
“attributes” will appear.
20.
Double click on “buildings_Intersect” group in the box on the left
21.
In the box on the right, click on the “R1” field in the “Property” column. The line of the
“R1” field will be selected.
22.
Click in the “R1” line you have selected, under the “Value” column
23.
Type the integer value of 1 and press Enter (Figure 26). In this way you have assigned
to all buildings with a R1 included in the interval [0;1] a RISK_MAX value equivalent to
1, converting all floating numbers in integer, and approximating them to 1.
RISK LEVEL
85
24.
Figure 26
86
RISK ASSESSMENT AND EVALUATION
25.
Repeat steps 17) to 23) assigning RISK_MAX = 2, 3, 4, 5 to buildings having R1
respectively included in [1;2] (BV1>1 and BV1<=2), [2;3] (BV1>2 and BV1<=3), [3;4]
(BV1>3 and BV1<=4), and [4;5] (BV1>4 and BV1<=5)intervals.
26.
Save your edits. Now every building in your study area has a Risk level (RISK_MAX) in
the attribute table of “buildings_Intersect” layer. This value is an integer number
between 1 and 5 (Figure 27).
RISK LEVEL
87
Figure 27
88
RISK ASSESSMENT AND EVALUATION
27.
Plot the five risk levels on the map assigning different colors to buildings having
different risk levels (RISK_MAX), as you did in the case of vulnerability level.
28.
RISK LEVEL
Your risk map is finished (Figure 28). Save your edits.
89
Figure 28. A detail of the buildings risk map of the pilot area
90
RISK ASSESSMENT AND EVALUATION