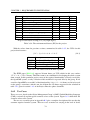
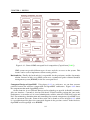
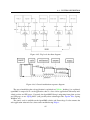
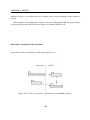
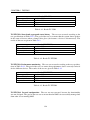
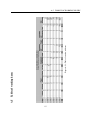
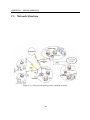
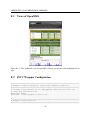
1
Customer Driven Project - Group 4
Final Report
NTNU - November 19, 2008
Andreas Eriksen
Azhar Ahmad
<[email protected]>
<[email protected]>
Francesc Martínez Maestre
José Manuel Pérez Pérez
<[email protected]>
<[email protected]>
Vegar Neshaug
Øystein Kjærnet
<[email protected]>
<[email protected]>
General Contents
1 Project Directive
2 Preliminary Study
3 Requirements Specification
4 Design
5 Implementation
6 Testing
7 Documentation
8 Evaluation
Abstract
This report details a project which is part of the course TDT 4290 Customer Driven Project, at
the Norwegian University of Science and Technology (NTNU) fall 2008. It has been given the
working title SCG Network Monitoring System, and the assigned task is to provide a system for
monitoring Telenor’s Sea Cage Gateway network. The Sea Cage Gateway is a network-based
platform for integrated operations in the aquaculture industry, combining video surveillance,
feeding actuation and more into a single integrated framework.
In this document we describe the planning and execution of the project. We study the general
concept of network monitoring systems, and a number of specific network monitoring systems.
The report also details Telenor’s requirements for a network monitoring system, and how we
evaluated and selected OpenNMS as the foundation for our work. We show how we extended
and configured OpenNMS to Telenor’s requirements, and include documentation for deployment, further configuration and use of the system. Finally, we evaluate our effort and provide
suggestions for further work.
Contents
1
Project Directive
1.1 Introduction . . . . . . . . . . . . . . . . .
1.1.1 Purpose . . . . . . . . . . . . . . .
1.1.2 Scope . . . . . . . . . . . . . . . .
1.1.3 Overview . . . . . . . . . . . . . .
1.2 Background . . . . . . . . . . . . . . . . .
1.3 Project mandate . . . . . . . . . . . . . . .
1.3.1 Project name . . . . . . . . . . . .
1.3.2 Customer . . . . . . . . . . . . . .
1.3.3 Stakeholders . . . . . . . . . . . .
1.3.4 Motivation . . . . . . . . . . . . .
1.3.5 Project objectives . . . . . . . . . .
1.3.6 Constraints . . . . . . . . . . . . .
1.4 Project plan . . . . . . . . . . . . . . . . .
1.4.1 Development model . . . . . . . .
1.4.2 Phases . . . . . . . . . . . . . . . .
1.4.3 Schedule/ Concrete Work plan . . .
1.5 Organization . . . . . . . . . . . . . . . . .
1.5.1 Organization chart . . . . . . . . .
1.5.2 Project roles . . . . . . . . . . . .
1.6 Version control procedures . . . . . . . . .
1.6.1 Choice of version control system . .
1.6.2 Directives for using version control
1.7 Templates and standards . . . . . . . . . .
1.7.1 Phase documents . . . . . . . . . .
1.7.2 Meeting agendas . . . . . . . . . .
1.7.3 Minutes . . . . . . . . . . . . . . .
1.7.4 Weekly status reports . . . . . . . .
1.7.5 Standards . . . . . . . . . . . . . .
1.8 Project management . . . . . . . . . . . . .
1.8.1 Project meetings . . . . . . . . . .
1.8.2 Internal reporting . . . . . . . . . .
I
.
.
.
.
.
.
.
.
.
.
.
.
.
.
.
.
.
.
.
.
.
.
.
.
.
.
.
.
.
.
.
.
.
.
.
.
.
.
.
.
.
.
.
.
.
.
.
.
.
.
.
.
.
.
.
.
.
.
.
.
.
.
.
.
.
.
.
.
.
.
.
.
.
.
.
.
.
.
.
.
.
.
.
.
.
.
.
.
.
.
.
.
.
.
.
.
.
.
.
.
.
.
.
.
.
.
.
.
.
.
.
.
.
.
.
.
.
.
.
.
.
.
.
.
.
.
.
.
.
.
.
.
.
.
.
.
.
.
.
.
.
.
.
.
.
.
.
.
.
.
.
.
.
.
.
.
.
.
.
.
.
.
.
.
.
.
.
.
.
.
.
.
.
.
.
.
.
.
.
.
.
.
.
.
.
.
.
.
.
.
.
.
.
.
.
.
.
.
.
.
.
.
.
.
.
.
.
.
.
.
.
.
.
.
.
.
.
.
.
.
.
.
.
.
.
.
.
.
.
.
.
.
.
.
.
.
.
.
.
.
.
.
.
.
.
.
.
.
.
.
.
.
.
.
.
.
.
.
.
.
.
.
.
.
.
.
.
.
.
.
.
.
.
.
.
.
.
.
.
.
.
.
.
.
.
.
.
.
.
.
.
.
.
.
.
.
.
.
.
.
.
.
.
.
.
.
.
.
.
.
.
.
.
.
.
.
.
.
.
.
.
.
.
.
.
.
.
.
.
.
.
.
.
.
.
.
.
.
.
.
.
.
.
.
.
.
.
.
.
.
.
.
.
.
.
.
.
.
.
.
.
.
.
.
.
.
.
.
.
.
.
.
.
.
.
.
.
.
.
.
.
.
.
.
.
.
.
.
.
.
.
.
.
.
.
.
.
.
.
.
.
.
.
.
.
.
.
.
.
.
.
.
.
.
.
.
.
.
.
.
.
.
.
.
.
.
.
.
.
.
.
.
.
.
.
.
.
.
.
.
.
.
.
.
.
.
.
.
.
.
.
.
.
.
.
.
.
.
.
.
.
.
.
.
.
.
.
.
.
.
.
.
.
.
.
.
.
.
.
.
.
.
.
.
.
.
.
.
.
.
.
.
.
.
.
.
.
.
.
.
.
.
.
.
.
.
.
.
.
.
.
.
.
.
.
.
.
.
.
.
.
.
.
.
.
.
.
.
.
.
.
.
.
.
.
.
.
.
.
.
.
.
.
.
.
.
.
.
.
.
.
.
.
.
.
.
.
.
.
.
.
.
.
.
.
.
.
.
.
.
.
.
.
.
.
.
.
.
.
.
.
.
.
.
.
.
.
.
.
.
.
.
.
.
.
.
.
.
.
.
.
.
.
.
.
.
.
.
.
.
.
.
.
.
.
.
.
.
.
.
1
1
1
1
1
2
2
3
3
3
3
4
4
5
5
6
9
10
10
10
12
12
12
13
13
13
13
14
14
15
15
16
1.8.3 Status reporting . . . . . . . . . . . . . . . . . . . . . . . .
1.8.4 TRECQ . . . . . . . . . . . . . . . . . . . . . . . . . . . .
1.9 Quality assurance . . . . . . . . . . . . . . . . . . . . . . . . . . .
1.9.1 Defining Quality . . . . . . . . . . . . . . . . . . . . . . .
1.9.2 Routines concerning the phase documents . . . . . . . . . .
1.9.3 Routines concerning the solution implementation . . . . . .
1.9.4 Routines and response times for customer communication .
1.9.5 Routines and response times for supervisor communication .
1.10 Results . . . . . . . . . . . . . . . . . . . . . . . . . . . . . . . . .
1.11 Conclusion . . . . . . . . . . . . . . . . . . . . . . . . . . . . . .
2
Preliminary Study
2.1 Introduction . . . . . . . . . . . . . . . . . . . . . .
2.1.1 Purpose . . . . . . . . . . . . . . . . . . . .
2.1.2 Scope . . . . . . . . . . . . . . . . . . . . .
2.1.3 Overview . . . . . . . . . . . . . . . . . . .
2.2 Integrated Operations . . . . . . . . . . . . . . . . .
2.3 Current situation . . . . . . . . . . . . . . . . . . .
2.4 Desired situation . . . . . . . . . . . . . . . . . . .
2.5 Business demands . . . . . . . . . . . . . . . . . . .
2.5.1 Technical demands . . . . . . . . . . . . . .
2.5.2 Non-technical demands . . . . . . . . . . . .
2.6 Evaluation . . . . . . . . . . . . . . . . . . . . . . .
2.6.1 The Evaluation Scheme . . . . . . . . . . .
2.6.2 The Evaluation Criteria . . . . . . . . . . . .
2.6.3 Summary . . . . . . . . . . . . . . . . . . .
2.7 Market investigation . . . . . . . . . . . . . . . . .
2.7.1 Network monitoring platforms . . . . . . . .
2.7.2 Cacti . . . . . . . . . . . . . . . . . . . . .
2.7.3 Nagios . . . . . . . . . . . . . . . . . . . .
2.7.4 OpenNMS . . . . . . . . . . . . . . . . . .
2.7.5 Zabbix . . . . . . . . . . . . . . . . . . . .
2.7.6 Zenoss . . . . . . . . . . . . . . . . . . . .
2.7.7 Further Evaluation . . . . . . . . . . . . . .
2.7.8 Individual Analysis . . . . . . . . . . . . . .
2.7.9 Companies using the different NMS solutions
2.7.10 About the license of the solutions . . . . . .
2.8 Currently Used Technologies . . . . . . . . . . . . .
2.9 Proposed Technologies . . . . . . . . . . . . . . . .
2.9.1 SNMP . . . . . . . . . . . . . . . . . . . . .
2.9.2 JMX . . . . . . . . . . . . . . . . . . . . .
2.10 Final solution . . . . . . . . . . . . . . . . . . . . .
II
.
.
.
.
.
.
.
.
.
.
.
.
.
.
.
.
.
.
.
.
.
.
.
.
.
.
.
.
.
.
.
.
.
.
.
.
.
.
.
.
.
.
.
.
.
.
.
.
.
.
.
.
.
.
.
.
.
.
.
.
.
.
.
.
.
.
.
.
.
.
.
.
.
.
.
.
.
.
.
.
.
.
.
.
.
.
.
.
.
.
.
.
.
.
.
.
.
.
.
.
.
.
.
.
.
.
.
.
.
.
.
.
.
.
.
.
.
.
.
.
.
.
.
.
.
.
.
.
.
.
.
.
.
.
.
.
.
.
.
.
.
.
.
.
.
.
.
.
.
.
.
.
.
.
.
.
.
.
.
.
.
.
.
.
.
.
.
.
.
.
.
.
.
.
.
.
.
.
.
.
.
.
.
.
.
.
.
.
.
.
.
.
.
.
.
.
.
.
.
.
.
.
.
.
.
.
.
.
.
.
.
.
.
.
.
.
.
.
.
.
.
.
.
.
.
.
.
.
.
.
.
.
.
.
.
.
.
.
.
.
.
.
.
.
.
.
.
.
.
.
.
.
.
.
.
.
.
.
.
.
.
.
.
.
.
.
.
.
.
.
.
.
.
.
.
.
.
.
.
.
.
.
.
.
.
.
.
.
.
.
.
.
.
.
.
.
.
.
.
.
.
.
.
.
.
.
.
.
.
.
.
.
.
.
.
.
.
.
.
.
.
.
.
.
.
.
.
.
.
.
.
.
.
.
.
.
.
.
.
.
.
.
.
.
.
.
.
.
.
.
.
.
.
.
.
.
.
.
.
.
.
.
.
.
.
.
.
.
.
.
.
.
.
.
.
.
.
.
.
.
.
.
.
.
.
.
.
.
.
.
.
.
.
.
.
.
.
.
.
.
.
.
.
.
.
.
.
.
.
.
.
.
.
.
.
.
.
.
.
.
.
.
.
.
.
.
.
.
.
.
.
.
.
.
.
.
.
.
.
.
.
.
.
.
.
.
.
.
.
.
.
.
.
.
.
.
.
.
.
.
.
.
.
.
.
.
.
.
.
.
.
.
.
.
.
.
.
.
.
.
.
.
.
.
.
.
.
.
.
.
16
16
17
17
18
18
18
19
19
19
.
.
.
.
.
.
.
.
.
.
.
.
.
.
.
.
.
.
.
.
.
.
.
.
.
.
.
.
.
.
21
21
21
21
21
22
22
23
23
23
24
24
24
25
27
27
27
31
31
33
35
36
37
38
43
43
44
44
44
46
48
3
Requirements Specification
3.1 Introduction . . . . . . . . . . . . . . . . . . . .
3.1.1 Purpose . . . . . . . . . . . . . . . . . .
3.1.2 Scope . . . . . . . . . . . . . . . . . . .
3.1.3 Definitions, acronyms, and abbreviations
3.1.4 References . . . . . . . . . . . . . . . .
3.1.5 Overview . . . . . . . . . . . . . . . . .
3.2 Background . . . . . . . . . . . . . . . . . . . .
3.3 Overall description . . . . . . . . . . . . . . . .
3.3.1 Product perspective . . . . . . . . . . . .
3.3.2 Product functions . . . . . . . . . . . . .
3.4 User characteristics . . . . . . . . . . . . . . . .
3.4.1 Constraints . . . . . . . . . . . . . . . .
3.5 Specific requirements . . . . . . . . . . . . . . .
3.5.1 Required deliverables . . . . . . . . . . .
3.5.2 Functional requirements . . . . . . . . .
3.5.3 Non-functional requirements . . . . . . .
3.5.4 Requirements representations . . . . . .
3.6 Use case based effort estimation . . . . . . . . .
3.6.1 The calculations . . . . . . . . . . . . .
3.6.2 Use Cases . . . . . . . . . . . . . . . . .
3.7 General test plans . . . . . . . . . . . . . . . . .
3.8 Conclusion . . . . . . . . . . . . . . . . . . . .
4
Design
4.1 Introduction . . . . . . . . . . . . . . . . . . . . . . . .
4.1.1 Purpose . . . . . . . . . . . . . . . . . . . . . .
4.1.2 Scope . . . . . . . . . . . . . . . . . . . . . . .
4.1.3 Overview . . . . . . . . . . . . . . . . . . . . .
4.2 Background . . . . . . . . . . . . . . . . . . . . . . . .
4.3 Development and modelling tools . . . . . . . . . . . .
4.3.1 Choice of programming language . . . . . . . .
4.3.2 Choice of Integrated Development Environment .
4.3.3 Choice of modeling diagrams . . . . . . . . . .
4.4 System description . . . . . . . . . . . . . . . . . . . .
4.4.1 OpenNMS . . . . . . . . . . . . . . . . . . . .
4.4.2 Environment . . . . . . . . . . . . . . . . . . .
4.4.3 System usage . . . . . . . . . . . . . . . . . . .
4.4.4 SCG OpenNMS extensions . . . . . . . . . . . .
4.5 Requirements Not Designed . . . . . . . . . . . . . . .
4.5.1 About features . . . . . . . . . . . . . . . . . .
4.6 Requirements not designed . . . . . . . . . . . . . . . .
4.7 Deployment . . . . . . . . . . . . . . . . . . . . . . . .
III
.
.
.
.
.
.
.
.
.
.
.
.
.
.
.
.
.
.
.
.
.
.
.
.
.
.
.
.
.
.
.
.
.
.
.
.
.
.
.
.
.
.
.
.
.
.
.
.
.
.
.
.
.
.
.
.
.
.
.
.
.
.
.
.
.
.
.
.
.
.
.
.
.
.
.
.
.
.
.
.
.
.
.
.
.
.
.
.
.
.
.
.
.
.
.
.
.
.
.
.
.
.
.
.
.
.
.
.
.
.
.
.
.
.
.
.
.
.
.
.
.
.
.
.
.
.
.
.
.
.
.
.
.
.
.
.
.
.
.
.
.
.
.
.
.
.
.
.
.
.
.
.
.
.
.
.
.
.
.
.
.
.
.
.
.
.
.
.
.
.
.
.
.
.
.
.
.
.
.
.
.
.
.
.
.
.
.
.
.
.
.
.
.
.
.
.
.
.
.
.
.
.
.
.
.
.
.
.
.
.
.
.
.
.
.
.
.
.
.
.
.
.
.
.
.
.
.
.
.
.
.
.
.
.
.
.
.
.
.
.
.
.
.
.
.
.
.
.
.
.
.
.
.
.
.
.
.
.
.
.
.
.
.
.
.
.
.
.
.
.
.
.
.
.
.
.
.
.
.
.
.
.
.
.
.
.
.
.
.
.
.
.
.
.
.
.
.
.
.
.
.
.
.
.
.
.
.
.
.
.
.
.
.
.
.
.
.
.
.
.
.
.
.
.
.
.
.
.
.
.
.
.
.
.
.
.
.
.
.
.
.
.
.
.
.
.
.
.
.
.
.
.
.
.
.
.
.
.
.
.
.
.
.
.
.
.
.
.
.
.
.
.
.
.
.
.
.
.
.
.
.
.
.
.
.
.
.
.
.
.
.
.
.
.
.
.
.
.
.
.
.
.
.
.
.
.
.
.
.
.
.
.
.
.
.
.
.
.
.
.
.
.
.
.
.
.
.
.
.
.
.
.
.
.
.
.
.
.
.
.
.
.
.
.
.
.
.
.
.
.
.
.
.
.
.
.
.
.
.
.
.
.
.
.
.
.
.
.
.
.
.
.
.
.
.
.
.
.
.
.
.
.
.
.
.
.
.
.
.
.
.
.
.
.
.
.
.
.
.
.
.
.
.
.
.
.
.
.
.
.
.
.
.
.
.
.
.
.
.
.
.
.
.
.
.
.
.
.
.
.
.
.
.
.
.
.
.
.
.
.
.
.
.
.
.
.
.
.
.
.
.
.
.
.
.
.
.
.
.
.
.
.
.
.
.
.
.
.
.
.
.
.
.
.
.
.
.
.
.
.
.
.
.
.
.
.
.
.
.
.
49
49
49
49
49
50
50
51
51
51
54
57
57
58
58
58
64
67
71
71
74
75
75
.
.
.
.
.
.
.
.
.
.
.
.
.
.
.
.
.
.
77
77
77
78
78
79
80
80
80
81
83
83
92
93
94
101
101
102
103
4.8
4.7.1 Environment . . . . .
4.7.2 Adding network nodes
4.7.3 Initial Configuration .
Conclusion . . . . . . . . . .
.
.
.
.
.
.
.
.
.
.
.
.
.
.
.
.
.
.
.
.
.
.
.
.
.
.
.
.
.
.
.
.
.
.
.
.
.
.
.
.
.
.
.
.
.
.
.
.
.
.
.
.
.
.
.
.
5
Implementation
5.1 Introduction . . . . . . . . . . . . . . . . .
5.1.1 Purpose . . . . . . . . . . . . . . .
5.1.2 Scope . . . . . . . . . . . . . . . .
5.1.3 Overview . . . . . . . . . . . . . .
5.2 Programming standards . . . . . . . . . . .
5.2.1 Layout . . . . . . . . . . . . . . .
5.2.2 Naming Conventions . . . . . . . .
5.2.3 Formatting . . . . . . . . . . . . .
5.2.4 Code commenting standard . . . . .
5.3 Process description . . . . . . . . . . . . .
5.3.1 Work Organization . . . . . . . . .
5.3.2 Libraries and Tools . . . . . . . . .
5.3.3 SOAP and AXIS . . . . . . . . . .
5.3.4 OpenNMS Libraries . . . . . . . .
5.4 Design Changes . . . . . . . . . . . . . . .
5.4.1 Customer View . . . . . . . . . . .
5.4.2 SMS Notification Acknowledgment
5.5 Conclusion . . . . . . . . . . . . . . . . .
6
Testing
6.1 Introduction . . . . . . . . . . . . . . . . . . . . . . . .
6.1.1 Purpose . . . . . . . . . . . . . . . . . . . . . .
6.1.2 Scope . . . . . . . . . . . . . . . . . . . . . . .
6.1.3 Overview . . . . . . . . . . . . . . . . . . . . .
6.2 Test plan . . . . . . . . . . . . . . . . . . . . . . . . . .
6.2.1 Introduction . . . . . . . . . . . . . . . . . . . .
6.2.2 Features to be tested . . . . . . . . . . . . . . .
6.2.3 Features not to be tested . . . . . . . . . . . . .
6.2.4 Approach . . . . . . . . . . . . . . . . . . . . .
6.2.5 Item pass/fail criteria . . . . . . . . . . . . . . .
6.2.6 Suspension criteria and resumption requirements
6.2.7 Test deliverables . . . . . . . . . . . . . . . . .
6.2.8 Testing tasks . . . . . . . . . . . . . . . . . . .
6.2.9 Environmental needs . . . . . . . . . . . . . . .
6.2.10 Responsibilities . . . . . . . . . . . . . . . . . .
6.2.11 Staffing and training needs . . . . . . . . . . . .
6.2.12 Schedule . . . . . . . . . . . . . . . . . . . . .
IV
.
.
.
.
.
.
.
.
.
.
.
.
.
.
.
.
.
.
.
.
.
.
.
.
.
.
.
.
.
.
.
.
.
.
.
.
.
.
.
.
.
.
.
.
.
.
.
.
.
.
.
.
.
.
.
.
.
.
.
.
.
.
.
.
.
.
.
.
.
.
.
.
.
.
.
.
.
.
.
.
.
.
.
.
.
.
.
.
.
.
.
.
.
.
.
.
.
.
.
.
.
.
.
.
.
.
.
.
.
.
.
.
.
.
.
.
.
.
.
.
.
.
.
.
.
.
.
.
.
.
.
.
.
.
.
.
.
.
.
.
.
.
.
.
.
.
.
.
.
.
.
.
.
.
.
.
.
.
.
.
.
.
.
.
.
.
.
.
.
.
.
.
.
.
.
.
.
.
.
.
.
.
.
.
.
.
.
.
.
.
.
.
.
.
.
.
.
.
.
.
.
.
.
.
.
.
.
.
.
.
.
.
.
.
.
.
.
.
.
.
.
.
.
.
.
.
.
.
.
.
.
.
.
.
.
.
.
.
.
.
.
.
.
.
.
.
.
.
.
.
.
.
.
.
.
.
.
.
.
.
.
.
.
.
.
.
.
.
.
.
.
.
.
.
.
.
.
.
.
.
.
.
.
.
.
.
.
.
.
.
.
.
.
.
.
.
.
.
.
.
.
.
.
.
.
.
.
.
.
.
.
.
.
.
.
.
.
.
.
.
.
.
.
.
.
.
.
.
.
.
.
.
.
.
.
.
.
.
.
.
.
.
.
.
.
.
.
.
.
.
.
.
.
.
.
.
.
.
.
.
.
.
.
.
.
.
.
.
.
.
.
.
.
.
.
.
.
.
.
.
.
.
.
.
.
.
.
.
.
.
.
.
.
.
.
.
.
.
.
.
.
.
.
.
.
.
.
.
.
.
.
.
.
.
.
.
.
.
.
.
.
.
.
.
.
.
.
.
.
.
.
.
.
.
.
.
.
.
.
.
.
.
.
.
.
.
.
.
.
.
.
.
.
.
.
.
.
.
.
.
.
.
.
.
.
.
.
.
.
.
.
.
.
.
.
.
.
.
.
.
.
.
.
.
.
.
.
.
.
.
.
.
.
.
.
.
.
.
.
.
.
.
.
.
.
.
.
.
.
.
.
.
.
.
.
.
.
.
.
.
.
.
.
.
.
.
.
.
.
.
.
.
.
.
.
.
.
.
.
.
.
.
.
.
.
.
.
.
.
.
.
.
.
.
.
.
.
.
.
.
.
.
.
.
.
.
.
.
.
.
.
.
.
.
.
.
.
.
.
.
.
.
.
.
.
.
.
.
.
.
.
.
.
.
.
.
.
.
103
103
103
104
.
.
.
.
.
.
.
.
.
.
.
.
.
.
.
.
.
.
105
105
105
105
105
106
106
106
108
109
112
112
112
112
113
113
113
114
114
.
.
.
.
.
.
.
.
.
.
.
.
.
.
.
.
.
115
115
115
115
115
116
116
116
117
117
117
117
118
118
118
119
119
119
.
.
.
.
.
.
.
.
.
.
.
.
.
.
.
.
.
.
.
.
.
.
.
.
.
.
.
.
.
.
.
.
.
.
.
.
.
.
.
.
.
.
.
.
.
.
.
.
.
.
.
.
.
.
.
.
.
.
.
.
.
.
.
.
.
.
.
.
.
.
.
.
.
.
.
.
.
.
.
.
.
.
.
.
.
.
.
.
.
.
.
.
.
.
.
.
.
.
.
.
.
.
.
.
.
.
.
.
.
.
.
.
.
.
.
.
.
.
.
.
.
.
.
.
.
.
.
.
.
.
.
.
.
.
.
.
.
.
.
.
.
.
.
119
120
120
122
123
123
129
132
132
133
133
7
Documentation
7.1 Introduction . . . . . . . . . . . . . . . . . . . . . . . . .
7.1.1 Purpose . . . . . . . . . . . . . . . . . . . . . . .
7.1.2 Scope . . . . . . . . . . . . . . . . . . . . . . . .
7.1.3 Overview . . . . . . . . . . . . . . . . . . . . . .
7.2 Installation guide . . . . . . . . . . . . . . . . . . . . . .
7.2.1 Installation of base system . . . . . . . . . . . . .
7.2.2 First time configuration . . . . . . . . . . . . . . .
7.2.3 Path outages . . . . . . . . . . . . . . . . . . . .
7.2.4 Adding network components . . . . . . . . . . . .
7.2.5 Configuration of the map feature . . . . . . . . . .
7.3 User manual . . . . . . . . . . . . . . . . . . . . . . . . .
7.3.1 Configure OpenNMS to start when Windows starts
7.3.2 Monitoring the network . . . . . . . . . . . . . .
7.3.3 Acting on alarms . . . . . . . . . . . . . . . . . .
7.3.4 Configuration of the SMS notifications . . . . . .
7.3.5 Configure notification sequences/escalation . . . .
7.3.6 Configure SNMP for Mikrotik devices . . . . . . .
7.4 Extensions manual . . . . . . . . . . . . . . . . . . . . .
7.4.1 Implementation of the customer view . . . . . . .
7.5 Conclusions . . . . . . . . . . . . . . . . . . . . . . . . .
.
.
.
.
.
.
.
.
.
.
.
.
.
.
.
.
.
.
.
.
.
.
.
.
.
.
.
.
.
.
.
.
.
.
.
.
.
.
.
.
.
.
.
.
.
.
.
.
.
.
.
.
.
.
.
.
.
.
.
.
.
.
.
.
.
.
.
.
.
.
.
.
.
.
.
.
.
.
.
.
.
.
.
.
.
.
.
.
.
.
.
.
.
.
.
.
.
.
.
.
.
.
.
.
.
.
.
.
.
.
.
.
.
.
.
.
.
.
.
.
.
.
.
.
.
.
.
.
.
.
.
.
.
.
.
.
.
.
.
.
.
.
.
.
.
.
.
.
.
.
.
.
.
.
.
.
.
.
.
.
.
.
.
.
.
.
.
.
.
.
.
.
.
.
.
.
.
.
.
.
.
.
.
.
.
.
.
.
.
.
.
.
.
.
.
.
.
.
.
.
.
.
.
.
.
.
.
.
.
.
.
.
.
.
.
.
.
.
.
.
.
.
.
.
.
.
.
.
.
.
.
.
.
.
.
.
.
.
.
.
135
135
135
135
135
136
136
137
139
140
141
146
146
147
148
148
151
153
155
155
159
8
Evaluation
8.1 Introduction . . . . . .
8.1.1 Purpose . . . .
8.1.2 Overview . . .
8.2 Background . . . . . .
8.3 Planning and execution
8.3.1 Timeline . . .
8.3.2 Tasks . . . . .
8.3.3 Tools . . . . .
.
.
.
.
.
.
.
.
161
161
161
161
163
164
164
166
166
6.3
6.4
6.5
6.6
6.2.13 Risks and contingencies . . . . . . . . .
Test design specification . . . . . . . . . . . . .
6.3.1 System functionality test . . . . . . . . .
6.3.2 System usability test . . . . . . . . . . .
Test results . . . . . . . . . . . . . . . . . . . .
6.4.1 Function test results . . . . . . . . . . .
6.4.2 Usability test results . . . . . . . . . . .
Tracking of tests . . . . . . . . . . . . . . . . . .
6.5.1 Test cases and Requirements . . . . . . .
6.5.2 Dependency of requirements not covered
Conclusion . . . . . . . . . . . . . . . . . . . .
.
.
.
.
.
.
.
.
.
.
.
.
.
.
.
.
.
.
.
.
.
.
.
.
.
.
.
.
.
.
.
.
.
.
.
.
.
.
.
.
.
.
.
.
.
.
.
.
.
.
.
.
.
.
.
.
.
.
.
.
.
.
.
.
V
.
.
.
.
.
.
.
.
.
.
.
.
.
.
.
.
.
.
.
.
.
.
.
.
.
.
.
.
.
.
.
.
.
.
.
.
.
.
.
.
.
.
.
.
.
.
.
.
.
.
.
.
.
.
.
.
.
.
.
.
.
.
.
.
.
.
.
.
.
.
.
.
.
.
.
.
.
.
.
.
.
.
.
.
.
.
.
.
.
.
.
.
.
.
.
.
.
.
.
.
.
.
.
.
.
.
.
.
.
.
.
.
.
.
.
.
.
.
.
.
.
.
.
.
.
.
.
.
.
.
.
.
.
.
.
.
.
.
.
.
.
.
.
.
.
.
.
.
.
.
.
.
.
.
.
.
.
.
.
.
.
.
.
.
.
.
.
.
.
.
.
.
.
.
.
.
.
.
.
.
.
.
.
.
.
.
.
.
.
.
.
.
.
.
.
.
.
.
.
.
.
.
.
.
.
.
.
.
.
.
.
.
.
.
.
.
.
.
.
.
8.4
8.5
8.6
8.7
8.8
Process . . . . . . . . . . . . . . . . .
8.4.1 Group dynamics . . . . . . . .
8.4.2 Development model . . . . . .
8.4.3 Phase model . . . . . . . . . .
Customer . . . . . . . . . . . . . . . .
8.5.1 Competence . . . . . . . . . . .
8.5.2 Resource . . . . . . . . . . . .
8.5.3 Availability . . . . . . . . . . .
8.5.4 The Project Tasks . . . . . . . .
Solutions . . . . . . . . . . . . . . . .
8.6.1 Documentation . . . . . . . . .
8.6.2 Short analysis of the application
8.6.3 Resources . . . . . . . . . . . .
8.6.4 Further work . . . . . . . . . .
The course . . . . . . . . . . . . . . . .
8.7.1 Lectures and seminars . . . . .
8.7.2 Compendium . . . . . . . . . .
8.7.3 Resources . . . . . . . . . . . .
8.7.4 Supervisors . . . . . . . . . . .
Conclusion . . . . . . . . . . . . . . .
A Project Directive Appendix
A.1 Involved Parties . . . . . . . . .
A.1.1 Customer representatives
A.1.2 Project group . . . . . .
A.1.3 Project supervisors . . .
A.1.4 Coordinator . . . . . . .
A.2 Gantt chart . . . . . . . . . . .
A.3 Meeting Documents templates .
A.3.1 Agendas . . . . . . . . .
A.3.2 Minutes . . . . . . . . .
A.3.3 Weekly status reports . .
A.4 Risk tables . . . . . . . . . . . .
A.4.1 Original table of risks . .
A.4.2 Updated table of risks .
A.5 Tables of working hours . . . .
.
.
.
.
.
.
.
.
.
.
.
.
.
.
.
.
.
.
.
.
.
.
.
.
.
.
.
.
.
.
.
.
.
.
.
.
.
.
.
.
.
.
.
.
.
.
.
.
.
.
.
.
.
.
.
.
.
.
.
.
.
.
.
.
.
.
.
.
.
.
.
.
.
.
.
.
.
.
.
.
.
.
.
.
.
.
.
.
.
.
.
.
.
.
.
.
.
.
.
.
.
.
.
.
.
.
.
.
.
.
.
.
.
.
.
.
.
.
.
.
.
.
.
.
.
.
.
.
.
.
.
.
.
.
.
.
.
.
.
.
.
.
.
.
.
.
.
.
.
.
.
.
.
.
.
.
.
.
.
.
.
.
.
.
.
.
.
.
.
.
.
.
.
.
.
.
.
.
.
.
.
.
.
.
.
.
.
.
.
.
.
.
.
.
.
.
.
.
.
.
.
.
.
.
.
.
.
.
.
.
.
.
.
.
.
.
.
.
.
.
.
.
.
.
.
.
.
.
.
.
.
.
.
.
.
.
.
.
.
.
.
.
.
.
.
.
.
.
.
.
.
.
.
.
.
.
.
.
.
.
.
.
.
.
.
.
.
.
.
.
.
.
.
.
.
.
.
.
.
.
.
.
.
.
.
.
.
.
.
.
.
.
.
.
.
.
.
.
.
.
.
.
.
.
.
.
.
.
.
.
.
.
.
.
.
.
.
.
.
.
.
.
.
.
.
.
.
.
.
.
.
.
.
.
.
.
.
.
.
.
.
.
.
.
.
.
.
.
.
.
.
.
.
.
.
.
.
.
.
.
.
.
.
.
.
.
.
.
.
.
.
.
.
.
.
.
.
.
.
.
.
.
.
.
.
.
.
.
.
.
.
.
.
.
.
.
.
.
.
.
.
.
.
.
.
.
.
.
.
.
.
.
.
.
.
.
.
.
.
.
.
.
.
.
.
.
.
.
.
.
.
.
.
.
.
.
.
.
.
.
.
.
.
.
.
.
.
.
.
.
.
.
.
.
.
.
.
.
.
.
.
.
.
.
.
.
.
.
.
.
.
.
.
.
.
.
.
.
.
.
.
.
.
.
.
.
.
.
.
.
.
.
.
.
.
.
167
167
167
167
168
168
168
168
169
170
170
170
170
171
172
172
173
173
174
175
.
.
.
.
.
.
.
.
.
.
.
.
.
.
.
.
.
.
.
.
.
.
.
.
.
.
.
.
.
.
.
.
.
.
.
.
.
.
.
.
.
.
.
.
.
.
.
.
.
.
.
.
.
.
.
.
.
.
.
.
.
.
.
.
.
.
.
.
.
.
.
.
.
.
.
.
.
.
.
.
.
.
.
.
.
.
.
.
.
.
.
.
.
.
.
.
.
.
.
.
.
.
.
.
.
.
.
.
.
.
.
.
.
.
.
.
.
.
.
.
.
.
.
.
.
.
.
.
.
.
.
.
.
.
.
.
.
.
.
.
.
.
.
.
.
.
.
.
.
.
.
.
.
.
.
.
.
.
.
.
.
.
.
.
.
.
.
.
.
.
.
.
.
.
.
.
.
.
.
.
.
.
.
.
.
.
.
.
.
.
.
.
.
.
.
.
.
.
.
.
.
.
.
.
.
.
.
.
.
.
.
.
.
.
.
.
.
.
.
.
.
.
.
.
.
.
.
.
.
.
.
.
.
.
.
.
.
.
.
.
.
.
.
.
.
.
.
.
.
.
.
.
.
.
.
.
.
.
.
.
.
.
.
.
.
.
.
.
.
.
.
.
.
.
.
.
.
.
.
.
.
.
.
.
.
.
.
.
.
.
.
.
.
.
.
.
.
.
.
.
.
.
.
.
.
.
.
.
1
1
1
1
2
2
2
4
4
8
10
12
12
13
15
.
.
.
.
.
17
17
18
18
22
27
B Requirements specification Appendix
B.1 Use case points estimation . . . . . . . . . . . . . . . .
B.2 Textual Use Case Scenarios . . . . . . . . . . . . . . . .
B.2.1 Operator Use Case Scenarios . . . . . . . . . . .
B.2.2 Administrator Use Case Scenarios . . . . . . . .
B.2.3 Network Component Agent Use Case Scenarios .
VI
.
.
.
.
.
.
.
.
.
.
.
.
.
.
.
.
.
.
.
.
.
.
.
.
.
.
.
.
.
.
.
.
.
.
.
.
.
.
.
.
.
.
.
.
.
.
.
.
.
.
.
.
.
.
.
.
.
.
.
.
C Design Appendix
29
C.1 Network Structure . . . . . . . . . . . . . . . . . . . . . . . . . . . . . . . . . . 30
C.2 Communication between OpenNMS packages . . . . . . . . . . . . . . . . . . . 32
C.2.1
Between the netmgt, secret and report packages . . . . . . . . . . . . . . 32
C.2.2
Between protocols entity and netmgt packages . . . . . . . . . . . . . . 32
C.2.3
Between web and netmgt packages . . . . . . . . . . . . . . . . . . . . 32
C.2.4
Between netmgt.poller, protocols and netmgt.notifd packages . . . . . . 32
D Testing Appendix
35
D.1 Unit test . . . . . . . . . . . . . . . . . . . . . . . . . . . . . . . . . . . . . . . 36
D.2 Test case specification . . . . . . . . . . . . . . . . . . . . . . . . . . . . . . . . 39
D.2.1 Node monitoring test cases . . . . . . . . . . . . . . . . . . . . . . . . . 39
D.2.2 Alarm notification test cases . . . . . . . . . . . . . . . . . . . . . . . . 41
D.2.3 Availability test cases . . . . . . . . . . . . . . . . . . . . . . . . . . . . 44
D.2.4 Reports test cases . . . . . . . . . . . . . . . . . . . . . . . . . . . . . . 45
D.2.5 User interface test cases . . . . . . . . . . . . . . . . . . . . . . . . . . 46
D.2.6 Usability test cases . . . . . . . . . . . . . . . . . . . . . . . . . . . . . 51
E Documentation Appendix
57
E.1 Views of OpenNMS . . . . . . . . . . . . . . . . . . . . . . . . . . . . . . . . . 58
E.2 JSVC Wrapper Configuration . . . . . . . . . . . . . . . . . . . . . . . . . . . . 58
E.3 SCG SMS Extension API . . . . . . . . . . . . . . . . . . . . . . . . . . . . . . 61
Glossary
77
Literature
81
VII
Chapter 1
Project Directive
1.1
Introduction
This chapter gives an introduction to the Project directive. The introduction presents the purpose,
scope and an overview of the chapters in the Project directive.
1.1.1
Purpose
The purpose of the Project directive is providing and administrative framework for the project.
The Project directive gives a summary of the task, the initial working plan as well as strategies
employed to ensure the success of the project.
1.1.2
Scope
The Project directive presents the initial task and its objectives as presented to the group. The
plan and overview of the methods the group intends to use to complete the project is also part
of the Project directive. In addition, the project directive will be continuously updated to reflect
changes and added knowledge in the project. The scope is therefore information on how the
group intends to complete the task and not the results.
1.1.3
Overview
This section gives an overview of the chapters in the Project directive.
• Chapter 1.2 - Background
This chapter gives the background for the project directive.
• Chapter 1.3 - Project mandate
This chapter presents a summary of the project,objectives and desired effect. The project
environment, such as constraints and stakeholders is also given here.
1
CHAPTER 1. PROJECT DIRECTIVE
• Chapter 1.4 - Project plan
This chapter describes the phases and the planning of the project activities.
• Chapter 1.5 - Organization
This chapter gives the organization of the group.
• Chapter 1.6 - Version control procedures This chapter describes the document and code
collaboration tool used by the group.
• Chapter 1.7 - Templates and standards
This chapter gives a description of the different templates and standards used by the group
during the project.
• Chapter 1.8 - Project management
This chapter describes the methods of project management used.
• Chapter 1.9 - Quality Assurance
This chapter describes routines for achieving a quality result.
• Chapter 1.10 - Results
This chapter gives the results of the planning phase.
• Chapter 1.11 - Conclusion
This chapter presents the conclusions drawn from the planning phase.
1.2
Background
The planning phase is an important part of every project. It is the first of the eight phases of
this particular project. Through discussion and decision making the purpose and intention of the
project is decided and time and resources available are determined. A plan for the execution
of the project must be agreed upon by the group together with the customer. Any deadlines,
limitations or other vital information is mapped out and considered when making this plan. This
plan gives a foundation for the group to work in the following project phases, and provide an
agreement between the involved parties when they are expected to contribute.
The project directive is the resulting phase document of the planning phase. To be able to
work efficiently and effectively towards the completion of the project it is necessary to have a
governing document which outlines the purpose of the project and the planned resources and
activities.
1.3
Project mandate
The project mandate contains information about the project’s motivation, objectives, and constraints. These elements will most probably remain invariant throughout the project and must be
adhered to in the planning and all the subsequent phases. For example, the plan cannot exceed
2
1.3. PROJECT MANDATE
or involve resources that the project does not possess. Also, the project must above all seek to
reach the project objectives and should not use time or resources on activities that do not add
value with regards to these objectives.
1.3.1
Project name
The project name is SCG Network Monitoring Systems. SCG (Sea Cage Gateway) is a project
of Telenor R&I which will form the basis of the new TelCage company owned by Telenor.
1.3.2
Customer
Telenor is the project sponsor with Telenor R&I being the sponsoring department. It is the
incumbent telecommunications company in Norway, with headquarters located at Fornebu, close
to Oslo. Today, Telenor is mostly an international wireless carrier with operations in Scandinavia,
Eastern Europe and Asia. It is currently ranked as the seventh largest carrier in the world, with
143 million subscribers. In addition, it has extensive broadband and TV distribution operations
in four Nordic Countries.
For commercialization of the SCG project Telenor has established a new company named
TelCage.
1.3.3
Stakeholders
The primary stakeholders are Telenor, TelCage and Salmar. Telenor has a large investment in
research and development of this possible new market segment. TelCage is a new subsidiary of
Telenor, created with the intention of being more agile and adaptive than the parent company in
pursuing the new market they hope to create. Salmar is the pilot client for this project, and are
investing time and other resources in a pilot deployment with Telenor/TelCage in the hope of
reducing cost and increasing efficiency.
1.3.4
Motivation
Telenor through the newly found company TelCage wishes to deliver Information and Communication Technology services to the aquaculture industry in Norway and abroad. The main
purpose is to enable remote production, supervision and monitoring of ocean based fish farms.
As part of the solution Telenor will establish a wireless broadband solution between sites. The
infrastructure will be owned by TelCage and bandwidth will possibly be shared between various
aquaculture companies as customers of TelCage. Telenor envisions several independent network
installations which will be managed by a management center. This management center will
ensure that TelCage is able to provide a reliable service to its customers.
3
CHAPTER 1. PROJECT DIRECTIVE
1.3.5
Project objectives
This section describes the effects and results expected by the customer. The goals have been
identified together with the customer.
Targeted effects
The project shall study the management of the network and associated components and provide
a recommendation of a network monitoring system. There are three main desired effects.
TE1 : The system will enable TelCage to identify components that fail in the network.
TE2 : The system will enable TelCage to give their customers reports on the performance,
stability and reliability of the network service.
TE3 : The system will enable TelCage to remotely configure components in the network.
The requirements specification will give the extent of these targeted effects.
Targeted results
TR1 : The Project will deliver a functioning prototype demonstrating the monitoring of a test
network.
TR2 : The prototype must be documented including usage scenarios.
The project report, specifically the documentation, is regarded as part of the delivery result.
1.3.6
Constraints
This section defines the constraints of the project. Constraints will be given for the solution,
resources, financial and time available for the project.
The solution
The project report and documentation as well as names and commentaries in code shall be written
in English. The delivered prototype is required to support open standards given in the requirements specification. In the case of the project extending an open source solution, the extensions,
with the customer’s approval, will be contributed to the open source community. The solution
must give a detailed plan for deploying from the test environment to a production environment.
4
1.4. PROJECT PLAN
Resources
The project group has access to the computer labs in the P15 building at NTNU’s Gløshaugen
campus at its disposal. In addition, all group members have 24 hour access to Telenorsenteret,
Otto nilsens v.12. The customer will provide a test network with components similar to the components which will be part of the Sea Cage Gateway network. Server machines for running the
network monitoring system will also be provided by the customer. Regarding human resources,
the project group consists of six participants which will carry out all the phases. In addition to
this, the group has regular communication with the project supervisors and the customer representatives. These involved parties are given in the appendix A.1.
Financial
The project has a budget of 310 working hours of work per member in the project group, giving
a total of 1860 hours.
Time
The project started on August 26th, 2008 and is scheduled to be completed by November 20th,
2008.
1.4
Project plan
In this section, the overall plan for the project is layered out. The chosen development model is
described, and there is a brief summary of each of the phases that the project has been divided
into. The section ends outlining a concrete work plan, which is described in more detail in the
Gantt chart appended as appendix A.2.
1.4.1
Development model
To better manage large software development projects, there has been made several models that
partition and systematize the process. Two such development models are scrum and the waterfall
model.
The scrum model is one of the so called “agile” development models. That is models that
are based on development iterations, open collaboration, and process adaptability throughout the
process [Ano08a, wikipedia]. Scrum partitions the development process into short “sprints”,
which produce an increment of usable software. The waterfall model is the more traditional, sequential approach, where the development process is divided into several “phases”, that the process moves through one at a time. This is envisioned like a waterfall, illustrated in figure 1.4.1.
The figure is actually a somewhat compressed version of the one in Winston W. Royce’s article
([Roy70]), which is often claimed to be the origin of the waterfall model. He also proposed
several refinements of this basic model, to deal with some of its shortcomings. The most widely
5
CHAPTER 1. PROJECT DIRECTIVE
used figure representing the waterfall model, with arrows both up and down the “steps” representing the phases, is from one of these refinements, representing iterative interaction between
the successive steps.
After carefully considering the scrum and waterfall models, along with several other common
models, the group decided on using the waterfall model with some minor modifications. It was
considered the most suitable model for us because of the strong focus on documentation and
research, and the fact that actual programming only will constitute a small part of the project.
The modifications were mainly in simplifying the process, due to the fact that the model is
constructed with large long-lived development projects; not a semester long school project with
a team of six students.
Also, since the group has very little experience with development projects of this magnitude,
there needs to be flexibility in regards to when phases start and finish, to allow a fair amount of
trial and error. The major consequence of this is that one phase will not have to be fully complete
before we start on the next phase. This kind of interaction between successive steps, and even
steps that are not successive, is also mentioned as an improvement to the strict waterfall model
in Royce’s article.
Figure 1.4.1: The waterfall development model
1.4.2
Phases
The project has been divided into nine phases, following the suggestions from this course compendium. First we have three phases with preparatory works, to plan and explore the problem,
and finally make the solution work as efficiently as possible. Then follows three phases with
working on the actual solution. Finally, when the solution is worked out and thoroughly tested,
it needs to be documented before the group can concentrate on evaluating the whole project and
preparing for the presentation. It is important to note that these phases are not fully separate
phases per se, but rather periods that will be dominated by the kind of work described for each
phase. This can be illustrated by the phases having overlapping borders, like in figure 1.4.2.
6
1.4. PROJECT PLAN
Figure 1.4.2: The workload over the different phases
Planning
The planning phase is a natural first phase, that needs to be, at least partially, completed before
moving on to the next phases. During this phase a road map will be set up for the whole project,
with deadlines for the different tasks and milestones, that is summed up in a Gantt chart. Version
control procedures, document templates and a group structure needs to be set up early in this
phase. Also critical is that an agreement with the customer over the task definition is reached.
Preliminary study
The preliminary study phase, or “prestudy” from now, is used to study the problem and its environment, and look for possible solutions to it. Also, if there are existing solutions to the problem,
they must be investigated. In particular, the current situation needs to be mapped, as well as the
wanted situation. Any technology used in the solution needs to be investigated and documented.
7
CHAPTER 1. PROJECT DIRECTIVE
Requirement specification
During this phase, the group will specify a list of requirements for the solution. The gathering
of requirements will happen in conversations with the customer, possibly with the help of early
prototypes. The final list of requirements produced must be approved by the customer, and the
group and the customer must agree on a procedure to handle the potential situation where the
customer wants to add additional requirements later in the development process.
Design / Construction
When the plan is made, and the problem and requirements are thoroughly investigated, the group
can start designing the final solution.
Implementation
During this phase, the solution designed in the previous phase, is to be implemented on the test
environment.
Testing
It is important that the implementation is extensively tested in a close to real environment.
Documentation
The documentation is the last phase with working on the implemented solution. It is also the
last phase in which interaction with the customer is critical. In this phase the group will produce
documents that explain the developed solution, and help the users fully exploit the possibilities
of it.
Project Evaluation
To a higher degree than the rest of the phases, the project evaluation will be a process that runs
throughout the whole project period. Evaluations will be written after every lecture and seminar,
and semi periodically when the group have experienced something worth taking note of, like
specific problems or good solutions.
Presentation and Demonstration
20th November the project is to be presented, and in due time prior to this, the group will start
giving a finishing touch to the report and rehearse for the demonstration.
8
1.4. PROJECT PLAN
1.4.3
Schedule/ Concrete Work plan
Time usage
As this course yields 312 working hours per student, and the group consists of six students,
the total effort budget is 1,872 working hours, including lectures and seminars, according to
[Unk08]. Table 1.4.1 shows the time distribution. An estimation of the planned distribution of
these working hours, between the different phases, is shown in table 1.4.1.
Activity
Lectures
Selfstudy
Project management
Planning
Prestudy
Requirements Specification
Design
Programming and documentation
Project evaluation
Presentation and demonstration
In total
Est. workhours
186
72
144
132
288
360
270
252
96
90
1521
Perc. of total
9.8 %
3.8 %
7.6 %
7.0 %
15.2 %
19.1 %
14.3 %
13.3 %
5.1 %
4.8 %
100 %
Sugg. norm
10%
10%
7%
15 %
20 %
15 %
13 %
5%
5%
100 %
Table 1.4.1: Workload distribution for the different activities.
Top level Milestones
To easier track the progress, a set of important deadlines, called “milestones”, have been set. The
top level milestones, spread throughout the duration of the project, are laid out in table 1.4.3.
In addition, there will be made milestones for each phase, during a planning meeting in the
beginning of that phase.
9
CHAPTER 1. PROJECT DIRECTIVE
Milestone
1. Project directive finished
2. Pre-study finished
3. Requirements finished
4. Pre-delivery
5. Construction finished
6. Implementation finished
7. Test report finished
8. Documentation finished
9. Evaluation finished
10. Final presentation
Description
Date
The group should now be finished with 2nd Sept.
the project directive phase document
The pre-study phase document should be 10th Oct.
finished.
The Requirements specification should be 10th Oct.
finished.
A deliverable containing the abstract, 26. Sept.
project directive, pre-study and requirements chapters of the report.
The construction phase document should 28th Oct.
be finished.
The implementation phase document 7th Nov.
should be finished.
The test report should be finished
14th Nov.
The user documentation should be fin- 10th Nov.
ished
The evaluation phase document should be 14th Nov.
finished.
The whole report must be finished, and a 19th Nov.
presentation is to be held
Table 1.4.2: The top level milestones for the project.
1.5
1.5.1
Organization
Organization chart
This section shows the organization chart. The project participants are delegated certain roles
that last throughout the project. These roles are selected in order to have a primary responsible
within key areas of the project. The benefits of well defined roles are accountability and a more
structured project. It also allows team members to concentrate on their area of responsibility. The
team members however have many tasks that do not fall in their specific project role, and every
team member is therefore first and foremost a contributor to the overall success of the project.
1.5.2
Project roles
In this section we present the different roles in the project, people assigned to them and a description of each role.
10
1.5. ORGANIZATION
Figure 1.5.1: shows the details of the group’s different roles.
Project manager
The project manager has a particular responsibility of monitoring the progress of the project. The
project manager is responsible for coordinating the tasks in the project, supervising deadlines
and holding effective internal meetings.The project manager also has a particular responsibility
of preventing internal conflicts. The project manager has a particular responsibility for the evaluation phase.
Andreas Eriksen is the project manager on this project.
Document manager
The document manager is responsible for the team’s document and collaboration tools. Moreover, the document manager is responsible for making templates for the phase documents, meeting notices and other standardized documents. He is also responsible for the file structure and
format of the documents. The document manager has a particular responsibility for the documentation phase.
Øystein Kjærnet is the document manager on this project.
Quality assurance manager
The quality assurance responsible will make sure that the project is executed in a way leading
towards a quality product. Moreover, the quality assurance manager has a particular responsibility of following up the requirements specification in order to provide a solution according to the
customer’s wishes.
Azhar Ahmad is the quality assurance manager on this project.
Technical manager
The technical manager has the responsibility of coordinating the use of systems and tools in the
project. This responsibility includes ensuring that systems and tools that are to be used in a given
activity are available at the beginning and throughout the activity. The technical manager has a
particular responsibility for the implementation phase.
Francesc Martínez is the technical manager on this project.
11
CHAPTER 1. PROJECT DIRECTIVE
Test manager
The test manager is responsible for the test phase. This includes the responsibility of setting up a
test plan, supervising its execution and documenting the final test of features. The test manager
is responsible for designing a test plan which verifies the fulfilment of the requirements in the
requirements specification. The test manager has a particular responsibility for the test phase.
José Manuel Pérez is the test manager on this project.
Customer contact
The primary responsibility of the customer contact is to coordinate communication with the
customer. The customer contact will arrange the meetings between the project participants and
the customer as well as planning and structuring these meetings. Finally, the customer contact is
responsible for gathering formal approval of documents and deliverables from the customer.
Vegar Neshaug is the customer contact.
1.6
Version control procedures
Working in groups where the members often work separately, demands an effective and reliable
way to exchange and combine this work; in this case: documents and source code. There are
several ways to achieve this, but the method encouraged by the course responsible are the clientserver revision control platforms Concurrent Versions System (CVS) or subversion (svn).
1.6.1
Choice of version control system
When deciding on a version control system, there were two choices provided in the student labs:
CVS or svn. These are simple but powerful tools, and probably the most widely used systems
when it comes to managing small to medium sized code bases. Both are set up on the school’s
servers, and are the methods used in earlier courses as well. They are easy to use, reliable and,
since they are made to handle source code, they also handle latex source files nicely. Using
the same tool for handling source code and collaborating on the report documents simplifies
management considerably. As the group members had had best experiences with subversion,
this tool was chosen and used from day one of the project.
1.6.2
Directives for using version control
Some guidelines are needed for subversion to function as smoothly as possible:
• Every file frequently changed by different group members should be under version control.
• Before changes are committed to the repository, it must be verified that the changed code
compiles flawlessly.
12
1.7. TEMPLATES AND STANDARDS
• Use subversion’s tools to perform file system changes, like copy or rename, to files under
version control.
• Every commit to the repository is to be explained briefly in the commit commentary.
1.7
Templates and standards
This chapter describes the templates and standards to be used throughout the project. The group
has committed to using templates for meeting minutes, agenda, status reports and phase documents.
1.7.1
Phase documents
The group has decided to use LATEXfor all minutes, agendas and weekly status report, as well as
the phase documents. This makes it easier to have consistency in appearance across the project
documents. Using LATEXalso makes it easier to manage large documents, like the final report.
The content of the phases is established by the project manager with the collaboration of the rest
of the members of the group. The document manager is responsible for creating and managing
templates for the different documents, as well as setting up the version control system.
1.7.2
Meeting agendas
Meeting agendas are sent out to participants prior to a meeting. There are three categories of
meeting agendas in this project.
• Internal project group meetings; see appendix A.3.1, figure A.3.1.
• Course supervisor meetings; see appendix A.3.1, figure A.3.3.
• Customer meetings; see appendix A.3.1, figure A.3.2.
Every notice of meeting file is kept in the svn repository so that we can track the different
issues and see how they have evolved.
1.7.3
Minutes
Minutes are written after each meeting and sent to the suitable responsible. They follow these
templates:
• Supervisor minutes; see appendix A.3.2, figure A.3.5.
• Customer minutes; see appendix A.3.2, figure A.3.4.
• Internal project group minutes; since these meetings are very frequent, the minutes are
written down more informally, as a list of keywords in a simple text document.
13
CHAPTER 1. PROJECT DIRECTIVE
1.7.4
Weekly status reports
The group is making a weekly report explaining the work that has been done during the week,
the status of the documents, meetings that have taken place and an overview about the problems
encountered while progressing in the project and a guideline for future activities. For an example,
see appendix A.3.3, figure A.3.6.
1.7.5
Standards
The group should follow one standard for storing the files that the whole group works on.
File organization
All files are stored at \\sambastud.stud.ntnu.no\groups\scg. There are the subversion repository
for all the documentation, the documents provided by Telenor and the files for the wiki website
used to keep general information about the next meetings and important news. There is also a
“working copy” of the subversion repository that always contains the most recent versions of all
files. Figure 1.7.5 shows a small overview of the structure:
14
1.8. PROJECT MANAGEMENT
The final report document consists of several chapters, one for each phase document, that are
joined together using LATEX. All the files are kept in the report folder. Each one of the chapters
will have a dedicated folder, and each of the sections under these chapters will be represented as
a separate tex file.
Other common resources such as pictures have their own folder, which is shared by all phase
documents.
File naming conventions
The name of the files as well as the folders are in English. There exists a list of guidelines that
affect the name of the report files, which is maintained on the group’s wiki web page, and added
to or modified when the need arises.
Meeting reports These files are inside the meetings folder and they follow a name convention,
being named agenda_type_XX.tex, where type can be ’cust’ from customer, ’sup’ from supervisor
or ’int’ for internal, and XX is the number of the week. Examples:
• agenda_sup_38.tex Notice of supervisor meeting of week 38th.
• agenda_cust_44.tex Notice of customer meeting minutes of week 44th.
• agenda_int_41.tex Notice of group meeting minutes of week 41st.
Meeting minutes Minutes are in the same folder as meetings and followed the same name
convention but using minutes instead agenda. Examples:
• minutes_sup_38.tex Supervisor meeting minutes of week 38th.
• minutes_cust_44.tex Customer meeting minutes of week 44th.
• minutes_int_41.tex Group meeting minutes of week 41st.
1.8
Project management
This chapter gives a discussion on how the project is managed. The contents include information
on group meetings, reporting status, internal reporting and TRECQ.
1.8.1
Project meetings
The official project meetings are given here. Supervisor meetings occur on a weekly basis and
are required by the course. Internal meetings are held at least twice a week, and vary in duration.
Internet Relay Chat is also utilized for short internal meetings. Official customer meetings will in
the beginning of the project occur approximately once a week, while later on this will be reduced
15
CHAPTER 1. PROJECT DIRECTIVE
to once every two weeks. Informal contact with the customer is preferred by both customer and
group, and all decisions or issues that arise during informal contact are put on the agenda for the
next official meeting. Schedule:
• Internal meetings, Tuesdays, Wednesdays and Thursdays at 9:15. Usually lasting until
10:00
• Supervisor meetings, Thursday from 08:15 - 09:00
• Customer meetings, Tuesdays or Wednesdays
1.8.2
Internal reporting
All group members are individually responsible for recording their own hours for the different
activities. The hours are recorded in a spreadsheet shared among the members on Google Docs.
Hours worked should be recorded at the end of every working day. The spreadsheet uses the
individual hours to produce a time management spreadsheet which is continuously compared
to the estimations by the project manager. Progress and milestones are to be discussed in the
internal meeting prior to every supervisor meeting.
1.8.3
Status reporting
Weekly status reports are to be sent to the supervisors 24 hours before the supervisor meeting.
The weekly status report contains the following:
• Summary
• Work done last period
• Status of phase documents
• Summary of latest official meetings
• Activities update
• Problems and issues (TRECQ) and related actions
• Planning for the following period
1.8.4
TRECQ
Every week the group will evaluate all activities according to time spent, risks, extent of project,
cost and quality of product. These factors will be discussed in this section.
16
1.9. QUALITY ASSURANCE
Time
This factor shows how the project is progressing according to time estimates and deadlines, in
other words the project plan. The evaluation will consider used and remaining resources in the
planned activities.
Risk
Risk factors may affect the projects progress, plans and schedules. The risks identified will be
listed in a table with the corresponding activity, consequences, probability, severity, mitigating
strategies and actions, deadline and responsible. The risk table can be found in appendix A.4.
Extent
The extent of the project describes the stability of the projects scope. Changes in the extent may
come from changing goals or objectives.
Cost
Cost in this project concerns the management of time and working hours. This includes time
spent in relation to estimates and time remaining on activities.
Quality
The quality measure states where there are compromises regarding the quality of the product.
These compromises may be caused from limited resources and/or time. Risks that have occurred
may affect the quality.
1.9
Quality assurance
To be able to deliver a high quality product, one first has to clearly identify the important product
qualities, and a way to measure them. After having made a clear definition of quality, a set of
routines is required to ensure the product’s quality every step of the development.
1.9.1
Defining Quality
The group was encouraged to use a standard set by International Organization for Standardization, or ISO, as guidance for making objective quality measures. The standard, called ISO 9126
[Int91], defines a hierarchy of software quality characteristics, and points out the importance of
setting measurable goals.
17
CHAPTER 1. PROJECT DIRECTIVE
1.9.2
Routines concerning the phase documents
These routines are to be followed when writing the phase documents:
• There shall be one group member responsible for every section in the final report.
• Every section is to be proof read by at least one group member other than the author.
Electronical spell checkers should be used to assist in this.
• Every phase document is to be approved by the group as a whole and the supervisor or
assisting supervisor.
• The phase documents “Pre-study” and “Requirements Specification” are to be approved
by a representative from the customer.
1.9.3
Routines concerning the solution implementation
These routines are to be followed when designing and programming the solution:
• No major program class is to be worked on by one group member alone.
• For any new functionality that is to be added to the system, there should be a thorough
investigation of relevant “best practices“ that may be used.
1.9.4
Routines and response times for customer communication
These routines and response times are to be followed when communicating with the customer:
• There shall be allocated to one group member to be point of contact with the customer.
• For every formal customer meeting, an invitation, agenda and other relevant documents
are to be sent to the customer, by email, before 12:00 two whole working days prior to the
meeting.
• Minutes of every formal customer meeting are to be sent to the customer by email for
approval, no later than two whole working days after the meeting ended.
• The response time for the customer regarding invitation and approval of agenda for customer meetings is two whole working days.
• The response time for the customer regarding approval of minutes is three whole working
days.
• The response time for the customer for feedback on, or approval of, phase documents the
customer would like for review is two whole working days.
• The response time for the customer regarding a general question is two whole working
days.
18
1.10. RESULTS
1.9.5
Routines and response times for supervisor communication
These routines and response times are to be followed when communicating with the customer:
• There is to be held weekly supervisor meetings.
• Change of time or place for the supervisor meetings are to be announced at least 24 hours
in advance.
• Before 12:00 the day before the meeting, the group shall deliver an agenda for the meeting,
the minutes from the last supervisor and customer meetings, a weekly status report and any
relevant parts of the phase documents. These are to be delivered by email to the supervisor
and assisting supervisor, and a printout is to be delivered to the supervisor.
• The minutes of each meeting are to be approved on the following meeting.
1.10
Results
This section gives the results of the planning phase. The results are presented without any interpretation or explanation of the data.
1.11
Conclusion
The planning phase process itself has given the group as a whole and the individual group members valuable insight on how the project will be executed. Through discussion and exchange
of opinions consensus has been formed within the group on ambitions, roles and development
methodology.
The results of the planning phase have provided the group with a series of tools to complete the project. Using collaboration tools like SVN and Google docs, the team will be able to
share information and collaborate on the writing of the report. Through planning documents like
the Gantt charts and shared spreadsheets the team will be able to measure their efforts against
working hour estimates and deadlines.
For the following phases the project directive will be a valuable reference for checking the
project heading as well as updating added knowledge.
19
CHAPTER 1. PROJECT DIRECTIVE
20
Chapter 2
Preliminary Study
2.1
Introduction
This chapter gives an introduction to the Preliminary study. The introduction presents the purpose, scope and an overview of the chapters in the Preliminary study.
2.1.1
Purpose
The purpose of the Preliminary study is building the group knowledge of the problem and the
possible solutions for reaching the objectives. Understanding how fish farming will be improved
by an integrated operations solution is important due to the fact that our project will implement
one of the major components of the SCG integrated operations solution. A network monitoring
system for SCG can be built by the project group or an existing system can be selected from a set
of evaluation criteria. The conclusion will be based on an evaluation according to the customer
needs.
2.1.2
Scope
The Preliminary study elaborates on the problem domain and the possible solutions to meet the
projects objectives and the customer needs. This document therefore provides the knowledge,
solution alternatives and the evaluation to base design and implementation.
2.1.3
Overview
This section gives an overview of the chapters in the Pre-study.
• Section 2.2 - Integrated operations
This section shall be a short description of the SCG context.
• Section 2.3 - Current situation
This section shall provide a introduction to the current situation of the customer’s system
and the application that they need.
21
CHAPTER 2. PRELIMINARY STUDY
• Section 2.4 - Desired situation
This section shall describe what are the desires and requirements of our customer.
• Section 2.5 - Business demands
This section shall provide a classification of the Technical and Non-Technical demands.
• Section 2.6 - Evaluation
This section shall describe the evaluation criteria that we follow in the final part of the
Market Investigation section.
• Section 2.7 - Market investigation
This section shall provide us a complete overview of the market situation, analysis of
different applications and the complete evaluation of each programs.
• Section 2.8 - Current Technologies
This section shall describe the current technologies that we have implemented.
• Section 2.9 - Proposed technologies
This section shall provide a complete introduction to the technologies that need to use, and
will use.
• Section 2.10 - Final solution
This section shall shows the selected final solution and the reasons of this choose.
2.2
Integrated Operations
Integrated operations in the context of SCG means integrate the sensor input, the decision making
and the feeding actuation into a single integrated operations center.
The operations center is intended to control several fish farming facilities.
2.3
Current situation
The Sea Cage Gateway is a new project. The primary pilot customer at this stage is Salmar and
they are in the process of building a prototype facility at Frøya. “SalMar is planning a further
investment and expansion of its efforts within VAP and the realization of scale economies within
handling and processing under the project name InnovaMar” “At InnovaMar SalMar plans to employ new technology and generally increase the degree of automation.” (Salmar.no, 15.09.2008).
A test network, consisting of similar components to those being deployed in the prototype facility, exists in Trondheim.
Currently, neither of these networks have any form of network monitoring in place. Network
and component failures are discovered only when the whole or parts of the sea cage gateway
application stop working. In such cases the current user of the system has to somehow contact
the system manager, which then investigates the problem.
22
2.4. DESIRED SITUATION
At this point the system manager does not yet know whether the issue is related to a failing
network connection, a failing hardware component, or some issue with the application itself.
If he suspects the network or a networked component is the problem, he will investigate using
conventional network testing tools such as ping, traceroute, and an SNMP client.
This process requires intimate knowledge about and access to the network, the networked
components and a variety of tools. It is also cumbersome and time-consuming, and it is possible
that the system will start working again before the problem can be identified. In such cases, one
may never know the cause of the problem, and therefore neither how to mitigate against it.
What part of the system is responsible for downtime, and for how long, is also an important
distinction because of service level agreements with the suppliers of various components and
services. There is currently no system in place to monitor failures and downtime, which will be
necessary in the future to validate compliance with customer contracts.
2.4
Desired situation
The desired situation is one in which network problems are quickly discovered and identified
through the use of a network monitoring system. This will reduce the time it takes to rectify the
problem. The system should also keep a log of all such problems, enabling network administrators to investigate these events in greater detail later, and enable the system to produce failure
statistics and the required service level agreement reports.
Telenor would like such a system to perform full surveillance of their antennas, and communications between both on-shore and off-shore facilities and their offices.
2.5
Business demands
This chapter defines the business demands based on the necessities of the customer. The effects
and result goals are defined in the wanted situation in earlier chapters. They show what the customer expects of the delivered software solution in order to improve their business processes.
These demands are used afterwards to carry out the evaluation criteria.
Telenor’s plans are to have a fully functional service some time during Q4 2008. As a commercial service provider, network failure and downtime will have serious economic consequences if
it causes them to fail in upholding the agreed upon service levels. The perceived reliability of
their service and expeditiousness in resolving problems will also impact the desirability of their
product in the market.
Telenor Company has the necessity of monitoring and controlling their telecommunication facilities in order to provide a service to their customers in accordance with service level agreements.
Business demands are divided into technical demands and non-technical demands.
2.5.1
Technical demands
• TD1 - The solution shall use SNMP and JMX to gather data.
23
CHAPTER 2. PRELIMINARY STUDY
• TD2 - The solution shall perform alarm notifications.
• TD3 - The solution shall provide current and historical status information.
2.5.2
Non-technical demands
• NTD1 - The project documentation shall be written in English.
• NTD2 - The system shall be easy to use with a friendly and customizable interface.
• NTD3 - The system shall have a high performance.
• NTD4 - The system shall be scalable.
• NTD5 - The solution shall be free and open-source.
2.6
Evaluation
In order to find the most appropriate network monitoring solution in accordance to the project
objectives and the business demands of Section 2.5, the project group has developed an evaluation scheme comprising the points that need to be evaluated to make the most suitable decision.
The evaluation scheme and the evaluation criteria used in this project are presented next in this
chapter.
2.6.1
The Evaluation Scheme
This section will define what is considered to be a suitable solution, as well as the scheme used
to evaluate the different solutions relevant to the project.
What is a solution?
In Section 2.7 a number of different NMS solutions will be described and evaluated. As this kind
of applications are complex to implement from scratch we consider the most sensible option is
to use a solution from those that already exists and have proved to work properly.
How to evaluate?
Several solution will be first described and briefly evaluated to set an overview of their main
features and how they can fit or not our project. Based on these evaluations, a subset of solutions
will be chosen and will be studied and evaluated more deeply. The following procedure has been
followed in order to carry out that last evaluation:
1. The solutions are given grades on how well they fit and accomplish the established criteria.
24
2.6. EVALUATION
Conformation / Priority
Low
Medium
High
Low
0
0
1
Medium
1
2
3
High
1
3
5
Table 2.6.1: Scoreboard according to priorities and conformations
2. Taking into account the priority level of the respective criteria, a score value is looked up
in the scores table.
3. The eight criteria scores of each solution are summed so that a final score is achieved.
The solution that gets the highest evaluation score will be the one considered to be the most
suitable for this project.
Grades
The solutions will be graded according to how well they conform to each evaluation criteria.
The grades High, Medium and Low will be assigned to an integer for further comparisons by the
following scheme:
• High: The solution conforms to the criteria to full extent.
• Medium: The solution conforms to the criteria to some extent.
• Low: The solution conforms to the criteria to little or no extent.
Priority levels
The priority levels assigned resembles the grading scheme. Their possible values are High,
Medium and Low. This values affects the scores that can be achieved.
2.6.2
The Evaluation Criteria
In this section the set of evaluation criteria will be given. Each criteria will be given a unique
identifier for further referencing, a name, a description and a priority level amongst the other
criteria in the set.
• EC1 - Open source - Telenor needs to use a solution that can be modified to be adapted to
their necessities. Therefore they need to get access to the code, at least to the customizable
parts of the solution. They are also aware of the potential of the open source products and
know that there exists software solutions used during last years that could fit in the project.
25
CHAPTER 2. PRELIMINARY STUDY
• EC2/EC3 - Multi-platform - Following Telenor’s philosophy of developing multi-platform
solutions made with Java, the product would not set a requirement for a specific platform
(operating system, network protocols...) using programming languages and databases systems that could be used in a flexible environment.
• EC4/EC5 - Compatibility with the existing protocols - The solution should be highly
adaptable to the field in which they work on. It should be compatible with the current
devices that are already working and those that will be monitored soon, such as the cage
sensors. Particularly the solution should manage data collection using both SNMP and
JMX since these are the methods to access the different devices.
• EC6 - Free cost - Telenor would like to minimize the cost of the solution and not to buy
a commercial product for this purpose. They count with experienced staff that is able to
carry out the maintenance of the solution, so they do not need to outsource this service.
• EC7 - Customizable interface - The user interface should be configurable to present the
information that is needed by the user at first sight, and it would be advisable to extend it
to other devices apart from computers, such as cell phones or PDAs.
• EC8 - Availability - It should be possible to track the different measures even when a
connection between a cage and the headquarters is unavailable.
• EC9 - Alarms - In case of malfunction the network administrator should be informed
using SMS message, e-mail or any other mean to solve a problem quickly or at least be
notified.
In Table 2.6.2 the different evaluation criteria are assigned a priority level and stated which
demands have produced them.
Evaluation
criteria
EC1
EC2
EC3
EC4
EC5
EC6
EC7
EC8
EC9
Name
Priority level
Based on
Open source
Multi-platform | Windows support
Multi-platform | Unix support
Compatibility - JMX
Compatibility - SNMP
Free cost
Customization - Cell phone / PDA
support
Availability - Distribute databases
and information gathering
Alarms - Email/SMS
High
High
Medium
High
High
Medium
Low
NTD5
NTD4 and NTD5
NTD4 and NTD5
TD1
TD1
NTD4
NTD2
Low
NTD3 and NTD4
High
TD2 and TD3
Table 2.6.2: Evaluation criteria with their corresponding priority levels.
26
2.7. MARKET INVESTIGATION
Taking into account that from the very first moment we were encouraged to choose an
open source solution (EC1) and the protocols used by the different existing devices were stated
(EC4/EC5) , these criteria have a high priority. In fact, it is compulsory that the NMS solution
adapts to the existing network and not the other way, since the network is well tested and it
works mostly ok. Support on Microsoft Windows operating systems (EC2) is very important
since Telenor seems to use more this OS. In addition, a complete alarm system is needed to get
information about failures in the system quickly.
Some other criteria such as Unix support (EC3) and free cost (EC6) are given a medium
priority. EC3 is recommended to follow a development strategy regardless on which OS or
architecture is the application running. The group have been asked for looking for a non-cost
solution, although this is not very relevant since most of the NMS open source solutions are also
free.
To a future improvement of the solution, extending it to be used on mobile devices is one of
the main possibilities, so it is advisable to find a solution that could provide this functionality
(EC7), although some of the other products could have implemented this feature by the time it is
needed. The availability (EC8) has received a low priority because the availability is a mediumterm necessity that will appear if there are lots of systems running at the same time or alternative
connections are needed to provide more QoS.
2.6.3
Summary
The evaluation scheme consist of an initial evaluation of all solutions considered to be appropriate
and then a further evaluation of the 3 or 4 most appropriate solutions. The former will be done
in prose, the latter in by giving each solution a grade how well they conform to the evaluation
criteria. The solution with the highest evaluation score will be considered as most appropriate
for our project.
2.7
2.7.1
Market investigation
Network monitoring platforms
In order to Monitor the status of the entire set of antennas and other devices such as sensors and
routers the use of a network monitoring tool can provide us a lot of information, both current and
historical, about how the different devices are performing.
Overview Network monitoring refers to the use of a system that constantly monitors a computer network for slow or failing components. It usually has functionalities to detect an alarm
situation, such as outages, and notify in different ways the network administrator. These systems
focus on problems caused by overloaded and/or crashed servers, network connections or other
devices, rather than security issues as for instance intrusions in the network.
27
CHAPTER 2. PRELIMINARY STUDY
How they work The different measures are gathered periodically, usually sending packets of
information to the devices that are controlled. This method is called polling. For instance, if
it was necessary to determine the status of a web-server, monitoring software may periodically
send an HTTP request to fetch a page; for email servers, a test message might be sent through
SMTP and retrieved by IMAP or POP3.
The retrieved information might be stored for later operations, like graphs or logs of the
different errors that could have been occurred. These metrics are usually response time and
availability, although it is possible to measure both consistency and reliability.
Status request failures, such as when a connection cannot be established, it times-out, or the
document or message cannot be retrieved, usually produce an action from the monitoring system.
These actions vary: an alarm may be sent out to the sysadmin (through SMS, email...), automatic
backup systems may be activated to remove the failed server from duty until it can be repaired,
etcetera.
Some tools measure traffic by sniffing and others use SNMP, WMI or other local agents to
measure bandwidth use on individual machines and routers. The latter generally do not detect
the type of traffic, nor do they work for machines which are not running the necessary agent
software, such as rogue machines on the network, or machines for which no compatible agent is
available. In the latter case, online appliances are preferred. These would generally ’sit’ between
the LAN and the LAN’s exit point, generally the WAN or Internet router, and all packets leaving
and entering the network would go through them. In most cases the appliance would operate as
a bridge on the network so that it is undetectable by users.
Solutions
Several software tools are available to measure network traffic. A complete comparison chart
is shown in figure 2.7.1, retrieved from [Ano08c, wikipedia]. These tools are often made up
of a main platform that can be extended using components or plug-ins which provide more
functionality. The main products will be studied further in this section.
The chosen product should have a set of features that fits the requirements from Telenor. The
main features are:
Solutions not evaluated
These are:
The solutions not evaluated are those that are not free or open source.
• Big Brother
• dopplerVUE
• FireScope BSM: BE
• ManageEngine OpManager
• Netscope
• Nimsoft
28
2.7. MARKET INVESTIGATION
• op5 Monitor
• PacketTrap
• SolarWinds Orion
• Wormly
• Zyrion
Solutions evaluated Several solutions have been evaluated to choose the most suitable one.
These are the following ones:
• Cacti
• Nagios
• OpenNMS
• Zabbix
• Zenoss
29
CHAPTER 2. PRELIMINARY STUDY
30
Figure 2.7.1: Comparison of network monitoring solutions
2.7. MARKET INVESTIGATION
2.7.2
Cacti
Description Cacti is an open source, web-based graphing tool designed. Cacti allows, like
other NMS-systems, to create performed graphs of the information about the CPU load and
bandwidth use. A common usage is to query network switch or router interfaces via SNMP to
monitor network traffic.
This application is used by hosting providers, because it can manage multiple users with their
oun graph sets to display bandwidth statistics for their customers, as we can see in the Figure
2.7.2. Because of it is a open source, it has a large and quite active community that can provide
us documentation, scripts and pulg-ins.
Figure 2.7.2: Shows the web interface to control and monitoring the network from the Cacti
software.
Evaluation Cacti performs well monitoring network usage. We encountered no bugs or flaws
in it, but it should be advisable to test Cacti on a spare box before implementing it in a critical
production environment. The software is extremely extensible, tracking parameters as diverse
as temperature and humidity. The user community is active, and development is proceeding at a
rapid clip.
Cacti is a useful tool for network administration, but is perhaps too focused on graphs and
time-series data, and lacking in capabilities when it comes to events and notifications.
2.7.3
Nagios
Nagios is a popular open source system and network monitoring application software, writed
under the GNU/GPL version 2 and published by the Free Software FUndation. It watches hosts
and services, alerting users when things go wrong and again when they get better.
31
CHAPTER 2. PRELIMINARY STUDY
Description Originally it was created under the name NetSaint, was written and is currently
maintained by Ethan Galstad. It has a good comunity that design and develops a lot of plugins,
both official and unofficial. The system was designed to run in Linux, but we can use it well in
other *nix systems.
Naggios shows the results of the monitoring and the use of diverse components in a web
interface across a set of CGI’s and a set of HTML pages. They offer a complete vision to the
manager about what is happening, where and even in some cases why. One example of the Web
User Interface can be find in the Figure 2.7.4.
Figure 2.7.3: This is the typical structure of Nagios as a management and monitoring system.
The main features that we can find in Nagios are de following:
It has a wide set of features:
• Monitoring of network services, external components and host resuources.
• Remote monitoring through SSH or SSL.
• Easily to creat plugins.
• Possibility to recive notification alarms when a servies or host has problems.
Evaluation Nagios probably is one of the better monitoring systems, because of it has a very
configurable, and has a lot of plugins that add features that in other systems are only thoughts.
In addition, a large number of companies or organizations use this software, and it do us to think
that if this big organisms use it and need security and stability, Nagios is a really good monitoring
and management system.
Nevertheless it is a complex and tedious system to configure correctly and probably is not
a good option to monitoring a small network. Besides the previous thing, we miss that the
system works at native form with standard protocols of network management as SNMP instead
of realizing the management and monitoring of the network with own tools, plug-ins, etc that
32
2.7. MARKET INVESTIGATION
Figure 2.7.4: Web interface to control and monitoring the network and its components.
might have problems to penetrate firebreak, to be dependent on the platform, etc. Another bad
thing is that Nagios has not got any graphing capabilities.
To set up Nagios a great background in these topics is needed:
• Knowledge to the level of user and manager of GNU/Linux.
• Installation and Apache’s advanced configuration Web Server.
• Advanced Knowledge of technical English.
Nagios is not comparable to other programs whose installation diminishes to a simple click
of mouse.
2.7.4
OpenNMS
Description OpenNMS is big and complete network management and monitoring plataform
developed under the GNU/GPL version 2. OpenNMS is focused on monitoring a lot of different
network services, like FTP, HTTP, etc. In addition it saves information about the availability of
all the devices, previously discovered automatically, to create customized reports for both the
historical and the current information.
Another features of this NMS system, are the possibility to configure many distinct types
of alarms. It is very important in a monitoring system, because of if any component, device or
service falls is necessary to know what, when and the priority of this service in the system.
33
CHAPTER 2. PRELIMINARY STUDY
Figure 2.7.5: OpenNMS screenshot showing some charts
Evaluation OpenNMS is open source and is free, although it is possible to ask for professional
services for deploying or developing taylormade features1 . It is highly adaptable, being possible
to activate or deactivate some functionalities in a very easy way. It supports a lot of network
protocols and has different interesting features that would be useful in the project:
• Data Collection: Collect, store and report the information toke from the nodes using different protocols.
• Event Management and Alarms: OpenNMS has a good notification system due to we can
configure it to send messages like Emails or SMS to notify it a node or a device in this
node breaks.
• Reports: It has a separated section to provide us a lot of reports of all of categories that we
want.
Some projects are under development to improve OpenNMS, as for instance two Google
Summer of Code projects consisting of integrating Google Maps in the application to map the
different devices and cell phone user interface 2 .
From the beginning, Telenor has proposed us to use this solution, which means that they are
familiar with the product. In fact they have already used in other departments of the company
with good results.
1
2
More information about the services at http://www.opennms.com/services.html
An overview of both projects is available at http://code.google.com/soc/2008/opennms/about.html
34
2.7. MARKET INVESTIGATION
2.7.5
Zabbix
Description Zabbix is a network management system application created by Alexei Vladishev
under the GNU/GPL in the version 2. It is designed to monitor the status of different network
services, servers, components, and other hardware.
Zabbix can uses the main database system in the market, e.g. Oracle, PostgreSQL and
MySQL to savbe the information of the system. We can verify the availability ot all of the
system services, as FTP, SSH or HTTP without installing any software on the monitored host.
An agent of this system, can be installed both *nix and Microsoft family systems to monitor
statistics e.g. netwrok charge, free disk space, availability of other devices, etc.
Figure 2.7.6: example of the web interface of Zabbix.
Evaluation Zabbix permits central access to all information that we obtain from the nodes of
our network system. It finds automatically, with an IP range, services and starts to monitor them.
It is scalable, proved in a system environment with 5000 servers and related services. In addition
permit us an easy administration of the systems saving all the information in any type of database
server (like Oracle, MySQL o PostgreSQL).
Nevertheless, the latest 1.x releases of Zabbix have had many bugs so it should not be deployed at this moment as a monitoring and management system in a company or managing tasks.
Some of the problems of these releases have been fixed in the 2.x release, but security should be
improved in the future.
35
CHAPTER 2. PRELIMINARY STUDY
2.7.6
Zenoss
Description Zenoss is an open source application, server and network management platform
released under the GNU/GPL at version 2. Zenoss has a web interface in which is allowed
to monitor availability, events, supervised devices or components and monitored services. An
example of the Web User Interface of Zenoss can be find in the Figure 3.5.2.
Zenoss Core provides the following capabilities:
• Monitoring availability network devices using SNMP, and of the services, as SSH or FTP.
• Monitoring of host components as CPU or Hard Disk usage
• Event management provide alerts to be used in the case that any component or device
breaks.
• Supports the installation of the plugin of Nagios.
Figure 2.7.7: Example of the web interface of Zenoss management and monitoring system.
A web-based portal provides operating system agnostic access to configuration and administration functions. Both Firefox and Internet Explorer are supported.
Evaluation Zenoss has a high level Web interface. It includes a performable desktop for monitoring, and everything is made with AJAX, that cause a good experience like GMail mail server
of Google. In addition it is very functional and had a lot of features that should be considered.
The problem rises when it is necessary to install it for supervise and monitoring large networks and systems. In addition, Zenoss is not supported on Windows Operating Systems and
has few plug-ins. For example, the map plugin uses Google Maps to show the location of other
systems; this implies that there is a certain dependency on the availability of Google Maps.
36
2.7. MARKET INVESTIGATION
2.7.7
Further Evaluation
So far we have described extensively each management and monitoring system and given a short
evaluation. In this section a further evaluation of the five solutions will be presented. This
section is a short summary of the differences between the evaluated servers, whereas the complete
description of each product will be presented in the Section 2.7.8.
Results of evaluation
The first part of the evaluation was an informal analysis of the table with the comparison of
the different network solutions. At the end of this analysis, we concluded that there were five
applications that suited our needs. After this we evaluated and described more or less extensively
each server and now we present the final result of the general evaluation of these applications
together.
The abbreviations that we have used are the following ones:
• H = High
• M = Medium
• L = Low
We also described the score of each Evaluation Criteria in the Chapter 2.6.2.
Solution
Cacti
Nagios
OpenNMS
Zabbix
Zenoss
EC1
H
H
H
H
H
EC2
H
L
H
H
L
EC3
H
H
H
H
H
EC4
M
M
H
M
H
EC5
M
M
H
M
H
EC6
H
H
H
H
H
EC7
L
M
M
L
L
Table 2.7.1: Evaluation scores
37
EC8
H
H
H
H
H
EC9
H
H
H
H
H
Results
28
26
31
28
28
CHAPTER 2. PRELIMINARY STUDY
2.7.8
Individual Analysis
In this section we will take an individual analysis of the different evaluation criteria applied to
our platforms proposed. The individual analysis contains a short description answering why we
take this evaluation.
Cacti
Eva. Criteria
EC1
EC2
Grade
5
5
Result
H
H
EC3
3
H
EC4
3
M
EC5
3
M
EC6
EC7
EC8
3
0
1
H
L
H
EC9
5
H
Total
Description
The platform fulfills the requirement specified perfectly.
The platform comply with the general proposal to serve in
different systems and architectures.
The majority of servers run on *nix, for what the functioning
is obvious on this architecture.
This technology is able to use but the implementation and
the posterior setting up are difficult and complicated.
This technology is implemented in Cacti but the problem is
that it does not work by default.
The cost of this platform is 0.
It has not any type support to PDA or Cell phones.
All kind of this platforms should have the possibility to create a distributed database system. Cacti is not an exception.
This platform fulfills this essential requirement that is to advise the administrator with email or SMS.
28
Table 2.7.2: Described analysis of Cacti
38
2.7. MARKET INVESTIGATION
Nagios
Eva. Criteria
EC1
Result
5
Description
H
EC2
1
L
EC3
3
H
EC4
3
M
EC5
3
M
EC6
EC7
3
1
H
M
EC8
1
H
EC9
5
H
Total
The platform fulfills the requirement specified perfectly.
The platform does not comply with the general proposal to serve in different systems and architectures. In
this case, Windows systems are not supported.
The majority of servers run on *nix, for what the functioning is obvious on this architecture.
This technology is able to use but we need to install this
with a plugin implementation because is not supported
natively.
This technology is able to use but we need to install this
with a plugin implementation because is not supported
natively.
The cost of this platform is 0.
With plug-ins we may have support to see our server in
our cell or PDA, the problem is that the implementation
is currently in testing phase and is very unstable.
All kind of this platforms should have the possibility to
create a distributed database system. Nagios is not an
exception.
This platform fulfills this essential requirement that is
to advise the administrator with email or SMS.
25
Table 2.7.3: Described analysis of Nagios
39
CHAPTER 2. PRELIMINARY STUDY
OpenNMS
Eva. Criteria
EC1
Result
5
Description
H
EC2
5
H
EC3
3
H
EC4
5
H
EC5
5
H
EC6
EC7
3
1
H
M
EC8
1
H
EC9
5
H
Total
The platform fulfills the requirement specified perfectly.
The platform comply with the general proposal to serve
in different systems and architectures.
The majority of servers run on *nix, for what the functioning is obvious on this architecture.
This platform supports this protocol perfectly and natively.
This platform supports this protocol perfectly and natively.
The cost of this platform is 0.
With plugins we may have support to see our server in
our cell or PDA, the problem is that the implementation
is currently in testing phase and is very unstable.
All kind of this platforms should have the possibility to
create a distributed database system. OpenNMS is not
an exception.
This platform fulfills this essential requirement that is
to advise the administrator with email or SMS.
33
Table 2.7.4: Described analysis of OpenNMS
40
2.7. MARKET INVESTIGATION
Zabbix
Eva. Criteria
EC1
Result
5
Description
H
EC2
5
H
EC3
3
H
EC4
3
M
EC5
3
M
EC6
EC7
EC8
3
0
1
H
L
H
EC9
5
H
Total
The platform fulfills the requirement specified perfectly.
The platform comply with the general proposal to serve
in different systems and architectures.
The majority of servers run on *nix, for what the functioning is obvious on this architecture.
This technology is able to use but we need to install this
with a plugin implementation because is not supported
natively.
This technology is able to use but we need to install this
with a plugin implementation because is not supported
natively.
The cost of this platform is 0.
It has not any type support to PDA or Cell phones.
All kind of this platforms should have the possibility to
create a distributed database system. Zabbix is not an
exception.
This platform fulfills this essential requirement that is
to advise the administrator with email or SMS.
28
Table 2.7.5: Described analysis of Zabbix
41
CHAPTER 2. PRELIMINARY STUDY
Zenoss
Eva. Criteria
EC1
Result
5
Description
H
EC2
1
L
EC3
3
H
EC4
5
H
EC5
5
H
EC6
EC7
EC8
3
0
1
H
L
H
EC9
5
H
Total
The platform fulfills the requirement specified perfectly.
The platform does not comply with the general proposal to serve in different systems and architectures. In
this case, Windows systems are not supported.
The majority of servers run on *nix, for what the functioning is obvious on this architecture.
This platform supports this protocol perfectly and natively.
This platform supports this protocol perfectly and natively.
The cost of this platform is 0.
It has not any type support to PDA or Cell phones.
All kind of this platforms should have the possibility to
create a distributed database system. Zenoss is not an
exception.
This platform fulfills this essential requirement that is
to advise the administrator with email or SMS.
28
Table 2.7.6: Described analysis of Zenoss
42
2.7. MARKET INVESTIGATION
2.7.9
Companies using the different NMS solutions
It is really hard to know which companies are using each of the NMS solutions studied. There
are some reasons that could explain this. On the one hand, the companies does not want the rest
to know which product are using, in a way to keep their business model as secret as possible. By
the other, letting people know what product a company is using could represent a threaten to the
security of the company. If an important bug is discovered in any of the products, it could be
exploit so that a malicious user could get information about the devices being monitored, produce
alarms or even modify the behavior of the hardware if the devices can be managed online.
At least, a general overview of the users can be carry out using different sources, such as their
partners:
Main users
Sources
Cacti
Geographical
area
Worldwide
Schools, blogs and small
business
Nagios
Worldwide3
Tulip, Yahoo Inc., op5 AB,
Econcern, Yellowpipe, TCS,
GFI4
OpenNMS
Worldwide5
Zabbix
?
University schools (Groupe
Esaip), network companies
(Sky High Speed, Innovation
Software Group), others
?
There is a small list of sites
that use cacti and whose stats
can be seen on [Gro08, cacti]
There is a complete report of
more than 1,500 companies
using Nagios on [Nag08, nagios]
OpenNMS users registered
on a map on [- O08, openNMS]
Zenoss
Mainly USA6
Solution
2.7.10
Service providers (rackspace
Hosting,
Coleman
Techonologies,
OpSource,
OmniPresence,
Pando),
health (Mercy, Medifast),
technology and media (UT
Starcom)
There is no information about
its users, instead there is a
list of its partners on [SIA08,
zabbix]
There is a number of case
studies and interviews with
responsibles from the company on [Inc08, zenoss]
About the license of the solutions
All the solutions studied so far are licensed under the GPL license V.2, as seen in Figure 2.7.1.
This entails that these solutions cannot be redistributed being packed in a commercial solution,
and that every modification made in the code should be licensed under the same license of the
nms solution. Thus, if any plug-in is developed or any change in the solution has been done, for
instance, in the user interface, the modifications should be released under the GPL license.
43
CHAPTER 2. PRELIMINARY STUDY
This is explained in a more extended way on [Wik06, opennms].
2.8
Currently Used Technologies
Querying the network components today is done by console “ping” or by detecting a time out
when trying to connect a service on the component. This approach only allows outage detection
when we are actively querying the service.
Getting access to JMX manage beans currently is done via the use of Java Monitoring &
Management Console (jconsole). Monitoring remote process is not a trivial task when using
jconsole.
The problems mentioned above means the currently used technologies are not scalable.
Which means the proposed technologies should be scalable.
2.9
Proposed Technologies
There is already in use a set of different devices that needs to be monitored and controlled.
This equipment sends its information basically using both SMTP packets or JMX calls, so it is
compulsory that the chosen NMS solution is capable of dealing with these protocols.
In this section this two methods will be described.
2.9.1
SNMP
Overview Simple Network Management Protocol (SNMP) is a set of standards used for network management. It is part of the Internet protocol suite, located in the Application Layer,
as defined by the Internet Engineering Task Force (IETF) [Ano08d, wikipedia]. By polling
client software in a network element (such as a router or an antenna), a Network management
station (NMS) is able to get information such as up-time, free memory or number of running
processes, that may be used by a network administrator to locate or foresee hardware problems.
The network element’s software module, called an agent, stores this information in hierarchical
variables, which, when asked for, can be read by the network management station to be stored in
its Management Information Base (MIB), and maybe be processed for viewing by the network
administrator.
History The first version of SNMP, described by the Internet Engineering Task Force (IETF)
in 1988, is now known as SNMPv1. It is described in a series of documents called "Request-ForComment"s, or RFCs, all which can be found on the Internet7 . Later references to "RFC xxxx",
where xxxx is a number, refers to these documents. Several issues made it necessary to refine
SNMPv1 into a new version SNMPv2 in 1993. This version was soon revised again into several
"flavours", with SNMPv2c as the most widely accepted. SNMPv2c is essentially SNMPv2 with
7
Available at http://www.ietf.org/rfc.html
44
2.9. PROPOSED TECHNOLOGIES
SNMPv1’s simpler security scheme, making the security issue more or less unresolved. To
attend the lack of security a new version was proposed in 2002, and SNMPv3 was recognized by
IETF as the current SNMP standard in 2004. This is mainly a definition of security capabilities
applicable to SNMPv1 or SNMPv2.
Still SNMPv1 is the version most widely used on the Internet. As of February 28th 2008,
Microsoft’s newest operative systems, Windows Vista and Windows Server 2008, only support
SNMPv1 and SNMPv2c [Cor08, MSDN]. RFC 1908 and RFC 3584 define methods of interoperability between the three versions. This can be accomplished using proxies, or with Network
Management Stations that can understand and use the different versions in use in the network.
Details SNMP defines a hierarchy of Managed Objects that represent the manageable characteristics of a network element. (It does not however define how or what information is to be
available.) These managed objects, as well as the variables used to describe them, are identified
with an Object Identificator (OID).
The OIDs that are to be used in SNMP is part of a global structure of OIDs, defined by ITU
Telecommunication Standardization Sector (ITU-T) and the International Organization for Standardization (ISO). These are defined as a hierarchy with a nameless root and numbered nodes
separated by a dot (.), like this "1.2.3.4". There are three branches from the root; branch 0, which
is managed by ITU-T, branch 1, managed by ISO, and branch 2, managed by the two in cooperation. For each node in the tree the "owning" organization can distribute subsidiary nodes. The
most widely known branch is probably the iso.identified-organization.dod.internet.private.enterprise
(1.3.6.1.4.1) branch, where the Internet Assigned Numbers Authority (IANA) assigns numbers
to organizations asking for one.
For instance, Telenor has the oid: 1.3.6.1.4.1.12748, NTNU has 1.3.6.1.4.1.13207 and IBM
has 1.3.6.1.4.1.2 [(IA08, IANA]. This is the branch where producers of network equipment registers oids for managed objects and variables used for SNMP management. Related managed
objects are collected into Management information base (MIB) modules and stored by the agent;
the client software that is responsible for providing SNMP support in the network element. To
communicate the information in the MIBs, between the agent residing in a network element and
the Network management stations (NMSs) that manage them, SNMP defines several Protocol
Data Units (PDUs).
A SNMP PDU defines one or more variable names, and an operation to apply to these variables. To retrieve information from the agent, the NMS can send a PDU in which the operation
is a GET, GETNEXT or, from version 2 of SNMP, a GETBULK request. It is also possible for
the agent to send unrequested, asynchronous information, such as alerts, through the TRAP or,
in SNMPv2 and later, the INFORM PDUs. There is also a SET request for setting variables’
values in the agent. SNMP also defines how the transferred information is to be represented. It
does this through a set of rules called the Structure of Management Information (SMI), which is
a subset of (check this) Abstract Syntax Notation One (ASN.1), a standard set by ISO/IEC and
ITU-T.
45
CHAPTER 2. PRELIMINARY STUDY
Security Security was not a high priority when constructing SNMPv1. As a result there are
several weaknesses allowing a hacker to retrieve sensitive information about a network’s structure, or, in some cases, even take active control over certain network elements. The main reasons
for SNMPv1’s weak security are it’s lack of authentication, privacy and access control. This
makes the protocol vulnerable to attacks such as packet sniffing, brute force and dictionary attacks and IP spoofing (over UDP). Even worse is the case when any of the network elements
support changing configuration via SNMP. This can, as mentioned, allow a hacker to take active
control over the network element.
The original version of SNMPv2 incorporated, in addition to several functional improvements, a party based security scheme. Unfortunately, this scheme was seen by many as too
complex, and was never widely accepted. Instead, SNMPv2c was created, keeping SNMPv2’s
functional improvements, but reverting to SNMPv1’s simple “community string” based security
scheme, thus reintroducing most of SNMPv1’s security weaknesses.
The security features introduced in SNMPv3 works by processing a SNMPv1 or SNMPv2
PDU in a security subsystem before sending and after receiving the SNMP data. This subsystem
is capable of secure authentication and encryption and decryption of the PDU. SNMPv3 defines,
in RFC 2274, a "User Security Model", or USM, utilizing the "HMAC-MD5-96" or "HMACSHA-96" authentication protocols. While this security subsystem is common for both NMSs and
network element agents, the agents in addition have an access control subsystem. This subsystem
is responsible for authorizing access to the MIBs containing information and configurations of
the network element. SNMPv3 defines the view-based access control model (VACM) in RFC
2275 as the mechanism to be used for access control.
2.9.2
JMX
Java Management Extensions is a Java technology that supplies tools for managing and monitoring applications, system objects, devices (e.g. printers) and service oriented networks. Those
resources are represented by objects called MBeans (for Managed Bean). MBeans wrap the most
common J2EE services: Servlet, JSP, EJB, O/R, Naming, JTS/JTA, JMS, SOAP and other 3rd
party modules.
Managing and monitoring applications can be designed and developed by Java Dynamic
Management Kit.
Uses Typical uses of the JMX technology include:
• Consulting and changing application configuration
• Collecting statistics about application behavior and making the statistics available
• Notification of state changes and erroneous conditions
46
2.9. PROPOSED TECHNOLOGIES
Server configuration Each application server provides a different, proprietary interface for
adding custom classes to it. Sometimes called "startup" classes, they can be used to perform
tasks on the server not directly supported by the J2EE model: initialization of resources; adding
maintenance or monitoring functionality; invoking and scheduling batch operations. The problem with server classes is they all use a proprietary interface to attach themselves to the server’s
startup sequence, which ties your application directly to the vendor’s J2EE implementation. Your
application is coupled with the server components and startup classes, and you have lost J2EE’s
portable components benefit. Changing your application server has become more expensive and
more difficult.
The JMX architecture offers a clean solution to this problem. Since the MBean server and
registry is defined by the JMX specification, any compliant MBean is able to plug in to any
compliant MBean server. Now an application server, which implements JMX, a standard extensibility interface. Since MBeans are portable, JMX-enabled application servers greatly increase
your application’s portability. You don’t longer need to rely on proprietary server interfaces.
Exposing services Another JMX-based server benefit is the management of custom components at runtime, which means taking advantage of generic administration tools, including those
provided by your application server vendor. You don’t have to drown in a constantly expanding
pool of unmanageable property files.
Consider an application that must collect summary information from a database and send it
to a predetermined e-mail address once a day. Since the J2EE model does not define a timer,
and does not allow components to manage system resources such as threads, a programmer
must include this functionality in custom classes which are attached to the server. To make sure
the application is still portable, the programmer creates an MBean for the task, using the JMX
MBean server to plug the component in.
The standard MBean exposes manageable attributes and operations. In our example there
could be an operation for setting the summary collection and e-mail notification interval to some
value. By exposing this operation in the MBean’s interface the developer has made it possible for
the administrator to change the interval setting at run-time. There’s no need to edit cumbersome,
difficult property files, nor is there a need to restart the server for the changes to take effect.
The attributes and operations of standard MBeans have similar naming convention to JavaBeans, facilitating the development of generic administrative interfaces, Each exposed attribute
and operation can be displayed and invoked by the administrator via a web browser, for example.
The JMX reference implementation provided by Sun includes exactly such a web client interface. As you add new custom components to your server, as it continues to run, they become
automatically available in the client interface, as long as the developer of the MBean exposes the
operations and attributes used for management. This is a very powerful feature.
Controlling variables of a Java Virtual Machine Using some JMX Client such as jManage
it is possible to monitor different JMX services implemented. There are several ones which are
included from J2SE 5.0, making possible to draw graphics of:
• Thread dumps
47
CHAPTER 2. PRELIMINARY STUDY
• Heap or non-heap memory usage
And make some operations:
• See if Garbage collection is working or run GC
• Turn on verbose class loading logs
• Look at configured JDK loggers and change log level without restarting the application
2.10
Final solution
From Section 2.6 and the individual evaluation tables, we can see that evaluation criteria E1,
E4, E5 and E9 differs the classification. These criteria are free and open source, compatible
to the protocols to be used like JMX and SNMP, and monitoring functions to non-technical
personal respectively. After a large analysis of each application we can conclude that we must
use OpenNMS because the following features:
• Nowadays, the free and open source is becoming a serious and sure option for our applications. The community who is behind a specific project is more important. In addition,
for this project the use of this type of software will be strictly necessary in order to do future modifications. This modifications perhaps will not be necessary but in a project with
these features to have only the possibility of it is one thing that we must take into account.
OpenNMS fulfills the first evaluation criteria perfectly.
• Another important feature in the evaluation of the applications is the compatibility with the
protocols that we will use. In this project we will use antennas and other type of sensors
that need to communicate with the central monitoring system using both SNMP and JMX
protocols. Only Nagios and OpenNMS fulfill this requirements but we have decided us for
the second monitoring platform because Nagios have not this connectivity natively.
• The last necessary evaluation criteria to take in account because of it priority have been
the monitoring functions. The application should perform monitoring functions and show
this information in an easy to understand way. It is because the application must be used
and supervised of technical and not technical personal. In this case, three applications
fulfills the requirements but the best, that supports more functions. In addition, OpenNMS
has a good plugin implementation to solve problems with the connection and notify the
responsible of the network.
48
Chapter 3
Requirements Specification
3.1
3.1.1
Introduction
Purpose
The purpose of the requirements specification is to establish a basis for the agreement between
the customer and the group on what the software product is to do. It also aims to provide a
baseline for validation and verification of the deliverables. It does this by establishing our shared
vision of the system as a set of unambiguous requirements. It is being written following the
guidelines established in the IEEE Recommended Practice for Software Requirements Specifications (830) [iee98b].
The intended audience for this document are the project group, the customer, and the group
supervisors.
3.1.2
Scope
This phase document is the requirements specification for the proposed Sea Cage Gateway network monitoring system. This system should monitor the status of the network links and networked components in the SCG network. It will be used to provide network management capabilities with information about the status of the network, fast detection and notification in case
of failure states, and service level agreement reports to assess the service providers’ compliance
to accessibility agreements with their end users. The requirements specification consists of a description of each requirement of the system, as determined by the group in collaboration with the
customer, based on the business requirements, desired situation and other sections of the Project
Directive and Preliminary Study reports. It does not contain details on design or implementation,
or any information on the development or documentation process.
3.1.3
Definitions, acronyms, and abbreviations
A list of all the acronyms and abbreviations used in this document can be found in the Glossary.
To simplify the enumeration of the requirements, the following notation has been utilized:
49
CHAPTER 3. REQUIREMENTS SPECIFICATION
Non-Functional Requirement
Functional Requirement
NR
FR
These will be appended by the type an abbreviation indicating the type of requirement, for example DR for documentation requirements, appended by a number to identify the requirement
within that type. The abbreviations for sections are shown in the next table.
Abbreviation Section name
Section number
CS
Component surveillance 3.5.2
UI
User interface
3.5.2
UA
User alarms
3.5.2
RE
Reports
3.5.2
AV
Availability
3.5.3
DR
Documentation
3.5.3
Table 3.1.1: Abbreviations for sections
An example: FR-UI03 means that the requirement is the third requirement in the user interface section of the functional requirements.
3.1.4
References
A list of the references used in this report is in the References Appendix.
3.1.5
Overview
• Section 3.2 - Background
This section provides a general system background and presents an introduction for the
following section.
• Section 3.3 - Overall description
This section provides an overall description of the system and provides a background for
specific requirement in the next section.
• Section 3.4 - User characteristics
This section provides a description of the skill that each type of user should have.
• Section 3.5 - Specific requirements
A detailed description of all software requirements for the application is given in this section.
• Section 3.6 - Use case-based effort estimation
This section uses use-case estimation to give an estimate of the effort of implementing a
system with the various requirements covered.
50
3.2. BACKGROUND
• Section 3.7 - General test plans
There are various requirements linked to the Testing phase, and these are given in this
section.
• Section 3.8 - Conclusion
In this section a summary of the most important conclusions drawn in this chapter is given.
3.2
Background
The requirements phase is the third of the eight phases. After establishing the project purpose in
the directive and studying the problem domain in the preliminary study, the requirements of the
customer for the final product needs to be established.
This process involves concretization of the customers ideas and desires. More specifically it
involves determining which desired features are the most important and which are less important.
Accomplishing this, is typically done by thorough and lengthy discussion with the customer. In
these discussions, the team acts as the experts which understands the limitations and possibilities
of the technologies to be used as part of the solution, while the customer has in-depth knowledge
about how the system should act to be an effective tool for the users.
For this project in particular, the customer representatives has the knowledge of the topology of
the test network, the pilot network with Salmar as well as the knowledge of how the production
network will operate.
3.3
3.3.1
Overall description
Product perspective
The main purpose of this section is to give a general system description and thus providing a
background for the specific requirements defined in detail in Section 3.5. The system’s environment and surroundings are introduced, as well as the general factors that affect the system and
its requirements.
The product will not be regarded as a component of a larger system, but a separate system
serving as a tool for the network administrators supporting the primary functions of the SCG
platform. It will therefore not provide any system interfaces. It will, however provide two user
interfaces: One being a user interface for accessing system status overview, status of individual
components and system reports, the other being the automated generation of alarms in case the
system discovers a critical state in a component or network link.
The system will communicate with the various components that are to be monitored over a
standard Internet Protocol network. The protocols to be used are determined by customer policy
to be Simple Network Management Protocol and Java Management Extensions.
51
CHAPTER 3. REQUIREMENTS SPECIFICATION
System interface
Most features of the system are based on and collaborate with components of the system itself.
User interface
When interacting with the system, the end-users will work with single graphic user interfaces.
The interfaces will provide functionality for registering various traceability data concerning
availability, functioning, state and other information about the devices.
The main purpose of the system is to supervise all the devices and services desired as well
and easy as possible. The user interfaces should also be easy and intuitive to use by novice users.
Hardware interface
Since it is impossible to exactly size OpenNMS for a particular environment, the following represents the minimum requirements for installation, assuming a network composed of about 200
devices. The following requirements have been extracted from [BG06, 1.3. Minimum Requirements]. Hardware requirements may differ throughout a distributed system according to the
number of devices and variables monitored.
Processor A 1 GHz Pentium III (or equivalent processor) or better. OpenNMS can also take
advantage of multiple processors.
Memory A minimum of 256 MB of RAM, although 512 MB is strongly recommended. The
OpenNMS Java Virtual Machine benefits from large amounts of memory, up to 2 GB, and more
if using a 64-bit processor. Given a budget choice between more RAM and a faster CPU, more
RAM should be chosen.
Disk Space OpenNMS uses a round robin database to store collected variables, which will
keep a constant size estimated to be 2 MB per monitored component. In addition to this, some
space is required for log files and the storage of events in the database:
OpenNMS requires about 25 MB of disk space for the program files. In addition, each data
variable collected requires, by default, 283 KB of disk space. It is safe to assume that each
interface being managed will require around 2 MB of disk space, so for 200 interfaces 400 MB
will be necessary (conservatively). Depending on the number of events stored, it is possible to
assume that 100 MB to 200 MB are required for the database. Finally, the OpenNMS logs can
grow quite large, especially in debug mode. Is possible to edit the log4j.properties file in the
OpenNMS configuration directory (usually /opt/OpenNMS/etc or /etc/opennms) to change those
settings. In a similar way, you can edit the parameters of the round robin algorithm, found in the
datacollection-config.xml file. For a minimum system, 800 MB to 1 GB should be sufficient.
Unless it is a very small system, is not recommended use Redundant Array of Inexpensive
Disks-5 with OpenNMS. RAID-1 or RAID-1+0 is recommended if using RAID.
52
3.3. OVERALL DESCRIPTION
In the test and pilot networks, the number of components is trivially small (<100) and disk
space on servers is abundantly plentiful (>500GB) so this will not be a concern. The storage
demands of even a very large network (10000 nodes) can be easily handled by common storage units, especially if the storage demands are distributed over multiple servers in a layered
configuration, which is the design we recommend in this project.
Software interface
This section lists other external software products that are required by the system during use and
to install it. The contents of the list depend on the scope of the project, i.e. what functionalities
or plug-ins will be set in the project. The elements listed below only include the software that
needs to be implemented and installed to carrying out the desired solution. A priority level for
each element is established.
OpenNMS
Name
Mnemonic
Version number
Source
Purpose
Definition
OpenNMS
Open Network Monitoring System
1.5.93
Open Source with GNU/GPL License
We are basing our project on customization of the OpenNMS software
OpenNMS, the application, is the first enterprise-grade network management platform to be developed under the open-source model. The
goal is for OpenNMS to be a truly distributed, scalable platform for all
aspects of the FCAPS network management model, and to make this
platform available to both open source and commercial applications.
Currently, OpenNMS focuses on three main areas:
• Service Polling - determining service availability and reporting
on same.
• Data Collection - collecting, storing and reporting on network information as well as generating thresholds.
• Event and Notification Management - receiving events, both internal and external, and using those events to feed a robust notification system, including escalation.
The OpenNMS Group is the commercial entity that funds the OpenNMS application development.[Wik08i]
JDK
53
CHAPTER 3. REQUIREMENTS SPECIFICATION
Name
Java SE JDK
Mnemonic
Java Standard Edition Java Development Kit
Version number 1.6
Source
Open Source with GNU/GPL License and is part of Java Community
Process
Purpose
OpenNMS is written mainly in Java, although there are a few Java Native Interface calls to some C code in order to implement features such
as ICMP so Java needs to be installed.
Definition
Java Development Kit provides development tools to create Java-based
applications. It can be installed locally or in a network environment. In
the latter case the application could be distributed in several computers
but it would work like one application.
PostgreSQL
Name
Mnemonic
Version number
Source
Purpose
Definition
Communication
interface
Site adaptation
requirements
3.3.2
PostgreSQL
PostgreSQL
8.2
Open Source with BSD License
PostgreSQL is a relational database that OpenNMS uses to store information about devices on the network, as well as information about
events, notifications and outages.
PostgreSQL is an object-relational database management system (ORDBMS). It is not controlled by any single company, but relies on a
global community of developers and companies to develop it.
The application will communicate with JMX and SNMP through a common TCP/IP and UDP interface, implemented automatically by OpenNMS. It will use Java to establish the communication, using these protocols, between OpenNMS and the different devices. By default, the
communication between the users and the GUI will be use port 8980
and will be through the default navigator.
The server to be set up will be custom-built to suit our customer, Telenor
and TelCage. The installation has few adaptation requirements, since it
only requires the additional installation of a few simple plug-ins, i.e.
maps. There is no need to have any costly production halts and the
initialization of the system can be realized gradually, consequently the
cost of delaying the installations should not be significant.
Product functions
This section provides a summary of the major functionalities that the prototype will perform.
To cover as many aspects as possible and simultaneously enhance the readability, we will use
different models and textual descriptions to explain the different functions that the system will
provide.
54
3.3. OVERALL DESCRIPTION
Monitoring the nodes
The NMS solution must provide the information that the customer needs to know about the
installed devices so that they can be tracked and decisions concerning performance, scalability
or maintenance can be taken in advance, looking at the registered data, using a friendly user
interface.
The different nodes should be grouped as the user decides (for instance, depending on area
or customers), and the corresponding charts or diagrams should reflect this grouping.
Alarm notification and acting
A good alarm notification system is needed. It is desirable that different levels of notification can
be set, depending on the:
• Priority level: Different priority levels should be set so the alarms can be treated depending on their importance
• Type of the alarm: Depending on which fact has produced the alarm a different approximation to solve it can be followed.
• Date and time: The moment in which it occurs can make the notification be sent instantly
or it could be put off.
• Sequence: Different notification methods (e-mail, Short Message Service...) could be set
up forming a sequence. Firstly one notification can be sent and if the receiver has not
noticed it, an additional notification could be sent after some minutes.
The system should expose different services that can be activated or deactivated using a
web interface. This would make that a great number of small problems could be solved online,
preventing the network administrator from moving from wherever he is, acting earlier than usual.
Reporting
The data being collected must be translated into reports that reflects that the system is working.
These reports must present the data in such a way that different stakeholders get the information
they need. For instance:
• TelCage: The different reports can be used for different tasks inside TelCage, and they can
be used by people playing different roles.
– Performance and decision taking: TelCage should know how well their network
is performing. The data should serve them to identify bottlenecks and points in the
network that need to be reorganized or scaled. Historical data can be viewed as a
dynamic representation of the network and how it has evolved and may be used to
take future decisions on how to improve the system.
55
CHAPTER 3. REQUIREMENTS SPECIFICATION
– Security and safety: The collected data is useful to determine the origin of attempts
of entering the network by malicious users. The use of logs of the different actions
carried out in the system during a certain period of time provides a powerful way to
track the intrusions and show up the system weaknesses.
– Audit: The reports prove that the system is behaving the way it should and can be
used in ordinary audit performing.
• Customers: Reports sent to customers improve their confidence on Telenor since they
make visible several aspects of the network that can not be measured at a first glance.
A quantified value about the QoS, reliability and performance of the network provide an
added value.
Use of application
The user interface will be divided into four main views. These views will be mapped to the
different tasks the user will want to perform.
• Nodes monitoring: This view will contain all the listed nodes and will provide further
information about each of them if their links are followed, such as description (location,
name, features...) and data (divided into several views as for instance each protocol supported by the device).
• Events: Every event happened in the system will be shown in a list attaching information
about the type of the event and its severity in case it represents a problem to the network.
• Path outages: There must be a view which shows path outages for important and defined
parts of the network. Component outage alarms which arise because of a path outage must
be shown as caused by the path outage. A path outage is considered a special alarm type.
• Alarms: This view will show the alarms that have taken place in the system. These alarms
will be a subset of the different events that has occurred on the network, so it could be
regarded as a shortcut to important data, to avoid filtering the events view.
• Reports: Different customized reports, as well as some others which represents basic
aspects of the devices, will be shown in this page.
Some basic functions like filtering according to dates, names, groups and so on, as well as
paging is important and should be available in every view. For instance, when making a report,
dates and nodes should be chosen. These views are shown in Figure 3.3.1.
Moreover, a main view showing important information about recent events or alarms in a
dashboard way is useful and could be set as the main page. Some other views could be added so
that the user gets the information more directly, for example setting a view to show the outages
happened, or a view to see the nodes distributed graphically on a map.
56
3.4. USER CHARACTERISTICS
Figure 3.3.1: Different views that the user will see
3.4
User characteristics
The system is intended to be used/extended by three classes of users: Administrators, operators
and developers. All are expected to be skilled in the use of computers and computer software,
and have a good understanding of technical English. They are differentiated by their use of the
system and the required competence level in different areas.
• Administrator: The administrator is the user responsible for installation and initial configuration of the system. This user is expected to have some training and/or experience
in networks and network monitoring, and to be familiar with the network into which he
deploys the system and the components to be monitored by the system.
• Operator: The operator is expected to have similar training and/or experience as an administrator, but is responsible for the daily monitoring of the system.
• Developer: The developer is expected to have some basic knowledge of networks and
network monitoring, and a good understanding of Java web application development.
3.4.1
Constraints
This project is subject to various constraints that limit our possibilities. In this section we explain which constraints are the most important, both technical and non-technical. The following
constraints are that we consider that limit our options to develop our solution.
• Time: The project has to finish on time and this is a strict date. It has to be finished within
the 20th of November. This limits us to choose solutions that that we can complete within
the given time frame.
• Resources: We have calculated 1860 hours for this project. If is necessary, more hours can
be invested, but this will interfere with other subjects and leisure time and consequently, it
will reduce notably our efficiency.
57
CHAPTER 3. REQUIREMENTS SPECIFICATION
In the rest of this section, we will describe the technical constraints that we think that are the
most important.
• Hardware limitations: The system must be distributed in a hierarchical structure, with
one level of the hierarchy reporting to the level immediately above.
• Interface to other applications: The choice of OpenNMS restricts the choice of database
to PostgreSQL version 8.2. All systems and components monitored by OpenNMS must
support JMX and SNMP.
3.5
3.5.1
Specific requirements
Required deliverables
The required deliverables from the group are:
• A running prototype of the system on the "fishy" server in Telenor’s test network, as described in the specific requirements
• Documentation of the system as described in the documentation requirements, and source
files for this documentation
• Source code for all extensions to OpenNMS developed by the group
3.5.2
Functional requirements
Component surveillance
The primary purpose of the system is to monitor the uptime and status of the nodes in the SCG
network. These nodes can be roughly divided into three classes:
• The network backbone, consisting of radio antennas and the connections between them
• Local networking node, such as switches and routers present at individual locations
• Networked nodes, like the servers running the SCG application, IP-enabled cameras and
serial-to-ethernet converters for sensor connectivity. This also includes the software nodes
making up the SCG system. The following requirements are related to the collection of
data by the system from the individual nodes.
• FR-CS01 Node monitoring The system must query all network backbone, local networking components and networked nodes at regular intervals to determine the functional status
of individual nodes and the network links connecting them.
Priority: High
Motivation: This data is essential to support all higher functions of the system, like providing a system status overview, alarms and reports.
58
3.5. SPECIFIC REQUIREMENTS
• FR-CS02 Stored status history The information collected in accordance with requirement
FR-CS01 should be stored for future reference where necessary or specifically requested
as per requirement FR-CS07.
Priority: High
Motivation: The status history of nodes and links are the basis for generating statistics
about their uptime.
• FR-CS03 Aggregation of status information The information may be aggregated to help
satisfy storage constraints when this is possible without interfering with other functionality.
Priority: Medium
Motivation: The data collected as per requirement FRCS01 is quite expansive, and is rarely
needed in full detail to satisfy other requirements. By aggregating this data, we can reduce
storage, processing and bandwidth requirements to a manageable level.
• FR-CS04 Monitoring protocols The system shall query networked nodes using either the
JMX or SNMP protocols, as described by their respective standards.
Priority: High
Motivation: This requirement is based on the customers official policy of supporting open
standards wherever possible. Simple Network Management Protocol and Java Management Extensions are dominant open standards for network/node monitoring. These protocols are also either already supported or support is in development for most, if not all of
the components in the customer’s network.
• FR-CS05 Performance monitoring The system shall query network backbone nodes to
determine the performance status of the network with regards to available and used bandwidth. This information should be stored for future reference, but may be aggregated to
help satisfy storage constraints when this is possible without interfering with other functionality (see FR-CS04).
Priority: Medium
Motivation: Even though the individual nodes are working perfectly, the system is reliant
on a certain bandwidth to operate. Recording the maximum available and used bandwidth
is interesting for several reasons:
– Investigating problems that may be caused by lack of network capacity, such as delayed or choppy video feeds
– Determining the network bandwidth requirements of the SCG system as the network
grows
– Determining if the delivered capacity is in accordance with the service level agreement
• FR-CS06 Layered system The system must be able to function in a layered configuration,
where one server is responsible for collecting data from a number of nodes and reporting
to a server on a higher level. The collected data from other servers and other networked
nodes should be stored locally for a configurable period of time and should be accessible
59
CHAPTER 3. REQUIREMENTS SPECIFICATION
to help in investigating network and component problems.
Priority: Medium
Motivation: With the network monitoring solution running on a single computer, it is itself
fully dependent on the network it is monitoring to query networked nodes as in requirement
FR-CS01. In case of a network link failing, no data on the availability of the nodes in
the other end of the network can be obtained. In a layered/distributed configuration, the
system is running and continues to collect data in both parts of the network, and can be
consulted later to determine the cause of the failure and what the consequences were in the
disconnected area.
• FR-CS07 Configurable detail level The system should be able to start providing in an
unchanged format the elicited reports from any specific nodes on request, to aid with investigating network and component problems.
Priority: Low
Motivation: This function is intended to be an aid in debugging problems with individual
nodes, if examination of generated statistics show them to be unreliable.
• FR-CS08 NAT Traversal The system must be able to operate in networks with public and
private IP addresses. More specifically, the system must be able to monitor nodes behind
a Network Address Translation router. The report needs to describe the strategy employed
to operate in such a network.
Priority: High
Motivation: The fish farming facilities has many components that need their own IP address to operate. The current status of available IP addresses requires the network to be
divided into private and public networks.
User interface
The following requirements describe some views that should be available in the system and some
details as to how the data should be presented to the user.
• FR-UI01 Node grouping The system must be able to assign networked nodes and network
links to groups. The same node or link shall be able to appear in different groups. A group
must be able to contain other groups.
Priority: High
Motivation: The customer aims to provide the SCG service to a number of clients. It is
necessary to be able to group the nodes that is involved in the delivery of the service to a
single customer to satisfy requirements FR202.
• FR-UI02 Network status overview The system must be able to provide a single view
displaying a complete overview of the status of all networked nodes and network links in
a chosen group.
Priority: High
Motivation: The customer wishes to have a complete overview of the parts of the network
60
3.5. SPECIFIC REQUIREMENTS
that provide service to a single customer, perhaps in a more detailed way than a complete
network overview would be able to show.
• FR-UI03 Node usage The system must for each node be able to provide information about
which groups the node is a part of.
Priority: High
Motivation: If a node fails, an operator must be able to quickly determine which customers
are affected by this problem.
• FR-UI04 Display of alarms When an alarm is raised, it should be displayed prominently
in the user interface. It should be possible for the operator to view a detailed description
of why the alarm was raised.
Priority: High
Motivation: Alarms are useless if they are not noticed, and do not carry with them information about what exactly is wrong with the system.
• FR-UI05 Vital network paths Network paths vital to the functioning of the network must
be defined in the prototype. A description of how to add new vital paths must be in the
report.
Priority: High
Motivation: It is important for the customer to see how their network backbone can be
defined in the system.
• FR-UI06 Display of path outage A path outage of a defined network path must be shown
as an alarm. Other alarms caused by the path outage must be either silenced or shown as
related to the path outage.
Priority: High
Motivation: Path outages in the customers backbone network are very important events.
Other events that are caused by the path outage may be numerous and result in an excess
of information.
• FR-UI07 Requesting reports The user interface must have a view to request reports as
described in section 3.5.2
Priority: High
Motivation: The system must be able to generate reports on requests from operators so
they can compile a service level agreement report based on the stored status information
in the system.
• FR-UI08 User interface language The user interface should be presented in English.
Priority: High
Motivation: English is the lingua franca in the network monitoring field and operators are
expected to have a good understanding of technical English.
61
CHAPTER 3. REQUIREMENTS SPECIFICATION
User alarms
An important function of the system is to provide the operator with an alarm if a node or network
link is determined to be failing either by reporting an error or a condition determined to be failing
through SNMP or JMX. These alarms will be displayed through the web-based graphical user
interface.
• FR-UA01 Alarm conditions If a node repeatedly does not reply when queried as per
requirement FR101, replies with an error message. If the node or a network link connected
to the node has failed as determined by examination of the reported data, an alarm should
be generated.
Priority: High
Motivation: If any of these conditions occur, it is likely that a node has failed, with some
consequence for the SCG application. An alarm should be generated to alert the operator
to this problem so it can be corrected as quickly as possible. These alarms may be passed
upward in a layered configuration of servers.
• FR-UA02 Alarm information This alarm should contain information as to what node
has failed, and how this has been determined. If the node has been determined to have
failed based on the examination of reported data, this data or an aggregation of should be
presented to the operator as a part of the alarm.
Priority: Medium
Motivation: Upon noticing an alarm, the first action of the operator will probably be to
investigate what node has failed, and in what way. By presenting this information as a part
of the alarm, time to repair can be reduced.
• FR-UA03 Notification acknowledgment When a user gets an alarm notification, the user
must be able to signal to the system that the notification has been received. The system
should subsequently stop the notification escalation sequence.
Priority: Medium
Motivation: It is not necessary to escalate the notification sequence if a user has acknowledged the notification. Also see FR-UA05.
• FR-UA04 Alarm notification Depending on the type of the alarm, the system must notify
the operator through one or several of the following notification methods: web interface,
e-mail or SMS. It must be possible to define which notification method is to be used for a
given alarm type.
Priority: Medium
Motivation: Operators may not be actively using the web interface at all times. For example on special dates operators may be designated to receive alarms on his/her cellphone.
• FR-UA05 Alarm sequencing It must be possible to define a sequence of notification methods for an alarm. The next notification method in the sequence must be utilized by the
system when an alarm has gone unhandled for a defined period of time.
Priority: Medium
62
3.5. SPECIFIC REQUIREMENTS
Motivation: Operators may not be actively using the web interface at all times. For example on special dates operators may be designated to receive alarms on his/her cellphone.
• FR-UA06 SMS Web Service The system needs to use Telenor’s SMS web service pats.no
to send SMS alarm notifications. The system must also be able to receive acknowledgements of notifications through this service.
Priority: Medium
Motivation: This is the only available service the customer has to send SMS notification.
• FR-UA07 Alarm prioritization Alarms must be ranked by priority/severity, based on
either an importance factor pre-assigned to the node by an administrator or a priority assigned to the alarm after it has been generated.
Priority: Medium
Motivation: In a critical situation, many alarms might be generated. It might be useful
for the operator to know what are the most important tasks. It might also be desirable for
management to prioritize alarms based on customer feedback or for business reasons.
• FR-UA08 Acknowledged alarms It must be possible for an operator to mark an alarm as
acknowledged.
Priority: Low
Motivation: There is no need to prominently display alarms that have been investigated
and where the problem has been rectified. By marking an alarm as acknowledged, it is
removed from the list of active alarms and the operator communicates to other users of the
system that the issue that caused the alarm is no longer present.
• FR-UA09 Working list Each user that is logged into the system must be able to view
a working list of the alarms that have been assigned to them and that are not marked as
resolved.
Priority: Low
Motivation: When the number of alarms is high, it might be hard to keep track of which
alarms are assigned to a specific operator. A working list of alarms makes this easier.
Reports
The system will be used to provide the necessary data for the creation of service level agreement
reports. These requirements concern what data should be accessible upon request to satisfy this
need.
• FR-RE01 Availability data The system must be able to provide, for each group of nodes
in the system, a report listing the uptime of the individual nodes in a decided time period.
Priority: High
Motivation: This data is needed to determine compliance with service level agreement
reports.
63
CHAPTER 3. REQUIREMENTS SPECIFICATION
• FR-RE02 Performance data The system must be able to provide, for each group of nodes
in the system, a report listing the networking performance (available and used bandwidth
over time) of any backbone network links in that group for a chosen time period.
Priority: Medium
Motivation: This data could also be needed to determine compliance with service level
agreement reports if they also require a certain level of network performance.
• FR-RE03 Daily report The system must automatically generate a daily report containing
a summary of alarms and downtime in the last 24 hours. This report should be sent by
email to a configurable address.
Priority: Low
Motivation: This would serve as a convenient reminder of the quality of the delivered
services.
3.5.3
Non-functional requirements
Availability
• NR-AV01 System availability It must not be necessary to shut down the system (eg for
maintenance) at any time during normal system and network operation.
Priority: Medium
Motivation: A network monitoring application can only monitor other devices while it is
running. If the system has to be shut down, it cannot later provide information on the status
of node in the time it was down, or provide notification of failing node. It is meant to be a
tool to help the network administrators become more efficient in maintaining the network,
and if it requires a lot of maintenance itself it may not be helpful at all in this regard.
• NR-AV02 Maintainability of remote nodes Any node of the system located in a remote
location should be stable enough that it does not require administrator intervention except
for initial configuration.
Priority: High
Motivation: The system may have a large number of nodes present in locations that are
hard to access. Even a very small amount of maintenance requiring on-site access will
present a huge load on network administrators, and because of the potential number of
these node, the same might be true for any maintenance that requires human intervention.
• NR-AV03 Clean shut down of the system It must be necessary that the system shut down
cleanly when a Uninterruptible Power Supply device signals a power outage.
Priority: Hight
Motivation: The system should have the aptitude to realize a save and a backup copy of all
the information when the UPS detects a fall in the electrical subminister. Beside realizing
these steps the system has to be capable of realize a shut down cleanly, so that it neither
alters the configuration files nor any other internal information because of the electrical
failure.
64
3.5. SPECIFIC REQUIREMENTS
• NR-AV04 System recovery Regardless of the circumstances of the previous shutdown,
the system must automatically start back up into a function state when possible.
Priority: Medium
Motivation: To provide reliable data about the uptime of nodes, the system downtime must
be as short as possible.
Security
No specific provisions will be taken with regards to security in this system, except what may be
provided by any software we decide to build upon.
Documentation requirements
These requirements are shared by all documents:
• NR-DR01 Documentation language All documents must be written in English.
Priority: High
Motivation: The report is required to be written in English by the course as well as the
customer.
• NR-DR02 Documentation delivery All documents must be delivered to all concerned
parties. The format for all documents must be the Adobe portable document format (pdf).
Priority: Medium
Motivation: The documentation is regarded as one of the deliverables of the project. PDF
is requested by both customer and course staff.
• NR-DR03 Pitfalls The documentation should not only present the recommended procedure but also give possible pitfalls in case of deviation from the recommended procedure.
Priority: Medium
Motivation: The recommended procedure might not always be applicable in case of change
of hardware or environment.
User documentation
• NR-DR04 Documentation for administrators The user documentation must have information or references to other documentation such that the administrator can rely on our
documentation and references for use of the system.
Priority: Medium
Motivation: Administrators should not have to do research beyond the report and its references to use the system.
• NR-DR05 Use Case scenarios The user documentation must describe the following use
case scenarios and the involvement of the system:
65
CHAPTER 3. REQUIREMENTS SPECIFICATION
– Administrator adds component
– Operator is notified by alarm
– Operator flags alarm as handled
– Operator needs to find which user flagged the alarm as handled.
Priority: Medium
Motivation: The user documentation must show how the most important user scenarios are
covered by the system.
• NR-DR06 Documentation for system extensions The user documentation must have information or references to other documentation such that the developers know how to
cleanly develop extensions for the system, as well as adapting the deployed system to the
necessities. Examples of this could be a list of ordered steps that should be followed to add
a new functionality, being integrated in a loosely-coupled way.
Priority: Medium
Motivation: Developers should not look for information about the source code and the
internal structure of the application, they can instead focus on the extension development
and not make too much effort in integrating it.
Installation documentation
• NR-DR07 Installation documentation The installation documentation must be sufficient
for the administrator or the developer to replicate the prototype installation.
Priority: Medium
Motivation: The installation will most likely have to be installed again in a production
environment.
• NR-DR08 Extensions installation The installation documentation must describe how to
install any extensions made by the project into a new installation.
Priority: Medium
Motivation: The installation will most likely have to be installed again in a production
environment.
Programming documentation
• NR-DR09 Documentation for developer All source code or extensions made by the
project must be documented with intension, functional description and involved components.
Priority: Medium
66
3.5. SPECIFIC REQUIREMENTS
Motivation: For further development and updates to the system, it is necessary to have
a written overview of any extensions or modifications to existing systems utilized by the
project.
• NR-DR10 Javadoc All Java code produced by the project must be documented using the
Javadoc commenting style. The javadoc must be e-mailed to the involved parties as part of
the handover.
Priority: Medium
Motivation: For further development and updates to the system, it is necessary to have
a written overview of any extensions or modifications to existing systems utilized by the
project.
3.5.4
Requirements representations
This section gives an overview of the requirements. The requirements are represented in a dependency matrix to see the dependencies between requirements. This will be used to divide the
requirements into working sets of co-dependent requirements for implementation and testing.
In addition, the requirements should also be traceable to project objectives and business demands.
Thus we also give a matrix representation showing this connection. All requirements should be
traceable to one or more of the target effects, or target results. This is because all requirements
should contribute to achieving the projects objectives.
Both representation matrices will also be useful for future development, in the case that any of
the requirements or the projects premises are changed.
Requirements dependency matrix
This matrix shows the requirements that are considered dependant on eachother. Two requirements are considered dependant if a change in one requirement needs change or review of the
other requirement. As an example, if the group together with the customer decides that requirement FR-UI07 "Requesting Reports" is to be removed, we can see from the matrix that the
dependent requirements are FR-CS07, FR-RE01, FR-RE02 and FR-RE03. It could be speculated that FR-RE03 could also be removed, since the FR-RE03 column does not show any other
dependencies except FR-UI07. The reasoning behind every dependency would be very lengthy
and is therefore not made explicit beyond the matrix itself.
67
CHAPTER 3. REQUIREMENTS SPECIFICATION
Figure 3.5.1: Requirement dependency matrix
68
3.5. SPECIFIC REQUIREMENTS
Requirement tracing matrix
Here, we give the matrix showing the connections between requirements and the project objectives as well as the business demands. The project objectives are given in section 2.4 and the
business demands are given in section 2.5. Project objectives consist of target effects and target
results, while the business demands consist of technical and non-technical demands.
The rows in the matrix are the projects requirements using the notation given in section 3.1.3,
while the columns in the matrix, consisting of project objectives and business demands, are the
traceability sources.
From the matrix we see that every requirement can be traced to one or more of the traceability
sources. The number of relations between a requirement and the different traceability sources
may indicate the importance of a requirement. However, most of the documentation requirements can only be traced to one of the traceability sources. It may seem that these requirements
therefore are not very important, but the customer depend heavily on this documentation and the
matrix can thus not be relied on exclusively for assigning priority to the requirements.
Assuring that the requirements are related to one or more of the traceability sources is important
to validate that the requirements are necessary. Also, if the project objectives or the business
demands change, then the matrix will be useful to see which requirements need review or may
be removed.
69
CHAPTER 3. REQUIREMENTS SPECIFICATION
Figure 3.5.2: Requirement tracing matrix
70
3.6. USE CASE BASED EFFORT ESTIMATION
3.6
Use case based effort estimation
Use case based effort estimation, or use case point estimation (UCP), is a technique for making
a rough estimation of effort, in work hours or code lines, needed to develop a software product.
The technique, introduced by Gustav Karner from the Linkøping University, takes into account
factors such as the complexity of the use cases, the technical complexity of the software to be
developed and the developers’ experience and capability. It then calculates a use case point score
through a weighted formula, which, in turn, can be used to derive a number of work hours.
As this technique is meant for typical software development projects, it is not very well suited
in this project, which is more about deploying an already developed piece of software with some
minor functional additions. Still it may say something about the amount of work to be expected
for developing these small extensions, so it will tentatively be applied in this section. Due to the
unusual form of development work, little experience with the technique and the large variations
in detail of the use cases, the actual result of this calculation is of little relevance. The important
part is the experiences done, and thoughts made during the process.
Tables defining and explaining the different weights are given in appendix B.1. These are
copied from [KMI+ 04]. The use cases, forming the base for the equations, are given in section 3.6.2 and appendix B.2.
3.6.1
The calculations
Here follows the calculations that derive a use case point count, which is finally used to estimate
the effort in number of expected working hours.
Unadjusted use case weight
The Unadjusted use case weight (UUCW) is based on the number and complexity of the use
cases. The complexity class of a use case is defined by it’s number of transactions between the
actor and the system. The counts and classes of use cases are summarized in table 3.6.1.
There are five use cases with between four and seven transactions, and four with more than
seven transactions.
Use case complexity
Simple
Avarage
Complex
Total
1
2
Trans.1
<4
4−7
>7
Weight
5
10
15
No.2
0
5
5
Product
0
50
75
125
Number of transactions.
Number of use cases
Table 3.6.1: The unadjusted use case weight (UUCW) for
the project.
71
CHAPTER 3. REQUIREMENTS SPECIFICATION
Unadjusted actor weight
The Unadjusted actor weight (UAW) is based on the number and complexity of the actors involved in the use cases. The classification of actors are explained in table B.1.1 in appendix B.1.
Table 3.6.2 summarizes the numbers specific to this project.
There are one actor of class “average”; the “Network node agent”, and two of class “complex”; the operator and the administrator.
Actor type1
Simple
Avarage
Complex
Total
1
2
Weight
1
2
3
No.2
0
1
2
Product
0
2
6
8
See table B.1.1 in appendix B.1 for
an explanation.
Number of actors.
Table 3.6.2: The unadjusted actor
weight (UAW) for the project.
Technical complexity factor
The Technical complexity factor (TCF) is an adjustment based on factors contributing to the
technical complexity of the system.
Making the system distributed is somewhat important, as there is expected to be layers of
monitoring servers, reporting to one top level server, so the assessment is set to a medium value;
3. There are no extraordinary performance objectives, aside from what users normally expect
from a web application, and the same accounts for the end-user efficiency. There is not much
complex processing involved, only the processing of network component status to present the
information in an intuitive way. There is no requirement to make the code reusable, but the
tasks it handles are general, so it is not unthinkable that some code may be inspiration for other
projects. Ease of install is not a high priority, as those installing the system probably will be
experienced system administrators, but it will be installed on several locations, and so deserves
a assessment value of 2. What is more important, is the ease of use, as it should not require the
user to give it much attention under normal monitoring use. Portability is pretty important, as it
supposed to be installed on numerous locations. The system is only meant as a base to be further
developed and expanded, so that it is easy to change is paramount. It is equally important that it
allows concurrent use by several network administrators at several different locations. Security is
an important concern because of the importance of working network components, as well as the
inherent vulnerability of such systems. Still, there will be taken measures external to the system
being developed to improve security, and it is therefore not given the highest assessment. There
will not be accounted for access by third parties at this time, but it is a relevant consideration for
later extension. There may be some need of training, both for users and administrators.
72
3.6. USE CASE BASED EFFORT ESTIMATION
These reflections result in the assessments given in table 3.6.3.
Factor
T1
T2
T3
T4
T5
T6
T7
T8
T9
T10
T11
T12
T13
Sum
TCF
1
Description
Distributed system
Performance objectives
End-user efficiency
Complex processing
Reusable code
Easy to install
Easy to use
Portable
Easy to change
Concurrent use
Security
Access for third parties
Training needs
Weight
2
2
1
1
1
0.5
0.5
2
1
1
1
1
1
Assessment1
3
2
2
1
1
2
4
4
5
5
4
1
2
0.6 + (0.01 ∗ Sum)
Impact
6
4
2
1
1
1
2
8
5
5
4
1
2
42
1.02
From 0 (irrelevant) to 5 (very important)
Table 3.6.3: The technical complexity factors (TCF) for the project.
Environment factor
The Environment factor is an adjustment based on factors of the development environment contributing to the effort of developing the system.
The development environment for this project is somewhat unusual, as the development team
consists of six students, who have fairly little actual experience from software development.
Also, there are no analysts involved in this project. However, the motivation among the team
could not have been higher, there is no part-time staff, and the programming language is Java,
which is considered an easy programming language.
All in all, this results in the distribution given in table 3.6.4.
Resulting Effort Estimation
The Unadjusted use case weight (UUCW) and the Unadjusted actor weight (UAW) are summed
to form the Unadjusted use case points (UUCP).
U U CP = U U CW + U AW
(3.6.1)
The total, adjusted use case points (UCP) are calculated following equation 3.6.2.
U CP = U U CP ∗ T CF ∗ EF = (U U CW + U AW ) ∗ T CF ∗ EF
73
(3.6.2)
CHAPTER 3. REQUIREMENTS SPECIFICATION
Factor
E1
E2
E3
E4
E5
E6
E7
E8
Sum
EF
1
Description
Familiar with the development process
Application experience
Object-oriented experience
Lead analyst capability
Motivation
Stable requirements
Part-time staff
Difficult programming language
Weight
1.5
0.5
1
0.5
1
2
-1
-1
Assessment1
1
1
2
0
5
3
0
0
1.4 + (−0.03 ∗ Sum)
Impact
1.5
0.5
2
0
5
6
0
0
15
0.95
Degree from 0 (non existing) to 5 (very high degree)
Table 3.6.4: The environmental factors (EF) for the project.
With the values from the previous sections, summarized in table 3.6.5, the UCPs for this
project then becomes:
(125 + 8) ∗ 1.02 ∗ 0.98 = 132.95
(3.6.3)
Factor
UUCW
UAW
TCF
EF
Description
Unadjusted Use Case Weight
Unadjusted Actor Weight
Technical Complexity Factor
Environmental Factor
Value
125
8
1.02
0.95
Table 3.6.5: The values used in the final equation.
The IEEE paper [KMI+ 04] suggests 20 man hours per UCP, which in this case renders
117.95 ∗ 20 = 2286.84 hours. This hour count is an estimation for developing the whole system
from scratch. In this particular project, most of the required functionality is already covered by
the OpenNMS system, so only a fraction of this workload is expected done by the group. If one
considers OpenNMS to cover 90% of the functionality, 2286 ∗ 0.1 = 229 hours are left to be used
on the group’s extensions, which is not far off from the 252 hours suggested in the schedule in
table 1.4.1 given in section 1.4.3 of the Project Directive phase document.
3.6.2
Use Cases
These use cases, based on the Object Management Group’s (OMG) Unified Modeling Language
(UML) version 2.0, explain typical scenarios of use of the system. Figure 3.6.1 shows how the
scenarios relate to the system.
The use case scenarios given in Appendix B.2 give a complete description of the use that the
customer requires from the system. These use case scenarios are varying in the level of detail,
74
3.7. GENERAL TEST PLANS
but they are all verifiable by the test plan. The use cases are organized according to the roles that
will be using the system. However, the developer role is not easily modeled by use case scenarios
and is referred to the documentation chapter. This documentation provides detailed descriptions
of system installation and configuration.
Figure 3.6.1: Use case diagram of the system.
3.7
General test plans
This document forms the basis for the test phase document. The requirements in this document
are written with the intention of being objectively verifiable. This way we can evaluate the
developing or finished system with regard to each requirement to determine to what degree that
requirement is satisfied by the system. The details of how we determine how a requirement has
been satisfied, and the results of our final testing can be found in the test phase document.
3.8
Conclusion
The demands and implicit requirements in the project directive and the preliminary study are the
focal point of the requirements specification. Specifically, the requirements specification elaborates the target effects and results into specific requirements.
Effective requirements must be verifiable in relation to the demands and should be testable for
an effective test phase. To simplify testing and verification the requirements document attempts
to give the relation between requirements and demands.
75
CHAPTER 3. REQUIREMENTS SPECIFICATION
The resulting requirements specification thus gives a satisfactory document for customer approval and verification of the project deliverables.
76
Chapter 4
Design
4.1
Introduction
This chapter describes the software design of the system that will be installed, configured and set
up in the optimal conditions. We based the design on the IEEE Standard 1016-1998 [iee98a], the
recommended practice for software design descriptions. Some parts have been added or removed
to adjust the standard to the SCG project. We have included several techniques that we have used
to communicate the software design, like models and diagrams, in addition to explaining text.
4.1.1
Purpose
The purpose of this document is to describe the design and construction phase of the plugin and
the installation and configuration of the OpenNMS server. In the construction part we should
decide which development tools and programming languages will be used.
The software design has to describe and show the structure of the system and its components
to satisfy the requirements stated during the Specific Requirements phase. These requirements
have been converted into a description of software structure, components, dependencies and
interfaces. The software design will thus be able to function as a detailed recipe for the implementation of the system.
With this document, the reader will be able to acquire an understanding of how the system
is structured. It is not meant to describe detailed aspects of the OpenNMS software, but rather
to give a high level understanding of it’s functioning. The most important use of the design
phase document is to establish a guide for the team members who are to install the system and
to understand how it functions. This last point is another important thing, because in this phase
we will implement a plugin, and the documentation of how we construct it will have to explain
it by means of graphs, schemes and the same documentation. This documentation must also be
presented for the installation and configuration of OpenNMS.
77
CHAPTER 4. DESIGN
4.1.2
Scope
This chapter will cover the most important aspects of the design of the system, so as to ensure
accordance with the requirements stated in the previous chapter. In this document, we explain
the implementation of the plugin and the installation of OpenNMS at a deeper level by adding
class diagrams and sequence diagrams of the system and it’s components. It is important that
each entity of the system is scrutinized carefully, in order to assure that all design choices made
actually are possible to apply.
4.1.3
Overview
In this section we give an overview of the remaining chapters in this document.
• Section 4.2 - Design Background
In this section, the background for the design phase and phase document is given.
• Section 4.3 - Development and modeling tools
This section gives a description of the tools that will be used for the modeling of the system
in this phase.
• Section 4.4 - System description
This section describes the entire system with the belonging data flow diagram, high-level
class diagram, and a study of the decomposition of the system.
• Section 4.5 - Requirements not designed
This section provides a description of the requirements that were not designed, with an
explanation of why they were omitted.
• Section 4.7 - Deployment
This section explains the customer’s infrastructure and how we will install the solution.
• Section 4.8 - Conclusion
In this section we give a summary of the most important conclusions about the realization
of the design document phase.
78
4.2. BACKGROUND
4.2
Background
The design phase is the fourth of the eight project phases and also one of the most important. In
a design phase a project decides on the system architecture and the details of the system functionality, as well as how the system will provide this functionality. Through diagrams and textual
description the design document should describe these decisions such that a reader familiar with
software development, but not familiar with this project in particular, will be able to understand
how the system works and compare it to similar system designs.
This project reuses an existing software system to provide a great deal of the functionality required by the customer, however some of this functionality needs to be extended by the project.
This means the project needs to gain thorough knowledge of the inner workings of this existing
software system to be able to extend it. Thus, the design specification will neccessarily provide
a design overview of this software system.
79
CHAPTER 4. DESIGN
4.3
4.3.1
Development and modelling tools
Choice of programming language
There are a number of factors to take into account when choosing a programming language,
but in this specific project there is one major consideration; the language in which the network
monitoring system is written, and, more specific, the language(s) that can be used to write extensions for it. OpenNMS supports java plug-ins as well as external scripts written in arbitrary
languages for its backend functions, but the web user interface (UI) is written exclusively in java
and Java Server Pages (JSP). Because of the strict time limitations, only a small extension can
be developed, and the web UI is well suited, and relevant for the customer, for making a quick
demonstrative extension.
This means the programming languages relevant for use in this project are Java and Java
server pages.
Java
Java is a platform from Sun Microsystems for making “cross platform” software, i.e. software
that runs on several different operating systems, such as Microsoft Windows, Mac OS or Linux.
It accomplishes this by running the software, written in the Java programming language, not
directly on the processor, but on an intermediate execution engine, called the “Java Virtual Machine” (JVM). This enables software developers to write a single piece of code that runs on a
wide variety of platforms, given that there exists a JVM for that platform. Most of the Java
platform is licensed under GNU General Public License.
Java server pages
Java Server Pages is a Java technology used to create dynamic content on web pages. It allows Java code to be embedded into HyperText Markup Language (HTML), and compiled or
interpreted by a web server, such as the Apache Tomcat.
4.3.2
Choice of Integrated Development Environment
A tool that can be of big help when writing programs is an Integrated Development Environment,
or IDE. This is a software application with several facilities that are intended to make software
development easier and more effective. The facilities often include a source code editor with
syntax highlighting, build automation tools and a debugger. An IDE can support one or more
programming languages. There are several available IDEs that support both Java and JSP. Table 4.3.1 compares important attributes of some of the IDEs supporting the Java programming
language.
The group has not decided on one common IDE for all group members to use, as the choice
of IDE for one group member seldom affects other group members. Still, Eclipse seems a good
choice for most of the group; it runs on Windows, Linux and Mac OS, has support for Java Server
Pages and Subversion through plug-ins and is open source.
80
4.3. DEVELOPMENT AND MODELLING TOOLS
IDE
Software license
JVM?1
Platforms
DrJava
Permissive free software license
proprietary (freeware)
yes
yes
Geany
IntelliJ IDEA
Eclipse Public
cense(EPL)
GPL
proprietary
JCreator
JCODER
JDeveloper
proprietary
proprietary (freeware)
proprietary (freeware)
no
no
yes
KDevelop
Monodevelop
GPL
GPL
no
no
NetBeans
CDDL, GPL2
yes
Xcode
proprietary (freeware)
no
Windows, Mac OS X,
Linux, Solaris
Windows, Mac OS X,
Linux, Solaris
Windows, Mac OS,
Linux
Windows, Linux
Windows, Mac OS,
Linux
Windows
Windows
Windows, Mac OS,
Linux, generic JVM
Linux
Linux, Windows, Mac
OS X
Windows, Mac OS,
Linux, Solaris
Mac OS X
Greenfoot
Eclipse JDT
1
2
Li-
yes
no
yes
GUI
builder?2
no
no
yes
no
yes
no
no
yes
unknown
yes
yes
no
Does the IDE include a Java Virtual Machine?
Does the IDE include helper tools for making graphical user interfaces (GUIs)?
Table 4.3.1: A table comparing several different IDEs that all support Java. (Copied from
[Ano08b])
4.3.3
Choice of modeling diagrams
A good way to get an overview of the system is by using illustrative diagrams. Unified Modeling
Language (UML) is a widely used standard, that defines a set of diagrams for describing complete software systems. Frequently used in the software development community, and the main
modeling method used in courses in computer science at NTNU, it is an obvious choice of tool
for this group.
In addition it supports the IEEE Recommended Practice for Software Design Descriptions
[iee98a]. In this document IEEE recommends to describe the system from four “design views”,
to cover different aspects. These views are given in Table 4.3.2, adapted from [iee98a], with
examples of diagrams that can be used in each view. The “design entities” referred to in this table
are distinct components of the system, that are given unique names and described separately in
the “detail description”.
The focus in this particular project is on configuring an already developed software application rather than developing any new software. Therefore, the purpose of the system description
81
CHAPTER 4. DESIGN
Design view
Decomposition description
Dependency description
Interface description
Detailed description
Scope
Partition of the system into design entities.
Description of the relationships
among entities and system resources
List of everything a designer,
programmer, or tester needs to
know to use the design entities
that make up the system.
Description of the internal design details of an entity.
Example representation
Hierarchical decomposition diagram, natural language
Structure charts, data flow diagrams, transaction diagrams.
Interface files, parameter tables
Flowcharts, N-S charts, PDL
Table 4.3.2: IEEE recommended design views
deviates from what is normally the case, in that it is more about getting a good understanding
of the functionality of the system, than thoroughly documenting the inner workings of it. This,
along with the facts that OpenNMS is very poorly documented, and consists of well over 1500
classes in 213 packages, strictly limits how detailed it is feasible for this group to describe the
system. Because of this, it does not make sense to strictly follow the IEEE recommendation.
Instead the design view descriptions will contain higher level information:
Decomposition description: This will be a top-level description of the system, and how it can
be decomposed into separate design entities.
Dependency description: The dependency description describes the dependencies among the
design entities.
Interface description: This would be much too extensive to include as a part of this report.
Detailed description: Here, the functionality of each of the entities defined in the decomposition description will be explained more thoroughly.
By, as much as possible, basing the system description on the UML standard, the group
hopes to create diagrams easily recognized and understood both by the customer and the group
members.
82
4.4. SYSTEM DESCRIPTION
4.4
System description
This section gives an overview of the entire system, i.e. OpenNMS as-is, the extensions of OpenNMS developed by this group (scg.opennms.sms and scg.opennms.customerview) as well as the
environment it is to be deployed into (the scg network). We state the functionality of the system,
and decompose the system into several entities, as suggested in the IEEE Recommended Practice
for Software Design Descriptions [iee98a] and described in section 4.3.3.
4.4.1
OpenNMS
This section describe the OpenNMS software as-is. The base OpenNMS software is thoroughly
described, since the group needs to understand it well to be able to configure it in the best manner
and to be able to code functioning extensions.
Periodically, OpenNMS consults the status of nodes, by ping, and services on those nodes using
an appropriate protocol to see if the resource is responding correctly. OpenNMS has a notification system which can send messages like Emails or SMS to notify if any of the aforementioned
resources fail to respond correctly. An extensive web interface provides the user interface, including the possibility to extract reports using specified categories. All these parts of OpenNMS
will be thorougly described in this section.
Conceptual Design
General conceptual design of Network Management Systems To give a better understanding of the idea behind Network Management Systems (NMSs) in general, this section gives a
description of a common conceptual design of such systems, according to Sing Li [Sin02]. A
visualization of a general structure of network management systems, and how these interact with
users and external components and interfaces, is displayed in figure 4.4.1.
The composition is typically structured in three levels, or tiers:
Front tier: This is composed of the interfaces to the networks of devices and services to be
managed, the users using the system, and external systems. Here you find the management
system, that supervises all the concurrently running tasks that run during the operation of
the NMS. Some of these tasks are shown in the leftmost third of figure 4.4.2. The user
interface, reporting logic and monitoring and notification components are also part of the
front tier.
Middle tier: At the middle tier we can find the logic that provides the set of features of the
NMS system. These can differ for different NMSs, but some features are common between different NMS-systems. They all have to have an inventory, a section to manage the
different users of the system and data analysis. The system can collect information of the
external devices and services, in addition, it can analyze it to create historical statics of the
external components. The statics can be, i.e. analysis of the functioning of the networks,
the external components and so on. Because some networks can be very extensive, the
83
CHAPTER 4. DESIGN
Figure 4.4.1: General NMS conceptual level composition (Copied from [Sin02]).
NMS-system can provide different types of users and roles to access to the system. This
feature can be used to implement custom security policies.
Back-end tier: Finally, the back-end tier is responsible for the persistence and the data manipulation. Because of this, every NMS system uses a commercial grade relational database
management system (RDBMS) in the last conceptual level.
Conceptual Design of OpenNMS Using figure 4.4.1 as a reference, we can draw concrete
parallels between the reference composition and OpenNMS’ architecture. Figure 4.4.2 shows
the components that make OpenNMS resides.
On the front tier, it uses JSP and Tomcat servlet technology to provide its flexibly customizable user interface. Currently it also has Perl-based UI that basically perform the same tasks.
Furthermore, it can make use of several administrative utilities written in UNIX shell script and
Perl. For monitoring, administration and controlling the network components, OpenNMS uses a
suite of concurrent Java tasks. Some of these tasks can be found as circles in figure 4.4.1, which
is a specialization of the three tier conceptual diagram in the previous section. In the final tier,
OpenNMS uses PostgreSQL as its RDBMS.
84
4.4. SYSTEM DESCRIPTION
Figure 4.4.2: General OpenNMS conceptual level composition. (Copied from [Sin02])
Decomposition description of OpenNMS
Since OpenNMS is already developed software, the most logical way to decompose it is by
looking on the actual package hierarchy of OpenNMS, as described in OpenNMS’ online API
documentation [Wik08k]. The decomposition, along with the dependencies among top-level
packages, is shown in the package diagram on figure 4.4.3. What immediately stands out is the
dominating “org.opennms.netmgt” package. This package is central in the polling of the different
services of the nodes, and, as such, is responsible for most of the base network management
functionality.
One should note that the small packages in this decomposition, not always correspond to the
lowest level actual Java packages of OpenNMS. The detail level of the packages are chosen to
give manageable, intuitive components.
Dependency description of OpenNMS
Because of the non existing system documentation of OpenNMS, finding all dependencies among
the well over 1500 classes is intractable for this project. From an intuitive, conceptual understanding, and by looking at some of the major classes, there are still some important dependencies that can be identified. A package diagram with these dependencies, is shown in figure 4.4.3.
Samples of communication among the entities are given in more details in the sequence diagrams of appendix C.2:
85
CHAPTER 4. DESIGN
• Figure C.2.3 shows what happens when a user requests an availability report via the Web
User Interface.
• Figure C.2.1 shows function calls between the netmgt, secret and report packages, when a
user requests an availability report on a node via the Web User Interface.
• Figure C.2.2 shows how netmgt reacts when receiving an error ticket from the network,
via the protocols network.
• Figure C.2.4 shows the interaction between the poller, the protocol specific polling modules and the notification daemon.
The sequence diagrams are to be understood as conceptual, and does not represent actual function
calls, as this is beyond the scope and purpose of this document. The prefix “org.opennms” is
dropped from every package to save space.
A package diagram of OpenNMS, with dependencies among packages indicated by a dashed
line.
86
4.4. SYSTEM DESCRIPTION
Figure 4.4.3: A package diagram of OpenNMS, with dependencies among packages indicated
by a dashed line.
Interface description of OpenNMS
The different interfaces of OpenNMS is easiest found in the online API documents [Wik08k].
For convenience, some examples of interfaces are given here, with some of the descriptions
copied from said document:
org.opennms.netmgt.capsd.Plugin: The CapsdPlugin interface is the basic interface that a plugin for the capabilities daemon must support. The interface allows the daemon to determine
what protocols can be verified by the plug-in and has the required methods to verify pro87
CHAPTER 4. DESIGN
tocol support for nodes/protocol pairs.
org.opennms.netmgt.poller.ServiceMonitor: This is the interface that must be implemented
by each poller plug-in in the framework. This well defined interface allows the framework
to treat each plug-in identically.
org.opennms.netmgt.collectd: Has several interfaces that new collectors need to implement.
org.opennms.netmgt.poller.ServiceMonitor: This is the interface that must be implemented
by each poller plug-in in the framework. This well defined interface allows the framework
to treat each plug-in identically.
org.opennms.netmgt.poller.NetworkInterface: The NetworkInterface class is designed to be
a well defined front for passing interfaces to a service monitor. There are many different
types of network in use today including IPv4, IPv6, IPX, and others. To accomidate the
possible differences this class provides the basic information that a monitor can use to
determine the type of interface and its expected address type.
org.opennms.web.svclayer: This service layer package contains a collection of interfaces used
for functions of the WebUI that require use of backend services.
Detailed description of OpenNMS
Here the design entities defined in the decomposition description are described in more detail.
org.opennms.web OpenNMS has some web functionalities to connect with servlets and provides several functions for the interface based on web server. The web node management stores
the nodes, interfaces and services information. Users functionality, web authentication, OpenNMS main web, and web graph work with others services to maintain the complete functionality
of the web-based interfaces.
The administrator have special options to manage the user input commands and gets output
reports. The user can do the monitorization, node control, data reports, and other tasks. In
conclusion, this is the OpenNMS graphical command processing unit.
OpenNMS can work using any web server that provides Java support. From OpenNMS
release 1.3.7 Tomcat is no longer required as an external dependency. Instead, OpenNMS uses
Jetty embedded into the main runtime JVM for serving the web UI.
Jetty is an open-source, standards-based, full-featured web server implemented entirely in
Java. It can be used as:
• A stand-alone traditional web server for static and dynamic content (as it is in the case of
OpenNMS)
• A dynamic content server behind a dedicated HTTP server such as Apache using mod_proxy
• An embedded component within a Java application
88
4.4. SYSTEM DESCRIPTION
There are lots of products that use Jetty. Its flexibility makes that it can be found in a number
of different contexts:
• Shipped with products to provide out-of-the-box usability (Tapestry, Liferay)
• Distributed on CDs with books to make examples and exercises ready-to-run
• Incorporated into applications as a HTTP transport (JXTA, MX4J)
• Integrated as a web container in JavaEE app servers (JOnAS, Geronimo, JBoss, JFox)
• Included as a component of an application (Continuum, FishEye, Maven)
According to OpenNMS Group [Wik08e, Summary section], using Jetty in their NMS solution provides a number of advantages:
• Caching of objects is shared between the backend and the web interface
• Tomcat no longer needs to be configured
• A single JVM is used
• Considerably less memory usage
Anyway, it is possible to use a Tomcat server, especially for escalating the system. It can
be installed on a dedicated server to further improve the performance of the WebUI and reduce
the overhead on the core OpenNMS server [Wik08l, Procedure for configuring a remote Tomcat
server for OpenNMS].
Sample subpackages:
• controller: The “controller” part of the Model-view-controller (MVC) design of the web
user interface. This handles a user’s input from the WebUI.
• svclayer: Provides interfaces and tools for the services that continually run in the background, updating the information shown in the WebUI.
• admin: A large package, with several sub packages, containing all the servlets used when
setting up and configuring OpenNMS via the “admin” page of the WebUI.
• alarm: Servlets handling requests to show and manage OpenNMS alarms through the WebUI.
org.opennms.dashboard A collection of servlets used by the “dashboard” view in the OpenNMS WebUI. The dashboard is made up of several tables and graphs called “dashlets”, which
each are represented by a class in this package. The dashboard is built with the “Google Web
Toolkit”; an open source Java software development framework for making dynamic web pages 1 .
1
For more information, see http://code.google.com/webtoolkit/
89
CHAPTER 4. DESIGN
org.opennms.netmgt OpenNMS uses IP interface to represent the auto action execution for
any existing application services within the network. When an event is received by this service
that has one of either a notification, trouble ticket, or auto action then a process is launched to
execute the appropriate commands.
There are several daemon programs performing specific service functionalities such as notification by the discovery process when a new node is discovered, services as a multiplexor for
DHCP requests and responses, services for XML configuration functionalities, TCP and UDP
receivers, filtering services and others.
In OpenNMS has been created and described several network interfaces. These are the different types that are used today (as IPv4, IPv6, IPX, and others). To solve all the differences,
OpenNMS provides the basic information that a monitor can use to determine the type of interface and its expected address type. In addition the interface allows to associate key-value pairs
with an interface.
The network configuration receives its activation orders from the principal SNMP unit. The
configuration management orders could be applied on different levels such as application level
for example, accounting, DSL, cable, and access register. It also can cover networking level for
example, IP, MPLS, and gateways, or it could be applied on the routing level at router configuration, switches, and hubs.
Sample subpackages:
• capsd: Has the responsibility of finding the capabilities of newly discovered nodes, by
prodding it’s ports for known service protocols.
• collectd: Collectors that run continually in the background to collect different data from
managed nodes.
• dhcpd: This is OpenNMS’ Dynamic Host Configuration Protocol (DHCP) client, allowing
it’s networking parameters to be set automatically.
• trapd: Handles events received via Simple Network Management Protocol (traps).
• eventd: Manages the events created by other system entities, and stores them in the database.
• poller: Polls managed services at configurable intervals, to determine if the service is
reachable.
• syslogd: Background process providing OpenNMS’ capabilities of monitoring a widely
used standard for forwarding log messages over a network, called “syslog”.
• discovery: Continually checks the monitored network for new nodes.
• threshd: Monitors attribute values that have thresholds specified.
• rtc: View Control Manager, that collects availability information about managed services,
in close to real time.
90
4.4. SYSTEM DESCRIPTION
• actiond: A background process that executes an automated action based on an incoming
event.
• notifd: Handles the sending of notifications to OpenNMS users.
org.opennms.report Package of classes used for collecting and presenting data about availability of the monitored services. OpenNMS stipulates methods to get wise-reports of each
categories in the “surveillance-views.xml”. Using the list of IP interfaces (that are sent during
the process of filtering and dividing in categories), several node reports are created by referencing tables from the database. Finally reports are created by the report nodes. OpenNMS supports
creating Portable Document Format reports as well as presenting them in the WebUI.
org.opennms.core Classes used by most other parts of OpenNMS, to help with concurrent
code execution, queue implementation and other basic functionality.
Sample subpackages:
• utils: A collection of small, useful tools, shared by several parts of OpenNMS.
• resource: Classes representing configuration files, database tables and other resources that
needs to be handled with care when used by concurrently running processes. OpenNMS
includes a storage unit that runs using PostgreSQL. Because of it, it has some functions to
save and retrieve the collected data. For example we have the following functions:
– Calculate the downtime and the number of all managed services.
– Calculate the percentage availability for all managed services.
org.opennms.secret A project started under the annual OpenNMS Developers’ Conference in
2005, to implement an improved object model using “data access objects” (DAOs), a method to
abstract database connections.
org.opennms.protocols OpenNMS has a centralized management unit, the “netmgt” package, which runs using Simple Network Management Protocol, Java Management Extensions and
other administration protocols, which allows communication between node-to-nod and node-tomanagement agent. We define management session as a communication channel between the
manager and a remote agent. A session groups various parameters, e.g. protocol version and
packet encoding.
OpenNMS has all the required interfaces as an extensive list of network protocols and services: TCP/IP, FTP, HTTP, DNS, DHCP, MSExchange, POP3 and IMAP. This interface helps
the monitoring system to discover and work with different network protocols.
91
CHAPTER 4. DESIGN
Sample subpackages:
• snmp, jmx and dns: Packages containing classes for receiving messages from the Simple
Network Management Protocol, Java Management Extensions and Domain Name System
protocols, and forward these to other parts of OpenNMS.
4.4.2
Environment
Network
The network which the system is supposed to monitor is, of course, of major concern. OpenNMS is constructed to run on most TCP/IP based networks. Therefore it supports several of the
most widely used protocols, like Simple Network Management Protocol, Java Management Extensions, HTTP, and NSClient. In the case of this project, the relevant networks all share several
similarities in topology, since their purposes are essentially the same; namely provide means to
remote control the fish feed barges.
There will always be several common segments present in all networks:
• An operations center, which forms the main location for the monitoring system. This will
contain the primary monitoring server with it’s support systems; database, logging and
backup facilities among others.
• One or more offices of the company owning the fish feed barges, which will run the feed
barge remote control applications.
• One or more feed barges with monitoring and remote control systems.
• Each feed barge will, subsequently, hold one or more sea cages with several measuring
instruments and other critical electronic devices.
The infrastructure of the network will most often to a large degree consist of wireless networks
because of the difficulties with cabled networks at sea. Figure C.1.1 in appendix C.1 shows
the general topology common to the monitored networks, while figure C.1.2 shows an actual
example of a network intended to install the system on.
A description of the network which the network monitoring system will be deployed on is
necessary for understanding the design choices made. The network structure was agreed upon
through several meetings with the customer.
The network is based on the Internet Protocol version 4. Thus, all components in the network
get a 32 bit address for communicating to and from. An IP address is typically shown as four
delimited integers from 0-254, e.g 10.1.2.3. In the IP specification, some address ranges are
reserved as private addresses, these ranges are given in RFC1918 [For96].
The IP ranges are given with an IP address and a netmask in RFC1918. For the IP range
192.168.0.0 - 192.168.255.255 the specification gives 192.168.0.0/16 where 192.168.0.0 is an
IP and 16 is the number of 1-bits in the start of netmask, the rest are 0-bits. The netmask
of 16 prefixed 1-bits, which corresponds to 255.255.0.0 in decimal notation, means that the
92
4.4. SYSTEM DESCRIPTION
remaining 16 (of 32) bits are "free" bits within the range. This means that a netmask of 16 gives
21 6 = 65, 536 available addresses. A netmask of 24 prefixed 1-bits, e.g 192.168.0.0/24, gives
28 = 256 available addresses.
Private IP addresses can be used in network "islands" which do not communicate directly
with the Internet of public IP ranges. Thus, several devices can share a private IP address when
they are on different networks, e.g different companies. The main motivation for such private IP
addresses is the fact that 32 bits gives only 4̃.3 billion unique addresses, which is not enough to
cover the expanding number of networks and devices.
SCG network The Sea Cage Gateway network utilizes a private network as described above.
More specifically, the test network uses the 172.16.1.0/24 IP range, which is a subset of one of
the IP ranges in RFC1918. The pilot network uses the 10.0.0.0/24 IP range.
Both networks are shown in figure C.1.1 and figure C.1.2 respectively.
In the pilot network figure, on the left yellow "post-it" note, one can see an internal addressing
scheme for the different types of components in the network. Together with the customer, the
network structure for the production environment was agreed upon to use the 10.0.0.0/8 private
IP range. This range gives a pool of 1̃6.8 million addresses to be used for all components and
equipment in the network. Distributing these IPs to the customers of TelCage can be done by
leasing 10.0.0.0/24 (256 addresses) subnets to each of the fish farming facilities.
The operations centers that monitor live camera streams and operate the remote feeding
equipment would benefit from low latency and high or at least controllable bandwidth. For
best performance, the operations center should reside on the same physical network as the fish
farming facilities.
To allow operations centers that do not reside on the same physical network, as the fish
farming facilities, connections between the operations center and fish farming facility can be
made by using for example VPN. The VPN server can for example reside on the feed barge or on
one of the antennas connecting several feed barges/fish farming facilities. To allow full flexibility
for the location of the operations center and HQ, the VPN server must have a public IP which
can be connected to from any public IP address.
For this project, it is assumed that the OpenNMS installation at the maintenance center can
reach any IP address/component in the 10.0.0.0/8 IP range, either by already established VPN
tunnels/routes or by being on the same physical network.
4.4.3
System usage
A major part of the project has been to, in conversations with Telcage, decide how the system is
to be used and configured. This is done with the use of sequence and data flow diagrams, as well
as by making a thorough documentation.
Data Flow Diagrams
Given here is the context data flow diagram showing which interfaces the system utilizes to exchange information with the different external entities. This exchange of information is denoted
93
CHAPTER 4. DESIGN
by the arrows, which are are called data flows. The diagram is shown in figure 4.4.4
Figure 4.4.4: Data flow context diagram
Following the rules of the data flow diagramming technique, we have made sure that every
flow originates and terminates in the external interfaces.
Figure 4.4.5 gives the logical top level data flow diagram, showing the main processes of the
system as processes in the system. We have attempted to externalize the human element into
interfaces, which we feel clarifies the DFD greatly.
Sequence Diagrams
The sequence diagram in figure 4.4.6 shows the general process of sending and acknowledging
a notification about an event. The event daemon asks the notification daemon to activate a notification strategy. This will start an escalating sequence of notifications, by the WebUI, mail or
sms, The operator then acknowledges the first received notification or alarm.
Figure 4.4.7 describes the special case of sending and acknowledging a mail notification.
This follows the general sequence described previously.
The same is the case with sms notification, shown in figure 4.4.8, but in this case, the web
application is not directly involved. Instead, a sms service external to the system is used to
receive and forward the user’s acknowledgment.
4.4.4
SCG OpenNMS extensions
OpenNMS can be extended in numerous ways, relating to what feature is being implemented.
When modifying functionality, there are several classes which can be extended to integrate the
functionality within the OpenNMS framework. If the implementation is related to the user interface, it is possible to extend the OpenNMS web application.
94
4.4. SYSTEM DESCRIPTION
Figure 4.4.5: Top level data flow diagram
Figure 4.4.6: General notification sequence diagram
The way of modifying the web application is explained on [Wik08c, hacking]. As explained,
openNMS is composed of a web application, that is a Java servlet application with many individual servlets and JSP pages. Currently, the OpenNMS Group is migrating from plain servlets
and JSP pages to use Spring MVC (and possibly other technologies like Apache Tiles, Spring
Webflow, etc.).
The source code is available on the OpenNMS website and Sourceforge. It also contents the
web application written in Java, that can be modified using Eclipse.
95
CHAPTER 4. DESIGN
Figure 4.4.7: Mail notification sequence diagram
Figure 4.4.8: SMS notification sequence diagram
Some other changes could be necessary. For instance, new database tables or fields could
be needed or additional text files. Every modification that is made should be easily exported
and used in an installation from scratch, developing the necessary scripts to modify the database
structure or other components.
Decomposition description of the extensions
SMS Extension The SMS notification sending and acknowledgement reception extensions can
be conceptualized as two services interfacing with the OpenNMS core software components.
Sending of SMS is called a notification strategy, and implements an interface equal to other
means of notification with OpenNMS. Reception of SMS is called a managed service, and will
interface with the existing software components by providing a JMX service management layer,
which can be managed by OpenNMS.
See figure 4.4.9 for the UML class diagram of the SMS extension.
Customer View Extending the web application and making a customer view means making a
jsp page to present the customer view and utility classes, preferably a servlet which provides the
96
4.4. SYSTEM DESCRIPTION
Figure 4.4.9: UML Class Diagram for SMS extension
logic and database connectivity. The main design of the customer view is an XML file with group
elements containing elements with node identifiers, as well as other group element identifiers.
The following is a listing showing an example instance of the XML structure:
<group id=’1’ name=’Backbone’>
<membernode id=’2701’/>
<membernode id=’2307’/>
<membernode id=’2201’/>
</group>
<group id=’2’ name=’Salmar’>
<membergroup id=’1’/>
<node id=’1702’/>
</group>
<group id=’3’ name=’Aquagen’>
<membergroup id=’1’/>
<membernode id=’1278’/>
97
CHAPTER 4. DESIGN
</group>
The customer view will use the database to create a customer view with relevant and usable
details relative to a selected customer. Thus, the customer view fulfills the requirement of logical
groups, and groups of groups, FR-UI01.
Map A mapping feature is already available in OpenNMS, as shown on [Wik08g, mapping].
It mainly maps the nodes being monitored and the different connections or links between them.
Each element is shown as a symbol that depicts a small circle filled with a different colour
depending on the status of the node. The nodes can be moved around the map, and maps can
be composed of other maps, as shown on Figure 4.4.10. Enabling this map had to be done my
renaming a file in the configuration folder, which was not immediately apparent and therefore,
we considered the mapping feature as a candidate for extension
Figure 4.4.10: Distributing nodes on a simple map.
The features provided depend on the browser used while seeing the page, and some functionalities such as zooming are restricted to Internet Explorer browsers, that use Adobe SVG Viewer
and needs to be installed.
Setting a geographical map under the nodes is a manually and tedious task, since the information standing underneath should be composed of pictures. These pictures have to be manually
positioned and if zooming is used the results could be unsatisfactory. An example is shown on
Figure 4.4.11.
Mapping could be improved if nodes were geopositioned. They could be spread on a geographical map using, for instance, Google Maps. Navigation through the different cages installations would be so easy as moving and zooming in the map. In addition, the use of a rich and
friendly user interface, as well as full compatibility with the main browsers would improve the
monitoring features.
98
4.4. SYSTEM DESCRIPTION
Figure 4.4.11: Using pictures representing regions of Italy as a background for the nodes.
Implementation of mapping can be achieved by extending OpenNMS retrieving information
about the devices. Right now, there is a REST interface for getting list of nodes and there
addresses to have them geocoded. There is also a really handy Javascript library that can be
used to add maps to the UI really easily.
As far as integrating Maps to the UI four places are targeted:
• The assets tab
• The dashboard page
• The node info page
• The geographical maps page
The idea behind the geographical map is to display the nodes, links, notifications and outages
within you network over a geographic context. It makes seeing assets and events in a more
familiar context network managers and admins.
There are currently at least two projects working on adding this functionality to OpenNMS.
By one side, OpenNMS has an official branch in its public repository. By the other, a 2006
Google Summer Code added this feature to a version from that time.
The problem of using the official branch is that a way to merge that branch with the head
branch must be found. The Google Summer Code, instead, made modifications to a non current
version, so these modification should be applied to a current version of OpenNMS, and this is
99
CHAPTER 4. DESIGN
difficult as long as several files have been modified and a deep knowledge of the solution is
needed.
The last option is developing this feature on our own, although probably the group will not
do it in the best possible way because not being very familiar with the code.
Dependency description of the extensions
Dependencies of the extensions are illustrated in figure 4.4.12.
Figure 4.4.12: The scg extensions’ dependencies to OpenNMS packages.
100
4.5. REQUIREMENTS NOT DESIGNED
4.5
4.5.1
Requirements Not Designed
About features
In this section we provide a description of the features that we have achieved with the implementation and configuration of OpenNMS. As well, we also will describe the features that are not
present in OpenNMS and finally we have not achieved.
Relevant features In this section will be described the relevant features that finally have been
implemented or configured to accomplish the necessary functions related in the Section 3.3.2.
These features are the following:
• Monitoring the nodes: OpenNMS periodically consults the status of nodes, by ping, and
services on those nodes by protocol TCP/IP to see if the resource is responding correctly.
In addition, in OpenNMS we can access to different information of our installed devices;
as well, we have a friendly and easy to follow user interface that provides all the necessary
functions for configure it.
• Alarm notification and acting: OpenNMS has a good notification system due to we can
configure it to send messages like Emails or SMS to notify it a node or a device in this
node breaks. Concretely, the SMS notification system allows to send an error message to
an specific number. OpenNMS has the possibility to configure who will receive it, when
and the text content.
• Reports: OpenNMS has a separated section to provide us a lot of reports of all of categories that we want. These reports can be generated in PDF or HTML files with a classic or
calendar structure. In addition they can include information about network devices, email
servers, web servers, jmx servers, DNS and DHCP servers, and more.
• Use of application: As we explained in the subsection 3.3.2, we need an application that
provides us a minimum of four views. OpenNMS fulfill these required functions, concretely, the first that is Nodes monitoring has been described before. The second function
was named Events because it is necessary to know all the events happened in the system
and for it, OpenNMS implements a dedicated section in the control panel for it. Another
functions that OpenNMS have implemented are the possibility to give Reports of all of
the categories both generally and concretely and at last, the Alarms are also included as a
feature present in OpenNMS, as we have described before.
Features not present in OpenNMS The most important feature that is not present in OpenNMS, is the possibility to group all the s as the user decides. We can see all the nodes, but by
default we can not group a set of nodes. It was important because one thing to implement was
the possibility to create s that have several nodes inside. In addition we wanted to show different
types of classification of these. We reject to implement it because of we wanted to create some
101
CHAPTER 4. DESIGN
problems, since when we modify some parts of OpenNMS we cause that when we need to update
to a new version, we have to modify the database, the web interface and some JSP files that we
need. In the Subsection 7.4.1 we can find more information.
4.6
Requirements not designed
All the specific requirements in the requirements specification are a product of the wishes expressed by the customer, and it would be preferable if all of them were implemented. However,
since this project has time and resource constraints and it also depends on another project for
realistic testing some of the requirements were not designed. The requirements not designed are
given here, with an explanation of why they were decided not to be part of the design:
• FR-CS06 Layered System: The motivation for a layered system was described as a desire
to enable monitoring of parts of the system which for a limited time is not reachable by
the main network monitoring installation, due to for example a path outage. While this is
a nice feature to have in a large network, spanning a large physical area, it was considered
more important to focus on the functionality of the main installation. Therefore, due to
time constraints, this requirement was omitted from the design.
• FR-CS08 NAT Traversal: Traversing between public and private networks is common today due to the limited number of IP addresses available. However, monitoring components
behind in a private network introduces many problems regarding duplicate private IP addresses and port forwarding. The SCG network is planning to use the 10.0.0.0/8 private
network creating a network which is completely reachable from any parts of the network.
This means they have an excess of 16 million IP addresses and TelCage will most likely
not reach this limit for many years. Meanwhile, technologies like network protocols and
network monitoring solutions can change. Thus, the project group has omitted this requirement from the design.
• FR-RE03 Daily report: Sending a daily report to management automatically removes the
need to train management personnel in retrieving reports from the OpenNMS system. This
functionality however is not readily available in the OpenNMS system and would require
extending the OpenNMS system. From the OpenNMS website it seems this feature will
be available in a future release. Thus, because of time constraints and since the priority of
this requirement is low, it is omitted from the design.
• User Documentation: - The user documentation explaining how to use, configure and
install the system is not a matter of design, rather tasks for the documentation phase. These
requirements are therefore not mentioned as part of the design.
102
4.7. DEPLOYMENT
4.7
Deployment
The deployment of the system is always important, but especially so in this project, since the
customer’s main concern is the study of their possibilities of utilizing an existing network monitoring system. Therefore, it should be taken into account already at the design/ construction
phase. This section explains the considerations to be taken, when implementing the solution, to
ensure ease of deployment.
4.7.1
Environment
The environment that the system depends on consists of the operating system of the server that
OpenNMS runs on and the network that the components to be monitored are attached to.
Operating system
Because OpenNMS is written in Java, it can be run under several different operating systems
(see section 4.3.1). The back end database server, PostgreSQL, also has implementations for
Windows, Linux, MacOS among others. Still, the customer, TelCage, mainly run windows on
their servers, and so the group will concentrate on testing on this operating system.
Network
The system should not depend heavily on a specific network topology or technology, but compatibility with the TCP/IP protocols is natural to assume. Deploying OpenNMS on such a network
is trivial, thanks to a highly configurable way to specify addresses and services to monitor.
4.7.2
Adding network nodes
New network nodes will probably be added to the network regularly, and it should therefore be
trivial to configure the system to monitor these. OpenNMS already has the functionality automatically detect new network nodes and services, by continually searching the monitored network.
The only prerequisite is that the new node is assigned an IP address within the monitored sequence, which is done manually or by Dynamic Host Configuration Protocol.
4.7.3
Initial Configuration
The configuration needed to set up the system on a network needs to be as straight forward as
possible. This is accomplished by thoroughly documenting the process in the documentation
chapter.
103
CHAPTER 4. DESIGN
4.8
Conclusion
In this construction document we have given a detailed design of the system and the extensions
we are going to install, configure and implement, respectively. Much of the effort invested on this
phase and on this document has focused on describing the system description and every module
that is structured in three levels.
One of the most difficult problems to solve has been the use of diagrams to explain better
the system description. This is because the OpenNMS team has not considered to create these
diagrams and they have not got a structured plan for the realization of this project. Because of
this we have to create these diagrams using reverse engineering or, in the worst case, only using
the intuition.
Another effort has been to design the fulfillment of the requirements started during the Requirements phase. This is an important section because some requirements has also been verified.
These requirements have a detailed description and tracking in the Fulfillment section.
104
Chapter 5
Implementation
5.1
5.1.1
Introduction
Purpose
The purpose of this phase document is giving an overview of our working practice, like programming conventions and a description of work organization. Thus, the document describes how the
task was carried out and gives a reference document for future development. The reader wanting
to see details of configuration or installation is referred to the Documentation phase document.
5.1.2
Scope
This document describes factors that affect the implementation work. It gives the approaches for
making the prototype and implementing the different partial solutions. Thus, the scope of the
document is explaining how the major parts of the requirements specification and design phase
were carried out, and therefore will frequently refer to these documents. It is emphasized that
this document does not explain how to configure, install, extend or make changes to the system,
for information relating to this the reader is referred to the Documentation phase document.
5.1.3
Overview
The following is an outline of the sections in this document with a short description:
• Section 5.2 - Programming Standards
This section explains programming standards and conventions used in the project.
• Section 5.3 - Process Description
This section shall present an overview of how the process of implementation was carried
out.
• Section 5.5 - Conclusion
This section gives the summary with the description of the goals of this section.
105
CHAPTER 5. IMPLEMENTATION
5.2
Programming standards
This section will explain the documentation in our code. We use the standards in Java Code
Conventions. A short description of some relevant standards is provided here.
5.2.1
Layout
• Spaces before parentheses and braces should be avoided. Listing 5.2.1 shows correct sample code.
public int send(List<Argument> list) {
...
}
Figure 5.2.1: Correct spacing before parenthesis
• Spaces before colon, semicolon and comma should be avoided. Listing 5.2.2 shows correct
sample code.
public ServiceException(java.lang.String s, java.lang.Throwable ex) {
super(s, ex);
}
Figure 5.2.2: Correct spacing before comma
• Spacing around variable initialization should follow the standard structure defined in Java
Code Conventions. It should avoid the spacing after the variable. Listing 5.2.3 shows
Correct sample code.
String list;
int n = 0;
Figure 5.2.3: Correct spacing with variable initialization
5.2.2
Naming Conventions
In this section we will describe, discus and give some simple examples about naming convections. Since there will be several readers of our, we need to consider the readability of the source
code. Following naming standards helps readers to easily read the source code.
106
5.2. PROGRAMMING STANDARDS
Modules
When naming modules, certain rules apply. These rules are described below.
• Module names should be either lower case or mixed case.
• The names shall be as short and concise as possible.
Classes
Rules guiding the naming of classes and interfaces are given below.
• All names should be nouns that clearly states what functionality that has been implemented.
• The first letter shall be an upper case letter. If the name consists of several words, it shall
be written as one, where every partial word will start with an upper case. An example of
this is the class name BigLongTree.
Methods
When naming methods, certain rules apply. These rules are given below.
• Method names shall be verbs that describe the functionality the method contains.
• The first letter shall always be a lower case letter. If the name consists of several words, it
shall be written as one, where every part word will start with an upper case. An example
method name could be AddToNumbers().
Variables
Rules guiding the naming of variables are given below.
• Variable names shall be short, yet meaningful. It should indicate the intent of its use.
• Variable names can either be lowercase or mixed case. If the name consists of several
words, it shall be written as one, where every partial word starts with an upper case. Example variable names are bigHead or head.
107
CHAPTER 5. IMPLEMENTATION
• One-character variables should be avoided except for temporary discardable variables, like
counters.
5.2.3
Formatting
In this section we will describe the formatting of classes, methods and statements. These formatting rules are used by the team in order to acquire a source code that has high readability.
Classes
Declaration of classes and interfaces should comply with the following formatting rules:
• Open brace { shall end the line where the declaration statement is.
• Closing brace } starts on a line by itself, indented to match its corresponding opening
statement.
• The body of the class is indented on the next line.
Listing 5.2.4 shows the correct class formating.
public class Scg{
...
}
Figure 5.2.4: Correct class example
Methods
Declaration of methods should comply with the following formatting rules.
• Methods are separated by a blank line.
• There shall be no space between a method name and the parenthesis starting its parameter
list.
• Formatting rules for braces and for the body of the method are the same as for classes.
Listing 5.2.5 shows correct method formatting.
108
5.2. PROGRAMMING STANDARDS
public void scgDo(int number){
...
}
Figure 5.2.5: Correct method example
5.2.4
Code commenting standard
The written code for prototype needs to be documented since we are going to deliver the product
to our customer. For purpose of development the code must be easily readable and understandable. The commenting standard we have used to comment our code is the one described in Code
Conventions for the Java Programming Language, namely Javadoc comments. The reason have
decided to use Javadoc is the possibility to compile it to API, something that makes it easy for
readers to follow. In Listing 5.2.6 and 5.2.7 a commented code is shown.
This is how a class should be commented.
/**
* The Send class sends a HTTP POST request
* to the pats.no SMS web service. This class
* was used mainly for testing purposes.
* The SMSNotificationStrategy class should
* be used for sending SMS messages through
* a Parlay X web service.
*
* @author Jose
* @author Vegar
*
*/
public class Send implements NotificationStrategy {
...
}
Figure 5.2.6: Javadoc commented code example in a class
This is how a methods should be commented.
An example of Javadoc API shown in the Figure 5.2.4.
109
CHAPTER 5. IMPLEMENTATION
/**
* The main method
*
* @param args
An array that contains the necessary parameters
*
to send an sms.
Usage: send <destination> <largeAccount> <user>
*
<passwd> <message>
*/
public static void main(String[] args) {
...
}
Figure 5.2.7: Javadoc commented code example
Figure 5.2.8: Javadoc API example for class
110
5.2. PROGRAMMING STANDARDS
An example of Javadoc API for methods in a class is provided in Figure 5.2.4.
Figure 5.2.9: Javadoc API example for methods in a class
111
CHAPTER 5. IMPLEMENTATION
5.3
Process description
This section gives an overview of how the process of implementation was carried out. Specifically, it gives a description of work organization as well as software libraries and tools utilized
to implement the design.
5.3.1
Work Organization
The implementation phase was carried out by making tasks using the requirement specification
and design phase document. Prioritization of tasks were made according to the priorities of the
requirement specification. These tasks were carried out in pairs, a practice called "pair programming" which the project group feels increases productivity as well as contributes to quality
assurance, since the code is "reviewed" while being made.
5.3.2
Libraries and Tools
This section gives the implementation specific tools we have used to implement our design as
well as any software libraries used. Implementation specific implies the design can be implemented using other tools as well.
The following is a listing of the libraries utilized by the implementation. A more detailed description is given in the subsequent sections. Keep in mind however that the library versions
used under compilation does not restrict the use of more recent libraries in the future as class
references are dynamically linked at run time.
Core Axis library
axis.jar
log4j-1.2.8
Library for advanced logging
jaxrpc.jar
Library for XML based Remote Procedure Calls
Dependency relating to axis.jar and jaxrpc.jar
saaj.jar
Run time loading of pluggable interface implementations
commons-discovery-0.2.jar
commons-logging-1.0.4.jar
Library for advanced logging
Dependency relating to Axis
wsdl4j-1.5.1.jar
OpenNMS utility classes
opennms-util-1.5.93.jar
opennms-services-1.5.93.jar
OpenNMS main library for service "daemons"
opennms-model-1.5.93.jar
Interfaces and abstract classes for extension
opennms-dao-1.5.93.jar
Database access classes
opennms-config-utils-1.5.93.jar Utility classes for configuration files
spring-2.0.7.jar
Implementation uses the database interfaces of the spring framework
5.3.3
SOAP and AXIS
The Parlay X specifications provides APIs for common telephone services, like Short Messaging(SMS) or Multimedia Messaging(MMS). Telenor R&I through the pats.no website provide
112
5.4. DESIGN CHANGES
web services following the Parlay X specifications. These web services are associated with a description file called a WSDL(Web Service Description Language) which specifies the interface
on the web service. We have utilized these web services to extend OpenNMS with functionality
for sending SMS as well as receiving SMS to acknowledge notifications when not present at the
management center.
For implementing the SMS extensions and making use of the web services, we have used Apache
AXIS which is an implementation of SOAP: "SOAP, originally defined as Simple Object Access
Protocol, is a protocol specification for exchanging structured information in the implementation
of Web Services in computer networks."[?] "Apache Axis is an implementation of the SOAP
("Simple Object Access Protocol") submission to W3C."[Fou08]
The extensions made by the project is thus dependant on the AXIS 1.4 software libraries.
5.3.4
OpenNMS Libraries
Implementing the extensions of OpenNMS required making use of the OpenNMS software libraries. Specifically, many of the Java classes made are dependant on OpenNMS Java classes
either by extending or making use of the OpenNMS Java classes in the code. This allowed the
extensions to be neatly integrated within the OpenNMS framework and be configured in the
normal configuration files of OpenNMS. Thus, the extensions are dependant on the OpenNMS
software libraries.
5.4
Design Changes
In this section we give any design changes which were made during the implementation phase.
Design changes may occur from events which are encountered during the implementation phase.
These events may be expected to occur given a probability and severity in the risk table.
5.4.1
Customer View
OpenNMS is a relatively big software system and it is not trivial to gather extensive knowledge
on all parts of the system through inspection. We therefore relied on the official OpenNMS
documentation on the official website. This official documentation does not discuss logical node
grouping and grouping of groups. After inspection of the web interface of OpenNMS and not
finding this feature, the group concluded that this feature would have to be implemented referring
to requirement FR-UI01 in Specific Requirements 3.5.2. However, during the implementation
phase while configuring the system, a feature called Surveillance Categories was found in the
web application which would cover requirement FR-UI01. Hence, the group decided to configure
the Surveillance Categories to show groups of customer components instead of implementing a
feature which would have to be maintained by the customer after handover. The risk associated
with this change is risk 7 A.4.2.
113
CHAPTER 5. IMPLEMENTATION
5.4.2
SMS Notification Acknowledgment
From the requirement specification the system must be able to send SMS notifications through
Telenor’s SMS web services (FR-UA06). During implementation of this feature, Telenor R&I
expressed the desire of also acknowledging notifications through SMS in the case that an operator is not present at the maintenance center when receiving the SMS notification. If the operator
is required to travel to the maintenance center to acknowledge the notification, this could potentially decrease productivity as well as potentially escalating notifications to the next escalation
step before the operator has had time to acknowledge the notification. This change was considered important and was thus implemented by the project. In addition, the design document and
specific requirement FR-UA06 was updated according to this requirement change.
5.5
Conclusion
During the implementation phase we have had two goals in mind. The first goal is two fulfill
the design and requirements while the other is to make a clean OpenNMS configuration and
extension in such a way that the customer is not tied to the current version of OpenNMS because
of limitations of this projects configuration or extensions. Thus, we have spent considerable time
looking at the source code of OpenNMS, trying to find best practices of implementing within the
OpenNMS framework. The resulting extensions and configuration should be very well in-line
with the intentions and best practices of OpenNMS. Licensing the source code of the Parlay X
SMS extension made by the project group under the GPL and providing the source code to the
OpenNMS community was suggested to the customer.
114
Chapter 6
Testing
6.1
6.1.1
Introduction
Purpose
The purpose of the test chapter is to set a formal method to be followed to carry out the testing
activities in our project. After a short introduction, the purpose and scope of the activities is
established, being followed by the definitions, acronyms, abbreviations and references used in
the document. It is being written following the guidelines established in the IEEE Standard for
Software Test Documentation (829) [iee98c].
The intended audience for this document are the project group, the customer, and the group
supervisors.
6.1.2
Scope
According to the Project mandate, the result of this project is expected to be a prototype of a
monitoring system that manages the test network. Because of time constraints, the testing of the
prototype will mainly comprehend requirements with priority level high. The test documentation
has been based on the IEEE Std 8292, however the structure and level of details have been
adapted to fit our project. The scope of the testing activities, and hence the test documentation,
is to improve the implemented solution as much as possible in accordance with the Requirement
specification.
6.1.3
Overview
In this section we will give an overview of the remaining chapters in this document. Each chapter
correspond to test deliverables specified by the IEEE Std 829 found appropriate for our project.
The proposed structure has been somewhat adapted to support a more evident presentation of the
testing activities.
115
CHAPTER 6. TESTING
• Section 6.2 - Test plan
This section is concerned about planning, i.e. deciding how and when the test activities for
our project will be carried out.
• Section 6.3 - Test design specification
In this chapter we will specify the types of tests that are going to be performed as a part of
the project.
• Section 6.4 - Test results
In this section we present the results of the different tests. Any changes done in the original
test plan will be described here.
• Section 6.5 - Tracking of tests
This section investigates how and if the various requirements have been tested. Then an
examination of the dependencies of the requirements not covered is given.
• Section 6.6 - Conclusion
This section gives a summary of the most important conclusions drawn in this chapter.
6.2
Test plan
This chapter defines a test plan for the project. The test plan specifies how and when testing of
the delivered prototype will be carried out.
6.2.1
Introduction
The purpose of the test plan is to identify the scope, approach, resources, and schedule of the
testing activities to be carried out in the project. As mentioned in the Purpose (section 6.1.1),
the scope of the testing activities is to improve the implemented solution as much as possible,
checking it works correctly, in accordance with the Requirement specification. The project group
has chosen an approach that will be described in the following section. Later on, the resources
needed to perform the testing and the responsibilities in connection with testing are identified.
Finally, a test schedule and the risks associated with the testing phase are given.
6.2.2
Features to be tested
There are a number of features that will be covered in the testing phase. They cover both OpenNMS features, the extensions and configurations we have made and the easy of use of the system
by the users.
116
6.2. TEST PLAN
6.2.3
Features not to be tested
Some features will not be tested, especially low-level features of OpenNMS that cannot be covered because of time constraints, and we can assume that they have been highly tested having
into account the history of revisions of OpenNMS and its wide use to monitor a lot of networks.
These features can be, for instance, the data retrieval, its storage and further presentation. We
will focus on the final view of the data rather than whether OpenNMS is managing correctly the
internal data.
6.2.4
Approach
The group will test the system carrying out a set of testing activities composed of:
• Planning of testing
• Design of test cases
• Testing
• Documenting the result of test cases
The testing activities will be classified by whether they will be carried out internally by the
project group, or in collaboration with the customer.
6.2.5
Item pass/fail criteria
The check lists developed for the unit test and the module test will consist of statements for each
test case. To pass the test, all the statements must be true when the unit test or the module test
has been performed (for the unit or module under consideration). A criteria for passing the test
case must be specified for each uniquely identified test case. To pass a test case, the criteria must
be satisfied when the test case has been performed, otherwise we consider it fails. If a test case
concerns functionality that has not yet been implemented, the test case fails.
6.2.6
Suspension criteria and resumption requirements
The testing activity will be suspended if critical parts of the system does not work properly, as it
could be the computer where the database is stored, the one where OpenNMS should run or the
network itself, since this would mean that most (if not every) of the testing activities cannot be
performed.
When the test is resume, activities concerning the interconnected services or devices should
be perform again to check that every test is passed.
117
CHAPTER 6. TESTING
6.2.7
Test deliverables
The testing documents that will be delivered are the following:
• The current report, composed of:
– Test plan
– Test design specifications
– Test case specifications
– Test procedure specifications
– Test item transmittal reports
– Test logs
– Test incident reports
– Test summary reports
• Test input data and test output data if needed
• Test tools (e.g., module drivers and stubs)
6.2.8
Testing tasks
As stated in the Approach (section 6.2.4), there are various tasks to be performed: planning,
design of test cases, testing and documentation of the result of the test cases.
In our project it is necessary that the customer is present to perform the customer tests. As the
group is familiarized with the network that will be used for testing, there is no need to count with
skilled people with knowledge about the devices that will be used in a real environment. Tests
can be made with a controllable subset of devices that will connect and disconnect. However, if
more complex devices need to be manipulated, such as antennas, or extra devices need to be test,
people from Telcage will be necessary.
6.2.9
Environmental needs
The test environment should contain a set of devices that is representative of the ones that will be
used in the real deployment, so that there are devices reporting their data through Simple Network
Management Protocol and Java Management Extensions, as well as other protocols support to
make sure that the OpenNMS module that retrieves the data is working with the protocols and
technologies that will be needed.
Of course, OpenNMS must be correctly installed and configured, as well as the components
that it needs to run properly (database, web server). The implemented extensions have to be integrated with this installation of OpenNMS. An OpenNMS administrator account is compulsory,
and it is advisable to create an extra account, e.g. Operator role, that allows to carry out a set of
tests more real, for instance a richer notification escalation can be made.
118
6.2. TEST PLAN
These devices should be interconnected and OpenNMS should be aware of their presence.
At least one of them should be accessible to be switched on and off to test the response of the
monitoring system, to test the path outages. An e-mail manager and a mobile phone should be
ready to test these two different methods of event notifications.
6.2.10
Responsibilities
• The test manager has the overall responsibility of the test documentation, as well as the
test phase.
• The project manager has the overall responsibility of coordinating test activities with other
project activities.
• The designer of a specific test case shall not perform the same test.
• The customer shall provide technical equipment for the system and integration test, as well
as the acceptance test.
• The customer shall respond to critical re-design issues related to error handling within 24
hours.
6.2.11
Staffing and training needs
All the group members that will carry out the testing activities should be skilled in basic networking (protocols, devices) and some of them should be skilled in Java and Web server, so that
problems and errors that might arise can be better interpreted and understood.
Our group is skilled enough to perform these testing activities, so additional training is not
needed.
6.2.12
Schedule
Test activities are performed during the implementation and testing phase. The unit and module
tests are carried out as a part of the implementation and are not a part of the schedule, the other
testing activities given in table 6.2.1.
6.2.13
Risks and contingencies
The main risk connected to testing is unforeseen difficulties with implementation, which leads to
extensive need for debugging or modifying the current configuration of OpenNMS. It is likely for
most software development projects to experience such difficulties on some level, hence a tradeoff between available time versus completeness of the prototype is likely to occur. For the testing
activities this implies that the project group has to take the available time into consideration when
handling errors. It is considered to be essential for the system and integration test and the two
customer tests, that a more or less complete version of the system is available.
119
CHAPTER 6. TESTING
Test activity
Test plan delivery
Test design specification delivery
Test case specification delivery
Usability test
Final system and integration test
Acceptance test
Test log delivery
Test summary report delivery
Deadline
12.November
13.November
13.November
14.November
15.November
15.November
15.November
18.November
Table 6.2.1: Test schedule
6.3
Test design specification
The purpose of this section is to specify refinements of the test approach and to identify the
features to be tested by this design and its associated tests.
6.3.1
System functionality test
The various function tests aim to cover the majority of functional requirements and use cases.
The use cases will be further tested in a potential usability test.
Features to be tested
These tests focus on the different functionalities that the system should provide in response to
the stated functional requirements, checking that a set of features is correctly configured and
working.
Test identification
The functional tests will check that the functional requirements list on section are correct. Therefore these tests have been designed to check that every requirement is covered. Every requirement
is covered by one or more tests, and every test can cover more than one requirement.
We have used an identifier that allows to classify the test as a functional test, and it also allows
to be sub classified depending on the type of functionality being tested. The identifiers for these
tests follow the following format:
TC-FT<XX><2 digits>: Unique functionality test, belonging to the XX category.
The designed tests are the following:
• Node monitoring
– TC-FTCS01 / Component monitoring using SNMP and JMX: tests if the NMS
can successfully retrieved data from devices using SNMP and JMX.
120
6.3. TEST DESIGN SPECIFICATION
– TC-FTCS02 / Stored and aggregated status history: tests if the system shows
updates in the status of devices when a change takes place (for instance a device is
disconnected).
– TC-FTCS03 / Performance monitoring: tests if performance data is correctly retrieved for the different devices.
– TC-FTCS04 / Layered configuration: tests if the NMS can successfully manage
data from other server running NMS, that is the system can scale to some degree.
• Alarm notification
– TC-FTAN01 / Display alarm: tests if the NMS can display alarm information and
the path outage.
– TC-FTAN02 / Alarm conditions: tests if the NMS generates an alarm when the
appropriate conditions take place.
– TC-FTAN03 / Alarm notification: tests if the NMS manages to notify the user of
the existence of an alarm using the notification method that has been set up.
– TC-FTAN04 / Alarm sequencing and priority: tests the ability of the NMS to
manage a number of alarms taking into account a prioritization and a period of time
during which the alarm must be ignored.
– TC-FTAN05 / Short Message Service Web Service: tests if the NMS can provide
alarm notification using pats.no web service sent to a phone number.
– TC-FTAN06 / Acknowledged alarms: tests if the NMS can successfully acknowledge alarms.
• Availability
– TC-FTAV01 / Availability: tests if the NMS is able to shut down cleanly, and once
the computer is started again, OpenNMS starts up correctly and automatically.
• Reports
– TC-FTAV01 / Availability and performance data and report generating: tests if
the NMS is able to report performance and availability data for each node, generating
daily reports.
• User interface
– TC-FTUI01 / Node grouping: tests if the NMS can classify nodes into groups specified by the operator.
– TC-FTUI02 / Network status overview: tests if the NMS can display an network
status overview to know if the system is working at a glance.
– TC-FTUI03 / Node usage: tests if the NMS can show which categories a node
belongs to.
121
CHAPTER 6. TESTING
– TC-FTUI04 / Vital network paths: tests if the NMS supports creation and visualization of critical paths.
Feature pass/fail criteria
A system is not well designed if the features that the system was required to have do not work.
The system would decrease its value and, in some cases, it would be completely useless. If a
functional test case is not passed, it will be marked as error. In the case that there are not any
errors marked, the test will marked as passed.
6.3.2
System usability test
This function describes the design of the usability test. The tests that we show in this section will
reveal defects in the design of the web user interface as well as will measure how intuitive the
user sees the WUI is.
Features to be tested
These tests focus on the web user interface of OpenNMS and aims to improve the usability and
intuitively of the system. An important aspect of these tests is clarify how intuitive is the WUI
for someone who is not part of the project.
Test identification
In the usability tests it is important that users are able to complete the use case scenarios given in
the requirements specification, Appendix B. Therefore all use case scenarios should correspond
to a usability test case. We define the following tests cases on the uses cases from the Requirements specification in Chapter 3.To each test case, we provide an identifier with its description,
that clarifies its meaning. The identifiers for these tests follow the following format:
TC-US-<2 digits>: Unique usability test.
The designed usability tests are the following:
• TC-US01 / Network monitoring: tests if the operator is able to see the overview information, choose individual component and acts on any alarm.
• TC-US02 / Component monitoring: tests if the operator is able to find a component by
name or id and view its status.
• TC-US03 / Alarm notification: tests to verify that the operator is able to deal with a
notification and its related alarms in an appropriate way.
• TC-US04 / Report extraction: checks if the operator is able to extract sufficient report
data for the Servile Level Agreement.
122
6.4. TEST RESULTS
• TC-US05 / Component addition: verifies if the administrator is able to add components
in the appropriate way.
• TC-US06 / Initial configuration: checks that the documentation is sufficient for initial
configuration.
• TC-US07 / Post configuration: checks that the administrator is able to perform postconfiguration tasks given the documentation.
• TC-US08 / User management: verifies that the administrator is able to manage the users
and groups according to the documentation.
Feature pass/fail criteria
A system is not well designed if externals users (of the project) cannot find what they need
intuitively. If the user feels lost or unsure when he interacts with the WUI, it means that there are
several flaws in the design. If the user test case is not passed, it will be marked as error. In the
case that there are not any errors marked, the test will marked as passed.
6.4
Test results
This section will describe the results of the testing of the prototype. All errors found during the
testing will be given a unique identifier, ERR-X, and a more thorough explanation will be found
below the table showing the results of the test. Note that all tables referred to in this section
which can not be found in the main text, are found in Appendix D.2.
6.4.1
Function test results
The function tests were executed as stated in the specific test descriptions.
Node monitoring test results
TC-FTCS01: Component monitoring using SNMP and JMX The test was executed according to the test specifications in Table D.2.1. The goal of the test is to ensure that the NMS can
successfully retrieved data from devices using SNMP and JMX. The results of the test are given
in Table 6.4.1
123
CHAPTER 6. TESTING
Test responsible:
Time of initial test:
Errors, initial test run:
Approval:
Result (TC-CS01)
Andreas Eriksen
14 Nov 2008
None
YES
Table 6.4.1: Result TC-CS01
TC-FTCS02: Stored and aggregated status history The test was executed according to the
test specifications in Table D.2.2. The goal of the test is to ensure that the system shows updates
in the status of devices when a change takes place (for instance a device is disconnected). The
results of the test are given in Table 6.4.2
Test responsible:
Time of initial test:
Errors, initial test run:
Approval:
Result (TC-FTCS02)
Andreas Eriksen
14 Nov 2008
None
YES
Table 6.4.2: Result TC-FTCS02
TC-FTCS03: Performance monitoring The test was executed according to the test specifications in Table D.2.3. The goal of the test is to ensure that performance data is correctly retrieved
for the different devices. The results of the test are given in Table 6.4.3
Test responsible:
Time of initial test:
Errors, initial test run:
Approval:
Result (TC-FTCS03)
Andreas Eriksen
14 Nov 2008
None
YES
Table 6.4.3: Result TC-FTCS03
TC-FTCS04: Layered configuration The test was not executed, because the functionality
was not designed. The goal of the test was to ensure that the NMS can successfully manage data
from other server running NMS.
124
6.4. TEST RESULTS
Test responsible:
Time of initial test:
Errors, initial test run:
Approval:
Result (TC-FTCS04)
Andreas Eriksen
14 Nov 2008
None
YES
Table 6.4.4: Result TC-FTCS04
Alarm notification test results
TC-FTAN01: Display alarm The test was executed according to the test specifications in
Table D.2.5. The goal of the test is to check that the NMS can display alarm information and the
path outage. The results of the test are given in Table 6.4.5
Test responsible:
Time of initial test:
Errors, initial test run:
Approval:
Result (TC-FTAN01)
Azhar Ahmad
14 Nov 2008
None
YES
Table 6.4.5: Result TC-FTAN01
TC-FTAN02: Alarm conditions The test was executed according to the test specifications
in Table D.2.6. The goal of the test is to check that the NMS generates an alarm when the
appropriate conditions take place. The results of the test are given in Table 6.4.6
Test responsible:
Time of initial test:
Errors, initial test run:
Approval:
Result (TC-FTAN02)
Azhar Ahmad
14 Nov 2008
None
YES
Table 6.4.6: Result TC-FTAN02
TC-FTAN03: Alarm notification The test was executed according to the test specifications
in Table D.2.7. The goal of the test is ensure that the NMS manages to notify the user of the
existence of an alarm using the notification method that has been set up. The results of the test
are given in Table 6.4.7
125
CHAPTER 6. TESTING
Test responsible:
Time of initial test:
Errors, initial test run:
Approval:
Result (TC-FTAN03)
Azhar Ahmad
14 Nov 2008
None
YES
Table 6.4.7: Result TC-FTAN03
TC-FTAN04: Alarm sequencing and prioritization The test was executed according to the
test specifications in Table D.2.8. The goal of the test is to check the ability of the NMS to
manage a number of alarms taking into account a prioritization and a period of time during
which the alarm must be ignored. The results of the test are given in Table 6.4.8
Test responsible:
Time of initial test:
Errors, initial test run:
Approval:
Result (TC-FTAN04)
Azhar Ahmad
14 Nov 2008
None
YES
Table 6.4.8: Result TC-FTAN04
TC-FTAN05: SMS Web Service The test was executed according to the test specifications
in Table D.2.9. The goal of the test is to check the NMS can provide alarm notification using
pats.no web service sent to a phone number. The results of the test are given in Table 6.4.9
Test responsible:
Time of initial test:
Errors, initial test run:
Approval:
Result (TC-FTAN05)
Azhar Ahmad
14 Nov 2008
None
YES
Table 6.4.9: Result TC-FTAN05
TC-FTAN06: Acknowledged alarms The test was executed according to the test specifications in Table D.2.10. The goal of the test is to ensure that the NMS can successfully acknowledge alarms. The results of the test are given in Table 6.4.10
126
6.4. TEST RESULTS
Test responsible:
Time of initial test:
Errors, initial test run:
Approval:
Result (TC-FTAN06)
Azhar Ahmad
14 Nov 2008
None
YES
Table 6.4.10: Result TC-FTAN06
Availability test results
TC-FTAV01: Availability The test was executed according to the test specifications in Table D.2.11. The goal of the test is to ensure that the NMS is able to shut down cleanly, and once
the computer is started again, OpenNMS starts up correctly and automatically. The results of the
test are given in Table 6.4.11
Test responsible:
Time of initial test:
Errors, initial test run:
Approval:
Result (TC-FTAV01)
Andreas Eriksen
14 Nov 2008
None
YES
Table 6.4.11: Result TC-FTAV01
Reports test results
TC-FTRE01: Availability and performance data and report generating The test was executed according to the test specifications in Table D.2.12. The goal of the test is to ensure that the
NMS is able to report performance and availability data for each node, generating daily reports.
The results of the test are given in Table 6.4.12
Test responsible:
Time of initial test:
Errors, initial test run:
Approval:
Result (TC-FTRE01)
Andreas Eriksen
14 Nov 2008
None
YES
Table 6.4.12: Result TC-FTRE01
127
CHAPTER 6. TESTING
User interface test results
TC-FTUI01: Node grouping The test was executed according to the test specifications in
Table D.2.13. The goal of the test is to ensure that the NMS can classify nodes into groups
specified by the operator. The results of the test are given in Table 6.4.13
Test responsible:
Time of initial test:
Errors, initial test run:
Approval:
Result (TC-FTUI01)
José Manuel Pérez
14 Nov 2008
None
YES
Table 6.4.13: Result TC-FTUI01
TC-FTUI02: Network status overview The test was executed according to the test specifications in Table D.2.14. The goal of the test is to ensure that the NMS can display an network
status overview to know if the system is working at a glance. The results of the test are given in
Table 6.4.14
Test responsible:
Time of initial test:
Errors, initial test run:
Approval:
Result (TC-FTUI02)
José Manuel Pérez
14 Nov 2008
None
YES
Table 6.4.14: Result TC-FTUI02
TC-FTUI03: Node usage The test was executed according to the test specifications in Table D.2.15. The goal of the test is to ensure that the NMS can show which categories a node
belongs to. The results of the test are given in Table 6.4.15
Test responsible:
Time of initial test:
Errors, initial test run:
Approval:
Result (TC-FTUI03)
José Manuel Pérez
14 Nov 2008
None
YES
Table 6.4.15: Result TC-FTUI03
128
6.4. TEST RESULTS
TC-FTUI04: Vital network paths The test was executed according to the test specifications
in Table D.2.16. The goal of the test is to ensure that the NMS supports creation and visualization
of critical paths. The results of the test are given in Table 6.4.16
Test responsible:
Time of initial test:
Errors, initial test run:
Approval:
Result (TC-FTUI04)
José Manuel Pérez
14 Nov 2008
None
YES
Table 6.4.16: Result TC-FTUI04
6.4.2
Usability test results
TC-US01: Network Monitoring The test was executed according to the test specifications
in Table D.2.17. The goal of the test is to ensure that the operator is able to see the overview
information, choose individual component and acts on any alarm. The results of the test are given
in Table 6.4.17
Test responsible:
Time of initial test:
Errors, initial test run:
Approval:
Result (TC-US01)
Vegar Neshaug
14 Nov 2008
None
YES
Table 6.4.17: Result TC-US01
TC-US02: Component Monitoring The test was executed according to the test specifications
in Table D.2.18. The goal of the test is to ensure that the operator is able to find a component by
name or id and view its status. The results of the test are given in Table 6.4.18
Test responsible:
Time of initial test:
Errors, initial test run:
Approval:
Result (TC-US02)
Vegar Neshaug
14 Nov 2008
None
YES
Table 6.4.18: Result TC-US02
129
CHAPTER 6. TESTING
TC-US03: Alarm notification The test was executed according to the test specifications in
Table D.2.19. The goal of the test is to ensure that the operator is able to deal with a notification
and its related alarms in an appropriate way. The results of the test are given in Table 6.4.19
Test responsible:
Time of initial test:
Errors, initial test run:
Approval:
Result (TC-US03)
Vegar Neshaug
14 Nov 2008
None
YES
Table 6.4.19: Result TC-US03
TC-US04: Report extraction The test was executed according to the test specifications in
Table D.2.20. The goal of the test is to ensure that the operator is able to extract sufficient report
data for the SLA. The results of the test are given in Table 6.4.20
Test responsible:
Time of initial test:
Errors, initial test run:
Approval:
Result (TC-US04)
Vegar Neshaug
14 Nov 2008
None
YES
Table 6.4.20: Result TC-US04
TC-US05: Component addition The test was executed according to the test specifications in
Table D.2.21. The goal of the test is to verify that the administrator is able to add components in
the appropriate way. The results of the test are given in Table 6.4.21
Test responsible:
Time of initial test:
Errors, initial test run:
Approval:
Result (TC-US05)
Vegar Neshaug
14 Nov 2008
None
YES
Table 6.4.21: Result TC-US05
TC-US06: Initial configuration The test was executed according to the test specifications in
Table D.2.22. The goal of the test is to ensure that the documentation is sufficient for initial
configuration. The results of the test are given in Table 6.4.22
130
6.4. TEST RESULTS
Test responsible:
Time of initial test:
Errors, initial test run:
Approval:
Result (TC-US06)
Vegar Neshaug
14 Nov 2008
None
YES
Table 6.4.22: Result TC-US06
TC-US07: Post configuration The test was executed according to the test specifications in
Table D.2.23. The goal of the test is to ensure that the administrator is able to perform postconfiguration tasks given the documentation.. The results of the test are given in Table 6.4.23
Test responsible:
Time of initial test:
Errors, initial test run:
Approval:
Result (TC-US07)
Vegar Neshaug
14 Nov 2008
None
YES
Table 6.4.23: Result TC-US07
TC-US08: User management The test was executed according to the test specifications in
Table D.2.24. The goal of the test is to ensure that the administrator is able to manage the users
and groups according to the documentation. The results of the test are given in Table 6.4.24
Test responsible:
Time of initial test:
Errors, initial test run:
Approval:
Result (TC-US08)
Vegar Neshaug
14 Nov 2008
None
YES
Table 6.4.24: Result TC-US08
131
CHAPTER 6. TESTING
6.5
Tracking of tests
The main purpose of this section is to investigate of the relationship and dependency between
test cases, requirement and use cases in the system. Making the relationship between test case,
requirements and use cases explicit, shows how the use cases are to be carried out in the system.
6.5.1
Test cases and Requirements
It is noticeable that not all of the requirements are covered in there test cases. Some requirements
are describing other main requirement and some others decide what and how the documentation
should be written. That’s why there is no test cases made for this kind of requirements. Instead
of documentation requirement (NR-DRXX), the textual use cases (USE-XX) provided in the
requirement appendix.
Figure 6.5.1: Tracking of test case and Requirements matrix
132
6.6. CONCLUSION
6.5.2
Dependency of requirements not covered
There are some specific requirements that are not covered. These specific requirements either
contain details about other main requirement or are dependent on each other. The dependency
matrix for requirements in requirement document shows the dependency of the requirements,
these who are covered here and these who are not.
6.6
Conclusion
This chapter has documented the testing of the prototype by stating a test plan and giving the
results.
All the tests were performed at Telenor’s facilities using their testing network. The usability
test were conducted together with the customer, that was able to successfully carry out every
test. He was pleased with the functionality of the prototype and gave some constructive feedback
regarding some parts of the prototype.
133
CHAPTER 6. TESTING
134
Chapter 7
Documentation
7.1
7.1.1
Introduction
Purpose
The purpose of this phase document is to give a detailed description of a many options that
can be configured or installed in OpenNMS. Some of these options have been requested by the
customer. To provide a more extent description about how to configure the different parts of the
system, manuals and guides have been redacted. Screen shots and diagrams have been added to
the documentation to improve the readability and to facilitate following the manuals.
7.1.2
Scope
This document only describes the factors that affect the documentation work. This document
shall explain how to configure, install, extend and make changes to the system. Additional
information on how each service works and the results of the tests can found in the Testing
chapter.
7.1.3
Overview
The following is an outline of the sections in this document with a short description:
• Section 7.2 - Installation Guide
This section gives the guides of the first installation and configuration.
• Section 7.3 - User Manual
This section gives the manuals to configure and set up some services of OpenNMS.
• Section 7.4 - Extensions Manual
This section shall present an overview of necessary manuals to set up and create an extension.
135
CHAPTER 7. DOCUMENTATION
• Section 7.5 - Conclusion
This section gives the summary of the document.
7.2
7.2.1
Installation guide
Installation of base system
OpenNMS provides an easy installation process on Windows family systems. In spite of this,
we will explain this process in three phases to be sure that all the information about installation
is clear. In the first explanation the installation of JDK will be explained, and after this we will
explain the installation and configuration of PostgreSQL and the creation of the database. The
last part of the explanation will cover the installation and configuration of OpenNMS.
JDK OpenNMS needs Java SE JDK version 1.5 or later. We should make sure that we install
the JDK and not the JRE, because the development kit is required by the WUI (Web User Interface), since JSP pages are dynamically compiled. Finally, it is necessary to clarify that we need
the version SE (Standard Edition), not the EE, FX or ME.
PostgreSQL In this second step we will configure the PostgreSQL database system. In the
final part, we add an explanation on how to create the database.
For our installation, we use the 8.2 version of PostgreSQL. The installer comes in a zip file
and, as it is explained in the OpenNMS website, it is recommended to extract the content of the
file in a non-zipped folder. When we finish to extract all the files, we have to open this folder
and execute the postgresql-8.2.msi and postgresql-8.2-int.msi files. When we are running the
postgresql-8.2.msi, we only have to follow the instructions shown. The default options usually
fit the requirements and there is no need to modify them.
For systems using NTFS it is not necessary to configure manually the database, since the
installer is able to do it for us.
Install OpenNMS First of all, we need to start the PostgreSQL server. This can be achieved
by clicking the “Start” button, then “PostgreSQL 8.2” option and select “Start service”.
To install the system, we need to download the standalone-opennms-installer-X.X.X.jar file
that is for Windows family systems. To run the installer, we need to select some options like
the paths of the other programs that we need to run OpenNMS. Then, in the second step of
the installer, we need to write the path of JDK (usually in C:\Program Files\jdk1.6.X). In the
following step we select the installation path (e.g. C:\Program Files\OpenNMS), and then we
need to configure the database. In this step, we write the information of our Database host,
Database name, Database admin user and finally Database admin password.
In the following step we need to write the range of IP addresses that we want to discover.
In this case we use the range between 10.0.0.1 and 10.0.0.254 because of the addresses used in
the current environment. Finally in the last three steps of the installer we only need to select if
we want to install the documentation (always recommended) and then it will begin to install the
136
7.2. INSTALLATION GUIDE
system. In the last step, the installer informs us that it has created an uninstaller program. In
addition, we have the possibility to generate an automatic installation script.
To start OpenNMS, we need to execute the Windows’ shell, go to the folder C:\Program
Files\OpenNMS\bin\ and execute opennms.bat start. It will start the server and we will be
able to log in. The address on the navigator, will be http://localhost:8980/opennms/. The initial
user and password are “admin” and “admin”, respectively.
7.2.2
First time configuration
Groups in OpenNMS
OpenNMS has native support for grouping and categorize several of its components, like users
or nodes. These categorizations often offer high flexibility, but may require manual editing of
configuration text files. To configure groups in OpenNMS, the user not only needs to have
administrator rights in the web user interface, but, depending on what he wants to do, may also
need to have write access to the configuration files located on the server on which OpenNMS
is installed. In the web user interface any user with administrator rights have access to a page
called “admin”. This is the starting point for most of the configuration that can be done via the
WebUI, and what referred to when later mentioning the “admin interface”.
Users, user groups and roles The admin page of the web user interface (WebUI), or “admin
interface” from now, has functions to add and delete “users”, “groups” and “roles”. All of these
can be found by clicking the “Configure Users, Groups and Roles” link in the admin interface.
Users have individual names and passwords, and can be set to have only read access to the
WebUI functions. In addition contact details and weekly “duty” schedules can be defined
for deciding how the user will receive notifications, and when the user is available for
receiving such notifications. The options are mostly self explanatory, except for the field
named “Numeric PIN”, which is used for sending notifications by Short Message Service
(SMS).
Groups allow users to be collectively assigned weekly “on-duty” schedules, and “dashboards”.
Dashboards are further explained in “Surveillance Categories”, below. Each user can belong to any number of groups, also none.
Roles can be assigned to each group. I.e. any group can be assigned to any number of roles,
but one role can only be assigned to one group. This is a function allowing for a more
flexible on-call schedule than the weekly schedule related to users and groups. The role
configuration interface has a calendar that allows a day-to-day schedule to be set up for
the members of the role’s group. Through this calendar, it is easy to see who is currently
on call, and if there are any periods that are unscheduled. Any user has access to these
schedules via the “On-Call Schedule” link on the front page of the WebUI.
137
CHAPTER 7. DOCUMENTATION
The configuration of “on-call” or “duty” schedules are intricate, but allows a very flexible
set up. Note that the expressions “on-call” and “duty” essentially mean the same thing, but
“on-call” is used when related to roles, while “duty” is used when related to users or groups.
The main function of the schedules is deciding who is to receive event notifications. What
kinds of notification are to be sent to each user, group or role is configured in the “Configure
Notification” interface, described in section 7.3.5. Adding users is also described in OpenNMS’
online documentation [Wik08m].
Change user rights
rights.
OpenNMS has built in support for assigning users four different levels of
OpenNMS Administrator: This is the highest level of rights a user can have. This gives access
to the “admin” page of the WebUI, or “admin interface” from now, where it is possible to
administrate users, nodes and configure network surveillance parameters.
OpenNMS User: This is the default level of rights for users constructed through the admin
interface. Users with this level of rights have access to all pages of the WebUI, except the
admin interface.
OpenNMS Read-Only User: These users have access to the same pages of the WebUI as the
normal OpenNMS users, but can not change any settings.
OpenNMS Dashboard User: This is the least privileged user, who only has access to the “dashboard” page of the WebUI.
To assign a level of rights to a user, it is necessary to edit the file “magic-users.properties” in
the configuration folder of OpenNMS (normally the “etc” folder under the folder where OpenNMS is installed). In this file, the levels are called “Roles”; this should not be confused with
roles in the previous section, which are configured via the admin interface, and only concerns
“on-call” scheduled. The roles in this file have two fields, “name” and “users”, and an optionally
third field, NotInDefaultGroup. The “name” field is the name of the role, as given in the list
above, and the “users” field is a comma separated list of all users who have been assigned to
that role. The field called “NotInDefaultGroup”, if set to “true”, states that users assigned to this
group are not to be considered members of the “OpenNMS User” role. If this is not set, or set to
false, users of the role are also considered members of the “OpenNMS User” role. Hence, to give
a user a specific access level, add the user’s user id to the “users” field of the corresponding role.
The file also defines a role called “rtc”, which is a role used by an internal process (daemon) of
OpenNMS. This can be disregarded for all normal purposes. In the current version, you can only
assign roles on a user level; group names can not be stated in the user field.
Surveillance Categories Each network node that is registered in the system may be assigned
to an arbitrary number of categories. This assignment of nodes to categories can be done in
the admin interface of the OpenNMS web user interface. Here, you can also create, delete
and rename categories. These categories are used in the surveillance table, seen highlighted in
138
7.2. INSTALLATION GUIDE
orange in figure E.1.1 in appendix E.1. The row- and column- headers of the surveillance table
represent categories, and each cell contains the number of nodes that are unreachable, within the
intersection of the row-/ column- category pair. To be shown in the surveillance table then, the
node have to be assigned at least two categories; one of the row categories, and one of the column
categories.
The choice of row and column categories is fully customizable through a configuration text
file written in Extensible Markup Language (XML) and located on the server where OpenNMS
is installed; “surveillance.categories.xml” under the “etc” folder in the OpenNMS installation
folder. This way, you can set up two levels of categories.
In addition, several such row and column specifications can be set up in different “surveillance views”. The surveillance view shown on a user’s “dashboard” page is one of the following
(in prioritized order):
1. The view with the same name as the user’s id.
2. The view with the same name as (one of) the user’s group(s).
3. The view called “default”.
A user can be restricted to only be allowed to view this “dashboard” page, as described in section 7.2.2.
The dashboard is more thoroughly explained in OpenNMS’ online documentation [Wik08a].
There you can also find a guide on how to edit the “surveillance.categories.xml” file, and a way
to set up dashboards to be shown on the WebUI to users not logged in.
Provisioning Groups OpenNMS also has a method for collecting data from several nodes into
one “virtual node” through a concept called “provisioning groups”. but the group did not test
this, since it depends on Unix “hard links”, which does not have native support by Window’s file
system. The method is described on the OpenNMS’ online documentation [Wik08d], where a
utility for making hard links under Windows is also mentioned.
7.2.3
Path outages
This section is based on the OpenNMS Path Outages HOWTO, [Wik08j], which also contains
some additional details and advanced configuration tips.
Motivation Consider the case where the monitored network consists of several physical locations joined by a WAN link. When the WAN link goes down, alarms are generated for each
component in the now disconnected part of the network. This will result in a flood of "node
down" notifications, that will be more confusing than valuable in determining the cause of the
problem.
Path outages are a solution to this - these "node down" notifications are deemed to be because
of the link failure and suppressed, and a single "node down" alarm for the WAN link is instead
presented. This works by assigning a "Critical Path IP" for the monitored nodes across the WAN
139
CHAPTER 7. DOCUMENTATION
link - when any of these nodes fail to reply, this IP is tested. If it does not respond, the link is
deemed to be down.
Enabling To enable path outages, add pathOutageEnabled="true" to the poller-configuration
tag in etc/poller-configuration.xml. This will suppress nodeDown notifications when they are
caused by a path outage.
Configuring individual nodes To configure the path to an individual node, open the OpenNMS web interface, find the node in the node page, select the Admin link, and then the configure
path outage link. Enter the critical path IP in the box provided, and click the submit button. This
will set the critical path, overriding any critical path that may have been set previously for this
node. To delete the critical path for this node, click the Delete button. It is not necessary to fill
in the IP address for the delete operation.
Configuring groups of nodes Paths can also be configured for any group of nodes that can be
described by a rule (these are also called filters, and are described in detail at [Wik08b]). This is
done quite differently. First, select the Admin link from the main navigation bar, then Configure
Notifications, then Configure Path Outages. Enter the critical path IP for the group in the box
provided. In the Current Rule: box enter the rule that defines a group of nodes for this critical
path IP. Typically this would be an IPADDR IPLIKE rule defining a set of IP addresses, but any
legitimate rule will work, for example "nodelabel LIKE ’foobar%’" will match all nodes with
node labels beginning with foobar.
Click the Validate Rule link at the bottom of the page to test the rule. If you checked the
Show matching node list box, a list of nodes matching the rule will also be shown. If the rule is
invalid you will be returned to the page to correct the rule and try again. If you are satisfied with
the results of the rule validation, click the Finish link. Otherwise click the Rebuild link to modify
your rule. To delete the critical path for a group of nodes, leave the critical path IP address blank.
This will clear any critical path IP address that may have been previously set for nodes matching
the rule.
7.2.4
Adding network components
In OpenNSM, components are not normally added manually, but auto discovered. To configure
auto discovery, log into the system and enter the administration panel. Select the "Configure
Discovery" link, the "Modify Configuration" link, and input the correct parameters for your
network(s). Specific addresses, address ranges, and ranges to be excluded are all supported.
When you are done, click the button marked "Save and Restart Discovery". The discovery
system will then attempt to detect units in the configured ranges.
If you wish to add a specific IP address, enter the administration interface and follow the
"Add Interface" link. You will be prompted to enter the IP address, then click the button marked
"Add".
140
7.2. INSTALLATION GUIDE
7.2.5
Configuration of the map feature
In this section we will explain the map configuration, the pitfalls we might have found and
finally the creation of a map that shows the location of all the existing nodes of the testing
network. In addition we will describe more extensively the possibilities to create sub-maps, and
their configuration and customization.
Overview
The information about the devices being monitored can be shown as a map. A map is a graphical
representation of the monitored elements with attached information about their current status,
like the availability. The elements can be moved around the map, in such a way that they can be
more understandable than just a list of IP addresses. An example is shown in the Figure 7.2.1. In
addition to the elements, the links between them is displayed.
As it is possible to observe in the map, we have a location for every node. This presentation
consists basically of a background image with the representative icons over it. These icons
represent machines of different nature e.g. servers, databases, mainframes, laptops, etc., and
they can also refer to submaps. Submaps can be accessed by double clicking its icon. A submap
is just a map included in another map like another element.
Figure 7.2.1: General view of a map in OpenNMS.
141
CHAPTER 7. DOCUMENTATION
Activating and using this feature
In this section we explain the configuration process along all its phases. Firstly we make an
introduction to the configuration of the plug in showing which files have to be modified to achieve
our goals. We continue with the description of how to create a map adding background, nodes,
sub-maps, etc. In the third part we set up the linked daemon that discovers the connections
between the monitored elements, adding lines that links elements on the maps.
Configuration of the plugin Initially the activation of this plugin is done by changing the
name of the map.disable file to map.enable in the /etc directory. After doing this, a map link will
appear on the OpenNMS website, pointing out to http://<machine>/opennms/Index.map, where
<machine> is the server in what OpenNMS will be running. Through that page maps can be
created (in Admin mode) or they can be visualized.
The map.disable/.enable file contains many options to set up the maps, that can be customized. The following properties are described:
• Severities
• Links
• Link status
• Node status
• Avail
• Icons
• Background images
## SEVERITIES
severities=critical,major,minor,warning,normal,cleared,indeterminate
severity.critical.id=0
severity.critical.label=Critical
severity.critical.color=red
severity.critical.flash=true
In the first of these examples we can see how OpenNMS declares the severities variables
and uses them. In this example of the map.enable we can check the parameters that OpenNMS
assigns to these variables, that in this case belong to the critical mode, although six other modes
are available, depending on the state of the node.
142
7.2. INSTALLATION GUIDE
## LINKS
links=ethernet,fastethernet,gigaethernet,serial,framerelay,unknown
link.ethernet.id=0
link.ethernet.text=Ethernet
link.ethernet.speed=10000000
link.ethernet.width=1
link.ethernet.snmptype=6
To continue with the description, in the Link section it is shown the different types of links
that can be shown in the map. The parameters specify the id, the name, speed in bytes, width
and the type of the SNMP for every type of link. The different types of links that we can find are
declared in the first line of this source.
## AVAIL
availabilities=normal,warning,critical,undefined
avail.normal.id=0
avail.normal.min=99
avail.normal.color=green
In this case, the declaration of the availability variables only describes the minimum value to
be drawn with the color that it is described after.
At the end, in the Icons and Background Images sections, only the name of the file that
contains the image like is specified, as the following example:
## ICONS
icons=desktop,infrastructure,laptop,opennms,other,printer,server,
telephony,unspecified,map,fileserver,firewall,mainframe,
multilayerswitch,pix,route,switch,vax
icon.desktop.filename=desktop.png
Creating a map First of all we have to go to the Map web page inside the OpenNMS server.
In this page we can find a short and small menu at right. To create this map we need to activate
the “Admin mode” and then we can select the New tab. As we can see in the Figure 7.2.2, we
have a lot of options for the map. To complete its creation, we have to save the map. We can
set a background image for our map by choosing the “Set Background” option. Then, a list will
appear with the available images (that are defined in the configuration file) and we select one and
then save the map.
To put images in this list is necessary to edit the Background Images section in the map.enable
file. This file has a default list with several examples of images and files, these can be found in
the XXXX folder at DIR.
143
CHAPTER 7. DOCUMENTATION
Figure 7.2.2: Map options in the menu
The next step is to locate on this map the elements. This is possible by selecting the “Node”
menu that is next to the “Map” as we can see in the Figure 7.2.3. As we explained in the first
paragraph of this section, we can select several options to add, add by ’option’, set and delete an
icon. The icons represent the servers or nodes.
In addition, we can configure a sub map as icon in the map, by using to the “Add a Map As
Node” option in the Node row in the menu.
Showing the links that connect the nodes of the map Showing the links connecting the nodes
can be achieved by enabling the linked daemon, since it is needed by the map feature. Linked is
a layer 2 iso/osi model network topology discovery daemon and is disabled by default.
To enable it we have to edit the service-configuration.xml file and find the next commented
XML:
<!-- To enable network topology discovery uncomment this service
<service>
<name>OpenNMS:Name=Linkd</name>
<class-name>org.opennms.netmgt.linkd.jmx.Linkd</class-name>
<invoke at="start" pass="0" method="init"/>
<invoke at="start" pass="1" method="start"/>
<invoke at="status" pass="0" method="status"/>
<invoke at="stop" pass="0" method="stop"/>
</service>
-->
144
7.2. INSTALLATION GUIDE
Figure 7.2.3: Node options in the menu
After uncommenting it we have to restart openNMS so linked is started. The initial Linked
discovery will take a bit as each nodes topology is discovered, collecting a lot of data from nodes
to perform the network topology discovery. Performance could be affected while running this
scan, so it can be a good idea to increase the default memory allocation (JAVA_HEAP_SIZE) at
64 MB for each 5 threads used. By default linked uses 5 thread to do the work.
An extended description about the configuration of the linked daemon is available on [Wik08f].
Internal representation OpenNMS stores the information about the maps using two related
tables in the database. One database, named map, stores the maps (one registry for each one) and
the other one, element, the elements that belong to the maps. This table has a field that determines the type of the element, so that OpenNMS can know in which table look for information
to display the severity and availability of the element (map, node, etc). Each registry in the map
table also stores the user that created the map, the background color, the size factor and offsets for
both horizontal and vertical coordinates. The structure of this two tables is shown in Figure 7.2.4.
General information about the maps is shared in the configuration file map.enable, as the
icons used to show the elements of the map, etc.
145
CHAPTER 7. DOCUMENTATION
Figure 7.2.4: Representation in the database structure. The tables Map and Element have a
One-to-Many relation.
7.3
7.3.1
User manual
Configure OpenNMS to start when Windows starts
In this section we will describe how we have configured OpenNMS to start when the Operating
System starts.
Overview
OpenNMS does not get installed as a Windows service when installed under any of the Windows
family of operating systems. Since the test server and deployment server will be running Windows Server 2003, and Windows Vista 64bit respectively, it is important to make OpenNMS start
as a Windows service to make it start automatically when the operating system starts. This will
reduce maintenance overhead in the case that the server needs to be restarted.
Implementation
A common obstacle when creating server applications in the Java programming language is that it
does not natively support common operating system signals to stop a running service. Because of
this there exists wrapper applications which runs the Java application and processes the operating
system signals. One such wrapper application is JSVC (http://wrapper.tanukisoftware.org), this
is not to be confused with the JSVC wrapper made by the Apache foundation for Unix systems.
In this project, we have downloaded the community version 3.3.1 of JSVC for X86 machines
146
7.3. USER MANUAL
running the Windows platform. To make use of it, we added several files to the OpenNMS
installation including configuration files and bat files for installing the wrapper as a windows
service.
All the following files reside in the OpenNMS installation directory. The files added are:
1. bin/WrapperOpenNMS.bat - Used to test the JSVC wrapper execution to see that OpenNMS starts successfully.
2. bin/InstallService.bat - Used to install the OpenNMS JSVC wrapper service in the windows service manager
3. bin/UninstallService.bat - Used to uninstall the OpenNMS JSVC wrapper service
4. conf/wrapper.conf - Configuration file for the wrapper for setting various parameters like
which java class holds the main method. The configuration for this project is given in
appendix E.2
5. lib/wrapper.jar - The JSVC java library
6. lib/wrapper.dll - The JSVC native windows bindings
After installing the OpenNMS JSVC wrapper service using the "InstallService.bat" file, the
service can be manipulated like any other windows service using the "services.msc" manager
application.
The JSVC homepage has extensive guides on integrating application types. The guide used in
this project is located at http://wrapper.tanukisoftware.org/doc/english/integrate-start-stop-win.html
and gives an example of how to integrate Tomcat but it is easily adaptable to OpenNMS.
7.3.2
Monitoring the network
Monitoring the network can be done in several different ways, and how you choose to do so
depends on the size and importance of your network, the demands of your customers and your
own personal preferences. The system should be configured accordingly. In a large network,
where notifications from the system would be frequent, one could imagine that working with the
network management system could be a full time job, where an operator is always logged into
the web interface and investigating reported events and outages. In such a situation, notifications
by email or SMS may not be necessary at all, because there will always be someone actively
searching for new events.
In a smaller network, the task of network monitoring would likely be handled by someone
who has other tasks to attend to. In this case, the primary way of discovering failures would
probably be through properly configured notifications. The operator would routinely access the
system through the web interface and acknowledge notifications of minor severity, while more
important problems would after a short period be escalated and notify the operator through email,
or SMS. The system would also be consulted to investigate when a user reports that something
is not working correctly.
147
CHAPTER 7. DOCUMENTATION
When monitoring the system, the index page is likely the place where the operator will start
and often return to. Here he will find a listing of all nodes with outages, availability percentages
for the last 24 hours, and a list of notifications from the system. By following the links from this
page, the complete status of the network should be available.
7.3.3
Acting on alarms
OpenNMS keeps separate the concept of an event - like a networked component not responding
to a query - and the concept of notifications, notifying an operator about the event. The concept
of notifications in OpenNMS largely correlates to our concept of alarms as used in the report.
When a notification/alarm is received by the operator, he should, if he is available to investigate the cause of the notification (or is already working on it), acknowledge the notification.
Acknowledging the notification stops the escalation of the notification along the destination path
- you have signaled that you are dealing with the problem, and that the system doesn’t have to
alert someone else to deal with it. Acknowledgments can be performed through many of the
same channels through which you can receive notifications, such as email and SMS.
If the destination path is set up to notify more than one operator, or a group, you should check
to see if the notification has been acknowledged by someone else before taking action, to avoid
duplication of effort.
For diagnosing the cause of the failure, you are left to your own understanding of the network
and the networked components, and the related data you can find in the system, such as reported
SNMP values and path outage information. Good luck!
7.3.4
Configuration of the SMS notifications
Overview
The project is required to implement SMS notification to alert operators when the web interface
is not used. In addition, these notifications must also be acknowledgeable by sending an SMS
reply with the notification identifier.
SMS notification allows the OpenNMS system to send a SMS to a specific telephone number
with a text. It is intended to be used to notify a user in case of an alarm or any event the user
should be concerned about. It is possible to configure who will receive the notification and when
(for instance, 5 minutes after a specified event has taken place) through the use of the notification
escalation configuration in the web application. The text content depends on the triggered event.
If a user fails to log in, its IP address can be sent inside the SMS text. If a node outage is detected,
its name and IP will be shown.
Sending and receiving SMS requires a gateway which bridges the IP network and the GSM
mobile network. This is done by extending the OpenNMS system to support the Parlay X specification, which is supported by Telenor R&I through the PATS initiative website.
PATS, standing for Program for Advanced Telecom Services, is an open community with the
aim of promoting development of innovative mobile services. It was proposed by Telenor and
NTNU, that have through several years co-operated on research and education. This co-operation
148
7.3. USER MANUAL
was extended through PATS to a triangular co-operation between industry, telecom operators and
university. More information about PATS is available on their website on [tPa07, Home].
Using a PATS account, one can send and receive SMS by making use of the extensions made
by the project through configuring the sms.properties configuration file.
Implementation
The implementation of SMS notification extends the base classes of OpenNMS. To let OpenNMS
know about the SMS service, one must add the service in configuration files.
SMS sending was integrated into the OpenNMS framework through implementing the NotificationStrategy interface. As explained on [Wik08h, NotificationStrategy class], this class
must be implemented to create new notification classes that can be used in the notificationsCommands.xml file. The ClassExecutor will simply call the NotificationStrategy.send()
method from this implementation and it is up to the new class to process the notification in
its special way and return an ’int 0’ for success or an error code (e.g ’int 1’) for unsuccessful
notification sending.
Receiving SMS notification acknowledgement messages was integrated into the OpenNMS
framework through wrapping the service in a "Managed Bean". This allows the SMS reception
service to be managed via JMX. Making this service start as any other OpenNMS service was
done by adding the Managed Bean wrapper in the services-configuration.xml file.
Both reception and sending was implemented using the WSDL files at pats.no and the AXIS
SOAP implementation.
Connecting OpenNMS and the extension Configuring OpenNMS such that it is aware that
there exists a notification service that can be used for sending and receiving SMS is achieved by
modifying the $OPENNMS_HOME/etc/notificationCommands.xml file and the $OPENNMS_HOME/etc/serv
configuration.xml files . The XML section to add in notificationCommands.xml is:
<!-- Use this to send an SMS notification through the pats.no telco
services -->
<!-- The ordering of these arguments are important! Do not change
the ordering! -->
<command binary="false">
<name>mobilePhoneSMS</name>
<!-- This can refer to either a class in the classpath or a
command line executable -->
<execute>scg.opennms.sms.SMSNotificationStrategy</execute>
<comment>for sending GSM messages (SMS)</comment>
<!-- Destination parameter, numerical pin in user account -->
<argument streamed="false">
<switch>-np</switch>
</argument>
<!-- Message parameter, -tm == text message -->
<argument streamed="false">
149
CHAPTER 7. DOCUMENTATION
<switch>-tm</switch>
</argument>
</command>
The name of the command is will be shown in the OpenNMS GUI when configuring a notification. The notification will be made by calling an instance of the class whose name is written in
the execute parameter. This class must implement the NotificationStrategy interface. A comment
can be added to clarify what the command will perform. Arguments are passed to this new class
in the form of <substitution> attributes, which are specified by hard-coding them in the XML,
and <switch> attributes that are replaced by values that depend on the notification (in this case
the telephone number of the user that should receive the message and its content).
For the service-configuration.xml we add:
<service>
<name>:Name=SMSNotificationService</name>
<class-name>scg.opennms.sms.jmx.SMSNotificationService</classname>
<invoke at="start" pass="0" method="init"/>
<invoke at="start" pass="1" method="start"/>
<invoke at="status" pass="0" method="status"/>
<invoke at="stop" pass="0" method="stop"/>
</service>
This service relies on the DataSource services of OpenNMS for normal operation, it is therefore advised to insert the service as the last entry in the OpenNMS service chain.
For more information about how to configure notifications the reader is referred to Section 7.3.5.
Configuration Files
The following is a listing of the configuration files which the SMS notification extensions depend
on:
sms.properties
Configuration file for the SMS
extension, see Javadoc E.3 in the
SMSNotificationService class for
examples.
notificationCommands.xml Configuration file which must
be edited for enabling the sending of SMS, see Javadoc E.3
in the SMSNotificationStrategy
class for examples.
service-configuration.xml Configuration file for to edit for
enabling SMS acknowledgement
reception. See listing 7.3.4.
150
7.3. USER MANUAL
7.3.5
Configure notification sequences/escalation
Overview of the notification feature
OpenNMS uses notifications to make users aware of an event. For instance, when a user logins
in the website, a services scan has been performed in one of the nodes or one an outage has
happened. Common notification methods are email and paging, but notification mechanisms
also exist for:
• XMPP (Jabber, an instant messaging protocol),
• arbitrary binary programs
• SNMP traps can be sent, and
• arbitrary java classes can be executed
A notification can be sent to users, groups, or roles configured in OpenNMS, as well as to
arbitrary email addresses, if needed. There is the possibility of adding a delay before sending a
notification and escalations in case a notification isn’t acknowledged within a configurable period
of time.
The notifications contain a text message and oftentimes a subject (depending on the notification method) that is built with text. The text of the message and/or subject can be configured to
include details from the triggering event, such as the name of the node, IP address, service, error
message, etc.
Destination paths
In OpenNMS, a destination path specifies the "who", "when", and "how" of the notification. It
specifies the recipients of a notification, the notification method, any initial delay, and any escalations. Since the destination path is separated from individual events as the same information is
often used for multiple notifications, it minimizes duplication and encourages re-use.
When an event is received that matches the UEI and rule in an enabled notification, OpenNMS goes through the destination path for that notification (or notifications if there are multiple),
performing the specified actions, until all notifications and escalations have been sent or the notification is acknowledged (automatically or by manual intervention).
The initial delay is waited once the destination path is started (default: zero seconds) before
sending the first notification. It then waits for the delay for each escalation (if any) and sends the
escalations in sequence.
Configuration
To create a notification escalation we go to the Admin tab and in the list of admin options we
click on "Configure Notifications".
In this page we can configure event notifications, destination paths and path outages. The
escalation is defined at "Configure Destination Paths". A screen shot is shown in Figure 7.3.1.
151
CHAPTER 7. DOCUMENTATION
Figure 7.3.1: Page where notifications can be configured by a user with administration permissions
There is a list of paths which are already defined in Existing paths, shown in Figure 7.3.2.
We will create a new one through the "New path" button.
Figure 7.3.2: List of existing paths
In this page we have an overview of the escalation. We can define an initial target and then a
sequence of escalations. We will start with an initial empty path, as shown in Figure 7.3.3.
In every target or escalation we will select which user, group of users, roles or email addresses
have to receive the notification.
After this we set the way(s) to use to inform the selected users about the notification, shown
in Figure 7.3.4. These options are retrieved from the notificationCommands.xml file, that we
edited in the Section 7.3.5 to add the sending SMS feature.
Then we set a time span between the receivers of that escalation. Delays between the escalations can be established in the Path Outline page, shown in Figure 7.3.5.
Then we repeat this steps adding the escalations we need. The path we have configured has
this sequence:
1. An operator is notified by email
152
7.3. USER MANUAL
Figure 7.3.3: Overview of an empty path
Figure 7.3.4: Selecting the notification service
2. If the notification has not been acknowledged after 10 minutes, then an administrator will
receive an email.
3. If the administrator has not knowledge it, after 30 minutes will receive a SMS.
The final notification path looks as it is shown in Figure 7.3.6.
7.3.6
Configure SNMP for Mikrotik devices
Summary
This section describes how to modify the OpenNMS configuration files in order to select an
alternative SNMP poller.
Motivation
Telenor’s test network is built using a number of "antennas", wireless routers supplied by Witelcom. These are based on the Mikrotik RouterOS software, which supports SNMP monitoring for
a variety of important statistics such as connection speed, utilization and signal strength. However, the SNMP support in these devices is not entirely in accordance with standards - it will
only respond to SNMPv1 queries, but will return some data in SNMPv2c format. Because of
this, they do not work with the default SNMP implementation in OpenNMS.
153
CHAPTER 7. DOCUMENTATION
Figure 7.3.5: Specifying a time span
Configuration
Open the text file "opennms.properties" in the OpenNMS /etc directory, and remove the hash
mark in front of the line reading "org.opennms.snmp.strategyClass=org.opennms.netmgt.snmp.joesnmp.JoeSnm
Make sure that the strategyClass is not set to another value elsewhere.
154
7.4. EXTENSIONS MANUAL
Figure 7.3.6: The final notification path
7.4
7.4.1
Extensions manual
Implementation of the customer view
The implementation of the customer view functionality will show the different ways to develop
extensions to OpenNMS.
Overview
OpenNMS does a great job listing the nodes and interfaces detected in the network. It provides
a list of these elements with links to pages that show more information about them. TelCage
thought that there could be a good idea to assign every node to a customer, since part of the
devices being monitored are located or at least dedicated to a concrete customer, it would be
easier for some users to get the information of the elements by clicking on the customer which
uses it. We will use this example to show how we could implement this functionality using
different approaches.
155
CHAPTER 7. DOCUMENTATION
Implementation
For implementing this functionality, we need to specify a set of features that this extension will
have:
• It is necessary to create, modify and remove customers
• The customers will be assigned nodes from the existing network.
• A list of the customers will be shown, as well as a list of their attached nodes once the user
clicks on them.
Extending the OpenNMS web application A first approach that can be taken looks at extending the OpenNMS by adding the required elements to perform the task we want. For instance,
we could create JSP pages and the new database tables needed, integrating our web application
with the existing one.
As we see, changes in the existing database are necessary. We need to create a table that will
store the customer’s information (customers). As we are going to assume that a single element
can belong to several customers and a customer can have several devices, we will need another
table to make the many-to-many relation (customers_elements), as shown in Figure 7.4.1.
We also need to implement CRUD functions to manage both customers and customers_elements
tables. In addition, we need to create a page for listing the nodes belonging to a concrete customer
and link those nodes to their information page, that will reside on OpenNMS web application.
Advantages: The advantages of this approach is that all the functionalities are inside a single
web application. This is good since one only web application and one database are used, so
permissions and configurations can be applied to the new extended OpenNMS system as a whole.
Disadvantages: However, there is a list of disadvantages when using this approach.
• Highly coupled: As we are using a single web application, our extension depends highly
on the version of OpenNMS used in the moment of the implementation. Thus, we might
have problems if we want to upgrade the installed version if a new OpenNMS release is
made because we should have to aisle and backup the modifications made and integrate
them after upgrading the new web application. In addition, there could be changes that
could break our code, since modifications are being made in every release of a product that
is always being improved like OpenNMS. For instance, using the MVC model which is
planned to be applied to the OpenNMS web application can have problems with our code
if we do not follow it, or at least it can not take advantage from this model.
• Understanding of OpenNMS structure: It is essential to understand how OpenNMS
works. As we have seen, there are no many diagrams explaining the structure of OpenNMS
and how it works. We have to look inside the code to find the best way to extend the system
and create the pages using a similar approach to that one that is being used, and this can
take some time and test and error operations to get a good solution.
156
7.4. EXTENSIONS MANUAL
Figure 7.4.1: The customers and customer_node tables that need to be added to store the information, and their relation with the nodes table.
• Modify and recompile the project: We should look for a way to implement the necessary
functionality by using for instance an IDE like Eclipse. We should download the source
code and execute a series of commands to create the project, and after modifying it we
have to find the best way to export it. If a Windows operating system will be used to run
OpenNMS, it would be great to use the same installation program that a raw OpenNMS
uses better than replacing the files that add new functionality.
Adding an extra web application A different approach is creating a new web application
that contains the new functionality. This web application can be based on Java, so we can use
the same web server that the basic OpenNMS uses (Jetty, Tomcat...). A new database could be
created or we can add the tables that are needed to the existing one.
Advantages: The advantages are that if we create a new web application, the OpenNMS
can be upgraded without affecting our web application. The only problem could arise if major
changes inside the OpenNMS structure are made. If we make a new database for the tables
needed we can keep the two applications divided completely, so this would be a less coupled
157
CHAPTER 7. DOCUMENTATION
solution that the previous one.
Disadvantages: If a separate database is used we could have some performance pitfalls while
querying the databases, since some SQL queries could require both databases (for instance in
one database all the nodes are stored and in the other one the relations between the nodes and the
customers). Additional memory space is needed to run two web applications instead of just one.
Using XML files Instead of adding new tables to the existing database structure, if the feature
to be implemented does not need to store a lot of data nor perform SQL queries, XML files can
be uses instead of database tables. For the proposed functionality we could have a XML file like
the one shown in Figure 7.4.1.
<customers>
<customer name="Customer 1">
<node id="3497"/>
<node id="3498"/>
<node id="3499"/>
</customer>
<customer name="Customer 2">
<node id="3497"/>
<node id="3581"/>
<node id="3582"/>
</customer>
</customers>
Figure 7.4.2: Example of XML data that could be used in this example. The root element is
“customers” and every element inside it are customers. Inside every customer there is a list of
nodes, identified by their “id” property. These nodes can belong to several customers, as shown
in the example.
It stores both the customers and the relations with the nodes that belong to each customer.
Advantages: It is very auto-descriptive, since at a glimpse we can see all the data needed for
this extension. It requires little effort to implement.
Disadvantages: However, it could be difficult to extend if additional requirements are made
or feature functionalities that need this data are to be implemented. In addition, there could be
performance problems if the list get too long. That is why this approach should only be followed
in case that we are aware of that it is not extensible in a clean way and it will not perform well if
it stores too much data.
The file can be parsed by a JSP file using the wide used classes that Java provides for manipulating this sort of files.
158
7.5. CONCLUSIONS
Evaluation
According to the different approaches we have studied and having into account their advantages
and disadvantages we can summarize some of the important issues we should think of.
Approach
Implementation effort
Single web application
Extra web application
XML files
High
Medium
Easy
Difficulty of being integrated into future releases
High
Medium
Medium
Performance
High
Medium
Low
Conclusions
OpenNMS can be extended in different ways, and the final decision must be made depending
on how scalable the extension will be, which are the performance requirements and the time and
effort available to implement it.
7.5
Conclusions
During the documentation phase we explain a lot of options that can be configured. One of the
most important things was to do more easier to understand how OpenNMS works and how we
can configure or set up the different services that it has. In the case of the map, we give an
introduction of the different variables that we can use to perform our own map. In addition, if
any wants to add more extensions, as to put nodes into groups we can find information to do it in
the Extension section.
159
CHAPTER 7. DOCUMENTATION
160
Chapter 8
Evaluation
8.1
Introduction
This phase will evaluate all aspects in TDT4290 Customer Driven Project. Planning and execution, the process, the customer and our solution are some of these aspects.
8.1.1
Purpose
The main focus of this evaluation is to point out group dynamics, work process, choice of development model, course contents, the report as a whole and each document individually, customer
relationship and generally speaking the project and our accomplishments.
The main focus of the this evaluation is to point out group dynamic, work process, choice
of development model, course contents, the report in whole and each document individually,
costumer relationship and the project generally and our accomplishments. The purpose of the
evaluation is to provide an understanding of the project progress and improvement possibilities.
There are to aspect of how the evaluation could be useful, for us as project participants and for
the course responsible. The benefit of evaluating our self is to get a general picture of process of
working in this team, the decisions we made and the both positive and negative consequences it
had on our process and then of course the product. The effect for the course responsible is to see
how they did on administrating this course and if there is any thing they could change or improve
to get an optimal result for the future.
8.1.2
Overview
An overview of the coming sections and what they will be containing is provided below:
• Section 8.2 - Background
This section provides background and introduction for the evaluation document.
• Section 8.3 - Planning and execution
This section will cover the planning, timelines for different task, tasks distribution and
tools used in this project.
161
CHAPTER 8. EVALUATION
• Section 8.4 - Process
Discussing the process in this project, this section will evaluate the group dynamics, cultural and individual differences and the development model we used.
• Section 8.5 - Customer
This section will talk about the customer, the project tasks, availability of the customer and
the available resources.
• Section 8.6 - Solutions
This section will cover our solution in general, the documentation, a short analysis application, the resources needed and possibly further work.
• Section 8.7 - The course
This section evaluate the lectures, compendium, the resources provided form the course
administrators and supervisor and advisors.
• Section 8.8 - Conclusion
In this section a summary of the most important conclusions drawn in this chapter is given.
162
8.2. BACKGROUND
8.2
Background
The evaluation phase is the last part of the Project Report. Throughout this document, we have
established all the phase that we need and developed it. The work began with the redaction of
the Project Directive and the Prelimiar Study (Sections 1 and 2, after this, we wrote about the
applicated phases to our system, as are the Requirements Specification (3), Design (4), Implementation (5), Testing (6) and finally Documentation (7).
This phase is important to give a complete ovewview of the human part of this project. We
will explain about the relations inside the group, with the customer and the course. More More
specifically related to the group, we will describe the human relations between the members of
the groups and the problems that we find and its solutions, refering to the customer, we will
explain how he solves our logistic and technical problems.
Finally, we do a constructive critic of the course emphasizing both the good things and the
points that we believe that can be improved.
163
CHAPTER 8. EVALUATION
8.3
Planning and execution
In this section we describe the results of the planning phase of the project, and how we have used
these results throughout the rest of the project.
8.3.1
Timeline
An important product of the planning phase is the partitioning of the project into phases, and
budgeting time for the completion of each phase. This was largely based on the suggestions of
the course compendium, and resulted in (among other things) the Gantt chart which can be seen
in figure A.2.1. In retrospect, analyzing our time spending in different phases as seen in our
work hours spreadsheet, we see that work has been much more overlapping between phases than
initially assumed. Work on phases that are seen as separate and dependent in the Gantt diagram
has been performed in parallel. This can be seen in figure 8.3.1, which shows the distribution of
our working hours into different phases for different weeks.
164
8.3. PLANNING AND EXECUTION
Figure 8.3.1: Work effort divided by phases
165
CHAPTER 8. EVALUATION
8.3.2
Tasks
Our strategy for task distribution was based primarily on the document - defining responsible
project members for different sections of the document, which were then also responsible for the
corresponding research or implementation tasks. This has worked reasonably well, perhaps with
the exception of the design phase, due to the nature of this project being mostly configuration
of pre-existing software. In practice, due to lack of available (existing?) design documents, the
design was discovered during the duration of the project, and writing this phase document was
not a very valuable exercise for the group.
8.3.3
Tools
To create the Gantt diagram, we used Microsoft Project. This worked reasonably well, but the
program was rather inflexible and difficult to work with in our efforts to keep the Gantt chart up
to date. This may just as well be attributed to our lack of experience with this or similar tools.
A course in the best practices of using such tools for project management could be a valuable
addition to the course.
To distribute tasks and sections to different project members and weeks, we used a Google
Charts spreadsheet. The easy ability to simultaneously view and edit the same version document
proved very valuable in coordinating when we were unable to meet in person.
A Google Charts spreadsheet was also used to record the working hours of each person per
phase, with one sheet per project member and sheets for summaries, estimates and charts. With
the exception of some calculation errors in the spreadsheet, this has worked well in giving us an
overview of hours spent and hours remaining.
To effectively discuss the project in spite of different lecture schedules, we have held some
of our weekly meetings on Internet Relay Chat. This made it trivial to record everything that was
said in the meeting, and, while not as easy as face-to-face communication, enabled us to hold
meetings when not everyone could be in the same place.
166
8.4. PROCESS
8.4
8.4.1
Process
Group dynamics
Despite the cultural differences within the group, and the fact that all communication had to
be in a language not natively spoken by any group members, the group has worked effectively
together, and the cooperation has run smoothly.
Cultural
As three different nationalities and cultures are represented in the group, cultural differences
could easily have been a problem. Fortunately, the differences were not substantial, and the
communication in the group was good, so this was never really an issue.
Individual
As in all groups, there were differences between individual group members’ opinions and preferences; some like to work early in the morning, while other preferred working late, some worked
best alone, and other needed a social environment to be efficient, and several other points that
can lead to disagreements. Thanks to a good internal dialog, and flexible group members, any
disagreements was quickly solved without problems.
Language
Because two of the group members are exchange students, from the Erasmus international exchange program, most of the communication had to be in English. This may have contributed to
some misunderstandings, and made some processes take more time, but all in all it was never a
big problem, since all members have adequate English qualifications.
8.4.2
Development model
The development model initially chosen by the group was the scrum agile development model,
but after more investigation, and after the task was more clearly defined, the group reconsidered
and decided on using the more traditional waterfall model. In retrospect, this has been a good
choice, as the model was well suited for this documentation emphasized project.
8.4.3
Phase model
The group decided early to follow the phase model described in the compendium [Unk08]. None
of the group members had experience with large development projects, and few of the reports
from earlier years had deviated much from the model in the compendium. It therefore seemed
risky to change this, and the group kept as much as possible to it, only making minor modifications where it did not fit this project.
167
CHAPTER 8. EVALUATION
8.5
Customer
This section gives an evaluation of the customer, Telenor R&I. The evaluation involves evaluating
the task as presented to the group and how it was refined, as well as a number of other factors
relating specifically to the customer.
8.5.1
Competence
The competence level refers to the technical background of the customer which affects communication and mutual understanding. In this respect, the customer representatives seems to have
good understanding of networking, servers ass well as an understanding of network monitoring
principles. The customer representatives have long experience with working in the telecommunication industry and has an educational background similar to the project participants.
This allowed the group to communicate with the customer through common nomenclature
without spending much time on explaining technical concepts.
8.5.2
Resource
Resources which the customer allocates to the project group may reduce the time needed to
complete tasks in the project. The project group was allocated an office with room for four
simultaneous users, located on the same floor as the customer representatives. This proved very
helpful for the project as it enabled group members to have informal talks with the customer
without necessarily having to schedule a meeting. Access to a test network with equipment
similar to the pilot network was also made available for the project through VPN from the Internet
and through physical connection when situated at the Telenor R&I office facility. This allowed
fairly realistic testing of the system throughout the development and in the testing phase. Access
to the pilot network was requested to get a more realistic environment for the testing phase.
However, the Sea Cage Gateway project is itself an early project and such access was not made
available.
8.5.3
Availability
The availability of the customer refers to how much of their time the customer representatives
made available to the project group. As stated in the Resources section, an office close to the
customer representatives was made available to the project group which enabled us to have informal talks with the customer when time allowed. Meetings were also regularly scheduled through
e-mail communication for approval of phase documents and to discuss aspects of the project.
During the requirements phase, a key customer representative went on vacation. This meant
the requirements specification draft had to be written relying on earlier communication and perceived wishes of the customer.
However, apart from this the group members feel that the customer has made their schedule as
available as possible in an otherwise hectic work situation, especially considering the starting up
of TelCage and SCG pilot tests were parallel activities for the customer throughout the project.
168
8.5. CUSTOMER
8.5.4
The Project Tasks
The initial task description in the course booklet was very broad and had a few hands-on task
suggestions. It became clear early on that the project would involve the fish farming industry
and a close connection with a project called the Sea Cage Gateway. However, not much else was
clear in the beginning. After a few meetings, it was suggested by the customer that the project
group should build the prototype-, and recommend the network monitoring solution, for the Sea
Cage Gateway network. The project group consulted the assigned supervisors for this change of
task before the final task was settled. This means some of the time spent early on in the project
was devoted to finding a suitable task, attempting to find a task giving the most added value to
the Sea Cage Gateway project within the constraints of the course.
The final project task would give the students a challenge in researching, recommending and
extending an enterprise-grade network monitoring solution and give the customer a reliable way
to diagnose the network which they will base a new business on. All-in-all, we believe all
involved parties were pleased with the project task.
169
CHAPTER 8. EVALUATION
8.6
Solutions
In this section will be described the different solutions needed during the installation and configuration process. The structure is divided in five sections: documentation, short description of the
selection of the application, the use of open source resources and the further work.
8.6.1
Documentation
For the documentation has been necessary to use LATEX, it have caused that part of our effort
has been designated to learn and discover the syntax this document markup language. In the
other hand, we have to admit that the use of this software has been perfect to create a clearly and
structured document.
Parallel of this, the necessity of correct all of our grammar and spelling mistakes and to do
that the document has a good presentation causes that we have wasted a lot of time writing and
rewriting the same parts of each phase of the final document.
8.6.2
Short analysis of the application
Before to start to do this analysis, is necessary to refer to the Section 2.7. In this section, we have
explored and evaluated several possible solutions that could have been installed and configured.
To select the best solution to our Customer, we created tables with specific analysis for each
solution that we evaluated (section 2.7.8); this tables were created on the basis of the Evaluation
Criteria described in the section 2.7.8. At the end of this process, we establish that OpenNMS
is the best solution for our requirement.
Finished all the installation and configuration process, we can say that we do not a wrong
decision choosing the system of monitoring and supervision. It has achieved our main requirements, e.g. to have a system with a good WUI for the relations between the users and the system,
to mount a SMS alarm system and to create maps and put the nodes and their links, amongst
other things.
8.6.3
Resources
Because of the nature of the software that we use to set up and configure the system, is practically
impossible to not reference the open source resources used during the documentation and the
installation process. We have to appreciate all the work done by the OpenNMS team and of
anonymous persons in the configuration process. In the other hand, a lot of work in this project
has been produced because of the necessity to use reverse engineering to know how the software
works. One of the big problems that we found, was the practically in existence of any type of
documentation of the construction and design process of OpenNMS.
170
8.6. SOLUTIONS
8.6.4
Further work
During our work on the project, we have found a great number of possibilities for further improvement. We have chosen to list some of them here as an inspiration for anyone wishing to do
further work on the system. Perhaps another group of students?
• Develop a new user interface that is accessible from mobile devices (Cell phones, PDAs)
• Extend the system to be able to remotely configure networked components
• Extend the system to be able to simulate failures for training purposes
• Add some intelligence to the system, so that it can reason about the cause of failure
• Standards compliant mapping support, for browsers other than Internet Explorer
• Improved configuration through the user interface (as opposed to configuration through
XML files)
• More fine grained permissions, group rights
• Automatic generation of complete SLA reports for a customer, SLA compliance warnings
171
CHAPTER 8. EVALUATION
8.7
The course
The customer driven project of 2008 has been a challenge to every group member, it has been
educational in many aspects. The group is left with experience in carrying out a software project,
and every group member feel they have learned something through the course. The areas in
which the course have been most educational are related to writing and managing of large project
reports, collaboration and synchronization/ coordination of work over the Internet. Use of virtual
collaboration tools as well as important lessons regarding planning of work effort. . . .
Several of the group members had expected to do more actual coding than the projects constraints allowed. They would probably like to trade a few of the report pages in for some coding
experience. . . .
8.7.1
Lectures and seminars
Many of the held lectures and seminars were helpful as a guidance in the different phases of the
project, as well as for the project as a whole.
There have been nine lectures or seminars in this course, and there have been representatives
from this group in every one of them. These are the representatives’ opinions about each of the
lectures:
Kick-off This was the first course introduction. A lot of useful information was presented.
Introduction seminar in group dynamics This mandatory, four hours long seminar was meant
as an introduction to group dynamics. Many ideas useful to the group were presented here,
but many feel that the seminar could have been somewhat shorter.
Seminar in group dynamics This mandatory seven hours long seminar continued where the introduction seminar left off. This seminar consisted of many social activities which required
exchange of ideas within and across the groups. The ideas presented on Jungian types were
not considered very useful, however the setting provided for a good atmosphere where the
group members could get to know eachother.
Scrum introduction The lecture in scrum was supposed to be held in the beginning of the
course, but was postponed for one week. For our project, this turned out to be somewhat late, as the group had decided on a development model before the lecture was held.
The lecture itself was however perceived as quite informative to the group members.
Requirements analysis Bearing Point was supposed to hold a lecture on requirements analysis, but held a lecture focusing more on techniques for effective customer meetings and
communication.
IT-architecture The lecture Statoil held about IT architecture was perceived as a good theoretical introduction to the subject. It provided the group with a good reminder of key principles
within IT systems.
172
8.7. THE COURSE
Use-case estimation Reidar Conradi held a lecture about use-case estimation, which was informative and useful for the project.
Seminar in technical writing This mandatory seminar was very educational, and gave the group
members valuable insight into how an academic report should be written. Some of the
insights provided in the seminar were applicable in the project while other insights are
probably more applicable later in the group members academic studies.
Course in presentation technique The course in presentation technique was interesting and
provided many useful techniques to holding a good presentation, as well as warning the
participants about potential hazards.
8.7.2
Compendium
The compendium for this year’s course, handed out at the kick-off lecture, is a fairly lengthy
document, which tries to collect all important information in one place. It contains a lot of useful
information, and the short introductions to subjects such as subversion, and scrum are much
appreciated. Some of the information, such as information which tend to change from group
to group, might have been more easily accessible in another format. There are drawbacks and
benefits to keeping all information in a lengthy and thorough document.
First, much of the information is dynamic, in the sense that it is constantly changed, or
updated, throughout the course. This especially applies to the schedules, but also other minor
points in the compendium. In most cases, the compendium just refers to the course’s web page,
but in some cases, there might be conflict between the two.
Second, several sections concern the groups at an individual level. This makes the parts of
the document concerning other groups rather irrelevant for a single group. It is apparent from
reading the compendium that the size of the document also increases the risk of the different
authors using different nomenclature in the document, impairing readability.
The benefits of keeping a single document is that every student only needs to relate to one specific
document. The course web page was considered useful, informative and easy to navigate. Thus,
the project group recommends making more extensive use of the web page.
8.7.3
Resources
The group is generally very satisfied with the resources provided. The office corner in the P15
building has provided a good place to work undisturbed, though the international members of
the group had problems getting access to it using their electronic card keys. Having a dedicated
computer was a positive experience, especially with the large computer screen which increases
readability of large on-screen documents. However, the computer would have been more helpful
if the group members were given administrator rights, as it lacked several programs which the
group members depended on and could not be installed. The meeting room has been very useful
for holding the weekly supervisor meetings. Telenor also provided the group with any further
resources it required, as described in section 8.5.2.
173
CHAPTER 8. EVALUATION
8.7.4
Supervisors
Our supervisors were Reidar Conradi and Guo Hong, with whom we had weekly meetings
throughout the project.
The supervisors have been helpful in guiding our work, and give feedback on our progress
with the report. A lot of the supervisors attention was focused on task control and hours spent,
which made the group aware of the importance of resource and task planning. More guidance
from the supervisors regarding the structure of the report was frequently requested by the group
members. Overall, the supervisors provided a valuable source for comments and constructive
criticism.
174
8.8. CONCLUSION
8.8
Conclusion
In the evaluation document we have discussed the opportunities and limitation of all aspects involved in this project. Planning explains how important and useful the planning phase was for
our project. It also describes the distributions of tasks and presents the tools we have used.
Our process includes group dynamics and describes different aspects of it, namely cultural and
individual differences in group members. We discuss and evaluate the development module we
have used by describing advantages and limitations it had on us and our work.
Luckily, our customer had relevant experience and high competence in telecommunications. We
have been provided the resources we needed at Telenor research center in Trondheim. Some
workplace, access to the building, access to a VPN server are some of there resources. The next
subsection discusses the availability of the project responsible and the schedules. The project
task has been changed almost after it was assign to us. In the solution subsection we evaluate the
different aspect of our solution of document writing and the platform used for our prototype. The
next subsection describes our resources for the prototype. Some remarks or recommendation are
provided in the future work subsection for future development.
Finally the course TDT4290 Customer Driven project has been evaluated. This course has been
hard but educational. We have learned to work intensively in groups, collaborate, and produce
result. The importance of planning has been proved to us several times. Lectures and seminars
has mostly been helpful. What we have learned from compendium and from our supervisor
guides us to more efficient and professional process and results.
175
Appendix A
Project Directive
A.1
Involved Parties
A.1.1
Customer representatives
Frode Flægstad
Mail: [email protected]
Phone: +47 91 61 76 18 / +47 73 54 38 19
Fax: +47 73 54 37 00
Jon Arne Grødal
Mail: [email protected]
Gunnar Senneset
[email protected]
A.1.2
Project group
Andreas Eriksen
Mail: [email protected]
Phone: +47 906 27 924
Jose Manuel Perez
Mail: [email protected]
Phone: +47 403 37 418
Øystein Kjærnet
Mail: [email protected]
Phone: +47 404 96 803
1
APPENDIX A. PROJECT DIRECTIVE APPENDIX
Francesc Martínez Maestre
Mail: [email protected]
Phone: +34 651673616
Vegar Neshaug
Mail: [email protected]
Phone: +47 951 21 637
Azhar Ahmad
Mail: [email protected]
Phone: +47 952 51 269
A.1.3
Project supervisors
Reidar Conradi
Mail: [email protected]
Phone: +47 73593444
Hong Guo
Mail: [email protected]
A.1.4
Coordinator
Geir Solskinnsbakk Mail: [email protected]
A.2
Gantt chart
2
Requirements Specificati
Construction
Implementation
Test Report
Documentation
Evaluation
Presentation
10
15
21
23
25
27
Figure A.2.1: Gantt chart
3
T
T
Milestone
08 Sep '08
M
F
S
22 Sep '08
W
S
Page 1
Project Summary
25 Aug '08
W
S
Progress
S
Summary
T
Split
Task
Pre study
7
Project: Project2003.mpp
Date: Mon 29.09.08
Project Directive
4
Final Report
1
2
Task Name
ID
T
T
S
20 Oct '08
W
S
Deadline
External Milestone
External Tasks
06 Oct '08
M
F
T
03 Nov '08
M
F
T
S
17 Nov '
W
A.2. GANTT CHART
APPENDIX A. PROJECT DIRECTIVE APPENDIX
A.3
Meeting Documents templates
A.3.1
Agendas
4
A.3. MEETING DOCUMENTS TEMPLATES
AGENDA
Internal meeting
September 12th, 2008
Meeting called by group 4
Attendees:
Ahmad Azhar,Eriksen Andreas Selfjord, Kjærnet Øystein, Pérez Pérez José Manuel, Martinez Maestre
Francesc, Neshaug Vegar.
Taking minutes: Name of the person taking minutes.
1.
Short description of point one on the agenda.
2.
Short description of point one on the agenda.
3.
. . . and so on . . .
1
Figure A.3.1: Example of agenda for internal meeting
5
APPENDIX A. PROJECT DIRECTIVE APPENDIX
AGENDA
Customer meeting
time and place, e.g. 09:15, September 3rd, 2008
Meeting at Telenor Senteret, called by group 4
Attendees:
On behalf of customer:
Flægstad, Frode
(+47 916 17 618)
Senneset, Gunnar
([email protected])
On behalf of group:
Ahmad Azhar
(+47 952 51 269)
Kjærnet Øystein
(+47 404 96 803)
Martinez Maestre Francesc (+34 651673616)
Taking minutes: Name of person taking minutes
Jon Arne, Grødal
([email protected])
Eriksen Andreas Selfjord
Pérez Pérez José Manuel
Neshaug Vegar
(+47 906 27 924)
(+47 403 37 418)
(+47 951 21 637)
1.
Approval of agenda
2.
Comments to the minutes from last customer meeting or other meetings
3.
Review/approval of attached phase documents
4.
Other points . . .
1
Figure A.3.2: Example of agenda for customer meeting
6
A.3. MEETING DOCUMENTS TEMPLATES
AGENDA
Supervisory meeting
time and date, e.g. “08:15, September XXth, 2008”
Meeting at room itv242, called by group 4
Attendees:
Supervisors:
Conradi, Reidar
(+47 73593444)
Guo, Hong
([email protected])
On behalf of group:
Ahmad Azhar
(+47 952 51 269)
Kjærnet Øystein
(+47 404 96 803)
Martinez Maestre Francesc (+34 651673616)
Taking minutes: Name of person taking minutes
Eriksen Andreas Selfjord
Pérez Pérez José Manuel
Neshaug Vegar
1.
Approval of agenda
2.
Approval of minutes of meeting from last advisory meeting
3.
Comments to the minutes from last customer meeting or other meetings
4.
Approval of the status report
5.
Review/approval of attached phase documents
(+47 906 27 924)
(+47 403 37 418)
(+47 951 21 637)
1
Figure A.3.3: Example of agenda for supervisor meeting
7
APPENDIX A. PROJECT DIRECTIVE APPENDIX
A.3.2
Minutes
Minutes of Customer Meeting
Week ??
Date:
Room:
Taking minutes:
Time and date, e.g. 08:00, 25th September
itv242
Name of the person taking these minutes
Project
Project name:
Customer:
Customer Driven Project – Group 4
Telenor R& I / TelCage
Participants
On behalf of customer:
On behalf of group:
1
Frode Flægstad
Jon Arne Grødal
Azhar Ahmad
Andreas Eriksen
Øystein Kjærnet
Arild Herstad
Vegar Neshaug
Francesc Martínez Maestre
José Manuel Pérez Pérez
Approval of agenda
The sections will differ from time to time, but will usually include these two sections, and will always
include all the sections in the corresponding agenda.
2
Comments to the minutes from last meeting
1
Figure A.3.4: Example of minutes from customer meeting
8
A.3. MEETING DOCUMENTS TEMPLATES
Minutes of Supervisor Meeting
Week ??
Date:
Room:
Taking minutes:
time and date, e.g. 08:00, 25th September
itv242
Name of the person taking these minutes.
Project
Project name:
Customer:
Customer Driven Project – Group 4
Telenor R& I / TelCage
Participants
Supervisors:
On behalf of group:
1
Conradi, Reidar
Azhar Ahmad
Andreas Eriksen
Øystein Kjærnet
Guo, Hong
Vegar Neshaug
Francesc Martínez Maestre
José Manuel Pérez Pérez
Approval of agenda
The sections will differ from time to time, but will usually include these five sections, and will always
include all the sections in the corresponding agenda.
2
Approval of minutes of meeting from last advisory meeting
3
Comments to the minutes from last customer meeting or other
meetings
4
Approval of the status report
5
Review/approval of attached phase documents
1
Figure A.3.5: Example of minutes from supervisor meeting
9
APPENDIX A. PROJECT DIRECTIVE APPENDIX
A.3.3
Weekly status reports
10
A.3. MEETING DOCUMENTS TEMPLATES
Weekly Report
Project
Project name:
Customer:
Week XX (timespan of period, e.g. “11th Sept. - 17th Sept.”)
Customer Driven Project – Group 4
Telenor R& I / TelCage
Participants
Azhar Ahmad
Andreas Eriksen
Øystein Kjærnet
Vegar Neshaug
Francesc Martínez Maestre
José Manuel Pérez
1
Summary
2
Work Done this Period
Hours worked this period:
Week
Estimated
XX-1
x hours
XX
x hours
Accumulated x hours
Actual
x hours
x hours
x hours
Milestones reached this week:
•
2.1
Status of Documents
Status of phase documents:
• Project Directive:
• Prestudy:
• Requirements Spesification:
• Design: Only templates are written.
• Implementation: Only templates are written.
• Testing: Only templates are written.
• Documentation: Only templates are written.
1
Figure A.3.6: Example of a weekly status report
11
Requirements
specification
and development
All
All
Planning
3
5
6
12
2
1
4
Implementation Unrealistic simulation
environment
2
re-
M
L
L
M
Meet often, keep all
work in central repository
Work on small chunks,
commit often, rely on
NTNU server backups
Implement
requirements in prioritized
order, monitor time
spent
Good dialog with customer, buffer of well
defined tasks
Table A.4.1: The original risk table
L
M
M
M
Cons.1 Prob.2 Strategy and actions
H
M
Support only components that communicate
based on open standards
M
M
Research behavior of
failing components
Seriousness of consequences (High, Medium or Low).
Probability of occurrence (High, Medium or Low).
Underestimating
quired time
Losing completed work
Duplication of effort
Customer
(TelCage)
too busy with pilot
deployment
Activity
Risk factor
Implementation Protocol support in devices
Original table of risks
A.4.1
No
1
Risk tables
A.4
x
x
x
Before individual
modules are developed
x
Deadline
x
Project Manager
Team
Team
Customer contact
Component module developer
Responsible
Team
APPENDIX A. PROJECT DIRECTIVE APPENDIX
A.4.2 Updated table of risks
13
A.4. RISK TABLES
Activity
Risk factor
Implementation Protocol support
in devices
2
Implementation Unrealistic
simulation environment
Requirements Customer
specification
(TelCage)
too
and develop- busy with pilot
ment
deployment
All
Duplication of effort
3
4
Cons.1 Prob.2 Sev.3 Strategy and actions
H
M
H
Support only components that communicate
based on open standards
M
M
M
Research behavior of
failing components
14
M
M
M
Good dialog with customer, buffer of well
defined tasks
L
M
L
Meet often, keep all
work in central repository
Work on small chunks,
commit often, rely on
NTNU server backups
Implement
requirements in prioritized
order, monitor time
spent
Revise the release notes
of the NMS, follow the
road map and check the
set of features as well as
their documentation
5
All
Losing
completed work
L
M
L
6
Planning
Underestimating
required time
M
L
M
7
Implementation Implementing
a feature that
it is already
implemented
M
M
M
1
2
3
Deadline
x
Responsible
Team
Before individual
modules are developed
x
Component module developer
x
Team
x
Team
x
Project Manager
x
Team
Customer contact
Seriousness of consequences (High, Medium or Low).
Probability of occurrence (High, Medium or Low).
Resulting of severity, calculated from Cons. and Prob. following: LxL=L, LxM=L, MxM=M, LxH=M, HxM=H, HxH=H.
Table A.4.2: The modified risk table adding some risks that were not considered and their severity
APPENDIX A. PROJECT DIRECTIVE APPENDIX
No
1
A.5
Figure A.5.1: Table of actual workhours
Tables of working hours
A.5. TABLES OF WORKING HOURS
15
APPENDIX A. PROJECT DIRECTIVE APPENDIX
16
Figure A.5.2: Detailed diagram of estimated workhours distribution
Appendix B
Requirements specification
B.1
Use case points estimation
Actor Type
Simple
Average
Complex
Example
Another system through an API
Another system through a protocol
A person through a text-based user interface
A person through a graphical user interface
Table B.1.1: Actor complexity
17
Weight
1
2
3
APPENDIX B. REQUIREMENTS SPECIFICATION APPENDIX
B.2
Textual Use Case Scenarios
B.2.1
Operator Use Case Scenarios
Use case
Actor
Trigger
Pre-condition
Post-condition
Main success scenario:
USE-01 Network Monitoring
Operator
The operator logs in to the system’s user interface.
The operator has the necessary privileges to monitor the concerned
system components.
The operator has gotten a complete overview of all system components of interest.
The operator:
1. The operator enters his/ her user credentials and authentication.
2. Operator chooses one of the monitoring views.
3. Operator gets overview information depending on which view
is selected
4. Operator chooses an individual component for detailed information.
5. Operator acts on any alarm issued by the system and presented in the view. (See section 3.5.2)
Extensions
1a System fails to authenticate the operator
.1 The erroneous login attempt is recorded in the system’s
logs.
.2 Operator may reenter credentials and authentication, or
may cancel.
18
B.2. TEXTUAL USE CASE SCENARIOS
Use case
Actor
Trigger
Pre-condition
Post-condition
Main success scenario:
USE-02 Component monitoring
Operator
The operator needs to check the status of a component. The exact causes may be numerous, possibly a request from a customer
experiencing bad service.
The component(s) already exists and are configured in the system
The system status remains unchanged.
1. The operator logs in to the system
2. The operator searches for the component by name or id, or
finds the component through one of the views.
3. The operator views the component status page.
Extensions
3a The component is down
.1 The operator opens the alarms issued and sees if they
are acknowledged
.2 The use case proceeds as in Alarm notification(issue
work order or find acknowledging user)
19
APPENDIX B. REQUIREMENTS SPECIFICATION APPENDIX
Use case
Actor
Trigger
Pre-condition
Post-condition
Main success scenario:
USE-03 Alarm notification
Operator
An Alarm has Occurred
The alarm has not acknowledged by any one yet
The alarm has been acknowledged
The operator:
1. Operators gets an alarm notification through one of the escalation notification methods.
2. Operator acknowledges the notification to stop notification
escalation.
3. Operators logs in to system and requests details about the
cause of the issued alarm(See monitoring use case).
4. Operator acknowledges the alarm to signal other operators
that the alarm is being dealt with.
5. Operators issues a work order to fix the problems causing the
alarm (Not modeled in the system).
Extensions
1a The alarm is not acknowledged before reasonable time
.1 The alarm is escalated to the next notification method
3a Operator is unable to act on the alarm at this time.
.1 Operator may choose to postpone the alarm for later inspection.
.2 The alarm is placed in a “working queue”.
4a The alarm is already acknowledged
.1 Operator may see who acknowledged the alarm to make
inquiries to the user who acknowledged it.
.2 The operator skips the last step in the use case.
20
B.2. TEXTUAL USE CASE SCENARIOS
Use case
Actor
Trigger
Pre-condition
Post-condition
Main success scenario:
USE-04 Report extraction
Operator
Regularly SLA report must be generated and delivered to the responsible parties
The system is running the normal state
The system is running in the normal state
1. The operator logs in
2. The operator opens the report view
3. The operator selects which time period the report data is to be
presented from.
4. The operator uses the data presented to manually create an
SLA report.
Extensions
3a The time period is not available, e.g. if the system was down
in the requested time period.
.1 The report presented is empty
21
APPENDIX B. REQUIREMENTS SPECIFICATION APPENDIX
B.2.2
Administrator Use Case Scenarios
Use case
Actor
Trigger
Pre-condition
Post-condition
Main success scenario:
USE-05 Initial Configuration
Administrator
The system has newly been installed and will start to be used.
The system is installed and up and running.
The system is up and running and configured, or, at least configurable.
The administrator:
1. Administrator enters his/ her user credentials and authenticates himself to the system.
2. Administrator opens the view to add components to the system.
3. Administrator enters one or more IP-ranges to monitor, or individual IP-addresses.
4. Administrator adds services to individual nodes for monitoring by the system.
5. Administrator sets up relevant logical groups of network components. Either in customer groups or other useful grouping.
6. Administrator sets up logical groups consisting of other logical groups.
Extensions
1a System fails to authenticate the Administrator.
.1 The erroneous login attempt is recorded in the system’s
logs.
.2 Operator may reenter credentials and authentication, or
may cancel.
22
B.2. TEXTUAL USE CASE SCENARIOS
Use case
Actor
Trigger
Pre-condition
Post-condition
Main success scenario:
USE-06 Notification Configuration
Administrator
The Administrators wishes to configure a notification for an event.
The system is installed and up and running. Components related to
the event are configured.
The system is up and running, components related to the event are
configured, and notification is enabled for the event.
The administrator:
1. Administrator enters his/ her user credentials and authenticates himself to the system.
2. Administrator opens the view to view possible events in the
system.
3. Administrator chooses an event for which to configure notification.
4. Administrator creates a rule for when this event will lead to
notification, based on the available criteria.
5. Administrator chooses a name and description for the notification.
6. Administrator chooses how the notification will be performed
(SMS, web interface, email)
Extensions
1a System fails to authenticate the Administrator.
.1 The erroneous login attempt is recorded in the system’s
logs.
.2 Operator may reenter credentials and authentication, or
may cancel.
23
APPENDIX B. REQUIREMENTS SPECIFICATION APPENDIX
Use case
Actor
Trigger
Pre-condition
Post-condition
Main success scenario:
USE-07 Component Adding
Administrator
New component has been installed and has gotten a reachable IPaddress
The new components are in the network but not in the system
The new components already had been added to the network
1. The administrator logs in
2. The view to add components is opened
3. The administrator adds the IP address of the component to be
monitored.
4. Every administrator registered in the system, whether logged
in or not, is notified.
5. The administrator adds the services to be monitored on the IP
address.
Extensions
3a The component is already registered to be monitored by the
system.
.1 The administrator receives a warning message and can
opt not to register a duplicate entry.
24
B.2. TEXTUAL USE CASE SCENARIOS
Use case
Actor
Trigger
Pre-condition
Post-condition
Main success scenario:
USE-08 Post Configuration
Administrator
Components must be reconfigured or groups need to be reconfigured
The system is running in the normal state
The system is running in the normal state
1. The administrator logs in
2. The administrator may open the component view
3. The administrator may then add/remove nodes (see USE-07)
4. The administrator may then select a node to configure
5. The administrator may then add/remove services to be monitored on the node
6. The administrator may open the grouping view
7. The administrator may then add/remove logical groups
8. The administrator may then add/remove nodes to logical
groups
25
APPENDIX B. REQUIREMENTS SPECIFICATION APPENDIX
Use case
Actor
Trigger
Pre-condition
Post-condition
Main success scenario:
USE-09 User Management
Administrator
Users or groups need to be managed
The system is running in the normal state
The system is running in the normal state
1. The administrator logs in
2. The administrator may open the user management view
3. The administrator may then add/remove a user
4. The administrator may then select a user to modify
5. The administrator may then add/remove users to user groups
6. The administrator may then extend/restrict a user’s privileges
7. The administrator may open the notification view
8. The administrator may then select which events/alarms generate notifications
9. The administrator may then select the course of escalation of
a notification (SMS, e-mail)
10. The administrator may then select which groups or users are
involved in which escalation steps.
26
B.2. TEXTUAL USE CASE SCENARIOS
B.2.3
Network Component Agent Use Case Scenarios
Use case
Actor
Trigger
Pre-condition
Post-condition
Main success scenario:
USE-10 Status update
Network Node Agent
The network node agent is polled for information of the Network
Management Station (NMS).
The network node is configured for monitoring by the NMS.
The NMS’ information about the network node is updated, or an
update error is indicated.
The agent
1. receives a request for status information.
2. fetches the requested status from it’s information base.
3. answers the request with the updated information.
Extensions
2a The information is not available in the information base.
.1 The agent answers the request with an error message.
27
APPENDIX B. REQUIREMENTS SPECIFICATION APPENDIX
28
Appendix C
Design
29
APPENDIX C. DESIGN APPENDIX
C.1
Network Structure
Figure C.1.1: The general topology of the common networks.
30
C.1. NETWORK STRUCTURE
Figure C.1.2: The network structure of the salmar customer.
31
APPENDIX C. DESIGN APPENDIX
C.2
Communication between OpenNMS packages
C.2.1
Between the netmgt, secret and report packages
Figure C.2.1: Example of communications between the netmgt, secret and report packages.
C.2.2
Between protocols entity and netmgt packages
Figure C.2.2: Example of communications between the protocols and netmgt packages.
C.2.3
Between web and netmgt packages
C.2.4
Between netmgt.poller, protocols and netmgt.notifd packages
32
C.2. COMMUNICATION BETWEEN OPENNMS PACKAGES
Figure C.2.3: Example of communications between the web and netmgt packages.
Figure C.2.4: A lower-level example of communication between the netmgt.poller, protocols and
netmgt.notifd packages.
33
APPENDIX C. DESIGN APPENDIX
34
Appendix D
Testing
35
APPENDIX D. TESTING APPENDIX
D.1
Unit test
This appendix contains the check list for unit testing. The unit test includes testing of the basic
software items, e.g. functions and classes. Unit testing is executed by thoroughly inspecting the
source code.
General check points
• Do all source code follow the decided standards for programming code and commenting?
• Does the implementation follow the design described in the Construction document?
• Are all blocks of code ended?
• Is there only one codeline per textline?
Variables and constants
• Do all variables and constants have descriptive and understandable names?
• Could any of the variables rather be made constants?
• Could any of the non-local variables rather be made local?
• Are there unused fields or variables?
Methods
• Do all methods have descriptive and understandable names?
• Do the methods return the correct value?
• Do all methods have the right parameters with the right types?
• Do all methods have the right access mode?
Classes
• Do all classes have the right access mode?
• Do all sub classes have variables that can be moved to their superclass?
• Can the hierarchy be simplified?
Calculations
• Are variables and constants in the same calculations the same type?
• Are all parenthesis correct to avoid ambiguity?
36
D.1. UNIT TEST
• Are there common subexpressions calculated more than once that could be calculated just
once?
Comparisons
• Are all operators used correctly in all comparisons?
• Are all boolean expressions correct?
Flow
• Do all loops have the right iterations?
• Will all loops finish?
• Are all loops ended?
• Are all nested loops correct?
• Are any nesting of code too complex?
Input/Output
• Are all files open correctly before use?
• Are all files closed after use?
• Is the text that is presented to the user correct?
• Are exceptions caught?
• Are all error messages understandable and/or helpful?
Code commenting
• Are all classes and methods commented in a understandable and descriptive matter?
• Are all declarations of variables and methods commented?
• Do the comments describe what actually happens?
• Do the comments increase the understanding of the code?
• Can comments be removed?
Libraries
• Are the correct libraries being linked and used?
• Are we taking advantage of classes provided by the programming language and platform?
37
APPENDIX D. TESTING APPENDIX
Performance
• Can any code be moved out of loops?
• Can loops operating on the same data be joined together?
• Does duplicated code exist? Can this be replaced?
• Are calculations stored more than once?
• Is there unreachable code?
Memory
• Are there memory leaks?
• Are objects being correctly reused?
• Are there any useful instantiations of classes?
• Are we accessing to the correct memory position in arrays?
• Are we checking that we do not access to memory addresses non allocated?
38
D.2. TEST CASE SPECIFICATION
D.2
Test case specification
The following subsections lists the specific tests cases to be run.
D.2.1
Node monitoring test cases
Test case TC-FTCS01: Component monitoring using SNMP and JMX
Id:
Head of test:
Time:
Precondition:
Data in:
Expected data out:
Info about errors:
Related requirements/use cases:
TC-FTNS01: Component monitoring using SNMP
and JMX
Andreas Eriksen
14.11.2008
OpenNMS is running in debug mode and at least one
component is configured
None
The result of component queries appears in the debug
logs at the configured polling interval
This is the most critical function of the system. Errors
discovered in this test must be corrected.
FR-FTCS01 Node monitoring, FR-FTCS04 Monitoring protocols, FR-FTCS07 Configurable detail level
Table D.2.1: Test case TC-FTCS01
Test case TC-FTCS02: Stored and aggregated status history
39
APPENDIX D. TESTING APPENDIX
Id:
Head of test:
Time:
Precondition:
Data in:
Expected data out:
Info about errors:
Related requirements/use cases:
TC-FTNS02: Stored and aggregated status history
Andreas Eriksen
14.11.2008
OpenNMS is running and at least one component is
configured
The component is disconnected after a successful
query
Status change information for the component is
recorded in the database when a query reports a
change in status
This is a very important function of the system. Errors
discovered in this test must be corrected.
FR-FTCS01 Node monitoring, FR-FTCS02 Stored
status history, FR-FTCS03 Aggregation of status information, FR-FTCS04 Monitoring protocols
Table D.2.2: Test case TC-FTCS02
Test case TC-FTCS03: Performance monitoring
Id:
Head of test:
Time:
Precondition:
Data in:
Expected data out:
Info about errors:
Related requirements/use cases:
TC-FTNS03: Performance monitoring
Andreas Eriksen
14.11.2008
OpenNMS is running and at least one network backbone component is configured
Performance data is requested from a network backbone component
The received network performance data is recorded in
the round robin database
This is an important function of the system. Errors
discovered in this test should be corrected.
FR-FTCS01 Node monitoring , FR-FTCS02 Stored
status history, FR-FTCS05 Performance monitoring
Table D.2.3: Test case TC-FTCS03
Test case TC-FTCS04: Layered configuration
40
D.2. TEST CASE SPECIFICATION
Id:
Head of test:
Time:
Precondition:
Data in:
Expected data out:
Info about errors:
Related requirements/use cases:
TC-FTNS04: Layered configuration
Andreas Eriksen
14.11.2008
Two OpenNMS servers are running. At least one
component is configured in server A. Server A is configured to relay component status changes and other
events to server B. Server B is configured to receive
events and component status changes from server A.
A component configured in server A is disconnected
after a successful query
Status change information for the component is
recorded in the database connected to server A when
a query reports a change in status. The change and related events are relayed to server B, which processes
these events according to its own rules. The event is
stored in the database connected to server B.
This is an important function of the system. Errors
discovered in this test should be corrected.
FR-FTCS01 Node monitoring, FR-FTCS02 Stored
status history, FR-FTCS03 Aggregation of status information, FR-FTCS04 Monitoring protocols
Table D.2.4: Test case TC-FTCS04
D.2.2
Alarm notification test cases
Test case TC-FTAN01: Display alarm
Id:
Head of test:
Time:
Precondition:
Data in:
Expected data out:
Info about errors:
Related requirements/use cases:
TC-FTAN01: Display alarm information and path
outage of a defined network path as an alarm.
Azhar Ahmad
14.11.2008
The node setting and alarm notification must be configured
User information should be given
detailed description of why the alarm was raised
FR-FTUI04 Display of alarms, FR-FTUI06 Display
of path outage, FR-FTUA02 Alarm information
Table D.2.5: Test case TC-FTAN01
41
APPENDIX D. TESTING APPENDIX
Test case TC-FTAN02: Alarm conditions
Id:
Head of test:
Time:
Precondition:
TC-FTAN02: Alarm conditions
Azhar Ahmad
14.11.2008
The node setting and conditions for alarm to be generated must be defined
User information should be given
Using the details of the reported data, an alarm was
raised
Data in:
Expected data out:
Info about errors:
Related requirements/use cases:
FR-FTUA01 Alarm conditions
Table D.2.6: Test case TC-FTAN02
Test case TC-FTAN03: Alarm notification
Id:
Head of test:
Time:
Precondition:
TC-FTAN03: Alarm notification
Azhar Ahmad
14.11.2008
Alarm Notification methods such as web-interface,
Email or SMS must be defined
User information and the way user wants to be notified should be given
Information about an raised alarm are sent or shown
for the user
Data in:
Expected data out:
Info about errors:
Related requirements/use cases:
FR-FTUA04 Alarm notification
Table D.2.7: Test case TC-FTAN03
Test case TC-FTAN04: Alarm sequencing and prioritization
42
D.2. TEST CASE SPECIFICATION
Id:
Head of test:
Time:
Precondition:
TC-FTAN04: Alarm sequencing and prioritization
Azhar Ahmad
14.11.2008
Number of alarms must be raised and some of them
should not be handled during the defined period
User information, alarm priority and the period of
time an alarm can be ignored after it occurred must
be given
The prioritized alarm using next notification method
should be used
Data in:
Expected data out:
Info about errors:
Related requirements/use cases:
FR-FTUA05 Alarm sequencing, FR-FTUA07 Alarm
prioritization
Table D.2.8: Test case TC-FTAN04
Test case TC-FTAN05: SMS Web Service
Id:
Head of test:
Time:
Precondition:
TC-FTAN05: SMS Web Service
Azhar Ahmad
14.11.2008
SMS implementation must be integrated with OpenNMS
SMS web service (pats.no) configuration and a test
telephone number must be given
An alarm notification using pats.no web service sent
to a phone number
Data in:
Expected data out:
Info about errors:
Related requirements/use cases:
FR-FTUA06 SMS Web Service
Table D.2.9: Test case TC-FTAN05
Test case TC-FTAN06: Acknowledged alarms
43
APPENDIX D. TESTING APPENDIX
Id:
Head of test:
Time:
Precondition:
Data in:
Expected data out:
Info about errors:
Related requirements/use cases:
TC-FTAN06: Acknowledged alarms
Azhar Ahmad
14.11.08
An alarm has occurred and yet not been acknowledged
User information must be given
confirmation on alarm to being acknowledged
FR-FTUA08 Acknowledged alarms
Table D.2.10: Test case TC-FTAN06
D.2.3
Availability test cases
Test case TC-FTAV01: Availability
44
D.2. TEST CASE SPECIFICATION
Id:
Head of test:
Time:
Precondition:
Data in:
Expected data out:
Info about errors:
Related requirements/use cases:
TC-FTAV01: Availability
Andreas Eriksen
14.11.2008
OpenNMS is running
The command is given to shut down the operating
system on which OpenNMS is running. When it has
halted, the OpenNMS logs are inspected. The computer is then started again, and the status of OpenNMS is examined.
OpenNMS shuts down cleanly, as determined by inspection of the log files. When the computer is started
again, OpenNMS starts up correctly and automatically.
It is important that the system can recover from a
power failure. Errors discovered in this test must be
corrected.
NR-FTAV02 Maintainability of remote nodes, NRFTAV03 Clean shut down of the system, NR-FTAV04
System recovery
Table D.2.11: Test case TC-FTAV01
D.2.4
Reports test cases
Test case TC-FTRE01: Availability and performance data and report generating
45
APPENDIX D. TESTING APPENDIX
Id:
TC-FTRE01: Availability and performance data and
report generating
Azhar Ahmad
14.11.2008
The system is up running and availability and performance variables are defined
Properties of the system and network to be processed
in openNMS
Performance and availability data for each node and
generate daily report
Head of test:
Time:
Precondition:
Data in:
Expected data out:
Info about errors:
Related requirements/use cases:
FR-FTRE01 Availability data, FR-FTRE02 Performance data, FR-FTRE03 Daily report
Table D.2.12: Test case TC-FTRE01
D.2.5
User interface test cases
Test case TC-FTUI01: Node grouping
46
D.2. TEST CASE SPECIFICATION
Id:
Head of test:
Time:
Precondition:
TC-FTUI01: Node grouping
José Manuel Pérez
14.11.2008
Proper display of OpenNMS website using an Administrator account
Data in:
1. Press the "Admin" link
2. Press the "Manage Surveillance Categories"
link
3. Write the name of the new category
4. Press the "Add New Category" button
5. Press the link with the name of the created category
6. Press the "edit" link
7. Select the nodes from “Available nodes” that
will form part of the category
8. Press the "Add" button
9. Since the nodes has to belong to two categories,
the steps from point number 4 to 8 must be repeated. The nodes will be shown as a matrix
and every node will be shown in its “row” category and “col” category.
10. Edit
the
$OPENNMS/etc/surveillanceviews.xml file.
11. Add the new category to an existing view or
create a new view, adding the categories to be
shown in the columns and in the rows.
12. Press the “Surveillance” link in the OpenNMS
website
13. Select the view from “Choose another view”.
Expected data out:
Info about errors:
Related requirements/use cases:
Correct display of the created group in the view matrix.
Errors in this test will be critical for the project and
will therefore be highly prioritized.
FR-FTUI01
47 Node grouping
Table D.2.13: Test case TC-FTUI01
APPENDIX D. TESTING APPENDIX
Test case TC-FTUI02: Network status overview
Id:
Head of test:
Time:
Precondition:
Data in:
TC-FTUI02: Network status overview
José Manuel Pérez
14.11.2008
Proper display of OpenNMS website
1. Press the “Surveillance” link in the OpenNMS
website
2. Select the view from “Choose another view”.
Expected data out:
Info about errors:
Related requirements/use cases:
The data shown in each cell is the number of nodes
that are down of the total amount.
Errors in this test will be critical for the project and
will therefore be highly prioritized.
FR-FTUI02 Network status overview
Table D.2.14: Test case TC-FTUI02
Test case TC-FTUI03: Node usage
48
D.2. TEST CASE SPECIFICATION
Id:
Head of test:
Time:
Precondition:
Data in:
TC-FTUI03: Node usage
José Manuel Pérez
14.11.2008
Proper display of OpenNMS website
1. Press the “Node list” link in the OpenNMS
website to get a list of nodes or “Search” to perform a search by name, alias, address, MAC,
etc.
2. Press the link with the name or address of the
node.
Expected data out:
Info about errors:
Related requirements/use cases:
In the “ Surveillance Category Memberships” table
there is a list of the categories the node belongs to.
Errors in this test will be critical for the project and
will therefore be highly prioritized.
FR-FTUI03 Node usage
Table D.2.15: Test case TC-FTUI03
Test case TC-FTUI04: Vital network paths
49
APPENDIX D. TESTING APPENDIX
Id:
Head of test:
Time:
Precondition:
TC-FTUI04: Vital network paths
José Manuel Pérez
14.11.2008
Proper display of OpenNMS website using an Administrator account
Data in:
1. Press the “Node list” link in the OpenNMS
website to get a list of nodes or “Search” to perform a search by name, alias, address, MAC,
etc.
2. Press the link with the name or address of the
node that is going to be object of the path outage.
3. Press the “Admin“ link
4. Press the ”Configure Path Outage“ link
5. Write the IP address of the critical path to the
node.
6. Choose the critical path service from the dropdown list.
7. Press the submit button.
8. Press the ”Path Outages“ link.
Expected data out:
Info about errors:
Related requirements/use cases:
The critical path node, its critical path ID and its critical path service should be shown on the matrix.
Errors in this test will be critical for the project and
will therefore be highly prioritized.
FR-FTUI05: Vital network paths
Table D.2.16: Test case TC-FTUI04
50
D.2. TEST CASE SPECIFICATION
D.2.6
Usability test cases
Test case TC-US01: Network Monitoring
Id:
Head of test:
Time:
Precondition:
Test execution and input:
TC-US01: Network Monitoring
Vegar Neshaug
14.11.2008
The operator has the necessary . . .
1. Log into the web user interface as an operator.
2. Find out how many nodes are unavailable for
the different customers.
Expected outcome:
Error handling:
Related requirements/use cases:
The user is logged in to the web user interface, and has
acquired information about the number of unavailable
nodes for the customers.
Head of test decides whether errors warrant improvements in documentation or user interface
USE-01 Network Monitoring
Table D.2.17: Test case TC-US01
Test case TC-US02: Component Monitoring
51
APPENDIX D. TESTING APPENDIX
Id:
Head of test:
Time:
Precondition:
Test execution and input:
TC-US02: Component Monitoring
Vegar Neshaug
14.11.2008
• Log in to the web user interface as an operator.
• Examine the availability of the FTP service on
node “radio_tyholt.”
Expected outcome:
Error handling:
Related requirements/use cases:
The user is logged into the web interface, and has acquired information of the availability of the correct
service.
Head of test decides whether errors warrant improvements in documentation or user interface
USE-02 Component Monitoring
Table D.2.18: Test case TC-US02
Test case TC-US03: Alarm notification
Id:
Head of test:
Time:
Precondition:
Test execution and input:
TC-US03: Alarm notification
Vegar Neshaug
14.11.2008
There is an unacknowledged alarm
1. Log into the system as an operator
2. Indicate that the cause of the alarm has been
resolved.
Expected outcome:
Error handling:
Related requirements/use cases:
The operator acknowledges the alarm
Head of test decides whether errors warrant improvements in documentation or user interface
USE-03 Alarm notification
Table D.2.19: Test case TC-US03
Test case TC-US04: Report extraction
52
D.2. TEST CASE SPECIFICATION
Id:
Head of test:
Time:
Precondition:
Test execution and input:
Expected outcome:
Error handling:
Related requirements/use cases:
TC-US04: Report extraction
Vegar Neshaug
14.11.2008
Logged into the system as an operator
Retrieve the necessary information to create an SLA
report for the last three days
The operator has the necessary information to create
an SLA report
Head of test decides whether errors warrant improvements in documentation or user interface
USE-04 Report extraction
Table D.2.20: Test case TC-US04
Test case TC-US05: Component addition
Id:
Head of test:
Time:
Precondition:
Test execution and input:
Expected outcome:
Error handling:
Related requirements/use cases:
TC-US05: Component addition
Vegar Neshaug
14.11.2008
There is a reachable component in the network which
is not configured in the system
Add the component on the given IP address to the system so that it’s availability is monitored
The component on the given IP address is now monitored as a node in the system
Head of test decides whether errors warrant improvements in documentation or user interface
USE-07 Component adding
Table D.2.21: Test case TC-US05
Test case TC-US06: Initial configuration
53
APPENDIX D. TESTING APPENDIX
Id:
Head of test:
Time:
Precondition:
TC-US06: Initial configuration
Vegar Neshaug
14.11.2008
The system has newly been installed and will start to
be used, the user is logged in as an administrator
Test execution and input:
1. Configure monitoring of the given IP address
ranges
2. Add monitoring of the FTP service of the node
of a given IP address
3. Assign the nodes of the given IP address range
to a group named "bartnir"
4. Assign the five first nodes of the given IP address range to a group named "fartafer"
5. Add a new surveillance view called "smuthbly"
with "bartnir" as a column and "fartafer" as a
rowgroup
Expected outcome:
Error handling:
Related requirements/use cases:
The system is up and running and configured
Head of test decides whether errors warrant improvements in documentation or user interface
USE-05 Initial configuration
Table D.2.22: Test case TC-US06
Test case TC-US07: Post configuration
54
D.2. TEST CASE SPECIFICATION
Id:
Head of test:
Time:
Precondition:
Test execution and input:
Expected outcome:
Error handling:
Related requirements/use cases:
TC-US07: Post configuration
Vegar Neshaug
14.11.2008
as after the successful execution of test case TC-US06
Change the name of the group "bartnir" to "fartafo",
and remove the third node from the group "fartafer"
The group formerly known as "bartnir" is now named
"fartafo", and the third node has been removed from
the group "fartafer"
Head of test decides whether errors warrant improvements in documentation or user interface
USE-08 Post configuration
Table D.2.23: Test case TC-US07
Test case TC-US08: User management
55
APPENDIX D. TESTING APPENDIX
Id:
Head of test:
Time:
Precondition:
Test execution and input:
TC-US08: User management
Vegar Neshaug
14.11.2008
User is logged into the system
1. Create two accounts in the system with the
identifiers "bomtertu" and "barmotru"
2. Create a group called "btards" and a group
called "gargeri"
3. Add both users to the group "mobrufa"
4. Move the user identified as "barmotru" to the
group "gargeri"
5. Remove the user identified as "bomtertu" from
the system
6. Set up an alarm to go off if a user logs out of
the system
7. Configure an escalation path for this alarm so
that the user "barmotru" receives an SMS 2
minutes after this happens.
Expected outcome:
Error handling:
Related requirements/use cases:
The administrator has added a user named "barmotru"
and this user is in the group named "gargeri". If someone logs out of the system, the user "barmotru" will
receive an SMS after 2 minutes.
Head of test decides whether errors warrant improvements in documentation or user interface
USE-09 User management
Table D.2.24: Test case TC-US08
56
Appendix E
Documentation
57
APPENDIX E. DOCUMENTATION APPENDIX
E.1
Views of OpenNMS
Figure E.1.1: The dashboard view of OpenNMS, with the surveillance table highlighted in orange.
E.2
JSVC Wrapper Configuration
#********************************************************************
# Wrapper License Properties (Ignored by Community Edition)
#********************************************************************
# Include file problems can be debugged by removing the first ’#’
# from the following line:
##include.debug
#include ../conf/wrapper-license.conf
#********************************************************************
# Wrapper Java Properties
#********************************************************************
58
E.2. JSVC WRAPPER CONFIGURATION
# Java Application
wrapper.java.command=C:\Program Files\Java\jdk1.6.0_10\bin\java
#"C:\Program Files\Java\jdk1.6.0_10\bin\java" -Xmx256m -Dopennms.home=
"C:/PROGRA~1/OpenNMS" -jar "C:/PROGRA~1/OpenNMS/lib/
opennms_bootstrap.jar" %1 %2 %3 %4 %5 %6 %7 %8 %9
# Java Main class. This class must implement the WrapperListener
interface
# or guarantee that the WrapperManager class is initialized. Helper
# classes are provided to do this for you. See the Integration
section
# of the documentation for details.
wrapper.java.mainclass=org.tanukisoftware.wrapper.WrapperStartStopApp
# Java Classpath (include wrapper.jar) Add class path elements as
# needed starting from 1
wrapper.java.classpath.1=..\lib\wrapper.jar
wrapper.java.classpath.2=C:\Program Files\Java\jdk1.6.0_10\lib\tools.
jar
wrapper.java.classpath.3=..\lib\opennms_bootstrap.jar
# Java Library Path (location of Wrapper.DLL or libwrapper.so)
wrapper.java.library.path.1=..\lib
# Java Additional Parameters
wrapper.java.additional.1=-Dopennms.home="C:/PROGRA~1/OpenNMS"
# Initial Java Heap Size (in MB)
#wrapper.java.initmemory=3
# Maximum Java Heap Size (in MB)
wrapper.java.maxmemory=256
# Application parameters. Add parameters as needed starting from 1
wrapper.app.parameter.1=org.opennms.bootstrap.Bootstrap
wrapper.app.parameter.2=1
wrapper.app.parameter.3=start
wrapper.app.parameter.4=org.opennms.bootstrap.Bootstrap
wrapper.app.parameter.5=true
wrapper.app.parameter.6=1
wrapper.app.parameter.7=stop
#********************************************************************
59
APPENDIX E. DOCUMENTATION APPENDIX
# Wrapper Logging Properties
#********************************************************************
# Format of output for the console. (See docs for formats)
wrapper.console.format=PM
# Log Level for console output.
wrapper.console.loglevel=INFO
(See docs for log levels)
# Log file to use for wrapper output logging.
wrapper.logfile=../logs/wrapper.log
# Format of output for the log file.
wrapper.logfile.format=LPTM
# Log Level for log file output.
wrapper.logfile.loglevel=INFO
(See docs for formats)
(See docs for log levels)
# Maximum size that the log file will be allowed to grow to before
# the log is rolled. Size is specified in bytes. The default value
# of 0, disables log rolling. May abbreviate with the ’k’ (kb) or
# ’m’ (mb) suffix. For example: 10m = 10 megabytes.
wrapper.logfile.maxsize=0
# Maximum number of rolled log files which will be allowed before old
# files are deleted. The default value of 0 implies no limit.
wrapper.logfile.maxfiles=0
# Log Level for sys/event log output.
wrapper.syslog.loglevel=NONE
(See docs for log levels)
#********************************************************************
# Wrapper Windows Properties
#********************************************************************
# Title to use when running as a console
wrapper.console.title=OpenNMS
#********************************************************************
# Wrapper Windows NT/2000/XP Service Properties
#********************************************************************
# WARNING - Do not modify any of these properties when an application
# using this configuration file has been installed as a service.
# Please uninstall the service before modifying this section. The
# service can then be reinstalled.
# Name of the service
60
E.3. SCG SMS EXTENSION API
wrapper.ntservice.name=OpenNMS
# Display name of the service
wrapper.ntservice.displayname=OpenNMS JSVC Service
# Description of the service
wrapper.ntservice.description=OpenNMS JSVC Service
# Service dependencies. Add dependencies as needed starting from 1
wrapper.ntservice.dependency.1=pgsql-8.2
# Mode in which the service is installed.
wrapper.ntservice.starttype=AUTO_START
AUTO_START or DEMAND_START
# Allow the service to interact with the desktop.
wrapper.ntservice.interactive=false
E.3
SCG SMS Extension API
61
SCG OpenNMS SMS
Extension API
Group 4
Copyright 2008
Package
scg.opennms.sms
Page 2 of 15
scg.opennms.sms.Send
scg.opennms.sms
Class Send
java.lang.Object
|
+-scg.opennms.sms.Send
public class Send
extends java.lang.Object
The Send class sends a HTTP POST request to the pats.no SMS web service. This class was used mainly
for testing purposes. The SMSNotificationStrategy class should be used for sending SMS messages
through a Parlay X web service.
Author:
Jose, Vegar
Constructor Summary
public
Send()
Method Summary
static void
main(java.lang.String[] args)
The main method
int
send(java.util.List list)
Methods inherited from class java.lang.Object
clone, equals, finalize, getClass, hashCode, notify, notifyAll, registerNatives,
toString, wait, wait, wait
Constructors
Send
public Send()
Methods
main
public static void main(java.lang.String[] args)
The main method
Parameters:
args - An array that contains the necessary parametres to send an sms. Usage: send
Page 3 of 15
scg.opennms.sms.Send
(continued from last page)
send
public int send(java.util.List list)
Parameters:
list - The list of arguments configured in the notificationCommands.xml file. This method
assumes a particular ordering of the list.
Page 4 of 15
scg.opennms.sms.SMSNotificationConfig
scg.opennms.sms
Class SMSNotificationConfig
java.lang.Object
|
+-scg.opennms.sms.SMSNotificationConfig
public class SMSNotificationConfig
extends java.lang.Object
Convenience class for reading the sms.properties file
Author:
vegar
Field Summary
public static final
CONFIG_PROPERTY_CODEWORD
Value: scg.opennms.sms.codeword
public static final
CONFIG_PROPERTY_LARGEACC
Value: scg.opennms.sms.largeaccount
public static final
CONFIG_PROPERTY_PASSWORD
Value: scg.opennms.sms.password
public static final
CONFIG_PROPERTY_POLLINTERVAL
Value: scg.opennms.sms.pollintervalmillis
public static final
CONFIG_PROPERTY_RECVURL
Value: scg.opennms.sms.recvurl
public static final
CONFIG_PROPERTY_SENDURL
Value: scg.opennms.sms.sendurl
public static final
CONFIG_PROPERTY_USERNAME
Value: scg.opennms.sms.username
private static
inited
private static
properties
Constructor Summary
public
SMSNotificationConfig()
Method Summary
static
java.lang.String
getProperty(java.lang.String key)
Page 5 of 15
scg.opennms.sms.SMSNotificationConfig
static void
initSMSNotificationConfig()
Reads the sms.properties file
Methods inherited from class java.lang.Object
clone, equals, finalize, getClass, hashCode, notify, notifyAll, registerNatives,
toString, wait, wait, wait
Fields
CONFIG_PROPERTY_USERNAME
public static final java.lang.String CONFIG_PROPERTY_USERNAME
Constant value: scg.opennms.sms.username
CONFIG_PROPERTY_PASSWORD
public static final java.lang.String CONFIG_PROPERTY_PASSWORD
Constant value: scg.opennms.sms.password
CONFIG_PROPERTY_CODEWORD
public static final java.lang.String CONFIG_PROPERTY_CODEWORD
Constant value: scg.opennms.sms.codeword
CONFIG_PROPERTY_POLLINTERVAL
public static final java.lang.String CONFIG_PROPERTY_POLLINTERVAL
Constant value: scg.opennms.sms.pollintervalmillis
CONFIG_PROPERTY_LARGEACC
public static final java.lang.String CONFIG_PROPERTY_LARGEACC
Constant value: scg.opennms.sms.largeaccount
CONFIG_PROPERTY_SENDURL
public static final java.lang.String CONFIG_PROPERTY_SENDURL
Constant value: scg.opennms.sms.sendurl
CONFIG_PROPERTY_RECVURL
public static final java.lang.String CONFIG_PROPERTY_RECVURL
Page 6 of 15
scg.opennms.sms.SMSNotificationConfig
(continued from last page)
Constant value: scg.opennms.sms.recvurl
properties
private static java.util.Properties properties
inited
private static boolean inited
Constructors
SMSNotificationConfig
public SMSNotificationConfig()
Methods
getProperty
public static java.lang.String getProperty(java.lang.String key)
Parameters:
key
Returns:
Returns the property either from the sms.properties file if it exists, from System.getProperty
otherwise
initSMSNotificationConfig
private static void initSMSNotificationConfig()
Reads the sms.properties file
Page 7 of 15
scg.opennms.sms.SMSNotificationService
scg.opennms.sms
Class SMSNotificationService
java.lang.Object
|
+-AbstractServiceDaemon
|
+-scg.opennms.sms.SMSNotificationService
All Implemented Interfaces:
java.lang.Runnable
public class SMSNotificationService
extends AbstractServiceDaemon
implements java.lang.Runnable
The SMSNotificationService class runs in its own thread when started. The thread polls a Parlay X web
service for text messages given a specific codeword. All text messages received are parsed for a
notification ID, which is then updated as acknowledged in OpenNMS.
The following system properties must be set before initializing(calling the init() method) this service:
The username to the Parlay X service
scg.opennms.sms.username
The password to the Parlay X service
scg.opennms.sms.password
The codeword which prefixes polled SMS messages
scg.opennms.sms.codeword
The interval in milliseconds to poll the web service
scg.opennms.sms.pollintervalmillis
The number the SMS messages are to be shown as sent from
scg.opennms.sms.largeaccount
The URL to the Parlay X SMS Send service
scg.opennms.sms.sendurl
The URL to the Parlay X SMS Receive service
scg.opennms.sms.recvurl
Author:
Vegar ([email protected])
Field Summary
private
codeword
private
initSuccess
private static final
m_singleton
Page 8 of 15
private
password
private
pollIntervalMillis
private
rs
private
stopReception
scg.opennms.sms.SMSNotificationService
private
thread
private
UPDATE_NOTIFICATION_STATUS
private
username
Constructor Summary
public
SMSNotificationService()
Method Summary
SmsMessage[]
fetchMessages(java.lang.String codeword)
Fetches the SMS text messages received by the Parlay X web service
since last fetch.
static
SMSNotificationServic
e
static void
getInstance()
main(java.lang.String[] args)
Main method for testing purposes.
void
onInit()
This method is called when the service is initalized, i.e the init() method
is called.
void
onStart()
This method is called when the service is started.
void
onStop()
This method gets called when the service is stopped, i.e stop() is called.
java.lang.String
parseNotificationId(java.lang.String message)
Parses the notification identificator from the SMS text message.
void
processMessages(SmsMessage[] messages)
Processes the SMS text messages and updates the status of the
notification to acknowledged.
void
run()
This method is called by the thread which gets spawned after the service
is started.
Methods inherited from class java.lang.Object
clone, equals, finalize, getClass, hashCode, notify, notifyAll, registerNatives,
toString, wait, wait, wait
Methods inherited from interface java.lang.Runnable
run
Fields
Page 9 of 15
scg.opennms.sms.SMSNotificationService
(continued from last page)
UPDATE_NOTIFICATION_STATUS
private java.lang.String UPDATE_NOTIFICATION_STATUS
stopReception
private boolean stopReception
initSuccess
private boolean initSuccess
username
private java.lang.String username
password
private java.lang.String password
codeword
private java.lang.String codeword
m_singleton
private static final scg.opennms.sms.SMSNotificationService m_singleton
thread
private java.lang.Thread thread
rs
private scg.opennms.sms.receive.ReceiveSms rs
pollIntervalMillis
private long pollIntervalMillis
Page 10 of 15
scg.opennms.sms.SMSNotificationService
(continued from last page)
Constructors
SMSNotificationService
public SMSNotificationService()
Methods
onInit
public void onInit()
This method is called when the service is initalized, i.e the init() method is called. Note that the
following system properties must be set before the service is initalized:
scg.opennms.sms.username
scg.opennms.sms.password
scg.opennms.sms.codeword
scg.opennms.sms.pollintervalmillis
scg.opennms.sms.largeaccount
onStart
public void onStart()
This method is called when the service is started. When started, a new thread is spawned to poll
the Parlay X web service for SMS text messages.
onStop
public void onStop()
This method gets called when the service is stopped, i.e stop() is called. The polling thread will be
stopped.
run
public void run()
This method is called by the thread which gets spawned after the service is started. Normally, one
would not call this method directly from another class.
fetchMessages
private SmsMessage[] fetchMessages(java.lang.String codeword)
throws PolicyException,
ServiceException,
java.rmi.RemoteException
Fetches the SMS text messages received by the Parlay X web service since last fetch.
Parameters:
codeword - The codeword prefix in the SMS text message
Returns:
An array of SMS text messages.
Page 11 of 15
scg.opennms.sms.SMSNotificationService
(continued from last page)
Throws:
PolicyException
scg.opennms.sms.common.ServiceException
RemoteException
processMessages
private void processMessages(SmsMessage[] messages)
Processes the SMS text messages and updates the status of the notification to acknowledged. The
senders phone number is also recorded.
Parameters:
messages - An array of SMS messages.
parseNotificationId
private java.lang.String parseNotificationId(java.lang.String message)
Parses the notification identificator from the SMS text message.
Parameters:
message - String containing the SMS text message
Returns:
A string containing the notification identificator, if no notification identificator is found, null is
returned.
getInstance
public static SMSNotificationService getInstance()
Returns:
The SMSNotificationService singleton
main
public static void main(java.lang.String[] args)
throws ServiceException
Main method for testing purposes.
Parameters:
args
Throws:
ServiceException
Page 12 of 15
scg.opennms.sms.SMSNotificationStrategy
scg.opennms.sms
Class SMSNotificationStrategy
java.lang.Object
|
+-scg.opennms.sms.SMSNotificationStrategy
public class SMSNotificationStrategy
extends java.lang.Object
This class implements a NotificationStrategy for sending notifications through a Parlay X SMS web
service, enabling an OpenNMS server to send SMS notifications.
To configure the use of this NotificationStrategy, modify the notificationCommands.xml file. The
following is an example command element, configuring the use of this class:
<command binary="false">
<name>mobilePhoneSMS</name>
<!-- This can refer to either a class in the classpath or a command line executable ->
<execute>scg.opennms.sms.SMSNotificationStrategy</execute>
<comment>for sending GSM messages (SMS)</comment>
<!-- Destination parameter, numerical pin in user account -->
<argument streamed="false">
<switch>-np</switch>
</argument>
<!-- Message parameter, -tm == text message -->
<argument streamed="false">
<switch>-tm</switch>
</argument>
</command>
Author:
vegar ( [email protected] )
Constructor Summary
public
SMSNotificationStrategy()
Method Summary
Category
static void
log()
main(java.lang.String[] args)
Main method for testing purposes or for command line SMS sending
int
send(java.util.List list)
Sends an SMS text message through a Parlay X web service.
Methods inherited from class java.lang.Object
Page 13 of 15
Index
clone, equals, finalize, getClass, hashCode, notify, notifyAll, registerNatives,
toString, wait, wait, wait
Constructors
SMSNotificationStrategy
public SMSNotificationStrategy()
Methods
main
public static void main(java.lang.String[] args)
Main method for testing purposes or for command line SMS sending
Parameters:
args - First argument must be phone number, second must be text message
log
private Category log()
send
public int send(java.util.List list)
Sends an SMS text message through a Parlay X web service. The method uses the following
arguments:
NotificationManager.PARAM_NUM_PAGER_PIN ( "-np" )
NotificationManager.PARAM_TEXT_MSG ( "-tm" )
Page 14 of 15
Index
Index
C
parseNotificationId 12
password 10
pollIntervalMillis 10
processMessages 12
codeword 10
properties 7
CONFIG_PROPERTY_CODEWORD 6
CONFIG_PROPERTY_LARGEACC 6
R
CONFIG_PROPERTY_PASSWORD 6
CONFIG_PROPERTY_POLLINTERVAL 6
rs 10
CONFIG_PROPERTY_RECVURL 6
run 11
CONFIG_PROPERTY_SENDURL 6
CONFIG_PROPERTY_USERNAME 6
S
F
Send 3
send 3, 14
fetchMessages 11
SMSNotificationConfig 7
SMSNotificationService 11
G
SMSNotificationStrategy 14
stopReception 10
getInstance 12
getProperty 7
T
I
thread 10
inited 7
U
initSMSNotificationConfig 7
initSuccess 10
UPDATE_NOTIFICATION_STATUS 9
username 10
L
log 14
M
m_singleton 10
main 3, 12, 14
O
onInit 11
onStart 11
onStop 11
P
Page 15 of 15
Glossary
A
Apache Tiles (Tiles) Templating framework built to simplify the development of web application user interfaces. Tiles allows authors to define page fragments which can
be assembled into a complete page at runtime. These templates streamline the development of a consistent look and feel across an entire application. Tiles grew in
popularity as a component of the popular Struts framework. It has since been extracted from Struts and is now integrated with various frameworks, such as Struts 2
and Shale., p. 95.
D
Domain Name System (DNS) A hierarchical naming system for devices connected to the
Internet., p. 92.
Dynamic Host Configuration Protocol (DHCP) A protocol that allows devices connected
to a network to receive networking parameters from a server on the network., p. 90.
E
Eclipse
Software platform comprising extensible application frameworks, tools and a runtime library for software development and management. It is written primarily in
Java to provide software developers and administrators an integrated development
environment (IDE)., p. 95.
Extensible Markup Language (XML) a general-purpose specification for creating custom
markup languages., p. 139.
G
GNU General Public License (GPL) A widely used, free software license., p. 80.
77
GLOSSARY
H
HyperText Markup Language (HTML) The predominant language used for writing web
pages., p. 80.
I
Integrated Development Environment (IDE) A software application with several facilities that are intended to make software development easier and more effective., p. 80.
Internet Protocol (IP) Protocol used for communicating data across a packet-switched internetwork using the Internet Protocol Suite (TCP/IP). It is the primary protocol in the
Internet Layer of the Internet Protocol Suite and has the task of delivering datagrams
(packets) from the source host to the destination host solely based on its address.,
p. 51.
J
Java
A software platform and a programming language for writing cross platform software., p. 80.
Java Management Extensions (JMX) A Java technology that supplies tools for managing and monitoring applications, system objects, devices (e.g. printers) and service
oriented networks. Those resources are represented by objects called MBeans (for
Managed Bean). In the API, classes can be dynamically loaded and instantiated.
Managing and monitoring applications can be designed and developed by Java Dynamic Management Kit., p. 46.
Java Native Interface (JNI) Programming framework that allows Java code running in the
Java virtual machine (JVM) to call and be called by native applications (programs
specific to a hardware and operating system platform) and libraries written in other
languages, such as C, C++ and assembly., p. 54.
Java Server Pages (JSP) Java server pages is a technology that is used to create dynamic
web pages, using a java like syntax. It is often used to process and present data
fetched from java programs., p. 80.
Java Virtual Machine (JVM) A platform on which Java programs are executed., p. 80.
Javadoc A documentation generator from Sun Microsystems for generating API documentation in HTML format from Java source code. In addition it is the industry standard
for documenting Java classes., p. 67.
Jetty
Jetty is a 100open source project under the Apache 2.0 License. It is used by several other popular projects including the JBoss and Geronimo application servers. Its
78
GLOSSARY
small size makes it suitable for providing web services in an embedded Java application., p. 88.
M
Model-view-controller (MVC) Is a user interface design pattern, based on splitting the functionality required to modify or view stored data via a graphical user interface into
three parts: The model, the view and the controller. The model represents the data,
the view handles drawing the graphical elements of the user interface, while the controller makes sure the users interaction with the view is reflected in the model., p. 89.
N
Network Address Translation (NAT) Process of modifying network address information
in datagram packet headers while in transit across a traffic routing device for the
purpose of remapping a given address space into another., p. 60.
node
In communication networks, a node is an active electronic device that is attached to
a network, and is capable of sending, receiving, or forwarding information over a
communications channel. A node is a connection point, either a redistribution point
or a communication endpoint (some terminal equipment). It may either be a data
circuit-terminating equipment (DCE) such as a modem, hub, bridge or switch; or a
data terminal equipment (DTE) such as a digital telephone handset, a printer or a
host computer, for example a router, a workstation or a server., p. 55.
P
Portable Document Format (PDF) A document file format created by Adobe Systems,
p. 91.
PostgreSQL PostgreSQL is an object-relational database management system (ORDBMS).
It is released under a BSD-style license and is thus free software., p. 103.
R
Redundant Array of Inexpensive Disks (RAID) Technology that employs the simultaneous use of two or more hard disk drives to achieve greater levels of performance,
reliability, and/or larger data volume sizes., p. 52.
S
scrum
A model for the process of developing software. It is one of the agile methods, used
to better cope with short deadlines and dynamic requirements., p. 5.
79
GLOSSARY
Servile Level Agreement (SLA) Part of a service contract where the level of service is formally defined, usually refered to the contracted delivery time (of the service) or performance., p. 122.
Short Message Service (SMS) Communications protocol that allows the interchange of
short text messages between mobile telephone devices. SMS as used on modern
handsets was originally defined as part of the GSM series of standards in 1985 as a
means of sending messages of up to 160 characters (including spaces), to and from
GSM mobile handsets., p. 55.
Simple Network Management Protocol (SNMP) Forms part of the internet protocol suite
as defined by the Internet Engineering Task Force (IETF). SNMP is used in network
management systems to monitor network-attached devices for conditions that warrant administrative attention. It consists of a set of standards for network management, including an Application Layer protocol, a database schema, and a set of data
objects., p. 44.
Spring
Open source application framework for the Java platform. Although the Spring
Framework does not enforce any specific programming model, it has become popular in the Java community as an alternative, replacement, or even addition to the
Enterprise JavaBean (EJB) model. By design, the framework offers a lot of freedom to Java developers yet provides well documented and easy-to-use solutions for
common practices in the industry., p. 95.
Subversion (svn) A version control system that allows several concurrent writers to edit the
same files, such as source code or text documents., p. 80.
U
Unified Modeling Language (UML) The Unified Modeling Language (UML) is a collection of diagrams used for describing software systems., p. 81.
Uninterruptible Power Supply (UPS) Device which maintains a continuous supply of electric power to connected equipment by supplying power from a separate source when
utility power is not available. It differs from an auxiliary power supply or standby
generator, which does not provide instant protection from a momentary power interruption., p. 64.
80
References
[- O08]
Frappr Maps - OpenNMS. Map of opennms users. http://www.frappr.com/
opennms, 2008.
[Ano08a] Anonymous. Agile software development. http://en.wikipedia.org/
wiki/Agile_software_development, 2008.
[Ano08b] Anonymous.
Comparison of integrated development environments.
http://en.wikipedia.org/wiki/Comparison_of_integrated_
development_environments#Java, 2008.
[Ano08c] Anonymous.
Comparison of network monitoring systems.
http://en.
wikipedia.org/wiki/Network_monitoring_comparison, 2008.
[Ano08d] Anonymous. Simple network management protocol. http://en.wikipedia.
org/wiki/SNMP, 2008.
[BG06]
R installation guide.
Tarus Balog and DJ Gregor. Opennms
http://www.
opennms.org/documentation/installguide.html, 2006.
[Cor08]
Microsoft Corporation.
Supported versions (windows).
http://msdn.
microsoft.com/en-us/library/aa379141(VS.85).aspxs, 2008.
[For96]
Internet Engineering Task Force. Address allocation for private internets. http:
//tools.ietf.org/html/rfc1918, 1996.
[Fou08]
Apache Software Foundation. Axis soap implementation. http://ws.apache.
org/axis, 2008.
[Gro08]
The Cacti Group. Sites that use cacti. http://www.cacti.net/sites_
that_use_cacti.php, 2008.
[(IA08]
The Internet Assigned Numbers Authority (IANA). Private enterprise numbers.
http://www.iana.org/assignments/enterprise-numbers, 2008.
[iee98a]
Ieee recommended practice for software design descriptions. IEEE Std 1016-1998,
pages 3–9, Dec 1998.
81
REFERENCES
[iee98b]
Ieee recommended practice for software requirements specifications. IEEE Std 8301998, pages –, Oct 1998.
[iee98c]
Ieee standard for software test documentation. IEEE Std 829-1998, pages –, Sep
1998.
[Inc08]
Zenoss Inc.
2008.
[Int91]
International Standards Organisation (ISO). International standard ISO/IEC 9126.
information technology: Software product evaluation: Quality characteristics and
guidelines for their use, 1991.
Zenoss’ customers.
http://www.zenoss.com/customers,
[KMI+ 04] S. Kusumoto, F. Matukawa, K. Inoue, S. Hanabusa, and Y. Maegawa. Estimating
effort by use case points: method, tool and case study. Software Metrics, 2004.
Proceedings. 10th International Symposium on, pages 292–299, Sept. 2004.
[Nag08]
LLC Nagios Enterprises. Nagios: User profiles. http://www.nagios.org/
userprofiles, 2008.
[Roy70]
Winston W. Royce. Managing the development of large software systems: concepts
and techniques. In Proc. IEEE WESTCON. IEEE Computer Society Press, August
1970. Reprinted in Proc. ICSE 1989, ACM Press, pp. 328-338.
[SIA08]
Zabbix SIA. Zabbix partners. http://www.zabbix.com/partners.php,
2008.
[Sin02]
L. Sing. From black boxes to enterprises, Part 3: Hands-on JMX integration. http:
//www.ibm.com/developerworks/java/library/j-jmx3/, 2002.
[tPa07]
tPats. tpats. http://www.pats.no, 2007.
[Unk08]
Unknown. Compendium for tdt4290 customer driven project, July 2008.
[Wik06]
OpenNMS Wiki. Commercial opennms. http://www.opennms.org/index.
php/Commercial_OpenNMS, 2006.
[Wik08a] OpenNMS Wiki. Dashboard.
Dashboard, 2008.
http://www.opennms.org/index.php/
[Wik08b] OpenNMS Wiki.
Filters, 2008.
http://www.opennms.org/index.php/
Filters.
[Wik08c] OpenNMS Wiki. Hacking the webapp. http://www.opennms.org/index.
php/Hacking_the_webapp, 2008.
82
REFERENCES
[Wik08d] OpenNMS Wiki.
How to present data sources from n nodes.
http:
//www.opennms.org/index.php/How_to_present_data_sources_
from_n_Nodes, 2008.
[Wik08e] OpenNMS Wiki. Jetty. http://www.opennms.org/index.php/Jetty,
2008.
[Wik08f]
OpenNMS Wiki. Linkd. http://www.opennms.org/index.php/Linkd,
2008.
[Wik08g] OpenNMS Wiki. Maps. http://www.opennms.org/index.php/Maps_
In_Trunk, 2008.
[Wik08h] OpenNMS Wiki. Notification enhancement. http://www.opennms.org/
index.php/Notification_enhancement, 2008.
[Wik08i]
OpenNMS Wiki. Opennms faq - about. http://www.opennms.org/index.
php/FAQ-About, 2008.
[Wik08j]
OpenNMS Wiki. Opennms path outage howto. http://www.opennms.org/
index.php/Path_Outage_How-To, 2008.
[Wik08k] OpenNMS Wiki. Overview (opennms 1.5.97-testing-snapshot api). http://www.
opennms.org/documentation/java-apidocs-stable/, 2008.
[Wik08l]
OpenNMS Wiki.
Running opennms with a dedicated tomcat server.
http://www.opennms.org/index.php/Running_OpenNMS_with_a_
Dedicated_Tomcat_Server, 2008.
[Wik08m] OpenNMS Wiki.
2008.
User.
http://www.opennms.org/index.php/User,
83
REFERENCES
84
Bibliography
[1] Anonymous. Java (software platform). http://en.wikipedia.org/wiki/Java_
(Sun), 2008.
[2] E.J. Braude. Software Engineering: An Object-Oriented Perspective. John Wiley & Sons,
Inc. New York, NY, USA, 2000.
[3] M. Fowler. UML Distilled: A Brief Guide to the Standard Object Modeling Language.
Addison-Wesley Professional, 3rd edition, 2004.
[4] William Stallings. Snmpv3: A security enhancement to snmp. IEEE Communications Surveys and Tutorials, 1(1), 1998.
85