1
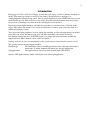
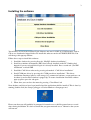
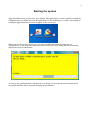
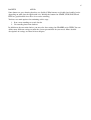
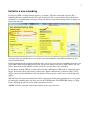
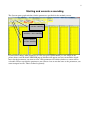
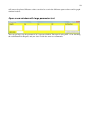
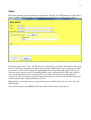
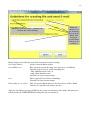
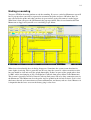
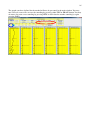
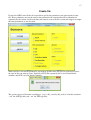
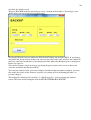
1
User Manual
Envi logger C1 & CS1
Version: R1B
Date: 2012-04-17
Innehåll
Introduction .......................................................................................................................................... 2
Installing the software .......................................................................................................................... 3
Starting the system ............................................................................................................................... 4
Initialize a new sounding ..................................................................................................................... 7
Starting and execute a sounding........................................................................................................... 8
Open a new window with large parameter text.............................................................................. 10
Notes .............................................................................................................................................. 11
Graph presentation settings ............................................................................................................ 12
Ending a sounding .............................................................................................................................. 14
Open and browse stored soundings .................................................................................................... 15
Create file ........................................................................................................................................... 17
System handling ................................................................................................................................. 19
2
Introduction
Envi logger C1/CS1 is a PC based logger system where all data is saved in a database installed on
the PC. Data from rig sensors are stored as raw values. If original data is analogue it is
sampled/digitalized before being stored. Data is stored continuously after START has been pressed
until STOP is pressed. This results in a very robust data collection mechanism where data can be
retrieved for a sounding at any time after the sounding has been executed.
Digital data from depth transducer and inductive transducer is transferred on a CAN bus to the
logger. This makes data transfer very secure and insensitive to noise; quite a lot better than in a
traditional analogue system.
You can specify what parameters to view during the sounding and also what parameters to include
in the files you create. Parameters you view can differ from what you include in the file.
File formats allowed this far is SGF/STD format or a simple tab separated format suitable for
import to Excel. (More formats can be added on request).
Settings made by the user are remembered by the system and used next time the system is used.
The system consists of two program modules:
EnviPackage
The foundation software handling transducer data collection and database
interaction. Is started automatically when you start the application.
CptApplication
The application to start if you want to work with CPT or SPT
Start the CPT application by double clicking the icon called CptApplication.
3
Installing the software
You will have received the installer for the database and drivers either on a USB memory stick or
CD or as a downloaded zipped folder. To install this software run the AUTORUN.EXE file. You
will then get this pop up window:
Follow these steps to install this software:
1. Install the database by pressing first tab, “MySQL database installation”.
2. Install java runtime environment (JRE) if not already installed on the PC. Nothing bad
happens if you try to install this despite it is already installed. Press second tab “java JRE
installation” to install JRE
3. Install the CAN driver software by pressing tab marked “CAN driver installation”
4. Install COM port driver by pressing tab “COM port driver installation”. This driver
installation sometimes behaves a bit strange (it is commercial software so not much we can
do about it) and no DOS window is popped up. To ensure installation if no DOS window
pops up please press the tab again
5. When done you can close the menu by pressing “Close Menu” tab
Now database and drivers have been installed and the application shall be installed. This is done by
running (double click) the Setup-CptLogger-<Version number>-<Language>.msi.
Please note that you will probably be prompted if network access shall be granted one or several
times during installation. It is then essential that you grant network access. Otherwise the system
will not run.
4
Starting the system
After installation icons are placed on your desktop. The application is started by double clicking the
CPTapplication icon. When you start the application (2) the enviPackage (1) will be started prior to
starting the application and an icon will appear in the system tray.
1
2
When you start the system all processes are started and the application and database are
synchronized etc. This may take some time and you will have a wait dialog that will be showing
until this has been accomplished:
As soon as the synchronization is finished the wait dialog is closed and the main window opens.
Any problem/failure will be reported through pop-up-windows.
5
The main window looks like below.
Change
settings
Start a new
sounding
Open graph
window for
dissipation test
System
management
Download data
from probe.Used
when first attempt
failsfor some
reason
Select
parametersto
show during
sounding
Fetch sounding
datafor
executed
Add a note
Get probe
zero values
Please note that the leftmost button has a blue frame. This is since this button currently has focus
and will be pushed if you have a keyboard and press Return or Space depending on your computer
setup. To change button focus you use the TAB key (see below).
When you press this key focus will move from one button to another in a predefined manner. After
pushing it enough times you will have passed all focusable objects and you are back to having focus
on the NEW button.
There are also keyboard commands for pressing almost all buttons. One letter in the name of each
button is underlined. The underlined character is the keyboard command key for pressing it. To use
the keyboard command you press ALT + <the underlined character>. So to press the NEW button
using keyboard commands you press ALT+N.
This is a complete list of available keyboard commands in main window:
NEW
ALT+N
START
ALT+S
PAUSE
ALT+P
STOP
ALT+T
SETTINGS
ALT+I
VIEW
ALT+V
SCROLL
ALR+C
NOTE
ALT+O
DATA
ALT+D
FILE
ALT+F
ERASE
ALT+R
6
BACKUP
ALT+B
Some button are gray showing that they are disabled. What buttons are disabled and enabled varies
depending on what state the application is in. Initially the buttons for START, STOP, PAUSE and
FILE are gray/disabled since there is no active sounding.
You have two main options for continuing at this stage::
1. Start a new sounding to record data for
2. Get sounding data from database
In addition to the two main choices you may also alter settings for GRAPHS or for USER. You can
define many different settings to make the system personalized for your needs. More detailed
descriptions of settings are found in later chapters.
7
Initialize a new sounding
If you press NEW a dialog window appears (see below). You must enter both a project ID, a
Sounding ID and a method in order to be able to proceed. The system will then detect if the three
parameters as a combination are unique. If not you will be requested to change name or approve to
replace the old data.
Method to use.
All other fields are optional to use. As of now you must manually enter GPS coordinates if you
want to include those.
Fields are automatically populated with the same data as was used for latest sounding next time you
press NEW. After having changed the fields you need to change you press SAVE (Alt+S) and you
will be back in the main window and the system is ready for start a new sounding.
If you choose method CPT the system will verify that a Memocone CPT probe is connected to the
logger. If not you will be requested to connect one. When a Memocone is connected the C1/CS1
logger system and the Memocone will synchronize. This may take a while and a wait dialog will
appear.
NB: The first time you use method you will be requested to define what parameters to view graphs
for during the sounding after you have pressed the SAVE button. The SENSORS dialog (see page
below) will pop up and ask you to define parameters to view.
ABORT will take you back to the main window in the state you left it.
8
Starting and execute a sounding
The System opens graph windows for the parameters specified for the method you use.
Press START to
start the sounding
Press NEW to
initialize a new sounding
Press STOP to
end the sounding
If you want to change what parameters to view you press VIEW button (see red ellipse in the
picture above) and the below SENSOR pop-up window will appear and you can mark the checkboxes for the parameters you want to view. Only parameters for which you have a sensor will be
selectable. Please note that the parameters you want to view are not the same as the parameters you
want to output in a file. That is defined separately.
9
In order to start a sounding you press START. You will then have a pop-up (see below) where you
can set start depth for the sounding you will execute.
You can change start
levelby rolling the
wheels hereor you
can enter the
depthin cm directly
in the text box
You save the start depth by pressing SAVE (keyboard command ALT+S). If you press ABORT no
sounding will be started and you will return to the main window in the state you left it.
The system now starts to read and store sensor data. As soon as you have a change in depth graphs
10
will start to be plotted. Measure values can also be seen in the different squares above and in graph
window headers.
Open a new window with large parameter text
You can get large text for parameters in a separate window. You open it using ALT + X or checking
the radio button for Expand, and you close it with the same two commands.
11
Notes
During the sounding you can add notes in your graphs. You press the NOTE button (see blue ellipse
above). A dialog window will then appear allowing you to add notes according to your choice.
In the drop-down menu ”Code” all SGF note codes and notes are available. The Depth text box will
hold the value of the depth that was when you pressed the NOTE button. You can change the depth
if you want to. You can also change the depth graphically in the plotted graphs later on if desired.
You can create your own codes by using the numbers not yet occupied by the SGF codes. All free
codes can be found in the New Code panel. These personal codes will be remembered by the
system. You can also add free text notes. Simply write whatever you like in the NOTE text box and
it will be added to the sounding with note code “0”.
When you have entered the note you want to add you press SAVE (Alt+S) to save it and close the
NOTE dialog.
You can abort by pressing ABORT and no note will be added and the dialog closed.
12
Graph presentation settings
To change settings for graph drawing (like scaling of coordinate axises) you press the SETTINGS
button in the GRAPHS panel in the main window.
Here you can define settings for
collection of dissipation data and
behavior of dissipation data windows
when depths changes
Select soil type
classification method
Here you can change looks of
plot lines, note squares etc.
Presentation mode for notes
Set an offset value
for Fs as
compared to Qc
Get a dialog for setting
rules for file creation and
Emailing
To save your settings and close the GRAPH SETTINGS dialog you press SAVE (Alt+S). To abort
and not save anything press ABORT (ALT+A). Some settings will change immediately and show in
the graph drawing but they will not be stored and remembered until you press SAVE.
If you want the system to determine soil type based on Qc and Fs according to Robertson
Campanella 86 you select that radio button. To get no soil type classification you select None as
classification method.
Note can be presented in three different ways:
• As only a red square showing where the note has been posted. Select the slightly misleading
Invisible radio button to get this presentation
• A red square + note code (according to SGF system). Select the Code radio button to get
this presentation
• A red square + note code + note text. Select the Code + Text radio button to get this
presentation
You can force the system to offset the Fs value so Fs measurement is on the same level as Qc, thus
removing the existing physical offset between the two.
13
If you press File & Email the you will have a dialog for specifying settings for this.
Mark this check box to getautomatic file
creation after each sounding
Mark this
check box to
get automatic
file transfer by
Email. You
must also
specify Email
settings in the
text boxes
Email settings can be found in your mail client under Account settings.
Your Email address
specify your own Email address
Your SMTP server
Here you must specify the smtp server you use to send Emails.
Typically such a server is called something like:
“smtp.<Mail Provider>.com” or
“smtp.<Your Domain>.com”.
You find it in you account settings
Port
This is typically 25 or 2525 or something.
You find it in you account settings
Email addresses to send to
Here you specify Email addresses for all receivers of files. Email
addresses are specified one address per line
After you are finished you press SAVE for the system to remember your settings. You then press
SAVE also the the USER SETTINGS dialog that you are returned to.
14
Ending a sounding
You press STOP in the main window to end the sounding. If you use a wireless Memocone you will
have a pop-up where you will be requested to reconnect the probe and press OK when done. So
now you retract the probe and when you have it up on surface again you connect it to the logger.
When that is done you press the OK button in the pop-up window. Data is now downloaded from
Memocone to logger and you will see a wait dialog as per below.
When data is downloaded the wait dialog disappears. Sometimes the system warns that data for
some depths is missing. This is generally not an issue since the system is a bit oversensitive to this,
but you should be alert and study the graphs thoroughly. If there are parts of the graphs where data
is 100% stable (not changing at all) you might have suffered from power failure in the Memocone.
This in turn is generally caused by batteries with too little power left or by dirty connection areas in
the Memocone. The Memocone uses the probe itself as ground in the electrical circuit. So it is vital
that battery threads and connection area between Memocone and battery tube are clean. Moreover it
is important that the brass screw on the battery plug is also clean.
15
Open and browse stored soundings
You press DATA button in the main window to open the dialog for selecting a sounding for which
you want to browse data. The dialog now shown gives you the option to pick one of the latest 20
executed sounding (see blue ellipse below) or you can search/filter out the sounding you want to
view by filtering from date and project ID (see red ellipse) and pressing respective button to the
right. The soundings corresponding to your selection criteria will be available in the RETRIEVED
PROBINGS drop down menu.
When you have found the sounding you want to browse in either retrieved probings OR in latest
20 you select the sounding you want to browse and press OPEN SELECTED PROBING. The data
for that sounding is then fetched from database and will be presented as graphs in the main window.
The final depth for the sounding you have fetched is presented in the Depth text box (see blue
ellipse below). The name of the sounding (project id, sounding id and method) are all presented in
the text boxes marked by the red ellipse below.
16
The graphs you have defined for the method will now be presented in the main window. You may
now select to create a file or erase the sounding by pressing either FILE or ERASE button. You may
of course also start a new sounding by pressing NEW or fetch data for another sounding by again
pressing DATA
17
Create file
If you select FILE you will first be requested to specify the parameters you want to print in your
file. These parameters are not the same as the parameters for viewing and will be remembered
separately by the system. So the next time you want to create a file the system will suggest to output
the same parameters as was last used.
When you have selected the parameters you want to include in the file you are requested to select
the type of file you want to create. Typically a TXT (Tab separated) file is used in non Nordic
countries and SGF is used in Nordic countries.
The system suggest a file name according to: ”project ID_sounding ID_method” with the extension
“.std” for SGF type files and “.txt” for TXT type files.
18
When you have specified file type to create you can also specify where to place the file in a typical
save file window as per below (my desktop is in Swedish as you can see but the principle is pretty
evident anyway):
If you accept the file name given by the system you can simply navigate to the folder where you
want to place the file and press Save button. If you want to change the file name you can simply
write whatever name you want to use.
19
System handling
You can update software, create a database backup, erase soundings etc by pressing SYSTEM
button and selecting in the dialog that appears.
You create logfiles by pressing button CREATE ZIP LOGFILE. If the PC is connected to the logger
system both calibration-/System data and logfiles will be zipped into the zip logfile that the system
creates. If you are not connected to the logger system only the logfiles will be included in the zip
logfile. You can choose where to save the zip logfile when the file dialog appears.
If you get a new calibration file from Envi you can easily import new calibration settings into your
system by pressing button UPDATE CALIBRATION. Then select the calibration file in the file
dialog and the system will update calibrations.
The system can determine if there is a new software version available and also download it. You
simply press the DOWNLOAD NEW VERSION button then you place the zipped installation
folder on your desktop. You extract the msi file from it and place it on your desktop. Then you
double click it to install the new version. If you get any question about allowing things etc you must
always answer Yes and Allow, otherwise the system may not function properly.
To erase one or several soundings from the database you press ERASE.
To erase a single sounding you
select it from the Sounding menu
and then press ERASE. In that
menu soundings will appear with
the most recently created on the
top and then in chronological
order.
To erase all soundings made before
a certain date you define the last
date for which to remove
soundings and select the check
box. Then press ERASE and all
soundings made prior to the
20
specified date will be erased
You press BACKUP in the System dialog to create a backup of the database. You will get a new
dialog where you can specify rules for the backup.
You specify the dates between which you want to store backup data and press RUN. If you change
your mind and do not want to backup, you cancel by pressing on the cross and close the window. If
you have started the backup there is no turning back other than using Windows process manager to
kill the Java process.
You can also backup a single project by specifying the project name in the text area above and
select the check box and then press RUN.
To restore the database from a previous backup or load the backup on another computer, you must
first enable the restore of the database, open the user settings and set the Backup possible (see
previous chapter).
The backup file shall be placed in folder “C: / EnviLoggerG1 /” prior to starting the database
restore. The name of the backup file shall be ENVILOGGERG1BACKUP.ZIP