1
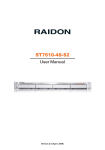
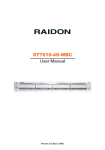
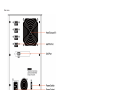
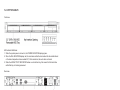
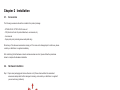
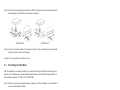
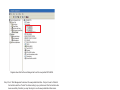
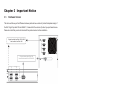
ST5650-4S-U5
ST7610-4S-U5
User Manual
Version : 1.1 (November, 2007)
Index
Chapter 1
1.1.
1.2.
Chapter 2
2.1.
2.2.
2.3.
Chapter 3
3.1.
Product Introduction................................................................................... 4
Product Features.................................................................................................... 4
Introduction to the Hardware.................................................................................. 4
Installation........................................................................................................ 7
Accessories............................................................................................................. 7
Hardware Installation.............................................................................................. 7
Formatting the Hard Drive...................................................................................... 8
Important Notice............................................................................................ 10
Hardware Version................................................................................................... 10
Chapter 1 Product Introduction
ST5650-4S-U5 / ST7610-4S-U5 systems utilize SAS (Serial Attached SCSI) technology to enable
simultaneous support of SAS and SATA hard drives. With this unit, you will be able to benefit from
the high system performance of SAS hard drives; or acquire cost-effective storage when using SATA
hard drives. The systems are also equipped with a removable hard drive tray that is compatible with
many other RAIDON product series that will bring convenience and efficiency when data sharing or
interchangeability is required.
1.1.
Product Features
•Simultaneous support of SAS and SATA hard drives
•Supports hot-swap of hard drives
1.2.
Introduction to the Hardware
1.2.1 ST5650-4S-U5
Tray Module Front View
Front view
LED Indicator Definitions:
1. When the system power is turned on, the POWER INDICATOR displays green.
2. When the FAIL INDICATOR displays red, this could mean either the heat exhaust fan has
malfunctioned or the device temperature has exceeded 55℃.
4
Product Introduction
Rear view
Product Introduction 5
1.2.2 ST7610-4S-U5
Front view
LED Indicator Definitions:
1. When the system power is turned on, the POWER INDICATOR displays green.
2. When the FAIL INDICATOR displays red, this could mean either the heat exhaust fan has malfunctioned
or the device temperature has exceeded 55℃. At the same time, the audio alarm will sound.
3. When the HDD ACTIVITY INDICATOR flashes on a hard drive tray, this means that the hard drive
within that tray slot is being accessed.
Rear view
6
Product Introduction
Chapter 2 Installation
2.1.
Accessories
The following accessories should be included in the product package:
•ST5650-4S-U5 / ST7610-4S-U5 main unit
•CD (Electronic format of product datasheet, user manual, etc.)
•User manual
•Spare parts pack (including screws and plastic key)
Should any of the above accessories be missing, or if the main unit is damaged prior to initial use, please
contact your distributor or supplier immediately.
After confirming that all hardware contents and accessories are intact, please follow the procedures
below to complete the hardware installation.
2.2.
Hardware Installation
Step 1 Open outer packaging and retrieve the main unit. (Please check whether the associated
accessories and product itself is damaged or missing, and contact your distributor or supplier if
you encounter any problems.)
Step 2 Mount the product to a stable surface or a rack. Make sure that the fan is not blocked and there
is appropriate space around for heat dissipation. (Do not place the product around environments
where it may cause danger to the product. Do not place product near water.)
Installation 7
Step 3 Take out the removable tray and mount your HDD to the tray with screws securely fastened to
avoid damages to the HDD from unnecessary movements.
ST5650-4S-U5
ST7610-4S-U5
Step 4 Connect the relevant cables to the relevant connectors. Then connect the power cord and flip
the power switch to power up the system.
Complete. You may initialize your system for use.
2.3.
Formatting the Hard Drive
After the hardware is successfully installed, you must first format the hard drive(s) before storing any
data into it. For Windows users, please follow the steps below to format the hard drive(s). Below is a
demonstration using four 3.5” SAS or a 3.5” SATA HDDs.
Step 1 After the computer has properly booted up, please go to “Device Manager”; you will be able to
see your newly added hard drive.
Diagram shows that the Device Manager has found the newly added SAS HDDs
8
Installation
Diagram shows that the Device Manager has found the newly added SATA HDDs
Step 2 Go to “Disk Management” and select the newly added hard drive. First you’ll need to “Initialize”
the hard drive and then “Format” the disk according to your preferences. After the hard drive has
been successfully formatted, you may then begin to use the newly added hard drive device.
Installation 9
Chapter 3 Important Notice
3.1.
Hardware Version
The notice will show you the difference between past and new version of product backplane design. If
the first 7 digit of product S/N are 8869611, it means that the version of product you purchased is new.
Please be noted that you should check with the product version before installation.
Original Available Hard Disk: SATA & SAS
New Available Hard Disk: SAS
Original Available Hard Disk: SAS
New Available Hard Disk: SATA & SAS

![Datasheet-SE1x00-ch [轉換].ai](http://vs1.manualzilla.com/store/data/005880953_1-483fad80bdf3a3090579fc760497bacf-150x150.png)