1
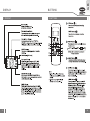
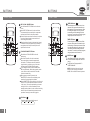
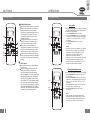
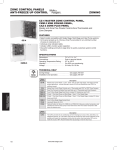
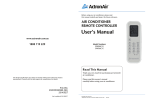
A/C REMOTE CONTROL
USER MANUAL
GB
F
E
AHI CARRIER S.E. EUROPE AIRCONDITIONING S.A.
18, KIFISOU AVENUE
10442 ATHENS, GREECE
TEL,; +30-210-6796300.
OWNER’S MANUAL
ENGLISH
MANUEL DE L’UTILISATEUR
MANUAL DEL USUARIO
I
D
NL
MANUALE DELL’UTENTE
ITALIANO
GEBRAUCHSANWEISUNG
DEUTSCH
BEDIENING
NEDERLANDS
GB
QUICK START
CONTENTS
ICK START
1. QUICK START
CONTENTS
Step 5
Quick Start
02
Display
Button
03
04
08
Operation
Step 4
Step 3
Step 6
SELECT MODE
FIT BATTERIES
[Auto/ Cool/ Dry/ Heat/ Fan]
Step
4
Step
1
SELECT TEMPERATURE
POINT REMOTE TOWARD UNIT
[17 OC~30 OC]
Step
2
Step
5
SELECT FAN SPEED
PRESS POWER BUTTON
Step
3
01
NOTE: The unit will operate on
default settings [24°C, Auto mode,
Auto fan speed].
[Auto/Low/ Med/ High]
Step
6
02
03
BUTTONS
2. DISPLAY
3. BUTTONS
GB
DISPLAY
04
BUTTONS
3. BUTTONS
3. BUTTONS
2
3
7
4
8
1
TIMER OFF Button (
2
3
7
4
8
FOLLOW ME / SMART EYE Button
5
10
10
6
11
6
Disable/Active FOLLOW ME function for
each press.
When the Follow Me function is activated,
the remote display is actual temperature at
its location. The remote control will send this
signal to the air conditioner every 3 minutes
until press the FOLLOW ME button again.
The Foll ow Me function is not available under
DRY and FAN mode. Switch the operation mode
or turn off the unit will cancel the Follow Me
function automatically.
When press more than 2 seconds, the
SMART EYE function will be activated, press
more than 2 seconds again to disable.
Under SMART EYE mode, with the built-in infrared
sensor, the unit can detects existence of humans
in the room. If the unit keep detecting no human
activity for 30 min, it will automatically enters
standby(monitor) status in order to save electricity.
And the unit will automatically start and resume
operation if sensing human activity again.
6
11
7
FAN Button (
)
Press this button to initiate the auto-off time
sequence. Each press will increase the autotimed setting in 30 minutes increments. When
the setting time displays 10, each press will
increase the auto-timed setting 60 minutes
increments. To cancel the auto-timed program,
simply adjust the auto-off time to 0.0
9
9
5
TIMER ON Button (
)
Press this button to initiate the auto-on time
sequence. Each press will increase the autotimed setting in 30 minutes increments. When
the setting time displays 10, each press will
increase the auto-timed setting 60 minutes
increments. To cancel the auto-timed program,
simply adjust the auto-on time to 0.0.
9
SLEEP Button (
)
Active/Disable sleep function. It can maintain
the most comfortable temperature and save
energy.
,,
For the ,detail, see ,,sleep operation in
USER S MANUAL.
,,
1
8
SELF CLEAN / IONIZER Button:
Active/Disable SELF CLEAN function for each
Press.
Under SELF CLEAN mode, the air conditioner
will automatically clean and dry the evaporator
and keep it as fresh for the next operation.
Press the button more than 2 seconds, the ionizer
function will be activated, press more than 2
seconds again to disable.
When the ionizer function is initiated, the Ionizer/
Plasma Dust Collector(depending on models) is
energized and will help to remove pollen and
impurities from the air.
,,
5
GB
BUTTONS
NOTE: While the unit is running under
SLEEP mode, it would be cancelled if
MODE, FAN or ON/OFF button is pressed.
)
Press tis button to select the fan speed:
AUTO LOW MED HIGH
05
06
GB
BUTTONS
OPERATION
3. BUTTONS
4. OPERATION
10
1
2
3
7
4
8
5
10
6
11
9
11
TURBO/SILENCE Button:
Active/Disable TURBO function for each press.
Turbo function enables the unit to reach the
preset temperature at cooling or heating
operation in the shortest time(if the indoor unit
does not support this function, there is no
corresponding operation happened when
pressing this button.)
Press the button more than 2 seconds, the
SILENCE function will be activated, press
it more than 2 seconds again to disable.
When silence function is activated, the
compressor will operate at low frequency and
the indoor unit will bring faint breeze, which
will reduce the noise to the lowest level and
create a quiet and comfortable room for you.
Due to low frequency operation of compressor,
it may result in insufficient cooling and heating
capacity.
LED/F.P. Button:
Press this button to clear or light the display on
the indoor unit.
During the heating operation(only when the
setting mode is HEAT), press this button
more than 2 seconds, the freeze protection
function is activated. The unit will operate at high
fan speed with the temperature automatically
set to 8OC(46OF).The display window of indoor
,,
unit will display FP . For the unit without display
area, the defrost indicator light will be keeping
on for 2 seconds, and then be off for 2 seconds
by turns. Press ON/OFF,SLEEP, F.P., MODE,
FAN SPEED, UP, DOWN button while operating
will cancel the freeze protection function.
Auto mode
Ensure the unit is plugged in and power is available.
The OPERATION indicator on the display panel of
the indoor unit starts flashing.
1. Press the MODE button to select Auto.
2. Press the UP/DOWN button to set the desired
temperature. The temperature can be set within
a range of 17 OC~30 OC(62 OF~88 OF) in 1 OC(2 OF)
increments.
3. Press the ON/OFFbutton to start the air
conditioner.
STEP 2
STEP 1
STEP 3
NOTE
1. In the Auto mode, the air conditioner can logically
choose the mode of Cooling, Fan, and Heating
by sensing the difference between the actual
ambient room temperature and the setting
temperature on the remote controller.
2. In the Auto mode, you can not switch the fan speed.
It has already been automatically controlled.
3. If the Auto mode is not comfortable for you , the
desired mode can be selected manually.
Cooling /Heating/Fan mode
STEP 2
STEP 1
STEP 4
STEP 3
Ensure the unit is plugged in and power is available.
1. Press the MODE button to select COOL, HEAT
or FAN mode.
2. Press the UP/DOWN buttons to set the desired
temperature. The temperature can be set within
a range of 17 OC~30 OC(62 OF~88 OF) in 1 OC(2 OF)
increments.
3. Press the FAN button to select the fan speed in
four steps- Auto, Low, Med,or High.
4. Press the ON/OFF button to start the air
conditioner.
,,
NOTE
In the FAN mode, the setting temperature is not
displayed in the remote controller and you are not
able to control the room temperature either. In this
case, only step 1, 3 and 4 may be performed.
07
08
OPERATION
4. OPERATION
4. OPERATION
Dry mode
STEP 2
STEP 1
STEP 3
Ensure the unit is plugged in and power is
available. The OPERATION indicator on the
display panel of the indoor unit starts flashing.
1. Press the MODE button to select DRY mode.
2. Press the UP/DOWN buttons to set the
desired temperature. The temperature
can be set within a range of 17 OC~30 OC
(62 OF~88 OF) in 1 OC(2 OF) increments.
3. Press the ON/OFF button to start the air
conditioner.
NOTE:
In the Dry mode, you can not switch the fan
speed. It has already been automatically
controlled.
Timer operation
GB
OPERATION
Timer OFF only
This function will allow the unit to stop automatically
at the set time. The timer can be set while the unit is
on or while it is off.
UNIT ON
-- Press the TIMER OFF
button to initiate the
auto--off time sequence. The set time is displayed
in the remote control display. Every time the
TIMER OFF button is pressed, the time will
increase by 30 minutes, up to 10 h. It will increase
by 60 minutes, afterwards, until the time settings
reach 24h.
-- When the TIMER OFF is set, the timer light on the
unit illuminates and the unit turns off automatically
at the set time.
UNIT OFF
-- Set the TIMER off as described in the UNIT ON
section.
-- The TIMER display on the unit illuminates and the
unit will remain off.
Timer ON only
Adjust the TIMER OFF settings to 0.0 to cancel this
option.
This function will allow the unit to start automatically
at the set time. The TIMER ON can be set while the
unit is on or off.
Timer ON and Timer OFF
UNIT ON
-- Press the TIMER ON
button to initiate the
auto-on time sequence. The set time is displayed
in the remote control display. Every time the
TIMER ON button is pressed, the time will
increase by 30 minutes, up to 10 h. It will
increase by 60 minutes, afterwards, until
the time setting reaches 24h.
-- When the TIMER ON is set, the TIMER light on
unit illuminates. The unit will continue to run at
the set time.
Use both functions to program the unit to turn on
and shut off the at specified times.
UNIT OFF
-- Set TIMER ON as previously described.
-- Set TIMER OFF as previously described.
-- The unit will start automatically at the set
TIM E ON and will turn off at the set TIME OFF.
UNIT ON
-- Set TIME OFF as previously described.
-- Set TIME ON as previously described.
-- The unit will turn off automatically at the set
TIME OFF and will turn on at the set TIME ON.
UNIT OFF
-- Set the timer described in the UNIT ON section.
-- The unit will start at the set time.
09
Adjust the TIMER ON settings to 0.0 to cancel this
option.
10