1
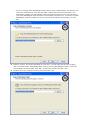
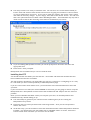
ManyStation: read this first Read this first This note answers tells you a bit about ManyStation and explains how to get up and running. Even if you know what ManyStation can do, please do not throw this note away – the second part contains the instructions for installing ManyStation. If you don’t follow these instructions then ManyStation will not work (and you will probably be unhappy and frustrated). This note is only a brief introduction to ManyStation. Further detail is contained in the user manual which you should get familiar with at the earliest opportunity if you are going to use ManyStation to its full potential. What is ManyStation? ManyStation is a sample based workstation synthesizer. That means: it is a synthesizer, so it can take raw waveforms and process them in a number of ways to change the sound and create new sounds it uses samples, so you can load samples for realistic playback of real instruments (and, of course, because it is a synthesizer too, you can manipulate those sounds) it comes with 1.5GB of high quality soundsets (ie groups of samples) including acoustic and electric instruments as well as classic synthesizers there are hundreds of presets, and there is a range of high quality effects units on board. In designing ManyStation the focus has been on detailed and highly playable sounds. Some of the real instrument soundsets include between 20 and 60 multi samples for stunning levels of detail, with special layers (such as slides, string noise and guitar palm mutes). ManyStation may be the only instrument you ever need for many of your tracks. How can I use ManyStation? You can use ManyStation in many ways – how you choose to use it is likely to be highly influenced by the particular project you are working on. At its most simple, you may use ManyStation as a preset machine. There are hundreds of patches already programmed (at the time of writing, ManyStation ships with over 700 patches). Alternatively, you may design your own patches using the waveforms supplied with ManyStation. If you’re feeling really ambitious, you can import your own waves and use them in ManyStation – either alone or in conjunction with the factory waveforms. Check out the user manual for further details. What do I do if it doesn’t work If you have any problems with ManyStation, or want to find out what’s going, then go to http://forum.manytone.com or you can click on the “forum” button in the Manytone website http://www.manytone.com. However, we do recommend you read this manual before you call for help. Alternatively, drop an email to [email protected] – you will generally find that you get a swifter response by using the forum. To start playing with ManyStation There are several ways to load up sounds in ManyStation. This note gives you one way – check out the user manual for details of other options. To load a new bank The ManyStation factory bank will load by default. If you want to use this, you need take no further action. If you want to load a new bank, click on the patch number (it says “bank” underneath this number as a reminder) as indicated in the graphic above. A dropdown menu of the available banks will display. Click on the bank you want to load. To load a new patch To load a new patch, you can either: click on the patch name (as indicated in the graphic): a dropdown menu will appear displaying all the patches in the currently loaded bank – click on the patch you want to load, or click on the nudge up and nudge down buttons (highlighted in red on the graphic) to audition each patch in turn. A warning about loading patches Some of the patches use several very large soundsets. Large soundsets can take a time to load, so please be patient. You should also ensure your machine has sufficient RAM to use ManyStation (check out the minimum specifications on the Manytone website). If you attempt to load a patch with soundsets that are larger than your RAM you may encounter a crash. Saving patches and banks For details of how to edit patches and then save patches and banks, please refer to the “Getting started” section of the ManyStation user manual. ManyStation factory banks ManyStation comes with a range of banks created by some brilliant and spectacularly talented sound designers. More banks are going to be added at a later stage and these will be made available. You will also notice that we have included some banks which are not yet full – we left the banks this way so that we feature the designer and his work rather than mix up all of the patches. Some of these partially filled banks will be added to as the sound designers get further into the synth and program some more gems for us. Installing ManyStation Warning: if you don’t follow these steps, ManyStation will not work. If ManyStation doesn’t work and you ask for help, then the first question that will be asked is “did you follow the installation instructions in the ‘read this first’ document?” If you already have a WusikEngine product installed ManyStation uses the WusikEngine. If you already have a WusikEngine based product running on your system (such as WusikStation), then the ManyStation data files need to be installed into your WusikStation (or WusikEngine as it will be) data folder. The installer program should find your WusikEngine data directory (which will be the data directory selected for your first installed WusikEngine product). The ManyStation DLLs and INI file may be installed in your VST directory (or in any other directory that is suitable for your host) – there is no requirement to put the ManyStation DLLs in the same folder as the data, nor is there a requirement to have all WusikEngine DLLs in the same folder (unless this is required by your host). Provided you are using WusikEngine version 1.1.02 or later for all installations of WusikEngine, you can move and rename the common data folder. When you next run each installation of WusikEngine you will then be asked to locate the data folder (see below). Installing ManyStation ManyStation comes in two parts: the VSTi (ie the program) – this file is installed by the file called “Manystation_VSTi.exe”, and the data – these files are installed by the file called “ManyStation_DATA.exe”. Both parts need to be installed before ManyStation will work properly. The data files are downloaded in 16 pieces – the installation file plus 15 .bin files (ManyStation_DATA-1a.bin to ManyStation_DATA-2e.bin – see the image to the right). Installing the data You should install the data files before you install the VSTi. The data files are downloaded as 16 separate files which all need to be present when the installer is run. To begin the data install, run the “ManyStation_DATA.exe” file (generally you would double click on the file to do this). The installer will put all the .bin files together as part of the installation process. The first screen that requires your input is the welcome screen confirming that you are running the ManyStation Data Setup Wizard. Click “next” and you will be presented with a license agreement – once you have decided that you do accept the license terms, click on the text that says “I accept the agreement” and then click the “next” button again. You will now have the option to select the destination for your data files. o You do not have to install the data to the same folder that the ManyStation VSTi will be installed if you do not want to (but you may). For instance, you may store all of your samples on a separate drive and this may be a better location for your data files. o If you are running other WusikEngine based products (such as Wusikstation), the directory you select here will determine where the uninstaller, readme and license files are located – the ManyStation installer will automatically install your ManyStation data in the same location as your other WusikEngine data irrespective of the location you select here. If you have no other WusikEngine products installed, all of your data will be installed to the directory you select here. Click on “browse” and choose the folder for your data – you will note that the setup program adds a sub folder called “ManyStation Data” (if this is the only WusikEngine product). Once the correct folder has been selected, click “OK”. Confirm the location and click “next”. Confirm where you want the shortcuts placed and click “next”. The setup wizard is now ready to install the data. You will now see a screen headed “Ready to install” which will confirm where the files and shortcuts are going to be installed. Take a moment or two to confirm these are correct. If you want to make any changes, click on the “back” button and make the necessary changes. If you’re happy, then click on the “install” button. You will note that I have placed the data in a folder called “WusikEngine Data”. This installation step may take a while since all of the bin files are being converted into the data files you will use. If you are loading ManyStation from CD, you will be prompted to insert the next CD at the appropriate time. Click “finish” when prompted. ManyStation data is installed and you can now load the VSTi. Installing the VSTi You should load the data before you load the VST – the installer will check that the data files have been loaded before the VSTi is installed. The VSTi should be installed to your VSTi folder, this may be c:\vstplugs or c:\steingberg\vst or it may be a sub-folder you have created specifically to hold ManyStation plugs. If you are unsure about which folder to use, you should refer to the documentation that came with your host. If your host does not run VSTis (for instance SONAR or Pro Tools) you are going to need to wrap the ManyStation VSTi. ManyStation has been tested with the Cakewalk VST adapter and runs without a problem. Once you have identified the folder where you will place your VSTi, run the ManyStation VSTi installation file (by double clicking on it): You will initially be greeted by the welcome screen confirming that you are running the ManyStation setup wizard. Click next and you will be presented with a license agreement – once you have accepted the license, click “next”. At this third step, you will be asked to select the destination location where ManyStation should be installed – you should select your VSTi folder that we identified earlier: to do this, click on the browse button which will allow you to browse for the folder. Once you have found the folder, click on it – you will see the location where the VSTi will be placed displayed above your directory tree structure. Note, that a sub folder called “ManyStation” will be created within the folder you select. If you don’t want this additional sub folder, you should edit the installation destination by hand. If you are happy that you have chosen the correct location, click “OK”. The next screen will confirm where the setup program will install ManyStation. Please check this to confirm it is going to the correct place – if ManyStation is not being installed where you intend it to be, please click on the “browse” button and select the correct location. If you are certain about the location, click “next”. The next screen will ask you to confirm where in the Start Menu Folder the ManyStation shortcuts should be installed. Select an appropriate location and click next. You will now see a screen headed “Ready to install” which will confirm where the files and shortcuts are going to be installed. Take a moment or two to confirm these are correct. If you want to make any changes, click on the “back” button and make the necessary changes. If you’re happy, then click on the “install” button. One last screen will now appear confirming that the VSTi has been installed. Click “finish”. ManyStation DLLs There are two versions of ManyStation – each has its own separate DLL file (both of which are loaded by the installer): ManyStation.dll (which is a single output version of ManyStation) ManyStation Multi-Out.dll The single output version has one stereo out and uses less CPU. The multi output version has three stereo outs – the dry signal plus two FX outputs. The multi output version uses more system resource. You can delete one of the DLL files only if you are sure you will never need it. Using ManyStation for the first time When you first run ManyStation, you will be asked to enter your serial number which will have been emailed to you when you purchased ManyStation. A box will pop up saying “Enter Serial-Number!” Delete that text and enter your serial number and then press enter. You’re now ready to go. The version number that is shown is the WusikEngine version number. Locating the data files When you first run the VSTi, ManyStation will locate the data folder. If this folder is subsequently moved, ManyStation will prompt you to locate this folder. Browse to the folder, click on it and then click the “select” button. Non VSTi users Users who are using ManyStation through a wrapper (eg Cakewalk’s VST adapter (go to www.cakewalk.com for details) or one of FXPansion’s wrappers (see www.fxpansion.com for their VST-RTAS, VST Audio Unit and VST Re Wire wrappers) have one further step – to run the wrapper. If you need any explanation about using your wrapper, you should refer to the documentation that came with the wrapper. Installation problems? If you have problems installing and running ManyStation, before you call for help, here are a few things to consider: Did you follow the instructions here? If not, please do so. Have you checked your host’s documentation? Are you sure you have installed ManyStation’s VSTi in the right place? Does your host support VSTis?? Do you have any other VSTis that are working? Where are they installed? Installing ManyStation on Receptor You can install ManyStation on Receptor by using the following procedure. 1 On the Receptor hard drive create a folder in the unsupported plug-ins directory called “ManyStation”. 2 Copy your ManyStation data folder (from your PC) to the ManyStation folder on the Receptor hard drive (if you are running more than one WusikEngine product, you should only have one data folder.). 3 Copy the ManyStation DLLs and INI files to the ManyStation folder on the Receptor hard drive. 4 Edit the INI files on the Receptor hard drive to include your ManyStation serial number (add your number in the line “Serial # :” immediately after the colon). Save these files once they have been edited. 5 Go to Receptor’s setup page (navigate through the monitor on the front of Receptor). Ensure the “unsupported plug-ins folder” is checked. After a few seconds you should see a message “Install 1 file”. Select the install button and wait for installation. If any dialogs ask for you to locate the ManyStation data folder and INI files, browse to those locations. After you have located these files you should receive the message “1 file successfully installed”. 6 Go to Receptor’s mixer and choose an empty track. Load ManyStation and play. ManyStation is now installed on your Receptor.


![ManyGuitar user manual [november 2005]](http://vs1.manualzilla.com/store/data/005861536_1-a0b937985b357a67600aa3c9a5e7e46a-150x150.png)


![How To Make A Noise [free version - July 2007]](http://vs1.manualzilla.com/store/data/005953668_1-8b501b70130f0a85eac6cc9cd6ff18b6-150x150.png)