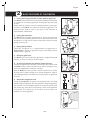
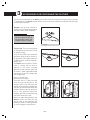
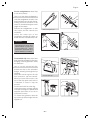
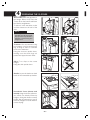
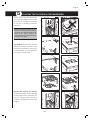
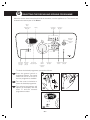
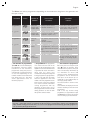
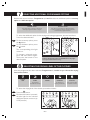
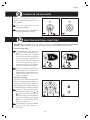
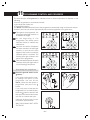
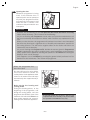
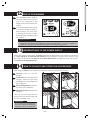
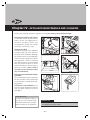
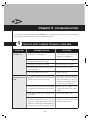
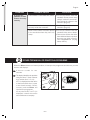
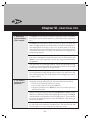
1
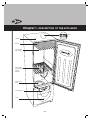
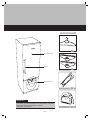
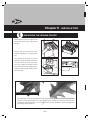
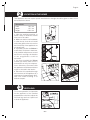
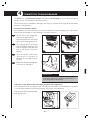
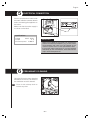
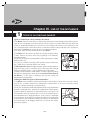
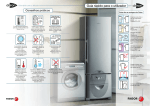
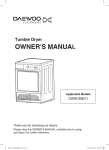
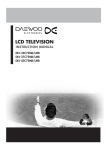
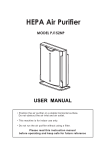
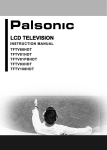
Unidad de planchado doméstico
Unidade doméstica para engomar
Domestic ironing unit
Huishoudelijke strijk-droogautomaat
Haushalts-Bügelmaschine
Manual de instalación y uso
Manual de instalação e uso
Installation and user manual
Installatie- en gebruiksaanwijzing
Installations- und Benutzerhandbuch
English
CONTENTS
Chapter I - Description of the appliance
56
Chapter II - Installation
1. Unpacking the ironing centre
58
2. Location in the home
59
3. Levelling
59
4. Connection to mains drainage
60
5. Electrical Connection
61
6. Preliminary cleaning
61
Chapter III - Use of the appliance
1. Treatment: types of clothes and fabrics
62
2. Basic features of the Driron
63
3. Accessories for positioning the clothes
64
4. Preparing the clothes
66
5. Placing the clothes in the wardrobe
67
6. Selecting the drying and ironing programme
68
7. Selecting additional programme options
70
8. Selecting the drying level of the clothes
70
9. Turning on the appliance
71
10. Selecting additional functions
71
11. Programme control and progress
72
12. End of programme
74
13. Interruptions to the power supply
74
14. How to collect and store the accessories
74
Chapter IV - Appliance maintenance and cleaning
75
Chapter V - Troubleshooting
1. Table of most common technical problems
76
2. Other technical or practical problems
77
Chapter VI - Practical tips
78
– 55 –
Chapter I - DESCRIPTION OF THE APPLIANCE
Filter
Cabinet
Basket
Removable
top hangers
Removable
and foldaway
bottom
hangers
Perforated
grille
Control panel
Tank
– 56 –
ACCESSORIES
Hanger
6
units
Tenter clip
6
units
Sleeve-straighteners
6
units
Trouser/skirt clip
6
units
Wardrobe door
Handle
Functional part
IMPORTANT
If you wish, you can purchase more accessories. There are
also small hangers for children’s clothes.
Please ask your retailer.
– 57 –
Chapter II - INSTALLATION
1
UNPACKING THE IRONING CENTRE
Remove the protective tapes from
the basket and the top and bottom
hangers.
Remove the accessories that come
inside the appliance on a polystyrene
tray.
The specifications label is located
inside the water collection container.
This label must never be removed,
since it provides information about
the exact model of the ironing centre,
required power supply, serial number
and warranty.
09530100350601002838
ENVIRONMENTAL NOTE
This appliance has been designed and manufactured with great care for the environment.
Dispose of the packaging in an appropriate way. Select the materials (polystyrene,
cardboard, plastic bags, etc.) in accordance with current standards and local regulations
governing waste disposal.
– 58 –
English
2
LOCATION IN THE HOME
This appliance does not require special installation but thought should be given to where it is to
be located in the home.
dimensions
width
depth
height
59.5 cm
67.7 cm
185.8 cm
1. Near the washing machine, to
make it easy to move the clothes
from one to the other.
2. Make sure that it is well ventilated;
in other words, that the air intake
and outlet grilles at the rear and on
the front (base) of the appliance are
not obstructed.
3. If possible, position the Driron in
a well-aired, cool place in the home.
If the ambient temperature around
the Driron is very high, the duration
of the programmes could be
excessive.
If you have installed the Driron
outside your home, make sure it is
protected from very low temperatures. Otherwise, the water inside
the appliance could freeze and burst
a pipe or the tank in the interior.
4. Since the air is expelled through
the front base of the appliance at a
temperature of approximately 40°C,
take care when installing it on
delicate carpets.
3
LEVELLING
For correct operation, it is important
for the appliance to be installed
perpendicular to the floor; adjust the
two front legs and use a spirit level
to level the appliance.
– 59 –
4
CONNECTION TO MAINS DRAINAGE
The Driron has a condensation system that extracts the humidity from the clothes during the
drying process. This humidity is turned into water.
There are two types of installation: drainage to the mains or collection of the water in the removable
container in the appliance.
Connection to the drain system:
If the appliance is located such that it can be connected to mains drainage, the condensated
water will be discharged to mains drainage. Proceed as follows:
a
At the rear of the appliance,
unscrew the pipe bracket.
Remove the pipe from the nozzle
and leave it hanging where it is.
b
The drainage pipe is in the top
basket inside the appliance. First
of all, fit the pipe to the drain and
then to the nozzle. Fasten the
bracket.
c
There should be a fixed water
outlet drain at a distance of
between 25 and 100 cm from
the floor.
d
Make sure that the drainage pipe
is not bent or squashed.
b
a
min.
25 cm
max.
100 cm
c
b1
d
IMPORTANT
Make sure that the bend pipe of the drainage pipe
is securely fitted to the outlet so that it does not
come away and cause flooding.
Collection of the water in the removable container in the appliance:
If the appliance is not connected to the home drains, the water will automatically be collected
in a removable container in the bottom drawer at the front of the appliance.
This container must be emptied after
each drying cycle.
– 60 –
English
5
ELECTRICAL CONNECTION
See the specifications label inside
the water collection container drawer
before connecting the appliance to
the mains.
Make sure that the mains supply is
as shown on the label.
09530100350601002838
specifications
voltage
230 V- 50 Hz
current
11 A
maximum power 2.600 W
6
IMPORTANT
Make sure the Driron is connected to an earthed plug
socket. The electrical installation, plug, socket, fuses,
circuit-breaker and meter must be capable of the
maximum power shown on the specifications label.
If the power cable is damaged, it must be replaced
exclusively by the manufacturer, after-sales service
(TS) or authorised personnel.
PRELIMINARY CLEANING
Once the Driron has been installed
and before its first use, the inside of
the wardrobe must be cleaned.
a
Clean it with a damp cloth to
remove any dust.
a
– 61 –
Chapter III - USE OF THE APPLIANCE
1
TYPES OF CLOTHES AND FABRICS
Types of clothes that can be treated in the Driron.
• The Driron does not cause wear to clothes since they do not move throughout the entire process.
They do not rub against each other and the warm air flows over them while they are dried and
ironed at moderate temperatures. There is no risk of fading, since they are not exposed to the
sun. The deterioration of the fabric fibres is reduced as direct contact with the iron is avoided or
minimised. The Driron processes do not use chemical products.
As a result, there are very few limitations to the Driron.
• The Driron can be used for all kinds of everyday clothing, shirts,
T-shirts, blouses, trousers, skirts and, in general, for all machinewashable clothes.
• It can also be used for household linen, sheets, pillowcases, towels,
kitchen cloths, etc.
• It also has a basket for drying small clothes (socks, underwear,
etc.), which do not normally need to be ironed.
• Take particular care with light knitwear, which should never be
hung for drying, since it stretches easily. Given that this clothing
does not normally crease, it can be placed in the top basket.
• Clothes made of leather, suede, plastic, fur and, in general, clothes
that may be damaged by damp and heat must not be treated in
the Driron. For this type of clothing, use only the airing and
deodorisation programmes.
Treating the different types of fibres and fabrics
• The Driron can treat fabrics made from all kinds of natural fibre, cotton, linen, wool, silk, flannel,
viscose, etc. or fabrics made from combinations of these fibres. It can also treat fabrics which
contain a certain percentage of synthetic fibres.
• It can also treat fabrics made with synthetic fibres only (conventional
polyester, polyamide, lycra, elastane or combinations of these fibres).
However, given the popularity of synthetic fibres in recent years, we
recommend caution and advise you to look at the manufacturer’s
recommendations for drying the fabrics. In any case, it is advisable
to position them as far away as possible from the hot-air intake grille
at the bottom of the wardrobe, making sure they do not slip and fall
on it. Place them on the hangers at the top or, if they do not crease,
use the top basket.
– 62 –
English
2
BASIC FEATURES OF THE DRIRON
1. Ironing and drying all kinds of newly washed garments.
The Driron removes the creases from clothes, making it unnecessary
to iron almost all everyday garments, leaving them dry and ready
to wear.
Simply take the clothes from the washing machine, place them
correctly in the Driron and select the desired programme. The
clothes will be ready to wear or put away in the wardrobe in
approximately 120 minutes.
2. Ironing dry garments.
The Driron has a specific programme for ironing dry garments
that do not need washing either because they have been in the
wardrobe for a long time or because they have become creased
during a journey, etc.
3. Drying damp clothes.
Especially designed as a complementary programme to
programmes 1 and 2, for garments that are still damp and for
damp clothes in general.
4. Airing dry garments.
The Driron airs and deodorises garments in approximately 60
minutes, so they are ready to be worn again.
5. An all-round solution for treating clothes at home.
Once the programme has finished, you can leave the clothes inside
the Driron until you want to take them out, without having to worry
about them getting wet, fading or creasing.
With the Driron at home, you don’t need a clothes line or a drier
and the pile of clothes waiting to be ironed disappears. Next to
the washing machine, it provides an all-round process for garments
at home.
6. Automatic programme end.
Except for programme (or group of programmes) No. 4, (Drying
damp clothes programme and Dry garments airing programme),
the machine uses an intelligent electronic control to decide when
the clothes are ready and, consequently, when the programme
should end. This means you do not have to worry about the
appliance or the programme.
– 63 –
100101100010100
001000101110100
1001010010111010
010100100010111
000110101001010
001000101110100
1001010010111010
010100100010111
000110101001010
3
ACCESSORIES FOR POSITIONING THE CLOTHES
For the correct operation of the Driron, the clothes must be positioned correctly in the wardrobe.
To help with this, the Driron comes with a set of accessories made from materials that are heatand humidity-resistant.
Hanger: the top part swivels to
make it easy to hang the garments
and place them in the wardrobe.
IMPORTANT
You must use the hangers
that come with the Driron as
they are made of heat- and
humidity-resistant material.
Hanger
Tenter clip: This must be placed
on the bottom of shirts and T-shirts
for better ironing.
They do not need to be used with
garments made of silk or viscose or
for garments with a high content of
synthetic fibres, such as polyester,
acrylic, etc.
The Driron has two types of Tenter
clips: a ‘strong’ clip for shirts in
general or for more creased
garments; and another ‘light’ clip
for cotton T-shirts or garments which
may stretch or go out of shape with
the stronger clip.
Reinforced tenter clip
How to use the clips
Once the shirt or T-shirt has been
buttoned up and placed on the
hanger, open a clip and insert the
bottom of the garment, making sure
that the clip is horizontal and in the
middle. Release the clip and let it
close. The garment should be
clipped tight and stretched along
the entire width of the clip.
When you place the garment in the
Driron, make sure that the clip
hangs freely in the wardrobe and
does not catch on other garments
or on the hangers at the bottom.
– 64 –
Light tenter clip
English
Sleeve-straighteners: these help
to iron shirt sleeves.
How to use the sleeve-straighteners
Hold the straightener closed in one
hand and insert one in each sleeve,
making sure that the fabric of the
sleeve is stretched along the entire
length of the sleeve.
Release the straighteners so that
they open and the sleeves are
stretched.
Leave the lower tips of the
straightener outside the sleeve so
that it does not overstretch the cuff.
Sleeve-straighteners
CAUTION
Do not use these
straighteners when the
sleeve fabric is prone to
overstretching. Take
particular care with the
narrow sleeves of T-shirts.
Trouser/skirt clip: these clips have
been specially designed for the easy
hanging of these garments inside
the wardrobe.
How to use the trouser/skirt clip
Attach the clip on the wardrobe
hanger, inserting it through the top
opening.
Insert the trouser leg into the clip
from bottom to top and release.
When you insert the trousers, the
top of the clip opens and, when it
is released, it closes to trap the
trousers.
Do the same with the other leg.
Leave the trousers to hang, making
sure that both legs are parallel and
opposite each other so as not to
crease the trousers.
To remove the garment, open the
top of the clip with a finger and the
leg falls out.
Trouser/skirt clip
– 65 –
4
PREPARING THE CLOTHES
Shirt/T-shirt: place the garment on
the hanger. Button it up. Place the
Tenter clip on the bottom and insert
the Sleeve-straighteners.
To place it in the wardrobe, make
sure the sleeves are in front of the
shirt.
NOTE:
To hang the shirt on the
hangers and fit the tenter
clip, pull the top basket a
little bit out and hang the
hanger on it.
Trousers: We recommend using
two hangers, one for each trouser
leg, as long as there is sufficient
room in the wardrobe.
Hang the trousers upside down,
making sure that both legs are
parallel and opposite each other.
Skirt: Fit to clips on the same
hanger.
Hang the skirt upside down.
Smalls: Lay out the clothes on both
levels of the removable top basket.
Household linen (sheets and
towels): Hang the sheets, pillowcases, towels, etc. directly on the top
hangers. Hang the sheets correctly
folded. We recommend you use at
least two hangers for each sheet for
correct drying.
– 66 –
English
5
PLACING THE CLOTHES IN THE WARDROBE
Always make sure the central area
of the bottom hangers is free so that
the warm air can flow from bottom
to top (like a chimney) inside the
wardrobe.
Make sure that the clothes do not
come into contact with or obstruct
the lower air outlet grille and are at
least 3 cm away. Under no
circumstances should garments be
placed on the grille.
Top basket: Remove the basket,
which has a stop to prevent it from
turning over and make it easy to put
in the wardrobe. Lay the garments
out evenly on both levels.
Spread the clothes out evenly:
Position the clothes evenly, covering
all the inside of the wardrobe. Do
not put one garment on top of
another or pile garments up on the
hangers.
– 67 –
6
SELECTING THE DRYING AND IRONING PROGRAMME
When the clothes have been placed inside the wardrobe, turn the appliance on. The controls are
located in the bottom part of the Driron.
Button:
Delay,
Drying time and
Airing time
Drying level
pilot lights
Display
Programme
pilot light
Start/pause
pilot light
Start/pause
button
Removable
tank empty
pilot light
Removable
tank full
pilot light
Interior tank
empty pilot light
Switch
ON/OFF
Programme
pilot lights
Additional Block option
pilot light
buttons
Programme
selector
To select the desired programme, proceed as follows:
a
Press the general switch or
programme selector. The control
comes out and is set to one of
the four programmes available.
b
Turn the control clockwise to
select the desired programme.
c
The selected programme will
appear on the display with the
letter ‘P’ and the selected
programme number.
a
c
– 68 –
b
English
The Driron has various programmes depending on the treatment to be given to the garments and
the type of fabric.
PROGRAMME
DISPLAY
TREATING THE
GARMENTS
TYPE OF CLOTHES
AND FABRICS
APPROXIMATE
DURATION
Programme 1
Ironing and
• Newly washed clothes.
dryingof newly • All kinds of fabrics (**).
washed clothes
Programme 2
• Newly washed clothes.
Ironing and
• From 60’ to 90’ (*).
dryingof newly • Crease-resistant fabrics
washed clothes
(polyester, acrylics, etc.).
Programme 3
Ironing dry
clothes
• Dry clothes that are a little • From 45’ to 90’ (**).
creased.
• All kinds of fabrics.
Programme 4
Drying damp
clothes
• Complementary programme
to porgrammes 1 and 2, for
those clothes that are not quite
dry.
• Damp clothes in general.
• From 20’ to 120’ (***).
The user selects the duration of
the cycle depending on how
damp the clothes are.
Airing dry
clothes
Deodorisation
• All kinds of fabrics.
• From 15’ to 60’ (***).
The user selects the time depending on the airing requirements.
time
Programme 4
+ button
time
(*) The duration of programmes
1, 2 and 3 is set automatically by
the appliance using the signals
transmitted to the Electronic
programmer during the process.
Consequently, a cycle can last more
or less time depending on the
number of clothes to be treated and
how damp they are. The table
shows approximate times for
reference purposes.
(**) Programme 3: this programme
uses steam and the tank in the
bottom of the functional part of the
appliance must have sufficient water
to generate the steam. This tank is
filled with the water that
condensates during the Drying and
ironing programmes (programmes
1 and 2). The tank may be empty
when the appliance is new and
neither of the two programmes have
been used or it may have emptied
as a result of several consecutive
Ironing programmes with dry
garments. In these cases, one or
more programmes must be run with
damp garments so that the tank
fills up with sufficient water.
• From 90’ to 120’: clothes (*).
• From 120’ to 180’: household
linen (sheets, towels, etc.) (*).
(***) The duration of programmes
4 is set by the user using the cycle
time
button (in minutes). Each
time the button is pressed, the cycle
time is increased by 20 minutes up
to a maximum of 2 hours (120
minutes) for the additional drying
programme. And 15 minutes for
each press of the button up to a
maximum of 1 hour (60 minutes) for
the Drying damp clothes.
The selected time is shown on the
display.
Once started, the display shows the
minutes remaining to the end of the
programme.
N.B. In the dry clothes airing
programme, it is a good idea to open
the Driron and remove the clothes
once the airing cycle has finished.
IMPORTANT
The Driron leaves the factory with the water tank empty. When the appliance is turned on for the first
time the
pilot light comes on because the tank is empty. Consequently, before using Programme
3 (dry clothes ironing) for the first time, run one or more programmes with damp garments (programme
1 or 2) until the pilot light remains off.
– 69 –
7
SELECTING ADDITIONAL PROGRAMME OPTIONS
Besides their normal versions, Programmes 1, 2 and 3 include two additional options: economy
option and delicates option.
ECONOMY OPTION
DELICATES OPTION
This option offers savings on electricity,
although programme time is longer.
This option is specifically for delicate clothes.
It uses temperatures that are slightly lower and
increases the programme time.
To select the additional option for the drying and Ironing programme, proceed as follows:
Press the selected button.
a
For the economy option, press
button.
the
b
For the delicates option, press
the
button.
The corresponding pilot light
comes on.
To change a selected option,
press the same button again.
Then press the button for the
desired option.
8
a
b
We do not recommend the delicates option when the
ambient temperature around the Driron is very high.
The cycle would last too long.
SELECTING THE DRYING LEVEL OF THE CLOTHES
Once the programme has been selected, Programmes 1, 2 and 3 let you choose the drying
level of the clothes.
SLIGHTLY
DAMP
NORMAL
IRONED
Occasionally
for additional ironing
WARDROBE
EXTRA DRY
For hanging or
wearing the clothes
Not recommended
for delicate clothes
To select the drying level of the clothes, proceed as follows:
a
Press the
b
Each time the button is pressed,
the pilot light for the selected
drying level option comes on (up
to five presses).
button.
a
– 70 –
x1
b
x3
English
9
TURNING ON THE APPLIANCE
Once the programme and the
options have been selected, turn on
the appliance.
a
button and the
Press the
programme begins.
b
The pilot light comes on to indicate
that the appliance is running.
10
a
b
SELECTING ADDITIONAL FUNCTIONS
Programmes 1, 2 and 3 have two additional functions: time delay function and blocking
function, which should be used after the options have been programmed and selected.
Function: time delay
a
To delay the start time, press the
button. Each time the button is
pressed, the start time is delayed
by one hour (from the moment the
button is pressed). If the button is
pressed twice, the start is delayed
by two hours and so on up to a
maximum of 24 hours. The display
shows the selected time delay.
a
x1
a
b
button and the time
Press the
delay begins to count down. The
display shows the time first in hours
and, when the final hour is reached, in minutes.
Function: blocking
This blocks the selected programme.
It does not allow changes until the programme has finished. This option has
been designed specifically to prevent
accidental changes made by children.
a
b
To turn on the blocking function,
press and hold down the
and
buttons for three seconds. The
appliance comes on automatically
without the need for pressing the
button. To deselect this option,
repeat the operation.
a
The pilot light comes on to indicate
that the blocking function is
activated.
– 71 –
b
x24
11
PROGRAMME CONTROL AND PROGRESS
The exact duration of Programmes 1, 2 and 3 can not be known beforehand. It depends on the
following:
• Amount of garments to be dried and ironed.
• How damp the clothes are.
• The selected options.
The Driron itself determines the end of the programme automatically using its electronic sensors.
However, the user can see the approximate phase of the programme at any given time:
a
Throughout the programme, the
drying level pilot light remains on
to indicate the target.
b
At the beginning of the
programme, the damp option
indicator flashes to indicate the
initial phase.
c
Once the first level of dampness
has been reached, the pilot light
remains on and the next level
begins to flash, and so on until the
selected option is reached. The
flashing pilot light indicates the
phase of the programme.
d
Once the selected option has been
reached, all the pilot lights will be
on (not flashing): final phase.
a
b
c
d
Interrupting the programme
a
Press the general switch or the
button.
If you wish to interrupt the cycle,
to change the option or the
programme, first turn off the
Driron, select the new option or
programme and press the
button.
If you only want to interrupt the
programme for it to continue later,
press the button to pause it and
then press the same button when
you wish to continue the cycle.
Obviously, in these cases, you do
not need to open the door.
AND YOU SHOULD NOT OPEN
THE DOOR.
– 72 –
English
b
Opening the door
Whichever programme is being
used, if the wardrobe door is
opened (and it can be opened at
any time), the programme will be
automatically interrupted. And
when the door is closed, it will
continue at the point where it was
interrupted.
IMPORTANT
However, we recommend you do not open the door when the Driron is running
unless strictly necessary. This is because of the following:
• If you are working with Programme 1 or 2, when you open the wardrobe door, all
the hot air and damp will escape from inside, which could be very unpleasant for the
user.
When you close the door, the programme will continue from where it was interrupted,
but there may have been a significant loss of humidity and temperature required for
the ironing process. This will have a negative effect on the results and lead to an
unnecessary use of electricity.
• If you are working with Programme P3, besides the reasons given for Programmes
1 and 2, opening the door may, in random cases, cause interference to the electronic
safety systems on the appliance, blocking the operation of the Driron and causing the
display to show a fault message.
If this happens, turn off the Driron (by pressing the general switch) and leave it off for
between five and 10 minutes. Then restart the programme.
When the programme has
been interrupted
You may still hear a fan noise inside.
This is not a reason for concern. It is
a safety device on the appliance which
comes on in certain cases and stops
automatically after approximately 2
minutes.
Noise during the heating and
cooling phase
During the heating phase, at the
beginning of the programme, and
during the cooling phase, once the
programme has finished, some of the
materials with which the Driron has
been made expand and contract,
making noises inside the appliance.
IMPORTANT
If you hear noises, do not worry. They are not
important and occur naturally. They do not affect
the operation of the Driron in any way.
– 73 –
12
END OF PROGRAMME
a
With Programmes 1 and 2,
during the 10 minutes before the
end of the programme, the
display shows the minutes that
remain.
b
Once the programme has ended,
a continuous buzzer sounds for
three seconds. The word ‘End’
is displayed and the ‘Empty
removable tank’ pilot light comes
on. Empty it.
a
b
IMPORTANT
The Driron memorises the programme and the options selected the last time it was used
(except the time delay and the blocking option). Consequently, if you wish to repeat the
programme, simply select the desired programme and press the button.
13
INTERRUPTIONS TO THE POWER SUPPLY
If the power supply is interrupted, the Driron interrupts the programme. If the supply is reconnected
in a time equal to or less than 30 minutes, the programme continues from where it was
interrupted. If the power cut lasts for more than 30 minutes, the appliance loses the memory
and needs to be reprogrammed.
14
HOW TO COLLECT AND STORE THE ACCESSORIES
After using the Driron, follow these instructions to store the accessories correctly:
a
Hanger: place on the top
hangers.
b
Tenter clip: place on the bottom
hangers. Open the clip when
attaching it to or removing it from
the hanger bar.
c
Sleeve-straightener: placed on
the sides of the wardrobe.
d
a
b
c
d
Skirt/trouser clip: placed on the
hangers.
This way, you will always have the
accessories stored away tidily and
in correct working order.
IMPORTANT
If you need more accessories,
they can be bought individually;
order them from your distributor.
– 74 –
Chapter IV - APPLIANCE MAINTENANCE AND CLEANING
Perform the cleaning operations regularly so that your ironing centre will last longer.
Cleaning the exterior and interior
To clean the exterior and the control
panel, do not use aggressive or
abrasive products under any
circumstances; simply use a damp
cloth and, if necessary, soap.
Cleaning the filter
The filter is made up of two elements
located at the top of the panel at
the back of the wardrobe. Although
the drying system of this appliance
does not scrape against the fabric
and, therefore, no fluff is removed
from the garments, we recommend
that you check the filter for fibres
every now and then. If there are any
fibres in the filter, clean it with a
dry cloth; do not use water under
any circumstances.
Emptying the condensated water
container
The condensated water gradually
fills the container. We recommend
you empty the container after each
programme.
This water is not drinkable, but it
can be used for domestic purposes
(e.g. for steam ironing or in the air
humidifier).
we recommend
you leave the appliance open so
that the air can circulate freely
around the interior if you are planning to be away for a long period.
IMPORTANT
Before any cleaning or maintenance operations, unplug
the appliance from the mains.
– 75 –
Chapter V - TROUBLESHOOTING
If you discover a problem when using the Driron, you will probably be able to solve it after checking
the following table of the most common technical problems.
1
TABLE OF MOST COMMON TECHNICAL PROBLEMS
PROBLEM
The appliance does
not come on.
The duration of the
programme is too
long.
POSSIBLE CAUSE
SOLUTION
• There is no power in the mains or the
appliance is not plugged in.
• Check that there is power in
the mains and that the
appliance is plugged in.
• After selecting the programme, you have
not pressed the start button .
• Press the start button
• The door is not closed correctly.
• Close the door correctly.
• The removable water collection tank is
not in position.
• Put the tank in position.
• The removable tank is too full.
• Empty the tank.
• The clothes have been placed in the
appliance when they were too damp.
Perhaps they were not spun dry.
• Do not put clothes inside the
wardrobe if they are too damp.
We recommend you spin the
clothes in the washing machine
at a minimum of 700 rpm.
• The air intake (protected with the grille)
on the rear of the appliance is obstructed.
• Clear the air intake area.
Remove obstacles from the air
intake.
• The filters inside the wardrobe are
obstructed.
• Clean with a dry cloth.
• The ambient temperature of the room
where the appliance is located is very
high. The high temperatures in the area
where the appliance is located hinder the
drying process and make it last too long.
• Ventilate the room. Open the
window or door. Lower the
ambient temperature.
– 76 –
.
English
PROBLEM
In general, the
garments, or some
of them, do not dry
correctly.
2
POSSIBLE CAUSE
SOLUTION
• The wardrobe is overloaded with clothes.
• Do not pile clothes inside the
wardrobe. Do not put too many
clothes inside the wardrobe.
See Placing the clothes in the
wardrobe (page 67).
• The clothes have not been positioned
correctly inside the wardrobe.
• See Placing the clothes in the
wardrobe (page 67).
• Some of the clothes have been placed
in the wardrobe when they were too
damp.
• Do not put clothes inside the
wardrobe if they are too damp.
• Remove the clothes that have
been dried and leave only those
that were not dried correctly.
Run Programme 4 (Drying
damp clothes).
OTHER TECHNICAL OR PRACTICAL PROBLEMS
When the Driron detects an internal problem, it interrupts the programme and informs you with
buzzers and displays.
a
A buzzer sounds for two
seconds.
b
The display identifies the problem
using the letter F (fault) followed
by a number (from 1 to 14):
• If F1 is displayed, the fault refers
to the fact that the door is open
or not closed correctly. Close it
correctly and the Driron will
continue the programme.
a
• If any other fault (F2 to F14) is
displayed, contact the service
and maintenance company.
– 77 –
b
Chapter VI - PRACTICAL TIPS
1. About the
type of clothes
to be treated
The Driron can be used for all kinds of everyday clothes, household
linen (sheets, towels, kitchen cloths, etc.) and Smalls (socks, underwear,
etc.).
The Driron can treat fabrics made of all kinds of fibres, but when the
fibres are 100% synthetic, we recommend you follow the manufacturer’s
recommendations for drying. In any case, position them as far away
as possible from the air outlet grille at the bottom. Given that this type
of synthetic fabric does not crease, the best place for drying them is
inside the top basket.
Clothes made of leather, suede, plastic, fur and, in general, clothes
that may be damaged by damp and heat must not be treated in the
Driron. For this type of garment, use only the airing and deodorisation
programmes.
Take particular care with light knitwear, which should never be hung
for drying, as it stretches easily. Given that these clothes do not normally
crease, they can be placed in the top basket.
When the Tenter clip is placed on shirts made of corduroy or velvet,
we recommend you hang the garments inside out to prevent the clip
from marking the shirt. The same applies when hanging up corduroy
or velvet trousers.
2. To make it
easier to iron
garments
The best way of ironing the garments is not to crease them too much
during the washing-spinning cycle. We recommend the following:
• Do not fill the washing machine to excess.
• Do not spin clothes at more than 900 rpm.
• Hang the garments in the Driron as soon as possible after they
have been washed.
With the Ironing and drying programmes (programmes 1 and 2), clothes
need to be sufficiently damp at the beginning of the cycle. The Driron
uses the damp of the garments for the ironing process. This is another
reason for not spinning clothes at more than 900 rpm. They would not
be sufficiently damp.
Make sure the clothes are not pressed against each other (wardrobe
too full) as this may hinder the ironing process. The more laid out and
flat the clothes are in the wardrobe, the better the result.
– 78 –
2. To make it
easier to iron
garments
(continued)
3. To make it
easier to dry
garments
It is important to use the tenter clips and sleeve-straighteners in their
correct position to obtain a better finish for shirts, blouses and T-shirts.
To do this:
• When attaching the Tenter clip, make sure it is not twisted and
that the clothes are correctly caught and stretched along the entire
width of the clip.
• When inserting the clothes, make sure the Tenter clip hangs freely
in the wardrobe and does not catch on other clothes or on the
bottom hangers.
• The use of the Tenter clip with shirts and T-shirts with a high
content of synthetic fibre (polyester, polyamide, Lycra, etc.) is not
necessary.
The use of Sleeve-straighteners is not appropriate when the fabric
is prone to being stretched out of shape.
The clothes must be spread out evenly around all the areas of the
wardrobe.
Do not put one garment on top of another or pile garments up on the
hangers in the Driron. The clothes must be hung as separately as
possible from each other. If two garments are close together, the air
cannot flow between them and the surfaces may not dry completely.
Consequently, do not overfill the wardrobe.
The greater the amount of clothes to be treated and the damper the
clothes are, the longer the cycle will be and the more possibility there
will be of a garment not being dried sufficiently.
For even drying, energy-saving and the correct programme duration,
do not mix clothes that absorb a great deal of humidity (towels, thick
cotton sheets, etc.) with light clothes of fine fabrics that absorb little
humidity in the same cycle in the Driron. The clothes may not dry
evenly; some may come out too damp and others too dry.
For correct drying-ironing, do not spin the clothes in the washing
machine at less than 700 rpm. They would have too much water for
the Driron.
If there is sufficient room, try to leave a separation between trouser
legs, using adjacent hangers. Drying will be better.
– 79 –
3. To make it
easier to dry
garments
(continued)
4. Use and
location of the
appliance
Do not pile too many clothes on top of each other in the top basket.
Use the intermediate tray of the basket. Do not cover the central area
of the basket.
When the programme has finished, if any of the clothes are not
sufficiently dry, remove the rest and leave the damp clothes inside.
Run Programme 4 (Drying damp clothes), which has been designed
to solve this problem.
Ensure that the Driron is not located in an area with very high
temperatures. This will increase the duration of the programmes.
We do not recommend using the delicate option when the ambient
temperature in the area in which the Driron is located is very high. The
cycle would be too long.
If you have installed the Driron outside your home, make sure it is
protected from very low temperatures. Otherwise, the water inside the
appliance could freeze and burst a pipe in the tank.
Do not open the door when the Driron is running unless absolutely
necessary.
ENVIRONMENTAL NOTE
INFORMATION FOR THE CORRECT HANDLING OF WASTE FROM ELECTRICAL
AND ELECTRONIC APPLIANCES
At the end of the service life of the appliance,
do not dispose of it together with general
domestic waste.
It can be taken, free of charge, by specific
waste collection centres approved by the local
authorities or removed by distributors that
provide this service.
To emphasise the obligation to collaborate
with selective waste disposal, the product
bears the mark which warns of the non-use
of traditional containers for its disposal.
For further information, please
contact your local authority
or the shop where you bought
the product.
Disposing of domestic appliances separately
avoids possible negative consequences for
the environment and for health resulting from
inappropriate disposal and also makes it
possible to treat and recycle materials to obtain
significant savings in energy and resources.
– 80 –
Fagor Electrodomésticos, S. Coop.
Apartado 49
Tel. 943 719 100 / 01
Fax 943 796 881
B° San Andrés, 18
20500 MONDRAGÓN (Gipuzkoa)
Internet: http://www.fagor.com
e-mail: [email protected]