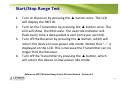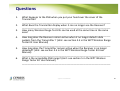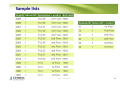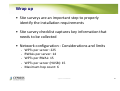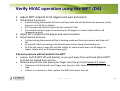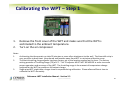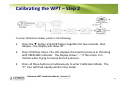
1
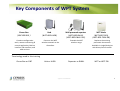
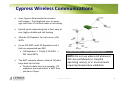
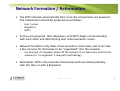
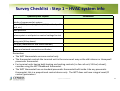
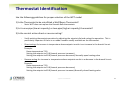
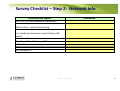
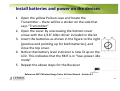
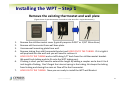
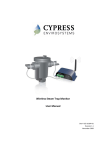
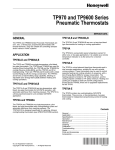
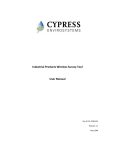
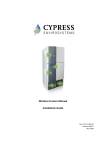
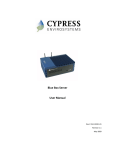
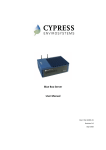
Wireless Pneumatic Thermostat
(WPT)
Level 1 Certification Training
www.CypressEnvirosystems.com
Doc No: 900-00010-01 Rev 01
Purpose
Walk through the steps for a successful installation
• Site survey
• Staging
• Installation
• Commissioning
• Post install
Cypress Confidential
2
Technical Training
Introduction
Key Components of WPT System
Green Box
(GBC-800-001 )
Contains configuration
tools, remote monitoring &
control application, BACnet
interface, DR Interface, and
web services.
Hub
(WPT-800-HUSB)
Wall powered repeater
(WPT-800-RWAL)
(WPT-800-RWAL 24V)
Connects the WPT
wireless network to the
Green Box.
Extends the WPT
wireless range.
WPT Node
(WPT-800-TXXX)
(WPT-800-TXXX-DB)
Replaces the existing
pneumatic thermostat.
Available in single/dual pipe
with direct/reverse action.
Terminology used in this training
Green Box or GBC
Hub or HUSB
Repeater or RWAL
Cypress Confidential
WPT or WPT-DB
4
Cypress Wireless Communications
•
Uses Cypress Semiconductor wireless
technology – first deployed over six years
ago, with over 25 million nodes in use today.
•
Hybrid mesh networking that is fast, easy to
use, highly reliable and self-healing
•
Allocate (1) Repeater for up to every (15)
WPTs
•
Up to 225 WPTs with 14 Repeaters and 1
Hub are supported per GBC.
• (14 Repeaters + 1 Hub) X 15 WPTs =
225 Total WPTs
•
The WPT network allows a total of (6) data
hops back to the Hub
• Think of a data hop as a repeater. If 3
repeaters are required for a WPT then
you have 3 hops.
2.4 GHz DSSS radios, +20dBm (100mW) peak output
NOTE: Do not use where cell phones or
WiFi are prohibited (i.e. hospital
operating rooms), or in environments
requiring temperature validation.
Cypress Confidential
5
Network Formation / Reformation
• The WPT network automatically form once the components are powered.
The components should be powered up as follows:
- Hub / server
- Repeaters
- WPTs
• As they are powered, Hub, Repeaters, and WPTs begin communicating
with each other and determining best communication routes.
• Network formation only takes a few seconds in most cases, but it can take
a few minutes for all devices to be “negotiated” into the network.
- For example, if a Repeater drops off the network it can take some time for the
network to “re-negotiate” a new path (self healing).
• Remember, WPTs only associate themselves with one device (directly
with the Hub, or with a Repeater)
Cypress Confidential
6
Wireless Communication
WPTs communicate every 15 min
WPT
Forward Channel Data
12:00 PM: Setpoint 70
GBC
12:00 PM: Setpoint 70
12:01 PM user changes setpoint to 71,
Dashboard still shows 70
12:15 PM Setpoint 70
12:15 PM Setpoint 71
Forward Channel Data
Backward Channel Data
12:15 PM Dashboard still shows setpoint of 70
Forward Channel Data
12:30 PM Setpoint 71
12:30 PM Dashboard updates setpoint to 71
Cypress Confidential
7
Recommended Installation Workflow
1. Start with site survey
• Walk the site and note the types of thermostats to be retrofitted
• Determine where to place Repeaters, Hub and Green Box
• Determine power requirements, number (and type) of Repeaters and Green Boxes required
2. Stage components in the office as much as possible
3. Install and configure Green Box and Hub
• The Hub and Green Box should be installed first as the core of the network
• Define unique IDs to assign to each WPT and Repeater
4. Install and configure Repeaters
• Verify power has been installed
• Install and configure the Repeaters to setup WPT wireless network
5. Install WPTs
• Physically remove old thermostats and connect/mount WPTs in their place
• Configure WPTs to communicate with the wireless network
6. Commission system
• Calibrate WPTs
• Verify full system functionality
7. Customer walkthrough
• Train customer
• Setup customer specific items (alarms, schedules, etc.)
Cypress Confidential
8
Technical Training
Site Surveys
Purpose
Goals:
• Gather information about project for quoting and install
-
Walk through the site
Verify wireless signal strengths
Determine locations for GBC(s) and repeaters
Determine HVAC compatibility, thermostat type and count
Discuss networking requirements w/ IT
Determine the wireless network
Deliverables/Outcomes:
• Marked up maps indicating GBC, repeater and thermostat
locations
• Network information for GBC
Cypress Confidential
10
Equipment needed for site survey
•
•
•
•
Wireless Range Test Kit (RKIT)
Colored pens and highlighters to mark up map
Floor plans / maps
Allen wrench set and screwdriver (to look at various
thermostats)
• Controls drawing if possible
Cypress Confidential
11
Pre-survey list
Customer information
Customer name:
Customer address:
Contact name:
Contact phone number:
Schedule
Survey dates:
Installation dates:
Pre-visit questions
Site maps received?
Certifications needed (safety, etc.)?
On-site training required?
Parking permits needed?
Accessibility issues for personnel?
Equipment needs to be sent to bonded area?
Cypress Confidential
12
Survey Checklist : Step 1 – HVAC system info
Questions/Info request
Information
Details of compressed air system
Type of HVAC system (single duct, VAV, hot-deck, colddeck, etc.)
Main pressure
Balance point or mid-point on control settings for stat
Spring rate (if they know)
Stat type (manufacturer and model number)
Power and network connection verification
Remember
• The WPT thermostats are zone control only
• The thermostat controls the terminal unit in the same exact way as the old Johnson or Honeywell
pneumatic thermostat.
• For terminal units having both heating and cooling controls (i.e fan coil unit, VAV w/ reheat),
consider using the WPT deadband thermostat.
• The WPT thermostat has an standard pneumatic thermostat built inside. Like any pneumatic
thermostat, this is a proportional control device only. The WPT does not have integral reset (PI
control) parameters.
Cypress Confidential
13
Thermostat Identification
Use the following guidelines for proper selection of the WPT model
1) Is the Thermostat to be retrofitted a Wall/Room Thermostat?
-
Note: WPT does not replace the Remote Bulb thermostats
2) Is it a one-pipe (low air capacity) or two-pipe (high air capacity) thermostat?
3) Is the control action direct or reverse acting?
-
Verify existing thermostat operation by adjusting the setpoint dial and noting the operation. This is
particularly important if there is no model number readily available on the thermostat.
-
Direct acting: An increase in temperature above setpoint results in an increase in the branch line air
pressure.
Example:
Room temperature 72.0
Setting the setpoint to 55.0 (branch pressure increases)
Setting the setpoint to 85.0 (branch pressure decreases) Normally open heating valve
-
Reverse acting: An increase in temperature above setpoint results in a decrease in the branch line air
pressure.
Example:
Room temperature 72.0
Setting the setpoint to 55.0 (branch pressure decreases)
Setting the setpoint to 85.0 (branch pressure increases) Normally closed heating valve
Cypress Confidential
14
Survey Checklist – Step 2: Network info
Questions/Info request
Will it run on a BAS network or standalone?
Information
BACnet client – what are they using
Is it a dedicated network or open LAN (port 80
open?)
Server Location
IP address, Default Gateway, DNS
MAC address
BACnet virtual network number
WPT Network ID
Cypress Confidential
15
Survey Checklist : Step 3 – Wireless survey
Questions/Info request
Stat count (and type of each stat)
Repeater count (and type of repeaters needed)
Green Box count
Information
How many floors – on maps
Cypress Confidential
16
WPT: Survey
•
Thermostats
-
Information collection – already installed, fixed locations
Floor plan, site map
•
•
Thermostat count, RA, DA, 1-pipe, 2-pipe
Repeaters, Green Box and Hubs
•
•
Green Box, Hub & Repeater Locations are flexible (location to be
determined)
RF signal should drive installation locations
1. Signal strength between WPTs and to neighboring RWALs and Hub
2. Wireless Routing
3. Accessibility & Power
Cypress Confidential
17
WPT Wireless Network Planning Overview
• Wireless network planning involves
selecting good locations for the
Repeaters and Hub
• Depending on the building, the
wireless range
and the number of Repeaters required
may differ
Green Box
• More than one Green Box
may be used at larger sites. Each
Hub and its associated Repeaters
are considered a separate network.
Cypress Confidential
18
Wireless Performance in Buildings
•
Cypress wireless has been installed in many different types of sites
– low-rise office buildings
– high-rise commercial buildings
– industrial plants
•
Typical wireless ranges for a single “hop” are:
Line of Sight
Drywall / Paneling
Brick Walls
Ceilings
•
300 ft open halls
150 ft in open office floor
100 ft in corridors
100 ft, through five walls
60 ft, through three walls
25 ft, through single ceiling
Repeaters allow for multiple “hops” which extend the communications range
of the system
Cypress Confidential
19
Factors Reducing Wireless Range
• Wireless range is affected when metal obstacles are in the
line of transmission.
• A solid sheet of metal and some rebar reinforced concrete
present the greatest obstacles.
• Try to note the following objects and avoid them in the line of
transmission:
- Hollow lightweight walls filled with insulating metal foil
- Office equipment and furniture such as book shelves, file cabinets,
metal partitions, computer racks
- Metal reinforced concrete walls, pillars and columns
- Glass walls with metal coating
- Plumbing and electrical risers
- Elevator shafts and stairwells
- Mechanical and electrical equipment rooms
The bigger the metal obstacles in the transmission path, the shorter the wireless range.
Cypress Confidential
20
WPT: Survey
• Wireless Range Test Kit (RKIT)
- Tool for determining received signal strength indication (RSSI) between points
- Enhanced RKIT; Instructions printed on the RKIT devices; continuous updates
for 30 seconds
- RSSI levels (1-5)
• 3 - 5 (Acceptable quality)
• 1 - 2 (Poor quality, unacceptable)
• “--“ indicates no wireless coverage
-
Average RSSI levels for typical office building (1-2 walls)
Avoid holding the RKIT near the antenna
• Influence from the body could adversely affect the radio range
• Antenna radiation patterns
Cypress Confidential
21
Wireless Survey Steps
1. Identify potential locations for the repeaters and
Hub on the floor plan
2. Place the Receiver at the target location for the
Hub
3. Take the transmitter to thermostat locations and
start transmitting
4. If the RSSI drops below 3, a repeater is needed
5. Move the Receiver to all potential repeater
locations and repeat step 3 and 4
Cypress Confidential
22
Site Survey Kit
Lab - 1
Lab Objectives
• Introduction to the RKIT
• Install batteries and power on transmitter and
receiver
• Select an RKIT ID
• Start/Stop range test
• Perform mock wireless survey
Cypress Confidential
24
Install batteries and power on the devices
1. Open the yellow Pelican case and locate the
Transmitter – there will be a sticker on the side that
says “Transmitter”
2. Open the cover by unscrewing the bottom cover
screw with the 1/16” Allen driver included in the kit
3. Insert the batteries as shown in the figure to the right
(positive end pointing up for both batteries), and
close the top cover.
4. Notice that battery level indicator is now lit up on the
LCD. This indicates that the RKIT is in “low–power idle
mode”
5. Repeat the above steps for the Receiver
Reference: WPT Wireless Range Tester Kit User Manual - Section 3.1
Cypress Confidential
25
Select an RKIT ID
Up to 3 RKITs can be used simultaneously as long as they have
different RKIT IDs (A, B or C). Setup your RKIT to use the ID that is
written on the front cover of the Transmitter and Receiver.
1. While the Transmitter is in low–power idle mode, hold down
and release all three buttons.
2. When the RKIT ID is flashing on the display, press the ▲ or
▼ button to change the ID.
3. Once the correct ID is chosen, press the OVR button to store
the new ID, and the device will go back to low–power idle
mode.
4. Repeat steps 1-3 for the Receiver
Reference: WPT Wireless Range Tester Kit User Manual - Section 4.2
Cypress Confidential
26
Start/Stop Range Test
1. Turn on Receiver by pressing the ▲ button once. The LCD
will display the RKIT ID.
2. Turn on the Transmitter by pressing the ▲ button once. The
LCD will show the RSSI scale. The override indicator will
flash every time a data packet is sent (once per second).
3. Turn off the Receiver by pressing the ▲ button, which will
return the device to low-power idle mode. Notice that “--” is
displayed on the LCD. This is because the Transmitter can no
longer find the Receiver.
4. Turn off the Transmitter by pressing the ▲ button, which
will return the device to low-power idle mode.
Reference: WPT Wireless Range Tester Kit User Manual - Section 4.4
Cypress Confidential
27
Perform Mock Wireless Survey
1. Turn on the Receiver and Transmitter
2. Leave the Receiver on the table and walk around
the room with the Transmitter
3. Take note of the RSSI value as you walk further
away from the Receiver
4. Place the Transmitter behind a concrete wall and
take note of the RSSI value
5. Place your hand over the front cover and take note
of the RSSI value
Reference: WPT Wireless Range Tester Kit User Manual - Section 5
Cypress Confidential
28
Mock Site Survey
Write down the RSSI at each location as directed by the
training coordinator:
Location 1 RSSI ______________
Location 2 RSSI ______________
Location 3 RSSI ______________
Cypress Confidential
29
Questions
1.
2.
3.
4.
5.
6.
What happens to the RSSI when you put your hand over the cover of the
Transmitter?
_________________________________________________________________
What does the Transmitter display when it can no longer see the Receiver?
_________________________________________________________________
How many Wireless Range Test Kits can be used at the same time in the same
area?
_________________________________________________________________
How long does the Receiver remain active when it no longer detects data
packets from the Transmitter ? (Hint: see section 4.5 in the WPT Wireless Range
Tester Kit User Manual)
_________________________________________________________________
How long does the Transmitter remain active when the Receiver is no longer
detected? (Hint: see section 4.5 in the WPT Wireless Range Tester Kit User
Manual)
_________________________________________________________________
What is the acceptable RSSI range? (Hint: see section 5 in the WPT Wireless
Range Tester Kit User Manual)
_________________________________________________________________
Cypress Confidential
30
Survey Checklist : Step 4 – Put it all together
Questions/Info request
Create WPT Node ID list
Create repeater ID list
Maps marked up with
Approximate repeater, GBC and stat locations
Indicators/comments where power is needed
Building material construction (if unusual)
Potential wireless barriers
Accessibility issues (if any)
Information
• Afterwards, ready to finalize order quantities
Cypress Confidential
31
Sample lists
Cypress Confidential
32
Typical Layout of WPT Network in a Building
Thermostats (28)
Hub (1)
Repeaters (2)
WPT Wireless Network in a Typical Office Building
Cypress Confidential
33
Typical layout of WPT Network in a Building
Thermostats
Hub
Repeaters
WPT Wireless Network in a typical multi-floor office building
Cypress Confidential
34
Best practices
• When you have locations with multiple GBC make sure you use different
Network ID numbers on each GBC.
- Even buildings within 1000ft may receive crosstalk
• Many times the core will be cool only and perimeter will have cooling with
reheat requiring different thermostat types. Both should be checked.
• If a section of a building has been remodeled check thermostats to verify
type (direct acting or reverse acting).
• Locating the GBC in the center of the building close to power and a LAN.
ID assignments
• WPT
- Useful to number per floor or area (1xxx = 1st floor, 2xxx = 2nd floor…)
- If possible, number in a clock-wise manner through the floor or some other
logical pattern to help with maintenance
• RWAL
- Left most digit doesn’t matter, but right most digit should be numbered with
the lower number closest to the Hub
• Repeaters with an ID ending with 1 will be discovered first
• Do not repeat the right most digit in a repeater ID number for a given network
Cypress Confidential
35
Troubleshooting Tips
Problems
Cause
Possible Solution
Either Receiver or Transmitter
does not display battery icon after
pressing any buttons.
No batteries inserted,
batteries inserted
incorrectly, or batteries
are low
Check the batteries.
Both Receiver and Transmitter are
in range, but they have no
communication after range test is
started, i.e. Transmitter always
displays “--“ and Receiver is not
flashing its override indicator.
RKIT ID mismatch.
Make sure the RKIT ID on both devices are
the same
Receiver is flashing its override
indicator even though the
Transmitter is turned off.
Another Transmitter with
the same RKIT ID is in
operation nearby.
Make sure there is no other Transmitter
with the same RKIT ID in operation nearby.
Transmitter shows a valid RSSI
reading even though the Receiver
is turned off.
Another Receiver with the
same RKIT ID is in
operation nearby.
Make sure there is no other Receiver with
the same RKIT ID in operation nearby.
Reference: WPT Wireless Range Tester Kit User Manual - Section 7
Cypress Confidential
36
Wrap up
• Site surveys are an important step to properly
identify the installation requirements
• Site survey checklist captures key information that
needs to be collected
• Network configuration : Considerations and limits
-
WPTs per server: 225
RWALs per server: 14
WPTs per RWAL: 15
WPTs per server (HUSB): 15
Maximum hop count: 6
Cypress Confidential
37
Technical Training
Staging
Purpose
Goals:
• Prepare as much as possible off-site
- Setup the GBC with pre-defined IDs (Hub, Repeater, WPT)
- Configure GBC network settings
- Optionally pre-configure Repeater IDs
Deliverables/Outcomes:
• GBC is preconfigured
Cypress Confidential
39
Equipment needed
•
•
•
•
GBC
Hub
Computer and network cable OR
Monitor, keyboard and mouse
Cypress Confidential
40
Accessing GBC and the WPT Web Portal
Option 1: GBC connected to LAN
1.
Launch Microsoft Internet Explorer from a PC connected to the WPT Green Box.
2.
Enter the GBC IP address or computer name in the address bar. The GBC
computer name is “wptserver” by default.
•
•
Default username: demo
Default password: demo
Option 2a: GBC not connected to LAN
1.
Use a network cable to directly connect from a laptop.
2.
Once connected, on the laptop, follow Option 1
Option 2b: GBC not connected to LAN
1.
The WPT Green Box can be directly accessed by connecting a monitor, keyboard
and mouse.
2.
Launch Microsoft Internet Explorer on the desktop. The WPT Web Portal will
loaded by default.
Cypress Confidential
41
How to change the GBC IP address
•
The WPT Green Box IP ports are configured as DHCP by default. A static IP address
can be set up by the installer.
•
WPT Green Box IP Address can be changed by connecting from any machine in the
network using Microsoft Remote Desktop connection
(Start → All Programs → Accessories → Remote Desktop Connection)
- Default username: cypress
- Default password: cypress123
Cypress Confidential
42
Staging – GBC and RWAL setup
Lab -2
Objectives
•
•
•
Launch and log into WPT web application
Set up RWALs
Configure Repeater IDs on the RWAL
Steps:
1. Setup server
2. ID the RWALs
Cypress Confidential
44
Accessing the WPT Web Portal
1. Open Internet Explorer and type http://192.168.1.100/ (IP address for
training purposes only) and hit Enter
2. Enter the username: “demo”
3. Enter the default admin password: “demo”
4. Click “Log In”
Cypress Confidential
45
Verify Network ID and add Repeater IDs
1. Click “Setup” then “Hub” and note the Hub/Network ID
2. Click “Repeater” and enter the Repeater ID as shown on the
cover of your RWAL
3. Click Add
Cypress Confidential
46
Create Node IDs
1. Click Node
2. Enter the Node ID as shown on the cover of your
WPT
3. Enter your name as the Node Name
4. Enter “test” as the Location
5. Enter the BACnet ID as shown on the cover of
your WPT
6. Click Add
Cypress Confidential
47
Verify the Virtual Network ID
1. Click on View Site Configuration
2. Note the BACnet Virtual Network ID
Note: Sites with multiple GBCs on BACnet make sure
• All WPTs have unique BACnet IDs
• Each Green Box Server has a unique BACnet Virtual
Network ID
Cypress Confidential
48
Step 2: RWAL setup: Turn on the RWAL
1. Open the RWAL cover by
unscrewing the bottom cover screw
with a 1/16” Allen driver.
2. Connect the RWAL to power
3. Verify the LCD turns on
Cypress Confidential
49
Programming Repeater Network ID
Press and release all three buttons
simultaneously to enter programming mode.
1.
2.
3.
Network ID Programming Mode
Press and release all three buttons simultaneously
Using the top and bottom buttons, enter the Network ID that you wrote down from
the WPT web console
NOTE: Network ID can never be “0”.
Press center button to confirm.
NOTES:
1. The Repeater is factory configured with Network ID 1. You can leave the Network ID unchanged
by pressing the center button.
2. The Repeater will exit programming mode automatically if there is no action for 1 minute
Cypress Confidential
50
Programming Repeater ID
1.
2.
Using the top and bottom buttons, change the right most digit (D1) to match the
right digit of the Repeater ID as written on the front of the RWAL and press the
center button to confirm
Using the top and bottom buttons, change the left most digit (D2) to match the left
digit of the Repeater ID as written on the front of the RWAL and press the center
button to confirm
NOTE: The Repeater will exit the programming mode automatically if there is no action for 1 minute.
Cypress Confidential
51
Questions
1. What are the range of values allowed for the right and left
most digit of the Repeater ID (D1 and D2)? (Try it out)
______________________________________________
2. What is displayed on the LCD on the RWAL if the Network ID
does not match the Network ID on the GBC?
______________________________________________
3. For sites with multiple GBCs, what ID needs to be unique?
______________________________________________
4. Can 2 WPTs on the same GBC have the same BACnet ID?
Why?
______________________________________________
Cypress Confidential
52
Best practices
• Configure network settings on the GBC prior to
install
• Before going on-site, make enough copies of the
following for installers
- Node ID list
- Floor plans
• Use different network IDs for multiple GBCs
- Select IDs accordingly to avoid cross talk. WPTs have been
known to communicate between buildings
Cypress Confidential
53
Troubleshooting tips
• To turn on the GBC make sure to press and hold the switch
until the green LED lights up on the front
• All GBCs are shipped with the following defaults:
- Windows login
• Username “cypress” and password “cypress123”
- WPT web application
• Username “demo” and password “demo”
- Computer name “wptserver”
• All repeaters are shipped with the following defaults:
- Repeater ID of A1
- Network ID of 1
• All WPTs are shipped with the following defaults:
- Default node ID of 1001
- Network ID of 1
Cypress Confidential
54
Wrap up
• Staging can help the install go smoother by setting
things up ahead of time
• There are several different ways to connect to access
the WPT web application
• When using multiple GBCs over BACnet,
- All WPTs have unique BACnet IDs
- Each Green Box Server has a unique BACnet Virtual
Network ID
Cypress Confidential
55
Technical Training
Installation – Server (GBC) and Hub
Purpose
Goals:
• Install server and hub
Deliverables/Outcomes:
• Server and hubs mounted with power and network
Cypress Confidential
57
WPT Green Box Setup
• GBCs can be mounted to a
wall
- Unscrew the feet and
attach the brackets
- Mount the GBC at eye level
or higher to avoid physical
interference
• Connect GBC to 110 VAC
• Connect Hub to any USB port
• Connect GBC to LAN using
either of the two network
ports
Cypress Confidential
58
GBC connections
Connect the Hub
(into any USB port)
WPT Green Box
(Front view)
Connect a network cable
(either port, both DHCP by default)
WPT Green Box
Connect the power cable
Cypress Confidential
(Back view)
59
Hub (HUSB) Installation
1. Mount the Hub on the wall at eye
level or higher.
2. Turn ON the Green Box.
3. Connect the Hub to the Green
Box’s USB port.
Cypress Confidential
60
Best practices
• Place the Hub and GBC in a central location on the site with
power and preferably nearby LAN connection
• Mount Hubs and GBCs (if applicable) at eye-level or higher to
avoid furniture obstructions
• Avoid solid metal obstacles in the line of transmission
• Don’t mount Hubs within 3 ft of computers or A/V equipment
(which may produce interfering radio waves)
• Pick a safe and secure location away from weather, possible
water leaks and doors that are used for freight
Cypress Confidential
61
Troubleshooting
Error Code
Possible Cause
Solution
E2
Restart the unit with removing and inserting the
USB cable to the WPT Green Box.
Radio Error – Not able to send/receive data
If the error continues the device requires
replacement. Contact the distributor.
E3
Ping Error – Not able to locate a free RF
channel to use due to high RF interference
Change the position of the Hub.
Connect Error – Not able to connect to the
nearest Repeater
The Hub auto recovers after a few refresh cycles,
if this error occurs after successful installation.
Consider adding/ changing the repeater location
in the zone, if the error persists.
E4
Check USB cable.
E5
USB Error – Not able to communicate with
the WPT Green Box
Change to a different USB port.
Replace the Hub if problem persists.
Reference: HUSB Installation Manual - Section 3
Cypress Confidential
62
Technical Training
Installation - Repeaters
Purpose
Goals:
• Install and power the repeaters
Deliverables/Outcomes:
• Repeaters installed and powered
Cypress Confidential
64
Equipment needed
• Repeaters
• Map
• Power (110VAC or 24VAC)
Cypress Confidential
65
Wall Powered Repeater (RWAL)
Mounting the Repeater
Powering the Repeater from a 110 V wall socket
NOTE: Consider using wire mold to conceal the
power cable
Cypress Confidential
66
What not to do
Cypress Confidential
67
24V Powered Repeater (RWAL 24V)
Route cable
service loop to
provide strain
relief
Non-polarity
sensitive
connector
Route cable through mounting
bracket
Recommendation: Budget 5VA for each RWAL with daisy chained power
24Vac multi-drop wire length table
Cypress Confidential
68
Best practices
• Repeaters may be mounted above ceiling tiles to keep them
out of the way
- Repeaters must be mounted securely when installed above the ceiling
and may not rest loosely on ceiling tiles
- Put a label next to the tile to indicate where the repeater is.
• Mount according to local codes
• Avoid solid metal obstacles in the line of transmission
• Don’t install Repeaters along the same side of the wall as that
of the WPT (wireless coverage is better in front vs. side of
WPT)
Cypress Confidential
69
Troubleshooting
Code
Reason
Solution
This code indicates that the RWAL is
performing a discovery operation and it
should not be disturbed.
This display goes off automatically after a few seconds.
E0
Discovery error – Not able to connect
to nearest RWAL or Hub
Force Discover to retry.
Check if RWAL or Hub is working.
Reset the RWAL.
Place the RWAL or Hub in a different position, if
feasible.
E1
Time synchronization error – Not able
to synchronize the RWAL time with the
wireless network
The RWAL recovers from this error within a few
refresh cycles, if this error occurs after successful
commissioning of the system.
E2
Radio error – Not able to send/receive
data
Restart the unit by unplugging and plugging the
adapter.
If the error persists, contact the original distributor for
replacement.
E3
Ping Error – Not able to locate a free RF
channel to use due to high RF
interference
Change the position of the RWAL.
Connect error – Not able to connect to
the nearest Hub or RWAL
The RWAL recovers after a few refresh cycles, if this
error occurs after successful installation.
Consider adding a RWAL in the zone if the error
persists.
dy
E4
Reference: RWAL Installation Manual
- Section 4
Cypress Confidential
70
Technical Training
Installation - WPTs
Purpose
Goals:
- Mount the WPTs to the wall
- ID the WPTs
- Verify pressures
Deliverables/Outcomes
- WPTs mounted on wall and ready for commissioning
Cypress Confidential
72
Equipment needed
•
•
•
•
•
•
Basic hand tools
1/16” Allen wrench
Suitable wall anchors
Extra 5/32” tubing with springs and adaptors
IR thermal gun (for troubleshooting)
Small battery powered or shop vacuum (if possible
for cleanup)
Cypress Confidential
73
Installing the WPT – Step 1
Remove the existing thermostat and wall plate
(Figure shows 2-pipe thermostat. Procedure is the same for a 1-pipe thermostat.)
1.
2.
3.
4.
5.
6.
7.
Remove the old thermostat cover (typically requires 0.050” or 1/16” Allen driver)
Remove old thermostat from wall base plate.
Unscrew wall mounting plate from wall.
Remove tubing from old thermostat bracket and HOLD ON TO THE TUBING. If it is tight it
will pop back into the wall and you will need to retrieve it.
HOLD ON TO THE TUBING and cut off tubing 1/2” back from the old thermostat bracket.
We want fresh tubing ends to fit onto the WPT tubing port.
If tubing is short you will need to extend the length by adding a coupler and a short 4 to 6
inch length of tubing. Don’t forget the internal spring in the tubing, this keeps the tubing
from kinking and closing the main air flow off to the thermostat.
HOLD ON TO THE TUBING. Now you are ready to install the WPT wall Bracket
Cypress Confidential
74
Installing the WPT – Step 2
Mount universal adapter plate, connect pneumatic lines to
WPT, mount WPT to wall, and install WPT cover plate
(Figure shows 2-pipe thermostat. Procedure is the same for a 1-pipe thermostat.)
1. HOLD ON TO THE TUBING Slide the tubing through the center of the large hole in wall mounting bracket. It is
important that the tubing has room to slide back into wall cleanly so it does not get pinched off as you mount
the WPT to the wall bracket.
2. HOLD ON TO THE TUBING and attach the mounting bracket to wall using existing anchors (if possible).
3. HOLD ON TO THE TUBING and place the tube with air blowing, on to the larger of the 2 fittings on to the back
of the WPT (the port on the left for a 2 pipe WPT). This is the main air inlet (supply line).
4. Place the 2nd tube onto the branch port (which should be blowing air) on the back of the WPT thermostat
(the port on the right).
5. DOUBLE CHECK THAT BOTH TUBES ARE PRESSED ALL THE WAY ON AND BOTTOMED OUT ON THE FITTING.
6. Slide the tubing back through the plate and into the wall.
7. Check to make sure the tubing slides into the wall smoothly and does not get kinked.
8. The WPT slides over the wall bracket at the top and catches allowing the WPT to hang and set into place and
secured with the 2 captured screws at the bottom. Do not over tighten the screws, just snug to tighten.
Cypress Confidential
75
WPT LCD Display
Numeric Display Degree Fahrenheit
Setpoint Indicator
Degree Celsius
OVR
Battery Level
Indicator
Pressure Indicator
Cypress Confidential
Occupancy Override Indicator
76
WPT Menu Structure
Cypress Confidential
77
WPT Setup
Lab - 3
Objectives
• Install batteries
• Configure Node IDs
• Check branch pressure
Cypress Confidential
79
Installing the Batteries in the WPT
1. Open the WPT cover by unscrewing the bottom cover screw
with a 1/16” Allen driver.
2. Install batteries as seen below
Cypress Confidential
80
Programming WPT Network ID
1.
2.
3.
4.
Press all 3 buttons and the LCD will display “Pd”
See section 2.2.1 in the WPT Installation Manual for the password
Using the and buttons, enter the Network ID that you wrote down
from the WPT web console
Press OVR button to confirm and move to the next programming step
OVR
NOTES:
1.
2.
Network ID
Programming
Mode
The WPT is factory configured with Network ID 1. You can leave the Network ID unchanged by
pressing the OVR button.
The WPT will exit programming mode automatically if there is no action for 1 minute.
Cypress Confidential
81
Programming WPT Node ID
1.
2.
3.
Using the and buttons, change the WPT Node ID to match what is
written on the outside of the thermostat , starting with the right most digit
(D1)
•
D1 can not be 0
Press OVR button to confirm and move to the next digit
Repeat until all for digits of the Node ID have been entered.
NOTE: The WPT will exit programming mode automatically if there is no action for 1 minute.
D4 D3 D2 D1
OVR
OVR
OVR
OVR
D4 D3 D2 D1
D4 D3 D2 D1
Cypress Confidential
D4 D3 D2 D1
82
Check branch pressure
1. Press and hold ▼ and OVR buttons
simultaneously for 2 seconds before
releasing – to enter the diagnostic mode
2. Press the OVR 4 times until you see
PRESSURE on the bottom of the LCD
3. Verify that the WPT can build up pressure.
If there is a leak in the branch line and the
WPT cannot build pressure, it cannot be
calibrated.
Cypress Confidential
83
Questions
1. How do you change the setpoint on a WPT when it
is in Unoccupied mode? (Hint – see the WPT
Installation Manual section 3.2)
__________________________________________
2. What is the problem if a WPT shows E0?
__________________________________________
3. If the desired node ID is 4123, what order do you
enter the Node ID into the WPT?
__________________________________________
Cypress Confidential
84
Common WPT Display Messages
Code
Description
dy
“dy” indicates that the WPT is performing a discovery operation and it
should not be disturbed.
dt
“dt” indicates that the WPT is performing a diagnostic operation.
Fd
“Fd” indicates that the WPT is performing a forced discovery operation.
UL
“UL” indicates that the keypad is unlocked by the user.
LC
“LC” indicates that the keypad is locked.
Pd
“Pd” indicates a password is required to proceed.
Cypress Confidential
85
Best practices
•
Use springs inside connector tubing to keep from collapsing
and pinching over time
•
Clean up area customer area after install (if needed)
•
Post install mechanical contractor to air balance the HVAC
system for best system performance
•
Take note of the zones that have possible HVAC problems
and notify appropriate personnel
Cypress Confidential
86
Wrap Up
• Pneumatic tubing can easily slip into the wall during
the WPT install so hold on to it
• WPT Node IDs are entered starting with the right
most digit
• Check branch pressure after installing the WPT
Cypress Confidential
87
Technical Training
Commissioning the WPTs
Purpose
Goals:
• Calibrate and verify the WPT is controlling and
functioning properly
-
Verify HVAC operation – make sure no lines are pinched
Calibrate the WPTs
Verify HVAC operation – make sure calibration worked
Verify the signal strength of each WPT
Deliverables/Outcomes:
• Calibrated thermostats with good RF signal
Cypress Confidential
89
Verify HVAC operation using the WPT (DA)
1. Adjust WPT setpoint to 55 degree and wait and watch.
2. Check Branch pressure
•
•
•
A direct acting thermostat will be in cooling mode and will build branch pressure (verify
pressure is at 15 lbs or higher)
A/C actuator will start to open fully (at around 13 lbs)
You should see the supply air temp drop to 65 degree or lower (check with an IR
temperature gun)
3. Adjust WPT setpoint to 85 degree and wait and watch.
4. Check Branch pressure
•
•
•
A direct acting thermostat will be in heating mode and branch pressure will drop to 0
lbs.
At around 5 lbs the heating valve should open and air temp should warm up.
At 0 lbs the valve is open full and the supply air temp should warm to 90 degree or
higher (check with an IR temperature gun)
If branch pressure will not build on the WPT
• Loosen and lift WPT off wall bracket, as you pull away from wall look behind WPT
to check for kinked main air line.
• Remove branch line and place your finger over the port and repeat # 2 above.
•
•
If pressure will build with your finger over the port, then there is a possible branch line
leak.
If there is no pressure, then replace the WPT and return the unit
Cypress Confidential
90
WPT Calibration and
Commissioning
Lab - 4
Objectives
•
•
•
•
Calibrate WPT
Manually discover wireless network (force discover)
Check WPT signal strength
Additional WPT features
- Turn on/off Standalone
- Lock/Unlock keypad
- Diagnostic data
Cypress Confidential
92
Calibrating the WPT – Step 1
1.
2.
Remove the front cover of the WPT and make sure that the WPT is
acclimated to the ambient temperature.
Turn on the air compressor
Notes
1.
Acclimating the thermostat can take 30 minutes or more after attachment to the wall. The bimetallic strip is
very sensitive to body heat. Keep hands and breathe away from WPT to minimize calibration error.
2.
The black throttling range adjuster has been factory set to the location marked on the lever. The factory
setting provides a Throttling Range (TR) of 4°F. This TR adjuster MUST NOT BE MOVED in order to ensure
proper operation and accuracy of the WPT. The throttling range is the amount of temperature change
required for the WPT to produce a full output change.
3.
Single pipe WPT might take a longer time to respond during calibration. Please allow sufficient time to
calibrate the WPT accurately.
Reference: WPT Installation Manual - Section 2.3
Cypress Confidential
93
Calibrating the WPT – Step 2
To enter Calibration Mode, perform the following:
1.
Press the ▼ button and OVR button together for two seconds, then
release. The display will show ‘dt’.
2.
Press OVR four times. The LCD displays the branch pressure in PSI along
with PRESSURE indicator. The display shows “--" if the motor is in
motion when trying to access branch pressure.
3.
Press all three buttons simultaneously to enter Calibration Mode. The
“C” icon will flash rapidly while in this mode.
Reference: WPT Installation Manual - Section 2.3
Cypress Confidential
94
Calibrating the WPT – Step 3
Reference: WPT Installation Manual - Section 2.3
1.
Use a 1/16” Allen wrench and very carefully turn the calibration set screw on the thermostat
lever, until the branch pressure is equal to the desired control point. Use extreme caution not
to allow the lever to rotate sideways while adjusting the setscrew.
2.
Each battery segment on the LCD represents 0.25 PSI resolution, as shown above.
3.
4.
When the desired control pressure is achieved, press the OVR button to exit and save the
value.
A confirmation screen will appear and flash the stored control pressure for 3 seconds.
Repeat the calibration procedure if this value does not match the desired control
pressure.
Replace the WPT front cover.
NOTE: The WPT will automatically exit Calibration Mode if the center button is not pressed after 3 minutes. The
control pressure will NOT be saved and the WPT will return to the home screen.
Cypress Confidential
95
Manually discover the network (Force Discovery)
1. On the RWAL, press and release the center and
bottom buttons at the same time. The LCD will show
“dt”.
2. Press the top button once. The LCD will show “Fd”
3. On the WPT web application click on “Zone Monitor”
then on “Network Status”. Take note of the
timestamp for your RWAL. It should have updated.
4. On the WPT, press and release the center and bottom
buttons at the same time. The LCD will show “dt”
5. Press the top button once. The LCD will show “Fd”
6. On the WPT web application click on the “Dashboard”
button. Take note of the timestamp for your WPT. It
should have updated.
NOTE: Force discovery helps in establishing the Wireless connectivity during
installation/troubleshooting.
Cypress Confidential
96
Checking Signal Strength
Each WPT attempts to find a primary and secondary wireless path back to the Hub.
The paths and associated signal strengths (1-5) from the WPT are displayed in
the “dt” menu.
1.
Press and hold the ▼ button and OVR button together for two seconds before
releasing. The display will show ‘dt’.
2.
Press the OVR button 5 times to see the primary path. °C icon is displayed,
indicating that the ID is being displayed (either a repeater ID or the Hub ID).
3.
Press the OVR button again to see the wireless signal strength from the WPT to
the primary path.
4.
Press the OVR button again to see the secondary path. °C icon is displayed,
indicating that the ID is being displayed (either a repeater ID or the Hub ID).
5.
Press the OVR button again to see the wireless signal strength from the WPT to
the secondary path.
NOTE: This menu is not available in Standalone mode.
Reference: WPT Installation Manual - Section 3.6
Cypress Confidential
97
Diagnostic Information
1.
To view diagnostic info press and hold ▼ and OVR buttons simultaneously
for 2 seconds before releasing.
2.
The LCD displays ‘dt’ to indicate the diagnostic mode.
3.
Press OVR once to view the major firmware version.
4.
Press OVR a second time to view the minor firmware version.
5.
Press OVR for a third time to view the control polarity (direct/reverse).
This table shows the value displayed in
the control polarity window depending
on the type of WPT used.
6.
Press OVR for a fourth time to view the current branch pressure in PSI
• Press the ▼ button. The LCD will flash the stored control pressure
for 3 seconds and return to the home screen. The battery segments
on the LCD represent 0.25 PSI resolution.
NOTES
1.
The WPT will exit diagnostic mode automatically if there is no action for 1 minute.
2.
The display shows “--" if the motor is in motion when trying to access branch pressure.
Cypress Confidential
98
Lock/Unlock WPT LCD Keypad
Additional WPT feature
Try Locking the LCD Keypad
1. Press and hold the ▲ and ▼ buttons together for 2 seconds
and release.
2. The keypad is locked and the LCD displays “LC” for 2 seconds.
3. When the keypad is locked, the user will not be able to use
the buttons on the thermostat to change the setpoint or
enter Occupancy Override.
4. When the keypad is locked, if the user tries pressing any
buttons, “LC” appears to indicate that buttons are locked.
Now Unlock the LCD Keypad
1. Press and hold the ▲ and ▼ buttons together for 2 seconds
and release.
2. The keypad is unlocked and the LCD displays “UL” for 2
seconds.
NOTE: The LCD buttons can also be locked/unlocked from the WPT
Green Box.
Reference: WPT Installation Manual - Section 3.5
Cypress Confidential
99
Configuring the WPT for Standalone Mode
1.
2.
3.
4.
5.
Press all three buttons simultaneously to enter programming mode.
See section 2.2.1 in the WPT Installation Manual for the password
Press OVR six times to enter wireless mode screen.
Press all three buttons simultaneously to toggle between wireless and standalone modes.
Press OVR to confirm.
Wireless mode
Standalone mode
NOTES:
• The WPT will exit programming mode automatically if there is no action for 1 minute.
• This mode is not a power saving mode
Reference: WPT Installation Manual - Section 2.2.4
Cypress Confidential
100
Questions
1. What is considered a good signal strength?
__________________________________________
2. What does it mean when the WPT shows “dy” on
the LCD?
__________________________________________
3. How do you check to see what control pressure the
WPT was calibrated to?
__________________________________________
4. What does it mean if the primary and secondary
paths are the same?
__________________________________________
Cypress Confidential
101
Best practices
• Identify the correct CONTROL POINT or BALANCE POINT to
correctly calibrate the WPT
• Install thermostats in a given area, and leave the cover off (if
possible) so the thermostat can stabilize. Come back later to
calibrate the thermostat, double check operation and attach
the cover.
• Do NOT pull, push or try to slide the arm to fluctuate the air
pressure as this may damage the bimetallic strip
• Use the up and down buttons to rotate the cam during the
install process and troubleshooting
Cypress Confidential
102
Wrap up
• Wait until the WPT is acclimated to the room
temperature before calibrating
• When calibrating be careful not to touch the
bimetallic strip
• WPTs should be properly calibrated to the control
point as defined during the site survey
• Before leaving the WPT make sure the ambient
temperature is displayed (and not E0)
Cypress Confidential
103
Technical Training
Commissioning at the GBC
Purpose
Goals:
• Complete final system check
- Verify all WPTs communicating
- Verify all RWALs communicating
- Make sure temperature setpoints are correct
Deliverables/Outcomes:
• System ready for customer walkthrough and training
Cypress Confidential
105
Proposed Install Checklist – final checkout
Item #
1
2
3
4
5
6
7
8
9
10
11
12
13
14
15
Installation Checklist
Have all thermostats reported in the last 15min
Do the RSSI statistics from the Node Status page show good links for all nodes?
RSSI greater than 3 for last 24HR, current RSSI greater than 3 for all hops
Validate thermostat count for Repeaters and Husbs. Do any exceed 15?
Validate hop count. Make sure no more than 6 repeaters are needed for any WPT
Have the all the WPTs been calibrated?
Are all WPTs showing battery life of OK?
Plot or scan tables for pressure, setpoint and ambient values for each WPT installed.
Do the values make sense?
DA --> Ambient above setpoint, pressure should be above the calibration pressure
RA --> Ambient above setpoint, pressure should be below the calibration pressure
Have all repeaters reported in the last 15min
Is the last digit of each repeater ID unique?
Have all the necessary updates been made to the job site map?
Have all WPTs been noted on the map?
Have all RWALs been noted on map?
Are all Network IDs unique across multiple GBCs?
Are the repeater locations listed in the server descript enough?
Has the customer been properly trained?
Is there follow-up work needed?
P=Passed
F=Failed
U=Unable to
Check
N/A=Not
Applicable
Results
• Before-You-Leave Checklist
- Preliminary list, but should be appended with installer feedback
- Simple “rules of thumb” that
can prevent call-backs
Cypress Confidential
106
Checking the thermostats
Item #
Installation Checklist
1
Have all thermostats reported in the last 15min
2
Do the RSSI statistics from the Node Status page show good links for all nodes?
RSSI greater than 3 for last 24HR, current RSSI greater than 3 for all hops
3
Validate thermostat count for Repeaters and Husbs. Do any exceed 15?
4
Validate hop count. Make sure no more than 6 repeaters are needed for any WPT
5
Have the all the WPTs been calibrated?
Results
Are all WPTs showing battery life of OK?
6
Plot or scan tables for pressure, setpoint and ambient values for each WPT installed.
Do the values make sense?
DA --> Ambient above setpoint, pressure should be above the calibration pressure
RA --> Ambient above setpoint, pressure should be below the calibration pressure
Cypress Confidential
107
WPT: RF Validation Methods (1 of 4)
Zone Monitor Dashboard
• Verify all WPTs are reporting
• Verify all timestamps are within 15 min
Cypress Confidential
108
WPT: RF Validation Methods (2 of 4)
Alarm Notification Flag – Verify WPT data over time
• Route and Hop Count
• RSSI per hop
Every 15 minutes
Cypress Confidential
109
WPT: RF Validation Methods (3 of 4)
Node Status Page – Latest WPT Data Packets
• Verify number of WPTs per RWAL or Hub <= 15
• Verify RSSI
- Current Min – Weakest link of latest packet, Hop Identified “*”
- 24-Hour Min – Lowest RSSI over last 24-hours, Hop Unknown
- 24-Hour Avg Min – Average RSSI of the Weakest Link over 24-hours
OK Link
Weak Link
Strong Link
Cypress Confidential
110
WPT: RF Validation Methods (4 of 4)
• Daily Performance Exports – Verify extended WPT
data over time
•
•
•
•
Route and Hop Count
RSSI
Battery
Missing data (are timestamps missing?)
Cypress Confidential
111
WPT: control/calibration verification
1
2
3
5
4
7
6
8
9
Cypress Confidential
112
Using Trends – Proper Response (example)
SETPOINT TEMPERATURE
•1st DR Event bumped up setpoint 2 deg
•2nd DR Event bumped up additional 2 deg
•Completion of Event – back to normal
ZONE TEMPERATURE
•Morning A/C comes on
•Temp climbs after initial DR event
•Continues climbing after 2nd DR event
DELTA SETPOINT MINUS ZONE TEMP
• Should maintain to within 2 degrees of
setpoint throughout
BRANCH PRESSURE
• Drops after first event called
• Drops after second event called
• Stays about neutral 8psi during entire DR
period.
Cypress Confidential
113
Using Trends – Insufficient Cooling (example)
SETPOINT TEMPERATURE
•1st DR Event bumped up setpoint 2 deg
•2nd DR Event bumped up additional 2 deg
•Completion of Event – back to normal
ZONE TEMPERATURE
• Morning A/C comes on
• A/C working, but never makes it to 63 deg
setpoint. Stabilizes at 73 deg.
DELTA SETPOINT MINUS ZONE TEMP
• Best able to achieve is about six degrees
higher than setpoint.
BRANCH PRESSURE
• Always maxed out i.e. calling for
maximum cooling.
Causes:
•Setpoint too low
•Faulty Reset Velocity Controller
•Mechanical Equipment Fault
•Undersized cooling capacity design
Cypress Confidential
114
Using Trends – Too Much Cooling (example)
SETPOINT TEMPERATURE
•1st DR Event bumped up setpoint 2 deg
•2nd DR Event bumped up additional 2 deg
•Completion of Event – back to normal
ZONE TEMPERATURE
• Morning A/C comes on
• Temp keeps dropping, even below
setpoint
DELTA SETPOINT MINUS ZONE TEMP
• Temperature way too cold, much below
setpoint most of the day
BRANCH PRESSURE
• Thermostat is trying to compensate for
over cooling all day long.
Causes/Remedy:
•Faulty Reset Velocity Controller
•VAV Box Fault
•Adjacent Zone Overcooling
Cypress Confidential
115
Checking the repeaters
Item #
7
8
Installation Checklist
Have all repeaters reported in the last 15min
Is the last digit of each repeater ID unique?
Cypress Confidential
Results
116
Repeater: RF Validation Methods
Network Status Page – Latest RWAL Health Packets
- Verify RWAL Health Packet received every 15-minutes
- Verify Routing Info / Hop Count
• Ideally Hop Count (total number of repeaters in the Routing Info
Column not including the hub) should not exceed 6
- Check for duplicate RWAL ID – Rightmost Digit ONLY
Cypress Confidential
117
Additional material to verify
Item #
9
10
11
12
13
14
15
Installation Checklist
Have all the necessary updates been made to the job site map?
Have all W PTs been noted on the map?
Have all RWALs been noted on map?
Are all Network IDs unique across multiple GBCs?
Are the repeater locations listed in the server descript enough?
Has the customer been properly trained?
Is there follow-up work needed?
Cypress Confidential
Results
118
Best Practices
• To ensure you have enough data at the GBC allow 24
hours of communication
• Use trending to verify the WPT is controlling properly
• Leave with a copy of the database backup
Cypress Confidential
119
Troubleshooting tips
• Additional diagnostic information can be seen by
clicking the Alarm Flag icon. It will show the
following
- Last 24 hours of WPT data including routing information
- Setpoint changes
- Alarm flags
Cypress Confidential
120
Wrap up
• Verify all repeaters are communicating with the GBC
• Verify all WPTs are communicating to the GBC
• Verify the hop count for each WPT is 6 or less
• Verify the number of stats communicating to a
repeater or directly to the hub is 15 or less
Cypress Confidential
121
Technical Training
Customer walkthrough/signoff
Purpose
Goals:
• Walk customer through completed install
• Train customer on WPT web application
- Setup node groups and alarms (if needed)
- Set setpoint limits (if needed)
- Set schedules (if needed)
Deliverables/Outcomes:
• Compile maps (floor plans) with locations of GBC-Repeaters
and thermostats along with a list of node numbers and
locations and deliver to customer.
• Compile a binder with installation manuals and maps for the
customer. Include all contact information.
• Create backup of information after all checks of system is
complete.
Cypress Confidential
123
Create Node Groups
1
2
3
4
5
6
Cypress Confidential
124
Configure schedule
Configure Occupied /
Unoccupied Setpoints
and/or Deadbands
1
2
3
4b
5b
4a
5a
6
7
1
2
3
Configure Weekday
Schedule
4
6
5
7
1
2
3
Configure
Weekend Schedule
4
5
6
7
Cypress Confidential
125
Configure Schedule
1
2
3
Configure Holiday
Schedule
4
5
6
1
2
3
4
5
Configure Special Day
Schedule
6
7
8
9
Cypress Confidential
126
Configure Alarms
1
2
Alarm Limits
3
4
1
2
3
Alarm Notifications
4
5
6
Cypress Confidential
127
Advanced Features
1
2
WPT LCD Keypad Lock/Unlock
- To lock/unlock the buttons on
the thermostat so that users
don’t accidently change the
settings
3
5
4
6
1
2
Configure Setpoint Limits
- To set the limits within which
the users can change the
setpoint values
3
4
5
6a
6b
7
Cypress Confidential
128
User Administration
Adding Users
Creating User
Groups
Cypress Confidential
129
Manually Change Setpoints or Deadbands
Changing the
setpoint or deadband
- The setpoint or
deadband can be
changed for
selected zone or for
all zones in a group.
- Setpoint can be
changed either by a
delta value or to a
specific value.
1
2
3
4
5a
5b
6
Cypress Confidential
130
View Daily Performance Report
1
2
3
4
5
6
Cypress Confidential
131
View Alarm Report
1
2
3
4
5
6
7
8
9
10
Cypress Confidential
132
After Hour Usage Report
1
2
3
4
5
6
7
Cypress Confidential
133
Advanced Features
Auto Calibration
- To initiate auto calibration
based on the historical data and
the desired control pressure
Backup Database
- To protect against data loss
Command Status
- To view advanced configuration
commands for given to nodes
1
2
Cypress Confidential
134
Advanced Features (cont’d)
1
2
3
Auto-DR Configuration
- To configure the DRAS Host
address, username and password
- Options to change the setpoint
either by delta or to a fixed value
4
5
6
7
8
9
Diagnostic Data File
1
- Export diagnostic data to Excel
2
3
4
5
6
Node Status
- View WPT wireless diagnostic
data
1
2
Cypress Confidential
135
Best practices
•
Run a trend of a few WPTs to view the history over a couple
of days to see how the system is working.
•
Cross check all thermostats between setpoint and room
temp.
-Is the room temp within 2 deg of setpoint?
•
Cross check all thermostats between room temp and branch
pressure.
-Is the branch pressure following the room temp correctly?
•
Check to make sure all thermostats are reporting to server.
-Node Status will help you verify network condition
•
Train the customer on how to use the system
Cypress Confidential
136
Technical Training
BACnet Integration
GBC BACnet integration
BACnet integration steps
-
GBC virtual ID selection
Discover nodes & points and add to system
Validate data communication
Add trend graphs
Schedule considerations with BACnet
Offline detection and reliability
Update rates and resolution
BMS issues/limitations
- Discovery reliability
- Caching of node configuration
- No longer support COV
Cypress Confidential
138
Accessing WPT using BACnet/IP
•
Each WPT is represented as a BACnet Device.
•
Conventional WPT devices support the following I/O Objects
- 3 x Analog Inputs (Ambient Temp, Branch Pressure and Battery Level)
- 2 x Analog Outputs (Setpoint, Unoccupied Setpoint)
- 1 x Binary Input (Occupancy Override)
- 1 x Binary Output (Occupancy State)
• Deadband WPT devices support the following I/O Objects
- 3 x Analog Input Object (Ambient Temp, Branch Pressure and Battery Level)
- 4 x Analog Outputs (Setpoint HeatBelow/CoolAbove, Unoccupied Setpoint
HeatBelow/CoolAbove)
- 1 x Binary Input (Occupancy Override)
- 1 x Binary Output (Occupancy State)
•
WPT BACnet Gateway is BBMD enabled.
Cypress Confidential
139
BMS Integration via BACnet
• GBC configuration
- Every node must have a network wide, unique
BACnet ID assigned.
- All schedules must be disabled as they will
conflict with BACnet generated
setpoint/occupancy changes.
- BACnet Virtual Network ID must be unique for all
servers on the network. Allows clients to
identify BACnet servers.
Cypress Confidential
140
BMS Integration via BACnet
Offline detection and reliability
- Offline is when the BACnet client is unable to communicate
with our GBC BACnet gateway.
• All devices for the server will be flagged as offline.
- Communication is lost when:
• Server is restarted or service has stopped.
• CPU is over utilized
• Network connection is lost
- Reliability is a state that is maintained by our GBC and
monitored by the BACnet client.
• The GBC will flag a node as unreliable when it detects that no RF
packets have been received from a node for 5 consecutive
15minute report intervals.
Cypress Confidential
141
Best practices
• Configure all WPTs on the GBC first before starting
BACnet integration
• Make all WPT BACnet IDs intuitive so they are easy
to discover
Cypress Confidential
142
Support/Resources
Private Self-Service Website (VAR Portal)
• Password protected
for partners only
• Software
downloads
• Product Bulletins
• FAQ’s
• Training Videos
• Product
documentation
• Knowledge Base to
store/query prior
experience
Cypress Confidential
144
Partner Portal
Cypress Confidential
145
Customer Support
How to contact us
- Main support email address: [email protected]
- Support hotline: 888-987-3210 (5am – 5pm PT, M-F except holidays)
Available resources
- Public Website www.cypressenvirosystems.com
• Product briefs
• Installation manuals
• Training manuals
- Online knowledgebase (login required) (end of June)
- Partner portal
• Product documentation and training
• FAQs, product manuals and bulletins
• Software updates
Cypress Confidential
146
Product returns
• If under warranty, contact support hotline for RMA number
• What info is required to obtain RMAs
-
Product and quantity
Installation site and installer
Installation date
Reported problem (in detail)
Actions taken
Steps to reproduce the problem (if known)
• Units should be shipped to
Cypress Envirosystems
198 Champion Ct.
San Jose, CA 95134
Attn: Angel Ruiz
Cypress Confidential
147
Thank you
www.CypressEnvirosystems.com
Cypress Confidential
148
Appendices
Reference Documents
Document
Number
Topics
Reference Document
Features and benefits of the WPT
Wireless Pneumatic Thermostat Product Brief
Installing and configuring Wall Powered
Repeaters (RWAL)
RWAL Installation Manual
910-00002-01
Installing and configuring the Hub (HUSB)
HUSB Installation Manual
910-00003-01
Installing and configuring the WPT
WPT installation Manual
910-00005-01
PBWPT
Estimating the number of Repeaters and selecting
WPT Wireless Network Planning Guide
the optimum locations for Repeaters and Hub
910-00006-01
Installing and configuring the WPT Green Box
WPT Green Box Installation Manual
910-00007-01
BACnet Objects and Properties supported by the
WPT Green Box
WPT BACnet PICS
910-00008-01
Using the wireless range testers
WPT Wireless Range Tester User Manual
910-00009-01
BACnet configuration
WPT BACnet Gateway Users Guide
910-00012-01
Cypress Confidential
150
Reference
WPT
Model
Description
JCI
Honeywell
Powers
Robertshaw
BarberColman
KMC
WPT-800T2DP
2-pipe
Direct
Acting
T4002-201
TP970A
TP973A
TH192 S
T15
T18
TK1001
CTC-1621
WPT-800T2RP
2-pipe
Reverse
Acting
T-4002-203
TP970B
TP973B
TH192 S
T16
T19
TK1101
CTC-1622
WPT-800T1DP
1-pipe
Direct
Acting
T-4002
TP973A
TH192 S
T15
T18
TK5001
CTC-1611
WPT-800T1RP
1-pipe
Reverse
Acting
T-4002
TP973B
TH192 S
T16
T19
TK5010
CTC-1612
Cypress Confidential
151