1
ENGLISH
r_ ,
_
_,,
Portable Navigation
OWNER'S
Ce
MANUAL
LN830/LN830R/LN835/LN835R
Please read this manual carefully before operating your
navigation device.
Keep it for future reference.
Designs and specifications are subject to change without
prior notice for improvement.
Support-
Hotline
USA
: 1-800-243-0000
CANADA
:1-888-542-2623
To purchase the Upgrade
http:!/us.l,ge,com/navigation.
httpJius.lge.com
http:i/caJge,com
Map, go to
CAUTION : TO REDUCE THE RISK OF ELECTRIC SHOCK DO NOT SPLIT COVER(OR BACK) NO
USER SERV]CEABLE
PARTS INSIDE, REFER SERVICING TO QUAUFIED SERVICE PERSONNEL
The lightning flash with the,
arrowhead symbol, within an
equilateral triangle is intended to alert
the u_r about the presence of
uninsu]ated dangerous vo.!_ge within
the product's enclosure that may be
of sufficient magnitude to, constitute a
risk of electric shock.
The exclamation point within a.n
equilateral triangle is intended toi alert _'_
tlhe user to the [presence of impoAant
operating and maintenance
(servicing) in_ructions in tlhe ifferao
ture ac_mpanying
the applian_.
A]ways operate the vehicle in a safe
manner. Do not become distracted by
the navigation whii.e drMng, and
a]ways be fully aware of aH drMng
conditions,
Minimize the amount of time spent
viewing the navigation screen while
driving and use voice prompts when
possible,
Do not enter de_inations,
change
settings, or ac_ss any functions
requiring probnged use of the unit's
controls whi]e driving.
Pull over in a safe and legal manner
before attempting such ,operations°
Do not kink or crease the power
cable or place heaw objects o,n the
power cable,
Fire can result from damaged power
cables,
Unp]ug the car charger during
e]ectrical storms. This may resu]t in
electrical shock
iDo not handie the power plug nor the
adapter with wet hands,
This may resu]t in a eiectrica] shock.
immediately _,wer off the unit and
unplug the car chiarger if you notice
smoke or odors coming from the
navigation device or adapter,
Fire can result from improper use.
Make sure to insert the power plug
tightly,
Fire can result from improper use.
Use only the specified power
adapter.
Using a different type of adapter
damage the product,
(5.0 +1_ 0.2V)
may
The appliance is not intended for use
by children or infirm _rsons without
supervision,
Note that malfunctions may o_ur if
you use the product in places where
static e]ectricity oocurs fr_uentiy,
Do not use the unit near water.
Do not touch the unit with wet hand&
Do not attempt to disassemble
repair the product yo,urself.
or
Do not use the product for other purposes than those described in this
guide.
Do not use in extreme temep, eratures,
(q0°C*_60,°C)
Avoid leaving the product in hot or
humid places.
Take special attention when touching
the product box, owneCs manual and
accessories to avoid cu_.
While driving, keep the sound volume
to a level that does not distract you
from driving.
Do not drop, and a_o,idl heavy
impacts.
if you notice unusual odors, excessive heat _,ming from the product ,or
an_hing else that seems unusual,
stop use and contact our Customer
Sen'ice Center.
Always use so,A, diry cotton cloth
when cleaning the, produ_o
Do not use strong solvents such as
alcoho!, _nzine,
or thinner, as these
might damage the surface of the un_.
When attaching a navigation holder
to the windscreen remove impurities
in the area _fore attaching and
slide the su_ion lever to secure to
the wind_reen.
Do not pulll out the SD, Memory Card
while the navigator is in operation as
this may cause mechanical problems.
Do not use the navigator for extended periods of time.
This may resuit in batte_ discharge.
Please obey all traffic regulations.
To aid safe driviing, info_at:ion on
safe driving routes and routes where
accidents occur frequently is included.
Voice guidance and map route may
differ from the actual tr_fic
conditions.
When moving the product, separate
the ipower plug from cigarette lighter
socket then remove the navigation
device from the windscreen mount.
Finally slide the ]ever on the windscreen mount to al! the suction cup
be released.
•if you attach the windscreen mount on the
gl_s for a long period of time, the pressure,
in the suction cup slowly reduces and the
windscreen mount may fall off,
, The windscreen mount may fall off the windscreen of not properly installed, Should this
occur, it is recommend_
that navigation
device is install!_ as dose to as possible to
the dash board to avoid damage to the unit.
• Applying too much force to adjust the angle
of the windscreen mount may cause damage. Take care whien making adjustments,
, If the windscreen mount fails off, please foibw the instructions again to reinstall and
use it.
• Back up, your data using our provid_
ware in the CD,
•. Please note that if the product is damaged
due to user negligence, it cannot be returned
or refunded.
the safety" operations of the vehicle when
installed. Eg. Deployment of air bags or
other safe_ equipment.
• The, unit may require the external antenna kit
if the vehicle, has, a heat reflective shield
embedd_
in the windscreen. Heat refle,Give
Caution
:
Danger of explosion if battery is
incorrectly replaced.
Repla_ only with the same or
equivalent type.
Winter precautiOn
- The windscreen mount can easily _me off
the glass due to differences in temperature
between inside and outside the windscreen,
Summer precautions
- The windscreen mount can easily come off
the glass due to difference in temperature
between inside and outside o,f the
• Remove
separately
time.
the windscreen
when parking
mount and store it
br a long period of
• The buibin batter/may
_ damaged when
kept under dire_ sunlight in the car for a
long period of time,
Separate the unit and store it in a cool place.
A temperature rise over _ d_rees
,can
reduce the bakery life span or cause an
exp!osion.
• Never leave your unit/accessories
(including
windscreen mo,unt, car charger etc) visible in
an unattended vehicle, as these are a
target for thieves.
so_ o
• In order to protect the screen and the unit,
always store _ in the carry" case,
• Do not use the memor/card
(SD card) with
other devils
as this may cause damage to
the SD card..
., The navigation ,device needs to, have direct
lin,e o,f sight with the sky in, order to pick up, a
signa!, For a speedier fix: on your location,
please allow up to 5 minutes at a standstill
for the device, to locate you,
• When installing the unit, make sure that it
does not b l_k the view on the windscreen,
Make sure that unit does not interfere with
windscreens can prevent a signal from being
received by the navigation device.
The external antenna kit is a vaillable _ an
optional a_essory.
• The guidance _oute is only a guide and there
maybe some variances between the information on the navigation device with the
actuail roads. Road data is always being
updated and furthers updates may be added
subje_ to availabili%
., The unit is designed to provide you with
route suggestions, so it does not reflect road
,conditions, traffic _ngestion,
weather
conditions or other factors that may affect
safety ,or timing while driving,
To reduce the risk of fire or electric-shock,
do
not ex_,s.e this
apparatus to rain or moisture.
Do, not expose this equipment to, dripping or
splashing and ensure that no objects filled
what liquids, such as vases, are placed on the
/
i¸¸ii!i:
¸ !ilia? ii
;;:
(i
"Underwriters
Laboratories Inc. ("UL") has not
tested the performance or
reliability of the Global Positioning System
("GPS") hardware, operating
_ftware
or other aspens of this product, UL
has only tested for fire,, shock or casualty hazards as outlined in UL's Standard for Safety
for Audio, Video and Similar Electronic
Apparatus - Safety Requirements,
UL 6_65.
UL CeRificat[on does not cover the performance or reliability" of the GIPS hardware and
G PS operating so.are
UL MAKES NO REPRESENTATIONS,
WARRANTIES OR CERTiFICATiONS
WHATSOEVER REGARDING THE PERFORMANCE
OR RELIABILITY OF ANY GPS RELATED
FUNCTIONS OF THiS PRODUCT."
!i
i
//
¸¸¸¸
CAUTION : Changes or modifications not
expressly approved by the manufacturer
responsible for compliance could void the
user's author_
to operate the equipment.
This device complies with part 15 of the FCC
Rules.. Operation is subject to the following
two conditions: (i) This device may not cau_
harmful interference, and (2) this device must
accept any interference received, including
interference that may cause undesired operation.
INFORMATION
TO USER
:
This equipment has b_n tested and found to
comply with the limit of a Class B digital
device, pursuant to Part 15 of the FCC Rules.
These limits are designed to p#ovide reasonable protection against harmful interference in
a residential instal]ation.
This Class B digital apparatus complies with
Canadian ICES-003, Issue 2, and RSS-210,
Issue 4 (Dec_ 20_),
"To, prevent radio interference to the licensed
service, this device i,s intended to be operated
indoors and away from windows to provide
maximum shielding. Equipment (or its transmit
antenna) that is in.ailed
outdoors is subiect
to licensing."
Cet appareil numerique de la classe Best
_nforme
& la norme NMB-_3,
No. 2, et
CNR-210, No. 4 (Dec. 2_0).
This equipment generates, uses and can radiate radio frequency energy and, if not
installed and used in accordance w_h the
instructions,
to radio
may cause harmfull interference
communications.
However, there is no guarantee that interference will not occur in a part[cular in_allation;
if this equipment does
cause harmful interference to radio or televi-
<< Pour emp¢cher que cet appareil cause du
brouilllage a u service faisant: I'objet d'une
licence, i! doit 6tre utilise & !"interieur et devrait
_tre place !oin des fen_tres afin de fournir un
_ran de blindage maximal. Si le materiel (ou
sion reception, which can be determined by
turning the equipment off and on, the user is
encouraged to try to correct the interference
by one or more of the foiliowing measures::
_n
i. Reorient / Relocate the receiving
antenne d'emission) est installe & I'exterieur,
doit faire I'objet d'une licence.>>
Operation
ditions:
is subject to the following
two _n-
This devi_
may not cause interference, and
(2) this device must accept any interference,
including interference that may cause undesired operation of the device.
The term "!C:" before the ce_:ification/registration number on4y signifies that the Ilndust_
Canada technical specifications were met.
il
2. Increase the separation
ment and receiver:
antenn&
between the equip-
3. Connect the equipment into an outlet on a
circuit different from that to which the
receiver is;connected.
4. Consult the dealer or an experienced
radiofTV technician for help.
IMPORTANT
i.
SAFETY
INSTRUCTIONS
.
Read these instructions. - Al! these safety
and operating
instructions should _ read before the
product
is operated.
2.
Keep these instructions. - The s afeby',
o_rating
and use
instructions should _ retained for future
3.
Heed all warnings. - All warnings on the
product and in the
operating in_ructio, ns should be adhered
to.
,
.
Follow all instructions. - All operating
use instructions should be foil,owed
and
Do not use this apparatus near water. For example: near a bath tub, wash bow!,
kitchen sink, laundry tub, in a wet
basement; or near a swimming poo!; and
other areas located near water.
Clean only with dry cloth. - Unplug this
iprodu_ from the wall
outlet before cleaning. Do not use liquid
cleaners.
6_
,
Do not bl_k any ventilation openings.
Ins_l! in a_ordance
w_h the manufacturer's in_ructions.
the
-Slots and openings
cabinet are provided
ensure reliable
for ventilation
in
and to,
operation of the produ_ and to protect it
from over-heating.
The o_nings
should never ibe blocked by
placing the product on a bed, sofa, rug or
other similar surface.
This product should not be placed in a
built-in in_allation such as a bookcase or
rack: unless proper ventilation is provided
or the manufacturer's
instru_ions
have
b_n adhered to
8.
Do not install near any heat sources such
as radiators, heat
registers, stoves, or other apparatus
(including amplifiers) that produ_
heat.
i0.
Do not defeat the safety purpo_ of the
polarized or
grounding4y_
plug. A polarized plug has
two blades with one wider than the other.
A grounding type plug has two blades and
a third grounding prong. The wide blade
or the third prong are
provided for your safe_. If the provided
plug does not fit into your outlet, consult
an e!_trician
for replacement of the
obsolete outlet.
Protect the power _rd from being walked
on o,r pinched
particularly at plugs, convenience receptacles, and the point where they exit from
the apparatus
1i. Only use attachments/accessories
fied by the
speci-
12. Unplug this apparatus
during lightning
storms or when unu_d for long periods
of time.
13. Refer all s:e_icing
sonnel.
to qualified
semice per-
Servicing is required when the apparatus
has been damaged in any way, such as
power-supply _,rd or plug is ,damaged,
liquid has been spilled or objects have
fallen into the apparatus, the apparatus
has been ex_sed
to rain or moisture,
does not
operate
normally,
or has been dropped.
General information
Package conten_
Option _ble
Name
Connecting
installation
for the windscreen
thie external
Connecting
Downlioading
mount
...............................
...........................................
(Optional)
...................................
.....................................................
files: Mass storage
device
..............................
....................................................
..................................................
the Volume/Brightness
...........................................
...............................................................
G_ing
started
Genera] operation
navigation
........................................
.....................................................................
Finding and storing a destination
Finding the stored destination
Map screen
Navigation
Navigation
General
on the map
................................
..........................................
.............................................................................
Men u
.......................................................
menu list
operations
...................................................
of navigation
menu
13
13
14
i5
i5
15
....................................................................
with
i2
15
featu re .........................................................
Using a earphone
12
14-15
............................................................................
Turning the unit on[off
11
13
..............................................
Initial setting
Lo_
11-13
the USB lead from the navigation
e_ration
Mute
mount
GPS antenna
the USB cable
Disconnecting
i0
..........................................
sequence
10
i0
the windscreen
Adjusting
............................................................
............................................................
devils
Ins_lling
9
..........................................................
Rear / Side panel
De_ching
9
..................................................
component
Front pianel
9
....................................................
by models
of _eh
Basic
.................................................
.................................................
15
16-17
16
i6
16
17
18-29
i8
18
Add ress .................................................................
i9
Recent Places
20
My Places
..........................................................
........................................................................
20-22
PO! .................................................................
22-23
Route Manager
24-25
Setup
........................................................
. ...........................................................
26-29
Music
Player
Photo
viewer
.................................................
....................................................
(Optional)
Blu_ooth
Bluetooth
.......................................
again the bluetooth
a call w_h phone number
Call Hii_o_
phone
33
..................................................
Disconne_ing/Deleting/Conne_ing
M_ing
33-38
.............................................
your unit and Bluetooth
Setting the Bluetooth
32
..........................................
wi reless tech no!ogy
Conne_ing
3_3i
34
phone
..........................................
..........................................................................
Using your phone b_k
33-3,4
..................................................
....................
34
35
36
36-37
Using voice Dial ..............................................................
37
In.ruing
38
ca!l!s ..........................................................
Ending calls
...................................................................
Listening to music flies ........................................................
Installation
Installing
.......................................................
the Navigator
Recommended
"PC Portal"
PC System
Starting the "PC Portal" Wizard
Using
software
Installing
Removing
ImpoSing
39
39
...........................................
. ................................................
Maps .........................................................
4_43
40-4!
42
Maps .......................................................
Favor_e
General Warning
Bluetooth
..................................
..................................................
Us;ing the "PC Por_!"
38
3_40
..............................................
Requirements
38
phone
Locations
Messages
...............................................
42
.................................................
43
..............................................
44-,45
compatibility
4_48
list
...............................
Package contents
USB Cable
Main Body
Gpis Antenna
Carrying
Car charger
Case
mounting
Contents
Option
may _
table
changed
by mode_s
Modell
B] uetooth
LN830
X
LN830R
X
LN835
O
O
without
notice.
disk
Front pane[
R
r/Side
pane)
3
2
3
l
il,
4
Microphone (for use on{y with
Bluetooth wi rel_s _chno}ogy)
3.
4.
POWER (OWOL,,
- Power o,n: Pre_
5
6
and hold this button in
power off st_us.
- Power off: Press this bu_on for about 2
1.
External
GPSAntenna
seconds in power on status.
- Handy setup: Pre_ this button briefly in
power on status.
RESET hole
3.
_,cking
connector
4.
Earphone
5.
USB port/Power
6.
M_ory
Card Slot
Ilnsert: a SiD Memo_
if the unit does no€ respond, press the
RESET hole using a bali point pen or a
simi)ar tool.
Port
jack
supply c,onn_tor
(DC
'_ Note
. To activate the menu function
on LCD
screen, touch the LCD screen with your
finger.
* If you cut the external power supply or the
batteB-' (evel is too [low, the device wiU be
turned off a_er a few seconds.
Card.
Deleting or altering the map, data in the builitqn
memory may cause problems in the navigat:ing operation.
nsta iation
!,
s uenc÷
for the windscreen
,Select the most suitable
position on the
Clean the surface of the windscreen
remove any dust and grease,,
Place the windscreen
Plug the small end of the car charger
the power supply connector at: the side of
the unit.
to
mount on the
o
7_
%
Push back the lever to the left until you
hear a dick fixing the windscreen mount
in position°
8_
9.
Align the docking connector at the wind _
screen mount then push the unit down
untiI you hear a click
0
mount
0
Note
Standard operation temperature of the suction
mount: is between o10°C and 60°C The sueo
tion mount may disengage under a tempera°
ture outside of what is specified
o
Plug the other end into your vehicle s
12V-24V (cigare_e iighter)socket.
To adjust the angle of the mount, slacken
the adjustable knobs at the suction_up
and then turn it gently, In addition to tilting
the mount up and down and from side to
side you can also rotate the mount, from
the left, -45 ° to 45°r
When you finish_ tighten up the knobs
Note
• This unit and its car charger are designed for
use in vehicles that have 5.0 +/o 0.2V_ negao
tive ground electdca_ systems.
(This is a standard for most vehicles )
If },our vehicle has a different ty_ d ele_rical
system, the DC power system cannot b_ used.
o The unit is automatically charged when
connecting the USB port of the unit and your
vehicle:s 12Vo24V (cigarette lighteO socket
with the car charger.
DetachiHg
1.
the winds¢
Insta!lation of the external a_enna
inside the vehicle
n
To separate the wind_r_n
the lever to the right.
mount, pull
Attach the e_ernal
antenna onto a surface
which is as level as possible, has line of sight
with the sky and can be s_ured
safely with
the double .sided tape.
_ Note
• Make sure tlhe surface
2.
if the wind_reen
mour4 still doesn't
detach from the wind_reen,
on the suction cup.
pull the tab
_ Note,
Drivers
in California
and
Minnesota are prohibited
from placing anything on
the windshield of a vehicle.
The suction_up
mount can
be f_tened
with dashboard
mounting
disk.
Dash board
_nstaHing
antenna
the e×tema_
GPS
(OptionaO
This unit has; a built-in GPS antenna to
receive the satell!ite signals.
The external GPS antenna is sold separately
and will improve the reception from the sateF
lites for cars w_h a heat reflective windscreen.
To install the antenna:
i,
Select the place to a_ch
GPS antenna.
tlhe external
2.
Plug the jack of the GIPS antenna into the
socket on the rear of the navigation unit,
is free of moisture,
dust, grime, oil, etc_, before affixing the double sided tape.
• The double-sided tape contains a strong
adhesive .and may leave a mark on the
dashboa#d if remove&
, Some vehicles use window ,glass that does
not allow signals from GPS satellites to
pass through. On such vehicles, install the
GPS antenna on the, outside of the vehicle.
Installation
of the e_ernal
o_side the vehicle
antenna
Place the external GPS antenna in a position
as level as possible, such as on the roof or
boot. (The GPS antenna is a_ached with a
magnm.)
When routing
of the door
the
lead
in from
the top
Make a Uoshaped loop in the dead on the outside to prevent rainwater from flowing along
the lead into the interior of the vehicle.
,(The GPS antenna
net.)
is attached
with a mag-
;es
Corm
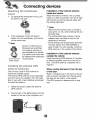
ting the USB cab_÷
Down_oadin9
- Connect one end to the US8 po_ on your
PC and then plug the other iend into your
un_'s USB po_.
- The unit is auto,matically charged when _nne_ing the USB port of the unit and your
PC with the USB cable.
With the SD
card inse_
Without the SD
fi_es: Mass storage
1.
Activate Windows Explorer ,on your PC.
A mass storage device is displayed in
window explorer.
2.
Create a folder you want to use.
3.
Select files you want to, downbad, then
drag and drop them to the folder you created.
_ Note
- When the SD card is inserted, you can
download the da_ on the SD card.
* When the SD ,card is not inserted, you can
download the data on the built-in memory.
, Don't remove the USB cable while uploading or downloading flies.
Note
You ,can not operate the navigator when the
unit is;connected to a PC with USB cable.
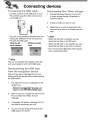
Disconnecting
the USB_
d
from the navigation device
Wait until you get a message that you can
safely unplug the device before disconnecting
the USB device.
i,
The safe remove i_n
system tray.
is displayed
in the
2.
Click on the icon to eject the unit from the
P,C and sele_: the 'Safely remove'
3i.
A message willl appear indicating that it is
now safe to dis_nnect
the, unit,
4,
You can now go ahead and remove the
USB cable from the PC.
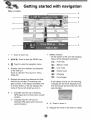
_nitia_setting
.
When 'you turn the unit on for the first time
after purchasing the, unit, you must follow the
steps as shown bebw.
If you turn the unit on after t:uming the unit off,
the "Attention" screen appears.
Follow the steps 6-7 as shown later on this
page.
.
6.
Set "D,istance Unff' ,and "Adjust Hour" by
touching the items you want and then
touch _,
Touch
"A g_r_" .
The "Attention"_reen
Press and hold POWER ((b)iVOL..
The "Language Settings:" screen appears.
(Page 27)
7,
Touch "A-9 ree"
The "Information"
appears.
screen appears.
il
Set "Language texf' and '_oice guidance"
by touching _ / _ ,and then touch D.
The "Displa_' screen appears. (Page 26)
2_
.
Set "Dimension",, "Day&N ightf', and "Map
Display" by touching the items you want
and then touch D. The "Route Options"
screen appears. (Page 25)
4_
8_
Touch "No".
The m,_ screen appears.
If you touch the "YES", the _r.een moves
to the "!ntrodaction"
men a of '%utoria!"
item° For detail, refer to the 'q-utorial" on
the page 29,
Set "Avoid Roads" and "Route Condition"
by touching the _ems you want and then
touch _. The "'Units & Time" screen
appears.
(Page 27)
Touch :_'_in order not to display
tio,n screen again.
informa-
Turning the unit
Lock feature
on/off
Press and hold POWER (©)NOL. to turn the
unit on. Press and hold POWER (0)NOL
for
about 2 se_nds
until the unit is turned off.
This feature i_ks the unit to prevent: _ from
operating when you acciden_lly
touch an
_em.
Touch
on the "Handy Setup" screen,.
"2 Note
If you conne_ the unit to a power source,
will automatica,y
turn o.n.
Adiustin
it
9 the Volum_
To cancel
Brightness
1.
2_
Turn the unit on.
(0)NOL
Using a earphone
Press POWER (©)NOL
briefly when the
map _reen appears.
The "Handy S_up" screen appears.
Map_hoto
it, touch POWER
Connect stereo earphones plug (_ 3.5 ram)
to earphone jack for private listening.
Music mode
mode
'_ Note
_
Note
When you have the uln_ with Bluetooth
wi reless tech nobgy,
and
appear on the screen.
3.
Set the volume
(_)
and brightness
by touching
/÷
and then touch _.
÷
(_÷,)
,Note
if there is no touch input for about 5 se_nds,
the screen moves to the previous screen.
Touch : :on the "Handy Setup" screen to
mute the sound .To cancel it, touch
again.
• Always turn down the voiume
necting your earphone.
before con-
, The speakers are turned off whiile the
earphone plug is inseAed in the earphone
jack.
avig
ng
Findiing
a_sd stodn9
a destinations
o_s
_he map
1. Turn the unit on.
The map screen appear&
Note
• If you don't want to store a destination,
touch
Cu_,ent:
• Touch
_sition
.
on the screen,
on the screen to move to
the previous
Select a de_ination
by simply touching
and dragging the map on the screen,
F_nding
the
1. Touch _
touch
Touch
to find a destination.
Drive in a_ordance
with the screen and
voice prompts.
The destination is stored in the "R_ent
3_
Places" menu automatically.
Touch
if you want to store the
destination
on the map screen and then
_,_
Touch the destination
touch
_'_'.
Set the ,group you want to store by
touching _/@
and then touch
The d,e,_ination is:stored in the "My
Places" menu. (Page 20)
stor_
Touch group that the destination
in and then touch _.
(Page 20)
4_
.
screen,
"i
is stored
you want and then
Touch _
to find the destination.
Drive in accordance with the screen and
voice prompt.
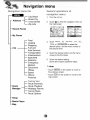
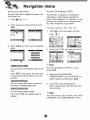
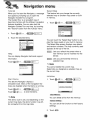
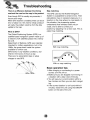
Map scr
n
8
7
,
3
6
5
4
1.
2.
Touch to zoom out.
@/_/@,
Touch to view the 2Di3D
Battery indicator
- On, the screen of the unit, the charging
status wi[! be displayed as follows:
map.
: Full mode
3,_
_:
Touch to view the navigation
4.
Displays next turn dir_tion
to the ne_ turn,
menu.
: Medium
mode
: Low mode
and dis_nce
: Empty mode
Touclh to view the "Turn by Turn'" menu
(Page 24),
: Charging
: Full charged
Displays the remaining distance and time
that the trip will take. If remaining time
gets _uched, it wil! display estimated time
of arrival. _ttom of the bar displays the
name ,of the current street you are on,
6_
If the ba_eB,, level is low, the, following
me_age will be will be displiayed and
then the device wil! be turned off a few
seconds later.
indicates that the unit is receMng
GPS signal and not found your current
location°
Indicates that the unit has not
received GPS signal and found your
current location.
8.
9.
Touch to zoom in.
Displays the name of the next turn street.
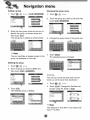
Navigation
menu
_ist
Genera_
operations
navigation
of
menu
1. Turn the unit on.
Street-Cite
C ross streets
___l_ city-street
Zip code
2.
Touch _ to, view the navigation
the map screen.
menu on
- Recent Places
- My Places
Food
Lodging
Shopping
Fuel and
Auto Sen,ices
Trans_atio,
n
Ente_ainment
Bank!ATM
Attraction
Emergency!
Medical
Goverment
Offices
Sports
Others/
Personal
- Route
- Setup
- Media Player
-, Map
Turn by Turn
Route Summary
Route Playback
Multistop Planner
Cancel Route
Route Options
3_
:H[_,or
to select the
desired option, and the menu moves to
the se_nd
level
4.
Touch the desired optbn
moves to the tMrd level.
and the menu
5.
Touch the desired se_ing.
Some _ems r_u[rie , additbnal
steps.
'_ Note
- Touch
the previous
* Touch
map screen.
o,n the screen to move to
screen.
on the _reen
to move to the
.
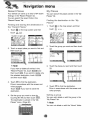
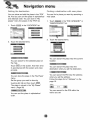
You can find a destination using the address
1, Touch _ on the map screen and then
touch
°
Enter characters of address using keyboard provided as shown. The characters
entered in the address field are highlighted
in red
Deletes the I!a_ character in the address
such as town or street names.
Extends or shortens the address
hiding or displaying the ke_oard.
÷
Uistby
Moves up or down the list of address
items.
Touch _,, Touch a mate you want using
the keyboard and then touch _,
Displays uppercase, numeric, and special
characters
The operating sy_em installed
on the device must be able to support
these characters.
_ Note
&
Touch the desired
Sometimes, it may take some time to search
the tetters of address you entered using
keyboard.
items.
.
Touch the street using the keyboard
then touch _.
Selects the address in ciW, street;, house
num_r order using the keyboard.
6_
Selects the _dress
num_r order.
in strut,
Sele_s the _dress
_reets order,
in city, street, cross
Touch the house number using the
key_ard
and then touch _.
city, house
Touch _
Sele_s the address in zip code, street,
house number order
to find the destination,
and
i
Recent
"on menu
P_aces
My P aces
'(our device can store up to tobal of 64 _recent
findings in the "Recent Places" listo
You can search the recent finds in the
"Recent Places" lis_.
Findin9
the "R
and stodn9
nt P_aces"
1. Touch _
the
destination
in
You can search the places stored in the "My
Places" list.
Finding
the destination
1. Touch _
in the '_My
o,n the map screen and then
touch
on the map screen and then
touch
2.
2.
Touch the group you want and then touch
Touch a recent place you want toi find and
then touch _.
Note
3i. Touch the place you want and then touch
if you want to delete all entries in the
"Recent Places" list, touch
and
then touch _.
If you want to delete only
the selected destination, touch
and then touch
.
,3. Touch _
to find the destination.
Drive in accordance with the screen and
,voice prompts.
Touch
if you want to store the
de_ination.
4_
Set the group you want to store by
touching _/@
and then touch @.
The de_ination
is stored in the "My
Places" menu. ( age 20)
p
i
,
Touch _
to find the destination.
Drive in a,c_rdanoe with the screen and
voice prompts.
Setting
a group
You can add, delete or edit the group in the
"My Places" list.
'_ Note
You can not delete o,r edit the "Home" folder.
I
Adding a group
1
2_
Changing the group name
Touclh _>_
>
>
1. Touch _>
o,_ ....
2.
Touch the group you want to edit and then
touch
>
.
3.
Change, the group name or the group icon
Enter the new group name and an icon to,
identify the group, as shown below and
then touch
.
The new group is added as shown below.
_J
.
identifies all places located in this
group, as displayedl on the map.
Deleting
Touch
The selected
group iis changed°
the group
1. Touch _>.
_,,_:_
.
2. Touch a group you want to delete and
then touch _>
.
The unit can sound the alert when the distance you set is closer than destination.
}_!'_"
.........
................
i. Touch
2.
3,_
Touch _.
Tlhie selected
Touch
_:_;_
.
> Cihange the "Set Alert dis _
tances" using the _/_
> _,
.group is deleted
@÷n:
_ Note
The distance of "2rid AI!e_' is set c!oser t:han
that of "1st Alert'.
i
Setting
the
Points
destination
You can show, edit or delete the place in the
"My Places;" list_.
1. Touch _
2.
,_,_,_, .
Of nter
t (PO )
The POI iist is a collection
of hundreds
interesting or useful places organized by
easyoto-find categories. For example, you can
use the unit to guide you to a shopping center, hotel, restaurant, or gas station.
Touch a group you want and then touch
Fi_dir_g a pine÷ in the "POi
1. Touch _
touch
3_
of
Touch
_ems,.
iist:
on the map screen and then
,__
and then touch the desired
2.
Touch one of "POI" you want from the list,
iiiii
iiiii
iiiii
iiiii
_ Note
You can search the selected place on the
map.
Touch
on the screen. And then drive
in ac_rdan_
with the screen and voice
You can view additional
touch
.
Sele_ the "POI CATEGORY",
"SUBCATEGORY"
and "LOCATION"
want to search and then touch _.
3i
prompts.
You can change the name, comment,
the group of selected desti nation,
or
"POF list, if you
4_
you
Touch
to find the destination.
Drive in accordance with the screen and
voice pr,ompts.
You can delete selected
if yo,u touch
place.
, the selected
place is
_i_Note
The "PO!" list may not Ibe shown o,n the "PO!
CATEGORY" and "SUBCATEGORY"
menu.
enu
_Hi_g
the d_tiHation
FindiH9
You can show and add the place in the "'POF
t,st, And yoiu can so_ the place in alphabetical
and di_anoe order. You can store in "My
places" menu the pla_s in the "POF list,
i.
Touch
in the "LOCATION"
!
with
_ear
place
You can find a place you want by searching
near place
a
Touch
in the "POI CATEGORY"
"SUBCATEGORY"
ist.
or
list.
2.
2. Touch the desired
a desthatio_
Touch t:he desired
items.
items,.
i:
You can search for the selected
the map,
place on
Touch
on the screen, And then drive
in accordance with the screen and voice
prompts,
You can store the place in the "My Place"
menu,
Set the group you want to store by
You can search the place near the current
location.
You can search the place near the
diestination when you set the destnaton.
You can search the POI near the address
when you set the address.
Follow the _eps 2-6 of 'tAddress"
page i9o
on the
touching _/_
and then touch
.
The Ipla_ is stored in the "My Places"
menu. (Page 20)
You can search for the POi within the
You can soR the place in alphabetical
order
radius you set,
Route Manager
Turn by Turn
You can set the route you wish to use when
you navigate a destination°
1
ROute
•
Touch
_
....
_,_÷
_
_¢_
_
.
And
then touch the list you want,
P_ayback
You can record your route while you're driving
and view the recorded route,
I.
Touch _>_
The recording
>
_arts.
_,_
>
2.
Touch the desired
Rem.
You can view the entire route on the
screen..
You can only view the turn you select.
You can also view the previous or next
turn by touching
2. Touch _>_;_
_,_, >
>
to
stop re_rding,.
3. Sele_ the d_a file to play the recording
and then touch _.
The navigator
the main m_
plays the recorded
_reem
4. Touch _>
>
>
You can avoid tlhe selected
turn in the
turn-by-turn list. The new route is recalculated automatically
route on
to
_/
Route
Summary
stop the playback
Route Playback
Options
Touch
on the "Route Playback"
and then touch the desired items.
menu
You can view an overview of your comp, lete
route on the map screen, the total driving
distance to your destination, the estimated
t_avel time, and the complete destination
address.
I.
Deletes a se!_t_
Touch _>_
>_:,
_,:_,,_.
recording,
_ Note
Deletes all re_rdings.
Touch
previous
:@
_-
Adjust the playba_
speed. The range _S
from !00% to 300%.
on the screen to move to the
screem
Mu_tistop
Ro_t÷
p_anner
You can plan a route w_h up to 5 stops.
When you touch the "Go" button, the route is
calculated in each stage, from the departure
point to the first stop. When you reach the first
stop,, the next route is calculated to the second _op, and so on.
;i!i_i'£_!_ ¸ !_i!_'
S_ing
i
options
"_<oucan use Route options to determine what
road categories to avoid or allow and to set
the default route type when navigation calculates your selected destination.
i. Touch
_,_,>
touch the desired
. And then
items.
_f,_
stops aiong
Avoid roads
the route
Toll, Highway and Fern/ro_e
sections are
avoided or aibwed as determined by
whether they are selected, when navigator
calculates a route. You cannot allow or
From the "SelectJAdd Multistop Route"
screen, touch the "Add" bu_on to add a
stop by Address, POI, My Favorites, or
Recent Locations.
avoid specific toll roads or ferry routes.
Route condition
Fastest: This option selects the route that
takes the least amount of time,
Fastest is the default value.
Shortest: This option sel_ts the _oute that
is the shortest distance.
2 Select one of thiese options, specify a
location, and touch the "OK" bu_on.
(If you touch
steps 2-6 d "Address" on
3. The "Select!Add Mu_istop
appears with the selected
Remember, the shortest route
may not always be the quickest,
as you are able _o travel faster on
some roads than on others.
, follow the
the page 19.)
RouW' screen
location.
2. Touch _,
Use the "Up" or "Down"
order of your itinerary
buttons to change
the
Use the "Edif' bu_on to show or
delete a highlighted
Note
Route generation excludes
or delays abng the _oute,
any detours, stops
entry.
Use the "Distance" button to organize your entries from closest to farthest distance from your current
location. (This is only available when
the _ored route is more than four.)
Taking
a detour
If you need to take a detour when you are navigating a route, touch _
_
_._ o.oj>
i
_i'ii'"_:'ii::::Yi'_:_'_i
_ _'_
_'" ...................
_'_"_
If you no longer need to travel to your destina o
tion or if you want to change your destination.
Touch _>_
:_,_<._÷_
:
.
After you select a distance to t_,e a detour,
touch _.
J
I
You can make various adjustmen_
by using the seCup menu.
to items
Display
Units & Time
Language
Guidance
G PS Status
Map Setup
Tutorial
Help
Start Demo
Select Map
Initialise
I
Touch
2.
Touch the desired
items,,
.......
The 2D and 3D M_e buttons lets you
display the map view in 2-dimensional or
3-dimensional views for either day or night
driving.
The Day and Night Mode buttons; lets you
display the map view b,r either day or
night driving.
,
The Auto button automatically adjusts the
map, view for day or night driving by GPS
time.
2.
Touch the desired
For details,
The Pedestrian Mode button lets you toggie between travelling as a pedestrian or
in a vehicle.
items.
refer to the pages 26-29,
When in Pedestrian Mode, you can generate a route up to ten kilometers and you
are not limited by vehicle _nstraints,
such
as one way street.
When creating a pedestrian route, the
navigator avoids motorways or other roads
where pedestrians would not travel.
Voice prompts are deactivated in this
mode.
_ Note
ii
• Touch
previous
on the _reen
screen.
, Touch
m_
to move to the
on the screen to move to the
screen.
3.
Touch
_.
UHits
& Time
You can speci_ units of measure and adjust
the time as displayed on your Navigator.
i.
You can select the types of voice and visual
notifications that you would like, to use while
navigating as follows,
Touch
2. Touch the desired
items..
1. Touch
2.
° _
Displays and announces
kiiome,terso
o ,:
• Displays
and announces
Touch the desired
_ems.
in
s_
in miles,
!;_°_¢'_/,:_ •
Warns you 'when your car exce_s
the
speed limit:. This prompt is not active by
defau _,
Displays the current i_a] time based on
GIPS time in the time zone selected ,on
,
you r device.
Activated when the Navigator recalculates
a new route.
This prompt is not active by default.
Automatically
adjusts the time when daylight saving time is in use,
_ Note
_!_ Note
Languages noted with (Spoken Streets)
are synthesized speeches, which have an
extensive vocabulary and pronunce the
street names as you app#oach turns, the
pre recorded voices have a limited vocabulary,
is shown only in some time zones, which
countries or regions adopt the daylight
saving times,
1. Touch _
.
.........................................................
2. Touch the desired
Warns that the GPS signa! is too Lowand
unreliable for navigation.
This prompt is active by default:,
items.
Reminder at tlhe staA of each journey,
This prompt is; active by default.
You can select the language
You can select voice travel messages and
driving directions, You can hear the voice, of
language through speakers _ile
driving°
3,_
Touch _,
You can set the bTpe of the guidance
name that you wil! use to, navigate the
route.
text,
3_
Touch _,
GPS
tus
Please check that:
The Navigator uses the GPS receiver to,
pinpoint your location.. GPS signals are
automatically aquired
and your vehicle's
location and position are constantly updated.
The GPS receiver may' take a few minutes to
find its initial location.
For _st results, ensure that the GPS reviver
has a clear ve_ical view of the sky.
i
.
....
.......................
Touch
" The GPS .antenna has a clear view of the
sky for uninterrupted GPS re_ptio, n. The
navigator cannot calculate the route if there
is no GPS re_ption
(for example, in a tunnel).
• The navigation
,device, is charged or con-
nected to the cigarette
Map
lighter.
up
You can tap the "Mlap Setup" button to customize your map display,
2,
The following
_ _3_H_÷
GPS information
Touch the desired
item&
is displayed:
The angular distance east o,r west
on the ea_h's surface.
IbaHtude: The location of a place north or
south on the earth's surface.
sp_:
_::_:_d_
The rate of movement, as expressed
by kilometers or miles per hour.
When this option is sele_ed, the zoom is
speed dependent. The map, zooms out at
higher speeds, displaying a larger map
area, and zooms in at slower speeds, displaying a smaller map area.
If you manually change the zoom, the
Automatic Zoom returns to a system
defined zoom level after several seconds
The height above, sea level.
Num
You can check re_ption
signals from the GPS
satellite.
_ Note
If GPS signal can not _ dete_ed for a long
time, please resta_ whole navigation system
by pressing
of inactivity.
This opt:ion increases the size of street
names to make the text easier to read.
GPS not found
When you first sta_ the navigator you will
hear thie message "Signal too Iow'L This message means that your navigation device hasn't yet located a reliable GPS signal.. Ch_k
that your device is connected to the cigarette
lighter and has a clear view of the sky.,
The "GPS no€ found" message means that
there is n,o GPS antenna ,or the antenna is not
properly
ins_lled.
3.
Touch _.
Map
When you first start the Navigator; a message
box appears prompting you to open the
Navigator Guided Tour program,
The Guided Tour is an excellent way of
This feature lets you change the, currently
selected map to another map sav_ on builtin memow.
_comiing familiar with the different navigation
features available, You can also start the
1. Touch _Q_'_°
....
_'_
__._,*_
,_
:
Navigator Guided Tour any time, by touching
tihe "Tutoriall" button from the '°E_ras" menu.
1, Touch
_""_
2, Touch the desired
items,
You can touch the "Select Map" button to display the maps saved on your built in memory:
The Select Map screen displays map details
and version numbers, The map currently used
appears at the top of the list.
You can d ispllay Navigator
technical
: Lets you refresh the screen when a
new memory card is inse_ed into the
device,
support
information.
Touch
_'_'°_
Lets you permanently
_lected
map.
_ _,
remove a
_'_Note
You cannot delete the current map.
Select ]e_ you designate a s:ele_ed
the current map.
Start
Touch
O®mo
_
map as
',,_,,
This lets the Navigator display a
simulated route. Many of the navigation features are disa!b!led when the Demo is running.
Touch _>_
to end the Demo.
_ Note
You can delete all list from the memory.
The demo route is set, and depending on the
current map, data, the demo fun_ion may difo
fer somewhat from the map data.
You can set a]] the function to their facto_
2,
Touch
,
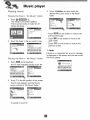
P ayin9
Playin
i.
music
9 the
files
3_
in "AH
Music"
fo_d÷_
Touch :
and then t,o,uch the
desired file to play music in "My MusW'
folder.
Touch _
_,
The "Music Lisf' screen appears.
There are two kinds of music list: All
Music, My Music:
• Touch mi_
on the screen to move to the
previous/next
• Touch
Touch the foEder or file you want to play
up_r
page
on the screen to move to the
folder.
- Touch
previous
on the screen to move to the
screen,
'_ Note
P_ayin 9 the
i.
Touch _
flies
in _°My Music"
during playback.
The # mark indicates
.
Touch
fo_der
playing
music file.
in the left position of the screen.
The _ mark appears and the file you
touch is _ored in "My Music" folder,,
To cancel
it, touch
If there is no supposed file, an error message
is displayed on the _reen and the neA music
fille will be played.
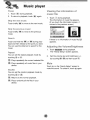
Pause
1. Touch
Viewing the information
music fi e
during playback.
2. To return to playback,
touch
again.
.
_ip
the
%ip
the
to move to the next: music.
p[eviot_S
Touch briefly
music.
during playback.
The information of music file appears.
(If you touch the information screen, it
moves to the previous screen.)
He×t music
Touch briefly
Touch _
of
muSiC
to move to the previous
if there is no information
Touch, and hold the
or
during playback and then release at the point you want.
You can use the slide bar to search for the
mus:ic.
Adiustin 9 the
of music file, U
umdBdghtness
1. Touch _
during playback.
The "Handy Setup" screen appears.
"You can set the repeat playback
touching
_'
by
the current select_
Plays repeatedly
device.
al! music files in your
or
_/_
(_)
and brightness
(,_)
and then touch _.
file.
Touch
on the "Handy Setup" screen to
mute the sound .To cancel it, touch _ again.
playback
mode by
.................
,
Returns to the normal playb, ack.
Plays randomly
device.
Set the volume
by touching
Plays repeatedly
touching
2.
or @.
You can set the random
,_'
m_e
all the files in your
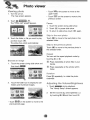
Viewing
, Touch
photo
1. Turn the unit on.
up_r
The map screen appears
on the screen to move to the
folder.
• Touch
on the screen to move to the
previous
Touch
The "Photo
screen,
List" screen, appears.
i,
Touch the screen during slide show,
2.
$3uch
3.
To return to, slide show, touch
to pause slide show,
S_Jp to _he _ext
3_
Touch the folder or file you want to play
and then touch :_:,
The slide show stacks automatically,
Touch
selected
Skip
again,
photo
to move to the next photo in the
folder.
to the
p_,evious
photo
Touch
to move to the previous
the selected folder,
You can set the repeat playback
touching
B_owse
1.
am image
Touch the _reen
_:
duringi slide show and
then touch _.
or _,
all photo files in your
Plays repeatedly
folder,
all the photos within
repeatedly
to rotate the photo
Adiustin 9 th÷
umdBdghtness
i,
2.
Touch _
during playback,
The "Handy Setup" _reen appears.
Set the volume
by touching
• Touch _/_
previous/next
on the screen to, move to, the
page,
mode by
Plays repeatedly
device
Press _
Touch the folder icon to display its subfolders and thumbnail images,
photo, in
(_
and brightness
(:)
_ / A_ and then touch _.
Bluetootl
wireless
technology
4,
The '"Searching for available devices."
pop-up screen appears on the screen,
If you ha,re a phone with Bluetooth wireless
technology and it is compatible with your
device (Please refer to the list of avaiilable
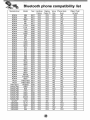
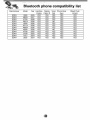
phones o,n the, page 46-_),, you can use the
following features iln your device: Hands-free
Calling, Audio streaming for mp3, and
Phoneboo, k sync and edit..
Hands free feature is to make or receive a
phone call using microphone and speaker
built in your device, Audio :streaming feature is
to enable to listen to, music (especially.,, mp3
file) in your stereo headset and to enable to
handle playing music such as play; pause, or
skip. Lastly, phonebo, ok sync and edit feature
is to transfer your phonebook in your phone to
your devi_
and to add and edit new phone
numbers on your device. These features on
your devi_
are only avaJl_le if your phone
supports these features using B/uetooth wireless technology. To use these features, you
must connect your phone with your device.
You may initiate this connection from your
phone or from your device. Please refer to
phone's guidebook for more information,
it will _ke about 30-60 se_nds,
ue, the process.
To cancel, touch
,
6_
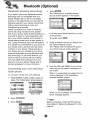
Connecting
your unit and b ueo
tooth phone
To connect
using
the
unit
ttings
1. Pre._ POWER (0)NOL
briefly in power on
_atus.. The "HaZy Setup" scr_n _pears..
i!:
MapPhoto,
2_ Touch
3. Touch:
Touch
to contin-
.
Touch a bluetooth phone you desire from
the "Search Resu_s" screen,
The '"Please enter the bebw PiN _de in
your phone" pop-up screen appears,
Input the PiN _,de (0_0) in your phone
when the pop-up screen is displayed on
the screen,
When _ is successfully connected, the
mark is displayed in the "Handsfree o
available devices'" screen.
li
mode
Music mode
When _ is not connected,
failure message
the connection
app,ears,.
Note
Before connecting, check the PiN code settings, Refer to "Setting the Blueto,oth" o,n the
page 34.
To conHect
usin9 the phone
s
ings
Your phone's Bluetooth feature may be set to
off by default. To use the Bluetooth feature,
Biuetooth must be turned on in your phone.
Refer to your phone's user guide.
oin9 again
the Muetooth
1. Touch the _,nne_ed
touch
phone
phone. And then
Enable the phone's Bluetooth component,
This might be iin a menu called Se_ings,
Bluet ooth, Connections, or Hands-free.
2.
Initiate a search for B!uietooth devices.
Tihese se_ings might be located in a menu
called Bluetooth, Connections, or Handsfree.
,
Select the your device
phone.
Touch
and the
. Yo,ur phone is disconnected
maA disappears.
from the list of
Input the PIN code (0000) in your phone,
4_
When it is su_essfu!ly
_nne_ed,
the
mark is displayed in the "Handsfree available devices" screen.
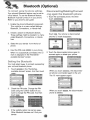
Setti
9 the Bluetooth
You must select
to connect
your unit and bluetooth phone.
i.
2. Touch the dis_nne_ed
phone again to
_nnect
again or delete your phone.
Touch
available
successfully
in the"Handsfree
devices" screen. And then touch
When you touch _
phone, is connected
The _
.
3.
Check the PIN code. Change the PIN
code using the, number buttons if you
want to change, the PiN code. And then
touch
.
If the visibility option h_ set as
.
Other Bluetoot:h devices can_ find your
device.
mark: appears
When you touch
phone is deleted.
the d i_on n_tagain to the unit.
again.
, the dis_nnected
Makin9
a cal! with phone
number
Connect your unit and Iblluetooth phone before
you make a call.
1.
Press POWER
(©)NOD
touch
Storing
the phone
number
1. Input the phone number in the "'Dial'"
screen. And then touch
.
briefly. And then
>
2.
Input the name. And then touch _.
is stored in the phone book,
Input the phone number you want t,o call,
by touching the number buttons.. And then
touch
Adiu®ti_g
1.
Note
• If you make a mistake while dialling,
touch
to erase one digit at a time_
• Touch
if you want to store the
phone number, i_ is stored in the phone
book.
3_
Touch
to finish the telephone
conversations.
.
tBe Vol_m
Touch
The "Volume
appears.
icropho_s÷
level
during a call.
& Microphone" screen
Set the volume
(_),
and microphone
level (a_:)
..... by touching
touch _.
_/@
and then
_ Note
* Touch _ to ,cut the microphone sound .To
cancel it, touch _ again.
- If there is not any touch for about 5 seconds, the screen moves to the previous
:screen
Switchir@
#}e sound
_h
You can hear sound through
unit or phone by touching
du_ _sg a call
the s_aker
.
if you want to store the phone numbed
touch
boar&
then input the name using key
And then touch
and it is stored
in the phone book.
Touch
if you want to make a call
again+
ff there is not any touch for about 10 seconds, the screen moves to the "MENU"
screen.
J_ Note
If you want to send the touch tones, touch
of
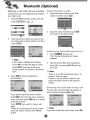
Ca_ History
"four unit keeps a record of your recently
received and dialling call!s_
1. Press POWER (©)NQL
briefly. And then
touch "'_ ...........
....
>
AddiHg
the phone
number
1. Touch
in the"Phone
And then Touch
number buttons.
screen,
inpu_ing the
,
Touch _
,
after
_k"
aRer changing
the name,
Touch the list you want to call. And then
touch
_
Receiving a_i Hst i_ !!ou_ _ho_÷
Using your one
1.
Press POWER
touclh
2_
__: _
book
_
'
(o)NOL.
>
Touch
in the "Phone
_,ok"
screen,
And
then touch _:;:
briefly. And then
,,
Touch the list you want to call. And then
touc!h _
,
- 'tour device wi!! receive the contact(s) via
Bluetooth in your phone. If your phone is
not connected, it needs to enter the PIN
code in the phone.
- With receMng phone book from your
phone, and the data will be stored in the
resident memory of your device,
Gettin9 a_ Hst from you phone
If your phone supports the synchronization of
phone book, you can get all list from the
phone.
Deleting the phone humor
Touch the list to delete in the "Phone _ok"
screen. And then touch
.
* if the phone hasn_ been registered to available list on your device, you will meet the
below p,op-up, "D,ovo,u want to get the
phonebook from your p!hone?",after connecting your phone with the your device.
Ed_tin 9 the phoee
nt_mbe_
1, Touch the list to edit in the "Phone Book"
screem And then touch
Touch
then touch
in the "Phone
Book" screen. And
.
2.
Touch
after
changing
And then touch _
the numben
after changing
the
name.
The synchronisation
w_h your phone _ok wil!
begin automatically, t:he data will be stored in
the resident memory of your device° (_ wi!!
takes a few minutes according to the number
d phone book in your phone.)
Deleting
aH Hst in the phone
book
1. Touch
in the "Phone Book" screen.
And then touch
Usin 9 voice
Dia
You can make a call by speaking the conta_'s
name.,
i,
Press: POWER
to Uch
(©)NOL
briefly. And then
>
.....
2.
Touch
:.
#
.
Speak the conta_ name from your phone.
And then speak name, number or
command.
Listenin9
You can control and hear the music (especiaF
ly, rap3) files saved on your device via the
your stereo, headset with Bluetooth wireless
technology.
Touch
3.
Touch
to music fi es
in the "Handy Setup" screen,
to finish the telephone
scomi[sg
1. If there is an incoming call, your phone
rings and the "Call from" pop-up screen is
display_
on the screen.
2.
Touch
to answer the call.
Jf yOU want to reject a call, touch
..
Endin 9
When you are _lling on the map, music:, or
photo mode, _ ap_ars
in the screen.
Touch _to
finish the telep, hone conversao
tions,
i
Music m_e
Photo mode
i
¸
Map mode
"_ Notes
_OU ca n hear the sound through the spe_er of unit or Bluetooth stereo headse_ by
touching
/
• The sound quali_ depends on Radio
Frequency (RF) conditions and the sampiing rate of audio,
• Sampling rate of MP3 file that can hear the
music using IBI!uetooth stereo Iheadset
16 KHz, 32 KHz, 44.1 KHz:, and 48 KHz
° The sound qualibj may be poor on the
sampliing rate of 1i6 KHz, 32 KHz.
i"
nsta in9
Installation
the Navigator
the Microso,_ .Net Framework
for computer
instructions.
i
'°PC
can be done by following
9. Select from up to _o connected
(LN830iLN830R/LN835/LN835R),
2.0
the
Incert the Navigator CD into the PC"s ,CDROM drive. The "PC: Portal" Installation
wizard prompts you to .select the language
used for the installation process. When you
have selected a language, dick ",OW'.
2. Read the Welcome
"Next",
message
and click
3. From the Select Directory screen, e_her
a_ept the re_mmended
defau_ dire_ory
or browse to, a different directory to install
the, ';'PC PortaR
Click "Next"..
4. If you want to change the directory location
before instal!ing, click "Back?. When you
are ready to Jnst.ail the "PC Po,Ral", click
"Next".
The ins_.llatio, n status box displays the
progress of the installation process°
5. When the installation
"Fi nish" button.
is complete,
click the
6. After finishing installing PC Portal, install
the "Maps installer' program. This procedures is similllar to PC Po_al install.
7o When the install!ation is complete, click the
"Finish"b,_o,n, The Select Language box
appears,
8. From the Select Language dialog box, you
can select the display language for the "PC
Polar
Select the Launch "PC Po_!"
checkbox for "PC Portar' to immediately
sta_ and click "OK", Alternatively, you can
sta_ the "PC Po_al" from the Microsoft@
Windows@
Programs
menu°
devices.
_ Note
Please pay close attention to .all the programs
befo,re in,ailing
the CD to your personal
computer.
Please pay close attention especially for antivirus programs like sp_are.
Recommended
Requ
PC System
Please review the following system requirements before installing '"PC: Portal":
- CPU: AMDilnte_
Processor 300 MHz or
faster
,
.
•
Operating System: Windows@ 2000/XPMsta
Memory: 128 MiB RAM (minimum)
Hard drive free space: 500 MB (minimum)
CDoROM: 4x drive or higher
ActiveSync Version 3.8 to 4.2 suppoRed
under Windows 2000 and XP
., USB 'Version 1_i ,or 20 _nnection
ble 2.0)
.. Microso_ ,Net Framework 2.0
(compati-
StaAin9
the "PC Porta+" Wizard
Using
the °°PC Porta+"
The first time you s_rt the "PC Portal"., the
"PC Portal"' Wizard automatically starts, le_ing
you install navigator so,ware, supported languages and voice prompts, and map&
For a complete description of the "PC Portal",
see Using the "PC Portal" on the page 4041.
1. ,Click the Microsoft® Windows_ Start b_ton.
2. Click the Programs > LGE > "PC Portal"..
The "LGE PC Portal for (LN830iLN830Ri
LN835/LN835R)"
appears.
..........
:_@:+_+
....
Click ":Install So._ware '+and sele_
3. _fthis is your first time using "PC Po_aF,
the "PC Poi_a]" wizard automatically starts
and! displays the Welcome screen,
4. Make sure that your deviice is connected by
USB cable to a port on your PC. You will
see Connected! on the "PC Portal" screen.
5. Click the
bu_ons to move to
the previous or ne_ screen.
6. Sele,_ software components
your device.
to install to
from the fol-
lowing .components to install to. your device:
+ LGE: GPS navigatio.n so.#ware
• Tutoda!: Tutorial guide
To in,all navigator components:
1, From the Insta!l So,ware screen, select
from the list: of _mponen_,
as described
above
2. Click the install button.
3, Navigator "PC Portal'" installs the selected
components to the device's main memo_.
<_ Note
• if you want to s_rt the wizard,, click
............
;_:_:;;;_
.........from the "PC Po_P Main screen°
• If you want to stop the wizard, click
The "'PC Portal" Main screen is displayed.
•. If after se[e,cting _mponent+ .software, and
voice options, you want to return to the original se[e_ions,
click i +++°_,+++,i.
Click "Manage Maps" to instill or remove a
map,
For more information, see "installing Map.s" on
the page 42+
Click the "User Manual" bu_on to see a user
manual.
Click the "Select Language" bu_on to show a
list .of languages that you can choose from to
displlay the "PC: Portal".
Click the. "Abouf'
version.
bu_on to check sof_¢are
Usin
Click the "Backup/Restore"
button to backup
the folbwing Navigator items:
- Favorites: All bcations that are displayed in
Navigator's Favorites screens.
- Trips: All locations that appear in Navigator's
Multistops screens.
- LGE Settings: Setting configurations,
such
as map views (2D/3D and Day/Night),
[prompts, units of measurement,
and map
and route setting preferences.
When you select Backup, "PC P,o_ar' makes
a copy ,and stores the information to your
_mputer.
To backup Navigator data to your PC:
i. From the Backup_estore
screen, select
Backup.
2. Select the items that you want to make a
copy of and save to your computer.
3o CHck the "Backup" button.
4. "PC Po_aP saves the selected items to
your _,mputer.
Click the, Backup/Restore
button to restore
Favorites, Multistops, and My Navigator data
to a navigation device, When you select
Restore, '"'PC Po_aF recovers the information
stored on your computer,
To restore stored Navigator data to a navigati,on device:
1. From the Backup/Restore
Restore.
screen, select
2. Select the items that you want to restore.
3. Cllick the "Restore"' button,.
4. "PC Portal" restores the selected items.
Click Install Languages to install a I!anguage
to your device,
To install languages:
1, From the Insta!l Languages _reen, select
the languages to be installed to the device.
2, Click the install button,
3. Navigator PC Po_l installs the selected
languages to the device's main memory.
4. You can display the Navigator inte#ace in
the language of your choice by tapping the
Language Settings button on the Stoup
menu and selecting the language in
Navig ator.
nstaNing
Maps
Removin9
Maps
You can remove a map by selecting a map in
the Device Maps pane and clicking the
"Add/Remove"
button.
1. From the Des_op, Map,s pane,, select a
map.
2. From the "Target" _ntext
main memory.
box, sielect the
3. When you select a Target option (Storage
Card, Main Memory) the "PC PoltaF' dis °
plays the following information:
• Required: The amount o,f free space necessa_ to install the map on the selected
Target option.
• A'¢.ail_le: The, amount of free space available for the selected Target option.
Note: Iif the free space requ[r_
is equal or
greater than the free space a'vailable, "PC
PoRaF will not install the selected map.
4. Sele_
a map to add or remove.
5. ,Click the "Add_emo,ve"
button.
6. The sele_ed map is install_
in the Device M_s p,anel.
and displayed
i
sln
Genera
ruing Messa9
The _ol!owing warning messages can appear
when you're working with navigator "PC
PoRarL
Lost
connexion
transfer
if at any point during the installation or data
transfer, the connection to the device is lost,
the following message, is displayed::
"Connection to, the ,device has been lost.
Please check your connexion."
Uninstalling
Navig_or
Console
When a version of navigator programme (versions prior to the "PC Po,_al") is located o,n
your computer, the following message is displayed:
"A previous version of '"PC Polar" was found.
D,o you wish to uninstall?"
It is re_mmended
t,o uninstal! the previous
progam before installing "PC Po,_al".
Unlns_!!ing
"PC Portal"
When an earlier version ,of navigator "PC
Portal" is located on your _,mputer, the fop
lowing message is displayed:
"A previous version of "PC Portal" was found.
Do you wish to uninstall? "
It is re_,mmended
t,o uninstall a previous version ,of "PC Po_l"
before instal!ling the current version.
Up_es
to "PC Po_l"
If there are updates in
prompted to download
message:
"There are updates to
wish to down!oad and
navigator, you are
them in the folilowing
"PC PoAal", do you
install them?"'
Previous maps
If maps from a previous ,version are L_ated
on your _mp, uter, the following message is
displayed:
"Existing map,s data found.. Do you want to,
keep it?"
Clicking '°Yes" le_ you install m_s from previous versions.
Remove maps
The following message appears when you
have seie_ed an ins_!led map and clicked
the Actions
button:
"Selected maps shall be removed from your
device. Are you sure you wish to oontinue?"
Data Transfer
if you close the PC Portal while install navigao
tor so,ware, a map, imposing or exposing a
Favorite location, or backing up data. the following message appears. :"if you will close
the PC Po_al now, the [process] shall not be
completed. Are you sure you wish to ,close?".
Backup Data
If stored data is located on your computer, the
folbwing message appears:
"Navigator Backup data foundi. Do you want to,
keep it?" it is re_mmended
_o,keep backup
data.
ootin
Navigation
program and map data
• if you want to operate this product properly;
navigation program and map data provided by
LGE should be in LGE fo,lder on your navigation device.
• Don't erase or m_iN any contents in the LGE
folder using USB mass storage connection.
(All contents are impo,_ant to, operate
navigation. Deleting this ,data may cau_ navi o
gation to lead to malfunction.)
Audio streaming
To enjoy high quality music using Bluetooth
stereo headsets, we recommend over l6-bit
audio with sampling rates d 48 KHz and 44.1
KHz, (The _und quality depends on _mpling
rates of audio and your header.)
JPG: Image file size shoulld be less than 1600
MP (megapixels).
Cannot identi_ the current location. (GPS
not re,-_ving)
,GPS cannot be used indoors and must be connected to the _wer with ACC to a vehicle in a
location where the sky can be seen well.
When initially _,nne_ing the G PS, it usually
takes about 10 min_es to operate normally, but
the connection speed can differ depending on
the wea_er condition, and surrounding obsta,cles,
If the GPS connection is unstable for a long perio
,od ,of time, try the folio,wing.
• Check if the power is conne_ed to the product.
• Check if the back of the GPS product is in a
location where the sky can be _en well
• if there are high buildings or if you are under a
tree, move to, a location where there aren_ any
obstacles.
• Check the GPS receiving condition from the
GPS menu,
Cannot hear the voice guide,
You can hear the voice guide when you select
"Guid_ce" in "Setup".
But during actual driving, the voice guide is provided.
If the volume is foo low, adiust the volume on
the right unit.
Can not see the map.
This is when you cannot see the map even
when you have executed the navigation
menu,,
This happens when the data within the
memo_ is damaged
Delete al! the data
within the memory and rein_all the data.
If the problem persists; after the installation,
contact the Customer Servi_ Center:
Map data and _ngerous
area inform_ion
are nOt updated.
You must periodically u_ate the map data.
Rder to the homepage for detailis on how to
update the, d_a.
The path guide ,_n be d_erent from the
actual path. (Path guide er'mr)
• When the road is closely parallel.
, When the splitting road angle, is;very small
• When there is an adjacent road when
turning.
• When driving on a road that is narrowing
f_t.
• When driving through the mountain or where
the road is;too curvy.
• When the starting, p_sing
and arriving
locations are too close within 10 km.
• When you have set the sta_ing, passing or
arriving location more than 1 km away from
the road,
• When driving through
, When driving through
the tunnel.
high buildings°
here
is a difference _ween
the driving
road and the road on the map in Me product°
Even though GPS is usuaJ]y very accurate, it
has an error range.
When GPS receiver is installed, there can be an
error of abo_ 5 to !5m. But for newly con_ru_ed roads, the problem could be from the data
update to the map_
Wh_
is GPS?
Map matching
The GPS u_d by this Mobile Navigation
System is susceptible to certain errors. Their
calculations may on o_ion
place you in a
location on the map where no road exists. In
this s_uation, the processing system
understands that vehicles travel only on
roads, and is able _ _rrect your
pos_ion by adjusting it to a near road. This is
called map matching.
The Global Positioning System (GPS) is a
sate!!_e-bas_
navigation system made up of
a network of 24 satellites plaid
into orbit by
the US,
Department of Defend.
GPS was originally
intended for milita_ applications, but in the
1980s, the government made the system
available for civilian use
GPS works in any weather conditions, anywhere in the world, 24 hours a day:
There are no subscription fees or setup
charges to use GPS.
With map matching
e
With no map matching.
Basic o_ration
tips
i. After charging or connecting
_urce, turn the unit on.
to a power
2, Make sure you are s_opped (not moving) in
a location with a clear view of the sky.
3. You will see your current location within a
few minutes and then you can start navigato
ing_
4. If the correct bcation is not found within 6
minutes, restart the unit using the ON/OFF
button on the side, of the unit.
- If even
a phone as described in this list mee_ requiremen_
of Bluetooth Hand4ree Profile
1o5 and Obje,_ Push Profile !,!, it can operate, However, it is noted that we cannot assure
for operation by function.
. .As difference in fun_ional operation by model is mainly resulted from feature of a hand4ree
phone, consult manufa_urer
of a phone if you have any question.
•. There may be restrictions on using Bluetooth technology depending ,on some locations or
wireless environment° Due to the variety of Bluetooth phones and their firmware version, your
device may respond differently when performing over Bluetooth_
Manufacturer
Model
Year
Calling
BLACK
BLACK
8ER RY
BERRY
81 _
88_
Display
Voice Phone Book
Caller ID Dial
Sync
Object Push
(vCard)
2_7
2_7
YES
YES
YES
NO'
NO
NO
NO
HP
HP
HW691 5
H6,315
2_5
2_7
YES
YES
YES
YES
NO
NO
YES
NO
YES
YES
LG
LG
KE970
KE8_
2_7
2_7
YES
YES
NO
NO
NO
NO
YES
YES;
NO
LG
LG
CU_0
2_7
2_7
YES
YES
NO
NO
NO
YES
NO
LG
LG
LG
MG320
MG280
KE5_
2_7
2_7
2_7
YES
YES
YES
YES
NO
YES
NO
NO
NO
NO
NO
NO
YES
YES
YES
LG
KG2_
2_7
YES
YES
NO
NO
YES
LG
LG
LG
KU380
YES
YES
NO
YES
YES
NO
NO
NO
NO
YES
KU580
2_7
2_7
2_7
LG
LG
KU970
KG245
2_7
2_6
YES
YES
YES
NO
NO
NO
NO
NO
YES:
LG
!LG
KG8_
M4410
2_6
2536
YES
YES
YES
YES
NO
NO
NO
NO
YES
YES
U890
U6
2_6
2_6
YES
YES
YES
YES
NO
YES
NO'
YES
NO
iNO
LG
MOTOROLA
YES
MOTOROLA
RIZR za0
ROKR !E6
2_7
2_7
YES
YES
YES
NO
NO
NO
NO
YES
MOTOROLA
MOTOROLA
RAZR V3i
V360
2_6
2_6
YES
YES
YES
YES
YES
YES
YES
YES
YES;
YES
MOTOROLA
MOTOROLA
KRZR K1
ROKR E2
2_6
2_6
YES
YES
YES
YES
YES
NO
YES
YES
MOTOROLA
MOTOROLA
SLVR L7
V195
2_6
2_6
YES
YES
YES
YES
YES
YES
YES
MOTOROLA
MOTOROLA
V6_
RAZR V3X
2_6
2_6
YES
YES
YES
YES
YES
YES
YES
YES
YES
YES
MOTOROLA
MOTOROLA
E10'_
A10'_
2_5
2_4
YES
YES
YES
YES
YES
YES
NO
YES
YES
MOTOROLA
E5_
V5,25
2534
2_4
YES
YES
YES
YES
YES
YES
MOTOROLA
NOKIA
NOKIA
'V6_
6230i
62_
2_4
2_5
2_4
YES
YES
YES
YES
YES
YES
YES
YES
YES
YES
NO
YES
YES
YES
NOKIA
8910i
2_4
YES
YES
NO
YES
YES
NOKIA
N77
2_7
YES
YES
YES
NO'
YES
Model
Year
Display Voice Phone Book
CalUn
9
Dial
YES
YES
Sync
NO
NO
Object Push
(_ard)
YES
YES
NOKIA
NOKIA
N95
N9!
2007
_07
YES:
YES:
Caller liD
YES
YES
NOKIA
8_0
_07
YES
YES
YES
YES
YES
NOKIA
NOKIA
NOKIA
N91
N9!
61,03
2007
2007
2006
YES;
YES
YES
YES
YES
YES
YES
YES
NO
NO
YES
iNiOKIA
6131
_06
YES:
YES
NOKIA
NOKIA
NOKIA
7370
7_0
61280
2006
2006
2006
YES
YES:
YES
YES
YES
YES
YES
YES
YES
YES
YES
YES
YES
YES
YES
_06
YES
YES
NiOKIA
YES
NO
NOKIA
NOKIA
NOKIA
E61
N70
5,_0
2006
_06
_06
YES
YES:
YES:
YES
YES
YES
YES
YES
YES
NO
NO
YES
YES
YES
YES
NOKIA
NOKIA
5_0
6670
2006
2006
YES;
YES
YES
YES
YES
NO
NO
YES
YES
NOKIA
NOKIA
E_
E62
_06
_06
YES
YES:
YES
YES
YES
NO
NO
YES
NOKIA
NOKIA
E70
N73
_06
2006
YES
YES
YES
YES
YES
YES
NO
NO
YES
YES
NOKIA
NOKIA
N80
N92
_06
_06
YES
YES
YES
YES
YES
YES
NO
NO
YES
YES
NOKIA
NOKIA
NOKIA
6670
3,230
6_0
2005
2005
_05
YES
YES
YES
YES
YES
YES
NO
NO
NO
YES
YES
NOKIA
76'10
2004
YES
YES
YES
NO
YES
NOKIA
NOKIA
NOKIA
9'_0
3,650
6_0
200,4
2004
2004
YES
YES
YES:
YES
NO
YES
NO
YES
YES
NO
NO
NO
NO
YES
YES
NOKIA
68_3a
2004
YES
YES
YES
NO
YES
NOKIA
NiOKIA
PALM
N+GAGE
6650
TREO750V
200,4
2004
_07
YES
YES
YES
YES
YES
NO
YES
YES
NO
NQ
YES
PALM
TREO750V
2007
YES;
YES
NO
NO
YES
SAMSUNG
SAMSUNG
PG6200
D900,
i6_
_06
2007
2007
YES
YES
YES:
YES
YES
YES
NO
NO
YES
NO
YES
NO
YES
YES
NO
SAMSUNG
A707
_07'
YES
NO'
NO
NO
SAMSUNG
SAMSUNG
SAMSUNG
D600,
D820
Z5_V
2006
_06
_06
YES
YES
YES
YES
YES
YES
NO
NO
NO,
NO
NO
NO
YES
YES
NO
SAMSUNG
T509
_06
YES
YES
NO
NO
YES
SHARP'
SIEMENS
SIEMENS
SIEMENS
GXI 5
SL75
SK65
SXl
200,4
2006
2004
_04
YES;
YES
YES
YES
NO
YES
YES
YES
NO
NO
NO,
YES
NO
YES
YES
NO
YES
YES
SIEMENS
$65
2004
NO,
Model
SONY
SONY
SONY
SONY
SONY
SONY
SONY
SONY
SONY
SONY
SONY
SONY
V8,_
M600'i
K750i
W810i
V60'0i
W710i
W850i
K800i
K700i
S70,0i
_610,
,Z600,
Year Hansfree
Calling
Voice Phone Book
Object Push
2_5
2_7
YES
YES
Caller iD
YES
YES
2_6
YES
YES
YES
YES
YES
2_6
2_6
2_6
YES
YES
YES
YES
YES
YES
YES
YES
NO
YES
YES
2_6
2_5
2_5
YES
YES
YES
YES
YES
NO
YES
YES
YES
YES
YES
YES
YES
YES
2_4
2_4
YES
YES
YES
YES
YES
YES
2C_6
Dial
YES
YES
Sync
YES
YES
(vCard)
YES
YES
YES
YES
CPU
Win CE 5,0
ARM9 400 MHz
Built-in Memory
3.5 inch TFT LCD
Resolution 3_ X 240
LED type Backlight
Touch Screen
Analog resistive
Mono, Internal Speaker
Typical
bjpe
1,0W (lEA)
SiRF star ill.
Internal Antenna
North America
Voice Guidan_
Navteq
DO 5V/IA
Vehicle Power
Cigar-jack Input
(12 o24V)
Operating • -10 °C to 60 °C
Storing • -30 °C to 80 °C
Built-in
BATTERY
DO 3,7 V (Li-lon),
- MP3:
1100mAh
5 hours [Brightness: Minimum, Volume: 5 (Center)]
- Navigation:
4,5 hours [Brightness: 5 (Center). Volume: 5 (Cente0]
- Photo:
5 hours [Brightness:
MinFUSB
External
Port
5 (Center),
Volume: 5 (Center)]
USB 2.0
GPS Jack
Image
Audio
MP3
Bluetooth
"The Bluet ooth word mark and _ogos are owned by the Btuetooth SIG, Inc. and any use of such
marks by L G Electronics is under license. Other trademarks and trade names are those of their
respective owners."
P/N: AFN36113927