1
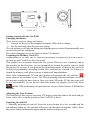
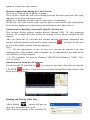
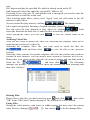
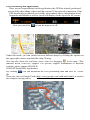
USER MANUAL
In addition to common functions of the Car DVR, this device has three main
features:
(1)There are two lenses built in and can take videos for both the front and the back
ways;
(2)GPS Module is added to this product and can record the complete driving tracks.
Through special software, you can use the Internet to connect to Google map while
playing videos on the computer and display driving paths on the map, so to track the
vehicles' driving routes.
(3)The built-in gravity sensor G-Sensor can record the gravity sensitive information
and make judgments according to the motion offsets. If the offsets achieve a certain
value, the sensor would consider the driving as unusual and lock the current video
automatically for security purpose. Through special software, you can also see the
gravity sensitive data changes while playing videos on the computer, so to track the
gravity status during the driving.
In order to optimize the Car DVR's performance, please read this manual carefully
before starting to use the device (the design and specifications of this product and
related components described herein are subject to change without notice).
Contents
Product Structure…………………………………………………………….……..3
Getting started with the Car DVR…………………………………………………4
Charging the Battery
Preparing the Memory Card
Adjusting the Lens Position
Powering On and Off
Basic Operations for the Car DVR…………………………………………….…..5
Switching the Operating Mode
Setting the Menu
Taking Videos
Shortcut Applications during the Video Process
Instructions for Reading Videos and Using the AP Software………………...…..5
Reading and Playing Video Files
Archiving Video Files
Deleting Files
Fixing Files
GPS Positioning and Applications
Using the Toolkit
Technical Specifications……………………………………………………………..9
Accessories List……………………………………………………………..………10
Product Structure
Getting started with the Car DVR
Charging the Battery
There are two ways to charge the battery:
1.Connect the device to the computer using the USB cable to charge;
2.Use the enclosed vehicular power to charge.
The red indicator will light on during the charging process and will automatically turn
off once the process completed.
The whole charging process will last for about 120 minutes.
Preparing the Memory Card (TF)
Requirement for TF card: The TF card for this product is required to be 4GB or above
in capacity and CLASS6 or above in speed.
This product uses a separate and private file system. When you use a memory card in
this product for the first time, you are prompted the format the card in order to build
the private file system. If you perform the formatting action, all data in the card will
be deleted permanently (including locked files) and can't be restored. So before you
format the memory card, please ensure to backup all important data.
Note: After formatting the TF card, this product will generate the AP software
in the card for the customer to use. The GPS positioning function and time service in
this product require the time zone to Once you open AP on the PC the time zone will
be set automatically. If you haven't done this action, the display screen will show
and the GPS positioning can't provide time service. Other features will function
normally.
Adjusting the Lens Position
The front lens of this project can rotate 270 degrees from the front to the back and get
better video effect even the position of the Car DVR is fixed.
Powering On and Off
1. Manually powering on and off: Press the power button for a few seconds and the
red indicator lights on. The product will power on after the tick and take videos. Press
the power button continuously again and the product will power off.
2. Automatically powering on and off during the driving: Firstly plug in the vehicular
power and when the engine starts, the product will power on and take videos
automatically after the delay. When the engine stops and the key is plugged out, the
product will save the current video and power off in 15 seconds.
Note: If the Car DVR is using the built-in power and in low power state, it will
provide a warning message and then power off automatically.
Resetting
If unusual situation occurs due to improper operations, please press the reset key and
power on the product again, the recorder will resume normal function.
Basic Operations for the Car DVR
Switching the Operating Mode
Two operating modes are available for this project: video and replay. You can switch
between these modes by pressing the MODE key.
Under the video mode, you can press the OK key to start or stop taking videos.
Under the replay mode, the videos files are ordered by the time sequence. You can
press the left and the right keys to view them and press the OK key to play the
selected video.
Setting the Menu
Press the MENU under the "Preview" mode, and you will enter the “System Setting
Menu” page. The background of the “Menu Setting” field is blue now. You can press
the up and down keys to select necessary setting options, then press "OK" to confirm
the setting. If you press the MENU key again, you will exit the menu.
Video Mode: Both lenses/the front lens/the back lens;
Time Setting: Press the left and right keys to adjust the hours and then press the OK
key to confirm and exit;
Formatting: Press the OK key to enter and select Yes/No;
TV Format: Set NTSC/PAL;
Prompt Tone: On/Off;
Recording: On/Off;
Language: English/Simplified Chinese/Traditional Chinese/Japanese/Korean/Russian
Screen Presetting: On/Off;
Automatic Video Protection Sensitivity: Low/Medium/High/Turn off the automatic
video protection function;
(This function sets the sensitivity for the gravity sensor to take videos automatically)
Frequency: 50HZ/60HZ.
Default Setting: Yes/No (Selecting Yes will restore to the factory default parameter
settings)
Taking Videos
Begin/Stop to take videos: The product will begin to take videos automatically after it
starts up or you insert the TF card. Press the OK key can stop the process and press it
again the resume the video process.
Shortcut Applications during the Video Process
The Up key: Turn off/on the audio recording
The Left key: Switch the full screen display between front lens and back lens (only
function if you select both lenses mode).
MENU key: Manually lock the current video in case of emergency.
MODE key: Save the current video, stop the process and switch to the replay mode.
Press this key again can exit the replay mode and resume the video process.
Instructions for Reading Videos and Using the AP Software
This product doesn't support reading directly through USB. TF card supported
devices (for example the card reader) are needed to read videos recorded by this
product.
After you insert the TF card into this product and the formatting completed, this
product will automatically generate the special software
. You must use this tool
to access files in this product from the computer.
Note:
(1) For the convenience of use, as well as to prevent the software tool from
damaging due to the memory card exceptions, we recommend that you back up the
tool and save it on the computer.
(2)The computer OS must be Windows 2000/XP/Vista/Windows 7/MAC OS x
10.3.6 or above.
Instructions for Using the AP Software
If you open the TF card disk on
, you can't see any other video files but only the
J PLAYER
software. Users need to read video and perform other actions with
the help of this software.
Reading and Playing Video Files
After clicking
a menu will pop up
for you to select the file to open.
Disk: Read all contents in the specified TF
card.
File: Import and play the specified file, which is already saved on the PC.
Path: Import all video files under the specified PC folder to AP.
Password: If you select the TF card and this card is encrypted, you need to enter the
password here to read files in this card.
After selecting paths above, please click "Apply" and you will return to the AP
interface to play videos.
You can control the play status by clicking
.The buttons from
left to right correspond to functions of rewind/stop/play (pause)/fast-forward.
You can select the lens channels to play videos by clicking
: both
lenses/the front lens/the back lens. (Limited to files recorded by double lenses)
While playing the video, you can click
to save the current frame as an
image.
Archiving Video Files
There are two ways to archive the video file: archiving the complete video file or
archiving part sections of a video file.
Archiving the complete video file: you only need to check the files the
needs and then click
to save the files to the specified
location.
Archiving video sections: Except the complete video file, this product also produces
sections in three minutes. You can archive these sections to decrease the file size.
Please place your cursor on the video file you want to archive and you don't need to
check the file
, and then click
. The following
dialogue box displays. You just need to check the sections that need archiving and
then click "Archive".
Deleting Files:
Please select video files you don't need any more
and click
, then select
"OK" in the "OK/Cancel" options displayed. The selected file will be deleted.
Fixing Files:
During the video process, card issues or sudden power loss may cause the current
video file to be damaged
. You can use
to fix the damaged files.
GPS Positioning and Applications
There are two requirements for this application: the GPS has already positioned
successfully when taking videos and the current PC has network connection. If the
GPS has already positioned successfully when taking videos, information about
longitude and latitude as well as speed will display on the top of the AP screen:
Now you can click
to turn the map on or off.
Under this mode, you can switch between different maps by clicking the options on
the upper right corner: map/Satellite map/3D map.
You can also check the real time street views by dragging
to the map. (This
function needs GOOGLE support. For specific support information of different
counties, please contact GOOGLE).
GOOGLE Earth KML Application:
By clicking
you can download the GPS positioning data and save as *.KML
file.
Then you can use Google Earth (http://www.google.com/earth/index.html) to restore
the complete driving routes.
Using the Toolkit:
You can enter the toolkit by clicking
. Through the toolkit, you can format the
SD card, upload software to the SD card, test the SD card's speed, select maps and set
user password.
Setting the Password: For confidential purpose, users can encrypt the TF card. After
that, only users with the correct password can open videos in the encrypted TF card.
Product Characters
- Super small volume and dual high definition lenses. The front lens can rotate 270
degrees from the front to the back and the back lens is the extra wide-angle lens with
120 degrees high resolution. This combination is more suitable for taking high
resolution videos on all occasions and from various angles.
- Built-in 1/4 inch sensor component with low noise and high quality can capture high
definition images under dark occasions
- Built-in Li Battery supports to take videos while charging
- Built-in microphones and horns
- Supports the high capacity Micro SD card
- Supports to take videos automatically once the engine starts
- Supports to delay the startup in case the transient pulse current when the engine
starts may damage the device
- GPS scan positioning and driving routes restoring, all under control.
- Gravity sensor
- The video encryption function can protect users' privacy by setting password.
Technical Specifications
LCD Screen Size
2.0”High definition screen
Lens
100 degrees front wild-angle lens/120 degrees back extra
wild-angle lens
Option Language
English/Simplified Chinese/Traditional
Chinese/Japanese/Korean/Russian
Video Format
AVI
TF Memory Card
Slot
Micro TF
Microphone/Horn
Built-in
Vehicular Power
DC Input
5V 500MA
Battery
Built-in polymer Li Battery
System
Requirement
Windows 2000/XP/Vista/Windows 7/MAC OS x 10.3.6 or
above
Note: The product design and specifications described herein are subject to
change without notice.
Accessories
1. Vehicular Power; 2. Vehicular Bracket; 3. USB Cable;
4. Instruction Manual.