1
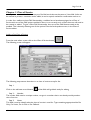
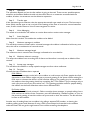
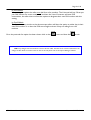
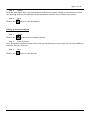
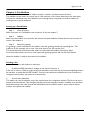
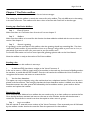
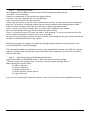
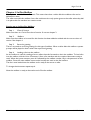
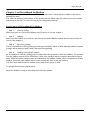
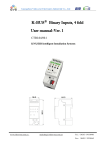
FAX Master Manual Version 1.1 Page 2 of 18 Contents Chapter 1 What is Fax Master? _____________________________________________________ 3 Fax Mail____________________________________________________________________ 3 Fax Retrieval ________________________________________________________________ 3 Fax Broadcast _______________________________________________________________ 3 A Complete Package of Benefits __________________________________________________ 3 Who would use Fax Master?_____________________________________________________ 4 Chapter 2 Conventions _____________________________________________________________ 5 Moving around the Editor_______________________________________________________ 5 Chapter 3 Class of Service __________________________________________________________ 7 Adding a Fax Class of Service ____________________________________________________ 7 Chapter 4 Mailbox ________________________________________________________________ 10 Adding a new Fax mailbox _____________________________________________________ 10 Editing an existing mailbox _____________________________________________________ 11 Chapter 5 Distribution ____________________________________________________________ 12 Adding a Fax distribution group _________________________________________________ 12 Chapter 6 Fax Mailbox ____________________________________________________________ 14 Setting up a Fax Mailbox _______________________________________________________ 14 Sending a fax _______________________________________________________________ 14 Chapter 7 Fax/Voice mailbox ______________________________________________________ 15 Setting up a Fax/Voice Mailbox __________________________________________________ 15 Sending a fax _______________________________________________________________ 15 Retrieving a Fax _____________________________________________________________ 15 Chapter 8 In/Out Mailbox__________________________________________________________ 17 Setting up an In/Out Fax Mailbox ________________________________________________ 17 Chapter 9 In/Out callback fax Mailbox ______________________________________________ 18 Setting up an In/Out callback Fax Mailbox __________________________________________ 18 Fax Master Manual 1.1 Voice Connect 1997 – 2001 Page 3 of 18 Chapter 1 What is Fax Master? The three-in-one unified communication tool that makes fax work harder for you. Incorporate Fax Mail, Fax Retrieval & Fax Broadcast into your VCII - you’ll quickly see how fax can play an efficient new role within your organisation. Whilst e-mail is becoming an increasing popular form of written communication there are still many occasions where fax is a more practical option. Fax Master from Voice Connect integrates three types of fax capability with your VCII: Fax Mail Allows you to have a personal fax sent direct to your mailbox. If you are using any of the Web, Unified Messaging, Desktop Integration modules then you can also view the fax on your PC’s screen, deliver it to either a printer or via phone to any fax machine world-wide. Fax Retrieval Sometimes the spoken word isn’t the most convenient way to put across the information you want. For example you make available maps of how to find your premises, distribute extended lists of staff names & extension numbers or make available diagrams with detailed product information. With Fax Retrieval you can offer a 24-hour a day way of allowing callers to gather such information for themselves. To do so they simply dial into the VCII and select the information they require from a spoken menu. If they are calling from a fax-phone they have the option of having the information faxed straight through to them - whilst still on the line. Alternatively if they are calling from a phone, they can enter the telephone number of the fax machine they require the information to be faxed to. Fax Broadcast When you have a written message you wish to fax to a number of people or organisations within a short period of time, then you can use Fax Broadcast. It simultaneously faxes to as many numbers as your VCII has fax ports. This time saving device has many uses and has proved especially popular with NHS trusts when they send out health warnings, or for police authorities releasing ongoing news stories to the media. A Complete Package of Benefits The Fax Master module incorporates all three functions, allowing you to easily receive & retrieve information via fax. But it also gives you advantages not possible with regular fax machines. Because personal faxes are stored within an individual's mailbox, they are as secure as your voice messages, and can be accessed in the same way. This offer you the flexibility of picking up faxes from wherever you, so you can direct them to the nearest fax machine. Back in the office, fax-back information designed for more general access (maps, product information etc) is also secure, but can be easily updated by simply ‘faxing into’ the mailbox. So long as you know the correct password, the revised information can be updated as often as you wish, from anywhere in the world. Fax Master Manual 1.1 Voice Connect 1997 – 2001 Page 4 of 18 Who would use Fax Master? Organisations tend to use Fax Master for one of three reasons. 1. It’s a cost effective & secure way to control incoming faxes to and from their PC’s. 2. It’s a convenient way to allow both customers and staff remote access to written information, 24 hours a day. 3. It’s a useful way to disseminate written information to large groups of people. Fax Master Manual 1.1 Voice Connect 1997 – 2001 Page 5 of 18 Chapter 2 Conventions In this manual certain text forms denounce items linked directly to the Voice Connector II. Items in this text will be the normal body text of the manual. Items in Italics are voice prompts that you will hear when using the FAX features of the Voice Connector II. Items in bold are to related to the set-up and the configuration of the Voice Connector II. Moving around the Editor Some of the following will be obvious to some and not others. It is simply to help with getting to know the Voicemail Editor and to move around the editor more swiftly. The black arrow indicates a selected record. Make sure this is pointing at the correct record before editing or deleting. Once the record is being edited the black arrow changes to a pencil as shown below. This moves to the first record. Previous record. Next record. Last record. This will delete a selected record. This button is in every editor section; it will exit the current screen. This is the search button. This button can be found in the mailbox editor and the group editor. When this is used the following screen will appear. Fax Master Manual 1.1 Voice Connect 1997 – 2001 Page 6 of 18 Enter the mailbox number and click on Find First. If the editor finds this number, but not as a mailbox number (it may be that it is mentioned in another mailbox) then click on the search button again and this time click on Find Next, keep doing this until the mailbox number has been found. Click on this button to create a new record. Some fields have a list of options to choose from instead of typing in the field. If it is a field with options then it will look like the following. Click here for options On the right hand side of the field there is a small black arrow pointing downwards, click on this arrow and a list of options will appear. Place the mouse over the square that the arrow is pointing to, press and hold down the left mouse button, move the mouse up or down, this will scroll up and down through the list of options. Once the option that is required comes into view click on that option. This option will now show in the selected field. N.B. For further notes on windows actions see any Win95/98 or NT documentation. Fax Master Manual 1.1 Voice Connect 1997 – 2001 Page 7 of 18 Chapter 3 Class of Service It is important to note that for the most part, Fax Mail works almost the same as Voice Mail. A fax can be marked as private, a comment can be added, it can be copied, marked for confirmation and so on. In order for a mailbox to have FAX functionality, a mailbox has to have been assigned to a Class of Service with one of the FAX options enabled, if there is not currently such a Class then one will need to be created or added. To give a Class FAX functionality, then one of the FAX features needs to be enabled. This is done by selecting one of the options from the fax dropdown menu, in the Class of Service editor. Adding a Fax Class of Service From the main editor screen click on the Class of Service button The following screen will appear. Figure 1, Class-of-Service Editor The following steps assume that there is no class of service set up for fax. Step 1: Click on the add new record button all the fields will go blank ready for editing. Step 2 : Number The number field must be a unique number, so type in a number that is not already used by another class of service. Step 3: Name This field is used to identify what the class of service is used for. Type something appropriate like Fax Only, Fax Voice, Fax In-Out or Fax Callback. Fax Master Manual 1.1 Voice Connect 1997 – 2001 Page 8 of 18 Step 4: Operation The operation depends on how the fax mailbox is going to be used. There are two possible options, extension and mailbox. Mailbox should only be used if there is no extension associated with the mailbox, all other circumstances use the extension operation. Step 5: Transfer type If the operation type is extension then the appropriate transfer type needs to be set. The best way to know which transfer type to use is to look at the settings of the class of service for normal extension users, if still in doubt contact a Voice Connect engineer for advice. Step 6: Voice Messaging This needs to be ticked for the mailbox to receive faxes and to receive voice messages. Step 7: Auto Attendant Make sure this is ticked. This enables the mailbox to be dialled. Step 8: Maximum messages in mailbox This will be the amount of faxes and/or voicemail messages the mailbox is allowed to hold at any one time, this will be a combination of new and stored. Step 9: Maximum message length The maximum time in seconds that a message is allowed to be recorded for. Step 10: Maximum silence in message This stops the mailbox from recording lots of silence and therefore is normally set to default of five seconds. Step 11: Accept copy messages This will allow the mailbox to accept copied messages sent from other mailboxes. Step 12: Fax type Choose the type of mailbox that is required. FAX mailbox No voicemail messages can be left in this mailbox as it will accept only Faxes, people who find themselves in that mailbox might not hear a personal greeting as the system will be waiting for a FAX tone so it knows that there is a FAX machine calling in. If a greeting is to be recorded for this mailbox, then the greeting should say something like, “This mailbox is for fax messages only, to send a fax press send on your fax machine now”. This greeting would be useful for people dialling the mailbox via the Auto Attendant rather than a dedicated DDI. Fax/Voice mailbox Can handle both FAX and voicemail. Callers can either leave messages, or people calling from a FAX machine can dial the Voice Connector, press #2 followed by a mailbox number, as soon as the personal greeting is heard the callers can press send on their fax machine. The fax will then be sent to that mailbox. Another way of sending faxes into a mailbox is by calling a separate DDI number, on hearing the mailbox greeting press send. However if using a DDI it must always be forwarded to the mailbox otherwise faxes will not get through because users will be answering the telephone. Fax Master Manual 1.1 Voice Connect 1997 – 2001 Page 9 of 18 In-Out mailbox When using this option the caller must dial from a fax machine. The Voicemail will say “Please put your FAX machine into receive mode, now” and then the Voice Connector will start FAX transmission, the caller does not have the option to designate their own FAX number with this setting. In-Out/Callback This function is very similar to the above except callers will have the option to either key in their own FAX number or to have the FAX sent straight to them if they are calling from a fax machine. Once the particular fax option has been chosen click on the to save and then the to exit. N.B If any changes have been made to a Class of Service editor then the server must be restarted for the changes to take effect. For further notes on how to do this please refer to the System Managers Manual. Fax Master Manual 1.1 Voice Connect 1997 – 2001 Page 10 of 18 Chapter 4 Mailbox Once the Fax class of service has been set up then a mailbox needs to be added. Or the new class of service needs assigning to an existing mailbox. Click on the Mailbox editor button from the main editor screen. The following screen will show. Fig 2 Mailbox editor screen Adding a new Fax mailbox Step 1: Add Click on new record button navigation buttons. which is along the bottom of the screen with the other record Step 2: Class of Service Click on the pull down arrow of the class of service field and select the required Fax class of service. Step 3: Mailbox Type in the mailbox number in the mailbox field. (the mailbox is normally the same as the extension number). Step 4: Extension Type in the extension number in the extension field. (The password appears automatically as **** which is 8888, the default password.) Fax Master Manual 1.1 Voice Connect 1997 – 2001 Page 11 of 18 Step 5: Names Fill in the name fields, this is not essential but is useful for the system manager as the names are used in the reporting sections and mailboxes can be searched for via their name as well as the number. Step 6: Click on the Save button so save the addition. Editing an existing mailbox Step 1: Click on the Search to search for the mailbox number. Step 2: Class of Service Once the mailbox number has been found, click on the pull down arrow on the class of service field and select the fax class of service. Step 3: Click on the Save button so save the edit. Fax Master Manual 1.1 Voice Connect 1997 – 2001 Page 12 of 18 Chapter 5 Distribution Fax distribution is a facility that enables a fax to be sent to a group of fax machines and or fax mailboxes. The first part in creating a fax distribution group is to create a main mailbox and give it a Class of Service that has fax functionality enabled (as described in the previous chapters). From the main editor screen, click on the maintenance button. Then click on the Fax button and the following screen will appear. Figure 3, FAX Distribution Editor Adding a Fax distribution group Step 1 If a mailbox has not already been added or assigned for this function then return to Chapter 2 “Adding a new mailbox” or “To edit an existing mailbox” Step 2: Add Click on the add new record button . Step 3: Group Number Click on the pull down arrow on the Group Number field and select the mailbox that is to be used as a group, or, click in the Group Number field and type the mailbox number. Step 4: Retries In the retries field, type in the number of retries, this will retry around the group for that number or tries. Fax Master Manual 1.1 Voice Connect 1997 – 2001 Page 13 of 18 Step 4: Internal or External Now move across to the members box and click on the first pull down arrow, select either internal or external depending on whether the member number that’s about to be added is an internal or external number. Step 5: Fax Number Now click in the field next to the previous one and type in the number of the fax machine or the fax mailbox number. Step 6: Sequence Click in the sequence field and type in the sequence number. If this is the first member then type in number 1, second member number 2, and so on. Step 7: Active Make sure the active box is ticked. To add another member, click on the add member button Step 8: and then repeat steps 4, 5, 6, and 7. Save Once all the members have been added click on the to save. N.B. As with a normal voice group, as soon as the screen has been exited, then the group has been created and is ready for use immediately and requires no server restart. Fax Master Manual 1.1 Voice Connect 1997 – 2001 Page 14 of 18 Chapter 6 Fax Mailbox A fax mailbox is similar to a voice mailbox except it receives only faxes instead of voice. This mailbox can be used in the same way as a fax machine. It can receive faxes and it can send faxes, however fax mailboxes have extra features such as being able to copy faxes to another mailbox or sending faxes to group mailboxes. Setting up a Fax Mailbox Step 1: Class of Service Make sure there is a Fax Mailbox class of service. If not see chapter 3 Step 2: Mailbox Make sure the mailbox to be used for this function has been added or edited with the correct class of service. See chapter 4. Step 3: Record a greeting. If a greeting is to be recorded for this mailbox, then the greeting should say something like, “This mailbox is for fax messages only, to send a fax press send on your fax machine now”. This would be useful in case the caller does not realise that the mailbox is purely for faxes. For further information on how to record personal greetings, please refer to the User Manual. Now the mailbox is ready to be used as a fax mailbox. Sending a fax A fax can be sent to this mailbox in two ways. 1. A dedicated DDI that diverts straight to the Voice Connector II. A fax can be sent to a DDI by simply using a fax machine in the usual way, but instead of dialling another fax machine, it would dial the DDI number. Once the call reaches the mailbox the Voice Connector II recognises the fax tones and starts to receive the fax. 2. Via the Auto Attendant. This option can only be done by using a fax machine that has a telephone handset. The fax to be sent is placed in the fax machine. Then using the handset the Auto Attendant number is dialled, once the Auto Attendant answers the caller presses #2 followed by the fax mailbox number, press send on the fax machine and replace the handset. Fax Master Manual 1.1 Voice Connect 1997 – 2001 Page 15 of 18 Chapter 7 Fax/Voice mailbox A fax and voice mailbox can receive both fax and voice messages. The setting up of this mailbox is exactly the same as fax only mailbox. The only difference is the setting in the class of service. This mailbox must have a class of service with Fax/Voice as the fax type. Setting up a Fax/Voice Mailbox Step 1: Class of Service Make sure there is a Fax/Voice class of service. If not see chapter 3 Step 2: Mailbox Make sure the mailbox to be used for this function has been added or edited with the correct class of service. See chapter 4. Step 3: Record a greeting. If a greeting is to be recorded for this mailbox, then the greeting should say something like, “You have reached Mr Smiths mailbox. If you would like to leave me a message I will get back to you as soon as I can, or alternatively if you want to send a fax, press send on your fax machine now”. For further information on how to record personal greetings, please refer to the User Manual. Now the mailbox is ready to be used as a Fax/Voice mailbox. Sending a fax A fax can be sent to this mailbox in two ways. 1. A dedicated DDI that diverts straight to the Voice Connector II. A fax can be sent to a DDI by simply using a fax machine in the usual way, but instead of dialling another fax machine, it would dial the DDI number. Once the call reaches the mailbox the Voice Connector II recognises the fax tones and starts to receive the fax. 2. Via the Auto Attendant. This option can only be done by using a fax machine that has a telephone handset. The fax to be sent is placed in the fax machine. Then using the handset the Auto Attendant number is dialled, once the Auto Attendant answers the caller presses #2 followed by the fax mailbox number, press send on the fax machine and replace the handset. Retrieving a Fax Once a fax has been delivered to a mailbox the user needs to log in to their mailbox to retrieve the fax. Once the fax has been retrieved and sent to a fax sent to a fax machine, the fax will then become a stored fax. Once the fax is stored it can then be copied to other users or groups. Step 1: Log in to mailbox Dial the internal or external access number of the Voice Connector. Once answered press #1 followed by the mailbox number that has the new fax. Enter the password for that mailbox. Fax Master Manual 1.1 Voice Connect 1997 – 2001 Page 16 of 18 Step 2: Retrieving new faxes Once logged into the mailbox if there are just new fax message the system will say: “You have 1 new Fax Message”. If there is a combination of voice and fax the system will say: “You have 1 new Voice Message and 1 new Fax Message” Press 3 to retrieve the fax. You will now hear: “Please enter the number of your fax machine followed by the star key, to send to the line you are calling from press star”. (If the fax is an external number then this must be keyed in full including the area code) If there are new messages as well then you will hear the following prompt instead: “Press 1 to listen to your voice messages, press 2 to forward fax messages to a fax machine” Once you have finished entering your fax number the system will say: “Press 1 to send the fax, press 2 to review the number” after pressing 1 to send you will be told “your fax has been added to the queue and will be sent as soon as possible”. At this point you will still be told that you have a new fax, the message will not go to stored until the fax has been successfully delivered to a fax machine. When Fax messages are waiting in a mailbox the message waiting indication will be the same as the normal indication for voicemail messages. The Voicemail will deliver all new faxes at once to your selected FAX machine, each FAX has a unique reference number at the top left hand corner of the FAX, this is important if you wish to re-send the FAX at a later date. Step 4: Retrieving, Copying and Deleting Stored Faxes Log into the mailbox as mentioned in step 1. Press 4 to listen to stored messages. “To listen to stored voice messages press 1, to deliver or delete stored fax messages press 2” After pressing 2 for the fax menu: “To deliver a fax press 1” “To delete a fax press 2” “To delete all faxes press 3” “To list fax reference numbers press 4” “To copy a fax press 5” If you are not sure which fax reference number to send, it can be found on the original fax at the top. Fax Master Manual 1.1 Voice Connect 1997 – 2001 Page 17 of 18 Chapter 8 In/Out Mailbox This option is used for Fax on Demand. This means that when a caller dials this mailbox a fax can be delivered to them. The caller must dial this mailbox from a fax machine as the only option given to the caller when they dial is to place their fax machine into receive mode. Setting up an In/Out Fax Mailbox Step 1: Class of Service Make sure there is a Fax In/Out class of service. If not see chapter 3 Step 2: Mailbox Make sure the mailbox to be used for this function has been added or edited with the correct class of service. See chapter 4. Step 3: Record a greeting. There is no need to record a greeting for this type of mailbox. When a caller dials this mailbox a system prompt will be played to them rather than a personal greeting. Step 4: Loading a fax into the mailbox As this mailbox is used for sending a fax to callers then this fax needs to be in the mailbox. To load a fax into the mailbox, dial the Voice Connector II from a fax machine with the required document ready to send. When the system answers press #1 followed by the mailbox number, key in the password of that mailbox. Once the main mailbox menu can be heard press send on the fax machine. The fax is now loaded into the mailbox and is ready to be sent to a caller. To change the document repeat step 4. Now the mailbox is ready to be used as an In/Out fax mailbox. Fax Master Manual 1.1 Voice Connect 1997 – 2001 Page 18 of 18 Chapter 9 In/Out callback fax Mailbox This option is used for Fax on Demand. This means that when a caller dials this mailbox a fax can be delivered to them. The caller can dial from any location, as the system will say “Please enter the number of your fax machine followed by the star key. To send to the line you are calling from press star” Setting up an In/Out callback Fax Mailbox Step 1: Class of Service Make sure there is a Fax In/Out callback class of service. If not see chapter 3 Step 2: Mailbox Make sure the mailbox to be used for this function has been added or edited with the correct class of service. See chapter 4. Step 3: Record a greeting. There is no need to record a greeting for this type of mailbox. When a caller dials this mailbox a system prompt will be played to them rather than a personal greeting. Step 4: Loading a fax into the mailbox As this mailbox is used for sending a fax to callers then this fax needs to be in the mailbox. To load a fax into the mailbox, dial the Voice Connector II from a fax machine with the required document ready to send. When the system answers press #1 followed by the mailbox number, key in the password of that mailbox. Once the main mailbox menu can be heard press send on the fax machine. The fax is now loaded into the mailbox and is ready to be sent to a caller. To change the document repeat step 4. Now the mailbox is ready to be used as an In/Out fax mailbox. Fax Master Manual 1.1 Voice Connect 1997 – 2001