1
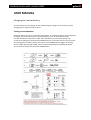
Heated insoles with remote GW2
Specifications:
battery: 2400mAh (8,88Wh); Li-Poly
built-in energy gauge
heating element: 2.2W - carbon fiber
the heating element is located at the front of the insole
modes: 33% (LO), 66% (MED), 100% (HI)
working time: 10h (LO), 6h (MED), 3h (HI)
fabric: 95% EVA, 5% velvet
charger: USB; 5V, 1A
sizes: M, L
weight with battery: 220g
convenient case included in the set
Features:
The heating element is constructed from carbon fibres offering extraordinary reliability and durability as
well as medical properties, thanks to infrared waves
A safe and economic Li-Poly battery provides a long time of operation of the heating system
The heating element is located at the front of the insert, thanks to which the heat is evenly distributed all
around your foot
The insert may be adjusted to the foot size between 35-40 or 41-46
The set contains a remote control, thanks to which the comfort of using the inserts is extraordinary
Cleaning and maintenance
The heating element used in is resistant to moisture. However, strong laundry detergent can cause mechanical
damage of the heating element . Therefore, we recommend surface cleaning with a cloth or brush with a small
amount of detergent and gentle rinsing . If you need a more powerful washing, tightly wrap the end of the
power cord. Do not clean with battery connected to them !
Important:
Before first use, fully charge the battery.
If the battery is stored for long periods without use, it should be fully charged before storage and charging
should be repeated every 3 months.
If there is mechanical damage to any items, immediately turn off the device and remove the battery . The
defective part must be sent to the service for repair or replacement .
Heated insoles with remote GW2
USER MANUAL
Charging the internal battery
Connect batteries to the charger socket and then plug the charger to the electricity outlet.
Charging time is approximately 5-6 hours.
Turning on and operation
Each time before turning on , make sure that the built- in connection cable is not mechanically
damaged. Also make sure that the connected battery is free of mechanical damage.
Connect the battery to the built-in cable. Place the battery in your pocket and zip it up.
To start the heating press and hold the POWER button for 2 seconds. Device will turn on with
the heating power at 100%. Another short press of the POWER button toggles the heating
power to 66%, 33% and again 100%, which is indicated by litting corresponding LED lights.
To turn off the heat press and hold the POWER button