1
N-Form
User Manual
Part Number 61950821L1-1A
February 2001
901 Explorer Boulevard
P.O. Box 140000
Huntsville, AL 35814-4000
(256) 963-8000
© 2001 ADTRAN, Inc.
All Rights Reserved.
Printed in U.S.A.
ii
To the Holder of the Manual
The contents of this manual are current as of the date of publication. ADTRAN reserves the right to change the
contents without prior notice.
In no event will ADTRAN be liable for any special, incidental, or consequential damages or for commercial
losses even if ADTRAN has been advised thereof as a result of issue of this publication.
Trademarks
N-Form, N-Command, and N-Spect are trademarks of ADTRAN, Inc. Copyright ©2001 ADTRAN Inc. All
rights reserved.
Java and Java™ Runtime Environment (JRE) are trademarks of Sun Microsystems, Inc.
Microsoft, MS-DOS, Windows, and Microsoft Internet Explorer are registered trademarks, and Windows NT
is a trademark, of Microsoft Corporation.
Netscape Navigator is a trademark of Netscape Communications.
Adobe, Acrobat, and Acrobat Exchange are trademarks of Adobe.
Apache web server is a trademark of The Apache Software Foundation. Copyright ©2000 The Apache Software Foundation. All rights reserved.
Sybase Adaptive Server Anywhere database server is a trademark of Sybase.
Perl. Copyright ©1997, 1998 Tom Christiansen and Nathan Torkington. All rights reserved.
Copyright ©1997-2000 by KL Group Inc. All rights reserved.
All other products, names, and services included in this manual are trademarks, registered trademarks, or trade
names of their respective companies or organizations.
iii
iv
N-Form Software
ADTRAN, Inc. License Agreement
THIS AGREEMENT CONSTITUTES A LEGAL AGREEMENT BETWEEN YOU, THE END USER, AND
ADTRAN, INC. YOU SHOULD CAREFULLY READ THE FOLLOWING TERMS AND CONDITIONS
BEFORE OPENING THE PACKAGE. OPENING THIS PACKAGE WILL BE CONSTRUED AS YOUR
ACCEPTANCE OF THESE TERMS AND CONDITIONS INCLUDED WITH THIS PACKAGE. IF YOU
DO NOT AGREE TO THEM, PROMPTLY RETURN THE UNOPENED PACKAGE AND YOUR MONEY
WILL BE REFUNDED.
1.
Grant of License: ADTRAN grants to you the right to use this copy of the enclosed ADTRAN software
program (the “Software”) at one site on one N-Form Server.
2.
Copy Restrictions. Ownership of Software. You own the media on which the program is recorded; ADTRAN retains title to the Software including copies, regardless of form or media, and to all copyrights
therein. The Software and accompanying written materials are copyrighted.You may either (a) transfer
the Software to a single hard disk and retain the original Software for backup purposes, or (b) make one
copy of the Software solely for backup or archival purposes.
3.
Transfer Restrictions. You may transfer the Software with a copy of this Agreement to another party only
on a permanent basis and only if the other party accepts the terms and conditions of this Agreement.
Upon such transfer, you must transfer all accompanying written materials, and either transfer or destroy
all copies of the Software. You may not lease, rent, merge, reverse engineer, decompile or disassemble
the Software.
4.
Termination. This License is effective until terminated. The License will terminate automatically without
notice from ADTRAN if you fail to comply with any provision of the License. You may voluntarily terminate at any time. Upon termination, you agree to destroy or purge all copies of the Software and
accompanying written materials.
5.
LIMITED WARRANTY. As its only warranty under this Agreement, ADTRAN warrants the media on
which the Software is provided to be free from defects in materials under normal use for a period of 90
days from the date of the delivery to you as evidenced by your purchase receipt. EXCEPT AS
EXPRESSLY WARRANTED HEREIN, THE SOFTWARE IS PROVIDED “AS IS” WITHOUTWARRANTY OF ANY KIND, EITHER EXPRESS OR IMPLIED, INCLUDING BUT NOT LIMITED TO
IMPLIED WARRANTIES OF MERCHANTABILITY AND FITNESS FOR A PARTICULAR PURPOSE. THE ENTIRE RISK AS TO THE QUALITY AND PERFORMANCE OF THE PROGRAM IS
WITH YOU. ADTRAN DOES NOT WARRANT THAT THE FUNCTIONS CONTAINED IN THE
SOFTWARE WILL MEET YOUR REQUIREMENTS OR THAT THE OPERATION OF THE PROGRAM WILL BE UNINTERRUPTED OR ERROR FREE OR THAT PROGRAMS DEFECTS WILL
BE CORRECTED.
v
6.
LIMITATION OF LIABILITY. ADTRAN’s entire liability and your sole remedy under this License is, at
ADTRAN’s option, either (a) return of payment as evidenced by a copy of your purchase receipt; or (b)
replacement of media not meeting ADTRAN’s Limited Warranty. IN NO EVENT WILL ADTRAN OR
ITS VENDORS BE LIABLE FOR ANY DIRECT, CONSEQUENTIAL, PUNITIVE OR INCIDENTAL
DAMAGES (INCLUDING DAMAGES FOR LOSS OF BUSINESS PROFITS, INFORMATION, OR
USE), EVEN IF ADTRAN HAS BEEN ADVISED OF THE POSSIBILITY OF SUCH DAMAGES.
7.
Governing Law. This Agreement is governed by the laws of the State of Alabama
8.
U.S. Government Restricted Rights. The Software and documentation is provided with RESTRICTED
RIGHTS. Use, duplication or disclosure by the Government is subject to restrictions as set forth in subdivision (b) (3) (ii) of The Rights in Technical Data and Computer Software clause at 252.227-7013. Contractor/manufacturer is ADTRAN, Inc., 901 Explorer Blvd., Huntsville, Alabama 35806.
vi
Sun Microsystems, Inc.
Binary Code License Agreement
READ THE TERMS OF THIS AGREEMENT AND ANY PROVIDED SUPPLEMENTAL LICENSE
TERMS (COLLECTIVELY "AGREEMENT") CAREFULLY BEFORE OPENING THE SOFTWARE
MEDIA PACKAGE. BY OPENING THE SOFTWARE MEDIA PACKAGE, YOU AGREE TO THE TERMS
OF THIS AGREEMENT. IF YOU ARE ACCESSING THE SOFTWARE ELECTRONICALLY, INDICATE
YOUR ACCEPTANCE OF THESE TERMS BY SELECTING THE "ACCEPT" BUTTON AT THE END OF
THIS AGREEMENT. IF YOU DO NOT AGREE TO ALL THESE TERMS, PROMPTLY RETURN THE
UNUSED SOFTWARE TO YOUR PLACE OF PURCHASE FOR A REFUND OR, IF THE SOFTWARE IS
ACCESSED ELECTRONICALLY, SELECT THE "DECLINE" BUTTONAT THE END OF THIS AGREEMENT.
1.
LICENSE TO USE. Sun grants you a non-exclusive and non-transferable license for the internal use only
of the accompanying software and documentation and any error corrections provided by Sun (collectively
"Software"), by the number of users and the class of computer hardware for which the corresponding fee
has been paid.
2.
RESTRICTIONS Software is confidential and copyrighted. Title to Software and all associated intellectual property rights is retained by Sun and/or its licensors. Except as specifically authorized in any Supplemental License Terms, you may not make copies of Software, other than a single copy of Software for
archival purposes. Unless enforcement is prohibited by applicable law, you may not modify, decompile,
or reverse engineer Software. You acknowledge that Software is not designed, licensed or intended for
use in the design, construction, operation or maintenance of any nuclear facility. Sun disclaims any
express or implied warranty of fitness for such uses. No right, title or interest in or to any trademark, service mark, logo or trade name of Sun or its licensors is granted under this Agreement."
3.
LIMITED WARRANTY. Sun warrants to you that for a period of ninety (90) days from the date of purchase, as evidenced by a copy of the receipt, the media on which Software is furnished (if any) will be
free of defects in materials and workmanship under normal use. Except for the foregoing, Software is
provided "AS IS". Your exclusive remedy and Sun's entire liability under this limited warranty will be at
Sun's option to replace Software media or refund the fee paid for Software.
4.
DISCLAIMER OF WARRANTY. UNLESS SPECIFIED IN THIS AGREEMENT, ALL EXPRESS OR
IMPLIED CONDITIONS, REPRESENTATIONS AND WARRANTIES, INCLUDING ANY IMPLIED
WARRANTY OF MERCHANTABILITY, FITNESS FOR APARTICULAR PURPOSE OR NONINFRINGEMENT ARE DISCLAIMED, EXCEPT TO THE EXTENT THAT THESE DISCLAIMERS
ARE HELD TO BE LEGALLY INVALID.
5.
LIMITATION OF LIABILITY. TO THE EXTENT NOT PROHIBITED BY LAW, IN NO EVENT
WILL SUN OR ITS LICENSORS BE LIABLE FOR ANY LOST REVENUE, PROFIT OR DATA, OR
FOR SPECIAL, INDIRECT, CONSEQUENTIAL, INCIDENTAL OR PUNITIVE DAMAGES, HOWEVER CAUSED REGARDLESS OF THE THEORY OF LIABILITY, ARISING OUT OF OR
RELATED TO THE USE OF OR INABILITY TO USE SOFTWARE, EVEN IF SUN HAS BEEN
ADVISED OF THE POSSIBILITY OF SUCH DAMAGES. In no event will Sun's liability to you,
whether in contract, tort (including negligence), or otherwise, exceed the amount paid by you for Software under this Agreement. The foregoing limitations will apply even if the above stated warranty fails of
its essential purpose.
vii
6.
Termination. This Agreement is effective until terminated. You may terminate this Agreement at any time
by destroying all copies of Software. This Agreement will terminate immediately without notice from
Sun if you fail to comply with any provision of this Agreement. Upon Termination, you must destroy all
copies of Software.
7.
Export Regulations. All Software and technical data delivered under this Agreement are subject to US
export control laws and may be subject to export or import regulations in other countries. You agree to
comply strictly with all such laws and regulations and acknowledge that you have the responsibility to
obtain such licenses to export, re-export, or import as may be required after delivery to you.
8.
U.S. Government Restricted Rights. If Software is being acquired by or on behalf of the U.S. Government or by a U.S. Government prime contractor or subcontractor (at any tier), then the Government's
rights in Software and accompanying documentation will be only as set forth in this Agreement; this is in
accordance with 48 CFR 227.7201 through 227.7202-4 (for Department of Defense (DOD) acquisitions)
and with 48 CFR 2.101 and 12.212 (for non-DOD acquisitions).
9.
Governing Law. Any action related to this Agreement will be governed by California law and controlling
U.S. federal law. No choice of law rules of any jurisdiction will apply.
10. Severability. If any provision of this Agreement is held to be unenforceable, this Agreement will remain
in effect with the provision omitted, unless omission would frustrate the intent of the parties, in which
case this Agreement will immediately terminate.
11. Integration. This Agreement is the entire agreement between you and Sun relating to its subject matter. It
supersedes all prior or contemporaneous oral or written communications, proposals, representations and
warranties and prevails over any conflicting or additional terms of any quote, order, acknowledgment, or
other communication between the parties relating to its subject matter during the term of this Agreement.
No modification of this Agreement will be binding, unless in writing and signed by an authorized representative of each party.
For inquiries please contact:
Sun Microsystems, Inc.
901 San Antonio Road
Palo Alto, California 94303
viii
JAVATM 2 Runtime Environment Version 1.3
Supplemental License Terms
These supplemental license terms ("Supplemental Terms") add to or modify the terms of the Binary Code
License Agreement (collectively, the "Agreement"). Capitalized terms not defined in these Supplemental
Terms shall have the same meanings ascribed to them in the Agreement. These Supplemental Terms shall
supersede any inconsistent or conflicting terms in the Agreement, or in any license contained within the Software.
1.
License to Distribute. Subject to the terms and conditions of this Agreement, including, but not limited to,
Section 2 (Redistributables) and Section 3 (Java Technology Restrictions) of these Supplemental Terms,
Sun grants you a non-exclusive, non-transferable, limited license to reproduce and distribute the Software
in binary code form only, provided that you (i) distribute the Software complete and unmodified, only as
part of, and for the sole purpose of running your Java applet or application ("Program") into which the
Software is incorporated, (ii) do not distribute additional software intended to replace any component(s)
of the Software, (iii) do not remove or alter any proprietary legends or notices contained in the Software,
(iv) only distribute the Program subject to a license agreement that protects Sun's interests consistent with
the terms contained in this Agreement, and (v) agree to defend and indemnify Sun and its licensors from
and against any damages, costs, liabilities, settlement amounts and/or expenses (including attorneys' fees)
incurred in connection with any claim, lawsuit or action by any third party that arises or results from the
use or distribution of any and all Programs and/or Software.
2.
Redistributables. In addition to the license granted in Paragraph 1 above, Sun grants you a non-exclusive,
non-transferable, limited license to reproduce and distribute, only as part of Software, those files specifically identified as redistributable in the Software "README" file (the "Redistributables") provided that:
(a) you distribute the Redistributables complete and unmodified (unless otherwise specified in the applicable README file), and only bundled as part of the JavaTM applets and applications that you develop
(the "Programs:); (b) you do not distribute additional software intended to supersede any component(s)
of the Redistributables; (c) you do not remove or alter any proprietary legends or notices contained in or
on the Redistributables; (d) you only distribute the Redistributables pursuant to a license agreement that
protects Sun's interests consistent with the terms contained in the Agreement; and (e) you agree to defend
and indemnify Sun and its licensors from and against any damages, costs, liabilities, settlement amounts
and/or expenses (including attorneys' fees) incurred in connection with any claim, lawsuit or action by
any third party that arises or results from the use or distribution of any and all Programs and/or Software.
3.
Java Technology Restrictions. You may not modify the Java Platform Interface ("JPI", identified as
classes contained within the "java" package or any subpackages of the "java" package), by creating additional classes within the JPI or otherwise causing the addition to or modification of the classes in the JPI.
In the event that you create an additional class and associated API(s) which (i) extends the functionality
of a Java platform, and (ii) is exposed to third party software developers for the purpose of developing
additional software which invokes such additional API, you must promptly publish broadly an accurate
specification for such API for free use by all developers. You may not create, or authorize your licensees
to create additional classes, interfaces, or subpackages that are in any way identified as "java", "javax",
"sun" or similar convention as specified by Sun in any class file naming convention.
ix
4.
Trademarks and Logos. You acknowledge and agree as between you and Sun that Sun owns the Java
trademark and all Java-related trademarks, service marks, logos and other brand designations including
the Coffee Cup logo and Duke logo ("Java Marks"), and you agree to comply with the Sun Trademark
and Logo Usage Requirements currently located at http://www.sun.com/policies/trademarks. Any use
you make of the Java Marks inures to Sun's benefit.
5.
Source Code. Software may contain source code that is provided solely for reference purposes pursuant
to the terms of this Agreement. Source code may not be redistributed.
6.
Termination. Sun may terminate this Agreement immediately should any Software become, or in Sun's
opinion be likely to become, the subject of a claim of infringement of a patent, trade secret, copyright or
other intellectual property right.
x
The Apache Software License, Version 1.1
Redistribution and use in source and binary forms, with or without modification, are permitted provided that
the following conditions are met:
1.
Redistributions of source code must retain the above copyright notice, this list of conditions and the following disclaimer.
2.
Redistributions in binary form must reproduce the above copyright notice, this list of conditions and the
following disclaimer in the documentation and/or other materials provided with the distribution.
3.
The end-user documentation included with the redistribution, if any, must include the following acknowledgment:
"This product includes software developed by the Apache Software Foundation
(http://www.apache.org/)."
Alternately, this acknowledgment may appear in the software itself, if and
wherever such third-party acknowledgments normally appear.
4.
The names "Apache" and "Apache Software Foundation" must not be used to endorse or promote products derived from this software without prior written permission. For written permission, please contact
[email protected].
5.
Products derived from this software may not be called "Apache", nor may "Apache" appear in their
name, without prior written permission of the Apache Software Foundation.
THIS SOFTWARE IS PROVIDED ``AS IS'' AND ANY EXPRESSED OR IMPLIED WARRANTIES,
INCLUDING, BUT NOT LIMITED TO, THE IMPLIED WARRANTIES OF MERCHANTABILITY AND
FITNESS FOR A PARTICULAR PURPOSE ARE DISCLAIMED. IN NO EVENT SHALL THEAPACHE
SOFTWARE FOUNDATION OR ITS CONTRIBUTORS BE LIABLE FOR ANY DIRECT, INDIRECT,
INCIDENTAL, SPECIAL, EXEMPLARY, OR CONSEQUENTIAL DAMAGES (INCLUDING, BUT NOT
LIMITED TO, PROCUREMENT OF SUBSTITUTE GOODS OR SERVICES; LOSS OF USE, DATA, OR
PROFITS; OR BUSINESS INTERRUPTION) HOWEVER CAUSED AND ON ANY THEORY OF LIABILITY, WHETHER IN CONTRACT, STRICT LIABILITY, OR TORT (INCLUDING NEGLIGENCE OR
OTHERWISE) ARISING IN ANYWAY OUT OF THE USE OF THIS SOFTWARE, EVEN IF ADVISED
OF THE POSSIBILITY OF SUCH DAMAGE.
This software consists of voluntary contributions made by many individuals on behalf of the Apache Software
Foundation. For more information on the Apache Software Foundation, please see <http://www.apache.org/>.
Portions of this software are based upon public domain software originally written at the National Center for
Supercomputing Applications, University of Illinois, Urbana-Champaign.
xi
xii
Sybase Adaptive Server Anywhere Database Server
All Sublicense Agreements for the Embedded Runtime Programs shall include substantially the following provisions:
1.
The End User is only granted a non-exclusive, non-transferable right to use the Application and Embedded Runtime Programs for its own internal business purposes. The End User may only use the Embedded
Runtime Programs with and as part of OEM's Application and is prohibited from using such Embedded
Runtime Programs for application development purposes or otherwise outside the scope defined in Section 1.7 of this Agreement.
2.
The End User's usage of the Application and Embedded Runtime Programs shall be restricted to the
licensed Servers and Seats or Concurrent Users consistent with the pricing terms of this Agreement. The
End User shall be prohibited from sublicensing, timesharing, rental, facility management, or service
bureau usage of the Embedded Runtime Programs.
3.
OEM's licensor (Sybase) retains title to the Programs, and all copies thereof, and associated intellectual
property rights therein. The End User may not copy the Programs, except for inactive backup and archival purposes only, and must include on all copies of the Program all copyright, government restricted
rights and other proprietary notices or legends included on the Program when it was shipped to such licensee.
4.
OEM and its licensors (including Sybase) shall not be responsible for any indirect, incidental, special and
consequential damages.
5.
Only object code versions of the Programs are licensed to the End User and reverse engineering, disassembly or decompilation to derive source code shall be prohibited (except to the extent expressly allowed
under applicable law).
6.
The End User must agree to comply with all export and re-export restrictions and regulations ("Export
Restrictions") imposed by the government of the United States. If any Program license is provided to U.S.
government licensee use, duplication or disclosure of the software and documentation by the U.S. Government shall be provided subject to terms and conditions consistent with these MandatoryTerms and
any applicable FAR provisions, for example, FAR 52.227-19.
7.
Although copyrighted, the Application (and Embedded Runtime Programs) is unpublished and contains
proprietary and confidential information of OEM and its licensor (Sybase). The End User will agree to
maintain the Programs in confidence and shall use a reasonable degree of care to protect the confidentiality of the Programs.
8.
Upon termination of the license for the Program, the End User shall be required to destroy or return all
copies of the Program.
9.
OEM shall have the right to conduct and/or direct an independent accounting firm to conduct, during normal business hours, an audit of the appropriate records of the End User to verify the number of copies of
the Program in Use, the computer systems on which such copies are installed and the number of Seats or
Concurrent Users.
xiii
xiv
Customer Service, Product Support Information, and Training
ADTRAN will replace or repair this product within five years from the date of shipment if the product does
not meet its published specification, or if it fails while in service.
A return material authorization (RMA) is required prior to returning equipment to ADTRAN. For service,
RMA requests, training, or more information, see the toll-free contact numbers given below.
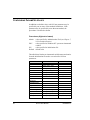
Presales Inquiries and Applications Support
Please contact your local distributor, ADTRAN Applications Engineering, or ADTRAN Sales:
Applications Engineering
(800) 615-1176
Sales
(800) 827-0807
Post-Sale Support
Please contact your local distributor first. If your local distributor cannot help, please contact ADTRAN Technical Support and have the unit serial number available.
Technical Support
(888) 4ADTRAN
The Custom Extended Services (ACES) program offers multiple types and levels of service plans which allow
you to choose the kind of assistance you need. For questions, call the ACES Help Desk.
ACES Help Desk
(888) 874-2237
xv
Repair and Return
If ADTRAN Technical Support determines that a repair is needed, Technical Support will coordinate with the
Custom and Product Service (CAPS) department to issue an RMA number. For information regarding equipment currently in house or possible fees associated with repair, contact CAPS directly at the following number:
CAPS Department
(256) 963-8722
Identify the RMA number clearly on the package (below address), and return to the following address:
ADTRAN Customer and Product Service
901 Explorer Blvd.
Huntsville, Alabama 35806
RMA # _____________
Training
The Enterprise Network (EN) Technical Training offers training on our most popular products. These courses
include overviews on product features and functions while covering applications of ADTRAN's product lines.
ADTRAN provides a variety of training options, including customized training and courses taught at our facilities or at your site. For more information about training, please contact your Territory Manager or the Enterprise Training Coordinator by phone at 800-615-1176 ext. 7500, by fax at 256-963-7941, or by email at
[email protected].
Training
xvi
(800) 615-1176, ext. 7500
Table of Contents
Chapter 1
Introduction ............................................................................................ 1
An Overview of the N-Form Product Suite .............................................. 2
The N-Form Tools ....................................................................................4
The N-Command™ Structure ..................................................................4
N-Spect™ Report Manager ...................................................................... 5
Chapter 2
Installing and Using N-Form ................................................................. 7
Minimum System Requirements .............................................................. 8
SNMP Setup .............................................................................................8
Installation Procedures ............................................................................. 9
Uninstallation Procedures ....................................................................... 12
Login Procedures .................................................................................... 13
Personal Web Page ................................................................................. 15
N-Form Registration ............................................................................... 16
Chapter 3
N-Command Network Manager ......................................................... 21
Network Manager ................................................................................... 22
Discovery ................................................................................................ 25
Editing Device Attributes ....................................................................... 30
Event Notification by Email ................................................................... 31
Telnet ...................................................................................................... 34
Data Collection ....................................................................................... 35
Chapter 4
N-Command Element Manager .......................................................... 37
N-Command Element Manager .............................................................. 38
Viewing a Device ................................................................................... 40
Status Polling .......................................................................................... 41
Configuring a Device ............................................................................. 42
Charts and Tables ................................................................................... 42
Chapter 5
N-Command Event Viewer .................................................................. 47
Event Viewer .......................................................................................... 48
Chapter 6
N-Spect Report Manager ..................................................................... 53
N-Spect Report Manager ........................................................................ 54
xvii
Network Port Reports .............................................................................55
PVC Reports ...........................................................................................57
N-Form Data Collection .........................................................................59
Data Archiving and Rollup .....................................................................62
Chapter 7
N-Form Administration .......................................................................73
N-Form Administration Tool ..................................................................74
Default SNMP Parameters ......................................................................75
Discovery Parameters .............................................................................78
Data Collection Parameters ....................................................................79
Email Parameters ....................................................................................81
Event Log Parameters .............................................................................83
Network Event Notification ....................................................................84
User/Group Administration ....................................................................86
N-Form User Settings .............................................................................88
Appendix A
Supported Products...............................................................................91
Appendix B
N-Form Parameters...............................................................................93
Types .......................................................................................................93
Relative Path Dependencies ....................................................................94
Configuring Parameter Values ................................................................96
xviii
Introduction
Chapter 1
ABOUT THIS CHAPTER
This chapter introduces the N-Form™ product suite and presents
an overview of the software modules.
CONTENTS
Topic
61950821L1-1
Page
An Overview of the N-Form Product Suite
2
The N-Form Tools
4
The N-Command™ Structure
4
N-Spect™ Report Manager
5
N-Form User Manual
1
AN OVERVIEW OF THE N-FORM PRODUCT SUITE
The N-Form product suite is based on a client/server architecture.
The N-Form server acts as the central network manager by
discovering, polling, collecting, and storing data from ADTRAN
devices on the network. The N-Form server is accessed and
controlled from virtually any computer on the network by a Java™
client using the Java Runtime Environment (JRE) browser plugin.
The Java client accesses a personalized web page that is set up and
maintained automatically for each user. The N-Form client
software is a Java based applet which is launched via a web server.
The applet runs within any browser using the JRE plugin.
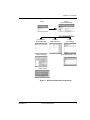
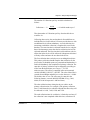
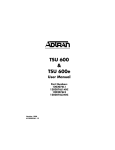
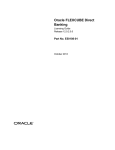
Figure 1 on pag e3 shows the basic components that make up the
N-Form product suite and illustrates the way these components
work together. In addition to the N-Form server and the basic
N-Form client modules for user and server administration, the
N-Form product suite consists of two client modules:
N-Command and N-Spect. The N-Command client module has
three parts: a Network Manager, an Element Manager, and an
Event Viewer. The N-Spect module includes an automated Report
Manager.
2
N-Form User Manual
61950821L1-1
Chapter 1 Introduction
N-Form
Personal Web Page
Login
N-Command
Network Manager
N-Spect
Report Manager
Element Manager
N-Form
User Settings
Server Administration Tool
Event Viewer
Figure 1. N-Form Product Suite Components
61950821L1-1
N-Form User Manual
3
THE N-FORM TOOLS
User Administration Tool
The User Administration Tool allows users to change and update
their user information and password.
Server Administration Tool
The Server Administration Tool allows the N-Form administrator
to set up and manage users, groups, and to configure the N-Form
Server. Each user is allowed exclusive access to his/her own data
and reports.
THE N-COMMAND™ STRUCTURE
The N-Command client module is made up of three parts:
! Network Manager
! Element Manager
! Event Viewer
Network Manager
The Graphical User Interface (GUI) for the Network Manager is
based on a hierarchical “tree” navigational structure. This
topology tree interface allows at-a-glance high-level network
health monitoring, with the ability to quickly drill down to detailed
device configuration and real-time troubleshooting diagnostics.
The Network Manager enables each device to send a message to
an e-mail account or alphanumeric pager to alert users of high
priority events.
N-Form uses a manually initiated discovery feature to quickly and
accurately poll the entire network to locate all Simple Network
Management Protocol (SNMP) accessible devices.
The discovery feature may be used to discover a single device, a
subnet, or the entire network. Once initiated, the N-Form
4
N-Form User Manual
61950821L1-1
Chapter 1 Introduction
discovery populates the topology tree with device types, names,
and addresses. The Network Manager is discussed in greater detail
in Chapter 3, N-Command Network Manager.
Element Manager
Once the Network Manager discovery is complete, the network
devices may be configured and diagnosed using the N-Command
Element Manager. The Element Manager is accessed from the
Network Manager and displays a graphical representation of a
device’s front and back panels as you configure or diagnose the
device. The program polls the device at regular intervals, allowing
you to monitor the LEDs as you troubleshoot events. The Element
Manager is discussed in greater detail in Chapter 4,
N-Command Element Manager.
Event Viewer
The spread-sheet like interface for the Event Viewer displays the
device name, address, time of event, event status, user-entered
notes, and an acknowledgment field. The event information is
color coded by event severity. The Event Viewer is discussed in
greater detail in Chapter 5, N-Command Event Viewer.
N-SPECT™ REPORT MANAGER
The historical trend analysis tool is built around an intuitive GUI.
The Report Manager creates easy-to-read reports based on user
selections. Reports can be scheduled to run automatically at
regular intervals based on a 24-hour day, business day, business
week, calendar week, calendar month, quarter, or even calendar
year. These scheduled reports are then published to individual
users via their personalized web pages.
N-Spect includes a comprehensive set of reports illustrating
network trends. Reports include exception-based reporting,
point-to-point performance monitoring, and many others. The
reports include a brief description of how to interpret the data and
61950821L1-1
N-Form User Manual
5
any graphs or tables. Reports are preserved in Adobe Acrobat™
PDF format, allowing for reduced file size and web posting. The
Report Manager is discussed in greater detail in Chapter 6, NSpect Report Manager.
6
N-Form User Manual
61950821L1-1
Installing and Using N-Form
Chapter 2
ABOUT THIS CHAPTER
This chapter presents the system requirements and procedures
required to install and register the N-Form product suite.
CONTENTS
Topic
61950821L1-1
Page
Minimum System Requirements
8
SNMP Setup
8
Installation Procedures
9
Uninstallation Procedures
12
Login Procedures
13
Personal Web Page
15
N-Form Registration
16
N-Form User Manual
7
MINIMUM SYSTEM REQUIREMENTS
N-Form requires the following:
Server - Data Collection:
!
!
!
!
!
Recommended Platforms:
Pentium III (500MHz or higher)
Operating Systems:
Windows NT™ 4.0 with Service Pack 3
128 MB RAM
1 GB hard disk space
CD-ROM drive for installation
Client - Network Configuration and Reports:
!
!
!
!
1024 x 768 display resolution
Any hardware with Internet browser:
Netscape Navigator™ (Version 4.76 or higher)
Microsoft Internet Explorer™ (Version 5.5 or higher)
Adobe Acrobat™ Reader (Version 4.05 or higher)
Java Runtime Environment (JRE) (Version 1.3 or higher)
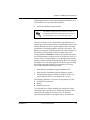
SNMP SETUP
If an SNMP server agent has not been installed on your computer,
you must install it before installing N-Form. The N-Form setup
program will determine whether this software is on the target
computer and prompt the user to install it if necessary. The SNMP
files are found on the Windows NT installation disks.
If you install SNMP from your Windows NT disks, the
installation replaces some of the files that are updated
by the required service packs. Therefore, it is necessary
to reinstall the service pack following the SNMP
installation.
8
N-Form User Manual
61950821L1-1
Chapter 2 Installing and Using N-Form
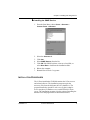
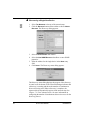
" Installing the SNMP Service
1. From the Start Menu, choose START > SETTINGS >
CONTROL PANEL > NETWORK.
Select the SERVICES tab.
Click ADD.
Select SNMP SERVICE from the list.
Click OK if the SNMP software exists on a local disk, or
select HAVE DISK to load from the installation disks.
6. Reboot the computer.
7. Reinstall Service Pack 3 or greater.
2.
3.
4.
5.
INSTALLATION PROCEDURES
The N-Form installation CD-ROM contains the N-Form server
and related software. The installation program copies the
necessary files from the disk onto the user’s hard drive. The
program installs the Apache™ web server, Sybase Adaptive
Server Anywhere™ database server, and ADTRAN N-Form
server. The installation program gives the option of installing the
database files and program files in different directories.
61950821L1-1
N-Form User Manual
9
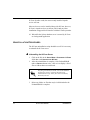
" Installing the N-Form Server
1. Insert the N-Form CD-ROM and wait for the installation program to autorun. To manually start the installation, from the
Start Menu, choose RUN and type the drive letter of the
CD-ROM followed by a colon; then type setup.exe. For
example, if your CD-ROM has been assigned drive letter D,
type D:\setup.exe.
2. Wait while the installation program checks for required software.
The installation program makes several checks to verify that your
system is ready to install N-Form.
The program first checks to verify that the system has Windows
NT Service Pack 3 or greater installed. Next the program verifies
that the system has the SNMP services installed. If SNMP is not
present, you must install it before installing N-Form (see
instructions above). Finally, the program checks to see that the
JRE is installed. If the JRE is not present, the program
automatically starts the installation program for the JRE, and the
user should follow the prompts to complete the installation. The
user may cancel the JRE installation if desired, but the report
generation features of the N-Form product suite will not be
available.
3. Accept the licensing agreement.
4. Choose the destination folder.
The destination folder will contain the following installations
required for the N-Form product suite:
!
!
!
!
N-Form server executable and related files
Apache web server version 1.3.12
Perl™ version 5.6.0
Sybase Adaptive Server Anywhere version 7.0
5. Choose the database destination folder.
The N-Form database consists of a single file called nform.db.
This file will contain all the historical data stored by N-Form.
10
N-Form User Manual
61950821L1-1
Chapter 2 Installing and Using N-Form
Optimal performance is achieved by installing the database on a
local hard drive versus a networked hard drive.
6. Choose the database backup location.
The database backup location cannot be the same as
the database destination. Choosing the same location
for both databases will cause the backup to fail.
The user can choose to have the database automatically store a
backup copy at this location each day. For better data security, this
backup should be stored on a separate physical drive. For better
performance, this backup should be stored on a local drive. The
database will perform a full backup each day at the completion of
data archiving. The backup will have the same name as the
existing database: nform.db. Each day's full backup will replace
the existing backup or create a new one if one does not exist. It is
not necessary to stop the database server during backup, and the
database remains available during the backup. However, querying
the database slows the backup speed. If no queries are executing,
the backup takes approximately the same time as a file copy
between the database and backup location.
7. Wait while the installation program configures Perl.
8. Wait while the installation program configures Apache.
9. The installation program will now start the N-Form server
and the Apache web server as Windows NT services.
The following Windows NT services are required by N-Form:
! ADTRAN N-Form Server
! Apache
! SNMP Trap Service
If you already have Apache installed, the existing files will be
untouched, but the Apache service installed by N-Form will be
started and will replace the existing service. If Apache is
subsequently reinstalled, it will replace the service started by
61950821L1-1
N-Form User Manual
11
N-Form. In other words, the most recently installed Apache
service will run.
Other web servers can be installed along with N-Form; however,
N-Form’s Apache web server utilizes port 80 and any other
installation using port 80 will interfere with the N-Form operation.
10. Wait while the Sybase database server is started by N-Form
as a background application.
UNINSTALLATION PROCEDURES
The N-Form uninstallation script should be used if it is necessary
to uninstall the N-Form server.
" Uninstalling the N-Form Server
1. Click on the link in the START MENU > PROGRAMS > N-FORM
folder that reads UNINSTALLING N-FORM.
2. After the uninstallation is complete, if the UnInstallShield
makes a DETAILS button active, click on it to display a list of
files or folders that were not deleted.
Any files generated by N-Form, such as the database
file and user reports, will not be deleted by the
Uninstallation script. These files must be manually
deleted by the user.
3. Delete any folders or files that may be left behind after the
UnInstallShield is complete.
12
N-Form User Manual
61950821L1-1
Chapter 2 Installing and Using N-Form
LOGIN PROCEDURES
The default user preconfigured with N-Form is the Administrator
account with username “root” and default password “password”.
This account may be used to set up additional users and perform
other administrative tasks (see Chapter 7, N-Form
Administration). When a new user is created by the N-Form
Administrator, their default password is “password”. You may
need to consult an N-Form Administrator for a username and
password, as well as the address of the login page for your
location.
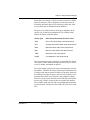
" Logging in to N-Form
1. Open an N-Form compatible browser and point to the
N-Form login page set up during installation. For more
details on the browser requirements, please refer to Minimum
System Requirements on page 8.
The login page appears.
2. Type your USERNAME and PASSWORD.
3. Click LOGIN.
61950821L1-1
N-Form User Manual
13
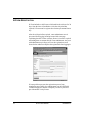
The user personal web page appears.
14
N-Form User Manual
61950821L1-1
Chapter 2 Installing and Using N-Form
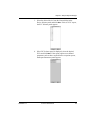
PERSONAL WEB PAGE
The personal web page maintains a list of user-specific network
reports and user exported data. The web page also allows the user
to access any of the N-Form modules by clicking the buttons on
the toolbar at the bottom of the screen. The buttons and their
functions are listed below.
Starts the N-Form User Administration Tool. The User
Administration Tool is discussed in Chapter 7, N-Form
Administration.
Starts the N-Command Network Manager. The Network Manager
is discussed in Chapter 3, N-Command Network Manager.
Starts the N-Command Event Viewer. The Event Viewer is
discussed in Chapter 5, N-Command Event Viewer.
Starts the N-Spect Report Manager. The N-Spect Report Manager
is discussed in Chapter 6, N-Spect Report Manager.
Starts the N-Form Server Administration Tool. The N-Form
Server Administration Tool is discussed in Chapter 7, N-Form
Administration.
Exits the N-Form personal web page and returns to the N-Form
login screen. The N-Form personal web page is discussed in
Chapter 2, Installing and Using N-Form.
Opens the online help document for the N-Form product suite.
Opens a browser window that contains links to download
necessary N-Form client components and patches for various
platforms.
61950821L1-1
N-Form User Manual
15
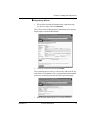
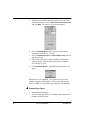
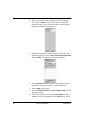
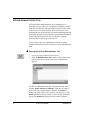
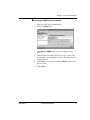
N-FORM REGISTRATION
N-Form includes a trial license which enables the software for 30
days from the time of installation. After the trial period has
expired, N-Form must be registered to obtain a permanent license
key.
After the trial period has expired, a non-administrator user is
prevented from logging in and presented with a message
explaining that the N-Form software license is invalid or expired
and asking them to contact their N-Form administrator. Any user
with administrator privileges will see the registration screen
shown below and must complete the registration before logging in.
If some problem prevents the registration process from
completing successfully, the administrator can call ADTRAN
Technical Support to obtain a temporary license key that will
provide another 30 day license.
16
N-Form User Manual
61950821L1-1
Chapter 2 Installing and Using N-Form
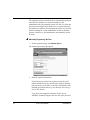
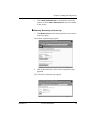
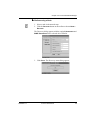
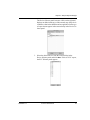
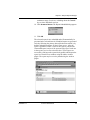
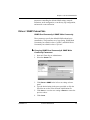
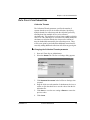
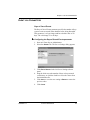
" Registering N-Form
1. Fill in all the required information on the registration page
(see previous page), and click REGISTER.
The N-Form Software Registration Confirmation screen appears,
displaying the completed information.
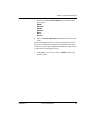
2.
Verify the information and click CONFIRM.
The registration process retrieves a license key and stores the key
in the local N-Form database. The registration information and the
license key are displayed on the successful registration page.
3. Print this information and save it for future reference.
61950821L1-1
N-Form User Manual
17
The registration process described above automatically generates
the license key and places it in the local database. The
administrator may also manually register N-Form. If N-Form has
previously been registered but needs to be re-registered because,
for instance, the database file containing the license key has been
deleted or damaged, or if the administrator wishes to manually
generate a license key, the administrator must manually register
N-Form.
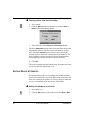
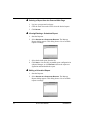
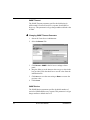
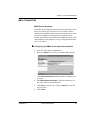
" Manually Registering N-Form
1. On the registration page, click MANUAL ENTRY.
The manual registration page appears.
2. Enter the required information.
If N-Form has previously been registered, enter the serial
number and the license key shown on the original confirmation page from your records, or enter the serial number and a
manually generated license key (see Manually Generating a
License Key below).
If you have been assigned a temporary license key by
ADTRAN Technical Support, enter it in the space provided.
18
N-Form User Manual
61950821L1-1
Chapter 2 Installing and Using N-Form
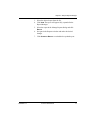
3. Click COMMIT PERMANENT KEY to permanently activate the
software, or click COMMIT TEMPORARY KEY to activate another
30 day license.
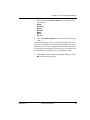
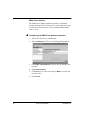
" Manually Generating a License Key
1. Click MANUAL ENTRY on the main registration screen (shown
on previous page).
The manual registration page appears.
2. Click on the ADTRAN N-Form License Registration Page
hyperlink.
The N-Form Key Generator page appears.
61950821L1-1
N-Form User Manual
19
3. Enter the required information and click SUBMIT.
The page returns the license key.
4. Print this information and save it for future reference.
20
N-Form User Manual
61950821L1-1
N-Command Network Manager
Chapter 3
ABOUT THIS CHAPTER
This chapter describes the N-Command Network Manager.
CONTENTS
Topic
61950821L1-1
Page
Network Manager
22
Searching for a Node in the Network Map
24
Editing Device Attributes
30
Event Notification by Email
31
Telnet
34
Data Collection
35
N-Form User Manual
21
NETWORK MANAGER
The GUI for the Network Manager is based on a hierarchical
“tree” navigational structure. This topology tree interface allows
at-a-glance high-level network health monitoring with the ability
to quickly drill down to detailed device configuration and realtime troubleshooting diagnostics.
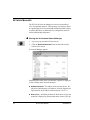
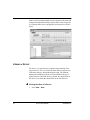
" Starting the N-Command Network Manager
1. Log on to your personal N-Form web site.
2. Click the NETWORK MANAGER button on the toolbar at the
bottom of the screen.
A Network Manager appears.
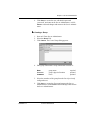
Information about the discovered network segments is displayed
in four columns in the Network Manager.
! SEGMENT/ADDRESS - The address of the network device, dis-
played as a domain name or IP address. Network segments are
represented by an IP address with an asterisk (10.12.1.*).
! DEVICE TYPE - ADTRAN products for which there are N-Form
models are displayed by their product name (such as TSU IQ).
22
N-Form User Manual
61950821L1-1
Chapter 3 N-Command Network Manager
ADTRAN products that have not been modeled and
non-ADTRAN devices have no DEVICE TYPE listed.
! STATUS - Displays whether the device is OFFLINE or has EMAIL
notification assigned to it.
! COMMENTS - User comments such as the device’s physical lo-
cation.
The tree structure can be explored by selecting the switches to the
left of the node icons to expand or close a segment of the network.
The network is expanded to reveal nodes, the nodes are expanded
to reveal individual devices, and the devices are expanded to
reveal accessory cards. The tree structure can also be completely
expanded or collapsed by selecting WINDOW > EXPAND ENTIRE
TREE or WINDOW > COLLAPSE ENTIRE TREE. The tree is updated
automatically to reflect the current state of the network. The tree
can be refreshed manually by choosing WINDOW > RELOAD TREE.
The current display state of each node in the network map may be
manually saved at any time by the user. This saved display state
can then be restored, allowing the user to view a particular part of
the network map without having to navigate back to the same
display state each time they log in.
The network map can be filtered to display only ADTRAN
devices by selecting WINDOW > VIEW ADTRAN DEVICES. Once this
option is selected, the menu item becomes WINDOW > VIEW ALL
DEVICES and is used to switch back to the all device view. When
switching between ADTRAN only and all device views, the last
stored display state for each view is restored.
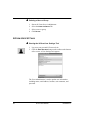
" Saving/Restoring the State of the Network Map
Device Tree
1. Choose FILE > SAVE SETTINGS to save a state, or choose
FILE > RESTORE SETTINGS to restore from a saved state.
Four menus appear at the top of the Network Manager screen.
Below the menus is a toolbar containing shortcuts to the most
frequently used functions. The tool bar may be repositioned by
61950821L1-1
N-Form User Manual
23
dragging the knurled handle on the leftmost end of the bar. The
toolbar may be anchored horizontally or vertically on the
top/bottom or left/right side of the window, or it may be unlocked
and positioned anywhere on the screen.
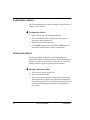
" Searching for a Node in the Network Map
This feature allows the user to search for a particular address in the
network map. The search dialog can be accessed two ways,
described in the steps below.
1. Click the SEARCH button on the toolbar, or choose NODE >
SEARCH.
The Node search dialog appears.
2. Type in the IP address or name you wish to search for and
click SEARCH.
The network map will open to display the desired address if it is
available.
24
N-Form User Manual
61950821L1-1
Chapter 3 N-Command Network Manager
DISCOVERY
N-Form’s discovery feature polls the network to seek and find
SNMP accessible devices. N-Form can discover a single device
given the device address, a range of devices given a starting device
address and ending device address, or a subnet given the subnet
address and subnet mask. N-Form’s discovery populates the
network map with the address, device type, name, and current
status of each device. The user may predefine SNMP properties to
be used during discovery in order to discover devices which have
non-default SNMP properties (such as read community, write
community names, timeout and retry values).
To speed the device discovery process, multiple devices may be
discovered simultaneously. The default value is 32 and the values
range from 1 to 64. However, adding additional simultaneous
discoveries also increases the amount of network bandwidth
consumed by the discovery process. There will be some point
beyond which the additional network traffic caused by adding
additional discoveries will offset any speed gain. The number of
simultaneous discoveries is set by the Server Administrator (see
Chapter 7, N-Form Administration).
61950821L1-1
N-Form User Manual
25
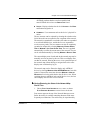
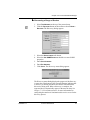
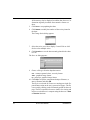
" Discovering a Single New Device
1. Select THE NETWORK at the top of the network map.
2. Click the DISCOVER button on the toolbar or choose NODE >
DISCOVER. The Discovery dialog appears.
3. Select the SINGLE NODE radio button.
4. Select the USE SNMP DEFAULTS checkbox or enter SNMP
properties.
5. Enter the address for the single device in the NODE entry
field.
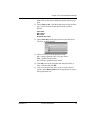
6. Click START. The Discovery status dialog appears.
The Discovery status dialog displays the progress of the discovery.
A status bar at the bottom of the Network Manager indicates that
a discovery is running and shows the number of simultaneous
discoveries being used. When a discovery is complete, the
requested device dynamically appears in the network map. See
Chapter 7, N-Form Administration, for more information on
configuring the number of simultaneous discoveries to use for the
discovery process.
26
N-Form User Manual
61950821L1-1
Chapter 3 N-Command Network Manager
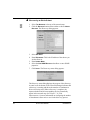
" Discovering a Range of Devices
1. Select THE NETWORK at the top of the network map.
2. Click the DISCOVER button on the toolbar or choose NODE >
DISCOVER. The Discovery dialog appears.
3. Select the DEFINE RANGE radio button.
4. Select the USE SNMP DEFAULTS checkbox or enter SNMP
properties.
5. Enter START ADDRESS.
6. Enter END ADDRESS.
7. Click START. The Discovery status dialog appears.
The Discovery status dialog displays the progress of the discovery.
A status bar at the bottom of the Network Manager indicates that
a discovery is running and shows the number of simultaneous
discoveries being used. When a discovery is complete, the
requested devices dynamically appear in the network map. See
Chapter 7, N-Form Administration, for more information on
configuring the number of simultaneous discoveries to use for the
discovery process.
61950821L1-1
N-Form User Manual
27
" Discovering an Entire Subnet
1. Select THE NETWORK at the top of the network map.
2. Click the DISCOVER button on the toolbar or choose NODE >
DISCOVER. The Discovery dialog appears.
3. Select USE MASK.
4. Enter IP ADDRESS. This is the IP address of the subnet you
wish to discover.
5. Enter SUBNET MASK.
6. Select the USE SNMP DEFAULTS checkbox or enter SNMP
properties.
7. Click START. The Discovery status dialog appears.
The Discovery status dialog displays the progress of the discovery.
A status bar at the bottom of the Network Manager indicates that
a discovery is running and shows the number of simultaneous
discoveries being used. When a discovery is complete, the
requested subnet and all corresponding devices dynamically
appear in the network map. See Chapter 7, N-Form
Administration, for more information on configuring the number
of simultaneous discoveries to use for the discovery process.
28
N-Form User Manual
61950821L1-1
Chapter 3 N-Command Network Manager
" Rediscovering a Node
1. Select a node in the network map.
2. Click the DISCOVER button on the toolbar or choose NODE >
DISCOVER.
The Discovery dialog appears with the required OPERATIONS and
SNMP PROPERTIES for the selected device filled in.
3. Click START. The Discovery status dialog appears.
61950821L1-1
N-Form User Manual
29
" Deleting a Node from the Device Map
1. Select a node.
2. Click the DELETE button on the toolbar or choose NODE >
DELETE. The Delete dialog appears.
3. Select the delete option ARCHIVE or PERMANENT button.
The delete PERMANENT option removes the node from the network
map and also removes any data stored in the database for that
node. The delete ARCHIVE option removes the node from the
network map but retains any collected data in the database. The
node can then be rediscovered and N-Form will automatically
resume adding to the data already saved in the database.
4. Click OK.
The node is instantly removed from the map. All connected clients
will see the deletion dynamically occur.
EDITING DEVICE ATTRIBUTES
N-Command allows the user to configure the SNMP properties
(read/write communities, timeout in milliseconds and retries) and
enter user comments for each device. These properties enable the
server to communicate with each device using SNMP.
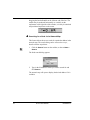
" Editing the Attributes of a Device
1. Select the device.
2. Click the EDIT button on the toolbar or choose NODE > EDIT.
30
N-Form User Manual
61950821L1-1
Chapter 3 N-Command Network Manager
The Edit Device dialog appears.
3. Click the SNMP ATTRIBUTES tab to modify SNMP properties.
Uncheck the USE DEFAULTS checkbox to specify new values
for this device. The default values may be changed by the
server administrator (see Chapter 7, N-Form Administration).
4. Click the COMMENTS tab to add or change a user comment.
5. Click APPLY to enter changes and continue editing, or click
OK to enter changes and exit.
EVENT NOTIFICATION BY EMAIL
The N-Form Network Manager can configure each node to notify
specified users via email when events are encountered. Different
users can be specified to receive notification of events of different
severity levels, and a severity level can be assigned to each
network node. Consider a device which is part of a subnet, which
is part of the network. The device level events can be designated
as minor severity, subnet events can be designated as major
severity, and network level events can be designated as critical
severity. A single user might wish to receive notification of events
from the specific device, but may not be concerned with other
events. Other users might need to be notified of events from a
particular subnet only. The network manager may be notified of
61950821L1-1
N-Form User Manual
31
events from the entire network. Notification for events from the
entire network must be configured in the Administration Tool (see
Chapter 7, N-Form Administration).
Event notification severity falls through to each higher level of
criticality. For example, a user who receives minor severity events
would also be notified of events of major and critical severity, but
a user who only receives critical severity events would not be
notified of events with lesser severity.
Email notification is dependent on the network’s local mail server.
Some servers are configured to send email only inside their local
domain, and N-Form event notification would therefore have the
same limitation. The N-Form mail server is configured in the
Server Administration Tool (see Chapter 7, N-Form
Administration).
" Configuring Event Notification
1. Select the node.
2a. Choose NODE > EDIT.
Alternately,
2b. Right click on a device and choose EDIT from the popup
menu. The Edit dialog appears.
3. Click the NOTIFICATION tab.
32
N-Form User Manual
61950821L1-1
Chapter 3 N-Command Network Manager
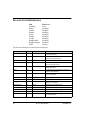
4. Select the notification EVENT SEVERITY level from the drop
down menu:
NONE
UNKNOWN
NORMAL
WARNING
MINOR
MAJOR
CRITICAL
5. Enter valid EMAIL ADDRESSES in the panel below the severity
menu.
These email addresses can be in any form accepted by the local
mail server. In addition to the typical user@domain form, some
email servers are set up to accept just the username or other aliases
to represent users and groups of users. Refer to your email server
documentation for clarification of accepted address forms.
6. Click APPLY to enter changes and continue editing, or click
OK to enter changes and exit.
61950821L1-1
N-Form User Manual
33
TELNET
N-Form facilitates telnet access to any device which is telnet
capable. Access is accomplished by ‘tunneling’ through the server
to the device. Multiple telnet sessions may be invoked
simultaneously.
" Opening a Telnet Session to a Selected Device
1. Select a telnet capable device in the network map.
2. Click the TELNET button on the toolbar or choose
NODE > TELNET. A telnet login screen for the device appears.
3. Enter the PASSWORD for the selected device.
34
N-Form User Manual
61950821L1-1
Chapter 3 N-Command Network Manager
DATA COLLECTION
The N-Form server automatically collects performance data stored
in the devices in the network map and stores the data in the
N-Form database. This data collection occurs at one or more
automatically scheduled times during the day, depending on the
configuration of each particular device. This data collection is
discussed in greater detail in Chapter 6, N-Spect Report Manager.
The Report Manager cannot generate or schedule a report for a
device until that device has data in the database. If the user wants
to schedule a report immediately for a device which has just been
discovered, they must manually force a data collection on that
device. This forced collection will not affect the automatically
scheduled data collection time. N-Form stores the time of each
collection in the database and only collects the data stored in the
device since its last collection time; therefore the forced collection
will not cause any duplication of data in the database.
" Forcing the Collection of a Selected Device
1. Select a device in the network map.
2. Select NODE > COLLECT DATA.
61950821L1-1
N-Form User Manual
35
36
N-Form User Manual
61950821L1-1
N-Command Element Manager
Chapter 4
ABOUT THIS CHAPTER
This chapter describes the N-Command Element Manager.
CONTENTS
Topic
61950821L1-1
Page
N-Command Element Manager
38
Viewing a Device
40
Status Polling
41
Configuring a Device
42
Charts and Tables
42
N-Form User Manual
37
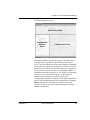
N-COMMAND ELEMENT MANAGER
Once the Network Manager discovery is complete, the network
devices may be configured and diagnosed using the N-Command
Element Manager. The Element Manager polls the devices at
regular intervals for their latest configuration and status data. As
each device is configured or diagnosed, the Element Manager
displays a graphical representation of the appropriate front and
rear panels, showing the current state of status LEDs and installed
option cards. The user can modify any SNMP updateable
configuration parameter and view the data stored in the device.
The Element Manager is accessed from within the Network
Manager and may be started four different ways.
" Starting the Element Manager
1. Select a device to view from the network map.
2a. Right-click the selected device and choose VIEW from the
popup menu.
Alternately:
2b. Click the VIEW button on the toolbar.
2c. Choose NODE > VIEW.
2d. Double-click the device on the network map.
38
N-Form User Manual
61950821L1-1
Chapter 4 N-Command Element Manager
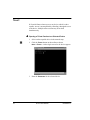
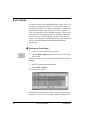
An Element Manager appears.
Device View Panel
Configuration
Selector
Configuration Panel
Panel
The Element Manager contains three panels. The upper device
view panel shows a graphical representation of the selected
device. The left configuration selector panel shows an expandable
tree of information about the selected device. The device name (or
IP address if not defined in the Domain Name Server) appears at
the top of the tree. Below the name are expandable “folders” of
information about the selected device. The folders vary depending
on the device type and installed options. As the folders are
expanded and a configuration selector is chosen, the
corresponding information is displayed in the right configuration
panel. Each configuration panel may be undocked by clicking the
UNDOCK button below the folder list on the left and moved
anywhere on the screen, thus freeing the right panel to display
additional information.
61950821L1-1
N-Form User Manual
39
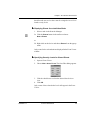
On devices that contain multiple slots for expansion, the status and
configuration information for the option card in each slot appears
in a separate folder in the configuration selector panel as shown
below.
VIEWING A DEVICE
The device view panel shows a graphical representation of the
selected device. The view shows the front and rear of the device,
LED status changes, and installed option cards. The Element
Manager automatically polls the selected ADTRAN device at
regular intervals. When the device is polled, the status LEDs on
the device view match the status LEDs on the actual device.
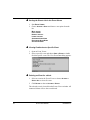
" Viewing the Back of a Device
1. Select VIEW > REAR.
40
N-Form User Manual
61950821L1-1
Chapter 4 N-Command Element Manager
The rear view of the selected device is shown and installed option
cards are visible as shown below.
STATUS POLLING
The Element Manager automatically polls the selected ADTRAN
device at regular intervals. It can also poll an ADTRAN device on
demand.
" Polling a Device on Demand
1. Select a device and start the element manager.
2. Select a data folder in the configuration selector panel to
open in the configuration panel.
3. Select the POLL button on status only configuration panels, or
select RELOAD on updateable configuration panels.
Polling the device returns and updates the status and configuration
fields. The time for the last device poll is shown in the lower left
of the configuration panel. If a poll attempt fails, the time field is
shown in red and remains red until the next successful poll.
61950821L1-1
N-Form User Manual
41
CONFIGURING A DEVICE
The Element Manager can be used to configure ADTRAN devices
connected to the network.
" Configuring a Device
1. Select a device and start an Element Manager.
2. Select a data folder in the configuration selector panel to
open in the configuration panel.
3. Modify desired configuration data.
4. Click SUBMIT to update the configuration or RELOAD to dismiss changes and reload the existing configuration.
CHARTS AND TABLES
The charts and tables produced by the Element Manger are
distinguished from the reports produced by the Report Manager in
that they use data directly from the selected devices. The Report
Manager produces reports using data from the database.
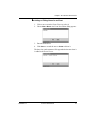
" Viewing Charts and Tables
1. Select a device in the network map.
2. Open an Element Manager.
3. Select a chart or table from the configuration selector panel.
Each chart or table is displayed in the configuration panel. If
a device has multiple PVCs, a drop down menu appears at the
top of the configuration panel and data is displayed for the
PVC chosen.
42
N-Form User Manual
61950821L1-1
Chapter 4 N-Command Element Manager
As you move the mouse over the plot, the x and y coordinates
of each point are displayed.
4. Click SHOW TABLE to display the data in tabular form.
61950821L1-1
N-Form User Manual
43
All charts may also be displayed as tabular data; however, information originally in tabular form cannot be shown as a
chart.
5. Click STOP to stop updating the chart.
6. Click SERIES to modify the number of data series plotted in
the chart.
The Change Series dialog appears.
7. Select the series you wish to display. Control Click or shift
click to select multiple series.
8. Click SAVE AS to save the data currently plotted in the chart
to a file.
The Save As dialog appears.
9. Choose a file type from the dropdown menu:
CSV - comma separated values, text only format
JPEG - graphical image format
PS - postscript, graphical image format
10. Click OK to accept the autogenerated unique filename, or
enter a filename and click OK.
The file is saved on the N-Form server and appears in the Exported Data section on the user’s personal web page. The file
is accessed by clicking on the filename hyperlink on the web
page. The file is opened in a browser window for viewing and
may be saved to the user’s computer using the browser’s SAVE
or SAVE AS functions.
44
N-Form User Manual
61950821L1-1
Chapter 4 N-Command Element Manager
Right-Click on the plot for additional display and export options.
11. Choose DISPLAY AS... from the popup menu to alter the chart
type. Choose the desired chart type from the available
options:
LINE CHART
AREA CHART
BAR CHART
STACKING BAR CHART
12. Choose SAVE AS from the popup menu to export the chart.
The Save As dialog appears.
13. Choose a file type from the dropdown menu:
CSV - comma separated values, text only format
JPEG - graphical image format
PS - postscript, graphical image format
14. Click OK to accept the autogenerated unique filename, or
enter a filename and click OK.
15. Drag over an area of the plot to zoom in on the selected
region. Choose RESET CHART from the popup menu to restore
the original chart view.
61950821L1-1
N-Form User Manual
45
46
N-Form User Manual
61950821L1-1
N-Command Event Viewer
Chapter 5
ABOUT THIS CHAPTER
This chapter describes the N-Form Event Viewer.
CONTENTS
Topic
Page
Event Viewer
61950821L1-1
N-Form User Manual
48
47
EVENT VIEWER
N-Form records all events and standard alarms such as receive yellow alarm, transmit yellow alarm, receive blue alarm, transmit
blue alarm, red alarm, loss of signal, and loopback. Events are distinguished from traps in that they may represent a system level
event for a node that does not normally send traps. These events
are dynamically displayed using the N-Command Event Viewer.
The events may be acknowledged by any client, and user comments may be attached to each individual event. All connected clients see event acknowledgments and updated comments
dynamically.
" Starting the Event Viewer
1. Log on to your personal N-Form web site.
2. Click the EVENT VIEWER button on the tool bar at the bottom
of the screen.
The Event Viewer may also be started from within the Network
Manager.
1. Start N-Command Network Manager.
2. Choose NODE > EVENTS
An Event Viewer appears.
By default, all network events of all severity levels appear in the
Event Viewer. The Event Viewer has a flexible filtering feature
48
N-Form User Manual
61950821L1-1
Chapter 5 N-Command Event Viewer
that allows the user to view the events for a single device or for selected severity levels.
" Displaying Events for an Individual Node
1. Select a node in the Network Manager.
2a. Click the EVENTS button in the toolbar or choose
NODE > EVENTS
or
2b. Right click on the device and choose EVENTS from the popup
menu.
Only events for the selected unit are displayed in the Event Viewer
window.
" Specifying Security Levels for Viewed Events
1. Open an Event Viewer
2. Choose VIEW > ALERT FILTER. The Alert Filter dialog appears.
3. Click the check boxes to select the desired alert levels to
view.
4. Click OK.
Only events of the selected alert levels will appear in the Event
Viewer.
61950821L1-1
N-Form User Manual
49
" Sorting the Events List in the Event Viewer
1. Start EVENT VIEWER.
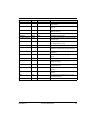
2. Choose ACTIONS > SORT and choose a sort option from the
list:
MOST RECENT
LEAST RECENT
HIGHEST SEVERITY
LOWEST SEVERITY
ASCENDING NODE NAME
DESCENDING NODE NAME
ACKNOWLEDGMENT
" Viewing Details about a Specific Event
1. Open an Event Viewer.
2. Select a specific event and choose VIEW > EVENT or double
click the specific event. The View Event Data dialog appears.
" Deleting an Event for a Node
1. Select an event in the Event Viewer or choose ACTIONS >
SELECT ALL to select all events.
2. Click DELETE or choose ACTIONS > DELETE.
The selected event is cleared from the Events Viewer window. All
connected clients will see the event deleted.
50
N-Form User Manual
61950821L1-1
Chapter 5 N-Command Event Viewer
" Adding or Editing Notes for an Event
1. Click on an event in the Event Viewer to select it.
2. Choose VIEW > NOTES. An Event Note Editor dialog appears.
3. Enter the desired text.
4. Click APPLY to record the note or CLEAR to delete it.
The date, time, and username will be appended to the note when it
is added to the Event Viewer.
61950821L1-1
N-Form User Manual
51
52
N-Form User Manual
61950821L1-1
Chapter 6
N-Spect Report Manager
ABOUT THIS CHAPTER
This chapter describes the N-Spect Report Manager.
CONTENTS
Topic
61950821L1-1
Page
N-Spect Report Manager
54
Network Port Reports
55
PVC Reports
57
N-Form Data Collection
59
Data Archiving and Rollup
62
N-Form User Manual
53
N-SPECT REPORT MANAGER
The N-Spect Report Manager is a historical trend analysis tool
built around an intuitive graphical user interface. The Report
Manager creates easy-to-read reports based on user selections.
Reports can be created on demand or can be scheduled to be
created automatically at regular intervals based on a 24-hour day,
business day, calendar week, business week, calendar month,
quarter, or calendar year. These scheduled reports are then
published to the Generalized Reports section of the user’s
personalized web page.
N-Spect includes a comprehensive set of reports illustrating
network trends. Reports include exception-based reporting, pointto-point performance monitoring, and many others. The resulting
reports include a brief description on how to interpret the data and
any graphs and/or tables. Reports are preserved in Adobe Acrobat
PDF format, allowing for reduced file size and web posting.
" Starting the N-Spect Report Manager
1. Log on to your personal N-Form web site
2. Click the REPORT MANAGER button on the toolbar at the bottom of the screen. A Report Manager appears.
54
N-Form User Manual
61950821L1-1
Chapter 6 N-Spect Report Manager
The Report Manager report selector panel shows the reports that
are available. The individual reports are selected by expanding the
folders in the report selector panel. As the user configures a report,
new panels are added on the right side of the Reporter Manager.
As new panels are added, the previously used panels are grayed
and scroll off the left side of the window. The user may scroll or
enlarge the window to see all the panels. At any point, select
Cancel to return to the previous panel and modify your selections.
The N-Spect reports are grouped into two types: Network Port
reports and PVC reports. At the top of each report is an
explanation of the report and notes on key information to look for
in the results and descriptions of the report's graphs or tables, as
applicable.
NETWORK PORT REPORTS
Network Port Utilization Exception
The Utilization Exception report indicates when the average
utilization of the network port exceeds an over-utilization
threshold or falls below the under-utilization threshold for the
transmit and receive directions. If the average consistently
exceeds thresholds set, additional bandwidth may be necessary to
prevent network bottlenecks. If devices consistently under-utilize
the amount of bandwidth for the device, this bandwidth could be
re-allocated in the network for more efficient use of overall
bandwidth.
Network Port Throughput Exception
The Throughput Exception report indicates when the average
throughput of the network port exceeds an over-utilization
threshold or falls below the under-utilization threshold for the
transmit and receive directions. If the average consistently
exceeds thresholds set, additional bandwidth may be necessary to
prevent network bottlenecks. If devices consistently under-utilize
the amount of bandwidth for the device, this bandwidth could be
61950821L1-1
N-Form User Manual
55
re-allocated in the network for more efficient use of overall
bandwidth.
Network Port Utilization
The Network Port Utilization report indicates the average and
maximum bandwidth utilized on the network port over the
specified interval. Typically, the maximum utilization will be
greater than the average utilization. If the difference between the
average and maximum utilization is consistently small, and the
average is relatively high, additional bandwidth may be necessary
to prevent network bottlenecks.
Network Port Throughput
The Network Port Throughput report indicates the average and
maximum bandwidth utilized on the network port over the
specified interval. Typically, the maximum throughput will be
greater than the average throughput. If the difference between the
average and maximum throughput is consistently small, and the
average is relatively high, additional bandwidth may be necessary
to prevent network bottlenecks.
Network Port Traffic Volume
The Network Port Traffic Volume report indicates the amount of
traffic present on the network port. The graphs show bytes and
frames transmitted and received relative to the network port
bandwidth.
Network Port Protocol Distribution
The Network Port Protocol Distribution Report indicates how the
Layer 3 protocols are distributed over the entire network port.
Graphs are shown for the transmit and receive direction. To drill
down to an individual PVC, use the PVC Protocol Distribution
report.
56
N-Form User Manual
61950821L1-1
Chapter 6 N-Spect Report Manager
Network Port Top Talker
The Network Port Top Talker Report indicates the relative
bandwidth utilization for each of the top users on the network port.
Network Port T1 Physical Layer
The T1 Physical Layer report indicates Errored Seconds and
Severely Errored seconds as well as unavailable time for the
network port. If the T1 line runs with errors, this could indicate a
problem with the physical media.
Network Port DDS Physical Layer
The DDS Physical Layer report indicates Bipolar Violations and
unavailable time for the DDS line. If the DDS line runs with
errors, this could indicate a problem with the physical media.
PVC REPORTS
PVC Utilization Exception
The PVC Utilization Exception report indicates when the average
utilization of one or more PVCs exceeds an over-utilization
threshold or falls below the under-utilization threshold for the
transmit and receive directions. If the average consistently
exceeds the thresholds set, increasing the CIR may be necessary to
prevent data from being lost. If the utilization of a PVC is
consistently low, lowering the CIR may reduce network costs.
PVC Throughput Exception
The PVC Throughput Exception report indicates when the
average throughput of one or more PVCs exceeds an overutilization threshold or falls below the under-utilization threshold
for the transmit and receive directions. If the average consistently
exceeds the thresholds set, increasing the CIR may be necessary to
61950821L1-1
N-Form User Manual
57
prevent data from being lost. If the throughput of a PVC is
consistently low, lowering the CIR may reduce network costs.
PVC Utilization
The PVC Utilization report indicates the average and maximum
bandwidth utilized on the selected PVC over the specified interval.
Typically, the maximum utilization will be greater than the
average utilization. If the difference between the average and
maximum utilization is consistently small, increasing the CIR may
be necessary to prevent network bottlenecks.
PVC Throughput
The PVC Throughput report indicates the average and maximum
bandwidth utilized on the selected PVC over the specified interval.
Typically, the maximum throughput will be greater than the
average throughput. If the difference between the average and
maximum throughput is consistently small, increasing the CIR
may be necessary to prevent network bottlenecks.
PVC Traffic Volume
The PVC Traffic Volume report indicates the amount of traffic
present on the selected PVC. The graphs show bytes and frames
transmitted and received.
PVC Congestion
The PVC Congestion report details congestion in the network in
both the transmit and receive directions. Congestion in the Frame
Relay network when the throughput of the PVC is below the CIR
may indicate a Service Level Agreement violation. Under normal
conditions, congestion in the Frame Relay network should only
occur when the throughput of the PVC exceeds the CIR.
58
N-Form User Manual
61950821L1-1
Chapter 6 N-Spect Report Manager
PVC Burst Rate
The PVC Burst Rate report indicates the amount of time per
interval that the PVC transmits or receives data at a rate above the
CIR.
PVC Efficiency
The PVC Efficiency report displays how efficiently the PVC is
operating by measuring round-trip delay and packet loss. If
packets are being dropped in the network when the PVC
throughput is below the CIR, the network may be congested.
PVC Protocol Distribution
The PVC Protocol Distribution Report indicates how the Layer 3
protocols are distributed over the selected PVC. Graphs are shown
for the transmit and receive direction.
N-FORM DATA COLLECTION
To be included in a report generated by the Report Manager, a
device must appear in the network tree (i.e., must currently be
discovered) and the device must have data currently in the
database (i.e., must have been collected).
The data collection process uploads the data stored internally in
each device and stores that data in the N-Form database. Data
collection occurs 1, 2, 3, 4, 6, 8, 12, or 24 times per day based on
the individual device’s buffer size and sampling rate. The
internally stored buffer represents a fixed-size time window of
data. This interval data is stored in the first-in-first-out buffer at a
user-defined sampling rate. As new data is sampled and stored in
the buffer, the oldest data ages out of the time window and is
discarded. The amount of time it takes for a sampled interval to
61950821L1-1
N-Form User Manual
59
enter the buffer and then be discarded may be calculated using the
following formula:
Time Until Discard = # Samples In Buffer * Sample Period
N-Form schedules the number of collections per day so that the
server has two opportunities to upload the data before it is
discarded. Thus if one collection fails for some reason, such as
network congestion, the data will still be in the device for the next
collection opportunity. The number of times per day that N-Form
collects data is calculated in the following way:
Collections = 2 *
86400
Time Until Discard
The Collections value is rounded up to the nearest integer, and the
resulting value is used to select the number of Collections per Day
from the table below.
Collections <= 1
Collections <= 2
Collections <= 3
Collections <= 4
Collections <= 6
Collections <= 8
Collections <= 12
Collections per Day = 1
Collections per Day = 2
Collections per Day = 3
Collections per Day = 4
Collections per Day = 6
Collections per Day = 8
Collections per Day = 12
For example, consider a device configured with a 120 sample
storage buffer and a sampling period of 5 minutes or 300 seconds.
The time until data is discarded is,
Time Until Discard = 120 * 300 = 36000 seconds = 10 hrs.
60
N-Form User Manual
61950821L1-1
Chapter 6 N-Spect Report Manager
The number of Collections per Day would be calculated as
follows:
Collections = 2 *
86400
36000
= 4.8 which rounds up to 5
Thus the number of Collections per Day from the table above
would be six.
Collecting data at twice the rate that data is discarded from an
individual device's buffer allows N-Form to provide the user with
an additional level of data redundancy. At each collection, the
timestamp at which the collection is completed is stored in the
database. The next time data is collected from the device, only the
data with timestamps newer than the last collection time will be
collected and stored. The first time data is collected from a device,
all the data in the device will be collected. Subsequent collections
will only collect and store the new data in the device.
The first collection time each day occurs at midnight local time.
This primary collection should complete data collection for the
previous day. Scheduled reports are generated and the database is
archived immediately after completion of primary collection. The
start time of primary collection can be changed by providing an
offset from the default time (see Chapter 7, N-Form
Administration). The offset is contained in the environmental
variable NFORM_COLLECT_OFFSET. The value of the offset is
seconds from midnight and must have a value between +/- 86400.
The default value is zero. The offset may be entered in the
following formats: seconds, MM:SS, HH:MM:SS (e.g. 3600,
60:00, 01:00:00 all represent 1 AM local time).
The other collection times during the day are relative to the
primary collection time. For example, if the primary collection
time is 1 AM, then a device which is collected four times a day will
be collected at 1 AM, 7 AM, 1 PM, and 7 PM.
The total collection time for each device is limited to one hour. If
the collection is not completed within this time, collection will
61950821L1-1
N-Form User Manual
61
cease for that device until the next collection time arrives. This
time limit prevents a slow segment of the network from tying up
the collection resources and causing data to be lost in responsive
segments due to being deleted from the buffers before being
collected.
The timestamps stored in the devices are based on the device's
internal clock. As the data is stored in the database, an offset is
added to compensate for differences between the device's local
time and the N-Form server's local time, and the resulting
timestamps are converted to Coordinated Universal Time (UTC).
This offset compensates for devices that are in different time zones
and for the effects of Daylight Savings time. The offset also
compensates for devices on which the internal clock is incorrectly
set; however, it is advantageous to ensure that each device's clock
is set correctly when the device is configured.
To speed the data collection process, data may be collected
simultaneously from multiple devices. The number of
simultaneous collections is set by the Server Administration Tool
and is discussed in Chapter 7, N-Form Administration. The
default value is 16 and the valid range is 1 to 96. However, adding
additional simultaneous collections also increases the amount of
network bandwidth consumed by the collection process. There
will be some point beyond which the additional network traffic
caused by adding additional collections will offset any speed gain.
DATA ARCHIVING AND ROLLUP
Data is stored internally in each device at some device specific
interval, typically 5 to 30 minutes. This raw data, referred to here
as interval data, from the device is collected by the N-Form server
and stored in the database. As the data ages and becomes less
relevant, the interval data is archived or rolled up into larger
intervals in order to decrease the amount of data which must be
stored.
Typically, the highest frequency data is stored for 30 days. On the
31st day, this oldest interval data is rolled up from interval to
62
N-Form User Manual
61950821L1-1
Chapter 6 N-Spect Report Manager
hourly data. For example, if the device data is stored at 5 minute
intervals, then there will 12 datapoints in each hourly interval.
Eventually this hourly data will be rolled up to daily data. After
one year daily data is discarded from the database.
The process by which the data is rolled up is dependent on the
specific type of data being manipulated. The available rollup
options are shown in the table below.
Rollup Type
Each rollup value takes the value of the...
SUM
Sum of all values within each rollup interval
AVG
Average of all values within each rollup interval
MAX
Maximum value within each rollup interval
MIN
Minimum value within each rollup interval
TIME
Start time of the rollup interval
NONE
Last datapoint in the rollup interval
The report manager uses the same logic to manipulate the data for
each report, with the additional rollup intervals of days to weeks,
weeks to months, and months to quarters.
The report manager produces the reports using the data stored in
the database. Therefore the rollup or archiving of the database has
a bearing on the data resolution available for reporting. Data may
be rolled up from higher frequency data to lower frequency, but is
not interpolated from lower frequency data to higher frequency.
Therefore a yearly report cannot be created with only interval data,
because only 30 days of interval data are stored in the database.
The available report intervals and corresponding data resolutions
are shown below. All times are referenced to N-Form Server local
time.
61950821L1-1
N-Form User Manual
63
Interval
Definition
Data
Resolution
24 Hour Day
24 Hour Day
Interval, Hourly
Business Day
8AM - 5PM server local time
Interval, Hourly
Calendar
Week
Sunday through Saturday
Hourly, Daily
Business
Week
Monday - Friday
24 hr days
Hourly, Daily
Month
1 Calendar Month
Daily, Weekly
Quarter
3 Calendar Months
(beginning January - March)
Daily, Weekly
Year
12 Calendar Months
(beginning January)
Weekly, Monthly
" Generating an Immediate Report
1. Start the Report Manager.
2. Select a report from the list of available reports displayed in
the Report Selector panel. The Device Selector panel
becomes visible on the right.
The Device Selector panel displays an abbreviated copy of the
network map. Only devices that have data in the database and
are applicable for the type of report chosen appear in the network map in the Device Selector panel.
64
N-Form User Manual
61950821L1-1
Chapter 6 N-Spect Report Manager
3. Select the desired device from the Network Map in the
Device Selector panel and click NEXT. If this is a PVC report,
the PVC Selector panel appears.
4. If the PVC Selector panel is displayed, select the desired
PVCs and click NEXT. If the report requires user-defined
parameters such as those required for the exception reports,
the Report Parameters panel appears.
61950821L1-1
N-Form User Manual
65
5. If the Report Parameters panel is displayed, enter any userdefinable parameters such as OVER UTILIZATION PERCENTAGE
and click NEXT. The Interval selector panel appears.
6. Select the GENERATE NOW tab to generate a report that is
immediately available for viewing.
7. Select the DESIRED INTERVAL and DATA RESOLUTION from the
drop down menus.
8. Select the desired date from the calendar by choosing the
month or quarter and year and clicking on the calendar to
select the day or week.
9. Click GENERATE REPORT. The Building Report dialog will
appear.
When the report is completed, it will open in a new browser
window using the Acrobat plugin. The user may then save the
report as a PDF file or print the report using the Acrobat plugin.
" Scheduling a Report
1. Start the Report Manager.
2. Select a report from the list of available reports displayed in
the Report Selector panel.
66
N-Form User Manual
61950821L1-1
Chapter 6 N-Spect Report Manager
The Device Selector panel becomes visible on the right and
displays an abbreviated copy of the network map. Only devices that have data in the database and are applicable for the type
of report chosen appear in the network map in the Device Selector panel.
3. Select the desired device from the Network Map in the
Device Selector panel and click NEXT. If this is a PVC report,
the PVC Selector panel appears.
61950821L1-1
N-Form User Manual
67
4. If the PVC Selector panel is displayed, select the desired
PVCs and click NEXT. If the report requires user-defined
parameters such as those required for the exception reports,
the Report Parameters panel appears.
5. If the Report Parameters panel is displayed, enter any userdefinable parameters such as OVER UTILIZATION PERCENTAGE
and click NEXT. The Interval selector panel appears.
6. Select the SCHEDULE tab to generate a report that will automatically be created repeatedly at a specified interval.
7. Enter a NAME for the report.
8. Select the DESIRED INTERVAL and DATA RESOLUTION from the
drop down menus.
9. Select the desired receivers from the RECEIVERS list. Select
multiple receivers by holding down the Shift key to select a
68
N-Form User Manual
61950821L1-1
Chapter 6 N-Spect Report Manager
continuous range of receivers or holding down the Control
key to select individual receivers.
10. Click SCHEDULE REPORT. The Report Scheduled dialog appears.
11. Click OK.
The selected report is now scheduled and will automatically be
generated at the selected interval. Scheduled reports are generated
each day following the primary data collection time which is, by
default, midnight local time for the N-Form server. After the
report is generated, a PDF version of the report is posted to the
Generated Reports section of the personal web page of each user
in the report's receiver list as shown below. These reports are
accessed by clicking on the report title hyperlink which opens the
report in a client browser window using the Adobe Acrobat
plugin. The report may be saved or printed using the Acrobat
plugin.
61950821L1-1
N-Form User Manual
69
" Deleting a Report from the Personal Web Page
1. Log in to your personal web page.
2. Click the check box on the left to select the desired reports.
3. Click DELETE.
" Viewing/Deleting a Scheduled Report
1. Start the Reporter.
2. Select SCHEDULED > SCHEDULED REPORTS. The Manage
Reports dialog appears. This dialog shows a list of available
reports to manage.
3. Select the desired report from the list.
4. Click VIEW to view the fully expanded report configuration in
a Report Manager, or click DELETE to delete the report configuration and unschedule the report.
" Editing a Scheduled Report
1. Start the Reporter.
2. Select SCHEDULED > SCHEDULED REPORTS. The Manage
Reports dialog appears. This dialog shows a list of available
reports to manage.
70
N-Form User Manual
61950821L1-1
Chapter 6 N-Spect Report Manager
3. Select the desired report from the list.
4. Click VIEW. The report will appear fully expanded in the
Report Manager.
5. Select the report in the Manage Reports dialog and click
DELETE.
6. Navigate in the Reporter window and make the desired
changes
7. Click SCHEDULE REPORT to reschedule the updated report.
61950821L1-1
N-Form User Manual
71
72
N-Form User Manual
61950821L1-1
Chapter 7
N-Form Administration
ABOUT THIS CHAPTER
This chapter describes the N-Form configuration parameters and
Administration Tools.
CONTENTS
Topic
61950821L1-1
Page
N-Form Administration Tool
74
Default SNMP Parameters
75
Discovery Parameters
78
Data Collection Parameters
79
Email Parameters
81
Event Log Parameters
83
Network Event Notification
84
User/Group Administration
86
N-Form User Settings
88
N-Form User Manual
73
N-FORM ADMINISTRATION TOOL
N-Form contains administration tools for managing users,
passwords, groups, and server configuration parameters. Each NForm user account has a password and account privileges which
control access to N-Form modules. Each user has their own
personalized web site on which to view their scheduled reports and
saved charts and data. Groups simplify report and data distribution
by allowing information to be sent to a number of users by
selecting only a single group as the receiver.
A user must use the ‘root’ administrator account or another
account with All Areas access privileges to use the administration
tools.
" Starting the N-Form Administration Tool
1. Log on to your personal N-Form web site.
2. Click the ADMINISTRATION TOOL button on the toolbar at the
bottom of the screen. An N-Form Server Administrator
appears.
The Server Administrator has three tabs across the top of the
window: USERS, GROUPS and SERVER. These tabs are used to
access each type of administrative function. The USERS tab
displays the tools used to create, modify, and delete users. The
GROUP tab displays the tools used to create, modify, and delete
groups.The SERVER tab displays the tools used to configure
74
N-Form User Manual
61950821L1-1
Chapter 7 N-Form Administration
parameters controlling the default SNMP settings, network
utilization, email configuration, event history log configuration,
and network event notification.
DEFAULT SNMP PARAMETERS
SNMP Read Community & SNMP Write Community
These parameters specify the default SNMP read and write
communities. The parameters are of type String. SNMP Read
Community has a default value of “public” and SNMP Write
Community has a default value of “private”.
" Changing SNMP Read Community & SNMP Write
Community Parameters
1. Start an N-Form Server Administrator.
2. Select the SERVER Tab.
3. Click DEFAULT SNMP in the left server settings selector
panel.
4. Type the desired string in the space provided, or click the
check box to use the values from the initialization file
5. Click APPLY to save the new setting or RESET to restore the
previous values.
6. Click CLOSE.
61950821L1-1
N-Form User Manual
75
SNMP Timeout
The SNMP Timeout parameter specifies the default time in
milliseconds N-Form will wait for a response from SNMP or
discovery. This parameter is of type Integer and has a default value
of 5000.
" Changing SNMP Timeout Parameter
1. Start an N-Form Server Administrator.
2. Select the SERVER Tab.
3. Click DEFAULT SNMP in the left server settings selector
panel.
4. Drag the slider to set the timeout value or type a value in the
box provided. Click the check box to use the value from the
initialization file.
5. Click APPLY to save the new setting or RESET to restore the
previous value.
6. Click CLOSE.
SNMP Retries
The SNMP Retries parameter specifies the default number of
retries for SNMP and discovery requests. This parameter is of type
Integer and has a default value of 2.
76
N-Form User Manual
61950821L1-1
Chapter 7 N-Form Administration
" Changing SNMP Retries Parameter
1. Start an N-Form Server Administrator.
2. Select the SERVER Tab.
3. Click DEFAULT SNMP in the left server settings selector
panel.
4. Drag the slider to set the retries value or type a value in the
box provided. Click the check box to use the value from the
initialization file.
5. Click APPLY to save the new setting or RESET to restore the
previous value.
6. Click CLOSE.
61950821L1-1
N-Form User Manual
77
DISCOVERY PARAMETERS
Discovery Threads
The Discovery Threads parameter specifies the number of
separate threads to use for device discovery. Specifying multiple
threads for discovery speeds the discovery process by allowing
multiple devices to be discovered simultaneously. This parameter
is of type Integer and has a default value of 32. The valid range is
1 to 64. However, adding additional simultaneous discoveries also
increases the amount of network bandwidth consumed by the
discovery process. There will be some point beyond which the
additional network traffic caused by adding additional discoveries
will offset any speed gain.
" Changing Discovery Threads Parameter
1. Start an N-Form Server Administrator.
2. Select the SERVER Tab.
3. Click NETWORK UTILIZATION in the left Server Settings selector panel.
4. Drag the slider to set the number of simultaneous devices to
discover, or click the check box to use the values from the initialization file.
5. Click APPLY.
6. Click CLOSE.
78
N-Form User Manual
61950821L1-1
Chapter 7 N-Form Administration
DATA COLLECTION PARAMETERS
Collection Threads
The Collection Threads parameter specifies the number of
separate threads to use for device data collection. Specifying
multiple threads for collection speeds the collection process by
allowing data from multiple devices to be collected
simultaneously. This parameter is of type Integer and has a default
value of 16. The valid range is 1 to 96. However, adding additional
simultaneous collection threads also increases the amount of
network bandwidth consumed by the collection process. There
will be some point beyond which the additional network traffic
caused by adding additional collections will offset any speed gain.
" Changing the Collection Threads parameter
1. Start an N-Form Server Administrator.
2. Select the SERVER Tab. The Server Settings dialog appears.
3. Click NETWORK UTILIZATION in the left Server Settings selector panel.
4. Drag the slider to set the number of simultaneous devices to
collect or click the check box to use the values from the initialization file.
5. Click APPLY to save the new setting or RESET to restore the
previous value.
6. Click CLOSE.
61950821L1-1
N-Form User Manual
79
Collection Offset
The Collection Offset parameter specifies the offset from the
default primary data collection time of midnight server local time.
This parameter is of type String and the value of the offset is
seconds from midnight and must have a value between +/- 86400.
The default value is “0”. The offset may be entered in the
following formats: seconds, MM:SS, HH:MM:SS (e.g., 3600,
60:00, 01:00:00 all represent 1 AM local time). Collection Offset
may be specified as a system environment variable or an entry in
the initialization file.
" Changing the Collection Offset parameter
1a. Change the value of the Windows NT system environment
variable NFORM_COLLECT_OFFSET to the desired value.
Alternately...
1b. Edit the offset entry in the collection section of the initialization file prior to starting the N-Form server.
[collection]
offset = value
See Appendix B, N-Form Parameters for more information on
setting the Collection Offset parameter
80
N-Form User Manual
61950821L1-1
Chapter 7 N-Form Administration
EMAIL PARAMETERS
EMail Server Hostname
The EMail Server Hostname parameter specifies the name of the
mail server used by the N-Form server to send email. Email
notification is dependent on the network’s local mail server. Some
servers are configured to send email only inside their local
domain, and N-Form event notification would therefore have this
same limitation. This parameter is of type String and the default
value is “localhost”.
" Configuring the EMail Server Hostname parameter
1. Start an N-Form Server Administrator.
2. Select the SERVER Tab. The Server Settings dialog appears.
3. Click EMAIL CONFIGURATION in the left Server Settings selector panel.
4. Enter MAIL SERVER HOSTNAME or click the checkbox to use
the values from the initialization file.
5. Click APPLY to save the new setting or RESET to restore the
previous value.
6. Click CLOSE.
61950821L1-1
N-Form User Manual
81
EMail From Address
The EMail From Address parameter specifies a valid email
account username for the N-Form server on the mail server used
to send email. This parameter is of type String and the default
value is “root”.
" Configuring the EMail From Address parameter
1. Start an N-Form Server Administrator.
2. Select the SERVER tab. The Server Settings dialog appears.
3. Click EMAIL CONFIGURATION in the left Server Settings selector panel.
4. Enter FROM ADDRESS.
5. Click APPLY to save the new setting or RESET to restore the
previous value.
6. Click CLOSE.
82
N-Form User Manual
61950821L1-1
Chapter 7 N-Form Administration
EVENT LOG PARAMETERS
Days of Saved Events
The Days of Saved Events parameter specifies the number of days
system events are stored in the database before being discarded.
This parameter is of type Integer and has a default value of 30
days. The valid range is 1 to 90 days.
" Configuring the Days of Saved Events parameter
1. Start an N-Form Server Administrator.
2. Select the SERVER Tab. The Server Settings dialog appears.
3. Click EVENT HISTORY in the left Server Settings selector
panel.
4. Drag the slider to set the number of days to keep network
event history, or click the check box to use the values from
the initialization file.
5. Click APPLY to save the new setting or RESET to restore the
previous value.
6. Click CLOSE.
61950821L1-1
N-Form User Manual
83
NETWORK EVENT NOTIFICATION
This panel configures the N-Form server to notify specified users
via email when network level events are encountered. Event
notification for network level events can only be configured with
the Administration Tool. Event notification for nodes and
individual devices is configured in the Network Manager (see
Chapter 3, N-Command Network Manager).
Event notification severity falls through to each higher level of
criticality. For example, a user who receives minor severity events
would also be notified of events of major and critical severity, but
a user who only receives critical severity events would not be
notified of events with lesser severity.
Email notification is dependent on the network’s local mail server.
Some servers are configured such that they cannot send email
outside their local domain, and N-Form event notification would
therefore have the same limitation. The N-Form email server
configuration is discussed above.
" Configuring Network Event Notification
1. Start an N-Form Server Administrator.
2. Select the SERVER Tab. The Server Settings dialog appears.
84
N-Form User Manual
61950821L1-1
Chapter 7 N-Form Administration
3. Select the notification EVENT SEVERITY level from the drop
down menu:
NONE
UNKNOWN
NORMAL
WARNING
MINOR
MAJOR
CRITICAL
4. Enter valid EMAIL ADDRESSES in the panel below the severity
menu.
These email addresses can be in any form accepted by the local
mail server. In addition to the typical user@domain form, some
email servers are set up to accept just the username or other aliases
to represent users and groups of users.
5. Click APPLY to save the new values or RESET to restore the
previous values.
61950821L1-1
N-Form User Manual
85
USER/GROUP ADMINISTRATION
" Creating a User
1. Start an N-Form Server Administrator.
2. Select the USERS tab.
3. Click CREATE. The Create User dialog appears.
4. Enter user information. User information consists of:
LOGIN
NAME
EMAIL ADDRESS
LOCATION
COMMENTS
unique login name
user's name
user's email address
user's physical location
notes
required
optional
optional
optional
optional
5. Choose user ACCESS LEVEL from the drop down menu:
PERSONAL SETTINGS ONLY - allows access only to User Settings Tool
NO REPORT GENERATION OR ADMINISTRATION - adds access to
Network Manager, Element Manager, and Event manager
to the privileges above
NO ADMINISTRATION - adds access to the N-Spect Report Manager to the privileges above
ALL AREAS - allows full access to all N-Form modules including Administration Tool
86
N-Form User Manual
61950821L1-1
Chapter 7 N-Form Administration
6. Click APPLY to create the user with default password
“password” and return to the Server Administrator, or click
CANCEL to discard changes and return to the Server Administrator.
" Creating a Group
1. Start an N-Form Server Administrator.
2. Select the GROUP Tab.
3. Click CREATE. The Create Group dialog appears.
4. Enter group information. Group information consists of:
NAME
LOCATION
COMMENTS
group name
group's physical location
notes
required
optional
optional
5. Select the members of the group from the list of previously
configured users.
6. Click APPLY to create the Group and return to the Server
Administrator or click CLOSE to discard changes and return to
the Server Administrator.
61950821L1-1
N-Form User Manual
87
" Deleting a User or Group
1.
2.
3.
4.
Start an N-Form Server Administrator.
Select the USERS OR GROUP Tab.
Select a user or group.
Click DELETE.
N-FORM USER SETTINGS
" Starting the N-Form User Settings Tool
1. Log on to your personal N-Form web site.
2. Click the USER SETTINGS button on the toolbar at the bottom
of the screen. A User Settings Tool appears.
The Users Administrator is used to update user information
including name, email address, location, user comments, and
password.
88
N-Form User Manual
61950821L1-1
Chapter 7 N-Form Administration
" Changing a Password
1. Start an N-Form User Settings Tool.
2. Click CHANGE PASSWORD. The Change Password dialog
appears.
3. Enter the OLD PASSWORD.
4. Enter and verify the NEW PASSWORD.
5. Click OK to set the NEW PASSWORD or CANCEL to exit and
leave the password unchanged.
61950821L1-1
N-Form User Manual
89
90
N-Form User Manual
61950821L1-1
Appendix A
Supported Products
The N-Form software suite currently supports the following
products. Future releases will continue to add other ADTRAN
product families.
! DSU IQ - 1200212L1
56/64K Frame Relay Monitoring DSU
! TSU IQ - 1200215L1
T1/FT1 Frame Relay Monitoring DSU
! NxIQ - 1200255L1
Frame Relay Nx port for TSU Multiplexers
! TSU IQ+ - 1200275L1
T1/FT1 DSU with DSX-1 port with Frame Relay Monitoring
! TSU IQ Rackmount - 1200277L1
Rackmounted T1/FT1 Frame Relay monitoring DSU
! IQ Probe - 1200214L1
In-line unit supports rates of 56K to 2M
! Atlas 800PLUS - 4200226L1
Supports 6M of Frame Relay
! TSU 100e - 1202052L1
Modular T1/FT1 DSU/CSU with V.35 and one option slot
! TSU 120e - 1202129L1
Modular T1/FT1 DSU/CSU with integral V.35 DTE and
DSX-1 ports and one option slot
! TSU 600e - 1202076L1
Modular T1/FT1 DSU/CSU with 6 option slots
61950821L1-1
N-Form User Manual
91
92
N-Form User Manual
61950821L1-1
Appendix B
N-Form Parameters
The default N-Form parameters should be adequate to allow NForm to work on most networks. However, these parameters
may be modified to configure N-Form behavior for a specific
environment. If you have any question about a parameter, please
contact ADTRAN Technical Support before modifying its
value.
TYPES
The parameters that control the operation of N-Form have seven
distinct type definitions. These type definitions and example
values are listed below.
Boolean =
Flag
=
Integer
=
Float
=
String
=
Path
=
Enum
=
True, False, T, F, Yes, No, Y, N
True, False, T, F, Yes, No, Y, N (on command
line, existence implies True)
Integer value in decimal, hexadecimal, octal, or
binary format (e.g., 23 or 0d23, 0x17, 0o27,
0b10111)
standard floating point number (e.g., 1, 1.0,
1.0e6)
Single word or quoted string (e.g., User, "This
user manual is for you")
Same as string, but may be relative to another
path specific to each variable.
Enumerated list of values (strings) specific to
each variable (e.g., Top, Left, Right, Bottom)
A path type parameter may be relative to some other fixed
location. For example, all the N-Form component directory
locations are relative to the N-Form installation directory. An
absolute path begins with a forward or backward slash (e.g.,
"/N-Form") or contains a colon (e.g, "C:/Program Files/Adtran/
N-Form"). The path parameters and their relative dependencies
are listed below.
61950821L1-1
N-Form User Manual
93
RELATIVE PATH DEPENDENCIES
Path
InstallDir
BinDir
LogsDir
DataDir
IniFile
WebDir
UserDir
DataBasePath
DataBaseEngine
JarDir
Relative to…
None
InstallDir
InstallDir
InstallDir
InstallDir
InstallDir
InstallDir
InstallDir
InstallDir
WebDir
The N-Form Parameters are shown in the table below.
Name
Type
Default Value
Definition
UserDir
Boolean
data
The path from the N-Form web root directory to
the user data directory.
EMailFrom
String
root
The username of the N-Form server in the email
system (for from and security).
EMailServer
String
localhost
The email server to which to send Event notices.
CollectionBarrels
Integer
16
The number of threads allowed for the server to
use during collection (1-96).
CollectionOffset
String
0
Start of collection time offset in seconds from
midnight (local time).
JarDir
Flag
jars
The path from the N-Form web root directory to
the java archives directory.
ReinitializeService
Flag
FALSE
Force N-Form service to reload configuration
files.('=' not needed)
StopService
Flag
FALSE
Stops the registered NT service.('=' not needed)
StartService
Flag
FALSE
Starts the registered NT service.('=' not needed)
UnregisterService
Flag
FALSE
Removes N-Form from the NT services
registry.('=' not needed)
RegisterService
Flag
FALSE
Registers N-Form as an NT service.
RunInShell
Flag
FALSE
Torunfromthecommandline.('='notneeded)
DataBaseEngine
Path
Sybase/win32/dbeng7
The pathname of the Sybase engine
DataBasePath
Path
.
The path to the Sybase database
TrapDays
Integer
30
The number of days before traps are
automatically deleted.
94
N-Form User Manual
61950821L1-1
Name
Type
Default Value
Definition
PollFreq
Integer
5
The time in minutes between discovered node
status checks.
SNMPRetries
Integer
2
The number of retries for SNMP and discovery
requests.
SNMPTimeout
Integer
5000
The time in milliseconds to wait for response from
SNMP or discovery.
SNMPWrite
String
private
The SNMP write community string.
SNMPRead
String
public
The SNMP community string.
PingFailureThreshold
Integer
2
The minimum consecutive ping failures that will
generate a trap.
DiscoveryBarrels
Integer
32
The number of threads allowed for the server to
use during discovery (1-64).
WebDir
Path
Apache/htdocs/nform
Location of N-Form web directory.
NotifyLogLevel
Integer
48
The detail level of information being logged to a
notification procedure such as the NT event log.
EchoLogLevel
Integer
60
The detail level of information being displayed in
shell output.
LogLevel
Integer
60
The detail level of information being written in the
log file.
PrintHelp
Flag
FALSE
Displaysthisinformation.('='notneeded)
LoggerControl
Boolean
TRUE
'TRUE' enables information logging. 'FALSE'
disables the logging.
IniFile
Path
N-Form.ini
The pathname from the installation directory to
the initialization file.
DataDir
Path
Data
The path from the installation directory to the data
directory.
LogsDir
Path
logs
The path from the installation directory to the logs
directory.
BinDir
Path
bin
The path from the installation directory to the
executables directory.
InstallDir
Path
/N-Form
The path for the N-Form product installation.
61950821L1-1
N-Form User Manual
95
CONFIGURING PARAMETER VALUES
In addition to a default value, each N-Form parameter may be
specified by one or more of the methods listed below. If the
parameter may be specified by more than one method, the
precedence is enforced as shown.
Precedence (highest to lowest)
Admin
ENV
INI
Default
value specified by Administration Tool (see Chapter 7,
N-Form Administration)
value specified as Windows NT system environmental
variable
value specified in initialization file
default value
The table below lists the environmental variable names and entries
from the initialization file used to set each of the N-Form
parameters.
Name
ENV
INI
UserDir
NFORM_USER_DIR
directory.users
EMailFrom
NFORM_EMAIL_FROM
email.from
EMailServer
NFORM_EMAIL_SERVER
email.server
CollectionBarrels
NFORM_COLLECT_BARRELS
collection.barrels
CollectionOffset
NFORM_COLLECT_OFFSET
collection.offset
JarDir
NFORM_JAR_DIR
directory.jars
DataBaseEngine
NFORM_DATABASE_ENGINE
database.engine
DataBasePath
NFORM_DATABASE_PATH
database.path
TrapDays
NFORM_TRAP_DAYS
traps.days
PollFreq
NFORM_POLL_FREQUENCY
statuspoller.frequency
ReinitializeService
StopService
StartService
UnregisterService
RegisterService
RunInShell
96
N-Form User Manual
61950821L1-1
Name
ENV
INI
SNMPRetries
NFORM_SNMP_RETRIES
snmp.retries
SNMPTimeout
NFORM_SNMP_TIMEOUT
snmp.timeout
SNMPWrite
NFORM_SNMP_WRITE
snmp.write_community
SNMPRead
NFORM_SNMP_READ
snmp.read_community
PingFailureThreshold
NFORM_PING_THRESHOLD
DiscoveryBarrels
NFORM_DISC_BARRELS
NFormWebDir
NFORM_WEB_DIR
NotifyLogLevel
NFORM_NOTIFY_LEVEL
EchoLogLevel
NFORM_ECHO_LEVEL
LogLevel
NFORM_LOG_LEVEL
discovery.barrels
PrintHelp
LoggerControl
61950821L1-1
logger.enabled
IniFile
NFORM_INI
DataDir
NFORM_DATA_DIR
directory.data
LogsDir
NFORM_LOGS_DIR
directory.logs
BinDir
NFORM_BIN_DIR
directory.bin
InstallDir
NFORM_INSTALL
directory.install
N-Form User Manual
97
" To change parameters with Windows NT system
environment variables
1. Open the System Properties by starting START MENU > SETTINGS > CONTROL PANEL > SYSTEM and clicking the ENVIRONMENT tab.
2. Select the desired parameter from the list of System Variables
and change the value in the VALUE box at the bottom of the
window.
3. Click SET to apply changes and OK to exit.
For example, to change the number of discovery threads to 16
using the environment variable, change the
NFORM_DISC_BARRELS variable as shown above.
" To change parameters with the initialization file
1. Open the N-Form initialization file, N-Form.ini, located in
the N-Form installation directory
2. Edit the desired parameter entry in the corresponding section
of the initialization file prior to starting the N-Form server.
[section]
parameter = value
98
N-Form User Manual
61950821L1-1
For example, to change the number of discovery threads to 16
using the initialization file, change the barrels entry in the
discovery section as shown below.
61950821L1-1
N-Form User Manual
99
100
N-Form User Manual
61950821L1-1