1
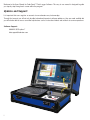
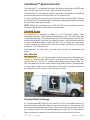
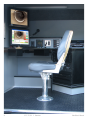
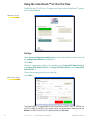
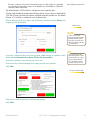
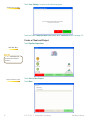
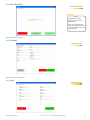
Touch ™ ™ User’s Manual TECHNOLOGIES Welcome to the Users Manual for CobraTouch™ Data Logger Software. This easy to use manual is designed to guide you step by step through each screen within the program. Updates and Support: It is important that users register an account at www.cobratec.com/customer.php Through that account you will not only be able to download important software updates as they are made available but you will also be able to access our online help features such as instructional videos and solutions to common questions. Software Support: 888-844-3309 option 7 [email protected] II Table of Contents Section 1: Overview 1 About the CobraTouch™ 2 About this manual 2 What Is PACP? 3 Pipeline Assessment Certification Program What Is LACP? 3 Lateral Assessment Certification Program CobraTouch™ System Overview 6 Data And Video File Storage The CobraTouch Data Logger 7 Data Validation 7 Section 2: Configuration and Settings Using the CobraTouch™ for the First Time 9 10 Settings���������������������������������������������������������������������������������������������������������������������������� 10 Create a Client and Project������������������������������������������������������������������������������������������������� 12 More settings�������������������������������������������������������������������������������������������������������������������� 14 Overlay Display Settings����������������������������������������������������������������������������������������������������� 15 To add a Database field to the overlay To add custom text to the overlay To remove information from the overlay Operator Table ������������������������������������������������������������������������������������������������������������������ 16 To add an operator To edit an operator To delete an operator Set File Naming Format������������������������������������������������������������������������������������������������������ 17 Set Optional Fields������������������������������������������������������������������������������������������������������������� 17 III Section 3: Projects and Work Orders 19 Working With Projects 20 Creating A New Project������������������������������������������������������������������������������������������������������ 21 Project For A New Client �������������������������������������������������������������������������������������������������������������� 21 Project For An Existing Client�������������������������������������������������������������������������������������������������������� 22 Work Order Overview 23 Creating A New Work Order������������������������������������������������������������������������������������������������ 23 Starting With A Blank Work Order�������������������������������������������������������������������������������������������������� 24 New Work Order From Existing����������������������������������������������������������������������������������������������������� 26 Other Work Order Functions 28 Opening a Work Order�������������������������������������������������������������������������������������������������������� 28 Deleting Work Orders��������������������������������������������������������������������������������������������������������� 28 Printing Work Orders���������������������������������������������������������������������������������������������������������� 28 Viewing/Editing Work Orders���������������������������������������������������������������������������������������������� 28 To view the work order without saving any changes: ���������������������������������������������������������������������� 28 To edit the work order:����������������������������������������������������������������������������������������������������������������� 29 Section 4: Inspections 31 The Inspection Screen 32 Starting The Inspection 34 Defects 35 Continuous Defects������������������������������������������������������������������������������������������������������������ 36 To close a Continuous Defect Capturing JPEGs 36 Section 5: Exports 39 Transferring Data, JPEGs, And Video Files 40 Index Index IV 43 Section 1: Overview 1 About the CobraTouch™ Cobra Technologies™ wishes to thank you for purchasing our CobraTouch™ data logger. A great deal of research and development went into this uniquely elegant data logger for the video inspection marketplace. The CobraTouch™ provides an intuitive means to carry out the data collection process through a simple touch screen approach. It was designed with the Owner (Municipality/Contractor) and user (Operator), in mind. Our objective was to provide a unique product designed to make the inspection process easier and more productive. It is like having instant access to the pages in a PACP or WRc Manual. The data is validated in the data logger, eliminating costly and time consuming post processing of the collected data. Through an industrial quality 15” touch screen on an XP Professional platform, the CobraTouch™ Data Logger is designed to collect PACP, WRc inspection data (other formats available upon request), MPEG Video files and JPEG images. The CobraTouch™ is certified by NASSCO for PACP and LACP. Due to the large number of defect codes, particularly with PACP and LACP, and each with specific attributes, it is very difficult to remember every code and requirement. Cobra has built-in a front-end validation to the PACP, LACP and WRc programs eliminating the need for the operator to remember coding requirements for each defect code making the inspection process easy. Integrated into the CobraTouch™ Data Logger is a video compressor with MPEG 1, 2, 4 and H.264 capabilities. A Pause function has been added to the software allowing the user to Pause and Restart the file at any time during the inspection. Video files can be stored on a removable USB hard drive. A CD/DVD burner is provided for users that want to burn the video/data files to an optical disc in the field. The following manual is designed to familiarize new users with the CobraTouch™ Data Logger in the PACP format and to provide extra knowledge for current users. This data logger is designed for you, the Operator, to easily handle data collection and defect requirements. About this manual We have attempted to write this manual in a way that is easy to understand. We assume the person reading this manual has never seen our data system before and go into detail about each feature and provide step-by-step instructions for performing each task. However, we spend a great deal of time working with this software and many procedures have become as automatic to us as breathing. If you find a section of this manual that you don’t understand or if there is something you feel should be explained in more detail, please contact us. We will be happy to provide you with the information you need and we will incorporate your feedback into future versions of the manual. Teachers always say not to be afraid to ask questions because the chances are there are other people with the same question. For questions or comments about this manual or the CobraTouch™ software, send an email to [email protected] or call 888-844-3309. In this manual, we have used color coding to help you quickly find the instructions you need. Information about the program and its features is in black text. Step-by-step instructions are in green text. Throughout this manual you will see notes, tips, warnings and picture labels presented in the left and right margins. 2 S E C T I O N 1 : Overview CobraTouch Manual What Is PACP? Pipeline Assessment Certification Program PACP is a standard developed by WRc in the UK for NASSCO. It is intended to provide the industry with a single data standard within the USA for the collection of data and video files for Pipeline Inspections. The PACP data dictionary, developed by WRc, followed the EU specifications. WRc has written a new WRc Version 4 program for use throughout the rest of the world. WRc Version 3 has been in use worldwide and in some places in the US since the early ‘80s What Is LACP? Lateral Assessment Certification Program LACP, based on PACP, is a standard developed by WRc in the UK for NASSCO. It is intended to provide the industry with a single data standard within the USA for the collection of data and video files for Lateral Inspections. For additional information on PACP, LACP or WRc Version 3 and Version 4 contact Alan Grant at Cobra Technologies™ in Atlanta, GA USA at 800-443-3761 or by e-mail at [email protected] PACP is Non Vendor specific There is no such thing as Granite PACP, Cobra PACP or any other PACP. The data generated from the PACP export is certified to meet the NASSCO standard and any data from a PACP certified vendor is required to meet that standard. Many users do not understand the purpose of PACP standard and ask for a specific vendor’s PACP. If this occurs, there are actions that the users should immediately take: 1. Notify NASSCO that the Owner or the Engineer is demanding a specific vendor’s PACP. 2. Contact the Cobra office immediately so we can contact the user and assist you in getting a resolution. You should be aware that certain vendors are attempting to circumvent the intent of the PACP program by providing a low cost version of their program that is not PACP compliant and is not certified. Engineers and Municipalities are purchasing these strippeddown versions either in an attempt to save money or because they don’t understand the differences between versions. These Engineers and Municipalities then are demanding that contractors provide PACP data they can import into their non-certified database. The only way to transfer data into these programs is to transfer the data using a proprietary transfer protocol. This means contractors working with these Municipalities and Engineers must either purchase the specific data collection software to be able to transfer PACP data to the non certified PACP database or pay a third party for expensive CobraTouch Manual S E C T I O N 1 : Overview 3 data conversion. This has been brought to the attention of NASSCO on a number of occasions and hopefully NASSCO will rectify the problem. Other vendors are providing customers software without a PACP import and are then are charging the customer for the PACP import. Customers, when they purchase a PACP certified package, think they are receiving a PACP certified database and then object to having to pay an additional fee for the PACP import. At that time, the user then often demands the contractor deliver that data in a format they can use because they either do not understand the purpose of PACP or they do not want to purchase the additional software module to make their system PACP compliant. Hopefully these practices by Vendors will be addressed by NASSCO now that the problems have been brought to the attention of the Association. Also, it should be noted certain Vendors are selling non-transferable software packages, they are leasing the software to the end user and the software is NOT transferable. When purchasing/acquiring software make sure you understand what you are paying for. Cobra allows the transfer of software from user to user; however, there is a fee to transfer the license. Other responsible Vendors provide the same or similar transfer arrangements. Cobra CDL 9000 Data Logger software and CIMS V9 are fully PACP and LACP compliant and are certified by NASSCO 4 S E C T I O N 1 : Overview CobraTouch Manual CobraTouch Manual S E C T I O N 1 : Overview 5 CobraTouch™ System Overview The CobraTouch™ is a dedicated data logger designed to collect data and MPEG video files in the field using the latest touch screen interface (CobraTouch™). The CobraTouch™ is specifically designed to capture data and video files in the field and transfer the information to the office where they can be processed. For users who desire to manage the data in the field, Cobra installs the CIMS™ database on the CobraTouch™ hardware platform and provide the appropriate hardware to manage the data and the video files in the field. NOTE: Although this manual only covers PACP and LACP format inspections, the basic operation of the software in WRc format is almost identical. Operating System The CobraTouch™ is designed to operate on an XP Professional platform. Cobra Technologies provides a solid state drive for the operating system . This is the cutting edge in hard drive technology. Conventional hard drives have rotating platters with tiny read and write heads float on a thin layer of air above the platters, and are extremely sensitive to shock and vibration. Whereas solid state disks have no moving parts whatsoever. Instead of rotating disc platters there’s flash memory chips mounted on a circuit board enclosed in a 2.5” hard drive shell. Solid state disks are faster, silent, and more shock resistant than conventional hard drives. User Interface The CobraTouch™ uses a 15” Industrial grade resistive touch screen as the primary user interface. In cases where the video screen is used on an ATV in direct sunlight, Cobra specifies the use of a 1200 nits sunlight-readable video/computer touch screen. This allows the operator to view the screen in direct sunlight without any loss of image quality. To use the touch screen the user simply follows the on-screen instructions and touches the selected box on the screen to enter and capture the data. Data And Video File Storage It is recommended MPEG Video files be stored on a USB 2.0 removable hard drive. To protect the integrity of the data, Cobra now uses solid state drives in the removable hard drive enclosures provided with our systems. These can be taken to the office to allow for easy and quick transfer of the data and the video files by using a USB 2.0 cable interface. There are alternative methods of transferring the data and video files to the office: 6 S E C T I O N 1 : Overview CobraTouch Manual 1. The data and the video files can be stored on a fixed drive in the data logger and transferred to a CD or DVD in the field. A DVD-RW drive is provided as a standard with the CobraTouch™. 2. Files can be transferred from the truck to the office using a wireless connection or by an Ethernet connection. Solid state drives have been selected by Cobra because of their ability to withstand the abuse to be anticipated in field applications at a fraction of the cost of a traditional drive in a “hardened” drop rated enclosure. Installation In A Video Inspection Vehicle The CobraTouch™ can be rack mounted using a 1U or 3U 19” rack mount computer. Alternatively, the CobraTouch™ can be installed in a wall mount unit. For retrofit systems, the form factor of the CobraTouch™ system depends on the characteristics of the existing equipment. Cobra recommends that a UPS be installed in every system to protect the CobraTouch™ from any power fluctuations. For users with properly designed inverter systems, a UPS is not normally required but they provide added protection for your valuable equipment and more importantly, for your valuable inspection data. The touch screen used to input the data can be installed in a number of ways depending on the layout in the truck. Cobra can recommend the ideal installation for a user’s particular application. Cobra provides two types of overlay units designed to display data on the video screen. The data overlay units are provided in either a 1U 19” rack mount or in a stand-alone enclosure. The CobraTouch Data Logger The CobraTouch™ Data Logger is designed to make the collection of inspection data and video files as simple as possible for the operator in the field. The CobraTouch™ Data Logger can be installed on any manufacturer’s TV inspection platform and only requires a video feed and a connection to the footage encoder. The CobraTouch™ has been designed to manage PACP, LACP and WRc Version 3 data. Data can be exported as an MDB file for PACP and LACP or as a Sewer.dat file for WRc Version 3. Data Validation Data collected by the user is validated in the data logger and will not allow the operator to continue with an inspection unless the data collected meets the published rules for PACP, LACP or WRc protocol. PACP and LACP in particular require certain data to be collected on defects. With approximately 200 defect codes, it is difficult to remember all the coding requirements. Therefore, the CobraTouch™ will not permit the user to save a defect record without having entered the required data for that defect. Optional data is collected at the user’s discretion. This front-end validation of data eliminates hours of data scrubbing required in the past to provide data compliant with the PACP and LACP coding systems. CobraTouch Manual S E C T I O N 1 : Overview 7 8 S E C T I O N 1 : Overview CobraTouch Manual Section 2: Configuration and Settings 9 Using the CobraTouch™ for the First Time Double click the CDL 9001 icon. The program will open and the CobraTouch™ launcher menu will be displayed. Application Launcher Settings Select System Configuration Application by touching the Teal box on the screen and the Configuration Wizard will be displayed. Touch Next Check the capture device settings, they should be set to Osprey-210 Video Device 1 and Osprey-210 Audio Device 1 or Osprey-230 Video Device 1 and Osprey-230 Audio Device 1 Choose the encoding format for your video files Touch Next Capture device settings The CobraTouch™ can record video in one of four formats: MPEG1, MPEG2, MPEG4 and H.264. For MPEG1 and MPEG2, the quality and file size of the video is determined by the Bitrate; for MPEG4 and H.264, it is determined by the Q-Factor. 10 S E C T I O N 2 : Configuration and Settings CobraTouch Manual Bit rate is a measure of the rate of information content in a video stream. It is quantified using the bit per second (bit/s or bps) unit or Megabits per second (Mbit/s). A higher bit rate allows better video quality. http://wikipedia.org/wiki/Video The default bitrate is 2000 and that is sufficient for most inspection jobs. Q-Factor works like bitrate except instead of being able to set any value you are limited to 1-30. With Q-Factor, the lower the number, the higher the quality and file size. The default Q-Factor is 10 and that is sufficient for most inspection jobs. Choose where you want your videos and still pictures stored by touching Browse and navigating to the desired drive Media options NOTE Cobra recommends using the external hard drive provided with your system for storing your videos and still images when conducting your inspections. TIP If you want a still picture taken every time you enter a defect during an inspection, check the box labeled Automatically capture still file with observations Choose the standard of measurement you wish to use Choose how time should be displayed in the program and your inspections The CobraTouch™ will automatically make a folder for each project you create. Set your storage location to E:\ and let the software organize your files for you. Touch Next Footage calibration utility Follow the on-screen instructions to calibrate your footage Touch Next CobraTouch Manual S E C T I O N 2 : Configuration and Settings 11 Touch Save Settings to return to the launcher program Configuration complete Touch the Green Compliant with PACP/LACP 6.01 standards button (see page 10) Create a Client and Project Touch Pipeline Inspections PACP Main Menu NOTE Clients and Projects are covered in more detail in Section 3. Project selection screen Touch Start a New Project Touch Next 12 S E C T I O N 2 : Configuration and Settings CobraTouch Manual Touch Enter New Client Client selection screen NOTE If you work for a municipality, the client will be your City name or department. If you are a contractor, the client name will be the City or company that hired you to do the inspections. Type in the Client’s name Touch Continue New client screen Type a name for the project Touch Save New project screen CobraTouch Manual S E C T I O N 2 : Configuration and Settings 13 More settings The first time you use the CobraTouch, you will need to set up the Operator Table and you may want to change other Project Settings. To get to the Project Settings, you will need to return to the Project Selection screen. Touch Back Work Order Selection screen Touch one of your projects to highlight it Touch Project Configuration Settings screen 14 S E C T I O N 2 : Configuration and Settings CobraTouch Manual Overlay Display Settings The Overlay Display Settings page is where you control what information is shown on the overlay during your inspection (Constant Overlay) and what information is displayed when the Display W/O button is touched during an inspection (Workorder Overlay). To add a Database field to the overlay Choose the desired field from the drop down menu in the upper left corner of the screen Touch the circle next to Use Database Field Touch the arrow from the Add To Side column next to the row on the overlay where you want the information displayed. Overlay settings TIP To add custom text to the overlay Type the text you want on the overlay in the text box above Use Text Field Touch the circle next to Use Text Field Touch the arrow from the Add To Side column next to the row on the overlay where you want the information displayed. Use the text field to create labels for the database fields or to add spaces between database fields. To remove information from the overlay Touch the circle next to Clear Line Touch the arrow from the Add To Side column next to the row on the overlay you want to erase CobraTouch Manual S E C T I O N 2 : Configuration and Settings 15 Operator Table he person doing the inspection must be in the Operator Table before using the data T logger. Operator Table To add an operator Type the operator’s name and PACP certificate number in the boxes provided. Touch Add New Operator To edit an operator Select the operator from the table Make your changes in the text boxes on the top Touch Update to save your changes Operator Table editing To delete an operator Select the operator from the table on the right Touch Delete 16 S E C T I O N 2 : Configuration and Settings CobraTouch Manual Set File Naming Format The CobraTouch software lets you choose how your MPEG and JPEG files will be named. You can choose from any of the fields from the project details and the work orders along with adding your own custom text. Choose the field you want to add from the drop down menu Touch Add to File Name File naming configuration Set Optional Fields his feature allows the user to rename any of the 10 optional fields that can be included T with the Work Order information. Type the name of any optional fields needed. Touch Save to save your changes Custom Field labels CobraTouch Manual S E C T I O N 2 : Configuration and Settings 17 18 S E C T I O N 2 : Configuration and Settings CobraTouch Manual Section 3: Projects and Work Orders 19 Working With Projects A project can be thought of as a folder that contains all of the work orders for a contract or, in the case of large/long-term contracts, a phase of a contract. The Project Screen is where the information about a contract is entered. The following items are entered in the Project Screen: • Project Name • Contractor • Start Date • Job • Location • Project Manager • Contract • Phone • Web site • Comments The CobraTouch™ allows the user to enter an unlimited number of projects into the database in the field. This feature allows the user to separate Inspections into whatever contacts or assignments are in use at the time. The information from the Project screen can be used in the video overlay and file naming settings (see Section 2). The user can create as many new projects as necessary. A new project created whenever a new contract or a new phase of an existing contract is started. The multiple project files allow the user to maintain separate databases for each project. New project screen Fig 3.1 20 S E C T I O N 3 : Projects and Work Orders CobraTouch Manual Creating A New Project From the project menu touch Start New Project. Project Selection Menu Project For A New Client Touch Enter New Client. Client selection screen NOTE If you work for a municipality, the client will be your City name or department. If you are a contractor, the client name will be the City or company that hired you to do the inspections. Enter the client’s information Touch Continue Client entry screen CobraTouch Manual S E C T I O N 3 : Projects and Work Orders 21 Type the project information (Fig 3.1) Touch Finish and Continue Project For An Existing Client Select the Client Name from the drop-down menu. Touch Continue. Client selection screen Type the project information (Fig 3.1) Touch Finish and Continue 22 S E C T I O N 3 : Projects and Work Orders CobraTouch Manual Work Order Overview Once a project file has been established, the user can create as many work orders as they need for that project. Work orders have Required and Optional fields. To ensure all required information is entered, the CobraTouch has grouped all of the Required fields on the first screen of work order entry. The operator will not be able to progress until all required information is entered. The Optional fields are displayed on the second and the third screens and need only to be entered if the Owner requires the information. Work Order list Creating A New Work Order A Project must be selected before creating a Work Order. From the project menu, touch Open an existing Project Select the project from the list and touch Next Project selection screen CobraTouch Manual S E C T I O N 3 : Projects and Work Orders 23 NOTE Work with LACP will be disabled unless you have purchased the LACP module. Starting With A Blank Work Order Touch either Work with PACP or Work with LACP, depending on the inspection to be done Touch Generate blank Work Order Touch Next Work Order list Where appropriate, drop down menus have been provided to eliminate as much data entry as possible. Enter all the data in the required fields Touch Next Work Order required fields 24 S E C T I O N 3 : Projects and Work Orders CobraTouch Manual Enter any optional data required by the contract Touch Next Work Order optional fields Enter any user-defined optional data required by the contract At this point you have two options to save this work order in the system. Touching Save and Start New Work Order will take you back to the Work Order list. This allows you to do all of the data entry work in one session and then open the work orders for inspection as needed. The other option will save the work order and take you to the inspection screen to begin the inspection. Save Work Order CobraTouch Manual S E C T I O N 3 : Projects and Work Orders 25 New Work Order From Existing To help streamline the workflow the CobraTouch has a “copy work order” feature to reduce the amount of manual input to the work order by simply duplicating an existing work order and allowing the user to make changes before saving the data as a new work order. This feature allows the user to copy an existing work order when doing inspections with similar characteristics. By copying an existing work order, the user only has to enter the fields that are different from one job to another instead of entering all of the information each time. From the work order options menu touch Start A New Work Order/Inspection Touch New Work Order From Existing Select the work order to be copied In the bottom right corner of the work order selection screen, there is a check box labeled Hold Optional Information From Work Order. If that box is not checked, none of the optional fields will be copied into the new work order. Touch Next Work Order list Change the Pipe Segment Reference and any other information that differs from the original work order Touch Next Work Order required fields 26 S E C T I O N 3 : Projects and Work Orders CobraTouch Manual Make any needed changes to the optional fields Touch Next Work Order optional fields Make any needed changes to the user-defined optional data required by the contract Touch Save and Start New Work Order or Save And Start Inspection Save Work Order CobraTouch Manual S E C T I O N 3 : Projects and Work Orders 27 Other Work Order Functions Work Order list NOTE Only Work Orders that have not been completed or abandoned can be opened as an inspection. Opening a Work Order Touch Open an existing Work Order Select a work order from the list Touch Next Deleting Work Orders Touch Open an existing Work Order Select a work order from the list Touch Delete NOTE Work orders can only be printed after an inspection is completed or abandoned. TIP See our CIMS™ program for a greater variety of reports. Printing Work Orders Touch Open an existing Work Order Select a work order from the list Touch the Print button. Select the reports to be printed Viewing/Editing Work Orders Touch Open an existing Work Order Select a work order from the list Touch Edit To view the work order without saving any changes: Touch Next to view the Work Order screens Touch Back to return to the first screen of the Work Order and to exit without saving 28 S E C T I O N 3 : Projects and Work Orders CobraTouch Manual To edit the work order: Enter the new information in the fields that need to be changed Touch Next to cycle through the screens Touch either Save Work Order or Save Work Order As New Save Work Order Save Work Order will overwrite the existing Work Order with the new changes. Save Work Order As New will save a copy of the existing work order with the changes made while leaving the original file unchanged. If the Pipe Segment Reference is edited, only the Save Work Order As New option will be available. CobraTouch Manual S E C T I O N 3 : Projects and Work Orders 29 30 S E C T I O N 3 : Projects and Work Orders CobraTouch Manual Section 4: Inspections 31 The Inspection Screen 1 2 4 3 5 6 7 8 9 aJ aB aA aD aE aI 32 aC aF aG aH bJ bA bB 1 ideo Settings are incorporated onto the inspection screen enabling the user to V adjust the digital image for best quality The digital image is identical to the image being stored in the MPEG file. 2 he CobraTouch™ automatically un-pauses the video when the crawler starts T moving unless this box is checked. 3 4 Defect Buttons are grouped to make finding defects as simple as possible. 5 6 7 The live digital video is displayed in this box. his box displays remaining storage space, current date/time, and the elapsed T time. The on-screen footage counter This button displays the footage preset box. This enables the user to enter a S E C T I O N 4 : Inspections CobraTouch Manual specific distance by using the keyboard. This is useful for resetting the counter after positioning the crawler in the pipe. 8 how Custom Text allows the user to enter text that will show on the video S overlay. The text will be displayed for 5 seconds then automatically disappear. 9 t any time during the inspection, the user can capture a still image (JPEG) by A touching Snapshot. The storage location of the JPEG image is chosen in the settings for the Project. aJ aA aB aC To pause the video, touch Pause, To continue touch Resume. aD he work order can be displayed on the video screen by touching Display Work T Order at any time. aE he user can edit the current work order by Selecting Edit Work Order during T the inspection. aF s the data is collected, it is displayed in the database matrix along with all the A necessary information including footage. The defect details are held in an MDB file that can subsequently be exported in PACP compliant format to the Customer’s database. Cobra files are NOT locked. aG record of all the Open Continuous Defects is maintained during the inspection in A the CD Box for reference. Open Continuous Defects remain in the Box until they are closed. aH aI Closes the selected Continuous Defect. bJ hen Start Inspection is selected, the Defect data buttons and the Control W Buttons will immediately become active. The file name and path are shown below the video display. The video encoding format being used warning will flash on the screen if the video storage drive is running low on A space. The warning appears when the drive has 1GB or less available space. That amount should be sufficient to finish the current inspection. Depending on the length of the inspections, you may have enough storage to finish the rest of the day’s work. ouch the Back button and the screen will revert to the Main Menu. This button is T only active before and after an inspection. Once the inspection has been started, it must be completed or abandoned before you can return to the menu. PACP requires certain data be entered at the start of the Inspection. The CobraTouch™ will guide the user through the required data entries to ensure the correct data is entered at the start of the inspection. bA bandon Survey will end the current session. Data will be saved as an abandoned A work order. bB Complete Inspection will end the inspection and save the data. CobraTouch Manual S E C T I O N 4 : Inspections 33 Starting The Inspection Inspection screen before starting the inspection Touch Start PACP requires certain data be entered at the start of the Inspection. The CobraTouch™ will guide the user through the required data entries to ensure the correct data is entered at the start of the inspection. As soon as Start has been touched, the required access point screen will open. Select the point of access. A box will open requiring the user to enter remarks. Type the required remarks and touch Submit (OK). Select the water level at the access point. (screen 3) Access point selection Water level selection Touch Submit (OK). Illustrations have been provided for reference to ensure the most accurate inspection possible. If the water level in the pipe changes during the inspection the new level can be entered by touching Water in the defect buttons. Once these entries have been selected, the inspection can begin. A message will appear on 34 S E C T I O N 4 : Inspections CobraTouch Manual screen saying “Please wait. Capturing Media Devices...”.Once the system has sent the starting commands to the capture card, this message will disappear, the system will begin recording video and audio (if enabled), the starting access point and water level will be logged and displayed on the overlay, and the defect buttons will activate allowing you to start inspecting. At any time after recording has started, the MPEG video can be paused by simply selecting Pause on the screen. When Pause is selected, the Pause Button will flash to warn the user the video is paused. Touch Resume and the video will continue to run. Defects As defects are located, the user simply touches the appropriate button on the screen. This will display the secondary screens to enable the user to capture the data required for the defect selected. NOTE The Pause button in the program does not control any DVD recorders or VCRs that may also be recording. Those devices will have to be paused and resumed separately. Example: Step 1: Select Roots Step 2:S elect one of the qualifiers Step 3:S elect the secondary qualifier Step 4: S elect the % and clock positions Step 5: (optional) Touch Remarks and type any additional information about the defect Step 6: Touch Submit Root defect entry Comparison Images are displayed in the Defect windows. Additional images will be added when they are provided by NASSCO. The purpose of these images is to allow the user to compare the standard PACP Image with the live image on the left side of the screen and, if it matches, proceed with the selection of the observation. Once the required fields have been entered, the Submit Button will become active (green) and the data can be saved to the database. The Optional conditions for any defect are displayed on the Screen for each defect and can be entered at the user’s discretion prior to the Submit Button being selected. CobraTouch Manual S E C T I O N 4 : Inspections TIP Quickly tap the video twice to switch to full screen video mode to get a better look at the pipe when deciding how to code a defect. Quickly tap the video two more times to switch back to data entry mode. 35 Example: At a Joint Continuous Defect Remarks In the event the data selected is not accurate or the user decides to make changes in the defect data, the red button at the bottom right allows the user to cancel the data prior to the selection of the Submit Button and start the defect selection again. Continuous Defects Touch Continuous Defect when entering the defect information. Continuous Defect box The Continuous Defect (S01, S02 etc) is displayed along with the footage and the Defect code in the Continuous Defect Box. A record of all the Open Continuous Defects is maintained during the inspection in the Continuous Defect Box for reference. Any Open Continuous Defect remains in the Box until it is Closed. To close a Continuous Defect Select the Continuous Defect from the list of open Continuous Defects. Touch Close CD. The appropriate defect window will be displayed on the screen. Enter the information about the end of the Continuous Defect. Touch Submit (OK). Once the Continuous Defect is closed it will no longer be displayed in the Continuous Defect box. The inspection cannot be Completed or Abandoned unless all the open Continuous Defects are closed. Capturing JPEGs Snapshot window The CobraTouch™ automatically saves JPEG images when a defect is entered during the inspection. The JPEG is stored in a folder on the hard drive selected in the User/ System Settings. At any time during the inspection, the user can capture additional 640 x 480 JPEG pictures. To capture a JPEG image touch Snapshot. A preview of the JPEG will be displayed as shown at right (screen 1). This will provide the user with the following options: 36 Discard the image Save the image Print the image S E C T I O N 4 : Inspections CobraTouch Manual A code (MGP) is added to the defect list of the inspection to inform anyone reviewing the inspection data that an additional picture exists. The naming convention and the storage location of the JPEG image is set in the Configuration Program for the Project. Ending The Inspection Touch either Abandon Survey or Complete Inspection A pop up will be displayed to verify that the inspection should be ended. Selecting No will allow the inspection to continue. If the user confirms the inspection is finished, the defect buttons will become inactive and the system will stop recording the video. The inspection and video will remain on-screen until the user touches Exit. This allows the user to see any defects or obstacles that would interfere with the crawler retrieval. Footage Display As long as the computer is powered up and the user has not touched Exit, the footage will be displayed on the video screen in the truck. CobraTouch Manual S E C T I O N 4 : Inspections 37 38 S E C T I O N 4 : Inspections CobraTouch Manual Section 5: Exports 39 Transferring Data, JPEGs, And Video Files A simple but comprehensive transfer protocol allows users to transfer files to the office using an external drive or a wireless network (if installed). Touch Export Inspections from the Main Menu. Main menu Select the project you want to export then touch Next Select project for export Touch Browse to choose where the export will be saved. Export Options 40 S E C T I O N 5 : Exports CobraTouch Manual Touch the down arrow to open the drop-down menu then select Video (E:) or wherever you want the export to be saved. Windows file browser Select the folder for the project you are exporting then touch Open Export location Type a name to create a new file for the export (project name and date is recommended), then touch Open to set the export file path. Export file name ! Do not select an existing file here, you will overwrite the data and lose your inspections! Checking “Include linked pictures” or “Include linked videos” will put a copy of the images or videos in the folder with the exported MDB file. If you are exporting your data onto the removable hard drive where the videos and images were stored during the inspection you do not have to check these boxes. Export options with file destination set Touch Next to continue CobraTouch Manual S E C T I O N 5 : Exports 41 The settings for the export have now been established. This screen is where you select which inspections are to be exported. You have the following choices: Export records created between two dates Export records that were created today Export all records that have never been exported Export records that have their status set to (choose from drop down list) Select the criteria for the records to be exported and Touch Next to continue. Export filter The data is now ready for export to the location selected. This screen displays a summary of all of the choices made on the previous screens. If you need to change anything, you can return to the previous screens and check the information that you entered by touching Back. Touch Export Now Export review Your export is complete, touch OK Export completed When finished exporting touch Exit. 42 S E C T I O N 5 : Exports CobraTouch Manual Index 43 A F Abandon Survey Access Point 33, 37 File Naming File Path 34 Audio 17, 33 11, 14, 33 Footage Capture Device Calibration 10 Display B Preset Bitrate 10–11 32, 37 32 H C H.264 10–11 Calibrate Footage See Footage: Calibration I Client Inspection Screen Add 12–13 33, 37 JPEG Configuration See Settings 15, 33 Manhole See Access Point MDB 33 Continuous 33, 41 Measurement 33, 36 Close 36 O Defect Button 32 Operator Optional Fields 44 16 17 OSD Settings See Settings: OSD Settings E Export 16 Certificate Number 15 Distance See Footage Exit 11 MPEG 2, 6, 10–11, 32 See also Video 35 Display W/O 40–41 M Transferring See Export Defect 11, 33 Transferring 33 Save 33, 36 Storage D Data 32–33 J Complete Inspection Custom Text 11 Overlay 37 Settings See Settings: OSD Settings 6, 40–42 I N D E X CobraTouch Manual P PACP Settings See Settings: Video 2, 3–4, 7, 3–4 Certificate Number Storage 16 Transferring Picture See JPEG Print Water Level 34 Work Order 23–29 Add 20–22 Add 23–25 Delete 12–13, 21–22 28 Display Q Q-Factor 6, 40–41 W See Work Order: Print Project 11, 32 10–11 R Reports See Work Order: Print WRc 33 Edit 28, 33 Open 28 Print 28 View 28 2, 6, 7 S Settings 14–17 OSD Settings Video 15 32 Snapshot See JPEG Solid State Drive Start Inspection 6 33, 34 Still File See JPEG T Time 11, 32 V Video 6, 32, 37 See also MPEG Capture Device Pause 10 32, 35 CobraTouch Manual I N D E X 45 Thank you for using the CobraTouch™ Data Logger Call Cobra Technologies™ for information on our data management software and video inspection systems 800-443-3761 ™ TECHNOLOGIES Leading the Industry in Data Collection Cobra Web site: www.cobratec.com E-mail: [email protected] 4806 Wright Drive, Smyrna GA 30082 USA Software Support Office: 770-435-3309 [email protected]