1
User Guide
NOTE: If magnetic materials are placed close
to the underside of the Series 3a they may be
affected by the speaker magnet. For this reason
it is best not to keep your Series 3a in the same
pocket as credit cards and/or travel passes with
magnetic strips.
WARNING: This equipment has been certified to comply with the
limits for a Class B computing device, pursuant to Subpart J of Part 15
of FCC Rules. See the instructions overleaf if interference to Radio or
Television is suspected.
© Copyright Psion PLC 1991-1993
All rights reserved. This manual and the programs referred to herein are copyrighted
works of Psion PLC, London, England. Reproduction in whole or in part, including
utilisation in machines capable of reproduction or retrieval, without the express written
permission of Psion PLC is prohibited. Reverse engineering is also prohibited.
The information in this document is subject to change without notice.
Psion and the Psion logo are registered trademarks, and Psion Series 3a. Series 3, SSD
and Solid State Disk are trademarks of Psion PLC.
Psion PLC acknowledges that some names referred to are registered trademarks.
This PDF version by David Kimberlin-Wyer 2013
vl.0 Jul 93
English
Part no. 6103-0044-01
FCC Information for the USA
Radio and Television Interference
This equipment generates and uses radio frequency energy and if not used properly —
that is, in strict accordance with the instructions in this manual - may cause interference
to Radio and Television reception.
It has been tested and found to comply with the limits for a Class B computing device
in accordance with the specifications in Subpart J of Part 15 of FCC Rules. These are
designed to provide reasonable protection against such interference in a residential
installation. However, there is no guarantee that interference will not occur in a
particular installation. If this equipment does cause interference to Radio or Television
reception, which can be determined by turning the equipment off and on, try to correct
the interference by one or more of the following measures:
• Reposition the Radio or TV antenna
• Relocate the Series 3a Computer with respect to the Radio or TV
• Move the Series 3a Computer farther away from the Radio or TV
• If you are using the Series 3a Computer with a Mains Adapter, plug it into an outlet
which is on a different circuit from that of the Radio or TV.
If necessary, consult an authorised Psion dealer or an experienced radio/Television
technician for additional suggestions.
Important
This equipment was tested for FCC compliance under conditions that included the use
of shielded cables and connectors between it and the peripherals. It is important that
you use shielded cables and connectors to reduce the possibility of causing Radio and
Television interference. Shielded cables, suitable for the Series 3a Computer range,
can be obtained from an authorised Psion Dealer.
If the user modifies the Series 3a Computer or its Expansion Modules in any way, and
these modifications are not approved, by Psion, the FCC may withdraw the user's right
to operate the equipment.
The following booklet prepared by the Federal Communications Commission may be
of help: "How to Identify and Resolve Radio-TV Interference Problems". This booklet
is available from the US Government Printing Office, Washington, DC 20402 Stock No
004-000-00345-4.
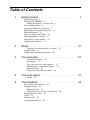
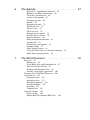
Table of Contents
1
Getting started. . . . . . . . . . . . . . . . . . . . . . .
1
Where things are 2
Powering the SERIES 3a 2
Fitting the batteries - the first time 3
Screen and keyboard 5
Setting the Home City and Time 7
Moving the cursor and editing text 11
Help information 12
Notes on menus and dialogs 12
How information is stored 15
Displaying a status window 16
Changing the batteries 17
2
World. . . . . . . . . . . . . . . . . . . . . . . . . . . . . 21
Changing the displayed city or country 23
Summer times 24
Adding and changing information 25
3
The Calculator. . . . . . . . . . . . . . . . . . . . . . . 27
Calculator memories 32
Percentages 33
Very large and very small numbers 33
Decimal places and number formats 34
Other functions 35
Using your own OPL procedures 36
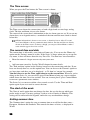
4
Time and alarms . . . . . . . . . . . . . . . . . . . . . 37
Alarms
5
39
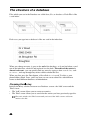
The Database . . . . . . . . . . . . . . . . . . . . . . . 43
The structure of a database 44
Typing in entries 45
Finding an entry 47
Changing the way an entry is displayed
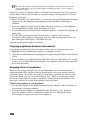
Managing your entries 51
Labels 52
Database files 53
Customising the ♦ list 56
50
6
The Agenda. . . . . . . . . . . . . . . . . . . . . . . . . 57
Day entries - appointments and notes 59
Birthdays and other anniversaries 62
To-do lists and other lists 64
Alarms in the Agenda 67
Changing an entry 69
Memos 70
Repeating an entry 72
The Week view 74
The List view 75
The Year view 76
Managing your Agenda 78
Defaults for new entries 79
Display functions 80
Entry management functions 81
Agenda files 83
Customising your Agenda 85
Example setups 87
Other editing features 88
Using the To-do view as a document manager
More about repeating entries 89
7
89
The Word Processor. . . . . . . . . . . . . . . . . . . 91
Basic use 92
Editing text 92
Using Bold, Italic and Underlined text 97
The saved file on the disk 97
Working with document files 98
Altering a paragraph's appearance 101
Example uses of the Word Processor 106
Advanced use 112
Paragraph styles 112
Managing styles 113
Managing emphases 116
Advanced editing 119
Outlining 121
Template files 123
Other file formats 125
Plain text files 125
Editing Rich Text Format (RTF) files 126
8
The Spreadsheet. . . . . . . . . . . . . . . . . . . .
Quick start for experienced spreadsheet users 128
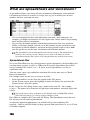
What are spreadsheets and worksheets? 130
Moving around and entering data 132
Types of data - text, number, formula 132
Editing data in cells 133
Formulae 133
Cell ranges 135
Functions in formulae 136
More ways to move around 136
Operators 137
Error messages when entering data 138
Deleting and moving data 138
Relative and absolute references 139
Recalculation 140
Circular references - the indicator 141
Moving data with 'Bring' 141
The file saved on the disk 142
Opening or closing a gap 143
The display of data 144
More operations on the worksheet 147
More operations on data 149
Graphs 150
Adding a new range to the current graph 151
Adding text to a graph 151
Changing the graph type 153
Other display options 154
Multiple graphs 155
Entering a database 156
Tables 159
Date and time functions 160
Financial functions 161
Mathematical and logical functions 164
Range functions 166
String functions 167
Statistical and database functions 169
Worksheet size 170
127
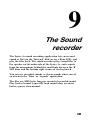
9
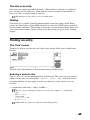
The sound recorder . . . . . . . . . . . . . . . . . . . 171
10
Dialling . . . . . . . . . . . . . . . . . . . . . . . . . . . 175
Setting up for dialling 176
Dialling from a Database or Agenda file
11
179
Printing . . . . . . . . . . . . . . . . . . . . . . . . . . . 181
Setting up the connection 182
Choosing the printer driver 183
Choosing the font 184
Character sets 184
Setting the page layout 185
Printing from the Word Processor 187
Printing from the Agenda 190
Printing from the Database 192
Printing from the Spreadsheet 193
Advanced worksheet printing 194
Print preview 195
Other printing information 196
12
Open files. . . . . . . . . . . . . . . . . . . . . . . . . . 197
Internal memory and open files 198
Why open more than one file? 198
Exiting open files 200
13
Moving information with 'Bring'. . . . . . . . . . . . 201
How 'Bring' options work 202
Alternatives to 'Bring' 203
14
Files and disks . . . . . . . . . . . . . . . . . . . . . . 205
Solid State Disks 206
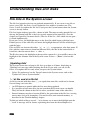
Understanding files and disks 208
File lists in the System screen 208
File management 209
Using disks 210
Advanced use of Files and disks 213
Directories and file extensions 213
The file selector 214
File specifications 216
Copying a disk 218
Other advanced options 219
15
Security and backups . . . . . . . . . . . . . . . . . . 221
Passwords 222
Setting the system password 222
Passwords on Spreadsheet / Word Processor files
Precautionary measures 224
Backups 225
Incremental backup 226
16
223
The System screen . . . . . . . . . . . . . . . . . . . 227
Icons in the System screen 228
New applications 228
Rearranging and grouping icons 229
Customising the System screen 234
System-wide settings 234
17
Troubleshooting . . . . . . . . . . . . . . . . . . . . . 237
General problems 238
'Memory full', 'No system memory' or 'Disk full'
Everyday use 240
The built-in applications 242
Resetting the SERIES 3a 244
239
A
Character set. . . . . . . . . . . . . . . . . . . . . . . 245
B
Specification . . . . . . . . . . . . . . . . . . . . . . . 249
C
For Series 3 users . . . . . . . . . . . . . . . . . . . 251
General changes 252
The built-in applications 253
D
Serial 3 Link . . . . . . . . . . . . . . . . . . . . . . . 257
Remote Link 258
The Comms application 258
The Script application 259
1
Getting started
You should read this chapter first. It shows you how to start using
your Series 3a. It also describes basic information on operating the
Series 3a, which you need to know before you read the other
chapters in this manual. Wherever there are things for you to do,
the instruction(s) are indicated with numbers. Extra notes, which
you may find useful, are indicated with a symbol.
The different applications - Agenda, Database and so on - are
described from chapter 2 onwards. The simpler applications are
described first. Each chapter begins with the important
information you will need for everyday use, before covering more
detailed information. You can read as much as you like of these
chapters, and read them in any order.
The second half of the manual covers more general topics,
including printing, tone dialling and security.
If you have any problems, try looking up suitable entries in the
index, or refer to the 'Troubleshooting' chapter.
(Experienced Series 3 users may wish instead to read Appendix C,
which lists the main differences between the two computers. 3 Link
users should read Appendix D also.)
1
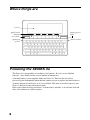
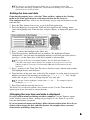
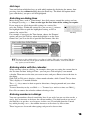
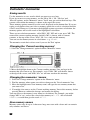
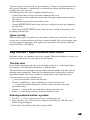
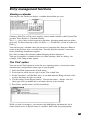
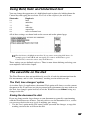
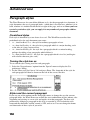
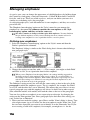
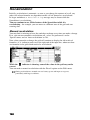
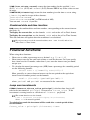
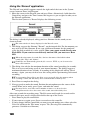
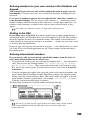
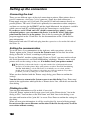
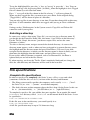
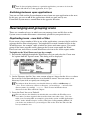
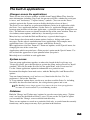
Where things are
screen
application
buttons
reset hole
mains power
light
expansion
socket
mains socket
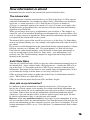
Powering the SERIES 3a
The Series 3a is powered by two ordinary AA batteries. It is best to use alkaline
batteries - they should last for several months of normal use.
A backup battery is also supplied with your Series 3a. This has the sole job of
preserving your information when the time comes for you to replace the main batteries.
A mains adaptor for the Series 3a is also available. This may be useful if you use your
Series 3a heavily in one particular location.
Don't worry about leaving your Series 3a turned on by mistake, as it will turn itself off
after a few minutes to conserve power.
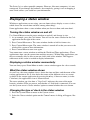
2
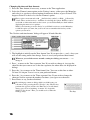
Fitting the batteries - the first time
You can fit the main batteries and the backup battery in any order.
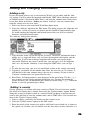
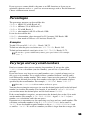
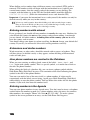
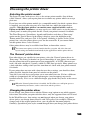
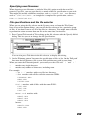
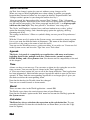
Fitting the main batteries
1. Make sure that the Series 3a is closed, then turn it over.
2. Unclip the main battery cover at the top and fit the main batteries. Be sure to insert
them the right way round, as marked on the case. (Note: one battery has its
positive end on a "pushable" contact.)
main batteries
3. Replace the main battery cover.
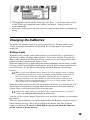
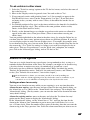
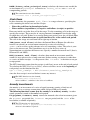
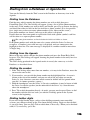
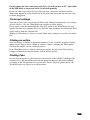
Fitting the backup battery
1. You will see two doors on the underside of the Series 3a which swing open; the
backup battery fits under the door on the left. Open the left-hand door:
2. The backup battery slides in from left to right. Insert it with the flat side, usually
marked with a + symbol, facing upwards.
3. Close the door again, and turn the Series 3a over.
3
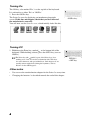
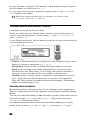
Turning On
The ON key, also marked 'Esc', is at the top left of the keyboard.
It is referred to as either 'Esc' or 'ON/Esc'.
1. Press the ON/Esc key.
The Series 3a starts by displaying an introductory/copyright
screen. If this does not happen, check that you have inserted
the main batteries correctly.
You will now see the System screen, which initially looks like this:
ON/Esc key
Turning Off
1. Hold down the Psion key, marked , at the bottom left of the
keyboard. While holding it down, press the OFF/1 key (next to
ON/Esc).
The Psion key (the symbol is part of the Psion logo) does
nothing on its own. It is used in conjunction with other keys
for extra characters and special functions. Such keypresses are
usually written with a dash joining the keynames, such as
Psion-1 for the OFF keypress.
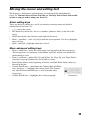
Other notes
• You can use the standard mains adaptor for the Series 3a at any time.
• 'Changing the batteries' is described towards the end of this chapter.
4
PSION-1
=OFF key
Screen and keyboard
The screen
To change the screen contrast:
• Hold down the Psion key, and while doing so, press the >
(Contrast +) key or the < (Contrast -) key, until you're happy
with the screen contrast.
If you ever need to clean the screen, use a dry cloth.
PSION->
PSION-<
contrast keys
Keypresses
The Series 3a keyboard is similar to that of a typewriter or desktop computer.
If you hold down either Shift key you get the symbols above the
numbers on the number keys, and the alphabetic keys produce
upper case (capital) letters - A instead of a , and so on.
Most keys "auto-repeat" (keep producing keypresses) if you hold
them down.
Shift keys
The (diamond) key
Most of the applications have different screens or views. You can
move between these screens or views by pressing the ♦ key. You
will see this referred to in the chapters which follow.
Diamond key
Keyboard markings
The yellow markings above certain keys are extra characters which the key can produce
(or special functions the key can perform). To get one of these characters or functions,
hold the Psion key down while pressing the key. For example, Psion-6 gives the @
character.
Although the ON key is also marked in yellow for consistency, you don't need to use
the Psion key when turning the Series 3a on.
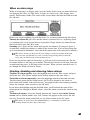
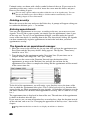
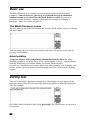
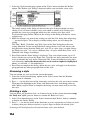
The application button pad
The touchpad of eight large buttons between the screen and keyboard allows you to
move between the different applications on your Series 3a - the Database, Word
Processor and so on. For example, if you want to check your daily agenda, press the
Agenda button; you can then look at your agenda, or enter new appointments.
• System takes you to the System screen - the screen shown when you first turned the
Series 3a on. The System screen displays an icon (picture) for each application on
the application button pad, and for some built-in applications which do not have
their own application buttons. There are more icons than can be shown on the screen
5
•
•
•
•
•
•
•
at one time. You can press the → and ← arrow keys to move between the icons on the
screen.
Data takes you to the Database, which you can use as a phone/address book.
Word takes you to the Word Processor, which you can use for typing notes, letters,
memos and so on.
Agenda takes you to the Agenda, which you can use as a diary/appointment
manager.
Time takes you to the screen where everything to do with time is managed,
including alarms.
World takes you to a screen that displays various information, including dialling
codes, for hundreds of cities and countries.
Calc takes you to a programmable scientific calculator.
Sheet takes you to the Spreadsheet where you can enter your own worksheets full of
calculations.
The Program and Record applications do not have application buttons. You can
access them from their icons on the System screen. You can use 'Program' to write
your own programs in the OPL language to add new features to your Series 3a. See
the Programming manual for more details of OPL. You can use "Record" to record
your own alarm sounds and voice messages. 'Record' is described in a later chapter
of this manual.
You can turn on the Series 3a by pressing any application button. You are then
taken to the relevant application.
You may wish to practise using the application buttons and special functions for keys
by trying the following example:
1. Press the Word button to move to the Word Processor.
2. Type some text.
3. Press Psion-♦ to use the special function for the ♦ key - the
Caps Lock keypress. Type some more text. As you can see the
alphabetic keys are now producing upper case letters on their
own. Press Psion-♦ again to revert to lower case letters.
Caps Lock
4. Press the System button to return to the System screen.
You don't have to finish with one application before
moving to another. As in the above example, you can press the Word button and
begin typing some text, then press the System button to move back to the System
screen, and then press Word again to continue with your document.
6
Setting the Home City and Time
There are two things you should set before you enter any of your information:
your home city, and the current time. You have to set these before you can make
effective use of world dialling, alarms, the Agenda and so on.
In setting these, you will see how some important keys work, and how things are
displayed on the screen.
Setting the home city
You should set your home city before you set the current time. The home city
affects the current time displayed by the Series 3a clock because the Series 3a knows
about time zones.
You can set the home city with either the World application or the Time application.
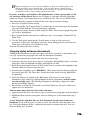
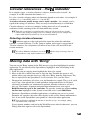
1. Press ON/Esc, if necessary, to turn the Series 3a on.
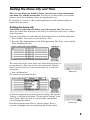
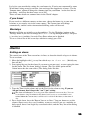
2. Press the Time button to move to the Time application. The 'Time screen' initially
looks something like this:
The central area of the screen shows any alarms that have been set
on your Series 3a. There are six lines for alarm details. Initially,
they all say 'No alarm set'. Your current home city is shown on
the top line.
3. Press the Menu key.
The screen will now look like this:
A menu has appeared on top of the previous display. The top line,
'Settings', is the title of this menu. (To the right of 'Settings' is the
word 'Alarm'. This is the title of a second menu, which allows
you to manage the alarms).
Each line below the menu title is a separate option. There is
currently a highlight on the first option on the 'Settings' menu.
Menu key
Arrow keys
7
You can move the highlight up and down the menu with the ↑↓ keys, and between the
different menus with the ←→ keys.
4. Move the highlight onto the 'Home city' option on the 'Settings' menu, and press the
Enter key.
Enter is the "do it" key. Whenever you want to perform a
highlighted option, press Enter. You also use it like the
Carriage Return on typewriters when you want to start typing
a new line.
The Time screen now looks something like this:
Enter key
A dialog is now displayed on the screen. Dialogs appear whenever the Series 3a has to
ask you for information. Most dialogs have a title at the top - in this case it is 'Set home
city' - and a number of lines in which you enter information. The Ti keys move the
cursor from line to line.
This dialog has two lines: 'City' and 'Country'. The 'City' line is currently highlighted
and the name of a city or area is shown. There is a flashing cursor on its first letter; you
can now type the name of a new home city.
Sometimes, as in this case, information in one line of a dialog affects the information
displayed in other lines. The reason is usually obvious - in this dialog as the 'City' line
changes, the 'Country' line changes as well.
5. Type in the name of your city, or the one nearest to you. As you press each key, the
cursor moves to the right and the Series 3a tries to find a city to match the letters
you've typed. Stop typing as soon as it has found the correct city.
Because the Series 3a also stores dialling codes, some cities may be named a little
strangely - London Inner and London Outer, for example.
If you make a mistake while typing in the city name, you can
use the Delete key to delete the last letter typed, moving the
cursor back to the left. (The Series 3a again shows the first city
which matches the letters to the left of the cursor.)
Delete key
If at any point the Series 3a can't find a city to match the
letters you've typed, it will beep. If you're sure you have spelt the city correctly, the
Series 3a doesn't know about that city. If this is the case you will need to press Delete a
few times to remove the letters you typed and then type in a different city name. Once
you are used to the Series 3a, you can move to the World application and add your own
city, then move back to Time to set it as your home city (described under 'Adding or
Changing Information' in the 'World' chapter).
6. When the city you want is displayed, press Enter and it will be set as your home
city. You will now be able to use the World application to find dialling codes for
other cities around the world. When you have set the current time, you can also use
the World application to find the times in other cities.
8
If you travel, you should change the 'Home city' to your current location. The
current time will change automatically, and international dialling codes will then be
given based on your new location.
Setting the time and date
Experienced computer users- select the 'Time and date' option on the 'Settings'
menu in the Time application to set the time and date for the Series 3a.
New computer users may wish to use the following step-by-step instructions to set the
time and date:
1. Press the Time button, if necessary, to go to the Time application.
2. Press the Menu key and select the 'Time and date' option on the 'Settings' menu
(move the highlight onto 'Time and date', and press Enter). A dialog will appear, like
this:
3. Press ↓ to move the highlight to the 'Date' line.
4. Type the correct day, month and year, in numbers. The highlight will move
automatically. You can move the highlight manually to the next part of the date by
pressing → (or the Space key), if the day or month is only one digit.
If you type in incorrect or unsuitable numbers, the day and month numbers are
corrected to the largest values allowed. For example, if you typed 88888888 the
numbers would be corrected to 31st December 2049 (the last date allowed by the
Series 3a).
5. Press ↑ to move to the 'Time' line. The time is shown as hours, minutes and seconds.
The highlight moves onto the hours.
6. Type the time, in the same way as the date. For example, to set the time to twenty five
minutes past nine in the morning you would type: 0 9 2 5 0 0 . For "am-pm"
clocks you can press A or P to change between "am" and "pm".
In "am-pm" format, midnight is written with a 12 , not 00 . For example, half past
midnight is 12:30:am.
7. Press Enter and the time and date are set.
The Series 3a is accurate to within a few seconds a week. Use the 'Time and Date'
option again if you ever need to correct the time.
Changing the way time and date is displayed
If you're used to menus and dialogs on other computers: use the 'Formats' option
on the 'Settings' menu in Time - perhaps by pressing its hot-key Psion-F - to set the
time and date formats you prefer.
If you are unsure of menus and dialogs: follow the instructions below. Even if you
do not wish to change the date and time formats, the example shows you more
about menus and dialogs along the way.
9
Changing the time and date formats:
1. Press the Time button, if necessary, to move to the Time application.
2. Select the 'Formats' menu option on the 'Settings' menu - either press the Menu key
and select it as you have selected options from menus before, or press Psion-F. The
keypress Psion-F is the hot-key for the 'Formats' option.
Every option on a menu ends with (the Psion key symbol), or Shift- followed by
a letter. These are the hot-keys - shortcuts for selecting the options. Hot-keys can be
used with or without the menu on the screen -you would normally use them without
displaying the menu as it is quicker.
While you're learning to use the Series 3a, you'll find it easiest to use the Menu key
to find the option you want, but you'll soon start to remember the hot-keys of the
options you use most.
The 'Set date and time formats' dialog will appear. It looks like this:
3. The highlight is initially on the 'Date format' line. If you press the ← and → keys you
will see the setting on the line change. Leave it set to your preferred date format.
Whenever you see little arrows around a setting in a dialog, you can use ←→ to
change it.
4. Press ↓ to move to the 'Date separator' line. If you wish to change it, just type the
character that you want to use as the date separator, for when dates are displayed in
dialogs.
5. Press the ↓ key to move to the 'Time format' line. You can set this line to either
'24 hour' or 'am-pm'. Leave it set to your preferred format.
6. Press the ↓ key to move to the 'Time separator' line. If you wish to change the
character used to separate the numbers for times, just type a new character.
7. Press Enter, to say you have finished.
If you bring up a menu or dialog which you didn't want, you
can remove it by pressing the Esc ("Escape") key. The Esc key
performs the opposite action to the Enter key, as it will almost
always get you out of anything - it means "no, forget this
thing I've just chosen". Here, you would use it to make the
menu go away.
10
Esc key
Moving the cursor and editing text
The keypresses and features explained here are used repeatedly throughout the
Series 3a. You don't have to learn all of this yet. You may wish to refer back to this
section as you get used to using your Series 3a.
Basic editing keys
These are the basic editing keys you'll use whenever entering almost any kind of
information on the Series 3a:
• ←↑↓→move the cursor.
• The Delete key deletes the character (number, symbol or letter) to the left of the
cursor.
• Shift-Delete deletes the character to the right of the cursor.
• Shift-← and Shift-→ start a highlight from the cursor position. Use this to highlight
an area of text.
• Shift-↑ and Shift-↓ highlight whole lines of text.
More advanced editing keys
• Psion-←and Psion-→move the cursor to the start and end of the line respectively.
These keypresses are sometimes called 'Home' and 'End', and they are marked on
the keyboard as such.
• Psion-↑ and Psion-↓ (marked 'Pg Up' and 'Pg Dn', for "Page Up" and "Page Down")
move the cursor up and down by several lines at a time.
• Psion-Delete deletes to the beginning of the line, and Shift-Psion-Delete deletes to
the end of the line.
• Control-Shift-Psion-← (hold down the Control, Shift and Psion
keys, and press ←) highlights the current word. (The Control
key, like the Psion and Shift keys, is used to modify other
keypresses.)
Control key
• Control-Shift-Psion-→ highlights the current paragraph.
11
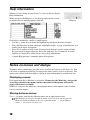
Help information
Whatever you're doing on your Series 3a, you can always display
Help information.
When you press the Help key, a list of help topics for the screen
on which you are working appears, like this:
Help key
Each topic is marked by a bullet (a small square).
• Use the ↑↓ arrow keys to move the highlight up and down the menu of topics.
• Press the Enter key to look at help on a highlighted topic. A page of information, or a
further list of topics will appear.
• Press Esc to remove a help screen. If you've been through several screens of help,
Esc goes back to the previous one. Press Esc until they are all removed. A useful
shortcut is Control-Esc, which always leaves help immediately.
• Control-Help presents a complete index of help topics.
Notes on menus and dialogs
Together, menus and dialogs give you access to all of the features of the Series 3a. You
can select an option for whatever you want to do from a menu, or press its hot-key. The
option you selected will then display a dialog if more information is needed from you.
Displaying a menu
Each application has a different set of menus. If you press the Menu key, and use the
arrow keys to look at the menu contents, the names of the options will usually
suggest the features available.
Whenever you press the Menu key, the highlight moves to the option it was on when
you last used the menus.
Moving between menus
Use ←→to move between the different menus on an application screen.
The Menu key itself cycles through the menus one by one. You can also press the
Menu key and then a number to move to a particular menu - 1 for the leftmost
menu, 2 for the next one, and so on.
12
Hot keys
You can find out which hot-keys go with which options by displaying the menus, then
pressing a hot-key without holding down the Psion key. The menu and option which
goes with the key you press will be highlighted.
Selecting on dialog lines
Many dialog lines, such as 'Time format', have little arrows around the setting, and can
be changed by using ←→. You can also type the first letter of the setting you require.
If you want to see all of the possible settings in a vertical list,
press the Tab key. Within the vertical list, you can use ↑↓ to move
the highlight. Enter to pick the highlighted setting, or Esc to
remove the vertical list.
For example, if you press the Time button, choose the 'Formats'
option, and press the Tab key when the highlight is on the 'Date
format' line, you'll see the list of possible date formats, like this:
Tab key
You may see this called tabbing out a line of a dialog. The only cases where Tab does
not work in this way are in options which list cities and countries, such as the 'Home
city' option you used earlier.
Entering dates with the calendar
When entering a date in a dialog - for example, when you are setting the current date in
the 'Set time and date' dialog in Time - you can press Tab to display a one month
calendar. Then move to the date you want to enter, and press Enter to insert the date in
the dialog.
Shift-Tab (or Tab twice) displays a three month calendar, while Control-Tab (or three
Tabs) displays a 12 month calendar.
The ←↑↓→keys move in their respective directions, changing month and year where
necessary.
To move from day to day, use Shift-←→. To move by a week at a time, use Shift-↑↓.
Press Esc to remove the calendar without selecting a date.
Entering numbers in dialogs
You can type numbers directly into dialog lines if you wish, but you can also use the >
and < keys to increase or decrease the current number. (You don't need to use one of
the Shift keys to get the > or < keypress, in this case.) If you hold down the Control
key while pressing > or < , the number increases or decreases by 10 at a time.
These keypresses also work when typing each part of a date or time.
13
Unavailable dialog lines
Each line of a dialog begins with a bullet (a small square). Sometimes a dialog line is
made unavailable because of the setting of a different line in the dialog. When this
happens, the bullet is removed from the start of the dialog line. If you try to set or
change this line, a message will remind you that it is unavailable.
You can see this in the 'Set the sound' dialog on the System screen. To display it:
1. Press the System button to move to the System screen.
2. Select the 'Sound' option on the 'Control' menu.
If you press the → key to change the setting on the 'All sound' line to 'Off, you will
see that the bullets are removed from the start of the other dialog lines. They are
unavailable because of the setting on the 'All sound' line.
3. Press Esc to remove the dialog from the screen without confirming the settings in the
dialog.
When you're filling in information in a dialog, you must complete the dialog (by
pressing Enter to confirm, or Esc to cancel) before you can select other options with
the Menu key or with hot-keys. You can, though, use the application buttons to move
to other applications.
14
How information is stored
Information may be stored on the internal disk and on Solid State disks.
The internal disk
Your information is initially stored on the internal disk of the Series 3a. Each separate
collection of information - for example an address book, a Word Processor document,
and so on - is stored separately as a file. Each file has a filename to identify it.
(Filename is sometimes written as two words, file name.) You may create quite a few
Word Processor or Spreadsheet files, and you may also have more than one Database,
Agenda or even World file.
When you no longer need a piece of information, you can delete it. This might be an
entire file, such as an unwanted Word Processor document file, or an item within a file,
such as a single entry in an Agenda file. When you delete information, the space which
it occupied on the internal disk can be re-used.
The internal disk is a part of the overall internal memory of the Series 3a. Other things
need to use internal memory too - for example, each application needs some in order to
get started.
If you enter so much information on the internal disk that the internal memory is almost
filled up. you may see a 'Memory full', 'No system memory' or 'Disk full' message.
Until you free some internal memory, you'll be unable to enter more information, or
even use certain features of the Series 3a. Don't worry - your information is still
perfectly safe. The 'Troubleshooting' chapter has suggestions on freeing internal
memory in this situation.
Solid State Disks
You can use Solid State Disks (SSDs) to store any of the information normally kept on
the internal disk - letters, address books, OPL programs etc. - whether the SSD is in or
out of the Series 3a. You might wish to use SSDs to give you more room for storing
information. You might also use them to store backup copies of important files, in case
you accidentally change or delete them, or even lose your Series 3a.
SSDs are plugged into sockets on either side of the Series 3a, behind doors marked A
and B . These sockets are called SSD drives.
SSDs are described in more detail in the 'Files and disks' chapter.
How safe is my information?
It is difficult to delete information accidentally on the Series 3a. If you press the
hot-key for a 'Delete' option, or do anything else which would delete information, the
Series 3a will usually ask you to confirm that you really want to delete it, before going
any further. When it does not ask for confirmation, the deleted information will be
stored on a clipboard and there will be an 'Insert' option to put it back again. So don't
be afraid to experiment a little, as you find your way around.
However, it is a very good idea to make backup copies of your information. If you do
this you can then recover any information that is lost from the internal disk and you will
not lose the information you have entered if you lose your Series 3a altogether. You can
backup information to SSDs. or via 3 Link (the Series 3a communications link) to other
computers.
15
The Series 3a is a robust portable computer. However, like most computers, it is not
waterproof. If you damage the hardware, for example by getting it wet or dropping it
onto a hard surface, you could lose your information.
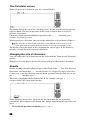
Displaying a status window
Whichever application you are using, you can almost always display a status window,
which shows the current time and date, among other things.
Some applications show a status window when you first use them, and some don't.
Turning the status window on and off
Use Control-Menu to turn the status window on and off, and change its size.
1. As an example, press the Calc button. You will see the status window for the Calc
application on the right of the screen.
2. Press Control-Menu once. The status window shrinks to half its former size.
3. Press Control-Menu again. The status window is turned off so that you can use the
whole of the screen to show information.
4. Press Control-Menu to turn it on again.
You cannot turn a status window on within the World and Time applications. (These
applications show you the current time and date anyway.) Within other applications you
may occasionally only be able to turn on a half-sized status window. This happens
when most of the screen is needed to display information.
Displaying a status window momentarily
You can always press Psion-Menu to make a status window appear for a few seconds.
What the status window shows
As you'll see, the status window always shows the time and date, and the name of the
current application or file. It also shows the names of the different views or screens
available in the current application by pressing the ♦ key; if there are none (as in the
Calculator), the application's icon is shown instead.
The status window can also show a "Caps Lock" indicator, the status of the main
batteries, whether SSDs are present, and whether a 3 Link lead is connected. You can
use the System screen's 'Status window' option to control whether these are shown.
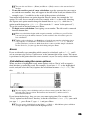
Changing the type of clock in the status window
1. Press the System button to move to the System screen.
2. Select the 'Status window' option on the 'Control' menu. A dialog will appear, like
this:
16
3. The highlight is initially on the 'Clock type' line. Press → a few times and you will
see the 'Clock type' change between 'Analog' and 'Digital'. (Analog clocks are
clocks with hands.)
4. Leave the 'Clock type' line on your preferred setting and press Enter to complete the
dialog.
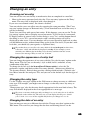
Changing the batteries
The battery life depends on the way you use your Series 3a. Playing sounds, using
3 Link, and writing information to Flash SSDs all use more power, and so reduce
battery life.
Battery levels
When the power (voltage) of the main batteries gets low the Series 3a will display a
low battery symbol - an empty-looking battery - in the status window. If you use the
'Battery info' option on the 'Info' menu in the System screen, the reading for the main
batteries will have changed from 'Good' to 'Low'.
When the battery power is approaching the absolute minimum, the low battery symbol
will start to flash, and a 'Replace main batteries' message will be shown whenever you
turn on the Series 3a. The 'Battery info' dialog will show 'Replace!' for the main
batteries.
When you are using alkaline batteries under high load (eg playing sounds, or writing
to Flash SSDs) they may lose voltage, but recover voltage when the load is reduced.
The Series 3a knows when this is happening, and takes this into account when
working out battery levels. Once the Series 3a decides the batteries really are 'Low',
this setting is locked, even if the batteries were to recover voltage slightly. (They also
"lock" in this way to the 'Replace!' reading.)
When the battery voltage becomes too low to power the Series 3a, it will turn off. You
will initially be able to turn it on again when the batteries have recovered sufficient
voltage. Soon it will turn off and refuse to turn on again.
At this point, alarms will not go off until you have changed the batteries (or inserted
a mains lead) and turned the Series 3a on at least once.
You can still use a mains adaptor if you need to use the Series 3a before you can replace
the batteries.
There are separate 'Batteries too low for digital audio' and 'Batteries too low to write to
Flash' warning messages. These are described in the 'Record' and 'Files and disks'
chapters respectively. If you use a Flash SSD be sure to read about the 'Batteries
too low to write to Flash' message.
17
Usage monitor
The 'Usage monitor' option on the 'Info' menu in the System screen gives information
on your pattern of battery use, including the time the Series 3a has been used on battery
power, the estimated total amount of battery power used (in milliAmp-hours) and the
average battery current (in milliAmps). If you press P in this dialog, you can see the
final readings for your previous set of batteries.
The Series 3a can only estimate (not measure) the amount of power it is using for
different activities.
When to change alkaline batteries
If you are using alkaline batteries, do not be alarmed by the low battery symbol in
the status window. It appears when you have used approximately 80% of the batteries'
power. Unless you are trying something which requires a lot of battery power - such as
using 3 Link - the Series 3a will continue to work for some time.
When the batteries are approaching their absolute minimum power, the 'Replace main
batteries' message appears. Change the batteries. (If you have new batteries ready, and
you're not relying on alarms, you can even wail until the Series 3a starts turning off
from low power, before you change the batteries.)
When to change rechargeable batteries
Rechargeable batteries are not charged while in the Series 3a. If you use
rechargeable batteries, you must replace them when they become low with freshly
charged ones. If you were to use just one pair of batteries, and you took them out to
recharge them, the backup battery would eventually run down and you would lose your
information. It is therefore a good idea to have two sets of batteries which you can swap
over when the pair in the Series 3a needs recharging.
Rechargeable batteries have a lower voltage to begin with, and may cause the "low
battery" state after a comparatively short time. They are also less predictable than
alkaline batteries - rechargeables may last for a long time without displaying a warning,
then fade so rapidly that hardly any warning messages can be shown. You may wish to
use the 'Usage monitor', and compare the estimated 'Total battery used' setting with
that of your previous set of rechargeables: this will give you advance wanting of when
your batteries are likely to fail.
Inserting the new main batteries
Have your replacement batteries ready before you take the old ones out.
1. Press Psion-1 (the OFF keypress) to turn the Series 3a off.
2. Clip off the main battery cover, remove the old batteries and replace them with the
new ones.
If you like to check your power usage with the 'Usage monitor' option on the 'Info'
menu of the System screen, you must leave the old batteries out for at least two or three
seconds before inserting the new ones, so that the 'Usage monitor' resets.
The backup battery alone can preserve your information for many hours, so you don't
have to rush when changing the batteries. Once you've replaced the main batteries you
can carry on as before.
When you turn on the Series 3a for the first time with new batteries, a 'Replace main
batteries' message may still be displayed, but it will go away.
18
Changing the backup battery
If the backup battery becomes low, or is fitted incorrectly, the Series 3a will display a
'Replace backup battery' message occasionally, when you turn it on. This will be
unusual, though, as the backup battery should last several years.
At this point, the backup battery's reading (in the System screen's 'Battery info' option)
can waver between 'Good' and 'Replace!' as its voltage can change under load. It will
soon consistently read 'Replace!', though.
You should change the backup battery within a week or two of it becoming low. Have
your replacement battery ready before you start.
1. Press Psion-1 to turn the Series 3a off.
2. Turn the Series 3a over, and open the door marked B . Lever out the old battery, with
a fingernail or a blunt non-metallic instrument, and insert the new one. Make sure
that the flat side of the backup battery, usually marked with a + symbol, faces
upwards.
While the backup battery is removed the main batteries are preserving your
information, so you don't have to rush this.
Changing both sets of batteries
If both the main batteries and the backup battery are low, you can change them in any
order, but not together. You should never remove the main batteries and the
backup battery at the same time. If you do, the Series 3a will be completely without
power, and after a few seconds it will lose all of the information in internal memory.
19
20
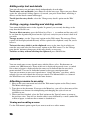
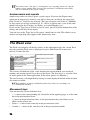
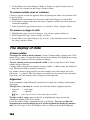
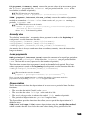
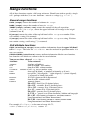
2
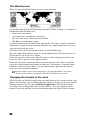
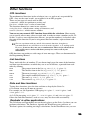
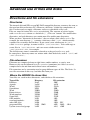
World
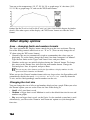
World displays a map of the world, and gives you the
following information on about 500 cities:
•
Dial code (from the home city).
•
Current time.
•
Position on the map, and distance to the home city.
•
Sunrise and sunset times.
21
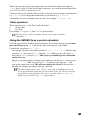
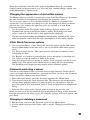
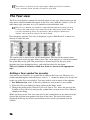
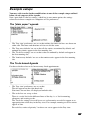
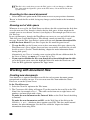
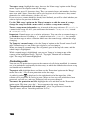
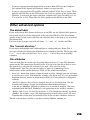
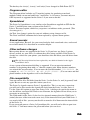
The World screen
When you press the World button, you see a screen like this:
On the right-hand side of the World map, beneath the 'Home' heading, is a column of
information about the Home City:
• Sunrise and sunset times.
• A running clock, showing the current time.
• The day of the week, and the day of the month.
• The Home city and country names.
On the left-hand side of the World map, beneath the ' City' label, a similar column of
information is given about the currently displayed city, with the addition of an 'am' or
'pm' indicator beside the clock.
A flashing cursor marks the position of this city on the World map.
The cities which World knows about are stored alphabetically. The first time you use
World, the first city in the list is shown.
In the lower centre of the screen is the dial code to call the displayed city from your
home city. This is prefixed with a phone symbol.
Below the dial code is shown the distance between the two cities. This is calculated
using the stored longitude and latitude of both cities. The distance is shown in either
kilometres, miles or nautical miles - use the 'Distance units' option on the 'Special'
menu to specify which measurement.
A status window can be shown temporarily by pressing Psion-Menu. You cannot
display a status window permanently in World; Control-Menu has no effect.
Changing the formats of the clock
When you first use the World application, the time format will be am-pm and the clock
format will be analog. You can change the time format to 24 hour if you wish, with the
'Formats' option on the 'Set' menu in the Time application. (The 'Formats' option
also allows you to change other time and date formats.) You can change the clock
format if you wish, with the relevant clock format option on World's 'Special' menu.
22
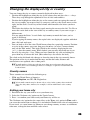
Changing the displayed city or country
You can change the city or country currently displayed in three ways:
• Position the highlight on either the city or the country line and press the ←→ keys.
These keys step through the alphabetical lists of cities and countries.
• Position the highlight on either the city or the country and start typing the name of
the city or country you want to find. As you press each key. the cursor moves to the
right, and the Series 3a will try to find a name which matches the letters you have
typed.
The Delete key deletes the last letter typed, moving the cursor to the left. Use Esc to
move the cursor back to the start of the city or country name, if you want to type a
different one.
If at any point the Series 3a can't find a city/country to match the letters you've
typed, it will beep.
If you're typing in country names, the capital cities are displayed, together with their
time, dial code and so on.
• You can look at all of the cities World knows about for a particular country. Position
to a city in the country you want, then press the ♦ key (or select 'Current country
only' on the 'Edit' menu). This locks World to this country, displaying the text
(only) after the country name. While locked, you can only skip from one city to
the next, by using the → key. When you have found the city you are looking for,
press the ♦ key to release the lock. (Most other keys also release the lock.)
The clock on the left-hand side changes to show the time in the city currently shown.
The position of the city is marked on the map. and the dial code, distance and
sunrise/sunset are updated, after a short pause.
A small number of cities are split into more than one area because they have more
than one area code for dialling. London, for example, is split into London Inner and
London Outer.
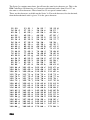
Country names
These countries are stored in the following way:
• USA, not United States of America
• United Kingdom, not UK, GB, England etc.
A few small countries may be shown only as a city, in the country whose national
dial codes they share, Andorra, for example, is shown with France as the country
name.
Setting your home city
1. Position to the city you wish to set as your home city.
2. Select the 'Set home city' option on the 'Special' menu.
3. Press Y to confirm your choice and your home city will be set.
The 'Set home city' option has the same effect as the 'Home city' option in Time, and it
can cause the current time to change. It is included in World for the sake of convenience.
If you travel, set a new home city whenever you change country, or move to a different
time zone, to keep the time and dial codes correct.
23
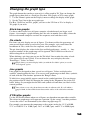
Summer times
Most countries set their times forward by an hour during their summer. The timing of
these 'summer times' (or 'daylight saving') in different countries is not something that
can be calculated precisely, so the Series 3a cannot automatically change times to allow
for it.
If you are not going to travel or make use of world times, summer times will not
affect your use of the Series 3a, so you do not need to set them.
Fortunately, countries can be grouped into three zones - European, Northern and
Southern - in each of which summer times change at around the same time. World
knows which zone each city is in. The Series 3a lets you set summer times on or off for
each of these zones.
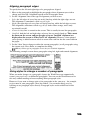
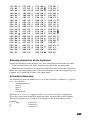
Setting summer times
1. Select the 'Summer times' option on the 'Set' menu in the Time application.
2. You should set summer times 'On' for approximately these periods:
Northern
early April - end of October
Europe
end of March - end of September
Southern
late October - end of February
If you set summer times on and off according to these dates, your World times should in
general be correct. If you know the exact changeover dates for countries you're
interested in, you can set the changeover accurately.
If the summer time setting for your home city is temporarily (or even permanently)
different to that of the zone it is in, you can also use the 'Summer times' option to
override the setting for your home city. Set the 'Home is' line to 'On' or 'Off.
If the current city in World has summer time on, an 's' is shown next to its clock, at the
left of the screen.
To see which zone a city is in select the 'Update city' option on the 'Edit' menu. (Cities
are in the zone which best matches their changeover dates, not their geographical
position.) Since 'Update city' lets you change the information displayed, press Esc to
quit the dialog.
Important: the easiest way to use summer times is to think of World as two
hemispheres - Northern/European combined, and Southern. When clocks go forward in
your Home city, set your hemisphere 'On', and the other 'Off'. When clocks go back
again, set your hemisphere 'Off, and the other 'On'. Some World times will then
occasionally be wrong by an hour, but that is all.
If you change the summer time settings of your home city in any way. the time on
the Series 3a will change accordingly by an hour. If you didn't want this to happen,
use the 'Time and date' option in the Time application, and set it back.
24
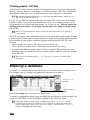
Adding and changing information
Adding a city
If your own home town or city is not known by World, you can add it with the 'Add
city' option. You'll be asked for longitude and latitude. GMT offset (the hours ahead of
or behind London's "Greenwich Mean Time") and zone for summer times. Don't worry
if you don't know all of these - before you choose 'Add city', you can estimate these
from the settings of a city near yours.
1. Find a city near to your own which World does know about.
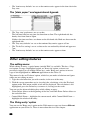
2. Select the 'Add city' option on the 'Edit' menu. The dialog suggests the longitude and
latitude (etc.) of the city you've just found, and this should be approximately right.
It's worth entering the longitude and latitude because they are used to calculate
distances and sunrise/sunset times.
The 'Add city' dialog looks like this:
3. Type the name of the city on the top line. If you've "borrowed" information from a
nearby city, as suggested above, you can leave the longitude and latitude, and the
GMT offset. If you want to change longitude and latitude, just type the digits
concerned. Wherever the cursor is on the line, you can type W or E for longitude,
and N or S for latitude. Similarly, if you change the GMT offset, you can type +
or - .
4. To enter the area code, type it as you would dial it when in the country concerned.
5. In general, you should set the summer time 'Zone' for new cities to 'As country'. It
will then have the same summer time as the rest of its country. (If you set this to
'Constant', summer times are ignored for this city.)
6. Press Enter. A flashing marker is now displayed on the world map. Use the ←↑↓→
keys to move it to the correct position for the new city. To move the marker by
greater distances you can hold down the Control key while using ←↑↓→. When the
marker is correctly positioned press Enter.
'Adding' a country
Strictly speaking, you cannot add a new country to World. You can, however, modify
the details of a country that is already there using the 'Update country' option. Before
doing this, it may be helpful to look at a country which you know is near the one you
wish to add, and note its zone for summer times, and its GMT offset. You can then use
these in the 'Update Country' dialog.
1. Select a country, preferably one which you don't expect to use.
2. Select the 'Update country' option on the 'Edit' menu.
3. Enter the details of the country you wish to add. Don't worry which city is shown as
the capital city, for now; you can add the real one later after you have entered it as a
25
new city. Enter the national phone code used to call this country from abroad ( 4 4
for the UK). Also give the national (STD) prefix, and the code used when starting an
international call (010 in the UK). Enter the GMT offset and the summer time
zone.
The dialling codes are entered with country details so that international dialling
works. See the 'Dialling' chapter for more information.
4. Use the 'Add city' option on the 'Edit' menu as described earlier to add the capital
city of the new country. Select the 'Update country' option again and set the new
city as the capital of the country.
Changing city or country information
You can use the 'Update City' or 'Update Country' options on the 'Edit' menu to enter
city or country details that have changed, such as dial codes.
The 'Update City' option requires the same information as 'Add City'.
If you use 'Update Country' and change the GMT offset of a country, all cities in that
country will have their current times changed by the same amount. If you change a
country's summer time 'Zone', its current time may change; all cities in that country
which have their 'Zone' set to 'As country' will also change.
Added/changed information
Information entered using 'Add city', 'Update city' and 'Update Country' is kept as a
file. Unless you specify otherwise, it is kept on the internal disk, with World as the
filename. It can contain information on up to 32 new or changed cities/countries.
You can, if you wish, make more than one file of added/changed information. Use the
'New file' option on the 'File' menu. Any future changes would be saved in this file. If
your home city is in your current World file, because you added or updated it, it will be
copied into this new file.
Any files you create appear in the file list under the World icon on the System screen.
The 'Open file' option on the 'File' menu lets you specify which file to use.
You can keep the file or files on an SSD, if you like: to do this set the 'Disk' line, in the
'New file' or 'Open file' dialog, to the SSD drive, A or B , containing your SSD. This
frees more internal memory for other information. Note, though, that the whole file is
saved every time you make a change.
World files are closely linked to the particular version of the Series 3a on which they
are made, and may not work on other Series 3a machines.
Deleting added or updated information
1. Find the city that you wish to delete and select the 'Delete city' option on the 'Edit'
menu.
2. Press Y to confirm that you want to delete the city.
Use 'Delete city' to delete a city you've added, or if you've updated a city but wish to
revert back to its original information. You can't delete an added city if it is set as your
home city.
You can remove all of the added/updated information by deleting or renaming the file
from under the World icon in the System screen. Exit the World application first.
26
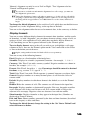
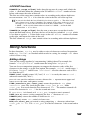
3
The Calculator
You can use the Calculator in a similar way to a pocket
calculator. It includes the following features:
•
Complex scientific calculations.
•
A list of the calculations you type and their results. You
can copy calculations or values from it into new
calculations.
•
Ten calculator memories. You can give them meaningful
names, if you like, and use these names in your
calculations.
•
Access to OPL functions and your own OPL procedures.
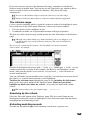
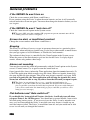
27
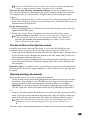
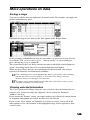
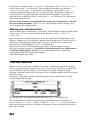
The Calculator screen
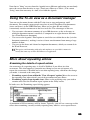
When you press the Calc button, you see a screen like this:
The bottom line of the screen has a flashing cursor. It's here that the calculations you
type are shown. The area in the centre of the screen is used to show a list of any
previous calculations.
Characters which represent arithmetic operations, like + , - , * (multiply) and /
(divide), are called operators.
While typing in a calculation, you can use the editing keys as described in Chapter 1.
The ♦ key has no effect in this application. Control-Menu works as in most of the
other applications by turning the Status window on and off, and changing its size.
The Esc key clears the whole of the calculation line you've typed. If you do this by
mistake, a second Esc will restore the calculation.
Changing the size of characters
You can change the size of characters on the screen with the 'Zoom in' and 'Zoom out'
options.
Whichever size you choose, the list will always hold up to 10 previous calculations.
Results
Results are only calculated when you press either Enter or the ' = ' key. You may find
Enter more convenient than ' = ' not only because it's a bigger key, but also because
it's then easy to use the calculator with one hand; you don't need the Shift keys to use
the + , - , * , / and Enter keys.
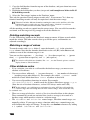
The result is highlighted on the bottom line. If, for example, you type 2 7 / 1 2
and press Enter, the screen looks like this:
When you press the next key, the result will be copied onto the list of previous
calculations. What happens to the bottom line, though, depends on the type of key you
press:
• To re-edit the previous calculation: press ← or →.
28
You can also use Psion-← (Home) and Psion-→(End) to move to the start and end of
the line.
• To use the result as part of a new calculation: type the operator that you want to
use and the next number: they will appear at the end of the result just obtained. For
example, type +5 to add five to the result of the previous calculation.
You might instead choose an option from the 'Powers' menu, for example the '1/x'
option, as it will also act on the result. For example, with 12 as the result, choosing
the 'Square root' option would change the bottom line to sqr(12), while the 'x2'
option would change it to (12)**2 . (Two asterisks-** - mean "to the power of".)
To see the result in decimal form press Enter.
• To begin a new calculation: start typing a new number. The old result is removed
from the bottom line.
If the new calculation begins with a negative number, you'll have to press Esc first;
you can't just type the minus character, as this would use the old result as part of a
new calculation.
Unlike pocket calculators, you don't have to break down complex calculations into a
long sequence of calculations. Consider the calculation 33/(0.7+8.4). On most
pocket calculators you have to think about how to enter even this simple calculation.
On the Series 3a. you just type the whole thing and press Enter.
Errors
If you accidentally type something which cannot be calculated, such as 7-*5 , you'll
see an error message such as 'Syntax error' at the bottom right of the screen. The cursor
is positioned to the point where the error occurred, so you can easily edit the calculation.
Calculations using the menu options
When you have a highlighted result, menu options such as 'Sin(x)' will act upon it;
their brackets go round the result. For example, if you have 2.25 as the highlighted
result, and you select the 'Sin(x)'option, the calculation becomes sin(2.25) , like
this:
If you're typing a new calculation and you select a menu option like 'Sin(x)', it is
inserted at the cursor position. The brackets are inserted loo, and the cursor is
moved between them.
If you know the hot-keys, they can save you some typing time. For example, the
'Cos(x)' option has the Psion-C hot-key; to do the calculation 3/cos (40) you could
just type 3 / , press Psion-C, type 4 0 and press Enter.
You can create a highlight by using Shift-← or Shift-→. Most Menu options will then
act upon the figures contained in the highlighted area.
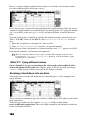
29
The list of previous calculations
Each calculation you enter, and its result, is added to the bottom of the list. Up to ten
calculations and their results (20 lines) can be kept on the list The screen can only
display a few lines, but you can scroll a highlight up and down the entire list with ↑↓.
You can retrieve values or calculations from the list, for use in future calculations. Press
↑, until the highlight reaches the value or calculation you want, then press Psion-Enter.
(Alternatively, select the 'Copy from list' option on the 'Special' menu.) The
highlighted characters will appear on the bottom line as if you had typed them one by
one.
• If you had just calculated a result, it would be replaced by the value or calculation
that you retrieved from the list.
• If you were typing a new calculation, the highlighted characters would be inserted at
the cursor position.
Other options:
If the highlight is on an item in the list, you can use the Tab key to move the highlight
back to the bottom line.
You can use the menu options on calculations or results in the list. The result will
replace any result or highlight on the bottom line, or will be inserted into any new
calculation that you are typing.
You can use Psion-↑ (Pg Up) and Psion-↓ (Pg Dn) to move up and down the list a
screenful at a time. Control-Psion-↑ and Control-Psion-↓ go to the top and bottom of
the list.
Clearing the list
You can clear the list with the 'New list' option on the 'Special' menu.
Trigonometric functions
The options on the 'Trig' menu can work either with degrees or radians. Initially, they
work with degrees. Use the 'Use radians' option on the 'Special' menu if you want to
work in radians. Once used, the option's name changes to 'Use degrees'. Select the
option again to return to using degrees.
For the value of the constant 'pi', just type PI . For example, SIN(PI/2) gives 1
(when using radians).
Precedence of operators
Some calculations which use more than one operator produce different results
according to the order of the calculation. 7+3*4 gives 40 if you work out the addition
first: 7+3 is 10, and 10*4 is 40. However, if you work out the multiplication first, the
result is 19.
The Series 3a performs a calculation according to the precedence of operators:
Highest:
**
- (make negative, as in -45 )
*/
Lowest:
+Multiplication ( * ) has higher precedence than addition, so if you type 7+3*4 the
multiplication is done before the addition, and the result is 19.
30
Where operators have equal precedence they are worked out from left to right. So
7-3+2 gives 6 (not 2) as the result. Powers, however, are calculated from right to left,
so 2**3**2 is 512 (2**9) not 64 (8**2).
You may want to use brackets either to make it obvious what the order of calculation is,
e.g. 7+(3*4) or to change the normal order of calculation, e.g. (7+3)*4.
Any number of levels of brackets may be used - for example, 7-((3+2 )*8)
Other operators
These operators give -1 (for 'True') or 0 (for 'False'):
>
greater than
<
less than
For example, 3>2 gives -1 ('True'), as 3 is greater than 2.
You can't use the = (test for equality) operator, as it is used to terminate
calculations.
Using the SERIES 3a as a pocket calculator
You can use the Series 3a like a pocket calculator, if you really want to, but you must
press the Enter key (or ' = ' if you prefer) after each stage of a calculation.
Consider the calculation (33-7)*2 :
On a pocket calculator you might type this as 3 3 - 7 = * 2 =. The first time
you press ' = ', the result of 33-7 is shown ( 26 ). When you press the final ' = ',
the result of 26*2 is shown ( 52 ). This is how you should type the calculation
on the Series 3a.
However, on many pocket calculators you could miss out the first = , and just type
3 3 - 7 * 2 =. Here the result of 33-7 is shown as you type the '*', and
you get the same final result. This will not work on the Series 3a. because the *
operator has a higher precedence than the - operator.
The various menu options - 'Sin', ' 1/x' etc - only work on a highlighted result. If
you've just calculated a result and you want to find its sine, you can choose the 'Sin'
option (Psion-S) and press Enter. If, however, you want to find Sin(45) , it's
quickest to press Psion-S, type 4 5 and press Enter.
31
Calculator memories
Saving results
Use the memories to save results which you want to re-use later.
If you just want to use one memory, use the 'M in', M +', 'M -','M clear' and
'M recall' options, on the 'Memories' menu. You'll soon get used to their hot-keys. The
current value within the memory is shown at the top of the screen.
These memory options normally use the result displayed on the bottom line. If you are
typing a calculation when you select a memory option, the result is calculated and this
value is used. However, if you move the highlight up onto a previous calculation, the
memory options will use the result of the highlighted calculation.
There are ten calculator memories, called 'MO', 'Ml', 'M2' and so on, up to 'M9'. The
name of the current working memory (initially 'Ml') is shown, with its current
contents, at the top of the screen. 'M in', 'M +' etc. work on this memory.
You can use the memory names in calculations - e.g. 25+M2 .
The memories retain their values even if you use the 'Exit' option.
Changing the 'Current working memory'
1. Select the 'Change memories' option from the 'Memories' menu:
2. Move the highlight down to the 'Current working memory' line and type in the
memory that you want to use. For example, set it to 'M4'. 'M4' will then be shown
at the top of the screen, and 'M In', M +' etc will now work on this memory.
Changing the memories ' names
1. Select the 'Change memories' option on the 'Memories' menu.
2. Find the memory whose name you wish to change on the 'List of memories' line.
3. Move the highlight onto 'New memory name' and type the new memory name that
you want to use.
4. You might also want to set the 'Current working memory' line to this memory, before
pressing Enter to confirm the changes and remove the dialog.
You can now use the memory's new name in calculations. For example, you might
change 'MO' to 'tax', and set the value in this memory to 0.175 ; the calculation
2500*tax would then give the result 437.5 .
New memory names
Memory names may be up to 8 characters long, must start with a letter and can contain
only numbers and letters.
32
If you try to use a name which is the same as an OPL function, or if you use an
unsuitable character such as + , you'll see an error message such as 'Invalid character'.
Choose a different name instead.
Percentages
The percentage operator can be used like this:
60+5% = 60 plus 5% of 60. Result: 63
60-5% = 60 minus 5% of 60. Result: 57
60*5% = 5% of 60. Result: 3
60/5% = what number is 60 5% of. Result: 1200.
It can also be used like this:
210>5% - what number, when increased by 5%, becomes 210. Result: 200
210<5% - how much of 210 was a 5% increase. Result: 10.
Examples
To add 15% tax to 345: 345+15% . Result: 396.75.
To find out what the price was before tax: 396.75>15%. Result: 345.
To find out how much of a total price is tax: 396.75<15%. Result: 51.75.
To use the % operator with memory names, put a space before it. For example:
5+M1 % .
Very large and very small numbers
Don't use commas when you are entering large numbers. If you use the value
1,000,000 in a calculation (note the commas), you will see a 'Syntax Error'
message.
If you need to use very large or very small numbers, use e (capital or lower case) as
the exponent in a number. An e usually follows a number between 1 and 10, and is
itself followed by another number. The e means "times ten to the power of". Its effect
is to move the decimal place in the first number to the right, by the number of places
specified by the second number. For example, 3.14159e3 means 3141.59 .
Note that 3.14159e3 is all one number, and has no spaces.
You may have to imagine extra zeros (or even the decimal point itself) in the left-hand
number, to visualise the number. For example, if you think of le5 as 1.00000e5 ,
you can then move the decimal place and see that it means 100000 .
If the second number is negative, you must move the decimal place to the left to work
out the number. For example, 4.1e-5 is 0.000041 . Again, 4.1e-5 is just a
number, not a calculation, and it has no spaces.
Exponents are a convenient way for expressing very large and very small numbers. The
calculator can handle numbers as big as 9.99999999999e99 and as small as
le-99 . It can also handle negative numbers as big as -9.99999999999e99 and
as small as -le-99 . If a result or a number you enter is larger than these ranges, the
33
message 'Overflow' is displayed. An 'Underflow' or 'Bad number' message is shown if
non-zero numbers are smaller than ±le-99 .
In a very large result, the positive exponent is displayed with a + sign- le+10 and
lel0 being the same number.
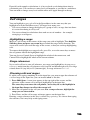
When using a number between 0 and 1 in a calculation, you can miss out the 0 you can use .5 instead of 0.5 , and so on.
Decimal places and number formats
Calculations are accurate to at least 12 digits.
Results are initially shown in 'General' format, showing as many decimal places as
necessary, up to the maximum of 12. For example, 1/3 gives 0.333333333333 ,
while 1/4 gives 0.25 .
Use the 'Format' option in the 'Special' menu to specify the way you want the results of
your calculations to be shown:
• General: as many decimal places are displayed as were calculated. Large or small
numbers are shown as exponentials, e.g. 1.1E+30 .
• Hexadecimal: results are shown as hexadecimal whole numbers (see below).
• Fixed: results are shown to the number of decimal places you specify on the
'Decimal places' line. The accuracy is still 12 digits, and results are rounded, if
necessary, to ensure that there are the correct number of decimal places.
• Scientific: results are always shown as exponentials to the number of significant
digits - digits either side of the decimal point - you specify on the 'Significant
digits' line. The result may be rounded to ensure that this happens. The minimum
number of significant digits is two.
Hexadecimal numbers
Hexadecimal numbers, also known as base 16, are sometimes used by programmers.
They are explained under HEX$ in the 'Alphabetic Listing' chapter of the Programming
Manual.
You can use hexadecimal numbers in any calculation, regardless of the format used for
results. For example, &F9*2 is the same as 249*2 , and gives the same result 498 , or &1F2 in hexadecimal format.
An arithmetic operation between two hexadecimal numbers always gives a whole
number result. So whereas 3/2 and &3/2 give 1.5 as the result, &3/&2 gives 1
34
Other functions
OPL functions
The mathematical functions in the calculator (SIN, COS and so on) are provided by
OPL - they are the same 'words' you would use in an OPL program.
There are two types of words used in OPL:
commands - which just perform an action, and
functions - which return a value of some kind.
The functions themselves come in two varieties:
string functions - which return a string of characters, and
numeric functions - which return a number.
You can use any numeric OPL function from within the calculator. Most require
you to specify one or more values to work with, in order to return a number to you. To
do this, as you've seen with functions like SIN, you put the number(s) in brackets after
the name of the function. If you're using more than one number, separate them with
commas.
You can experiment with any and all of the numeric functions, though most
non-mathematical ones will either not work from the calculator, or do nothing useful.
However, do not use the CALL, OS or USR functions. These are for advanced use
only, and if you are careless with them you may lose some or all of your
information.
OPL functions can produce a wide range of error messages. These are documented in
the Programming Manual.
List functions
These work with lists of numbers. To use them simply type the name of the function,
and then type the numbers on which they are to act in brackets, separated from each
other by commas.
MAX
The greatest item in the list, e.g. MAX(2,8,4) gives 14 .
MIN
The smallest item in the list, e.g. MIN(2,8,14) gives 2 .
MEAN
The mean (average), e.g. MEAN(2,8,17) gives 9 .
STD
The sample standard deviation, e.g. STD(2,8,14) gives 6 .
SUM
The sum, e.g. SUM(2,8,14) gives 24 .
VAR
The variance, e.g. VAR(2,8,14) gives 36 .
Date and time functions
Typing these functions gives the date and time as kept by the Series 3a:
DAY. MONTH, YEAR. HOUR. MINUTE. SECOND
For example, on 3rd September 1990 typing DAY gives 3 , MONTH gives 9 and
YEAR gives 1990 .
At 3:42:56 pin typing HOUR gives 15 , MINUTE gives 42 and SECOND gives 56
Other date and time functions, such as DAYS, may also be useful occasionally.
'Evaluate' in other applications
The Calculator and Spreadsheet are not the only places on the Series 3a where you can
perform calculations. The Database, Agenda and Word Processor each have an
'Evaluate' option, for working out single calculations. In the Word Processor, you can
35
type a list of numbers to add or subtract, like this:
25.76
+10.00
+121.09
-43.71
You can sum this list by highlighting it and selecting 'Evaluate'.
Using your own OPL procedures
If you have an OPL module containing procedures which return a number of some kind,
you can use these modules in the Calculator. You can also pass values from the
Calculator to parameters in the procedures.
To make your module available for use, select the 'Load OPL' option from the 'Special'
menu, and enter the name of the module.
For example, there is no operator for "modulus" - the remainder after a division of
whole numbers ( 9 modulo 4 is 1 ). You might write and translate an OPL module
containing this procedure:
PROC mod:(a,b)
RETURN a-INT(a/b)*b
ENDP
Once you've used the 'Load OPL' option and given the module name, you can, for
example, type mod:(9,4) and get a result of 1.
If you need to use more than one module, the module you specify with 'Load OPL'
should use the OPL LOADM command to load any other modules itself.
If an error occurs in one of your own procedures, the cursor is positioned to the start
of the calculation line.
To "unload" the OPL module you have loaded, you must exit the Calculator.
'Module does not exist'
If you load an OPL module in the Calculator, it must be available for all future
calculations. If you delete it, or remove the SSD on which it is stored, a 'Module does
not exist' message will be shown on every future calculation. There are two ways to
solve the problem:
• Reinsert or recreate the translated OPL module.
• Exit then re-open the Calculator.
Passing parameters to OPL
All parameters passed from the Calculator to procedures which it calls are by default
passed as floating-point numbers.
If a procedure is declared as requiring a long integer parameter, use the INT function on
the number you wish to pass - for example, myproc:(INT(101500)) .
36
4
Time and alarms
The 'Time' application provides access to everything to do
with time on the Series 3a:
•
You can set the time, and the way times are displayed.
•
You can say which days are workdays, and which day the
Series 3a should use as the first day of the week.
•
You can set your home city, and turn summer times on
and off.
•
You can use your Series 3a in place of an alarm clock,
anywhere you take it. You can set up to six alarms and
make them repeat automatically, even on workdays only.
•
You can see alarms that have been set in other
applications on your Series 3a.
37
The Time screen
When you press the Tune button, the Time screen is shown:
The Time screen shows the current time, as both a digital and an extra-large analog
clock. The date and home city are also shown.
The centre of the screen shows information on the six alarms you can set. If you set any
alarms here, or on Agenda entries, a reminder of the time until the next alarm is shown
below this.
All time information is shown on one screen, so the ♦ key has no effect. You can't
use Control-Menu to show a permanent status window; the time and date are already
shown on the Time screen. As always, though, you can press Psion-Menu to make a
status window appear for a few seconds.
The current time and date
The current time is affected by your choice of home city. You can use the 'Home city'
option on the 'Settings' menu to set this. If the Series 3a beeps when you try to type the
city name, it does not know about the city. Press Esc. You then have two alternatives:
• Enter the name of a larger town or city near your own.
or
• Add your own town/city. See the 'World' chapter for more details.
The 'Time and date' option on the 'Settings' menu sets the current time and date. If you
have not already done so, use this option now. You can also use the 'Formats' option to
say how times and dates are to be displayed - as '24-hour' or 'am-pm' for example.
You don't have to use the Time application to see the current time. Whatever you're
doing on the Series 3a, you can always press Psion-Menu to bring up a status window,
which shows the time, for a few seconds. You can, in most places, press Control-Menu
to turn on a permanent status window.
The Series 3a is accurate to within a few seconds a week. Use the 'Time and Date'
option again if you ever need to correct the time.
The start of the week
The 'Start of week' option does not change the date, but sets the day on which you
prefer weeks to start. You may, perhaps, wish to set it to Sunday or Monday. This
setting will be reflected in the Agenda, and in the way week numbers change.
Setting summer time
The 'Summer times' option lets you set summer time on or off for the three zones European, Northern and Southern. This controls the times of cities, as displayed in
World.
38
It also lets you override the setting for your home city. If you're not concerned by some
World times being wrong by an hour, you can forget the complexity of zones. Use the
'Summer times' option to change the summer time for your Home - on the first line of
the dialog - and leave the three zones set to 'Off'.
There are more details on summer limes in the 'World' chapter.
If you travel
If you travel to a different country or time zone, change the home city to your new
location, or to a nearby city in the same country. The current time will change
automatically, and the correct international dialling codes will be used.
Workdays
Monday to Friday are initially set to be workdays. Use the 'Workdays' option on the
'Settings' menu if you need to change this. Use ←→ to step through the days, and press
R (rest day) or W (workday) for each. Press Enter when you're finished.
To see a vertical list of the seven days with their settings press Tab.
Alarms
Setting an alarm
The central area of the Time screen has six lines, to show the details of up to six alarms.
To set an alarm:
1. Move the highlight with ↑↓ to any line which says No alarm set . (Initially any
line will do.)
2. Start typing the text for the alarm (if you want a text message), or start typing the time
for the alarm. The 'Set alarm' dialog is shown. (The 'Set alarm' option on the
'Alarm' menu has the same effect.) The dialog looks like this:
3. Type the 'Time' for the alarm, and set the 'Day' for the alarm to ring. If you use
'am-pm' format, don't forget the "am"/"pm" setting.
The alarm will always be set to ring some time within the next seven days. You can
set an alarm to ring one minute in the future, but if you try to set an alarm for one
minute before the current time, it will be set for a week in the future, at that time of
day.
4. For a single alarm, leave the 'Repeat' line set to 'Once'. You can, however, set this
alarm to repeat every day, every workday, or once a week. If you set a workday or
daily repeat, there is no single day associated with it, and the 'Day' line of the dialog
is blanked.
39
Monday to Friday are initially set to be workdays. Use the 'Workdays' option on the
'Settings' menu if you need to change this.
5. If you want to enter text to appear with the alarm, type it in the 'Text' line.
6. Select the sound for the alarm on the 'Sound' line, and press Enter to set the alarm. Its
details are shown on the line you chose, after a bell symbol. For example:
The 'Set alarm' dialog checks your disks for sound files, such as those recorded by
the 'Record' application. See the chapter on 'Record' for more details.
The Time screen displays two more things:
• If you set a workday or daily repeat, the day the alarm will next ring is shown in the
alarm line.
• If the next alarm, whether an ordinary alarm or an agenda alarm, is due to ring in
under 24 hours, this will be shown at the bottom of the screen - for example:
Changing an alarm
To change the details of an alarm, move the highlight onto it and press Enter again. You
can now change the settings in the 'Set alarm' dialog.
Alarms from the Agenda
You can also set alarms within the Agenda on your Series 3a. To see when the next
alarm for each agenda is set to ring, use the 'View next alarms' option on the 'Alarm'
menu in the 'Time' application. If you do not have any alarms set in your Agenda (or in
Time), a 'No alarm pending' message will be displayed.
If an alarm is set, the 'Next alarm for Agenda' dialog will appear. It shows when each
alarm is due to ring, the event for which the alarm is set and the text of the entry for
which it has been set.
See the note in the 'Agenda' chapter about the effect that exiting an agenda file has on
its alarms.
40
When an alarm rings
When an alarm rings, its display takes over the whole of the screen, no matter what you
are doing on the Series 3a. (The Series 3a turns on, if necessary.) The ringing starts
quietly, and becomes louder. The centre of the screen shows the time the alarm was set
for, like this:
Before you can do anything else with the Series 3a, you must acknowledge this alarm.
Turning the alarm off: press Esc and the alarm is cancelled. If it is a repeating alarm,
it is automatically set to ring on the next repeat date. Single alarms are removed from
the list of alarms once they have rung.
Snoozing: press Space and the alarm will stop for five minutes. If you press Space a
second time, another five minutes is added to the snooze time. You can keep doing this
up to a maximum of 60 minutes, after which the snooze time will return to five minutes.
The Series 3a beeps at this point. If you're trying to set the snooze time in the dark,
and you're not sure whether you set it correctly, keep pressing until you hear the
beep, and you will be back at a five minute snooze.
If you are not present when an alarm rings, it will ring at increasing intervals. For the
first three minutes it will ring every minute. The intervals increase to an hour. After the
second hour-long pause, it will ring for the last time. When you next turn the Series 3a
on. though, the alarm will still be shown.
Deleting, disabling and silencing future alarms
To delete an alarm entirely: move the highlight onto it in the Time screen, and press
the Delete key. (The 'Delete' option on the 'Alarm' menu has the same effect.)
To disable an alarm temporarily: move the highlight onto the alarm and select the
'Disable alarm' option on the 'Alarm' menu. An X will be shown by the alarm, in
place of the bell symbol, and it will not ring. You might disable your morning workday
alarm, for example, when you have a day off work.
If you move the highlight onto the disabled alarm, you'll find that the name of the
menu option has changed to 'Enable alarm'; select this when you want the alarm to ring
again.
To silence all alarms: select the 'Sound' option in the 'Control' menu in the System
screen, and set 'Alarm sounds' to be 'Off'. Alarms will appear on the screen, but will
not ring. To turn the alarm sound back on, set 'Alarm sounds' to be 'On' again.
The Series 3a doesn't know about Bank Holidays, so remember to disable your
workday alarms for these days, if necessary.
41
42
5
The Database
The Database lets you enter and find names and addresses,
like in a phone book. You can also create other databases of
information - client details, price lists, catalogues, and so on.
•
You can quickly find an entry by searching for a small
piece of text contained in the entry, such as Jones or
doctor.
•
You can define labels for the lines of data in each entry,
such as name or phone to guide you when typing in
new entries.
Note: dialling is covered in a later chapter.
43
The structure of a database
Files which you use in the Database are called data files, or databases. Each File is like
a card index:
Each entry you type into a database is like one card in the index box.
When you change an entry, it goes to the end of the database, as if you had taken a card
out of the index box, altered it and replaced it at the back. The order of the entries is
almost irrelevant - you can quickly find any entry by typing a short search clue, such
as Jones , and step through any entries which contain this text.
When you first press the Data button, a file called data is used. Use this as your
phone/address book. Later, you'll see how you can create other files with different
names to hold different databases of information.
Pressing the key
Initially the ♦ key switches between two Database screens: the 'Add' screen and the
'Find' screen.
• The 'Add' screen allows you to create new entries.
• The 'Find' screen allows you to search for the entries you have previously typed in.
You can't switch to the 'Find' screen until you've used the 'Add' screen to add some
entries to the file.
44
Typing in entries
The 'Add' screen
When you first use the database, the 'Add' screen is shown:
If you look at the status window, on the right-hand side of the screen, you will see that
'Add' is marked with a ♦ symbol, indicating that the 'Add' screen is in use. The
Database is already prepared for use as a phone book, with a suitable set of labels Name , Address etc. - down the left of the screen.
If you want to change the labels for your address book, it is best to do so before
typing any entries. (If you edit the labels after adding entries, these entries may not
line up with your new labels.) But the labels should be fine for most address books.
Don't worry if think you won't use some of the labels much; it is better to have them
there for the few times they are needed.
If you do want to edit the labels first, see 'Editing the labels' later in this chapter.
1. To make a new entry, type the name, phone numbers, address and notes alongside the
labels. To leave a label blank - for example, if you don't have a work phone number
for a particular person - just press Enter (or ↓) to skip to the next line.
Most labels are currently set up for one line only. However, any label can have any
number of lines. To insert an extra line for the label you're at, press Shift-Enter.
2. When you've finished, press Tab to save the entry. The Database is then ready for you
to type another entry. You can type as many as you like; press Tab to save each one.
If you need to insert a real Tab character, press Control-Tab. Use the 'Set tabs' option
on the 'Display' menu to specify how many character widths each Tab should be
shown as on the screen.
3. You can type in further entries, pressing Tab after each. (If the last screen you used
was the 'Find' screen, and you want to add more entries, press the ♦ key and the
'Add' screen will appear.)
Lining up with the labels
For example, you might want to type an entry which has no work phone number, no fax
phone number, and requires three lines for the address. This is how you would type it:
Name:
Simon Evans
Enter
Home:
081-034-0987
Enter
Work:
Enter
(to leave this line blank)
Fax:
Enter
(to leave this line blank)
Address:
2 Sighthill Rd Enter
London
Shift-Enter
(for an extra line with this
label)
SW18 9ZZ
Enter
Notes
Doctor
Tab
(to save entry)
45
If you don't want to use labels at all, use the 'Hide labels' option on the 'Display'
menu. But they are useful, especially as they identify phone numbers when you dial.
Entering phone numbers
If you want to be able to use DTMF dialling, enter phone numbers which are in your
own country with their area codes. This applies to local numbers too - having entered
the area code, you can then use the Dial keypress (Psion-Help) to dial the number,
wherever you are. Use a space or hyphen to separate the area code from the rest of
the number - eg 071-999-8080 , 415 000 9999 , or 0636 999111 .
You can enter text after the number if you wish. Nothing after the text will be dialled.
For example, you can enter an extension as in 0636 999111 x444 -only the
main number will be dialled, because of the x .
If you need to enter and dial international numbers, see the 'Dialling' chapter for more
information.
Editing while you enter text
The editing keys work as described in Chapter 1.
If you type information on the wrong line, perhaps by pressing Enter when you meant
to use Shift-Enter, you can move it easily:
• To move a line up: move the cursor to the start of the line, and press the Delete key.
All of the lines below also move up.
• To move a line down: move the cursor to the start of the line, and press Enter. All of
the lines below also move down. You can also press Enter when the cursor is in the
middle of a line, to break it into two lines.
While you're typing an entry, you can also use the options on the 'Edit' menu:
• 'Copy text' makes a copy of any area of text you've highlighted by using a Shift
key with one of the arrow keys.
• 'Insert text' inserts the area of text you most recently deleted with the Delete key, or
copied with 'Copy text'.
• 'Bring text' brings in text that you have highlighted in other application programs in
the Series 3a. A later chapter discusses the operation of the 'Bring' options.
'Evaluate' calculates a result You can use this option to make numerical calculations
while you're typing. If there is no spacing in the calculation, just move the cursor
onto it; otherwise, highlight the calculation with Shift-← or Shift-→. Do not put an
equals character at the end of the calculation. When you select 'Evaluate', the result
appears. The calculation will be left highlighted, so you can delete it, if you wish, by
pressing the Delete key.
If you want to cancel what you've typed, you can press Esc at any time. After
confirming that you wish to abandon the changes you've made, you can start typing the
entry again.
Using codes in entry text
If you have a lot of related entries, include a code in the text for each one. Then, as you
will see, you can find them all, one by one. For example, if you had the numbers of
several agencies, you might include the word Agency (or even just the code AGN ) in
each entry.
46
The size of an entry
Each entry can contain up to 4094 characters. (This number is reduced very slightly if
lines extend over 255 characters.) Other than this, there is no limit on the number of
lines in an entry, or on the length of each line.
The Database does not allow you to save blank entries.
Dialling
Your Series 3a is capable of dialling phone numbers from your address book. When
you use the Dial keypress (Psion-Help) the Series 3a emits the DTMF tones required to
call the number you chose. The dialling system takes account of international codes and
your current home country. Details of how to use this feature are given in the 'Dialling'
chapter.
Finding an entry
The 'Find' screen
The ♦ key is used to swap between the 'Add' screen and the 'Find' screen, which looks
like this:
The first entry in the database is shown in the main part of the screen.
Entering a search clue
Type a search clue into the highlighted box at the bottom. This can be any piece of text
which is in the entry you want to find - doctor , jones , doct and so on. It docs
not matter whether you type upper or lower case characters as the search is not case
sensitive.
DI would match with both Gliding and Diana .
The text you are searching for must be on one line. For example, DI would match
with
Diana Smith
but not with
Grantham Road
Inglebrook
Unlike OPL, you cannot use 'wildcards' when finding entries.
47
If no matching entries are found
If none of the entries contain the search clue you typed, a 'Not found' message is
displayed. Press Esc to remove this message. Then, try typing a different search clue
instead.
If a matching entry is found
If a matching entry is found it is displayed in the main part of the screen, and the text
which matched is briefly highlighted - for example:
If you left any of the lines blank when typing the entry, those lines are not shown. You
see only the information you entered, correctly labelled. In this example, no work/fax
phone numbers are shown.
Scrolling a long entry
The main part of the window has a highlight around it, and has a small arrowhead by
the line in which the match occurred. You can move the arrowhead up and down with
↑ and ↓. If there are too many lines to show at once, use ↓ to move the arrowhead down
the entry. When the arrowhead reaches the bottom of the screen, ↓ will make the entry
scroll upwards.
You can also use ← and → to scroll the entry to the left and right.
At the bottom right of the screen you will see two numbers, showing the position of this
entry, and the total number of entries in the database. 4/5 , for example, means that
this is the fourth entry out of a total of five in this file.
If more than one entry matches
If a matching entry is found, you can keep pressing Enter to search for further matching
entries. When the Database finally fails to find another matching entry, a 'No more
found' message is displayed. If you press Enter again, the Database begins the search
again from the first entry.
Finding a different entry
To find a different entry, type the new search clue and press Enter. It doesn't matter
whether an entry was shown, or 'Not found' or 'No more found' were displayed: as
soon as you start typing the search clue, the Database shows the first entry again, and
when you press Enter, it searches from the first entry onwards.
If you want to re-edit a search clue, perhaps because you made a typing error, press
Esc.
48
Searching backwards
If you press Enter to move from one matching entry to the next, you can use Shift-Enter
to move back to the previous matching entry. You might also use Shift-Enter when the
'No more found' screen is shown, to go back to the entries you'd already matched.
This diagram shows the effect of Enter and Shift-Enter:
Stepping through all your entries
If you press Enter without typing in any search clue (or having deleted any previous
search clue, which you can do by pressing Esc), you can step through all of the entries
in the database, one by one. You'll see the first of the two numbers in the bottom right
of the screen increasing by one each time.
You can press Shift-Enter at any time to go back to the previous entry; the first of the
two numbers decreases by one.
Searching by label - speeding up searching
You can also request a more specific search if you want to find an entry which has a
particular name, phone number, address or note included in a particular field. This is a
much faster way of searching for an entry.
For example, to search for all the phone numbers of companies you have listed in inner
London:
1. Select the 'Find by label' option on the 'Search' menu. Press the → to select the label
for the information you are looking for. In this example, it would be Work'.
2. Press the Enter key and ' Work' will replace 'Find' in the bottom left-hand corner of
the screen.
49
3. You can now perform the search - type 071 (the area code for inner London) and
press Enter.
The Database will display the first matching entry it finds, searching from the first entry
in the file. Press the Enter key to move on to the next matching entry.
Searching from the current entry
The entries are numbered in the order in which they are created. When you start typing
a new search clue, the database immediately resets to the first entry; the Enter key
searches forwards from this first entry, while Shift-Enter skips to the last entiy and
searches backwards.
You can, however, use the 'Start at current entry' option on the 'Search' menu to start a
search from the currently displayed entry. You can type a search clue in the normal way,
and then:
• Press Enter to start searching forwards from the next entry after the current one.
• Press Shift-Enter to start searching backwards from the entry before the current one.
Once a matching entry has been found, you can use Enter and Shift-Enter as before, to
search for other matching entries.
Moving directly to one specific entry
You can go straight to a particular entry by specifying its position in the file. Select the
'Jump to entry' option on the 'Search' menu and a dialog will appear which allows you
to enter the number of the entry you want to see.
Changing the way an entry is displayed
Wrapping at the screen edge
The 'Wrap on' option on the 'Display' menu makes each line word-wrap at the
right-hand edge of the screen. It applies to both the 'Add' screen and the 'Find' screen.
If you set 'Wrap on', you don't have to use → to see the end of a long line. However, a
name and address can look strange if a phone number or part of the address wraps onto
more than one line. For this reason, word-wrapping is not initially used when you start
using the Database.
When you use the 'Wrap on' option, its name changes to 'Wrap off'. Select it again,
and the Database will no longer word-wrap each line.
Word-wrap does not affect the way you find entries. For example, if your search clue is
green bay , entries containing green bay will match even if bay has been
word-wrapped onto a different line from green .
You can use soft hyphens, hard hyphens and non-break spaces for precise control of
word-wrap. See the Word Processor chapter for more details.
Displaying more text
To change the size of the text, select the 'Zoom in' and 'Zoom out' options on the
'Special' menu.
To increase the screen space available for your entries, use Control-Menu to reduce the
size of the status window or remove it altogether.
50
Managing your entries
Re-editing an entry
When, for example, someone's phone number changes, don't type in a new entry.
If you do, the old entry will still turn up when you try to find the correct name and
address. It will also be using up internal memory or disk space unnecessarily.
Instead, you can change the entry which you previously typed in. Find the entry you
wish to change, then select the 'Change' option on the ♦ menu.
The 'Change' screen looks as if you'd just typed the entry, but had not yet hit Tab to
save it:
The cursor is positioned at the start of the entry.
You can now edit this entry in the same way as when typing in a new one. When you
press Tab. this new version of the entry is saved, as the last entry in the database. The
old version of the entry is automatically removed from the database.
If, while you're editing, you want to cancel the changes you've made, press Esc. You
will be asked to confirm that you wish to lose the changes.
If you find that you are using the 'Change' option a lot. you may wish to make the
'Change' screen available to you from the ♦ key. This feature is described at the end
of this chapter.
The 'Update entry' option has a similar effect to 'Change'. It is provided for Series 3
compatibility reasons.
Deleting an entry
Find the entry you wish to delete, then press the Delete key or select the 'Delete entry'
option on the 'Edit' menu. A dialog will be shown, asking for confirmation before
deleting the entry.
Copying all or part of an entry
1. Find the entry to copy. Move the arrowhead to point at the first line you wish to copy
and press Shift-↓ a few times, to highlight the lines you want to copy. If you hold
down Shift-↓, the highlight will soon reach the bottom of the entry.
Although you can highlight text when you've found an entry, you're not editing it;
only the 'Change' and 'Update entry' options re-edit an entry.
2. Select the 'Copy text' option on the 'Edit' menu. A copy has now been made of the
highlighted area. Even though blank lines are not shown on the screen, they are
copied as well.
3. Press the ♦ key. and the 'Add' screen is displayed. The cursor should be at the first
line.
51
4. If you copied just part of an entry, move the cursor to the relevant label.
5. Select the 'Insert text' option on the 'Edit' menu, and the copied text is inserted. Each
line should match up correctly with its label.
6. Press Tab to save the copied entry.
Keeping notes in a database
You can use a database file for storing notes. In this case, you'd probably turn the labels
off (as described later) and word-wrap on. If you store each note as a separate entry,
you can then quickly step through all notes which mention a particular key word.
Compressing your database
When you delete an entry from your database, the space it takes up is not automatically
reclaimed. Similarly, when you re-edit an entry and press Enter to put in the new
version, space is still taken up by the old version.
The 'Compress file' option on the 'File' menu will reclaim any such space taken up by
old information. It's a good idea to use it if you've recently deleted or changed a lot of
entries.
The 'Compress file' option does not work if the database file is currently on a Flash
SSD. Instead, use the 'Save as' option to create a new copy of the database. Whichever
kind of disk you create it on, the new file will be compressed.
If you fill all of internal memory and are unable to enter more information into your
Series 3a, one of the first things to do is to compress your database (or databases). If
this does happen to you, see the 'Troubleshooting' chapter for more ideas.
Labels
Turning labels on and off
When labels are shown, the 'Hide labels' option on the 'Display' menu will remove
them, leaving the whole width of the screen free for your entries. This applies to both
the 'Add' screen and the 'Find' screen.
The name of the option then becomes 'Show labels', and if you select it again the
Database will return to showing the labels with the entries.
Editing the labels
The 'Edit labels' option on the 'Edit' menu lets you edit the labels in the same way as
you edit an entry.
Use the Enter key to put in blank lines. The number of blank lines below a label
controls the number of lines the label takes up when displayed.
When editing labels. Shift-Enter has the same effect as Enter.
The Shift-Dial keypress (Psion-Shift-Help) can be used to insert a phone symbol, to
mark a label as being for phone numbers. This is not just for cosmetic reasons; when
you dial from the Database, these lines will be searched for phone numbers. See the
'Dialling' chapter for more details.
52
When you're happy with the new labels, press Tab. There is a maximum screen width
which the labels can occupy; if one is too long it will be highlighted, and a 'Label too
long' message will be shown. Otherwise, you are returned to the 'Find'/'Add'/'Change'
screen, with the new labels in place.
If you do need to change labels after you've typed in entries, you may need to re-edit
the entries to match the new labels. However:
• If you add new labels at the bottom, this can only affect entries that use what was
previously the bottom label.
• If necessary, you can write an OPL program to change the structure of every entry,
one by one. The 'Example programs' chapter in the Programming Manual contains
such a program.
Database files
Initially, all of the entries you save are kept in one file. Unless you specify otherwise, it
is kept on the internal disk, with Data as the filename.
Creating a new database file
You can, if you want, use more than one database file. You might, for example, want a
business database and a personal database.
To make a new database file;
1. Use the 'New file' option on the 'File' menu.
2. Type a name for the new file - business , for example. The name can be from one
to eight letters and numbers, and must begin with a letter.
You can make the new database on an SSD, if you like: set the 'Disk' line to the
SSD drive, A or B , containing your SSD. This frees more internal memory for
other information.
3. Press Enter, and a new blank database is made for you. The 'Add' screen is displayed,
for you to type new entries.
In the System screen, you'll now see two names under the Data icon- Data .the
original database you were using, and the name of the new database you have created.
To use either database, move the highlight onto the file you want and press Enter.
Creating labels for new files
Each database file has its own set of labels. When you create a new file, the Database
automatically gives it the same 'phone book' labels you've seen before.
If you want to change the labels for this database:
• Before you type any entries, use the 'Edit labels' option on the 'Edit' menu.
Think carefully about which labels to use; once you've started typing in entries, adding
or removing labels could mean re-editing entries to match.
For a business address book you might, for example, add extra labels for the numbers
of a fax or mobile phone. It doesn't matter if most of the entries don't use the extra
labels; when you find the entries later, only the labels you filled in are shown.
53
Changing the name of a database file
The System screen's 'File' menu has a 'Rename file' option. You might use this to
rename the Data file to something like Personal , especially if you've created
other database files such as Business . If the file is open (its name is in bold letters),
you must press Delete to exit it before you can rename it
Changing to a different database
As well as using the System screen, you can use the 'Open file' option on the 'File'
menu of the Database to exit the current database and open a different one.
In the Database, the status window shows the name of the database you're using,
beneath the Data icon.
Copying a database file
1. Use the 'Save as' option on the 'File' menu to make a new copy of the database
you're using. The new file will automatically be compressed. The 'Save as' dialog
looks like this:
2. The 'Save as' line controls the type of file created. Set it to 'Text' to save a copy of
the database as plain text, perhaps for use by the Word Processor. See the notes on
"plain text files" later.
3. If you want to start using this new version of the file, set 'Use new file' to 'Yes'. If
you're just making a backup of your database, leave 'Use new file' set to 'No'.
The other lines in this dialog are described under "Plain text files" below.
Merging databases
The 'Merge in' option on the 'File' menu adds copies of all the entries in another file to
the end of the current database. You might use this, for example, to merge your personal
and business databases into one big database.
You can specify the same information about the type of file being merged in as you can
when creating a file with the 'Save as' option.
Plain text files
If you want to transfer database information to and from other computers, you may
wish to use files which contain only the text.
1. In the 'Save as' dialog, the 'Save as' line controls the type of file created. Set it to
'Text' to save a copy of the database as plain text.
2. Now specify how lines in your database should be delimited. You can still make each
start on a new line, but you can also keep them on the same line, separated by a tab,
comma, semicolon or other character. If you choose 'Other' as the delimiter, type the
54
character code of the character to use. on the next line of the dialog. (Character
codes are listed in an appendix to this manual.)
For example, if you set 'Newline' as the delimiter, your address book would be saved
like this:
Simon Evans
081-034-0987
(a single space)
(a single space)
2 Sighthill Rd
London
SW18 9ZZ
Doctor
(a blank line)
Nick Twyman
0242 0100216
(a single space)
(a single space)
12b Orchard Rd
Bognor Regis
Sussex
There is a blank line between each entry. Note that when there is nothing on one of the
lines in an entry itself, it is saved with a single space. (In this example, neither entry has
"Work" or "Fax" phone numbers, so a single space is saved for those lines.)
You can use 'Merge in' to merge a plain text file like this into the Database. (You might
use 'New' to make a new empty database file, then merge the plain text file into it.)
Again, if you want a line inside an entry to have no information on it, use a single space.
Each line in a text file you 'Save as' or 'Merge in' is limited to 255 characters.
Saving on Flash SSDs
It is a good idea to store your database files on a Flash SSD, as it is an extremely secure
place to keep information. Additionally, as the Database reads entries from the file into
internal memory only when necessary, you can look at large database files without
running out of memory.
On a Flash SSD, you cannot use the 'Compress file' option to recover the disk space
taken up by modified or deleted entries. Instead, use the 'Save as' option to make anew
(compressed) copy of the database.
The 'Files and disks' chapter contains further information about using SSDs.
OPL and Database files
OPLcan manipulate files made in the Database. In OPL terminology, each entry is a
record, and each line of an entry is a field. There is more about this in the Programming
manual.
55
Sorting Database files
If you want to sort your entries alphabetically, an OPL program to do this is included in
the 'Example programs' chapter of the Programming Manual. If you want it to sort by
people's second names, you must enter second names first, as in
Bartholomew, Eric .
Customising the list
As described earlier, the ♦ key swaps between the two screens on the ♦ list - the 'Find'
screen and the 'Add' screen. When you press the ♦ key, you can see the ♦ symbol
move on the ♦ list, on the right-hand side of the screen.
Putting the Change' screen on the ♦ list
You can add a further screen to the • list - the 'Change' screen, which is used to update
existing entries. You may find it quicker to select the 'Change' screen with the • key
than to select 'Change' from the menu.
1. Make sure the Find screen is shown.
2. Select the 'Set up ♦ list' option on the ♦ menu.
3. In the dialog which is shown set the 'Include Change' line to 'Yes'.
4. Press Enter to complete the dialog.
Removing screens from the ♦ list
You can also use the 'Set up ♦ list' option on the ♦ menu to reduce the number of
screens which the ♦ key moves between. For example, if you wanted to discourage
someone else from adding entries to your database (accidentally or otherwise) you
might remove the 'Add' screen from the ♦ list:
1. Make sure the Find screen is shown.
2. Select the 'Set up ♦ list' option on the ♦ menu.
3. In the dialog which is shown set the 'Include Add' line to 'No'.
4. Press Enter to complete the dialog.
You can still use the different screens by selecting them from the menu (or by
pressing their hot-keys).
You might also find this option useful to set the ♦ list to include the screens that you
use most frequently. For example, if you use a large database you may find yourself
changing entries much more often than adding new ones. In this case, it would be easier
to have the ♦ key step between just the 'Find' and 'Change' screens.
When using the ♦ key to swap between the different screens you may see some
information messages. You might, for example, be moving from the 'Find' screen to
the 'Add' screen but, in moving through the 'Change' screen, a 'Nothing to save'
message may be shown.
56
6
The Agenda
The Agenda is a powerful personal organiser which can be
used to record your notes, appointments, anniversaries and
things you have to do.
Individual entries can be set to repeat, to sound alarms, and
to have memos attached to them.
You can customise the appearance and operation of the
Agenda in many ways, to suit the type of information you
enter in it.
57
The power of the Agenda
The Agenda is designed to be flexible. If you want to. you can use it as a blank
notebook and just enter notes into it. Alternatively, you can set your entries with times
and alarms and use it as a sophisticated time manager. You can even use it as a "what I
did today" diary, if you wish, by attaching memos to entries.
There are six different views you can use:
• The Day view can show all the entries in your Agenda, day by day.
• The Week view shows all the entries week by week.
• The Year view is a "year planner", showing symbols for selected entries over a
whole year's range.
• The List view shows a list of entries, in order of date.
• The To-do view shows the entries in all the To-do Lists.
• The Anniversary view shows all the anniversary entries, month by month.
You can change the appearance of these views, so that the screen display matches your
use of the Agenda. For example, the Day view initially appears with time slots which
are one hour long. You can change the range and/or duration of the time slots if they
don't suit your usual appointment schedule. Alternatively, you might turn the time slots
off altogether, if you want to use the Agenda like a paper agenda.
You can enter notes, appointments, anniversaries and to-dos (with or without due
dates); you can also delete or cross out any type of entry when it is completed.
Other Agenda functions allow you to search for particular entries and dates, set up
series of repeating entries, copy and insert entries, copy text from other applications on
your Series 3a. and even perform calculations inside the Agenda.
Concepts like due dates and crossing entries out are, however, flexible. You might cross
out a forthcoming appointment because it has been cancelled, not completed; a due date
might be the date to start taking action on a to-do entry, or the deadline on a project.
As with the other powerful applications on your Series 3a, though, you need only
find out about those features - and, indeed, those views - that you want to use.
Note for Series 3 users only: The Agenda can convert files from the Series 3
Agenda. This is a one-way conversion - you will not be able transfer the Agenda
back from the Series 3a to the Series 3. Use the 'Open file' option to open your
Series 3 file. A dialog asks you for the name to use for the new converted file. You
must enter a new filename: the Agenda will not allow you to overwrite an existing
file.
Moving between the Agenda views
When you first press the Agenda button you will see the Day view:
On the right side of the screen you will see a status window, which contains the ♦ list.
This lists the Agenda views. A ♦ symbol is displayed next to the current view ('Day').
58
To move to the next view in the list, press the ♦ key. To move to the previous view in
the list press Shift-♦ key. Alternatively, use the hot-keys shown on the ♦ menu to go
straight to the view you want.
The following keys also move around the different views:
• Control-Space moves to the current day within the Day view.
• Space moves to today within the current view. Pressing it again returns to the day
you were on.
• Esc switches between the current and last view.
• Control-M/T/W/T/F/S/S move to the Day view, setting to the next day beginning
with the letter.
• Shift-Control-M/T/W/T/F/S/S move to the Day view, setting to the previous day
beginning with the letter.
Types of entry
There are three types of Agenda entry: day entries, anniversaries and to-dos. You can
set any entry to sound an alarm, or to have a memo attached. You can also repeat, move
and copy entries to other dates. The Agenda can store entries for any date within the
range 1/1/1980 to 31/12/20149.
Day entries - appointments and notes
Read this section, as it introduces you to the Agenda. Then read whichever sections you
feel are relevant to the way you want to use the Agenda.
The Day view
If you do not already have the Day view on display, move to it - with Control-Space,
for example, or the Shift-Psion-D hot-key, or with the ♦ key.
The day and date are displayed at the top of the left-hand column, with time slots for
morning entries underneath. Time slots for afternoon and evening entries are in the
right-hand column. The cursor is shown as a black bullet in one of the time slots.
You can move the cursor with these keys:
• ↑↓ move between time slots on the same day.
• Control-↑↓ and Psion-↑↓ move up/down by a screenful of time slots.
• ←→ move to the other column first, and then to the same time slot on the
previous/next day.
• Control-←→ move to the same time slot on the previous/next day.
• Psion-←→ move to the same day in the previous/next week.
Entering untimed entries, eg notes
1. Use the ←↑↓→ keys to move the cursor to a suitable time slot.
2. Type your entry (up to 254 characters) and press the Enter key. The 'Day entry
details' dialog will appear.
3. Select 'No' on the 'Timed entry' line, and press Enter.
59
Untimed entries are shown with a bullet symbol in front of the text. If you want to do
something to this entry, such as re-edit it, move the cursor onto this bullet, and press
Enter to start editing it again.
You can enter a phone number anywhere within the text of an Agenda entry. You can
then use the Dial keypress (Psion-Help) to dial the number automatically. See the
'Dialling' chapter for more information.
Deleting an entry
Move the cursor to the entry and press the Delete key. A prompt will appear asking you
to confirm the deletion; press Y to confirm.
Entering appointments
You can enter appointments in two ways, according to the way you want to use your
Agenda. To use it like a paper agenda, you simply type the appointment's time as part
of the entry text. To use it as an appointment manager, you must make the Agenda
aware of the time details, by entering them in the 'Day entry details' dialog; the Agenda
can then automatically organise appointments in time order and show you where
appointments overlap.
The Agenda as an appointment manager
1. Move the cursor to the relevant day (in any time slot) and type the appointment text.
Press Enter and the 'Day entry details' dialog appears. The top line, 'Timed entry',
should be set to 'Yes'.
2. Type the time for the appointment on the 'Start time' line. (If your times are in
'am-pm' format, don't forget the "am"/"pm" setting.)
3. Either move the cursor to the 'Duration' line and type the duration of the
appointment, or move to the 'End time' line and type the end time for the
appointment. Press Enter to complete the dialog and the appointment will be entered
in the correct time slot.
To the left of the appointment, you will notice a grey line that covers the times of the
slots in which the appointment takes place. This is called a duration bar, duration bars
appear beside any timed appointment in your Agenda. (A black line will appear over the
slot times whenever two or more timed appointments overlap. This is called an overlap
bar.)
The appointment time is displayed in front of the text. The end time of the appointment
is shown in brackets after the text.
If you want to, you can turn off duration bars or overlap bars, show the duration instead
of the end time, and so on. See "Changing the appearance of the Day view", later in this
chapter.
Appointments that last no time do not display an end time or duration.
60
You cannot enter tinted appointments that span more than one day. If you want an
entry to go across midnight, enter it as more than one entry, or as a repeating entry
(described later).
You can also type day entries into the Week, Year and List views. Enter the 'Day entry
details' in the dialog as you would in the Day view.
The Agenda as a "plain paper" Agenda
If you intend to use your Agenda as a "plain paper" agenda, you should first change the
'Day entry preferences' so that day entries are untimed by default:
1. Select the 'Set preferences' option on the 'Special' menu. A new submenu is shown.
2. Select the 'Day entry defaults' suboption on the 'Entry preferences' menu. Then
change the 'Day entries timed by default' line to 'No', and press Enter.
You are now ready to enter notes and appointments:
1. Position the cursor to an appropriate place on the screen. (You can put it in the
corresponding "time slot", if you like, or you can choose to ignore time slots
altogether.) Type the text (and the time, if it is an appointment) For example, you
might type 2.30 Dentist .
2. Press Enter, then Enter again to remove the 'Day entry details' dialog from the screen.
To change the position of an untimed entry, press Delete to delete it, then move to the
desired position and use the 'Insert entry' option on the 'Edit' menu.
As an alternative to pressing Enter twice, you can press Psion-Enter. No 'Day entry
details' dialog will be shown. If you wish, you can even set the Enter key to do this,
instead of Psion-Enter:
1. Select the 'Set preferences' option on the 'Special' menu, and in the submenu it
displays, select 'General preferences'.
2. Change the first line, 'Prompt for entry details on', to 'Psion-Enter'. Press Enter to
complete the dialog.
Now you can type entries and just press Enter once to enter them. If you do want to
enter 'Day entry details' on occasion, use Psion-Enter (or, having entered the entry,
select the 'Change entry details' option on the 'Edit' menu.)
Finally, you may even wish to remove the guide times shown at the start of the slots. To
do this:
1. Select the 'Set preferences' option on the 'Special' menu, and in the menu it displays,
select 'Day view'.
2. Move to the 'Slot definitions' line, and press Tab. A 'Slot definitions' dialog is
displayed.
3. Set both of the 'Show' lines to 'Only slot line' (or, to remove the grey slot lines as
well, to 'Neither slot time nor line'). Press Enter to complete the dialogs.
61
Time slots and slot compression
To insert a second entry in a time slot, simply type it as you did the first one. A new
line will be created for it automatically.
Notice that when a time slot needs more than one line to show its entry or entries, the
slot expands to accommodate the second entry, while other time slots without entries
reduce in size. This feature is called slot compression; it allows the maximum number
of entries and empty time slots to be displayed.
If you wish, you can turn slot compression off. See "Changing the appearance of the
Day view", later in this chapter.
Changing the display of entries
The 'Zoom in' and 'Zoom out' options on the Special menu allow you to cycle through
the fonts available.
The 'Wrap on/off' option, also on the 'Special' menu, controls whether long entries
word-wrap on the screen, or are just truncated.
Birthdays and other anniversaries
You can use the Anniversary view to enter birthdays and other anniversaries, rather than
entering them as untimed day entries. The Agenda then "knows" that they are
anniversaries, i.e. that they repeat every year, and will insert them into your Agenda
every year. It will also display age (for birthdays) and/or the start year (for
anniversaries) for you.
The Anniversary view
Press the ♦ key until you reach the Anniversary view, or press the Shift-Psion-A
hot-key to move there directly. It initially looks like this:
The screen is split into two columns, with the current month in the left-hand column
and the following month in the right. The current year is shown at the top of the screen.
The cursor appears on the bullet in the left-hand column.
Entering an anniversary
1. Type the text for the anniversary - Steve's birthday , for example - and press
Enter. (It does not matter which month the cursor is currently in.) The 'Anniversary
details' dialog will appear.
2. Type the day of the anniversary on the 'Day of month' line and select the month on
the 'Month' line.
62
3. If you don't want to display anything about an anniversary's start year, set the
'Specify start year' line set to 'No'. If you do, set it to 'Yes'; then type the start year
(eg the year someone was born) in the 'Start year 'line, and set 'Display year as' to
display the 'Number of years' or 'Start year' (or both) with the anniversary entry.
4. Move to the bottom line of the dialog. If you want this entry to have a symbol in the
Year view too. type the character or symbol to use. If you don't want a year symbol,
press the Delete key, to set this line to 'None'.
5. Press Enter to complete the dialog. The anniversary will be entered in the column for
the month in which it occurs.
Although the Agenda only shows from 1980 onwards, you can set an anniversary's start
date to be before this.
You can even enter BC dates, by beginning them with a minus sign.
If you press Shift-Psion-D you will move to the Day view on the date of the
anniversary. You will see the anniversary entry displayed in the first time slot, with a
small candle as its "bullet".
If you press Shift-Psion-Y, you will move to the Year view. The cursor will be placed on
the date of the anniversary, and the year symbol A will be displayed for your
anniversary. The text of the entry will be shown on the top line of the screen.
By default, all anniversary entries are shown in the year view, and with the symbol
A . You can change these settings by using 'Set preferences' and selecting
'Anniversary defaults'.
You can enter public holidays that occur on the same date every year as
anniversaries, for example Christmas Day and New Year's Day. They will then
appear in your Agenda each year. You can distinguish them in the Year view from
other anniversaries by giving them a different year symbol. (See "Setting a year
symbol for an entry" later in this chapter).
You can enter anniversaries from within the Day, Week, Year and List views, with
the 'New entry' option on the 'Edit' menu.
Movement keys
You can move the cursor with these keys:
• ↑↓ move to the previous/next entry (or month).
• Control-Psion-↑↓ move to the first/last entry in the month currently displayed.
• Psion-↑↓ move by a screenful at a time.
• ←→ move to the previous/next month.
• Control-←→ move by three months at a time.
• Psion-←→ move by a year at a time.
• Control-Psion-←→ Move to the same month five years before or ahead.
• The Spacebar displays the current month in the current year, and moves to the first
entry which is on or after today's date.
Changing the appearance of the Anniversary view
You can change the number of month columns that are displayed at the same time:
1. Select the 'Set preferences' option on the 'Special' menu.
2. Select the 'Anniversary view' suboption on the 'View preferences' menu.
63
3. Type the number of months that you want to display on the screen (1-4) and press
Enter to complete the dialog.
You can use the 'Find' option (described later) to show a list of all anniversaries
Some less common uses of anniversaries are described in the note on "Anniversaries
and repeats", in the "Repeating an entry" section of this chapter.
To-do lists and other lists
You can use the To-do view to enter to-dos and other lists, for example shopping lists,
rather than entering them as untimed day entries. The Agenda then keeps them on a
To-do list until you delete them.
You can set a due date for a to-do entry, if you like.
When you enter to-dos you give each one a priority between 1 and 9, where 1 is the
highest and 9 the lowest. Initially, all priority 1 entries are automatically shown in
the Day/Week/List views as well. Lower priority entries are only shown on their to-do
list.
You can control which priority entries should be shown in other views. As you'll see,
to-do lists can be customised in many ways. 'Set preferences' has a 'To-do view'
suboption for any overall settings for the To-do view, and a 'To-do entry defaults'
option for setting the values suggested when you enter each to-do entry. There is also a
'To-do list settings' option on the 'To-do lists' menu, which controls the way each of the
lists work.
The To-do view
Press the ♦ key until you reach the To-do view, or press Shift-Psion-T to move there
directly. It initially looks like this:
The To-do view initially has just one list, called 'To-do list'. The name is displayed at
the top of the screen. The cursor is on a bullet in the list.
Entering a to-do
1. Type the text for the entry, and press Enter. The 'To-do details' dialog will be
displayed. If you want this to-do to appear in the Day, Week and List views too,
leave the 'Priority' line set to '1'; if you don't, type in a lower priority.
Typically, most to-dos do not need to have dates.
2. For an undated to-do, leave the 'Dated' line set to 'No', and just press Enter.
If the undated to-do has a high enough priority to be displayed in other views, it
will be shown on "today" in the other views.
64
However, you might want an entry like "pay rent" to have 'Due date' set to when the
rent is due, and with a warning date (or "start date" or "valid date" - however you think
of it) a few days beforehand.
2. For a dated to-do, fill in the 'Due date' line. Then move to the 'Date details' line and
press Tab to display the "To-do date details' dialog.
3. You can set the warning as a date on the top line, or as a number of days on the
second line.
4. If you leave the 'Show due date as' line set to 'Auto', the "time to go" will be
displayed in an intelligent fashion. While more than a week away it is shown as a
date; then the day is shown; then "tomorrow", "today" and "yesterday"; then as "last
Mon", for example, finally, if it is more than seven days overdue (past the due date),
it is shown as a date again.
Instead of this, you can choose to show the due date as a number of days to go, or
always as a date (or not show it at all). Overdue dates are always shown in bold.
5. Press Enter twice to complete both dialogs.
The to-do is displayed with its priority as the entry bullet.
If the dated to-do has a high enough priority to be displayed in other views, it will
be shown on its warning/start date. Once the real date has passed this warning/state
date, the entry will be carried forward, always appearing on the screen for today, until
you delete it or cross it out.
You might want to repeat an entry like "pay rent". Repeating an entry is described
later in this chapter.
You can enter to-dos from within the Day, Week, Year and List views, with the 'New
entry' option on the 'Edit' menu.
You might use dated to-dos to complement anniversary entries - for example. you
might enter 'Buy card for Joe' as a dated to-do, with Joe's birthday as its due date,
and a warning date of two or three days.
IMPORTANT: choosing the sort order
Initially, to-do entries are ordered manually. There are two ways to set the position of an
entry on a manually ordered to-do list;
• Use the 'Position to-do entry' option on the 'To-do lists' menu.
• Delete the entry, move to the desired position on the list, and use the 'Insert entry'
option.
However, you can also sort to-dos automatically, according to their due date, and
their priority. For example:
1. Select the 'To-do list settings' option on the 'To-do lists' menu. (If you've defined
more than one to-do list, select the name of the to-do list to change, on the top line.)
2. Set the 'Sort order (in To-do view)' line to 'Date first, then priority'.
The list is then ordered according to the importance of the entries. Dated to-dos which
are "valid", ie in their warning period, come first. Then come undated to-dos, sorted by
priority; last come dated to-dos which have not yet reached their warning date.
You can then enter long-term to-dos with a high priority and a warning date a few
days before they are due. They will then stay at the bottom of the to-do list until their
warning from date is passed, at which time they will appear at the top of the to-do
list.
65
The 'Priority first, then date' order sorts dated and undated entries together, by
priority. Within each priority the dated entries come before the undated ones.
Bulleting a list with numbers
When a list is manually ordered, you may wish to bullet it with numbers instead of
priorities. (This also lets you see how many entries it has.)
1. Select the 'To-do list settings' option on the 'To-do lists' menu. (If you've defined
more than one to-do, select the name of the to-do list to change, on the top line.)
2. Set the 'Bullet entries with' line to 'Numbers', and press Enter.
Creating other lists
You can create up to 99 to-do lists in your Agenda. For example, you could create a
new list for shopping, which displays unsorted numbered entries, and set it not to have
its entries appear in the Day/Week/List views at all:
1. Select the 'New to-do list' option on the 'To-do lists' menu.
2. Type Shopping as the name for the new list, and press Enter.
The top line of the To-do view will now display an arrowhead in the top comer to
indicate that there is another list ←→ move from list to list.
3. Select the 'To-do list settings' option on the 'To-do lists' menu. Check the
shopping list is selected on the top line. Set 'Manual' on the 'Sort order (in To-do
view)' line.
4. Set the 'Bullet entries with' line to 'Numbers', and press Enter.
5. Set the 'Display entries in general views...' line to 'No', and press Enter.
Movement keys
You can move the cursor with these keys:
• ↑↓ move to the previous/next entry in the current list.
• Psion-↑↓ move up/down the current list by one screenful of entries.
• ←→ move to the list to the left/right of the current one. (There is no "wrapping"
from the start to the end of a list.)
• Psion-←→ move to the list that is furthest to the left/right.
Managing To-do lists
The 'To-do lists' menu has options for renaming and deleting to-do lists. For example,
you might wish to rename or delete the initial list in the Agenda (called "To-do list").
If you have more than one to-do list you can change the order in which they are shown.
Use the 'To-do list settings' option, and set 'Position among to-do lists' for each list you
want to move. The first/leftmost to-do list has position 1.
Showing more than one To-do list
1. Select the 'Set preferences' option on the 'Special' menu.
2. Select the 'To-do view' suboption on the 'View preferences' menu.
3. Type the number of To-do lists to display at once. You can display up to four (if you
have created four lists). Press Enter.
66
To-do entries in other views
1. Select the 'To-do list settings' option on the 'To-do lists' menu, and select the name of
the to-do list to set.
2. Move to the 'Display entries in general views' line and set this to 'Yes'.
3. If you want only entries with priorities from 1 to 3 (for example) to appear in the
Day/Week/List views, enter 3'on the 'From priority 1 to' line. ( If you don't have
too many to-dos. you may wish to enter '9' here, so that all to-dos on this list are
included.)
4. Set 'Default position in Day view' to the time at which to-dos from this list should be
positioned in the Day view. (They will have the same position, relative to day
entries, in the Week and List views.)
5. Finally, set the bottom line to say whether crossed out to-do entries are allowed to
appear in the other views. Then press Enter. (There is more about crossing out
entries later.)
You can position individual to-dos when in the other views, by using the Delete key to
cut them, then the 'Insert entry' option to insert them at a different position. If you wish
you can display to-dos in some, but not all other views. (You might, for example, want
to see them on the Day view, but not on the Week view, as they would fill up the slot for
the current day.) Use 'To-do list settings' as before to set each list to display to-dos in
other views. Then use 'Set preferences'; use the 'Week view' suboption, for example,
press Tab on the 'Allowed types' dialog, and set 'To-dos' to 'No'.
Alarms in the Agenda
You can set a single alarm for any type of entry (except undated to-dos), to ring as a
reminder before the date/time of the entry. For example, you might set an alarm to ring
a few days before an anniversary entry, to remind you to go and buy a card.
Each entry type has a different a default alarm sound: 'Rings' for timed day entries,
'Fanfare' for untimed day entries, 'Soft bells' for anniversary entries, and 'Chimes' for
to-dos. (See "Defaults for new entries", later in this chapter.)
As an alternative to alarms, you can warn yourself of an event by making two
entries, with one of them appearing a few days before the event as a reminder, or you
can enter it as a to-do which has a warning date a few days before the event.
Setting an alarm for an entry
You can set an alarm for an entry while you are entering it, or at any time thereafter.
Alarms for new entries: type the entry and press Enter. In the entry details dialog, set
the 'Alarm' line to 'Yes'. Move to the ' Alarm details' line and press Tab to display the
'Alarm details' dialog. (For day entries, you can enter the time of the alarm in the main
'entry details' dialog.)
Alarms for existing entries: move to the entry and select the 'Set alarm for entry'
option on the 'Entry' menu to display the 'Alarm details' dialog.
In the 'Alarm details' dialog, set the 'Alarm' line to "Yes" and type the time for the
alarm in the 'Alarm at' line (remember to put in am or pm if your Series 3a is set to
use a 12 hour clock). Enter the number of days prior to the entry date that you want the
alarm to ring in the 'Days previous' line. Select the alarm sound that you want to use in
67
the 'Sound' line. You can lest each sound by pressing the Menu key. Press Enter to
complete the dialog.
The entry will now display a bell symbol after the text to indicate that it is set to
produce an alarm.
To set workday alarms for a day entry or a to-do, you must make the entry repeal on
your workdays. (In the 'Repeat entry' dialog, set 'Type' to 'Weekly', and 'Days in
week' to include all your workdays.) Then set this repeating entry to have an alarm.
When an alarm rings
When an alarm rings, a dialog appears taking over the whole of the screen, no matter
what you are doing on your Series 3a. (The Series 3a will turn itself on if necessary).
The dialog shows the text and time of the entry for which it is set. The alarm starts
quietly, and becomes louder. You cannot use your Series 3a until you have
acknowledged the alarm.
To turn the alarm off: press Esc.
To silence the alarm: press Enter. The dialog will remain on the screen so that you can
read it
To snooze the alarm: press Space. The alarm will turn off for five minutes and then
resume ringing. If you press Space again, a further five minutes is added to the snooze
time. You can do this to a total of 60 minutes.
Removing an alarm
If you decide that you don't want an entry to produce an alarm:
1. Move to the alarmed entry and select the 'Set alarm for entry' option on the 'Entry'
menu.
2. Set the 'Alarm' line to 'No', and press Enter.
Alarms and exiting files
Open Agenda files always inform the Time application about their next alarm only. (It
is the Time application which actually rings the alarm.) When an Agenda alarm rings,
the open Agenda file then informs Time of the next alarm it contains, and so on.
However, when you exit an Agenda file, the Time application still knows about the
agenda's next alarm. It will still ring it, but will not be able to ring any others from that
file, until you open it again.
• If you did not want the alarm to ring, use the 'View next alarms' option on the
'Alarm' menu in the 'Time' application. When you get to the alarm in question, the
Time application knows that the Agenda file is no longer open, and offers you the
chance to remove the alarm.
• If you did want this and other alarms in the file to ring, you must re-open the file.
68
Changing an entry
Crossing out an entry
You can use the cross-out facility to mark entries that are completed or cancelled.
• Move to the entry concerned and select the 'Cross out entry' option on the 'Entry'
menu. The entry will be displayed with a line through it.
If you cross out alarmed entries, the alarm is disabled.
You can take the cross-out off an entry by repeating the same procedure. (The 'Cross
out entry' option changes to 'Reinstate entry'.) If an alarm had been set for the entry, it
will be re-enabled.
To-do lists can fill up with crossed out entries. If this happens, you can use the 'To-do
list settings' option, and set 'Display crossed out entries' to 'No' for the list concerned.
If 'Display entries in general views' in this dialog is set to 'Yes', and the bottom line of
the dialog is set to 'Yes', crossed out entries with a suitable priority will still be
displayed in other views. You can therefore still use your Agenda to look back at when
you did different to-dos. without them filling up the to-do view itself. (If you don't wish
to do this, you should tidy your agenda, as explained later.)
If you take the cross-out off a to-do entry which is shown in the past in other views,
it becomes "valid" and will then be displayed on today. If, for example, you are
currently on a different day in the Day view, the entry vanishes from the screen;
however, the message "Entry crossed out" is shown.
Changing the appearance of entry text
You can change the appearance of any entry with the 'Set style for entry' option on the
'Entry' menu. This lets you set the entry's style to bold, italics, underline, or any
combination of the three.
To change the default style (to be used for all future entries), select the 'Set
preferences' option, and choose either 'Day entry defaults', 'Anniversary defaults' or
'To-do entry defaults'. Each of these presents a dialog which includes a 'Default style'
line. Move onto this line and press Tab, and you can set the default style for that type of
entry.
Changing the entry type
Use the 'Change entry type' option on the 'Edit' menu to change an entry to a different
entry type. For example, you might want to change a to-do entry into a day entry, or
vice versa.
'Change entry type' asks for the entry details appropriate for the new kind of entry. The
entry will then be displayed in the views appropriate to its new type.
If you are on an entry in the past and you change it to a to-do entry, the to-do will be
displayed on the current day. The only way you can display it in the past - should
you so wish - is to cross out the original entry before you change it to a to-do.
Changing the date of an entry
You can move an entry to a different date with the 'Change entry date' option on the
'Edit' menu. This even lets you change the due date and warning date of a to-do.
69
Editing entry text and details
You can edit entry text and entry details independently of each other:
To edit entry text and details: press Enter to edit the entry text. When you press Enter
again, the 'entry details' dialog appears: if, instead, you press Psion-Enter, no dialog is
shown, and the details remain unchanged.
To edit just the entry details: select the 'Change entry details' option on the 'Edit'
menu.
Cutting, copying, inserting and deleting entries
You cannot highlight entries in the Agenda. In general, you can only do things to the
entry that the cursor is on.
To cut or delete an entry: press the Delete key. Press Y to confirm and the entry will
be cut from the Agenda and placed on the clipboard, ready for you to insert it back in if
you wish.
To copy an entry: use the 'Copy entry' option on the 'Edit' menu. The message 'Entry
copied' will be displayed and the entry will be copied to the clipboard, ready for you to
insert it.
To insert the entry which is on the clipboard: move to the time slot in which you
want the entry and select the 'Insert entry' option on the 'Edit' menu. Use the 'Change
entry details' option to change any of the entry details as necessary.
To delete an entry without affecting the clipboard: press Shift-Delete.
Memos
You can attach notes to any Agenda entry with the Memo editor. Each memo can
contain over 3000 characters. None of the text is displayed in general views; a symbol
like a sheet of paper is displayed after the entry text to indicate that the entry has a
memo attached. You can set individual memos to have password protection.
You can use memos to turn your Agenda into a "what I did today" type diary, which
nobody else can read without the correct passwords. The Memo editor is a variant of
the Word Processor, and has most of the same features.
Attaching a memo to an entry
1. Move to the entry concerned and select the 'Edit memo' option on the 'Entry' menu.
The Memo editor appears.
2. Type the text for the memo. If you press the Menu key, you will see that many of the
Word Processor features for manipulating and changing the styles of text are
available to you.
3. When you have finished, select the 'Exit 'option on the 'Special' menu, to return to
the previous view. You will see that the entry is now followed by a small symbol like
a sheet of paper, to indicate that a memo is attached to it.
Viewing and re-editing a memo
Use the 'Edit memo' option again if you want to read or re-edit a memo.
70
When you've finished, select the 'Exit' option in the Memo editor. If you've made
changes which you do not want to save, select the 'Exit, abandon changes' option, also
on the Memo editor's 'Special' menu.
Changing the appearance of text within memos
The Memo editor is essentially a specialised version of the Word Processor. It contains
the same functions for manipulating and changing the appearance of text.
The set of styles which can be used within memos is common to all memos in the
Agenda file. So if you make any change to a style, that change will affect any memo
that uses that style. Initially, the same four styles are available as in new Word
Processor documents.
• Use the options on the 'Paragraphs' menu to change the fonts, indents, tabs,
alignment and spacing of paragraphs within a memo. (Each change you make
creates a new style, and that style is then applied to the paragraph.)
• Use the 'Style housekeeping' and 'Emphases housekeeping' options on the 'Styles'
menu for complete control over the styles and emphases of text within a memo.
Other Word Processor options
• You can use the 'Insert', 'Copy', 'Bring' and 'Evaluate' options (on the 'Edit' menu)
for text within memos in the same way as you can use them within other Agenda
views.
• Use 'Find' to search for text. 'Find again' searches for further occurrences of text
searched for by 'Find'.
• Use 'Replace' to search for a particular piece of text and replace it with other text.
• Use 'Count' to count the number of words in the memo.
• Press the ♦ key to display an outline of a memo. (Each paragraph style has its own
outline level.) The options on the 'Memo' menu to change the level of outlining.
The Word Processor chapter has more details of these and other options.
Password protecting a memo
You can set each memo to have a password of up to eight characters. In the Agenda
views you cannot tell that a memo has a password, but when you try to view or edit the
memo, you will be asked to enter the password.
1. While editing the memo, select the 'Password' option on the 'Memo' menu.
2. Type the password in the 'Enter password' line. The characters are not displayed as
you type them; padlock symbols are shown in place of each character. Type the
password again in the 'Confirmation' line as a check and press Enter to complete the
dialog.
3. Select the 'Exit' option on the 'Special' menu to return to the previous view.
When you next try to edit this memo the 'Password protected' dialog will be displayed.
Enter the password in the dialog (again, the characters you type will not be shown), and
press Enter.
Changing or deleting a password
1. Edit the memo, and select the 'Password' option on the 'Memo' menu.
2. You are asked for the password again; enter it, and the 'Change password' dialog is
shown.
71
3. To change the password, type the new password in the 'Enter password' and the
'Confirmation' line. To delete the password, press Enter twice to complete the
dialog without entering a new password.
Deleting a memo
You can delete any memo which you no longer wish to keep, by deleting all the text
that it contains.
1. Edit the memo, then select the 'Highlight all text' option on the 'Edit' menu, to
highlight all of the text. Press the Delete key to delete all of the text.
2. Select the 'Exit' option on the 'Special' menu to return to the previous view. The
memo symbol will have disappeared to show that the entry' no longer has a memo
attached.
Long memos
Memos can take up to 4K of space on a disk. If you change an entry which has a memo
attached, you will use up that amount of disk space again, as the entry is re-written to
disk. You should therefore try to avoid making unnecessary changes to entries with
long memos.
You can use the 'Compress file' option (or 'Save as' for Flash SSDs) to reclaim the
space taken by deleted or changed entries. This is described later in this chapter.
Repeating an entry
You can repeat any entry on a daily, weekly, monthly by date, monthly by day or yearly
basis. Any alarm or memo attached to the entry is also repeated.
• 'Monthly by date' means that an entry appears on the same day each month - for
example the 12lh of June, 12th of July and so on. (Note that an entry on the 29th.
30th or 31st of a month can be given a 'Monthly by date' repeat; in months which do
not have this day. the entry appears on the last day of the month.)
• 'Monthly by day' means that the day of the week controls the repeat date - the first
Tuesday of each month, the second Saturday, the last Thursday, and so on.
To make an entry repeat on workdays, give it a weekly repeat, then select the days in
the week on which you want the entry to appear. (If your workdays were to change you
would have to edit any workday repeat entries.)
Repeating entries have their repeat information stored as part of the entry. They do not
use up space on disk for each occurrence of the repeat.
Using the 'Repeat entry' option
1. Move to the entry that you want to repeat and select the 'Repeat entry' option on the
'Entry' menu.
2. Select the type of repeat on the 'Type' line.
3. Type the interval for the repeat on the 'Interval' line. For example, if you want an
entry to repeat every 2 weeks, set 'Type' to 'Weekly' and 'Interval' to 2 .
4. On the 'Front' line, type the date which you want the repeating entry to start from.
72
5. If you want the entry to be repealed forever, leave the 'Repeat forever' line set to
'Yes'. If you choose 'No', either type the date that you want the repeating entry to
finish, on the 'Until' line, or type the number of times you want the entry to repeat,
on the 'Occurrences' line.
6. Use the 'Show' line to set whether just the nest outstanding occurrence of the entry is
to be shown, or every occurrence.
7. If you are creating a weekly, monthly by date, or monthly by days repeat move to the
last line in the dialog and press Tab to display the dialog for entering days and dates.
Weekly repeats: set the days on which you want the entry to repeat to 'Yes', and press
Enter.
Monthly by date repeats: select the first date on which you want the entry to repeat,
and press the + key to set this date. If you want any other dates for this repeating entry,
select them, and press the + key for each. You might, for example, select the 3rd, 4th
and 5th of every month. Press Enter to complete the dialog.
Monthly by days repeats: Select the lop two lines to the day for the repeat - 'Second'
and 'Tuesday', perhaps, or 'Last' and 'Friday' - and press + to set this day. Use this
procedure to set any other days to repeat on. You might, for example, select the first
Wednesday and last Wednesday of every month. Press Enter to complete the dialog.
8. Press Enter to complete the 'Repeat entry' dialog.
You cannot enter more than one day for a yearly repeating entry. You must enter a
yearly repeating entry for each day of the year on which you want the entry.
If an overdue repeated to-do is not crossed out or deleted by the time the next
occurrence is set to display, it is superseded by the occurrence which is now due.
Keeping track of repeated entries
Select the 'View all repeats' option on the 'Search' menu to display a list of all
repeating entries. The entries are sorted by the date which you set as the 'From' date.
(This is not necessarily the same date on which the entry first appears in the Agenda
views). You can use the ↑↓ keys to scroll the list.
If an anniversary has a start date before 1980, it will he listed as 1980.
Changing repeat entries
You can edit the text, modify the entry details, change the date and delete any
occurrence of a repeating entry as you would any other entry.
When you make a change to a repeating entry, a dialog will ask you which occurrences
are to be affected by the change. Select 'All', 'Just this one'. 'This & all future', or
'This & all previous'. (If you make a change by using the 'Repeat entry' dialog itself,
some of these choices will not be appropriate; you may find that no 'Just this one'
setting is offered, or even that no dialog is shown at all.)
• If you choose 'Just this one' the Agenda creates a new non-repeating entry with the
changes you made, and disables (hides) the occurrence of the repeating entry. The
new entry has no "repeat" symbol.
• If you choose 'This & all future', or 'This & all previous', a message informs you
that the repeating entry has been split into two repeating entries.
Each new entry created in the above ways inherits most of its settings from the
repeating entry. Memos are inherited too; if the entry has a long memo, the new entry
uses up that much more disk space.
73
You cannot set the "due date" or "warning date" for a repeating dated to-do, only the
number of days warning. This is because the actual dates on which the entry will be
due are controlled by the "repeat" settings.
Anniversaries and repeats
Anniversary entries are always given a yearly repeat. If you use the 'Repeat entry'
option on an anniversary, however, you will see that you can change the repeat type
from 'Yearly' to 'Yearly by day of week'. This type of repeat is the same as a 'Monthly
by day' repeat set to have an interval of' 12' - that is, it repeats once a year in the same
month, but on the first Tuesday, last Friday, or second Saturday (etc).
If you set the 'Type' line to 'Yearly by day of week', press Tab on the bottom line of the
dialog, and set the day for the repeat.
You can also set the 'Type' line to 'No repeat', should you so wish. This allows you to
make a non-repeating entry appear in the Anniversary view.
The Week view
The Week view displays all the day entries, to-dos and anniversaries for a week. Press
the ♦ key until the Week view is displayed, or press Shift-Psion-W to move to it
directly. It looks like this:
The screen is divided into eight: a title featuring the current month, year and week
number, and sections for the seven days of the week. (The first day is as set in the 'Start
of week' option in the Time application. In the above picture it is Monday.)
The slot for today is distinguished by having its name displayed in black while all other
day names are white.
Week numbers are always calculated from the start of the year, according to an
international standard.
Movement keys
You can move the cursor with these keys:
• ←→ move to the corresponding day slot on the on the opposing page, or to the same
day in the previous/next week.
• ↑↓ move to the previous/next entry, or the previous/next day slot if there are no
entries in the current slot.
• Psion-←→ move to the same day in the previous/next week.
• Control-←→ move to the same day slot in the previous/next month.
74
• The Spacebar moves to today. Pressing it again returns to the day you were on.
Tip: To get to the end of a day full of entries, use PgDn (Psion-↓) then ↑.
Changing the appearance of the Week view
Select the 'Set preferences' option on the 'Special' menu, and then the 'Week view'
suboption on the menu shown. The 'Preferences in Week view' dialog lets you set the
position of the title, the display of entry durations and end times, and the entry types
which are allowed in the Week view. You may wish to exclude to-do entries from
display in the Week view, to prevent today's slot from becoming cluttered.
The Week view always displays entries in two columns; use the List view to show a
single column of entries.
The List view
The List view normally displays all the day entries and anniversaries in your Agenda,
plus those to-dos of sufficient priority to appear in other views. Press the ♦ key until
the List view is displayed, or press Shift-Psion-L to move to it directly. It looks like this;
Entries are listed in a single column and are separated into monthly blocks. The date of
an entry is given to the left of the entry text.
Movement keys
You can move the cursor with these keys:
• ↑↓←→ move to the previous/next entry.
• Control-↑↓ move to the previous/next entry at the start of a day.
• Psion-↑↓ move by a screenful at a time.
• Control-Psion-↑↓ move to the first/last entry on the list.
• The Spacebar moves to today, or as close as possible. Pressing it again returns to the
day you were on.
Changing the appearance of the List view
Select the 'Set preferences' option on the 'Special' menu, and then the 'List view'
suboption on the menu shown. The 'Preferences in List view' dialog lets you set the
display of entry durations and end times, and the entry types which are allowed in the
list.
You can also specify whether repeat entries are to be shown 'Once only' (ie at their next
occurrence) or 'As normal'.
75
If you choose 'As normal', and you have entries which repeat 'Forever' and have
every occurrence shown, this may slow the List view down.
The Year view
The Year view displays symbols for selected entries of any type. Anniversaries are the
only entries which automatically appear in the Year view (with the symbol A). For all
other entry types you must set a year symbol for each individual entry.
You can set a different year symbol for each individual anniversary when you enter
it. Choose the symbol in the 'Year symbol' line in the 'Anniversary details' dialog. If
you don't want them at all, use 'Set preferences' and its suboption 'Anniversary
defaults', and set the Year symbol to be off by default.
Press the ♦ key until the Year view is displayed, or press Shift-Psion-Y to move to it
directly. It looks like this:
The current year is shown in the lop left-hand comer. The date of the current cursor
position is given on the top line of the screen. The cursor appears as a black box around
one of the dates in the grid. The grid of days is drawn in grey for the past (with
diagonal grey lines through the days), and with black lines for the future.
The year symbols of all entries which have them are shown on the appropriate
days.
Setting a Year symbol for an entry
You can use any character as a symbol for an entry in the Year view. However, it is
worth remembering that some characters, such as # , cannot be shown very clearly due
to the size of the Year view display. You may wish to stick to letters of the alphabet.
1. In a different view, move to the entry which you want to have a year symbol.
2. Select the 'Set year symbol for entry' option on the 'Entry' menu.
3. Change the setting on the 'Show in Year view' line to 'Yes', move the cursor to the
'Symbol in Year view' line and type the symbol that you want to use. Press Enter to
complete the dialog.
When you move to the Year view you will see the symbol that you just entered, in the
date on the grid that corresponds to the date of the entry. The text for the entry is
displayed on the top line of the screen whenever the cursor is positioned over the
symbol.
76
Days with multiple entries
Up to two year symbols can be displayed for each day in the Year view, though you can
set year symbols for as many entries as you like for each day. When there are two or
more entries, a message such as '(1/2: + - for more)' is displayed in the top right-hand
corner of the screen. The text for the first entry for a particular date is shown on the top
line of the screen, whenever the cursor is positioned over that date in the grid. To see
the text for further entries use the '+' and '-' keys to move between them.
Movement keys
You can move the cursor with these keys:
• ←→ move to the previous/next day.
• ↑↓ move to the day above or below the current one. If you are at the top or the
bottom of the year view they scroll the screen by a year.
• Control-←→ move a week at a time.
• Psion-↑↓ move to the first/last day of the month.
• Control-↑↓ move a month at a time.
• Psion-↑↓ move a year at a time.
• Control-Psion-↑↓ move by four years at a time.
• Shift-↑↓ scroll the Year view backwards/forwards by a month. (You can also use
Shift with Control-←↑↓→ to keep the cursor on the same line, scrolling the Year
view if necessary.)
• Shift-Space makes the current month go to the top of the Year view. You can then see
the next 12 months.
Changing the appearance of the Year view
Select the 'Set preferences' option on the 'Special' menu, and then the 'Year view'
suboption on the menu shown. The 'Preferences in Year view' dialog lets you set the
month that is displayed first, and whether appointment durations or end times are
shown with the entry text on the top line.
You can also change the display to show just one symbol at a time, for example to show
all your anniversary entries, without cluttering the Year view with all the other entries
for which you have set a year symbol. To do this, select the 'Which symbols' option on
the 'Special' menu. Set the 'Which symbols' line to 'One', and type the 'Symbol to
display'. Press Enter to complete the dialog.
As a reminder, the symbol is shown in the lop left of the Year view. To return to
showing all symbols, select 'Which symbols' again and set the top line to 'All'.
77
Managing your Agenda
As well as deleting entries, you can cross them out when they are completed (or if they
are cancelled), and you can use the 'Tidy/extract' option to remove out-of-date entries.
You may wish to leave selected entries in the past, whether crossed out or not, as a
"what I did" type of diary, or as a record of appointments and so on. Alternatively, you
may wish to remove all out-of-date entries, and then maybe reclaim the disk space they
took up.
Tidying your Agenda
Use the 'Tidy/extract' option to delete specific entries from your Agenda.
The top line of the dialog sets what should happen to tidied entries. 'Delete entries'
just deletes the entries from the Agenda; 'Copy to file' copies them into a new Agenda
file, but still leaves them in the current agenda file; 'Copy to file and delete entries'
copies them to a new file and deletes them from the current file. For the last two of
these you must enter the name for the agenda file to be created containing the tidied
entries.
Choose the 'Start date' and 'End date' of entries to be tidied; however, you can set these
dates automatically by setting 'Range' to 'Whole Agenda', 'From/until today', 'This
week/month/year', or 'Last week/month/year'.
Two further settings control which entries are tidied:
• The 'Entry types...' line lets you set which types of entries can be tidied.
• The 'Status filter' line lets you tidy 'Crossed out entries only' (or, should you so
wish, 'All except crossed out' entries).
For example, you might set both of these lines so that only crossed out to-dos were
tidied.
Repeating entries appear in any file created by 'Tidy/extract', but with their date ranges
clipped to the range of dales you were tidying. However, they are only deleted from the
original file if all their occurrences lie within the range you are tidying.
If you chose 'Copy to file' or 'Copy to file and delete entries', you can move to the
System screen and see the name of the file beneath the Agenda icon. You can access the
file in the same way as any other Agenda file.
It is not possible to use the Tidy/extract option to tidy entries into an existing Agenda
file. Instead, open this other file, merge in the file created by 'Tidy/extract', and exit
the file again.
Tidying to-do entries
If you use 'Tidy/extract' when in the To-do view, the dialog does not ask for dates, but
instead asks which to-do lists to Tidy. Set 'Which lists' to 'AU', 'One' or 'Selection'; if
you choose 'Selection', set 'Include list' to 'Yes' for each list you want to tidy, and to
'No' for all the others.
If you just want to tidy crossed out entries, set 'Status filter' to 'Crossed out entries
only'.
Important: if you are in the Day, Week or List views when you use 'Tidy/extract', low
priority to-dos which are not shown in these views will not be tidied.
78
Merging Agenda files
You can merge in the entries and/or preference settings from another Agenda file. You
might wish to do this if you have two separate Agenda files, perhaps for work
appointments and domestic entries, and have decided instead to merge them into one
file.
Alternatively, you might wish to merge just the preference settings from an existing
Agenda file into a new file so that it looks the same and works in the same way as your
original one - or if someone else has a layout you want to use for your own Agenda.
1. If any of the files you want to merge in are open, exit them. (If you do not, you will
see a 'File or device in use' message later, and the merge will fail.)
2. Open the Agenda file into which you want to merge the entries and/or preferences.
3. Select the 'Merge in' option on the "File" menu, and on the 'Merge in' line select
whether you want to merge the entries, preferences or both.
4. Select the name of the file whose entries you want to merge in. and press Enter.
If you choose to merge preferences a confirmation dialog will appear. Press Y if you
are sure you want to overwrite them.
If you want to combine one list into another, tidy the list to a file (using the 'Copy to
file and delete entries' setting), open the file and rename this to-do list to have
exactly the same name as the list where you wanted the entries. Then open your
main Agenda file again, and Merge in the tidied file.
Defaults for new entries
The default settings are the settings suggested in entry details dialogs. If you find you
regularly have to make the same changes in entry details dialogs, you can change the
default settings to make the Agenda more suited to the entries you want.
Select the 'Set preferences' option on the 'Special' menu. In the submenu it displays,
the 'Day entry defaults', 'Anniversary defaults' and 'To-do entry defaults' suboptions
control the default values suggested when you enter a new entry of each type. These
suboptions also let you set the default style for each type of entry, and the default year
symbol (should you choose to give an entry a year symbol).
Notes on day entry defaults
'Day entries limed by default' is a very important setting. If you are repeatedly
selling 'Timed' to 'No' when entering day entries, set this to 'No' instead.
'Default position for untimed entries' controls where untimed entries should be
positioned if you enter them while not in the Day view. 'Default position for timed
entries' does the same for timed entries, if you enter them using Psion-Enter to avoid
the 'Day entry details' dialog.
Defaults for anniversaries
If you don't like the positioning of anniversaries on the Day/Week/List views, set
'Default position for anniversaries' to a different lime slot. (If you don't want them at
all. you should use the 'Day view' (or 'Week view' or 'List view') suboptions of 'Set
preferences', and set the 'Allowed types' line to exclude anniversaries.)
You can also set whether anniversaries should have a year symbol on by default.
79
You can change the position of any individual anniversary in the Day view: press
Delete to delete it, then move to the desired position and use the 'Insert entry' option.
Defaults for to-do entries
You can change these settings for each to-do list independently. Set the top line of the
dialog to the to-do list you want to change. (Having made changes, you can then
change the top line to a different to-do list, and set that one.)
Note that many related settings are available from the 'To-do list settings' option,
including the default position in the Day view for entries from each list.
Display functions
There are several display functions that you can use to change the display of text on
your Series 3a.
'Zoom in' and 'Zoom out'
The 'Zoom in' and 'Zoom out' options allow you to cycle through the fonts available,
in all views except the Year view, to increase and decrease the size of text on your
screen. The font in use in each view is remembered separately. You might set the Week
view to use the smallest font, for example, while the Day view uses a larger font.
Wrapping text
The Wrap function allows you to set whether text is automatically wrapped to the next
line if it does not fit on one line.
When wrapping is on, the option on the Special menu is 'Wrap off'. Select it to turn off
wrapping. If an entry is too long to fit on the screen it will be displayed truncated. (The
entry itself is unchanged.) The option then becomes 'Wrap on'; select it to turn
wrapping on again.
The "wrap" setting is remembered separately for each view. You might set just the
Week view to have wrapping off.
In the Year view, the 'Wrap' option is replaced by 'Which symbols'.
You can use soft hyphens, hard hyphens and non-break spaces within the text for more
precise control of word-wrap. (See the Word Processor chapter in the manual for
further details).
The time separator character
When timed entries are displayed in a view, a dot is used to separate the hours and
minutes. You can change this if you wish:
1. Select the 'Set preferences' option on the 'Special' menu, and in the submenu it
displays, select 'General preferences'.
2. On the 'Time separator character' line, enter the character you want to use. Press
Enter to complete the dialog.
This does not affect the display of times in dialogs.
80
Entry management functions
Viewing a calendar
You can press the Tab key to display a calendar from within any view:
Similarly, Shift-Tab (or Tab twice) displays a three month calendar, while Control-Tab
(or three Tabs) displays a 12 month calendar.
The ←↑↓→ keys move in their respective directions, changing month and year where
necessary. To move from day to day, use Shift-←→. To move by a week at a time, use
Shift-↑↓.
You can bring up a calendar, move the cursor to a particular date, then press Enter to
return to the previous view, set to this date. You may find the calendar a convenient
means of moving around your Agenda.
Press Esc to remove the calendar without changing the date displayed.
You can also produce a calendar in this way when entering a date in a dialog - for
example, in the 'Jump to date' option.
The 'Find' option
You can use the 'Find' option to search for text, repeating entries, crossed out entries,
alarmed entries and particular entry types in your Agenda.
1. Select the 'Find' option on the 'Search' menu.
2. If you want to search for text, type it in the 'Text to find' line.
3. Set the 'Start date', and 'End date' lines, or set them with the 'Range of entries' line,
to select the range of entries to search.
4. Use the settings on the 'Repeat entries', 'Crossed out entries', 'Alarms', and 'All
entry types' lines to modify the set of entries that are to be searched.
5. Press Enter, and the entries will be searched for:
While a search is in progress, you can move the highlight up and down the list of
entries found so far. A 'Special' menu is available, with zoom, wrap and printing
81
options. If you see the entry you are looking for, move the cursor to it and press Enter
to see this entry in the previous view.
When the search is finished the top line shows the number of entries found, and then
lists the matching entries, like in the List view. If no entries were found, the message
"None found" will be displayed. Press Esc to return to the previous view.
If you are searching the whole Agenda, and you have repeating entries which are set to
show all their occurrences, the search could take a very long time, as it keeps finding
occurrences of repeating entries. You can press the Esc key to stop the search at any
time. (If, in the 'Find' dialog, you set 'Repeat entries' to 'Show next only', you should
avoid the problem.)
Find docs not search for text within memos.
For example, you could use 'Find' to search for all the anniversaries in this year for
which you have set alarms, excluding those anniversaries which are crossed out. To do
this you would leave the 'Text to find' line blank, set 'Range of entries' to 'This year',
and 'Crossed out entries' to 'No'. Then you would set 'All entry types' to 'No', press
Tab on the 'Entry types' line and set all entry type lines except 'Anniversaries' to 'No'.
The 'Find again' option
The 'Find again' option works in the same way as the 'Find' option, but it suggests the
same settings you used the last time you used 'Find'.
The previous/next entry
Use the 'Go to next entry' and 'Go to previous entry' option to jump to the
next/previous entry in the current view.
The 'Jump to date' and 'Jump to list' options
You can use the 'Jump to date' option on the 'Search' menu in the Day, Week, Year,
Anniversary and List views to move to a particular date. A dialog asks for the date to
jump to. (Sometimes, you may find that pressing Tab or Control-Tab to navigate by a
calendar is quicker.)
In the 'To-do' view, 'Jump to date' is replaced by 'Jump to list'. It asks you to select the
list which you wish to jump to.
Printing entries
See the chapter on Printing later in this manual for information about printing all or part
of an Agenda file.
82
Agenda files
All the entries in your Agenda are stored in an Agenda file. You can have more than one
Agenda file on your Series 3a.
Reclaiming space - compressing Agenda files
When you delete or change an entry in an Agenda File, the original version of the entry
still takes up space in the file. You may therefore need to compress Agenda files
periodically to reclaim this unused space.
For Agenda files on the Internal disk or on RAM SSDs:
1. Select the 'Compress file' option on the 'File' menu.
The size of your current Agenda file and the amount of space used by deleted entries
are displayed (in bytes).
2. Press Enter to compress the file. The message "Agenda compressed" is displayed
when the process is completed.
You cannot reclaim used disk space on a Flash SSD until you copy all of its files to
another disk, format the Flash SSD, and copy the files back. When you're doing this,
however, you should use 'Save as', to make a new (effectively compressed) copy of the
Agenda file. This is then the file to copy back to the formatted SSD.
For an Agenda file on a Flash SSD you can also get to 'Save as' via 'Compress file':
1. Select the 'Compress file' option. The same dialog is displayed showing you how
much the file would compress by, but with a message saying that you must use 'Save
as'. The Enter key is displayed with the text "Save as".
2. Press Enter, and the 'Save as' dialog appears automatically. Type a name for the new
file, and press Enter.
3. You may wish to exit the Agenda, go to the System screen and use its 'Delete file'
option to delete the old file, in case you were to use it by mistake.
You can make a new, "compressed" file in this way at any time, if you wish, as long
as you have enough disk space free for the new file.
Making new Agenda files
You can use the 'New file' option to create as many Agenda files as you like. For
example you might create two Agenda files, one for work and one for home. You can
create new Agenda files from the System screen, by first moving the highlight to the
Agenda icon, or from within another Agenda file:
1. Select the 'New file' option on the 'File' menu.
2. Type the name for the new file on the 'File: Name' line (maximum 8 characters).
3. On the 'Disk' line, select the disk that you want to create the file on. A message is
displayed, confirming the creation of the new file.
If you move to the System screen you will now see the names of two Agenda files
beneath the Agenda icon.
If you create the new file from inside the Agenda, or from the System screen while
another Agenda file is open, the new file will inherit the preference settings of the open
Agenda file. Only if no other Agenda file is open does the new file use the default
preference settings.
83
Opening Agenda files
You can open Agenda files from the System screen or from within another Agenda file.
From the System screen: move the cursor over the name of the Agenda file that you
want to open, and press the Enter key.
From within another Agenda file: select the 'Open file' option on the 'File' menu, and
select the file to open.
If you open a file from the Series 3, the Agenda must first convert it. A dialog asks you
for the name to use for the new converted file. You must enter a new filename: the
Agenda will not allow you to overwrite an existing file.
The Series 3 is unable to open Series 3a Agenda files - you cannot transfer Agenda files
back from the Series 3a to the Series 3.
Saving copies of Agenda files
You can save a copy of an Agenda file onto an SSD or the internal disk. You might wish
to do this to create a second copy of the file for back-up purposes.
Select the 'Save as' option on the 'File' menu. Type the name for the copy of the file
and select the disk that you want to create it on. Press Enter to complete the dialog and
create the copy of the file.
If you set 'Use new file' to 'Yes', your old file will be exited and you will start using
this file instead.
You cannot import/export plain text (ASCII) files. You can, however, use 'Print
setup', set 'Printer model' to 'General' and 'Printer device' to 'File', and print all or
part of your Agenda to a plain text file.
Low battery when saving an entry
If there is a 'Battery too low' or 'Batteries too low to write to Flash' error while saving
an entry, you will be given a 'Fail'/'Retry' choice. If possible, change the batteries (or
insert a mains lead) and select 'Retry'. If you select 'Fail', an incorrect entry will be
saved. Exit the file: when you next open the file, the Agenda will remove the bad entry,
and you can then add new entries after it.
Marking it as the end of file could conceivably fail if there was no space at all on a
Flash SSD. or if the SSD were write-protected. In these cases, the Agenda would exit
immediately, and would refuse to open the file until you remedy the situation.
84
Customising your Agenda
The appearance and function of the Agenda is highly flexible; the slot times and lines
that are initially displayed in the Day view, for instance, are only there for guidance.
You can change the settings of many preferences to customise your Day view. You can
also change the content of the ♦ list so that you can move more quickly between the
views that you most frequently use. A number of example set-ups are given below to
give you some ideas. You may wish to experiment until you have found the right
combination of settings that you wish to use for the Agenda.
Changing the appearance of the Day view
You can change the following display preferences in the Day view:
1. Select the 'Set preferences' option on the 'Special' menu.
2. Select the 'Day view' suboption. This dialog lets you put the title on the left or right,
turn slot compression, duration bars and overlap bars on or off, set whether
appointments should be shown with end times or durations, and set which entry
types are allowed in the Day view.
3. To change the display of slot times and lines, move to the 'Slot definitions...' line and
press Tab to display the 'Slot definitions' subdialog. The settings for the left and
right of the screen are separate to allow you to have different layouts on each side.
For both left and right side: set the 'From' line to the lime that you want the page to
start on. Set the 'Slot duration' to the length of time that you want for each slot. Set
the 'To' line to the time the last slot on the page ends. You can then choose among
four options on the 'Show' line to determine whether or not slot times and lines are
displayed.
Even if you do not display the slot times and lines, the Agenda still knows about the
time slots and will always place timed entries in their correct positions on the page.
Press Enter to complete the subdialog.
4. Press Enter to complete the dialog and return to the Day view.
The Day view always displays the day in two columns.
Changing the position of entry types
The appearance of the Day view is also affected by the entry defaults which determine
the time slot in which entries of each type appear in the Day view. You can change these
defaults to make entries appear at different times in the Day view. For example you
could have a number of different to-do lists and make their entries appear at different
times of the day.
Use 'To-do list settings' to change where a to-do list's entries appear: use the
'Anniversary defaults' suboption of 'Set preferences' to set where anniversaries should
appear.
Within a single time slot entries always appear in the following order: to-dos,
anniversaries, untimed day entries, then timed day entries. This allows entries of the
same type to be grouped together and appointments to be sorted according to time.
If you extend the duration of a time slot you may get two or more blocks of entries in
this order, depending on the default time positions for to-dos and day entries.
85
Changing the ♦ list
You can change the views that are included in the ♦ list so that you can move more
easily between the views that you use most frequently. For example:
• If you mainly use the Day and Week views, you could just have these two views
from the ♦ list. If you're not in the Day view, the ♦ key will always go there, and a
second press will always go to the Week view.
• If you mainly use the Day view, you could remove all the other views from the ♦
list. You can then always press the ♦ key, wherever you are, to go to the Day view.
Select 'Set up ♦ list' from the '♦' menu. Set 'Yes' for the views you wish to include
and 'No' for those you wish to exclude from the list.
86
Example setups
You may wish to make further modifications to one of the example setups outlined
below, to suit your use of the Agenda.
Note: apart from 'To-do list settings', which has its own menu option, the settings
referred to in these examples are suboptions of 'Set preferences'.
The "plain paper" agenda
• The 'Day view' preferences are set so that neither slot times nor lines are shown on
either side. The times and durations of slots are left the same.
• The 'Day entry defaults' are set so that all day entries are untimed by default, and
untimed day entries appear in the first morning slot.
• The 'To-do list settings' are set so that to-dos are undated by default and appear in
the first morning slot.
• The 'Anniversary defaults' are set so that anniversaries appear in the first morning
slot.
The To-do based Agenda
For those who have lots to do, but not many fixed appointments.
• The 'Day view' preferences are set so that:
The title appears on the right-hand side.
Slot times, but not lines, are displayed on both sides.
• The to-do lists are set up so that:
There is a to-do list for the different limes of the day, i.e. a list for morning,
afternoon, and evening to-dos.
The 'To-do list settings' for each list are set so that entries on each list appear at an
appropriate time of the day in the Day view. For example, morning to-do list entries
appear at 9am.
For each list, entries of priority 3 or above are set to appear in the Day view.
87
• The 'Anniversary defaults' are set so that anniversaries appear in the 6am slot in the
Day view.
The "plain paper" and appointment Agenda
• The 'Day view' preferences are set so that:
The left-hand side has one time slot from 6am to 9am. The right-hand side has
hourly slots from 9am to 10pm.
Neither slot times nor lines are shown on the left-hand side. Both are shown on the
right-hand side.
• The 'Day entry defaults' are set so that untimed day entries appear at Sam.
• The 'To-do List settings' are set so that to-dos are undated by default and appear at
7am.
• The 'Anniversary defaults' are set so that anniversaries appear at 6am.
Other editing features
The editing menu
While editing an entry, a special menu (entitled 'Edit') is available. This has a 'Copy
text' option, to copy a highlighted region; an 'Insert text' option, to insert text
previously copied (or cut with the Delete key); and a 'Bring text' option, to insert a
copy of text highlighted in a different application on the Series 3a.
This menu also has an 'Evaluate' option, which lets you make calculations on figures
while you are editing an entry:
1. Type the calculation that you wish to make, in the text of the entry.
2. With the cursor somewhere on (or just after) the calculation, select the 'Evaluate'
option on the 'Edit' menu and the result will be displayed. The calculation is left
highlighted; press the Delete key to remove it, leaving just the result.
You can use the advanced editing keys while editing an entry:
• Psion-Delete deletes to the beginning of the line, and Shift-Psion-Delete deletes to
the end of the line.
• Control-Shift-Psion-← highlights the current word, while Control-Shift-Psion-→
highlights the whole of the entry.
The 'Bring entry' option
You can use the 'Bring entry' option on the 'Edit' menu to copy text from a different
application on your Series 3a. There is more about this in a later chapter.
88
Note that to "bring" an entry from the Agenda into a different application you need only
move the cursor onto the entry to copy. (Don't press Enter to re-edit it.) You cannot
"bring" more than one entry at a time, to or from the Agenda.
Using the To-do view as a document manager
You can use the memo feature with the To-do view to store and manage small
documents. For example, many people store lots of small Word Processor documents
(notes and letters) in the \WRD directory. Most are less than 4K and could be
conveniently stored as memos on to-dos in a to-do list. The advantages of this are:
• You can enter a document summary of up to 200 characters as the to-do entry to
which the document memo is attached, as compared to an eight character filename
for a Word Processor document.
• You can use the Agenda's 'Find' option to search for text within the to-dos (ie in the
document summaries), making it easier to locate one document from among a large
number of them.
• You can set due dates and alarms for important documents, which you cannot do in
the Word Processor.
Encryption, and formatting with styles and emphases are provided for memos in
exactly the same way as in the Word Processor application.
More about repeating entries
Examining the details of repeat entries
An occurrence of a repeating entry is disabled (hidden) if you delete just that
occurrence. This also happens if you make any change to just one occurrence of a
repeat: the occurrence is disabled and a new non-repeating entry, which has the change
you made, is inserted at the same point.
• Examining repeats from within the 'View all repeats' option: Move the cursor to
the repeating entry whose details you wish to examine and press Enter.
• Examining repeats from Agenda views: Move to the repeating entry you wish to
examine and select the 'Examine repeat' option on the 'Entry' menu.
In both cases, the 'Examining repeat' dialog appears:
A maximum of 999 occurrences will be shown. Typically, you will see a message to this
effect when examining a weekly or daily repeating entry which is set to repeat forever.
89
You can use the ←→ keys on the 'Date' line to view all the dates for the repeating entry.
The number of the occurrence is shown in the 'Occurrence' line.
You can press the '+' and '-' keys to set an occurrence as enabled or disabled. You
might, for example, re-enable an occurrence which you had deleted. Press the Spacebar
to search for the next hidden entry.
Press Enter to confirm any changes you make. If you press Esc, the entry is left
unchanged.
Creating complex repeats
You might wish to create complex repeats for events that repeat themselves on varying
dates. For example, you could enter a repeating entry for your pay day that occurs on
the 26th of each month, unless that is a weekend or public holiday:
1. Enter "pay day" as a monthly repeating day entry (untimed) for the 26th of each
month from today's date, with an interval of one (ie set for every month).
2. Use the 'Set year symbol for entry' option to set a year symbol ( P , perhaps) for this
entry.
3. Move to the Year view and find all the occurrences of this entry which fall on a
weekend or public holiday. (Weekends are shown in grey; you can enter public
holidays yourself, and give them their own year symbol - H , perhaps.) For each of
these occurrences, use the 'Change entry date' option on the 'Edit' menu; each time,
change 'Just this one' occurrence to the date on which your pay day would occur.
90
7
The Word
Processor
Word processors allow you to type in all kinds of information, from
short notes or lists to letters or longer documents that you intend to
print.
The Word Processor has powerful editing features. It word-wraps
each paragraph as you type. It has 'Find' and 'Replace' functions
and an 'Outline' feature, to show you the structure of longer
documents. You can set different phrases or paragraphs to be bold,
underlined and so on, position paragraphs to the left or right, or
indent them. You can set tab positions, and enter tables of
information. You can create and save different styles for text, and
save templates for documents that you frequently type.
With the Word Processor you can print things like hold and
underlined text, in a variety of fonts, on a range of printers. It can
print plain text to almost any printer. It can show you a preview of
how the document will look, before you print. You can even add
headers and footers, for example to add a page number
automatically to the bottom of each page.
The Word Processor also offers password protection and
encryption, to keep confidential information secure. (For
information on passwords see the 'Security and backups' chapter.)
91
Basic use
The Word Processor is as powerful as many word processors used on desktop
computers. You can, however, just use it as a notepad and type in documents
without learning in any detail how the Word Processor works. It is set up to
perform everyday functions - making a word bold, for example, or bulleting a
paragraph - with a few simple keypresses.
The Word Processor screen
The first time you press the Word button, the screen is blank and the cursor is in the top
left-hand corner:
You can change the size of the status window and turn it off and on. if you wish, by
pressing Control-Menu.
About printing
A separate chapter deals with printing information from the Series 3a. After
showing you how to set up the Series 3a for a given printer, it covers "simple printing"
from the Word Processor, before moving on to more advanced topics.
As you'll see. Word Processor features which only affect printing, such as headers and
footers, and the 'Spacing' option on the 'Paragraph' menu, are covered in the 'Printing'
chapter.
Editing text
You can begin typing a document straight away. Everything you type appears in the
main part of the screen. The text you type word-wraps when it reaches the right-hand
side. For example:
Press Enter when you want to start a new paragraph. The cursor moves to the start of
the next line.
92
If you are new to word processors, type in any kind of text at all for the moment, and
try out the keypresses and options suggested in this chapter.
As in many other Series 3a applications you can use the 'Zoom in' and 'Zoom out'
options on the 'Special' menu to change the display size of the text you type.
Using paragraphs
Paragraphs are an important concept in any word processor. Every time you press
Enter, you end the current paragraph and start a new one. The word paragraph applies
even to headings, or to a few words on their own. For example, if you type
Dear Sir/Madam and press Enter, the Dear Sir/Madam is a separate
paragraph. As you'll see, many display features, such as font settings, are often applied
to paragraphs as a whole.
To start a new line without starling a new paragraph - when typing an address,
for example - use Shift-Enter. Such forced line breaks are marked on the screen with
a down-arrow symbol.
No blank lines are shown on the screen between adjacent paragraphs, so that as much
text as possible can be displayed. (If you print documents, you can separate adjacent
paragraphs by any amount of vertical spacing - not just by whole lines.)
There are several ways to see more clearly where one paragraph ends and the next
begins:
• To mark the start of each paragraph. Select 'Set preferences' on the 'Special'
menu, and set 'Show style bar' to 'On'. The start of each paragraph will now be
marked by the two-letter shortcode - such as 'BT' - of the style which each
paragraph is using. Marking the start of each paragraph in this way does not affect
the printed document. (There is more information about styles and their shortcodes
later in this chapter.)
• To mark the end of each paragraph. Select 'Set preferences' on the 'Special'
menu, and set 'Show carriage returns' to 'Yes'. The Word Processor will now mark
the end of each paragraph with a symbol like the one on the Enter key. Marking the
end of paragraphs in this way does not affect the printed document.
• To indent the first line. Select 'Indents' from the 'Paragraphs' menu. Move the
highlight to the 'First line' line and type a suitable value. Indents are initially
measured in inches. (The unit of measurement is set using the 'Printer setup' option
on the System screen.) Press Enter to complete the dialog and return to the
document. Indenting the first line of particular paragraphs in this way does affect the
appearance of those paragraphs in the printed document.
You can use this option to set an indent for the current paragraph, as above, or all
paragraphs using the same style. Styles and their shortcodes are explained later in
this chapter.
Moving the cursor
Whatever you type is always inserted at the cursor position. You can move the cursor
around the text with the ←↑↓→ keys. You can also use the following keypresses:
• Control-← and Control-→ move the cursor a word at a time.
• Psion-← ('Home') and Psion-→('End') move to the start and end of the line
respectively.
• Control-↑ and Control-↓ move the cursor up and down by a paragraph at a time.
• Psion-↑ ('Pg Up') and Psion-↓ ('Pg Dn') move the cursor up and down by a
screenful at a time.
93
• Control-Psion-↑ (Control-PgUp) and Control-Psion-↓ (Control-PgDn) move the
cursor to the top and bottom of the document
Long documents
If you type a long document, you can move from page to page with the 'Jump to page'
option on the 'Search' menu. The Word Processor calculates where pages would begin
and end if you were to print, and lets you move to the start of any page.
Page ends are shown as a dotted line across the screen. For more details of page breaks,
see the 'Printing' chapter.
Highlighting text
You often want to highlight an area of text - so that you can delete or copy it. perhaps.
You can use Shift with any of the previous 'cursor movement' keypresses to start or
extend a highlight by the same amount. For example:
• Shift-←→ move a highlight one character at a time.
• Shift-↑ and Shift-↓ highlight a line at a time.
You can use the 'Highlight all text' option on the 'Edit' menu to highlight all the text in
a document.
Esc removes any highlight.
More advanced keypresses:
• Control-Shift-Psion-← highlights the current word, and Control-Shift-Psion-→
highlights the current paragraph.
Splitting text in a paragraph
Position the cursor at the point where you want to split the text and press:
• Enter to start a new paragraph.
• Shift-Enter to start a new line without starting a new paragraph.
Deleting text
To delete characters you have typed position the cursor and use:
• The Delete key to delete the character to the left of the cursor.
• Shift-Delete to delete the character to the right of the cursor.
• A highlight to mark an area of text and then press Delete to delete the whole area.
Text that is deleted by highlighting an area of text and then pressing the Delete
key is placed on the clipboard. (This is like the 'cut' function on some other
systems.) The text on the clipboard remains intact until you copy or delete something
else onto it, or you exit the Word Processor. To delete highlighted text without
replacing the clipboard, press Shift-Delete.
If you delete text by mistake, use the 'Insert text' option to put it back (undelete it).
You cannot use 'Insert text' to replace characters deleted with Shift-Delete.
As you delete text, paragraphs are word-wrapped again.
If you press Delete when the cursor is at the start of a paragraph, the two paragraphs
either side of the cursor are joined together. The same happens if you press Shift-Delete
when the cursor is at the end of a paragraph.
94
Advanced Delete keypresses:
• Psion-Delete deletes to the beginning of the line.
• Shift-Psion-Delete deletes to the end of the line.
The deleted text is also put on the clipboard, replacing any previous text there.
Copying text
You can copy any area of text and insert new copies of it elsewhere in your document:
1. Highlight the area to copy.
2. Select the 'Copy text' option on the 'Edit' menu. A copy of the text is placed on the
clipboard. Any text previously on the clipboard is lost. A 'Copied' message is
displayed.
3. Move to the place where you wish to insert the copy, and select the 'Insert text' option
on the 'Edit' menu. You can use this option to insert as many copies of the text as
you like, anywhere in your document.
Each application - Word Processor, Database, Agenda and so on - keeps its own
clipboard. If you want to copy information between different open files, see the
separate chapter on 'Moving information with 'Bring''.
Moving text
To move text around, just delete it, move the cursor to the new position, and insert it:
1. Highlight the area to move.
2. Press the Delete key. The Word Processor deletes the text from the document and puts
it on the clipboard.
3. Move the cursor to the place where you wish the text to be, and select the 'Insert text'
option on the 'Edit' menu. You can insert more than one copy, if you wish, by using
'Insert text' again.
Wordcount
To find the number of words in your current document, select the 'Count' option on the
'Search' menu.
The 'Evaluate' option
You can use the 'Evaluate' option to work out a calculation while you're typing:
1. Type the calculation without putting an = at the end.
2. If the calculation is all on one line and has no spacing, just move the cursor onto it;
otherwise, highlight it with Shift-← or Shift-→. Then select 'Evaluate' and the result
will appear.
3. The calculation is left highlighted; press the Delete key to remove it, leaving just the
result.
95
You can also use 'Evaluate' to sum a list of highlighted numbers, like this:
25.16
+10.00
+121.08
-43.71
Results are initially shown with two decimal places. You can use the "'Evaluate"
format' option on the 'Control' menu of the System screen to set results to be in any
format supported by the Calculator. See "Decimal places, accuracy, and number
formats" in the 'Calculator' chapter.
Word-wrap features
The Word Processor word-wraps your text to the screen width. Word-wrapping occurs
at the last suitable space or hyphen in a line. As you'll see, if you print the document it
will be word-wrapped to the page width. You can, however, control word-wrapping
yourself:
• Forced line breaks (press Shift-Enter) are used to make text start a new line.
• Non-break spaces (press Control-Space) are spaces at which word-wrap cannot take
place. Use them between words or characters which should always stay together initial and surname, perhaps, like 'J. Smith'.
• Hard hyphens (press Control-Shift-hyphen) are hyphens at which word-wrap cannot
take place. These are displayed slightly lower on the screen than ordinary hyphens.
• Soft hyphens (press Control-hyphen) mark a place at which hyphenation for
word-wrap can occur if necessary. A soft hyphen only appears on a printout if it
causes word-wrap to occur.
If you select the 'Use printer layout' option on the 'Word' menu, you can see your
document (and even edit it) word-wrapped as it would be on the printed page.
Special characters
The 'Set preferences' option on the 'Special' menu lets you display special characters
which are not always easy to see:
Special character:
Displays as:
Tab
right-arrow
Space
dot
Paragraph end
symbol on the Enter key
Soft hyphen
hyphen with gap
Forced line break
down-arrow
This only affects the screen display: these symbols are never printed.
Non-breaking spaces are always displayed as spaces, even if you set spaces to
display as dots.
96
Using Bold, Italic and Underlined text
You can change the appearance of a highlighted word or phrase by holding down the
Control key and typing the two-letter shortcode of the emphasis you wish to use:
Shortcode:
Emphasis:
BB
bold
UU
underline
II
italic
SS
subscript
EE
superscript
NN
resets to normal text
All of these settings are shown both on the screen and on the printed page:
You don't have to highlight an area first. If you want to start typing bold letters, for
example, press Control-B-B, and start typing. To return to normal letters, press
Control-N-N, or move the cursor away from this area.
These settings are pre-defined emphases. There is more about defining and using your
own emphases later in this chapter.
The saved file on the disk
The Word Processor does not work directly on a file; it loads the information from the
file into memory, and it is this "in-memory" working version which you edit.
The 'Exit, lose changes' option
As in other Series 3a applications, the normal 'Exit' option will always save the current
document to file. If you were just playing around with a document you may wish to use
the 'Exit, lose changes' option instead, to exit the Word Processor without saving any
changes to the file.
Saving the document to disk
If you are about to make large changes to your document or generally experimenting
with the Word Processors features, you may wish to save the document as it is, so that
you can revert back to the way it was if anything goes wrong.
• Use the 'Save' option on the 'File' menu, before you make the changes, to copy this
working version to the real file on the disk.
97
The file is also saved when you use the 'Exit' option, or if you change to a different
file, either with the 'Open file' option on the 'File' menu, or from the file list in the
System screen.
Reverting to the saved document
• Select the 'Revert' option on the 'Edit' menu to revert to your previous document.
'Revert' re-loads the file on disk, losing any changes you had made to the in-memory
version.
Running out of disk space
Whenever it saves a file, the Word Processor deletes the old version from the disk, then
saves the new one. First, though, it checks the free disk space; if there might not be
enough space to save the new version, it just displays a 'Not enough space left to save
file' message.
In rare circumstances, though, the Word Processor can try to save and still fail with a
'Disk full' error. It will then display a 'File deleted; cannot exit until file is saved'
message. Even the 'Exit, lose changes' option will not work, because the original file
on disk has been deleted. If you were to quit, the file would be gone forever.
• To save the file, use the System screen to free some more disk space, then try the
Word Processor's 'Save' option. Once you have successfully saved the file you will
be able to exit it. (See the 'Troubleshooting' chapter for more information about
freeing disk space.)
Alternatively, use 'Save as' to make a new version of the file on a different disk. In
the 'Save as' dialog, you must set 'Use new file' to 'Yes'.
• If you want to abandon the file, even though it has been deleted from the disk,
go to the System screen, move the highlight to this file under the Word icon, and
select the 'Kill application' option on the 'Apps' menu.
Working with document files
Creating new documents
You should use a separate Word Processor file for each separate document, memo,
notepad and so on that you type. You can create new files from within the Word
Processor, or on the System screen.
In the Word Processor:
1. Select the 'New file' option on the 'File' menu.
2. The 'Create new file' dialog will appear. Type the name for the new file on the 'File:
Name' line, for example memol . The name can be from one to eight letters and
numbers, and must begin with a letter.
To make the new document on the 'Internal' disk: set the 'Disk' line of the dialog
to 'Internal'.
To make the new document on an SSD: set the 'Disk' line of the dialog to the
SSD drive, A or B , whichever drive contains your SSD. This frees more internal
memory for other information. See the 'Files and disks' chapter for further
information about using SSDs.
98
If you use a Flash SSD, it is better to keep your document on the 'Internal' disk until
you have completely finished editing it. and then copy it to the SSD.
To create the new file using a document template: set the 'Use template' line to
'Yes' and enter the name of the template file on the 'Template: Name' line. Leave the
'Use template' line set to 'No' for now. (Template files are described later in this
chapter.)
3. Press Enter and the new file is created. You will see its filename displayed at the top
of the status window. If you move to the System screen, you will be able to see its
filename below the Word icon.
On the System screen:
1. Place the highlight below the Word icon and select the System screen's 'New file'
option from the 'File' menu.
2. Follow steps 2 and 3 above to complete the 'Create new file' dialog shown.
Preferred settings for new files - when you create a new file, it is given the same
standard settings for items such as 'Set preferences' and 'Print setup'. You can,
however, give new files your preferred settings, by creating a default template.
This is covered later in this chapter.
The list of files on the System screen
On the System screen, under the Word icon, is a list of all the Word Processor
documents you have created. The file in which you first typed is called Word:
• If you typed real information of some kind and you want to keep it, you may like to
use the System screen's 'Rename file' option on the 'File' menu, and give this file a
more appropriate filename than Word.
• If you were just typing anything while you learned about the Word Processor, you
can use the System screen's 'Delete file' option on the 'File' menu, and delete the
file altogether.
If the file is open - ie, shown in bold - you need to exit it (by pressing the Delete key)
before using the 'Delete file' option. Otherwise, a 'File or device in use' message will
be shown.
Opening existing documents
There are two ways to open (use) a particular document:
• On the System screen, move the highlight onto the name of the file you want and
press Enter. You will move to the Word Processor screen for the document you
selected and exit all other open documents. Instead of Enter you can press
Shift-Enter if you want to open the file without exiting the existing open file(s).
(See the 'Open files' chapter for further details of using Shift-Enter to open files.)
or:
• If you are already using the Word Processor, use the 'Open file' option on the 'File'
menu, to exit the current document and display the 'Open file' dialog. Choose the
name of the file that you want on the 'File name' line and press Enter to open it.
If the name of the file that you want is not on the list, check that the setting on the
'Disk' line is correct for the disk where the file is stored, that is, 'Internal', 'A', or
'B'.
The name of the currently open document is shown at the top of the status window.
99
Copying document files
1. Use the 'Save as' option on the 'File' menu to display the 'Save as' dialog.
2. Type the name you want to call the copied file.
3. You can copy the document to the internal disk or to an SSD. To copy it to an SSD:
set the 'Disk' line of the dialog to the SSD drive, A or B , whichever contains your
SSD. This frees more internal memory for other information.
4. If you want to start using the new version of the file, set the 'Use new file' line to
'Yes'. If you're just making a backup of your document, leave 'Use new file' set to
'No'.
5. The 'File type' line controls the type of file created. Leave it set to 'Normal'. for
ordinary Word Processor documents.
Remember that, with a Flash SSD, it is better to wait until you have finished the
document completely, and then copy it to the SSD.
Deleting document files
You can delete any document file that you no longer want to use from the internal disk
of your Series 3a, or from any SSD on which the file has been saved.
You cannot delete files from within the Word Processor. Press the System button to
move to the System screen. A list of all your files will be shown beneath the Word icon.
You cannot delete files when they are open (in use). An error message will be shown
to tell you that the file is in use. Press Esc to remove the message, then press the Delete
key and press Y to exit the file.
To delete a file:
• Highlight the name of the file and select the 'Delete file' option on the 'File' menu.
The name of the file should be given on the 'File: Name' line. Press Enter and then
Y to confirm and the file will be deleted, or N to cancel deleting the file.
To delete a file from an SSD when the name of the file Is not show n on the list on
the System screen:
1. Highlight the name of any other file on the list. The 'Delete file' dialog will appear
2. Move the highlight to the 'Disk' line and choose the drive in which the SSD is placed.
Then choose the name of the file that you want to delete on the 'File name' line.
3. Press Enter and then Y to confirm and the file will be deleted, or N to cancel deleting
the file.
File size
The Word Processor can handle up to 40K of text in each file. If you try to open a file
which is larger than this, an 'Overflow' message will be displayed.
File size can also be restricted by the number of internal index entries in use. The
Word Processor uses one index entry for each paragraph, and two for each emphasis
(phrases which are bold, underline etc). Its limit is 1700 index entries. A long
document consisting only of very short single-line paragraphs might hit this limit
before hitting the 40K limit.
If you have copied or deleted a very large area of text, this reduces the current
maximum size by a similar amount.
If you are typing or trying to insert text from the clipboard, and you reach the size limit,
a 'Maximum number of characters reached' message is displayed.
1 00
When the Word Processor has a large file open, certain operations (such as copying a
large area of text lo the clipboard) can cause a 'No system memory' message to be
displayed. This happens because for each open file the Word Processor can only use
64k of memory, for the information from the file itself, the clipboard, and the
memory the Word Processor itself needs to get started. Go to the System screen and
press the ♦ key to see whether the internal memory is really full.
Printing
A separate chapter deals with printing information from the Series 3a. After showing
you how to set up the Series 3a for a given printer, it covers "simple printing" from the
Word Processor, before moving on to more advanced topics.
Features which affect printing, such as the 'Spacing' option in the 'Paragraph' menu,
are covered in the 'Printing' chapter.
Altering a paragraph's appearance
The appearance of paragraphs on the screen
As you will see, many settings in the Word Processor are for the printed page:
• Some settings, such as paragraph indents, are not shown exactly on the screen; text
is normally word-wrapped to the screen width as you type. (When you are ready to
print, the 'Use printer layout' option will display the document laid out as it will
appear on paper.)
• Some settings, such as font size, cannot be shown on the screen at all.
Different fonts are not shown on the screen. However, if a font has serifs - the "tails"
on the corners of letters, which guide the eye along lines of text - a serif display font
will be used. (Conventionally, as in this manual itself, the main text of a document
uses a serif font, while headings use a sans serif (no serif) font.) Monospaced and
proportional fonts are also distinguished on the screen.
Units of measurement
Some settings are distances on the printed page - for example, paragraph indents and
tab positions. These are measured in inches or centimetres, according to the 'Units' that
are set in the 'Print' option on the 'Control' menu, on the System screen.
The System screen's 'Printer configuration' dialog looks like this:
If you have not already done so, select the 'Printer' option from the 'Control' menu on
the System screen, move to the 'Units' line of the 'Printer configuration' dialog, and set
the line to your preferred setting.
1 01
The Word Processor only takes account of this setting when opening (moving to) a file.
If you want to change the units for the File which is currently open, select the 'Exit'
option on the Special menu to exit the file, highlight the name of the file on the System
screen, and press Enter.
The options on the 'Paragraphs' menu
The options on the 'Paragraphs' menu allow you to set the font, indents, tabs, text
alignment and line spacing for a paragraph.
You would normally use the 'Paragraphs' options to change the appearance of just the
current paragraph. You can, however, use them to change a number of adjacent
paragraphs:
• Highlight the paragraphs that you wish to change and then use the required option
on the 'Paragraphs' menu. Leave the 'Alter' line set to 'Current paragraph(s)'.
Warning: this always sets all of the paragraphs concerned to have all of the same
layout settings.
You can also use these menu options to change all the paragraphs in a document which
have the same style as the current paragraph:
• Use the required option on the 'Paragraphs' menu and set the 'Alter' line in the
option dialog to 'All using this style'.
'All using this style' refers to the paragraph style. The default style is 'Body text'
(BT). which is a basic style. When you change a paragraph with the 'Paragraphs'
options, the Word Processor records the change you have made and saves this as a
new style. It gives the style a shortcode, starting from 'ZA' then 'ZB'. 'ZC' and so
on. Styles, described in full later in the chapter, make it easier to set and apply
changes.
Changing the font of a paragraph
The 'Font' option allows you to set font and size, underline, bold, italic and print
position for text in a paragraph. Different fonts and font sizes cannot be shown on
the screen - they are just used when the document is printed.
The fonts and sizes available for you to choose from are governed by the printer
model the Series 3a is set to use. You can set the printer model with the 'Print setup'
option on the 'Special' menu. (See the 'Printing' chapter for more details.)
1. Move to the paragraph or highlight the paragraphs whose font you wish to change
and select the 'Font' option on the 'Paragraphs' menu.
2. Set the 'Font' line to the font you want and select the size on the 'Size' line. Font sizes
are conventionally specified in points, and the Series 3a uses this convention. There
are 72 points in an inch.
All fonts are either proportional (characters vary in width) or monospaced
(characters are all the same width), and they are shown as such on the screen.
3. Use the other lines of this dialog to set any combination of bold, underline and italic,
to be applied to the paragraph as a whole.
Bold, underline and italic are shown on the screen. ('Font', 'Underline', 'Bold' and
'Italic' all have an 'Inherited' setting, but this will only be of use when you begin to
use styles explicitly.) Don't set the 'Print position' line.
4. Set the 'Alter' line to change to either the current paragraph(s) or all paragraphs using
the current style. Press Enter to complete the dialog.
1 02
Indenting a paragraph
1. Move to the paragraph (or highlight the paragraphs) you wish to indent, and select the
'Indents' option on the 'Paragraph' menu. The 'Set Indents' dialog will appear.
2. Set the type of indents you want. 'Left', 'Right' and 'First Line' and how far from the
left or right you want to position the text.
3. Set the 'Alter' line to change to either the current paragraph(s) or all paragraphs using
the current style. Press Enter, to complete the dialog.
The size of the indents you set is measured in the units that are shown in brackets in
the title of the dialog (either inches or centimetres). You can change the units with
the 'Printer' option on the 'Control' menu in the System screen.
A 'Left' indent will indent all but the first line of the paragraph, in relation to the other
paragraphs. 'First line' lets you set an indent for the first line of the paragraph, as is
common in letters. If you set both 'First line' and 'Left' indents, the whole paragraph
will be indented.
Right indents position the text away from the right-hand margin by the amount you
specify.
These are not margin settings for the document. When you come to print, you'll find
separate options which set the overall left and right margins on the paper.
Setting tab positions
When you press the Tab key while typing, the cursor moves to the next predefined Tab
position to the right. You can define up to eight tab positions for a paragraph. You
might, for example, set the first tab position to 1 cm from the left-hand side, the second
to 2cm, and so on. Tab positions are measured in the units - inches or centimetres - you
specified with the 'Printer setup' option in the System screen.
The Body Text (BT) style is supplied with the Series 3a with tab positions already
set. You can, of course, change or delete these settings if you wish.
To set or change tab positions:
1. Move to the paragraph or highlight the paragraphs whose tab positions you wish to
set and select the 'Tabs' option on the 'Paragraphs' menu. The Set tabs dialog will
appear. The title of the dialog indicates which unit of measurement is set.
2. Select the Tab number (1 to 8) on the 'Select tab' line and type the distance from the
left-hand margin for the Tab 'Position'.
3. Set the 'Type' of tab you want to use. There are three types of Tab:
• Left tabs are like Tabs on a typewriter.
• Right tabs align the right-hand side of words.
• Centre tabs centre a word around the tab position.
You can set up any combination of left, centre and right tabs. All three tab types can be
shown on the screen.
4. Set the 'Alter' line to change to either the current paragraph(s) or all paragraphs using
the current style. Press Enter, to complete the dialog.
You can view a symbol for Tabs by setting the 'Show tabs' line in the 'Set preferences'
dialog to 'Yes'. If, when you insert a Tab, the cursor is already past the rightmost lab
position, or if the next Tab position to the right is close to or beyond the right edge of
the screen, the Tab will be shown as a single character - either a space or an arrow
symbol, according to the setting in 'Set preferences'.
1 03
The following three example paragraphs show the different types of tabs; the first
paragraph has left tabs, the second right tabs, and the third centre tabs.
Creating tables using tabs
Tabs can be used to display items of information as a table. Type each item of
information that is to appear in a row within the table (including row and column
headings) separated by Tabs. Each row in a table can take up only one line. This means
that each item in each column cannot be wrapped onto more than one line. At the end of
each line press Shift-Enter rather than Enter so that the table remains a single
paragraph.
Now use the 'Tab' option on the 'Paragraph' menu, and set some regularly spaced left
tabs for this paragraph to form the columns of the table:
If you are going to print your table, you can make sure that it is always printed as a
whole on one page. Select the 'Spacing' option on the 'Paragraph' menu, and set 'Keep
together' to 'Yes'.
In its normal display, (screen layout) the Word Processor cannot always position
tabbed text exactly the way it will be positioned when printed. (This is because of the
Word Processor's rules for displaying tabs, and because of differences in font widths
between screen and printer.)
To be sure of how your table will be laid out in print, select the 'Use printer layout'
option from the 'Word' menu. (This also word-wraps paragraphs as they would be
wrapped if printed.) The option becomes 'Use screen layout'; select it to return to
normal editing. (There is more about 'Use printer layout' in the 'Printing' chapter.)
If you want to add up columns of numbers, highlight the whole table, then go into
the Spreadsheet and use 'Bring' to copy the table in. You can then use the SUM
function to add up a column: if, for example, the column goes from cell B2 to cell
B6, sum it by entering =SUM(B2:B6) in some other empty cell.
1 04
Aligning paragraph edges
To specify how the left and right edges of a paragraph are aligned:
1. Move to the paragraph or highlight the paragraphs whose alignment you wish to
change and select the 'Alignment' option on the 'Paragraphs' menu.
2. Set the 'Alignment' line to the type of alignment you wish to use:
• Left-, the left edges of every line are neatly lined up, while the right edges are not.
This alignment is sometimes called ragged right.
• Right: the right edges of every line are neatly lined up, while the left edges are not.
This alignment, sometimes called ragged left, looks rather strange, and is only
occasionally useful.
• Centred: every line is centred on the screen. This is usually for one-line paragraphs.
• Justified: both the left and right edges of every line arc neatly lined up. This cannot
be shown on the screen, and paragraphs set to use 'Justified' alignment are
displayed on the screen as if they had 'Left' alignment. However, when printed,
extra spacing is added between words to ensure that each line has the same width on
the paper.
3. Set the 'Alter' line to change to either the current paragraph(s) or all paragraphs using
the current style. Press Enter, to complete the dialog.
When you first type in paragraphs of text, they use 'Justified' alignment.
The following example screen shows paragraphs using left, right and centred alignment:
Using styles to change a number of paragraphs
When you make changes to a paragraph's layout, the Word Processor automatically
creates paragraph styles to define the paragraphs. You can use the Word Processor in
this way without needing to know anything about paragraph styles.
However, if you want to change quite a few paragraphs in the same way - for example,
to give most of your paragraphs a first-line indent - you can make things easy by
learning to use paragraph styles directly. Paragraph styles are described later in this
chapter.
1 05
Example uses of the Word Processor
The Series 3a Word Processor has many powerful features that can help you to create
different kinds of documents - letters, memos and reports, for instance. At first it may
be difficult to see how to use them to create the document you want. The following
examples demonstrate how to combine features to perform everyday editing and
printing tasks. (All of the features are described in more detail in the rest of this
chapter.)
If you are happy with the basics of using the Word Processor you may wish to try
out some of these examples, referring to relevant sections in the rest of this chapter
if you need further help.
Copying text from another Word Processor document
1. Open the document which contains the text you wish to copy, and highlight the text.
Then select the 'Copy text' option from the 'Edit' menu. This copies the highlighted
area onto the clipboard.
2. Use the 'Open file' option on the 'File' menu to open the document in which you
want to insert the text, and move the cursor to the position where you want to insert
it.
3. Select the 'Insert text' option on the 'Edit' menu. The text is copied from the
clipboard into the document.
You can insert further copies of the text, if you need to, by using the 'Insert text' option
again. The text remains on the clipboard until you delete or copy another piece of text.
Copying an address from the Database
1. In the Database, find the address you wish to copy.
2. Use ↑↓ to move the cursor to the start of the address, then use Shift-↓ to highlight the
lines which you wish to copy, like this:
3. Go to the Word Processor file, and position the cursor at the place where you want to
insert the address.
4. Select the 'Bring text' option on the 'Edit' menu and the address will be inserted.
For further details of copying addresses from the Database, see the chapter on the
'Bring' options.
Putting an address on the right
1. Put the cursor in the middle of the first line of the address.
2. Hold down a Shift key, and press ↓ until a highlight extends into the last line of the
address.
1 06
3. To line up the left-hand side of the address: select the 'Indents' option on the
'Paragraphs' menu. Enter a suitable indent - ie how far in from the left margin the
address should be - both on the 'Left' and 'First line' lines of the dialog.
Alternatively, to line up the right-hand side of the address: select the 'Alignment'
option on the 'Paragraphs' menu, and use the → to set the 'Alignment' line to 'Right'.
4. Leave the bottom line of the 'Set indent' or 'Set alignment' dialog set to 'Current
paragraph(s)'. Press Enter to complete cither dialog.
Indenting first lines of paragraphs
1. Move the cursor to a paragraph whose first line you wish to indent, and select the
'Indents' option on the 'Paragraphs' menu.
2. Move the highlight to the 'First line' line and type a suitable value for the indent. (The
title of the dialog tells you the unit of measurement that is currently being used.)
3. If you want to indent just the current paragraph press Enter to complete the dialog. If
you want to indent all the paragraphs that are using the same paragraph style, move
to the 'Alter' line and change the setting to 'All using this style'; then press Enter to
complete the dialog.
If you intend to use indents for a number of different types of paragraphs, for example
for greetings, sign-offs and body text, you can define a paragraph style for each of them
that includes the first line indent that you wish to use. (See the section on 'Managing
Styles', later in this chapter for further information on defining new styles.)
Writing a standard letter - document templates
When you have found a look which you like for letters, you can save the page/printer
settings, paragraph styles, any text you always use (such as an introductory paragraph),
and an appropriate cursor position as a template. When, in future, you want to create a
new letter, you can then use the template and save a lot of time. You can create as many
new documents as you like from the same template.
In this example an existing document is saved, text is deleted from it to create the
template and then the 'Revert' option is used to restore the document to its former
state. If you were to exit the Word Processor, or open a different file before using
'Revert', you would not be able to restore the document to its former slate.
1. Open a letter which has the styles and printer settings you like (or create a new one
with the styles and printer settings you want to use in your standard letters). Select
'Save' on die 'File' menu to save the file.
2. Delete any text, leaving only the text that you want to use in your standard letters for example, your address, a greeting such as " Dear ", and perhaps " Yours " and
your name at the bottom.
3. Position the cursor at a suitable place, such as immediately after the " Dear ".
4. Use the 'Save as template' option on the 'File' menu, and enter a suitable filename for
the template, such as " letter ".
5. Having saved the template file, select the 'Revert' option on the 'File' menu, and
press Y to restore this particular document to its previous state.
In future you can create a standard letter like this:
• Select the 'New file' option on the 'File' menu. In the dialog which appears, set 'Use
template' to 'Yes', and enter the name of your template file (e.g. letter ).
1 07
The new file is created with all the correct styles and printer settings. The cursor is
positioned ready for you to type the name of the addressee, and the main body of the
letter.
Printing simple headed paper
You can enter text - a company name, perhaps - to appear as a header on every page.
1. Select the 'Print setup' option on the 'Special' menu. Move to the 'Header' line and
press Tab, to display the 'Enter header details' dialog:
2. Type the text for the header in the 'Text' line (maximum SO characters). Set
'Alignment' to control the horizontal position of the text. Set 'On first page' to 'Yes'
so that the header will appear on every page.
3. Move to the 'Font' line and press Tab to display the 'Font' dialog. Choose the settings
for each line to set the size and appearance of the text. You might, for example,
choose to increase the font size, so that the header stands out. Press Enter to
complete the dialog.
4. Move to the 'Vertical offset' line to set the vertical position of the header. It is initially
set so that the header appears 0.5 inches below the top of the page. Press Enter to
complete the dialog.
Tip: to get the header to print with a horizontal line all the way across the page,
experiment with right-aligned headers. Set 'Underline' on in 'Font', and start the
header text with a row of spaces, tabs or underscores (or even the more unusual of
the characters in the character set).
5. Move to the 'Printer model' line, press Tab, and select the most appropriate printer
model. (If your printer is not listed, and does not itself emulate any of those shown
in the dialog, select 'General'.) Press Enter twice to complete the dialogs.
Note: the 'Printing' chapter has full details, if you need them, about connecting to
printers, setting up to print, and spacing after a header paragraph.
The header is not shown on the screen - however, you can see its position on the
printed page by using the 'Print preview' option on the 'Special' menu.
You may now wish to save this document as a template with the 'Save as template'
option on the 'File' menu. You can then use the template to create documents on headed
paper in the future.
Printing an envelope
The way to print an envelope depends upon the type of printer you have. You don't
normally need to change the page size to match the envelope. You can usually just print
as if to a normal page, although you need to set the margins to make the address appear
on the area covered by the envelope. It may take a little practice before you can print
envelopes correctly.
1. Select the 'New file' option on the 'File' menu, to make a new file for the envelope.
1 08
2. Type the address, or use the 'Bring' option to copy an address from the Database. If
you want to, change the appearance of the text, for example change the Font size.
When you are typing the address, use Shift-Enter instead of Enter, at the end of each
line. This keeps the whole address as one paragraph and prevents a vertical gap like a
blank line appearing after each line of the address when it is printed.
3. Select the 'Print setup' option on the 'Special' menu.
4. If your printer takes envelopes end-on (as most laser printers do): you will
probably need to change the orientation of the page. Move to the 'Page size' line and
press Tab to display the 'Page size' dialog. Change the 'Orientation' line to
'Landscape' and press Enter to complete the dialog. The printer will now treat the
paper as if the left side of the page is really the top and print accordingly.
If you do find you have to change the page size, set 'Page size' to 'Monarch' or 'DL',
if one of these matches your envelope size. Otherwise set it to 'Custom' and type in
the dimensions yourself.
5. Move to the 'Margins' line, press Tab. and set the top margin to something like
3"/8cm and the left margin to 4"/10cm or so. The printing should then start on the
area covered by the envelope.
6. Check the 'Printer model' line is correctly set; if not, press Tab, and select the most
appropriate printer model.
7. Now use the 'Print' option on the 'Special' menu to print the envelope. The address
will probably be printed in the wrong place; if this is the case, change the 'Margins'
line in the 'Print setup' dialog and then try again.
When you have found the settings that will print your envelope correctly, you may wish
to save the file, without the address, as a template with the 'Save as template' option on
the 'File' menu. When you next want to type/print another envelope, you can just create
a new file using this template. The new file will automatically have the correct page
size (and any other settings you've made) for typing a new envelope.
For further details see the 'Printing' chapter later in this manual.
Entering bulleted lists
There is a predefined style 'Bulleted list' (shortcode BL ) for any bulleted list that you
want to include in your report or memo.
1. Hold the Control key down while you press BL to turn on the Bulleted list style.
2. Type the character that you want to use as the bullet, for example a *, press the Tab
key. and then type the item. Repeat for all the items in the list. The text will be
moved over and indented for you as you type:
If you want to, you can change any of the attributes of this paragraph style. For
example, you can change the indents and Tabs to move the bullets to the left-hand
margin. Select the 'Style gallery' option on the 'Styles' menu and select the Bulleted list
style. Move to the 'Indents' line, press Tab to display the 'Set indents' dialog and
1 09
change the setting on the "Left" line to 0.25 and the setting on the 'First line' to 0. Then
move to the 'Tabs' line, press Tab to display the 'Set tabs' dialog and change the
'Position' line for tab number one to 0.25.
You can also use an emphasis with a bullet character to make it bold, for instance.
Highlight the bullet symbol, select 'Emphasis housekeeping' on the 'Styles' menu,
select 'Apply' and choose the emphasis that you want to use. You can then use this
emphasis on other bullets in the document.
Most laser printers contain symbol character sets, which have a variety of symbols
you might want to use as bullets. Consult your printer manual for details. Find which
character value represents the symbol you want. You can enter this character by
holding down the Control key and typing the three digit number on the keyboard; if
this value happens to be an everyday character, you can just type it in directly, of
course.
Where appropriate, the printer drivers in the Series 3a try to translate symbols from
the Series 3a character set to that of the printer.
Improving document templates
If you make small improvements to the look or layout of a document, you may wish to
copy the changes into a particular template, so that new files can, in future, benefit from
the changes.
To edit the template directly:
1. Select the 'Open file' option on the 'File' menu, but instead of selecting a file to open,
press Control-Tab to display the 'Specify filelist' dialog:
2. Now type the full name of the template itself. To do this, type \WDR\ in front of the
template name, and .WRT directly after it. For example, for a template called FAX
you should enter \WDR\FAX.WRT .
3. Instead of Enter, press Control-Enter.
Control-Tab and Control-Enter provide short-cuts to using the full file selector.
4. Press Enter to complete the 'Open file' dialog.
You can now edit the template directly. Select the 'Exit' option on the 'Special' menu
when you have finished to save the changes.
Copying new paragraph styles to the template:
1. Open the template file as above.
2. Press the System button to move to the System screen, and move the highlight to the
document file containing the styles that you want to copy into the template.
3. Instead of Enter, press Shift-Enter. (This opens the new file without exiting the other
open file - i.e. the template.)
4. Temporarily apply the various styles to consecutive paragraphs, and use Shift-↑↓ to
cover some or all of each paragraph with a highlight.
5. Press the Word button to switch back to the template file.
6. Select the 'Bring text' option on the 'Edit' menu. This inserts in the template a copy
of the text you highlighted in the other document, and also copies over the styles
used by this text.
7. Press Delete to delete the text which was inserted. However, the styles which were
copied over remain as part of the template file.
8. Select the 'Exit' option from the 'Special' menu to save the template file with the new
styles and exit the Word Processor.
1 10
9. Press the Word button to return to the document. If you made changes to it in order to
assign the styles to consecutive paragraphs, you should use the 'Revert' option on
the 'Edit' menu to undo these changes.
You cannot copy a style in this way if its shortcode is already used for another style
in the template. To replace a style by a new one with the same shortcode, first use
'Style housekeeping' on the 'Styles' menu in the template file, and use the 'Delete'
option to delete the current version of the style. You can then use 'Bring text' as
before.
If you want to keep both of the styles in the template, you will need to use the
'Rename' option to give the style in the template a new shortcode. You can then copy
over the style from the other document.
(See the chapter on 'Opening files' for more details of using Shift-Enter to open files.
See the chapter on 'Moving information with "Bring"' for more details of the 'Bring
text' options.)
Standard paragraphs
If you need to include standard paragraphs of information in different documents you
can save each standard paragraph as a separate document, then use the 'Merge in'
option to add it into your current document:
1. Open a document containing the desired standard text.
2. Highlight the standard paragraph and use the 'Copy text' option on the 'Edit' menu to
make a copy of the paragraph on the clipboard.
3. Use the 'New file' option on the 'File' menu to make a new file for the standard text it's best to give it a name that reflects the text it contains. Use the 'Insert text' option
on the 'Edit' menu to paste the standard text into the new file.
You can now insert a copy of your standard text at the cursor position in other
documents, like this:
• Position the cursor and select the 'Merge in' option on the 'File' menu. Select the
name of the file containing the standard paragraph and press Enter.
1 11
Advanced use
Paragraph styles
The Word Processor lets you define different styles for the paragraphs in a document. A
style determines the way a paragraph looks - which font is used for text, whether it is in
bold, whether it is indented from the left or right of the page, and so on. Once you have
created a particular style, you can apply it to any number of paragraphs within a
document.
Predefined styles
Each style is identified by a two-letter shortcode. The Word Processor has four
predefined styles for each document you create:
• BT , short for Body Text - the style for ordinary paragraphs of text.
• HA, short for Heading A - the style for a paragraph which is a major heading, such
as the title of a large section of text.
• HB , short for Heading B - the style for a paragraph which is a minor heading,
perhaps describing a few paragraphs which follow it.
• BL, short for Bulleted List - the style for a paragraph which is in a list (and begins
with a bullet character plus a tab).
Turning the style bar on
To see which style is being used for each paragraph:
1. Select the 'Set preferences' option from the 'Special' menu to display the 'Set
preferences' dialog.
2. Set the 'Show style bar' line to 'On' and press Enter. The shortcode of the style for
each paragraph will then be shown on the left of the screen, like this:
Styles and the current paragraph
If you use any of the options on the 'Paragraph' menu, to change the way the current
paragraph looks, the Word Processor records the new combination of font, indents, tabs
alignment and spacing as a new style and applies it to that paragraph. The first style
produced by changing a paragraph in this way is recorded as 'ZA' for both the style
name and the shortcode. and the second as 'ZB', and so on. You can change the names
and shortcodes of these styles if you wish.
1 12
If you only occasionally change the way a paragraph looks, you may wish to
continue using the options on the 'Paragraphs' menu, and not worry about how
styles are being used for you.
Applying an existing style
You can change the style for the current paragraph (the one in which the cursor is
positioned), or any highlighted paragraphs by holding down the Control key and typing
the two-letter shortcode of the style you want to use. For example, to change the style
of a paragraph to the 'Heading A' style, you would hold down Control and press H
then A.
Alternatively, you can select the 'Styles housekeeping' option on the 'Styles' menu and
choose 'Apply' from its submenu. You may have to use this method if you've forgotten
the shortcode of the style you wish to use.
If a paragraph doesn't appear to change to the right style, check no emphasis (bold,
italic etc) has been applied separately to the whole paragraph - highlight it. and press
Control-NN (for the 'Normal' emphasis).
Managing styles
The styles that you create in the Word Processor are stored with the document file that
you were using when you created the styles. They are not stored independently as
stylesheets as they are in a number of word processors and desktop publishers. So you
cannot list all the styles you have ever created in the Word Processor, and select one to
use with a new document. However, you can create template files which contain styles
you wish to re-use. Whenever you then create a new document, you can make it inherit
the styles from a given template file. (Template files are described later in this chapter.)
The 'Style gallery' and 'Style housekeeping' options on the 'Styles' menu allow you to
manage the styles in a particular document.
The 'Style housekeeping' option has a submenu from which you can define new styles,
apply a particular style to one or more paragraphs that you have highlighted, rename a
style, delete a style and search forwards and backwards in your document for a
particular style.
Reviewing and changing defined styles
To see which styles are defined for the document you are using, select the 'Style
gallery' option on the 'Styles' menu.
When the highlight is on the top line you can use ←→ to move between the different
styles. As you do so, the settings for each style are shown in the rest of the dialog. You
can move the highlight down and change any of the settings for any of the styles.
The 'Style gallery' option doesn't apply styles to paragraphs.
Defining new styles
When you create a new style using the 'Styles' menu you can change all the settings
that you can change from the 'Paragraphs' menu, and you can also give the style the
name you choose.
1 13
1. Select the 'Style housekeeping' option on the 'Styles' menu and then the 'Define'
option. The 'Define style' dialog is displayed where you can define a new style:
The initial settings in the dialog are those of the style of the paragraph you were
editing. So if you want to define a new style which is similar to an existing style,
position the cursor on a paragraph which uses the existing style, then select
'Style housekeeping-Define'. Many of the settings in the dialog will then be correct
straight away.
2. Make the changes you want to the settings on each line. For dialog lines displaying
'...' you need to press Tab to display a further dialog where you can change the
setting.
The 'Font', 'Bold', 'Underline' and 'Italic' lines in the 'Font' dialog have the extra
setting 'Inherited'. If you use the 'Inherited' setting, the new style will always take
that particular setting from the 'Body text' style. If, at a later stage, you then change
the 'Body text' style - say, to use a different font - all styles which have 'Font' set to
'Inherited' will change accordingly.
3. Press Enter and the 'Name' dialog is displayed. Type a descriptive name (up to 15
letters) for the new style on the 'Name' line. Type the two-letter shortcode you want
to use to identify this style on the 'Shortcode' line. It must be different to any other
style shortcode, and to the shortcodes that can be used to emphasise highlighted
areas - BB for bold, UU for underline etc.
4. Press Enter to complete the dialog, define the new style, and apply it to the current
paragraph and any other paragraphs that use this style.
Renaming a style
You can rename any style used in the current document.
1. Select the 'Styles housekeeping' option on the 'Styles' menu, then the 'Rename'
option from its submenu.
2. Press ←→(or the first letter of the shortcode) and select the style you want to rename.
Then move the highlight to the 'Name' and 'Shortcode' lines, and change either or
both. When you press Enter to complete the dialog, the new names will be used for
this style.
Deleting a style
You can delete any particular style, or all unused styles in the current document except
the 'Body text' style (you can, however, rename the 'Body text' style).
1. Select 'Style housekeeping' on the 'Styles' menu and then 'Delete' from its submenu
to display the 'Delete' dialog.
2. Press ←→ (or the first letter of the shortcode) to select a particular style that you wish
to delete, then press Delete to delete it, or press Space to delete all unused styles.
A message will be displayed to tell you how many styles were deleted.
1 14
Styles are deleted as soon as you press the Delete or Space key. Pressing Esc to end
this dialog will not restore deleted styles. You can only retrieve a deleted style by
reverting to a previously saved version of the document, by copying it from another
document (see later), or by creating it again from scratch.
If you try to delete a style which is still applied to one or more paragraphs, an 'In
use' message will be shown. Before you can delete it, you must find any paragraphs
which are using it, and change them to use a different style. You can use 'Find' on the
'Style housekeeping' submenu to Find all the styles that you need to change:
1. Press Esc to quit the 'Delete' dialog.
2. Press Control-Pg Up (Control-Psion-T) to move the cursor to the top of the document
and select 'Find' from the 'Style housekeeping' submenu.
3. Select the style that you want to find, and press Enter. The next paragraph using that
style will be highlighted.
4. Press Control and the shortcode for a different style - for example, Control-B-T for
'Body Text'.
5. Use the 'Find again' option on the 'Search' menu, to skip to each successive
occurrence of this style, and change each one. After changing the last one, the next
'Find again' will display a 'Not found' message.
You can now delete the style as above.
Copying styles between documents
Although the Word Processor does not apply stylesheets separately to documents, you
can copy a particular paragraph style from one document to another:
1. Open the document that contains the style you want to copy.
2. Apply the style that you want to copy to a paragraph, and highlight some or all of the
paragraph. You can highlight an empty paragraph if you like.
3. Press the System button to move to the System screen, and move the highlight to the
file into which you wish to copy the style.
4. Instead of pressing Enter, press Shift-Enter. (This opens the file without exiting the
previously open file. The 'Open files' chapter has more details of using Shift-Enter
to open files).
5. Select the 'Bring text' option on the 'Edit' menu. This inserts in your current
document a copy of the text you highlighted in the first document, and also copies
over the existing style. (The 'Moving information with 'Bring'' chapter has more
details of the 'Bring' options).
6. Press Delete to delete the text which was inserted. However, the styles which were
copied over are unaffected.
You can move more than one style at the same time:
1. Apply each of the styles you want to copy to consecutive paragraphs in the document.
2. Highlight all the relevant paragraphs, then use 'Bring text' as described from step 3
above.
A style will not be copied in this way if its shortcode already exists in the new
document. If you wish to replace a style by a new one with the same shortcode, first
use 'Style housekeeping-Delete', and delete the current version of the style. You can
then use 'Bring text' as before.
1 15
Managing emphases
As you've seen, you can change the appearance of a highlighted area by holding down
the Control key and typing a two-letter shortcode - Control-B-B for bold, Control-I-I
for italic, and so on. These are called emphases, and you can define your own in a
similar way to defining styles for paragraphs.
As with paragraph styles, each document has its own emphases, and they are saved as
part of the file.
The 'Emphasis housekeeping' option on the 'Styles' menu lets you manage the
emphases in a document. Its submenu contains the same options as the 'Style
housekeeping' option, and they act in the same way.
It is more common to change or define styles than emphases. You may find that
the pre-defined emphases are all you need. Perhaps the most common reason for
creating a new emphasis is to use a particular font for a word or phrase.
Defining new emphases
1. Select the 'Emphases housekeeping' option on the 'Styles' menu and then the
'Define' option on the submenu.
The 'Emphasis' dialog is similar to the 'Font' dialog that is shown when defining a
new paragraph style:
2. Change the settings on any line with ←→. For example, you might set both 'Bold'
and Italic' to 'On', or set a particular font for this emphasis.
When you use 'Emphases housekeeping-Define', the settings initially suggested in
the dialog are those of the emphasis at the cursor position. So you will usually see
the settings of the 'Normal' emphasis. With neither subscript nor superscript set, and
with all other settings set to 'Inherited', text using the 'Normal' emphasis does not
differ at all from the style of the paragraph.
The 'Inherited' setting on any line will take the same setting as that in the style of the
paragraph in which the emphasis occurs. The BB emphasis, for example, has 'Bold'
set to 'On', and the other lines set to 'Inherited'. This means that you can use it in any
type of paragraph; text with this emphasis will always be bold, but in other respects
(font, underline on/off, italic on/off) will look the same as the rest of the paragraph.
You can also set the new emphasis to use superscript or subscript, by changing the
setting on the 'Print position' line. Since paragraph styles don't have this setting, you
can't set this line to 'Inherited'.
3. When you have made the settings, press Enter, and the 'Name' dialog is shown. Type
a descriptive name (up to 15 letters) for the new emphasis on the 'Name' line. Type
the two-letter shortcode you want to use to identify it on the 'Shortcode' line. If you
were creating a 'bold-italic' emphasis, for example, you might use BI for the
1 16
shortcode. It must be different to any other shortcode used by a style or another
emphasis.
4. Press Enter and the new emphasis is defined.
If you had highlighted an area, this emphasis is applied to it. If not, this emphasis will
be applied to letters you now type. When you have finished, press Control-N-N to
return to normal letters. (If you don't want to type anything with this emphasis just yet,
move the cursor away instead.)
Using a defined emphasis
You can set an area to use any existing emphasis by highlighting it, then holding down
the Control key and typing the two-letter shortcode. You can also set the emphasis for
text you are about to type: position the cursor, enter the shortcode (with the Control
key), then type the text.
Alternatively, you can select the 'Emphases housekeeping' option and choose 'Apply'
from its submenu. You might use this method if you've forgotten the shortcode of the
emphasis you wish to use.
Use ←→ to select the emphasis to use, or press Tab to list the emphases in a vertical
box. Select the emphasis you wish to use and press Enter to apply it.
Reviewing and changing emphasis settings
To see which emphases are defined for the document you are using, select the
'Emphasis gallery' option on the 'Styles' menu. This is like the 'Style gallery' option.
When the highlight is on the top line you can use ←→ to move between the different
emphases. As you do so. the settings for each emphasis are shown in the rest of the
dialog. You can move the highlight down and change any of the settings for any of the
emphases.
Renaming an emphasis
You can rename an emphasis in the same way as a style:
1. Select the 'Emphasis housekeeping' option and choose 'Rename' from its submenu.
2. Press ←→ (or the first letter of the shortcode) until the emphasis is shown that you
want to rename.
3. Move the highlight to the 'Name' and 'Shortcode' lines, and change either or both.
When you press Enter, the new names will be used for this emphasis.
Deleting an emphasis
You can delete any particular emphasis, or all unused emphases in a document except
the 'Normal' emphasis (you can, however, rename the 'Normal' emphasis).
1. Select the 'Emphasis housekeeping' option and choose 'Delete' from its submenu.
2. Press ←→ (or the first letter of the shortcode) until the emphasis you want to delete is
shown and press Delete. Or, press Space to delete all the unused emphases.
A message will be displayed to tell you how many emphases were deleted.
As when deleting styles, emphases are deleted as soon as you press Delete or Space pressing Esc to end this dialog will not restore deleted emphases.
1 17
You can only retrieve a deleted emphasis by reverting to a previously saved version
of the document, by copying it from another document (see later ), or by creating it
again from scratch.
If you try to delete an emphasis which is still used in the document, an 'In use' message
will be shown. Before you can delete it, you must remove each occurrence of it in the
document. To do this:
1. Press Control-Pg Up (Control-Psion-↑) to move the cursor to the top of the document
and then select the 'Emphasis housekeeping' option and choose 'Find' from its
submenu.
2. Select the emphasis to find, and press Enter. The next occurrence of that emphasis
will be highlighted, and the cursor positioned at its end.
3. You can now press the shortcode for a different emphasis - Control-N-N, perhaps, for
normal text.
4. Use the 'Find again' option on the 'Search' menu, to skip to each successive
occurrence of this emphasis, and change each one. After changing the last one, the
next 'Find again' will display a 'Not found' message.
You can now delete the emphasis as before.
Copying emphases between documents
You can move emphases between documents in the same way that you copy styles:
1. Highlight an area containing the emphasis or emphases to move.
2. Open the second document by highlighting it and pressing Shift-Enter on the System
screen.
3. Select the 'Bring text' option from the 'Edit' menu, then press the Delete key. As long
as there were no clashes between shortcodes, the emphases will have been copied to
the second document.
Keeping track of emphases
When you are using paragraph Styles in your document, you can remind yourself
which paragraph styles you have used by displaying the style codes on the left-hand
side of the screen. (To do this: select the 'Set preferences' option on the 'Special' menu
and set the 'Show style bar' line in the dialog to 'Yes'.) There is no equivalent option
that shows all the emphases used in a document. To keep track of the emphases you
have used, you have to use the 'Find' option to search for them.
To find each emphasis in your document:
1. Use the 'Find' option on the 'Emphasis housekeeping' submenu. This will allow you
to search for a particular emphasis.
2. To skip to the next emphasis of any kind set the 'Find' line to 'All'. To find a
particular emphasis select its name on the 'Find' line. Use 'Find again' on the
'Search' menu to skip to each successive emphasis.
1 18
Advanced editing
'Find' and 'Find again'
You can use the 'Find' option to locate a particular piece of text in the current
document. You can then use the 'Find again' option to locate further occurrences of that
piece of text, without having to enter the details of the text in any further dialog.
Using the 'Find' option:
1. Select the 'Find text' option on the 'Search' menu to display the 'Find' dialog:
2. Type the text to find on the 'Search for' line (maximum 20 characters).
3. Specify on the 'Direction' line whether to search forwards or backwards from the
cursor position.
4. Set the 'Case sensitive' line to 'Yes' if you would like to make the search case
sensitive. If not, leave it set to 'No'.
For example, if you want to find API in capital letters, and do not want the search to
stop on words with a lower-case api , such as capital , set 'Case sensitive' to
'Yes'.
It is more common to leave this setting as 'No', unless you know how the word
appears in the document or if you expect the search to stop a number of times at
incorrect places.
5. Press Enter to complete the dialog and the search is performed. The found text will be
highlighted.
Each subsequent time you use 'Find text', the same text is suggested in the 'Find'
dialog. However, you are more likely to follow 'Find text' by using 'Find again',
described below.
Using 'Find again':
• Select the 'Find again' option on the 'Search' menu to perform another search,
exactly the same as the last search you performed, from the current cursor position.
If you have just used 'Find' on either the 'Styles housekeeping' or 'Emphasis
housekeeping' submenu, 'Find again' will perform another search of the same type finding the next matching style or emphasis.
'Replace'
You can use the 'Replace' option to find and replace any number of occurrences of a
particular piece of text in your document.
1. Before using the 'Replace' option it may be a good idea to use the 'Save' option on
the 'File' menu so that you can revert to this copy of the document if you
accidentally replace text you didn't mean to change.
1 19
2. Choose the 'Replace' option on the 'Search' menu to show the 'Replace' dialog. It is
very similar to the 'Find' dialog.
3. Type the text that you want to find on the 'Search for' line, and the text that you want
to replace it with on the 'Replace with' line.
4. Choose the 'Direction' and whether the search should be 'Case sensitive' and press
Enter.
The Word Processor will search for the text from the cursor position, in the direction
you specified. If it finds a match for the text, it highlights it. and displays a special
dialog in which you can choose from four options:
• Press E (or Esc) to leave 'Replace' and to return to normal editing without
replacing any of the text.
• Press R to replace the highlighted text, then search in the same direction for the
next occurrence of the text.
• Press S to leave the highlighted text as it is, but then to search in the same direction
for the next occurrence.
• Press A to replace this and any other occurrences found in the same direction,
without asking for any further confirmation. Be very careful with this option. It's
easy for 'Replace' to find an unexpected match - in the middle of a long word,
perhaps - for the text you typed.
You can interrupt a 'Replace All' by pressing Esc.
Each subsequent time you use 'Replace', the same text is suggested in the dialog.
You can use 'Replace' to delete any or all occurrences of a particular piece of text leave the 'Replace with' line of the dialog blank. Each "replacement" that occurs will
remove the matched text, but then insert no text in its place.
The 'Bring text' option
The 'Bring text' option on the 'Edit' menu brings in a copy of text you have highlighted
in another application, such as the Agenda or Database. There is a separate chapter later
in this manual for further details of moving information with the 'Bring text' option.
Merging documents
You can use the 'Merge in' option to add a copy of another document into the current
document, at the cursor position. You might, for example, save an often-used
paragraph as a separate document, and merge it into any document which needed it.
• Select the 'Merge in' option on the 'File' menu to display the 'Merge file' dialog.
Select the name of the file that you want to add to the end of the current file and
press Enter.
Any styles and emphases in the document you merge in are also merged with those of
your current document.
1 20
If a shortcode already exists in your current document, it overrides any shortcode of the
same name in the document being merged. If this happens, you may find that
paragraphs from the file being merged change their appearance, as different styles are
applied to them. To avoid this, open the document you wish to merge, and rename the
styles concerned.
You should ensure there are no clashes between emphasis shortcodes in one
document and style shortcodes in the other. If you merge in a plain text file, as
opposed to an ordinary Word Processor document, no clashes of style and/or
emphasis names can occur.
Your document is automatically saved before the Merge begins. If you merge the
wrong thing, or in the wrong place, select the 'Revert' option on the 'File' menu to
"un-do" the Merge.
Spellchecker and Thesaurus
If you add on Spellchecker and Thesaurus software, two new options will appear in the
'Word' menu, to give access to these features from inside the Word Processor. The
Spellchecker and Thesaurus software comes with its own documentation.
Outlining
If you type long documents and use headings to break the text into different sections,
you may find it useful to view an outline of the document so that you can see the
structure of the document more easily. (An outline is a summary that shows only the
headings in a document) The Word processor allows you to switch between a normal
view and an outline view of your document. The appearance of the outline view of your
document is dependent upon the paragraph styles you have used.
When you are typing your document you use paragraph styles to differentiate
paragraphs. Each paragraph style in the Word Processor has an outline level. The
outline level determines the ranking of the paragraph style in terms of the document
outline, i.e. whether the paragraph is a major heading, minor heading, sub-heading, and
so on. The Word Processor allows you to set nine outline levels - 1 is the highest level
and 9 the lowest. The pre-defined paragraph style 'Body text' initially has level 9, and
the 'Heading A' style has level 1.
Outlining only makes sense when you are using headings. If all of the paragraphs in
your document use the 'Body text' style, there is no outline to show, and when you
try to switch to the outline you will see the message "Nothing to show in outline".
Setting paragraph outline levels
• You can set the outline level for a new paragraph style on the 'Outline level' line in
the 'Define style' dialog.
• You can set the outline level for an existing paragraph style with the 'Style gallery'
option on the 'Styles' menu.
If you just want to change the outline level of one particular paragraph, leaving the
others of the same style unchanged, you have to create a new paragraph style for the
paragraph. You can then set an outline level for this new style.
1 21
Turning the outline on
Press the ♦ key to switch to the outline view. Press it again to return to the normal view.
The outline view is initially set to display paragraphs whose styles have an outline level
between 1 and 8 - ie any styles except those with an outline level of 9.
You can change the display of the outline view by changing the paragraph outline levels
that arc included. For example, the outline view below has been set to show paragraphs
with outline levels between 1 and 3:
Here, the major headings have style HA (outline level 1). Further sub-headings have
outline levels of 2 (HB) or 3 (a new style, HC). Apart from the temporary change of
indentation, the paragraphs are shown with their current settings, such as the font
settings.
• To change the outline levels shown, select the 'Set outline level' option on the
'Word' menu.
• Press the ♦ key to switch to the outline view. Only paragraphs whose styles have
outline levels less than or equal to the outline level you set will be shown.
While outlining, you can only move the cursor around the outline. As soon as you make
any change to the document, the Word Processor stops outlining and returns to the
normal view.
While outlining, you can use the 'Expand outline' and 'Collapse outline' options on the
'Word' menu to increase/decrease the number of levels shown in the outline by 1.
Using a highlight while outlining
If you highlight an area while outlining, and the highlight extends from one paragraph
to another, it includes any hidden paragraphs of a lower outline level which are
between the two paragraphs shown. If you delete ('Cut') or copy this highlighted area,
the Word Processor comes out of Outline, and you can see that the whole area has been
cut or copied to the clipboard.
Printing document summaries
Outlining also allows you to print document summaries. If an outline is shown, the
'Print' option will print the outline, not the whole document.
1 22
Template files
Template files can be used to load styles, settings and text into any new file that is
created with the 'New file' option. If you do not choose to use a template file, new files
are given the standard set of styles and settings. Any document can be saved as a
template file.
You might use templates for a variety of reasons:
• To save an empty document which has the styles and emphases that you wish to use
for new files.
• To save all of your favourite settings, such as those in 'Set preferences' and 'Print
setup' to use with new files.
• To save the settings, styles and emphases that you use for each of the different
documents that you write - letters, memos, and so on.
• To save the styles, emphases, settings and text that you want to use for a particular
type of document. The template file will even save the cursor position. For example,
you might set a template file for standard letters.
Templates are not the same as stylesheets on other word processors, as you can save
settings and text as well as paragraph styles. (You cannot apply templates to existing
files, though.)
You can change the settings and/or sty les for all new files, by creating a default
template - described later in this chapter.
Creating a template file
You can create as many templates as you need, for different types of files. If you use
more than one printer you may even have different versions of your favourite
templates, each set for the appropriate printer model, and each tailored to the fonts it
provides.
1. Open a file which has the styles, emphases and text that you want to save in the
template file.
2. Use 'Save as' to create a new intermediate copy of the file. Set the 'Use new file' line
to 'Yes'.
If you're careful, you could, of course, do all of this without making a temporary
file: just remove the unwanted text from a real document, use 'Save as template',
then use 'Revert'. However, if you were to exit the document for any reason before
you used 'Revert', you would lose your original file.
3. Check that all of the settings - as in 'Set preferences', 'Printer setup' and so on - are
as you want them.
4. Delete all of the unwanted text in the file. If you want to delete it all, press
Control-Psion-↑, Control-Shift-Psion-↓, then press the Delete key.
5. Select the 'Save as Template' option on the 'File' menu, and type a name for the
template file on the 'File name' line (you can use a maximum of 8 characters for the
name and it must start with a letter). Press Enter to create the template file.
The Series 3a adds the file extension .wrt onto template filenames. You don't need
to enter this yourself, though.
6. You can now use 'Exit', then delete the intermediate file.
1 23
Using template files
To use one of the templates you have created, when creating a new document:
1. Select the 'New file' option and set the 'Use template' line in the 'Create new file'
dialog to 'Yes'.
2. Select the name of the template file, that you wish to use, from the 'Template name'
line and press Enter.
Creating a default template file
If you use 'Save as template' and give default as the filename to use, this becomes
the template to use whenever no other template is specified. For example, it will always
be used when opening a document from the System screen, as there is no way to
specify any other template.
The default template is kept on the default disk. This is initially 'Internal', but you can
set it with the 'Default disk' option in the System screen. You may wish to create a
default template, with the settings, styles and emphases that you wish to use in
most of (or all) your new documents.
Important: if you use 'Create new list' in the System screen, and create a new file list
for the Word Processor, the name of the default template for this list will be the same as
the name you gave the list itself. (If you save the list as faxes , say, then you can
create a template called faxes and it will be the default for all new files in this list.)
If you forget the original name you gave to a list use the 'About application' option
in the System screen. The top line of the resulting dialog tells you the name.
Deleting template files
You can delete any of the template files you have used with the Word Processor if you
no longer wish to use them, and wish to free up space on your disks.
Template files are stored in a different place to document files. To delete one, find it
using the file selector.
1. Move to the System screen and place the highlight under the Word icon.
2. Choose the 'Delete file' option from the 'File' menu. The 'Delete file' dialog will then
be displayed, as if you were about to delete a document file.
3. Press the Tab key to display the 'File selector'. You will see your document files
listed with their full filenames (that is, with a .wrd file extension appended to each
name.)
4. To list the template files instead, move the highlight up to the top of the list, over the
\ symbol, and press Enter. Then move the highlight over the \WDR\ line and press
Enter. You will now see a list of files, including template files (which have a .wrt
file extension.) Choose the name of the one that you wish to delete and press Enter.
5. The 'Delete file' dialog will be redisplayed. The name of the template file is shown.
Press Enter again to delete it.
File extensions and the file selector are explained in greater detail in the 'Files and
disks' chapter.
1 24
Other file formats
Plain text files
Word Processor files contain text that you type in, plus coded information about all of
the styles and emphases. This coded information is put into the file by the Word
Processor.
If you want to transfer documents to and from other computers, you may wish to use
files which contain only the text.
Saving a plain text file
1. To save a copy of the document as plain text, first select the 'Set preferences' option
from the 'Special' menu. There are two settings for 'Text file type':
• 'Paragraph': each paragraph in the document will be saved as a single line of text,
with no blank lines between paragraphs. Most Word Processors will understand this
format.
• 'Line': each paragraph will be word-wrapped to a width of less than 80 characters,
and a blank line will separate paragraphs. You could then copy the file direct to a
printer, or type it on a PC. Text editors, and many Word Processors, understand this
format.
2. Select the 'Save as' option on the 'File' menu. Type a different name for the new file
on the 'File Name:' line. Set the 'File type' line to 'Text' and the file will be saved as
a plain text file.
Opening a plain text file
The Word Processor can open any plain text file.
1. Select 'Set preferences', as when saving a plain text file, and set 'Text file type' to the
setting - 'Paragraph' or 'Line' - which corresponds to the file you wish to open.
2. Select 'Open file', and type the name of the file to use. The Word Processor
recognises that the file does not have the Word Processor's own format, and so treats
it as plain text. The file will inherit the same styles and emphases as the file you
were previously editing.
Important: when you next use the 'Save' option, or you switch to a different file, the
current document will be saved in Word Processor format, including style and emphasis
information. The filename will be changed to use the standard .wrd file extension.
If you later want to send a file back to another computer, you can use 'Save as' to save
it as a text file, as described before.
Full filenames, including file extensions, are shown when you press Tab in the
System screen. See the 'Files and disks' chapter for more details.
1 25
Plain text editing
If you do need to keep documents in plain text format all the time, you can use the
Word Processor as a plain text editor. (Don't worry if you don't understand some of the
terms mentioned in this procedure.)
1. Move the highlight in the System screen to the Word icon. Select the 'Create new list'
option on the 'Special' menu.
2. On the 'Directory for files' line, enter a name of up to 8 letters for the directory to
keep text files in. For example, enter text .
If you know about directories, note that this will be a subdirectory of \WRD . For a
directory off the root directory, you might for example type \text . There is more
information about directories in the 'Files and disks' chapter later on in this manual.
3. On the 'Extension for files' line you can enter a different file extension for your text
files, if you wish. It should be from one to three characters; txt or doc are
commonly used for text files.
4. Make sure the 'Type' line is set to 'Text editor'.
5. On the 'Save list as: Name' line, enter a name to save this information as textedit , perhaps.
6. Press Enter. A dialog is shown, listing your choices; press Enter again to confirm
them.
A new Word icon is shown in the System screen. All files you create with it will be
plain text files. It does not have the menu options for features (eg styles, emphases and
passwords) which require non-textual information to be saved in files. There are a few
other differences:
• There is an 'Indentation' option, for setting the tab width and turning
auto-indentation on and off.
• There is no outlining facility.
• The 'New file' option will only ever use a default template (stored as
default.$). When you select 'Save as template', you are given the option of
replacing this template. Do not try to swap templates between the Word
Processor and the Text editor.
• 'Set preferences' has settings for bold/normal and mono/proportional text.
Use the Program editor icon in the System screen if you want to edit OPL programs,
The Text editor, like the Program editor, does not save the status window or "Zoom"
settings to file, as its files only contain the plain text you type.
Editing Rich Text Format (RTF) files
A small software add-on to the Word Processor allows it to save and load Rich Text
Format (RTF) files, compatible with Microsoft Word and other word processors. The
Psion serial 3 Link is supplied with this add-on. The serial 3 Link allows you to transfer
RTF files, like other files, to and from a desktop computer. Documentation for the RTF
software is on the serial 3 Link disk.
1 26
8
The Spreadsheet
The Spreadsheet allows you to keep all sorts of inter-related
numerical information, and to perform calculations based on
it.
•
This chapter begins with two pages of information
experienced spreadsheet users may need to use the
Series 3a Spreadsheet.
•
After this comes an introduction to spreadsheets and their
uses, guiding new users through the everyday features.
•
The rest of the chapter contains a full reference for the
various functions and features of the Spreadsheet.
Like the Word Processor, the Spreadsheet offers password
protection and encryption, to keep confidential information
secure. Passwords are discussed in the "Security and
backups" chapter.
Press the Sheet button to use the Spreadsheet.
1 27
Quick start for experienced spreadsheet
users
The Spreadsheet works in a very similar way to versions 1A and 2 of Lotus. If you're
already familiar with other spreadsheets, you won't need most of the information in this
chapter; experiment with the Spreadsheet, and use this manual when in doubt.
The main points to note are:
• Use = (not + ) to start a formula.
• No @ symbol is needed on function names.
• Range references use a colon; A1..C3 in Lotus is A1:C3 in the Spreadsheet.
• ** is the power operator; Lotus uses ^ . (The precedence of all the operators is the
same.)
Other differences:
• To hide columns, set their column width to zero.
• Numbers in 'Bargraph' format are shown as a graphical bar.
• The logical operators AND and OR do not need # symbols around them as they do in
Lotus - for example, the formula A1=1#AND#A2=2 in Lotus would be
=A1=1 AND A2=2 in the Spreadsheet.
• The Spreadsheet has a % operator.
• The @ function is called AT in the Spreadsheet.
File types and file transfer
Files from the Series 3a Spreadsheet can be loaded into other spreadsheet packages,
such as Excel or Lotus 1-2-3, and vice versa.
You should be familiar with the basic use of 3 Link before you transfer worksheet files.
You don't have to transfer files at all, though; while linked to a PC or Macintosh you
can save and open worksheet files directly on the other computer, without copying the
file to the Series 3a.
When linked, the PC/Macintosh drives become available to you as the REM::
filing system. See the 3 Link User Guide for full details.
The file types which the Spreadsheet supports have these file extensions:
• SPR - the Series 3 and Series 3a Spreadsheet format. (You can transfer SPR files to
and from a Series 3, as long as you do not use the 'Password' option in the Series 3a
Spreadsheet.)
• WKS or WK1 - a standard format which most spreadsheet programs support, in
which virtually all the information in your worksheet is saved.
SPR files are smaller than WKS and WK1 files, so save files as SPR until you need
to export them, and only then save them as WKS or WK1.
Most accented characters, and symbols used by certain languages (such as ¿ , «
and » ) should be converted correctly. Some other symbols with values above 127 in
the character set cannot be converted.
• DIF - use only when your other spreadsheet program supports DIF but neither WKS
nor WK1. The DIF format only transfers numbers, text and evaluated results. All
other information is lost.
1 28
The SPR file format on the Series 3a is a superset of that used by the Psion MC
Spreadsheet. You can transfer files between the computers in both directions, but
with one proviso: if you move a Series 3a worksheet to the MC and save it on the
MC, any information not used by the MC Spreadsheet - graphs, for example will be lost.
Opening a different type of worksheet
You can use 'Open file' directly on files with the WKS, WKI and DIF formats. When
you press Enter to complete the 'Open file' dialog, a 'Convert to SPR format' dialog is
shown. This is to remind you that when the file is next saved it will be in the
Spreadsheet's own format, with a .SPR extension. This dialog allows you to set the
filename to use when this happens.
Exporting to a different file type
To 'export' to another spreadsheet program, use 'Save as', and set the 'File type' to one
suitable for your other spreadsheet program. The file extension will be set to match the
file type.
Lotus 1-2-3 WKS/WK1 compatibility
All cell information is converted - i.e. format and alignment information, column
widths, formulae, values, text, range names and protection. Note:
• The Spreadsheet cannot understand macros from Lotus. The cells containing the
instructions making up the macro will be left intact - you just cannot run the macro
in the Spreadsheet. If you subsequently transfer the file back to Lotus, the macro
will run as it did originally.
• The differences in notation listed earlier - such as using = to start formulae - are
handled automatically.
Day numbers are the same as in Lotus except before 28/2/1900, because Lotus treats
1900 as a leap year.
The Spreadsheet displays only the D4 and D8 date/time formats. If you import a
Lotus file you may get others returned in functions such as CELL.
The graph features closely match those of Lotus 1-2-3. You can even create .PIC files,
which you can print with the Lotus PrintGraph utility. However, a few graph features
change when you transfer files:
• A few graph settings are lost when you convert to Lotus format: whether to use 3D:
whether to show titles and axis titles; fixed axis limits; whether to show values on
pie charts; and the name of the current graph, which changes to the next available
name like Graphl , Graph2 etc. Also, Lotus can only display one cell reference
in any piece of text on a graph, while the Series 3a Spreadsheet can use many - e.g.
\bl....\cl .
• If you do not define a graph in your Lotus worksheet, Lotus saves it with a current
graph showing no information. This is what you will see initially if you open the file
on the Series 3a.
• The Series 3a Spreadsheet supports neither colour codes nor exploding codes when
displaying pie charts.
1 29
What are spreadsheets and worksheets?
A spreadsheet allows you to keep all sorts of numerical information, and to perform
calculations based on it. It consists of a large area, org rid, in which you can enter
numbers and text, and work out sums:
• You can manipulate the data (the information you enter) again and again - for
example, you might sort databases of sales figures into various orders, keep running
totals and do statistical calculations.
• You can do calculations quickly with the help of functions, like on a calculator.
Unlike a calculator, though, you can see all the elements of your calculation, enter
descriptions beside the numbers, and work out many related results at once. And
you can quickly try out the same calculations with different numbers.
The Spreadsheet loads the information from a file into memory. The information in
memory is the version you edit. Changes are not saved to file until you exit the
Spreadsheet with the 'Exit' option (or by using the Delete key in the System screen).
Spreadsheet files
Just as the Word Processor lets you keep many separate documents, the Spreadsheet lets
you keep many separate worksheets. When you first use the Spreadsheet you will be
using a worksheet file called sheet. If you're new to Spreadsheets, use this to
experiment with.
You can create, open, copy and delete worksheet files in the same ways as Word
Processor documents.
For example, there are two ways to create a new file:
• In the Spreadsheet: use the 'New file' option on the 'File' menu.
• On the System screen: move the highlight to below the Sheet icon and select the
System screen's 'New file' option..
In the 'Create new file' dialog shown, type a name for the new file - for example,
budget. The name can be from one to eight letters and numbers, and must begin with
a letter.
It is usually better to keep worksheets on the 'Internal' disk or a RAM SSD. A Flash
SSD will slowly fill up as you keep saving worksheets to disk.
Press Enter to complete the 'Create new file' dialog. The Spreadsheet creates the new
file and you can start entering information.
As with any important information, you should back up your worksheet files
regularly - either to an SSD which you keep separate from your Series 3a, or via 3 Link
to another computer.
1 30
Big worksheets
A worksheet can cover an area much larger than the Series 3a screen. You can have
different calculations in different areas of the worksheet. For example, you could have a
worksheet for all aspects of your personal finance:
You can give range names to each area, to identify them more easily, and/or add
explanatory text.
The results of one calculation (say, the 'Miscellaneous expenses' calculation) can be
used in other calculations (say, the 'Grand total' calculation).
This manual uses simple example worksheets - your own may well be larger, but they
will use the same principles.
1 31
Moving around and entering data
The grid is the working area of the Spreadsheet - where you enter your data. Each cell
in the grid can contain one piece of information. Each cell is identified by its cell
reference, made from its column ( A , B , C ...) and row ( 1 , 2 , 3 ...). The top left
cell, for example, is called A1 .
You can use ←↑↓→ to move a cell pointer around the grid. It marks where you are on
the grid - the current cell - rather like the cursor in the Word Processor. The cell
reference of the current cell - A1, B2 and so on - is shown at the left end of the input
line at the top of the screen.
There are 256 columns, labelled A to IV, and 8192 rows, labelled 1 to 8192. The display
can only show a small part of the grid, and will scroll as required if you try moving the
cell pointer off the screen.
To enter data into the current cell, just start typing. The data appears in the input line.
When you've typed it:
• Press Enter to enter the data into the current cell.
• Alternatively, use ←↑↓→ to enter the data and then move the cell pointer in the
corresponding direction. This is a quick way to enter a series of cells.
As in many other Series 3a applications you can use the 'Zoom in' and 'Zoom out'
options on the 'Special' menu to change the display size of the data you enter.
Types of data - text, number, formula
Each cell can contain only one piece of data. It will be one of three types, depending
on the first character you enter:
• If the first character is one of these: 0123456789(.+- then the data is treated as
a number.
You can also enter calculations, which are immediately calculated and entered as
numbers - for example, 78*36 would enter into a cell as 2808 .
• If the first character is = the data is treated as a formula. Formulae are used to do
calculations.
• For any other first character, the data is treated as text. (Separate items of text are
sometimes called text strings.)
Cell width
If a text string is too long for its cell the text is displayed on lop of adjacent cells to the
right, as long as they are empty. (Text strings may be up to 236 characters long.)
If a number in the selected format is too large for its cell, the cell is displayed filled
with # symbols.
'Illegal character' message
If you see an 'Illegal character' message when you try to enter data remember that the
first character you type controls what type of data you are entering. For example, 30b
1 32
is illegal, as the initial 3 sets the type of data to numbers, so letters, like b , aren't
allowed.
To force the Spreadsheet to accept data as text, type the ' symbol first. You might, for
example, enter a phone number like this: '081-999-0102 .If you want to enter a
text string which itself begins with a ', enter ' twice.
The ' doesn't appear in the cell - it just instructs the Spreadsheet to treat the
characters which follow as text. You can use the same trick if you want to enter text
beginning with = ; if you don't use a ' symbol, the = character tells the Spreadsheet
to treat what you type as a formula.
There are three other prefixes which behave in this way: ^ " and \ . They are
covered later.
Editing data in cells
You can change data entered into the grid as much as you like, until it's as you want it.
• To edit as you type: you can press the Delete key to delete to the left of the cursor.
Remember that the arrow keys enter the data, then make the cell pointer move.
If you press Psion-←('Home') or Psion-→('End') you can use the full range of
Series 3a editing keys, including ←↑↓→. When you've finished editing, press Enter
to enter the data in the current cell.
If the Spreadsheet displays an error message such as 'Illegal character', because you
have tried to enter something it doesn't understand, it will automatically let you edit
the whole input line.
• To re-edit the current cell: press Enter. Here again you can use the full range of
editing keys, including ←↑↓→.
• To overwrite the current cell: just type the new entry.
• To clear the current cell: press the Delete key.
Formulae
All calculations in the Spreadsheet are done through formulae. Formulae always
start with an = character. You enter formulae into cells in the same way as text or
numbers, but the cell shows the calculated result of the formula it contains, not the
formula itself.
Working out what a formula should be
To work out the formula you need, use the cell references - A1, B2 and so on - of the
cells you wish to refer to, with the appropriate mathematical operators - characters
which represent arithmetic operations, like + , - , * (multiply) / (divide) and so on.
For example, a formula to add whatever is in cells Al and B2 would be =A1+B2 .
When you enter a formula into a cell it is evaluated - using the current values of the
cells it references - and the result is displayed in the cell. However, it is the formula
which is stored. The formula will be displayed in the input line whenever you move the
cell pointer back to this cell.
1 33
Here is a simple example worksheet that contains a list of bills, and calculates money
free after deducting these bills from a salary:
If you want to, you can enter the data and follow the example through. Enter the text in
column A and the numbers in column B and C by moving to the cell, typing the number
(eg 30 in cell B2) or the text (eg Gas in A3) and pressing Enter, or one of the arrow
keys.
You now want to enter a formula to calculate the amount of money you have left over.
This is "SALARY minus all the BILLS"-that is, C2-B2-B3-B4-B5-B6 . To enter
this:
1. Move the cell pointer to an empty cell - here, use D2.
2. Type =C2-B2-B3-B4-B5-B6 (note the = to start the formula).
When you press Enter, the formula is evaluated and the result, 160 , appears in cell D2.
Note that the formula is still shown in the input line.
There is often more than one way to enter a formula. This example could also have
been entered as =C2-(B2+B3+B4+B5+B6) . Brackets, as in the Calculator, group
together part of a calculation.
'What if?'- trying different values
Once a formula is set up, you can change the values in the cells to which it refers
and see the change in the result. For example, move to B3 (the gas bill) and change
40 to 50 . When you press Enter, the result in D2 changes to match.
Breaking calculations into sections
You might want to break a bill down into its constituent parts - in this example, fuel,
repair and loan:
These can then be summed to give the value for cell B6, the car bill, which is part of the
main calculation.
To do this you would enter the formula =D6+D7+D8 in B6. in other words:
total car bill=fuel+repair+loan. The result (100) returned by this formula is then used
in the calculation in cell D2.
1 34
Especially with complex calculations, it is best to break a calculation down into its
constituent parts. You can have as many levels of formulae as you like in a worksheet.
You can make a change at any level and the effect will 'ripple through' to the top.
Cell ranges
You can highlight a range of cells in the Spreadsheet, in the same way that you
highlight text in the Word Processor. Cell ranges have many uses:
• You can use them to change the display of a group of cells, or copy data into them it is easier than doing it cell by cell.
• You can use them for calculations that work on sets of numbers - for example,
averaging a set of figures.
Highlighting a range
Move to a cell in one of the corners of the range you wish to highlight. Then hold the
Shift key down and press any arrow key to extend the range in that direction. The
screen will scroll if you reach the edge of the screen, so that you can keep highlighting
cells.
To remove the highlight on a range of cells, press Esc, or use the arrow keys to move
the cell pointer outside the highlighted range.
You can also use Control-Space to highlight the whole of the current row, and
Control-Tab to highlight the whole of the current column.
Range references
Just as each cell has its own cell reference, any range you highlight has its own range
reference, made from the cell references of its top left and bottom right cells. If a range
extends from A2 (top left) to C6 (bottom right), its range reference is A2:C6 .
Choosing cells and ranges
If, while you're typing something in on the input line, you want to type the reference of
a cell or range in the input line, you can instead select it. like this:
1. Press Shift-Space. A new icon appears in the top right of the screen, and the
reference of the current cell is inserted, highlighted, in the input line.
The arrow keys now move the cell pointer, and as they do so, the highlight in
the input line changes to reflect the current cell.
2. Move the cell pointer to the cell you want. For a range reference, highlight the
range you are interested in.
3. Press Enter, and the cell or range reference appears on the input line.
Entering a range reference in this way is called range painting. It is slower than typing
the reference, but it may help avoid typing errors.
1 35
Functions in formulae
The Spreadsheet has a set of functions which you can use in formulae, in a similar way
to OPL functions in the Calculator. For example, the formula =COS(A4) uses the cos
function. The functions are listed later in this chapter.
Functions can save you a lot of work. In the earlier example worksheet, you could use
the SUM function, which adds up the contents of the cells in a specified range, to
calculate the result in D2. In cell D2, instead of typing =C2-B2-B3-84-B5-B6 or
=C2-(B2+B3+B4+B5+B6) you would just type =C2-SUM(B2:B6) .
If you want to enter a one-off calculation (as opposed to a formula) which starts with
a function name, use a + symbol, e.g. +COS(pi/4) .
More ways to move around
You don't have to learn the keypresses mentioned here, but you may wish to try some
of them out.
If you have a highlighted range, you'll find that Home/End, Tab/Shift-Tab. and
Control-Enter/Shift-Enter keep the cell pointer within the highlighted range; if you then
go outside the range, the highlight is removed.
Note: the extent is the area which encompasses all the cells currently in use.
• Home and End (Psion-← and Psion-→) go to the left/right edge of the extent, or of
the highlighted range if there is one.
Control with Home/End goes to the top left/bottom right of the extent, or of the
highlighted range if there is one.
• Tab and Shift-Tab move one cell right or left respectively. If there is a highlighted
range, they "wrap around" to the next row when they reach the edge.
Shift-Tab in cell Al wraps round to the bottom right corner of the grid (cell IV8192).
This area is sometimes used to enter data which needs to be accessible but out of the
way of the main work area.
• Control-Enter steps down the first column, then down the second, and so on. When
it reaches the end of the range, it returns to the beginning.
Shift-Enter works in a similar way, moving up and left.
• Use Pg Up and Pg Dn (Psion-↑ and Psion-↓.) to move the cell pointer up and down
the grid a screenful at a time. To move it by one screenful horizontally, use
Control-← and Control-→.
Using 'Jump to'
You can use 'Jump to' to move to a particular cell, or one corner of the current extent
(or highlighted range).
The top line of the 'Jump to' dialog lets you choose between jumping to a specific cell,
or one comer of the current extent (or highlighted range). Leave it set to 'Range/cell',
and move to the line below. Type in the cell reference you want, and press Enter.
If you type a range reference, the whole range will be highlighted, and the cell pointer
will move to the top left cell in this range.
1 36
Remember that, as long as you have not highlighted a range, the quickest way to go
to A1 is to press Control-Home (Control-Psion-←).
If a range is already highlighted, you can use 'Jump to' to jump to one of the corners of
the highlighted range.
The top line of the 'Jump to' dialog will also offer options for named ranges and
circular references, if they exist in your worksheet. These are covered later.
Operators
These operators are available:
Operator
**
raise to power
make negative
*/
multiply, divide
+-&
add, subtract, string concatenate
= > >= < <= <>
comparison operators
NOT, AND, OR
logical operators
%
percent
precedence
1
2
3
4
5
6
(precedence varies)
In this list, the precedence numbers indicate the order in which operations are
performed. For example, 2+3*4 would evaluate as 2+12 , not 5*4 . Where
precedence is equal, calculation is from left to right (except for powers, which evaluate
from right to left). To override this order of precedence, use brackets.
AND, OR and NOT work in the same way as in OPL.
The '%' operator
The percent operator % can be used after a number to mean "divide by 100". For
example, as in the Calculator, 500*10% is the same as 500*0.1 - both mean "10
percent of 500".
The '&' operator
You can add together (concatenate) two text strings with the & operator. For example,
if A1 contains xyz and B1 contains abc , the formula =A1&B1 will give the text
string xyzabc . In practice, string concatenation is rarely used.
1 37
Error messages when entering data
These are the error messages specific to the Spreadsheet. They may occur when you try
to enter data into a cell.
Illegal character: You've tried to enter a number or formula containing a character not
allowed in that type of data.
Function argument error: You've given the wrong number of arguments to one of the
Spreadsheet functions.
Type mismatch: You've given the wrong type of argument (for example a range
instead of a cell reference) to one of the functions.
Syntax error: You've mistyped a formula.
Mismatched ( or ): You've missed out an opening or closing bracket.
Too complex: You've tried to type in a formula which is too complex for the
Spreadsheet to evaluate.
After one of these errors, the cursor is automatically positioned in the input line at the
point where the error was detected.
Deleting and moving data
If you are familiar with other applications on the Series 3a. you should find deleting,
copying and moving data very easy to do.
As in the Word Processor, when you delete or copy data it is kept on the clipboard,
ready to be inserted back into the worksheet if required.
The clipboard holds complete cell information - values, formulae, and format and
alignment information (as explained later). Cell information remains on the clipboard
until it is overwritten.
Deleting, copying and pasting cells
• Press the Delete key to delete the current cell, or all the cells in a highlighted range.
• Use the 'Copy' option on the 'Edit' menu to make a copy of the current cell (or all
the cells in a highlighted range) on the clipboard. This leaves the original cell or
cells unchanged.
• To copy cells back from the clipboard to the grid, use the 'Paste' option on the 'Edit'
menu.
Important: 'Paste' differs from the 'Insert' options found in the other built-in
applications, as it overwrites existing cells. If you want to move existing cells out of
the way before using 'Paste', see the 'Open/close gap' option, described later.
If you mistakenly overwrite something with 'Paste', the 'Undo Paste' option will
"undo" the damage.
You can copy cells from one worksheet to another. Use 'Copy', then 'Open file' to
open the other worksheet, and 'Paste' to paste the cells into this second worksheet.
1 38
Pasting when a range is highlighted
• If you highlight a range which is smaller than the range on the clipboard, no paste
will be done at all.
• If you highlight a range which is larger, the clipboard contents will be repeated as
many times as possible within the range.
For example, you may want to fill a range of cells with the same formula. Enter the
formula once, copy it, highlight the whole range and select 'Paste'. The cell references
will be automatically modified, because they are relative references.
Relative and absolute references
If, for example, A1 contains the formula =A2+4 , and you copy this and then paste it
into cell Bl, cell B1 would then contain the formula =B2+4 not =A2+4 . This is in
order to preserve the same meaning as in the original formula - "make the contents of
the current cell equal to the value of the cell below, plus four":
The cell and range references you have used so far (such as the A2 in the formula
=A2+4 ) are relative references.
Sometimes you may want to stop a formula from changing if copied to different cells.
You can do this by using absolute references. Put a $ before the parts of the cell
reference you don't want to be modified. The formula =$A$2+4 will always be
pasted in as =$A$2+4 - "make the contents of the current cell equal to the value in A2,
plus four". (The $ symbols don't affect the calculation.)
You can also use just one $ , before either the row or the column part of a cell
reference. This makes only the row or the column part of the reference fixed. For
example:
Formula in A1
will paste into C3 as:
=$B2
=$B4
=B$2
=D$2
=$B$2
=$B$2
Any part of the reference not preceded by a $ is modified.
1 39
Recalculation
Initially, recalculation is automatic: as soon as you change the contents of a cell, any
other cells whose formulae are dependent on this cell are themselves recalculated.
In larger worksheets, a Recalculating message may be shown while the
Spreadsheet is recalculating.
You can continue to use all the features of the Spreadsheet while it is
recalculating - for example, you can move to a different area of the grid and start
entering data.
Manual recalculation
You may find it irritating to have the worksheet redrawn every time you make a change.
If so, you can turn automatic recalculation off - select 'Set preferences' on the
'Special' menu, and set 'Auto recalculation' to 'No'.
Now, when you make a change, the grid will continue to display the old results of
formulae. A +/- indicator comes on at the right end of the input line, whenever there
are formulae in the grid which need to be recalculated:
While the
indicator is showing, some of the values in the grid may not be
correct.
You can make a manual recalculation with the 'Recalc' option on the 'Edit' menu.
Setting recalculation to manual can save battery power and improve response,
particularly with large worksheets.
1 40
Circular references - the
indicator
In its simplest sense, a circular reference is where a formula refers to itself - for
example, if cell B2 contained the formula =B2 .
It is also a circular reference when two formulae depend on each other - for example, if
you have =D3+1 in cell B2, and =B2+1 in cell D3.
A circular reference usually means you've made a mistake - for example, you've
typed in the wrong cell reference. They are rarely used deliberately in a worksheet.
Circular references can be very complex, leading from cell to cell around the
worksheet, finally returning to the cell from which they started.
Each time a worksheet is recalculated, the values in cells involved in a circular
reference may change in strange ways. For example, in the previous example, the
values in B2 and D3 would rise by one at each recalculation.
Detecting circular references
The
indicator appears at the right end of the input line when the worksheet
contains a circular reference. Use the 'Jump to' option, and accept its suggestion of
'Circular reference'; the cell pointer will move to one of the cells involved in the
circular reference.
If you have Manual recalculation set on, the
indicator may not be up to date, as
the worksheet is only cheeked when it is recalculated.
Moving data with 'Bring'
You can use the 'Bring' option on the 'Edit' menu to copy data highlighted in another
application. To get data out of the Spreadsheet, highlight it, then select Bring' in the
other application.
1. In the file you are copying from, highlight the data to be copied.
2. Move to the file to which you want to copy the data. Position the cursor or cell
pointer where you want the data to go, and select 'Bring' from the 'Edit' menu. The
data is copied in. In the Spreadsheet, it will overwrite cells, just like 'Paste'.
• Between two worksheets all values, text and formulae are copied. This is as if you'd
used 'Copy', then opened the second worksheet and pasted the data in. Relative
references in formulae are automatically updated. Absolute references are left as
they are. The format, alignment and protection information are also copied.
Both files must be open at the same time. To open the second one without exiting
the first one. highlight it in the System screen and select it with Shift-Enter.
• Between a Spreadsheet and other applications, everything you can see is pasted.
Formulae are copied as the values they display on the screen. Format information is
lost. A row in the Spreadsheet corresponds to a line in the other application.
Some applications will limit the amount of data they accept - for example, taking
only the first line of the data.
If you separate numbers and text in the Word Processor with tab characters, you can
'Bring' them into separate cells in the Spreadsheet.
1 41
The file saved on the disk
The Spreadsheet does not work directly on a file: when you edit a file, you change the
version which is currently held in memory, not the version on the disk.
Exiting the Spreadsheet
As in other Series 3a applications, the normal 'Exit' option will always save the current
worksheet to file.
Although the position of the cell pointer is stored as part of the file, a worksheet will
not be re-saved if moving the cell pointer is the only change you make.
If you were just playing around with a worksheet and you do not wish to save the file,
use the 'Exit, lose changes' option instead, to exit the Spreadsheet without saving any
changes to the file.
Undoing changes
The 'Undo' option on the 'Edit' menu lets you reverse the last change made by
insertion, deletion, pasting and so on. The name of the 'Undo' option reflects the last
operation you performed.
For example, delete cell A1. The 'Undo' option appears in the menu as 'Undo delete';
select it. and A1 is restored.
You can use 'Undo' on the following operations:
• 'Paste'. 'Bring', 'Paste special' and 'Open/close gap' on the 'Edit' menu.
• 'Format' and 'Alignment' in the 'View' menu.
• 'Protection', 'Clear' and 'Sort' in the 'Range' menu.
• 'Data extract', 'Data delete', 'Table 1' and 'Table 2' in the 'Database' menu.
Changes made to the clipboard cannot be undone. So if you copy one cell, then
delete a second, and then select 'Undo', the cell which was deleted will be restored, but
the clipboard will still contain a copy of this second cell, not the cell you copied first.
To disable the 'Undo' feature, select 'Set preferences' from the 'Special' menu and set
'Keep undo buffer' to 'No'. This can save memory, and also makes the Spreadsheet run
more quickly.
Saving the worksheet to disk
If you are about to make large changes to your worksheet you may wish to save it as it
is, so that you can revert back to the way it was if anything goes wrong.
Use the 'Save' option on the 'File' menu, before you make the changes, to save this
working version to the real file on the disk.
The file is also saved when you use the 'Exit' option, or if you change to a different
file, either with the 'Open file' option on the 'File' menu, or from the file list in the
System screen.
Reverting to the saved worksheet
If something does go wrong, select the 'Revert' option on the 'File' menu to revert to
the version you just saved.
1 42
'Revert' re-loads the version of the file on disk. This abandons any changes you have
made to the in-memory version.
Backup files
You can choose to keep the previous version of a file as a backup, whenever you save a
file. Use 'Set preferences' from the 'Special* menu and set the 'Keep backup files' line
to 'Yes'. The backup file will be in the same directory and have the same filename, but
with the .SP! file extension.
Important: 'Disk full' message
If a 'Disk full' error prevents the Spreadsheet from saving a file, a 'Not saved, continue
anyway?' message will appear. Press N to answer 'No' to this, and your changes are
safe: the Spreadsheet will stay as it was, keeping the file open. Use the System screen
to free some more disk space, then try again. (If the file is on a Flash SSD, use 'Save
as' to save the file onto a different disk.)
If you answer 'Yes' to the 'Not saved, continue anyway?' message, you will exit the
Spreadsheet and lose any changes. The previous version of the file will still exist,
though it will normally have a .SP! file extension, like backups. You can find it if
you move the highlight in the System screen to below the Sheet icon, and press Tab.
Opening or closing a gap
You can insert new blank cells, or remove areas of the worksheet (whether they contain
data or not), with the 'Open/close gap' option on the 'Edit' menu.
This option has no effect if the cell pointer is outside the extent.
When you open or close gaps, all cell references in formulae are adjusted so that they
still refer to the same cells in their new positions.
Inserting a new row or column
Rows always shift down to make room for the extra row; columns always shift to the
right if you're inserting new columns.
1. To insert rows, move onto the row above which you wish to insert a gap, and press
Control-Space to highlight the whole row. For columns, go onto the column
concerned, and highlight it with Control-Tab.
2. If you want to insert more than one new row or column, use Shift—> (for rows) or
Shift 4 (for columns), and highlight an equivalent number of rows or columns.
3. Select 'Open/close gap' from the 'Edit' menu. Set 'Action' to 'Open', and press Enter.
(The 'Move' line in the dialog has no meaning when a whole line or column is
highlighted.)
To insert a range
1. Highlight the range where you wish to insert a new rectangle of blank cells, shifting
the present cells out of the way.
2. Select 'Open/close gap' from the 'Edit' menu. Set 'Action' to 'Open'.
1 43
3. Set the 'Move' line of this dialog to 'Right' or 'Down', to specify the direction to
move the cells currently in this range, and press Enter.
To remove whole rows or columns
Closing a gap has exactly the opposite effect of opening one; other cells will move left
or up as a result.
1. Highlight the row/column to be removed, with Control-Space or Control-Tab.
2. If you want to remove more than one row or column, use Shift and an arrow key to
extend the highlight.
3. Select 'Open/close gap' from the menu, set 'Action' to 'Close', and press Enter.
To remove a range of cells
1. Highlight the range you wish to remove, as if you were going to delete it.
2. Select 'Open/close gap', and set 'Action' to 'Close'.
3. Set the 'Move' line of this dialog to 'Up' or 'Left', as the direction to move cells into
this range, and press Enter.
The display of data
Column widths
To change the width of whole columns: use the 'Column widths' option on the 'View'
menu. (If you want to change more than one adjacent column, first highlight any range
of cells which extends across the columns to change.)
To reset columns to the current default width: set the 'Action' line of the 'Column
widths' dialog to 'Restore'.
Column width is measured in numeric character widths - in other words, the width of a
zero. The default width is initially 8 characters.
If a number cannot be displayed because the column is not wide enough, the cell is
filled with # symbols. The cell contents are unaffected: if you move the cell pointer
onto such a cell, the contents will be displayed in the input line.
Alignment
Text and numbers align differently by default: text aligns left, numbers and formulae
align right.
To align text as you enter it: start the text with one of these alignment prefixes
' align left
" align right
^ centre
\ repeated
The \ prefix repeats text in a cell as many times as will fit.
To align a cell or range: move to the cell, or highlight the range, and use the
'Alignment' option on the 'View' menu.
Leave the top line of the 'Alignment' dialog set to 'Range'. You can set either the
alignment to be used for displaying text, or the alignment for displaying numeric
data. Set 'Cell type' to 'Text' or 'Numeric', then set 'Align' to the desired alignment.
1 44
'Numeric' alignment can only be set to 'Left' or 'Right'. 'Text' alignment also has
'Centred' and 'Repeated' options.
If you want to set both text and numeric alignment for a cell or range, you must use
the 'Alignment' option twice.
Setting the alignment of empty cells takes up memory, so do this only for cells which
are going to contain data. If you highlight a whole column or row, the range shown in
the dialog will be cropped either to row 100/column Z or to the extent, whichever is
larger.
To change the default alignment (to be used for all cells which have not had their own
alignment set): in the 'Alignment' dialog, set the top line to 'Default'.
You can set the alignment either for text or for numeric data, in the same way as before.
Display formats
You can set many different display formats for numeric data (numbers, and the results
of formulae). As with 'Alignment', you can choose between setting a range of cells, or
setting a default, to be applied to all cells which have not had a display format set.
Cells containing text arc not in general affected by the 'Format' option.
To set a display format: move to the cell you wish to set (or highlight a cell range,
columns or rows), then use the 'Format' option on the 'View' menu and set the 'Show
as' line to the format you wish to use.
Again, setting number formats for blank cells does use up memory.
You can set any of the following formats:
Fixed: Displays to a fixed number of decimal places.
Scientific: Displays in scientific (exponential) notation - for example, 3.24E-1 .
Currency: Like 'Fixed', but with a currency symbol. Negative numbers are shown in
brackets, for example (£54.00) .
Percent: Like 'Fixed', but with a % sign. Percentages should be entered as decimal
fractions, so e.g. to enter 71 %, type in 0.71
Triad: Like 'Fixed', but with a Triad separator (a comma) between every three digits.
General: Displays numbers to as many decimal places as will fit in the cell at its
current width.
Default: Displays numbers in whichever format is the default, as set in the 'Format'
dialog.
Hidden: Hides the contents of cells. The contents are still shown in the input line.
Bargraph: Displays numbers as horizontal bargraphs. Like text, bargraphs overflow
across adjacent cells if they can't fit into a cell at its current width, as long as the
adjacent cells are empty. Negative values are shown as bars with no outline.
Show formulae: Displays formulae as they appear in the input line. (Numbers are
displayed in 'General' format.)
Date and Time: Shows numbers generated by the date and time functions (described
later in this chapter) as dales and times.
To change the default format, change the setting in the 'Set' line to 'Default' and
select the format as before.
1 45
Numbers can be from 1E-99 (inclusive) lo 10E99 (exclusive), from -1E-99
(inclusive) to -10E99 (exclusive), and zero. If a number outside these ranges is
entered in a cell (through a formula) that cell is filled with **** characters.
Font styles
You can change the font style for a range with the 'Change styles' option. The four font
styles work rather like styles in the Word Processor - you can set any range to have any
of the four font styles.
Initially, the four font styles are defined to use the same font, but in normal, bold, italic
and bold/italic. The screen display reflects the underline/bold/italic settings of the font
styles.
See the 'Printing' chapter for more details of these styles.
Titles
Many worksheets consist of a table with column titles along the top and row titles down
the side. When you move around the grid, away from the top left comer, you can lock
the titles on screen, to remind you of what the data in a given cell means:
1. Go to the cell immediately below the column titles, and to the right of the row titles.
This will usually be B2.
2. Select 'Titles on' from the 'View' menu.
A thin line now separates the titles from the working area. You cannot move the cell
pointer into the titles area. The titles will remain visible even when you scroll away to
other parts of the worksheet:
You cannot turn titles on if the cell pointer is in A1.
To enter or edit data in cells which are part of the titles you must turn titles off
temporarily.
Other display controls
To show/hide grid lines and labels: use the 'Show' option on the 'View' menu.
You can hide any cell containing the number zero, or a formula returning to zero by
setting the 'Zero values' line in the 'Show' dialog to 'No'.
You can turn the status window on and off, if you wish, by pressing Control-Menu.
Separators and currency
The 'Number formats' dialog in the System screen has two lines - 'Number separators'
and 'Currency' - which allow you to set a variety of numeric settings, such as the
decimal point character and the currency symbol. Press Tab to expand either line into a
subdialog, allowing you to change the appropriate settings.
1 46
The Spreadsheet treats the 'Number separators' settings as follows:
• The 'Decimal point' setting is used in all decimal numbers displayed by the
Spreadsheet. If you use dot as the decimal point character, use a comma between
parameters to functions. If you use comma as the decimal point, use a semicolon
between parameters. (You will have to do the same in the Calculator, when you call
a function or OPL procedure.)
• When displaying numbers in 'Triad' format, the Spreadsheet will separate every
three digits with the 'Thousands separator' character. If 'Separate thousands' is set to
'10000 and above', no separator will be used for four digit numbers.
• When displaying numbers in 'Currency' format, the 'Separate thousands' setting
controls whether every group of three digits is separated (the way they are in
'Triads' format).
The Spreadsheet uses the settings on the 'Currency' line only when displaying numbers
in 'Currency' formal, taking all four settings into account.
If you make changes, the Spreadsheet takes your settings into account when you return
to it. This also causes a recalculation.
More operations on the worksheet
Searching a worksheet
To find a string of text, a number, or part of a formula in a worksheet: use the
'Find' option on the "Search" menu.
On the 'Search for' line of the dialog, type in the characters to search for. Then set the
'In' line to control where to search. 'Values' means text, numbers, and the current
results of formulae; 'Formulae' means only the formulae, not their results; 'Values &
formulae' means all of the data in your worksheet.
If you set the 'Exact match only' line to 'Yes', only cells containing exactly the same
characters and nothing else will be found.
If you set the 'Case sensitive' line to 'Yes', characters must also have the same case.
The first cell in which a match is found becomes the current cell. Note that if you have
titles on, cells in the titles area will not be found.
Unlike the FIND keyword in OPL. you can't use wildcards in search clues.
To find the next occurrence: use the 'Find again' option, also on the 'Search' menu.
Keep selecting 'Find again' until you find the cell you are looking for.
'Find' starts searching from the current cell. 'Find again' starts searching from the cell
after the current cell. They then search across the current row to the edge of the extent.
Then they search from the left end of the next row. and so on. At the end of the
worksheet area, they loop back and start searching from cell Al.
To search inside a particular range: highlight the range before you start the search
and 'Find' and 'Find again' will only search inside this range.
Range names
If you use a range of cells over and over again, you can give it a range name by which
you can refer to it. You can use the range name in formulas and with 'Jump to' to move
directly to the range.
1 47
To name a range: highlight the range, then use the 'Name range' option on the 'Range'
menu. Type in a descriptive name for the range.
Names can be up to 15 characters long. They can contain letters and numbers, but they
must start with a letter. Since they can be used in place of cell references, they cannot
themselves be valid references (such as A1, etc).
If you try to use a name which has already been defined, you will be asked whether you
want to replace the previous definition.
Use the 'Edit range' option on the 'Range' menu to re-edit the name of a range,
change the range to which a name refers, or delete a range name entirely.
To use a range name in formulae: use it instead of the range reference. If totals is
a name for the range A3:A12, you could enter the formula =SUM(totals) instead
of =SUM(A3:A12) .
Important: Named ranges act as relative references. You can refer to a named range as
an absolute reference by adding a $ symbol in front of it - $totals , for example.
You can then copy or move a function which uses the named range, without the range
changing.
To 'Jump to' a named range: select the 'Jump to' option on the 'Search' menu. It will
offer 'Named range' as one of the types of places you can jump to.
When you jump to a named range, the cell pointer goes to the top left corner, and the
whole range is highlighted.
While a named range is highlighted, you can use 'Jump to' to jump to one of the
corners of the highlighted range- 'Top left', 'Top right', 'Bottom left' or 'Bottom
right'. The range will remain highlighted.
Protecting cells
You can use cell protection to prevent the contents of cells being modified. A common
use is in worksheets used mainly for data entry, in which the formulae have been set up
and should not be modified.
To protect cells: highlight them, and then use the 'Protection' option on the 'Range'
menu. Press the '+' key to turn protection on for the range.
A padlock symbol
is displayed, at the right-hand end of the input line, if the
current cell is protected. If you try to paste, delete or clear any cells which have been
protected, you will see a message 'Protected cells were not changed'.
To remove the protection on cells: highlight the cells and then use the 'Protection'
option again. This time, press the '-' key to unprotect the range shown.
To unprotect all protected cells temporarily: select 'Set preferences' from the
'Special' menu, and set 'Override protection' to 'Yes'.
1 48
More operations on data
Sorting a range
You can sort tabular data into alphabetic or numeric order. For example, you might sort
product information by price:
Highlight the range to sort, then use the 'Sort' option on the 'Range' menu:
In this example, each row has the data for one product, so you want to leave 'Sort by'
set to 'Rows'. The '1st key' is the sort key - "what to sort by"; to sort according to
price, the sort key to use is column B.
The second line of the 'Sort' dialog controls the order in which the rows/columns are
sorted. 'Ascending' means that cells are ordered from lowest to highest.
When you press Enter, the rows are rearranged in the desired order. Any relative
references in formulae are automatically modified.
Cells containing text are sorted alphabetically, before ("lower than") cells containing
numeric data. If you set 'Case sensitive' to 'Yes' in the 'Sort' dialog, lower-case
characters always sort after upper-case characters.
If you have rows/columns which have the same value for the first sort key, you can
sort them according to a second sort key.
Clearing selected information
The 'Clear' option on the 'Range' menu lets you selectively clear the information in a
range of cells. (It does not affect the clipboard.) It has settings for 'Formulae',
'numbers' and 'text'.
If you choose the 'Formats' setting, any empty-looking cells which still contain format
or alignment information are cleared; no other cells are affected.
If you use the 'Clear' option, set 'Formulae' to 'Convert to values', and set all of the
other options to 'No', any formulae in the highlighted range will be replaced by their
current values.
1 49
Paste special
The 'Paste special' option on the 'Edit' menu pastes the contents of the clipboard, like
the 'Paste' option, but allows you to choose which aspects of the cell information to
paste:
• 'Formulae', 'Numbers', 'Text' - if you set any of these, cells with the corresponding
kind of data will be pasted. The 'Action' line controls what happens to the data:
'Overwrite': inserts the new data into the cells.
'Add': values on the clipboard are added to those currently in the cells. Formulae
and/or numbers are added together: text strings are concatenated (joined together).
'Subtract': numbers and formulae on the clipboard are subtracted from the existing
ones. (Subtracting has no effect on cells which contain text.)
If you try to mix text with numeric values, the cell will be left with its contents
unchanged.
• 'Formats' means information set by the 'Format' and 'Alignment' dialogs. If set,
format information will replace the existing formats.
Graphs
You can create a graph to display the current values of one or more ranges in a
worksheet. You can define any number of graphs in each worksheet. The ♦ key
changes the display between the worksheet and graphs.
Creating the first graph
1. Enter the numbers for which you want to create the graph in a single row (or column)
and highlight them, using ←↑↓→
2. Press the ♦ key, and the numbers are displayed as a 3D bar graph.
To return to the worksheet, press the ♦ key again (or the Esc key). You might then
highlight a different range of figures, and press the ♦ key to see them displayed as a
graph.
If you highlight several rows of figures before selecting 'Graph', the rows are displayed
together on the same graph. If the top left cell contains text, the top row will be used as
labels along the bottom of the graph.
You can also highlight and display columns in this way.
Saving the graph
While a graph is displayed, a new set of graphics menus is available. If you use any
of their options to change the appearance of the graph, the Spreadsheet saves the graph
for you with the name Graphl . (It is a not a separate file, but part of the worksheet
itself.)
Once graphs have been saved, the current graph - the one most recently displayed
will always be displayed when you press the ♦ key. This is because there are now
two reasons why you might highlight another range of figures before pressing the ♦
key:
1 50
• To add the highlighted range to the current graph, so that it displays two sets of
figures. (Use the 'Set ranges' option). Or:
• To start a new graph with the highlighted figures, as before. (Use the 'New graph'
option).
Adding a new range to the current graph
Up to six graph ranges can be displayed on a graph. The first range shown on the graph
is called range A . Further ranges are named from B to F .
1. Highlight the range of figures to add, and press the ♦ key. The current graph is
shown, as before.
2. Select the 'Set ranges' option. Set the top line of the dialog to B , then press Space.
This sets 'Enabled' to 'Yes', and the range you highlighted appears on the 'Range'
line of the dialog.
3. Press Enter, and the graph will now show the two sets of figures, side by side, each
with a different shading pattern.
Graph range X is a special graph range, used to label the X-axis. It is described later.
Adding adjacent rows or columns of figures
If you want to add figures from several adjacent rows (or columns) to the graph,
highlight the figures as a block, and select 'Set ranges'. Repeat step 2 above and define
each new range for the graph.
If there are more rows than columns in the highlighted range, the Spreadsheet treats
each column as a new graph range. Otherwise, each row becomes a new graph range.
Displaying a legend for graph ranges
You can enter names for graph ranges on the 'Legend' line of the 'Set ranges' dialog,
for example 'Sales', 'Profits' and so on. You can then use the 'View Legends' option on
the 'Special' menu to display a box containing the graph's legends. The box is removed
when you press a key.
Background drawing
A graph may take a little time to draw if it contains a very large number of cells.
However, you can use options on the menus while the graph is redrawing, or press Esc
to return to the worksheet.
Adding text to a graph
Labelling the X-axis
You can put X-labels along the bottom of the graph (the X-axis) to show what each
value on the graph represents. For example, you might add the text for months from Jan
to May to a graph showing the sales figures for those months.
1 51
1. Highlight the range of text cells to use as X-labels, display the graph and select the
'Set ranges' option.
2. Set the top line of the dialog to 'X'. Then press Space: this sets the "Enabled' line to
'Yes' and fills in the range you highlighted. Press Enter to complete the dialog.
If the X-labels are too wide and overwrite each other, select 'Set ranges', set the top
line of the dialog to 'X', and change the setting in the 'Step' line to a number greater
than1. If, for example, you set it to 3, only every third X-label is shown.
If your graph displays just one set of figures, you can show the figures corresponding
to the bars on the X-axis, by using the range of figures themselves for the X range.
Labels on each bar
You can use text or numbers in the worksheet as labels on the top of each bar, to show
what each bar represents:
1. Highlight the range of cells to use as labels, display the graph and select the 'Set
labels' option.
2. Set the top line of the dialog to the graph range for the labels, e.g. A . Then press
Space: this sets the 'Enabled' line to 'Yes' and fills in the range you highlighted.
Press Enter to complete the dialog.
If you use numbers as labels, they are shown in exactly the same way as they arc
shown in the Spreadsheet.
As with 'Set ranges', you can highlight several rows or columns before selecting the
option. You would then enable each graph range to have labels in turn by pressing
Space.
Adding a main title to a graph
Select the 'Titles' option on the 'Display' menu, set the 'Show titles' line to 'Yes', and
type the title on the 'First' line. If you wish, enter a second line of title text on the
'Second' line. Press Enter to complete the dialog.
To turn the titles off and on. without losing the text itself, select the 'Titles' dialog
again, and set the top line to 'No' or 'Yes'.
Titles do not affect the name which is given to the graph.
Adding a title to an axis
You can add a title of up to 39 characters for the X-axis (across the bottom of the
screen) and/or Y-axis (down the left):
• Select the 'Axis titles' option on the 'Display' menu, set the 'Show X-axis title'
and/or 'Show Y-axis title' line(s) to 'Yes' and type the text that you want to use.
Press Enter to complete the dialog.
Entering cell values as text
To insert the current value of a cell (text or numbers) into text you have added to a
graph (for example in titles), use the \ character and the cell reference. For example,
to enter the title "Result:", followed by the contents of cell B2, you would type
Result: \b2 in the 'First' line of the 'Set titles' dialog.
To enter a \ character itself in text you must type it twice.
1 52
Changing the graph type
The graph format that you have seen so far is a Bar graph in 3D. You can change the
graph type to show data as a Stack-bar, Pie chart. Line graph, or X/Y scatter graph:
1. Use the 'Format' option on the 'Display' menu to change the display of the graph.
2. Set the 'Type' line to the new graph type.
For 'Bar', 'Stack-bar' and 'Pie' graphs, you can set the '3D' line to 'Yes' to display a
3D graph, if you wish.
Stack-bar graphs
Use these when several sets of figures comprise a breakdown of one larger set of
figures - for example, a graph showing bars for sales in months Jan to May, where the
bar for each month comprises sections for corporate, retail and direct sales.
Pie charts
Pie charts can only display one set of figures. Use them to reflect the percentage of
some overall figure taken by each of its parts. For example, a pie could show the
breakdown of sales, with slices for corporate, retail and direct sales.
The pie chart displays the values in the first enabled graph range - usually A . Any
negative numbers in the graph range will be ignored. The X-label for each value is
shown alongside its slice of the pie.
When defining a pie chart you can use the 'Pie labels' line to make the value of each
slice appear next to any X-label. You can choose the way to display the value 'Percentages', 'Values' or 'None'.
On pie charts you cannot display labels (set with the 'Set labels' option) or use the
'View legends' option.
Line graphs
Line graphs are designed to show several sets of figures. Values are displayed as
symbols, joined together by lines. You can set each graph range to show lines, symbols,
or both, with the 'Line formats' option on the 'Ranges' menu.
X-labels for a range initially appear centred on the symbol positions. You can change
the position of the X-labels by changing the setting in the 'Alignment' line in the 'Set
labels' dialog. Or you might turn the lines and symbols off and show just labels in the
centred position.
Lines, when set, are only shown between values in adjacent cells. If a cell within a
range is blank, no line will be drawn between the values of the cells before and after
it.
XY/Scatter graphs
Use the XY/Scatter format when sets of figures are dependent on some other variable.
The values in graph ranges still represent a position "up the screen", but their positions
"across the screen" are determined by the values in graph range 'X'.
For example, you measure the temperature at five points in the day: 19°C at 09:00,
27°C at 12:00. 29°C at 15:00 (3pm). 26°C at 19:00 (7pm). and 21°C at 20:00 (8pm).
1 53
You can set the temperatures (19, 27, 29, 26, 21) as graph range 'A', the times (9,12,
15, 19, 20) as graph range 'X', and use the XY/Scatter format:
formats for the X-axis as well as the Y-axis (see 'Axes' later in this chapter for further
details). For other aspects of the display, the 'XY/Scatter' format acts like the 'Line'
format.
Other display options
Axes - changing limits and number formats
The 'Axis' option on the 'Display' menu controls the way the axes are drawn. The top
line of the dialog controls which axis to set - 'X' or 'Y'. (You can only change this to
'X' when using the 'XY/scatter' format.)
• Normally, the axes are automatically sized to accommodate the values you are
displaying. To set the limits, change the 'Limits' line from 'Automatic' to 'Manual'.
Type the new limits on the 'Upper' and 'Lower' lines, and press Enter.
• Numbers on the axes are initially displayed using the 'General' format. To change
this, move to the 'Format' line, and select the new number format. Change the
'Decimal places' line, if required, and press Enter.
You can use any of the formats used by the Spreadsheet to display numbers in cells,
apart from 'Show formulae' and 'Default'.
When you use the 'General' number format with very large values, the Spreadsheet will
automatically display the words THOUSANDS or MILLIONS vertically down the
Y-axis, and use correspondingly smaller numbers on the axis.
Changing the font size
You can change the size of all text and numbers displayed on a graph. When you select
the 'Format' option, you can set the 'Font size' line of the dialog to:
• Small: a 5x3 pixel font is used.
• Medium: a bigger font is used. Medium is used as the default font size for text and
numbers on graphs.
• Big: an even bigger font is used - on the Series 3a, the standard system font is used.
Alternatively, you can use the 'Zoom in' and 'Zoom out' options to cycle through the
font sizes.
1 54
Grid lines
If you select the 'Format' option, and set the 'Horizontal grid' line to 'Yes', you may
rind you can read across more easily from a bar or point to its value on the Y-axis. (You
may also wish to do the same to 'Vertical grid'.)
Grid lines are not shown in 'Pie' format.
Horizontal scaling
If, for example, you want a graph of "yearly profit", adding the figures throughout the
year, you may wish to set the graph ranges to be 12 cells wide, right from the start. You
could then fill in the cells month by month.
Multiple graphs
Creating a new graph
Highlight the first set of figures to use in the new graph, then press the ♦ key. If you
have already defined a graph previously, it will still be shown. Now select the 'New
graph' option on the 'Graphs' menu. Type a name for this new graph.
Leave 'Keep data' set to 'No' for a brand new graph. If you set it to 'Yes' your new
graph inherits the same sets of figures as the previous graph.
To use all of the same settings as before - format, text, and so on - set 'Keep settings'
to 'Yes'. To start with a 3D bar graph, with no legends, axis settings (etc) set at all, set
'Keep settings' to 'No'.
New graphs with multiple graph ranges
To create a new graph using figures from several adjacent rows (or columns) as the
ranges, highlight them all together, before using 'New graph'.
If the first cell in the range contains text, the first row/column will become graph range
'X'. Otherwise, it will be 'A'. You can therefore highlight a range of figures with or
without X-labels, and 'New graph' will fill in the graph ranges correctly for you.
As with 'Set ranges', if there are more rows than columns in the range (i.e. if the range
is "tall and thin"), the Spreadsheet treats each column as a new graph range. Otherwise,
each row becomes a new graph range.
Managing your graphs
To cycle round the graphs use the Tab key. Shift-Tab cycles round in the opposite
direction.
To select a graph by name select the 'Use graph' option. If you press Tab here, you
can see a list of all the defined graphs.
To rename the current graph select the 'Rename graph' option on the 'Graphs' menu.
To delete an unwanted graph use the 'Delete graph' option on the 'Graphs' menu.
This also frees the memory which it took up. If you delete all existing graphs, you
are returned to the worksheet.
1 55
Printing graphs: .PIC files
As the Series 3a does not have graphics-based printer drivers, you cannot print graphs
directly. You can, however, save graphs as "industry-standard" .PIC files, and then use
spreadsheets, word processors, or print utilities on other computers to print them.
The .PIC files mentioned here have no connection with OPL bitmaps, which also use
.PIC as the default file extension.
Use the 'Create .PIC file' option on the 'Special' menu. The 'Colour' line of the dialog
controls whether areas are saved as filled blocks ('Yes') or as shading patterns ('No').
If you intend to use a black and white printer, set 'Colour' to 'No'. You can change the
shading pattern used for a set of figures by entering it in a different graph range
('A' to 'F').
In fact, colour information is always saved, but will only be used if you print to a
colour printer.
The .PIC file format stores information on the items which make up the graph. It is not
a pixel-by-pixel format; the resolution and precise detail of the printed graph depend on
the resolution of your printer, and of the program which prints the .PIC file. Note,
however:
• All bar graphs are stored as 2D. Only pie charts can be 3D.
• Titles are always shown, if set - even if they are not shown on screen.
• A guide to the different graph ranges is always included. This performs the same
function as the box shown by the 'View legends' option, which is itself not included
in the .PIC file.
.PIC files are by default kept in a \SPR directory - the same as worksheet files
themselves.
Entering a database
A database is a table of information which you can sort and search by various criteria.
For example, here is a database of contractors working for an agency;
Each row is a
record
Each column is a
field
Each column must have a field name in the first row.
To define it, highlight the whole range, including the field headers. In this example, the
range is A1:F6. Then use the 'Set database' option on the 'Database' menu.
Setting the database simply creates a named range called database . (Each
worksheet can only have one database.) You can check or change this at any time
with the 'Edit ranges' dialog. You can also use 'Jump to', and select the database
range; this highlights the whole range.
1 56
If you enter any new records at the bottom of the range, remember to redefine the
database range to include them. You can also use the 'Open/close gap' option to add or
remove records or fields to the middle of a database. This adjusts the range
automatically.
You can sort the Database range in exactly the same way as any other range,
Databases in the Spreadsheet have no connection with the Database application.
The criterion range
Criteria specify conditions which a record has to meet in order to be highlighted, rather
like search-clues in the 'Find' option. However, criteria can be more complex:
• You can specify several conditions at once.
• A condition can make use of Spreadsheet functions and logical operators.
The first row of the criterion range should contain the same field names as the database
range.
Although you would normally copy all the field names, this is not obligatory: you
can quite happily copy only those that are of interest. The order of field names is
unimportant.
The second row contains the first criterion - the data which a record must contain in
order to match - for example:
Records in the database must have both Y in the Car column and N in the London
column to match this criterion. In this example, the 'Harvest' and 'Humphrey' records
match. (Note that the match is case-sensitive, so if you used y in the criterion, no
records would match.)
You can add further criteria in further rows if you like. A record only has to meet one of
the criteria (i.e. to match one of the rows) to be highlighted.
To define the criterion range highlight the range to use (including the field names),
then use the 'Set criteria' option on the 'Database' menu. Make sure you do not
highlight any blank rows below the criteria - all records will match with a blank
criteria.
The criterion range is also just a named range ( criterion ).
Searching by the criteria
Select the 'Data find' option on the 'Database' menu. The first record (from the top
downwards) meeting the criteria is highlighted. Select 'Data find again' from this menu
to highlight the next matching record.
Extracting matching records
To make the Spreadsheet copy all the matching records into a separate area:
1 57
1. Copy the field headers from the top row of the database, and paste them into a new
area of the worksheet.
2. Highlight the field headers you have just pasted, and enough rows below to fit all
the matching records.
3. Select the 'Data extract' option on the 'Database' menu.
This asks the question 'Extract unique records only?'. If you answer 'Yes', then any
identical matching records will only be copied once into the extract range.
"Identical" includes different formulae returning the same result. And if not all of the
field headers were copied to the top of the extract range, "identical" records have
only to be identical in the field names which were copied.
All the matching records are copied into the extract range. You are told if no matches
are found, or if the range isn't big enough to fit all the matches in.
Deleting matching records
Use the 'Data delete' option on the 'Database' menu to remove all those records which
match the criteria. The other records close up to fill the space, and formulae are
adjusted accordingly.
Matching a range of values
To match records with a Rate below 5, enter the formula =B2 in the criterion's
Rate column. Note that the formula should refer to the cell (B2) in the first record,
whichever row of the criterion range it is on.
You can use these operators: < (less than), <= (less than or equal to), > (greater
than), >= (greater than or equal to), and <> (not equal to).
For criterion cells which use formulae, like =B2 , use the 'Format' option to set their
display format to 'Show formulae".
Other database notes
• If, in a criterion, you refer to a cell outside the database range, you must use an
absolute cell reference.
• You can use these wildcards: ? (any one character), * (any number of characters)
~ (anything except what follows it). For example, the criteria ~*Jones* would
match all records which don't have Jones anywhere in that field.
• You can use Spreadsheet functions in criteria. For example.
=F2>AVG($F$2:$F$6) would search for all those with above average w.p.m.
(Note the use of absolute references, so that AVG always works on F2:F6.)
In this example, you could improve performance by using AVG in a cell outside the
criterion range, and referencing this cell in the criterion range, AVG would then only
be evaluated once.
• There are a range of database statistical functions described later in this chapter.
These automatically work out statistical data (such as averages) of records in a
database range which match a criteria in a criterion range.
• The database and criterion named ranges, like other named ranges, are
normally relative. If you copy or move a function which uses a named range you
will find that this range will change. To stop this, use absolute references by adding
a $ symbol - $database and $criterion .
1 58
Tables
Tables let you perform sensitivity analysis. or 'what if' calculations.
Table 1
A Table 1 tries different values in one particular cell (the input cell) elsewhere in the
worksheet. Each time it does so it recalculates the whole worksheet, and records the
results of several formulae. (As an example: you have several "profit" cells, all
dependent on an "exchange rate" cell, and you want to see what the profit figures would
be for different exchange rates.)
1. Find a blank rectangular area of your worksheet, to use as the table. Leave the top left
cell of this area blank.
2. Down the first column, below the top left cell, enter the values you want to try for the
input cell. (In the example: some different exchange rates.)
3. Across the first column, to the right of the top left cell, enter the formulae you wish to
work out. (In the example: simple formulae, like =F7 , referring to the cells which
have the profits.) You may wish to use the 'Format' option to set these cells to the
'Show formulae' format.
4. Highlight the whole area and select the 'Table 1' option on the 'Database' menu. On
the dialog it displays, enter the reference of the 'Input cell' - the cell to try the
different values in. (In the example: the "exchange rate" cell.)
The table is filled in. Each cell in the body of the table shows the value the formula at
the top of this column had, when the value at the left of this row was copied into the
input cell.
Table 2
A Table 2 tries different pairs of values in two particular input cells elsewhere in the
worksheet. Each time it does so it recalculates the worksheet, and records the result of
one formulae. (As an example: you have a "profit" cell, dependent on an "exchange
rate" cell and a "unit cost" cell, and you want to see what the profit figures would be for
different exchange rates and unit costs.)
1. Find a blank rectangular area of your worksheet, to use as the table. In the top left cell
of this area, enter the formula you wish to work out. (In the example: a simple
reference to the profit cell, eg =F6 ) You may wish to use the 'Format' option to set
this cell to the 'Show formulae' format.
2. Down the first column, below the top left cell, enter the values you want to try for the
first input cell.(In the example: some different exchange rates.)
3. Across the first column, to the right of the top left cell, enter the values you want to
try for the second input cell.(In the example: some different unit costs.)
4. Highlight the whole area and select the 'Table 2' option on the 'Database' menu. On
the dialog it displays, enter the references of the two cells - 'Input cell 1' and 'Input
cell 2' - to try the different values in. (In the example: the "exchange rate" and "unit
cost" cells.)
The table is filled in. Each cell in the body of the table shows the value the formula in
the top left cell had, when the value at the left of this row was copied into the first input
cell, and the value at the top of this column was copied into the second input cell.
1 59
More about tables
• The formulae and the values may contain references to cells containing values or
expressions, using any of the Spreadsheet functions.
• The original contents of the input cells are restored after the table has been filled.
• To make the table recalculate every time a change is made to the worksheet, use 'Set
preferences' on the 'Special' menu to turn 'Table recalculation' on. This may slow
down recalculation.
• You can use the 'Table 1' and 'Table 2' options in conjunction with databases. The
input cells for the table should be in the criterion range; the formulae you are
calculating should be database statistical functions. In this way, various different
criteria are tried, resulting in various sets of records matching. The data in the
matching records is then analysed by the database statistical functions.
Date and time functions
• You can enter dates and times using these formulae:
=DATE(year,month,day) enters dates as day numbers - a count of days since
31/12/1899. (Day 93503 - 31st December 2155 - is the maximum value.)
=TIME(hour,minute,second) enters times as a time number, from 0
(midnight) through 0.5 (noon) to 0.999... (just before midnight).
To see a day or time number displayed as a date or time, use 'Format' from the 'View'
menu, and set the 'Show as' line to 'Date' or 'Time' as appropriate. The exact format is
as set by the 'Formats' option in the Time application.
• You can enter dates and times as ordinary text, with the ' prefix. Then in formulae
which refer to these cells, use one of these functions to convert the text into day or
time numbers:
DATEVALUE(cell) for dates
TIMEVALUE (cell) for times
- where cell is the reference of the cell containing the date or time.
Date functions
DATE(year,month,day) returns the appropriate day number, giving the date as
year (0-255, where 0 is 1900), month (l-12) and day (1-31).
DATEVALUE("datestring") returns the appropriate day number given
datestring , the date as a text string in the format set up in the Time application.
DAY(x)
MONTH(x)
YEAR(x) returns the day of the month (1 to 31), month number (1 to 12), and year
number (0 to 255) from the day number x .
Time functions
HOUR(x)
MINUTE(x)
SECOND(x) returns the 'hour value' (0-23), 'minute value' (0-59) and 'second value'
(0-59) for the time number x .
1 60
TIME(hour,minute,second) returns the time number for the specified hour
(0-23), minute (0-59) and second (0-59). Returns ERR if any of the values are out
of range.
TIMEVALUE(timestring) returns the time number given the time as a text string.
timestring must be in one of these formats:
"hour:minute:second"
"hour:minute:secondAM" (or PM instead of AM).
You can omit second if you like.
Combined date and time function
NOW returns the combined date and time number, corresponding to the current time on
the Series 3a.
To display the current date, use the formula =NOW and set the cell to 'Date' format.
To display the current time, use the formula =NOW and set the cell to 'Time' format.
This date and time will update when the worksheet is recalculated.
If you just want to record the current date/time, enter +NOW in a cell, and set it to
either 'Date' or 'Time' format.
Financial functions
When using these functions:
• Enter rates as either a percentage or as a decimal - e.g. 5% or 0.05
• Enter interest rates for the same unit of time as used for the term. So if you specify
that a loan lasts for 12 months, rather than 1 year, enter the interest rate per month,
not per year.
• To calculate the annual percentage rate (APR) from a percentage for a monthly period
use the following formula:
annual rate = ((1+monthly rate)**12)-l
More generally, to convert from an interest rate for one period to the equivalent
interest rate for another period, use the formula:
rate2 = (1+ratel)**(period2/periodl)-1
where periodl and period2 are measured in the same units.
Lump sum investments
CTERM(interest,future_value,principal) calculates how long it will
take for an investment of principal to increase to future_value , if the
investment is earning interest at a fixed rate of interest per period.
The CTERM function uses the formula:
term = ln(future value/principal)/ln(1+interest)
where ln is the natural logarithm.
To calculate how much the investment will be worth after a certain period of time,
use the formula:
future_value = principal*(1+interest)**term
1 61
RATE(future_value,principal,term) calculates the interest rate needed for
an investment of principal to increase to future_value over a term of
compounding periods.
The RATE function uses the formula:
interest rate = (future_value/principal)l/term - 1
Cash flows
In these functions, the parameter cash_flows is a range reference, specifying the
cells containing the initial cost and the receipts.
• Enter the cash flows in chronological order.
• Enter outflows (expenditures) as negative and inflows (receipts) as positive.
Enter any initial cost in the first cell in the range. Use the remaining cells in the range to
specify the receipts. These may be of varying amounts, but must be listed in the order
in which they are paid. If there is no receipt during one period, leave the cell blank. The
cash flows are assumed to occur at equal time intervals, at the end of each period.
The cells in the range are read from left to right top to bottom.
IRR(guess,cash flows) calculates the Internal Rate of Return (the effective
interest rate earned) on an investment returned in a series of cash flows.
guess can be a value, or the reference of a cell containing a value. The value is your
guess at the interest rate. The Spreadsheet uses it as the first in a series of
approximations to calculate the interest rate. Specify a number between 0 and 1 (that is,
between 0% and 100%).
NPV(interest,cash flows) calculates how much an investment would be
worth if it were possessed as a lump sum now (before earning any interest) rather than
as a series of future receipts - i.e. the present value. Interest is the interest rate per
receipt period.
The NPV function assumes that the receipts (cash flows) occur at the end of each period.
To calculate the NPV (Net Present Value), where cash flows occur at the beginning of
each period, use the function like this:
npv = first_receipt + NPV(interest,remaining_receipts)
since the first receipt is received before it earns any interest.
The NPV function uses the formula:
Σ(cashflowi/(1+interest)i)
where cashflowi ...cashflown is the series of cashflows.
Annuity investments
An annuity is an investment of a series of equal payments earning a fixed rate of
interest - such as a savings account into which you pay £200 every month.
The following functions assume that the annuity is an ordinary annuity - in other
words, payment is made at the end of each period.
FV(payment,interest,term) returns the matured value of an investment given
the payment per period, the interest rate per period, and the term of the
investment (a number of periods).
The FV function uses the formula:
future value = payment*((1+interest)n-l)/interest
where n is the number of periods.
1 62
PV(payment,interest,term) returns the present value of an investment given
the payment per period, the interest rate per period, and the term of the
investment (a number of periods).
The PV function uses the formula:
present_value = payment*(1-(1+interest)-n)/interest
TERM (payment,interest,future_value) returns the number of payments
needed to accumulate future value from a series of payments earning a
periodic interest rate.
The TERM function uses the formula:
number of payments = ln(1+(future_value*interest/payment))
divided by LN(1+interest)
where LN() is the natural logarithm.
Annuity due
To calculate 'annuity due' - an annuity where payment is made at the beginning of
each period - use the functions like this:
=FV(payment,interest,term)*(1+interest)
=PV(payment,interest,term)*(1+interest)
=TERM(payment,interest,future_value/(1+interest))
An annuity due is always worth more than an ordinary annuity, since the interest has
longer to mature.
Loan payments
PMT(principal,interest,term) returns the amount to be repaid per period on
a loan, given the principal of the loan, the interest rate per period and the
term the loan has to run (expressed as the number of periods).
This function assumes that repayment is made at the end of each period. For a loan
where repayment is made at the beginning of each period, use the function like this:
=PMT(principal,interest,term)/(1+interest)
The PMT function uses the formula:
payment = principal*interest/(1-(1+interest)-term)
Note: you can use the TERM function to calculate the number of payments needed to
pay back a loan, by making future value a negative amount.
Depreciation
These functions calculate the depreciation of an asset over a period of time. In these
functions:
• The asset has the initial ('book') value cost .
• The asset has the value salvage at the end of its life.
• The asset's salvage value is taken at the end of life number of periods.
• The periods of depreciation are period length of time.
The Spreadsheet provides functions that allow you to spread the depreciation in 3
different ways.
SLN(cost,salvage,life) returns depreciation using the straight-line method.
which assumes that the asset loses the same value during every period of its life.
1 63
The SLN function uses the formula:
depreciation per period = (cost-salvage)/life
SYD(cost,salvage,life,period) returns depreciation using the
sum-of-the-years'-digits method, where the asset depreciates more at the beginning of
its life than at the end.
Change the period to find how much the asset loses in each particular period.
The SYD function uses the formula:
depreciation per period = (cost-salvage)*(life-period+1)
divided by (life*(life+1)/2)
DDB(cost,salvage,life,period) returns depreciation using the
double-declining balance method, where the asset depreciates much more at the
beginning of its life than at the end.
Change the period to find how much the asset loses in each particular period.
The DDB function uses the formula:
depreciation per period = (book value*2)/life
where book value at the start of each period = (total cost - total
depreciation over all previous periods)
Mathematical and logical functions
Trigonometric functions
These functions use angles expressed in radians. If you want to type in and display
angles in degrees, convert the angle using these formulae:
radians = PI*degrees/180
degrees = 180*radians/PI
PI returns the value of the mathematical constant PI.
ACOS(x) returns COS-1(x) - the angle, in radians, whose cosine is x .
ASIN(x) returns SIN-1(x) - the angle in radians whose sine is x.
ATAN(x) returns TAN-1(X) - the angle in radians whose tangent is x .
ATAN2(x,y) returns TAN-1 (y/x) - the angle, in radians, whose tangent is y/x using the signs of x and y to return an angle in the appropriate quadrant:
x and y
value returned
x>0 and y>0 between 0 and π/2
x<0 and y>0 between π/2 and π
x<0 and y<0 between - π and - π/2
x>0 and y<0 between - π/2 and 0
COS(x) returns the cosine of the specified (radian) angle x .
SIN(x) returns the sine of the specified (radian) angle x .
TAN(x) returns the tangent of the specified (radian) angle x .
Logs
EXP(x) returns the value of the mathematical constant e raised to the power of x
(which can be negative).
1 64
LN(x) returns the natural (base e ) log of x , or ERR if x<0 .
LOG(x) returns the logarithm base 10 of x , or ERR if x<0 .
General mathematical functions
ABS(x) returns the absolute (positive) value of x .
CHOOSE(x,vo,v1...vn) returns the xth item in the list v0,v1...vn. The list may
contain a mixture of strings and values. The first item in the list has the number 0, not 1.
Returns ERR if x is greater than the number of items in the list minus 1.
INT(x) returns the integer part of x by truncating toward zero.
ROUND(x,n) returns x rounded to n places, n must be between 15 and -15
inclusive. If it is not an integer, just its integer part is used.
n>0 : x is rounded to n decimal places
n=0 : x is rounded to the nearest integer
n<0 : x is rounded to the nth power of ten - that is, to the nearest ten, hundred,
thousand ...
RAND returns a random number between 0.0 (inclusive) and 1.0 (exclusive), to 16
decimal places. Multiply by 10 to get a number between 0 and 10. Use the expression
=INT(RAND*6)+1 to get a number between 1 and 6.
MOD(x,y) returns the remainder of x/y . Returns ERR if y<0 .
SQRT(x) returns the square root of x , or ERR if x<0 .
Logical functions
TRUE returns 1.0 (true).
FALSE returns 0.0 (false).
IF(x,then,else) returns the value of then if x<>0 (true) or the value of
else if x=0 (false). x , then and else may be cell references, values or
expressions.
A common use of the IF function is to check for a 'divide by zero' error. For example, if
a cell contains the formula: =23/A2 and it is possible that A2 will contain the value 0,
then you might change the formula to this: =IF(A2,23/A2,"Infinite") .This
formula evaluates like this:
• if A2 is true (that is, contains a non-zero value) then the formula becomes =23/A2 .
• if A2 is false (that is, contains the value zero) then use the text Infinite .
See the Series 3a Programming Manual for a full explanation of the comparison and
logical operators available on the Series 3a.
'Error' and 'Not available' functions
Any cells which refer to cells containing ERR or NA also have ERR or NA in them. You
can check for this ripple-through effect with ISERR or ISNA.
ERR returns ERR (error).
NA returns NA (not available).
ISERR(x) (where x is a cell reference) returns 1.0 (true) if the value in x is ERR, or
0.0 (false) if the value in x is not ERR.
ISNA(x) (where x is a cell reference) returns 1.0 (true) if the value in x is NA, or
zero (false) if the value in x is not NA.
1 65
Range functions
All of these functions require a full range reference. Should you wish to specify a single
cell - perhaps with the N, S or CELL functions - enter it as a range (e.g. A1:A1 ).
General range functions
COLS(range) returns the number of columns in range.
ROWS(range) returns the number of rows in range.
INDEX(range,column,row) returns the contents of the cell at position
( column,row ) in range , where the upper left-hand cell in range is the 'origin'
(column 0, row 0).
N(range) returns the value of the top left-hand cell in range as a number. If the
cell contains a string, 0 is returned.
S(range) returns the value of the top left-hand cell in range as a string. If it does
not contain a string, a null string ("") is returned.
Cell attribute functions
CELL(attribute,range) returns attribute information about the upper left-hand
cell in range . The value for attribute must be enclosed in quotation marks: it is
not case sensitive.
CELLPOINTER(attribute) returns attribute information like the CELL function,
but about the cell which was current at the last recalculation.
You can use these values of attribute:
Attribute
Value returned
ADDRESS
absolute cell address
ROW
from 1 to 8192 - row number
COL
from 1 to 256 - column number
CONTENTS
contents of cell, e.g. text or number string
TYPE
data type: b (blank), v (number or formula) or 1 (text)
PREFIX
text prefix:' (left-aligned), " (right-aligned), ^ (centre-aligned),
\ (repeated) or blank if no prefix.
PROTECT
1 if cell is protected, 0 if unprotected
WIDTH
from 1 to 99 - column width
FORMAT
numeric format:
F0 to F15- fixed, 0 to 15 decimal places
S0 to S15 - scientific, 0 to 15 decimal places
C0 to C15 - currency, 0 to 15 decimal places
,0 to ,15 - comma, 0 to 15 decimal places
P0 to P15 - percent, 0 to 15 decimal places
G, T, H, + - general, text (Show formulae), hidden and bargraph
D1 to D5 - date formats DD-MMM-YY, DD-MMM, MMM-YY
Long International and Short International
D6 to D9 - time formats HH:MM:SS AM/PM, HH:MM AM/PM.
Long International and Short International
For example, if clients is the name of range A1:C3,
=CELL("Address",clients) returns A1 .
1 66
LOOKUP functions
HLOOKUP(x,range,offset) looks along the top row of a range until it finds the
value x , then looks down the column to the cell which is offset number of rows
below, and returns the value of that cell.
The first row of the range must contain values in ascending order with no duplicates.
HLOOKUP returns ERR if x is less than the value in the first cell of the top row.
HLOOKUP in fact finds the last cell which is less than or equal to x . The effect is that
each column covers a range of numbers. For example, if the values in the top row of
the range are 1, 2 and 3, HLOOKUP will look in the first column when x is from 1 to
1.99999...., in the second column when x is from 2 to 2.99999...., and in the third
column when x is 3 or above.
VLOOKUP(x,range,offset) does the same as HLOOKUP, except that it tracks
down and then looks across. It locates the last cell in the first column of range which
is less than or equal to x . It then looks across to the cell offset number of columns
to the right, and returns the value of that cell.
The first column of range must contain values in ascending order with no duplicates.
String functions
In these functions, string may be either a series of characters enclosed in quotation
marks, e.g. "hello" , or a formula which results in a string, for example =B2 where
cell B2 contains a siring.
Editing strings
You can join strings together by 'concatenating' (adding) them. For example, the
formula ="help"&"mate" would return the string value helpmate .
You can also use comparison operators to compare the character codes of the first
characters in the strings, as in the 'Sort' option. For example, =A1<B1 would return 1
if A1 were "Brown" and B1 were "Smithson" since the character code of 'B' is
less than that of 'S'.
EXACT(strl,str2) returns 1.0 ("true") if strl is exactly the same as str2 ,
otherwise returns 0.0 ("false").
EXACT is case-sensitive and notes accents, whereas the = operator treats upper and
lower case as the same, and ignores accents.
FIND(searchstr,str,start_pos) returns the position in str where
searchstr starts. The search begins from start_pos in str . Make
start_pos 0 to search from the first character of str . The number returned is 0
for the first character in str , 1 for the second and so on.
If searchstr isn't found, or if start_pos is negative, ERR is returned.
LEFT(str,n) returns a string comprising the first n characters of str .
LENGTH(str) returns the number of characters in str .
LOWER(str) returns str entirely in lower case.
MID(str,start_pos,n) returns a string comprising n characters taken from
start_pos in str . For start_pos , 0 is the first character. 1 the second and so
on.
1 67
PROPER(str) returns str with "Proper Capitalisation" - i.e. just the first letter of
each word in upper case.
REPEAT(str,n) returns str repeated n times.
REPLACE(str,start_pos,n,newstr) removes n characters from str ,
starting from start_pos . Then inserts newstr at start_pos , and returns the
resulting string. start_pos can be immediately after the end of str , in which
case newstr is simply added to the end of str .( n is ignored.)
RIGHT(str,n) returns a string comprising the last n characters of str .
TRIM(str) returns str with all leading and trailing spaces removed, and
consecutive spaces replaced by single spaces.
UPPER(str) returns str entirely in upper case.
Strings and numbers
AT(str) returns the contents of the cell at the reference given by the string str
(e.g. AT("B2") ).
CHAR(x) returns the character with the character code x , or ERR if x is not between
1 and 255.
CODE(str) returns the character code of the first character in str .
STRING(x,n) returns the number x as a string, to n decimal places. This uses
'Fixed' format, and rounds if necessary.
VALUE(str) returns str converted to a number, str may specify a decimal or
scientific number, or may include a fraction - for example "0.34" , "4.2E3" or
"91 3/4" . You can also use a cell reference, e.g. =VALUE(B2) .
Returns 0 for blank cells and null strings. Leading and trailing spaces are ignored.
Identifying strings from numbers
ISNUMBER(x) returns 1.0 if x is a number or a formula returning a number.
Otherwise returns zero.
ISSTRING(x) returns 1.0 if x is a string (even a null string) or a formula returning a
string. Otherwise returns zero.
1 68
Statistical and database functions
The statistical functions perform calculations on lists of values. A list is a variable
number of parameters, where each parameter is either a single value or cell reference,
or a range reference or name.
In a list, empty cells are ignored if they are part of a range - in other words they are
taken to contain the value zero and do not add one to any count of cells. But the
individual reference of a blank cell docs count.
Statistical functions
AVG(list) returns the average of the values in list .
COUNT(list) returns the count of the items in list .
MAX(list) returns the maximum value in list .
MIN(list) returns the minimum value in list .
SUM(list) returns the sum of the values in list .
Standard deviation and variance
These are measures of the extent to which individual values in a list vary from the mean
(average) of the list. The less the variance or standard deviation, the closer values are7to
the average, STD returns a result in the same units as the input values, while VAR=STD2.
STD(list) returns the standard deviation of the values in list .
The STD function uses the formula:
standard deviation = √Σ(Vi-AVG)2/n
where n is the number of items in list , AVG the average of list and Vi the
i th item in list . This is the biased method. To calculate the unbiased standard
deviation, use the function like this:
=STD(list)*SQRT(COUNT(list)/COUNT(list-1))
VAR(list) returns the variance of the values in list .
The VAR function uses the formula:
variance = Σ(Vi-AVG)2/n
where n is the number of items in list , AVG the average of list and Vi the
i th item in list . This uses the biased method. To calculate the unbiased
variance, use the function like this:
=COUNT(list)/VAR(list)*COUNT(list-1)
Database statistical functions
DAVG(rangel,column,range2)
DCOUNT(rangel,column,range2)
DMAX(rangel,column,range2)
DMIN(rangel,column,range2)
DSTD(rangel,column,range2)
DSUM(rangel,column,range2)
DVAR(rangel,column,range2)
These perform the same calculations as the statistical functions AVG, COUNT and so on.
However, they get the values to use from cells in a specified field ( column ) of those
records in a database range rangel which match criteria in another range range2 .
1 69
Column 0 is the leftmost field in the database range, column 1 the one to the right of
that, and so on.
Although you can use any two ranges for the database and criteria, you would normally
use database and criterion , as set by 'Set database' and 'Set criteria'.
You cannot use these functions in a criterion range.
Worksheet size
The Spreadsheet has been designed to use memory efficiently, for example by "formula
sharing", when one formula is used in more than one cell.
If the worksheet reaches its maximum size, and you try to add more data, a 'Worksheet
too big' message will be shown. You will also find this if you try to open a worksheet
file from a different Spreadsheet program, and the file is already too big.
Memory usage
With very large files some situations instead cause a 'No system memory' message to
be displayed. This happens because for each open file the Spreadsheet can only use 64k
of memory, for the information from the file itself, the clipboard, "undo" information,
and the memory the Spreadsheet itself needs to get started. Go to the System screen and
press the ♦ key to see whether the internal memory is really full.
To minimise the memory used by a single worksheet:
• Disabling 'Undo' can save memory. For example, if you copy and then paste some
cells, the Spreadsheet uses memory to remember what the worksheet was like before
you did the paste. (Again, no formula sharing is used here.) If you are confident that
you don't need the security of 'Undo', turn it off: use 'Set preferences' on the
'Special' menu, and set 'Keep undo buffer' to 'No'.
• If you delete or copy a large range of cells, considerable memory is used to retain
the cells on the clipboard even after you have pasted the cells back into the grid.
(Note also that there is no formula sharing on the clipboard.) To clear the clipboard,
move to an empty cell and select 'Copy'.
• Get rid of cells which contain only format or alignment information. Highlight a
range (or all of the worksheet), and use 'Clear' from the 'Range' menu. Set
'Formats' to 'Yes', and all other lines to 'No'. (Cells with values or formulae in
them will be left exactly as they are.)
You can also get rid of unnecessary formulae - for example, =34*78 can be
entered as just 34*78 . Also, each graph that you define takes up a certain amount
of memory. Use the 'Delete graph' option on the 'Graphs' to delete any unwanted
graphs.
1 70
9
The Sound
recorder
The Series 3a sound recording application lets you record
sound as files on the 'Internal' disk (or on a Ram SSD), and
play the files back. The sound recorder plays sound files to
the speaker on the underside of the Series 3a, and records
from the microphone behind the small hole between the 'B'
SSD door and the bottom right corner of the keyboard.
You can use recorded sounds as alarm sounds when you set
an alarm in the 'Time' or 'Agenda' application.
The files are 8000 bytes long per second of recorded sound.
Play back of sound (especially loud sound) does use more
battery power than normal.
1 71
Using the 'Record' application
The 'Record' icon initially appears towards the right end of the icons in the System
screen, between 'Sheet' and 'Program'.
1. Move the cursor to the 'Record' icon and press Enter. Alternatively, hold down the
Control key and press the 'Time' button; this keypress is pre-assigned to take you to
the 'Record' application.
The first time you use it, 'Record' displays the following screen;
The dialog is already displayed, asking you for a filename for the sound you are
about to record.
The status window is always displayed on the 'Record' screen.
2. The dialog suggests the filename "Record", on the internal disk. For the moment you
may wish to use this filename. If not, type a different filename for the sound and
select the disk on which it is to be created. Note: you cannot record directly onto
Flash SSDs. If you want to record directly onto an SSD, you must use a Ram
SSD.
When choosing names for sound files, don't use the names of the built-in alarm
sounds, like "rings" and "chimes".
Sound files are automatically given the file extension .WVE, so you do not need to
enter a file extension.
3. The dialog also asks for the maximum duration of the sound recording (in seconds).
This is to try to avoid using up all of your internal memory. The dialog suggests a
maximum duration of two seconds. A recording of this length will take up 16k of
memory. Again, you may wish to leave this setting while experimenting with sound
recording.
As a precaution, 'Record' does not allow you to use up all of the free memory when
recording a sound, and will always leave a small amount of memory free.
4. Press Enter to complete the dialog.
5. Now get ready to make the sound. Position the microphone near the source of the
sound. When you're ready, press Space, and make the sound.
You may need to record the sound a number of times to sec how close the
microphone needs to be to the source of the sound; start with it fairly close.
After two seconds the recording stops. The file's name and length (in seconds and in
terms of disk space used) is displayed in bold at the top of the screen.
• Press Enter to play the sound back.
• If you want to try again, press Space to record over the same file.
• If you're happy with the sound and you want to record another one, either select the
'New file' option on the 'File' menu, or press Tab. (Pressing Tab automatically
generates a suitable new filename.)
1 72
When you have more than one file you can select the file you want to play back by
using the 'Open file' option on the 'File' menu (or by selecting the file from the System
screen).
The 'Set preferences' option on the 'Special' menu sets the default disk and default
duration suggested by the 'Record to new file" dialog when you record. It also sets the
volume of sounds played back in the 'Record' application.
You cannot record directly onto Flash SSDs. You can, however, copy (and perhaps
rename) sound files that you have created on the internal disk onto Flash SSDs, and
then play them back. (Copying and renaming files is described under 'File
management' in the 'Files and disks' chapter.)
Recording alarm sounds
When you set an alarm in the 'Time' or 'Agenda' application, the 'Set alarm' dialog
checks your disks for sound files, and will offer them on the 'Sound' line.
If, for some reason, the selected 'Sound' file is no longer present when the alarm
actually rings, the "Rings" sound is used instead.
Alarms are always played three times, with increasing volume, at 15 second intervals.
(If the alarm is still not acknowledged, this whole sequence is repeated after one
minute, and again at increasing intervals.) If you record a short sound file for use as an
alarm, you may wish to set the file so that the sound repeats. The 'Record' application
has two options on the 'Repeats' menu to do this:
• The 'Adjust for alarm' option sets the sound to repeat as often as possible in a 15
second period. It also sets the amount of trailing silence (the gap after each repeat)
to use in order to take the total time to around 15 seconds.
If the sound is already set to repeat 2 or more times, and these repeats can fit within
15 seconds, 'Adjust for alarm' will only change the trailing silence, not the number
of repeats. You can use this feature to customise alarm sounds quickly.
• The 'Set repeat' option lets you set the number of repeats and the trailing silence to
any values you wish.
Setting repeats and/or trailing silence does not increase the length of the file.
The 'Record' application takes into account the short time it must take between each
repeat, so the 'Total' length displayed may not exactly match the other values
displayed.
Recording other sounds
If you want to record sounds that you do not wish to use for alarms (such as voice
messages), you may wish to keep their files in a different place (directory) on the disk,
so that they are not offered as "alarm sounds" when you set alarms. To do this, you need
to make a new list for the 'Record' application in the System screen to be used for these
sound files:
1. Move the highlight in the System screen to the "Record" application, and select the
'Create new list' option on the 'Special' menu.
2. Type a new directory name on the 'Directory for files' line. You might, for example,
type voice . You can use up to eight characters for the directory name. The name
must start with a letter, not a number.
If you're used to directories, note that the above example would cause these voice
files to be stored in a \wve\voice directory.
1 73
3. The 'Save list as' line asks for the name to give the file in which the information
about the new list is to be stored. (You'll then be able to remove and install this file,
just like an application.) Enter a suitable file name (such as voice ), again up to
eight characters long. You do not need to enter a file extension.
4. Press Enter to complete this dialog, and press Enter again when the confirmation
dialog is displayed.
The new list will appear in the System screen beneath its own 'Record' icon next to the
original 'Record' list.
If you wish, you can set a keypress to turn the Series 3a on (if necessary) and move to
the 'Record' application using the new list of sound files:
1. Select the 'Assign button' option on the 'Apps' menu on the System screen.
2. Select the 'Button' - Control-Sheet, perhaps - and press Enter.
Recording voice messages
If you want to record voice messages rather than alarm sounds, you may find it better to
use the Tab key to start recording each new message than the 'New file' option. When
you use Tab the filename for each message is automatically generated, thus saving you
the bother of entering one each time.
You may also wish to use the 'Set preferences' option on the 'Special' menu to set a
long default duration. You can then record messages of any length - just press Esc at
the end of each message, and the file will be saved.
Battery power and sound playback
If you see a 'Batteries too low for digital audio' message when playing a sound, the
batteries are too low at that time to play the sound. The louder and longer a sound is,
the more likely you are to encounter this message.
Alkaline batteries in particular can recover voltage slightly, and you may find later
that you can still play short or quiet sounds for a while.
1 74
10
Dialling
Modern phone systems understand DTMF signals - the
sounds you hear when dialling from a push-button phone.
The Series 3a can generate DTMF signals, and you can use it
to dial numbers from most phones.
The Series 3a can dial numbers directly from any database
file, such as an address book, and from any Agenda file. As
long as you take a little care in the way you enter
international numbers, the Series 3a will generate the correct
code for international calls, wherever you set your current
'home city'.
All you have to do is find the number that you wish to dial
and press the Dial key.
NOTE: Phone systems do vary. DTMF dialling cannot be
guaranteed to work on all phones.
1 75
Setting up for dialling
Move to the System screen, and select the 'Dialling' option on the 'Control' menu:
• The 'Dial out code' line lets you enter the code you would use to get an outside line
on a private exchange - for example, to dial out front a workplace or other
environment When in future you dial a number, you will be given the option of
dialling it directly or dialling this code at the beginning.
The 'Dial out code' is initially set to ' 9, '. You can enter up to five characters. The
comma represents a short pause, which is often required when requesting an outside
line.
• The 'Default country' line of the dialog sets the default dial country - the country
for ordinary (non-international) phone numbers in your address book. This should in
general be the same as your usual home country.
It is important to set this correctly, so that if you travel abroad, international dialling
codes can be supplied when you dial. If you need to change it, select the country
name as you would when using World.
• The other three lines of this dialog let you customise tone dialling. 'Tone time' and
'Delay time' are the length of each tone and the length of the gap between each tone;
'Pause time' is the length of the pause caused by a comma, as described above. All
three are specified in 1/32s of a second.
You may decide not to change these three values at all. However, you may find you
can obtain quicker connections by reducing the 'Tone time' or 'Delay time' settings.
You may find that increasing 'Tone time' and 'Delay time' improves the chance of
success over less-than-perfect connections. If you have no problems with dialling,
though, you may like to reduce these values, to reduce the time taken by DTMF
dialling.
Phone numbers in your own country
Phone numbers in your own country begin with a national prefix (or STD prefix) and an
area code:
• Sometimes the national prefix is thought of as part of the area code. In the UK
number 0636-999111 , for example, 0636 is the area code, and it includes the
national prefix 0 .
• Sometimes the two are thought of as separate. In the USA number
1-415-000-9999 , the initial 1 is the national prefix, and 415 is the area code.
1 76
Entering numbers for your own country in the Database and
Agenda
You do need to enter the area code, with or without the national prefix, even for
local numbers. Using the area code, you can dial from anywhere, including the local
area itself.
Use a space or hyphen to separate the area code from the subscriber's number, as
in the previous examples. You can also use slash characters ( / ) and brackets in the
number. Numbers which have none of these characters - just the digits themselves- are
treated as work extensions, or similar codes, and are always dialled exactly as they
appear.
A dot (full stop) terminates an entry, i.e. digits after it will be ignored.
Dialling in the USA
If your home city is in the USA, then when you dial from an address book the digit 1
(the national prefix) will be added at the start of all numbers in the USA. This generates
the correct number for most calls around the country. The number to be dialed can be
edited, though, so you can always remove an unwanted 1 (and/or any area code, if you
so wish) by pressing Shift-Delete.
If most of your calls are local and you do not want the 1 to be added in this way, find a
city in the USA in the World application, use the 'Update country' option and remove
the national prefix.
Entering international numbers
If you want to be able to travel abroad and still dial numbers from the Series 3a,
enter international numbers in one of two ways:
• If you know the country code, you can begin the number with + , then the country
code. You can enter the Swedish number 031-999999 as +46-31-999999 ,
or +46-(0)31-999999 . (The country code for Sweden is 46. In the area code
031, the 0 is the national prefix. You don't have to enter it, but if you do it must be
in brackets.)
• If you do not know the country code, move the cursor to the end of the number, and
press Control-Shift-Psion-Help (Control-Shift-Dial) to display the 'Append country'
dialog. Select the country and press Enter. The country name will appear at the end
of the number, between square brackets - for example: 031-999999 [Sweden]
With this system the national prefix is optional.
The dial dialog for the above Swedish number would look like this:
You can, if you wish, type the square brackets and country name yourself, without
using Control-Shift-Dial. Psion-9 and Psion-0 produce the left and right square
bracket characters.
1 77
When dialling such a number from a different country, any national (STD) prefix is
removed. The number to dial will begin with the international access code of your
current home country, then the country code of the country you are dialling. For
example, with the home city in the UK, the Swedish number would be dialled as
010-46-31-999999 . (010 is the international access code from the UK.)
Important: if you enter the international access code yourself, the number can only be
dialled correctly while you stay in that country.
A few very small countries share their dialling code with a nearby larger country.
They are shown in World as if they were a city within the larger country, and you
should use the name or dialling code of the larger country.
Entering numbers while abroad
If you go abroad, you should still enter numbers in exactly the same way. Numbers for
your default dial country do not need the country code or name adding, even though
you are abroad. All other numbers, including those of the country you are in, must
have the country code or name.
You should change your home city when travelling, but do not change your default dial
country. If you do, you will not be able to dial existing numbers correctly.
Extensions and similar numbers
Work extensions, or other codes, should be entered with no spaces or hyphens. They
will then always be dialled exactly as they appear, and no checking of international
codes will take place.
How phone numbers are marked in the Database
When you start entering an address book, some of the labels - Home , Work - and
Fax - begin with a phone symbol. This is a special symbol, as it marks these labels as
the titles for phone numbers.
When editing the labels of a database file, you can insert a phone symbol with the
Shift-Psion-Help (Shift-Dial) keypress. The remainder of the label following the phone
symbol is the title of this phone number.
You can even mark a line of the entry itself as a phone number, if it does not fit
conveniently with the labels you are using. Again, press Shift-Psion-Help (Shift-Dial)
while editing, to enter the phone symbol. You can follow this with a title for this phone
number, if you wish; then enter the number itself.
Entering numbers in the Agenda
You can enter phone numbers in any Agenda entry. You don't need to insert a telephone
symbol before the number to mark it as a phone number, unless the entry also contains
other numbers, for example "Phone 3A's taxis 071 333 4444". To insert a phone
symbol at the cursor position in an entry, use the Shift-Psion-Dial keypress.
1 78
Dialling from a Database or Agenda file
You can dial directly from the 'Find' screen in the Database or from any view in the
Agenda.
Dialling from the Database
Find the entry which contains the phone number you wish to dial, then press
Psion-Help (Dial). The 'Dial' dialog will appear, giving a list of all the phone numbers
in the entry. If the number you want to dial is not shown, press Esc to remove the dialog
and check that either its label or the line itself has a phone symbol. (It is also possible
for a single entry to have too many phone numbers to be shown on the screen.)
If no phone numbers are found, a message to this effect is displayed.
If more than one line corresponds to a particular label with a phone symbol, each line
will be taken as a separate phone number.
The same phone numbers are listed whether the labels are hidden or shown.
If the phone number ends with the name of a country which the Series 3a does not
recognise, a 'Number is not valid' message is displayed, and you cannot move the
highlight to that line. The same message is displayed if a number would be more than
24 digits long.
Dialling from the Agenda
Move to the entry which contains the phone number and press the Psion-Help (Dial)
keypress. The 'Dial' dialog will appear showing the phone number in the entry next to a
phone symbol.
The 'Dial' dialog produced in the Agenda works in exactly the same way as in the
Database, as described above.
Dialling the number
1. If the 'Dial' dialog offers more than one number, as it may in the Database, move the
cursor to the one to dial.
2. If you need to, you can edit the phone number on the highlighted line. A cursor is
shown at the start of the number, and you can edit it like any other text on the
Series 3a. Any characters you enter which cannot be dialled will be ignored when
you dial. (A comma generates a pause.)
3. Hold the mouthpiece over the Series 3a. In noisy conditions, it may be better to hold
the Series 3a with the speaker (on the underside of the Series 3a) a short distance
above the mouthpiece.
4. Press Tab to dial the number directly. At work, you may need to press Enter, to dial
the number with the 'dial out' code (set with the 'Dialling' option in the System
screen) at the beginning.
Dialling further digits
If you need to dial further digits, such as when dialling automatic tone-controlled
systems, press Menu to bring up the 'Free-form dialling' dialog. Digits are then dialled
as you type them. You can press Tab to redial them, if necessary. When you've finished
with free-form dialling, press Esc.
1 79
Dialling problems
If dialling fails, try altering the distance between mouthpiece and speaker. If this still
fails, you can try increasing the 'tone time' and 'delay time', in the 'Dialling' option on
the System screen - the longer you set them for, the better the chance of tone dialling
succeeding when the phone connection is poor.
Remember that phone systems do vary, and DTMF dialling cannot be guaranteed to
work on all phones.
You may wish to dial a local number without its area code (if it won't work with one
in your country, or if it costs more to use the area code, or if there is a local area code
you can use instead). To do this, enter the number twice in a Database entry, once
with the area code and once without it (but with any local area code). Press
Shift-Enter to insert the extra line. Then, when you dial, you'll be given the choice of
the two versions of the number. Make sure that there are no spaces or hyphens in
the version without the area code - otherwise, a national prefix will be added when
you dial. (Alternatively, put the area code in the entry, and when dialling use
Shift-Delete in the 'Dial' dialog to delete it from the start of the number.)
If you travel abroad
Set your home city to your new location, or to that of a nearby city in the same country.
As long as the local phone system understands DTMF signals, dialling should be
possible.
If you have followed the guidelines in this chapter for entering phone numbers, the
Series 3a will, wherever possible, provide the correct code to dial. If, for any reason, it
cannot - one or two countries have incomplete international information - you can still
edit the number to be dialled, before pressing Tab or Enter.
Free-form dialling
Whatever you're doing with the Series 3a, you can almost always press Control-Dial
(Control-Psion-Help) to display the free-form dialler.
As explained beforehand, digits are now dialled as you type them. The digits you type
are displayed on the screen, and you can press Tab to redial them, if necessary.
Very occasionally, such as when an alarm is being shown, free-form dialling is not
possible.
1 80
11
Printing
You can print text from the Word Processor, Spreadsheet,
Agenda, Database and Program editor. All have identical
'Print setup' options to specify the page layout you wish to
use - headers, footers, margins and so on. All also have 'Print
preview' options.
The Word Processor is a special case, with advanced printer
support in its design.
There are three areas to consider before printing:
•
Setting up the connection to the printer.
•
Choosing the printer driver for the Series 3a to use.
•
Designing the page layout.
Printing does not hold you up: you can start printing one
open file, then carry on using the Series 3a, while the printing
is in progress.
1 81
Setting up the connection
Connecting the lead
There are two different types of physical connection to printers. Most printers have a
parallel connector, a few have a serial connector. (Some have both connectors.)
Psion supply two types of 3 Link leads. The parallel 3 Link lead connects directly to
parallel printers. The serial 3 Link lead is primarily for connection to other computers,
and there are versions for the IBM PC and the Apple Macintosh. An adaptor is available
which converts both PC and Macintosh leads for connection to a serial printer.
If you have a serial 3 Link, and a PC which is connected to a printer - even a
networked printer - you can connect the Series 3a to the PC with 3 Link, then
print from the Series 3a to the printer. You do this by running the MCPRINT
program supplied on the 3 Link disk. See the documentation on the 3 Link disk for
more information.
Both parallel and serial 3 Link leads plug into the expansion socket on the left side of
the Series 3a.
Setting the communication
To set the Series 3a to communicate in the right way with your printer, select the
'Printer' option on the 'Control' menu in the System screen. Set the first line of the
dialog to 'Parallel' or 'Serial', according to your printer type.
If you set 'Parallel', no other settings apply. If you set 'Serial', you may need to tab-out
the 'Serial characteristics' and 'Serial handshaking' subdialogs. However, many serial
printers will use the settings as they are; if in doubt, check your printer manual.
Handshaking is the method used to stop and start the flow of information between
the Series 3a and the printer. Most serial printers use either 'Xon/Xoff' handshaking,
'Dsr/Dtr' handshaking, or both. The Series 3a is initially set to use both, and this
should work even if your printer is only using one of the two methods. If you have
problems, you can try setting one or other of the two to 'Off'.
When you have finished with the 'Printer setup' dialog, press Enter to confirm the
settings.
You don't have to return to the System screen to use this dialog. Every 'Print setup'
option in the applications which print has a 'Printer device' line, which tabs out into the
same dialog.
Printing to a file
You can print information to a file on disk, if you wish.
Select the 'Printer' option in the System screen, and set the 'Printer device" line in the
dialog to 'File'. You can then set the 'File Name' and 'Disk' lines in the dialog, to set
the name and location of the "print file" to create. Press Enter to confirm the settings in
the dialog.
When you next print information, it will be saved in this file, instead of being printed.
Be sure to use the correct filename and location. If the file already exists, it will be
overwritten without warning.
1 82
Choosing the printer driver
Selecting the printer model
The Series 3a comes with printer drivers for various printer models. One of them,
called 'General', allows you to print plain text to almost any printer which can accept
plain text.
If you have one of the printer models (or a compatible model) for which a printer driver
is supplied, you can print using any of its fonts and sizes which the printer driver
supports. Note that most printers can emulate more standard models, such as
Epsons or the IBM Proprinter; you may need to set a DIP switch, or use the printer's
control panel, to make your printer do this. Check your printer's manual if in doubt.
The Word Processor, Spreadsheet. Agenda and Database each have a 'Print setup'
option on the 'Special' menu, hi the dialog it displays, move the highlight to the
'Printer model' line, and press Tab. A 'Set printer' subdialog is shown; on the 'Select
printer' line, select the printer driver to use for the current file. If you cannot find a
suitable printer driver, select 'General'.
Other printer drivers may be available from Psion, or from other sources.
You cannot enter printer codes by hand in the files you print. All of the font and
layout settings are handled automatically by the applications and the printer drivers.
The 'General' printer driver
If no other drivers are suitable for your printer, select the 'General' printer driver in
'Print setup'. The Series 3a then has no special knowledge of your printer, but assumes
that the printer font will be monospaced (not proportional), at 10 CPI (characters per
inch), and with a height of 12 points, which is 6 LPI (lines per inch). Many printers use
a font with these settings when you first turn them on; check with your printer manual
if in doubt.
If your printer does not start with a font that uses these settings, you should set them,
where possible, from the front panel of switches on the printer.
You can if you wish leave your printer set to some other font size. If it has a different
width or is proportional, the left and right margins (word-wrapping) may not be
handled correctly. If it is set to a different height, page breaks may not be at the correct
places.
When the 'General' printer driver is installed, the Word Processor will print spaces to
implement layout features, such as centred text and tab positions.
Changing the printer driver
If you change your printer driver with the 'Printer setup' option to one which supports
fewer fonts, then when you print with this driver, only the supported fonts will be used.
In the Word Processor, font settings are not changed when you change your printer
driver (unless you change them yourself, with 'Style gallery' for example). When you
change back to the original printer driver, you can print the document properly.
Similarly, Spreadsheet print styles are not changed when you change your printer driver.
1 83
Choosing the font
Except in the Word Processor and die Spreadsheet, which have their own advanced font
control, you can set the 'Default font' - the font to use for the printout. In the 'Print
setup' dialog, tab-out the 'Printer model' line to display the 'Set printer' subdialog.
Move to the 'Default font' line and press Tab; a 'Font' subdialog is displayed.
The fonts available depend on the printer driver you choose. The 'Font' subdialog lets
you set any combination of bold, underline and italic for the Default font.
You cannot set the 'Default font' line when in the Word Processor- each style or
emphasis can be set individually to any of the available fonts. For example:
• Select the 'Style Gallery' option on the 'Styles' menu.
• Press ←→ to select the style to set.
• Move the highlight to the 'Font' line, and press Tab.
The same 'Font' subdialog is shown. The only difference is that the final line. 'Print
position' cannot in this case be changed.
Important: if you use the 'General' printer driver, you can still set font attributes bold, underline, italic, and sometimes superscript and subscript - in the 'Default font' in
an agenda or database, in styles in a Word Processor document, and in 'Font styles' in a
worksheet. However, they will not appear on any printout - only normal text will be
used.
Font sizes
Font sizes are specified in points. There are 72 points in an inch. Font sizes allow for a
gap between lines of text. (In the Word Processor, you would usually set the line
spacing to be the same as the font size.)
Character sets
The Series 3a uses the IBM Code Page 850 character set. Some printers use this
character set; others use extended versions of the ASCII character set.
Code Page 850 and ASCII use the same characters for the decimal codes from 32 to
127. This includes the letters A-Z in upper and lower case, the digits 0-9 and most
commonly used symbols. Some characters in the range 128 to 255 - foreign language
characters, and various symbols - are different.
If you have one of the printer models supported by the Series 3a, and you use its printer
driver, a suitable character set will be used. If there are differences between the
character sets, the Series 3a will translate characters to the same (or nearest) character
on the printer. However, if the printer supports more than one character set, you may
need to set a DIP switch, or use its front panel, to set it to use the correct character set.
If you use the 'General' printer driver, and you try to print characters with codes
between 128 and 255, some may not print out correctly on a printer which does not use
the Code Page 850 character set.
The Code Page 850 character set is included in an appendix to this manual. Most
printer manuals also include the printer's character set (or sets).
1 84
If you have trouble printing the £ symbol, check your printer manual, and see if you
can set the printer to use a character set which has the £ symbol as character 156
(hexadecimal 9C).
Setting the page layout
The first five lines of the 'Print setup' dialog in the Word Processor, Spreadsheet,
Agenda and Database allow you to design aspects of the layout of information on the
printed page. Each line produces a subdialog when you press Tab.
The 'Page size' subdialog
On the top line ('Page size'), set the size of the paper you are using. If you press Tab on
this line, you can see which page sizes are supported.
If your paper size is not on this list, choose 'Custom' as the page size. You can then
type the width and height of the paper.
The title of the 'Page size' dialog reminds you of the current "units" setting inches or centimetres. You can set this either by tabbing out the 'Printer device' line of
the 'Print setup' dialog, or with the 'Printer' option in the System screen.
If you set 'Orientation' to 'Landscape', the Series 3a will lay out the text as if the width
and height of the paper have been swapped. Some printer drivers (especially for laser
printers) send a code to the printer to instruct it to print in landscape orientation. In
other cases, you may be able to use the control panel on the printer to set it to print like
this, or simply feed the paper in sideways. However, some printers will not print in
landscape orientation at all.
The 'Margins' subdialog
This allows you to set the margins to use on the paper. Information will only be printed
on the area inside the margins.
If you try to set any individual margin to a value that is too large for the size of the
paper, a message will inform you, and the 'Margins' subdialog will remain displayed.
If you set a combination of margins which is too great for the size of the paper you are
using, an 'Invalid margins' message will be displayed when you press Enter.
Few printers can print right to the edge of the paper, so you should not normally set
very small margins.
The 'Headers' and 'Footers' subdialogs
Headers and footers are printed in the top and bottom margins of each page. For
example, you might use a header to print the title for the document at the top of every
page, and a footer to print the page number at the bottom of every page.
Both subdialogs require the same information. On the 'Text' line, type the text that you
want to print as the header or footer on every page. You can also use any of the
following codes in the "Text' line to insert particular pieces of information in the header
or footer:
1 85
Code
Inserts
%F
the name of the document file
%D
the current date
%T
the current time
%P
the current page number (1,2, 3...)
%%
a single % character
When setting up headers and footers in the Word Processor and Spreadsheet, you can
also use %M , to insert the last page number. For example, if you use
Page %P of %M as the footer, then a three-page printout would have
Page 1 of 3 , Page 2 of 3 and Page 3 of 3 as the footers on the three
pages.
You can change the position of the header or footer on the page using the 'Alignment'
line:
• 'Left'/'Right': positions the text at the left/right margin.
• 'Centred': centres the text between the two margins.
• 'Two column': is used for text that is in two parts, separated by a Tab. The first part
is printed on the left, and the second on the right.
• 'Three column': is used for text in three parts, each separated by a Tab. The first part
is printed on the left, the second in the centre, and the third on the right.
The 'On first page' line lets you turn off the header and/or footer on the first page - for
example, for a title page in a Word Processor document.
The 'Font' line lets you set the font for the header or footer.
For a header, the 'Vertical offset' is the distance from the bottom of the header text to
the bottom edge of the top margin. For a footer it is the distance from the bottom of the
footer text to the top edge of the bottom margin (which therefore includes the height of
the text). 'Vertical offset' should be specified in inches or centimetres, according to
your current 'Units' setting.
The larger the vertical offset, the closer the header/footer will be to the edge of the page.
The 'Word Processor' chapter includes an example of using a header to produce
headed notepaper.
The 'Paging control' subdialog
This controls how page numbers appear (if you use them in headers or footers), and
offers widows and orphans control of page ends.
If you use %P in a header or footer, you can set the number of the first page of the
document, and the style of the page numbers - 1,2,3, or i,ii,iii, or I,II,
III. The last two use Roman numerals.
The 'Allow widows/orphans' line is mainly for Word Processor documents, which
are based around paragraphs. The terms widows and orphans describe the first or last
line of a paragraph being printed on a different page to the rest of the paragraph. This
looks a little strange, so 'Allow widows/orphans' is initially set to 'No'. Set it to 'Yes',
if you want to allow widows and orphans to occur on your printed pages.
If, in the Word Processor, a style has 'Keep together' set (in the 'Spacing' subdialog),
paragraphs using this style cannot be split over a page end at all, and widows and
orphans cannot occur in them.
1 86
Printing from the Word Processor
Spacing and positioning paragraphs
You can set the spacing and positioning of a paragraph (or highlighted paragraphs) with
the 'Spacing' option on the 'Paragraphs' menu. To change all paragraphs which use a
particular style, use the 'Style gallery' option on the 'Styles' menu, and tab-out its
'Spacing' subdialog.
• 'Line spacing' is the height required for each line of text. It takes effect when you
print, but is not reflected in the screen display.
Vertical spacing, like font sizes, is specified in points. One point is 1/72", so:
Lines per inch
Equivalent line spacing (in points)
2
12
8
9
9
8
Important: The line spacing should always be at least as big as the font size for this
style, otherwise lines could overlap when you print. (The font size already allows for
a small gap between lines of printed text.) For example, for a 12 point font size you
would typically set a 12, 13 or 14 point line spacing.
• 'Space above' and 'Space below' can be used to set extra vertical gaps above and
below this paragraph for printing. Initially, 'Space above' for Body Text is set to
zero, while 'Space below' is set to the same value as the line spacing. This has the
effect of printing a blank line after each paragraph.
If you prefer, you could set 'Space below' to 0, and enter blank lines between
paragraphs (by pressing Enter twice). You can then see the gaps between paragraphs
on the screen. However, you will have no fine control over inter-paragraph spacing,
and blank lines may get printed at the tops of pages.
Controlling page breaks
The other three settings in the 'Spacing' dialog are for controlling page breaks:
• 'Keep together': if set to 'Yes' a paragraph will never be split across two pages. If
there is not enough room for it at the bottom of a page, a new page will be started.
You might set this to 'Yes' for a paragraph consisting of a number of lines that end
with Shift-Enter - a table, for instance.
• 'Keep with next': if set to 'Yes', a paragraph of this style must be printed on the
same page as the paragraph which follows it. For example, you might use this
setting for heading styles, so that your headings don't end up being printed "alone"
at the bottom of a page.
• 'Start new page': if set to 'Yes', a paragraph of this style will always appear at the
top of a new page. Use this setting to force the start of a new page.
Displaying page breaks
The 'Paginate' option on the 'Search' menu works out where each page will end if the
current document is printed, and displays a dotted line across the screen at each
position. This takes all of your current settings into account - font sizes, margins, line
spacing, styles which force a new page, and so on. 'Paginate' displays a message telling
you the number of pages needed to print your document:
1 87
If a page break occurs within a paragraph, and the document wraps at the screen
edge, the position of the page break can only be shown approximately.
Page break positions are not updated automatically. Any time you wish to see where
they would occur in the printed document, select the 'Paginate' option.
The 'Jump to page' option on the 'Search' menu will also paginate the document, if
necessary, before asking for the page to go to.
Previewing line ends and page ends
Before you print a document, you can if you wish see on the screen how line ends and
page ends will appear:
1. Select the 'Paginate' option, to show where each page will end.
2. Select the 'Use printer layout' option on the 'Word' menu.
New lines are now started only where they will start on the printout, and all page breaks
are shown at exactly the correct place. If you've used Tabs to align columns of
information, they are accurately shown, so that you can check the alignment of the
information.
Printer layout does not accurately show the position of centred or right-aligned text.
When selected, the 'Use printer layout' option changes to 'Use screen layout': select
this option to return to normal word-wrapping at the screen edge.
For further information about previewing, see the notes on 'Print preview' towards
the end of this chapter.
The 'Print' option
When the document is laid out as you wish it to be printed, select the 'Print' option on
the 'Special' menu. A 'Print' dialog is shown, like this:
If you set the 'Whole document' line to 'No', you can set a page range to be printed.
You can also set the number of copies to print.
When you press Enter to complete the dialog, the printing begins. You can carry on
using your Series 3a for other things while the printing is in progress.
1 88
Do not unplug the lead connecting your Series 3a to the printer or PC, open either
of the SSD doors or turn your Series 3a off while printing.
If you see a message such as 'Device does not exist', check that you have used the
'Print setup' option to set the destination of the print, and check that the relevant cable
is firmly plugged in.
Preferred settings
You can give new files your preferred 'Print setup' settings automatically, by creating a
default template. (See the 'Word Processor' chapter for more details.)
If you create a new document with the 'New file' option in the Word Processor and
specify the name of a template file to use, then the new document will inherit the 'Print
setup' settings from the template file.
Whenever a document is saved, its current 'Print setup' settings are saved as part of the
file.
Printing an outline
You can display an outline or document summary on the screen by using the 'Outline'
option on the 'Special' menu. When an outline is shown, selecting the 'Print' option
will print the outline, not the whole document.
If the Word Processor is currently showing an outline, the title of the 'Print' dialog
changes to remind you that the outline version will be printed.
Printing Tabs
Instead of printing tabs as 'tab' characters (character 9 in the ASCII / Code Page 850
character sets), the Word Processor tells the printer to move by the correct amount,
according to the Tab positions for a given style. For the 'General' printer driver, the
Word Processor uses spaces to set the positions.
1 89
Printing from the Agenda
Before printing, you must have the Series 3a properly connected to a printer, as
described earlier in this chapter.
Use the 'Print setup' option on the Agenda's 'Special' menu, also described earlier, to
set the font to use and to control the layout of the printed page.
If you frequently print from your Agenda, you may wish to include today's date (ie
the letters %D ) in the header. You can then distinguish the most up-to-date copy.
The 'Print' option
The 'Print' option on the 'Special' menu lets you print part or all of an agenda. In the
Anniversary and To-do views 'Print' only prints anniversary and to-do entries. In other
views all entry types are printed. You can also use 'Find' to list more selective groups
of entries, and then print them.
The printed entries have a similar appearance to the List view; each entry starts on
a new line and word-wraps to the width of the paper. Timed entries have their times
neatly aligned. Most special symbols, such as the memo symbol, are not printed.
Crossed out entries will only be printed as crossed out if your printer driver supports
this. Crossed out entries are marked with a - - on the printout.
You can choose to print a range of entries from today forwards, until today, for this
month, last month, this year and last year, or between specific dates.
Do not unplug the lead connecting your Series 3a to the printer or PC, open either
of the SSD doors or turn your Series 3a off while printing.
Printing from the Day, Week, Year and List views
It is a good idea to use 'Print preview' first, as the Agenda may produce very long
printouts because of repeating entries.
To print all or part of your Agenda from these views:
1. Select the 'Print' option on the 'Special' menu.
2. Select the 'Range of entries' that you want to print, or type your own 'Start date' and
'End date'. You can also set 'Entry types' to exclude certain types of entry from the
printout.
3. Set the 'Repeat entries' line. If you choose 'Show once only', repeating entries will be
printed once; 'As normal' means they are printed as many times as they are shown in
the view. (The 'Repeat entry' dialog lets you set this for each entry.)
If you choose 'As normal', note that repeating entries or anniversaries could be
printed many times, producing a very long printout. Remember that you can always
stop a print in progress by pressing Esc.
4. Set the 'Crossed out entries' line to 'No' if you wish to exclude crossed out entries
from the printout.
5. Press Enter to complete the dialog.
To print a more specific list of entries, print from the 'Find' screen, as described later
in this chapter.
1 90
Printing a list of anniversaries
To print a list of anniversary entries within a specified date range:
1. Move to the Anniversary view and select the 'Print' option.
2. Set the 'Range to print'. You can choose from 'This year' and 'By date'. If you set
'By date', set the 'Start month', 'Start year", 'End month' and 'End year' lines.
3. Set the 'Include crossed out entries' line to 'No' if you want to exclude crossed out
entries from the printed list.
4. Press Enter and the selected entries will be printed.
Printing a list of to-dos
To print a list of all the to-do entries in all your to-do lists, or all the entries from a
single list:
1. Move to the To-do view and select the 'Print' option.
2. Set the 'Range to print' line to 'All lists', 'One list', or 'Selection'. If you set 'One
list', select the list to print on the 'List name' line. If you set 'Selection', you can set
each individual list to 'Yes' or 'No', and print all the lists you want at the same time.
3. Set the 'Include crossed out entries' line to 'No' if you want to exclude crossed out
entries from the printed list. (This is independent of whether they are shown on
screen.)
4. Press Enter to complete the dialog.
If you chose to print 'All lists' they are printed in the order in which they appear in the
To-do view. You can set this with the 'To-do list settings' option.
Information not printed
Display features such as duration and overlap bars, slot times, slot lines and so on are
not printed.
Most special Series 3a symbols, for example the memo symbol, are not printed as they
are not supported by most printers.
Memos are not printed. However, they can be printed separately.
Printing memos
Memos are not printed when you print an Agenda. However, while editing a memo
you can use the Memo editor's 'Print' option to print it. Note that there is one set of
'Print setup' settings for all the memos in each Agenda file, so use the 'Print setup'
option while editing any memo.
Printing from the 'Find' screen
You can use 'Find' to search for a set of entries that you want to print. For example, if
you have marked all your job interviews with the letters intv in the entry text, you
can use 'Find' and then 'Print' to print them all.
When you choose to print from the 'Find' dialog, no "Print' dialog is displayed; the
Series 3a always prints the same list of entries shown on the 'Find' screen.
If you want to exclude crossed out entries from the printed list, you must exclude
them in the 'Find' dialog itself.
1 91
Printing from the Database
Before printing, you must have the Series 3a properly connected to a printer, as
described earlier in this chapter.
In the Database, use the 'Print setup' option on the 'Special' menu, also described
earlier in this chapter, to set the font to use and to control the layout of the printed page.
The 'Print' option
You must have the 'Find' screen displayed, not the 'Add', or 'Change' screens, if you
want to print.
Use the 'Print' option on the 'Special' menu to print the current database.
The 'New page for each entry' line allows you to print each entry on a separate page.
The 'Entries' line setting controls which entries are printed:
• Matching: only those entries which match the current search clue are printed.
• All: all of the entries in the current database are printed.
• Current: Only the currently displayed entry is printed. (This setting is not available
if 'Not found' is currently displayed on the 'Find' screen.)
If labels are currently shown on the screen, then they are printed alongside each entry.
You can use the 'Show labels'/'Hide labels' option on the 'Special' menu to set this.
The Database does not show blank lines in an entry. If you wish, however, you can
print them, by setting 'Show blank lines' in this dialog to 'Yes'.
If you set the 'Keep entries together' line to 'Yes', each entry will always be printed on
one page, and will never split across two pages. If there is not enough room for it at the
bottom of a page, it will be printed on a new page. This is the same sort of effect as the
'Keep together' setting in the Word Processor.
Each line or group of lines corresponding to each label will act as a separate
paragraph, as far as the 'Allow widows/orphans' print setting is concerned.
The telephone symbol is a special Series 3a character, and its character code would be
interpreted differently by printers. For this reason, it cannot be included in information
sent to a printer via 'Print' options. Instead, the printer driver translates it to some other
suitable character or characters - usually a # symbol.
Do not unplug the lead connecting your Series 3a to the printer or PC, open either
of the SSD doors or turn your Series 3a off while printing.
1 92
Printing from the Spreadsheet
Before priming, you must have the Series 3a properly connected to a printer, as
described earlier in this chapter.
In the Spreadsheet, use the 'Print setup' option on the 'Special' menu, also described
earlier in this chapter, to control the layout of the printed page.
To print the whole worksheet
If you want to print the whole worksheet, and you don't want to change the margins,
fonts and so on, select the 'Print' option on the 'Special' menu. The Spreadsheet
paginates - works out where any page breaks will be, given your current printer
settings. Page breaks may be caused by the length or width of the worksheet - if the
worksheet is too wide to fit on a page, it will be printed in strips, with as many columns
in each strip as will fit.
The 'Print' dialog is displayed. To print the whole worksheet, just press Enter. If you
wish, you can set which pages to print.
The 'Print formulae as' line of the dialog controls what should be printed for cells
which contain formulae. If you set this to 'Formulae', the formulae themselves will be
printed - just as if the cells had 'Show formulae' as their format.
Do not unplug the lead connecting your Series 3a to the printer or PC, open either
of the SSD doors or turn your Series 3a off while printing.
To print a highlighted range
If you highlight a range before you select 'Print', you can set the top line of the 'Print'
dialog to print the highlighted region instead of the whole worksheet.
If the highlight covers a large range, you can again set which pages to print.
Information not printed
The following are not printed:
• Grid lines
• Row/column headers ( A B C ...and 1 2 3 ...)
• The contents of cells with 'Hidden' display format.
Page breaks
To see where the page breaks occur, select the 'Jump to page' option on the 'Search'
menu. This paginates, if necessary, before producing the dialog. The first line of the
dialog lets you choose between the whole worksheet, and any print ranges (explained
later). Move down to the second line, and type a page number in the range suggested by
the third line.
When you press Enter, the page you chose is highlighted, with the cell pointer in its top
left cell.
"Vertical" printing
When printing wide worksheets on separate sheets of paper, you may prefer to print in
'landscape' orientation, where the sheet is "turned" through 90 degrees. This may allow
you to use fewer pages when printing.
1 93
Select 'Print setup', tab-out the top line ('Page size'), and set 'Orientation' at the
bottom of this dialog to 'Landscape'.
Some of the built-in printer drivers (e.g. for laser printers) may tell the printer
automatically to print in landscape orientation. On other printers - wide-carriage dot
matrix printers, for example - you may be able to feed the sheets in manually.
Advanced worksheet printing
You can define any number of print ranges - ranges to be printed. When you finally
come to print, choose which of these ranges to use.
To define a print range, highlight the range to use, then select the 'Set print range'
option on the 'Range' menu.
You can edit the suggested range, if necessary. You can even, if you wish, type in the
name of a named range.
Press Enter to define the print range.
Unlike named ranges, you do not give each print range a separate name. A print range is
referred to just by the range reference (or named range) you enter when defining it.
Changing or deleting print ranges
Select the 'Edit print range' option on the 'Range' menu. Use ←→ to select the print
range you want to change. Move the highlight to the second line, and type the new
range to use. Then press the Enter key.
To delete a print range, use the 'Delete print range' option on the 'Range' menu.
Font styles
There are four font styles which you can apply to cells in a similar way to applying
styles in the Word Processor. These font styles are reflected on the screen, and are used
when you print information from the Spreadsheet.
Initially, the four font styles are set to use the same font and size, with different
combinations of bold and italic settings.
You can change these fonts, though, to be any size and style supported by the printer
driver for your chosen 'Printer model'. The names of the font styles change to reflect
the settings you give them.
Font (1) is special in that it applies to all cells which have not had a font style
applied to them.
To change one of the font styles, select the 'Change styles' option on the 'View' menu.
Select the font style to change, on the top line of the dialog. Then move down the
dialog, and change the font, size and/or style for this font style. The fonts available to
you are set by your choice of 'Printer model' in the 'Print setup' option.
To set a range to use a particular font style, highlight the range, then use the
'Format' option on the 'View' menu. The bottom line of this dialog lets you choose
the font style to use for this range.
The screen display will reflect the style of the font - bold, underline, and so on. Note
that some printer models may not print the style of the font - in particular, the 'General'
printer driver.
1 94
Be careful if you apply a font style to a range. As this uses the 'Formal' dialog, you
will also set the display format for all numbers in the range.
Pagination and 'Jump to Page'
If you use the 'Jump to page' option when you have set print ranges, it first paginates
all of them. You can then set the first line of the dialog to the print range required, and
the second line to the page number in that print range.
Pagination does not take account of different font styles. When 'Jump to page'
paginates it assumes the settings of font styles (1) throughout. If, for example, you
were to use double-height characters in one of the four font styles, any rows which use
it may need a blank row above them, to stop them overwriting previous rows.
There is no simple way to force page breaks. Change your print ranges if you wish to
print different areas of the worksheet on different pages.
Print preview
If you wish, you can check that your printout is going to be the way you want before
you print it. Select the 'Print preview' option on the 'Special' menu, in the Agenda,
Database, Spreadsheet or Word Processor.
'Print preview' acts initially like the 'Print' dialog; it paginates, if necessary, then asks
for the same "what to print" information as the 'Print' option.
'Print preview' then begins to work out and display how each printed page will look. It
may take a little time to do this. (Lines which use small font sizes may be shown run
together, ie all in one block.)
You can press Esc to leave 'Print preview', at any time. If you press the Menu key, you
will see a new menu of 'Print preview' options:
• 'Print' prints the file, as it appears in 'Print preview'. You cannot print while 'Print
preview' is still calculating the layout of the pages; for a long file, you may wish to
press Esc to abandon the 'Print preview', and use the 'Print' option from the main
menu.
The Word Processor allows you to print more than one copy at a time; although
'Print preview' only shows the one copy, it will still prim them all.
• 'Show margins' displays the current margins, as set in 'Print setup', as grey lines on
the pages in Print Preview. As well as the left, right, top and bottom margins, it
displays the 'Vertical offset' positions of the headers and footers.
• ' Pages to display' lets you show from one to four pages on the screen at a time. It
also has a 'Facing pages' setting: if your final document is to be bound, use this
setting to see each pair of left and right pages together.
• 'Jump to page' lets you see the preview for any page calculated so far.
• 'Exit preview' has the same effect as Esc.
When the calculations are finished, 'Print preview' displays the final number of pages
in the top left-hand corner. Use the ←→ keys to move from page to page. (Pg Up and
Pg Dn move to the previous/next set of screens; Home and End move to the first/last
screen.) Again, you don't have to wait until 'Print preview' has finished calculating - at
any time you can move between the pages calculated so far.
1 95
Each application initially takes its settings for 'Margins' and 'Pages to display' from
those set on the 'Print preview' line of the 'Printer' dialog in the System screen.
Thereafter each individual application remembers its own last-used settings, for as long
as it has an open file.
'Print preview' needs 3-4K of free memory to get started, and takes up around 400
bytes per previewed page.
Other printing information
Cancelling printing
You can cancel any printing in progress. Return to the application which is printing, if
you have left it, then press the Esc key.
Settings for new files
When you create a new file, whether an agenda, database, word processor or worksheet
file, the new file inherits the 'Printer setup' settings from any file you were using - that
is, from the previously open file which exits when you create your new file.
If there was no open file, the settings most recently set in any application will be
inherited.
If you use a template when creating a new Word Processor document, the printer
settings are inherited from the template.
Printing from the Text editor and the Program editor
You can print plain text files when using the Word processor as a text editor, and OPL
programs from the Program editor, as you would print a document from the Word
Processor. The same 'Print setup' and 'Print' options are available in the Program editor.
As in the Agenda and Database, you can tab-out the 'Printer model' line of the 'Print
setup' dialog, and set the default font for the printer to use.
Printing from an OPL program
OPL has a command, LPRINT, for printing information. The Programming manual has
an appendix to do with printing from OPL.
1 96
12
Open files
You have seen how to create new files, and how to change the
open file - the one you're looking at - using 'Open file'
options, or the file lists on the System screen.
You can, however, open more than one of any kind of file more than one database, more than one Word Processor
document, and so on. If, for example, you open two database
files at the same time, both names appear in bold in the file
list on the System screen.
1 97
Internal memory and open files
Every time you open a file a certain amount of internal memory is used up. This means
that there is less space for the internal disk, as it is also a part of the internal memory of
the Series 3a.
To see how much memory each open file is using, use the 'Memory info' option from
the 'Info' menu in the System screen. It displays a dialog like this:
The shaded part of the bargraph shows the amount of internal memory currently used.
The clear part of the bargraph shows the amount still free. If you press → you can see
what is using up internal memory. The first time you press the size of the internal
disk is shown. This is the amount of information stored on the internal disk. The disk
can grow until internal memory is filled.
Memory is measured in K (short for kilobyte) - 1K can hold just over a thousand
characters.
Further presses of → show the memory used by each open file. Time and Calc also use
memory, as does the Series 3a itself (shown as System ).
Press Esc to remove the memory dialog from the screen.
Why open more than one file?
The main benefit of opening more than one file is speed. You can switch instantly
between the open files with a single keypress, instead of using an 'Open file' option, or
using the System screen. It is particularly useful when you want to use 'Bring' to
transfer information from one file to another.
If you rarely swap between files, though, you may choose never to open more than
one of each type of file.
If you want to use more than one Agenda file and to use alarms in them, you must
open both files. If an Agenda file is not open, only its next alarm will ring.
Different types of file
You can open more than one file with the Database, Word Processor, Agenda,
Spreadsheet or Program editor.
The Calculator and Time do not use files. They will always appear as Calc and
Time on the System screen, and will never have file lists.
World is limited to one open file at a time.
1 98
Opening a second file
To open a second file without exiting the currently open one:
1. In the System screen, move the highlight to the name of the file to open.
2. Instead of Enter, press Shift-Enter.
If you now return to the System screen, you'll see two filenames in bold at the top of
the list. Both files are open.
You can open several files of the same kind - press Shift-Enter on each one, in the
System screen.
Up to 19 files can be open, i.e. bold, at the same time in the System screen (including a
World file, plus Calc and Time). In practice, you may fill up all of the internal memory
on the 256K model if you try to keep numerous files open. Installing other applications,
and using 3 Link, may have the effect of reducing the maximum number of files you
can open at the same time.
To move between open files of the same type, press the relevant application button.
You can also press Shift with the button to move through open files in the reverse order.
You can also create and open a new file without exiting another open file. Use the 'New
file' option in the System screen, and type the name for the new file, but use Shift-Enter
to complete the dialog.
File order in the System screen
Whenever you open a file to look at it, its name becomes bold and moves to the top of
the file list in the System screen. This means that the top bold filename in a file list is
the file you most recently looked at, while the bottom bold filename is always the file
you least recently looked at.
Whenever you press Enter to open another file (one not shown in bold), you will exit
from the file that you least recently looked at, so its filename will no longer be bold.
When you press Enter to run a translated OPL program file, it never causes you to
exit any other open file or running program. You can still exit (stop) a running OPL
program in the System screen - move the highlight onto it and press Delete.
To open multiple files by default
If you wish, you can set the System screen to open files without exiting those which are
already open. Select the 'Set preferences' option on the 'Special' menu in the System
screen, and change the 'Open multiple files' line from 'Shift-Enter' to 'Enter'. Files
will now remain open until you exit them yourself.
1 99
Exiting open files
You can exit an open file in the Database, Agenda, Word Processor, or Spreadsheet by
using the 'Exit' option on the 'Special' menu. All of your information is always saved
when you do this - unlike many computers, you don't need to use any separate "save"
option on the Series 3a.
You can also exit an open file from the System screen - move the highlight onto it and
press the Delete key. The 'Exit' dialog will appear. Press Y to confirm exiting the file.
The 'Exit application' option on the 'Apps' menu also does this.
On the System screen, the Delete key is only for exiting open files. To delete a file, first
exit it if it is open, then use the 'Delete file' option on the 'File' menu.
If you exit all of the files of a particular type, the relevant button has no open files to
move to. It will then instead return to the System screen, with the highlight under its
icon, ready for you to choose a file to open. (Psion-button also moves back to the
System screen, with the highlight under its icon.)
The System screen has an 'Exit all applications' option on the 'Apps' menu. This exits
every open application file (except 'Time', which must always be open), to free as
much memory as possible. (You must still turn 'Link' off, if you want it off.)
'Please replace volume...' and 'User abandoned'
Whenever the Series 3a tries to write to or read an open file on an SSD, but fails to
access the disk - perhaps because you have removed it, or one of the SSD doors is
open - a message is shown asking you to replace the SSD. If the disk's volume name
(described in a later chapter) is backup , for example, the message is 'Please replace
volume "backup"'.
Reinsert the disk, close the doors and select 'Retry'. If you select 'Fail', the
application enters a 'User abandoned' state, and will either become unusable, or exit
immediately. (If a file was being saved or written to in any way, and you select 'Fail',
the file will almost certainly be corrupted and become unusable.)
Calc and Time
The Calculator uses internal memory, just like an open file. If you exit it by moving the
highlight onto it and pressing Delete, you can recover the memory it uses (about 5K).
Of course, to use the Calculator in the future, you would need this amount of memory
to be free.
The Time application also uses a small amount of memory, but you cannot exit it - it is
essential to the operation of the Series 3a.
2 00
13
Moving
information with
'Bring'
Sometimes you may want to move or copy information from
one area of the Series 3a to another - for example, you may
wish to copy an address from a database into a letter you are
writing with the Word Processor.
The 'Bring' options on 'Edit' menus allow you to transfer
information between the Word Processor, Agenda, Database
and Spreadsheet. The option is called 'Bring entry' in the
Agenda, 'Bring text' in the Word Processor and Database,
and 'Bring' in the Spreadsheet.
2 01
How 'Bring' options work
To 'Bring' text from one file to another:
1. Move to the file from which you want to copy, and highlight the text to be copied.
Use Shift-↑↓ and/or Shift-←→, as appropriate, to highlight the text. (In the Agenda,
you need only move the cursor to the entry to copy. You cannot "bring" more than
one entry at a time from the Agenda.)
2. Move to the file in which you want to insert the copy, and position the cursor. (In the
Database, move to the 'Add' screen.) Select the 'Bring' option.
The text remains highlighted, so if you select a 'Bring' option by mistake, just press the
Delete key to remove the copied text
'Bring' options copy from the highlight most recently created, in any open file. You can
copy as large an area as you can select with a highlight:
• In the Database, you can highlight part or all of one entry.
• In the Word Processor/Spreadsheet, you can highlight an entire file.
How information is transferred
When you copy text by using a 'Bring' option, the Series 3a copies it directly into the
file. Lines of text are inserted in the most appropriate way. Each real end of line will
cause an end of line in the new copy. Where a line of text wraps, it will be re-wrapped
to suit the destination.
'Bring' options do not affect the text which will be inserted by any future 'Insert'
option.
'Bring' options and the Agenda
You only need to move the cursor onto the bullet for the entry that you want to copy to
select it.
When copying an Agenda entry to the Database, Word Processor and Spreadsheet, only
the text for the entry is inserted. Symbols for to-do priority, alarms and so on are not
copied. When copying an entry to another open Agenda file with 'Bring', all the
symbols and settings for the entry arc copied.
'Bring' options and the Database
Find the entry from which you want copy and use Shift-↑↓, on the 'Find' screen to
highlight the lines you want to copy. You do not need to use the 'Update entry' option
to re-edit an entry.
Blank lines are not shown on the 'Find' screen. When using 'Bring' options, though,
any blank lines are always copied.
'Bring' options and the Spreadsheet
You can highlight and 'Bring' a range of text from the Spreadsheet into the Database
and Word Processor. The text is copied as it appears on the worksheet. Each row is
treated as a line of text, and tabs are used to split the lines of text into columns.
You can only 'Bring' a single row of text from the Spreadsheet into the Agenda. Spaces
are used between cells.
2 02
'Bring' between files of the same type
You can use the 'Bring' options to copy text between two files of the same type. To do
this, you must open both files at the same time. (The previous chapter explains how to
do this.) Highlight the area that you want copy, then press the application button
concerned to move to the new file, and select the 'Bring' option.
In general, 'Bring' has the same effect as using a 'Copy text' option, then 'Open file' to
open die second file, followed by an 'Insert' option to insert the text. The information is
copied in as complete a form as possible - for example, styles and emphases in a Word
Processor document are copied correctly (as long as there are no clashes between
shortcodes).
If you are keeping two files open at the same time, you must use 'Bring' instead of the
'Copy text' / 'Open file' / 'Insert' method - the 'Open file' option would not be able to
open the second file as it would already be open. Moving to it with the application
button concerned would not help, as a separate "clipboard" of copied text is kept for
each open file.
Also, the 'Copy text' / 'Open file' / 'Insert' method exits and saves the first file when
opening the second. You may want to avoid this:
• If you are editing large Word Processor or Spreadsheet files on a Flash SSD. this
uses up disk space unnecessarily.
• You may have made changes in the first file which you wish to "undo" by using the
'Revert' option.
• You may already have some important information on the clipboard in the first file.
Alternatives to 'Bring'
You may wish to use an alternative to 'Bring' to transfer information, because 'Bring'
restricts you to transferring the currently highlighted text. In the Database, for instance,
you can only highlight and then 'Bring' one entry at a time. In the Agenda, you can
only 'Bring' one entry, or a highlighted area in a memo attached to an entry, at a time.
Printing to a plain text file
You can transfer more extensive information by setting the 'General' printer driver in
any application from which you can print, and then printing the information to a plain
text file, which you can then edit and insert into another file. This method is particularly
useful if you want to transfer information from Data and Agenda files, since it allows
you to transfer any combination of entries that you are able to print.
1. Select the 'Print Setup' option on the 'Special' menu, tab out the 'Printer model' line
and set it to 'General'.
2. Tab out the 'Printer device' line and set the 'Printer device' line to 'File'.
3. Type the file name and extension you want to use in the 'File: Name' line and select
the disk on which it is to be created on the 'Disk' line. If you wish to create the file
in a particular directory, enter it on the 'File: Name' line. If not. the file will be
created on the root directory.
If you do not enter a file extension with the file name, the default extension for files
in the current application will be used.
2 03
4. Print the information you want to transfer as you would when printing it normally and
it will be printed to the file.
5. Open the plain text file within the Word application if you want to edit the
information. (The directory and file extension will probably be different to the
default directory and extension for Word files. You will therefore need to use the file
selector to find and often the file.)
6. You can now use the 'Save as' option to save the file in a format suitable for use with
'Merge in' in the destination application. Or you can highlight the areas you want to
transfer and use 'Bring'.
See the 'Printing' chapter for further details of the 'General' printer driver and printing.
See the 'Files and disks' chapter for further information on the file selector and merging
files.
'Tidy/Extract' within the Agenda
You can also use the 'Tidy/extract' option within the Agenda as a means of transferring
extensive information between two Agenda files. Simply use the 'Copy to file' option
within 'Tidy/extract' to copy the entries that you wish to transfer to a file. Then use the
'Merge in' option within the destination Agenda file to insert the contents of the file.
See the 'Agenda' chapter for further details of the 'Tidy/extract' option. See the 'Files
and disks' chapter for further details of merging files.
Transferring calculations
You cannot use 'Bring' to transfer information to or from the Calculator. You can,
however, perform calculations as you type with the Word Processor, Agenda and
Database, by using the 'Evaluate' option on the 'Edit' menu. (In the Agenda, you only
see this option when editing the text of an entry.)
If there is no spacing in the calculation, you can just move the cursor onto it; otherwise,
highlight the calculation with Shift-← or Shift-→. When you select 'Evaluate', the result
appears. The calculation will be left highlighted, so you can delete it, if you wish, by
pressing the Delete key.
If you generate a result in the Calculator, you can transfer it into the Word Processor,
Agenda or Database:
• Use the 'M in' option to assign the value to a calculator memory.
• In the Word Processor, Agenda or Database, type the name of the calculator memory,
highlight it and select the 'Evaluate' option.
2 04
14
Files and disks
You can store your Series 3a files on the internal disk or on
Solid State Disks (SSDs). This chapter begins with an
explanation of SSDs; read it if you have an SSD, or you want
to know how they work.
The Series 3a uses the MS-DOS filing system on all disks.
Although it normally hides the complexity from you, there is
full access to the filing system, and this chapter shows you
how you can use it. You do not need this information, though,
for straightforward Series 3a use, and some of it is technical.
2 05
Solid State Disks
Solid State Disks (SSDs) can store any of the information normally kept on the internal
disk - letters, address books, OPL programs etc. The main reasons for using them are:
• To provide more room for storing information.
• To make backup copies of important information, in case you accidentally change or
delete it, or even lose your Series 3a.
• As a simple way to swap information with another Series 3a.
Fitting an SSD
SSDs fit in one of two SSD drives, marked A and B . You can use either, or both at the
same time.
To fit an SSD. turn the Series 3a over, open one of the doors and insert the SSD. The
side with the Psion logo should be uppermost and the end with the arrow symbol
should go in first, like this:
Push the SSD all the way in - it needs a firmer push at the end - then close the door.
When you open the door again the SSD is ejected a little way. so that you can remove it.
There are two types of SSD - Flash SSDs and Ram SSDs.
Flash SSDs
Flash SSDs do not rely on any form of battery power, and can store information in a
completely secure form for many years. However, deleting or replacing old information
on a Flash SSD is like crossing out old notes in a book - the information is gone, but
the space is still occupied. So Flash SSDs are for storing important and/or
"finished" information - that is, information which is likely to change only
occasionally, if at all.
Eventually, the Flash SSD will fill up. You must then copy the information that you
wish to keep to another disk, format the Flash SSD to make it blank again, then copy
the information back.
You might also keep backup copies of important information on a Flash SSD and leave
the Flash SSD in a safe place, in case you lose your Series 3a.
Ram SSDs
Ram SSDs store information securely for day-to-day use. They have a built-in battery,
to preserve the information when the SSD is out of the Series 3a. When in one of the
SSD drives. Ram SSDs are powered entirely by the Series 3a, and a new SSD battery
will typically remain good for several years. When out of the Series 3a, Ram SSDs rely
on the power of their built-in batteries; a fresh battery will typically preserve the
information for at least three months.
2 06
When you delete or replace information on a Ram SSD, the space that was used is freed
for further use, just as it is on the internal disk. So Ram SSDs are for storing all kinds
of information, such as OPL programs or Word Processor documents.
Don't keep important information on a Ram SSD, unless you have a backup copy
elsewhere, as the battery power will run down one day.
Before you use a new Ram SSD:
1. Fit its battery, as indicated in its accompanying leaflet.
2. Format it, as described below. Until you do this, you cannot save information on it.
When you format the disk, the Series 3a will try to check the condition of the
battery, and will display a 'Battery is low' warning if the battery has insufficient
power to preserve information out of the machine.
3. If formatting produces no 'Battery is low' warning: use the 'Disk info' option in
the System screen, and press the key corresponding to the drive containing the Ram
SSD to check the condition of the battery. The message 'Battery good' or 'Battery
low' may appear in the top line of the "Disk info' dialog, after the size of the SSD.
Again, if you see 'Battery low' check the battery is fitted correctly.
4. If the 'Disk info' option produces no message after the size of the SSD: the
Series 3a cannot check the battery. If this is the case, take the SSD out of the
Series 3a. Leave it out for five minutes, then re-insert it. Use the 'Disk info' option
again. If the dialog has the same top line as before, all is well. If the top line
indicates an error such as 'Media is corrupt', either you have fitted the battery
incorrectly, or it no longer has sufficient power.
Formatting an SSD
Formatting an SSD wipes it completely clean, ready for re-use. (A Ram SSD also needs
formatting before you first use it.)
You cannot format an SSD if it contains files which are in use. (See 'Open files'
later in this chapter.)
1. Insert the SSD into one of the two SSD drives.
2. On the System screen, select the 'Format disk' option on the 'Disk' menu.
3. Select the drive containing the disk on the 'Disk' line. Be sure to choose the correct
SSD drive - A or B - and be sure not to choose Internal .
4. It's a good idea to give each SSD its own name, as it may on occasion be used to
identify the SSD. As PC users may recognise, this is called the volume name of the
disk. It has the same format as a filename; enter up to 8 numbers and letters, plus (if
you wish) a dot and up to three further characters.
5. Press Enter, and confirm that you wish to proceed with the formatting.
A bargraph is shown, to show you the progress of the formatting. You can use the
application buttons to continue using the Series 3a while the formatting is taking
place. You can press the System button to return to the System screen, to check the
progress of the formatting.
The Series 3a can check the state of the battery in some Ram SSDs. If it can
check your SSD's battery, it will do so at this point. You will be warned if the battery
is low; either you have fitted the battery incorrectly, or it no longer has sufficient
power to preserve information when it is out of the Series 3a. Do not format and
use the disk because it will lose any information it contains if it is taken out of
the Series 3a. Check you have fitted the battery the right way round.
2 07
Understanding files and disks
File lists in the System screen
The file lists beneath each icon are updated automatically. If you create a new file or
insert a new SSD, the Series 3a will update the lists within a second or two. The
Series 3a will also update the file lists if you press the System button when the System
screen is already shown.
File lists begin with any open files, shown in bold. The most recently opened file is at
the top; the bottom bold file is the least recently opened of the open files. (See the
chapter on 'Open files' for more details.) The rest of the list - files which are not open is sorted alphabetically.
If you press a key, the highlight moves to the first file which begins with that letter.
Further presses of the same key will move the highlight between all files which begin
with the letter.
Files on SSDs are shown with either [A] or [B] , as appropriate, after their name. If
files with the same name are found on different disks, the one on the internal disk is
listed first, then the one on drive A , then B .
The Esc key moves the highlight to the top of the current list. A second Esc moves the
highlight to the leftmost icon in the System screen. Psion-← ('Home') also has this
effect.
'Updating lists'
The System screen tries to keep its file lists up to date at all times, displaying an
'Updating lists' message while checking the disks. If you wish, you can set the
Series 3a to update the lists only when you press the System button:
• Select 'Set preferences' on the 'Special' menu in the System screen, and set the
'Update lists' line to 'System button".
'...' at the end of a file list
A file list can end with three dots (...), to signify that some files could not be shown.
Several things can cause this;
• An SSD door was opened while the lists were being updated.
• It is possible to have more files for one icon than the System screen can handle.
They will not be shown in the file list unless you delete some of the other files.
• Internal memory may have become filled by the generation of the file lists, causing
one or more lists to be incomplete. You need to free some internal memory, as
described in the 'Troubleshooting' chapter.
To find out which of these caused '...' to be shown, try to move the highlight onto the
'...' itself. A message will be shown, explaining the reason for the incomplete list.
2 08
File management
New files and copying files
The 'New file' and 'Save as' options on the 'File' menus (in the Database, Word
Processor etc.) let you create or copy files on any disk. You can also create or copy files
from the System screen.
To make a new file: move the highlight anywhere on the file list for the icon
concerned, and select 'New file' from the 'File' menu. Type the name, and select the
disk to use.
To copy a file: move the highlight onto it, then select the 'Copy file' option on the
'File' menu. Move the highlight to the 'To file: Name' line, and type the name for the
new copy of the file. Change the 'To file: Disk' line to the disk where this new copy
should be made. Leave the last two lines of the dialog set to 'No'.
Important: If you copy agenda or database files with 'Copy file' in the System screen,
the space taken by old (edited or deleted) entries is not recovered. Use the 'Save as'
options in the Agenda and Database instead, to make smaller files.
Deleting and renaming files
The 'Delete file' and 'Rename file' options on the 'File' menu both work on the
currently highlighted file.
'Delete file' removes a file completely. You cannot then recover the file, so be careful
with this option.
If you delete all the files below an icon in the System screen, the original name for
that icon is again displayed beneath it. No file has yet been created, however, the
creation only happens if you move the highlight onto it and press Enter.
'Rename file' changes the name of a file. The file stays on the same disk - to move a
file to a different disk, you must use 'Copy file', then 'Delete file' to remove the
original.
Open files
Important: open files - generally, those in bold in the System screen's file lists cannot be copied, renamed or deleted. You must exit them first. The easiest way to exit
an open file is from the System screen - move the highlight onto it. press Delete, then
Y to confirm.
World files, even when shown in bold in the file lists, are not "open" in the same way as
other open files, and you do not need to exit them first.
It is possible to modify or delete an open file on an SSD if you move the SSD to the
other SSD drive (or in another Series 3/3a). Do not try this - it will have
unpredictable effects if you go back to the open version of the file.
Auto-saving of files
When you change to a different file, by using an 'Open file" option or by choosing a file
from the file list in the System screen, the file you were using is exited. Any changes
you had made to it are automatically saved. This is a different system to that used by
many programs on business computers, where you must first use a 'Save' option to
save changes you've made.
2 09
In the Word Processor and Spreadsheet, any changes made since the file was last
opened or saved will now be saved. (In the Spreadsheet, any changes you were
making on the input line will be lost.)
• In the Database and Agenda, entries are always saved to file when you enter them.
However, if you were editing an entry in the Database, any changes you were
making would be saved, whereas they would be lost in the Agenda.
• In World, changes to city and country information are always saved when you
complete the relevant dialogs.
If you are not careful, auto-saving can use up space on a Flash SSD. If. for example,
you continually swapped between two documents in the Word Processor, making small
changes each time, they would be auto-saved repeatedly. If one or both were on a Flash
SSD, it would start to fill up with old information.
It's best in such a case to open both files at the same time, by using Shift-Enter to open
them from the System screen. When you then swap between them, either from the
System screen or by pressing the relevant application button, no auto-saving will occur.
Using disks
Removing an SSD
You can remove an SSD at almost any time - just open the door and take it out. If the
System screen is currently shown, you'll see its file lists update automatically,
removing the names of files which were on that SSD.
Do not remove an SSD while information is being written to it. such as when a file is
being saved. If you do, a message is shown asking you to replace the SSD. If the disk's
volume name is backup , for example, the message is 'Please replace volume
"backup"'.
Reinsert the disk, close the doors and select 'Retry'. If a file was being saved or
written to in any way. and you select 'Fail', the file will almost certainly be corrupted
and become unusable.
You cannot use the Series 3a until you select 'Retry' or 'Fail' (although any alarms will
still ring).
If you intend using an SSD on another computer, such as another Series 3/3a or a
Psion MC, exit any open files on the SSD each time before you remove it.
It is a good idea to exit any open files on an SSD before removing it (for whatever
reason). If you do not. and you then try to access one of these open files, the application
will soon ask you to put the SSD back in, and may not allow you to continue until you
do so (or you select 'Fail', which may lose unsaved information).
Write-protecting an SSD
Each SSD has a switch to let you write-protect the information on it. If you set the
switch to the 'Protect' position you can only read the information it contains. You
cannot save anything on it, or alter or delete anything it contains. For example, if the
SSD contained database files, you could view these in the Database, but you couldn't
save any changes to the files.
This is like write-protecting an audio or video cassette by breaking a plastic tab. or
write-protecting a PC floppy disk.
2 10
You might want to write-protect an SSD containing particularly important files.
Important: before you write-protect an SSD, exit any open files on it.
The write-protection can be removed by setting the switch back to the 'Write' position.
Reclaiming space on a Flash SSD
When a Flash SSD is full, you can reclaim any space used by deleted information:
1. Make a copy of any files the Flash SSD contains, perhaps on the internal disk or on
another SSD. The old deleted information is not copied. Use the 'Copy File' option
on each file shown with the corresponding drive letter ( [A] or [B] ) in the
System screen. Alternatively, use the 'Copy disk' option to copy all files from the
disk.
To reclaim maximum space, open any Agenda or Database files and use the 'Save
us' options in the Agenda and Database to create the copy. This ensures that the
space taken by old (modified or deleted) entries is reclaimed.
If you see a 'File or device in use' message when you try to copy a file, the file is
still open. Exit it first - move the highlight onto it in the System screen, and press
Delete.
2. Format the Flash SSD, as described earlier. The Flash SSD will be completely blank
again, ready for re-use.
3. You can now copy back the files you copied before formatting, then delete the copies.
If you wish to copy all of the files on a disk in one go, see 'Copying a disk', later in
this chapter. If you have any agenda or database files, though, you may wish to copy
them again afterwards, using 'Save as', before you format your Flash SSD and copy
the files back.
Speed and Flash SSDs
Each database and agenda entry is stored separately on an SSD. as you enter it. (This is
in contrast to Word Processor documents, where the smallest change will cause the
whole document to be re-written onto the SSD when you next exit the document.)
Particularly on larger SSDs, you may find that accessing larger files gradually becomes
slower as you continue adding information, because the Series 3a has to search each
time through longer and longer chains of new, deleted or updated entries.
If you do find a decrease in speed, try using 'Save as' to make a new version of the
affected file. It will then be saved without old deleted information, and in one area on
the disk.
Battery power and SSDs
Important: writing information to a Flash SSD requires more power than writing to
the internal memory. (The most power is used when formatting a Flash SSD; saving
and copying files also uses more power than normal.) If a 'Batteries too low to write to
Flash' message is displayed when you try to write to a Flash SSD. you are given the
choice of 'Retry' or 'Fail'. You should not in general select 'Fail'. Plug in a mains
lead, or turn the Series 3a off and replace the main batteries. (Alternatively, turn the
Series 3a off and wait for a while. The batteries may recover enough voltage to write to
the SSD.) Then use the 'Retry' option.
If you select 'Fail', the information you were trying to save may occasionally end up in
a corrupted form on the disk. With Agenda or Database files you may then see 'Write
failed' or 'End of file' error messages, even with good batteries.
2 11
If this happens, or if you have any other problems after a 'Battery too low to write to
Flash' message, exit and re-open the file. If the errors still occur, copy the file (or use
'Save as') and use the new version of the file.
The 'Disk info' option on the 'Info' menu displays the status ('Good' or 'Low') of the
battery in some types of Ram SSD. If it says 'Low', the battery may no longer have
sufficient power to maintain the disk. Keep the SSD in the Series 3a, which will power
it, and backup the information to another disk. You can then remove the SSD and
change the battery, as described in the leaflet accompanying the disk.
The 'Format disk' option will also tell you that the battery is low in a Ram SSD, if it
can read the battery.
Disk management
The 'Format disk' option can format the internal disk. This will delete every file on
the internal disk. Be careful when formatting an SSD that you select the correct drive.
You can use the 'Disk info' option on the 'Info' menu to find the free space, and the
amount used, on any disk.
The 'Name disk' option on the 'Disk' menu sets or changes the volume name of any
disk. You should in general name all of your SSDs, either with 'Name disk' or in the
'Format' dialog, as you may see the name used occasionally to identify the disk.
Drive C:
When setting a 'Disk' line in a dialog, the choices given are the internal disk, the SSD
drives A and B , and the expansion socket C . This will usually be shown as
'Absent' or 'No disk'. Some expansion devices, such as serial 3 Link, do contain a
drive C which has files on it. (Parallel 3 Link does not contain a drive C .)
2 12
Advanced use of files and disks
Directories and file extensions
Directories
The internal disk and SSDs use an MS-DOS-compatible directory structure, the same as
that used on disks on business PCs. However, the Series 3a hides the complexities of
this. You have only to supply a filename, and to say which disk a file is on.
Files are stored in various directories on each drive. The structure of a drive begins
with a root directory, written as a backslash ( \ ). This can "contain" files and/or other
directories, and each directory can contain more files and/or more directories.
When you have "directories in directories", they are often called subdirectories. For
example, the root directory ( \ ) contains a directory called \DAT , which normally
contains files created by the Database. If you create a new subdirectory in \DAT ,
called RECORDS perhaps, its name in full is \DAT\RECORDS . You could copy or
create files in \DAT\RECORDS , and even create subdirectories in it \DAT\RECORDS\TMP , for example.
The full directory name is sometimes referred to as the path or directory path.
In some places, directory names are written with a final backslash, such as \DAT\ and
\DAT\RECORDS\ .
File extensions
Filenames are composed of one to eight letters and/or numbers, as you've seen.
However, this can be followed by a file extension (sometimes just called extension)
comprised of a dot and from one to three letters and numbers.
File extensions are by convention used to group different types of files. The Series 3a
uses file extensions in this way, but hides this from you.
Where the SERIES 3a stores files
Your files are saved in these directories, and with these file extensions:
Type of file
Database
Agenda
World
Spreadsheet
Word
Printer drivers
Word templates
Sound files
OPL modules
translated modules
other OPL files
programs/OPAs
System screen lists/groups
Directory
\DAT
\AGN
\WLD
\SPR
\WRD
\WDR
\WDR
\WVE
\OPL
\OPO
\OPD
\APP, \IMG
\APP
File extension
.DBF
.AGN
.WLD
.SPR
.WRD
.WDR
.WRT
.WVE
.OPL
.OPP
.OPD, .PIC
.APP, .IMG, .OPA
.ALS, .GRP
2 13
If you have an Agenda called PERSONAL , its filename is really PERSONAL.AGN ,
and it is kept in the \AGN directory. You can add the filename to the directory \AGN\PERSONAL.AGN - to specify the file completely, for the disk it is on.
A freshly formatted SSD has only the root directory on it. The Series 3a makes the
above directories on a disk whenever it needs them. For example, if you copy a
database file to an SSD. the Series 3a will create a \DAT directory if it is not already
there, then put the file in it.
File lists in the System screen show only files in the expected directories and with
the expected file extensions. The file selector, described later in this chapter, gives
access to other files and directories.
Making your own directories
You can make your own directories, if you wish, with the 'Make directory' option in the
System screen. To use it, type the name of the directory, such as \TEMP\ or
\WRD\HOME .
If you do put files in subdirectories, you won't see them listed on the System screen.
However, when you use an 'Open file' option inside an application, it lists files in the
subdirectory from which the current open file came. You can also "navigate" the
directories on a disk with the file selector, described later.
The System screen has a 'Remove directory' option, if you've finished using a
directory and want to remove it. You will be warned that any files or subdirectories
it contains will be deleted. (MS-DOS users should note that this is unlike the
corresponding MS-DOS command, RD/RMDIR.)
You cannot rename directories.
The file selector
Whenever you are selecting a filename in a dialog - whether the name of an existing
file, or typing the name of a new file to create - you can press the Tab key, and the file
selector will be displayed. With it. you can specify the name of any file in any
directory, anywhere on any disk. You can also use it to look around a disk, and see what
directories it has.
If you press Tab while using the 'Open file' option in the Word Processor, the file
selector might look like this:
The top line gives you information about the disk. Use ←→ to change disk.
The second line tells you the current directory, and which files are listed below. *
means "all files", so \WRD\* means "all files in \WRD ". (' * ' is a wildcard. There is
more about wildcards later in this chapter.) Sometimes, only certain of the files in the
directory are listed.
2 14
Various directory names are then listed, to allow you to navigate the disk. Below them
are listed the files in the current directory. You can move the highlight with ↑↓, and the
screen will scroll up and down if necessary. If the file you want is in this directory,
move onto it and press Enter.
You can also type the first letters of a filename to move to it, as with city and country
names in World. If you use a Shift key with the letter you type, you can move to a
directory. If you use the Control key instead, you can type a drive letter - A or B for
the SSD drives, or M for the Internal disk.
The list begins with the names of the parent directory and the current directory. (The
parent is the directory which "contains" the current directory - here, it is the root
directory, \ .) The rest of the list is the contents of the current directory - any
subdirectories it may have (in this example, \WRD\FAX ), then any files it contains.
If you want to select a file in \WRD\FAX , move the highlight onto \WRD\FAX and
press Enter. The file selector will then show a similar screen for the \WRD\FAX
directory:
If the file you want is not in the current directory, nor in one of its subdirectories, you
can navigate to different directories via the parent directory. The parent directory of
\WRD\FAX is \WRD - to return to it, move the highlight onto it, and press Enter.
The parent directory of \WRD is \ , the root directory. If you move the highlight onto
it and press Enter, the file selector will show the directories and files in the root
directory. This gives you a view of the general structure of the disk. You can move the
highlight onto any of the directories shown and press Enter, to see which files and
subdirectories it contains.
The file selector and the System screen
If you press Tab in the System screen (or select the 'Directory' option), the file selector
again appears. The position of the highlight in the System screen controls which
directory is shown - if it was on the Agenda file list, \AGN is shown, and so on. If it
was below an icon which does not use files, such as Time or Calc, the root directory is
shown. If it was below a group, the directory for the particular applications is shown.
When using the file selector from the System screen, you can press the Menu key to
bring up menus of the System screen's file and directory options. This allows you to
use the file selector itself to manage your files and directories.
You can also use the file selector in the System screen to open a particular file. Move
the highlight under the icon of the application you wish to use, and press Tab. You can
now navigate to the correct directory, move the highlight to the file to use, and press
Enter. (If you press Shift-Enter, you open the file without exiting another one.)
Tagging files
When using the file selector you can tag more than one file. You can then do something
with the group of files you have tagged - copy them or delete them, for example, in one
go.
2 15
To tag the highlighted file, press the ' + ' key; to "un-tag" it, press the ' - ' key. You can
also tag or un-tag a file by pressing Shift-↑ or Shift-↓ when the highlight is on it. Tagged
files are shown by a tick after their name.
Press ' * ' to tag all of the files shown in the file selector. ' / ' will un-tag them all.
When you have tagged the files you want to use, press Enter. In the original dialog,
'(Tagged files)' will be shown in place of a filename.
You can only tag files in one directory at one time. If you then change disk or directory,
the Series 3a will remember which files are tagged, until you tag or select a different
file.
Settings such as 'Subdirectories' in the System screen's 'Copy file' and 'Delete file'
cannot be used if you tag files.
Selecting a directory
In some cases, such as when using 'Copy file', you can just give a directory name. If
you do this for the 'From file: Name' line, this means "copy all files in this directory".
For the 'To file; Name', this means "put the new copies here, and use the same
filenames as before."
To select a directory name, navigate towards the desired directory. As soon as the
directory name appears, such as when you have navigated to its parent directory, move
the highlight onto the directory name and press Psion-Enter. (You can, if you wish,
navigate into the directory, in which case the directory name is shown in bold; you can
then move the highlight onto this bold name, and press Enter to select it)
If you try this when a filename is required, such as in 'Rename file', the Enter is
ignored and you are left in the file selector.
If, when copying, you leave the 'To file: Name' completely blank and just change the
disk, the same directory and filenames will be used on the new disk.
File specifications
Complete file specifications
In order to specify a file completely, the Series 3a uses a filing system and a disk
(sometimes called the drive or device) in front of the directory and filename.
• The filing system usually specifies the computer, and is usually LOC:: ("local'the Series 3a) or REM:: ('remote' - an attached computer).
• The disk is the area on that computer where the file is kept. On the Series 3a this can
be M: (the internal disk), A: (left SSD drive) or B: (right SSD drive).
To completely specify a file, you add the four parts together. So an agenda file named
BUSINESS , in a directory called \AGN\OLD on the internal disk of the Series 3a can
be specified as:
LOC::M:\AGNNOLD\BUSINESS.AGN.
If this file were in the root directory, you would specify it as:
LOC::M:\BUSINESS.AGN .
A full file specification may be up to 128 characters long.
2 16
Specifying new filenames
When choosing a new filename, as with the 'New file' option or with the new file's
name in 'Copy file', you can type directly as much of the file specification as you wish.
This might just include a different extension, such as AGENDA.TMP , or a directory,
such as \DAT\OLD\DATA , or it might be a complete file specification, such as:
REM::C:\WORD\ME.DOC .
File specifications and the file selector
When you are using the file selector on the System screen, or from the 'File Name:'
lines of any of the option dialogs, you can tell the file selector to list a particular group
of files, if you don't want to see all of the files in a directory. You might want to do this
to perform an action on more than one file at the same time, for instance.
1. Press Control-Tab instead of Tab to bring up the file selector with the 'Specify filelist'
dialog. This lets you set or change the file specification:
You can also press Tab when in the file selector, to display this dialog.
2. On the 'Filename pattern' line enter the specification of files to list. On the 'Full path'
line enter the full directory (file system, disk and directory path) to start from.
When you enter the 'Filename pattern', you usually use the wildcards ' ? ' and ' * '
?
matches any single character
*
matches any number of characters, including none.
For example:
* (or *.* ) matches with every file in a directory.
*.WRD matches with all files with the extension .WRD:
FEESMEMO.WRD
MEMO.WRD
LETTER.WRD
FAX1.* matches with all files with the name FAX1:
FAX1.WRD
FAX1.TMP
FAXl.OK
Memo?.wrd matches with:
MEMO2.WRD
MEMO3.WRD
MEMOO.WRD
but not:
MEMO2A.WRD
MEMO.WRD
2 17
3. When you have typed the file specification, press Enter, and the file selector is shown,
set to this specification. However, if you wish to select all the files which match
this specification - if, for example, you are using the 'Delete file' option on the
System screen - press Control-Enter instead of Enter. You are then returned to the
original option dialog, with the 'File Name:' line set to the specification you gave.
For example, to delete all files in the \AGN directory which have the file extension
.TMP :
1. In the System screen, move the highlight onto the Agenda file list and select the
'Delete file' option.
2. Press Control-Tab, type *.tmp on the 'Filename pattern' line, and press
Control-Enter.
You can now continue with the 'Delete file' option as normal - press Enter then Y to
confirm the deletion of these files.
If you also set a 'Subdirectories' line to 'Yes', such as in the System screen's 'Copy file'
and 'Delete file' options, subdirectories will also be searched for files which match your
specification.
Copying a disk
To copy one SSD to another:
1. Select the 'Copy disk' option on the 'Disk' menu in the System screen.
2. Select the SSD to copy on the 'From disk' line.
3. Set the disk to copy to on the 'Disk' line of the dialog. If you wish to copy this disk
into a particular directory on the other disk, enter the name of the directory on the
'To dir: Name' line of the dialog. If you are making an exact copy of the disk, just
press Enter.
Files in the root directory and all its subdirectories are replicated on the other SSD.
If you are about to format a Flash disk, you might wish to copy all of its files to a
temporary directory on the internal disk, then format the SSD. and then copy the files
back. To do this:
1. Copy the files from the SSD, as before. When you set 'To dir: Disk' to 'Internal', you
should also set 'To dir: Name' to \TEMP\ . The directories and files on your SSD
will be copied to an identical directory structure on \TEMP on the internal disk.
2. Format the SSD with the 'Format disk' option.
3. You can now use the 'Restore files' option on the 'File' menu to copy the files back
onto the disk. This time, navigate to \TEMP\ for the 'From dir: Name'. The
'From dir Disk' should be 'Internal', and the 'Restore files to' line should be the
correct SSD drive.
4. To delete the files from the internal disk, select the 'Remove directory' option. Press
Tab to use the File selector, move onto \TEMP , and press Enter; then press Enter
again, to select \TEMP as the thing you want in the dialog. Then press Enter to
complete the dialog. A warning dialog is displayed, telling you that all files in
\TEMP will be deleted; press Y to confirm this.
Important: If you copy Agenda or Database files in this way. the space taken by
modified or deleted entries is not recovered. So:
2 18
• If you are copying from the internal disk or from a Ram SSD, use the 'Compress
file' options in the Agenda and Database, before you copy the files.
• If you are copying from a Flash SSD, make the copy of all the files as above. Then
open the affected files on the SSD and use the 'Save As' options in the Agenda and
Database, to overwrite the copies with new (compressed) copies. In either case, set
'Use new file' to 'No'. Then select the 'Exit' option, to exit the file on the SSD.
Other advanced options
The default disk
If you wish to keep files almost exclusively on an SSD, use the 'Default disk' option in
the System screen to set the default disk to the relevant SSD drive. File-based menu
options in the System screen will then start with this drive as the disk to use, instead of
the internal disk.
File lists in the System screen will still show [A] and [B] for files on SSDs.
The "current directory"
If you move the highlight onto a filename line in a dialog and press Psion-Tab. a
message is displayed showing the disk/directory assumed for this file. This begins with
LOC:: if it is a drive on the Series 3a, or REM:: if it is a drive on an attached
computer.
File attributes
You can mark files in certain ways by giving them attributes. Use the 'File attributes'
option on the 'File' menu in the System screen. You can select the file or files to set in
the normal way, using the file selector if you wish. (You can also set the
'Subdirectories' line, for your chosen settings to apply to all matching files in
subdirectories of the current directory.) Then set any of the four attributes:
• Read only' means that changes cannot be made to a file, although you can still open
it and view it as usual. You might like to make a file 'Read only' if it was particularly
important and you wanted to avoid the possibility of it being deleted or changed by
accident.
• 'Modified' indicates that a file has changed since it was last backed up. (See the
'Security and backups' chapter for information about making backups.)
A file has its 'Modified' attribute set whenever it is created or changed. (For users
acquainted with MS-DOS, 'Modified' is the equivalent of the 'Archive' attribute.)
• 'Hidden' and 'System' are used by the Series 3a. You should not normally use them.
('Hidden', for example, stops a file from appearing in the System screen's file lists.)
Unpredictable results may occasionally occur if you use these attributes, however.
The file selector shows all files, even those with the 'Hidden' attribute set.
2 19
2 20
15
Security and
backup
If you keep private information on your Series 3a, you can
protect it against prying eyes by entering a password. You
can enter a system password to protect the Series 3a itself, so
that it will not turn on until the password is entered. You can
also password-protect individual worksheets, Word Processor
documents and memos in the Agenda. They will be stored in
encrypted form, and will be unreadable unless the correct
password is given.
You can also make backup copies of important information as
a safeguard against accidental change or deletion. It can be
very distressing to spend many hours entering information
into a computer, only to lose it, and have to re-type it from
scratch.
2 21
Passwords
Warning: The casual use of passwords is dangerous. It is all too easy to decide to
password-protect a Word Processor document, say, then return to it some time later only
to find that you cannot recall the password. Unless you remember (or guess) the
password, the information in that file is then lost to you, just as if you had deleted the
file.
You must decide whether your Series 3a contains any information which needs to be
protected. If not, you may decide not to use passwords at all.
Choosing a password
If you just want to protect information against casual snooping, you don't have to go to
any great lengths to pick an "un-guessable" password. Just make sure the password is
something you won't forget.
If you have some important information which needs real protection, you should think
more carefully about your password. If anyone makes a serious attempt to guess your
password, they may well try your date of birth, car registration number, spouse's name,
and so on. It is much safer to invent a short password, perhaps part of some word or
words which means something to you. The important thing is that the password is
almost impossible for someone else to guess.
Before using a password for individual files, it is a good idea to get used to it by setting
it as the system password for a while, even if you only intend using it for individual
files. You will then have to type it in whenever you turn the Series 3a on, and after a
few days (or maybe weeks) you will know the password for good.
You can use different passwords for different files but the more you use, the more likely
you are to forget one. Most people who use password-protection use only one
password.
Setting the system password
1. Move to the System screen and select the 'Password' option on the 'Special' menu.
2. In the dialog which is displayed, enter a password of up to eight characters. Padlock
symbols are shown on the screen in place of each letter, so that no-one can read the
password as you type. If at any time you think you have made a mistake, press
Delete to delete backwards towards the start of the password. (Esc leaves the 'Set
password' dialog without setting a password.)
You can enter the password in upper or lower case.
3. Having typed the password once, press ↓ to move to the 'Confirm password' line, and
type it again. This is to guard against accidental typing errors.
4. Leave 'Password set' to 'On', to turn passwords on. When you now press Enter to
confirm this dialog, a system password is set. The next time you turn the Series 3a
on, you will have to type the password.
The job of a password is to make information secure. If you forget the system
password, you must do a hard reset before you can use the Series 3a again. All
information in internal memory will be lost when you do this. (To do a hard reset,
hold down the right-hand Shift key, and gently press something like an unfolded paper
2 22
clip into the reset hole. Then press ON/Esc to turn on, still holding down the right Shift
key.)
Alarms still ring while a system password is set.
The password is stored in encrypted fashion. Even a program which looks through
internal memory cannot discover your password.
Changing the system password
If you ever need to change the system password:
1. Select the 'Password' option on the 'Special' menu. Type the current password in the
'Password protected' dialog and press Enter. A 'Change password' dialog is shown.
2. Press ↓ to move the highlight onto 'New Password", and type the new password.
3. Press ↓ and type the password again on the 'Confirm password' line. Then press Enter
and the new password will be set.
Disabling or clearing the system password
1. Select the 'Password' option on the 'Special' menu.
2. Enter the current password in the 'Password protected' dialog and press Enter. The
'Change password' dialog will appear.
3. To disable the system password: use → to turn the 'Password set' line to 'Off'. Then
press Enter. Your password is unchanged, but you will no longer be asked for it
whenever you turn the Series 3a on. (But don't forget your password, as you will
be asked to enter it if you try changing to a different password later.)
To clear the system password altogether: move the highlight onto the 'New
password' line, and press Enter as if to enter no characters as a password. The
Series 3a displays a 'Password not confirmed' message, and moves the highlight
down to the 'Confirm password' line. Press Enter again. The old password is then
cleared, and the Series 3a will no longer ask for a password when you turn it on.
Passwords on Spreadsheet / Word Processor files
You can store confidential information in a Spreadsheet or Word Processor file, or a
memo in an Agenda file, and then password-protect it. You might, for example, keep a
list of Personal Identification Numbers (PIN numbers) for credit cards as a Word
Processor document.
The 'Password' option is on the 'Word' menu in the Word Processor, and the "File'
menu in the Spreadsheet.
The option asks for a password in the same way as the System screen. Type the
password, press ↓, type it again for confirmation, and press Enter.
There is no 'Password set' line in the dialog when setting the password for a file; the
password you enter is set immediately.
The password takes effect when the file is next saved; you may wish to use an 'Exit'
option, to save the file. Whenever you then try to open this file, a dialog is shown
asking for the password. If you forget the password, you cannot access the
information in the file. You can only press Esc, to abandon the attempt to open the file.
2 23
To change a password, select the 'Password' option again. As protection against
tampering, you will first be asked to enter the current password. When you have
entered it, a 'Change password' dialog is shown, which requires you to type in the
password twice, as before.
To clear a password, select 'Password' again, but (as when clearing the system
password) press Enter twice, to enter no characters at all on both lines of the dialog.
The password is used to control the encryption of the file, and is not itself stored
anywhere. You can copy the file to an SSD if you like: the information cannot be
accessed without the password, even on another Series 3a
Important: once you have opened a password-protected file, you can read its contents
by pressing the Word or Sheet button to return to it. So when you have finished looking
at a password-protected file, be sure to use an 'Exit' option to exit it.
Precautionary measures
Precautions against losing your SERIES 3a
The 'Set owner' option on the 'Info' menu of the System screen lets you enter "owner"
information, in case you lose your Series 3a. If you set a system password, this owner
information will be shown whenever the Series 3a aims on. and asks for the password.
If you do not set a system password, your owner information will still be shown
whenever the 'Set owner' option is selected.
The 'Set owner information' dialog allows you to enter four separate lines of
information. You don't have to stick to the suggested format - you can delete the
suggested text ( Owner:, Phone: and so on) if you wish, and type whatever
personal information you want.
Protection against accidental change or deletion
To protect an important file, set its 'Read only' attribute. (If a file is open, you will need
to exit it - e.g. with the Delete key in the System screen - before you can do this.)
1. Move the highlight onto the file in the System screen, and select the 'File attributes'
option on the 'File' menu.
2. Set the 'Read only' line of the dialog to 'Yes'. Press Enter.
The file is now protected against any form of change or deletion - you can look at it.
but you can't make changes to it. You would only lose the information it contains if
you were to format the disk it is on.
To reset the attribute to read/write: select "File attributes' from the 'File' menu and
set the 'Read-only' line to 'No'.
You can also protect an entire SSD. Each SSD has a small switch on one side. If you
slide this from the 'Write' position to the "Protect' position, you cannot change the disk
in any way - you cannot delete, change or create files, or format the disk.
Protection against tampering
If you choose not to set a system password, there is nothing to stop another person who
is familiar with the Series 3a from setting the password on your Series 3a, preventing
you from using it.
2 24
You can prevent this from happening by setting a system password, as described earlier,
but disabling it by setting the 'Password set' line to 'Off'. It will then be impossible for
anyone else to tamper with the password without knowing the password you entered.
Backups
While it would be impractical to make regular backup copies of information in paper
address books, agendas and so on, it is easy to backup information on a computer.
If you try to save time or money by not making backups, you may well find out why
people who work with computers almost always backup important information - or all
information, if possible.
Backing up one file
To backup a single file, copy it to an SSD (Solid State Disk), but carry on using the file
on the internal disk. If you accidentally delete the file on the internal disk, or delete
information in it, you can copy the file from the SSD back to the internal disk. You will
then lose only those changes made since you made the copy on the SSD.
SSDs also provide extra space for your information, if you need it.
If you have access to an IBM PC or compatible, or to an Apple Macintosh, you can
instead copy files via a serial 3 Link to the other computer. Serial 3 Link can also
communicate with many other types of computers, if they have suitable serial
communication software.
See the 'Files and disks' chapter for full details of using SSDs and copying files.
How safe are backups?
Information on a Flash SSD is safe from everything but accidental change or deletion.
The information will last for at least 10 years.
Ram SSDs store information securely for day-to-day use. When in one of the SSD
drives. Ram SSDs are powered by the Series 3a, and a new battery will remain good for
at least a year, and probably a lot longer. When out of the Series 3a they rely on the
power of the built-in battery: a fresh battery will preserve the information for at least
three months. Because it is hard to tell the condition of the battery, you should not rely
on information backed up to a Ram SSD which is kept out of the Series 3a
Information backed up to another computer is reasonably secure, although floppy disks
and hard disks can occasionally go wrong.
Any backup, of course, can be lost or stolen
When to backup
You can backup as often as you wish to a Ram SSD, or via a serial 3 Link.
If you use a Flash SSD purely for backups, you can also use it as often as you wish format it first each time, then copy the files you want backed up.
If you keep "live" information on a Flash SSD, or if you backup individual files to it, it
will slowly fill up, as old versions of files still take up space on a Flash SSD. See
'Reclaiming space on a Flash SSD' and 'Copying a disk' in the 'Files and disks' chapter.
2 25
Incremental backup
The System screen can perform incremental backup of disks. The first time you do this,
all of the files on the disk are copied to the backup area. When you next do it, only
those files which have been changed in the meantime are copied. This makes backing
up a disk as fast as possible - quicker than using the 'Copy disk' option - and
minimises the space used if you are backing up to a Flash SSD.
Your first backup
To back up all the files on a disk drive:
1. Select the 'Backup files' option on the System screen's 'File' menu. The "Backup
flies' dialog will appear.
2. On the 'Backup files on' line, enter the drive (Internal, A or B ) that contains the
files you want to back up.
3. On the 'To Dir: Name' line, enter the name of the directory into which you want to
copy the files. The first time you back up, choose a new (or empty) directory.
4. On the 'Disk' line, specify which disk drive that the backup files should be copied to.
5. On the 'Files' line, specify whether you want to copy all the files on the drive you
specified in step 1, or only those files that have changed since you last used the
'Backup' option to back up these files. The first time you backup, this setting is
irrelevant; all of the files will be copied.
Subsequent backups
On future occasions, when backing up the same disk, the 'Backup' dialog will suggest
the same destination directory. If you select 'Modified since last backup' on the 'Files'
line, only those files which have changed or been created since the last backup will be
copied. The backup directory will then always contain the most up-to-date versions of
all your files.
'Backup' looks at the 'Modified' attribute to work out which files to copy. File
attributes are described in the 'Files and disk' chapter.
If you have saved files with the 'Save as', 'Save' or 'Copy file" options, the 'Backup
option will still treat them as files which have been modified, and back them up again.
Reverting to backed up copies of files
If you lose an entire disk you can copy all the files in the backup directory at once,
using the 'Restore files' option on the 'File' menu.
You may wish first to format the disk from which the files have been lost. Take great
care not to format the disk containing the backups.
You may also wish to check the directory into which you have been backing up. It may
contain versions of out-of-date files which you subsequently deleted from your
Series 3a; if so, you may wish to delete them from the backup directory before you
restore from it.
If you lose just one file and need to revert to your backed up copy of it, use the
'Copy file' option as normal to copy the file. This is particularly important if you have
modified any of the other files in the directory since you last backed them up. If you
used 'Restore files', your up-to-date files would be overwritten with out-of-date
files.
2 26
16
The System screen
The icons shown in the System screen represent different
application programs - Database, Word Processor and so on in the Series 3a.
•
You can customise the appearance of the System screen
by moving icons to different positions on the screen,
duplicating icons for new lists of files, grouping icons
together, and by removing icons from the screen.
•
You can buy application programs which, once installed,
appear as icons in the System screen.
•
You can make your own OPL programs appear on the
System screen, with their own icons and file lists.
The menu options on the System screen allow you to control
some of the system-wide settings for the Series 3a.
Note that file lists themselves are covered in the 'Files and
disks' chapter.
2 27
Icons in the System screen
New applications
You can install additional application programs onto the Series 3a, from SSDs or 3 Link
leads.
Installing a new application
To install the icon on the System screen:
1. Plug in the SSD or 3 Link lead containing the application.
2. Select the 'Install' option on the 'Apps' menu, and in the dialog which appears set the
'Disk' line to the relevant drive, (If the application is on an SSD, the drive will be A
or B ; if it is on a 3 Link lead, set drive C , the "drive" for files on the lead.)
3. The new application name will be shown on the 'Name' line. (If there is more than
one application on the SSD or 3 Link lead, you can choose between them.)
4. Set the 'Position' line to 'Current', 'Last' or 'First' to position the new application
icon on the System screen. ('Current' means the position of the highlight on the
System screen.) Press Enter to complete the dialog and install the new application.
Installing OPL applications (OPAs)
The built-in programming language, OPL, lets you add your own OPL applications (or
OPAs), with their own icons and file lists, into the System screen.
See the 'Advanced topics' chapter of the Programming manual for more details.
Reassigning the application buttons
You can re-assign any application button (apart from System), with or without the
Control key, to move to any application whose icon is currently on the System screen.
Usually you would assign an application button plus the Control key, but you can also
assign an application button on its own, if you don't want it to go to its normal
application. Both assignments have the same effect.
Assigning an application button keypress provides a quick entry to a new add-on
application which you have installed, saving you from having to use the System screen
every time. You could also assign an application button to any groups or new file lists
which you have created. Groups and new file lists are described later in this chapter.
To assign/re-assign an application button:
1. Make sure that you have installed the application's icon in the System screen.
2. Move the highlight to the icon concerned.
3. Select the 'Assign button' option on the 'Apps' menu.
4. To assign an application button on its own. instead of the Control key plus the button,
change the 'Modifier' line from 'Control+' to 'None'.
5. Set the 'Button' line to the application button you wish to use, and press Enter to
complete the dialog.
2 28
Even if, after assigning a button to a particular application, you remove its icon, the
button will still move to that application, if it is open.
Switching between open applications
You can use Shift and the System button to move from one open application to the next.
In this way you can see all of the applications which are open, one by one.
Psion-Shift-System moves around them in the opposite direction.
Rearranging and grouping icons
There are a number of ways in which you can rearrange icons and file lists on the
System screen to make them more conveniently placed for your particular use.
Duplicating icons - new lists of files
If you create a large number of files in any of the applications, you may find it useful to
separate the files into related groups. You might have created a number of files in the
Word Processor, for example, some of which are letters and some reports. You could
group all the letters together and list them on the System screen under the Word
Processor icon, and create a second Word Processor icon to list all the reports under.
To duplicate the Word Processor icon, for example:
1. Position the highlight beneath the Word Processor icon and select the 'Create new
list' option from the 'Special' menu. This dialog will be displayed:
2. On the 'Directory for files' line, enter a name of up to 8 letters for the directory where
the new files listed beneath the new icon should be stored. You can create a new
directory if you wish, or specify an existing one.
If you know about directories, note that this directory will be a subdirectory of
\WRD . To use a directory off the root directory, you would type \ in front of the
directory name, for example \report . There is more information about
directories in the 'Files and Disks' chapter.
3. Leave the 'Icon' line set to 'Default'.
You can only use the default icon, which in this case will be the Word Processor
icon, unless you have acquired other icon files from some other source. (You can
make your own using OPL; an example is given in the section on OPL applications OPAs - in the 'Advanced topics' section of the Series 3a Programming Manual.) If
you wish to use another icon, you would press Tab on the 'Icon' line and select the
icon you wanted to use.
2 29
4. For ordinary Word Processor files, set the 'Type' line to 'Word Processor', and
leave 'Extension for files' set to 'wrd'. (If you want to use plain text files, set 'Type'
to 'Text editor' and 'Extension for files' to something like txt . There is more
about this in 'Plain text editing' in the 'Word Processor' chapter.)
5. On the 'Save list as:' line, enter a name to save this information as, and the disk to
use. You might enter report , perhaps, as the name. Initially the list will appear on
the screen with this name.
6. Press Enter. A dialog is shown, listing your choices; press Enter again to confirm
them.
When you create a new list of files, you can open them in the usual way of highlighting
the file in the System screen and pressing Enter. However, you can also assign an
application button keypress (as described earlier) to any of the new lists you create.
You cannot create new lists for applications which are not file-based, such as Calc and
Time.
Grouping applications
If you find that the row of icons on the System screen gets too long, you can group
together a number of applications under one icon. You might want to do thus to
applications that you use least often, or which are closely related, or which do not have
file lists.
For example, if you have created several lists of Word Processor files (as described
above), and you don't use them very often, you could put them all under one icon to
shorten the row:
1. Place the highlight in the position that you want the group to appear: the new group
will be inserted to the left of the highlight. Select the 'Create new group' option
from the 'Special' menu.
2. In the 'Create new group' dialog, enter the name that you want to give the group, for
example "WP", and specify which disk you want the group to be stored on.
3. Leave the 'Icon' line set to 'Default'. (If you have your own icons, you can press Tab
on this line, and select the icon to use.) Press Enter and the group icon will appear on
the screen:
4. Place the highlight beneath the group icon and press Space. The group expands to
take up most of the screen:
2 30
5. If you are adding one of the standard applications to the group, such as Calc, Data or
the original 'Word' list, select 'Install standard' from the 'Apps' menu. If you are
adding an add-on application, or a list which you created yourself, select 'Install'.
Use the ←→ keys to find the first application or list that you want to include in the
group, and press Enter to select it.
Repeat step 5 until the group contains all the icons you want it to contain. You can then
select applications and files in this group in the same way as on the main list of icons.
The group acts like a new version of the System screen.
Press Esc (or Space) to come out of the group and return to the main list of icons.
(Space goes back into the group.)
The icons you have put in the new group are still shown individually on the main
list of icons as well. (They have the same file lists as the icons in the group.) You can
remove them as described below in "Removing icons from the System screen".
A more typical example would be to group together Time, Calc and World. This
reduces the length of the row of icons in the System screen, but you can still see Time,
World and Calc. and open and exit them, on the System screen.
This example assumes you are still using just the one World file, itself called 'World'.
The list under the Group icon
The names of applications installed in a group are listed under the group icon. If an
application is file-based and may have a file list, the application name is followed
by three dots, such as "Word...", for example. To open a file for this application,
press Space to go into the group, and select the file from its file list.
Once one or more of an application's files are open, the names of the open files are
show n (still with three dots) under the group icon, instead of the application name.
You can move back to them by moving the highlight onto them and pressing Enter.
Note: if a file-based application has no files open, and you press Enter on its name
under the group icon, a file of the same name - 'Word', for example - will be
created or opened.
You can also select a file to use by positioning the highlight onto an application or
(bold) filename under a group, then pressing Tab to use the file selector (as described in
the 'Files and disks' chapter).
To go to an application in a group
You can go to any application in a group by moving the highlight in the System screen
onto the application name (or one of its open files) and pressing the Space key.
You could also re-assign an application button or assign an application button and the
Control key to the group icon on the System screen. (Re-assigning application buttons
is described earlier in this chapter.) This would only allow you to move to the group
icon, from another application, and you would then have to press Space to go into the
group.
For quicker access to an application in the group, assign a Control-application button
keypress to it. To do this: press Space to go into the group, and position the highlight to
the application's icon. Then select the button keypress with the 'Assign button' option,
in the usual way.
2 31
Removing icons from the System screen
You can, if you wish, remove any icon - application, list or group - from the System
screen. This only affects what is shown on the System screen. No files are deleted, and
no open files are exited.
You cannot remove all of the icons from the System screen - at least one must
always be present.
To remove an icon:
1. Move the highlight in the System screen below the icon. (If the icon is inside a group,
go into the group and highlight the icon.) Select the 'Remove' option on the 'Apps'
menu.
2. Press 'Y' to confirm that you wish to remove the application. The icon and any file
list are then deleted from the System screen.
Re-inserting an icon
You can re-insert an icon in any position on the System screen - in a group, if you wish.
There are two menu options for re-installing an icon:
• The 'Install standard' option on the 'Apps' menu is used to install any of the
standard applications supplied with your Series 3a.
• The 'Install' option on the 'Apps' menu is used to install duplicated icons, group
icons and any add-on application icons you may have bought.
To re-install an icon:
1. If you want to move the icon anywhere other than the first or last positions on the
screen, first' place the highlight in the desired position: the icon will be re-installed to
the left of the highlight.
2. Select 'Install standard' or 'Install', as appropriate, from the 'Apps' menu.
In the 'Install standard' option dialog, select the icon to install from the icons you
have deleted. ('RunImg' and 'RunOpl, described later, are also offered as icons
which can be installed, if they are not already shown in the System screen.)
In the 'Install' option dialog, set the 'Disk' line to the disk where the file is stored,
then select the name of the file to install from the list of those available. Groups have
filenames ending in .grp ; lists have filenames ending in .als ; application
filenames end in .app or .opa .
3. Select the position for the icon: 'Last', 'First' or 'Current'. The 'Current' position
refers to the position of the highlight on the System screen. Finally, press Enter.
Moving Icons
You might rearrange icons so that the ones you use less often are at the end of the row
of icons on the System screen. This makes the icons you use frequently more easily
accessible.
To move an icon you need to remove it, then re-install it in the position you choose.
Instructions on how to remove and re-install icons are given above. Do not forget to use
the correct option - 'Install' or 'Install standard' - for re-installing an icon.
The 'RunImg' icon and open files
If you use the 'Install standard' option on the System screen's 'Apps' menu, and install
the 'RunImg' application, it will list the names of open applications/files whose icons
have been removed from the System screen.
2 32
You can still switch to these open applications and files, by moving the highlight onto
the list of names below the RunImg icon, and pressing Enter.
RunImg also lists any IMG programs - a different kind of Series 3a program - which
it finds in a \IMG\ directory on any disk.
RunImg does not go away automatically. If you move the highlight onto an application
and press Delete to exit it. the RunImg icon remains, with the name "RunImg". You can
remove the RunImg icon in the same way as other icons.
You can press Control and the System button to move to the RunImg icon, whatever
you are doing on the Series 3a.
You cannot create a new list for the RunImg icon.
The 'RunOpl icon'
icon' and translated OPL modules
If you have successfully translated an OPL module, the RunOpl icon will automatically
be shown to the right of the Program icon. All translated OPL modules are shown
beneath it. If you delete them all, however, the icon remains in the System screen, with
the name 'RunOpl'.
You can press Control and the Calc button to move to the RunOpl icon.
You can remove the RunOpl icon in the same way as other icons. If you do remove
it, it will not reappear automatically. To see it you must re-install it with the
'Install standard' option on the 'Apps' menu.
See the Programming manual for more details.
Positioning to icons
Whichever application you are using on the Series 3a, if you hold down the Psion key
and press one of the application buttons the System screen is displayed, and it tries to
place the highlight on the file list below the relevant icon.
If, however, you have removed that icon, a message such as 'Calc is not installed' is
displayed on the System screen to remind you that you have removed that icon.
Application information
Use the 'About application' option on the 'Info' menu of the System screen while
selecting a file beneath an icon to see what kind of an application the icon represents.
2 33
Customising the System screen
Set preferences
The 'Set preferences' dialog controls three aspects of the System screen:
• Whenever an SSD is placed in a drive, or a file is deleted, copied or created, the file
lists on the System screen are updated to display the files that are currently available.
However, if you set the 'Update lists' line to 'System button', file lists will not be
updated until you press the System button.
• Initially, if you want to open a file from the System screen without exiting the
previously open file you must press Shift-Enter (instead of Enter). However, if you
set the Open multiple files' line to 'Enter', the Enter key opens multiple files as
well. This speeds up the opening of new files, as the Series 3a does not have to exit a
file before opening each new file. However, more internal memory is used up in
keeping more files open at once.
• If you change the 'Font' line from 'Swiss' to 'Roman', the file lists are displayed
using a serif font. (Serifs are the "tails" on the corners of letters.)
You can also use the 'Zoom in' and 'Zoom out' options on the 'Special' menu to change
the size of the font used for the file lists.
System-wide settings
Automatic switch off
To conserve power, your Series 3a is initially set to switch off automatically if you do
not use it for a five minute period. However, automatic switch off does not occur if the
Series 3a is busy - for example, printing a file.
You can change the automatic switch off time with the 'Auto switch off' option on the
'Control' menu:
• To disable the automatic switch off when the Series 3a is connected to external
power, set the 'Auto switch off line to 'If no external power'.
• To disable the automatic switch off all the time, set the 'Auto switch off' line to 'No'.
Warning: if you do disable the 'Auto switch off feature, the Series 3a will only
turn off when you press Psion-1. the OFF keypress. You should not in general
disable 'Auto switch off while using battery power - if you were to leave the
Series 3a on by mistake even once, or if an alarm turned the Series 3a on while you
were absent, it would stay on until the batteries failed. The Series 3a would then turn
off. and you would not be able to use it at all until you changed the batteries.
• To alter the switch off time interval, change the setting on the 'Switch off time' line
to the interval you require, within the range of 15 seconds to 18 hours.
Sound
Your Series 3a can make a variety of sounds, including alarms and key-clicks. The
initial settings are for all the sound options to be turned on. However, if you wish you
can change these settings to turn off some or all of the sounds.
Select the 'Sound' option on the 'Control' menu. You can make these changes:
2 34
• If you set the 'All sound' line to 'Off', this disables all sounds, including alarms and
key clicks.
• If you set 'Alarm sounds' to 'Off', alarms will still "go off' (ie appear on the
screen), but they will make no noise.
• You can set the 'Beep sounds' and 'Key click" lines to 'Loud', 'Off' or 'Quiet'.
Setting the '"Evaluate" format'
While editing Database or Agenda entries, or Word Processor or OPL Program files,
you can use the 'Evaluate' options on the 'Edit' menu to work out a calculation. With
the ' "Evaluate" format' option in the System screen you can set the format for results
from 'Evaluate' (and the trigonometric unit assumed in such calculations):
1. Select the '"Evaluate" format' option on the 'Control' menu.
2. Set the 'Format' line to the number format that you wish to use. If you select 'Fixed'
or 'Scientific' you will also need to specify the number of 'Decimal places' or
'Significant digits' respectively.
3. Set the 'Trigonometry units' line to the trigonometric unit that you wish to use. Press
Enter to complete the dialog.
See the Chapter on the Calculator for more information about "Evaluate", number
formats and trigonometric units.
Setting the 'Number formats'
The 'Number formats' option on the 'Control' menu produces a dialog with a 'Number
separators' line. If you press Tab on this line, a subdialog is shown which allows you to
change the decimal point character, should you so wish. You can set it to a full stop or a
comma. The Calculator will immediately take note of the change.
If you use a full stop as the decimal point character, use a comma between the
parameters of functions (in Calc and Sheet) or OPL procedures (in Calc). If you use
comma as the decimal point, use a semicolon in these situations.
Even when comma is the decimal point character, you should still use a full stop as
the decimal separator in OPL programs; commas are used to separate the
parameters of a function or a procedure. However, the decimal point would be a
comma in strings passed to VAL and EVAL, or returned by FIX$, GEN$ and SCI$. It would
also be a comma when entering numbers to a running program - for example in
response to INPUT- and in numbers displayed on the screen by the PRINT command.
The other settings in the 'Number formats' dialog - such as the currency symbol affect the Spreadsheet, and are described in the Spreadsheet chapter. They may also be
used by external applications which you add to your Series 3a.
Linking to another computer
You can link your Series 3a to another computer with the serial 3 Link lead. When you
have attached the lead to both computers, you need to run certain programs on each
computer before you can use the link: the 'Remote link' option on the 'Special' menu
runs the program on the Series 3a.
See the 3 Link manual, and the "Comms" appendix to this manual, for more
information about linking your Series 3a to another computer.
2 35
The "About Series 3a" screen
Use the 'About Series 3a' option on the 'Info' menu to redisplay the
introductory/copyright screen.
2 36
17
Troubleshooting
2 37
General problems
If the SERIES 3a won't turn on
Check the screen contrast with Psion-> and Psion-<.
If you continue using the Series 3a when the main batteries are low it will eventually
turn off and refuse to turn on again. You must then change the batteries before you can
use it again.
If the SERIES 3a won't "auto turn off"
Check the 'Auto turn off' option in the System screen.
If you use OPL, note that a running OPL program can prevent automatic turn off if it
neither pauses nor waits for a keypress.
Screen too dark, or insufficient contrast
Change the screen contrast with Psion-> and Psion-<.
Beeping
The Series 3a will beep if you try to type in too many characters in a particular place for example, when entering an agenda entry. It also beeps when unable to match letters
that you type against a list of filenames, or World cities and countries.
The volume of these beeps is controlled by the 'Sound' option in the System screen.
When the power of the main batteries gets too low for the Series 3a to play digital
sounds, alarms only produce short beeps.
Alarms not sounding
You may have turned the sound off permanently with the 'Sound' option on the System
screen's 'Control' menu. Use it again to turn the sound back on.
Open Agenda files always inform the Time application about their next alarm only. (It
is the Time application which actually rings the alarm.) When an Agenda alarm rings,
the open Agenda file then informs Time of the next alarm it contains, and so on. So if
you exit an Agenda file, the Time application will still ring the Agenda file's next
alarm, but will not be able to ring any others from that file until you open it again.
The Series 3a can only have 24 processes - open files and applications, for
example - at one time. While you are at this limit, the Series 3a will not be able to
play a sound file as an alarm, and will only beep instead. (If you are at this limit and
you try 'Test sound' in the 'Set alarm' dialog to play a sound file, you will see a 'Too
many processes' message.)
Flat batteries and "Auto switch off"
If you disable the 'Auto switch off' feature, the Series 3a will only turn off when
you press Psion-1, the OFF keypress. You should not in general disable 'Auto switch
off while using battery power - if you were to leave the Series 3a on by mistake even
once, or if an alarm turned the Series 3a on while you were absent, it would stay on
until the batteries failed. The Series 3a would then turn off, and you would not be able
to use it at all until you changed the batteries.
2 38
'Memory full', 'No system memory' or 'Disk full'
If you've almost filled up the internal memory with information on the Internal disk,
you may find yourself unable to enter more information. A 'Memory full', 'No system
memory' or 'Disk full' message will be shown.
• The Spreadsheet, Word Processor or Program editor need enough free memory to
make a separate copy of the file to work with, as they do not use the file directly.
• Internal memory is also used to keep each file or application open. The name of each
open file is shown in bold in the System screen. (You can open more than one file of
the same type by using Shift-Enter in the System screen.)
• Translating large OPL programs requires a certain amount of free memory.
Many of the things you do on the Series 3a need just a little free memory in order to
work - bringing up dialogs, menus. Help information, or the File Selector. These can
also fail with a message like 'Memory full'.
Don't worry if you fill up memory - your information is still safe. Here are some
ways to free more memory:
• Press the System button, move to a bold name at the top of a list, and press Delete.
This exits an open file. You can even exit the Calculator in the same way. You might
exit Calc and World for a while, or any Word files or programs that you are editing.
(You can use the System screen's 'Exit all applications' option to exit them all. if
you wish.)
• Use the Agenda's 'Compress' option on any agenda files on the internal disk. Then
use the Database's 'Compress' option on any databases on the internal disk. This
will reclaim any space taken up by deleted or edited information.
• Delete any unwanted files on the internal disk.
• Copy files to an SSD, then delete them from the internal disk.
• Sometimes you can free (temporarily) a certain amount of memory by moving to an
open Spreadsheet. Database, Agenda or Word Processor file, and using the 'Copy
text' option on as small an amount of information as possible. If you last used the
option on a large area of text, the copy on the clipboard is thrown away, freeing
some memory.
If you edit a large file, then open a small file, the Word Processor or Program editor
may under some circumstances still take up more internal memory than necessary for
the new file. Exit the file, then open it again.
The Spreadsheet and Word Processor can sometimes produce these messages
when their files approach their maximum size. See the notes under 'File size' in the
Spreadsheet and Word Processor chapters.
Checking internal memory
If you want to keep an eye on the amount of internal memory which is still free, press
the ♦ key in the System screen. You can then take early action to prevent the internal
memory filling up, to avoid it happening at an inconvenient time.
The ' Memory info' option from the 'Info' menu in the System screen also shows you
the amount of internal memory used and the amount free. If you press the ← and →
keys, more details are given of what is using up the memory - the internal disk, each
open Word Processor file, and so on. Memory is measured in K (short for kilobyte) 1K can hold just over a thousand characters.
2 39
The Calculator uses a few K of internal memory. If you exit the Calculator, by moving
the highlight onto it and pressing Delete, you can recover this memory. Of course, to
use the Calculator in the future, you would need a few K of memory to be free.
Time also uses a few K of memory, but you cannot exit it.
Everyday use
Problems with menus
You cannot use the Menu key to bring up a menu in these situations:
• While a dialog is being shown on the screen.
• While you are using Help on the screen.
• While setting a city's position in World.
• While full screen messages, such as alarms and disk error messages, are displayed.
Cut/Copy/Paste, and Delete/Undelete
If you've used commands like these in other personal computer software, note that the
Series 3a combines the 'delete' and 'cut' ideas:
• When you copy highlighted information with the 'Copy...' menu options (such as
'Copy text'), a copy of the information is made on a separate area, sometimes called
the clipboard. Any information previously on the clipboard is lost.
There is no highlighting in the Agenda; just move onto the entry you want to cut or
copy.
You can insert (paste) the information on the clipboard, as many times as you like,
with the 'Insert...' menu options. (This is usually called 'Insert text'; in the
Spreadsheet it is called 'Paste'.)
• When you delete highlighted information with the Delete key, it is deleted from the
document, but is also put on the clipboard. (This also happens if you delete part of a
line with Psion-Delete or Shift-Psion-Delete. If you just delete a single character
with the Delete key. however, the clipboard is not affected.)
So if you delete information by mistake, you can use the 'Insert...' option to put it
back (undelete it).
To delete highlighted information without replacing the clipboard, press
Shift-Delete. (You cannot do this in the Spreadsheet, though.)
Each open application has its own clipboard. You can copy information to a file of the
same kind by copying it, then using the 'Open file' option to open the second file. The
clipboard still contains what you copied, so you can insert it in the second file.
To copy information to a file of a different type, use the 'Bring' options.
2 40
'File or device in use'
You will see a 'File or device in use' message if you try to copy, rename or delete a
file shown in bold in the System screen's File lists. Exit it, by moving the highlight to
it and pressing the Delete key, then try again.
If an opened file is busy for some reason, you cannot exit it.
You cannot open a file if that file is already open (or otherwise in use). For example,
you might have two agendas called Agenda and Business , and use Shift-Enter on
the System screen to open both files at the same time. If, while looking at Business ,
you use the 'Open file' option and try to open Agenda , a 'File or device in use'
message is shown, as it is already open.
The same situation may occur if you use the file selector to open a different type of file.
For example, if you try to open an OPL program file in the Word Processor, this will
fail if the file is already opened under the Program editor.
You may also encounter this message if you have a link failure (eg from pulling out the
cable) while copying to REM::, and you then try to access the file which was being
copied. Turn 'Remote link' off in the System screen, and try again.
Problems with SSDs
Do not remove an SSD while information is being written to it, such as when using a
'Save as' or 'Copy file' option and choosing a file on the SSD drive. Information may
also be written when you exit a file, to look at a new file.
If you do remove an SSD while it is being written to. a message is shown asking you to
replace it. If the disk's volume name is backup , for example, the message is 'Please
replace volume "backup"'.
You must either reinsert the disk and select 'Retry', or just select 'Fail'. You cannot use
the Series 3a until you do so (although any alarms will still ring).
Important: If a file was being saved or written to in any way. and you select 'Fail', the
file will almost certainly be corrupted and become unusable. You should then delete the
file.
The 'Media is corrupt' message means that the Series 3a cannot read the structure of a
disk. You may see it when trying to access an unformatted SSD. If the SSD is
formatted, remove it, then re-insert it and try again. If you still can't get the Series 3a to
access it. there may be a hardware problem with the SSD. Contact Psion Technical
Support for information.
Three dots (...) in file lists
A file list can end with three dots (...), to signify that some files could not be shown.
Several things can cause this:
• It is possible to have more files for one icon than the System screen can handle.
They will not be shown in the file list unless you delete some of the other files. Try
creating a new list for this icon, and moving some of the files to this new list.
• Internal memory may have become filled by the generation of the file lists, causing
one or more lists to be incomplete. You need to free some internal memory, as
described above.
• An SSD door was opened while the lists were being updated.
To find out which of these caused '...' to be shown, try to move the highlight onto the
'...' itself. A message will be shown, explaining the reason for the incomplete list.
2 41
The built-in applications
Deleting the first entry in a database
When you have just found an entry, you can always delete it with the Delete key. The
main area of the 'Find' screen, where the entry is shown, has a highlighted border.
If, however, you have just moved to the 'Find' screen, the first entry is shown. The
one-line box at the bottom is highlighted, ready for you to type a search clue, The
Delete key will now delete characters you type, as when editing any kind of text on the
Series 3a
If you want to delete the first entry, use the 'Delete entry' option on the 'Edit' menu.
Alternatively, press Tab, and the main area of the screen will have the highlighted
border. The Delete key can then be used to delete the entry.
Losing entries in the Agenda
If a repeating entry has a fixed end date, and is set to show 'Next only', the entry will
vanish after its last occurrence. To make the entry reappear, temporarily set the date on
the Series 3a back to before the last occurrence.
If a 'Merge in' fails (through lack of disk space, for example), it is possible for the
Agenda to lose track of the number of to-do lists in the file. Create "new" lists, and any
missing lists will reappear.
Trig functions in the Calculator
Functions such as 'Sin' and 'Cos' can work with either degrees or radians. (360 degrees
equals 2*PI radians.) A 'Use radians'/'Use degrees' option on the 'Special' menu lets
you swap between the two. You can also use the 'Format' option on the same menu.
World times
The biggest problem with calculating world times is "daylight saving", or summer
times, where clocks are put forward, usually for the summer months. The dates these
are set on vary from country to country, and sometimes even within a country; some
countries do not use summer times at all.
The chapter on World describes summer times in detail. Countries around the world
tend to fall into three separate zones, each with their own behaviour for summer times,
and you can set summer times on and off at the appropriate time for these three zones.
However, if you're not concerned by some World times occasionally being wrong by an
hour, think of World as two hemispheres - Northern/European combined, and Southern.
When clocks go forward in your Home city, set your hemisphere 'On', and the other
'Off'. When clocks go back again, set your hemisphere 'Off, and the other 'On'.
'Module does not exist' in Calc
If you load an OPL module in the Calculator, it must be available for all future
calculations. If you delete it, or remove the SSD which contains it. a 'Module does not
exist' message will be shown on every future calculation. There are two ways to solve
the problem:
• Reinsert or recreate the translated OPL module.
• Exit then reopen the Calculator.
2 42
Problems while printing
Margins are not checked against any indents used by the various styles in a Word
Processor document. If you do set a style's indents so large that the paragraph will not
fit on the page, paragraphs with this style will not print correctly.
If small areas of text are unexpectedly printed in the wrong font, or in bold, underline
and so on, go to the top of the document, select the 'Emphasis Housekeeping' option
and its 'Find' suboption, and set it to find 'All' emphases. This will show the first
emphasis in the document. You can then skip through the document, from one emphasis
to the next, with the 'Find again' option, to hunt down any unwanted emphases.
If you use the 'General' printer driver, you can still set font attributes - bold, underline,
italic, superscript and subscript - both in the 'Default font' in an agenda or database,
and in styles in a Word Processor document. However, they will not appear on any
printout - only normal text will be used.
If a Word Processor document prints with blank lines between each line of text, this
may just be because each line in your document is a separate paragraph - that is, you
have pressed Enter after each line. Here are two ways to change the printout:
• Reformat the document, removing the line breaks inside each paragraph and letting
the paragraphs word-wrap. Although paragraphs word-wrap at the screen edge,
when you print them they will print all the way across the page, wrapping at the
right margin.
• Use the 'Spacing' option. Reduce the size of the 'Space below' setting (to 0, if every
line is double-spaced), and set the 'Alter' line to 'All using this style [BT]'
You might also do this if you type blank lines between paragraphs (by pressing Enter
twice). However, you will have no fine control over inter-paragraph spacing, and
blank lines may get printed at the tops of pages.
Password-protected files
If you have given a password to a Word Processor or Spreadsheet file, and then
forgotten it, that file is no longer available to you.
If it is the only Word Processor or Spreadsheet file (perhaps still called 'Word' or
'Sheet'), you need to create a new file, and use that instead. Position the highlight under
the Word or Sheet icon in the System screen, and use the 'New file' option on the 'File'
menu. Enter a different name for the new file.
However, you will still be unable to access the password-protected file, until you
remember the password.
2 43
Resetting the SERIES 3a
You should never need to reset your Series 3a. Even if an add-on application were to
crash, the Series 3a is designed in such a way that it could not interfere with other
applications, such as the built-in Database, Word Processor and so on. However, there
is always some way to crash any computer.
If you do need to reset, gently press something like an unfolded paper clip into the reset
hole (above the ON/Esc key). When you then turn the Series 3a on it will beep, show
the start-up screen again, and then the System screen. Your files on the internal disk will
almost always be safe. Any changes you had made to open Spreadsheet or Word
Processor files (or OPL programs) would, however, be lost This kind of reset is called
a soft reset.
However, it is possible (though unlikely) that a crash can cause the reset to lose the
information on the internal disk. It could even prevent the reset from working at all. If
this were to happen, you would have to perform a hard reset. To do this, hold down the
right-hand Shift key, and gently press a suitable object into the reset hole, as before.
Press ON/Esc to turn on, still holding down the right Shift key. This will reset the
Series 3a completely, and all information in internal memory, including the internal
disk, will be lost.
You may not need to press ON/Esc when resetting, as the Series 3a may turn itself on.
The 'About Series 3a' option on the 'Info' menu of the System screen displays the
introductory/copyright screen, together with the version number of the software in
your Series 3a.
Killing a running application
You can kill any application (except Time) from the System screen - move the
highlight onto the running application to kill, and select the 'Kill application' option on
the 'Apps' menu. Again, you should never need to do this. The application is terminated
with no chance to save any unsaved changes.
The Control-Shift-Psion-K keypress terminates the foreground process (the one
currently shown on screen) without warning. Control-Shift-Psion-K is an emergency
keypress. If you use it carelessly you will probably regret it.
2 44
A
Character set
2 45
The Series 3a contains many fonts, but all have the same basic character set. This is the
IBM Code Page 850 character set. Characters with decimal codes from 32 to 127 are
the same as ASCII characters. Those from 0 to 32 are special control codes.
These are the characters available on the Series 3a. For each character, first the decimal,
then the hexadecimal code is given. 32 is the space character.
32
36
40
44
48
52
56
60
64
68
72
76
80
84
88
92
96
100
104
108
112
116
120
124
128
132
136
140
144
148
152
156
160
164
168
2 46
20
24
28
2C
30
34
38
3C
40
44
48
4C
50
54
58
5C
60
64
68
6C
70
74
78
7C
80
84
88
8C
90
94
98
9C
A0
A4
A8
$
(
,
0
4
8
<
@
D
H
L
P
T
X
\
`
d
h
l
p
t
x
|
Ç
ä
ê
î
É
ö
ÿ
£
á
ñ
¿
33
37
41
45
49
53
57
61
65
69
73
77
81
85
89
93
97
101
105
109
113
117
121
125
129
133
137
141
145
149
153
157
161
165
169
21
35
29
2D
31
35
39
3D
41
45
49
4D
51
55
59
5D
61
65
69
6D
71
75
79
7D
81
85
89
8D
91
95
99
9D
A1
A5
A9
!
%
)
1
5
9
=
A
E
I
M
Q
U
Y
]
a
e
i
m
q
u
y
}
ü
å
ë
ì
æ
ò
Ö
Ø
í
Ñ
®
34
38
42
46
50
54
58
62
66
70
74
78
82
86
90
94
98
102
106
110
114
118
122
126
130
134
138
142
146
150
154
158
162
166
170
22
26
2A
2E
32
36
3A
3E
42
46
4A
4E
52
56
5A
5E
62
66
6A
6E
72
76
7A
7E
82
86
8A
8E
92
96
9A
9E
A2
A6
AA
"
&
*
.
2
6
:
>
B
F
J
N
R
V
Z
^
b
f
j
n
r
v
z
~
é
å
è
Ä
Æ
û
Ü
×
ó
ª
¬
35
39
43
47
51
55
59
63
67
71
75
79
83
87
91
95
99
103
107
111
115
119
123
127
131
135
139
143
147
151
155
159
163
167
171
23
27
2B
2F
33
37
3B
3F
43
47
4B
4F
53
57
5B
5F
63
67
6B
6F
73
77
7B
7F
83
87
8B
8F
93
97
9B
9F
A3
A7
AB
#
'
+
/
3
7
;
?
C
G
K
O
S
W
[
_
c
g
k
o
s
w
{
⌂
â
ç
ï
Å
ô
ù
ø
ƒ
ú
º
½
172
176
180
184
188
192
196
200
204
208
212
216
220
224
228
232
236
240
244
248
252
AC
B0
B4
B8
BC
C0
C4
C8
CC
D0
D4
D8
DC
E0
E4
E8
EC
F0
F4
F8
FC
¼
░
┤
©
╝
└
─
╚
╠
ð
È
Ï
▄
Ó
õ
Þ
ý
¶
°
³
173
177
181
185
189
193
197
201
205
209
213
217
221
225
229
233
237
241
245
249
253
AD
B1
B5
B9
BD
C1
C5
C9
CD
D1
D5
D9
DD
E1
E5
E9
ED
F1
F5
F9
FD
¡
▒
Á
╣
¢
┴
┼
╔
═
Ð
ı
┘
¦
ß
Õ
Ú
Ý
±
§
¨
²
174
178
182
186
190
194
198
202
206
210
214
218
222
226
230
234
238
242
246
250
254
AE
B2
B6
BA
BE
C2
C6
CA
CE
D2
D6
DA
DE
E2
E6
EA
EE
F2
F6
FA
FE
«
▓
Â
║
¥
┬
ã
╩
╬
Ê
Í
┌
Ì
Ô
µ
Û
¯
‗
÷
·
■
175
179
183
187
191
195
199
203
207
211
215
219
223
227
231
235
239
243
247
251
255
AF
B3
B7
BB
BF
C3
C7
CB
CF
D3
D7
DB
DF
E3
E7
EB
EF
F3
F7
FB
FF
»
│
À
╗
┐
├
Ã
╦
¤
Ë
Î
█
▀
Ò
þ
Ù
´
¾
¸
¹
Entering characters at the keyboard
Any of the characters in the character set can be entered directly from the keyboard:
• Look up the decimal code of the character you want in the preceding table.
• Hold down the Control key and type the 3-digit code, then release the Control key.
Make sure you add preceding zeros if necessary to make a code three digits long - for
example, use Control-096 to enter a left single quote, `
Accented characters
The Control key turns the number keys 1 to 6 into accent keys (Control-1 is a special
case - see overleaf):
"
umlaut/diaeresis 2
\
grave 3
/
acute 4
~
tilde 5
^
circumflex 6
The letters a, e, i, n, o. u. y (upper or lower case) can be accented, as appropriate.
To get the accent, hold down the Control key while you press the accent's number.
Then press the letter to be accented. It will appear on the screen with an accent.
Examples:
àtype:
Control-3 a
üControl-2 u
ñControl-5 n
2 47
To get the letters in upper case, either have Caps Lock on or hold down a Shift key
while you enter the letter.
Example:
Ñtype:
Control-5
Shift-n
Other characters
The following characters are also available:
Press Control-1
Result:
and then:
a, A
å, Å
c, C
ç, Ç
d, D
ð, Ð
e, E
æ, Æ
o,O
ø, Ø
t, T
Þ, þ
To get the upper case versions, have Caps Lock on. or hold down either Shift key.
Press Control-1
Result:
and then:
s
ß
l
«
r
»
q
¿
x
¡
p
£
All of these characters are part of the character set given above.
2 48
B
Specification
2 49
Dimensions:
Size: 165mm x 85mm x 22mm (6.5" x 3.3" x 0.9").
Weight: 275g including batteries.
Screen:
480x160 graphics screen, up to 80 characters by 25 lines.
High contrast, retardation film LCD.
Internal memory:
ROM: 1Mbyte containing multi-tasking, windowing operating system. Microsoft
MS-DOS Rash Filing System, and software applications.
RAM: 256k or 512k.
Solid State Disks:
Size: 63mm x 43mm x 6mm/2.5" x 1.75" x 0.2".
MS-DOS format for compatibility with desktop computers.
Rash SSDs require no battery backup: capacity up to 2 Mbytes (July 93).
RAM SSDs have their own Lithium battery; capacity up to 1 Mbyte (July 93).
2 drives giving up to 4 Mbytes storage (July 93).
Processor:
16 bit NEC V30H (80C86 compatible), 7.68 MHz.
Sound:
Loudspeaker, with DTMF auto-dialling and digital sound playback
Microphone for digital sound recording
Power:
2 x AA size Alkaline batteries, giving approximately 80 hrs use (without expansions)2-4 months of typical usage.
Standard Lithium backup battery protects RAM while main batteries are changed.
External AC adaptor optional (9-10v 150mA).
Keyboard:
58 key, QWERTY layout, computer-style keyboard.
8 touch-sensitive buttons for application selection.
Operating temperature:
0-50 degrees C.
Communications options:
Fast serial interface (1.536 Mbits/sec) accepts optional 3 Link interface to computers,
modems and printers.
• Optional serial 3 Link provides RS232 link to other computers, modems and serial
printers.
Provides XMODEM and YMODEM protocols, giving compatibility with most
computer communications software.
Full script language with sample scripts allows automated log-on to electronic mail
and other systems, and control of modems.
Additional software supplied provides a simple interface for exchanging information
with IBM PC compatibles and the Apple Macintosh, giving direct remote file access.
• Optional parallel 3 Link provides Centronics interface for parallel printers.
2 50
C
For Series 3 users
This appendix should give users of the Psion Series 3 a quick
guide to the main changes they will encounter when using the
Series 3a. It is by no means a complete list of changes.
2 51
General changes
Hardware and power
The Series 3a screen has 480x160 pixels (four times as many as on the Series 3), and
has a grey plane (ie displays black-grey-white). Its CPU runs at twice the speed of the
Series 3. Two versions are available, with 256k or 512k internal memory.
The speaker is larger and louder, and a microphone is built in. DTMF dialling should
work if you just hold the telephone mouthpiece over the Series 3a. Digital sound can be
played and recorded.
The application buttons can be used to turn the Series 3a on. The 'Program' button has
been replaced by a 'Sheet' button, for accessing the built-in Spreadsheet. You can still
select the Program editor from the System screen, or by pressing Control-Word.
The battery life should be similar to that of the Series 3. More accurate battery
monitoring is provided. If you wish, you can set the Series 3a to perform automatic
switch off only if no external power (mains) is detected.
The Series 3a can check the state of the battery in some kinds of Ram SSDs.
Resetting the Series 3a is slightly different. To perform a soft reset press something
suitable into the reset hole. When you then press ON/Esc you will hear the beeps.
Any unsaved changes in open applications will be lost. A hard reset is performed
in the same way as this, except you hold down the right Shift key while pressing the
reset hole and ON/Esc. This loses all information held in the internal memory.
Add-ons
Programs written in 'C' and OPL for the Series 3 run unchanged in compatibility mode.
Four pixels are set for each Series 3 pixel, "reducing" the screen size to the same
240x80.
If the program supports changing between different screens, this will be with the ♦
key, not with the application buttons. There are more details in the "Compatibility"
section of the Programming Manual.
The Series 3 Spellchecker and Thesaurus can be used, both on their own and from
inside the Word Processor.
Use only Series 3/Series 3a mains supplies. In particular, do not use power supplies
intended for use with the Psion MC range of computers. These are likely to damage
the Series 3a.
Existing 3 Link leads - serial and parallel - can be used with the Series 3a. New
'Comms' and 'Script' applications, supplied in the ROM of the Scries 3a, replace those
supplied on the 3 Link lead itself. Just install the applications from the 3 Link lead
as before; the Series 3a recognises the 3 Link applications, and automatically
installs the ones in the ROM instead.
The Series 3a can drive the serial 3 Link lead at 19200 Baud. See Appendix D for more
about 3 Link.
2 52
The built-in applications
Changes across the applications
There are two sizes of status window available from Control-Menu. They show far
more information, including Caps Lock, the presence of SSDs. whether the serial port
is in use, and "low battery" / "replace battery" symbols. (You can use the 'Status
window' option in the System screen to disable the display of any of these.)
The Series 3a uses the ♦ key to go between different screens in an application, while
the Series 3 uses application buttons. (On the Series 3a. application buttons switch
between open instances of the same application - eg between two open Word Processor
files.) The different screens are shown towards the top of the status window. There are
also ordinary menu options, with hot-keys, for moving to each screen.
Many hot-keys use both the Shift and Psion keys as part of their keypress.
Some changes have been made to menu options, hot-keys, dialogs and screen
messages, for the sake of standardisation across applications. For example, most
applications have a 'Set preferences' option, with hot-key Psion-Q.
Most applications also have 'Zoom in' / 'Zoom out' options, on the 'Special' menu, for
changing the size of the screen font.
Applications which can print have a 'Print preview' option on the 'Special' menu. Use
this to check the appearance of your printout before you print it
More help text is available in each application.
System screen
You can group applications together, to reduce the length of the list of icons: use
'Create new group', press the Spacebar to go into the group, and use 'Install' or 'Install
standard'. You can also make new file lists for applications, with 'Create new list".
Use the 'About application' option for information on a particular icon.
Incremental backup has been made easier, with the 'Backup files' and 'Restore files'
options.
You can change between a serif and sans-serif font for the file lists. Use 'Set
preferences', and set the 'Font' line.
A 'Usage monitor' option shows you the way you have used the Series 3a, including
the time it has been used on batteries, the average battery power and so on.
The 'RunImg' icon no longer appears if you remove the icon of an open application.
You must use install standard' if you want RunImg installed.
Database
Both the 'Change' and 'Update entry' options let you alter an existing entry. ('Update
entry' was kept for the benefit of Series 3 users.) If you use the 'Set up ♦ list' option
you can make the 'Change' screen available from the ♦ key.
There are new options to search on a particular label only, to search from the currently
found entry, and to jump to an entry by its position in the database.
2 53
Word Processor
An 'Exit, lose changes' option lets you exit without saving changes to file.
When you copy or delete highlighted areas when editing an outline, paragraphs
between those shown in Outline are also copied or deleted. 'Expand outline' and
'Collapse outline' options let you change the outline level by 1.
'Alter paragraph' has been replaced by separate 'Font', 'Indents', 'Tabs', 'Alignment'
and 'Spacing' options. Each of these has a new line in its dialog which lets you change
just the current paragraph(s), like 'Alter paragraph' on the Series 3, or all paragraphs
which use the same style. They thus provide a "back door" into using styles.
The 'Styles' and 'Emphases' options have each been broken in two, with a 'gallery'
option for changing settings, and a 'housekeeping' option for applying, deleting,
renaming and so on.
The settings in the Series 3 'Show as symbols' dialog are now part of 'Set preferences'
instead.
With the 'Create new list' option in the System screen, you can make as many separate
lists as you want for different kinds of documents. (The name of the default template
for each list is the same as the name of each list itself.)
You can use the Word Processor as a plain text editor, if you wish: use 'Create new list'
in the System screen, and leave the 'Type' line set to 'Text editor'.
Agenda
The Series 3a Agenda is a completely new application, with many new features
including dated to-dos, multiple to-do lists, anniversaries, memos on entries,
DTMF dialling, and a Year planner view. See the note on file compatibility at the end
of this chapter.
Time
Alarms can have a text message. You can enter an alarm just by typing the text or the
time you want. You can enter up to 6 alarms in the 'Time' application.
A 'View next alarms' option lets you see all of the alarms which the 'Time' application
has been informed of, which includes one per Agenda file which is open (or has been
opened). If 'Time' finds the corresponding Agenda file is no longer open, it gives you
the chance to delete the corresponding alarm.
Note that the hot-key for 'Disable alarm' has changed.
You can use recorded sounds as alarm sounds.
World
There are more cities in the World application - around 500.
The World screen shows the sunrise/sunset times of your Home city.
Note that the 'Defaults' option on the 'Dial' menu has become the 'Dialling' option in
the System screen.
Calculator
The Enter key always calculates the expression on the calculation line. To copy
something from the list into the calculation line use Psion-Enter (or select the 'Copy
from list' option).
2 54
The hot-keys for 'asin(x)', 'acos(x)' and 'asin(x)' have changed to Shift-Psion-S/C/T.
Program editor
The 'Program editor' includes an 'S3 translate' option, for producing translated
modules which can run on both Series 3 and Series 3a. Of course, you must only use
OPL keywords as supported on the Series 3 if you want to do this.
Spreadsheet
The Series 3a Spreadsheet is very similar to the Spreadsheet supplied on SSD for the
Series 3 (and built into some versions of the Series 3).
It has a 'Password' option, which lets you protect a worksheet with a password. (This
also encrypts it.)
An 'Exit, lose changes' option lets you exit without saving changes to file.
The 'Data' and 'Print' submenus have been replaced by separate menu options.
Sound recorder
A new application, 'Record', lets you record and play back sound and voice, and record
new alarm sounds. It is described in an earlier chapter.
Other software changes
More printer drivers are supplied in the Series 3a. If you have any Series 3 printer
drivers on disk, try your Series 3a without these files being available. If the Series 3a
already has a driver for your printer, you should use this and delete your old driver from
the disk.
The old 'Postscript' driver has been replaced by one which is identical to the 'Apple
LaserWriter' driver.
A new system of international dialling is supported. You can enter international
numbers by beginning them with a + , then the country code. Many business numbers
are written this way nowadays. You can enter the Swedish number 031-999999 , for
example, as +46-31-999999 , or +46-(0)31-999999 . (You can enter and dial
phone numbers in the Agenda as well as the Database.)
File compatibility
You can transfer files and disks from the Series 3 to the Series 3a, and (in general) back
again. Be sure to exit any open files before you do so.
The Series 3a Agenda converts Series 3 Agenda files. This is a one-way conversion you will not be able transfer the Agenda file back from the Series 3a to the Series 3.
Use the 'Open file' option to open your Series 3 file. A dialog asks you for the name to
use for the new converted file. Enter a new filename; the Agenda will not allow you to
overwrite an existing file.
The 256k model of the Series 3a has less free internal memory than the 256k Series 3
(mainly because of the increased screen size). If the internal disk of your 256k Series 3
was nearly full of files, you may not be able to transfer all of them onto the internal disk
of the Series 3a.
If you password-protect a Series 3a Spreadsheet file, you will not be able to open it on
the Series 3. You must remove the password before you can do so.
2 55
World files (which contain information on added/modified cities and countries) cannot
be exchanged between the Series 3 and Series 3a.
Script files (for the Comms application) translated on the Series 3a cannot be used on
the Series 3.
2 56
D
Serial 3 Link
The manual for serial 3 Link describes how it is used on a
Series 3. This appendix explains the differences you will see if
you use it on a Series 3a.
2 57
Remote Link
As on the Series 3, use the 'Remote link' option on the System screen to prepare to link
the drives on the Series 3a with those on an attached PC or Macintosh.
'Remote link' can run at 19,200 Baud on the Series 3a. If you can set the software on
the PC / Macintosh to run at 19,200 Baud, you can transfer files twice as fast as on a
Series 3.
The Comms application
A new 'Comms' application, supplied in the ROM of the Series 3a, replaces that
supplied on the 3 Link lead itself. Just install 'Comms' as if from the 3 Link lead;
the Series 3a recognises what is happening, and automatically installs the one in
the ROM instead.
The Comms application in the Series 3a is designed to make full use of the Series 3a
screen. Also, as it is running from the ROM instead of being loaded into memory, it
uses far less internal memory.
It is still possible to install the old applications from the 3 Link lead. To do so,
complete the 'Install' dialog by pressing Shift-Enter.
Comms and the SERIES 3a screen
Comms now has a 'Screen rows' option on the 'Screen' menu, to control how big the
underlying screen area should be - how many lines are remembered, for you to scroll
through with ↑↓. By default it is 25, but you can set it from 25 to 100.
A 'Border on/off' option, also on the 'Screen' menu, controls whether the border is
drawn around the outside of the screen. Without it, there is slightly more room for text.
The 'Zoom in' and 'Zoom out' options on the 'Special' menu change between four sizes
of display font. With the border off. these four fonts give 52x14, 60x20, 80x20 and
80x26 characters.
To see the 26th line with the 80x26 font, you must increase the 'Screen rows' setting.
Comms on the Series 3a supports status windows - press Control-Menu, as normal.
Serial communication
The 'Port' option supports a 19200 Baud setting.
The status window
If you see the Link indicator in the status window, but 'Remote link' is not on, chances
are you are still in 'Comms'.
If you remove the 'Comms' application while you are still using it, the Link indicator
stays on. You will have to get back to the 'Comms' application - perhaps by pressing
Shift-System - and exit it.
2 58
Opening and exiting Comms
You can now create new files for Comms by using the 'New file' option in the System
screen. As well as creating the translated script this also creates the script of the same
name, under the Script icon. (The 'Save settings' option in 'Comms' also does this.) It
will contain a SETUP command listing the settings in force when the file was created.
The Script application
Script, as before, just runs a variant of the Word Processor application. Install it as if
from the 3 Link lead, as with Comms; the Series 3a automatically installs the one
in the ROM instead.
Changes to the script language
There are five new parameters to the SETUP command:
• BORDER ON / BORDER OFF is like the 'Border on/off option.
• LINES [number] is like 'Screen rows', from 25-100.
• WRAP [number] is like 'Bring margin', from 1-80.
• FONT 0/1/2/3 is like 'Zoom in/out'-0 is smallest font, 3 is biggest.
• STATUS [number] sets the status window - 0 for none, 1 for small, 2 for large.
SETUP also supports a 19200 Baud setting.
A new script command, QUIT , exits Comms entirely.
New advanced script commands
• PORT "string" selects the port to use. If none is given then TTY:A will be
selected, PORT should be executed before any commands such as SETUP etc.
• LOAD "string" loads a device driver- an .LDD or .PDD, depending on the file
extension. (If no extension is provided .LDD will be assumed.) The siring you pass
should include a full path name.
On the Series 3, Comms opens the serial port (TTY.A) as soon as it starts and before it
runs any script commands. On the Series 3a it delays the initialisation of the port until
the first command is executed which uses the comms port, or until it goes online. This
allows you to use LOAD to load a device driver, and then use PORT to select a "port"
supplied by the device driver.
A device loaded in this way will be automatically unloaded when the Comms program
terminates. Only one device driver can be loaded during a single execution of Comms.
2 59
2 60
Index
!
& operator 137
* wildcard 217
... (System screen) 208,241
1-2-3
See Sheet
24 hour/am-pm 10
3 Link 252,257-260
'Remote link' option 235
←↑↓→ keys 11
♦ key 5
? wildcard 217
\ (root directory) 213
£ symbol
printing 185
A
'A' (SSD) drive 15
Accented characters 247
Accuracy of calculations 34
Address book
See Data
Agenda
alarms 67-68
anniversary entries 62
Anniversary view 62
'Anniversary view preferences' 63
anniversary defaults 79
appointments 60
as a "plain paper" Agenda 61
backup files 84
'Batteries too low to write to Flash' 84
'Battery too low' 84
bell symbols 68
'Bring entry' option 88,201
'Bring' option alternatives 203
'Bring text' option (editing) 88
calendar 81
'Change entry date' option 69,90
'Change entry details' option 70
'Change entry type' option 69
changing dates 82
changing repeat entries 73
changing to-do list 82
changing to-do sort order 65
changing view 59
clipboard 70
'Compress file' option 83
'Copy entry' option 70
'Copy text' option (editing) 88
copying entries 70
copying with 'Bring entry' 88,201
'Cross out entry' option 69
crossing out entries 69
crossing out to-dos 69
cutting entries 70
date range 63
day entry defaults 79
'Day entry defaults' suboption 61
Day view 58-59
Day view preferences 85
default settings 79
'Delete to-do list' option 66
deleting entries 60,70,78
deleting memos 72
♦ list 58
document management 89
duration bars 60,85
'Edit memo' option 70
'Edit' menu (editing) 88
editing entry details 70
editing entry text 69-70
entering anniversaries 62-63,65
entering appointments 60
entering to-dos 64
entry types 59
'Evaluate' option 88,204
'Examine repeat' option 89
example set-ups 87-88
'Exit'(memos) 71-72
'Exit' option 200
'Exit' option (memos) 70
'Exit, abandon changes'(memos) 71
files 83
'Find again' option 82
'Find' option 81
finding entries 81
'General preferences' suboption 61,80
'Go to next entry' option 82
'Go to previous entry' option 82
hidden entries 90
'Highlight all text' (memos) 72
'Insert entry' option 70
'Insert text 'option (editing) 88
inserting entries 70
'Jump to date' option 82
'Jump to list' option 82
List view 75
List view preferences 75
losing entries 242
low battery 84
memos 70
memos and printing 191
'Merge in' option 79
merging files 79
moving cursor 59,63,66,74-75,77
moving to today 59
'New entry' option 63,65
'New file' option 83
new files 83
'New to-do list 'option 66
new To-do lists 66
numbering to-dos 66
'Open file' option 84
opening files 84
overlap bars 60,85
'Password' option (memos) 71
"plain paper" Agenda 61,87
'Position to-do entry 'option 65
'Print' option 190
'Print preview' option 195
'Print setup' option 183,190
printing memos 191
public holidays 63
reclaiming disk space 83
'Reinstate entry' option 69
'Rename to-do list' option 66
'Repeat entry' option 72
repeating entries 72,90
'Save as' option 84
saving files 84
Series 3 Agenda files 84
'Set alarm for entry' option 67-68
'Set preferences' option
61,63,66,75,77,79,85
'Set style for entry' option 69
'Set year symbol for entry' option 76,90
slot compression 62,85
'Tidy/extract' option 78
time slots 62,85
timed appointments 60
to-do due dates 64
to-do entries 64
To-do list ordering 65
to-do list settings 64
'To-do list settings' option 65-67
to-do priorities 64
To-do view 64,89
'To-do view preferences' 66
to-dos, crossing out 69
to-dos, numbering 66
'View all repeats' option 73,89
Week view 74
'Week view preferences' 75
'Which symbols' option 77
workday alarms 68
workday repeals 72
'Wrap on/off' option 80
year symbols 63,76-77
Year view 76
Year view preferences 77
'Zoom in' option 80
'Zoom out' option 80
See also Printing
\AGN directory 213
.AGN extension 213
Alarms
acknowledging 41
changing 40
deleting/disabling/silencing 41
problems 238
ringing alarms 41
setting 39
snooze 41
sound on/off 235
See also Time
.ALS extension 213
am-pm/24 hour 10
\APP directory 213
.APP extension 213
Application programs 227
add-on applications 228
switching between 229
Arrow keys 11
Arrows
in dialogs 10,13
ASCII
See Character set
B
'B' SSD drive 15
Backup battery 2-3
changing 19
Backups 219,225
Batteries 3
changing 17
fitting 3
life 250
problems 238
rechargeable 18
'Replace backup battery' 19
'Replace main batteries' 17
'Batteries too low for digital audio' 174
Batteries too low to write to Flash' 211
Beeping 8,23,235,238
Bell symbol
in Time 41
Bold filenames
See Open files
Bold text
in Agenda/Data/Sheet 184
'Bring' options
alternatives 203
Buttons 5
reassigning 228
C
'C' drive 212
Calc
'1/x' option 29
= key 28
accuracy 34
averages 35
'Bad number' 34
'Change memories' option 32
clearing the list 30
'Copy from list' option 30
copying from the list 30,204
'Current working memory' 32
date and time 35
decimal places 34
degrees and radians 30,242
divide 28
errors 29
exiting 200
exponential (E) numbers 33
extensions 36
'Fixed' format 34
formal of results 34
'Format' option 34
'General' format 34
'Hexadecimal' format 34
'Invalid character' 33
list functions 35
list of calculations 30
'Load OPL' option 36
long integers 36
'M in/+/-/clear/recall' options 32
M0-M9 32
memories 32
memory names 32
menu options 29
'Module does not exist' 36
modulus 36
multiply 28
'New list' option 30
operators 28,31
OPL functions 35
OPL procedures 36
'Overflow' 34
percentages 33
pi 30
pocket calculators 31
precedence of operators 30
radians and degrees 30,242
results 28
saving results 32
Scientific format 34
Square root option 29
standard deviation 35
'Syntax error' 29
'Underflow' 34
variance 35
'x2' option 29
'Zoom in' option 28
'Zoom out' option 28
See also 'Evaluate'
Calc button 28
Calculations
in Agenda/Data/Word 204
Calculator
See Calc
Calendar 13,81
Caps Lock 6
Changing the batteries 17
Character set 184,246
Cities
See World
Clocks
in World 22
status window 16
Code Page 850
See Character set
Comms 257
See also 3 Link
Confidential information 223
Contrast 5,238
Control key 11
with buttons 228
Control-Calc keypress 233
Control-Menu key 16
Control-System keypress 233
Control-Tab keypress
in dialogs/file lists 217
Copying information 201
Copyright screen 4,236
Correcting text 11
Countries
See World
Currency symbol 147,235
D
\DAT directory 213
Data
'Add' screen 44-45
arrowhead 48
blank entries 47
blank lines 45
'Bring' option alternative 203
'Bring text' option 46,201
'Change' screen 51,56
changing database file 54
'Compress file' option 52
compressing 52
'Copy text' option 46,51
copying database files 54
copying entries 51
copying with 'Bring text' 201
data files 44
databases 44
'Delete entry' option 51,242
deleting entries 51-52
deleting first entry 242
♦ list 56
'Edit labels' option 52
editing lines 46
'Evaluate' option 46,204
'Exit' option 200
file types 54
files 53
'Find by label' option 49
'Find' screen 44,47
finding entries 44,47
'Hide labels' option 46,52
highlighting an area 46,51
"Home"/"Work"... 52
'Insert text' option 46,52
inserting extra lines 45
'Jump to entry' option 50
'Keep entries together' 192
'Label too long' 53
labels 52
labels for new files 53
length of entries 47,55
'Merge in' option 54
merging database files 54
new database files 53
'New file' option 53
'No more found' 48
'Not found' 48
as a notebook 52
'Nothing to save' 56
number of entries 48
numbers at bottom right 48
'Open file' option 54
and OPL 55
order of entries 44
phone numbers 46
phone symbol 52
plain text files 54
'Print' option 192
'Print preview' option 195
'Print setup' option 183
Psion-Shift-Help key 52
re-editing entries 51-52
'Save as' option 52,54
saving an entry 45
saving as text 54
scrolling 48
search backwards 49
search clue 46-47
Shift-←→↑↓ 46,51
Shift-Dial keypress 52
Shift-Enter key 45,49
'Show labels' option 52
size of entries 47
sorting entries 56
SSDs 52
'Start at current entry' option
Tab key 45,53
'Tabs' option 45
typing in entries 45
'Update entry' option 51
upper/lower case 47
wildcards 47
'Wrap on/off option 50
'Zoom in' option 50
'Zoom out' option 50
See also Dialling
See also Printing
Databases
See Data
Date
setting the date 9
.DBF extension 213
Decimal point character 147,235
Degrees and radians
See Calc, Sheet
Delete key 8,11,200
Deleting information 15
'Device does not exist'
when printing 189
Dial keypress 179
Dialling 175
in Agenda 179
area code 176
area codes (removing) 180
in Data 179
default country 176
defaults 176
'Delay time' 176
Dial keypress 179
dial out code 176,179
dial settings 176
dialling a number 179
extension numbers 178
free-form dialling 180
inside your country 176-177
international dialling 177,180
labels, in Data 178-179
national prefix 176
national prefix, unexpected 180
'Number is not valid' 179
'Pause time' 176
pause while dialling 176
problems 180
setting up 176
speed 176
square brackets 177
STD prefix 176
'Tone time' 176
work (dial out) 176,179
Dialogs 8
Diamond key 5
DIF files 129
Directories 213
automatic creation 214
in 'Copy file' 218
in dialogs 216
in filenames 213
parent directory 215
root directory 213
Series 3a directories 213
'Disk full' 15,239
in Sheet 143
in Word 98
Disks 205
See also Internal disk
See also SSDs
Drives
in filenames 216
Drives, in filenames 216
DTMF dialling
See Dialling
E
Editing text 11
End key 11
'End of file' 211
Enter key 8
Esc key 10
'Evaluate' option
format of result 96,235
Expansion socket 212
Extensions, in filenames 213
F
File attributes 219,224
'File deleted: cannot exit until
file is saved' 98
File extensions 213
'File or device in use' 99,241
File selector 214
in System screen 215
tagging files 215
wildcards 217
File specifications 216
Filenames 15,213
drive letters 216
extensions 213
Files
LOC:: and REM:: 216
under icons 209
in Agenda 83
ASCII files 125
backup 226
changing 54,99
in Data 53
explained 15
open files 209
opening 197
opening more than one 197,234
plain text files 54,125,203
protecting 221
Series 3 files 251
in Sheet 130
size (Sheet) 170
size (Word) 100
in Word 97,125
in World 209
Filing system 216
Flash SSDs 206
life 225
reclaiming space 211.218
warning on auto-saving 210
See also SSDs
Flat batteries 17,238
Fonts
size 184
when printing 184
Footers 185
Foreign characters 247-248
G
'General' printer driver 183
.GRP extension 213
H
Headers 185
Help key 12
Hexadecimal numbers 34
'Hidden' attribute 219
Home city 7,39,180
Home key 11
Hot-keys 10
I
Icons 5,228
default names 209
duplicating 229
groups 230
moving 232
re-inserting in System screen
removing from System screen
RunImg icon 232
RunOpl icon 233
MMG directory 213
Incremental backup 226
Internal disk 15
Internal memory 15,239
checking 198
Introductory screen 4,236
Italic text
in Agenda/Data/Sheet 184
K
K (kilobyte) 198,239
Keyboard 5
buttons 5
foreign characters 247
key clicks 235
markings 5
L
Latitude of a city 25
Linking to another computer
the 'Remote link' option 235
LOC;: in full filenames 216
Longitude of a city 25
Lotus
See Sheet
Low battery symbol 17
M
Mains adaptor 2,252
Map of the world 22
Margins
when printing 185
MC spreadsheet
compatibility 129
'Media is corrupt' 241
Memory
See Internal memory
'Memory full' 15,239
Memos (Agenda) 70
Menu key 7
Menus 7
problems 240
Microsoft Word
See Word
'Modified' attribute 219
'Module does not exist' 36,242
Moving information 201
MS-DOS directory structure 213
N
'No system memory' 15,101,170,239
Number formats 147
O
.ODB extension 213
Off 4,238
automatic off 2,234
On 4,6,238
On/Esc key 4
OPA extension 213
OPAs (OPL applications) 228
\OPD directory 213
Open files 197,209
moving between 199
opening more than one file 197
problems opening files 241
switching between 229
'Open multiple files' 199
OPL
editing 126
functions, in Calc 35
OPL applications 228
printing from OPL 196
See also the Programming Manual
\OPL directory 213
.OPL extension 213
OPL module 233
\OPO directory 213
.OPO extension 213
'Overflow' 100
Owner information 224
P
Padlock symbol 222
Page numbers 185-186
Page size (printing) 185
Parallel printing 182
Password 222
changing 223
clearing 223
problems 243
Path
See Directories
Percentages
See Calc
Pg Dn key 11
Pg Up key 11
Phone book
See Data
Phone symbol 178
in Data 52
when printing 192
.PIC extension 213
Plain text files 203
'Please replace volume' 200,210,241
Points (font size) 102,184
Pound symbol
printing 185
Printing 181
in Agenda 190
cancelling 196
character sets 184
in Data 192
'Device does not exist' 189
envelopes 108
font sizes 184
font styles (Sheet) 194
fonts 184
footers 185
headers 185
landscape/portrait 193
line spacing 187
margins 185
named ranges (Sheet) 194
OPL programs 196
other printers 183
outlines (Word) 189
page breaks (Data) 192
page breaks (Sheet) 193,195
page breaks (Word) 187
page layout 185
page numbers 186
page sizes 185
Parallel 182
phone symbol 192
portrait/landscape 185
preferred settings 189
previewing a print 188
printer drivers 183,255
problems 243
in Program editor 196
Serial 182
in Sheet 193
spacing 187
tabs 189
in Text editor 196
to file 182
types of printers 182-183
vertical printing 193
widows and orphans 186,192
in Word 187
Program editor
See the Programming Manual
Psion key 4
Psion-← key 11
Psion-↑ key 11
Psion-→ key 11
Psion-↓ key 11
Psion-Menu key 16
Psion-Shift-System key 229
R
Radians and degrees
See Calc, Sheet
Ram SSDs 206
checking the battery 212
life 206,225
See also SSDs
'Read-only' attribute 219,224
Rechargeable batteries 18
'Record'
'Adjust for alarm' option 173
'New file' option 172
'Open file' option 173
'Set preferences' option 173
'Set repeat' option 173
status window 172
REM:: in full filenames 216
'Replace backup battery' 19
'Replace main batteries' 17
Reset 244
Root directory 213
RunImg icon 232
RunOpl icon 233
S
Screen
cleaning 5
contrast 5
See also 'Zoom in/out' in applications
Script 259
See also 3 Link
Security 221
Separators 235
Serial printing 182
Series 3
compatibility 251
Sheet
# character 132,144
$ character 139
% operator 137
'\^" prefixes 144
* characters 146
* wildcard 158
'1st key' 149
? wildcard 158
\ character on graphs 152
~ wildcard 158
ABS function 165
absolute reference 139
ACOS function 164
'Alignment' option 144
alignment prefix 133,144
AND operator 137
annuity due 163
annuity investments 162
ASIN function 164
AT function 168
ATAN function 164
ATAN2 function 164
AVG function 169
'Axis' option (Graph) 154
axis titles (graphs) 152
backup 143
backup files 143
'Bargraph' display format 145
bottom right corner 136
'Bring' option 141,201
cash flows 162
cell contents 133
CELL function 166
cell selection indicator 135
CELLPOINTER function 166
'Change styles' option 194
CHAR function 168
CHOOSE function 165
circular reference indicator 141
'Clear' option 149
clearing cells 138
clearing selected information 149
clipboard 138
CODE function 168
COLS function 166
column headers 193
column widths 144
'Column widths' option 144
'Convert to SPR format' 129
'Copy' option 138
copying with 'Bring' 141,201
COS function 164
COUNT function 169
'Create .PIC file' option (Graph) 156
CTERM function 161
'Currency' display format 145-146
currency symbol 146
'Data delete' option 158
'Data extract' option 158
'Data find again' option 157
'Data find' option 157
data types 132
database criteria 157
database statistical functions 169
databases 156
'Date' display formal 145
DATE function 160
dates and times 160
DATEVALUE function 160
DAVG function 169
DAY function 160
DCOUNT function 169
DDB function 164
decimal places 145
decimal point character 146
default alignment 145
'Default' display format 145
degrees and radians 164
'Delete graph' option (Graph) 155
'Delete print range' option 194
deleting cells 133,138
depreciation 163
♦ key 150
DIF files 128
'Disk full' 143
display formats 145
DMAX function 169
DMIN function 169
DSTD function 169
DSUM function 169
DVAR function 169
'Edit print range' option 194
'Edit range' option 148
editing cells 133
editing strings 167
entering formulae 133
entering numbers as text 133
ERR function 165
error messages 138
EXACT function 167
'Exit' option 200
'Exit, lose changes' option 142
EXP function 164
exponential display format 145
extent 136
'Extract unique records only' 158
extracting from database 157
FALSE function 165
fields, database 156
files 130
files from other programs 128
financial functions 161
'Find again' option 147
FIND function 167
'Find' option 147
'Fixed' display format 145
font styles 146,194
fonts (in graphs) 154
'Format 'option 145
'Format' option (graph) 153
formats, clearing 170
formula display 145
formulae 133
formulae to values 149
'Function argument error' 138
functions in formulae 136
FV function 162
'General' display format 145
graph ranges 151
graphs 150
grid lines 193
grid lines (graphs) 146,155
'Hidden' display format 145,193
hiding cells 145
highlighting a range 135
highlighting rows and columns 135
HLOOKUP function 167
HOUR function 160
IF function 165
'Illegal character' error 132,138
INDEX function 166
insert cells 143
inserting blank cells 143
INT function 165
investments 161
IRR function 162
ISERR function 165
ISNA function 165
ISNUMBER function 168
ISSTRING function 168
IV8192 cell 136
'Jump to' option 148
'Jump to page' option 193,195
'Keep backup files' 143
'Keep undo buffer ' 142
Labels (in graphs) 152
LEFT function 167
Legends (in graphs) 151
LENGTH function 167
line graphs 153
LN function 165
loans 163
LOG function 165
logical functions 165
logs 164
lookup functions 167
Lotus 1-2-3 files 128-129
LOWER function 167
lump sum investments 161
macros (Lotus 1-2-3) 129
mathematical and logical functions 164
MAX function 169
memory saving 170
MID function 167
MIN function 169
MINUTE function 160
'Mismatched ( or)' 138
MOD function 165
MONTH function 160
N function 166
NA function 165
'Name range' option 148
named ranges, printing 194
Net present value 162
'New file' option 130
'New graph' option 155
new graphs 155
NOT operator 137
'Not saved, continue anyway?' 143
NOW function 161
NPV function 162
numbers allowed 146
numbers, entering 132
'Open file' option 142
'Open/close gap' option 143
operators 137
OR operator 137
other Spreadsheet programs 129
'Override protection' option 148
overwriting a cell 133
passwords 223
'Paste' option 138
'Paste special' option 150
pasting, destination range 139
'Percent' display format 145
percentages 137
PI function 164
.PIC files 129,156
pie charts 153
PMT function 163
'Print formulae as' 193
'Print' option 193
'Print preview 'option 195
print ranges 194
'Print setup' option 183
printing graphs 156
PROPER function 168
protection 148
protection indicator 148
'Protection' option 148
PV function 163
radians and degrees 164
RAND function 165
range functions 166
range names 147
range painting 135
range references 135
ranges 135
ranges, sorting 149
RATE function 162
re-editing cells 133
'Recalc' option 140
recalculation 140
recalculation indicator 140
records, database 156
relative reference 139
'Rename graph' option (Graph) 155
REPEAT function 168
repeat text (\ prefix) 144
REPLACE function 168
'Revert' option 142
RIGHT function 168
ROUND function 165
row headers 193
ROWS function 166
S function 166
'Save' option 142
scatter graphs 153
'Scientific' display format 145
screen, overview 132
searching 147
SECOND function 160
'Set criteria' option 157
'Set database' option 156
'Set preferences' option 140,160
'Set print range' option 194
'Show formulae' display format 145
'Show' option 146
SIN function 164
SLN function 163
'Sort' option 149
sorting 149
.SP! files 143
SPR files 128
SORT function 165
stack-bar graphs 153
standard deviation 169
statistical functions 169
statistical/database functions 169
status window 146
STD function 169
string concatenating 137
STRING function 168
string functions 167
strings 132
'Styles' option 146
SUM function 169
SYD function 164
'Syntax error' 138
tab, moving with 136
'Table 1' option 159
'Table 2' option 159
table recalculation 160
tabs in "Bring" 141
TAN function 164
TERM function 163
text, entering 132
'Time' display format 145
TIME function 161
TIMEVALUE function 161
titles 146
titles (graphs) 152
'Titles on' option 146
'Too complex' 138
transferring files 129
'Triad' display format 145-146
trigonometric functions 164
TRIM function 168
TRUE function 165
'Type mismatch' 138
Undo 142
'Undo' option 142
UPPER function 168
'Use graph 'option 155
VALUE function 168
VAR function 169
variance 169
'View Legends' option 151
VLOOKUP function 167
'What if?' 134
wildcards in criteria 158
WKS.WK1 files 128
'Worksheet too big' 170
worksheets 130
X-labels (graphs) 151
XY/Scatter graphs 153
YEAR function 160
'Zero values' 146
'Zoom in' option 132
'Zoom out' option 132
See also Printing
Sheet button 127
Shift-←→ 11
Shift-↑↓ 11
Shift-Delete key 11
Shift-Dial keypress 178
Shift-System key 229
Snooze (alarms) 41
Solid State Disks
See SSDs
Sound on/off 234
'Special' menu 230
Spellchecker/Thesaurus 252
V5 PR directory 213
.SPR extension 213
Square brackets
when dialling 177
SSDs
copying 218
and Data 53-55
formatting 207
naming 207
other computers 210
problems 241
problems with battery power 211
removing 210
SSD drives 15
volume names 207
and Word 98,100
write-protection 210,224
Subdirectories
See directories
'System' attribute 219
System password 222
System screen 4
'About application' option 233
'About Series 3a'option 236
'Apps' menu 229
'Assign button' option 228
'Auto switch off' option 234
automatic switch off 234
'Backup files' option 226
'Battery info' option 17
'Control' menu 234
'Copy disk' option 218
'Copy file' option 209
'Create new group' option 230
'Create new list' option 126,173,229
customise 227
'Default disk' option 219
'Delete file' option 99,209
'Dialling' option 176
♦ key 239
'Directory' option 215
'Disk info' option 212
'"Evaluate" format' option 96,235
'Exit all applications' option 200
'Exit application' option 200
'File attributes' option 219,224
file list order 199
file lists 199,208,234
font used 234
'Format disk' option 207,218
grouping icons 229
icons 228
'Install' option 228
'Install standard' option 232
'...is not installed' 233
'Kill application' option 98,244
'Make directory' option 214
'Memory info' option 198,239
memory information 239
moving icons 232
'Name disk' option 212
'New file' option 99,130,209
'Number formats' option 147,235
opening multiple files 199,234
owner information 224
'Password' option 222-223
'Printer' option 182,185
'Printer Setup' option 101
'Remote link' option 235,258
'Remove directory' option 214
'Remove' option 232
removing an icon 232
Rename file' option 99,209
'Restore files' option 218,226
RunImg icon 232
RunOpl icon 233
'Set owner' option 224
'Set preferences' option 199,208,234
Shift-Enter key 199,234
'Sound' option 41,234
'Status window' option 16
system-wide settings 234
updating File lists 234
'Usage monitor' option 18
'Zoom in' option 234
'Zoom out' option 234
T
Tab key
in Agenda 13
in Calc 30
in file selector 214,217
in Time 39
Tagging files 215
Text editor 126
printing 196
3 Link
backups 225
printing 182
Time
accuracy 9,38
bell symbol 40
'Delete alarm' option 41
'Disable alarm' option 41
'Enable alarm' option 41
formats 9
'Formats' option 22,38
'Home city' option 8,38
'No alarm pending' 40
'No alarm set' 39
screen 38
'Set alarm' option 39
setting the time 9
'Start of week' option 38
Status window 38
'Summer times' option 24,38
'Time and date' option 38
'View next alarms' option 40,68
'Workdays' option 39-40
X symbol 41
See also Alarms
Time button 37
Tone dialling
See Dialling
'Too many processes' 238
Troubleshooting 237
Turning off 4
Turning on 4,6
U
Underlined text
in Agenda/Data/Sheet 184
'Updating lists' 208,234
'User abandoned' 200
V
Volume names 200,207,210,241
W
\WDR directory 213
.WDR extension 213
Widows and orphans
in printing 186,192
Wildcards
in file selector 217
WKS, WK1 files 129
\WLD directory 213
.WLD extension 213
Word
adding up columns 104
alignment of paragraphs 105
'Alignment' option 105,107
ASCII files 125
auto-indentation (Text editor) 126
Body Text 93,112
bold paragraphs 102
bold text 97,116
'Bring text' option 110,115,201
BT style 93,112
bulleted lists 109
centimetres/inches 101
changing file 99
clipboard 94-95
'Collapse outline' option 122
columns, adding up 104
'Copy text' option 95,106
copying emphases 118
copying files 100,125
copying styles 110,115
copying text 95,106
copying with 'Bring text' 201
'Count' option 95
default template 124
deleting files 100
deleting text 94
'Disk full' 98
down-arrow symbol 93
emphases 116
'Emphasis gallery' option 117
'Emphasis housekeeping' option 116
envelopes 108
'Evaluate' option 95,204
example documents 106
examples 106
'Exit' option 97,200
'Exit, lose changes' option 97
'Expand outline' option 122
file size 100
file types 125
files 98,125
'Find again' option 115,118-119
'Find text' option 119
finding text 119
first line indent 93
font (of paragraph) 102
'Font' option 102
forced line breaks 93
headed paper 108
'Highlight all text' option 94
highlighting an area 94
hyphens 96
'In use'(styles) 115
inches/centimetres 101
indenting a paragraph 103,107,243
'Indents' option 107
'Inherited'(emphases) 116
'Inherited'(styles) 114
'Insert text' option 95
inserting addresses 106
italic paragraphs 102
italic text 97,116
joining paragraphs 94
'Jump to page' option 94,188
justification of paragraphs 105
'Keep together' 187
'Keep with next' 187
line breaks 96
lines and paragraphs 93,125
'Maximum number of characters
reached' 100
'Merge in' option 111,120
merging files 111,120
Microsoft Word files 126
movement keys 93
'New file' option 98,189
'Normal' emphasis 117
'Normal' file type 100
'Not enough space left to
save file' 98
'Open file' option 98-99
opening plain text 125
outlining 121
'Paginate' option 187
paragraphs and lines 93,125
'Password' option 223
passwords 223
plaintext 125
'Print' option 188
'Print preview' option 108,195
'Print setup' option 102,183
proportional text 102,126
'Replace' option 119
replacing text 119
'Revert' option 98
Rich Text Format (RTF) 126
RTF (Rich Text Format) 126
'Save as' option 100,125
'Save as Template' option 123
'Save' option 97
saving as plain text 125
serifs 101
'Set outline level' option 122
'Set preferences' option 96,112
settings for new files 99,124
Shift-←→ 94
Shift-Delete key 94
Shift-Enter key 93
shortcodes (styles/emphases) 97,112
'Show carriage returns' 93
show special characters 93
'Show style bar' 93
'Space above' 187
'Space below' 187
spaces 96
'Spacing' option 187
and Spellchecker 121
standard letters 107
standard paragraphs 111
'Start new page' 187
status window 99
style bar 112
'Style gallery' option 187
'Style houskeeping' option 113
styles 112
styles, applying 113
subscript text 97,116
summary outlines 121
superscript text 97,116
tables 104
tables, adding up columns 104
tabs 96,103
template files 107,110,123.126
and Thesaurus 121
underlined paragraphs 102
underlined text 97,116
'Use printer layout' option 104,188
'Use screen layout' option 104,188
wordcount 95
wrapping text 92,96
ZA. ZB... styles 112
'Zoom in' option 93
'Zoom out' option 93
See also Agenda document management
See also Printing
Worksheet files 130
World
'Add city' option 25
adding a city 25
adding a country 25
beeping 23
capital cities 23,25
changing city 23
clocks 22
country names 23
'Current country only' option 23
daylight saving 24
'Delete city' option 26
deleting information 26
♦ key 23
'Distance units' option 22
distances 25
exiting 239
extra information 26
files 26,209
files, changing 26
GMT offset 25-26
home city 23,26
longitude/latitude 25
map 22
'New file' option 26
'(only)' 23
'Open file' option 26
's' on world map 24
'Set home city' option 23
SSDs 26
Status window 22
summer times 24
sunrise and sunset 22,25
'Update city' option 24,26
'Update country' option 25
See also Dialling
World button 22
\WRD directory 213
.WRD extension 213
'Write failed' 211
Write-protecting files 219,224
Write-protecting SSDs 210,224
.WRT extension 213
\WVE directory 213
.WVE extension 213
NOTES
WARRANTY
Manufacturer's Warranty and
Limitation of Liability
To avoid any possible damage to your Psion products, they should not be
exposed to extremes of temperature or humidity. Do not subject them to
hard knocks or excessive force and do not immerse them in liquids or use
volatile fluids when cleaning.
If within 12 months of purchase this product can be shown to the
reasonable satisfaction of Psion to be faulty and not to function
substantially as described in the user manual, Psion will, at their
discretion, refund the purchase, repair, or replace the affected product.
Apart from this warranty, Psion will not in any event be liable for any
loss, including consequential loss, caused by any error, defect or failure
of the computer system hardware or software, or howsoever otherwise
arising, including but not limited to loss of use, loss of stored data, loss
of profit or loss of contracts.
This limitation of liability shall not apply to consumer transactions nor to
any liability for death or personal injury arising from the negligence of
Psion or its employees.
If you encounter difficulty using this Psion product, consult the manuals
supplied with it to verify you are using it correctly.
If after thoroughly checking the documentation the difficulty still persists,
return the affected item with proof of purchase to your dealer who will
send it for examination and repair or replacement as appropriate.
Alternatively, you may choose to return the affected item(s) directly to
Psion.
Please note that all items must be sent by Registered Post and proof of
purchase with dates must be enclosed. Packaging should be robust and
secure against damage in transit.
Be aware that any information stored in the product will be lost
during our test procedures.
Psion accepts no responsibility for loss or damage of equipment in
transit to us, nor will Psion be held responsible for any loss of data
held in any of the devices returned to us. It is the user's responsibility
to ensure that their data has been adequately backed-up prior to
shipment to Psion.
NOTES