1
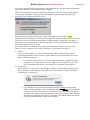
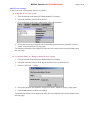
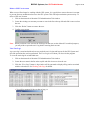
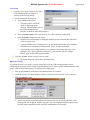
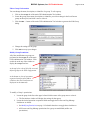
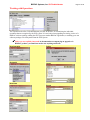
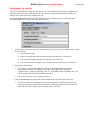
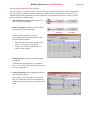
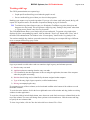
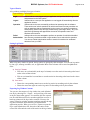
GLP Administrator AcqKnowledge GLP Introduction When AcqKnowledge is used with the GLP System installed, each user is assigned “permissions” for the program that indicate what operations that user is and is not allowed to perform within AcqKnowledge. In addition to the Permissions, the software keeps a continuous log of all software and hardware operations associated with a file, whether performed, canceled or failed. These GLP logs store the time, date, machine, and MP unit for each operation. Additionally, they can contain comments giving more detail about the reason for a change. These logs are stored along with a graph file and cannot be altered. The software monitors only actions that are executed within AcqKnowledge — it does not record personal information from other applications on the machine. To use a GLP System with AcqKnowledge, you must designate someone as the “Administrator” for the GLP system. This administrator will need to use the BIOPAC GLP Administrator application to maintain user accounts and configure the GLP System to match the standard operating procedures in use. 9 If you do not agree to be monitored by the GLP system, please contact your systems administrator. This document describes common administration tasks that will need to be performed to properly integrate the GLP System into a working laboratory environment. BIOPAC Systems, Inc. GLP Administrator Page 2 of 36 Terminology Term Definitions Administrator Person in charge of performing maintenance for the GLP system for creating and modifying users. Execute permission Used to allow or prevent a user from performing a specific operation. GLP Good Laboratory Practices. Regulations published by the Food and Drug Administration to govern the conduct of safety tests on regulated products (21 CFR part 11). The purpose of the regulations is to assure the quality and integrity of the data used by the government to arrive at sound regulatory decisions (i.e., to grant approval for marketing a new drug or pesticide). The regulations are process-oriented and address matters such as organization and personnel, facilities, equipment, facility operations, test and control articles, and study protocol and conduct. In all, the regulations contain 144 requirements that control the procedures and operations of toxicology laboratories. Source: http://www.glpguru.com/ GLP user account Identity of a user used when starting AcqKnowledge. The GLP user accounts specify what parts of AcqKnowledge are accessible to a user. While each GLP user account has a corresponding system user account, not every system user account may have a corresponding GLP user account. If a system user account does not match a GLP user account, that user will not be able to launch the AcqKnowledge application. Group Set of users that share the same permissions in the GLP system. Group Identifier See Identifier. GUI Graphical User Interface—the buttons, menu items, etc. available to users. Identifier Up to 32 characters, used to internally to distinguish multiple groups from each other; not visible to regular users. Log Listing of all of the operations a user has performed within AcqKnowledge. It contains both automatically generated information and optional user-specified information. Log entry Single operation, login, logout, or failed authorization item within a log. Log message User-specified phrase that can be associated with a log entry. Whether it is required from a user can be specified with the log permission. Log permission Used to determine whether a user can perform an operation directly or if the user must specify a brief description before performing the operation. This has no effect unless a user has execute permission for the associated operation. Modification Log Log of all operations performed on a graph (vs. user log). Operation Specific piece of functionality of the AcqKnowledge software. For example, performing an Integrate transformation. Permission Setting that allows portions of the AcqKnowledge software to be restricted. Short Name Login Thirty-two (32) characters or less, used to create the GLP account. SOP Standard Operating Procedure outlined by your laboratory. Systems Administrator Person in charge of performing maintenance for the computer system. User Person who is authorized to utilize the AcqKnowledge software with the GLP System. User account Identity of a user for the operating system. This is the user account that is used when logging into the machine (Mac OS X or Windows XP Professional). GLP Administrator will not launch without a qualified user account. GLP user names should only consist of alpha-numeric and space characters. User Interface See GUI. User Log Log of all operations performed by a user across all computers and graph files. This per-user audit trail is saved when you close/exit the program. BIOPAC Systems, Inc. GLP Administrator Page 3 of 36 Administrator Requirements Windows XP Professional Only By design, GLP Administration Tool users must log into Windows XP Professional with the unique username “Administrator” (not member of Administrators Group, but exactly “Administrator”). GLP user accounts must have non-blank passwords even though Windows XP Professional allows user accounts without passwords. If the GLP Administration Tool is started under another account, configuration changes will not be saved. This prompt will be generated and clicking OK will quit the GLP Administration Tool. The AcqKnowledge GLP user must be the same as the system user to have the ability to record logs into glp_user_log.xml file. For example, if a user logged into Windows XP Professional with account “A” starts AcqKnowledge GLP and registers into it as account “B,” GLP logs will be missed since system user A has no permissions to modify glp_user_log.xml file corresponded to user B. In the GLP Administrator program, all folders and files are: • writeable (full control) only by the “Administrator” privileged account • read-only by all other users • except for the glp_user_log.xml files, which are owned by the corresponding user and are modifiable only by that user. The Windows XP Professional default “Welcome” screen does not list “Administrator” as one of the accounts. For possible work-arounds, refer to your Windows User Manual, contact Microsoft, or review the following articles: • Access the Administrator Account from the Welcome Screen Submitted by Doug Knox, Tewksbury, Massachusetts; Published: November 12, 2001 http://www.microsoft.com/windowsxp/using/setup/learnmore/tips/knox1.mspx • How can I add the Administrators account to the Welcome Screen in Windows XP? By Daniel Petri http://www.petri.co.il/add_the_administrator's_account_to_the_welcome_screen_in_xp_pro.htm o Includes a downloadable tool by Doug Knox that can enable/disable the Administrator’s account in the Welcome Screen Domain Installations — For domain controlled installations, you must use a domain controlled machine to log on to Windows™ as Domain Controller “Administrator” (not Local “Administrator”). Without this specific login, you will not have authority to set permissions for domain users. Mac OS X Only The GLP Administrator can be used with any user account that has permissions to administer the computer. This permission can be found in the “Accounts” System Preference pane under the “Security” tab. It is recommended that you limit administrative access only to users that require administrative rights to install software, create users, or other administrative operating system tasks. If you do not have the required permission and need help creating a user account, contact your systems administrator or consult the manuals that came with the computer or operating system. The GLP Administration Tool uses the “Short Name Login” for the system user, as established under System Preferences > System >Accounts. BIOPAC Systems, Inc. GLP Administrator Page 4 of 36 Starting the GLP Administrator Application 1. Locate the BIOPAC GLP Administrator program and double-click to open. Use the desktop icon, or the Windows Start > Programs >AcqKnowledge 3.X path or browse to the AcqKnowledge 3.X Program Files/Applications folder. Mac OS X Only — Mac users will be prompted to authenticate privileges with a valid user name and password. Enter a name and password that correspond to a system user account that has administrative rights and click “OK.” Note that name and password are case sensitive. There will be a momentary pause before the main GLP Administration Tool launches. If you click “Cancel,” the application cannot be launched. A prompt will be generated and the program will exit when you click “OK.” 2. When the GLP Administrator first launches, the software will automatically: a. First, attempt to open the most recently viewed GLP settings from the last time the GLP Administrator was used. On first launch after an installation of the GLP Administrator, this step is skipped. See Recent Settings Persistency for details. b. Second, search the hard drive for valid GLP settings if no valid settings were opened in step A. The glp_config.xml file lives in the GLP Settings folder, which is located in the same place as AcqKnowledge. See Configuration for details. If prompted to choose a GLP Settings file, click “Choose other…” Mac: If you have difficulty finding this file, you can locate it in the Finder by choosing File > Find… and searching for glp_config.xml. Click “Open” to load the GLP configuration. If you Cancel, a prompt will be generated and OK will quit GLP Administrator. BIOPAC Systems, Inc. GLP Administrator Page 5 of 36 3. Navigate to the GLP Settings folder in the BIOPAC GLP Administrator folder in the AcqKnowledge 3.X program folder (in the Programs/Applications folder) and select glp_config.xml 4. The GLP Administration Tool should open with a dialog similar to the one shown below. About is under the BIOPAC GLP Administrator program menu on a Mac™ BIOPAC Systems, Inc. GLP Administrator Page 6 of 36 The Main GLP Administration Tool Window The main window of the GLP Administrator application contains a set of tabs and menus that allow you to examine and modify the GLP setup, logs, and permissions. The path to the settings that are currently being displayed, and potentially edited, is printed at the bottom of the main GLP Administration Tool window. GLP Administration Tool Tabs Users Groups Operations Log Analysis See page 10 See page 17 See page 20 See page 22 GLP Administration Tool Menus The three menus at the top of the main GLP Administration Tool window—File, Backup, and About—are available regardless of which tab is active. File Description Open… Switches to a different GLP configuration. This is useful if you have the GLP System for AcqKnowledge installed in multiple locations. Search Searches local drives for GLP Settings. See Configuration on page 5 for more information. Save Saves any changes made to the users, groups, or permissions. A prompt is generated for unknown users: Revert Discards any changes you have made to the users, groups, or operations and reloads the settings from the disk. Clear Deletes the contents of the user log files. Quit Exits the GLP Administrator application. Backup Description Backup Current Settings… Takes a snapshot of the current settings and stores them to a single file. See Using Backups on page 9 for more information. Restore from Backup File… Loads a backup file and makes the current settings correspond to that backup. See Using Backups on page 9 for more information. Windows XP Professional: Select About menu > About. Mac OS X: Use the “BIOPAC GLP Administrator > About BIOPAC GLP Administrator” path. BIOPAC Systems, Inc. GLP Administrator Page 7 of 36 Configuration The search and selection of GLP settings files is handled by a sequence of two windows. The first window the user will see is the progress window. While this window is displayed, the GLP Administrator will proceed to search the local hard drives of the computer for any glp_config.xml files. It may take several minutes to fully search all of the local hard drives, particularly for large hard drives with many files and folders. The search does not attempt to look on the network for settings files, only the local computer. The first line of the window changes to reflect the current location that is being searched. In general, the contents of the hard drive are searched according to the top-level folder structure of the hard drive listed in alphabetical order. This line is not as much of a progress indicator; it is intended to change frequently enough to reassure the user that there is still activity progressing. The second line will increment each time a new settings file is found. Once all of the hard drives have been exhaustively searched, this window will automatically disappear. The user can choose to interrupt the search at any time by clicking the “Stop” button. Once the search is complete or has been terminated, the user will see a list of all of the settings files that were found: This dialog contains a list of all of the GLP settings files that were located on the local hard drives. If the user interrupted the search, it will list all of the settings files located up until the time the user canceled. If no settings files were found, the list will be empty. If the user clicks the “Choose Other...” button, a file chooser will be opened allowing the user to manually locate the glp_config.xml file. Normally the automated search for GLP settings will occur only on the first installation of the software. After the first launch the persistent most recently used system should remember the appropriate location of the GLP settings. If desired, users can re-initiate a search for the GLP settings files. Mac OS X: the menu item “File > Search Local Drives for GLP Settings” triggers a new search. Recent Setting Persistency The location of the most recently used settings is stored in a properties file named “.glp_admin_mru”. The GLP Administrator automatically creates this file when the application exits. Users will never need to interact directly with this Properties file. • The most recently used settings are independent for each user account under which the GLP Administrator tool is used. • Mac OS X: this file is invisible to the user in the Finder, but can be accessed from the Terminal. BIOPAC Systems, Inc. GLP Administrator Page 8 of 36 Saving Configurations Use File > Save to save changes to the GLP configuration settings. If you choose another menu item before saving, you will be prompted to save. If you use File > Quit without saving, you will be prompted to save. If you select “No” from a save changes prompt (Confirm Save or Confirm Quit), you will be prompted to confirm that you want to revert to the previous configuration settings. BIOPAC Systems, Inc. GLP Administrator Page 9 of 36 Using Configuration Backups A configuration backup retains all of the information about users, permissions, groups, and operations that can be configured with the GLP Administrator application. It is a good idea to make periodic backups of the GLP settings. Keeping backups in a separate location can help you recover the GLP System easily in case of failure. To create a backup of the current configuration settings: 1. Select “Backup > Backup Current Settings…” from the GLP Administrator window. 2. Enter the filename and location where you want to save the backup file. The backup will contain any unsaved modifications you have made to the GLP configuration before creating the backup. If you want a backup to mirror the current settings on disk, choose “File > Revert” before creating your backup. To restore the settings contained within a backup: 1. Select “Backup > Restore from Backup File…” from the GLP Administrator window. 2. Locate the backup file (these files end in .gbf). 3. Click on “Open” to apply the settings from that backup file. Note that “restore” will overwrite any unsaved changes you have made to the GLP configuration before restoring the backup. If you want to save your changes before restoring, choose “File > Save” or create another backup. For added backup security: 1. Copy “.gbf” files created by the configuration backup in the GLP Administration Tool onto a CD. The caveat is that the “.gbf” files contain only the groups, operations, and specific user permissions themselves; they do not contain copies of the user logs. This method requires only a single file, rather than requiring users to copy a complete directory structure with all of its permissions. The only way to backup user logs is to copy all the “glp_user_log.xml” files with a separate utility. 2. Later, if something goes wrong, restore the configuration from a “.gbf” file on the CD. BIOPAC Systems, Inc. GLP Administrator Page 10 of 36 Working with Users You modify users on the Users tab in the main GLP window. Click on the Users tab to generate the interface for managing GLP user accounts. Add New Users 1. The first step to add a user is to create a computer user account to allow the user to log on to the computer. This account is also used to identify the user for the file system permissions to ensure security. The user accounts must be valid for the computer with the GLP Administration Tool installed. User names should only consist of alpha numeric and space characters. (Even if the OS allows user names with characters like ~, ^, etc., the GLP Administration Tool will fail if these characters are used for GLP user names.) If you do not have the required permission and need help creating a computer user account, contact your Systems Administrator or consult the guides for your computer and/or computer or operating system. 2. The second step to add a user is to create a GLP user account. To successfully create a GLP user account, you must first have created an operating system user account. If you attempt to create a GLP user account for a user that does not have an operating system user account, the software will warn you that the computer user account needs to be created. If you have do not have a valid user account, an error prompt will be generated. BIOPAC Systems, Inc. GLP Administrator Page 11 of 36 Creating GLP User Accounts A) Click on the “Users” tab in the main GLP Administration Tool window. B) Click the “New User…” button to generate the New User dialog: C) Enter a valid login name. Mac: Enter the Short Name Login Short Name Login of the user in the edit field next to “Login”. This short login name should be thirty-two (32) characters or less. D) Select a group name or “None” from the popup menu next to “Member of group”. A user’s group can be changed later. E) Click the “Create” button. The user will now appear in the list of known users in the upper left of the Users tab of the main GLP Administration Tool window. Modify a User’s Permissions Each user has a unique set of Execute and Log permissions that indicate what that user can perform with the AcqKnowledge software and when the user must enter extra information when performing operations. To modify a user’s permissions: 1. Click on the Users tab in the main GLP Administration Tool window. 2. Locate the User in the list in the upper left corner and click his/her name once. 3. The User’s current permissions will be displayed in the Permissions window: The permissions window displays a tree containing all of the operations that can have permissions associated with them. Operations are grouped together into folders based upon the area of the software they affect. For example, the “Data Removal” folder contains all of the operations that can delete data out of a graph file or a journal. The permissions for every operation within an Operation folder can be toggled at the same time by using the checkboxes next to the Operation folder. For example, if the Execute permission box is checked for the “Other” operation folder, the user gets the ability to execute every operation within that operation folder: BIOPAC Systems, Inc. GLP Administrator Page 12 of 36 If you have suppressed Log Messages for any of the operations, they will not be affected unless the log message checkbox for the operation folder is toggled. If the user is a member of a group, he/she will be allowed to execute all of the operations allowed for that group. In addition, if the group is able to perform an operation without entering a log message, the user will have that ability as well. Permissions that are inherited from a user’s group are displayed as entries with a yellow background. Group Permissions (with the yellow background) cannot be changed. This is because a user can never have less Permission than allowed to other members of the group—only more. To change the state of Permissions in a yellow background, you need to assign the user to a different group where that Permission is not set. To view the operations contained in one of these operation folders, click the arrow next to the folder to reveal its contents. For a full list of Operations, see Appendix A on page 30. a) Execute To give a user the ability to execute a certain operation within AcqKnowledge, click the corresponding checkbox in the “Execute” column. When the box is checked, the user will be able to perform the operation. o For example, to allow a user to overwrite existing information in a graph file during acquisitions, you would click the box to the right of “Overwriting Files” to give the user Execute permission for the “Overwriting Files” operation, as shown above. b) Log Message Notice that there is a check in the “Log Message” column too. This means that whenever the user executes the “Overwriting Files” operation, they will be required to enter a description each time they overwrite a file. o If you want the user to be able to execute the operation without providing further details, click the checkbox in the “Log Message” column to uncheck the Log Message permission. The user will be able to overwrite files. To the user, it will seem like the operation is proceeding as it would without the GLP System present, but the operation will still be logged by the GLP System. This allows for operations that are not critical to an SOP to be performed in a user-friendly manner. BIOPAC Systems, Inc. GLP Administrator Page 13 of 36 Duplicate User Settings If you are adding new users to a GLP System and want them to have settings identical to an existing user, you may find it useful to make a copy of the existing user account instead of configuring a new one from scratch. To duplicate a user account: 1. Click on the Users tab in the main GLP Administration Tool window. 2. Locate the existing user account you want to duplicate in the list at the top left and click it once to select the row. 3. Click the “Duplicate” button. This will create a new user at the bottom of the list with _copy_# added to the end of their name, where # is replaced with a digit. 4. Click once on the newly added copy account to select it. 5. Click the “Edit…” button. 6. Type in a valid user name. Mac: Use the short name login of the new user’s Mac OS X user account. 7. Click “OK” to confirm your changes. Note If multiple users share the same permissions, you may want to consider using groups to ease administration. Using groups will allow you to modify permissions for multiple users from a single location. If you use the Duplicate command, you will need to manually change the permissions for each individual user. Edit — Change a User’s Login Name If you change the short name login associated with a user account or add user accounts through the “Duplicate” command, you may need to change the login name to correspond to the new user account settings. To change the username for a GLP user account: 1. Click the Users tab in the main GLP Administration Tool window. 2. Locate the old username in the list at the top left and click it once to select the row. 3. Click the “Edit User…” button. 4. Enter a new valid user name. Mac: Enter the new short name login corresponding to the Mac OS X user account in the “Login” text field. 5. Click “OK” to confirm your changes. BIOPAC Systems, Inc. GLP Administrator Page 14 of 36 Add a User to a Group To add a user to an existing group, there are two options. A) Assign the user to a new group. 1. Click the Users tab in the main GLP Administration Tool window. 2. Locate the username in the list at the top left. 3. Click on the entry in the Group column to the right of the username. 4. Choose the new group to assign the user to from the popup menu that is generated, or choose “None” to not assign the user to any group. The Permissions display will be adjusted to reflect the new permissions the user has obtained from the new group. B) Use the full “Edit User” dialog to change the user’s group. 1. Click the Users tab in the main GLP Administration Tool window. 2. Locate the username in the list at the top left and click it once to select the user. 3. Click the “Edit User…” button. 4. Choose the group the user should be assigned to from the “Member of group” popup menu. 5. Click the OK button to confirm your changes. The permissions display will be adjusted to reflect the new permissions the user has obtained from the new group. BIOPAC Systems, Inc. GLP Administrator Page 15 of 36 Delete a GLP User Account When a user will no longer be working with the GLP system, it’s a good idea to remove that user’s account to prevent from any unauthorized access to the GLP system. This will help to maintain system security. To delete a GLP user account: 1. Click on the Users tab of the main GLP Administration Tool window. 2. Locate the existing user account you want to erase in the list at the top left and click it once to select the row. 3. Click the “Delete” button to remove the user. 4. Confirm your request. Note: When you delete a user account, the GLP logs for that user are also deleted. For archival purposes, you may wish to export the user’s log before removing their account. View User Logs A per-user log is associated with each user to tracks the user’s logins and logouts for the GLP System and all of the operations the user has performed. The User Log is saved when you close/exit the program. To view the entire log for an individual user: 1. Click on the Users tab of the main GLP Administration Tool window. 2. Locate the user name in the list at the top left and click it once to select the row. 3. Click the “View Logs” button. A log window will be generated to display all log entries associated with the selected user. See Working with Logs for details. You will be prompted if the user has no logs yet. BIOPAC Systems, Inc. GLP Administrator File menu Page 16 of 36 Close Close the log window. Export Export the log to a text file in comma separated format. Sort menu Sort log entries by date, type, message, machine, user, or application. To restrict the displayed entries to a specific range, you can use the query features on the “Log Analysis” tab of the main window (see page 21). Log File Maintenance There are two sets of logs. The one that tracks everything and is accessible from the administrator application may need to be cleared periodically. After extended periods of usage, the per-user audit trails can grow quite large and the performance of AcqKnowledge and the Log Analysis features of the GLP Administrator may become sluggish. • It is recommended that the per-user audit trails be cleared out periodically to maintain the system in a functional state. The logs can be cleared using the “File > Clear Logs” menu item. A second set of audit trails is stored in the system. • How often it may need to be cleared depends on how heavily the system is used. The way to determine if it needs to be cleared is if, when trying to view logs in the GLP Administrator, an "Out Of Memory Exception" warning is shown instead of the per-user log (essentially, the log is too large to fit in memory). • Users should perform this as maintenance once a year or so. • Clearing the logs is a workaround for reducing the log size. Note that clearing the per-user logs has no effect on the logs that are stored along with each graph file. BIOPAC Systems, Inc. GLP Administrator Page 17 of 36 Working with Groups Groups represent a set of users that have a common set of permissions within the GLP System and allow for ease of administration. When the Permissions are changed for a group, they are automatically changed for each user that is a member of the group. You can customize the permissions of groups to match categories of users of your SOP. Doing so can provide a quick way to ensure newly added users gain the proper permissions as required by your SOP. In addition, if your SOP changes you can quickly add or remove the necessary operations allowed for users by simply modifying the group settings. Default Groups When you first install the GLP System, a set of generic, predefined groups will be available. You can extend, remove, or modify the default groups to match your SOP. The default groups are intended to be generic and provide a quick way for a laboratory to establish the GLP System. Group Description Administrator Access to all areas of the software and will not be required to enter a log message when performing any operations. This group is intended to encompass system administrators configuring the GLP System, but it may be extended to include SOP developers who are constructing default graph templates for researchers. Researcher Access to all areas of the software with the exception of the GLP administrative functions (setting auto-logout timeout, toggling automatic backup after acquisition, and specifying the auto-configuration of the AcqKnowledge GUI based on user permissions). Researchers can also view the GLP modification logs in order to review changes made by others to the files. Researchers will be required to log all operations that modify or remove data. All other operations will be logged automatically, but the user will not be required to insert a specific message to accompany them. Technician Access to all areas of the software with the following exceptions: GLP administrative settings; removing data from a graph; overwriting data on an acquisition; modifying the hardware setup (with the exception of changing acquisition parameters—for example, adjusting latencies based on system load conditions). Technicians can also connect to different MPs, connect to different network adapters, and add new MPs in a multiple-unit system. Technicians will be required to log all operations that modify or add data (except typing into a journal), adjust hardware settings, or export data to the clipboard. Students Mostly limited to viewing data, although they will have the ability to export information to other applications. Students will be able to open graph files and templates, save graph files, modify the view of a graph file, and perform textual additions to a journal along with wave data and measurement export. Students will be required to comment copying information to the clipboard for data export or saving files. Guests Limited to viewing data only. Guests will be allowed to open data files and close them, but will not be allowed to print them or export them to other operations. Guests will not be required to enter log messages, as none of their operations will affect the data. BIOPAC Systems, Inc. GLP Administrator Page 18 of 36 New Group 1. Click the “New Group” button on the main GLP Administration Tool window to generate the New Group dialog. 2. Fill in descriptions for the group: a. Enter a Name for the group. This name will be used in the group list displayed on the “Groups” tab and in other areas of the GLP Administrator user interface. It should be short and descriptive. b. Enter a short Description of the types of users who will be members of this group. c. Enter an Identifier identifier for the group. Identifiers are used internally to distinguish multiple groups from each other and aren’t visible to regular users. A group identifier can be 32 characters or less and should contain only letters, numbers, and underscores. It should not contain periods, spaces, or other punctuation. A good method for choosing identifiers is to construct a short name with eight or less characters, like a short login name, and postfix _group onto the end. For example, labtech_group would make a good identifier. 3. Click the “Create” button to create your new group. By default, the group will not have any Permissions. Duplicate a Group If you want to create a new group, you may wish to base it off one of the existing groups to avoid configuring the permissions from scratch. Note that changes to one of these groups will not affect the other group—both are independent groups. To duplicate an existing group: 1. Click on the Groups tab of the main GLP Administration Tool window. 2. Locate the group you want to duplicate from the list in the top left and click it once to select it. 3. Click the Duplicate button. A new entry will be created and added to the bottom of the list. It will take the name of the source group with “Copy of” added to the front. You can rename the duplicated group using the Edit Group command from the main GLP Administration Tool window. BIOPAC Systems, Inc. GLP Administrator Page 19 of 36 Edit a Group’s Information You can change the name, description, or identifier of a group. To edit a group: 1. Click on the Groups tab of the main GLP Administration Tool window. 2. Locate the group whose name, description, or identifier you wish to change in the list of known groups at the top left, and click it once to select it. 3. Click the Edit … button of the main GLP Administration Tool window to generate the Edit Group dialog. 4. Change the settings for the group. 5. Click OK to accept your changes. Modify Group Permissions All of the modifications to groups are performed on the Groups tab of the main GLP Administration Tool window. Click on this tab at the top of the window to display the Groups interface: At the top left is a list of all of the currently defined groups in the GLP configuration. At the bottom is a list of operations organized into Operation folders (similar to how the Permissions are displayed on the Users tab). To modify a Group’s permissions: 1. Locate the group in the list at the upper left and click the name of the group once to select it. The Permissions window will display the settings for that group. 2. Locate the desired operation or operation folder and toggle the Execute and Log Message checkboxes as desired. See Modifying Permissions on page 11 for details about how to toggle these checkboxes. All Execute and Log Message permissions for a group are modifiable (unlike user permissions). BIOPAC Systems, Inc. GLP Administrator Page 20 of 36 Delete a Group If a group no longer has any users associated with it or is no longer used, you may want to delete that group. You should not delete a group that still has users assigned to it. After you delete a group, you may want to run through all users to make sure that each user is still a member of a valid group. To delete a group: 1. Click on the Groups tab of the main GLP Administration Tool window. 2. Locate the group you want to delete from the list in the top left and click it once to select it. 3. Click the Delete button. 4. Confirm your request. BIOPAC Systems, Inc. GLP Administrator Page 21 of 36 Working with Operations The Operations tab of the GLP Administrator provides an interface for customizing the individual operations that are recognized by the GLP system. It is used only when upgrading an existing version of a BIOPAC software package, adding the GLP System to another BIOPAC application, or enabling your own software package to be incorporated into the GLP System. 9 Unless you are explicitly instructed in documentation accompanying an upgrade of a BIOPAC product, you should not need to use anything on this tab. New Operation Reclassify New Class Edit Delete Import Export BIOPAC Systems, Inc. GLP Administrator Page 22 of 36 Performing Log Analysis You can view individual user logs from the Users tab, or you can search across the logs of multiple users. Unlike the AcqKnowledge modification log, the log entries for a single document being worked on by multiple users will be split across multiple user logs. Use the Log Analysis tab of the main GLP Administration Tool window to specify criteria and search through the logs of all users and extract only specific entries. 1. Activate the desired search criteria by checking the box next it; you can use multiple search criteria at the same time. a) A specified date range. b) Entries from applications whose names contain an explicit piece of search text. c) User entered messages containing an explicit piece of search text. d) Log entries created on computers whose names contain an explicit piece of search text. 2. Specify the search criteria. Type in the text field for the application, message, and machine name search criteria. For example, to search for log entries from all users from applications containing “AcqKnowledge”, messages containing “SOP 12”, and machine names containing “Lab”, the search criteria would look like the dialog shown above. Specify the date range (see next page for details). 3. Click on Execute Query to perform the search through all user logs and display the results. The GLP System does maintain the per-user logs persistently on disk, but it does not keep records of search queries performed with the GLP Administrator application. If you need to archive the results of a search, you must export them to a text file. BIOPAC Systems, Inc. GLP Administrator Page 23 of 36 Specifying Date Range Search Criteria You can restrict Log Analysis results to a specific date range, as specified at the top of the Log Analysis tab. The date range line contains two buttons showing the range of dates to search between, inclusively. The start and end dates are both initially set to the current date. You perform the same series of steps to set the start and end dates of the date range. 1. Activate the date criteria by checking the box next to the date range buttons. 2. Click a date button to generate the calendar for the start or end of the search range. Start date At the top of this calendar is a textual representation of the date that reflects the date selected from the calendar. This date will be used in the search criteria when you click on the “OK” button. Today’s date is always indicated as a red number in the calendar. 3. Change the date by clicking its number within the calendar. The date at the top will change. For example, if the “3” was clicked, the newly chosen date would be Friday, September 3rd. 4. Change the month using the popup menu directly above the day headings. For example, to enter December 5, 2004 as the date, you would choose the new month from the list that is generated when you click on the month menu. End date BIOPAC Systems, Inc. GLP Administrator The selected date will be moved to that month. This change will be reflected in the date printed above the calendar. In this example, the date was changed to December 5, 2004. 5. Change the year by clicking in the year text field and typing in the desired year. You must use four digits to designate the year. If you type “01” in this field, you will be flipped to the year 1 AD. The layout of the days in the calendar will change to reflect the year entered. In this example, “2001” was entered. Notice that the chosen date has changed to the new year and “December 3rd, 2001” is printed above the calendar. 6. To complete this example and, click on the “5” button in the Wednesday column to move to the 5th. 7. Click the OK button when the date printed above the calendar shows the desired date. In this example, the date range for the search criteria will start on December 5, 2001 and end on February 26, 2002. Page 24 of 36 BIOPAC Systems, Inc. GLP Administrator Page 25 of 36 Working with Logs The GLP System maintains two separate logs: Graph-specific audit trail log (saved when the graph is saved). Per-user audit trail log (saved when you close/exit the program). Both log types capture every keystroke/operation. If you type a five letter word in the journal, the log will capture five keystroke entries. See the table of operations starting on page 30 for details. TIP To minimize log clutter from text entry, use Wordpad or TextEditor to type the desired text and then paste it to the journal. This will generate a single log entry “Pasting in the journal” rather than a “Typing text to journal” entry for every keystroke. The GLP Administrator allows you to analyze the per-user audit trails. To generate a log window that displays all of the corresponding log entries, click on either the “View Logs” button in the “Users” tab of the main GLP Administration Tool window or the “Execute Query” button on the “Log Analysis” tab. You can have multiple log windows open at the same time, allowing you to compare full logs of different users or compare different log query results. Logs are presented as a table where each row contains a single log entry and columns represent: a) Date the entry was made b) Application that was running when the entry was made c) User identified by the short login name of the user using the application, the name of the computer where the program was running d) Machine that is being used, as identified by the name assigned to that computer e) Type of the entry (login, logout, operation, or failed authorization). f) Message accompanying the entry. If you cannot see any of these columns, use the horizontal scrollbar at the bottom of the window to reveal the hidden columns. To resize the entire window, click in the lower right hand corner of the window and drag, similar to resizing windows in other applications. To resize the width of an individual column, move the mouse to the line between two columns labels (at the top of the column). The cursor will change from a pointer to a horizontal arrow. Click the mouse and drag to specify the new column width. To close a log window, click its Close box in the title bar or choose File > Close. BIOPAC Systems, Inc. GLP Administrator Page 26 of 36 Types of Entries A log window can display four types of entries: Type of Entry Description Login Indicates when a user began using an application and provided his/her login name and password to the GLP system. Logout Indicates when a user quit the application or was logged off automatically after the application timeout. Operation Indicates when the user successfully performed an operation with the software. These entries can include operations for which users have Execute permission as well as operations that were authorized by other users. Log entries for operations authorized by another user will begin “Authorized by (short login name)”. Any userspecified Log Message will appear after the end of the operation name and hardware serial number. Failed Authorization Indicates when the user attempted to perform an operation for which he/she didn’t have Execute permission and did not get another user to authorize the operation. You can use Failed Authorization entries to search for intentional or accidental deviations from your SOP. Sorting Log Entries When a log entry window is opened, the log entries are grouped by their username. You can sort log entries by date, type, message, machine, user, or application. Most of the columns will be sorted in alphabetical order. A) Sort by Columns Click once on a column label (at the top of columns) to sort the entries in increasing order based on the values of that column. Click on a column label a second time to sort the entries in decreasing order based on the values of that column. B) Sort menu Choose the corresponding menu item to sort the log entries in ascending order by that column. Choose the menu item again to sort the log entries in descending order by that column. Exporting Log Window Contents You can save the contents of a log window into a tab delimited text file by choosing File > Export… and specifying a file name in the file chooser that appears. You can then open the exported text file with Microsoft Excel or another application to create a hardcopy printout of the log window contents. You may also want to export log window contents to perform searches through log entries with more detail than the GLP Administrator application provides. When you use File > Export to export the log to a tab-delimited text file; the order of the entries in the created file will match the order of the entries in the log window. BIOPAC Systems, Inc. GLP Administrator Page 27 of 36 Configuring AcqKnowledge In addition to the User Permissions and Log Analysis features that are controlled with the GLP Administrator application, there are three AcqKnowledge-specific settings that can be useful in a GLP environment. All of the operations for changing these settings are located in the “Administrative Functions” operation folder in the GLP Administrator permissions areas. Only users with sufficient privileges on their GLP user account can modify the AcqKnowledge-specific settings. Members of the default “Administrators” group will have the execute permission to change all of these settings. These three settings are located in the AcqKnowledge Preferences dialog accessed through Display > Preferences: Create data snaphots after acquisitions AcqKnowledge can be configured to automatically take a snapshot of the data within a graph file immediately as an acquisition is completed either normally or through using the Stop button. These snapshots are retained within the graph file. When an acquisition finishes, the contents of the graph contain the original data as read in from the hardware unit. By allowing AcqKnowledge to automatically create snapshots at the end of acquisitions, the program facilitates retention of original data in a format that cannot be changed by any user. Additionally, the original data will be automatically kept with the graph file as it is moved to different media or renamed. To enable the snapshot function, locate the “Other options” box of the Display > Preferences > General dialog from AcqKnowledge and check “Create data snaphots after acquisitions.” This setting will apply to all users of the software. IMPORTANT: To satisfy GLP record retention requirements, in addition to using this automatic snapshot, you should retain physical media with the original graph file saved to disk immediately after an acquisition. BIOPAC Systems, Inc. GLP Administrator Page 28 of 36 Auto-logout When used with a GLP System, AcqKnowledge will automatically log users out after a specified period of inactivity. This period is specified in minutes in the “GLP Settings” box of the Display > Preferences dialog. Specify this period in the Display > Preferences dialog “Inactivity” means a period of time in which the user has not used either the mouse or the keyboard for the AcqKnowledge application. The software maintains a timer that is reset whenever the mouse or keyboard is used. Note: The timer is only reset when a mouse button or a keyboard key is pressed; mouse motion alone will not reset the timer. If the timer reaches the timeout specified in Display > Preferences > GLP Options > Auto-logout after “X” minutes, the user will be required to re-enter his/her login and password to continue using the AcqKnowledge software. The user will be prompted to re-login the next time he/she attempts to use the keyboard or the mouse. This means that auto-logout will not affect the completion of any long running acquisitions or transformations that are in progress at the time the user is automatically logged out due to inactivity. If a dialog is open, expiration of the auto-logout timer will not require reauthorization until after the displayed dialog is closed. Configure user interface by permissions Users may not have access to all areas of the AcqKnowledge software based on their permissions as assigned with the GLP Administrator application. AcqKnowledge offers a way to allow the GUI to restrict itself to only show the operations a user will successfully be able to perform. When “Configure user interface by permissions” is checked in the Display > Preferences dialog, menu items and buttons that correspond to operations a user does not have permission to perform will be removed from the GUI. For example, if a user doesn’t have permission to perform the “Integrate” transformation and the Configure option is active, the “Integrate” command will be removed from the Transform menu display. Some menu items may correspond to multiple operations. These menu items will not be removed from the GUI, regardless of the user’s permissions. An example of this is the Edit > Clear All menu item. This item corresponds to two distinct operations, clearing wave data in a graph window and removing the text of a journal. Because the menu item corresponds to multiple operations, it will not be removed automatically from the GUI. By using the “Configure user interface by permissions” option, you can simplify the application for your users and prevent them from encountering many Failed Authentication permission dialogs. This works best in an environment where reauthorization of operations by other users occurs infrequently. Users will not be able to access operations for which they do not have Execute Permission. By not using this option, the user interface will contain all of the controls and menu items that a user with permission to perform every operation would see. When a user attempts to perform an operation for which they do not have Execute Permission, the reauthorization dialog will be generated. If there is no authenticating user, a failed authorization entry will be made in the GLP user logs and AcqKnowledge will not perform the operation. Setting “Configure user interface by permissions” off is useful in environments where users may need to perform operations not allowed by their permissions. BIOPAC Systems, Inc. GLP Administrator Page 29 of 36 Applicability of menu.dsc Configurations Previous versions of AcqKnowledge have included a menu configuration file to remove menu items. The text file was named menu.dsc and was installed in the same directory as the AcqKnowledge application. If a menu.dsc file is present on your computer, it will override any user’s execute permissions corresponding to that menu item. Which is to say, menu entries that the configuration file specifies should be removed will be removed from the GUI regardless of the user’s execute permissions. To prevent access to software functionality, you are encouraged to configure AcqKnowledge’s user interface through the “Configure user interface by permissions” setting in combination with appropriate user permissions; using menu.dsc files is not a secure solution. BIOPAC Systems, Inc. GLP Administrator Page 30 of 36 Appendix A — Operations Æ Operations for AcqKnowledge GLP for Mac OS X are on page 33. Operations for AcqKnowledge GLP under Windows XP Professional — see table below. Use the table to indicate user permissions for your Administrator to establish: E Execute (allow) Data Addition Data Modification L Require Log Message AcqKnowledge GLP for Windows XP Professional E L Insert Marker Acquire New Data Insert Measurements into Graph Acquisition Settings Summary to Journal Insert Waveform Add Measurements to Journal Marker Summary Add Wave Data to Journal New Data File or File Create New Data Snapshot New Histogram Graph Create a Calculation Preset New Offline Averaging Graph Duplicate Waveform Open Histogram Options Panel FFT Power Spectral Density Filter Responses Rate Find Marker Rate Transformation Gastric Wave Analysis Selecting Measurements Gastric Wave Coupling Stop Acquiring Go To Marker Time and Date Stamps Heart Rate Variability Typing Text into Journal IFFT Integral Absolute Value Integration Adaptive Filter Inverse Mean Square Error Arc Tangent Limit Base 10 Log Mean Square Error Change Displayed Measurement Modify Channel Labels Change Marker Location Modify Channel Units Connect Endpoints Modify Horizontal Axis - Precision Convolution Copy Wave Data Modify Horizontal Axis - Time, Frequency, Arbitrary or Offset Correlation Modify Vertical Axis - Precision Coupled WFLC Natural Log Derivative Noise Difference Organize Channel Presets Edit Marker Label Paste Waveform Equation Generator Pasting Clipboard Data Into The Expression Journal Exponential Rename Presets, Standard and FIR Bandpass Filter Custom FIR Bandstop Filter Resample Graph FIR Filters Resample Waveform FIR Highpass Filter Sine FIR Lowpass Filter Smoothing FLC Square Root Function Template Function IIR Bandpass Filter Threshold IIR Bandstop Comb Filter Undo IIR Bandstop Filter Wave Math IIR Filters Wavelet Decomposition IIR Highpass Filter Wavelet Recomposition IIR Low + Highpass Filter WFLC IIR Lowpass Filter E L BIOPAC Systems, Inc. GLP Administrator Data Removal Data Export File, Journal Hardware Modification Display Modification AcqKnowledge GLP for Windows XP Professional E L Erasing a Marker Clear Text in the Journal Overwriting Data on Acquisitions Clear Wave Data Overwriting File Cut from Graph Removing a Waveform Delete All Presets, Standard & Custom Rewind Function Delete Preset(s), Standard & Custom Export Modification Log Acquisition Settings Summary to Clipboard Graph Merge Copy Graph to Clipboard New Graph Copy Journal to Clipboard New Journal Copy Measurements to Clipboard Saving a Graph Copy Wave Data to Clipboard Saving a Journal Cutting from Journal Modify Stimulator Parameters Add New MP Devices Modify Triggering Parameters Modify Acquisition Parameters Switching Between MP Devices Modify Advanced Averaging Parameters Switching Between Network Adapters Modify Channel Parameters Update Firmware Modify Manual Control Parameter Modify Sound Feedback Parameters Journal Preferences Adjust Grid Line Spacing Last Dot Only (X/Y mode) Adjust Grid Parameters Line Plot Autoplot Lock/Unlock Grid Autoscale Horizontally, all Channels Markers Preferences Autoscale Horizontally, to Length of Active Channel Maximizing Window Autoscale Vertically, all Channels Minimizing Window Autoscale Vertically, one Channel Modify Input Value Display Settings Autoscale after Transformation Modify the Horizontal axis - Scale and Center Horizontally (X/Y mode) Initial Offset Center Vertically Modify the Vertical axis - Scale and Initial Offset Change Font Number of Measurement Rows Change Markers Preferences Optimize Range Change Proportion of Journal to Graph Overlap Waveforms Change Proportion of Modification Log to Reset Chart Boundary Graph Scroll Change Wave Tool Select All Change Window Position Separate Line for Each Measurement Change Window Size for Graph and Journal Show/Hide Channel Numbers Change Selected Area Show/Hide Grids Chart Display Show/Hide Hardware Compare Waveforms Show/Hide Journal Digit of Precision Show/Hide Markers Display Mode - Scope, Chart, X/Y or Show/Hide Measurements Overlap Show/Hide Toolbar Dot Plot Step Plot Dot Size Tabs Draft Mode for Compressed Waves Tile Waveforms Enable Tools During Acquisition Tile after Transformation Find Peak, Find Next Peak, Find All Time Measurement Units Peaks Update Screen Interval; Full, Half, or Frequency Measurement Units Quarter Page at a Time General Preferences Use Measurement Interpolation Gray non-selected Waves Waveform Color Include Channel Number Waveform Order Include Measurement Name Wrap Text to Window Include Time Value Zoom Forward and Back Page 31 of 36 E L BIOPAC Systems, Inc. GLP Administrator Viewing Data Other Administrative Functions AcqKnowledge GLP for Windows XP Professional E L Printing Graph About Printing Journal About MP# Printing Modification Log Close Data View Show Input Values Close File Show Original Data Create Data View Show/Hide Channels Opening a Data File or Journal Statistic Print Setup Interpolate Pasting Between Windows Application Notes From The Web Toggling Overwrite Warning Change Default Graph Close Action Use all Available Memory Exit Change Auto-logout Timeout Data Snapshot after Acquisition Completion Create Default Menu.dsc Change User Interface Configuration by Show/Hide Modification Log Permission Page 32 of 36 E L BIOPAC Systems, Inc. GLP Administrator Page 33 of 36 Æ Operations for AcqKnowledge GLP for Windows XP Professional are on page 30. Operations for AcqKnowledge GLP under Mac OS X — see table below. Use the table to indicate user permissions for your Administrator to establish: E Execute (allow) L Require Log Message AcqKnowledge GLP for Mac OS X GROUP OPERATION Data Addition Operations that insert Duplicate waveform channels into the graph Insert waveform Rate Transformation Adding text into graph Adding Text to Journal Insert Measurements into Graph Events Inserting a new event Typing text into journal Adding Measurements to journal Acquisition Settings Summary Adding Wave data to journal Paste Selection Edges in Journal Event Summary Time and Date stamps Gastric Wave Analysis Gastric Wave Coupling Time-Frequency Analysis HRV Analysis New Graphs, not acquired Filter Responses Histogram Off-line Averaging Rate FFT New Graph from Spectrum IFFT (Acq only) DWT IDWT E L INVOKED BY… Edit > Duplicate Rt mouse menu Edit > Insert waveform Transform—Rate, all functions Transform > Find Cycle/Peak Append Acquisition Mouse Click Right-click menu in event insertion area in event toolbar Event tool Escape, F1-F9 Typing text into a journal Edit > Journal > paste measurements (Edit > Clipboard > copy measurements, paste into journal) Ctrl M Transform > Find Cycle/Peak Edit > Journal > Paste Acquisition Summary to Journal Edit > Journal > paste wave data (Edit > Clipboard > copy wave data, paste into journal) Command D Selection palette > Popup > Paste edges in Journal Event palette > Actions > Summarize to Journal Icons in the journal Transform > Specialized Analysis > Gastric Wave Analysis Transform > Specialized Analysis > Gastric Wave Coupling Transform > AR Time-Frequency Analysis Transform > Specialized Analysis > Heart Rate Variability Transform > Digital Filters > FIR, IIR Derivative Transform > Histogram Transform > Find Cycle/Peak > Output > Averaging Transform > Rate, New Graph Transform > FFT Spectrum Analyzer Palette > Popup menu > New Graph from Spectrum Transform > IFFT Transform > DWT Transform > IDWT (only available when a DWT produced graph is in front) BIOPAC Systems, Inc. GLP Administrator Page 34 of 36 AcqKnowledge GLP for Mac OS X GROUP OPERATION PCA Inverse PCA ICA Inverse ICA 3D Visualization Other Acquiring new data New data file or file Selecting measurements Creating a new preset Creating New Data Snapsnot (3.8.1 GLP) Inserting events at selection boundaries Starting Batch Acquisition Adding Template to Batch Adding Text Annotation New Workflow Adaptive Template Matching Analysis Data Modification Editing Functions Copy Paste (from Cut or Copy operation) Off-line Transformations Integral Integration Function Absolute Value Arc Tangent Connect Endpoints Exponential Limit Natural Log Base 10 Log Threshold Square Root Sine Noise Derivative Difference Smoothing Resample Equation Generator, Expression Delay Rescale E L INVOKED BY… Transform > Principal Component analysis Transform > Inverse PCA (only available when a PCA produced graph is in front) Transform > Independent Component Analysis Transform > Inverse ICA (only available when an ICA produced graph is in front) Transform > Find Cycle/Peak > Output > 3D Surface Press the start button Command-space (Mac) Advanced Averaging window > Start File > New (PC) File > New > Independent journal (Mac) File > New > Graph window (Mac) Measurement rows MP > Channel Setup > Calculation setup dialogs Edit > Create New Data Snapshot Event Palette > Actions > Mark Selection Batch > Start Acquisitions Batch window, Add... Annotation tool > Click in graph window Workflow > New Workflow Transform > Template Functions > Adaptive Template Matching Edit > Copy Command C Edit > Paste Command V Transform > Integral Transform > Integration Transform > Function > (unlisted) Transform > Function > Abs Transform > Function > Atan Transform > Function > Connect Endpoints Transform > Function > Exp Transform > Function > Limit Transform > Function > Ln Transform > Function > Log Transform > Function > Threshold Transform > Function > Sqrt Transform > Function > sin Transform > Function > Noise Transform > Derivative Transform > Difference Transform > Smoothing Transform > Resample Transform > Expression Transform > Delay Transform > Rescale BIOPAC Systems, Inc. GLP Administrator Page 35 of 36 AcqKnowledge GLP for Mac OS X GROUP OPERATION Remove Projection Normalized Cross Correlation Comb Filter Wave math Changing event location Undo Editing Events Execute Script Transformation E L INVOKED BY… Transform > Template > Remove Projection Transform > Template > Normalized Cross Correlation Transform > Digital filters > Comb Transform > Wave Math Option-click and drag the event Event palette > Selected Event > Location edit field Edit > Undo Event toolbar > event label edit field Event palette > Selected Event > Label edit field Transform > Specialized Analysis > (script name) BIOPAC Systems, Inc. GLP Administrator Page 36 of 36 Information in this document is subject to change without notice and does not represent a commitment on the part of BIOPAC Systems, Inc. Copyright This manual and the software described in it are copyrighted with all rights reserved. Under the copyright laws, this manual or the software may not be copied, in whole or part, without written consent of BIOPAC Systems, Inc., except in the normal use of the software or to make a backup copy. The same proprietary and copyright notices must be affixed to any permitted copies as were affixed to the original. This exception does not allow copies to be made for others, whether or not sold, but all of the material purchased (with all backup copies) may be sold, given, or loaned to another person. Under the law, copying includes translating into another language or format. This software is intended for use on only one machine at a time. Warranty BIOPAC Systems, Inc. warrants its hardware products against defects in materials and workmanship for a period of 12 months from the date of purchase. If BIOPAC Systems, Inc. receives notice of such defects during the warranty period, BIOPAC Systems, Inc. will at its option, either repair or replace the hardware products that prove to be defective. This warranty applies only if your BIOPAC Systems, Inc. product fails to function properly under normal use and within the manufacturer’s specifications. This warranty does not apply if, in the sole opinion of BIOPAC Systems, Inc., your BIOPAC Systems, Inc. product has been damaged by accident, misuse, neglect, improper packing, shipping, modification or servicing, by other than BIOPAC Systems, Inc. Any returns should be supported by a Return Mail Authorization (RMA) number issued by BIOPAC Systems, Inc. BIOPAC Systems, Inc. reserves the right to refuse to accept delivery of any shipment containing any shipping carton which does not have the RMA number(s) displayed on the outside. The Buyer shall prepay transportation charges to the BIOPAC Systems, Inc. designated site. BIOPAC Systems, Inc. makes no warranty or representation, either expressed or implied, with respect to this software, its quality, performance, merchantability, or fitness for a particular purpose. As a result, this software is sold “As is”, and you, the purchaser, are assuming the entire risk as to its quality and performance. In no event will BIOPAC Systems, Inc. be liable for direct, indirect, special, incidental, or consequential damages resulting from any defect in the software or its documentation, even if advised of the possibility of such damages, or for damage of any equipment connected to a BIOPAC Systems, Inc. product. Trademarks AcqKnowledge and GLP Administrator are trademarks of BIOPAC Systems, Inc. Windows is a registered trademark of Microsoft Corp. Apple, Mac, and Mac OS are registered trademarks of Apple Computer, Inc. All brand or product names are trademarks or registered trademarks of their respective holders. Acknowledgments Documentation created by Edward Peterlin and Jocelyn Kremer for BIOPAC Systems, Inc. Manual created with Microsoft Word® for Windows® and Adobe Acrobat®. File: 03.13.07