1
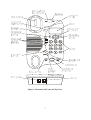
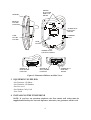
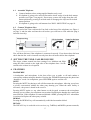
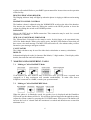
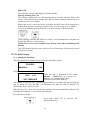
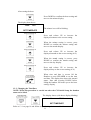
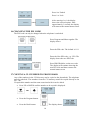
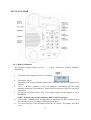
HANDSFREE CLI TELEPHONE WITH CALCULATOR USER MANUAL 862-02978 CONTENTS 1 2 3 4 PRECAUTIONS............................................................................................................ 2 INTRODUCTION ......................................................................................................... 2 EQUIPMENT SUPPLIED ............................................................................................. 4 INSTALLING THE TELEPHONE ................................................................................ 4 4.1 4.2 5 6 7 Assemble Telephone ........................................................................................................................5 Connect Telephone Line...................................................................................................................5 SETTING THE TONE CALLER VOLUME.................................................................. 5 FEATURES ................................................................................................................... 5 MAKING AND ANSWERING CALLS ........................................................................ 6 7.1 7.2 7.3 7.4 7.5 8 Making a Call in HANDSET Mode..................................................................................................6 Making a Call in HANDSFREE Mode .............................................................................................6 Restricting Your Number .................................................................................................................7 Call Timer .......................................................................................................................................7 Parallel Working..............................................................................................................................7 SPEED DIAL ................................................................................................................ 7 8.1 8.2 8.3 9 10 11 12 Programming and Changing the Speed Dial .....................................................................................7 Programming the Speed Dial when Connected to a PABX ................................................................8 Dialing a Speed Dial Number...........................................................................................................8 MUTE BUTTON........................................................................................................... 8 RECALL BUTTON ....................................................................................................... 8 REDIAL BUTTON........................................................................................................ 8 CLI FEATURES ............................................................................................................ 9 12.1 12.2 List of CLI Features.....................................................................................................................9 Description..................................................................................................................................9 13 CLI Initial Setup .......................................................................................................... 10 13.1 13.2 Setting the Time/Date ................................................................................................................10 Changing the Time/Date ............................................................................................................ 11 14 CLI OPERATION........................................................................................................ 12 14.1 14.2 14.3 14.4 14.5 Automatic Time/Date Stamping .................................................................................................12 Receiving CLI Information ........................................................................................................12 Reviewing Call Records ............................................................................................................12 Erasing Call Records .................................................................................................................12 Making a Call from CLI Memory ..............................................................................................13 15 16 17 18 LOCKING AND UNLOCKING THE PHONE............................................................ 13 CHANGING THE PIN CODE..................................................................................... 14 COPYING A CLI NUMBER TO PHONE BOOK........................................................ 14 PROGRAMMING NAMES AND NUMBERS IN THE PHONEBOOK (MAXIMUM 45)……………………………………………………………………………………...15 19 DIALING A PHONEBOOK ENTRY........................................................................... 16 20 CALCULATOR ........................................................................................................... 17 20.1 20.2 21 22 23 24 25 Basic Calculations .....................................................................................................................17 R Using M+, M- and MC ...............................................................................................................18 WALL MOUNTING.................................................................................................... 18 TROUBLESHOOTING CHECKLIST......................................................................... 19 CLEANING THE TELEPHONE ................................................................................. 19 TECHNICAL SPECIFICATION.................................................................................. 19 SERVICE ENQUIRES................................................................................................. 19 1 1 PRECAUTIONS Do not expose the telephone to direct sunlight or moisture. Do not use the telephone in the bathroom. Do not use the telephone outdoors. Do not use the telephone during a lightning storm. Do not install the telephone near open fires, heating appliances, air conditioning units, etc. Do not drop the telephone or handle it roughly. Do not allow magnetic objects to come into contact with the telephone receiver. Use a soft damp cloth to clean the telephone. Do not use strong or abrasive cleaning agents to clean the telephone. 2 INTRODUCTION The Tanzanite 150 CLI handsfree telephone offers a range of features including full handsfree operation and an electronic keypad lock to prevent unauthorized calls being made from your telephone. The telephone can store and display up to 50 telephone call records, including information such as the caller’s telephone number (where available) and the time and date the call was made. These call records are stored in CLI memory. For the CLI facility to operate, you must have subscribed to Telkom’s "Caller Display" service IdentiCall. Contact Telkom at 10219 for further information. There is a charge for this service which will appear on your monthly telephone account. The IdentiCall service may not be available in some areas. NOTE: The CLI facility receives its power from the telephone line, i.e. no batteries are required. The Speed Dial facility allows you to store up to 3 telephone numbers (of up to 16 digits each) in the “one touch” memory locations M1 to M3. The phone incorporates a 45 number phonebook function for storing the names and telephone numbers of your contacts. When the handset is lifted, a telephone number selected from the CLI memory or the phonebook and displayed on the screen can be dialed directly by pressing the DIAL key. The telephone handset is hearing aid compatible. Refer to your hearing aid user manual for the operation of this facility. The telephone is equipped with a standard Calculator (including memory functions), which can be used even during telephone conversations. 2 Figure 1: Tanzanite 150 Front and Top View 3 WEDGE SLOTS FOR DESK TOP MOUNT HANDSET RECEIVE VOLUME CONTROL SCREW SLOT FOR WALL MOUNT HANDSET JACK TONE CALLER VOLUME TONE CALLER WEDGE SLOTS FOR WALL MOUNT WEDGE IN DESK MOUNT POSITION WEDGE IN WALL MOUNT POSITION SCREW SLOT FOR WALL MOUNT Figure 2: Tanzanite 150 Base and Side Views 3 EQUIPMENT SUPPLIED One Tanzanite 150 Phone One Tanzanite 150 Handset One Line cord One Handset Curly Cord User Guide 4 INSTALLING THE TELEPHONE NOTE: If you have an extension telephone, the first (main) wall socket must be supplied and fitted by the Network Operator, otherwise your guarantee will be void. 4 4.1 Assemble Telephone a. Connect handset to base using supplied handset curly cord. b. If telephone is going to be used on flat surface check wedge is in the desk mount position (see Figure 2 on page 4). If necessary, remove the wedge from the wall mount position by pressing in on both ends to disengage the clips and fit in desk mount position. c. If telephone is going to be wall mounted see WALL MOUNTING on page 18. 4.2 Connect Telephone Line Plug one end of the Line cord into the Line Jack on the base of the telephone (see Figure 1 on page 3) and the other end into the wall socket (you will hear a click when the plug is inserted correctly). You will hear dial tone if the telephone is connected correctly. If you do not hear dial tone check that the line cord is inserted correctly into the wall socket and to the telephone. 5 SETTING THE TONE CALLER VOLUME The ringer volume control has three settings Low, Medium and High using the slider switch on the right side of the telephone base. Set the switch to the volume level required. 6 FEATURES HANDSFREE A loudspeaker and microphone in the base allow you to make a call and conduct a conversation without using the handset. Pressing the SPEAKER button puts the phone into “handsfree” mode. On completion, press SPEAKER again to end the call. MUTE Pressing the MUTE key during a call will disconnect the microphone, allowing you to have a private conversation without the other party hearing you. When the mute facility is activated, a beep tone is heard in the receiver. Pressing MUTE again (or any other button on the keypad) reconnects the microphone allowing you to resume your telephone conversation. Replacing the handset also cancels the mute function. If the telephone is connected behind a PABX, pressing RECALL when Mute is activated will place the other party on hold. REDIAL Pressing the REDIAL key will automatically redial the last number dialed. RECALL The RECALL key is used with voice services (e.g. TalkPlus) and PABX systems to transfer, 5 or place calls on hold. Refer to your PABX system manual for instructions on the operation of this facility. RINGING INDICATOR (RINGER) The Ringing indicator lamp will light up when the phone is ringing to indicate an incoming call. HANDSET VOLUME CONTROL The handset volume is adjusted using the NORM/HIGH switch on the side of the handset. You increase the volume louder by sliding the switch to the HIGH position or lower the volume by sliding the switch to the NORM position. DATA JACK Next to the LINE jack is a DATA connection. This connection may be used for a second telephone or a modem. NEW CALL/VOICEMAIL INDICATOR The Telkom Basic Voicemail service must be active for this feature to be operational, ring 10219 for further details. When voice mail is active, the MSG LED flashes to show that you have a new voice mail message. The MSG LED will switch off, a few minutes after you have listened to your messages and gone on-hook. CALCULATOR The 8-digit calculator may be used for either basic calculation or memory calculations. DISPLAY Information displayed on the 16 character Dot Matrix, 13-digit number, 3 line display caller details, date and time and call information. 7 MAKING AND ANSWERING CALLS 7.1 Making a Call in HANDSET Mode If the number you have dialed is busy or does not exist, you will hear a repeated tone (engaged) or a long continuous tone (number unobtainable). To make calls from a telephone connected to a PABX, consult your system manual. 7.2 Making a Call in HANDSFREE Mode When the phone is in Handsfree mode, the speaker icon is displayed and the Handsfree LED on the speaker button will be lit. You will hear dial and ring tones through the speaker. Adjust the volume control by pressing the VOLUME button. Each press of the button will increase the level of volume until the maximum is reached and then decrease toward the minimum level. 6 To answer or end a call in Handsfree mode: Press SPEAKER To change from Handsfree mode to handset mode: Lift the handset To change from handset mode to Handsfree mode Press SPEAKER and replace the handset 7.3 Restricting Your Number Should you wish to restrict the display of your number to the called party, dial * 3 1 * before dialing the number of the party you wish to call. Note that this sequence must be repeated for each new call that you wish to restrict your number. 7.4 Call Timer The facility displays the duration of an incoming or outgoing call up to a maximum of 60 minutes. The timer will start 5 seconds after the handset is lifted, or, for an outgoing call, 3 seconds after the last digit was dialed. 7.5 Parallel Working If the telephone is connected in parallel (two or more telephones on the same PABX/exchange line) and one of the other telephones is used simultaneously, correct operation cannot be guaranteed. It is, therefore, recommended that only one of the telephones be used at a time. 8 SPEED DIAL The Speed Dial facility allows you to store up to 3 telephone numbers (of up to 16 digits each) in the “one touch” memory locations M1 to M3. If you make a mistake while entering a number or name, cancel the programming sequence by lifting the handset. Replace the handset and start again. NOTE: During a programming sequence, if a period of 15 seconds or more elapses between each button press, the sequence will be cancelled and you must start again. Any speed dial number currently in the memory location that you have chosen will be overwritten. 8.1 Programming and Changing the Speed Dial To program the One Touch Memories M1 to M3 follow the sequence below. Note that the display will “echo” the key sequence, i.e. Each time PROG is pressed the display shows in sequence PROGRAM – ENTER NAME – STORE TO __?, STORE TO MX. NOTE: If required the activation and deactivation codes for Telkom’s TalkPlus facilities can be programmed into the one touch memory locations using programming sequence given above. 7 8.2 Programming the Speed Dial when Connected to a PABX When connected to a PABX you have to dial an access code to obtain an exchange line. There may be a short delay before the exchange line is available. Thus, when programming a speed dial number from a PABX phone it is usual to enter a “pause” to accommodate this delay. This is done using the REDIAL button’s second function which is only available in the programming mode. Note that when you press PAUSE a P will appear in the display, e.g. an example entered number with a pause would be displayed 0P0217103312. 8.3 Dialing a Speed Dial Number The Speed Dial numbers (M1, M2 and M3) are stored in non-volatile memory and will not be lost if the telephone is unplugged. Dialing from One Touch Memories M1 to M3 NOTE: If required the activation and deactivation codes for Telkom’s TalkPlus facilities can be programmed into the one touch memory locations using the above sequence. 9 MUTE BUTTON Pressing the MUTE button during a call will disconnect the microphone allowing a private conversation without the other party hearing. A beep tone will be heard in the receiver. Pressing the MUTE again will reconnect the microphone allowing you to resume your telephone conversation. 10 RECALL BUTTON The RECALL button is used with Voice Services (e.g. TalkPlus) and PABX systems to transfer, place calls on Hold etc. It is also referred to as “R” or FLASH and functions as Time Break Recall (TBR). Refer to your PABX system manual or your TalkPlus manual for the operation of this facility. 11 REDIAL BUTTON The Tanzanite 150 stores the most recently dialed number (up to 32 digits) in the redial memory. Press the REDIAL button to automatically redial the last number dialed. 8 12 CLI FEATURES You must subscribe to your Network Provider’s Caller Display service IdentiCall to view caller information. Call 10219 for further details. 12.1 List of CLI Features 50 Caller ID Memories 16 Character Dot Matrix, 13 digit number, 3 Full line LCD Display Total number of calls received (maximum 50 stored in memory) Date, Time Display Real Time Clock Private call, Unavailable Call display Repeat Call indicator New Call indicator (LED & LCD) Memory Data Retention Capability when unplugged. 12.2 Description a) LCD Display A three –line liquid crystal display (LCD) panel displaying the following information: PRIVATE Call Call information UNAVAILABLE Caller phone number Time of call Date of call Call counter New call indication Repeat call indication Number of New Calls Line Error indication Real Time Clock Display b) New call LED indicator This LED flashes whenever new calls are received and turns off when call records have been reviewed. c) Key Definitions DELETE - used to delete individual or all CLI call records. DIAL -when pressed with the handset lifted, automatically dials the number currently shown on the display. Navigation buttons are used to scroll through the CLI call records in either direction and for time/date setting. d) Display Messages The display messages will vary according to the type and origin of the incoming call: UNAVAILABLE This is displayed on receipt of an international call or a call originating from an area or exchange which does not support the IdentiCall service. 9 PRIVATE The caller has restricted the display of his/her number. Message Waiting/New Call The message waiting and new call indicator shares the same function. Where this service is provided by the exchange, the LED will flash to indicate that a message is waiting in your voice mailbox. Where this service is provided by the exchange, the MSG icon will be displayed to indicate that you have a message waiting in your voice message service mailbox. To clear the Message Waiting indicator, it is not necessary to lift the handset. If the exchange switches the MSG icon on/off, it will automatically increment the Total Calls and New Calls counters. NOTE: This service is not available from Telkom at the time of publishing this manual. This LED flashes whenever new calls are received and turns off when call records have been reviewed. 13 CLI Initial Setup 13.1 Setting the Time/Date After the telephone is installed for the first time, the display shows: 50-CALL MQ322815 VXX Followed by 12:00 1/01 SET TIME/DATE Time and date is displayed in the format hh:mm M/dd where h = hours, m = minutes, M = months and d = days. The Hour icon will be blinking If no buttons are pressed for a period of approximately 15 seconds, the unit will skip the step of setting the time and date. The telephone will then be ready to display CLI information when a call is received. When the first CLI call is received, the time and date will be automatically updated to the exchange time and date i.e. the current time and date. To set the time and date: Press and release UP to increase the displayed hour by 1. 10 After setting the hour Press DOWN to confirm the hour setting and move to the minute display. The display then shows: 13:00 1/01 The minute icon will be blinking SET TIME/DATE Press and release UP to increase the displayed minutes to the correct setting. When the minute setting is correct, press DOWN to confirm the minute setting and move to the month display. Press and release UP to increase the displayed months to the correct setting (0-12) When the month setting is correct, press DOWN to confirm the month setting and move to the day display. Press and release UP to increase the displayed days to the correct setting (0-31) When time and date is correct lift the Handset or press SPEAKER to set the time and date. The display then shows the normal status. Note that pressing DOWN before lifting the handset will return you to the hour setting. display 13.2 Changing the Time/Date NOTE: When this procedure is carried out after the CLI initial Setup, the handset must not be lifted. The display shows (with hours display blinking) hh:mm M/dd SET TIME/DATE Refer to 13.1 on page 10 and follow steps “Setting the time and date”. 11 14 CLI OPERATION 14.1 Automatic Time/Date Stamping The time and date for all incoming calls is recorded and stored automatically each time a call is received. Therefore, if you subscribe to the IdentiCall service, it is not necessary to manually set the time and date. 14.2 Receiving CLI Information When you receive a call, the NEW Call LED indicator flashes and the caller’s number (where available) and the time and date is shown on the display. NOTE: To ensure correct reception of the Caller ID information, let the phone ring twice before answering. The call records of repeat calls from the same number that have been viewed are not stored more than once, however, the time and date of the original call record is updated and the REPEAT icon is shown on the display. If the original call has been viewed, then the repeat call is stored as a new call. The CLI memory can store up to 50 call records. When the 51st call is received, call number 1 is deleted from the memory and the 51st call is recorded as call number 50. 14.3 Reviewing Call Records When the telephone is in idle mode and new calls are received the NEW Call indicator will flash and the total number of calls and the number of the new calls will be displayed. To browse through the call history list: Pressing DOWN displays the last received call record. Pressing UP displays the earliest to the latest received call record. When the end of the call history list is reached, END OF LIST will be displayed. Pressing UP/DOWN repeats the list 14.4 Erasing Call Records NOTE: A call record can only be erased if it has been viewed and once erased, it can not be retrieved. The DELETE button is used to delete previously reviewed call records. To erase a single call record: Until the call to be erased is displayed 12 Press DELETE, the display will show “DEL CALL?”Press the DELETE button again, the call record is deleted and the display changes to show the next call record. To erase all call records: Once to enter the call history list Press DELETE and hold for 3 seconds, the display will show “DEL ALL CALL?”Press the DELETE button again, the call records in CLI memory are deleted and the display changes to show “NO CALLS”. 14.5 Making a Call from CLI Memory Any of the numbers in the CLI memory can be dialed directly by lifting the handset, selecting the number requied and pressing the DIAL button: The displayed number will be automatically dialed. If the DIAL button is not pressed within 10 seconds of the handset being lifted the call will be cancelled and the display will blank. If you press the DIAL button without lifting the handset, the prompt “PICK UP HANDSET” will be shown on the display. 15 LOCKING AND UNLOCKING THE PHONE When the keypad is locked, you can only to dial out numbers stored in memory locations M1 to M3. If an invalid key is pressed, the display will show “LOCKED”. To lock/unlock the keypad: Press Mute and hold for 3 seconds. The display shows: Enter the PIN code. The default is 1111 13 Press 0 to Unlock Press 1 to Lock After entering 0 or 1 the display shows the selected option. After approximately 3 seconds, the display will return to the normal status screen 16 CHANGING THE PIN CODE The PIN code can only be changed when the telephone is unlocked. Press Program and Mute together. The display shows: Enter the PIN code. The default is 1111 Enter the New PIN code, e.g. 2222. The display shows the new PIN code. Press PROGRAM to set the new code. The display will continue showing the new PIN code and then return to the normal status screen 17 COPYING A CLI NUMBER TO PHONE BOOK Any of the numbers in the CLI directory can be copied to the phonebook. The telephone must be unlocked. The numbers from the CLI memory cannot be copied directly to the M1 – M3. If required the number and the name associated with it can be edited. Press UP or DOWN until the number to be copied is displayed. Press the Program button: Press the Book button: The display shows: 14 To edit the number press the Delete button: Each press of the DELETE button deletes one digit starting from right. If you make a mistake during editing, lift and replace the handset and begin again. Enter the required digits using the keypad. On completion of editing or to proceed without editing press: The display shows and the cursor moves to the name position: Enter the name using the keypad noting the following: Each press of the key corresponds to the letters alongside the key i.e. Press 2 once for A, twice for B and three times for C. Wait for the cursor to step to the next position before entering the next letter. During editing, the 0 button is used to insert a space. If you make a mistake during editing, lift and replace the handset and begin again. NOTE: If a name is already associated with the number it can be edited if required using the same method as that described for editing the number above. On completion of entering the name press: The display shows “STORE TO BOOK” confirming that the name and number has been saved: 18 PROGRAMMING NAMES AND NUMBERS IN THE PHONEBOOK (MAXIMUM 45) Press the BOOK button Press PROG Enter the telephone number you wish to store Press PROG 15 Enter the name associated with the number Press PROG The number will be stored in the phonebook 19 DIALING A PHONEBOOK ENTRY Lift Handset or press the SPEAKER button Press the BOOK button Either use the UP/DOWN keys to scroll through the numbers to view the one you require OR Enter the first letter of the person’s name via the keypad. The phonebook display will go to the first entry for that letter. If necessary, use the UP/DOWN keys until the name you require is displayed. Press the Dial button. The number will be dialed Note that if DIAL is pressed when the handset has not been lifted or the SPEAKER button has not been pressed the display will prompt you to “PICK UP HANDSET” . Once the Handset has been lifted the number will be dialed. 16 20 CALCULATOR 20.1 Basic Calculations The calculator facility allows you use +, -, x and ÷ buttons to perform arithmetic calculations. To activate the calculator press the CAL button The display shows: The phone will exit the calculator mode if the calculator functions are inactive for 3 minutes. Use +, -, x and ÷ buttons to carry out arithmetic calculations, just like using standard calculators. Note that the = button must be pressed to show the result of a calculation. To quit the calculator mode, press CAL button again, lift the handset or press SPEAKER. NOTE: You may also use the calculator while a call is in progress. If you make a mistake while entering data, or would like to cancel current step in the calculation, press CE button. The display will show 0. To cancel all steps of the calculation press the AC button. The display will show zero. 17 R 20.2 Using M+, M- and MC When you store a number in memory, an M appears in the display after the CAL prompt. You can work with numbers stored in memory in the following ways: NOTE: The MRC button has two functions Memory Recall (MR) and Memory Clear (MC). To add the displayed number to the number already in memory, press M+. To see the new number, press MRC. To subtract the displayed number from the number already in memory, press M-. To see the new number, press MRC. To display the result of the calculation in memory, press MRC (Memory Recall). To clear the calculation in memory, press MRC (Memory Clear) twice. Note that you must clear the display by pressing CE before carrying out another calculation. The memory is not cleared when you deactivate the calculator. This means that after activating the calculator you should always clear the memory by pressing MRC twice. 21 WALL MOUNTING The key-slots on the underside of the telephone base can be used to mount the telephone directly onto a wall. The telephone base has a reversible handset retaining clip ( see Figur e 1 on page 2) for wall mounting. The wedge (see Figure 2 on page 3) should be removed and fitted at the bottom two wedge slots when wall mounting. d. To mount the phone against a wall, you need two screws (not supplied) with heads that fit into the keyhole slots in the bottom of the phone and wedge. e. Remove the wedge from the desk top position by pressing in on both ends to disengage the clips. f. On the base, pull out the handset retainer clip (see Figure 1 on page 2), turn it around and place in the opposite direction, so that the clip allows the handset to hang onto the base unit. g. Fit the wedge in wall mounting position so that the narrow end of the screw slot faces upwards. h. Drill two holes in the wall 100 mm apart and fit raw plugs if necessary. i. Thread a screw into each hole, letting the heads extend about 5 mm from the wall. Place the base on the 2 screws and slide downwards to engage the screws in the narrow portions of the slots. j. Connect phone to handset and telephone jack on wall as described in Installing the Telephone on page 4. 18 22 TROUBLESHOOTING CHECKLIST After following the procedures in this manual, if you experience problems with the operation of your telephone, refer to the checklist below. Problem No dial tone when the Handset is lifted. The display remains blank. The telephone ring too loudly/softly. CLI facility not operational. Noise on the phone Action Check that the telephone line cord is connected to the wall socket. Set the ringer volume Refer To Section 4 on page 4 Section 5 on page 5 been Ring 10219 IdentiCall service has not activated. Contact Telkom. Check for source of noise (e.g. mobile -----phone, cordless phone, PC, etc). Move phone or source of noise. 23 CLEANING THE TELEPHONE Use a soft damp cloth to lightly wipe the telephone. If the telephone is dirty, use a mild detergent on the cloth. Do not use abrasive materials or solvents as these can damage the telephone surface and printing. 24 TECHNICAL SPECIFICATION The TANZANITE 150 HANDSFREE CLI telephone complies with ICASA Regulatory Requirements. Recall: 100ms (typical) Line Cord Plug: RJ11 Dialing Mode: TONE NOTE: We reserve the right to make modification to the product to enhance features and functionality. User manual will change accordingly without notification. 25 SERVICE ENQUIRES For any service or product information queries relating to this telephone, please call our ShareCall number 08602HELPU (0860243578) or visit our website on www.phones4telkom.co.za. Issue 1 ECN 5¬11354 19