1
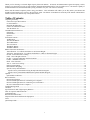
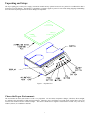
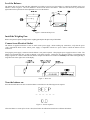
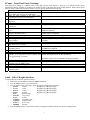
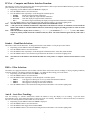
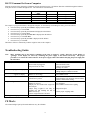
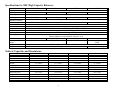
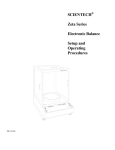
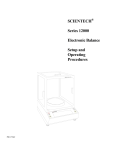
SCIENTECH®
High Capacity Series
Electronic Balance
Setup and
Operating
Procedures
PN11764A
Thank you for choosing a Scientech High Capacity Electronic Balance. Scientech, an ISO9001:2000 registered company, and its
employees are pleased to provide you with a balance designed and manufactured for years of reliable service. The attractive quality of
Scientech balances has been demonstrated by being certified to carry the “CE” mark of conformity.
Please read this manual completely before using your balance. This information will enable you to fully utilize your balance and
should be located nearby to be used as a quick reference guide. The balance is intended to be used only in the manner outlined in this
manual. Misuse of the balance may cause product failure.
Table of Contents:
Unpacking and Setup: .................................................................................................................................................................................. 3
Choose the Proper Environment: ............................................................................................................................................................. 3
Level the Balance: ................................................................................................................................................................................... 4
Install the Weighing Pan:......................................................................................................................................................................... 4
Connect to an Electrical Outlet: ............................................................................................................................................................... 4
Turn the balance on:................................................................................................................................................................................. 4
Good Measurement Practices: ..................................................................................................................................................................... 5
Equipment:............................................................................................................................................................................................... 5
Environment: ........................................................................................................................................................................................... 5
Operator: .................................................................................................................................................................................................. 5
Front Panel Controls: ................................................................................................................................................................................... 6
Audible Beep: .......................................................................................................................................................................................... 6
The ON/OFF Button: ............................................................................................................................................................................... 6
The TARE Button:................................................................................................................................................................................... 6
The CAL Button: ..................................................................................................................................................................................... 6
The MENU Button:.................................................................................................................................................................................. 6
The PRINT Button:.................................................................................................................................................................................. 6
Balance Functions and Features:.................................................................................................................................................................. 7
Autocalibration – To Calibrate the balance to an External Weight: ........................................................................................................ 7
Alternative Autocalibration – To Calibrate the Balance to a Heavier External Weight: ......................................................................... 7
PCount - Front Panel Parts Counting:...................................................................................................................................................... 8
UnitS - Unit of Weight Selection:............................................................................................................................................................ 8
PC-Prtr – Computer and Printer Interface Function: ............................................................................................................................... 9
bAud rt – Baud Rate Selection:................................................................................................................................................................ 9
FiltEr – Filter Selection:........................................................................................................................................................................... 9
Auto 0 – Auto Zero Tracking:.................................................................................................................................................................. 9
Density Determination:............................................................................................................................................................................ 10
Below Balance Weighing: ....................................................................................................................................................................... 10
Specific Gravity Determination: .............................................................................................................................................................. 10
Specific Gravity Determination Using the Optional SHCSG Program:............................................................................................... 10
Specific Gravity Determination Without the Optional SCHSG Program: ........................................................................................... 11
Options:........................................................................................................................................................................................................ 11
Optional RS-232 Printers:........................................................................................................................................................................ 11
RS-232 Interface:......................................................................................................................................................................................... 11
RS-232 Specifications:............................................................................................................................................................................. 11
RS-232 Cable Requirements for Connecting to a Computer: .................................................................................................................. 11
RS-232 Cable Requirements for Connecting to a Serial Printer: ............................................................................................................. 11
RS-232 Command Set from a Computer: ................................................................................................................................................ 12
Troubleshooting Guide: ............................................................................................................................................................................... 12
CE Mark: ..................................................................................................................................................................................................... 12
Specifications for SHC High Capacity Balances: ........................................................................................................................................ 13
Table of Capacities and Resolutions:........................................................................................................................................................... 13
Limited Warranty:........................................................................................................................................................................................ 14
Returned Goods Procedure: ......................................................................................................................................................................... 14
Disposal of Electrical and Electronic Equipment: ....................................................................................................................................... 14
Notes:........................................................................................................................................................................................................... 15
Quick Setup Guide:...................................................................................................................................................................................... 16
2
Unpacking and Setup:
The top weighing pan, remote power supply, instruction manual and any optional accessories are packed in a cardboard box that is
located on top of the balance. The balance is suspended in a separate support to protect it from shock during shipping and handling.
Save and reuse all packing material for future damage-free shipments.
Figure 1 – Exploded view
Choose the Proper Environment:
The environment in which your balance is used is very important. Air movement, temperature changes, vibrations, direct sunlight,
etc. influences the performance of high precision balances. Therefore, place your balance on a solid, sturdy surface that is free of air
currents and vibration and not in direct sunlight. The surface should not be magnetic and should be located away from doors,
windows, heaters, air conditioners and fans.
3
Level the Balance:
The balance has one fixed foot and three adjustable feet which are used to level the balance by centering the bubble in the level
indicator. Refer to figure 2. The level indicator is located on the back of the balance. Make sure the fixed foot is pressed down
against the bench top and use the three adjustable feet to level the balance.
Figure 2 – Bottom and top views
Install the Weighing Pan:
Remove the protective plastic coating from the weighing pan and place the pan on top of the balance.
Connect to an Electrical Outlet:
The balance is supplied with either a 120V or 220V remote power supply. Before making any connections, verify that the power
(VAC) requirement shown on the remote power supply is compatible with the AC power outlet to which the balance will be
connected.
First plug the power supply’s connector into the balance’s rear panel receptacle. Then plug the power supply into the AC outlet. The
balance will automatically turn on and go through a self check sequence. During the self check the balance’s programming and
display segments are verified. When the self check is complete the balance will remain in a Stand By mode which is designated by a
single dot in the lower right corner of the display.
Figure 3 – Rear view
Turn the balance on:
Press the ON/OFF button one time to turn the balance on and observe the following turn on sequence.
Figure 4 – Turn on sequence
Allow the balance to warm up for at least 1 hour, then follow the calibration instructions to calibrate the balance.
4
Good Measurement Practices:
(As quoted from the Mass Standards Handbook by Troemner, 3-015BKT rev 1/03)
There are numerous steps that one can take in order to improve the quality of a mass measurement system. However, they usually fall
within three main categories: the equipment, the environment, and the operator. If even one of these areas is neglected, it can have a
dramatic negative impact on your results. Although these suggestions are not meant to be all encompassing or all-inclusive, the
improvements that can be made following these simple guidelines are extraordinary.
Equipment:
1.
2.
3.
4.
5.
6.
Select weights that have a tolerance that is one third or better than the accuracy you require for your application. This way
the error of the weight will not dramatically impact the quality of your measurements.
The equipment must be of sufficient readability to calibrate or measure the weight or sample under test.
The balance should be placed on a stable platform free from the effects of vibration. The most common type of setup
involves placing the instrument onto a balance table that is constructed of marble or granite.
Never use a balance or scale as soon as it is turned on (plugged in). The internal electronic components need to stabilize and
“warm up” for at least 24 hours once the equipment has been energized. Troemner recommends that you leave this
instrument plugged in twenty four hours a day, seven days a week.
Never use a balance that has been idle for several hours without first "exercising it" and calibrating it. A balance is exercised
by repeatedly placing and removing weights from the balance pan. We recommend that this be done at least ten times each
with a weight that is 100% of the max capacity of the balance. After exercising, the balance should be calibrated. If these
two techniques are consistently employed, a noticeable improvement will result in both linearity and stability of the
measurement.
When weights are not in use, store them in the case in which they were supplied. If the weights were not supplied with a
case, either purchase a case or use a clean container to protect the surfaces. This will keep airborne particles from getting on
your weights between uses. Weights should be in thermal equilibrium with the balance so store weights near your balance.
Another option is to leave calibration masses commonly used inside the weighing chamber when not in use. This assures
your weights are in thermal equilibrium with the balance producing a better measurement.
Environment:
1.
2.
3.
4.
5.
The more stable your environment, the better your measurement results. Changes in temperature, pressure, and humidity
affect balance performance and weight stability. Ideal room conditions are 20º C with a relative humidity between 45% and
60%. Fluctuations in temperature should not exceed 1º C per hour. Humidity fluctuations should not exceed 10% per hour.
Balances should not be placed in close proximity to anything that shakes, vibrates, or stirs violently. Avoid placing your
equipment near centrifuges, vortexers, or shakers.
Do not place your balance and/or scale near anything that generates heat. Heat will cause the balance chamber to warm and
due to the effects of the thermal expansion introduce large errors into your measurement. Do not place the balance near a
window. Sunlight can penetrate the window, warm the balance chamber at different rates during the day, and affect the
quality of your work.
Avoid placing the balance near sources of drafts, extreme air currents, or near air-conditioning vents. These positions can
cause your readings to be unstable and can dramatically cool the balance chamber when the air-conditioning system begins to
run.
The measurement environment should be clean and free of excessive contaminants. Contaminants such as dirt and grease
can adversely affect the weight of an object.
Operator:
1.
2.
3.
4.
Never touch a weight with your bare hands. Oils and contaminants from your hand will be transferred to the weight and
introduce a significant error. It is recommended that all weights be manipulated with gloved hands or forceps. The two types
of gloves that are commonly used and accepted are either latex (powderless) or cotton. Avoid any metal to metal contact
when handling or storing weights. This will cause scratches that may introduce error. All weight forceps and weight lifters
should be either nonmetallic (plastic or wood) or if metal, covered with a soft protective coating or material to avoid
scratches.
Place the weight or sample near the center of the balance pan. A small offset from center can have a pronounced effect and
introduce undue variation.
Take special care not to breathe onto the weight or into the balance chamber. Back away from the instrument. This will
prevent any thermal transfer of heat from your breath or body to the balance, the weight, or the sample.
Time your measurements. Consistent sample times will provide more consistent measurement.
5
Front Panel Controls:
Figure 5 – Balance front panel
Audible Beep:
Each time any of the front panel buttons is activated the balance returns an audible “beep”.
The ON/OFF Button:
When the balance is in Stand By mode, pressing the ON/OFF button will start the turn on sequence shown in Figure 4. When the
balance is on, pressing the ON/OFF button will place the balance in Stand By mode, with only a single dot in the lower right hand
corner of the display.
The ON/OFF button is also used to exit the Parts Counting function.
The TARE Button:
Pressing the TARE button at any time returns the display to zeros. When a weighing that has been zeroed out is removed from the
weighing pan a negative reading is displayed. To return the display to zeros, press the TARE button.
The CAL Button:
This button is used to activate the calibration function. Calibration is fully discussed later in the manual.
The MENU Button:
The MENU button accesses all of the balance’s functions except calibration. Each time the MENU button is pressed one of the
following functions is displayed.
• P count
Parts counting
• UnitS
Units of weight selection
• PC-Prtr
Computer or printer interface
• bAud rt
Baud rate selection
• FiltEr
Stability filter selection
• Auto 0
Autozero
To select one of these functions press the PRINT button when the desired function appears in the display. Each of these functions is
fully discussed later in the manual
The PRINT Button:
Pressing the PRINT button sends the weight and unit of measure on the balance’s display to a printer or computer via the RS-232
interface.
Note:
Scientech High Capacity balances have specific and different cable requirements for connecting to serial printers
verses computers. The cable specifications are discussed later in the RS-232 section of this manual.
The PRINT button is also used to select many of the options available from the balance’s features menu.
6
Balance Functions and Features:
Autocalibration – To Calibrate the Balance to an External Weight:
This procedure calibrates your balance to an external calibration weight.
Note:
Note:
Note:
For correct calibration weight refer to specification chart in the back of the manual.
The balance should be warmed up for at least one (1) hour prior to calibration and leveled according to the
Unpacking and Setup section.
Perform autocalibration every time you move your balance.
Calibrate the balance using a recently certified external calibration weight. Metrology handbooks state that the calibration weight
utilized to calibrate a balance should have a tolerance no larger than the readability of the balance divided by 3. Therefore, a ±0.033g
tolerance weight or better is required.
1
2
3
4
User Action
Remove any containers or weighing samples so
that nothing is on the weighing pan, then press
the TARE button
Press the CAL button
Balance Response
Zeros are displayed
A series of dashes is displayed followed by the flashing calibration weight
and grams (Gr) annunciator.
Place the flashing weight in the center of the
weighing pan
The weight stops flashing and a solid weight and grams annunciator (Gr)
are displayed.
Remove the calibration weight
After approximately 10 seconds the balance will “beep” and display the
calibration weight including decimal places. The balance is now calibrated
and in the normal weighing mode.
The display returns to zeros.
Alternative Autocalibration – To Calibrate the Balance to an Alternate External Weight:
The balance can also be calibrated with an alternate (heavier) weight than is used in the standard Cal function described above. This
alternative calibration function is done as follows.
1
2
3
4
User Action
Remove any containers or weighing samples so
that nothing is on the weighing pan, then press
the TARE button
Press and hold the CAL button until the beep
stops, then release the button
Place one of the alternate calibration weights
listed in the specification table on page 13 in
the center of the weighing pan.
Remove the calibration weight
Balance Response
Zeros are displayed
A series of dashes is displayed followed by a flashing LoAd.
A solid LoAd is displayed.
After approximately 10 seconds the balance will “beep” and display the
calibration weight including decimal places. The balance is now calibrated
and in the normal weighing mode.
The display returns to zeros.
If the calibration process is disturbed or compromised by environmental noise, such as vibration or air currents, or by a procedural
problem “Error” will be displayed and the balance will return to the normal weighing mode. Remove any weight from the weighing
pan and start again.
7
PCount - Front Panel Parts Counting:
Front panel parts counting is a standard feature of the High Capacity Series balances. However, if an optional specific gravity
determination function (SHCSG) is purchased it is installed in place of the front panel parts counting function. High Capacity Series
balances can have either front panel parts counting or specific gravity determination, but not both.
User Action
Balance Response
1 Remove any weighing samples or containers from Zeros are displayed.
the weighing pan, then press the TARE button.
2 Place the empty container in the center of the Zeros are displayed.
weighing pan, then press the TARE button.
3 Press the MENU button repeatedly until PCount is PCount is displayed.
displayed.
4 Press the PRINT button.
nc 10 is displayed. This indicates the number of samples required.
5 Press the MENU button repeatedly to change the The options of nc 10, nc 25, nc 50, nc 100 and MAnuAL are displayed.
sample size.
6 Press the PRINT button to select the desired sample A series of dashes followed by LoAd and the required number of
size.
samples are displayed.
7 Place the required number of samples in the container LoAd will flash while the balance is processing the weight, then the
and press the PRINT button.
number of pieces is displayed.
8 Load the parts to be counted into the container.
The balance displays the number of parts.
9
If the weight of the individual samples is too light
for the balance.
Error is displayed. These parts must be counted on a balance with more
resolution.
10
If the individual sample weight is acceptable, but
the sample size is too small.
Place additional samples in the container and press
the PRINT button.
Repeat step 11 until the sample size is large enough.
Add is displayed.
11
12
13
To update the sample size at any time, place any
quantity, up to 255 pieces, into the container and
wait approximately 10 seconds.
If the sample size is large enough the number of pieces is displayed. If
not, Add will be displayed.
The number of pieces is displayed.
The balance will display the number of samples for approximately 10
seconds, then display a series of ▼’s and will beep.
The sample size has now been updated to the displayed quantity.
14
15
16
To see the actual weight of the samples in the
container, press the MENU button.
To return to parts counting, press the MENU button
The weight of the samples and a series of ▼’s is displayed.
To exit the parts counting function, press the
ON/OFF button
The balance returns to the normal weighing mode.
The number of pieces is displayed.
UnitS - Unit of Weight Selection:
To change the units of measure proceed as follows.
• Repeatedly press the MENU button until UnitS is displayed.
• Press the PRINT button to select this function.
• Press the MENU button repeatedly to scroll through the available units of measure.
o GrAM
Grams
Designated by a▼ on the display
o CArAt
Carats
Designated by a▼ on the display
o OUncE
Ounces
Designated by a▼ on the display
o Pound
Pounds
Designated by a▼ on the display
o Penn
Pennyweights
o OUncEtr.
Troy ounces
o GrAin
Grains
o tAELHon
Hong Kong taels
o tAELSGP
Singapore taels
o tAELroc
R.O.C. taels
o MoMME
Momme
• Press the PRINT button to select the desired unit of weight and return the balance to its normal weighing mode.
8
PC-Prtr – Computer and Printer Interface Function:
This function is used to set the format of the data sent through the balance’s RS-232 port when the PRINT button is pressed or when a
print command is issue by an attached computer.
• Repeatedly press the MENU button until PC-Prtr is displayed.
• Press the PRINT button to select this function.
• Press the MENU button repeatedly to scroll through the available options.
o PrintEr
Displayed weight and units annunciator
o Prt tIM*
Time, date, displayed weight and units annunciator
o Prt GLP*
GLP data, displayed weight and units annunciator
o PC**
The balance begins transmitting the displayed weight and units annunciator continuously
• Press the PRINT button to select the desired option and return the balance to its normal weighing mode.
Note: *Prt tIM and Prt GLP are only available if printer Model Custom DP24E4 is used.
Note: **The speed of the continuous transmission is dependent on the baud rate selected. If continuous send is selected the
balance will continue to send data until this function is turned off by using the preceding procedure to select one of the
other formats.
Note: When the balance’s display shows overload (┌ -- -- -- -- -- ┐) or underload (└ -- -- -- -- -- ┘) “over” and “under”
respectively will be printed when in the continuous send (PC) mode. The send command is ignored in any of the other 3
modes.
bAud rt – Baud Rate Selection:
The balance is delivered in 9600 baud. To change the baud rate of the balance’s serial port proceed as follows.
• Repeatedly press the MENU button until bAud rt is displayed.
• Press the PRINT button to select this function.
• Press the MENU button repeatedly to scroll through the available baud rates 1200, 2400, 4800 and 9600.
• Press the PRINT button to select the desired speed and return the balance to its normal weighing mode.
Note:
The baud rate of the balance must match the baud rate of the printer or computer connected to the balance’s serial
port.
FiltEr – Filter Selection:
All balances are equipped with three user-selectable vibration filters which reduce nervous readings in varying weighing conditions,
especially vibrations. The balance is delivered in FiltEr 3. To change the filter setting, proceed as follows.
• Repeatedly press the MENU button until FiltEr is displayed.
• Press the PRINT button to select this function.
• Press the MENU button repeatedly to scroll through the 3 available options.
o FiltEr1
Least aggressive filtering for use in very stable environmental conditions.
o FiltEr2
More aggressive filtering for less stable conditions.
o FiltEr3
Most aggressive filtering for least stable conditions.
• Press the PRINT button to select the desired setting and return the balance to its normal weighing mode.
Auto 0 – Auto Zero Tracking:
Auto zero tracking is a software function that enables the balance to keep the display at a 0.0 reading. It prevents minor
environmental “noise” from causing the balance to drift away from a 0.0 reading. The balance is delivered with auto zero turned on.
The auto zero tracking function can be turned on or off as follows.
• Repeatedly press the MENU button until Auto 0 is displayed.
• Press the PRINT button to select this function.
• Press the MENU button toggle between on and OFF.
• Press the PRINT button to select the desired setting and return the balance to its normal weighing mode.
9
Density Determination:
Scientech does not offer a density determination kit nor do you need one to determine density. Density is mass (grams) per unit
volume (cubic centimeters).
In order to determine density of a solid, place a graduated flask with a known volume of water on the pan of the balance, tare the
balance, and then place the solid in the flask of water. Divide the displayed weight in grams by the increased volume of water. The
result is the mass per unit volume of the solid in g/cc.
To determine the density of a liquid, place an empty graduated flask on the balance weighing pan, tare the balance, then pour the
liquid into the graduated flask. Divide the displayed weight in grams by the volume of the liquid. The result is the mass per unit
volume of the liquid in g/cc.
Below Balance Weighing:
Note:
Please use care when using below balance weighing. The balance’s suspension can be damaged if the below balance
weighing hanger is subjected to too much force or a sidewards shock.
For applications requiring suspension of weighings below the balance, a hook is provided. To use below balance weighing refer to figure
2 and proceed as follows.
• Gently turn the balance on its side.
• Remove the hole plug
• Mount the balance on a solid pedestal or surface with a hole under the balance to allow access to the hook.
While using the below balance weighing feature all other functions of the balance operate normally. The balance is capable of weighing
both above and below simultaneously provided the capacity of the unit is not exceeded.
The below balance weighing feature is ideal for determining specific gravity. Specific gravity is the ratio of the mass of a body to the
mass of an equal volume of water. Every mineral has its own specific gravity (SG). A list may be found in any Handbook of
Chemistry and Physics. Specific gravity will classify or authenticate a substance. For instance, a diamond’s SG is 3.50-3.53 while
quartz’s is 2.65. The following section discusses how the below balance weighing feature can be used to determine specific gravity.
Specific Gravity Determination:
An optional specific gravity determination program, SHCSG, is available for all High Capacity Series balances. This option must be
purchased and installed when the balance is purchased. The SCHSG program is installed in place of the front panel parts counting
function. High Capacity Series balances can have either the specific gravity determination program of front panel parts counting, but
not both.
Specific Gravity Determination Using the Optional SHCSG Program:
1.
2.
Remove all objects from the weighing pan and press the TARE button. 0.0 will be displayed.
Suspend the empty basket from the below balance hook then press the TARE button. Flashing dashes will be displayed until
a stable reading is obtained, then 0.0 will be displayed
3. Press the MENU button so dEnS is displayed.
4. Press the TARE button. t. – H2O is displayed.
5. Suspend the empty basket, from the below balance hook, in water, then press the TARE button. Flashing dashes will be
displayed until a stable reading is obtained, then a negative reading will be displayed.
6. Remove the empty basket from the water.
7. Press the MENU button so dEnS is displayed.
8. Press the CAL button so S. – Air is displayed.
9. Load the sample into the empty basket then suspend the basket from the below balance weighing hook. Press the CAL
button. A flashing S. – Air is displayed until a stable reading is obtained. The balance then beeps and S. – H2O is displayed.
10. Suspend the sample and basket in water then press the CAL button. A flashing S. – H2O is displayed until a stable reading is
obtained, then the density of the sample will be displayed.
11. Press the MENU button to return to the normal weighing mode.
The balance will store the tare values until it is turned off. To determine the specific gravity of another sample, start at step 7. To
reset the tare values, start again at the beginning of the procedure.
10
Specific Gravity Determination Without the Optional SCHSG Program:
1.
2.
3.
4.
5.
Install a below balance weighing apparatus, such as a wire hook, including a pan suspended in a bowl of water. Insure that the
pan and the hanger do not touch any part of the bowl and all are totally submerged. Then tare the balance.
Place the sample to be tested on the balance pan and record the weight reading shown on the display. You may use any unit of
measure you desire.
Place the same sample to be tested on the pan suspended in the bowl of water. Make sure that the sample is completely
submerged in the water and record the weight reading shown on the display.
Subtract the reading in Step 3 from the reading in Step 2.
Divide the reading in Step 2 by the number calculated in Step 4. The result is the SG of your sample.
EXAMPLE:
Reading in Step 2 = 6.50
Reading in Step 3 = 4.25
Subtraction
= 2.25
Division (Step 5) = 6.50/2.25= 2.89 specific gravity
Options:
Optional RS-232 Printers:
Note:
Printers must be serial.
Contact Scientech for available printers.
RS-232 Interface:
Your balance is equipped with a bi-directional RS-232 compatible interface. The interface is uni-directional (balance send only) when the
balance is connected to a serial printer and bi-directional when connected to a computer. The RS-232 connector is a 9 pin D subminiature
connector located on the balance rear panel. See Figure 3.
RS-232 Specifications:
Format
Display Format
1200, 2400, 4800, and 9600 baud rate selectable
Code: ASCII
Parity is not considered
8 data bits, 1 start bit, 1 stop bit
First character
Space or minus sign
Second thru ninth characters
Displayed weight or pieces number
Tenth thru twelfth characters
Unit of weight annunciator
Thirteenth character
Carriage return
Fourteenth character
Line feed
RS-232 Cable Requirements for Connecting to a Computer:
Figure 6 – Computer cable
RS-232 Cable Requirements for Connecting to a Serial Printer:
Figure 7 – Printer cable
11
RS-232 Command Set from a Computer:
With the exception of the Alternative Calibration function described on page 7, all balance functions available through the balance’s
front panel are also available through RS-232. The command set is shown below.
Balance Function
TARE
CAL (calibrate)
PRINT (send or select)
MENU
ON/OFF
Computer Keyboard
Entry
T
C
E
M
O
ASCII Code
Location in Manual
H54
H43
H45
H4D
H4F
Page 6
Page 6
Page 6
Page 6
Page 6
For example, to program the balance, through the computer, to continuously send readings in carats, proceed as follows.
• Press the M key repeatedly until UnitS is displayed on the balance
• Press the E key to select UnitS
• Press the M key repeatedly until CArAt is displayed on the balance
• Press the E key to select CArAt
• Press the M key repeatedly until PC-Prtr is displayed on the balance
• Press the E key to select PC-Prtr
• Press the M key repeatedly until PC is displayed on the balance
• Press the E key to select PC
The balance will now continuously send the weight in carats to the computer.
Troubleshooting Guide:
Note:
Many problems such as the balance remaining in the turn on sequence, "weird" characters on the display or
"garbage" on the display are caused by connecting the power supply to the balance incorrectly. The proper
procedure is to connect the round connector on the power supply cable to the balance then plug the power supply into
the wall outlet.
Problem
Possible Cause
Possible Solution
The display is blank
*Balance not turned on
*Press ON/OFF switch
*Power cable not plugged in
*Press ON/OFF switch
*Turn on circuit breaker
*No power from AC outlet
*Change AC outlets
*Maximum capacity exceeded
*Reduce container weight
┌ -- -- -- -- -- ┐ appears in display
*Weigh sample in smaller increments
*Pan is not in place
*Insure pan is positioned properly
└ -- -- -- -- -- ┘appears in display
*Balance is out of range
*Press ZERO switch
The display is unstable
*Drafts (air currents are present)
*Install windscreen, relocate balance
*Isolate balance from vibration, relocate balance
*Vibrations are present
*Select a different filter setting
*Recalibrate balance
Weight readings are incorrect
*Balance is out of calibration
*Level balance
*Balance is not level
*Display was not zeroed before weight was *Press ZERO switch before weighing
placed on pan
*Object being weighed is not fully on *Reposition object
weighing pan and touching the side of
*Select proper weighing mode
balance or case top
*Unit of weight selection is incorrect
Error appears in display
*Procedural error
*Review procedure in manual and try again
CE Mark:
All Scientech High Capacity Electronic Balances carry the CE Mark.
12
Specifications for SHC High Capacity Balances:
Model
SHC 12
SHC 16
SHC 20
SHC 30
Weighing Mode
Single Range
Capacity
12 Kg
16 Kg
20 Kg
30 Kg
Readability
0.1 gram
Tare Range
0-12 Kg
0-16 Kg
0-20 Kg
0-30 Kg
Repeatability
0.2 g standard deviation
(Standard Deviation)
Linearity
± 0.2 g
± 0.3 g
Stabilization Time
~3 Seconds
Units of weight
grams, carats, ounces, pounds, pennyweights, troy ounces, grains, Hong Kong taels, Singapore taels, R.O.C. taels, momme
Data Interface
RS-232 bidirectional interface is standard. Baud rates are 1200, 2400, 4800, and 9600.
Pan Size
Rectangular 12.5” x 8.5”/31.75cm x 21.6cm
Operating Temperature
50°F to 86°F /10°C to 30°C
Power Supply
Remote adapter for 120 Volts/50Hz or 60 Hz ± 10 %
Remote adapter for 230 Volts/50Hz or 60 Hz ± 10 %
Calibration Weight
4 Kg
4 Kg
10 Kg
10 Kg
Alternative Calibration
In increments of 1000 grams from 5000g to capacity
20 Kg
20 Kg
Weight
30 Kg
Housing (WxDxH)
12.75" x 12.50" x 4.00"/ 32.4cm x 31.75cm x 10.1cm
Weight
21.4 pounds/9.7Kg
24.5 pounds/11.1Kg
Table of Capacities and Resolutions:
Unit of measure
Grams
Carats
Ounces
Pounds
Pennyweights
Troy Ounces
Grains
Hong Kong Taels
Singapore Taels
R.O.C. Taels
Momme
SHC12
SCH16
SCH20
SCH30
12,200 x 0.1
61,000 x 0.05
430 x 0.001
27 x 0.0001
7850 x 0.01
392 x 0.001
188 x 0.001
325 x 0.001
322 x 0.001
324 x 0.001
3,250 x 0.01
16,250 x 0.1
81,300 x 0.05
570 x 0.001
35 x 0.0001
10,450 x 0.01
520 x 0.001
250 x 0.001
432 x 0.001
430 x 0.001
433 x 0.001
4,330 x 0.01
20,500 x 0.1
102,500 x 0.05
720 x 0.001
45 x 0.0001
13,170 x 0.01
658 x 0.001
315 x 0.001
547 x 0.001
541 x 0.001
545 x 0.001
5,460 x 0.01
30,500 x 0.1
152,500 x 0.05
1,075 x 0.001
67 x 0.0001
19,600 x 0.01
980 x 0.001
470 x 0.001
814 x 0.001
806 x 0.001
813 x 0.001
8,133 x 0.01
13
Limited Warranty:
All Scientech High Capacity Series Electronic Balances and their accessories are warranted against defects in materials and workmanship
two (2) years from the date of delivery. During the warranty period, Scientech will repair, or at its option replace at no charge,
components that prove to be defective. The equipment must be returned, shipping prepaid, to Scientech's product service facility. This
limited warranty does not apply if the equipment is damaged by accident or misuse or as a result of service or modification by other than
a Scientech service facility. The foregoing warranty is in lieu of all other warranties expressed or implied including but not limited to any
implied warranty of merchantability, fitness, or adequacy for any particular purpose or use. Scientech, Inc. shall not be liable for any
special incidental or consequential damages whether in contract, tort or otherwise.
Returned Goods Procedure:
Should it become necessary to return any item to Scientech for any reason, please contact our Product Service Department at (800) 5250522 or (303) 444-1361 or Fax (303) 444-9229 or E-mail [email protected]. When you contact us, please be ready to provide the
model number, serial number and a description of the problem. Frequently we can provide self-help information that will eliminate the
need for returning the unit.
If equipment return is required, please pack the items in the original box and packing material. As an alternate, place equipment in a snug
fitting box, then pack that box in a larger box with at least four inches of packing material between the two boxes. Scientech does not
assume responsibility for under packed items.
Please include the name and phone number of the person we should contact regarding repair question(s).
Normally, products are repaired and shipped within 5 working days after their arrival at the product service facility. This is an average
time and could vary depending on the workload.
Shipping Address:
Scientech, Inc.
5649 Arapahoe Avenue
Boulder, CO 80303
U.S.A.
Disposal of Electrical and Electronic Equipment:
Scientech, Inc. recommends the following for disposal of electrical and electronic equipment:
1. The best option is to reuse the equipment in its entirety.
2. Where the equipment can not be reused in its entirety, priority should be given to reuse of its subassemblies and components.
3. Where reuse is not appropriate, electrical and electronic equipment, including batteries, should be recycled according to local
ordinances.
4. Waste electrical and electronic equipment should never be mixed with municipal waste.
14
Notes:
15
Quick Setup Guide:
1
UNPACK BALANCE
3
LEVEL BALANCE
Adjust 3 adjustable feet to level the balance by
centering the LEVEL INDICATOR.
5
TURN ON BALANCE
Press the ON/OFF switch and make sure the balance
goes through the following sequence.
6
WARM UP 1 HR, THEN
CALIBRATE
2
Calibration instructions in manual.
PLACE IN PROPER
ENVIRONMENT
4
CONNECT BALANCE
TO ELECTRICAL OUTLET
16