1
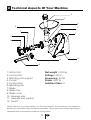
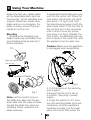
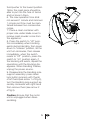
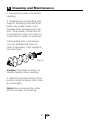
BKK 2184
Meat Mincer
User Manual
Read this manual prior to initial operation of the product!
Dear Customer,
We hope that your product, which has been manufactured in
modern facilities and passed through a strict quality control
procedure, will give you very good results.
We advise you to read through this manual carefully before
using your product and keep it for future reference.
The User Manual will help you use your machine in a
fast and safe way.
• Read the User Manual before installing and starting your
product.
• In particular, follow the instructions related to safety.
• Keep this User Manual within easy reach for future reference.
• Also read all additional documents supplied with this
product.
Remember that this User Manual is also applicable for several
other models. Differences between models will be identified in
the manual.
This product has been produced in environmentally friendly, modern facilities
CONTENT
1 Safety Warnings
2
2 Technical Aspects Of Your Machine
3
3 Using Your Machine
4-5
4 Making Sausage
6
5 Cleaning and Maintenance
7
1
1 Safety Warnings
When using the electrical appliance, the below basic safety
precautions should be followed:
• Read all instructions.
• To protect against risk of electrical shock do not put the motor
unit in water or other liquid.
• Before using, check that the
voltage power corresponds to the
rating label of the appliance.
• Close supervision is necessary
when any appliance is used by or
near children.
• Do not operate any appliance
with a damage cord or plug or
after the appliance malfunction or
has been damaged in any manner
.Return the appliance to the nearest authorized service facility for
examination ,repair or adjustment.
• Unplug from outlet when not in
use, before putting on or taking off
parts, and before cleaning.
• Never feed food by hand.
Always use food pusher.
• Blades are sharp, so handle
carefully.
• The use of attachment, not recommended or sold by manufacture may cause fire, electric shock
or injury.
• The appliance cannot be used
for blending hard and dry substance, otherwise the blade could
be blunted.
• Do not let cord hang over edge
of table or counter.
2
• Do not use fingers to scrape
food away from discharge disc
while appliance is operating. Cut
type injury may result.
• Do not use outdoors.
• Never run the appliance empty
after assembling the blade and
blade tray. Otherwise the blade
and blade tray will be abraded
seriously, and accelerate the unit
aging.
• Save these instructions
• This appliance is not intended
for use by persons (including children) with reduced physical, sensory or mental capabilities, or lack
of experience and knowledge,
unless they have been given supervision or instruction concerning
use of the appliances by a person
responsible for their safety.
Children should be supervised to
ensure that they do not play with
the appliance.
2 Technical Aspects Of Your Machine
5
4
3
6
2
7
1
8
9
11
12
10
Net weight : 3.25 kg
Voltage : 230 V ~
Frequency : 50 Hz
Power : 600 W
Isolation Class : II
1- Motor Unit
2- Lock button
3- Blending pole support
4- Funnel
5- Food pusher
6- Blending pole
7- Blade
8- Blade tray
9- Blade cover
10- Sausage pole
11- Sausage pole support
12- Switch
Values stated on your product labels or in the documentation accompanying it are obtained in
laboratory in accordance with the relevant standards. These values may change depending on
operational and environmental conditions of the product.
3
3 Using Your Machine
Before the first use, please clean
all the detachable parts such as
food pusher, funnel, blending pole
support, blade tray, blade cover,
blade and so on completely, the
blade is sharp, ensure that your
hands do not be hurt.
Blending
1. Assemble the blending pole,
blade, blade tray and blade cover
as illustrated as figure (see fig.1)
before blending.
Pin
2.Assemble the blending pole support into the motor unit. Press the
lock button with thumb one hand
(see arrow 1 of fig.2), and hold
the blending pole support with the
other hand, insert it into the hole of
the unit and turn it anti-clockwise
until it cannot move any longer
(see arrow 2 of fig.2). Release the
lock button, the blending pole support is fixed on the motor unit, and
the appliance can be used now.
Caution: Make sure the appliance
is unplugged when assembling.
2
Align the location hole
with the pin
1
The edge of blade
Fig.2
Fig.1
Note: Let the location hole on
the blade tray align with the pin,
and make sure the edge of blade
toward the blade tray when assembling. Never assemble the
blade reversely.
4
3. Put the funnel on the blending
pole support.
4.Ensure that the unit is set at
0 position, then plug in power
supply.
5. Press the switch to “on” position (the blending blade turns anticlockwise), when the appliance
operates normally, put the meat
piece into funnel, then press the
food pusher to the lowest position.
Note: the meat piece should be
able to put into the hole of funnel
and no bone in them.
6. The max operation time shall
not exceed 1 minute and minimum
1 minute rest time must be maintained between two consecutive
cycles.
7. Place a clean container with
proper size under blade cover to
receive meat powder come from
the appliance.
8. Press the switch to “off” position immediately when blocking
exists during blending, then press
down to “reverse” position, let the
unit turn clockwise, then release
immediately, when the switch
resets to “off” position, press the
switch to “on” position again, if
the blocking still exists, repeat the
operations until the blocking disappears. When blending finishes,
unplug the power source.
9. Disassemble the blending pole
support assembly: press down
lock button properly with thumb
of left hand (see arrow 1 of Fig.3),
turn the blending pole support assembly clockwise with right hand
then remove them (see arrow 2
of fig.3).
Caution: Ensure that the motor
unit is unplugged when disassembling.
5
2
1
Fig.3
4 Making Sausage
1.Assemble the blending pole,
sausage pole support, sausage
pole, blade cover as illustrated as
figure (see fig.4).
Pin
Align the location hole
with the pin
Fig. 4
Note: Never assemble blade and
blade tray when use for making
sausage, and do not assemble
sausage pole and sausage pole
support when blending meat.
2. Set clean small intestine to
sausage pole as the figure 5, then
place blended meat powder into
funnel.
Fig. 5
6
3.Press the switch to “on”position,
the appliance turns anti-clockwise
and the meat powder enters the
small intestine, you can tie anywhere you like with thread to make
the sausage has proper length.
5 Cleaning and Maintenance
1. Unplug the power cord before
cleaning.
2. Disassemble the blending pole
support, blending pole (see fig.6),
blade tray, blade, blade cover,
sausage pole, sausage pole support, food pusher, funnel and so
on except the motor unit, then immerse them in water for cleaning.
The blending pole is as follows,
you can disassemble them to
clean if necessary, then replace in
turn (see fig.6)
Fig. 6
Caution: The blade is sharp, so
handle carefully when cleaning.
3. Wipe the outside surface of the
motor unit with a damp cloth, then
dry thoroughly.
Note: Never immerse the motor
unit in the water for cleaning.
7
www.beko.com