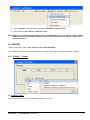
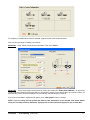
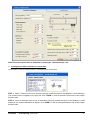
1
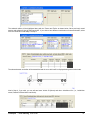
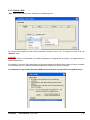
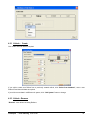
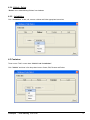
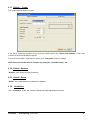
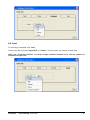
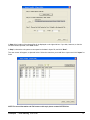
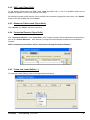
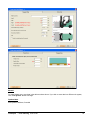
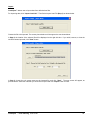
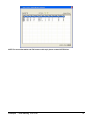
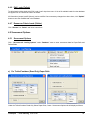
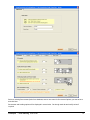
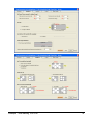
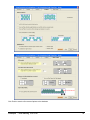
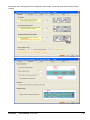
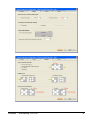
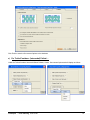
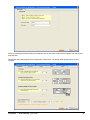
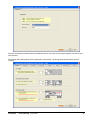
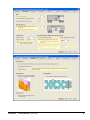
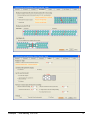
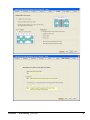
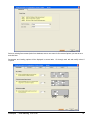
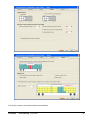
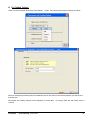
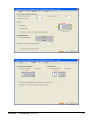
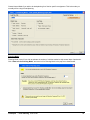
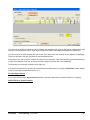
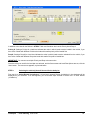
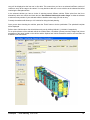
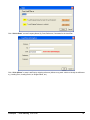
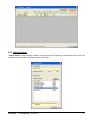
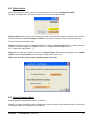
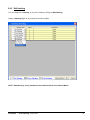
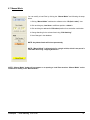
Load Xpert™ - Load Planning User Guide 5990 Auteuil Ave., Brossard, QC, Canada, J4Z 1N2 Tel.: (450) 923-1458 Fax: (450) 923 2077 email: [email protected] www.loadxpert.com Copyright © 2006-2010, CIE-TECH Inc. All rights reserved. Table of Contents Section 1: Introduction 1.1 Features of Load Xpert™ - Load Planning software 1.2 Getting Started Section 2: Instructions for Administrator Section 3: Instructions for Supervisors and Operators Section 4: Database - Enter Data (vehicle & Load) 4.1 Trailer 4.1.1 Vehicle - Create 4.1.2 Vehicle - Edit 4.1.3 Vehicle - Rename 4.1.4 Vehicle – Delete 4.1.5 Jurisdiction Name 4.2 Railcar 4.2.1 Vehicle – Create 4.2.2 Vehicle - Edit 4.2.3 Vehicle - Rename 4.2.4 Vehicle – Delete 4.2.5 Jurisdiction 4.3 Container 4.3.1 Vehicle – Create 4.3.2 Vehicle - Edit 4.3.3 Vehicle - Rename 4.3.4 Vehicle – Delete 4.3.5 Jurisdiction 4.4 Load 4.4.1 4.4.2 4.4.3 4.4.4 4.4.5 4.4.6 4.4.7 Create new Loads (Paper Rolls) Edit Loads (Paper Rolls) Rename or Delete Loads (Paper Rolls) Production Diameter (Paper Rolls) Create new Loads (Pallets/…) Edit Loads (Pallets/…) Rename or Delete Loads (Pallets/…) 4.5 Securement Options 4.5.1 Securement Option Section 5: Database - Other Options Section 6: Import (Manual/Batch Mode) Section 7: Unit System Section 8: Doing Load Planning 8.1 Main Menu 8.2 Using Wizard to do Load Planning 8.3 Printing a Load Plan 8.4 Saving a Load Plan Load XpertTM – Load Planning User Guide 2 8.5 Opening a Load Plan 8.6 Editing a Load Plan 8.6.1 Edit vehicle 8.6.2 Change Vehicle 8.6.3 Delete Vehicle 8.6.4 Change Transport Mode 8.6.5 Edit Hatching 8.7 Manual Mode Load XpertTM – Load Planning User Guide 3 SECTION 1: Introduction Load Xpert™ - Load Planning software is a very powerful and easy-to-use software that automatically suggests loading configurations for transporting paper rolls, pallets, skids and boxes via trailers, railcars and containers. This user manual is intended to give a general overview and to provide guidelines on how to use the software. 1.1 Features of Load Xpert™ - Load Planning software Load Xpert™ – Load Planning software uses a very unique optimization method to do the load planning. Some of the main features of Load Xpert™ – Load Planning are: 1.2 Maximizes payload carried in a vehicle Complies with axle load limits for trailers Complies with center of gravity height limits for railcars Creates load plans with minimum securement needs Automatically inserts risers, void fillers, air bags and straps All suggested load plans comply with industry best practices for cargo securement Getting Started Please make sure the software protection key (HASP key) is inserted in the USB or Parallel port before you open the software. Login: Before you could use Load Xpert™ software you need to login into the software with a password. Contact your administrator to get your password. SECTION 2: Instructions for Administrator Administrators have full privilege to assign user accounts and to create, edit, rename and delete entries in the database. Follow the instructions below: 1. After login, click “Database” in main menu. 2. Click “Administrator Management” and click on the “User” menu to create all new user accounts. Load XpertTM – Load Planning User Guide 4 Make sure you verify first the location of the current database in use. If you wish to select a different database or move the database to another location in your computer, click “Select” or “Move” and follow instructions. There are three types of user categories beside Administrator: Supervisor Operator Viewer The main difference between these user categories is the privileges they have for accessing the database and for changing Load Plan Options. NOTE: Administrator has full privilege 3. Click “Privilege Manager” to assign privileges to Supervisors and Operators. Privileges can be assigned to any of the following four options: Trailer and Container (Road only) Trailer and Container (Intermodal) Trailer and Container (Road only - Mix) Railcar General Options Load XpertTM – Load Planning User Guide 5 For example if you click “Trailer and Container (Road Only)”, the following will appear on the screen. Click the tab to select Paper Rolls or Pallets and assign editing privileges. In the same way, you can assign appropriate editing privileges for “Trailer and Container (Intermodal)” and for “Railcar”, Railcar Options are shown below: By clicking “General Options” you can assign privileges related to Vehicle to Load data, Add/Delete Securement Options, Import Load List, etc., as shown below. Load XpertTM – Load Planning User Guide 6 NOTE: Click the Compact Database to compact your current database in use SECTION 3: Instructions for Supervisors & Operators Depending on the privileges assigned to you by the administrator, you may be able to access under “Database”: “Data Entry (Vehicle & Load)” to create, edit, rename and delete Vehicle & Load (see details in Section 4) “Securement & Loading options” to create, edit, rename and delete securement and loading option set “Other Options” (see details in Section 4) SECTION 4: Database - Enter Data (Vehicle & Load) Depending on the privileges assigned to you by the administrator, you may be able to access “Data Entry (Vehicle & Load)” to create, edit, rename and delete Vehicle & Load data. To enter data on Vehicle & Loads: 1. Make sure you select the appropriate unit system you wish to work with. In the main menu next to “Unit System” the current unit system active in the software is displayed. If you wish to change this unit system, click “Unit System” and select US (in, lb) or metric (mm, cm, m, kg) units of your choice. Load XpertTM – Load Planning User Guide 7 2. Click “Database” in the main menu and select “Data Entry (Vehicle & Load)”. 3. Enter data for Trailer, Railcar, Container or Load. NOTE: Make sure you verify first the location of the current database in use. If you wish to select a different database or move the database to another location in your computer, click “Select” or “Move” and follow instructions. 4.1 TRAILER There are two “Tabs” to enter data: “Vehicle” and “Jurisdiction Name”. Click “Vehicle” and there are five drop-down items to Create, Edit, Rename, Delete and view Max. Payload: 4.1.1 Vehicle - Create a) Creating Tractors: Click Tractor and select a Tractor Configuration (tractor # 1 to # 4). Load XpertTM – Load Planning User Guide 8 For example, if a tandem drive tractor is selected, a typical screen will be as shown below. Now you have two ways of creating a new tractor. Method #1: Enter Tractor ID and all other information. Then click “Finish”. Method #2: Select a previously saved tractor by clicking the combo box “Select from database”. All previously created and saved tractors will be listed and you can select the tractor of your choice. When you choose a tractor, all data including Tractor ID will be displayed. You can edit any data including the Tractor ID. If you wish to enter data in a different unit system, click “Unit System” button to change. NOTE: If you are using US Unit system and wish to enter dimensions in ft-in, double click mouse button when you are ready to enter a dimension. A pop-up box as shown below will appear for you to enter data. Load XpertTM – Load Planning User Guide 9 b) Creating Semitrailers / Flatbed: Click Semitrailer and select a configuration (Semitrailer # 1 to # 9) For example, if a tandem trailer (Semitrailer # 2) is selected, a typical screen will be as shown below. Enter Semitrailer ID and other information. If you wish to create new Semitrailer from a previously created Semitrailer, click “Select from database”, enter a new Semitrailer ID and then edit data as required. Select the Closed Van to create a Semitrailer and Flatbed to create a Flatbed Load XpertTM – Load Planning User Guide 10 NOTE: Enter the unusable area for Semitrailer by clicking the “Unusable Area(s) ” tab. c) Creating Vehicle with Jurisdiciton(s) (Create New) Use this menu, if you are creating Vehicle + Jurisdiciton(s) for the first time. STEP 1: Select a Tractor from the list of Tractors previoulsy created and saved in the database. A small drawing of your selected tractor will appear on the right side. Click “ZOOM” to view the selected Tractor with its tare weights and axle loads. STEP 2: Select a Semitrailer from the list of Semitrailers previously created and saved in the database. A small drawing of your selected Semitrailer will appear. Click “ZOOM” to view the selected Semitrailer with its tare weights and axle loads. Load XpertTM – Load Planning User Guide 11 As soon as STEP 2 is completed, an assembled Tractor - Semitrailer with a default name (Tractor name + Semitrailer name) will be displayed along with its tare axle loads. As before click “ZOOM” to view the vehicle with its tare weights and axle loads. STEP 3: Here you first select all Jurisdictions (States or Provinces) where your selected vehicle may travel and then enter your vehicle’s desired GVW (Gross Vehicle Weight) and Axle Load limit for each Axle Groups for each of these jurisdictions. To select the Jurisdiction from the drop-down list, you must have these Jurisdiction names saved previously in the database. To save Jurisdiction names in the database, click “Add Jurisdiction Name” tab, enter and save. In the case of U.S. Interstate Jurisdiction (Federal Bridge Formula), it is programmed in the software as a default and can be selected from the Jurisdiction drop-down list in Step 3 as “U.S. Interstate”. Therefore there is no need for you to enter data for U.S. Interstate. A typical example is shown below: d) Creating Vehicle with Jurisdiciton(s) (from Previously Saved) Use this menu, if you wish to modify Jurisdiction(s) information (i.e., Jurisdiction name, Desired GVW and Axle Load limits) for a previously created tractor-semitrailer combination vehicle. In Step 1, as shown below, select the vehicle. Load XpertTM – Load Planning User Guide 12 The selected vehicle will be highlighted along with the Tractor and Trailer as shown below. Other previously saved tractors and trailers will also be listed as shown. If you wish to have different combination of tractor and trailer, select from the combo-box under Step 2 or Step 3. The selected tractor and trailer will be assembled and the new vehicle will be displayed along with its axle loads. Now in Step 4, if you wish, you can edit and save Vehicle ID (Name) and other Jurisdiction Info. (i.e., Jurisdiction name, Desired GVW and Axle Load limits). Load XpertTM – Load Planning User Guide 13 4.1.2 Vehicle - Edit “Edit” menu allows editing Tractor, Semitrailer or Jurisdiction(s) Info. For Tractor and Semitrailer you can edit all information except the name or ID. To change the name or ID, use “Rename” menu. CAUTION: If you edit a Tractor or a Semitrailer, the following message box will appear with a warning. It is important that you follow the instructions. For example, if you edit a Trailer and update it, all previously assembled vehicles with this trailer will also be updated. The Jurisdiction info (i.e., desired GVW and axle load limits), however, will remain unchanged. It is important to verify whether the desired GVW and axle load limits are still valid for the updated vehicle. Load XpertTM – Load Planning User Guide 14 If the Jurisdiction Info. requires editing, click “EDIT” and then “Jurisdiction(s) Info.” and update desired GVW and axle load limits for each one of the updated vehicles. If you edit Jurisdiction(s) Info., the tractor and trailer for the selected vehicle will be displayed along with the Jurisdiction info. The Jurisdiction name can’t be edited. However, the desired GVW and the axle load limits can be edited. To add a new Jurisdiction, first click “Add Jurisdiction Name” and add. Then enter desired GVW and axle load limits. 4.1.3 Vehicle - Rename “Rename” menu allows renaming Tractors, Semitrailers or Vehicles. If you rename a Vehicle, all associated Jurisdiction Info. (Desired GVW and axle load limits) with the old vehicle will now be associated with new vehicle. 4.1.4 Vehicle - Delete “Delete” menu allows deleting Tractors, Semitrailers or Vehicle + Jurisdiction(s). When a vehicle + Jurisdiction(s) is deleted, all Jurisdiction Info. (Desired GVW and axle load limits) associated with that vehicle will also be deleted. CAUTION: When you delete a tractor or a trailer, the change will be propagated, and all the vehicles which have the deleted tractor or trailer as a part, will also be deleted from the database. If you have a load plan saved with any deleted vehicle, then that load plan, although viewable, can no longer be edited. 4.1.5 Jurisdiction Name Click “Jurisdiction Name” to add, rename or delete and follow appropriate instructions. 4.2 Railcar There are two “Tabs” to enter data: “Vehicle” and “Jurisdiction”. Click “Vehicle” and there is four drop-down items to Create, Edit, Rename and Delete: Load XpertTM – Load Planning User Guide 15 4.2.1 Vehicle - Create Click create and enter data as required. If you wish to create new Railcar from a previously created vehicle, click “Select from database”, enter a new Railcar ID and then edit data as required. If you wish to enter data in a different unit system, click “Unit System” button to change. 4.2.3 Vehicle - Rename “Rename” menu allows renaming Railcars. Load XpertTM – Load Planning User Guide 16 4.2.4 Vehicle - Delete “Delete” menu allows deleting Railcars from database 4.2.5 Jurisdiction Click “Jurisdiction” to add, edit, rename or delete and follow appropriate instructions. 4.3 Container There are two “Tabs” to enter data: “Vehicle” and “Jurisdiction”. Click “Vehicle” and there is four drop-down items to Create, Edit, Rename and Delete: Load XpertTM – Load Planning User Guide 17 4.3.1 Vehicle - Create Click create and enter data as required. If you wish to create new Container from a previously created vehicle, click “Select from database”, enter a new Container ID and then edit data as required. If you wish to enter data in a different unit system, click “Unit System” button to change. NOTE: Enter the unusable area for Container by clicking the “Unusable Area(s) ” tab. 4.3.2 Vehicle - Rename “Rename” menu allows renaming Containers. 4.3.3 Vehicle - Delete “Delete” menu allows deleting Containers from database 4.3.4 Jurisdiction Click “Jurisdiction” to add, edit, rename or delete and follow appropriate instructions. Load XpertTM – Load Planning User Guide 18 4.4 Load To enter Cargo (Load) data, click “Load”. Choose cargo type by clicking “Paper Rolls” or “Pallets/..” and then create, edit, rename or delete loads. NOTE: Use “Production Diameter” to specify average production diameter to be used by software for calculation for paper rolls. Load XpertTM – Load Planning User Guide 19 4.4.1 Create new Loads (Paper Rolls) To create new Loads (Paper Rolls), there are two ways: Manual and Import. Manual: For manual data entry, enter data in the table as shown below. If you wish to enter data in a different unit system, click “Unit System” button to change. Import: Load Xpert™ allows user to import data from delimited text files. For importing data, click “Import Load List”. Then Select Import Load File (Step 1). Load XpertTM – Load Planning User Guide 20 In Step:2, the location of the selected file will be displayed on the right side box. If you wish, however, to view the text file that was imported, click “View” button. In Step 3, choose the unit system to correspond to the data in import file, and click “Next”. The next screen will appear, as pictured below. Select the rows that you would like to import and click “Import” to finish. NOTE: For more information and File format on this topic please contact CIE-TECH Inc. Load XpertTM – Load Planning User Guide 21 4.4.2 Edit Loads (Paper Rolls) To edit already existing loads click ‘Edit’ under ‘Load’ drop-down menu. A list of all available loads from the database will appear in a list. Choose the load to be edited. All information (except Load ID (Name)) can be modified. Once necessary changes have been done, click “Update” button to save the modified load in the database. 4.4.3 Rename or Delete Loads (Paper Rolls) Click “Rename” or “Delete” and follow instructions. 4.4.4 Production Diameter (Paper Rolls) Click “Production Diameter” under “Paper Rolls” menu to assign Average Production Diameters corresponding to each of the “Ordered Diameters”. Enter data only if Average Production Diameter is different from the Ordered Diameter. NOTE: Load planning calculations will be solely based on Average Production Diameters. 4.4.5 Create new Loads (Pallets / ..) To create new Loads (Pallets), there are two ways: Manual and Import. Load XpertTM – Load Planning User Guide 22 Manual: For manual data entry, enter data in the table as shown above. If you wish to enter data in a different unit system, click “Unit System” button to change. Optional data: Enter partial Load data, if needed Load XpertTM – Load Planning User Guide 23 Import: Load Xpert™ allows user to import data from delimited text files. For importing data, click “Import Load List”. Then Select Import Load File (Step 1) as shown below. Choose the file to be imported. The screen pictured above will change as the one shown below: In Step:2, the location of the selected file will be displayed on the right side box. If you wish, however, to view the text file that was imported, click “View” button. In Step 3, choose the unit system same as the imported file, and click “Next”. The next screen will appear, as pictured below. Select the rows that you would like to import and click ‘Import’ button to finish. Load XpertTM – Load Planning User Guide 24 NOTE: For more information and File format on this topic please contact CIE-TECH Inc. Load XpertTM – Load Planning User Guide 25 4.4.6 Edit Loads (Pallets) To edit already existing loads click ‘Edit’ under ‘Load’ drop-down menu. A list of all available loads from the database will appear in a list. Choose the load to be edited. All information (except Load ID (Name)) can be modified. Once necessary changes have been done, click “Update” button to save the modified load in the database. 4.4.7 Rename or Delete Loads (Pallets) Click “Rename” or “Delete” and follow instructions. 4.5 Securement Options 4.5.1 Securement Options Click “Securement & Loading Options” under “Database” menu to enter securement data for Paper Rolls and Pallets/Skids. a) For Trailer/Container (Road Only) Paper Rolls Under the Trailer/Container Road Only Select Paper Rolls, Create. Securement Options tab will display as follows. Load XpertTM – Load Planning User Guide 26 Select an existing Securement Option from database, enter a new name for Securement Options you want to save and click Next Securement and Loading options will be displayed in several tabs. Go through each tab and modify values if required. Load XpertTM – Load Planning User Guide 27 Load XpertTM – Load Planning User Guide 28 Click Finish to save the Securement Options to the database Load XpertTM – Load Planning User Guide 29 b) For Trailer/Container (Road Only) Palletts/… Under the Trailer/Container Road Only Select Palletts/…, Create. Securement Options tab will display as follows. Select an existing Securement Option from database, enter a new name for Securement Options you want to save and click Next Load XpertTM – Load Planning User Guide 30 Securement and Loading options will be displayed in several tabs. Go through each tab and modify values if required. Load XpertTM – Load Planning User Guide 31 Load XpertTM – Load Planning User Guide 32 Click Finish to save the Securement Options to the database Load XpertTM – Load Planning User Guide 33 c) For Trailer/Container (Road Only) Paper Rolls + Palletts/… Under the Trailer/Container Road Only Select Paper Rolls + Palletts/…, Create. Securement Options tab will display as follows. Select an existing Securement Option from database, enter a new name for Securement Options you want to save and click Next Securement and Loading options will be displayed in several tabs. Go through each tab and modify values if required. Load XpertTM – Load Planning User Guide 34 Load XpertTM – Load Planning User Guide 35 Load XpertTM – Load Planning User Guide 36 Load XpertTM – Load Planning User Guide 37 Click Finish to save the Securement Options to the database d) For Trailer/Container (Intermodal) Paper Rolls Under the Trailer/Container Road Only Select Paper Rolls, Create. Securement Options tab will display as follows. Load XpertTM – Load Planning User Guide 38 Select an existing Securement Option from database, enter a new name for Securement Options you want to save and click Next Securement and Loading options will be displayed in several tabs. Go through each tab and modify values if required. Load XpertTM – Load Planning User Guide 39 Load XpertTM – Load Planning User Guide 40 Click Finish to save the Securement Options to the database e) For Trailer/Container (Intermodal) Pallets/… Under the Trailer/Container Intermodal Select Palletss, Create. Securement Options tab will display as follows. Load XpertTM – Load Planning User Guide 41 Select an existing Securement Option from database, enter a new name for Securement Options you want to save and click Next Securement and Loading options will be displayed in several tabs. Go through each tab and modify values if required. Load XpertTM – Load Planning User Guide 42 Load XpertTM – Load Planning User Guide 43 Click Finish to save the Securement Options to the database f) For Railcar Paper Rolls Under the Railcar Select Paper Rolls, Create. Securement Options tab will display as follows. Load XpertTM – Load Planning User Guide 44 Select an existing Securement Option from database, enter a new name for Securement Options you want to save and click Next Securement and Loading options will be displayed in several tabs. Go through each tab and modify values if required. Load XpertTM – Load Planning User Guide 45 Load XpertTM – Load Planning User Guide 46 Load XpertTM – Load Planning User Guide 47 Load XpertTM – Load Planning User Guide 48 Click Finish to save the Securement Options to the database g) For Railcar Pallets/.. Under the Railcar Select Pallets/.., Create. Securement Options tab will display as follows. Load XpertTM – Load Planning User Guide 49 Select an existing Securement Option from database, enter a new name for Securement Options you want to save and click Next Securement and Loading options will be displayed in several tabs. Go through each tab and modify values if required. Load XpertTM – Load Planning User Guide 50 Load XpertTM – Load Planning User Guide 51 Click Finish to save the Securement Options to the database Load XpertTM – Load Planning User Guide 52 h) For Flatbed Pallets/.. Under the Trailer (Flatbed) Road Only Select Pallets/.., Create. Securement Options tab will display as follows. Select an existing Securement Option from database, enter a new name for Securement Options you want to save and click Next Securement and Loading options will be displayed in several tabs. Go through each tab and modify values if required. Load XpertTM – Load Planning User Guide 53 Load XpertTM – Load Planning User Guide 54 Click Finish to save the Securement Options to the database Load XpertTM – Load Planning User Guide 55 SECTION 5: Database - Other Options 1. Click “Other Options”, to select Import/Export options, Language, Number of Load Plan solutions to display, Company Logo and Top view scale. 2. Select Other Option 2 tab to enter Default Comments to appear in the Printouts for a selected vehicle type. Load XpertTM – Load Planning User Guide 56 SECTION 6: Import (Manual/Batch Mode) The concept behind the “Import” is to allow generating, saving (as image file) and printing Load Plans without using the Start Wizard, where user have to Select the Unit System, Vehicle Type, Load Type, Mode of Operation, Load information, Securements and Load Plan Options, Jurisdiction, and Vehicle. An ASCII file is created as per the format required by the software where all the above mentioned information is provided by the user for example, Jurisdiction Name, Vehicle Name, Securement and Load Plan Options Name, Load Information and the software will generate Load Plans. If manual, then one file at a time is used, and if Batch then all files in a specified folder is used to create different load plans one after the other. NOTE: For more information and File format on this topic please contact CIE-TECH Inc. Load XpertTM – Load Planning User Guide 57 SECTION 7: Unit System Load Xpert - Load planning software allows user to work with US (in, ft-in, lb) or metric (mm, cm, m, kg) unit system. Before entering data for doing load planning, it is advisable to select the appropriate unit system you wish to work with. In the main menu next to “Unit System” the current unit system active in the software is displayed. If you wish to change this unit system, click “Unit System” and select US (in, ft-in, lb) or metric (mm, cm, m, kg) units of your choice. Load XpertTM – Load Planning User Guide 58 SECTION 8: Doing Load Planning 8.1 Main Menu Once you login to the software, the main menu appears. The main menu has five active menu buttons namely 1) Start Wizard 2) Open Load Plan 3) Database 5) Import 6) Unit System Start Wizard: Allows you to create new load plan. Save Load Plan: Allows you to save a load plan on the screen for future use. e.g. viewing or editing Open Load Plan: Allows you to open an already existing load plan for viewing or editing. Database: See details in Section 4 Import: See details in Section 6 Unit System: See details in Section 7 8.2 Using Wizard to do Load Planning NOTE: Example is done for Paper rolls. However, the same methodology applied to pallets/skids. Click “Start Wizard”. STEP 1: Start Load Planning wizard 1. Enter “Load Plan Title”. 2. Verify whether you wish to continue with the Current Unit System displayed. If not, click “Change Unit System” and select unit system of your choice. 3. Choose “Vehicle Type” and “Load Type”. 4. Select Mode of Operation: Normal Mode or Planning Mode Normal Mode: Load XpertTM – Load Planning User Guide 59 Choose Normal Mode if you wish to do load planning for a fixed or specific consignment. This is the mode you normally will be using for load planning. Planning Mode: Planning Mode is used if you wish to estimate the number of vehicles needed to ship several days of production. Click “Enter Info for Planning Mode” and enter info for Planning Mode in the pop-menu shown below. Load XpertTM – Load Planning User Guide 60 For example, let us assume that you are interested in loading cargo from several days of production, say 15 production sequences. Here production sequences can be interpreted as 15 days of production or 15 consecutive production shifts, etc. Now if you wish to restrict loading cargo together inside a vehicle from any 3 out of 15 consecutive production sequences, then “Enter 3” in the box above. Then the software will perform load planning and present vehicles needed to carry cargo from all 15 production sequences but combining loads from any 3 consecutive production sequences. That is no vehicle will have cargo from more than 3 consecutive production sequences. Upon completion of the load planning if any of the vehicle(s) is partially loaded, you have the option to redo the planning by including loads from subsequent production sequences by checking the check box. The # of production sequences selected and the box if checked will be displayed for your convenience adjacent to the button “Enter Info for Planning Mode”. STEP 2: Select list of items to be carried and set securement and loading option if needed Note: This example is for a railcar carrying Paper Rolls Rolls to be loaded in the vehicle can be selected in two ways. Either through the manual selection using the dropdown menu of existing rolls in the database or by importing the loads through “Import Load List” button. If “Diameter List ” is clicked, the following screen will appear. Diameters of all rolls saved in the database will be displayed. This allows you to select which diameters will be displayed in the drop-down list of SKUs. If in case no data has been entered previously, you can create new diameter by clicking the button “Create New Diameter”. The steps involved are as described in Section 4.3.1 (Manual). To enter the production diameter click “Edit Production Diameter”. The steps involved are as explained in Section 5. Note that the load planning will be solely based on Average Production Diameter. Next step will be to select from the database the rolls you want to load by clicking the drop-down menu in the Table. Only rolls corresponding to diameters previously selected in “Select Diameter” list will be available. As soon as you select, the row will be filled with information on Roll Name / SKU, Order Diameter, Roll width, and Roll weight. The information filled is read only and will be shaded in light beige color. Load XpertTM – Load Planning User Guide 61 You can enter # of Rolls and Rolls per Pack. Software will calculate the # of Packs and will be displayed as a read only info in the subsequent column. Total cargo entered in the table will be displayed highlighted in yellow color. You have a choice of either selecting the color for the roll or leave auto color selection by the software for displaying. There are 100 rows in the grid, and each row can have different rolls. At any time if you wish to remove a particular cargo from the load plan, check the clear button and the selected row (cargo) will be deleted. If you wish to remove the entire cargo list from the table, click “Clear All”. The next step is to select the orientation of the paper roll. Final step in this sequence is to select Securement and Load Plan Options by clicking “Select/View” button. Details of how to enter data is described in Section 4.1.7. For Importing Load List If you import loads through “Import Load List” button, then follow instructions outlined in Section 4.3.1 (Import). NOTE STEP 2 for Trailer/Container Load XpertTM – Load Planning User Guide 62 In addition to the data for the Railcar in STEP 2 Trailer and Container also has the Priority # and Drop #. Priority # : Setting a Priority for a load item indicates the order in which Loads must be loaded in the vehicle, if you have a list of loads with different Priorities the loads with smaller priority will be loaded first. Drop # : Setting a Drop # for a load item indicates the order in which Loads must be unloaded from the vehicle, if you have a list of loads with different Drops the loads with smaller Drop will be loaded last. IMPORTANT: You cannot use multiple Priority and Drop at the same time. Once the rolls to be used for the load plan are selected, and the Securement and Load Plan Options are set, click the ‘Next’ button. The next screen appears, as pictured below. STEP 3: Selecting the vehicle(s) that will be used for the load plan First step is to “Select Routes (Jurisdiction)”. All previously entered Routes (Jurisdiction) in the database will be displayed for your selection. If no data appears, you must follow steps outlined in Section 4.2.5 to enter Routes (Jurisdiction). Load XpertTM – Load Planning User Guide 63 The next step is to select the vehicles associated with the selected the jurisdiction. That is all vehicles that may travel in the selected jurisdiction. You will notice all vehicles previously entered in the database and are associated with the selected jurisdiction will be displayed as shown above. For all vehicles their corresponding cargo capacity (allowed) will also be displayed. Select the vehicle of your choice for load planning and click “Add” to add to the table on the right side (Selected Vehicle List). If you wish to review the dimensions and tare weight of the vehicle you have selected, click the yellow button “View Selected Vehicle”. All vehicles you have selected for carrying the cargo will be listed in the table with its corresponding cargo capacity (allowed). Total cargo to be carried as indicated in Step 2 will also be displayed at the top of this table. If the total cargo to carry is more than the sum of all cargo capacities of the vehicles you have selected, then the cargo left to Load XpertTM – Load Planning User Guide 64 carry will be displayed at the last row in this table. This means that you have not selected sufficient number of vehicles to carry all the cargo to be carried. You may decide to add one or more vehicles to the selected list before continuing the load plan solution. In the selected vehicles you have a choice of selecting several different vehicles. Either select from the list or alternatively select one vehicle and check the box “Use Identical Vehicle(s) for entire Cargo” to allow the software to select as many number of your selected vehicle to load the entire cargo you wish to carry. Currently the software will allow up to 100 vehicles for doing the load planning. Once you are done choosing the vehicles, press the ‘Finish’ button to do the optimization. The optimized load plan will be displayed. Refer to the to Vehicle tab to view all vehicles one by one by clicking Vehicle # 1, Vehicle # 2 respectively. For a quick reference of the selected vehicle the Vehicle Name, Jurisdiction (Routes) traveled, Weight and Volume percentage of the cargo loaded on the vehicle and the Options and Vehicle dimensions used for the Load Plan are available on the mail screen. Load XpertTM – Load Planning User Guide 65 Use the “Load Plan” arrow to view the next possible load plan for the selected vehicle and click Accept 3 of 50 in this case to select the solution you like the most as per your requirement. NOTE: Accepted load plan will be saved in the database on clicking “Save Load Plan”. The first load plan is always the accepted one by default. Click “View” to change the view of the selected vehicle NOTE: Click “Vehicle + Securement Info” for a quick view of the “Vehicle” and the “Securement and Loading Options” used for the vehicle on your screen. Click Print Preview under “Print” to preview the print for a selected “View” and to print the vehicle on the screen. To print multiple views for multiple vehicles in one shot along with the captions use the Print button Click Report to get a summary Report for the Vehicle information, Cargo information, Detailed report (vehicle by vehicle) including Cargo loaded, Securement Options used for each vehicle and the Picking order report. NOTE: You can also print the Report 8.3 Printing a Load Plan Following screen appears on clicking Print button, select the options and the pages you want to print and click OK. Load XpertTM – Load Planning User Guide 66 The regular Print Screen will appear after clicking OK, where you can select the Printer you want to print to. NOTE: You can also view the page by clicking the View button in order to know and see what will be printed. 8.4 Saving a Load Plan Click Save Load Plan button to save a Load Plan Load XpertTM – Load Planning User Guide 67 Click “Click & Enter” to enter Company Name, By, Date, Reference, Comments for the Load Plan Click “Click & Enter” to save Load Plan by shipping reference (Allows to tag each vehicle to identify the difference e.g. Loading Zone, Loading Dock #, or Shipper Name, etc.) Load XpertTM – Load Planning User Guide 68 NOTE: This is an optional information. Enter only if needed. Click Save to finish saving Load Plan. 8.5 Opening a Load Plan Click “Open Load Plan” and “Select All Load Plans” Click “Open Load Plan” and “Load Plans with Shipping Reference only” if you saved the Load Plan with Shipping Reference Select Load Plan you want to Open by scrolling through the List, and click Open or Double click on the selected Load Plan Load XpertTM – Load Planning User Guide 69 You can also narrow your search by either typing the Load Plan Name or selecting the vehicle type. NOTE: You also have the option to Rename, Delete or Delete Multiple Load Plan(s). 8.6 Editing a Load Plan You have two ways to edit a Load Plan Click “Back to Edit” to modify a Load Plan by selecting a different vehicle, Jurisdiction, Loads, Securement Options, Mode of operation or Unit System. Or You can use the “Edit Vehicle” menu 8.6.1 Edit Quantity Edit Quantity is a useful tool in case some Loads are damaged during loading or the “Density” of a Roll happens to be different that what was provided by the production team. NOTE: It allows re-optimizing just a selected vehicle rather then re-optimizing all the vehicles Load XpertTM – Load Planning User Guide 70 8.6.2 Change Vehicle “Change Vehicle” allows selecting a different vehicle and transfers all loads from the selected vehicle to this new vehicle and re-optimize with a new solution for the new vehicle Load XpertTM – Load Planning User Guide 71 8.6.3 Delete Vehicle Delete a selected vehicle from a Load Plan and moves all the Loads in to the “Quantity Not Loaded”. This option is available only if you have more than one vehicle for a selected Load Plan. Qty Not Loaded shows you the list of the Loads that are part of the Load Plan but are not loaded on any vehicle for the reason that these Loads are Damaged or Leftover or there was not enough vehicle to carry the entire cargo. You have 2 Options to use these Loads Option # 1: Export the Leftover or Damaged Quantity by clicking the “Qty Not Loaded” button. In order to use them in another Load Plan using Import Load (Refer to the 4.4.1 Create new Loads (Paper Rolls) or 4.4.5 Create new Loads (Pallets / ..) ) Option # 2: On saving the Load Plan if you have a “Qty Not Loaded” following screen will appear, click “Qty Not Loaded” button to repeat Option # 1 or Click “Yes” to Export them for future use. NOTE: If you click “No” all the Loads in “Qty Not Loaded” will be lost. 8.6.4 Change Transport Mode Allows changing the transportation mode for a Load Plan. Example, If you had a Load Plan done for a Railcar and for some reason this load cannot be sent by a Railcar you can change the Mode of Transportation and re-optimize. Load XpertTM – Load Planning User Guide 72 8.6.5 Edit Hatching You can change the “Hatching” on any of the Loads by clicking the Edit Hatching. Change “Hatching Type” for any load and click OK to update. NOTE: “Edit Hatching” is only available for the Load Plan that is in the “Manual Mode”. Load XpertTM – Load Planning User Guide 73 8.7 Manual Mode You can modify a Load Plan by clicking the “Manual Mode” and following the steps below: 1 Clicking “Manual Mode” switches the software to the “2D (Axle Loads)” view. 2 Click and drag any Load item to a different position or delete it. 3 Click and drag the axle and/or Fifth-wheel position for a semitrailer combination. 4 Change Hatching for the selected load using “Edit Hatching” 5 Save Changes in the database. NOTE: Any deleted loads will be lost permanently. NOTE: “Manual Mode” is allowed only for a single vehicle, which is not part of a Load Plan done using “Shipping Reference”. NOTE: “Manual Mode” button will not appear on re-opening a Load Plan saved as “Manual Mode” as the Load Plan is already in the “Manual Mode”. Load XpertTM – Load Planning User Guide 74