1
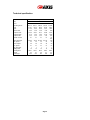
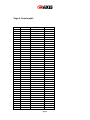
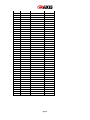
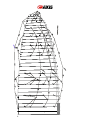
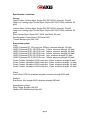
VEGA IV
PILOT'S MANUAL
Thank you for taking the time to read this booklet.
Vega 4
CONTENTS
1. Introduction
2. Pre flight
• Pre-delivery inspection
• Brake-line lengths
• Weight range
• Pre-flight safety
3. Flying the Vega 4
a. Normal flight
• Pre-flight inspection
• Launch
• Flight
• Landing
b. Losing altitude
• Big ears
• B-line stall
• Spiral dive
c. Dealing with turbulence
• Asymmetric collapse
• Symmetric collapse
• Deep stall
• Full stall
• Negative spin
4. Care, maintenance and repairs
• Ground-handling
• UV damage
• Storage
• Repairs
5. Technical details
• Certification
• Technical data
• Line plan
• Specification of materials
6. About Axis
Vega 4
1. INTRODUCTION
When setting out to design our next-generation cross-country glider we had a
clear target: we wanted to create the best paraglider possible for discerning
sports and recreational pilots. Pilots who want top performance and sensitive
handling, but who rightly demand ever more security.
The Vega 4 is that glider, keeping the comfortable but precise characteristics of
the original Vega while improving on the glider’s already high performance and
safety margins.
With an internal structure based on the successful Mercury competition glider the
Vega III includes our unique differential speed system. This means pilots can
achieve a good sink-rate at half or one-third speed bar, and maintain good
stability at maximum speed: in short, it gives the glider excellent usable speed.
The Vega 4 is an intermediate-performance glider (EN-C, corresponding to old
LTF -2 ) and is meant for qualified pilots who hold a full paragliding pilot licence.
It is designed as an ideal cross-country glider, suitable for experienced pilots who
fly regularly and who will enjoy a performance glider with good safety
characteristics.
This manual provides information about the glider, which will help you to fly safely
and keep your wing in good condition. If after reading this manual you have any
further questions, please don’t hesitate to contact us or any authorised Axis
dealer.
Thank you for choosing the new Vega 4 from Axis.
www.axispara.cz
SAFETY NOTICE
By the purchase of this equipment, you are responsible for being a certified
paraglider
pilot and you accept all risks inherent with paragliding activities including injury and
death. Improper use or misuse of paragliding equipment greatly increases these risks.
Neither Axis nor the seller of Axis equipment shall be held liable for personal or third
party injuries or damages under any circumstances.
If any aspect of the use of our equipment remains unclear, please contact your local
paragliding instructor, Axis dealer or the Axis importer in your country.
2. PRE FLIGHT
Vega 4
Pre-delivery inspection
The Vega 4 is delivered with a rucksack, inner bag, compression strap and this
manual. The dealer or your instructor should have made a test inflation and test
flight before delivery to you.
Brake-line length
When you receive your new Vega 4, the brake-line length is set the same as the
Axis test glider. This length has been finely tuned by Axis test pilots and it should
not be necessary to adjust it.
If you feel it is necessary to adjust the brake-line length to suit physical build,
height of harness hang points, or style of flying we recommend you test-fly the
glider after every 20mm of adjustment.
There should always be free brake travel when the glider is flown hands-up. This
means when you look at your brake lines in flight with your hands up, there
should be a slight bow, or arc, to the line – the brake lines should not be tight.
This is to prevent the brakes being applied when the speed-system is used.
Brake lines that are too short:
•
•
•
May lead to fatigue from flying with your hands in an unnatural position
May impede recovery from certain manoeuvres
Will certainly reduce your glider's speed range.
Brake lines that are too long will:
•
•
•
Reduce pilot control during launch
Reduce control in extreme flying situations
Make it difficult to execute a good flare when landing.
Each break line should be tied securely to its control handle with a suitable knot.
Other adjustments or changes to your Vega 4 lead to a loss of guarantee,
airworthiness and validity of EN certification and may endanger both yourself and
others.
If you have any suggestions on improvements let us know and our test pilots will
try out your ideas in a controlled situation.
Weight range
Vega 4
The Vega 4 must only be flown within the certified weight range as shown in this
manual. The weight range quoted is the total in-flight weight which includes pilot,
glider, harness, clothing and accessories.
Pre-flight safety
Before flying this glider you should:
•
•
•
•
•
•
Have the appropriate practical and theoretical training
Have the required licence and insurance
Be fit to fly and unaffected by stress or drugs
Wear a suitable helmet
Use a suitable harness and emergency parachute
Make a thorough pre-flight check.
3. FLYING THE VEGA 4
Vega 4
We recommend you practice inflating your glider before flying it, and make your
first flights in gentle conditions on a familiar flying site.
A. Normal flight
Pre-flight check
A proper pre-flight check is essential for safe flying.
Before launch lay the glider out into a slight arc and check that:
•
•
•
•
•
•
•
Cell openings are free of obstructions
Lines are free of tangles or knots
No twigs, grass or other objects are tangled in the lines
Risers are correctly connected
Brake lines run freely through the pulleys
Knots on brake handles are secure
Carabiners on risers are closed and/or tightened
Launch
The key to successful launching is to practice ground-handling on flat ground as
often as possible. The Vega 4 inflates easily and steadily using forward or
reverse launch techniques. There is no tendency to overshoot the pilot. To
forward (alpine) launch in light or nil wind there is no need to pull the risers hard.
Allow the glider to stabilise overhead and run positively forward checking the
canopy is fully inflated and clear of any knots or tangles. Reverse launching is
recommended in strong wind.
Flight
The best glide speed in calm air is achieved in the hands-up position. The best
sink rate is produced with both brake lines drawn down equally to about 20% of
their range.
Turning
The handling characteristics of the Vega 4 require no special or non-standard
procedures. Brake pressure is progressive. This gives a responsive and sporty
feel to the handling. In an emergency (e.g. a broken brake line) the Vega III can
be manoeuvred by steering carefully with the rear risers or by weight shift.
Using the speed system
The speed system on the Vega 4 comes supplied with Brummel hooks ready to
attach to your own speedbar of choice. When you have done this, check the
speed system runs smoothly by hanging in your harness before flying. In
particular check that the speed system won’t be engaged when in normal flight.
Unnecessary knots and loops in a speed system are not recommended.
Vega 4
Maximum useable speed is one of the strong points of Axis paragliders and the
Vega 4 is no exception. However, in spite of this exceptional stability, any
collapse at full speed will be more severe than the same event experienced at
trim speed. Always keep both hands on the controls when flying fast and be
ready to release the speed system immediately at the first sign of a collapse. Use
the speed system carefully when flying close to the ground or the terrain.
Landing
On your first flights you may be surprised at how well the Vega 4 glides. Take
account of this when making your landing approach and give yourself the
opportunity for S-turns or a longer approach than you might be used to.
For a normal, into-wind landing evenly pull the brakes all the way down when you
are about one metre from the ground. Under nil-wind conditions, or if you are
forced to make an emergency downwind landing, a wrap on each brake will allow
you to make a stronger flare.
B. Losing altitude
Most pilots will, at some time, want to lose height. This may be because of a
change in the weather, you are at cloudbase and don’t want to go any higher, or
simply because you want to finish your flight quickly.
Ideally, the best way to lose height is to find an area of sink and stay in it. This
way you can fly normally to the ground. However, if there is no sink, or if you are
in strong lift and want to go down, a rapid descent method may be needed.
There are three main rapid descent methods:
•
•
•
Big ears
B-line stall
Spiral dive
Each of these descent methods places extra, different stresses on gliders and
should be avoided if you want to extend the life of the glider.
It is important these manoeuvres are initially practiced under qualified supervision
and preferably during a safety training course.
Big ears
Vega 4
This is the easiest and safest technique for descent while maintaining forward
speed. Depending on how much of the wing-tip you deflate, 3m/s to 6m/s sink
rate can be achieved. While in big ears your forward speed can be increased by
using the speed system.
The Vega 4 can be steered with big ears in by weight-shift alone.
Initiation: Reach up as high as possible and take hold of the outer A-line on each
side of the glider. Pull one in first, maintain direction, and then pull in the second.
Hold them in firmly. Make sure the lines are pulled down equally on each side
and your big ears are even.
Recovery: Under normal circumstances the ears will come out on their own when
the lines are released. Opening may be accelerated by slightly pumping the
brakes.
B-line stall
This is an effective way of making a rapid descent but doesn’t allow any forward
speed.
Initiation: Take hold of the B-risers just below the maillons and smoothly pull
them down, twisting your hands until the canopy shows a span-wise crease at
the B-line attachment points. It is difficult to pull at first but becomes easier as the
aerofoil creases. Your sink rate will increase while your forward speed will reduce
to practically zero. Don’t release the lines immediately - the glider should be left
to settle before releasing.
Recovery: Let go of the risers smoothly but determinedly and symmetrically. The
Vega III automatically returns to normal flight without any deep stall tendencies
but may dive slightly forward. If the risers are released slowly and very unevenly
the glider could start to spin.
Spiral dive
The spiral dive is the most effective way of making a fast descent. During the
spiral dive the pilot and glider will experience strong centrifugal forces which
strain the glider. As such it should be considered an extreme manoeuvre.
Initiation: Weight shift and smoothly pull on one brake so the glider goes from a
normal 360-degree turn into a steep turn and from there into a spiral dive. Once
established in the spiral the descent rate and bank angle can be controlled with
weight shift and the outer brake.
Recovery: The Vega 4 recovers from a spiral spontaneously as soon as the
brakes are released and weight shift returns to neutral. To exit allow the spiral to
slow for a turn or two by applying outer brake and weight shift then release
smoothly. Always finish a spiral dive at a safe altitude.
Vega 4
C. Flying in turbulent conditions
Deflations can occur when flying in turbulence but in most situations the Vega 4
will stabilise without pilot input. Flying with a little brake applied equally will help
to prevent deflations and allow you to experience more direct feedback.
Active flying will help avoid deflations. The aim is to keep the glider above your
head in all situations by responding correctly to the glider's movements by using
the brakes and weight shift.
It is important these manoeuvres are initially practiced under qualified supervision
and preferably during a safety training course.
Asymmetric collapse
The Vega 4 will normally re-inflate after an asymmetric collapse without input
from the pilot, but the wing will turn towards the collapsed side. You should
always maintain course and direction by weight-shifting away from the collapsed
side. This can be reinforced by applying a small amount of brake on the opposite
side to the deflation. If the collapse stays in, the collapsed side can be re-inflated
by pumping the brake on the collapsed side in a firm and smooth manner.
If you experience a big collapse while accelerated the canopy will fall behind you
due to the difference in inertia between you and the canopy. You must wait until
you pendulum back under the canopy before dealing with the deflation. Reacting
too early can risk stalling the glider completely. Release the speed-bar
immediately if you have a big collapse during accelerated flight and, while
keeping weightshift neutral, apply slight brake to the open side. Let the glider
enter a turn if space allows in order to avoid a spin or stall.
Symmetric collapse
A symmetric, or frontal, collapse will normally reopen without any pilot input. The
Vega 4 will regain airspeed with a small surge. Be careful not to brake while the
glider is behind you as this could induce a stall.
Deep stall
The Vega 4 has no tendency to either get into, or stay in, a deep stall. If the glider
does enter a deep stall, accelerate the glider out of the deep stall by either
pushing on the A-risers or by using the speed bar. Never try to steer out of a
deep stall. A wet glider has a higher tendency to deep stall, so if you pass
through rain accelerate a little and avoid using big-ears until the glider is dry.
Vega 4
Full stall
This is an extreme manoeuvre that should rarely, if ever, be required. To induce
a full stall take one or two wraps of the brake lines and pull both of them down
smoothly. Hold them down, locking your arms under your seat until the canopy
falls behind you and deforms into a characteristic crescent shape. In a stable full
stall the canopy will oscillate back and forth. Be careful not to release the brakes
prematurely or asymmetrically.
The Vega 4 recovers from a full stall automatically after the brakes are released.
During correct recovery, where the brakes are let up a little to allow air to enter
the glider prior to being released when the glider is in front of you,the Vega 4
shows no tendency to surge strongly in front of the pilot.
If the brakes are released prematurely or too quickly there is a possible tendency
for the glider to surge. This can be corrected by simultaneous equal braking on
both sides. Be careful not to release the brakes asymmetrically as this can cause
a large asymmetric collapse followed by a tendency to enter a spin.
Negative spin
Should a spin occur the Vega 4 is capable of recovering automatically when the
brakes are released. As the glider surges forward slow it down with the brakes to
avoid the possibility of a front collapse or an asymmetric collapse which could
cause a cravat. Always wait for the glider to be in front of you or above you never brake while it is behind you as this can risk a stall.
Safety notice: The Vega 4 has excellent passive safety as shown by the
certification tests. However, be aware that the Vega 4 can surge forward
when a negative spin is released too quickly. Avoid releasing from a spin
too quickly or while the glider is behind the pilot.
Remember: A wrong manoeuvre at the wrong time may change a
straightforward situation into a dangerous problem. Extreme manoeuvres also
expose your glider to forces which may damage it. Practice these techniques
under adequate supervision preferably during a safety training course.
Vega 4
4. CARE, MAINTENANCE AND REPAIRS
The materials used to construct your Vega 4 have been carefully chosen for
maximum durability. If you treat your glider carefully and follow these guidelines it
will last you a long time. Excessive wear can occur by bad ground-handling,
careless packing, unnecessary exposure to UV light, exposure to chemicals, heat
and moisture.
Ground-handling
• Choose a suitable area to launch your glider. Lines caught on roots or
rocks lead to unnecessary strain on the attachment tabs during inflation.
Snagging lines may rip the canopy fabric or damage lines.
• When landing, never let the canopy fall on its leading edge. The sudden
pressure increase can severely damage the air-resistant coating of the
canopy as well as weaken the ribs and seams.
• Dragging the glider over grass, soil, sand or rocks, will significantly reduce
its lifetime and increase its porosity.
• When preparing for launch or when ground-handling, be sure not to step
on any of the lines or the canopy fabric.
• Don't tie any knots in the lines.
UV damage
Protect your canopy and lines from unnecessary exposure to sunlight.
Storage
• Avoid packing your glider when it is wet. If there's no other way, then dry it
as soon as possible away from direct sunlight. Be careful to avoid storing
your canopy when damp or wet: this is the most common reason for
canopy degradation.
• Don't let your glider come into contact with seawater. If it does, rinse the
lines, canopy and risers with fresh water and dry it away from direct
sunlight before storing.
• After flight or when storing, always use the inner protection sack.
• When storing or during transport make sure your glider isn't exposed to
temperatures higher than 50°C.
• Never let the glider come into contact with chemicals. Clean the glider with
clean lukewarm water only. Never clean using abrasives.
• For long-term storage don't pack the glider too tightly. Leave the rucksack
zip open when possible to allow any moisture to evaporate.
Vega 4
Repairs
• Small holes in the canopy can be repaired using adhesive tape.
• Larger repairs or cell replacement should only be carried out by the
manufacturer’s authorised agent.
• Damaged lines should be replaced by your Axis dealer. When a new line
has been fitted always check its length against its counterpart on the
opposite side of the wing. After replacing a line always inflate the glider on
flat ground to check that everything is in order before flying.
• After tree or water landings always examine the glider carefully. If you
suspect the glider may be damaged in any way contact your nearest
authorised Axis supplier.
• After 100 hours of flying or two years, whichever is sooner, your Vega III
must be checked and tested by the manufacturer’s authorised agent.
Vega 4
5. TECHNICAL DETAILS
Based on the highly successful Vega III, the Vega 4 has a slightly changed profile
with improved shaping of the wingtips to reduce drag and give better
performance.
The aspect ratio of 5.90, the high number of cells (61), and the reduced total line
length gives the Vega 4 its proven high performance.
The inner structure is a direct development from Axis’s Mercury competition
glider with every third rib reinforced. The changes in the internal structure mean
higher passive safety. The canopy is reinforced by tapes which connect
attachment points inside the cells – this prevents distortion and helps the canopy
keep its form.
A new line system helps to reduce the length of the main lines. The brake
attachments have been moved to the trailing edge to create more precise
handling and feedback.
All the stitching is on the inside of the canopy for greater protection.
Testing and certification
The Vega III has passed certification EN-C . The certification of each canopy and
its serial number is found on the wingtip label. Certification is valid for all
harnesses of ABS type. This type of harness allows a certain degree of
adjustment to be made to the length of the waist strap. The recommended
distance between the carabiners is 42cm.
In common with all other paragliders, when cross-bracing is looser than the
recommended 42cm, weight-shift control increases and the glider feels more
sensitive. However, automatic recovery from a collapse when using slack crossbracing can be slower and more unpredictable. When cross-bracing is tighter, the
pilot feels more stable but the effectiveness of weight-shift is less effective.
The Vega 4 has been designed for hill and/or tow launches. It is not a paramotor
wing. The use of a power unit, paramotor or motor with the Vega 4 has not been
tested by the manufacturer or by the testing authority.
Vega 4
Technical specification
Vega 4
Size
XS
S
M
ML
XL
Zoom
Max Wing Chord
Area
Span
Aspect Ratio
Projected Area
Projected Span
Projected A/R
Number of Cells
93
242,73
21,81
11,35
5,90
19,00
9,16
4,42
61
97
253,17
23,73
11,83
5,90
20,67
9,55
4,42
61
100
261,00
25,22
12,20
5,90
21,97
9,85
4,42
61
102,5
267,53
26,49
12,51
5,90
23,08
10,10
4,42
61
Take Off Weight
Min. Speed
Trimm Speed
Acc. Speed
Min. Sink Rate
Gliding Ratio
Homologation
weight
60-80
23
39
57
1
10
EN-C
5,4
75-95
23
39
57
1
10
EN-C
5,7
85-105
23
39
57
1
10
EN-C
5,9
95-115
23
39
57
1
10
EN-C
6,1
105,5
275,36
28,07
12,87
5,90
24,45
10,39
4,42
61
105130
23
39
57
1
10
EN-C
6,4
203
212
219
224
231
lines lenght
Vega 4
Vega 4 lines lenght :
NAME
QUANTITY
MATERIAL
A1
A2
A3
A4
A5
A6
A7
A8
2
2
2
2
2
2
2
2
DC120
DC120
DC120
DC120
Vectraline 12240
Vectraline 12240
Vectraline 12240
Vectraline 12240
M
100%
1315
1191
1153
1182
1035
930
839
848
M1
M2
8
8
DC200
Vectraline 16330
1781
1493
AA1
AA2
2
2
PPSL 275
PPSL 200
3699
4008
B1
B2
B3
B4
B5
B6
B7
B8
2
2
2
2
2
2
2
2
DC120
DC120
DC120
DC120
Vectraline 12240
Vectraline 12240
Vectraline 12240
Vectraline 12240
1251
1121
1086
1123
986
895
813
829
BB1
BB2
STAB.
2
2
2
PPSL 275
PPSL 200
PPSL 160
3705
3997
4702
C1
C2
C3
C4
C5
C6
C7
C8
2
2
2
2
2
2
2
2
Vectraline 12240
Vectraline 12240
Vectraline 12240
Vectraline 12240
Vectraline 16140
Vectraline 16140
Vectraline 16140
Vectraline 16140
1338
1211
1174
1208
1067
972
884
892
MC1
MC2
4
4
Vectraline 16330
Vectraline 12240
1794
1491
Vega 4
D1
D2
D3
D4
2
2
2
2
Vectraline 12100
Vectraline 12100
Vectraline 12100
Vectraline 12100
1431
1311
1261
1281
CC1
CC2
2
2
PPSL 200
PPSL 160
3703
3976
A9
A10
B9
B10
C9
SA
SB
SC
MSA
MSB
2
2
2
2
2
2
2
2
2
2
Vectraline 12100
Vectraline 12100
Vectraline 12100
Vectraline 12100
Vectraline 12100
Vectraline 12100
Vectraline 12100
Vectraline 12100
Vectraline 16140
Vectraline 16140
669
587
657
591
1341
1130
1120
1177
637
631
R1
R2
R3
R4
R5
R6
R7
R8
R9
R10
R11
2
2
2
2
2
2
2
2
2
2
2
Vectraline 12100
Vectraline 12100
Vectraline 12100
Vectraline 12100
Vectraline 12100
Vectraline 12100
Vectraline 12100
Vectraline 12100
Vectraline 12100
Vectraline 12100
Vectraline 12100
1480
1132
1113
1041
1086
917
904
992
807
746
771
RR1
RR2
RR3
RR4
2
2
2
2
Vectraline 16140
Vectraline 16140
Vectraline 16140
Vectraline 16140
1205
998
955
926
RRR1
RRR2
RRR3
2
2
2
Vectraline 12240
Vectraline 12240
Vectraline 12240
2509
2298
3200
R
2
DFSL 200
2643
Vega 4
Vega 4
Specification of materials
Canopy
Upper surface: Porcher Sport: Skytex 38 E 9017 E25A, universal, 38 g/m2
Upper surf. leading edge: Porcher Sport: Skytex 38 E 9017 E25A, universal, 38
g/m2
Lower surface: Porcher Sport: Skytex 38 E 9017 E25A, universal, 38 g/m2
Lower surf. leading edge: Porcher Sport: Skytex 38 E 9017 E25A, universal, 38
g/m2
Ribs: Porcher Sport: Skytex 9017 E29A, hard finish, 40 g/m2
Reinforcement: Porcher Sport: SR Scrim-2420
Thread: Bonded nylon D60, D40
Suspension system
Lines
LIROS: Dyneema DC 120/ comp line, 0.85mm, minimum strength 120 daN
LIROS: Dyneema PPSL 120/ PES cover, 1.15mm, minimum strength 120 daN
LIROS: Dyneema PPSL 160/ PES cover, 1.40mm, minimum strength 160 daN
LIROS: Dyneema PPSL 200/ PES cover, 1.42mm, minimum strength 200 daN
LIROS: Dyneema PPSL 275/ PES cover, 1.mm, minimum strength 275 daN
LIROS: Dyneema DFLS 200/ PES cover, 1.42mm, minimum strength 200 daN
Cousin Trestec: Vectraline 12100/ comp line, 0.6mm, minimum strenght 50 daN
Cousin Trestec: Vectraline 12240/ comp line, 0.9mm, minimum strenght 115 daN
Cousin Trestec: Vectraline 16330/ comp line, 1.0mm, minimum strenght 145 daN
Cousin Trestec: Vectraline 16140/ comp line, 1.0mm, minimum strenght 145 daN
Risers:
Guth & Wolf: PES Pre-stretched polyester, minimum strength 2000 daN
Maillons:
Elair Servis: Niro triangle 4/200, minimum strength 200 daN
Speedsystem pulleys:
Riley Fittings Australia, RM 302
Harken USA, Ball Bearing Pulley 467
Vega 4
6. ABOUT AXIS
Axis started to design and make paragliders in 2001. Success swiftly followed
and now many of the world’s best competition pilots choose to fly Axis. They
have won podium places at competitions around the world, including at recent
World Cup events and the World Championships.
The lessons learned from these thousands of hours of competition success have
been used to develop the Vega 4, a new generation of glider.
We welcome feedback from you about your new Vega 4. Send it to us at
[email protected]
Please note
We have made every effort to ensure that the information in this manual is
correct but please remember it is for guidance only. It is not a training manual. It
must not be used as a substitute for proper training under the direction of an
approved body.
The manual is subject to change without prior notice. Check the websites for
updates and the latest information regarding Axis products.
Enjoy your Vega 4!
www.axispara.cz
Vega 4
Produced by axispara.cz 2013
Vega 4