1
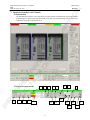
n
p
r
D ie
o
t
N a
o r
t y
D In
is f
t o
r r
ib m
u a
t t
e io
Guardian PQV 100% Inspection
System
(Print Quality Verification)
P
r
o
Technical Description Manual
Document Reference:
Issue: Release
Revision: 3.0
Document Date: 22 December 2010
PC Industries
176 Ambrogio Drive, Gurnee, IL 60031 – USA
Tel. +1 847 336 3300 - Fax +1 847 336 3232
http://www.pcindustries.com
Title: Guardian PQV Software User Manual
Ref:
Date: December 22, 2010
Issue: Release
p
r
D ie
o
t
N a
o r
t y
D In
is f
t o
r r
ib m
u a
t t
e io
n
Revision: 3
P
r
o
This Page Left Intentionally Blank
1
Title: Guardian PQV Software User Manual
Ref:
Date: December 22, 2010
Issue: Release
p
r
D ie
o
t
N a
o r
t y
D In
is f
t o
r r
ib m
u a
t t
e io
Table of Contents
n
Revision: 3
1 Introduction .............................................................................................................................................. 3
1.1 Purpose and Scope ........................................................................................................................... 3
1.2 Problem Reporting Instructions..................................................................................................... 3
2 Installation & Configuration .................................................................................................................. 4
2.1 Hardware and Software Requirements ......................................................................................... 4
2.2 How to Configure the Application ................................................................................................. 4
3 Operator Security Level Controls .......................................................................................................... 5
3.1 Introduction ..................................................................................................................................... 5
3.2 Lower Screen Controls.................................................................................................................... 5
3.3 Upper Screen Controls .................................................................................................................... 9
3.4 Roll Map Controls ......................................................................................................................... 11
4 Manager Security Level Controls ........................................................................................................ 12
4.1 Introduction ................................................................................................................................... 12
4.2 Log In Popup Box .......................................................................................................................... 12
4.3 Setup Tab ....................................................................................................................................... 12
4.4 Image Tab....................................................................................................................................... 12
4.5 Users Tab ........................................................................................................................................ 13
5 Settings Tabs .......................................................................................................................................... 14
5.1 Universal for all Tools ................................................................................................................... 14
5.2 Print Quality .................................................................................................................................. 14
5.3 Dimensional Gauging .................................................................................................................... 15
5.4 OCR ................................................................................................................................................ 16
5.5 OCV ................................................................................................................................................ 17
5.6 Linear Barcode Reading ............................................................................................................... 18
5.7 Linear Barcode Reading ANSI ..................................................................................................... 19
o
5.8 Data Matrix .................................................................................................................................... 20
5.10 Locate.............................................................................................................................................. 22
5.11 Objects ............................................................................................................................................ 23
P
r
5.9 Data Matrix ANSI ......................................................................................................................... 21
2
Title: Guardian PQV Software User Manual
Ref:
Date: December 22, 2010
Issue: Release
n
Revision: 3
p
r
D ie
o
t
N a
o r
t y
D In
is f
t o
r r
ib m
u a
t t
e io
1 Introduction
1.1 Purpose and Scope
The purpose of this document is to describe the functionality of the Guardian Print Quality Verification
(PQV) Software.
1.2 Problem Reporting Instructions
P
r
o
Record any on screen error messages and details on what was done to help duplicate the problem. Then
call PC Industries at 1-847-336-3300 for technical support.
3
Title: Guardian PQV Software User Manual
Ref:
Date: December 22, 2010
Issue: Release
n
Revision: 3
p
r
D ie
o
t
N a
o r
t y
D In
is f
t o
r r
ib m
u a
t t
e io
2 Installation & Configuration
Installing the Guardian PQV software:
1.
2.
3.
4.
5.
Remove Previous Version of software using the MS Windows Add/Remove program feature.
Insert the installation disk into the CD reader.
Navigate to the CD drive using Windows Explorer.
Click on the file Setup.exe.
Follow the Instructions as presented in the setup program.
2.1 Hardware and Software Requirements
Hardware and software requirements will be supplied by PC Industries (PCI) at the time of purchase.
2.2 How to Configure the Application
P
r
o
Configuration is handled by PCI at the time of installation.
4
Title: Guardian PQV Software User Manual
Ref:
Date: December 22, 2010
Issue: Release
n
Revision: 3
p
r
D ie
o
t
N a
o r
t y
D In
is f
t o
r r
ib m
u a
t t
e io
3 Operator Security Level Controls
3.1 Introduction
The Guardian PQV Software is developed by PCI to allow printers to automatically inspect and compare
printed images to a master image stored as a PDF file or other type of printed image. This section covers
controls that are usable at the operator level.
1
2
4
3
r
8
16
10
11
12
13
14
P
9
7
6
5
o
3.2 Lower Screen Controls
15
19
17
18
5
21
20
Title: Guardian PQV Software User Manual
Ref:
Date: December 22, 2010
n
Revision: 3
Queue Indicator
This item displays a graphic indicator of defects currently queued. If the box color is green the image
passed inspection. If the box color is red the image failed inspection. The box highlighted is the image
currently displayed on the screen (default image is the one under the camera). Clicking on a red box
will display the failed inspection image. The queue direction can be changed in the ini. file. The
number of defects in the queue is displayed in the lower left. If there are defects in the queue beyond
what can be displayed in the 15 boxes, then the small box at the end will display red.
Select All
The Select All button is used when training multiple images. Clicking on this button will highlight all
the inspection boxes at one time making image training faster.
Add Objects/Stop Add
The Add Objects button allows the operator to manually add object boxes. Object boxes allow for
separate sensitivity’s for the foreground and background. Select the desired region of interest box by
clicking on it with the left mouse button. Then click on the Add Objects button. After clicking on the
Add Objects button the selected region of interest box will display the currently trained objects and
the mouse cursor will display a crosshair when moved over the image. Left click the mouse on the
corner of the desired object area then move the mouse to the opposite corner and left click the mouse
to complete. After completion additional objects can be added, or to end the process click on the Stop
Add button.
Note: The system must be in Inspection Stopped mode to access this button.
Train Objects 1
Clicking on this button automatically trains objects based on the gray-scale edge difference of the
object to the background. The system must be in Inspection Stopped mode to access this button.
Train Objects 2
Clicking on this button automatically trains objects based on the average gray-scale difference of the
object to the background. The system must be in Inspection Stopped mode to access this button.
Object Edge
Adjusting this number changes the object train threshold for Train Objects1 and Train Objects2. The
lower the number the more sensitive the Object Training will be to lower contrast objects. A higher
Object Edge number will filter out lower contrast objects. The smooth check-box under the Object
Edge setting window is used to when inspecting material printed using multi-hued dots. The feature
prevents each dot from being selected as an object.
Note: The system must be in Inspection Stopped mode to access this button.
Job #
This box used to enter the job number for the product currently being run.
Setup
Clicking on the set up button displays the setup box.
Minimum represents the smallest length measurement
allowed. Maximum represents the largest length
measurement allowed. Over X Repeats represents the
number of repeat images used for a length
measurement. Calibration is used to convert number
of pixels to a known length in English units or Metric
units.
p
r
D ie
o
t
N a
o r
t y
D In
is f
t o
r r
ib m
u a
t t
e io
1.
Issue: Release
2.
3.
4.
5.
6.
7.
P
r
o
8.
6
Title: Guardian PQV Software User Manual
Ref:
Date: December 22, 2010
Issue: Release
n
Revision: 3
Start/Stop
Clicking on this button start or stops the inspection process depending on the current state.
10. Open Project
Clicking on this button opens a Windows dialog box allowing an operator to open an existing project.
p
r
D ie
o
t
N a
o r
t y
D In
is f
t o
r r
ib m
u a
t t
e io
9.
P
r
o
11. Save Project
Clicking on this button opens a Windows dialog box allowing an operator to “Save” or “Save As” an
existing project.
7
Title: Guardian PQV Software User Manual
Ref:
Date: December 22, 2010
Issue: Release
n
Revision: 3
P
r
o
p
r
D ie
o
t
N a
o r
t y
D In
is f
t o
r r
ib m
u a
t t
e io
12. Reset Count
Clicking on the button resets the Pass, Warn, Fail total counts, and Missed Images to zero.
13. Count Total Information Box
This information box displays the total count and the percentage for each category; pass, warn, and
fail and total counts and percentages.
14. Delete Objects/Stop Delete
Clicking on this button allows operators to manually delete object boxes. Select the desired region of
interest box then press the Delete Objects button. After pressing the Delete Objects button the selected
inspection box will display the currently trained objects and the mouse cursor will display a hand
pointer when moved over the image. Left click the mouse on the desired object to be deleted. After
completion additional objects can be deleted or press Stop Delete to return to the arrow mouse cursor.
The system must be in Inspection Stopped mode to access this button.
15. Display Objects
Clicking this button displays the objects trained in the currently selected inspection box. It is
recommended to display objects while the inspection process has stopped or the next inspection image
will have priority and overwrite the display of the object boxes.
16. Roll Quantity/Count Settings
This optional setting is enabled in the .ini file and is used for roll mapping and reporting to record the
current roll number with the documentation. The system can be set to output a signal when the desired
roll quantity is reached and can automatically increment the roll quantity if enabled in the ini file.
17. Proof
Clicking on this button allows the operator to take a live image from a run and display it with
Guardian OLP for verification in an Off-Line Proofing. Clicking on the Return button brings the
program back to the Guardian PQV software screen.
18. Report
Clicking on the report button generates a secured PDF report of a run project in accordance with 21
CFR Part 11. See Appendix A for a Sample Report.
19. Log In
Clicking this button opens a Security dialog box that allows a User Name and Password to be entered.
If the proper password is entered the system will enter the Manager Security level allowing for
adjustment of sensitivity settings.
20. Exit
Clicking this button opens a message box confirming if the user wants to close the program. If
confirmed, the program will exit to Windows.
21. Enable/Disable Outputs
Enables or disables the output controls signals. Typically output control signals are used to control a
re-winder or flag the web.
8
Title: Guardian PQV Software User Manual
Ref:
Date: December 22, 2010
Issue: Release
n
Revision: 3
p
r
D ie
o
t
N a
o r
t y
D In
is f
t o
r r
ib m
u a
t t
e io
3.3 Upper Screen Controls
1
10
11
5
4
3
2
12
13
6
14
7
8
15
16
1.
2.
3.
4.
P
r
o
5.
9
17
18
Viewing Area
The viewing area displays the image of the roll directly underneath the camera during a run. During
setup the image displayed is used to create the master image that parts are checked against.
Inspection State Message Box
This message box indicates the current mode the Guardian PQV is in when the Start/Stop button is
pressed.
Viewed Inspection State Message Box
This message box indicates if the currently viewed image has passed inspection, failed inspection, or
was trained.
Highlights State Message Box
This message box indicates if the current image is displayed with or without defect highlights when
the Hide/Unhide Highlights button is used.
Error Message Box
This message box displays information related to the speed of a web or re-winder, and if there is a
problem with the camera. The messages for this box are listed below:
“Speed OK” (green) < 90% maximum speed
“Speed Warn” (yellow) > 90% and <100% maximum speed
“Speed Critical” (red) > 100% maximum speed – missed images likely
“Camera Error” – the system is unable to find or communicate with the camera
9
Title: Guardian PQV Software User Manual
Ref:
Date: December 22, 2010
n
Revision: 3
Security Level Message Box
This message box indicates the current security level the Guardian PQV is being run in. It also
displays a color indicator. When Green the security level is “Security Operator”. When yellow the
security level is “Security Manager”, and when red the security level is “Security Admin”. Manager
and Admin security can Change Sensitivity setting, and only Admin can change all settings and add
users.
Current User Message Box
This message box displays the name of the current user logged into the system.
Current Project Message Box
This message box displays the name of the current project open.
Output State Message Box
This message box displays the state of the Outputs for the Guardian PQV. If the output state is off
messages will not be sent to a web or re-winder, and if the output state is on messages will be sent.
Defect Queue Cycle Buttons
These arrow buttons will cycle forward and backward through all defect images in the queue. If no
defect images are present the system will display the current inspection. The defect image currently
displayed will be represented with a box around the colored queue indicator.
Delete Defect
Clicking on this button deletes the currently displayed image in the queue. This feature will also
cancel the jog and stop commands associated with the defect in the queue. If the defect queue is
empty after deletion then the re-winder will resume run speed.
Accept Defect
Clicking this button will temporarily accept and train to accept the currently displayed defect in an
image. This temporary acceptance will be cleared when the project file is reopened for use.
Disable/Enable Highlights
Clicking on this button toggles the defect highlighting overlay on the currently displayed image on
and off.
View Master/Test Image
Clicking on this button toggles the current image display between the master train image and the test
image being reviewed. The master image will be displayed for the Box Number (region of interest)
currently selected. Select the test box (region of interest) by clicking inside the box with the mouse.
Zoom In/Zoom Out
These buttons are used to increase or decrease the magnification of a displayed image.
Zoom to Box
Clicking on this button zooms in to fully display the currently selected box. The currently selected
box can be either a region of interest box or an object box.
Zoom to Fit
Clicking on this button automatically zooms out to display the entire image being inspected.
Region of Interest Box
Adjusting the size and position of this box allows operators to select the inspection area. Move the
mouse over an edge of a selected box to stretch the box do the proper size. To move a region of
interest box move the mouse cursor into the center of the active box, then left click and hold the
mouse button while adjusting the overall box position. Future references for the region of interest box
will be to call it a box.
p
r
D ie
o
t
N a
o r
t y
D In
is f
t o
r r
ib m
u a
t t
e io
6.
Issue: Release
7.
8.
9.
10.
11.
12.
13.
14.
15.
16.
17.
P
r
o
18.
10
Title: Guardian PQV Software User Manual
Ref:
Date: December 22, 2010
Issue: Release
n
Revision: 3
p
r
D ie
o
t
N a
o r
t y
D In
is f
t o
r r
ib m
u a
t t
e io
3.4 Roll Map Controls
P
r
o
Listed below is a description of the roll map features.
1. Roll Map Display
This feature displays a red box for a failed inspection and a
green box for a passed inspection. The user can click on a
red box to display the defect image for that position in the
roll. The current position is indicated by a darker shade of
red or green.
Color Code:
Green = Passed
Red = Fail
Yellow = Accepted by Operator
Gray = Stopped Inspection during roll map
Purple = Make Ready by Operator
2. Fail
Press this button to reject a displayed image.
3. New
Press this button to start a new roll map.
4. Accept
Press this button to accept a displayed image.
5. Map Scroll
Click these buttons to scroll up or down to view the next
defect image in the roll map. The current position is
indicated by a darker shade of red or green.
6. View
Clicking this button displays currently selected roll map
location.
7. Fit
Click on this button to display an overview of the roll map.
The system will only display the overview while the
inspection/roll map creation process is idle.
8. Load
Click on this button to load a roll map file and start the
reverse roll map defect placement.
9. Save
Click on this button to save a roll map file.
10. Sync
Press this button to synchronize the current defect image
selected to the current stopped position on the rewinder.
This feature can only be used in Reverse roll map mode or
after loading a roll map file.
11
Title: Guardian PQV Software User Manual
Ref:
Date: December 22, 2010
n
Revision: 3
Manager Security Level Controls
4.1 Introduction
p
r
D ie
o
t
N a
o r
t y
D In
is f
t o
r r
ib m
u a
t t
e io
4
Issue: Release
This section presents and gives a description of the controls available to users with manager level security
clearance.
4.2 Log In Popup Box
The Security Login Screen is displayed when the
login button is clicked on the main screen. In
order to change the security level a valid user
name and password need to be entered.
1. User Name field is used for entering a user
name.
2. Password field is used to enter the password
for the user name.
3. OK button is used to log on the entered user
after a valid user name and password is entered.
4. Cancel is used to exit the Security Login popup box.
4.3 Setup Tab
The setup tab has a list of the possible hardware outputs (output
0-7) that can be used during the inspection process.
1. Outputs are only accessible when the system is in the
inspection stop mode. Clicking on an output in the
inspection stop mode will toggle that output on or off.
2. Inspection Rate Message box displays the time in seconds
it takes to inspect an image.
3. Load button use will display a Windows Explorer dialog
box for selecting an image file to load for testing and
validation.
4. Save button use will open a Windows explorer dialog box
for saving an image for future testing or validation.
5. Test button loads the validation image for testing and validating the setup settings discussed in section
4.5.
The image tab is used to set the resolution for images being
inspected.
1. Image Width can be set to any size lower or equal to the
maximum resolution of the camera.
2. Image Height can also be set to any resolution lower than
the maximum resolution of the camera.
3. Image Left and the Image Top are used to set the offset in
number of pixels for positioning from the left and right
respectively; the offsets may not exceed the resolution of
the camera.
4. Apply button is used to reset resolutions after the other
settings are adjusted. When loading an image for
inspection the image resolutions need to be changed to
match the resolution of the image being loaded.
P
r
o
4.4 Image Tab
12
Title: Guardian PQV Software User Manual
Ref:
Date: December 22, 2010
Issue: Release
n
Revision: 3
p
r
D ie
o
t
N a
o r
t y
D In
is f
t o
r r
ib m
u a
t t
e io
4.5 Users Tab
P
r
o
The user name tab is only available to the system
administrator. It is used to add and remove users for the
Guardian PQV system.
1. User Name text box is used to enter a new or existing
user’s name. Case sensitive and no spaces are allowed.
2. Level test box Displays or sets the security level for the
current user name.
0 = Operator Level – cannot access sensitivity settings
1 = Manager Level – can access sensitivity settings but
cannot access Users Tab.
2 = Administrator Level – Same as manager but can
access Users Tab.
3. Add button is used to enter a new User Name and
Security Level then press button. If successful, will
display a message box “User Created”.
4. Edit button is used to edit the security level for the User Name entered.
5. Delete button is used to delete the current User Name entered.
13
Title: Guardian PQV Software User Manual
Ref:
Date: December 22, 2010
n
Revision: 3
Settings Tabs
p
r
D ie
o
t
N a
o r
t y
D In
is f
t o
r r
ib m
u a
t t
e io
5
Issue: Release
This section describes the settings for each for the Guardian PQV Tools.
5.1 Universal for all Tools
1.
Box Number indicates the box that settings are being adjusted for. Clicking on the arrows to the right
of the box will cycle through the boxes.
2. Inspection Tool Indicator is the box with the pull down menu underneath the box number. This box
indicates the type of inspection being done in a box. The selections are;
a. Print Quality
b. OCV
c. OCR
d. Data Matrix
e. Data Matrix ANSI
f. Linear Bar Code Reading
g. Linear Bar Code Reading ANSI
h. Dimensional Gauging (DMG)
3. Apply All button is used to apply the setting of a currently selected box to all region of interest boxes.
4. Copy is used to create a duplicate box with the same settings as the currently selected box.
5. Delete is used to eliminate the currently selected box.
5.2 Print Quality
P
r
o
Use the settings tab to adjust the sensitivity settings for the print
quality inspection tool.
1. Contrast is used to filter and ignore defects with a lower
contrast difference than indicated by this setting. This
setting is measured in grayscale values. The arrows to the
right are used for adjusting the size setting up or down.
2. Edges setting is used to filter and ignore defects on edges of
graphics or characters that are larger than the indicated size
in pixels. The arrows to the right are used for adjusting the
size setting up or down.
3. Min. Size setting filters and ignores defects or blobs smaller
than indicated setting in Pixels. The arrows to the right are
used for adjusting the size setting up or down.
4. Defect Limit setting is used to limit the total number of
defects under the minimum size setting and creates a signal
if the total number of defects for a filter exceeds the Defect
Limit. Underneath the defect limits is the defect score, this
message box indicates the total defect score for the currently
select region of interest box in pixels.
5. Object/Background check boxes are used to enable (when
checked) object based inspection methods. Pressing the
object button allows for adjusting setting for the current
region of interest box, and clicking the background button
allows for adjustment of background settings.
6. Mask is used to select areas in a region of interest for the
inspection process to ignore.
14
Title: Guardian PQV Software User Manual
Ref:
Date: December 22, 2010
Issue: Release
n
Revision: 3
p
r
D ie
o
t
N a
o r
t y
D In
is f
t o
r r
ib m
u a
t t
e io
5.3 Dimensional Gauging
P
r
o
Use the settings tab to adjust the measurement settings used for dimensional
gauging.
1. Type selection box indicates how measurements are taken. There are
two types of measurements; 2 Edges and PQV Tool.
Type: PQV
This tool measures the distance between two boxes. First set up two PQV
boxes over the print feature areas to measure. Second create a new box
and set it to dimensional gauging and PQV Tool. Place the new box
between near one of the tool boxes (Note: the new box is a math tool
used for calculation). Select the direction of measurement, and then
select the boxes that the measurement will use. Next enter the target
measurement and the tolerances. Now click on the calibrate button and
the scaling factor will automatically calculate. Click on the train button
on the lower tool bar and the gauging application is set.
Type: 2 Edges
This tool measures the distance between edges of a print features. For
instance if there is a large bar in the graphic that need to be a set
thickness the 2 Edges measurement method will track the distances
between the edges of the graphic entity. The PQV Tool measurement is
used to measure distance between 2 boxes.
2. Direction Pull down menu is used to set the direction of a measurement,
horizontal or vertical.
3. Scan Type (2 Edges Only) indicates the type of scan being done. There
are two scan types outside-in and inside-out. Outside-in determines if a
measurement is taken from the outside edges in. Inside-out sets the scan
to measure from inside the edges out.
4. Tool 1 and Tool 2 (PQV Tool Only) are used to indicate the region of
interest boxes used in a measurement calculation.
5. Edge 1 and Edge 2 (2 Edges Only) boxes are used to set the difference
in grayscale for locating an entities edge. Larger numbers indicate a
greater difference in grayscale change and smaller numbers indicate a
smaller difference in grayscale change.
6. Target Box is used to set the measurement length in inches or
millimeters.
7. Scale Box indicates the size of a pixel in inches or millimeters for current
resolution.
8. Tol. + Box indicates the size in inch or millimeter a measurement can be
larger than the target. For instance if the target is set at 1.5” and Tol. + is
set at 0.010”, then a measurement is still good if the measurement is less
than 1.51”.
9. Tol. – Box indicates the size in inches or millimeters a measurement can
be smaller than the target. For instance if the target is set at 1.5” and Tol.
– is set at 0.010” then the measurement is still good if the measurement is
greater than 1.49”.
10. Dim. Display Box shows the last measurement taken.
11. Diff. Display Box shows the difference between the measurement taken and the target measurement.
12. Dark-Light (2 Edges Only) check boxes are used to determine edges. The default setting for this feature is
light-Dark. When scanning for an images edge the edge location is determined when a change is found
going from a lighter to a darker medium. Clicking these check boxes changes this feature for edge location
by reversing the scan properties to identifying an edge when going from a darker to lighter grayscale value.
13. Calibrate is used to set the Guardian PQV system to use the currently entered target, scale, and tolerances.
15
Title: Guardian PQV Software User Manual
Ref:
Date: December 22, 2010
Issue: Release
n
Revision: 3
p
r
D ie
o
t
N a
o r
t y
D In
is f
t o
r r
ib m
u a
t t
e io
5.4 OCR
P
r
o
These setting allow for setup and adjustment on how characters
are read.
1. Direction indicates the orientation of the human readable
characters. There are four direction:
Top-Bottom
Reads the barcode from the top to the bottom.
Bottom-Top
Reads the barcode from the bottom to the top.
Left-Right
Reads the barcode from left to Right.
Right left
Reads the barcode from right to left.
2. String box is used to enter the text that will be read from
an image. It is also used to verify that image strings match
the required characters.
3. Threshold settings adjust the grayscale threshold level.
The grayscale threshold level is the point where the
foreground and background features in the imager are
separated. Adjust higher if characters are not separate and
lower if too separate.
4. Search Setting is the area in pixels that is searched to find
a character.
5. Min. Accept sets the minimum acceptable quality score as
a percentage.
6. Character Count looks to see that the proper number of
characters are present in an inspection. It does not verify
character type.
7. Learn Fonts button associates the objects in the image box with the characters entered in the string
text box.
8. View Fonts/Hide Fonts displays a box showing the trained character string. Learn fonts is not
available while viewing fonts.
16
Title: Guardian PQV Software User Manual
Ref:
Date: December 22, 2010
Issue: Release
n
Revision: 3
p
r
D ie
o
t
N a
o r
t y
D In
is f
t o
r r
ib m
u a
t t
e io
5.5 OCV
P
r
o
These setting allow for setup and adjustment for optical
character verification.
1. Direction indicates the orientation of the human readable
characters. There are four direction:
Top-Bottom
Reads the barcode from the top to the bottom.
Bottom-Top
Reads the barcode from the bottom to the top.
Left-Right
Reads the barcode from left to Right.
Right left
Reads the barcode from right to left.
2. String box is used to enter the text that will be read from
an image. It is also used to verify that image strings match
the required characters.
3. Threshold settings adjust the grayscale threshold level.
The grayscale threshold level is the point where the
foreground and background features in the imager are
separated. Adjust higher if characters are not separate and
lower if too separate.
4. Search Setting is the area in pixels that is searched to find
a character.
5. Min. Accept sets the minimum acceptable quality score as
a percentage.
6. Match Bar Code is the number of the barcode tool that
will send the decoded string to this OCR tool. It is used to
verify that the barcode being read matches the human readable characters associated with the barcode.
The barcode tool must be a lower tool number to this tool for verification.
7. Learn Fonts button associates the objects in the image box with the characters entered in the string
text box.
8. View Fonts/Hide Fonts displays a box showing the trained character string. Learn fonts is not
available while viewing fonts.
17
Title: Guardian PQV Software User Manual
Ref:
Date: December 22, 2010
Issue: Release
n
Revision: 3
p
r
D ie
o
t
N a
o r
t y
D In
is f
t o
r r
ib m
u a
t t
e io
5.6 Linear Barcode Reading
P
r
o
Adjusting these setting allows for the set-up and use of bar code
registration inspection.
1. Box Number indicates the box that settings are being
adjusted. Clicking on the arrows to the right of the box will
cycle through boxes.
2. Inspection Tool Indicator is the box with the pull down
menu underneath the box number. This box indicates the
type of inspection being done in a box. (See the print quality
tab for a listing of settings.)
3. Direction indicates how the barcode should be read. There
are four direction:
Top-Bottom
Reads the barcode from the top to the bottom.
Bottom-Top
Reads the barcode from the bottom to the top.
Left-Right
Reads the barcode from left to Right.
Right left
Reads the barcode from right to left.
4. Type is used to indicate what form of barcode is being
inspected. There are 5 choices:
UPC/EAN
Code 128
Code 39
Codabar
Interleave 2 of 5
5. Size sets the laser emulation size for reading the barcode.
6. Threshold is the point at which all bars within a bar code are being read. If this setting is set to 0, the
software will automatically calculate the threshold. Manual adjustment should only be used when auto
threshold for a threshold fails.
18
Title: Guardian PQV Software User Manual
Ref:
Date: December 22, 2010
Issue: Release
n
Revision: 3
p
r
D ie
o
t
N a
o r
t y
D In
is f
t o
r r
ib m
u a
t t
e io
5.7 Linear Barcode Reading ANSI
P
r
o
Adjusting these setting allows for the set-up and use of bar
code registration ANSI inspection and Grading.
1. Direction indicates the barcode orientation. There are four
direction:
Top-Bottom
Reads the barcode from the top to the bottom.
Bottom-Top
Reads the barcode from the bottom to the top.
Left-Right
Reads the barcode from left to Right.
Right left
Reads the barcode from right to left.
2. Type is used to indicate what form of barcode is being
inspected. There are 5 choices:
UPC/EAN
Code 128
Code 39
Codabar
Interleave 2 of 5
3. Aperture sets the virtual size of the aperture to emulate
the laser beam dot size.
4. Threshold is the point at which all bars within a bar code
are being read. If this setting is set to 0, the software will
automatically calculate the threshold. Manual adjustment
should only be used when auto threshold for a threshold
fails.
5. Min. Grade is used to set the minimum level of acceptance for Bar codes being inspected. Bar codes
that do not meet this requirement are rejected.
6. Results Display shows the ANSI results.
6. Calibrate is used to calibrate the light and dark range a calibration plaque is recommended.
19
Title: Guardian PQV Software User Manual
Ref:
Date: December 22, 2010
Issue: Release
n
Revision: 3
p
r
D ie
o
t
N a
o r
t y
D In
is f
t o
r r
ib m
u a
t t
e io
5.8 Data Matrix
P
r
o
Adjusting these setting allows for setup and use of Data Matrix
inspection.
1. Direction indicates how the Data Matrix orientation. There
are four direction:
Top-Bottom
Reads the barcode from the top to the bottom.
Bottom-Top
Reads the barcode from the bottom to the top.
Left-Right
Reads the barcode from left to Right.
Right left
Reads the barcode from right to left.
2. Aperture sets the virtual size of the aperture to emulate the
laser beam dot size.
3. Threshold is the point at which all bars within a bar code
are being read. If this setting is set to 0, the software will
automatically calculate the threshold. Manual adjustment
should only be used when auto threshold for a threshold
fails.
20
Title: Guardian PQV Software User Manual
Ref:
Date: December 22, 2010
Issue: Release
n
Revision: 3
p
r
D ie
o
t
N a
o r
t y
D In
is f
t o
r r
ib m
u a
t t
e io
5.9 Data Matrix ANSI
P
r
o
Adjusting these setting allows for setup and use of Data Matrix
ANSI inspection and Grading.
1. Direction indicates how the Data Matrix orientation.
There are four direction:
Top-Bottom
Reads the barcode from the top to the bottom.
Bottom-Top
Reads the barcode from the bottom to the top.
Left-Right
Reads the barcode from left to Right.
Right left
Reads the barcode from right to left.
2. Aperture sets the virtual size of the aperture to emulate
the laser beam dot size.
3. Threshold is the point at which all bars within a bar code
are being read. If this setting is set to 0, the software will
automatically calculate the threshold. Manual adjustment
should only be used when auto threshold for a threshold
fails.
4. Min. Grade is used to set the minimum level of
acceptance for Bar codes being inspected. Bar codes that
do not meet this requirement are rejected.
5. Results Display shows the ANSI results.
6. Calibrate is used to calibrate the light and dark range a
calibration plaque is recommended.
21
Title: Guardian PQV Software User Manual
Ref:
Date: December 22, 2010
Issue: Release
n
Revision: 3
p
r
D ie
o
t
N a
o r
t y
D In
is f
t o
r r
ib m
u a
t t
e io
5.10 Locate
P
r
o
The locate tab is used to adjust the settings for the locate
function. This function tracks positional variance of image
objects.
1. Locate Contrast is used to find object edges that can
contrast slightly or greatly from the background of an
image. Adjust the contrast level using the arrow keys to the
right. For images with a low contrast level adjust the
number lower, and for images with a high contrast level
adjust the number higher. Locate contrast is measured in
grayscale.
2. Locate Size sets the locate boxes width and height (in
pixels) which is used to track positional variations on the
test image. This number is adjusted using the arrow keys to
the right. Decrease this number if the locate box is trained
on areas that are too large. Increase this number if the locate
box is training on areas that are too small.
3. Locate Search is used for adjusting the size for the locate
search area (in pixels) on a test image. Decreasing this
number improves the maximum inspection speed. Increase
this number if inspections fail due to acceptable positional
variations on the test image.
4. Locate Accept sets the minimum match value for the locate
image acceptance. Decrease this number if the inspection
fails because of acceptable quality variations on the test
image. Increase this number to fail unacceptable quality
variations on the test image and to prevent incorrectly
locating on similar areas of print. Typical setting: 50 to 85.
5. Locate Score Display shows the locate score percentage for the currently selected inspection box.
6. Locate Box Check Box when clicked on displays the locate size and search area for the currently
selected box.
22
Title: Guardian PQV Software User Manual
Ref:
Date: December 22, 2010
Issue: Release
n
Revision: 3
p
r
D ie
o
t
N a
o r
t y
D In
is f
t o
r r
ib m
u a
t t
e io
5.11 Objects
P
r
o
This tab displays the settings for determining objects.
1. Object Border sets the border area around found objects
during object training. Decrease this number to separate and
inspect more objects independently. Increase this number to
enlarge the area around the object to be inspected at the
object sensitivity level. Typical setting: 0 to 3.
2. Object Min. Size filters objects found below this total pixel
size during object training. Decrease this number to allow
for smaller objects to be trained and inspected. Increase this
number to reduce the number of small objects trained.
Typical setting: 4 to 10.
3. Object Max. Size filters objects found above this total pixel
size during object training. Decrease this number to allow
for larger objects to be trained and inspected. Increase this
number to reduce the number of large objects trained.
Typical setting: 250 to 500.
4. Object Contrast is used to filter out low contrast objects. A
low object contrast will allow for recognition of a higher
volume of objects, while a high object contrast will
recognize fewer objects.
5. Object Search sets the object search area width and height
on the test image. Decrease this number to improve the
maximum inspection speed. Increase this number if the inspection fails due to acceptable object
positional variations on the test image. Typical setting: 5 to 15.
6. Object Accept sets the minimum match value for the object image acceptance. Decrease this number
if the inspection fails because of acceptable quality variations of the object on the test image. Increase
this number to fail unacceptable quality variations on the object and to prevent incorrectly accepting
similar nearby objects. Typical setting: 60 to 80.
7. Objects Display shows the total number of objects trained for the selected box.
8. View Checkbox when checked displays objects during inspection.
23