1
Copyright 2006, WaverlyStreet Software. All rights reserved.
I
ShareCon
Table of Contents
Part I Introduction
1
Part II Adding New Records
1
Part III Right Click Functions
3
Part IV Making Lists
4
Part V Web Page Styles
6
Part VI List Mode
7
Part VII Finding Things
8
Part VIII Making Contact
8
Part IX Using Keywords
9
Part X Data Import and Export
10
Part XI Different Data Sets
12
Part XII Envelope Printing
12
Part XIII The FTP Utility
13
Part XIV The "Auto Mail" Utility
14
Part XV Configuration
16
Part XVI How to Buy ShareCon
18
Part XVII License - Disclaimer of Warranty
19
Index
0
Copyright 2006, WaverlyStreet Software. All rights reserved.
Introduction
1
1
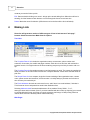
Introduction
ShareCon is a sturdy, no-nonsense name and address program for people who need quick
access to their contact information. The emphasis is on finding things quickly, and being able
to USE the information right then!
To help find things, there is a keyword system, a word search function, and several Filters.
Once you have found what you are after, make contact! Click the Phone button to call the number, the
Email button to compose an email, or the Web button to start your web browser.
When you get off the phone, record what you talked about with the notes function so you won't forget
the conversation.
The "Share" in ShareCon comes from it's rich set of data import / export features, and it's ability to
access data directories anywhere on your network. After all, it should only be necessary for one person
in an organization to have to manually type a new name and address one time; from then on, anyone
else in the organization ought to be able to simply Share it!
2
Adding New Records
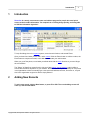
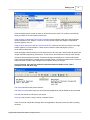
To add a new record, click the New button, or press F2 or INS. The record editing screen will
come up, with all fields blank.
Copyright 2006, WaverlyStreet Software. All rights reserved.
2
ShareCon
Most of the fields should be self-explanatory. The ones which might not be are as follows:
Records are classified with one of four "types" - "Public, Individual", "Public, Organization", "Private,
Individual", and "Private, Organization". Select one of the four radio buttons to set this. The public /
private distinction specifies whether the record is for general distribution, or just for your own use.
Public and Private are displayed in different colors on screen. The individual / organization distinction
controls how the record will be displayed on screen (by the person's name, or the organization name).
The Keyword fields enable you to further classify records into quick-display groups. Each record may
have up to three keywords. When you are first starting out, type keywords into the boxes. You only
need to type them once, though, because as you add more records the keywords will be available for
selection in the drop-down list.
A real time-saver on the new record screen is the Scratch Pad (click on "Description" to toggle it on
and off). The Scratch pad is a convenient spot to temporally paste a chunk of text from another
program, and then cut and paste pieces of it into the ShareCon record fields. For example, suppose
you get an email from someone, and wish to record a ShareCon record for them; use the mouse to
copy the information from the email message, then paste it in the Scratch Pad. Now you can cut the
name(s), organization name, email address, etc. from the pad to the correct fields, without having to
switch back and forth from ShareCon to the email client. The contents of the Scratch Pad are erased
when the new record screen is closed.
Almost-duplicate records
Suppose you have two or more contacts at the same organization, and need separate records for
each. Enter in one of them and save it. Now highlight that record on the main display and click the
Copy (F3) button. The new record screen will come up, with the first record already loaded. All you
Copyright 2006, WaverlyStreet Software. All rights reserved.
Adding New Records
3
need to do is modify the few fields that are different (perhaps name, title, phone extension, etc.), and
click Save when done. Saves a lot of typing!
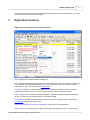
3
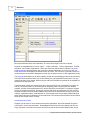
Right Click Functions
Right-click on any record to access these functions:
Show. Displays the complete record in a dialog box.
Notes. Allows keeping detailed notes specific to each record. These notes are private, in that they are
never included in any data export function. There is no hard limit on size. You can elect to either
include them or not in "full records" (see Configuration).
Clip Address. Places the record's mailing address in the Windows clipboard, ready to be pasted
anywhere else with the mouse. You can also print it directly from the confirmation dialog.
Clip All. Places the full record in the Windows clipboard, ready to be pasted anywhere else with the
mouse. You can also print it directly from the confirmation dialog.
Print Envelope. Sends the mailing address directly to your printer in "portrait mode". (May require
configuration changes to get right at first.)
Dial Phone, Dial Mobile, Send Email, Visit Website. Same as the command buttons.
Place on Call List. Puts the record in a special quick-find group called "the call list". Use this to tag
Copyright 2006, WaverlyStreet Software. All rights reserved.
4
ShareCon
contacts you need to follow up with.
Edit. Same as double-clicking on a record - brings up the record editing form. When the edit form is
showing, click the forward or back buttons to move through the list one record at a time.
Delete. Marks the record for deletion. (Will show as red on the list until the list is refreshed).
4
Making Lists
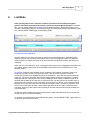
ShareCon will generate a number of different types of lists in both text and "web page"
formats. Select the menu item Make Lists for options.
Text Lists
The Complete Phone List includes the organization name, contact name, phone number and
extension, fax number, plus mobile and pager numbers. Each item is on two lines, with a blank line
between records. You might make one of these containing everyone you're likely to need to call on a
trip.
The Complete Records list contains as many or as few items as you wish. The content is controlled by
fields you select on an interim field inclusion form. Complete Records writes all the selected fields as
plain text.
The Simple Phone List is a compact, single-line format consisting of the organization name, contact
name, phone number and extension, and fax number. It is really handy to print this one from time to
time and carry it around with you.
The Email Addresses list looks at each record in turn, and if there is an email address, if includes it.
This format can be cut and pasted into email client distribution lists.
Selecting Address Labels formats the addresses to fit on standard "Avery" #8161, 1" x 4",
twenty-per-sheet stick on labels. (Note: if you aren't satisfied with the results, try exporting your records
to comma-delimited format, and using your word processors mail merge or label printing functions
instead. Quite a bit more flexibility can be obtained this way.)
Web Pages
Copyright 2006, WaverlyStreet Software. All rights reserved.
Making Lists
5
All the web page options contain as many or as few items as you wish. The content is controlled by
fields you select on an interim field inclusion form.
Single Column Complete and Two Column Complete create complete, stand-alone web pages that
can be uploaded to your website, or used on an office intranet. Pages are assigned a style which
specifies graphics, font, etc.
Single Column Include File and Two Column Include File create only the plain-text "body" of the page,
without graphics or font specification. These can be included in other web pages by using a
server-side include directive.
All the web page creation items put out file names that are all lower-case, and that have all spaces and
"illegal" characters replaced by underscores. This is done to avoid bad links caused by case mix-ups.
All lists are first presented for preview. Complete web pages are displayed in a built-in web browser
and text lists are displayed in a simple text box preview window. The preview window can be used as a
simple text editor to make minor changes to the list before printing or saving it.
In preview mode, there are four additional command buttons available: Close, Word
processor, Print, and Save Copy.
The Close button shuts the preview window.
The Word processor button starts your word processing application with the ShareCon list pre-loaded.
Print will send the list as-is directly to your printer.
Save copy lets you save a copy of the list in another location.
There are several configuration settings which are applicable to the print preview and built-in printing
functions.
Copyright 2006, WaverlyStreet Software. All rights reserved.
6
5
ShareCon
Web Page Styles
On this form you can quickly experiment with and preview various graphic, font, and background
configurations, and save different combinations as reusable styles! Create as many different styles as
you want, and assign them to individual pages. When the program is first installed a number of sample
styles are is created.
To create a new style, click the New Style button, provide a name, click OK. Make whatever
modifications you want, preview them, and save.
All the web page creation functions will copy the required graphic files into the output folder along with
the .htm files they create. Links are written in such a way that graphics are taken from the same single
folder containing the web pages. If you wish to place your collection on the internet, simply FTP the
entire contents of the output folder to your server.
Also, you may notice that all of the output file names and copied graphic file names are lower case.
This is to eliminate the incredibly frustrating hassle of file name case mix-ups on an UNIX server.
Whenever you create a web page, the style you select for it is remembered (tied to the keyword used
to filter the records).
Copyright 2006, WaverlyStreet Software. All rights reserved.
Web Page Styles
6
7
List Mode
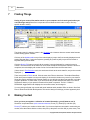
Often you may want to see a list which contains records from several different keyword
groups, and/or does not need to have all the records in a keyword group included. To facilitate
this, you may switch ShareCon's List Mode from the default Keyword / Search Result Only to Free
Selection / Add Subtract. When in Free Selection mode, the main display background switches to light
blue, and the NORM / FREE toggle switch displays FREE.
This requires a little explanation:
Normally, whenever you select a keyword or perform a word search operation, ShareCon's main
display is cleared, and only those records which fit the search are displayed. Under Free Selection
mode the list is not cleared; the results of the second search are added to whatever was previously
displayed.
When you are in Free Selection mode, pressing the delete key removes a highlighted record from the
list. (Indeed, pressing delete while in Normal Mode removes the record and switches you to Free
Selection mode.)
An example: Suppose I have keyword groups "contractor" and "landlord", and wish to make a list
containing only some of each. From the main screen, with all records displayed, I select the
"contractor" keyword. Now I highlight the first of the contractors I don't want included and press the
delete key. The record goes away and the main display shifts to a light blue background. I continue
deleting contractors, until only the ones I want are displayed. Now I click the "landlord" keyword; all
landlords will be added to the "short list" of contractors, and I can then proceed to eliminate some of
them as well. Now it strikes me that I also want one more person on the list; I can't remember which
keyword group I have him under, but I do know his first name is "Bob". So with Free Selection mode
still on, I do a word search for "Bob", and all "Bob"s get added to the list. Again, I delete the ones I
don't want, and end up with a special list consisting of selected contractors & landlords, and that one
guy named "Bob".
As with any group of displayed records, any list printing or data export operation will only contain the
records you can see on the main display.
To get back to normal Keyword / Search Result Only mode, click the NORM / FREE toggle switch, or
the Click for All Records (F5) button.
Copyright 2006, WaverlyStreet Software. All rights reserved.
8
7
ShareCon
Finding Things
Having all your contact information stored on your computer won't do much good unless you
can find things easily! ShareCon incorporates several features which make it easy to find any
specific record in a hurry.
The primary search / category system is the Keywords unit. However there are several other features
to allow finding specific records:
Click any of the alphabet tabs on top of the main display to jump to the first currently displayed record
starting with that letter. If using the keyboard, pressing any letter key will jump to the first record or
keyword starting with the letter.
Click the Search (F6) button to search all the records *currently displayed for a particular word or
number. The search looks at all ShareCon record fields except for the keywords. When the search is
completed, the main display will consist of a list of all records where the word was found.
(*Note, when in Free Selection mode, the word search looks at the entire data file, not just the records
displayed...)
There are six built-in Filters as well. Click the menu item Filter to show them. The default Show Both
Public and Personal makes it so the main display of all records includes every record in your data file.
Show Only Public and Show Only Personal make it so you will only see the group selected, in all other
program operations. In other words, if you have Show Only Public checked, then there is no chance
whatsoever that any of your personal records will be listed or exported. The ALL / PUBLIC /
PERSONAL toggle switch both displays the current filter status, and changes it.
You may also specify that only records with email address and/or website URLs are shown. One final
Filter is Show Records With No Keywords. This can be handy to find things you have apparently lost!
8
Making Contact
Once you have put together a collection of contact information, you will want to use it!
ShareCon incorporates three quick-connection buttons, Phone (F7), Email (F8), and Web (F9).
Phone (F7) utilizes your modem to initiate calls. If you have a telephone connected in series with your
modem, have the modem dial the number, then pick up the phone and click OK (or press enter). This
Copyright 2006, WaverlyStreet Software. All rights reserved.
Making Contact
9
takes the modem out of the loop, and you are left with a normal voice connection. You will need to
provide several pieces of information in configuration to make this work. Note that you can also dial the
FAX, mobile, and pager numbers as well, but you have to select those options from the menu item
Make Contact, or by right-clicking on the record.
Email (F8) starts your email client with the address loaded, on a new message composition screen.
You have the opportunity to select additional recipients, Cc, Bcc prior to starting the email program.
Web (F9) starts your web browser with the URL loaded, and goes directly to the site.
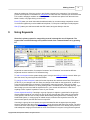
9
Using Keywords
ShareCon's primary system for categorizing records is through the use of Keywords. The
keyword list is accessed through a drop-down list left of the command buttons or by pressing
F4.
Keywords are case-sensitive; for example "contractor" and "Contractor" are treated as different.
Keywords can be a maximum of 30 characters long.
To add a new keyword to the system simply type it in as you are adding or editing a record. When you
save the record, any new keywords will be added.
To change or delete a keyword, select it from the drop-down list, and then select Filter, Edit Keyword
(CTRL F4). If you change it and click Save, the change will be made on the keyword list, as well as in
every record containing the old keyword. Click Delete to remove a keyword. Then elect to either
remove it from all the entries too, or doing nothing further. The default is to do nothing; that way, if you
later change your mind and add the keyword back in, your records will still have it. It won't hurt
anything to have "orphan" keywords in some of your records.
Choose keywords carefully. If working in a group of people, it might be a good idea for the group to
discuss what keywords to use, before you get too far into entering data. Don't make your keywords
overly specific, and don't use so many of them that browsing the keywords list is confusing. Use a
hierarchical system - in a large group of related records, make the first keyword a broad one, the
second more specific, and the third even more specific.
If working in a group, have one person set up an initial data file with the agreed-upon keywords
structure, then have the other users merge that in and go from there with their own records. The other
users will be much more likely to stick with the group keyword structure if it is already set up for them,
and subsequent merging of records will be much more efficient if everyone is using the same general
Copyright 2006, WaverlyStreet Software. All rights reserved.
10
ShareCon
structure.
10
Data Import and Export
ShareCon is able to import and export data in several different formats, including its native
format, comma-separated values (.CSV), and comma-delimited text (.TXT).
The .CSV and .TXT formats provide compatibility with many other applications such as word
processors, spreadsheets, and label printers, as well as other contact apps and most email program
address books, under DOS, Windows, UNIX, LINUX, and PDA platforms.
Exporting
First of all, no matter which export function is used, keep in mind that the only data which is exported is
that which is currently displayed on the main list. In other words, if you are looking at a keyword or
word search list, and perform an export operation, only the records included in the search results will
be included. This is important, but perhaps not obvious!
To bring up the export options, select the menu item Import / Export. All the export functions follow the
same general order; you confirm that you want to proceed, specify an output file, and click OK. When
the process is complete you are presented with a short dialog telling you what was done.
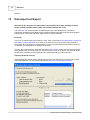
Importing ShareCon records
Importing ShareCon format is easy. Select from the menu, then find the file you wish to import. If the
file passes inspection, you will be presented with the ShareCon Records Import Controls.
Copyright 2006, WaverlyStreet Software. All rights reserved.
Data Import and Export
11
The import control form shows the file you have selected, how many records it contains, and the date
& time it was created.
ShareCon imports are actually "smart" merge operations, in that each potential import record is
compared to your existing data, and you control whether or not duplicates are replaced. Keywords are
also taken from the new records, and merged in with your existing keyword list. The Import Controls
form has two sets of radio buttons, one controls the definition of "duplicate", the other sets rules on
what to do when a duplicate is encountered.
Once you have defined "duplicate", and set the replacement rules, click the Import button to start the
process. When the operation is complete, the bottom half of the Controls screen will display an outline
of what took place. If you are not happy with the results, the entire operation can be un-done.
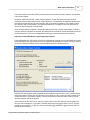
Importing comma-delimited or comma-separated records
Comma-delimited and .CSV import is a bit more complicated, because you must tell ShareCon exactly
which data fields in the import records are to be mapped to which ShareCon fields. As before, select a
file, and you will be presented with the Comma-Delimited Import Field Selector form.
With any luck, the program which generated the data made the first record an "index", naming exactly
which field is what. The first five records in the file are shown in a box on the left, with a number next
to each data field. Look at these carefully; if all five records do not show the same number of fields,
then the operation should be aborted!
If the records look OK, then one by one pick a field number on the left, and then click the ShareCon
field you want it mapped to. If you make a mistake and put the wrong field number in a box, just pick
another one to overwrite it, or pick one of the record titles (|||||||| RECORD 3 ||||||||) and then click the
ShareCon field to clear it.
Copyright 2006, WaverlyStreet Software. All rights reserved.
12
ShareCon
Next, select one of the two radio buttons, Default to Individual, or Default to Organization. These
control whether records with both an organization name and a person's name are recorded as
Organizations or Individuals.
Finally, click the radio button Add Extra Items to Notes if you would like import fields you weren't able
to match up to be written to the ShareCon description field.
When all is ready, click the Import button to start the process. During the first pass the records will be
converted and stored in ShareCon format in a temporary file. Once that is done the native format
operation will start and there you can specify what to do with duplicates. When the operation is
complete, take some time to carefully review several of the new records to make sure the data fields
mapped over correctly.
Note - prior to running any import operation, you are strongly advised to make an Internal Data
Back-Up so that you can un-do the changes if you are not pleased with the results. You will be
prompted to do this, or may do it any time with the menu item File, Create Backup Data Set. (This
works in any data set, completely independent of all other data sets.)
11
Different Data Sets
By default, ShareCon keeps its data files locally, under "Documents and Settings\[your
name]\Application Data\WaverlyStreet\ShareCon5\". If you wish to have multiple data sets,
proceed as follows:
Select the menu item File, Select a Data Path, and use the file/folder/drive selectors to reach the spot
you want. Click Select when you are there. Note that the box in the bottom right corner of the
ShareCon screen will show this new path. As long as this folder (path) is selected, ShareCon will use it
for all operations; you can have a completely separate set of records here.
To return to the default set, use menu item File, Use The Default Data Set. Whenever the program
starts up, the default set will be accessed (unless you select an alternate start up folder in
configuration).
If you wish to be able to bypass the selection process on a particular alternate data set, go into
configuration and set the path to either Alternate Set #1 or #2. From then on you will be able to pick it
with the menu item File, Use Alternate Data Set... (Note: the configuration file will allow storing two
alternate paths, but you can set up and manually select an unlimited number.)
Network usage: ShareCon may be configured to use a common data folder in an office environment.
Simply specify the same "alternate" data folder on each machine and set the program to start up in
that folder (see configuration).
12
Envelope Printing
ShareCon has a special envelope printing utility built in.
Copyright 2006, WaverlyStreet Software. All rights reserved.
Envelope Printing
13
You must adjust the address placement (just once) to suit your printer. First and foremost, do your
testing on PLAIN PAPER, not on envelopes! Look at your printer, and note how an envelope travels
through it. The envelope is shown in light grey on the setup form. You can move the envelope to three
different locations by clicking the L, C, and R buttons (left, center, right), matching your printer. Next,
move the "to" and return addresses (indicated by red and blue rectangles) where you want them on the
envelope outline. Once you think you have it right on plain paper, try it with an envelope.
13
The FTP Utility
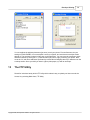
ShareCon includes a handy built-in FTP utility which makes it easy to upload your lists to a web site.
Access it by selecting Make Lists, FTP Utility.
Copyright 2006, WaverlyStreet Software. All rights reserved.
14
ShareCon
The first step is to type in your website server address, username, and password in the three spaces
provided. Your web host will have provided this information. Also provide a name for this connection in
the drop-down box. Click the save button. To connect to the site, click on the connect button, and
confirm that you do indeed connect properly. If not, make sure you have entered all the login
information correctly and try again. (Note that these items are usually case-sensitive.) These setting
are preserved between sessions, and you may set up as many connections as you need.
Once connected, use the Remote Host file selection list to go into the remote directory where you wish
to host your work. (Note - when you first enter an EMPTY folder, it can take quite a while for the list
operation to complete - just be patient and wait for the hourglass mouse cursor to go away!)
Select files to send in the Local Host list, and click the Send all or Send only newer buttons. The Send
all button sends all files you have selected in the Local Host list. The Send only newer button sends
only selected files which either do not exist at all on the remote host, or which have been modified
since the last time you used the FTP utility. This can really speed things up when all you have changed
is text or "style" elements, because the graphic files themselves won't be sent over again.
You may also use the Local filter buttons to make it easier to find certain files to send. (When the FTP
utility first loads, "Both" is selected.)
When the send operation is complete, click the Disconnect button and then close the FTP form.
14
The "Auto Mail" Utility
ShareCon includes a simple utility ("Auto Mail") for sending the same e-mail message to multiple
recipients. It sends each piece at a variable time interval of as little as 5 seconds apart. The utility can
be minimized while it works so that you can do other things while it sends your e-mail for you.
Copyright 2006, WaverlyStreet Software. All rights reserved.
The "Auto Mail" Utility
15
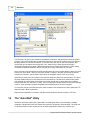
To use it, select the people who you wish to e-mail using the normal keyword and/or word search
features of ShareCon, then select the menu item File, Auto Mail Utility. The program will create an
internal list of all the e-mail addresses contained in the displayed records, then display the Auto Mail
form:
The first time you use Auto Mail, select (on the Auto Mail form) File, Mail server configuration. You
need to provide an SMTP server name, user name, and password that will work with your internet
service provider. These are the same bits of information you have previously entered into your e-mail
program for the outgoing mail configuration. Test the settings by saving them, entering in a single "To:"
address, "From:" address, subject, and message body text, and clicking the Test button. If all is well,
you will soon get a message from the program that the test was successfully sent, and that you should
check the e-mail for the test recipient (use your own address for testing so that you can check it).
Also use the Test function to check the formatting & etc. of each message you plan to send, to make
sure it looks like you want. The From:, Subject: and message body fields are all saved between Auto
Mail / ShareCon sessions.
WARNING!!!!!!!!!!!!!!!!!! Before using Auto Mail to send to a group, please heed
the following:
Sending unsolicited bulk e-mail (which is commonly called "Spam") is almost
certainly frowned upon by your ISP, and in some circumstances doing so can
Copyright 2006, WaverlyStreet Software. All rights reserved.
16
ShareCon
get your account terminated. Read and understand your ISP's policy on this
before sending! WaverlyStreet Software shall not be held responsible for any
trouble you may get into through the use of Auto Mail.
Mail Send Settings: Auto Mail has features to help you conform to your ISP's mail sending policies.
First, the Minimum and Maximum interval settings control how often each piece is sent out. For
example, if the minimum is set to 30 seconds and the maximum set to 90 seconds, then there will be a
pause between each piece, for a random number of seconds between 30 and 90. The variable,
random interval may make it less likely that the activity will attract attention (but there is no guarantee
that it will).
Second, the "Pause after sending" setting stops the process after x number of pieces have been sent.
This is useful if, for instance, your ISP has a fixed rule on the number of e-mails you are allowed to
send per hour.
Also, you can at any time click the Pause button and stop the process. You can even close the Auto
Mail utility and ShareCon and then come back to it later and take off from where you were.
Auto Mail's configuration settings, saved message text, and recipient list are all stored locally on each
machine running ShareCon, and thus network users can use the utility independent of one another.
15
Configuration
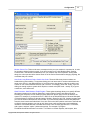
Throughout this document we have referred to "settings" or "configuration". To view these
options, select File, Configuration, General Settings. Here are the details:
Copyright 2006, WaverlyStreet Software. All rights reserved.
Configuration
17
Modem Comm Port. This must be set to correspond to the port your modem is connected to, in order
for the phone dialing functions to work. If you don't know the port, click Windows Start, Settings,
Control Panel, then double-click Modems. Pick your modem, then click Properties. Among other
things, the comm port should be shown. Back out of the Control Panel without changing anything, but
remember that port number!
Area Code, Long Distance Code, Outside Line Code. These all effect how phone numbers are
handled during phone dialing. To suppress dialing your local area code for numbers which have the
same code, enter it in the appropriate box. If you wish to have long distance calls use a calling card
number or one of those discount services (like "1010321" for example), enter that. Finally, if you are
dialing out through a phone system which requires a certain code (PBX code - usually "9") to get an
outside line, enter that as well.
Word Processor, Web Browser, Email Program. These optional settings allow you to specify different
third-party programs to be called by ShareCon's various "Make Contact" and editing functions.
Normally your computer will run certain programs whenever specific types of files are asked to be
opened. For example, if you double-click on a .DOC file in the Windows Explorer, Microsoft Wordpad
or Word will start up, with the file already loaded. Similarly, ShareCon will "call" another program when
you click the Email or Web buttons on the toolbar. If you are already satisfied with the way ShareCon
does this, then leave these fields blank. If not, then click on the little question mark next to the field and
go find the alternate program you wish to use. Note: some email programs may require additional
"switches" to be added after the executable file's name. Here are some popular ones - For Eudora,
add a space, and then "mailto:" (without the quotes). For example: C:\Program
Files\Qualcomm\Eudora\Eudora.exe mailto: For Outlook or Outlook Express, add a space, then
Copyright 2006, WaverlyStreet Software. All rights reserved.
18
ShareCon
"/mailurl:mailto:" (without the quotes). For example: "C:\Program Files\Outlook Express\msimn.exe
/mailurl:mailto:" For Pegasus, add a space, then "-t ," (without the quotes). For example:
"C:\PMAIL\winpm-32.exe -t ,". If your secondary mail program is not one of these, there may be
information available on the web for it's command line operation. It is beyond the scope of this
document to provide these for all! (The best alternative is to use your default mail program and leave
the configuration form blank.)
Return Address (for envelope printing).
Before Name: Phrase to be inserted before the person's name when addresses are put together
(envelopes, etc.). Defaults to "Attn:".
Put Names in Email. This sets whether or not to include the actual name in an email address. For
example this address has the name included: Dave Gjessing <[email protected]>, but this one
does not: [email protected]. Some email programs don't seem to be able to handle the literal
address properly from the command line, so this option allows you to change the format. This effects
both the Email button and the format of addresses in Print Preview, Email Addresses.
Skip Most "Confirm?" Dialogs. Once you are familiar with ShareCon, check this to eliminate several
confirmation dialogs (and speed things up).
Remind me to Merge on Exit. This is for laptop users who sometimes are connected to an office
network, and sometimes aren't. Check this to make ShareCon remind you to merge your local data
with the network data when you close the program. (Only if you are working in the network data folder
when you close.)
Show names Last, First. If checked, records classified as "individual" (public or private) will have the
last name first, then the first name, separated by a comma. If not checked they will display as first
name last name, with no comma.
Adjust Phone Numbers to US Stds. If checked, a "1" is added, and your local area code is not included
when ShareCon dials a phone number.
Path #1, Path #2. These refer to the two built-in "alternate" data paths. When these fields are filled in,
they can be quickly selected from the menu, without having to go through the manual selection
process. Use the [...] button to select a folder for each.
If you want ShareCon to start up in one of the two alternate paths, select the path, then click the
appropriate radio button. Note that this change will not apply until you have re-started the program. If
the alternate path is not available upon start-up, ShareCon will switch to your local default path (and
tell you so).
Other configuration settings:
Switch between bold and regular fonts. Select File, Configuration, Use Bold Fonts to toggle
bold/regular in ShareCon's interface.
Select Colors. Select File, Configuration, Select Colors for options.
16
How to Buy ShareCon
In order to use ShareCon beyond the 30 day trial period, you must buy it from WaverlyStreet. It
Copyright 2006, WaverlyStreet Software. All rights reserved.
How to Buy ShareCon
19
only costs $29.95 US. When you buy, we will generate for you a matching Registration Name and
Registration Key, which you will then enter into the appropriate boxes on the registration key form.
Once registered, all program functions are restored, plus the opening title box clears without your
having to click "OK!".
Each $29.95 registration fee entitles one person to use ShareCon on up to two computers. Site
licenses are available, please click here for details.
To buy, use one of the following two methods:
1) If you wish to use a credit card, and have internet access, click here to purchase on line.
2) If you wish to use surface mail, send a check, money order, or cash (US funds only please) for
$29.95 to WaverlyStreet Software, 277 W. Brighton Road, Columbus Ohio 43202, United States. Be
sure to include a return address (either surface or email) so we can send you your registration key!
Surface Mail Order Form: (please print clearly)
______ Send me a ShareCon registration code! Enclosed is $29.95, US funds.
NAME:
______________________________
ADDRESS:______________________________
_______________________________
_______________________________
Mail to: WaverlyStreet Software, P.O. Box 14249, Columbus, Ohio 43214 (US)
Thanks for your support!
17
License - Disclaimer of Warranty
Great care has been taken to make sure that ShareCon is a solid and dependable computer
program. The program is written in Microsoft Visual Basic version 5 (SP3), and the installation is
performed by Inno Setup 2.0. The program, installation, and un-installation have been extensively
tested on several in house machines and also by a number of outside "beta testers". However, it is
simply not possible to test on every conceivable hardware/operating system combination, and so
therefore it is impossible to say for sure that ShareCon will function flawlessly on your system.
License - disclaimer of warranty:
Prior to installing ShareCon (hereinafter referred to as the SOFTWARE) you agreed to the license
terms and other provisions contained herein:
The SOFTWARE and accompanying documentation are protected by United States copyright law and
also by international treaty provisions. In exchange for the purchase price, WaverlyStreet grants you a
Copyright 2006, WaverlyStreet Software. All rights reserved.
20
ShareCon
limited license to install and use the SOFTWARE on a single computer. You are explicitly prohibited
from copying, renting, leasing, selling, modifying, decompiling, disassembling, or transferring the
program license to others. Any such unauthorized use shall result in immediate and automatic
termination of this license. All rights not expressly granted here are reserved to WaverlyStreet.
NO WARRANTY - THE SOFTWARE IS PROVIDED ON AN "AS IS" BASIS. WAVERLYSTREET
DISCLAIMS ALL WARRANTIES RELATING TO THE SOFTWARE, WHETHER EXPRESSED OR
IMPLIED, INCLUDING BUT NOT LIMITED TO ANY IMPLIED WARRANTIES OF
MERCHANTABILITY OR FITNESS FOR A PARTICULAR PURPOSE. NEITHER WAVERLYSTREET
NOR ANYONE ELSE WHO HAS BEEN INVOLVED IN THE CREATION, PRODUCTION, OR
DELIVERY OF THE SOFTWARE SHALL BE LIABLE FOR ANY INDIRECT, CONSEQUENTIAL, OR
INCIDENTAL DAMAGES ARISING OUT OF THE USE OR INABILITY TO USE THE SOFTWARE,
EVEN IF WAVERLYSTREET HAS BEEN ADVISED OF THE POSSIBILITY OF SUCH DAMAGES OR
CLAIMS. THE PERSON USING THE SOFTWARE BEARS ALL RISK AS TO THE QUALITY AND
PERFORMANCE OF THE SOFTWARE.
WaverlyStreet's maximum liability under this Agreement for all damages, losses, costs and causes of
actions from any and all claims (whether in contract, tort, including negligence, quasi-contract,
statutory or otherwise) shall not exceed the actual dollar amount paid by you for the software.
This agreement shall be governed by the laws of the State of Ohio (USA) and shall inure to the benefit
of WaverlyStreet and any successors, administrators, heirs and assigns. Any action or proceeding
brought by either party against the other arising out of or related to this agreement shall be brought
only in a STATE or FEDERAL COURT of competent jurisdiction located in Franklin County, Ohio. The
parties hereby consent to in personam jurisdiction of said courts.
Copyright 2006, WaverlyStreet Software. All rights reserved.