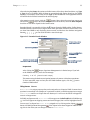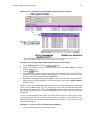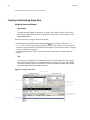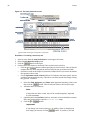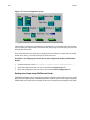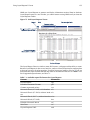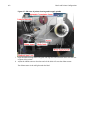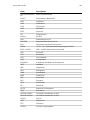
1
LDMS User Manual
For The Laboratory Data
Management System, Version 11.0
Frontier Science and Technology Research Foundation, Inc.
4033 Maple Road
Amherst
New York
14226-1056
United States
Tele: (716) 834-0900
Fax: (716) 833-0655
iv
LDMS User Manual
LDMS User Manual: For The Laboratory Data Management System, Version
11.0
by
Copyright © 2015 Frontier Science and Technology Research Foundation, Inc.
The LDMS Manual is provided "AS-IS". This document may be distributed for reference purposes to members of cooperative groups
or networks associated with Frontier Science Foundation. Reproduction of this document without the consent of Frontier Science
Foundation is strictly prohibited. All trademarks, trade names, service marks, and logos referenced herein belong to their respective
companies. For more information, see to the LDMS License Agreement.
Table of Contents
About This Manual .......................................................................................................... xi
1. Getting Started ............................................................................................................. 1
What is LDMS? ......................................................................................................... 1
Who is Frontier Science? ........................................................................................... 1
Getting Started with LDMS ....................................................................................... 2
Getting LDMS Installed ..................................................................................... 2
Upgrading to the Latest version of LDMS ........................................................... 2
Setting up an LDMS Client-Server Environment ................................................. 3
LDMS and Challenge Passwords ........................................................................ 4
Logging into LDMS for the First Time ................................................................ 5
Changing Users ................................................................................................. 6
Date and Time in LDMS .................................................................................... 6
Setting Up a Printer for LDMS ........................................................................... 6
Finding Your Way Around ................................................................................. 6
Keyboard Usage ................................................................................................ 9
Getting Help ........................................................................................................... 10
Submitting Corrections and Questions For This Manual ............................................ 10
2. Specimen Management ................................................................................................ 11
Introduction ........................................................................................................... 11
Specimen Identifiers ............................................................................................... 12
Entering a New Specimen ........................................................................................ 13
Understanding the Specimen Management Screen .................................................... 16
The Patient Grid ............................................................................................. 16
The Primary Grid ............................................................................................ 17
The Aliquot Grid ............................................................................................. 19
Preloads: Templates for Expected Specimen Collections ........................................... 21
Using Preloads ................................................................................................ 21
Defining Preloads ............................................................................................ 21
Using Condition Codes ............................................................................................ 23
What are condition codes? .............................................................................. 23
Individual condition codes .............................................................................. 24
Condition codes and never store ...................................................................... 28
Correcting a Specimen Entry Error ........................................................................... 28
General advice for correcting specimen data .................................................... 28
Example Corrections ....................................................................................... 30
Doing Other Things with Aliquots ........................................................................... 32
Finding Aliquots After Logging Them .............................................................. 32
Using Never Store ...................................................................................... 33
Marking Aliquots for Shipment ........................................................................ 34
Assigning an Assay to Aliquots ........................................................................ 34
Re-printing Labels .......................................................................................... 35
Entering Special Types of Specimens ....................................................................... 35
Creating Anonymized Specimens ..................................................................... 35
Adding Bulk VQA Records ............................................................................... 37
Pharmacology Specimens ................................................................................ 38
Pharmacology Controls ................................................................................... 39
Culture Derivative ........................................................................................... 39
Astro Numbered Specimen .............................................................................. 40
Entering Reagent Information ......................................................................... 40
3. Storage ....................................................................................................................... 43
The LDMS Storage Hierarchy ................................................................................... 43
vi
LDMS User Manual
Defining a Storage System ....................................................................................... 44
Defining Containers and Levels ....................................................................... 44
Modifying and Deactivating Containers and Levels ........................................... 45
Defining a Freezer Configuration ..................................................................... 46
An Example: Storing Dried Blood Spot Cards ................................................... 47
Creating a Storage System in LDMS ......................................................................... 47
What Each Tab in LDMS Storage Does ............................................................. 47
Adding and removing Freezers ........................................................................ 48
Adding Levels and Containers to a Freezer ....................................................... 49
Maintaining Storage ................................................................................................ 49
The Storage Structure List Explained ............................................................... 49
Adding and Removing Specimens from Storage ................................................ 51
Modifying All the Specimens in a Container ..................................................... 52
Shipping a Storage Unit .................................................................................. 53
How LDMS Storage Handles Shipped Specimens ............................................... 53
Moving and Re-arranging Stored Items ............................................................ 54
Finding Specimens in Storage .......................................................................... 55
Storage Reports .............................................................................................. 56
Storage Change Log (Transactions) .................................................................. 56
Locating Specimens not in Storage .................................................................. 58
4. Patient Management ................................................................................................... 59
Finding and Modifying Participant Information ........................................................ 59
Adding a New Participant ........................................................................................ 60
Using OPID ............................................................................................................. 60
Merging Participants ............................................................................................... 60
5. Shipping ..................................................................................................................... 63
Shipping = Data Transfer ........................................................................................ 63
Preparing Shipments ............................................................................................... 64
Creating a New Shipment ................................................................................ 64
Finding Containers to Ship .............................................................................. 65
Finding Specimens to Ship .............................................................................. 65
Selecting a Shipment Destination .................................................................... 67
Setting up the Shipping Container ................................................................... 68
Performing Quality Control on a Shipment ...................................................... 70
Viewing and Modifying Shipments ........................................................................... 72
Correcting Shipment Problems ................................................................................ 73
Shipping file with an incorrect shipment date .................................................. 73
Error with shipment destination ...................................................................... 73
Discrepancy between expected and received shipment ...................................... 74
Lost or Unsatisfactory Shipment ...................................................................... 74
Important Shipment Reports ................................................................................... 75
Sending a Shipment ................................................................................................ 75
Importing a Received Shipments ............................................................................. 77
Importing a Shipment from an LDMS Laboratory .............................................. 77
Text Shipping File ........................................................................................... 78
Removing a Received Shipment ....................................................................... 80
Compatibility with WebLDMS .................................................................................. 80
6. Assays ........................................................................................................................ 81
Running an assay means reading data ..................................................................... 81
Supported Assays .................................................................................................... 82
Creating and Reviewing Assay Runs ......................................................................... 84
Assigning Assays to Aliquots ........................................................................... 84
Creating a New Assay Run .............................................................................. 85
Specimen Thaw Count .................................................................................... 87
vii
Adding Specimens and Controls not Logged into LDMS .................................... 87
Recalling an Assay that has been Setup but not Read ........................................ 87
Generating Layout Reports .............................................................................. 88
Reviewing Assay Results After They Have Been Read ........................................ 88
Censor Codes .................................................................................................. 88
Correcting Errors in Assay Runs ...................................................................... 89
Virology Assays ....................................................................................................... 90
Abbott Realtime and COBAS TaqMan .............................................................. 90
COBAS TaqMan HIV-1 Qualitative ................................................................... 92
Template Based Virology Assays ...................................................................... 94
Cultures ................................................................................................................ 101
Culture Workflow Overview ........................................................................... 101
Creating Culture Schedules ............................................................................ 102
Creating a Culture ......................................................................................... 102
Culture Schedule and Harvest Labels ............................................................. 104
Running Cultures on a p24 Antigen Assay ...................................................... 104
Reviewing Results and Terminating Cultures .................................................. 105
Enter MT-2 Culture Assay Results Using a Culture Supernatant ....................... 106
Creating a Specimen from a Culture Harvest .................................................. 107
p24 Antigen Assays ............................................................................................... 108
Immunology Assays ............................................................................................... 108
Lymphocyte Proliferation Assay (LPA) Assay .................................................. 108
Apoptosis by P.I. Assay ................................................................................. 109
Advanced Flow and TUNEL Assays ................................................................. 110
Natural Killer Cell (NK) Assay ........................................................................ 111
Cryopreservation ........................................................................................... 112
Pharmacology (PK) Assays ..................................................................................... 113
Creating PK Templates .................................................................................. 113
Entering PK Assay Results ............................................................................. 114
Reviewing and Accepting PK Results .............................................................. 116
GeneXpert Assay ................................................................................................... 116
Managing Controls ................................................................................................ 118
Setting up Assay Kit Information ................................................................... 118
Setting up VQA Kits ...................................................................................... 120
Pharmacology Control Charting ..................................................................... 121
Virology Control Charting ............................................................................. 121
Pharmacology QC and Calibration Lot Entry ................................................... 122
Using Assay Device Readers ................................................................................... 123
Associating an Assay with a Reader ............................................................... 123
Creating a Reader Configuration .................................................................... 124
LDMS Remote Reader ............................................................................................ 126
What is LDMS Remote Reader ....................................................................... 126
Configuring LDMS to use LDMS Remote Reader ............................................. 126
Configuring LDMS Remote Reader ................................................................. 126
Reading Assay Output using LDMS Remote Reader ......................................... 128
7. Reports ..................................................................................................................... 131
LDMS as a Database Front-end .............................................................................. 131
Running LDMS's Built-in Reports ........................................................................... 131
Using Crystal Reports® Viewer .............................................................................. 132
Running Custom Data Retrieval Reports ................................................................ 134
Descriptions of Built-in Reports ............................................................................. 135
8. Labels and Printer Configuration ............................................................................... 149
Advanced Label Printing ........................................................................................ 149
Creating a New Label Format ................................................................................. 150
viii
LDMS User Manual
Setting the Default Label Size and Format .............................................................. 152
Barcodes ............................................................................................................... 152
Setting the Printer Used to Generate Labels and Reports ......................................... 153
Printing Test Labels .............................................................................................. 153
Setting up Specific Printers ................................................................................... 154
Setting up the Brady BBP33 Printer ............................................................... 154
Setting up the Brady IP300 Printer ................................................................. 155
Setting up the Brady BMP53 Printer ............................................................... 155
Setting up the Brady BP-PR 300 Printer ......................................................... 156
Setting up the Brady BBP11-34L Printer ......................................................... 156
Setting up the LabXpert Printer ..................................................................... 157
Setting up the Brady MVP 300 Printer ............................................................ 158
Setting up the Zebra GX 430t printer ............................................................. 165
Setting up other printers ............................................................................... 165
9. System Administration and Maintenance .................................................................... 167
System Configuration ............................................................................................ 167
Configuration Tab ......................................................................................... 167
Internet Tab .................................................................................................. 167
Storage Tab ................................................................................................... 167
Assays Tab .................................................................................................... 168
Import Tab .................................................................................................... 168
Managing Users ..................................................................................................... 168
Creating New Users ....................................................................................... 168
Adjusting User Permissions ........................................................................... 169
Modifying Users and Passwords ..................................................................... 170
Adjusting Login Security ............................................................................... 170
Group Configuration ............................................................................................. 170
Backups ................................................................................................................ 172
Exports and Updates ............................................................................................. 173
Activity Log .......................................................................................................... 175
Recovering from an Unexpected Shutdown ............................................................. 176
Computer requirements and recommendations for LDMS ........................................ 177
10. Group-Specific Information ...................................................................................... 179
ACTG (AIDS Clinical Trials Group) ......................................................................... 179
Aeras .................................................................................................................... 180
ATN (Adolescent Medicine Trials Network) ............................................................ 181
CHAVI (Center for HIV-AIDS Vaccine Immunology) ............................................... 181
CPQA (Clinical Pharmacology Quality Assurance and Quality Control) ..................... 182
FACTS (Follow-on African Consortium for Tenofovir Studies) ................................. 183
HPTN (HIV Prevention Trials Network) .................................................................. 183
HVTN (HIV Vaccine Trials Network) ...................................................................... 184
IMPAACT (International Maternal Pediatric Adolescent AIDS Clinical Trials) ........... 185
iPrEx (Pre Exposure Prophylaxis Initiative) ............................................................ 186
MACS (Multicenter AIDS Cohort Study) ................................................................. 187
MTN (Microbicide Trials Network) ......................................................................... 188
NICHD-WESTAT ................................................................................................... 188
PHACS (Pediatric HIV/AIDS Cohort Study) ............................................................. 189
PHIA (Population-Based HIV Impact Assessments) ................................................. 190
REPRIEVE ............................................................................................................. 191
VQA (Virology Quality Assurance) ......................................................................... 191
WIHS (Women's Interagency HIV Study) ................................................................ 192
11. Frequently Asked Questions about LDMS .................................................................. 195
12. LDMS Code Abbreviations ........................................................................................ 199
A. LDMS Software License Agreement ............................................................................ 213
ix
Glossary ........................................................................................................................ 215
Index ............................................................................................................................ 219
x
About This Manual
This user manual is for the current version of LDMS for Windows. For the most part, the content
of this manual will also apply to previous versions of LDMS.
For more information about LDMS, visit the LDMS website [http://www.fstrf.org/ldms].
xii
Chapter 1. Getting Started
What is LDMS?
The Laboratory Data Management System (or LDMS) is a comprehensive specimen management
application built specifically for medical research laboratories. It is used by research institutions
to manage specimen inventories, prepare and process specimen shipments, generate barcode
labels, and much more.
Initially released in 1998 to collect data for the Adult and Pediatric AIDS Clinical Trials Groups
(AACTG and PACTG), LDMS has been built with the needs of medical research laboratories in
mind. While LDMS is most widely used among clinical trials networks that study HIV/AIDS and
related infections, it is also used in many other medical research areas. In addition to using LDMS to complete work for certain trial networks, laboratories can use LDMS for managing independent work as well, such as studies or trials that are only taking place at one or two laboratories.
For small and medium sized research-oriented laboratories, the ease of adopting LDMS is very
appealing. LDMS is designed to work out-of-the-box without any significant setup or configuration. LDMS User Support, which is included as part of LDMS’s license agreement, can assist
users with every aspect of using LDMS, including installation, seven days a week, 24 hours a day.
This is a great help to laboratories without a dedicated I.T. support staff.
LDMS development is driven in significant ways by the needs of its users. Many features and
updates in LDMS are added as a direct result of a user request. The LDMS team actively maintains
relationships with network leadership and individual laboratories, and updates LDMS, organizes
special training sessions, and writes custom documentation based on each one's unique needs.
Despite catering to smaller organizations, LDMS is built to scale to the size of the laboratory.
A powerful Oracle® back-end allows LDMS to be capable of managing millions of specimens.
This means that LDMS can be used at large repositories without sacrificing the ease of setup
and maintenance that smaller laboratories enjoy.
Some research institutions use LDMS as a tool for transferring data to Frontier Science, a data
management center for many research studies.
Who is Frontier Science?
Frontier Science and Technology Research Foundation (FSTRF /fis-triff/, or just Frontier
Science), is the not-for-profit organization that develops and maintains LDMS.
Frontier Science provides data management services to research organizations—LDMS is one of
those data management services. Many groups that use LDMS also utilize Frontier Science to
manage that data. In fact, LDMS has a built-in mechanism for sending certain laboratory data
to the Frontier Science Data Management Center (often referred to as the “DMC”) in Amherst,
New York.
2
Getting Started
Frontier Science is involved in many other statistical research efforts beyond LDMS. To learn
more about the work that Frontier Science does, visit the Frontier Science website [http://
www.fstrf.org].
Getting Started with LDMS
Getting LDMS Installed
If you do not have LDMS installed, contact Frontier Science as they will facilitate installation.
As part of this process, your laboratory will be assigned a unique LDMS laboratory ID by Frontier
Science. A laboratory ID is a 3-digit number that uniquely identifies a laboratory. This ID is used
in several places in LDMS:
• It is used to generate global specimen IDs for specimens, a number that uniquely identifies a
single specimen across all laboratories using LDMS.
• It is used for shipping specimens between laboratories.
Your LDMS laboratory ID will be assigned to you by Frontier Science prior to the installation of
LDMS. Once this ID has been assigned to you, LDMS User Support will coordinate the installation
of LDMS for you.
For more information on the process of getting LDMS installed, contact LDMS User Support. See
the section called “Getting Help” on page 10.
Upgrading to the Latest version of LDMS
Frontier Science releases major updates for LDMS several times each year. An email notification
is sent to users when a new version is available. It is important that you upgrade when a new
version is released so that your laboratory has access to the most secure, stable, and feature-rich
version available.
If you already have LDMS installed, you can upgrade to the latest version yourself by downloading and running a software update. To determine what version of LDMS you are currently using,
click HelpAbout from the LDMS menu bar.
Important
If you are running LDMS in a client-server setup, you must upgrade LDMS on the server
prior to upgrading the client machines.
Procedure 1.1. Upgrading LDMS
1.
2.
Prepare for installation.
•
Using LDMS, create a current backup of your LDMS database. See Procedure 9.6, “Manually generating a backup file”.
•
Close all programs (including LDMS) on the computer. It is a good idea to reboot the
machine.
•
Ensure that you have full local administrative privileges on the computer. These will
be required to complete installation.
Obtain the LDMS software update. There are two ways to get it:
Setting up an LDMS Client-Server Environment
3
Visit the Frontier Science website [http://www.fstrf.org/portal]. Click the Get LDMS
Updates link from the section entitled LDMS User Support. There you will find a link
to download any available LDMS updates.
•
Get an installation DVD by contacting LDMS User Support. See the section called “Getting Help” on page 10.
Run the installer.
•
3.
Important
4.
During installation, LDMS will need to update your LDMS database (see Figure 1.1).
The time required to complete this process will vary, depending on the amount of
data at your laboratory. For large laboratories, this process could take several hours.
Do not interrupt this process or turn off your computer.
Once the update has finished, attempt to start LDMS. You will be prompted to contact LDMS
User Support to unlock LDMS before you can use it again.
Figure 1.1. Table update screen
▲ This window will show the progress of updating your LDMS database during the upgrade; do not close
this window or turn off your computer.
If you encounter any difficulties or need assistance upgrading, do not hesitate to contact LDMS
User Support. See the section called “Getting Help” on page 10.
Setting up an LDMS Client-Server Environment
LDMS can be set up so that multiple computers running LDMS utilize the same LDMS database.
LDMS is installed on one computer and acts as the server; LDMS is then installed on other computers (the clients) connected to the same local network, and access the LDMS database on the
LDMS server. Doing this allows you to have multiple computers with LDMS installed that can
access the same data. The LDMS sever does not need to be a dedicated sever either—you can use
the sever like any other computer with LDMS to add specimens, read assay results, etc.
4
Getting Started
Important
The LDMS server and all clients must be running the same version of LDMS. Upgrades
must be performed on all machines at once, with the server machine upgraded first.
Procedure 1.2. Installing LDMS for client-sever setups
1.
2.
Install LDMS on the computer to act as the LDMS server and perform any needed updates.
See the section called “Getting LDMS Installed” on page 2.
Locate the LDMS reports directory on the server machine. This location will need to be
accessible to LDMS clients, such as a shared network location. A typical location may be \
\[machine name]\[drive letter]\fstrf\reports.
Important
3.
4.
5.
This directory must be a shared directory and clients must have full control
permissions for it. To make this directory more secure, you can obtain a list of Windows login usernames for the people that will be using LDMS and modify permissions on the reports directory so that only those users will have permissions to
access it.
Install LDMS on each client computer that will be connecting to the LDMS server.
On the client machine(s), open C:\fstrf\assay\bin\lldms.ini in a text editor such
as Notepad. Update the following settings (replace ### with your 3-digit LDMS laboratory
ID number):
OracleDatabaseServerName=servername:1521/xe
OracleDatabaseSchemaName=LAB###
DBPATH=\\servername\fstrf\reports
REPPATH=\\servername\fstrf\reports
ExportDir=\\servername\drive\fstrf\reports\Export
Start each LDMS client and ensure that all of them open without error.
You must set up a printer for each LDMS client individually (as well as the server, if you will
be using it for normal work). For instructions on setting up a printer and why it is important in
LDMS, see the section called “Setting Up a Printer for LDMS” on page 6.
LDMS and Challenge Passwords
The first time you start LDMS after installation or after an upgrade, or if you attempt to access
specific features in LDMS, you will see a message asking for a password. See Figure 1.2.
Figure 1.2. Challenge password window
▲ You must give the challenge code to LDMS User Support, who will use it to generate the correct password.
Logging into LDMS for the First Time
5
This message means that you must contact LDMS User Support and provide them with the letters listed in the Challenge field. LDMS User Support will use this information to generate and
provide you with a Password to enter.
Important
After providing LDMS User Support with a challenge code, do not close the challenge
password window. Doing so will generate a new challenge code and thus a different
password. Leave the password window open until you receive the password from LDMS
User Support.
If LDMS encounters a serious problem and shuts down unexpectedly, you may also be asked
to provide a challenge password. In these situations, there will be a description of the problem
in the challenge password window. When contacting LDMS User Support, you will be asked to
provide those details. This information is very important, not only for ensuring that there has
been no damage to data at your laboratory, but also to help improve LDMS in general.
The purpose of this locking mechanism is protect LDMS's database from accidental damage.
Due to the size and complexity of the data with which LDMS works, certain features could cause
damage to your LDMS database if used incorrectly. Certain actions in LDMS also require the
approval of leadership for certain networks, and this locking mechanism helps facilitate that
process.
For instructions on how to contact LDMS User Support, see the section called “Getting
Help” on page 10.
Logging into LDMS for the First Time
LDMS requires users to log in with their own, unique user name and password. The first time
you start LDMS, you need to create a new user to act as your system administrator. This person
will have the ability to create accounts for other users.
Procedure 1.3. Creating your first LDMS User
1.
2.
3.
4.
5.
6.
7.
8.
9.
10.
11.
12.
13.
Log into LDMS with the temporary user ADMIN, and the password admin. This is the only
time you will use this account.
From the LDMS menu bar, click AdministrationUser Configuration
Click the
button to create an account for your system administrator.
Enter the login name for the person into the User Name field. User names must be unique
at your laboratory. A good idea is to use person's first initial and last name (e.g. jdoe for
"John Doe").
Enter the user's full name into the Real Name field.
Enter the user's initials into the Initials field. By default, the user's initials are used by
LDMS in specific places to document the user making a change or entering data.
Click the OK button.
Enter a password for the user into the New Password and Confirm Password fields. The
passwords must match.
Select the System Administrator Capabilities check box.
In the Menu Permissions list, click the column header labeled Full to give the user access
to all features in LDMS.
Click the
button from the LDMS toolbar.
From the User ID drop down list, select ADMIN.
Click the
button.
6
Getting Started
14. When prompted to save your changes, click the Yes button.
From now on, the user that you created will act as the administrator for your LDMS system. They
will be able to create new users and manage what users can do within LDMS. You can create
more than one user with these administrative capabilities. For more information on managing
users, see the section called “Managing Users” on page 168.
Changing Users
You must be logged into LDMS to use it—there is no concept of a guess account in LDMS. The
current user is displayed in the status bar at the bottom of the screen.
To change to a different user after logging in, click Ctrl+Shift+LAdministrationSession
Lock from the LDMS menu bar. This is also how you would lock LDMS if you need to leave a
computer station unattended. By Default, LDMS will automatically lock and require a user name
and password after 30 minutes of inactivity.
Warning
If you click the Cancel button on the login screen, LDMS will close. If there is unsaved
work on the screen, you will not be given the opportunity to save it.
Date and Time in LDMS
Every time you log into LDMS, you'll be asked to confirm the date and time. It is very important
that the date and time are correct as this information is used throughout LDMS.
The date and time LDMS will use is pulled directly from your computer's system time. If the
date or time is not correct, you must update it within Windows. This is typically done by rightclicking on the system clock on the Windows task bar.
Setting Up a Printer for LDMS
LDMS pulls the settings for your printer directly from Windows for certain tasks. This is especially important for generating labels. LDMS will access the driver software for your printer to
get information such as the paper size, and use this information when generating the labels. If
a printer is not specified in LDMS, the labels may not be generated correctly.
For instructions on setting the printer that LDMS uses to generate labels, see the section called
“Setting the Printer Used to Generate Labels and Reports” on page 153.
Finding Your Way Around
LDMS is task-oriented by design. When you start doing something, you are performing that
task only. To switch from performing one task (such as entering specimens) to doing another
(configuring an assay), you need to stop doing the first task. You can't be doing two tasks at once.
When LDMS first starts, you will see a white screen. To start working, select a task from the LDMS
menu bar or tool bar. For example, you can click the
button to start Specimen Management
and enter specimen data. To change tasks and ship the specimens you just entered, you'd need to
click the button to leave Specimen Management, and then click the to open Shipping. This
is why, when you start working, you'll notice that most of LDMS's menu and tool bar buttons
become disabled.
Finding Your Way Around
7
Tip
The
button is used to leave a task in LDMS; the
button is used to exit LDMS itself.
Figure 1.3. Main LDMS Screen
▲ A brief overview of where to find certain features in LDMS
All of the task shortcuts on the toolbar are identical to the tasks listed in the Tasks menu on the
menu bar. Likewise the database actions in the toolbar can also be found in the Database menu.
Let's take a brief look at what each button does:
Add
Save
Execute
Refresh
Specimen Management
This action adds something you're doing on a screen, such
as creating a new report or adding a new specimen. Notice
the distinction between
and the Save button. Saving is
what you do when you are modifying something that already
exists; adding is what you do when you're saving something
new.
This action saves changes that you've made to a screen. It's
different than adding
a record in that the record already
exists. On most screens in LDMS, you'll get a warning message if you try to leave without saving changes.
This action does something. For example, if you are on a
screen that lets you search for something, the execute button will initiate that search.
This action clears a screen of things you entered. It doesn't
undo entering a record (LDMS does not have an undo function); it simply clears data that's been entered so that you can
start fresh. So if you started entering information and just
want to start again, click this button.
This is where you go in LDMS to enter new specimens, and
modify or view existing specimens. All specimens begin their
8
Getting Started
Patient Management
Storage Management
Shipping
Assays
Reports
Labels
igation
Browse and
Search
Database Nav-
Extended
life in LDMS here. New study participants can be added to
LDMS when you are creating specimens too. You can also
print labels, flag specimens for shipment or for testing, and
much more. Using Specimen Management is explained in detail in Chapter 2: “Specimen Management” on page 11.
This is where you go in LDMS to modify existing study participants, such as adding or correcting study enrollment. New
participants can also (but are generally not) added here. Using Patient Management is explained in detail in Chapter 4:
“Patient Management” on page 59.
This is where you go in LDMS to see or change a specimen's
storage location. LDMS allows you to define a virtual storage
structure in your LDMS database that corresponds to your
real-life storage items. There are freezers, shelves, racks, etc.
Using Storage Management is explained in detail in Chapter
3: “Storage ” on page 43.
This is where you go in LDMS to send or receive specimens
to or from another laboratory. LDMS transfers data between
laboratories by creating shipping files. A shipping file contains specimen information that goes with a physical shipment of specimens. The receiving laboratory can import this
shipping file to add the specimens to their own LDMS database. Using the Shipping feature is explained in detail in
Chapter 5: “Shipping” on page 63.
This is where you go in LDMS to read assay data and associate it with specimens. LDMS supports a variety of assays
and assay reader devices. All of the assays available and how
to use them with LDMS is explained in detail in Chapter 6:
“Assays” on page 81.
This is where you go in LDMS to generate a wide variety of
pre-configured reports. There are dozens of reports available. For a description of all these reports, see the section
called “Descriptions of Built-in Reports” on page 135. LDMS can also generate custom reports using the Data Retrieval
tool, which is explained in the section called “Running Custom Data Retrieval Reports” on page 134.
This is where you go in LDMS to create new, custom label formats for specimens. You can also print labels for numerous
specimens at once. The Labels feature and printer configuration in LDMS is explained in Chapter 8: “Labels and Printer
Configuration” on page 149.
These buttons are used in a few places in LDMS to move between entries. Most notably, they are used in LDMS Specimen Management
to move between specimen records.
They are also used on some assays to change between specimens when multiple specimens are being tested.
These two buttons are used to find specimens. Their primary
purpose is in LDMS Specimen Management , where they
are used to search for specimens. Browse is used to find exactly one specimen; Extended Search is used to find a range
of specimens. Extended Search is also available in a few other
places in LDMS to help find specimens. For instructions on
using these features, see the section called “Finding Aliquots
After Logging Them” on page 32.
Keyboard Usage
9
Begin/Break
Reports (feature specific)
Close
Exit
This button is only used in LDMS Specimen Management
in conjunction with the
button. When you use
,
you are limiting the specimens that are displayed. Clicking
button removes this limited scope. For more information, see the section called “Finding Aliquots After Logging
Them” on page 32.
This button's function is different than the button. The
button is used to generate reports that are specific to whatever you are doing in LDMS at that moment. For example, if
used while setting up an assay in LDMS, it will generate reports specific to your assay layout. If you use it in LDMS Shipping
however, it will generate reports specific to shipping
specimens. When you are doing something without any associated reports, this button will be disabled.
This button is used to leave a feature in LDMS. For example,
if you are using LDMS Specimen Management
and you
want to move to LDMS Shipping , you must click the
button.
This button closes the LDMS program.
Keyboard Usage
Much of the work you will complete in LDMS is data entry. For these types of tasks, working with
just the keyboard can be a lot faster than switching between the keyboard and a mouse pointer.
Many screens in LDMS are designs so that you can complete large sections of them quickly using just the keyboard. In Specimen Management, for example, you can press the Tab key after
completing each field to move on to the next one.
LDMS menus can also be navigated using just the keyboard. Press the [Alt] key. Notice that
certain letters in the menu bar are now underlined? If you press the corresponding key, those
menus will open. You can also you your keyboard's arrow keys to navigate menus.
LDMS also has several key combinations that perform a specific function.
Shortcut
Toolbar Icon
Description
Alt+F3
--
Close current task
Alt+F4
--
Exit the LDMS program
Ctrl+A
Add record
Ctrl+D
Delete record
Ctrl+G
Refresh the screen
Ctrl+H
--
Show a helpful description of the currently selected item on the screen
Ctrl+S
Save changes made on a screen
Ctrl+B
(In Specimen Management) Exit restricted scope when using extended search
Ctrl+E
Display the last data record
Ctrl+P
Display the previous data record
Ctrl+N
Display the next data record
10
Getting Started
Shortcut
Toolbar Icon
Description
Ctrl+F
Display the first data record
Ctrl+W
(In Specimen Management) Open the
Browse feature
Ctrl+Z
--
(In Shipping on the QA/QC tab) Pass the
selected aliquot
Ctrl+X
--
(In Shipping, on the QA/QC tab) Fail the
selected aliquot
Getting Help
One of the unique things about LDMS is that Frontier Science, the not-for-profit organization
that develops and maintains LDMS, works closely with both laboratories and research groups.
These relationships allow LDMS User Support and LDMS Training to cater to each laboratory's
specific needs.
There is a lot of LDMS documentation available on the Frontier Science Portal [http://
www.fstrf.org/portal]. Look for the LDMS Documentation and Training link under the LDMS
User Support heading. In addition to this manual, there are also small, topic-specific reference
and video tutorial that demonstrate how to use specific features in LDMS.
LDMS User Support is available to laboratories 24-hours per day, every day. They can assist you
by telephone or by e-mail. They can even connect remotely to your LDMS computer to help.
LDMS User Support can assist with more than just technical issues—they can also answer your
questions about using specific features in LDMS.
LDMS Training is also available. In-depth training sessions are held at Frontier Science's data
management center in Amherst, New York several times each year. There is no registration cost
to attend these trainings (though travel accommodations are not provided by Frontier Science).
Frontier Science can also arrange for a trainer to come to your site to assist you. Finally, webbased conference calls can be setup as needed to address specific LDMS usage topics.
LDMS Support Contact Information
Administrative Support
E-mail <[email protected]>
LDMS Training
E-mail <[email protected]>
LDMS User Support
E-mail <[email protected]> or call (716)-834-0900 extension 7311
For the latest LDMS news and training information, visit the LDMS website [http://
www.fstrf.org/ldms].
Submitting Corrections and Questions For This Manual
We are always working to make corrections and improvements to this manual. If you have a
suggestion or would like to submit a correction, or would like to request the inclusion of a new
topic, please let us know by contacting <[email protected]>.
Chapter 2. Specimen Management
Introduction
Context-Sensitive Help in LDMS
For many fields in LDMS, press Ctrl+H after selecting the field to open a help window.
This works in drop-downs in Specimen Management, for example, to show you what
address is associated with a clinic code or what an additive code actually means. Whenever you don't know what something is, select it and press Ctrl+H.
LDMS Specimen Management is the place where specimen information is entered and maintained in LDMS. This is where you can add new specimens, correct issues with existing specimens, add new participants, assign tests, mark specimens for shipment, etc. Specimen Management is the only place in LDMS where new specimens can be created.
To work with LDMS in general, there are two important points to understand:
1. LDMS is aliquot-driven: Records in LDMS's internal database are organized by primary and
aliquot, and aliquots are the basic unit of information. All actions in LDMS (testing, shipping, and storing) happen to aliquots.
2. LDMS is also group-driven: When a group is selected in Specimen Management (and you
must select a group), LDMS enforces rules for specimen entry determined by leadership
for that group. Frontier Science works closely with network leadership to maintain each
group's rules within LDMS.
Important terms in LDMS
aliquot
frozen time
global specimen ID
group
participant (or patient)
This is the derived unit from the primary.
The time that specimen is put into a freezer and the freezing process begins.
A number assigned by LDMS to every primary and aliquot. It is unique among
all specimens at all LDMS laboratories, and clearly shows the relationship between primaries and aliquots.
Individual clinical trial networks, research groups, etc available in LDMS. Every
specimen and participant enrollment must be associated with a group.
The individual from whom you've collected samples. The words participant and
patient are used interchangeably in this manual.
participant (or patient) ID
primary
processing time
received date
This is the sample that was collected from the participant, such as a tube of
blood.
The time that the processing laboratory begins to process a specimen into
aliquots.
12
Specimen Management
The date that the specimen was received at the processing laboratory, where
the primary was processed into aliquots.
received time
specimen
specimen date
specimen ID
specimen time
visit ID
The time that the specimen was received at the processing laboratory.
This is a generic term for either primaries or aliquots.
The date that the specimen was collected from the study participant.
An identifying number assigned by LDMS to primaries and aliquots that is not
necessarily unique, and does not show the relationship between primaries and
aliquots. By default, this number is unique per derivative type.
The time that the specimen was collected from the study participant in 24hour format.
The combination of the visit and visit unit (such as 1 WK).
Specimen Identifiers
Every specimen in LDMS is assigned two identifying numbers: specimen ID and global specimen
ID. 1
The global specimen ID is a unique number generated by LDMS for every specimen logged. It is
unique not just at your laboratory but at all laboratories using LDMS. The global specimen ID
is 10 characters long. The last two characters are the aliquot sequence, with the first aliquot
numbered -01, the second being -02, etc. The aliquot sequence for a primary is -00.
Figure 2.1. Global specimen ID format
▲ An example global specimen ID; this number is unique for each aliquot and is assigned by LDMS.
The global specimen ID is not generated until you actually add the specimens and aliquots to
your database. Once used, the global specimen ID will never be reused, even if the specimen
is deleted.
Specimen IDs, unlike global specimen IDs, are not necessarily unique. They are generated for a
primary as soon as you've entered the primary and additive type. By default, primaries with the
same type and additive will have the same specimen ID. For example, if you drew two vials of
1
There is a third identifying number called the other specimen ID. LDMS does not generate the other specimen ID, nor does it enforce
any rules for its usage. It is there to accommodate unique workflows, such as internal groups at a laboratory.
Entering a New Specimen
13
blood at the same visit and used the same additive, you essentially have 2 specimens that are the
same. LDMS does provide users with the ability to customize how the specimen ID is generated.
Figure 2.2. Specimen ID format
▲ An example specimen ID; the six digit sequence resets back to 000001 at the beginning of each year.
Specimens Converted from RLMP
Early in LDMS's life, many specimens were imported from an another platform called
the Retrovirus Laboratory Management Program (RLMP). These specimens have a unique
specimen ID that you may encounter if you are working with older specimens (or data
from older specimens). They appear in the format 048R98001145, where 048 is the LDMS
laboratory number and R indicates that the specimen was converted from RLMP.
The way LDMS generates specimen IDs (not global specimen IDs) can be adjusted. If you do adjust
it, the changes will take effect for new specimens; existing specimen IDs will not be modified.
Procedure 2.1. Changing the default method for generating specimen IDs
1.
2.
3.
Click AdministrationDefine Specimen Numbering.
Select one of the following options:
•
If you want all primaries to have the same specimen ID regardless of additive, select
No unique number.
•
If you want primaries to have a unique specimen ID for each additive, select Unique
number for EACH additive.
•
If you want the specimen ID to be unique for every primary, select All unique number.
•
(Optional) If you want the specimen ID to be unique for each aliquot of each type of
derivative, select Unique number for EACH derivative.
Click the OK button.
Warning
You can only change the way LDMS generates specimen IDs once. If you do change it,
you will not be able to do so again.
Entering a New Specimen
Entering a specimen in LDMS is a multi-step process, and many networks have their own rules
and workflows. You should always follow the procedures defined by individual groups. The material in this section should, however, apply to most specimen entries.
14
Specimen Management
Figure 2.3. Specimen Entry Workflow
▲ The numbered call-outs are referenced in Procedure 2.2, “Entering a new specimen”.
Procedure 2.2. Entering a new specimen
1.
Enter the participant's information into the Patient Grid at the top of the screen. (#1 in
Figure 2.3)
a.
b.
c.
Select a Group (sometimes called the network) from the drop-down. This must be done
first because it affects other fields.
Enter ID1 for the participant. For many groups, this is called the PID or patient identifier, and its format is specific to that group.
Enter ID2 for the participant. For many groups, this is a study or protocol number.
Note
d.
For most groups, studies are selected from a pre-populated list. Studies can be
added or removed by Frontier Science as needed. If you are looking for a study
but find that it is not available, contact LDMS User Support. See the section
called “Getting Help” on page 10.
Enter ID3 for the participant. This is often a sub-study number though some do not
require or use this field.
Note
2.
For networks that use ID3 for SID (study identifier), NOSID may be a valid
entry. You would do this when a SID hasn't be assigned yet, then update the
participant's information later once it has been assigned. For more information on how to correctly make this update, see the section called “Finding and
Modifying Participant Information” on page 59.
e. Enter the Visit and [Visit] Unit for the this particular specimen entry.
f. Enter the clinic for this particular specimen entry. If you want to know what clinic is
associated with a code, select it and press Ctrl+H
g. To enter additional information, such as whether or not the participant was fasting,
click the
Enter the information for the first primary into the Primary Grid in the middle of the screen
(#2 in Figure 2.3).
a.
Enter the Spec[imen] Date from the drop-down. This is the date that the specimen
was collected from the participant.
Entering a New Specimen
15
Enter the Rec[eived] Date from the drop-down. This is the date that the specimen was
received by the processing laboratory.
c. Enter the Rec[eive]d Time into the bottom. This is the time (in 24-hour format) that
the processing laboratory received the specimen.
d. Enter the number of tubes collected for the primary into the # of Tubes box. If you're
planning to pool multiple primaries together, enter one.
e. Select the Primary Type from the drop-down. If you need to enter more than one type
of primary, they must be added as separate tubes.
f. (Optional) Enter the Other Spec[imen] ID.
g. Enter the Spec[imen] Time in 24-hour format. This is the time that the specimen was
collected from the participant.
Click the
button (#3 in Figure 2.3). This will add the number of tubes you entered
to the primary grid below.
For each primary added, select an Additive from the drop-down. After doing this, the Specimen ID will be generated (the Global Specimen ID isn't generated until you click the button later.
For each primary added, enter the Volume and Units for the primary. It is acceptable to
pool primaries of the same type for the same participant together. (e.g. two 10 ML tubes
drawn from the same participant, with the same additive, and the same specimen time can
be entered as become one 20 ML tube).
Click a primary row to select it (it will be highlighted). When an aliquot is added, they will
be derived from this primary.
Enter information for the first aliquot into the aliquot grid. (#4 in Figure 2.3)
b.
3.
4.
5.
6.
7.
a.
b.
Enter the number of aliquots that were derived from this primary for a specific derivative type into the # of aliquots field. If you have more than one type of derivative for
the primary, they must be added separately.
Enter the Vol[ume] and [Volume] Units for the aliquots. This is the volume per aliquot,
not the total.
Note
CEL (cells) is expressed in millions in LDMS. For example, if you need to enter 2 million CEL, enter 2 into the Vol field, not 2,000,000. When you click
the
button later to add the records later, the volume will automatically be
converted to millions.
c. Select the Derivative type from the drop-down.
d. Select the Sub Add[itive]/Der[ivative].
e. Click the
(#5 in Figure 2.3).
8. After all of the primaries and aliquots have been added, click the button from the LDMS
toolbar.
9. If the group and ID1 combination have never been entered before, LDMS will prompt you
to add the new participant to LDMS.
10. LDMS will prompt you to print labels for your aliquots. Select the group from the Format
drop-down, the Barcode Content and label Size. For more information on labels, see Chapter 8: “Labels and Printer Configuration” on page 149.
When you are entering specimens, you'll see all the primaries for a particular visit, as well as all
the aliquots derived from each primary on the same screen. This is the only time you'll see all this
visit information on the same screen. Once you click the
button, the entries will be split up by
primaries. If you click the
button from the LDMS toolbar, you'll see the last primary. Using
the database navigation buttons
from the LDMS toolbar, you can see that all of
the primaries for the visit are now on different screens.
16
Specimen Management
Figure 2.4. The Specimen Management screen before and after adding records
▲ The left side shows how a visit will appear when it is being entered; the right side shows how two
different primaries are split into two different records.
Understanding the Specimen Management Screen
The Patient Grid
The patient grid is the top portion of the LDMS Specimen Management screen. This is where
you enter participant information for the specimens you are about to enter. Specimens can only
be entered for one participant at a time, however, co-enrollments (meaning one participant who
is enrolled in more than one study) can be entered together.
Figure 2.5. The Patient Grid from the Specimen Management Screen
▲ This image shows how one participant can be enrolled in two studies at once. In this case, the participant
is enrolled in ACTG/IMPAACT and FRONTIER studies.
Co-enrollments require additional handling when entering aliquots. Normally, when the participant is in one study, the aliquot will default to the first group (since it's the only group).
With co-enrollments, you'll need to specify the group for each aliquot for using the Group/
ID field in the aliquot grid. For more information on this, see the section called “The Aliquot
Grid” on page 19.
The OPID (other patient identifier) is an optional identifier that some groups may utilize to
track participant information instead of using ID1. LDMS is not strict on the format OPIDs, so
they can contain up to 15 letters and numbers, as well as spaces. For some groups, OPID may
not be available.
The
button opens up the details window. For participants, this only has two fields:
Time and Time Unit. These fields let you specify more details about the visit. For example, you
might select 12 for the Time and Fasting for the Time Unit to indicate that the participant
had been fasting for 12 hours at the time of the visit. You can tell if details have been set when
The Primary Grid
17
the button changes to a letter code. If it still reads "Details", then no options were specified; if
it says "T", that means the time fields were specified.
The Primary Grid
The primary grid is the middle portion of the Specimen Management screen. This is where you
enter information for the primaries that were processed. The top half is used for entering information for primaries; once they are added, they appear in the bottom half. You can enter as
many primaries as you'd like at once, provided that they are for the same participant and the
same visit.
Figure 2.6. The Primary Grid from the Specimen Management screen
To delete a primary after adding it, select it and click the
button.
Times Fields in LDMS
There are several "time" fields in LDMS:
Time
Description
Specimen Time
Time specimen was collected from study participant
Received Time
Time that the specimen was received by the processing laboratory
Processing Time
Time that the processing laboratory began processing the specimen into aliquots (i.e. the time that you
opened the tube to start processing)
Frozen Time
Time that the specimen was placed in a freezer and
the freezing process begins
Time
See below
The field labeled simply time in the primary grid has several purposes. It can be used to
indicate things such as the amount of time it took to process an aliquot, the amount of time
a study participant was fasting, and even how many raw samples were pooled together to
form the primary. For a list of all the time units available, see Chapter 12: “LDMS Code
Abbreviations” on page 199.
A separate time field can also be found in the patient details window. The possible time
unit values for this field are identical to the one found in the primary grid.
The Time field is typically used when testing pharmacology specimens. You can use the
primary comments (found by clicking the Details button for the primary) to clarify how
the time field was used, if necessary.
18
Specimen Management
Some of the information you specify for primaries can be cascaded to derived aliquots. For example, if you had difficulty collecting a blood draw from a participant, and only collected about
80% of the tube, you can change that primary's Cond[ition Code] to SHV (short volume), and
then cascade that condition code to aliquots. This will help show why the volume for each aliquot
is slightly less than what would typically be collected for that visit. Cascading information from
the primary to aliquots applies to Cond[ition Code], Other Spec[imen] ID, and much of the
information in the
window, which is shown in Figure 2.7. LDMS will automatically
prompt you if a change to the primary can be cascaded.
Figure 2.7. Primary Details window
▲ The Primary Details Window. Here, you can enter comments and set conditions that can be inherited
by aliquots, and specify who processed the primary into aliquots and when.
Note
You might think that Original Vol and Time will show the original information from
when the primary was entered if you modify it. This isn't the case. If you enter a primary
with a volume of 10 ML, then later change it to 7 ML, the Original Vol will change
to 7 ML.
Warning
Specimen comments are included when shipping specimens to another laboratory. They
are also included with specimen records that are exported to Frontier Science. For this
reason, comments should never contain protected health information or personal identifying information like a participant's name.
A key feature on this screen is the ability to send ambient shipments. Ambient shipment is the
only way to ship a primary without creating aliquots (the name "ambient shipment" refers to the
fact that it is shipped immediately after collection, usually at room temperature, instead of being
frozen). To do this, change Ambient Ship to Sent, and then select the intended destination
laboratory from the Ship To drop-down list. This will change the primary's status to sent in
LDMS.
This method of shipping a primary has a significant disadvantage: you can't add the primary's
information to a shipping file, meaning the destination laboratory can't import it; they have to
re-enter the specimen information and manually enter the Specimen ID. The primary will also
have a different global specimen ID at your laboratory and the receiving laboratory.
To ship a primary in LDMS in such a way that it can be added to a shipping file, create an aliquot
with the exact same volume, derivative, etc as the primary you are shipping, then ship that
aliquot like you would any other aliquot. This is referred to as creating a ghost aliquot.
The Aliquot Grid
19
For more information on creating shipments, see Chapter 5: “Shipping” on page 63.
The Aliquot Grid
The Aliquot Grid is the bottom portion of the Specimen Management screen. The aliquots derived from the currently selected primary in the Primary Grid are displayed. If a new aliquot is
added, it is considered derived from the currently selected primary as well.
Figure 2.8. The Aliquot Grid
To add a new aliquot, complete the fields in the upper-left corner of the aliquot Grid, and then
click the
button. This will add as many aliquots as specified in the # of Aliquots field
into the list of aliquots below. To delete an aliquot, simply select it and click the
button.
You can select multiple aliquots at once by holding down the Ctrl or Shift key.
Warning
Other Spec[imen] ID can be used as an internal specimen identifier for both primaries
and aliquots. There are no validation checks for this field, which allows it to be flexible.
If you work with laboratories that are using LabWare version 1.x, however, you should
leave this field blank. When reading shipping files, these versions of LabWare will incorrectly use the other spec ID instead of the global specimen ID as the primary identifier for that specimen. If other specimen ID is not present, however, the global specimen
ID will be used correctly.
After entering an aliquot, you can modify it by simply changing a value in the table, and then
clicking the
button from the LDMS toolbar.
Tip
Want to modify more than one aliquot at once? Simply select those rows by holding
down the Ctrl or Shift key and clicking them. Next, enter your corrections in the fields
where you enter new aliquots. For example, if you want to correct the volume for multiple aliquots, enter the corrected volume into Vol field in the top-left, then click
button. This will cascade your changes down to all the selected aliquots.
If you are entering specimens for a co-enrollment (i.e. you entered two or more rows in the participant grid), you need to select which group/study combination will be assigned to the aliquot.
To do this, click the Group/ID for the aliquot to show the group drop-down list. From this list,
select the correct group and study combination.
The Aliquot Grid also has a handy right-click menu that lets you perform some functions on
multiple aliquots.
Aliquot grid right-click menu options
All selected are never to be stored
Marks all aliquots to never store; this means they will not appear as available to be added to storage in LDMS; for more information on never store,
see the section called “Using Never Store” on page 33
20
Specimen Management
All selected can be stored
If the aliquots have been set to never store, this removes that flag
All selected mark for shipping
Makes it easier to find aliquots when setting up a shipment. For more information on how this works, see the section called “Finding Specimens to
Ship” on page 65
Delete all selected
Same as
Frozen Date/Time
Enter a frozen date time for multiple aliquots. This is the same as opening up
the Details Window for each aliquot and entering the same information one
at a time
Modify all selected
Same as the
button: cascade changes from the entry fields above the
aliquot grid to the selected aliquots
Print Labels for Selected Aliquots
Re-print aliquot labels; same as when you initially added the aliquots by clicking the button
Test Setup
Assign an assay in LDMS to a specimen. A test must be assigned to a specimen
before you can actually setup the assay to be read in LDMS. For more information on adding specimens to assays, see the section called “Assigning an Assay
to Aliquots” on page 34
button: delete the selected aliquots
The right column in each aliquot row is the aliquot details button. It has a series on single letter
codes on it, similar to the primary details button. Click it to open up the Aliquot Details window.
Warning
A lot of information in the Aliquot Details window can be cascaded from the primary.
For example, if you enter a condition code or processing information for a primary, you
will be prompted to cascade that information to all aliquots derived from that primary.
If you haven't entered aliquots yet, some of this information will automatically cascade
when you add them. It's a good idea to review the aliquot details just to make sure that
something didn't end up in them that you didn't intend.
Figure 2.9. The Aliquot Details window
Most fields in the Aliquot Details window can be cascaded to other aliquots too . If you make a
change, LDMS will automatically prompt you if you want those changes to affect other aliquots
of the same derivative type or all aliquots on the screen.
Preloads: Templates for Expected Specimen Collections
21
Preloads: Templates for Expected Specimen Collections
Using Preloads
A preload is a template for LDMS Specimen Management that fills out the expected primaries
and aliquot collections for a particular study and visit combination. A preload is triggered by
entering information into the patient grid that meets the criteria for the preload. For example,
a preload may be triggered by a 1 WK visit for study S103. If you enter this information for the
participant, LDMS will prompt you if you'd like to use a preload.
A preload automatically fills out the expected specimen collections for that visit. For example,
if a study defines 3 vials on BLD on the visit 3 WK, the preload will add those 3 primaries and the
aliquots that are supposed to be produced from them. This will save you a lot of data entry work.
There are two types of preloads: FSTRF-defined and user-defined. FSTRF-defined preloads are
created through collaboration between groups and Frontier Science, and are sent to laboratories
through deploys. These preloads cannot be modified by individual LDMS users. Many groups
also will not allow users to define their own preloads for those groups as well, preferring to
define them at a leadership level instead. This is to prevent individual laboratories from creating
an incorrect preload and logging specimens improperly. User-defined preloads are, of course,
preloads created at your laboratory. You're free to use these as you see fit, though you won't be
able to create them for some groups. There are no limitations to creating preloads for internal
groups.
To see what preloads are available and how to trigger them you can do one of the following.
1. Click AdministrationDefine Preloads from the LDMS menu bar. Here, you can create, view, and modify preloads.
2. Generate the Preload List report, which is found by clicking TasksReports, then selecting PreloadPreload List.
Defining Preloads
For groups that are hard-coded into LDMS, you cannot define your own preloads. Preloads for
these groups are created by Frontier Science in collaboration with individual group leadership.
Tip
New preloads created by Frontier Science are added to LDMS regularly. Laboratories receive these updates when they perform an export. For more information, see the section
called “Exports and Updates” on page 173.
You can create preloads for your own internal groups. For more information on creating internal
groups see the section called “Group Configuration” on page 170.
22
Specimen Management
Figure 2.10. Define preloads screen
▲ The define preload screen, showing a read-only FSTRF-defined preload.
Warning
You cannot create modify and save an existing preload that was created by Frontier
Science, nor can you use one as a base for creating a new one. You won't see this message
until you click the or
button on the LDMS toolbar. New preloads must be derived
from ones that you created or simply be new altogether. You can tell if a preload was
defined by Frontier Science by looking at the FSTRF Preload check box beneath the
preload name.
Procedure 2.3. Creating a new preload
1.
2.
3.
4.
5.
6.
7.
8.
Click AdministrationDefine Preloads
Enter a name for your preload into the Preload Name field or select a saved preload to be
modified as the base for a new preload.
(Optional) Select the Comments check box and enter a message that will appear to the
user when the preload is triggered. This is commonly used for providing instructions on the
preload's usage.
In the Criteria section, enter the field values that must be met in Specimen Management
for the preload to be triggered. For example, entering the study "14", visit "1", and visit unit
"wk" will cause your preload to trigger when that combination is entered. Group is required;
other fields are optional.
(Optional) Enter participant enrollment data that will automatically be added into the patient grid when the preload triggers into the Patient Data Auto Fill section.
Click the
button next to the Primaries fields to add a primary row. Enter the information
for the primary just as you would in Specimen Management. Primary, Additive, Volume,
and Volume Units are required; other fields are optional.
(Optional) With a primary selected, click the
button next to the Aliquots section to add
a new aliquot to be derived from that primary.
Click the button to add the new preload.
Using Condition Codes
23
Figure 2.11. Primary and aliquot details windows for preloads
▲ The primary details (left) and aliquot details (right) windows found in the define preloads feature.
The
windows for primaries and aliquots (Figure 2.11) are stripped-down versions of the
ones you can find in Specimen Management. The most notable feature is that you can automatically mark specimens for shipment and select the intended destination laboratory.
You can modify an existing preload (that you created) by selecting it from the Saved Preloads
drop-down, making your changes, and clicking the
button from the LDMS toolbar. You can
also disable a preload, which will prevent it from being triggered, by selecting the Preload Disabled check box. Preloads can be deleted clicking the button from the LDMS toolbar.
Using Condition Codes
What are condition codes?
A condition code is a 3-letter code that indicates the status of a specimen. Every primary and
aliquot in LDMS has a condition code assigned to it. The default condition code for new specimens is SAT (satisfactory), but there are many others.
The majority of condition codes indicate a deviation from the expected handling for a specimen.
For example, if a specimen has supposed to be collected in one type of tube but another was
used, the INT (incorrect tube type) condition code could be used to indicate this.
There are several places where the condition code of specimens can be changed:
• In the Specimen Management
task, there is a Cond column in both the Primary Grid and
the Aliquot Grid that can be used to change the condition code.
• In the Specimen Management
task, the condition code can also be changed in the primary or aliquot Details windows. See the section called “The Aliquot Grid” on page 19.
• When importing a shipping file, the condition code for the specimens being important can
be changed. See the section called “Importing a Received Shipments” on page 77.
• In the Storage Management task, the condition code for all specimens in a storage
item can be modified together. See the section called “Modifying All the Specimens in a
Container” on page 52.
The most common use for condition codes is to use them in conjunction with a preload, a feature in LDMS that automatically enters expected specimen collection information when certain
24
Specimen Management
criteria is met when entering a new specimen. For example, a preload may add 2 expected primaries. If the participant decided during the visit that they did not want to be stuck with another
needle and only one of the primaries was collected, the second primary added by the preload
would not exist. While you could simply delete the second primary, there will be no indication
why the expected collection is not available in LDMS. Was it not entered in error? Does it not
exist? Was it intentionally destroyed because the sample was of poor quality? At this point, there
is no way to know for sure.
Using a condition code can solve this problem. By changing the condition code from SAT to SNC
(sample not collected), you now know why the expected specimen is not available. There's an
additional option within the Details window for aliquots called Reason sample not collected,
which allows you to specify the exact reason why it was not collected. By using condition codes,
you can document why an expected collection is missing.
Important
Not all networks permit preloads, and some networks do not want condition codes to
be used in this manner. Always defer to instructions specific to your network.
Whenever a condition code is applied, it is strongly recommended that you add comments to
the affected specimens to describe why the code was applied. These comments can help investigators diagnose discrepancies with study data without needing to contact your laboratory for
clarification.
There is a related property to condition codes called never store. Never store indicates that the
specimen is not available (for example, because it was never collected). For more information
about the never store property, see the section called “Using Never Store” on page 33.
Individual condition codes
This section organizes condition codes into logical groups of similar codes. Condition codes
in LDMS are updated often, therefore the codes available to you may differ slightly. You can
generate a list of codes available at your laboratory by using the Reports task in LDMS. The code
list reports are found in the Misc category.
Processing and procedural condition codes
These condition codes describe issues that can occur in the collection and processing environment. There are also codes in LDMS for describing the qualitative properties of a specimen described in the section called “Qualitative condition codes” on page 26.
Table 2.1. Processing and procedural condition codes
Code
Description
Usage
ANP
Aliquot Not Pre- Indicate that an expected aliquot was not processed,
pared
but no other more specific condition code applies. The
Reason sample not obtained field should be used in
conjunction with ANP.
EQF
Equipment
ure
INV
Invalid
Fail- There was an issue with the processing equipment,
such as a power failure during processing.
The specimen is not valid for testing purposes. Generally another condition code, such as LBE or PST, would
be more appropriate.
Individual condition codes
25
Code
Description
Usage
LBE
Laboratory Error The laboratory made a general error during processing, such as setting equipment up incorrectly or mislabeling specimens.
OPR
Outside Protocol The specimen was drawn during the protocol-defined
Requirements
window, but not in a manner consistent with the protocol. For example, if a participant was supposed to be
fasting but was not, this code would apply.
OSW
Outside
Window
PST
Processed After The specimen was collected and processed into
Specified Time
aliquots, but the processing was done after the time
frame specified by the protocol. This is commonly applicable for PBMC and pharmacology specimens.
Visit The specimen was collected correctly, but outside the
window for the visit as specified by the protocol.
Container condition codes
These condition codes describe physical problems with the specimen’s container. If there is a
qualitative issue with the specimen as a result of the container issue, a qualitative code may be
more appropriate. See the section called “Qualitative condition codes” on page 26.
Table 2.2. Container condition codes
Code
Description
Usage
BKV
Broken Vial
The container was broken beyond recovery, such as being dropped and shattered on the ground.
DMG
Damaged
The container is not leaking, but is damaged in another way, such as a tear in a label or a dent in a plastic
container.
EXP
Expired
The additive in a container, or some other component
used during specimen collection, was expired.
INT
Incorrect Tube
A tube type other than the one specified by the protocol
was used, and the tube used was determined to be an
acceptable alternative by the study team.
LKD
Leaked
The specimen leaked from the container, and it was
placed inside another container and recovered.
Temperature condition codes
Temperature condition codes are typically applicable if there was an issue during shipping (such
as sublimed dry ice) or if a piece of storage equipment failed. Other codes are applied as part of
routine and expected handling of specimens. For example the FRO condition code can be used
to indicate that a specimen intended to be stored ambient or refrigerated was frozen.
Table 2.3. Temperature condition codes
Code
Description
Usage
DIM
Dry Ice Melted
The specimen was kept on dry ice, but the dry ice sublimed. This does not necessary imply that the specimen
was damaged or TNO.
26
Specimen Management
Code
Description
Usage
FRO
Frozen
The temperature of the specimen has been lowered below its freezing point. This applies only to specimens
that were not intended to be frozen, such as specimens
that were shipped at ambient temperature during the
winter.
REF
Refrigerated
The specimen is cooler than room temperature but not
below its freezing point. This applies only to specimens
that were not intended to be refrigerated.
TNO
Temperature Not The specimen was stored or shipped at any temperaOptimal
ture other than the temperature specified by the protocol.
TWD
Thawed
The specimen was frozen, and has been warmed so that
it is no longer frozen. LDMS has a field to track a thaw
count, which can be used to keep track of how many
times the specimen has been thawed. This information
can be found on the Details Window for the aliquot in
Specimen Management.
Shipping condition codes
These condition codes apply to issues with a specimen shipment where the specimens are unaccounted for or were received late. If the shipping issue damaged the specimens, a temperature-related code such as DIM (dry ice melted) may be more appropriate. See the section called
“Temperature condition codes” on page 25.
Table 2.4. Shipping condition codes
Code
Description
Usage
DSH
Delayed
ment
LSH
Lost Shipment
SNR
Sample Not Re- A data collection form, such as a CRF, was received,
ceived
but a specimen listed on the form was not received.
This differs from LSH in that only some specimens were
not received, compared to an entire shipment.
Ship- A shipment did not occur on schedule, but there is no
obvious damage to the specimens. If there was obvious
damage, a more descriptive, temperature-related code
(such as DIM or TNO) may be more appropriate.
A shipment was created and sent, but did not arrive at
the receiving laboratory. Neither the shipping or the
receiving laboratory can locate it.
Qualitative condition codes
These codes refer to the quality of a specimen. For example, if a blood specimen clotted, this is a
qualitative issue that could prevent processing. If there was a qualitative or participant abnormality that would prevent processing but no other code is applicable, the SNP condition code
can be used.
Table 2.5. Qualitative condition codes
Code
Description
Usage
CLT
Clotted
The specimen has clotted, often because the additive
did not mix correctly with the specimen.
Individual condition codes
27
Code
Description
Usage
CTM
Contaminated
The specimen is visibly contaminated.
HEM
Hemolyzed
A blood specimen that has hemolyzed.
HUM
Humidity
The specimen has been exposed to high humidity.
ICT
Icteric
There are excessive amounts of bilirubin in the specimen.
LIP
Lipemic
There is excessive fat content in the specimen.
LYS
Lysed
There has been a breakdown of cells in the specimen
other than hemolyzation.
SNP
Sample
Processed
Not A generic code for when there is a qualitative issue that
prevents an otherwise correctly collected primary from
being processed into aliquots, but no other code applies. The Reason sample not collected field should
be used in conjunction with SNP.
Quantitative condition codes
These condition codes refer to the volume of specimen collected.
Table 2.6. Quantitative condition codes
Code
Description
Usage
QNS
Quantity Not Suf- There was not enough specimen available to create the
ficient
aliquot. For example, if specimen collected from the
participant was supposed to be 10 mL but only 5 mL
was collected, the aliquots that could not be created
due to the low volume would be considered QNS. QNS
means there is no volume at all for the aliquot, even
though there was some volume for the primary.
SHV
Short Volume
SNC
Sample Not Col- The primary specimen was not collected from the parlected
ticipant at all. This might happen if the participant declined to provide a specific sample.
The primary or aliquot specimen has at least some volume, but not the full expected volume.
Other condition codes
These condition codes are either automatically assigned to specimens or indicate some combination of issues. The default condition code that is assigned to all new specimens is SAT (satisfactory).
Table 2.7. Other condition codes
Code
Description
Usage
ANM
Anonymized
The specimen was created using the anonymization
tool in LDMS. This code is automatically assigned by
LDMS and cannot be assigned manually.
COC
Combination
Codes
of More than one condition code applies; the comments
field in LDMS can be used to list the applicable codes.
DSR
Destroyed
The specimen has been destroyed.
28
Specimen Management
Code
Description
Usage
OTH
Other
There is something noteworthy or unusual about the
specimen, but no other available condition code applies.
SAT
Satisfactory
The default condition code for new specimens, indicating that the specimen was collected, processed, and
handled as expected.
UNK
Unknown
Indicates that there is a significant gap in knowledge
in the specimen’s history. For example, if the specimen
was collected by another laboratory that was not using
LDMS and is several years old, and it may have been
stored or treated improperly, this code may be appropriate.
Condition codes and never store
Many condition codes indicate that a specimen is not available. For example, if a specimen has
the condition code SNC (sample not collected), it does not exist, therefore will not be shipped
or stored.
When certain condition codes are applied, the never store property will automatically be
assigned to those specimens. These codes are listed in Table 2.8. There may be other situations
where never store is not automatically assigned, but may still be appropriate.
Table 2.8. Condition codes that will automatically trigger never store
Code
Description
QNS
Quantity Not Sufficient
SNC
Sample Not Collected
SNP
Sample Not Processed
ANP
Aliquot Not Prepared
LSH
Lost Shipment
DSR
Destroyed
Some groups do not want specimens that are not available to be entered into LDMS at all. In
these situations, it would be more appropriate to delete the specimen instead of applying a condition code. Always check with the team conducting the study to ensure that you are following
the most appropriate course of action.
Correcting a Specimen Entry Error
General advice for correcting specimen data
Most data in LDMS can be corrected by a user simply by changing it and clicking the Save button
from the LDMS toolbar. For example, if a specimen date was entered incorrectly, the specimen
can be located in Specimen Management, the specimen date changed, and the records saved.
General advice for correcting specimen data
29
Changes that apply to a participant enrollment, such as PID or study, should be made in Patient
Management, not Specimen Management, to avoid creating erroneous duplicate enrollments.
There are a few important points that need to be considered when modifying LDMS data:
• Different groups have different policies on what data can and cannot be corrected. If you are
not sure if a group permits a specific change, consult with leadership from that group.
• If the specimen data was exported to Frontier Science previously, you will need to export
again so that Frontier Science receives the corrected data. You can determine if information
for a specific specimen exports to Frontier Science by looking at the Exportable field in the
Details Window Specimen Management.
• If the specimen(s) was shipped to another laboratory, correcting data at the sending laboratory will not fix the error at the receiving laboratory. Both laboratories must make the
change.
• If you change data it will not be apparent to others who made the change and why. LDMS
has several data entry fields that can be used to help track changes (see below).
• If labels were already printed, those labels may now have incorrect information. LDMS will
automatically ask if you would like to print new labels when saving modified specimens.
Warning
LDMS does not have an undo function. If you delete a record or click the
button, the
changes you made are permanent. Think carefully before you act. If you're considering a
significant change, or need to change records that were imported or shipped to another
laboratory, contact LDMS User Support for assistance. See the section called “Getting
Help” on page 10.
LDMS has several features to help users track specimen changes. All of these fields are accessed
by clicking the Details button for the aliquot or primary in Specimen Management. These fields
are described below:
Comments
Condition codes
Reason sample not collected
The comments field can be used to enter free-form details
about the change. So that others know about the change, it is
important that you use this field to document it. Comments
should include what information was changed for the specimen, the original data, the new data, the date it was changed,
who made the change, and why.
Condition codes are 3-character codes that signify certain
properties about the specimen. For example, the condition
code DSR indicates that a specimen was destroyed, while
the code SHV (Short Volume) indicates that the volume of
the specimen is less than was expected. The default condition code for specimens is SAT , which indicates that the
specimen is satisfactory and was collected and processed
as expected. A full listing and descriptions of condition
codes can be found in the section called “Using Condition
Codes” on page 23.
This field is a drop-down list on the details window that can
be used to specify why an expected specimen was not collected from a participant. This field is typically used in conjunction with condition codes such as SNC (Sample Not Collected) that indicate that a specimen was not collected.
When making a change to a specimen, you will be asked if you’d like to cascade the change to
aliquots, which can help if the data entry change was made to the primary specimen or if multiple
30
Specimen Management
aliquots were affected. It is important that comments are made at the aliquot level (instead of
or in addition to comments to the primary). The reason is because comments to aliquots will
appear on shipping manifests, whereas comments for primaries will not.
Data corrections made for a specimen at one laboratory will not be automatically synchronized
with that specimen’s record at another laboratory. For most data corrections, if the specimens
were shipped, both laboratories will need to make the corrections.
Example Corrections
Correcting an ID1 for a Specimen
In LDMS, ID1 is used to uniquely identify a study participant across many visits (and even across
multiple studies). The name for ID1 varies across groups, including PID, PTID, MSCSID, etc. The
integrity of this identifier is very important.
For this reason, many groups have specific instructions on how to remediate an error with an
ID1 entry. Some groups will not permit any changes to an ID1 after it has been entered; other
groups may allow changes but only after approval by the group has been given. The exact rules
vary from group to group, so it is very important to discuss the issue with the affected group
once the error is discovered.
If you do need to make an approved ID1 change, the safest way to do so is to use the extended
search feature in Specimen Management. This will allow you to restrict Specimen Management
to show only the affected records that need to be changed. This will help ensure that you change
all of the records that need updated.
Important
If you are unsure if it is acceptable to make a change to enrollment information for a
participant for a specific group, contact that group for further guidance before attempting to make a change. Some laboratories may also have their own stricter rules that
prohibit modifying enrollment information.
If a participant was entered incorrectly such that two different participants are actually the same
person this is a correction that you cannot make on your own. You will need to contact LDMS
User Support for assistance merging the two participants.
After changing an ID1, corrected labels need to be printed and the specimens re-labeled. If the
specimens have been shipped to another laboratory, the correction should be made at both laboratories as well.
Once all approved changes have been made, you should review the affective participants and
specimens in Specimen Management to ensure that everything is correct. It is also important
to confirm that any other laboratories that had the specimen(s) have also made the changes, so
that LDMS data is consistent across laboratories.
Correcting specimen information (other than ID1)
When an error occurs to information other than ID1, groups generally allow corrections. This
would include things such as fixing an incorrect specimen date or a specimen type code. If the
specimens have been shipped to another laboratory, both laboratories will need to make the
changes.
Using Specimen Management or Patient Management, find the specimen(s) or enrollments that
were entered incorrectly. Correct the data that was entered incorrectly. For aliquots that were
affected by the change, open the details window and explain what was changed in the comments
Example Corrections
31
fields. To make the change as transparent as possible, the following information in comments
is strongly encouraged:
•
•
•
•
Field that was changed and its original value
Who made the change
When the change was made
Why the change was made
If the comment was added it a primary, it must be cascaded to all aliquots from the primary. The
reason the comment must be added to aliquots is because only aliquot comments will appear on
shipping manifests. In addition to this, if the data is exported to Frontier Science, only aliquot
comments will be exported. Once these changes have been made, click the
button from the
LDMS toolbar.
Example 2.1. Example aliquot comment to document a data change
Aliquot volume changed from 1 mL to 10mL. This was a data entry error; the specimen has been
verified to be 10mL. – Dr Doe, 17-Jan-2014
Upon Saving, LDMS will automatically ask if you would like to re-print labels. Depending on the
label that was originally used and the data that was corrected, the labels on the specimens may
now have inaccurate information. Laboratories may, at their discretion, re-print and re-label
the modified specimens.
If the specimens have been shipped, both the sending and receiving laboratories would need
to make the correction—the correction will not be synchronized across laboratories for shipped
specimens.
Note
The Specimen ID (but not the Global Specimen ID) can be manually specified. You
might want to do this if you deleted a primary and want to re-enter it using the same
Specimen ID. Click the
button before you click the
button to add
the primary. You won't see your entry immediately, but when you click the
button to add the primary, it will be assigned to the specimen ID that you entered. Once
a specimen has been assigned a Specimen ID by the system, it cannot be manually
changed.
Documenting specimens processed or frozen outside an expected window
Many specimens have specific time requirements for processing. These would include things
like PBMCs, pharmacology, and single copy assay (SCA) specimens. Such specimens need to be
collected, processed, and frozen following specific instructions.
LDMS has a set of condition codes that can be utilized when such specimens are not processed
as scheduled.
Table 2.9. Condition codes for specimen processing exceptions
Code
Description
Usage
OPR
Outside Protocol The specimen was drawn during the protocol-defined
Requirements
window, but not in a manner consistent with the protocol. For example, if a participant was supposed to be
fasting but was not, this code would apply.
OSW
Outside
Window
Visit The specimen was collected correctly, but outside the
window for the visit as specified by the protocol.
32
Specimen Management
Code
Description
Usage
PST
Processed After The specimen was collected and processed into
Specified Time aliquots, but the processing was done after the time
frame specified by the protocol. This is commonly applicable for PBMC and pharmacology specimens.
If these conditions apply, the condition code should be set cascaded to all affected aliquots, or
(if applicable) set at the primary. You should also use the comments field in the Details window
for the aliquots to explain why the condition code was selected.
If the assay results are supposed to be entered or read by LDMS for the study, but the assay
will not be run due to the improper specimen handling, you can document this in Specimen
Management. Find the specimen(s) and right-click on it to select Test Setup . Assign the test (if
not already assigned), but then select Test Not Run . Use the Reason field to indicate why the
test will not be performed.
Doing Other Things with Aliquots
Finding Aliquots After Logging Them
In Specimen Management, you can use the database navigation buttons
on the
LDMS toolbar move between specimen records. This is fine if you only have a few dozen primaries. For larger laboratories, though, this really doesn't scale.
There are several other ways to find records in LDMS:
1. Scan a barcode with LDMS Specimen Management
open and the record associated with
it will be displayed.
2. Use the Browse feature when you need to find exactly one specimen.
3. Use the Extended Search feature when you need to find a range of specimens based on
certain criteria.
The browse feature is accessed by clicking the button from the LDMS toolbar within Specimen
Management. It is used to find exactly one, specific specimen.
Figure 2.12. The Browse window
Using Never Store
33
After selecting the Group, the options available in many of the drop-down lists below (e.g. Type
1, Type 2, etc) will change. Many of these are enumerated with entries already in your LDMS
database. For example, if you select PID for Type 1, then the ID1 list will be populated with all
of the PIDs that have been entered for the selected group.
After entering search criteria, click the
button. Next, select the record you want to see
and click the
button. By default, only primaries will be shown; select the Show Aliquots
check box to also show aliquots in the search results.
Extended Search is accessed by clicking the
button from the LDMS toolbar. Unlike Browse,
Extended Search is used to find a range of one or more specimens, based on search criteria. You
can then limit LDMS to only displaying those records, and then use the database navigation
buttons
to view records within a restricted scope.
Figure 2.13. Extended Search Window
Important
After clicking the
button, Specimen Management is in limited scope. If you look
at the LDMS status bar, you'll see this message:
Primary 1 of 13 (restricted scope)
This means using the database navigation buttons only moves within these specimens.
To leave restricted scope and see your full LDMS database again, click the
button
from the LDMS toolbar.
Using Never Store
Never store is a unique property that can be assigned to an aliquot in LDMS. It means that a
specimen is unavailable. An examples of a specimen to which it would be appropriate to assign
never store would be an aliquot that was destroyed—it will never be stored or shipped because it no longer exists.
In LDMS, an aliquot set with never store will not appear on the Bulk Add tab in LDMS Storage
. It will still appear on shipping screens and can be shipped, but it will be highlighted in red.
You can see if an aliquot has never store assigned to it by clicking on the aliquot
button in LDMS Specimen Management . If the aliquot hasn't been shipped or added to storage, this is also where you can change its status to never store.
34
Specimen Management
Some condition codes will automatically cause an aliquot to be flagged with never store.
Those condition codes are listed in Table 2.10.
Table 2.10. Condition codes that will automatically assign never store to a specimen
Code
Description
QNS
Quantity Not Sufficient
SNC
Sample Not Collected
SNP
Sample Not Processed
ANP
Aliquot Not Prepared
LSH
Lost Shipment
DSR
Destroyed
Marking Aliquots for Shipment
Marking aliquots for shipment makes them easier to find later when you're setting up a shipment. Marking for shipment is not the same as creating a shipment or adding aliquots to an
existing shipment; it simply flags the aliquots as intended for shipment. You are not required to
mark aliquots before shipping them, but doing so can make the processing easier.
Procedure 2.4. Marking aliquots for shipment
1.
2.
3.
In the Aliquot Grid on the LDMS Specimen Management
screen, select the aliquots to
be marked for shipment (use Ctrl or Shift to select multiple aliquots).
Right-click on the aliquots, then select All Selected Mark for Shipping. (The Mark
for Shipping option only marks the aliquot that was clicked, not all the ones that are
highlighted.)
Enter the Shipping Category, Intended Shipping Date, and Intended Receiving Lab.
After marking aliquots for shipping, the
shipment".
will show the I code, meaning "intended for
The Shipping Category, Intended Shipping Date, and Intended Receiving Lab correspond
to criteria that you can search for on the Setup Shipment tab in LDMS Shipping . They correspond to MARKED SHIPS, INTENDED REC LAB, and INTENDED SHIP DATE respectively.
They have no enforced semantic meaning (meaning if you selected monthly for the Shipping
Category, you're not locked into only sending that aliquot in a monthly shipment), though you
will see a warning if the intended and actual destination differ. For more information on setting
up and sending shipments, see Chapter 5: “Shipping” on page 63.
Assigning an Assay to Aliquots
Similar to marking aliquots for shipment, aliquots can also be flagged to be run on an assay.
On the LDMS Assays
screen, you can then quickly find all aliquots that have been assigned
a specific assay but not yet tested.
Important
You must assign the aliquot the assay before results can be read by LDMS; this step is
no optional. You will not find an aliquot in LDMS Assays
until you assign it to a
test. For more options on test assignment, see the section called “Assigning Assays to
Aliquots” on page 84.
Re-printing Labels
35
Procedure 2.5. Flagging an aliquot for an assay
1.
2.
3.
4.
Select the aliquot(s) to which you want to assign an assay from the Aliquot Grid.
Right click on the aliquot(s) and select Test Setup.
Find the assay you want to assign, and double click on it; this will added it to the Tests
Setup table below.
Click the
button, and then click the
button.
Warning
Clicking the Done button without clicking the Save button will not save your changes.
You'll see that the
button for the aliquots now has a T code on it, indicating that
the aliquots have been assigned a test. To remove the test assignment, simply return to Test
Setup, highlight the test, and click the
button.
Re-printing Labels
LDMS will prompt you to print labels whenever you enter new specimens or make changes to
an existing specimen. You can also re-print labels manually at any time.
Procedure 2.6. Re-printing labels using LDMS Specimen Management
1.
2.
3.
Find the aliquot(s) to be re-printed. See the section called “Finding Aliquots After Logging
Them” on page 32.
Click on the aliquots to be re-printed in the aliquot grid.
Right-click on one of the selected aliquots and select Print Labels for Selected
Aliquots.
This is not the only way to print labels after entering specimens. For more information about
labels, see Chapter 8: “Labels and Printer Configuration” on page 149.
Entering Special Types of Specimens
Creating Anonymized Specimens
Note
Due to the nature of this feature, LDMS's anonymization tool is locked by default. If you
would like to use the anonymization feature, contact LDMS User Support and it will be
enabled for you.
Every specimen in LDMS is associated with a group and participant identifier. This information
is entered into the patient grid in LDMS Specimen Management . Using this information in
conjunction with information from other source could enable a user to determine a participant's
real-life identify. For certain work, such as blinded studies, this is a significant problem.
LDMS has a tool for creating specimens that have been stripped of identifying information. This
process is called anonymization. Anonymized specimens are new specimens that have had certain
identifying information removed; the original specimen is not modified or deleted. To see how
the values for each field of the new anonymized specimens are determined, see Table 2.11.
36
Specimen Management
Table 2.11. Anonymized specimen mapping
Original Specimen Field
Anonymized Specimen Value
Group
Changed to ANON
ID2/Study
Not modified
PID
Random number
Specimen ID
New specimen ID assigned
Specimen Date
Date of anonymization
Received Date
Date of anonymization
Clinic ID
empty
Other Specimen ID
empty
Comments
empty
Global Specimen ID
New global specimen ID assigned
Visit Unit
Changed to UNK
Visit value
Empty
OPID
Empty
ID3
Empty
Specimen Time
Empty
Processing fields (e.g. frozen date, ini- Empty
tials, etc)
▲ This table shows how fields are mapped from an original specimen to the new, anonymized specimen
Figure 2.14. The Anonymization screen
▲ The anonymization screen. Note that some of the right-click menu options (such as Anonymize
Aliquot apply to the aliquot that was clicked, not the selected aliquots.
Procedure 2.7. Creating anonymized specimens
1.
2.
Select AdministrationSpecimen Anonymization from the LDMS menu bar.
Find the specimens that you want to anonymize. There are two ways to do this:
•
Import a text file list of specimen IDs or global specimen IDs.
•
Enter search criteria to find and select the specimens to be anonymized.
Adding Bulk VQA Records
3.
4.
37
To import a list of specimen IDs or global specimen IDs, click the
button and select
your file. This must be a list of either specimen IDs or global specimen IDs, with one ID per
line.
To search for specimens:
a.
b.
c.
d.
Drag the criteria you want to search from the Available Criteria list on the left to the
Selection Criteria on the right.
Select or enter a Value for each criteria.
(Optional) Specify logic for the search in the Criteria Sentence box using the numbers
from the Selection Criteria list, using AND, OR, and parenthesis (e.g. 1 AND (2 OR
3)) If no logic is specified, LDMS will default to separating each criteria with AND (i.e.
1 AND 2 AND 3... etc).
Click the
button to find aliquots that meet your criteria.
Note
Specimens that have been shipped, specimens in the ANON group, and specimens with condition codes that indicate the specimen does not exist (e.g. DSR)
will not be displayed. Such specimens cannot be anonymized.
5. Select the aliquots that you would like to anonymize. Hold down the Ctrl and Shift keys
to select multiple aliquots.
6. Click the
button below the search results.
7. You will be prompted if you would like to mark the specimens for shipment. If yes, indicate
the intended shipping information. For more information on how this information is used,
see the section called “Marking Aliquots for Shipment” on page 34.
8. You will be prompted if you would like to change the derivative type for the anonymized
specimens. If yes, select the new derivative type.
9. You will be prompted if you would like to remove the original specimens from storage and
flag them as never store. For more information on never store, see the section called
“Using Never Store” on page 33.
10. You will be prompted if you would like to view a report showing the linking between the
original and new specimens that were just anonymized. This information can be obtained
later by generated the Anonymous Patient Map report in LDMS Reports.
Adding Bulk VQA Records
Note
Access to this feature is only available to laboratories that prepare VQA panels to be
sent to individual laboratories; it is not available to most users.
The VQA Bulk Plate Add feature can be used to create numerous specimens at once for VQA
panel testing. These specimens can later be added to a shipping file for distribution to individual
testing laboratories.
38
Specimen Management
Figure 2.15. The Bulk VQA Plate Add Tool
▲ The VQA Bulk Plate Add feature allows many specimens to be added using a small sub-set of LDMS's
specimen entry features.
Procedure 2.8. Using the Bulk VQA Plate Add tool
1.
2.
3.
Open LDMS Specimen Management by clicking the
button from the LDMS toolbar.
Click the
button from the top of the primary grid.
Enter the panel information into the top of the screen. See Figure 2.15.
Note
4.
5.
6.
7.
8.
9.
The Panel consists of the assay category, panel number, and panel sub-type only, not the full PanelID. The specimen number referrs to the VQA specimen
number number for the panel, not the specimen ID. For more information about
the VQA PanelID format, see the section called “VQA (Virology Quality Assurance)” on page 191.
Enter the Primary Type, Additive, Derivative, and Sub Add/Der for the aliquots to be
added.
Enter the volume for each aliquot into the Vol field and select the desired [volume] units.
Select the desired test(s) to be assigned to each aliquot. Multiple tests can be selected and
assigned.
Click the
button. Aliquots will be added below for each specimen within the
starting specimen number and ending specimen number range that you specified.
(Optional) If needed, repeat the above steps to add more aliquots to the list of specimens
to be added.
Click the button from the LDMS toolbar.
When you are finished, click the button from the LDMS toolbar to return to LDMS Specimen
Management. You can see the specimens you just added by using the database navigation buttons
from the LDMS toolbar.
Pharmacology Specimens
Pharmacology protocols utilize the Time and Time Unit fields in the Primary Grid to record the
expected time point for the draw. For example, if you were expected to draw a PK specimen at 2
hours, select 2 for the time and hours for the time unit. The Spec[imen] Time is stilled used
to document the time the specimen was actually drawn (in 24-hour format).
Pharmacology Controls
39
Intracellular Pharmacology specimens have a few extra fields for entry. When you select the IPK
derivative code for an aliquot, you'll automatically be prompted to enter this information.
Procedure 2.9. Entering Intracellular Pharmacology Aliquots
1.
2.
3.
4.
Enter the number of cells per aliquot into the Volume field and select CEL from the Units
in the aliquot grid.
Select the Derivative type IPK.
Click the
button to add the new aliquot. This will cause a dialogue window to appear
asking for the methanol volume for the aliquot.
Enter the methanol volume and units or select IPK Methanol Vol is not available.
After entering the methanol volume, you can view or change it later by clicking on the aliquot
button.
Pharmacology Controls
Note
This method of entering pharmacology controls should no longer be used. Use the PK
QC Lot Entry feature. For more information, see the section called “Pharmacology
QC and Calibration Lot Entry” on page 122.
Pharmacology control specimens must be entered into LDMS Specimen Management
they can be used on a pharmacology assay.
before
Procedure 2.10. Entering pharmacology control specimens
1.
2.
3.
4.
5.
6.
7.
8.
Open LDMS Specimen Management
From the Group selection field, select CONTROL.
Enter the CONTROLNAME, PROTOCOL and (optionally) ID3.
Enter the date that the control specimen was prepared into the Spec[imen] Date and
Rec[ieved] Date fields.
Enter 00:00 into the Spec[imen] Time field.
Enter the number of control tubes into the # of tubes field, and then click the
button.
In the Time field for the primary, enter 0.00 and select Random from the Time Unit list.
Complete the remaining specimen information as normal. See the section called “Entering
a New Specimen” on page 13.
Once the controls are added, you will also need to assign them to the PK assay. You can do this
while you create the control specimens by right-clicking them in the aliquot grid and selecting
Test Setup, or by using the Assign Tests tool to locate specimens in the CONTROL group. For
more information about assigning assays to specimens, seethe section called “Assigning Assays
to Aliquots” on page 84.
Culture Derivative
Culture derivatives are the specimen remnants after a culture is terminated. Creating and terminating cultures is done in LDMS Assays. Since LDMS is aliquot-based, you can't do certain
things with a culture itself (such assigning a storage location). To do these things, you'll need to
create an aliquot (or aliquots) derived from the culture. For more information on cultures, see
the section called “Cultures” on page 101.
Procedure 2.11. Logging a culture derivative
1.
Locate the aliquot in LDMS Specimen Management
that was used to create the culture.
For various ways to find specimens, see the section called “Finding Aliquots After Logging
Them” on page 32.
40
Specimen Management
2.
Click the
button.
Note
3.
4.
5.
6.
If you receive a message that no cultures were found, it means that you have not
yet created the culture from this specimen in LDMS Assays. See the section called
“Cultures” on page 101.
Select the culture from the top from which you will be creating an aliquot(s).
Complete the aliquot information (# of Aliqots, Vol, etc) as appropriate.
Click the
button to create the aliquots.
You will be prompted as to whether you would like to specify a specimen ID manually (which
will be applied to all of the aliquots you are creating).
Astro Numbered Specimen
Note
This feature is currently only available for the internal group SIP-13. This group must
be created manually. For instructions on adding a new internal group, see the section
called “Group Configuration” on page 170.
An astro number is a sequential hexadecimal number that is assigned to an aliquot's other specimen ID. It is pulled from a range of numbers that were specified by you. When entering an aliquot
in LDMS Specimen Management , LDMS picks the next available number within that range,
and assigns it to the aliquot.
Procedure 2.12. Specifying the astro number range
1.
2.
3.
4.
From the LDMS menu bar, select AdministrationAdd Astro Number Block
Enter an 8-digit hexadecimal number into the Starting Number and Ending Number fields
Click the Add button.
After all number ranges have been assigned, click the Done button.
You can also remove numbering blocks this way as well. Blocks can only be removed if they are
not currently in use, which is indicated by the In Use column. This means that a specimen has
been assigned an astro number from within that number range already.
In LDMS Specimen Management , astro numbers are triggered and assigned automatically,
provided that you selected the SIP-13 group. The astro number will be assigned to the other
specimen ID for aliquots (but not primaries). Each aliquot is assigned a unique astro number.
Entering Reagent Information
In LDMS, reagents are not specimens nor are they directly associated with specimens. Instead,
you can define a reagent used at your laboratory, and the dates that it was used. You can compare
this information to the date a specimen was entered into LDMS to determine if that reagent was
being used at that time.
LDMS currently supports two reagents: dimethylusulfoxide (DMS) and fetal bovine serum (FBS).
Procedure 2.13. Adding a reagent into LDMS
1.
2.
3.
Click AdministrationReagent Logging from the LDMS menu.
Complete the fields at the bottom of the screen as applicable for your reagent.
Enter the date that use of the reagent began into the start date field.
Entering Reagent Information
41
Note
4.
5.
The start date can be a future date, allowing you to enter planned reagent use in
advance.
(If applicable) Enter the date that the reagent was discontinued at your laboratory into the
End Date field.
Click the button from the LDMS toolbar.
After a reagent has been entered, you can modify by selecting it from the list of reagents, changing the desired fields at the bottom of the screen, and clicking the
button from the LDMS
toolbar.
42
Chapter 3. Storage
The LDMS Storage Hierarchy
LDMS Storage is a flexible tool for assigning aliquots to storage locations and keeping track
of them. Storage works on the concepts of containers and levels, and represents the real-life
physical arrangement of storage at your laboratory.
LDMS distinguishes between a storage unit's configuration and a named storage unit. For example, you might have dozens of boxes of a certain type, then there is a specific box of that type
called "Box 3, Specimens For Testing". This distinction between the types of units and specific,
named units allows you to define the type of unit once, then reuse it. This applies to all storage
units, from the biggest freezers to small boxes.
The three types of storage units in LDMS (from biggest to smallest) are freezer, level, and container. LDMS organizes these units in a tree structure, such that a freezer holds levels, levels
hold more levels or containers, and containers hold individual aliquots. Figure 3.1 shows how
these three types of units are organized and Figure 3.2 shows how this appears in LDMS.
Figure 3.1. An example storage hierarchy
▲ This example shows the different type of storage units in LDMS and the corresponding visual representation.
44
Storage
Figure 3.2. The Storage Tree In LDMS
▲ LDMS organizes the three types of units (freezers, levels, and containers), as a tree.
In LDMS, creating a storage system is a three part process.
1. Define the configurations for your storage—that is, you need to create templates and rules
for storage containers, levels, and freezers.
2. Create the named storage units—that is, tell LDMS how the configurations you created are
setup in your real-life storage.
3. Add specimens to storage containers.
Defining a Storage System
Defining Containers and Levels
In LDMS, a container is considered a rectangular object with places for individual specimens.
It is the smallest storage unit in LDMS. An 8x8 container, for example, would contain 8 rows
of 8 specimens, for a total of 64 aliquots in the container. Individual specimens have a unique
storage position using the container's coordinates.
Before a container can be used in LDMS, you must define the type of container (its size, sorting
method, etc) by creating a configuration for it. Adding a container configuration is done in LDMS
Storage on the Configuration tab.
Procedure 3.1. Creating a storage container configuration
1.
2.
3.
4.
Select the Container radio button (this is selected by default).
Enter the No. of Columns and No. of Rows for your container. These are the dimensions
for the number of specimens the container can hold.
(Optional) If needed, select an Exclusion Type. This allows you define a specific position,
row, or column in the box that will not hold a specimens. For example, by excluding the
top-left corner, you can use the empty spot as a reference point to determine which side
of the box is the top.
Enter a descriptive name for the container into the Label field.
Tip
5.
To make it easier to re-use configurations, consider using generic names. For example, 8x8 Box, no top-left corner could be used for many groups, whereas
Frontier Group Box implies that the box can't be used for other groups.
Select the Labeling Method. This is how coordinates for the container are labeled. You
can chose from a combination of numeric or alphabetic rows and columns. You can also
Modifying and Deactivating Containers and Levels
6.
7.
8.
9.
45
chose Positions Only, which will assign a number to each specimen slot instead of coordinates.
Select the Fill Order. This how LDMS will add specimens to a container when positions are
automatically assigned to specimens.
Select the format you want to use for coordinates from the Coordinates list. You can chose
between (row, column) or (column, row)
(Optional) If the box's rows are organized in ascending order (e.g. F, E, D...) instead of the
default (A, B, C...), select the Reverse Row Labeling check box.
Click the button from the LDMS toolbar to add the new storage container configuration.
Figure 3.3. Example container configurations
▲ Examples of the settings used for two different storage containers. The arrow indicates how the box will
be filled; the shaded location illustrates the two different ways of displaying coordinates.
Storage level configurations are created the exact same way as containers. Storage levels have
coordinates and positions just like containers. The difference is that instead of holding aliquots,
levels hold containers or other levels. For example, a storage level with 1 row and 3 columns
would equate to a shelf that can hold 3 boxes (one box per column).
Creating storage level configurations does offer one additional option, the ability to set the
Container for Level. This field lets you restrict a level to only holding certain containers. For
example, you can create a shelf that only lets you add a specific type of box to it. If a level is to
be restricted, it can only be restricted to one specific type of container. If you anticipate needing
to use more than one container type, leave the Container for Level field blank.
Modifying and Deactivating Containers and Levels
A container or level can be modified on the Configuration tab by selecting it in the Storage
Type list, making any changes, and then clicking the
button from the LDMS toolbar. (To
modify a level, select the Level radio button instead; Container is selected by default).
If you want to remove a container or level, select it from the Storage Type list at the bottom,
then click the from the LDMS toolbar.
However, You cannot delete a container or level configuration that is currently in use. Instead,
you must deactivate the storage unit. This prevents users from adding more units of that type to
your storage. To de-activate a container or level, select it from the Storage Type list, unselect
the Configuration is Active check box, then click the
button from the LDMS toolbar.
46
Storage
Defining a Freezer Configuration
The largest unit in LDMS Storage
is a freezer. A freezer contains one or more levels, which
contain containers, which hold individual specimens. A freezer in LDMS isn't necessarily an actual freezer. For example, a refrigerator is considered a freezer since it is the largest storage unit.
The term freezer was chosen simply because it is the most common large storage unit that laboratories use.
The Freezer Cfg tab in LDMS Storage is where you define a freezer configuration. Like containers and levels, a freezer configuration must be defined before a new freezer of that type
can be created. The types of levels and combinations of levels that your freezer will accept are
specified in the Configuration Design list in Figure 3.4. When this particular freezer is added
to storage (e.g. when the user creates a new Big Cabinet freezer), it will automatically have
these levels added exactly as shown. Additionally, the user will be restricted to only adding 4x1
shelves directly to freezers using this configuration.
Figure 3.4. The Freezer Configuration tab
▲ Levels and sub-levels are added to a freezer configuration by dragging them from the list on the left to
the list on the right. In this example, users will only be able to add a 4x1 level directly to the freezer.
Procedure 3.2. Creating a freezer configuration
1.
2.
3.
4.
Enter a descriptive name for your freezer into the Label field.
Select the type of "freezer" from the Type list.
Select the operating temperature for your freezer from the Temperature list.
Select a level from the Level Types list and drag it to the Configuration Design list. You
must add at least one level to the freezer configuration. See Figure 3.4.
a.
5.
(Optional) If the level is going to be a sub-level of another level, select the parent from
the Sub Level of list; if it is not a sub-level, leave this field blank.
b. Enter the number of levels to add into the Number field.
After all levels are added, click the
button from the LDMS toolbar to create the configuration.
You can modify an existing freezer the same way. Select the freezer from the Configurations list
in the top-left corner, make your changes, and then click the
button from the LDMS toolbar.
Note
If the freezer configuration is already in use, only the label, type, and temperature can
be modified; you can't modify the configuration design.
An Example: Storing Dried Blood Spot Cards
47
An Example: Storing Dried Blood Spot Cards
Figuring out how to define your storage is not always obvious. Certain specimens doesn't easily
fit into a box with rows and columns. These types of scenarios may require some creativity to
store things efficiently.
One such scenario is storing dried blood spots (DBS) cards that have multiple blood specimens
on them. Each blood spot may have its own, unique global specimen ID in LDMS, thus a single
DBS card isn't really a single specimen that can be placed into a box. Putting the cards into,
for example, a 1x20 container would not be correct since it doesn't account for the individual
spots on the card.
One way to solve this is to treat the spots on the card as columns in a storage container. Each
row in the container would be one card, and each spot would be a column. Figure 3.5 shows how
this would be done with a DBS card with 4 specimens on it.
Column 1
Column 2
Figure 3.5. Dried blood spot cards in storage
3hgffhh378jgdd
23fhsrtjs3456d
fghz3y3135y4x
24sgxeg335jh
Row 3
Row 2
Row 1
Row 2, col 3
▲ The LDMS configuration (bottom) used to create a box of 40 DBS cards, where each card contains 4
blood spots.
Another way to approach this problem is to treat the DBS card itself as a container (meaning
you would create a 1x4 container), and then treat the container that you are putting the cards
into as a level. This would only work, however, if your freezer needs only one level in it, since
LDMS limits you to two levels in a freezer. This would also require you to add many containers,
one for each card.
There are many types of unusual specimens and container needs that exist. If you have trouble
figuring out how to define a certain type of container in LDMS to meet your needs, LDMS User
Support can help you. See the section called “Getting Help” on page 10.
Creating a Storage System in LDMS
What Each Tab in LDMS Storage Does
LDMS Storage has multiple tabs. While each tab does something different, many of them look
very similar and some functionality is common across multiple screens. The behavior of the
button is also a little different than in other places in LDMS.
48
Storage
Table 3.1. LDMS Storage
tabs explained
Tab Name
What You Do on It
Main View
View the contents of a level or Add new freezers, levels and
container
containers
What the
Button Does
Container View View the contents of a container Add new freezers, levels and
containers
Move
Move stored specimens and con- Add new freezers, levels and
tainers from one location to an- containers
other
Configuration
Create and modify level and con- Create a new container or levtainer configurations
el configuration using inputs on
the screen
Freezer Cfg
Create and modify freezer con- Create a new freezer configurafigurations
tion using inputs on the screen
Bulk Add
Add one or more specimens to a Add new freezers, levels and
container
containers
Compress
This tab is disabled; rearrange a N/A
storage container, use the Move
tab
Search
Find specimens in storage; N/A
purge shipped specimens from
storage
Transactions
View changes made in storage
N/A
On the Main View and Container View tabs, the button from the LDMS toolbar is used to
display the contents of the currently selected freezer, level, or container.
Main View vs Container View
The difference between the Main View and Container View tabs might not be apparent
at first. Both are used to view the contents of storage by finding a container and clicking
the button from the LDMS toolbar. The Container View tab is limited to only displaying
the contents of containers, while the Main View tab can be used to see levels as well.
The main difference is how they display information. The Container View tab shows each
location in the container in large, graphic representation (you'll need to scroll to see all of
them), whereas the Main View tab shows more familiar, tabular information. The content
that is displayed is identical. For most users, the Main View tab will be more appropriate.
Adding and removing Freezers
Creating named freezers, as well as adding levels and containers to a freezer, is done on the Main
View tab in LDMS Storage . You must create the freezer configuration on the Freezer Cfg tab
before adding the freezer. For instructions on how to do this, see the section called “Defining
a Freezer Configuration” on page 46
Procedure 3.3. Creating a new freezer in storage
1.
On the Main View tab, click the
button from the LDMS toolbar.
Adding Levels and Containers to a Freezer
2.
3.
4.
49
You will be prompted to select the type of item you want to add. Select FREEZER.
Select the freezer configuration that you want to use. You must have already created the
freezer configuration on the Freezer Cfg tab.
Enter a name for your freezer. This is for ease-of-use and can be changed later. It is okay to
use a group name as part of a freezer name, if that's the freezer's primary purpose.
If the configuration used had levels added by default, you'll see those levels were already added
to the newly created freezer.
To remove a freezer, select it on the Main View tab, then click the
button from the LDMS
toolbar. The freezer can contain levels and containers when it is deleted, but it cannot contain
specimens; you'll need to remove the specimens from storage or move them to another location. For more information on deleting specimens, see the section called “Adding and Removing
Specimens from Storage” on page 51. For more information on moving specimens, see the
section called “Moving and Re-arranging Stored Items” on page 54.
Adding Levels and Containers to a Freezer
Levels can be added to and removed from freezers on the Main View tab. There are a few restrictions to how they can be added.
• Every freezer must have at least one level. Containers must be added to levels; they cannot
be added directly to freezers.
• You cannot add more than one sub-level within a freezer.
• Levels that were not defined as part of your freezer configuration cannot be directly added
to a freezer (any level configuration, however, can be added as a sub-level).
Procedure 3.4. Adding levels and containers to a freezer
1.
2.
3.
4.
5.
Select the freezer or level that will hold the new level or container.
Click the button from the LDMS toolbar.
You will be prompted to select the type of item you want to add. Select LEVEL or CONTAINER as appropriate.
Choose the container or level that you want to add.
(For containers only) Enter the number of containers that you want to add to the selected
level. If you need to cancel at this point, enter 0.
Just as with freezers, you can remove levels and containers by selecting them, and then clicking
the button from the LDMS toolbar. The level or container cannot contain any specimens when
removing it.
Maintaining Storage
The Storage Structure List Explained
You may have noticed that the left side of the Main View, Container View, Move, and Bulk
Add tabs in LDMS is identical. This list is called the Storage Structure and it shows your actual
storage items and specimens. It also allows you to set a few options for storage levels/containers,
and storage in general.
By selecting a storage item from the Storage Structure list and then clicking the
button,
you can access more options for that storage unit. This is similar to the details button in LDMS
50
Storage
Specimen Management
in that it allows you to assign comments to storage locations and
mark items for shipment.
Figure 3.6. The storage details window
The Storage Comments field allows you to add details about a storage level, such as special
handling instructions. These comments can also be viewed in LDMS Specimen Management ,
on the Aliquot Details window. Storage comments, unlike Specimen Management comments,
are not included when specimens are shipped and will not be exported to Frontier Science; they
are for your internal use.
Note
If you append a storage comment to an existing comment, LDMS simply combines them.
If you're going to use this feature, you need to add some sort of separator at the beginning of the appended comment, such as "---", so that the comments don't bleed together.
What does the Resequence button do?
You might think that the Resequence button on a the Details window is used to rearrange specimens in a box. In truth, the button is actually a legacy feature for when many
laboratories were converting data from RLMP, another laboratory software program, to
LDMS. The feature has not been removed from LDMS, in the event that old data needs to
be processed.
If you're looking for a way to re-arrange a container's contents, see the section called
“Moving and Re-arranging Stored Items” on page 54.
There is also an
button at the bottom of the list. This button allows you to access two
settings that affect how storage items are added and moved. For more information, see the section called “Adding and Removing Specimens from Storage” on page 51.
Adding and Removing Specimens from Storage
51
Adding and Removing Specimens from Storage
Specimens can only be added to containers, and the container must already exist in storage
(meaning you can't add specimens to a container, and then put the container in storage). There
are three ways to put an aliquot in a storage location in LDMS:
• Use the Bulk Add tab in conjunction with a barcode scanner to simply scan a specimen.
• Use the Bulk Add tab to find specimens that meet your search criteria.
• Select the container from the Storage Structure list, and then click the button from the
LDMS toolbar. LDMS will load a list of all specimens not currently in storage. This method
is not recommended as the list can be slow to load and you can only add one specimen at a
time.
Procedure 3.5. Using the Bulk Add tab to add specimens to a storage container
1.
2.
3.
4.
5.
6.
7.
8.
In the Storage Structure list, find the container to which you would like to add specimens.
Specimens must be added to a container, not a level.
Enter the criteria for specimens you want to find in the search fields in the upper-right
corner.
Click the button from the LDMS toolbar. LDMS will display all specimens that meet the
criteria you entered.
Select one or more specimens from the search results. You can select multiple specimens
by holding down the Ctrl or Shift keys.
Drag the specimens from the search results on the right to the desired storage container on
the left. A red box will appear around the location where the specimens will be added.
Place the first specimen into the container by doing one of the following:
•
Select a location in the container, and then click the
button. This must be
done for every specimen being added. The order they are added is the order in which
they were selected.
•
Select a starting location in the container, select the Start here check box, and then
click the
button. This will place the specimen into the container based on
its fill order, starting with the selected location. This must be done for every specimen
being added.
•
Select a starting location, select the Start here check box, and then click the
button. This will add all specimens being added based on the container's fill order. This
will also enable the Automatically Assign Positions option.
You will be prompted if you want to adjust the volume of the specimens. Select Yes or No
(If you don't want to see this option again, select Don't Ask Again).
(Optional) If adjusting volume, select the specimen(s) that you want to modify, enter a new
volume into the Volume field, and then click the Modify button. You can also adjust the
volume in the volume column for each specimen.
Warning
If you select the
button to automatically place all specimens into the box,
LDMS will continue doing this automatically every time you add specimens to a container during the current session. To revert back to manually placing specimens into
containers, click the
button beneath the Stoage Structure list, and disable the
Automatically Assign Positions option. This is also where you can re-enable the adjusting specimen volume when they are added to storage, if you ever select the Don't
Ask Again button for that feature.
Removing a specimen from storage simply removes the specimen from a storage container; it
does not delete the aliquot from LDMS. You can still find it if you go to LDMS Specimen Management
and you can re-add it to storage.
52
Storage
Procedure 3.6. Removing specimens from storage
1.
2.
3.
Select the specimen(s) that need to be removed from storage.
Click the button from the LDMS toolbar.
(Optional) If you want to flag the specimen as Never Store, select the Permanent Delete
From Storage option.
Note
4.
If you want specimens to be set to never store by default when they are removed
from storage, enable this option on the Storage tab in AdministrationSystem
Configuration. For more information on never store, see the section called
“Using Never Store” on page 33.
Click the Yes button to remove the specified aliquot or the Yes to all button to remove all
aliquots that were selected.
Modifying All the Specimens in a Container
LDMS has a feature for changing the condition and specimen comments, and assigning the never store property to all specimens in a storage item at once. This feature can be useful if
something happened to all of the specimens in a storage container. For example, if a freezer
failed, you could use this feature to change the condition code for all of the specimens to thawed.
To access this feature in the Storage Management task, find the storage item in the Storage
Structure on the left side of the screen, then right-click on the container and select Bulk Update Specimens of Container. Due to the large amount of data this feature can modify
at once, using the bulk update feature requires a challenge password from LDMS User Support.
For more information about challenge passwords, see the section called “LDMS and Challenge
Passwords” on page 4.
Figure 3.7. Bulk specimen update window
▲ The bulk specimen update window. The comment will be added to the specimen comment, not the
storage comment.
Note
The bulk update feature modifies the specimen comment, not the storage comment for
the specimen. This is the comment that appears on shipping manifests and can be
Shipping a Storage Unit
53
viewed using the Specimen Management
task. The bulk update feature will append
to any existing comments for the specimen.
Shipping a Storage Unit
LDMS allows users to ship entire units. This is often easier and faster to do than selecting individual specimens to ship. Specimens can be added to a shipping container within a freezer, and
then the container, level, or freezer itself can be shipped.
Shipping storage units is a two step process. First, you need to mark the storage unit for shipment, then you need to actually add it to a shipment in LDMS Shipping . Unlike shipping individual specimens, you must mark the storage unit for shipment, otherwise it will not appear
in LDMS Shipping as available to ship.
Procedure 3.7. Marking a storage unit for shipment
1.
2.
3.
Select the storage unit that you want to ship from the Storage Structure list.
Click the
button.
Click the
button.
A storage unit cannot be marked to ship if any specimens or storage units in it have been shipped
(which is indicated by a icon next to it) or added to a shipping batch (indicated by a
icon).
Note
While you are permitted to ship a container without any restrictions, you will be
prompted to contact LDMS User Support for a challenge password if you want to ship
a level of freezer. This is because shipment of such a large storage unit generally requires coordination with group leadership and multiple laboratories. For more information about challenge passwords, see the section called “LDMS and Challenge Passwords” on page 4.
The same process is used to un-mark the storage unit for shipment. If a storage unit has been
added to a shipping batch in LDMS shipping , it must be removed from the batch before it can
be un-marked in LDMS Storage .
For instructions on how to add a container to a shipment after it has been marked for shipment,
see the section called “Finding Containers to Ship” on page 65.
How LDMS Storage Handles Shipped Specimens
Specimens go through a two-part process when they are shipped in LDMS. First, they are added
to a shipment (also called a batch). Next, the user creates a shipping file from that batch that
contains the specimen information. This shipping file is sent to a receiving laboratory, where it
is then imported into their LDMS database.
At no point during this process, however, does LDMS Storage
remove specimens from the
sending laboratory's storage. This means that when you send a shipping file to another laboratory and they import it, both laboratories now have the exact same specimen in LDMS. The
Storage Structure list shows the shipment status of a specimen with an icon next to its name.
For an explanation of what these icons mean, see Figure 3.8.
Figure 3.8. Storage Structure List Icons and Meaning
Specimen has been added to a shipping batch
Item has been marked for shipment
A shipping file with the specimen has been created (e.g. the specimen has been shipped)
54
Storage
You will need to periodically find and remove shipped specimens from your LDMS Storage .
This will remove the specimens from storage, and since shipped specimens will not appear in the
Bulk Add tab, you won't be able to add them to storage again. This only removes the specimens
from storage; they will still appear in other places in LDMS, such as Specimen Management.
Warning
When a shipped specimen is purged from storage, it is automatically assigned the never
store flag. For more information on never store, see the section called “Using Never
Store” on page 33.
Procedure 3.8. Removing shipped specimens from LDMS Storage
1.
2.
3.
4.
In LDMS Storage , select the Search tab.
Click the
button.
Enter a Beginning and Ending date to find specimens with a shipment date within that
range. If you leave these blank, LDMS will find all shipped specimens in storage.
When prompted to purge items from storage, click Yes.
LDMS does not have a way to automatically perform this purge; you must do it yourself. A good
practice would be to remove specimens after sending the physical shipment to the laboratory.
If you purge them without contacting the receiving laboratory, you run the risk of something
being wrong and no easy way to diagnose the problem.
Moving and Re-arranging Stored Items
Moving specimens between different containers (and within the same container), as well as
moving levels within freezers and other levels, is done on the Move tab within LDMS Storage
. This is also how you would re-arrange a storage unit's content.
Note
Only specimens and storage containers can be moved. Storage levels cannot be moved.
Procedure 3.9. Moving specimens or storage containers
1.
2.
3.
4.
Find and select the storage unit to be moved from the Storage Structure list on the left.
Find the destination storage unit from the Destination list on the right.
Select and drag the storage unit to be moved from the left side to the right.
Place the storage unit or specimens into the destination by doing one of the following:
•
Select a location in the container, and then click the
button. This must be
done for every unit being moved. The order they are added is the order in which they
were selected.
•
Select a starting location in the container, select the Start here check box, and then
click the
button. This will place the specimen into the container based on
its fill order, starting with the selected location. This must be done for every storage
unit being moved.
•
Select a starting location, select the Start here option, and then click the
button. This will add all specimens being added based on the container's fill order. This
will also enable the Automatically Assign Positions option for the remainder of your
LDMS Storage session.
Warning
There is no undo functionality when performing a move. Since moves take effect immediately, you will need to correct any mistakes by moving specimens or containers to
the correct location.
Finding Specimens in Storage
55
Tip
If you want to re-arrange a unit's contents, such as rearranging specimens in a box,
simply move them to the same container. For example, if you move specimens from one
box, to the same box, you'll be allowed to select new locations for them.
Finding Specimens in Storage
You have a few options for finding a specimen that is in LDMS Storage
:
• Open the Main View tab and just scan the label with a bar code reader (this only works if
you have the specimen in front of you or reprinted its label).
• Browse the Storage Structure list
• Use the simple search feature, accessed by clicking the
button below the Storage
Structure list.
• Use the Search tab
Simple Search is used to locate a specimen with a specific specimen ID, global specimen ID, or
other specimen ID. You can limit your search to a specific storage location by using the Narrow
Your Search fields. If you need more advanced searching, use the Search tab.
Figure 3.9. The storage search tab
▲ On the search tab, you can also click the
extended search feature.
button from the LDMS toolbar to access the more familiar
To search, enter criteria to search, and then click the button from the LDMS toolbar. Specimens that meet all of your search criteria that are in storage will be displayed at the bottom
of the screen. Specimens that are not in storage or do not meet all your search criteria will not
be displayed. For example, in Figure 3.9, the user has specified the Group to be Frontier and
they have also entered one or more (Global) Specimen IDs. Even though there are many more
specimens in storage that are in the Frontier group, only the ones that also match the specimen IDs specified will be displayed.
Searching by specimen ID and global specimen ID can be confusing. Here are a few key points:
• The field (Global) Specimen ID accepts both specimen IDs and global specimen IDs.
• The only specimen IDs/global specimen IDs that will be shown will be the ones in the list
below the (Global) Specimen ID field. They are added to this list by using the Add button
or the <- button.
• Clicking the
button will find all specimens in storage that meet the search criteria
you've already entered and display them in the Specimen List box (this is identical to clicking the button) . You still need to select the specimens, and then click the <- button to
move the specimen to the box to the right.
• Clicking the
button will import a text file list of specimens to search. This text file
must have one global specimen ID per line.
56
Storage
Tip
You can also use the Extended Search feature to find specimens in storage by clicking the
button from the LDMS toolbar. Extended Search works the same way that it
does in LDMS Specimen Management . For more information on how to use extended
search, see the section called “Finding Aliquots After Logging Them” on page 32.
Storage Reports
There are a number of reports that are available within LDMS Storage
.
Storage reports
Container Report
List specimens in a container, along with pertinent details, organized by container. To find this report, select a level from the Storage Structure list, click
then click the Spec Report button.
Empty Storage Locations Report
List storage positions by container that do not have any specimens. Empty level
locations are not shown; only containers. To find this report, select a level from
the Storage Structure list, click
then select Empty Storage Locations
Report
Specimens not in Storage
After generating search results on the Bulk Add tab by clicking the
button, click the button from the LDMS toolbar. This report shows specimens
within your search results that are not currently in storage. For more information about this report, see the section called “Locating Specimens not in Storage” on page 58.
Specimens Stored from Bulk Add
Report
Shows specimens that have been added to storage using the Bulk Add tab. To
access this report, click the
button on the Bulk Add tab.
Storage Detail Report
Shows basic information about specimens that were found on the Search tab.
You must click the button from the LDMS toolbar to generate search results
before generating the report. To find this report, go to the Search tab and click
the button from the LDMS toolbar.
Storage Move Report
Shows specimens that have been moved to a new location within storage on the
Move tab. To access this report, click the
button on the Bulk Add tab.
Storage Transactions Report
Shows saved transactions that were found or (if no search criteria was entered)
all saved transactions. To find this report, go to the Transactions tab and click
the button from the LDMS toolbar.
There are more storage reports available in LDMS Reports . For a listing of those storage reports, see the section called “Storage Reports” on page 137.
Storage Change Log (Transactions)
LDMS automatically tracks changes that you make to storage. The record of each change is called
a transaction. When you exit LDMS, these transactions are automatically deleted. The change
still happened; only the record of it is not saved.
For some networks and at some laboratories, you may need to have audit-able storage records
on hand. To keep records of storage transactions, you need to manually save them. Saving a
transaction is also synonymous with creating a comment for the transaction.
Warning
LDMS will not save transactions automatically; you must do this. If you exit LDMS entirely without saving them, they are lost forever.
Storage Change Log (Transactions)
57
Figure 3.10. The Transaction tab and Storage Open Transactions window
▲ The Storage Open Transactions window shows changes that were made during the current session.
These records must be saved by you or they will be lost when you exit LDMS.
Procedure 3.10. Saving records of transactions from the current session
1.
2.
3.
4.
5.
On the Transactions tab, click the
button.
Select the transaction(s) that you want to save. Hold down the Ctrl or Shift key to select
multiple transactions.
Click the
button.
(Optional) Enter a comment for each transactions. This comment can be used to track why
you saved a transaction or what was significant about it. If you do not wish to enter a comment, leave it blank and simply click the Save button.
(Optional) If you selected multiple transactions, you can use the same comment for all of
them (instead of being prompted for each transaction) by selecting the Apply comment
to all check box.
If there are any transactions that have not been saved, you will be prompted to view them when
you try to leave LDMS Storage
. It's a good idea to review them and make sure that there
are none that you need to save. You can use the Delete button to remove unsaved transactions
that you know you don't need to save; the Clear button can be used to remove all unsaved
transactions.
To view saved transactions, simply enter your search criteria (such as a date range or a type
of transaction) and click the button. Saved transactions will appear at the bottom. For instructions on how to view saved transaction comments, see Procedure 3.11, “How to view saved
transaction comments”.
Procedure 3.11. How to view saved transaction comments
1.
Select the transaction that you would like to view.
58
Storage
2.
3.
Click the
button from the LDMS toolbar.
(Optional) If you want to modify the comment, you can do so, and then click the Save button.
Tip
Want to view a summary of saved transactions and comments? Search for them and then
click the button from the LDMS toolbar. This will generate the Storage Transactions
Report. If you run this report without searching, you'll find all saved transactions.
Locating Specimens not in Storage
Accurate storage locations, processing times, storage conditions, and other information are vital
to the long term study of specimens that your laboratory has in its possession. If the location
where a specimen is stored is not documented using LDMS's Storage
tool, it could be very
difficult to locate it in the future.
Important
Several clinical trial groups require that all specimens be logged using LDMS Storage .
Data management centers work with these networks to monitor the storage status in
data that your laboratory has exported, and may contact laboratories to ensure that the
mandates for these networks are being enforced.
LDMS has a built-in report that will tell you what specimens do not have a storage location
documented in LDMS. You can use this report to find specimens and add them to storage. For
instructions on adding specimens to storage in LDMS, see the section called “Adding and Removing Specimens from Storage” on page 51.
Procedure 3.12. Generating the Specimens Not In Storage Report
1.
2.
3.
4.
Click TasksReports or click the button from the LDMS toolbar.
Select the Storage Reports category, and then select the Specimens Not in Storage report.
(Optional) Add a group filter at the bottom of the screen if you want to only show specimens
for a specific group.
Click the button from the LDMS toolbar.
If you need a more flexible report, you can also use LDMS's data retrieval tool to create a custom
report. Simply create a report that selects and displays the global specimen ID, stored, and
never store fields, and then sort by the stored field. For more information on using the data
retrieval tool, see the section called “Running Custom Data Retrieval Reports” on page 134.
Note
It is important to look at both the stored and never store fields. The reason being is
that a specimen that has been flagged as never store would appear as not stored, even
though you would never be expected to store it. For more information on never store,
see the section called “Using Never Store” on page 33.
Chapter 4. Patient Management
Finding and Modifying Participant Information
LDMS Patient Management
is used to add, view, or modify study participants in LDMS. This
isn't the only way to add patients in LDMS (you can also use Specimen Management to add
participants when entering specimen information), but it is the only way to modify an existing
participant's information.
Figure 4.1. Patient Management Screen
You can bring up participants that have already been entered to add them to new studies, change
their identifier (e.g. to fix a data entry error) and to add them to a new group.
Procedure 4.1. Modifying an existing participant
1.
2.
3.
4.
5.
6.
Click TasksPatient Management from the LDMS menu bar or click the
button from
the LDMS toolbar.
At the bottom of Patient Management screen, select the group from the drop-down.
Select the identifier from the drop-down.
Click the Find button.
Modify the patient information as necessary, such as adding or deleting rows, or modifying
identifiers.
Click the
button from the LDMS toolbar.
A common change you'll need to make is updating patients enrolled in the study NOSID. For
many groups, it is acceptable to enter NOSID as the study identifier when entering specimens.
After the participant is assigned to a study, you need to use Patient Management to update the
patient information, which will cascade to all previously logged specimens.
Warning
If you entered specimens using NOSID, then (once an SID has been assigned) you start
entering specimens with the new SID, you will end up with two different enrollments
(one with the SID and one with NOSID) when there is in fact only one. This mistake can
be difficult to correct and will usually require LDMS User Support's assistance. See the
section called “Merging Participants” on page 60.
60
Patient Management
Once a SID has been assigned to a participant previously entered with NOSID, you must
immediately update the NOSID before adding any more specimens for that participant.
Adding a New Participant
Typically, new participant enrollments are added in Specimen Management when new specimens are added to LDMS. This is typically more efficient than manually creating enrollments.
For more information on using Specimen Management, see Chapter 2: “Specimen Management” on page 11.
Procedure 4.2. Adding a new enrollment using Patient Management (Not
recommended)
1.
2.
3.
4.
5.
Click the
button.
Select the group for the participant from the Group drop-down menu. This will modify the
values in the Type fields, depending on the group selected.
Enter the identifiers as required by the group.
Select the clinic ID with which the patient should be associated from the Clinic drop-down
Click the
button from the LDMS toolbar.
You'll receive a confirmation message after the participant has been added. If you add multiple
rows to the patient grid, LDMS treats them as the same patient in different studies. You cannot
add two different participants at the same time, meaning enrollments in the same group can't
have two different PIDs.
Using OPID
OPID (Other Patient Identifier) is a field that can be used as a supplement to ID1 (which is usually
a PID, hence OPID) or as the primary identifier for patients in LDMS.
To use an OPID for a participant, simply enter a value into the OPID column when entering or
modifying that patient's information.
Tip
You can pre-populate the OPID in multiple rows by typing it into the OPID box above
the patient grid before clicking the
button. You can also do the same thing with
the clinic.
Merging Participants
Merging Participants
61
Suppose you realize that you have a participant with two different enrollments. For example,
you have two different participants enrolled in two different studies, then later realized that
these two participants are actually the same person, and should have been listed under the same
participant record as two different enrollments. This could happen if, when entering the specimens into LDMS, the user didn't add two rows to the participant grid and instead entered each
set of specimens separately.
LDMS can correct issues like this by combining participant records. This feature, however, is not
accessible to users. The reason for this restriction is because incorrect use of the feature could
significantly damage data in your LDMS database in a way that would be difficult to correct.
If you need to combine participants, contact LDMS User Support. They will be able to access this
feature and make the correction for you. See the section called “Getting Help” on page 10.
62
Chapter 5. Shipping
Shipping = Data Transfer
In LDMS, shipping specimens is the process of transferring specimen information from your
local LDMS database to the database of another laboratory. It would be more accurate to say that
a shipment in LDMS is actually a shipping file, not a container of specimens. You are shipping
a file to another laboratory, and they read the file to add specimens to their LDMS database. It
is a parallel process to physically sending specimens to another laboratory.
LDMS can...
• Prepare a shipping computer file, which must then be sent to the receiving laboratory (on a
CD, via FTP, attached to an email, etc); this file contains LDMS data for the specimens.
• Read a shipping file received from another laboratory, and add those specimens to your LDMS database.
• Create and print lists to help you pull specimens being shipped from storage, as well as
manifest lists to include with the physical shipment.
• Provide tools to help verify that the physical specimens received match those in the shipping file that was received.
• Create shipping files for laboratories not using LDMS.
LDMS can not...
• Transmit shipping files or shipping information directly between laboratories; users must
do this manually (e.g. on a CD-RW packed with the specimens).
• Keep LDMS databases at laboratories in sync. For example, if an aliquot is shipped from one
laboratory to another where it is later destroyed, the initial laboratory will still have that
specimen marked as "shipped" while the receiving laboratory will have it as "destroyed"; the
destroyed status does not get sent back.
• Assist with actual shipping (printing mailing labels, arranging pick-up, etc); individual laboratories need to develop their own workflows for those processes.
• Track in-progress shipments or notify the receiving laboratory of incoming specimens.
To ship something in LDMS is a multi-step process that happens at both the sending and receiving laboratory. At a high level, the sending laboratory marks specimens for shipment, then prepares a shipping file and paperwork. They send the shipping file (through some method outside
LDMS) to the receiving laboratory, along with the actual specimens. The receiving laboratory
imports this data into LDMS and reviews it to make sure the specimens that were expected were
actually received. See Figure 5.1.
64
Shipping
Figure 5.1. Typical workflow for shipping specimens with LDMS
Sending Laboratory
Receiving Laboratory
Add specimens to a batch
Create a shipping file
Print storage report and pull
specimens from storage
Print manifest and physically
send the specimens
Import shipping file
Perform QA/QC on shipment
Transfer shipping file to
the receiving laboratory
Batch is now marked as "shipped"
Batch is now marked as "Imported"
▲ The left side shows the steps performed by the sending laboratory while the right shows the receiving
laboratory.
Preparing Shipments
Creating a New Shipment
Shipments are organized into batches. A batch is simply one shipment, either sent or received.
Each batch has a batch number, which uniquely identifies the shipment in your local LDMS
database.
Important
A batch number is not consistent between different LDMS laboratories. Each batch is
assigned a sequential number, with the first batch starting at 1. When a shipment is
imported at a receiving laboratory, it is assigned the next available batch number at that
laboratory. As a result, the same shipment may have a different batch number at the
sending and receiving laboratories.
Procedure 5.1. Overview of creating a new batch
1.
2.
3.
4.
On the View Shipment tab, select the bottom, blank row from the batch listing. This row
is designated for new shipments.
Change to the Setup Shipment tab. You will be prompted whether you want to ship Specimens (i.e. aliquots) or ship Storage Items, meaning boxes or other storage containers that
contain multiple specimens.
Add items to your shipment.
•
If shipping a container, select the containers that you want to ship and click the Add
to batch button. For more details on how to do this, see the section called “Finding
Containers to Ship” on page 65.
•
If selecting individual aliquots to add to the shipment, search for them and select
them. For more details on how to do this, see the section called “Finding Specimens
to Ship” on page 65.
Change to the Shipment Destination tab. Select the person or laboratory to whom the
shipment will be sent. For more information on how to do this, see the section called
“Selecting a Shipment Destination” on page 67.
Finding Containers to Ship
5.
Click the
shipment.
65
button from the LDMS toolbar. This step creates the new (currently unsent)
The new batch can be found on the View Shipment tab. This batch will be the last batch on the
list. It will have the status of batched, which means it has been prepared but not yet shipped.
To ship the batch, see the section called “Sending a Shipment” on page 75.
Finding Containers to Ship
It is possible to ship any storage unit in LDMS,1 whether it be a container of specimens or an
entire freezer. Shipping a container is in fact one of the most expedient ways to send aliquots
to another laboratory. Simply add them to the container in LDMS Storage , then just ship the
container. For many laboratories, this is a lot more efficient and a lot easier than finding all of
the individual specimens that need to be shipped.
To ship any container, it must be marked for shipping in LDMS Storage . If it is not marked in
LDMS Storage , it will not appear as available to Ship. For more information on how to mark
storage items for shipping, see the section called “Shipping a Storage Unit” on page 53.
To select a container to ship, change to the Setup Shipment tab and select Storage Items
button.
Figure 5.2. Adding storage items to a shipment
▲ On the left are marked storage items; on the right are storage items that have been added to the shipping batch. To move a storage item, select it and click the Add to batch or Remove from batch button
respectively.
Finding Specimens to Ship
If you want to individually select specimens to ship (as opposed to shipping a container from
storage), there are a few ways to do it:
•
•
•
•
1
Use a text file containing a list of global specimen IDs
Use the search features on the Setup Shipment tab
Use the extended search feature on the Setup Shipment tab
Scan them with a barcode reader
Although large containers like freezers and shelves can be shipped, they will require approval. You will automatically be prompted
by LDMS to obtain this approval. See the section called “Shipping a Storage Unit” on page 53.
66
Shipping
Figure 5.3. Selecting individual specimens to ship
▲ The Setup Shipment tab. The selected specimens are those that will be added to the shipping file.
Specimens in red are marked as never store.
Procedure 5.2. Finding specimens for shipment on the Setup Shipment tab
1.
Select Government if you want to ship specimens from a built-in government group or
select Internal to ship specimens from an internal group at your laboratory.
Note
2.
3.
4.
5.
You cannot ship government and custom-group specimens together in the same
shipping file. If you need to ship both government and internal groups, you will
need to create two separate shipping batches.
Select a group from the Group drop-down list (simply selecting it adds it to the criteria to
be searched; the group won't appear in the list of search criteria on the right though).
Select a Type (i.e. field) and an ID (i.e. value), and then click the arrow button to the right
to add it to the list of search criteria.
After adding all desired search criteria, click the button from the LDMS toolbar. This will
bring up all the aliquots found that meet your criteria.
Click individual aliquots to select them and add them to the shipment. Hold down the Ctrl
and Shift keys to select multiple aliquots.
Important
If you change the search criteria to something more narrow and then click the button
again, you'll notice that aliquots that don't meet your new criteria are still displayed.
This is because the search results are concatenated together. What you need to do is
click the
button, which will clear your previous search results, and then click
the button again. Don't click the
button on the LDMS toolbar; that will actually
clear your search and all the criteria, taking you back to the beginning.
If you need more refined searching (such as using AND/OR logic) you can use the Extended
Search feature, which is accessed by clicking the button on the LDMS toolbar. This works the
same way as it does in LDMS Specimen Management . For more information on how to use it,
see the section called “Finding Aliquots After Logging Them” on page 32.
Selecting a Shipment Destination
67
Marking Items for Shipping: What's the Point?
You can mark items for shipment in Specimen Management, setting the intended shipment date and destination. This allows you to specify the intent to ship while entering a
specimen. For more information on doing this, see the section called “Marking Aliquots
for Shipment” on page 34.
You might think that the button on the LDMS toolbar works the same way when no
search criteria is specified in LDMS Shipping
that it does in LDMS Assays—that is, it
finds all specimens that have been marked for shipping. This is not the case; if no search
criteria is specified, LDMS Shipping will show you every specimen available at your laboratory.
Marking an aliquot for shipment is still very useful, you just need to know where to search.
Table 5.1 below shows how the fields on the Details screen in Specimen Management correspond to fields that can be searched in LDMS Shipping .
Table 5.1. Fields to search for finding marked specimens
Field in Specimen Management
Field (i.e. Type) to Search in Shipping
Shipping Category
MARKED SHIPMENTS
Intended Shipping Date
INTENDED SHIP DATE
Intended Receiving Lab
INTENDED REC LAB
While LDMS does not enforce the usage of these fields, you will receive a warning if you
attempt to ship an aliquot to a destination other than the Intended Receiving Lab.
If you establish a good workflow at your laboratory, marking specimens for shipment can
be a very useful, time-saving tool.
Selecting a Shipment Destination
LDMS shipping files can be generated for any laboratory. If the intended destination uses LDMS,
all you need to do is select it from a list. If the laboratory is not using LDMS, you will need to
enter additional information. This is done on the Shipment Destination tab.
Procedure 5.3. Shipping to an LDMS Laboratory
1.
2.
3.
4.
5.
Select either the Contact, Lab Number, or Lab Name radio button, depending on which
you want to look for.
Select the appropriate contact or laboratory from the drop down list.
Review the address information that was populated.
Select the person who should receive the shipment at the receiving laboratory from the
Contact at Sending Lab section on the left; you can also enter in a new contact and telephone number.
Enter any additional comments for the recipient into the comments box; this information
will appear on the shipping manifest and should not contain PHI or PII.
Procedure 5.4. Shipping to a Laboratory without LDMS
1.
2.
Select the Lab Number radio button.
Select one of the following:
68
Shipping
Select 0-Unassigned Lab Code if this will be a one-time shipment or if the shipment is
intended for a laboratory using Labware that has not been assigned an LDMS laboratory
ID
•
Select 999000 Select to Enter New Address if you want to save the address for future
use.
Enter the receiving laboratory's information; the contents of the comments field will appear
on the shipping manifest and should not contain PHI or PII.
(Optional) Click the Save Address button.
•
3.
4.
The shipping information for LDMS laboratories
Frontier Science maintains a master database of laboratories using LDMS. The information that is stored includes the laboratory's shipping address and individuals working at
the laboratory who are authorized to act as points of contact for receiving shipments.
When laboratories perform a data export, they automatically receive small database updates. Updates to contact information are one of these important updates. These updates
are released several times each month. For more information about exporting, see the
section called “Exports and Updates” on page 173.
If you need to update the shipping or shipping contact information for your laboratory or
an employee at your laboratory, you can do so on the Frontier Science web portal [http://
www.fstrf.org/portal]. Look for the Submit Contact Changes link under the LDMS User
Support heading.
If you elected to save the address for future use, it will now appear in the laboratory drop-down
with the laboratory ID number 999xxx, where xxx is the next available number.
If you've selected all the aliquots that you want to ship and the shipping destination, be sure to
click the button from the LDMS toolbar.
Setting up the Shipping Container
If you're shipping a marked storage container, LDMS already knows how your shipping container is organized (the same way it is organized in LDMS Storage ) . If you selected individual
aliquots to ship, however, you'll need to tell LDMS about the container that you'll put them in
for shipping.
This can be a little confusing because the settings for shipping containers are found on different
tabs in LDMS Shipping .
Table 5.2. Shipping container settings
Setting
Tab to find setting
Container size
Shipment Destination
Using letters or numbers for coordinates Shipment Destination
Use position numbers instead of coordi- Shipment Destination
nates
How specimens will be put into the con- Shipment Destination
tainer
Specify how specimens are organized to View Shipment
put into the container
Setting up the Shipping Container
Setting
69
Tab to find setting
See a visual representation of the con- Shipment QA/QC
tainer
To view and change settings for the container, go to the Shipment Destination tab; to set how
the specimens are ordered before filling them into the container, go to the View Shipment tab,
and to see the container itself, go to the Shipment QA/QC tab.
Note
If you change a setting for the container or specimen sort, you need to save your changes
by clicking the button from the LDMS toolbar. If you don't, the view won't be updated
on the Shipment QA/QC tab.
Options available on the Shipment Destination tab for containers
Label Method
Set whether columns and rows are numbers or letters, or a combination of the
two.
Reverse Row
Reverse the number of columns so that they start at the bottom instead of the
top. This is often applicable when your fill order is bottom-to-top.
Rows & Columns
Set the height (rows) and width (columns) of the container. The default is 9x9.
Shipping Container Fill Order
How specimens will be put into the container. For example, Left to Right,
Bottom to Top will put the first aliquot into the bottom-left corner, fill out
the bottom row right to left, then move up towards the top until all aliquots
are in the container.
70
Shipping
Figure 5.4. Normal vs Reverse Rows
▲ This illustrates how the Reverse Row option affects a container. Essentially, it moves (1,1) from the
top-left corner to bottom-left. There is no equivalent option for reversing column numbering.
Fill order (on the Shipment Destination tab) is not the same as the sort order (on the View
Shipment tab). Fill order is where the specimens are placed into a shipping container; sort order
is how the specimens themselves are organized. The sort order is found on the bottom of the
View Shipment Tab. The sort order will affect both how aliquots are placed in a container and
the order they appear on the manifest report.
Figure 5.5. Shipping container sort order on the View Shipment tab
▲ A Primary Sort Order is required; the Secondary Sort Order is only required if the primary sort order
is Prot[ocol]/ID2.
Performing Quality Control on a Shipment
It would be bad practice to not check the contents of a shipment before shipping it. Aliquots can
get misplaced in storage, for example, and a mistake like that is much easier to correct before
it has been shipped.
Performing Quality Control on a Shipment
71
The process of checking each specimen's label against the information that LDMS will put on
the shipping manifest and in the shipping file is called QA/QC. This is done in LDMS Shipping
on the Shipment QA/QC tab. QA/QC should be performed at both the sending and receiving
laboratories for the same shipment, to make certain what was sent is what was received.
Figure 5.6. The Shipment QA/QC tab
▲ Selecting Pass or Fail will advance automatically to the next aliquot. You can also simply scan the
aliquot.
Note
If you're shipping individual aliquots (instead of shipping a container), you'll need to
set the sort order on the View Shipment tab before you can perform QA/QC.
There are two ways to do QA/QC: manually or using barcode scanner. Using a barcode scanner
is by far the easier (and more accurate) method.
Procedure 5.5. Performing QA/QC
1.
2.
3.
4.
5.
6.
7.
8.
9.
Select the shipment batch for which you want to perform QA/QC from the Setup Shipment
tab.
Select the current container (the one you're currently checking or filling) from the Container Name list.
Pull the first selected aliquot out of the container. Where the first aliquot is located in the
container will depend on the sort order.
(Optional) If you want to assign an other specimen ID or comments, complete the appropriate field; this information will be appended to aliquots in your local LDMS database, as well
as in the shipping file.
Do one of the following
•
Compare the aliquot's label to the information on the QA/QC tab. If the information
matches, click the Pass Aliquot button, or press Alt+Z. If the information does not
match, click the Fail Aliquot button, or press Alt+X.
•
Scan the aliquot with a barcode reader; LDMS will pass or fail the aliquot based on the
global specimen ID.
Put the aliquot in the shipping container in the correct location.
Continue until all aliquots in the container have been checked.
Repeat for each container in the Container Name list in the upper-right corner.
After checking every container in the Container Name list, click the
button from the
LDMS toolbar.
72
Shipping
Note
You might have noticed that the other spec ID and Specimen Management Comments fields are active. You can enter information into these fields while performing
QA/QC. When you save, this information will be appended to aliquot records in LDMS
Specimen Management , as well as updated in the shipping file.
The semantics are a little different, depending on whether you are shipping a storage container
or individual aliquots. If you're shipping individual aliquots, you'll be putting aliquots into a new
container, based on the sort order you selected on the View Shipment tab. If you're shipping
a container, you're pulling the aliquot out of a container, checking it, and putting it back in the
same spot. Other than that, the process is the same.
Viewing and Modifying Shipments
On the View Shipment tab, you can view all the shipments that your laboratory has prepared,
sent, and received. Each row on the View Shipment tab represents one shipment. The status
column shows you the type of shipment it is (with Batched being a shipment that you have
prepared but not sent).
Figure 5.7. View Shipment Tab
Filter shipments by date
Ship selected batch
QA/QC is performed
on the QA/QC tab
Shipment batches
Row for new
shipment
Sort order for selected shipment
Generate reports for
selected shipment
To modify a shipment with the status of Batched, simply select it, then change to the appropriate tab, such as Shipment Destination to change the receiving laboratory or Setup Shipment
to add more specimens. When you are done, click the
button from the LDMS toolbar.
You can modify batches that have been shipped. This is because "shipping" in LDMS means
generating a shipping file—you still likely have the shipment in your possession after generating
the shipping file in LDMS, at least for a little while. If you discover that you made a mistake,
you need to un-ship the batch in LDMS, which will allow you to make changes and generate a
new shipping file and manifest.
To un-ship a batch after you have created a shipping file, right-click on the batch on the
View Shipment tab and select Unship Batch. This will change its status from Sent back to
Batched so you can edit it again. To change it back to Sent, you would follow the normal shipping process. You can use the right-click menu to delete a shipment with the status Batched
as well.
Correcting Shipment Problems
73
Note
Un-shipping an LDMS batch requires the original shipping file. The shipping file must
be in a directory named with the batch number (e.g. C:\342\342 for batch number
342); this is the same as the default location where LDMS creates new shipping files. If
you do not have this shipping file, you will need to re-generate it (see the section called
“Sending a Shipment” on page 75). This requirement does not apply to non-LDMS
shipping files, such as CSV files.
Correcting Shipment Problems
Shipping file with an incorrect shipment date
When you create an LDMS Shipping File, LDMS will set the shipping date for the specimens to
the current date. This date will be reflected in the shipping file and only shipping paper work
generated by LDMS. If a shipment is created in LDMS and not shipped on the same day, the
shipment date in the LDMS Shipping File and on paper work will not be correct.
Tip
To prevent shipping date errors from occurring, be sure to create the LDMS shipping
file on the day the shipment is going to be sent.
If the correct shipment date is today’s date and the sending laboratory has a copy of the original
shipping file, they can correct the error on their own. Un-ship the batch in LDMS, and then
create a new shipping file. The shipment date will be updated to reflect the current date. If the
laboratory does not have the original shipping file, they will need to contact LDMS User Support
for a challenge password.
If the correct shipping date is a date in the past or if the sending laboratory no longer has
the LDMS shipping file, the sending laboratory cannot correct the error on their own. They
will need contact LDMS User Support for further assistance. See the section called “Getting
Help” on page 10.
Error with shipment destination
The receiving laboratory must be specified when creating a shipment in LDMS. When the receiving laboratory attempts to import the shipping file, LDMS will check to verify that the laboratory that was supposed to get the shipment is that laboratory that received it. This is one way
LDMS helps avoid the wrong laboratory getting the wrong shipment through human error.
It is possible, however, that the laboratory that prepared the shipment selected the wrong receiving laboratory in LDMS but shipped to the correct laboratory. If this error is discovered before the shipment was sent, the sending laboratory can simply unship it and make the correction. If the shipment has been sent, other steps would be needed.
If the sending laboratory still has a copy of the LDMS shipping file, then they must change the
batch to unshipped, correct the shipment destination and then re-send the corrected shipping
batch file to the receiving laboratory. If the sending laboratory no longer has a copy of the orig-
74
Shipping
inal, incorrect shipping file, then the sending laboratory must contact LDMS User Support for
assistance with updating the shipping file.
If the shipment has already been sent, the receiving laboratory will be given a warning about
the discrepancy when trying to import the shipping file. At this point, the receiving laboratory
should chose not to import the file and instead get a correct file from the sending laboratory.
LDMS will allow the receiving laboratory to import the shipping file with the incorrect destination, but this issue is much more difficult to correct if the warning is ignored.
Discrepancy between expected and received shipment
When specimens are shipped using LDMS, a printed manifest is also sent. This printed paperwork, in conjunction with the LDMS Shipping File data, is used to confirm that the physical
specimens that were received match what was expected. It may be that the specimens were not
packaged correctly or the shipment was prepared incorrectly in LDMS. If there is a discrepancy
between the printed paperwork and the actual specimens that were packaged, the corrective
measure will depend on when the error is discovered.
Tip
Pay close attention to any specimen comments displayed on the Shipping Manifest Report. These comments could explain why there are discrepancies between the specimen
label and the Shipping Manifest Report.
If the discrepancy is caught before the file is imported, the receiving laboratory should not import the file and instead contact the sending laboratory to get the correct shipping file. The
sending laboratory should unship, correct, and re-create the shipping file and shipping paperwork, then send these to the receiving laboratory. The receiving laboratory can then safely import the corrected shipping file.
If the discrepancy is not caught until after the shipping file is imported, how to proceed will
depend on the nature of the issue.
If the shipping file contained extra specimens that were not part of the physical shipment, the
receiving laboratory now has these specimens listed at their laboratory in LDMS. Since the sending laboratory didn’t actually send the physical specimens, the receiving laboratory will need
to send those specimens back in LDMS. This will move the data for the specimens back to the
sending laboratory, where the specimens are still located.
To do this, the laboratory that received the shipping file with extra specimens will create a new
shipment with those specimens, and then send the shipping file back to the originating laboratory. Once that laboratory has imported the shipping file, the data for those specimens will have
been successfully moved back to the laboratory.
If the laboratory received specimens that were not part of a shipping file, the receiving laboratory must notify the sending laboratory in writing. The sending laboratory will need to create
a shipping file with these specimens and provide that to the receiving laboratory so that they
can be imported.
If there are any discrepancies between the physical specimen labels and the shipping report, the
two laboratories should work together to resolve the issue appropriately.
Lost or Unsatisfactory Shipment
If the entire shipment is lost and never received, LDMS information needs to be updated to
reflect the event. If this does not happen, one laboratory will show the specimens have shipped
Important Shipment Reports
75
to another laboratory, where those specimens don’t exist. Later, when the data is viewed later,
it won’t be clear where the specimens are located and what happened to them.
The receiving laboratory should import the affected shipment. During the import process, you
will have the opportunity to adjust the condition of the specimens. If the shipment was lost, the
condition code for all specimens in the shipment should be changed to LSH (Lost Shipment) and
apply the never store property to all of the specimens. If another condition applies—for example,
if the specimens were left outside during winter and frozen—that code should be selected. If
the specimens are in a state that they will not be saved, the never story property should also
be applied to them.
In either case, if replacement specimens are available, those specimens should be sent to the
receiving laboratory.
Important Shipment Reports
There are a few reports that can be generated on the View Shipment tab. They are found in
the bottom-right corner of the screen. There are more shipping-related reports available using
the LDMS Reports
feature. For a listing of those reports, see the section called “Shipping
Reports” on page 136.
Shipment reports
Details the specimens included in a shipment; should be printed and shipped
along with the shipment; this report must be generated before you can create a
shipping file
Shows the layout for specimens in shipping containers, based on the sort order
and fill order.
Contains the specimens and their storage location, useful if you've batched
specimens together to be shipped but you still need to pull them from storage
Note
The manifest and shipping container reports should be included with the physical shipment of specimens.
Sending a Shipment
If a shipment's status is "batched", this means that the shipment has been prepared, but not
sent. Sending a shipment is done on the View Shipment tab. You're not technically sending
it; what you're doing is changing the status of the shipment to shipped in LDMS and creating
the shipping file. The shipping file is a computer file that the you will send to the receiving
laboratory to import into LDMS.
Note
The process for re-creating a shipping file is identical to creating it.
76
Shipping
Procedure 5.6. Changing the status of a batch to shipped in LDMS
1.
2.
3.
(When shipping loose specimens) Select the primary sort order from the bottom of the
view shipment tab.
(When shipping loose specimens) Select the secondary sort order
Generate the shipping manifest by clicking the
button.
Note
4.
If your shipment contains specimens for MACS or WIHS groups, you will be prompted to chose between generating the standard manifest report or the SeraCare manifest. Export the SeraCare manifest as a CSV file; this is considered a SeraCare shipping file.
Select the type of shipping file to generate from the Shipment Type drop-down in the
upper-right corner. For a description of these formats and the output files, see Table 5.3.
Tip
5.
6.
7.
It is a very good idea to communicate with the receive laboratory to determine what
software they are using and their preferred shipping file format. When both laboratories are using LDMS, the standard LDMS Shipping Batch format should be used.
Click the Ship button.
When prompted, select the temperature at which the shipment will be sent.
Click the appropriate drive where the shipping file should be created. This may be a removable media drive, such as a USB-drive or it may be the C:\ drive.
Note
8.
At this time, you cannot specify a specific directory to which to write the shipping
file; you can only specify the drive.
A separate program called LDMS Data Exchange (sometimes called LDX) will appear. This
program will show you the progress of pulling information from your LDMS database and
creating the shipping file. To start, click the Exchange button.
(For LABWARE2 and Cross-LIMS only) Before selecting the Exchange button, click the
Configure button in the Destination section. Specify the output location for the file.
Select the temperature at which you will be shipping the specimens. If you want to specify
more information, use the comments field on the Storage Destination tab.
•
9.
LDMS will create a folder named with the batch number in the drive that was specified (e.g. C:
\43\43, where 43 without an extension is the shipping file). The corresponding batch will now
have the status of Sent on the View Shipment tab.
Table 5.3. Available shipping file formats
Format
File exten- Encrypted? Example filename
sion
LDMS Shipping Batch
None
Yes
43
Excel or Comma Separated .xls or csv
Text
No
ship43.xls
Cross-LIMS Manifest
.txt
No
500-512-0000000043.txt
Labware Shipments
.csv
No
500-512-0000000043.csv
▲ In the file name examples, the batch number is "43", the sending laboratory is "500", and the receiving
laboratory is "512."
Importing a Received Shipments
77
How exactly the shipping file is given to the receiving laboratory will vary, depending on the
group and laboratory. Only LDMS Shipping
Batches are encrypted; all other formats are, by
nature, plain text files that could be read outside of LDMS.
Importing a Received Shipments
Importing a Shipment from an LDMS Laboratory
LDMS can receive shipments in all the same shipping file formats that it can create.
Important
When the batch is imported into your LDMS, it will be assigned the next available batch
number. It will not have the same batch number that was assigned to it at the sending
laboratory. However, if you are receiving an LDMS Shipping Batch file, you do need to
know the batch number from the sending laboratory to import it. This is a safeguard
to keep paper manifest consistent with shipping files as they are imported. The batch
number is printed on the LDMS-generated manifest.
Procedure 5.7. Importing a shipping file from another laboratory
In LDMS Shipping , select the bottom, blank row on the View Shipment tab.
Change to the Import tab.
Select the type of shipping file that you will be importing from the Shipment Type dropdown list.
4. (For LDMS Shipping Files) Enter the batch number from the receiving laboratory into the
Shipment No. field. If this does not match the batch number in the shipping file, it will
be rejected.
5. Click the
button and select the shipping file that you received from the sending
laboratory.
6. (For LDMS Shipping Files only) Change to the Shipment QA/QC tab and perform QA/QC on
the shipment. For more information on how to do this, see the section called “Performing
Quality Control on a Shipment” on page 70.
7. Change back to the Import tab, then click the
button from the bottom-left of the
screen.
8. (Optional) Change the condition code of one or more specimens as needed to reflect the
condition of the shipment as you received it. Hold down the Ctrl or Shift key to select
more than one specimen, then change the condition code from the drop-down list. For an
explanation of condition codes, see the section called “Using Condition Codes” on page 23.
9. Select whether to Import associated Test (assay) Setup Information. If yes, aliquots that
were assigned a test at the sending laboratory will be assigned to those tests at your laboratory. If no, test assignments will be disregarded. See the section called “Assigning an
Assay to Aliquots” on page 34.
10. Select the temperature at which you received the shipment from the Select a shipping
temperature drop-down list.
11. (If the import as is feature is enabled) Selected whether you want to automatically import
received containers into LDMS as-is. If yes, a temporary freezer will be created in LDMS
Storage called SHIPPING IMPORT that contains the specimens from the shipping file.
You would then move the specimens to the appropriate location in storage.
1.
2.
3.
78
Shipping
12. (Optional) If you do not want to ever store the specimens, select the Mark specimens to
never store check box. For more information on never store, see the section called “Using
Never Store” on page 33.
13. (For internal groups only) If the shipment contained an internal group, you'll be prompted
to either create the new group in your local LDMS database or map the imported group to
an existing internal group.
By default, specimens will not be added to your storage automatically after importing them. The
Bulk Add tab in LDMS Storage has fields that allow you to search for specimens to store by
batch number and received date. For more information on adding aliquots to storage, see the
section called “Adding and Removing Specimens from Storage” on page 51.
If you would rather add specimens to your LDMS storage automatically when a shipping file is
imported, you must enable the Allow automatic storage of imported samples option. This
is option is found by clicking AdministrationSystem Configuration and then changing to the Import tab. For more information about this feature, see the section called “Import
Tab” on page 168.
Text Shipping File
LDMS is capable of importing specimens from tab-delimited text files. The filename must be
in the format described in Figure 5.8. The file must contain all of the fields listed in Table 5.4
separated by tabs. A header row should not be included.
Figure 5.8. Text shipping file filename format
aaa_bbbbbb_ddmmmyyyy.txt
OR
999aaa_bbbbbb_ddmmmyyyy.txt
Where aaa is the sending laboratory's LDMS laboratory ID number, bbbbbb is the batch number
(with leading zeros added, if necessary), and ddmmmyyyy is the date the batch was created.
Important
Text shipping files must have exactly 22 columns, and the columns must be in the order
specified below. If there are more or less than 22 columns, LDMS will not be able to
correctly read the file. No columns can be removed, and extra columns cannot be added.
Table 5.4. Text shipping file fields
Field
Field
Type/ Example
Max Length
Note
Group
Alpha / 20
ACTG/
IMPAACT
REQUIRED:
The
applicable
group must be available in the
Specimen Management at the
receiving laboratory
PID/ID1
Alpha/Numeric / 25
0012345L
REQUIRED
Protocol/ID2
Alpha/Numeric / 25
A0000
SID/ID3
Alpha/Numeric / 25
A00001234L
Text Shipping File
79
Field
Field
Type/ Example
Max Length
Note
VID
Numeric / 6
1.00
Visit number. Format: three
numbers before the decimal and
two numbers after the decimal
VID Unit
Alpha / 3
Vst
Clinic
Numeric / 5
12301
The applicable clinic must be
available in the LDMS
Specimen Date Alpha/Numeric / 9
28May2009
REQUIRED:
MYYYY
Specimen Time Alpha/Numeric / 5
13:00
Format: HH:MM (24-hour military format)
Received Date
29May2009
REQUIRED:
MYYYY
Received Time Alpha/Numeric / 5
14:00
Format: HH:MM (24-hour military format).
Time
Numeric / 6
1.00
Format: three numbers before
the decimal and two numbers after the decimal. Typically used
for pharmacology and metabolic
specimens.
Time Unit
Alpha / 3
Hrs
Typically used for pharmacology and metabolic specimens. See Times Fields in LDMS on page 17.
A1234567-89
See the section called “Specimen Identifiers” on page 12.
Global
men ID
Numeric / 9
Speci- Alpha / 11
Format:
Format:
DDMM-
DDMM-
Primary
Alpha / 3
BLD
REQUIRED:
See
12: “LDMS Code
tions” on page 199
Chapter
Abbrevia-
Additive
Alpha / 3
EDT
REQUIRED:
See
12: “LDMS Code
tions” on page 199
Chapter
Abbrevia-
Derivative
Alpha / 3
PL1
REQUIRED:
See
12: “LDMS Code
tions” on page 199
Chapter
Abbrevia-
Sub/Add Deriv- Alpha / 3
ative
N/A
REQUIRED:
See
12: “LDMS Code
tions” on page 199
Chapter
Abbrevia-
Volume
Alpha/Numeric / 11
10.00
REQUIRED: Format: Nine numbers before the decimal and two
numbers after the decimal.
Volume Unit
Alpha / 3
ML
See Chapter 12: “LDMS Code
Abbreviations” on page 199
80
Shipping
Field
Field
Type/ Example
Max Length
Note
Condition
Alpha / 3
If blank, LDMS will default to SAT (satisfactory). For
more information about condition codes, see the section called “Using Condition
Codes” on page 23.
Other
men ID
Speci- Alpha/Numeric / 15
SAT
Optional identifier at specimen
level
Removing a Received Shipment
A shipment that you've received in LDMS and imported via the Import tab in LDMS Shipping
can be removed. To do so, simply find the shipment on the View Shipment tab, right-click
on it, and then select Unimport Batch.
You will be required to contact LDMS User Support to complete this process (the section called
“LDMS and Challenge Passwords” on page 4). This is because LDMS works under the assumption
that your laboratory reviewed the shipment prior to importing it. If it needs to be removed, that
implies that a serious or unique problem has occurred.
Compatibility with WebLDMS
LDMS for Windows is capable of importing shipments that were created using WebLDMS. In
order ship files to or receive shipments from laboratories using WebLDMS, you must be using
LDMS for Windows version 10.0 or higher.
There are a few key differences between LDMS for Windows and WebLDMS that can affect the
shipment of specimens.
• WebLDMS uses a different format for the global specimen ID, however the global specimen
ID will never be changed during shipment. This means that the global specimen ID will look
different, depending on where the specimen originated.
• WebLDMS does not assigned a specimen ID. If you import a shipment sent from a WebLDMS laboratory, LDMS for Windows will assign a specimen ID automatically.
• WebLDMS allows the shipment and storage of primary specimens; LDMS for Windows does
not. If you import a shipment in LDMS for Windows that contains a primary that has no
aliquots, it will automatically be converted into an aliquot.
For more information about compatibility between LDMS for Windows and WebLDMS, see
the WebLDMS User Manual [https://dev-alpha.fstrf.org/apps/cfmx/apps/ldms/webldmsManual/webhelp/index.html#topics/shipping/c_shipping_compatibility.html].
Chapter 6. Assays
Running an assay means reading data
The method of getting assay data into LDMS will vary, depending on the assay and available
equipment at your laboratory. There are three ways to get assay data into LDMS:
• Read the assay output directly from the instrument
• Read an output file that was created when the assay was run
• Enter the assay results data by hand
LDMS does not really run your assay; it is more accurate to say that LDMS reads assay data, and
then stores it. This reading may or may not coincide with running the assay, since the direct
read method is not available for all assays. Reading assay output using LDMS is also sometimes
referred to as "resulting" an assay in LDMS, since the intent is to get assay results into LDMS's
database for long-term storage.
Note
Throughout LDMS (and this manual), the terms "read" and "run" are used interchangeably. Many features in LDMS refer to running an assay when you may actually be reading an output file from an assay that was already run.
The process of reading an assay in LDMS varies, depending on the assay involved. Below are the
steps that apply to most assays:
1. Select the assay and create a new run on the Assay Selection tab.
2. Find and chose the specimens in LDMS to be added to the run.
3. Set up the assay. This would include things like defining the locations of controls on plates,
the settings used when running the assay, etc.
4. Run (i.e. read) the assay. The exact method involved will vary by assay.
5. Review and accept assay results.
6. (If the results are for a study where data is managed by Frontier Science) Perform an export.
82
Assays
Figure 6.1. Assay Workflow in LDMS
Supported Assays
Table 6.1. Assay Support in LDMS
Category
Assay
Cultures
Qual. Macro.
●
Qual. Micro
●
Quant. Cell
●
Quant Fluid
●
DNA PCR
Immunology
Direct
a
Read
COBAS TaqMan HIV-1 Qual
File
Transb
fer
Data Enc
try
●
Roche HIV DNA PCR
●
●
Roche HIV DNA PCR 1.5
●
●
Advanced Flow
●
Apoptosis by P.I.
●
Cryopreservation
●
LPA
●
NK Assay
●
TUNEL Assay
●
Misc
MT-2 Assay
●
P24 Antigen
Cult.-Dupont/PerkinElmer
●
●
Culture-Abbott
●
●
Culture-Coulter
●
●
Supported Assays
Category
PK Assays
83
Assay
Direct
a
Read
File
Transb
fer
Culture-Organon Teknika
●
●
[Teknika] VQA controls prior to ●
1997
●
Culture-ZeptoMetrix
●
●
ZeptoMetrix Extended
●
●
Dir.-Dupont/PerkinElmer
●
●
Direct, Mono-Abbott
●
●
Direct, Poly-Abbott
●
●
Direct-Coulter
●
●
ICD, mono-Abbott
●
●
ICD, mono-Coulter
●
●
ICD, poly-Abbott
●
●
ICD, Dupont/PerkinElmer
●
●
[Various]
●
Viral Load RNA Abbott Realtime HIV-1
●
Abbott Realtime HIV-1 with Calibrators
●
COBAS TaqMan HCV
●
COBAS TaqMan HIV-1
●
NASBA HIV RNA QT Assay
●
NASBA - No Negative Control
●
Nuclisens HIV RNA QT
●
Roche Amplicor Monitor HIV RT ●
PCR
●
Roche Amplicor (Kit Controls)
●
●
Roche COBAS Amplicor
Roche COBAS
pliprep
a
Data Enc
try
Amplicor
●
Am-
●
Roche COBAS UltraSensitive
●
Roche COBAS
Ampliprep
●
UltraSensitive
Roche UltraSensitive HIV RT ●
PCR
●
Roche UltraSensitive (4 control) ●
●
Roche UltraSensitive (Kit Con- ●
trol)
●
Assay is capable of being read directly by LDMS using compatible instruments.
Assay produces output that must be copied to the computer with LDMS; LDMS can read these output files
b
84
Assays
c
The user must manually enter or copy results into LDMS.
Creating and Reviewing Assay Runs
Assigning Assays to Aliquots
Important
Aliquots must be flagged for testing on a specific assay before results can be read or
entered into LDMS. If an aliquot is not assigned an assay, then it will not appear on the
Assay Selection tab.
There are two ways to assign an assay to an aliquot:
• Find the aliquot in LDMS Specimen Management , right-click on it and select Test
Setup. This is useful if you need to assign tests to only a few aliquots, or want to tests to
aliquots as you enter them. For instructions on doing this, see the section called “Assigning
an Assay to Aliquots” on page 34.
• Use the Assign Test tool. This is useful if you need to assign tests to a large number of
aliquots.
Tip
If you receive a shipment from another laboratory and that laboratory had assigned
tests to the aliquots already, you can import those test setups. In this way, a processing
laboratory can assign assays to specimens as they are entered into LDMS, and a testing
laboratory doesn't need worry about that step.
Figure 6.2. Assign Tests Tool
Creating a New Assay Run
85
Figure 6.3. The Assign Tests Tool
▲ The Assign Tests tool.
Procedure 6.1. Using the Assign Tests Tool
1.
2.
3.
4.
5.
6.
7.
8.
Access the Assign Tests tool by clicking ToolsAssign Tests from the LDMS menu bar.
Drag a field from the Available Criteria list on the left to the Selection Criteria list on
the right.
Enter an Op[erator] and Value for the field to be searched.
(Optional) After all fields needed have been added, enter the Criteria Sentence using the
numbered fields above it. If left blank, LDMS will default to 1 AND 2 AND 3 AND... etc.
Click the button from the LDMS toolbar.
Select the aliquots to be assigned to a test from the Select samples list.
Select an assay from the Select a test list.
Click the
button.
You can also use a list of Global Specimen IDs instead of specifying search criteria. Click the
button. This file must be a text file with exactly one global specimen ID per line.
If you want to see what specimens have been assigned to a specific assay, you can do so by
generating a Pending Specimens report.
Procedure 6.2. Generating a pending specimens report
1.
2.
3.
4.
5.
Click the
button from the LDMS toolbar.
On the Assay Selection tab, select the assay for which you want to see assigned specimens
from the Assays list in the upper-left corner.
Click the button from the LDMS toolbar.
Select [Assay Name] Pending Specimens Report.
Enter the desired date range to display.
There is a pending specimens report available for each assay in LDMS.
Creating a New Assay Run
The Assay Selection tab is where you specify the assay and specimens to test. After selecting
an assay, only specimens that have been assigned that particular assay will be displayed. For
instructions on how to assign assays to aliquots, see the section called “Assigning Assays to
Aliquots” on page 84.
86
Assays
Figure 6.4. The Assay Selection screen
▲ Each number in this figure corresponds to a step below.
Procedure 6.3. Creating a new assay run
1.
2.
3.
4.
Select an assay from the Assay Selection box in the upper-left corner.
Select the New Run/Not Setup option.
Click the
button on the right.
Find and select the aliquots to be tested. There are three ways to do this:
•
Click the or
button without specifying any search criteria. This will find all
aliquots that have been assigned the selected assay but not yet resulted in LDMS.
•
Scan the bar code on the aliquot. If you do this, LDMS will ask if you want to increment
the specimen's thaw count.
•
Use the Specimen Search Criteria fields to find aliquots that meet specific criteria
(and have been assigned the assay). This allows a narrower search than simply clicking
the button. To do this:
a.
b.
Select the Field, Op[erator], and Value under Specimen Searching Criteria, and
then click the
button. This will add your filter to the list on the right.
Add more filters, as necessary.
Note
c.
d.
If more than one filter is used, they will be searched together, separated
by AND statements.
(Optional) Select the Use Date check box, and enter a start and end date to narrow
down your criteria within a specific Received Date range.
Click the or
button.
Important
If you change your search criteria (e.g. by adding a filter or changing the
date range) you need to click the
button. If you don't, your old
Specimen Thaw Count
5.
6.
87
search results will be combined with your new search results, and it will
look like your filters aren't working.
Click on each aliquot to select it and add it to the selected assay run.
Click the
button on the bottom. You'll automatically be taken to the appropriate
screen to continue setting up the assay before running it.
Specimen Thaw Count
All specimens in LDMS have a thaw count property. This property is set to 0 by default when a
specimen is created. The thaw count represents the number of times that a specimen has been
removed from storage and warmed. There are two places in LDMS where this information is
displayed:
• In the Specimen Management task , thaws are displayed in the Aliquot Details Window
for all aliquots.
• In the Storage Management task , thaws are displayed by selecting a specimen in the storage view and clicking the
button.
Since specimens generally need to be thawed when they are removed from storage for testing,
LDMS will automatically ask if you would like to increment the thaw count for a specimen when
you add it to a new assay run. This will only happen, however, if you are adding the specimen
by scanning it with a barcode reader. If you are searching for the specimens to test and adding
them manually, LDMS will not ask if you want to increment the thaw count (you can still do so
using Specimen Management or Storage Management).
Adding Specimens and Controls not Logged into LDMS
There may be times where you need to test a specimen or control that is not entered into LDMS
through Specimen Management . For example, you may have a control that is used on assay
internally at your laboratory.
Procedure 6.4. Adding a specimen or control to an assay that was not logged into LDMS
1.
2.
3.
Setup the assay as normal. See the section called “Creating a New Assay Run” on page 85.
On the Preview tab, click the button from the LDMS toolbar.
Enter an identifying name into the specimen identifier field. This is not an LDMS specimen
ID (since the specimen was not added to LDMS), but rather a name for your usage.
Specimens added in this manner will always be placed into the next available location in your
assay setup. These specimens will appear on the assay result report but will not be available to
select for patient reports.
Recalling an Assay that has been Setup but not Read
LDMS allows you to set up an assay run and save it so that it can be completed later. This is
done by clicking the
button on the Preview tab for most assays. You can open these
saved assays later and continue where you left off. This could be used, for example, to prepare
an assay in LDMS before it is actually run.
Procedure 6.5. Finding assay runs that were set up but not run
1.
2.
3.
4.
5.
Select an assay from the Assay Selection box in the upper-left corner.
Select the Runs Not Performed/Not Terminated radio button.
Click the
button.
Select the run that you want to open from the Previous Runs Found list.
Click the
button.
88
Assays
Once you're back to the assay Preview screen, you can continue to configure or read the assay
like normal.
Generating Layout Reports
For many assays, you need to tell LDMS the location of controls and specimens on your testing
equipment. This is generally done on a grid in LDMS, where each position corresponds to a
position on your instrument.
If you prepared the assay in LDMS before running it on your equipment, it may be helpful to
have a print out of how you set it up in LDMS. This way, when you are setting up your equipment,
you can be sure that it matches your LDMS setup.
To generate a layout report, click the button from the LDMS toolbar while setting up or reviewing an assay before it has been run. For instructions on recalling an assay, see the section
called “Recalling an Assay that has been Setup but not Read” on page 87.
Reviewing Assay Results After They Have Been Read
The results of previously run assays are saved in your laboratory's LDMS database and can be
viewed at any time. You can review data, generate result reports, censor results, enter review
information, etc.
Procedure 6.6. Viewing a previously read assay
1.
2.
3.
4.
5.
6.
On the Assay Selection tab, select the assay for the results you want to review from the
Assays list on the left.
Select the Review/Edit check box.
(Optional) If known, enter the Run ID for the assay results you're looking for.
Click the
button on the right. This will list all assay runs for that assay in the
Previous Runs Found
Select a run from the Previous Runs Found list, and then click the
button. The
assay results will be displayed.
Review, modify, or censor the run as needed.
Note
7.
The Results screen and options available when reviewing results will vary, depending on the assay selected.
If changes were made (including entering reviewer information), click the
button from
the LDMS toolbar.
Censor Codes
Censor codes are special indicators that can be assigned to assay results or individual specimens
on an assay to document an issue. If an assay has no censors applied, the results are assumed to
be fine; if there is a censor, the results should be examined more closely as they may be invalid.
A censor code might indicate that a specimen on an assay plate was contaminated, or it might
indicate that an equipment failure invalidated all the results for the run. If the results for a
control specimen were significantly wrong, this tool would probably warrant a censor code.
Censor codes that are added by the user are called user censors; those added automatically by
LDMS are called system censors. There are three types of censor codes:
run censors
These censor the results of an entire assay run. They indicate that something
went wrong with the entire test.
Correcting Errors in Assay Runs
89
specimen censors
These censor a single specimen on a run; other specimens on the run are unaffected.
test censors
These censors are assigned in LDMS Specimen Management and are used to
explain why an assay that was expected to be run for the specimen was not run.
For a detailed listing of all the censor codes available in LDMS, see Chapter 12: “LDMS Code
Abbreviations” on page 199.
Correcting Errors in Assay Runs
There may be times that you read an assay output file and, for whatever reason, there is an error
in the run. This might happen, for example, if there is a discrepancy between the placement of
a specimen in LDMS and your physical assay plate. In this case, there is nothing wrong with the
results, but rather LDMS expects the specimens to be in a different plate location. You correct
the position of specimens on the plate, LDMS will be able to read the results again, and they will
now be correct. For other issues, only a single specimen by be affected, and it will be more cost
efficient to test that one specimen on another plate to correct it.
This section will describe a few common errors that can occur and how to correct them.
Out of Sequence Errors
An out of sequence error occurs if a well's absorbance values do not decrease as the dilution factor increases across your plate. For Roche Virology assays, this is designated by the system-assigned specimen censor codes L(HIV) for specimens and L(QS) for controls, depending on the
type of well.
Procedure 6.7. Manually correcting an out of sequence error
1.
2.
3.
4.
5.
Open the completed run in LDMS Assays . See the section called “Reviewing Assay Results After They Have Been Read” on page 88.
Click the
button.
Select the Reselect Well option and click the OK button.
In the Change Selected Well window, select the specimen(s) that must be updated and
make your corrections.
Select the reason for your change from the Reason well is being reselected drop-down list.
The kit copies per mL will automatically be recalculated, and the censor code C (corrected) will
be applied to the specimen that was modified. The C censor code will be used to document the
change.
Controls with OD Ratio Failure
If a control in the assay results receives the system-assigned censor code D (OD Ratio Failure),
the control can be re-detected to validate your assay results. To do this, you must run the control
on another assay run where the control was detected correctly and is valid. You will need the
following information from this valid run:
•
•
•
•
The LDMS runid
Control name
Plate number that the control appeared on
Position (column) on the plate (e.g. 1 for the first column, 2 for the second, etc.)
Procedure 6.8. Updating a run with an invalid control due to OD ratio failure
1.
Open the completed run in LDMS Assays . See the section called “Reviewing Assay Results After They Have Been Read” on page 88.
90
Assays
2.
3.
4.
Right-click on any specimen and select Censor Run.
Select the censor code C (control re-run and valid - assay is valid) and click the OK button.
Enter the runid, control name, plate number, and position on the plate (column) from the
valid run into the appropriate fields.
If you look at your results now, you will see that the D or DF system censor is still applied, but the
run is now valid and the user censor code C (corrected) has been added. The Re-detect Runid
field will have the run ID for the run with the validated control.
Modifying Dilution and Recalculating
If the calculated viral load result for an assay's results is above the upper limit of the assay, the
censor code X4 will be applied. When this happens, you can modify the dilution and recalculate
a specimen.
Procedure 6.9. Updating specimen dilution after an assay has been completed
1.
2.
3.
Open the completed run in LDMS Assays . See the section called “Reviewing Assay Results After They Have Been Read” on page 88.
Right-click on the specimen to be modified and select Modify Specimen.
Enter the new dilution into the Sample Dilution field, and click the OK button.
LDMS will re-calculate the results based on the new dilution factor.
Virology Assays
Abbott Realtime and COBAS TaqMan
LDMS supports the following Abbott Realtime and COBAS TaqMan assays:
•
•
•
•
Abbott Realtime HIV-1
Abbott Realtime HIV-1 with Calibrators
COBAS TaqMan HIV-1
COBAS TaqMan HCV
All of these assays are run relatively the same way in LDMS.
Note on Abbott Data
Exporting data from the Abbott assay is done using the Abbott m2000rt software. For
detailed instructions on creating a result file with this software, refer to the documentation provided with m2000rt.
m2000rt will output a text file with a filename similar to this:
m2000rt serial number_PCR plate name_date_time.txt
Unlike other viral load assays, the Abbott and TaqMan are setup as a line listing instead of a
plate layout on the Preview tab. Each row corresponds to one control or specimen on the run.
To re-arrange the order of specimens and controls, select the match by position check box,
and then use the
and
buttons. If match by position is selected, the order of controls
Abbott Realtime and COBAS TaqMan
91
and specimens in LDMS must match the order of specimens and controls in the output file exactly.
If this option is not selected, LDMS will match specimens to results using the global specimen
ID, PID/ID1, or other specimen ID values. If the match by position option is not selected and
the PID/ID1 is used in the result file, there cannot be more than one specimen with that ID1
on the same run.
Figure 6.5. The Preview tab for the Abbott Realtime HIV-1 assay
Specimens to be resulted
Right-click menu
Enable manual placement
of specimens
Abbott
Or
TaqMan HIV-1
Or
TaqMan HCV
▲ Shows the slight differences in the previous screen between the different assays.
Creating a required VQA200 control
For certain networks, the VQA200 control is required. LDMS expects that this control is
named exactly VQA200 in the assay output file. To add a VQA200 control:
1.
2.
3.
4.
5.
Click the Add VQA Control button.
Specify the Control Lot Number by either:
•
Selecting a previously used lot number from the list, or
•
Entering a new lot number. The lot number must be in the format VQA<control
lot #><AR or RT>. Use AR on the Abbott Realtime HIV-1 and RT on the
COBAS TaqMan HIV-1. For example, enter VQA11035079AR for a lot number of
11035079 on an Abbottt run.
Enter the expected value of 200.
Enter the minimum value. For Abbott Realtime HIV-1, enter 64; for COBAS TaqMan
HIV-1, use 98.
Enter the maximum value. For Abbott Realtime HIV-1, enter 642; for COBAS TaqMan HIV-1, use 985.
If you've used the control before, the minimum and maximum values will be set for you.
While it is possible to bypass the VQA200 requirement for networks that require it, you
will need a challenge password from LDMS User Support. See the section called “LDMS
and Challenge Passwords” on page 4.
92
Assays
There are a couple of things you may want to do before reading the assay output:
• Generate the Abbott Assay Run Preview report. This report shows you the positions of the
specimens and controls on the assay run, tube position, and bar codes for specimens.
• Modify the dilution. This is done by selecting the appropriate cell in the dilution column
and changing the value.
• (Abbott and TaqMan HCV only) Change the sample preparation method. For Abbott, this
can either be manual or using the m2000sp; for TaqMan HCV, select either manual or automated.
• (TaqMan only) Select the version of the assay that you used.
• Enter the Data Transfer Tech initials. This would be the person who loaded the assay result file into LDMS (i.e. you).
After reading the assay, the results screen will be displayed. There are a few things you can do
on this screen.
• Review the assay results. Complete the Reviewed by and Reviewed Date fields, and then
click the
button from the LDMS toolbar.
• Add a censor code for a specimen, control, or the entire run. This is done by right-clicking
on the specimen or control and selecting the Censor Specimen or Censor Run option.
For more information on censors, see the section called “Censor Codes” on page 88.
• Change between raw and calculated results using the grid view options in the bottom-right
corner.
• View and print the assay results report by clicking the button from the LDMS toolbar.
• View the patient report for patient specimens included on a valid assay run. This option is
found by clicking the
button.
After it has been run, the assay data will be available within LDMS for future review. For more
information on recalling assay runs, see the section called “Reviewing Assay Results After They
Have Been Read” on page 88.
Kit Entry for Abbott and TaqMan Assays
When you run the Abbott Realtime HIV-1 or COBAS TaqMan HIV-1 assays, kit information
is automatically pulled from the assay result file. Two fields, however, are not pulled from
the result file: Date Rec[eived] and Storage Temp[erature]. If this is your first time using
the kit, you must complete these fields using the Kit Entry tool. For more information on
how to do this, see the section called “Setting up Assay Kit Information” on page 118.
COBAS TaqMan HIV-1 Qualitative
The COBAS TaqMan HIV-1 Qualitative assay (not to be confused with the COBAS TaqMan HIV-1,
which is described in the section called “Abbott Realtime and COBAS TaqMan” on page 90)
can be found DNA PCR category. This assay is setup and the results are read differently than
most other assays in LDMS. The result file is read during the setup process and LDMS will attempt to match results to individual specimens and controls by global specimen ID or other specimen ID and will show you any results that could not be automatically matched. You will have
the opportunity to associate unmatched results by hand or simply ignore them.
You can either setup a 24-item run or a 48-item run. Like the name implies, these two options
set the maximum number of specimens that can be tested in LDMS to either 24 or 48. Controls
COBAS TaqMan HIV-1 Qualitative
93
are automatically added to runs. Table 6.2 shows the number and types of controls that will
automatically be added to a run.
Table 6.2. 24 and 48 item run comparisons
Control
24 item run
48 item run
Blind pellets
Two
Four (two per rack)
Kit positive
One
Two (one per rack)
Kit negative
One
Two (one per rack)
VQA controls
Four
Four
Maximum number of test- 16
ing specimens (less controls)
36
VQA controls will only be added for certain groups. For example, if you tested specimens for an
internal group, the VQA controls would not be added and you could test four additional specimens on the run.
Figure 6.6. COBAS TaqMan HIV-1 Qualitative Assay
▲ The COBAS TaqMan HIV-1 Qualitative assay after a result file has been selected and matching has taken
place; unmatched results in the result file are displayed on the left.
Procedure 6.10. Reading COBAS TaqMan HIV-1 Qualitative results in LDMS
1.
2.
3.
4.
5.
6.
7.
Create a new COBAS TaqMan HIV-1 Qualitative run and add assigned specimens to it. For
instructions, see the section called “Creating and Reviewing Assay Runs” on page 84.
Select either 24 item run or 48 item run from the bottom of the screen. For a description
of the differences between the two, see Table 6.2.
(Optional) To add more specimens, controls, and pellets, click the
button.
Select the kit lot number for any VQA controls by right-clicking on the specimen and selecting Select VQA lot number. You can either select an existing lot number or enter
a new one.
Specify the pellets that were used by selecting the appropriate pellet from the drop-down
list next to each.
Click the
button. A window will appear allowing you to choose to the result file
created when you ran the assay.
Complete specimen matching. Specimens in the result file will automatically be matched
to specimens. This will be shown by the Result ID column. Specimens without a Result
ID listed were not automatically matched. Unmatched results will appear on the left. To
associate a result with a specimen, drag it from the list on the left to the desired specimen
94
Assays
on the right. You can also drag results back to the unmatched results to remove it, or move
it to a different specimen.
Note
All specimens added to the run in LDMS must have an associated Result ID, however, there may be unused results in the file that are not associated with a specimen.
8. Select the version of the assay from the Assay Version box.
9. Enter the initials of the assay technician who ran the assay into the Tech Initials field.
10. Enter the date that the assay was run into the Run Date field.
11. Click the
button.
After committing the results, they will be immediately saved to your LDMS database. A screen
will then appear, showing you the results and any censors that may have been automatically
applied by LDMS. You can enter comments and reviewer information, and then click the
button from the LDMS toolbar.
You can apply a censor to a specimen (or the entire run) by right-clicking on a specimen and
selecting Censor Specimen or Censor Run respectively. To see a list of what individual censor
codes mean, click the
button. Because this assay can be run with multiple racks, it is
possible for one rack to have a system assigned censor code applied to it while another rack has
no censors.
There are two reports available after the TaqMan HIV-1 Qualitative assay has been run:
assay results report
patient report
Available by clicking the from the LDMS toolbar.
Click the
button, and then select Print Patient Report.
These reports can be accessed at any time after results have been read by using the Review/Edit
option on the Assay Selection tab. For instructions in recalling previously read assay, see the
section called “Reviewing Assay Results After They Have Been Read” on page 88.
Template Based Virology Assays
Creating a Customized Virology Assay Template
With the exceptions of Abbott and TaqMan, virology assays in LDMS are based around templates. Templates are custom configurations that you can create for an assay, with controls and
settings for your specific assay needs. The following virology assays in LDMS utilize templates:
•
•
•
•
•
•
•
NASBA HIV RNA QT
Nuclisens HIV RNA QT
Roche Amplicor Monitor HIV RT PCR
Roche COBAS Amplicor
Roche COBAS UltraSensitive
Roche UltraSensitive HIV RT PCR
Roche HIV DNA PCR (versions 1 and 1.5)1
Some templates lock specific features during template creation for certain assays (for example,
you cannot modify the controls on some templates). User templates are listed under their respective assay, and are shown in the Assay List in all upper case.
1
This assay appears in LDMS under the category DNA PCR; all other virology assays are in the category Viral Load RNA.
Template Based Virology Assays
95
Figure 6.7. Virology assay selection list
▲ In this example, FS ASSAY is a user-created template for the Roche Amplicor assay; Roche Amplicor
(Kit Controls) is a system template that comes with LDMS for the same assay.
Procedure 6.11. Creating a virology assay template
1.
2.
3.
4.
5.
On the Assay Selection tab, find the existing assay that you want to use as the basis of
your customizations.
Select the Design check box.
Click the
button; this will automatically take you to the Design tab.
Make the changes that you need, such as adding plates, modifying controls, and toggling
wells.
Enter a name for your custom assay template into the Assay Name field, and then click
the
button.
Warning
You must make all your changes to the assay before clicking the
button. You
cannot modify and re-save assay templates after they have been created.
Figure 6.8. Virology assay template design screen
Control name V3
Well dilution Dilution: 5
Expected Result E: 15000
Disabled well
Add, remove, or
modify controls
Selected control
Information for selected control
Add, remove, and
navigate assay plates
Save assay Move
Enable/disable Name for template
selected
template
selected well
well
▲ A typical plate layout. Each cell represents one well on the plate. The Assay Options window is also
shown.
96
Assays
You can use the buttons in the Plate Controls section to add and remove plates from the assay,
as well as change between plates. The current plate and total number of plates also appears at
the bottom of the screen.
Individual wells can be enabled and disabled by selecting them, and then clicking the
button. Disabled wells appear as black boxes on the plate. If you want to select multiple rows,
hold down the Ctrl key. You can select an entire column by clicking the header row above the
column.
Adding, deleting, and modifying controls is done by clicking the
button. To add a control, you'll need to specify the Control Number and Expected Value for the control. While the
control number will appear as written on the well in the template, they are also assigned a sequential control number in LDMS (1, 2, 3, etc.). If you need to modify or delete a control later,
you'll need to know that sequential number. So, while you can technically enter anything for the
Control Number, it's a good idea to use the number of the next available control. If you want
to see what the next available control number is, select the Modify a control option, and then
look in the Specimen ID list. That list shows the current controls. Now, change to the Add a
control option and use the next number in the sequence.
Note
Modifying controls on the assay is not available for all templates. If the feature is not
available for the assay that you have selected, the
button will be disabled.
The Compress and Compress Wells options will remove empty wells by moving other wells to
fill them. Wells will be moved right to left to fill out the empty space.
Important
When a new virology template is create, an assay reader device must be associated with
it before it can be run in LDMS. For more information, see the section called “Associating an Assay with a Reader” on page 123.
Running a Template-Based Assay
Important
While the basic steps in running template-based assays are largely identical across all
virology assays, there are important, assay-specific differences. Before running an assay, be sure to review the section specific to that assay for those differences.
Virology assays can be run by using the templates that come with LDMS or by creating your own
template. For instructions on creating your own template for an assay, see the section called
“Creating a Customized Virology Assay Template” on page 94.
Template Based Virology Assays
97
Figure 6.9. The Roche HIV DNA PCR 1.5 assay setup screen
▲ This screen shows the setup screen for the DNA PCR assay (v1.5). Most virology assays will have the
features shown, though there are slight variations between assays.
The assay setup screen shows a visual representation of your assay plate(s). Each well on the
plate corresponds to one cell on the setup screen.
Procedure 6.12. Setting up template based assays
1.
2.
3.
4.
5.
6.
7.
8.
On the Assay Selection tab, select the desired assay template from the Assays list and the
specimens to run, then click the
button. For more detailed instructions on this
initial setup, see the section called “Creating a New Assay Run” on page 85.
If needed, add additional specimen. There are two ways to do this:
•
Return to the Assay Selection tab, select additional specimens from the Specimens
Found list, and then click the
button.
•
Click the
button. You can enter a global specimen ID into the Specimen ID
field, and then click the Add button. You can also click the Import button to import a
text file list of global specimen IDs, with one ID per line.
If needed, modify specimens or controls. Do this by right-clicking on the specimen to
modify and selecting Modify Specimen/Control. This is how you would update the specimen/control's dilution factor, volume, or expected result.
If needed, remove specimens or controls. Do this by right-clicking on the specimen or control and selecting Delete Specimen/Control or Delete Specimen/Control (Compress).
The Compress option will move wells from right-to-left to fill the gap created by the deleted
specimen/control.
If needed, move specimens or controls. Do this by selecting the specimen/control to move,
clicking the
button, and then selecting the destination well.
If needed, add or remove plates by clicking the
or
button respectively.
If needed, enable and disable wells. Do this by selecting the well, and then clicking the
button.
If needed, add controls. Do this by clicking the
button, and selecting the Add Control option.
98
Assays
Once you have the assay setup exactly as it is on your plate(s), click the
button. You
will be prompted to select kit and other information, depending on the assay being run. If you
cannot find your assay kit, you need to enter it into LDMS. For instructions on doing this, see
the section called “Setting up Assay Kit Information” on page 118.
LDMS will begin reading your assay results. When prompted, select the output file from your
assay. For more information about reading assay output files, see the section called “Using Assay
Device Readers” on page 123.
Special Information for Individual Template-Based Assays
NASBA HIV RNA QT
LDMS comes with two pre-defined templates for the NASBA assay, which are described in Table
6.3.
Table 6.3. Pre-defined NASBA assay templates
Template
Number of Controls
Expected Values
NASBA HIV RNA QT
4
0 / 15,000 / 150,000 / 1.5e
+006 (i.e. 1,500,000)
NASBA - No Negative Con- 3
trol
15,000 / 150,000 / 1.5e
+006 (i.e. 1,500,000)
The recommended maximum number of plates for the NASBA assay is three. If you attempt
to add more than three plates, LDMS will prompt you with a warning message. LDMS will not
automatically move or add controls when specimens are added beyond the first plate.
Nuclisens HIV RNA QT
LDMS comes with one pre-defined templates for the Nuclisens assay, which are described in
Table 6.4.
Table 6.4. Pre-defined Nuclisens assay templates
Template
Number of Controls
Expected Values
Nuclisens HIV RNA QT
4
0 / 1,500 / 15,000 / 150,000
The recommended maximum number of plates for the Nuclisens assay is three. If you attempt
to add more than three plates, LDMS will prompt you with a warning message. LDMS will not
automatically move or add controls when specimens are added beyond the first plate.
Roche Amplicor Monitor HIV RT PCR
LDMS comes with two pre-configured PCR assay templates for the Roche Amplicor Monitor HIV
RT PCR assay, which are described in Table 6.5.
Table 6.5. Pre-configured templates for the Roche Amplicor Monitor HIV RT PCR Assay
Assay
Number of controls
Controls/Expected
ues
Val-
Roche Amplicor Monitor 4 VQA
HIV RT PCR
1, 1,500,
150,000
Roche Amplicor (Kit Con- 3
trols)
KN (kit negative), KLP (kit
low positive), and KHP (kit
high positive)
15,000,
and
Template Based Virology Assays
99
The expected values for VQA controls will be displayed on the Preview tab before running the
assay. The most plates recommended in a kit control assay is four. LDMS will automatically
move controls to a new plate if a new plate is added while adding specimens. If there are more
than four plates, a VQA control with an expected value of 1,500 will be added to the fifth (and
all subsequent) plates.
Roche COBAS Amplicor
The Roche COBAS Amplicor is run identically to the Roche Amplicor Monitor HIV RT PCR assay.
For this assay, a plate in LDMS refers to an A-ring on the real-life instrument. There are two
pre-configured templates available for this assay, which are described in Table 6.6.
Table 6.6. Pre-configured templates for the Roche COBAS Amplicor Assay
Assay
Number
controls
of Controls/Expected
Values
Serial
tions
Roche COBAS Amplicor 3
KN (kit negative), KLP 1:9
(kit low positive), and
KHP (kit high positive)
Roche COBAS Amplicor 3
Ampliprep
KN (kit negative), KLP 1:10
(kit low positive), and
KHP (kit high positive)
Dilu-
Roche COBAS UltraSensitive
The Roche COBAS UltraSensitive comes with two pre-configured templates.
Assay
Number
controls
of Controls/Expected Values Serial
tions
Roche COBAS Ultra- 4 VQA
Sensitive
0, 150, 1,500, 15,000
Roche COBAS Ultra- 4
Sensitive Ampliprep
KN (kit negative), KLP (kit low 1:10
positive), KHP (kit high positive), and V (VQA control with
expected value of 1500)
Dilu-
1:9
The expected values for VQA controls will be displayed on the Preview tab before running the
assay. The most plates recommended in a kit control assay is four. LDMS will automatically
move controls to a new plate if a new plate is added while adding specimens. If there are more
than four plates, a VQA control with an expected value of 1,500 will be added to the fifth (and
all subsequent) plates.
Roche UltraSensitive HIV RT PCR
The Roche UltraSensitive HIV RT PCR is run identically to the Roche Amplicor Monitor HIV RT
PCR assay. There are two pre-configured templates available for this assay, which are described
in Table 6.7.
100
Assays
Table 6.7. Pre-configured templates for the Roche Amplicor Monitor HIV RT PCR Assay
Assay
Number
controls
of Controls/Expected Values
Roche UltraSensitive
4
KN (kit negative), KLP (kit low
positive), KHP (kit high positive),
and one control with an expected value of 1,500
Roche UltraSensitive (Kit Con- 4
trols)
KN (kit negative), KLP (kit low
positive), and KHP (kit high positive), and one control with an expected value of 1,500
Roche HIV DNA PCR
LDMS supports version 1.0 and 1.5 of the Roche HIV DNA PCR (version 1.0 is simply labeled
Roche HIV DNA PCR without a version number). These assays are found under the category
DNA PCR on the Assay Selection tab.
To run a DNA assay in LDMS, you must rename the two blinded controls (or "pellets") at the
beginning of the assay plate to match the actual blinded controls that you will be using. If you
add more blinded controls, those will need to be renamed as well.
Figure 6.10. Blind control well
▲ A blinded control well as it appears in LDMS. Notice that the expected value (E:) is hidden and the
control is labeled as BLND.
Procedure 6.13. Adding or Renaming blinded controls for DNA assays
1.
2.
Do one of the following
•
To rename a control, right-click on the well with the blinded control and select Modify
Control.
•
To add a new blinded control, click the
button.
Enter or select the blinded control. See Figure 6.11.
Note
If you are looking for a blinded control that is not listed, try performing an export. For
instructions on exporting, see the section called “Exports and Updates” on page 173.
If that does not work, contact LDMS User Support for assistance.
LDMS uses the results of blinded controls when the assay is run to verify that the results of the
plate are valid, and, if appropriate, will automatically apply some system censor codes. For more
information about censor codes, see the section called “Censor Codes” on page 88.
Cultures
101
Figure 6.11. Modify control screen for PCR assays
▲ The PCR version 1.0 (left) and version 1.5 (right) screens, accessed by right-clicking on a blinded control
and selecting Modify Control.
Note
If you have added more than 10 specimens to a single PCR assay plate, LDMS expects
you to add more blinded controls. To add more blinded controls, select the
button.
When running the assay, LDMS expects 2 different results files: one for the specimen plate and
another for the control plate. Single plate runs require special consideration and setup.
After reading all plates in the assay's output, LDMS will show you the results on the Results
tab. You can generate an exportable version of these results by clicking the button from the
LDMS toolbar.
Cultures
Culture Workflow Overview
Creating a culture assay in LDMS is a mult-step process. It involves running more than one
assay, and working with special specimens derived from other aliquots. The high-level steps
involved are shown in Figure 6.12.
Figure 6.12. Culture workflow
▲ The steps involved in creating and testing cultures in LDMS.
The rest of this section describes each step in this process in more detail.
102
Assays
Creating Culture Schedules
Culture schedules define the feeding and harvesting timeline for the culture(s) you are creating.
You can create several schedules and reuse them many times. LDMS also comes preconfigured
with a few standard schedules.
Figure 6.13. The culture schedule design screen
▲ The schedule design screen replaces the assay design screen for cultures. The actual schedule appears
in the Culture Schedule list on the right.
Procedure 6.14. Creating culture schedules
1.
2.
3.
4.
5.
On the Assay Selection tab, select the appropriate culture for which you want to create a
schedule from the Assay list on the left side.
Select the Design check box.
Click the
button to enter design mode. This will automatically take you to the
Design tab (Figure 6.13).
(Optional) To load a previously saved schedule and edit it, find it from the drop-down list
on the bottom, and then click the
button.
Select the Day the event will occur and Culture Event to add.
Note
6.
7.
8.
The day that the culture is created is considered day 0.
Click the -> button to add the event to the schedule
After all events have been added, enter a name for your schedule into the Assay Name text
field.
Click the
button. Do not use the from the LDMS toolbar.
Creating a Culture
Unlike other assays in LDMS, you can only create a culture from a single aliquot; you cannot
select multiple aliquots and create cultures for them at once. If you need to create multiple
cultures, you must create each one individually. For more information on finding specimens and
selecting an assay, see the section called “Creating a New Assay Run” on page 85.
Warning
If you select multiple specimens on the Assay Selection tab, a culture will only be created for the first specimen selected.
Creating a Culture
103
Figure 6.14. Creating a culture
Procedure 6.15. Creating a new culture
1.
2.
3.
Create a new assay run, selecting the desired culture assay. For instructions, see the section
called “Creating a New Assay Run” on page 85.
Enter the Culture Setup Date. This is the date that the culture was created (i.e. day 0).
Select the feeding and harvest Schedule. If you need to create a specific schedule, see the
section called “Creating Culture Schedules” on page 102.
Tip
4.
5.
6.
7.
8.
To view the events on a schedule, select it, and then click the button from the
LDMS toolbar. To see a list of all available schedules and associated events, you
can run the Culture Schedule Report, found in TasksReports, and then CultureCulture Schedule Report.
Select the p24 assay that will be run on the cultures. The p24 assay must be run on cultures
in LDMS.
(Optional) Enter donor information into the Donor # field if you have an established
method for tracking donors for cultures. LDMS does not enforce any particular usage of this
field.
Enter the Total Volume and Total Volume Units for the prepared culture.
(For quantitative cultures only), specify the way harvests from the culture should be loaded
onto p24 assay plates. To add them to the plate top-bottom/left-right, select A1, B1, C1...;
to add them to the plate left-right/top-bottom, select A1, A2, B1....
Click the
button.
Note
If you need to return to the culture setup later (for example, to update donor information), select the assay on the Assay Selection tab, and then select the Runs Not Performed/Not Terminated option.
Warning
The
button on the culture setup screen allows you to add unscheduled feeding
and harvest events. This is not recommended, as these events do not get tracked in LDMS and will not appear on reports. Unscheduled harvest events will not create additional samples to be run on p24 assays. If you need to create a custom schedule, it is more
appropriate to delete the culture, create a custom schedule, and create a new culture.
104
Assays
Creating a culture creates special specimen from the original aliquot. These special specimens
cannot be found in LDMS Specimen Management ; they can only be found by looking for specimens assigned to the appropriate p24 assay. They are identified using the same global specimen
ID, but will have different harvest dates—specimen will be created for each harvest event in the
schedule that was used for the culture.
These sub-aliquots are created automatically, but not immediately. For example, if you create a
culture with harvests at days 3 and 10, you will not find them when trying to set up a p24 assay
until you are 10 days past the culture setup date.
Culture Schedule and Harvest Labels
It may be useful to obtain a list of when cultures need to be fed and harvested. LDMS has a special
report that does just that. This is also the same mechanism you would use to create printable
labels for your culture harvests.
Procedure 6.16. Generating the Harvest/Feed report and labels
1.
2.
3.
4.
5.
From the Assay Selection tab, click the button from the LDMS toolbar.
Select Harvest Feed.
Do one of the following:
•
Select the Pending option; this will find all cultures that have not been terminated.
•
Select the group for which you want to find all cultures.
Specify the date range; LDMS will find all culture events that occur within this date range.
Generate the event report or labels by selecting the Generate Report or Generate Labels
button respectively.
Unlike labels for normal specimens, the labels for culture harvests cannot be customized. If you
are planning to permanently store a culture, you'll need to create a culture derivative, which will
open up the same label and storage options available to normal specimens. For more information, see the section called “Culture Derivative” on page 39.
Running Cultures on a p24 Antigen Assay
When you setup a culture, you were required to select the p24 Antigen assay to be run. After you
have one or more harvests from the culture, you can begin running that p24 assay. You don't
have to have all of the harvests for the culture when you run the assay (and you can put harvests
from different cultures onto the same assay plate when you run it).
Procedure 6.17. Running culture harvests on a p24 antigen assay
1.
2.
3.
4.
Select the appropriate assay from the Assays list on the Assay Selection tab.
Select the New Run/Not Setup option, and then click the
button.
Find the culture harvest that you want to test by clicking the
button from the LDMS toolbar or by using search criteria. See the section called “Creating a New Assay
Run” on page 85.
All of the culture harvests that are from cultures assigned to the selected assay will appear
in the Specimens Found list.
Note
You can differentiate harvests by looking at the Culture Day field. If you do
not see all of the harvests that you were expecting, review the Harvest/Feed Report. Harvests are only created after the required number of days have passed,
Reviewing Results and Terminating Cultures
5.
6.
7.
105
per the schedule used. See the section called “Culture Schedule and Harvest Labels” on page 104.
Select the harvest that you will be testing, and then click the
button.
Configure the assay plate(s), wells, and controls like you would configure virology assays.
See the section called “Creating a Customized Virology Assay Template” on page 94.
Click the
button to read the assay output.
Reviewing Results and Terminating Cultures
After running the appropriate p24 antigen assay on your culture harvests, you must review and
accept the results. These results are in two places:
• By selecting the p24 assay and the Review/Edit option
• By selecting the culture assay and the Terminate/Unterminate option.
In LDMS, terminating a culture is the process of reviewing the p24 assay results and approving
them. This typically corresponds to the actual termination of the culture.
Procedure 6.18. Reviewing a culture's results and terminating it
1.
2.
3.
Select the appropriate culture from the Assay list on the Assay Selection tab.
Select the Terminate/Unterminate option, and then click the
button.
Select either the All Open Cultures, All Closed Cultures, or All Cultures option, depending on which cultures you want to review, and then click the button from the LDMS toolbar.
Note
4.
Closed and open cultures are the same as terminated and not-terminated cultures
respectively.
Select the culture(s) you want to review. You can select multiple cultures and view more
than one at the same time. Once they have all been selected, click the
button.
Warning
5.
6.
7.
8.
9.
While you can use the
and
buttons to terminate/unterminate
multiple cultures at once, this is not recommended. When you terminate a culture,
you are saying that you have reviewed and approved the results; by doing this en
masse, you don't actually review the results.
Review the culture results. LDMS has already determined whether or not the culture is positive or negative based on the status of each harvest tested on the p24 assay. If you want
to override these results, change the Culture Result option and enter a comment. If multiple cultures were selected, you can switch between them by using the database navigation
buttons
from the LDMS toolar.
Enter the initials of the person terminating the culture into the Terminated by and your
initials into the Reviewed by fields, and then complete the Reviewed Date.
(Optional) If you want to create an MT-2 supernatant from one of your harvests and use
it to run the MT-2 assay, select the Generate MT-2 supernatant on termination option.
If you do select this option, you will be prompted for the harvest date of the harvest that
you want to use when terminating the culture. See the section called “Enter MT-2 Culture
Assay Results Using a Culture Supernatant” on page 106.
Select the Terminate option to accept the specimen results, the UnTerminate option to
re-open a culture, or the Save option if you do not want to open or close the culture but
want to save other changes.
Click the
button from the LDMS toolbar.
106
Assays
How does LDMS determine if a culture result is positive or negative?
When you review a culture's results during the termination process, LDMS will automatically set the culture result to be pos[itive], neg[ative], or ind[eterminate] based
on the status from the p24 antigen assay result. You can override this automatic determination, but you may want to know how LDMS actually figures it out.
p24 Results
Final Culture Result
14 Day
21 Day
Positive
Not Run
Positive
Negative
Positive
Positive
Positive
Positive
Positive
Positive
Negative
Indeterminate
Negative
Not Run
Negative
Negative
Negative
Negative
The logic for determining if a result is positive or negative is as follows:
• If all p24 results are <30 pg/mL until at least day 28, the result is considered negative.
• If two consecutive p24 OD values are out of range (greater than or equal to 2.0 or 3.0,
depending on the assay and reader), the result is considered positive.
• If there are two consecutive p24 values of > 30 pg/mL, and the second value is at least
four times greater than the first value or is out of range, the result is considered positive.
• If there are three consecutive p24 values of > 30 pg/mL, where the third value is at
least four times greater than the first value.
Enter MT-2 Culture Assay Results Using a Culture Supernatant
If you selected the option to generate a MT-2 supernatant, one will be created. The MT2 supernatant is a special specimen derived from the culture that has the same global specimen ID as
the original aliquot (and culture) and is only viewable within LDMS Assays
when setting up
the MT-2 assay.
In LDMS, the MT-2 culture assay in LDMS is a data entry assay used after your work is completed.
See Figure 6.15.
Creating a Specimen from a Culture Harvest
107
Figure 6.15. MT-2 Culture Assay screen
Procedure 6.19. Entering MT-2 Assay results
1.
2.
Select the MT-2 Assay, found in the Assays list in the Misc category, and click the
button.
Find the supernatant that you want to test by clicking the from the LDMS toolbar or by
using search criteria, then click the
button. For more information on how to find
specimens, see the section called “Creating a New Assay Run” on page 85.
Note
3.
4.
5.
6.
7.
8.
9.
The supernatant will have the same global specimen ID as the culture from which
it was created.
Enter the date that the MT-2 culture was created into the Setup Date field.
Select the results of your testing.
•
If the culture was positive for syncytium-inducing (SI), select SI.
•
If the culture was negative and non-syncytium-inducing (NSI), select NSI.
Enter the date that the MT-2 culture was terminated into the Termination Date field.
Enter the passage number of MT-2 cells into the MT2 cell line passage box; this must be
a number between 1 and 100.
Enter the results for your controls into the Positive Control and Negative Control fields.
Enter the initials for the person who performed the culture work into the Assay Setup Initials box.
Click the button from the LDMS toolbar.
If you are testing multiple MT2 cultures, use the database navigation buttons
on the LDMS toolbar to find them, then repeat the data entry process.
Creating a Specimen from a Culture Harvest
You typically can't find cultures and culture harvests in LDMS Specimen Management , in
Shipping , or in Storage . This is due to the way harvests are derived from an aliquot, and
most parts of LDMS were designed with aliquots as the smallest unit of information.
It is possible to create a special specimen from a culture harvest, allowing you to utilize LDMS's
storage, shipping, etc. features, just like any other specimen. These special specimens are called
culture derivatives. For specific instructions on how to create a culture derivative, see the section
called “Culture Derivative” on page 39.
108
Assays
p24 Antigen Assays
There are two types of p24 antigen assays in LDMS: direct and culture. The culture version is
used with culture harvests created in LDMS Assays. When you attempt to run the culture version,
you will only find culture harvests that have already been created. Harvests are automatically
created based on the culture's schedule and setup date (e.g. for the day 28 harvest to appear in
LDMS, the current date must be 28 days after the culture's setup date).
The direct version, on the other hand, is used to test specimens that are not culture harvests.
This means that the aliquots must be assigned to the assay in LDMS Specimen Management or
using the Assign Tests tool. For instructions on how to do this, see the section called “Assigning
Assays to Aliquots” on page 84.
Other than the source, this assay is read the same way, regardless of specimen or instrument. For
detailed instructions on this assay, see the section called “Running Cultures on a p24 Antigen
Assay” on page 104.
Immunology Assays
Lymphocyte Proliferation Assay (LPA) Assay
The first specimen that was selected on the Assay Selection tab will appear in the Specimen
Info box at the top of the Results tab screen. You can use the database navigation buttons
to switch between specimens that were selected on the Assay Selection tab.
Figure 6.16. Lymphocyte Proliferation Assay (LPA) screen
▲ The LPA assay data entry screen.
Apoptosis by P.I. Assay
109
Procedure 6.20. Entering LPA assay results into LDMS
1.
2.
Complete all of the fields in the Results Questions. All questions are required.
Complete all of the fields in every row in the Results Grid at the bottom of the screen.
To add more rows, type a number into the # of rows to add text box and click the
button.
b. To remove a row, select it and then click the
button.
c. Enter replicate information into CPM Rep. A/B/C/D columns or, if a stimulant was not
run, select the N/A check box to the left of that replicate, and then select the appropriate censor code from the Censor drop-down.
Enter your initials into the Data entered by field.
Enter the initials of the assay technician into the Assay Tech field.
Click the button from the LDMS toolbar to add the results to LDMS.
a.
3.
4.
5.
To view the LPA Patient Report after entering data for the specimens tested, click the
from the LDMS toolbar.
button
After you've finished with the first specimen, click the
button from the LDMS tool bar and
enter the results for the next specimen. Once all specimens have been entered and added, the
data entry is complete. You can now return to the Assay Selection tab to perform more work.
Apoptosis by P.I. Assay
The first specimen that was selected on the Assay Selection tab will appear in the Specimen
Info box at the top of the Results tab screen. You can use the database navigation buttons
to switch between specimens that were selected on the Assay Selection tab.
Figure 6.17. Apoptosis assay screen
▲ Apoptosis assay data entry screen.
Procedure 6.21. Entering Apoptosis results into LDMS
1.
2.
3.
Select whether or not results for the specimen were obtained from the Were results obtained on this specimen radio button.
Select the date that the Apoptosis assay was setup in the Enter the assay setup date box.
Enter the time that it took to complete the assay (in hours) in the Enter the assay duration
box.
110
Assays
4.
5.
6.
7.
Enter the apoptosis percentage for Replicant A and Replicant B.
•
The Mean of replicates will be calculated automatically
•
If there are no results for that replicant, select the check box next to it, then select the
appropriate censor from the Censor drop-down.
Enter the initials of the assay technician into the Assay Tech field
Enter your initials into the Data entered by field.
Click the button from the LDMS toolbar.
To view the LPA Patient Report after entering data for the specimens tested, click the
from the LDMS toolbar.
button
After you've finished with the first specimen, click the
button from the LDMS tool bar and
enter the results for the next specimen. Once all specimens have been entered and added, the
data entry is complete. You can now return to the Assay Selection tab to perform more work.
Advanced Flow and TUNEL Assays
The first specimen that was selected on the Assay Selection tab will appear in the Specimen
Info box at the top of the Results tab screen. The Advanced Flow and TUNEL assays have identical data entry screens. You can use the database navigation buttons
to switch
between specimens that were selected on the Assay Selection tab.
Figure 6.18. Advanced Flow and TUNEL assay screens
Procedure 6.22. Entering Advanced Flow and TUNEL assay data into LDMS
1.
2.
3.
4.
Select whether or not results for the specimen were obtained from the Were results obtained on this specimen radio button.
Indicate whether or not the sample was fresh or frozen in the Indicate whether the assay
was performed on a fresh or frozen specimen box.
Select the gating method from the Indicate the Gating method used for anchor Immunophenotyping drop-down.
•
Method 1 gates all lymphocytes using FL/SS followed by a second gate on fluorescence
histogram to select for the anchor marker.
•
Method 2 gates the anchor marker fluorescence versus SS histogram.
Complete all of the rows and columns Anchor Gated Analysis section.
Natural Killer Cell (NK) Assay
111
•
5.
6.
7.
8.
For Anchor Gate <500 cells, LDMS will auto-fill subsequent rows based on your selections for the first row of data. You can manually change individual marker sets in other
rows if needed.
•
Rows can be added or deleted by using the Add Row and Delete Row buttons to the
right.
•
If a marker was not run, select the N/A check box at the end of the row and select the
appropriate Censor from the drop-down.
•
The Total Percent field will automatically be calculated. The sum of the four quandrants should equal 100%; if it does not, the Total Percent will turn red.
Enter the subset marker and colors, and quadrant results into the Total Lymphocyte Gated
Analysis fieldset.
Enter the assay technician’s initials into the Assay Tech field.
Enter your initials into the Data Entered By field.
Click the button from the LDMS toolbar.
To view the Advanced Flow Patient Report after entering data for the specimens tested, click
the button from the LDMS toolbar.
After you've finished with the first specimen, click the
button from the LDMS tool bar and
enter the results for the next specimen. Once all specimens have been entered and added, the
data entry is complete. You can now return to the Assay Selection tab to perform more work.
Natural Killer Cell (NK) Assay
The first specimen that was selected on the Assay Selection tab will appear in the Specimen
Info box at the top of the screen. All fields on the screen are required. You can use the database
navigation buttons
to switch between specimens that were selected on the Assay Selection tab.
Figure 6.19. Natural Killer Cell (NK) Assay screen
Current specimen
N/A checkbox for 25:1
Changes table below
▲ Natural Killer Cell (NK) assay data entry screen.
Procedure 6.23. Entering NK results into LDMS
1.
2.
3.
Indicate whether or not Were the results obtained on this specimen. If no, select an
option from the Specify Reason list.
Indicate Was the % viability performed on this sample. If yes, enter a value into the
Indicate the % viability of the sample field.
Select a value in the Indicate whether the assay was performed on a fresh or frozen
specimen.
112
Assays
Enter the date that the assay was run into the Enter the assay setup date field.
Select the Target Code and Target Name from the drop-down lists.
Select the Effector Code and Effector Name from the drop-down lists.
Select the Starting E.T. Ratio. Your selection will change the table below.
For each row, enter the E.T. Ratios, Spontaneous, and Maximum values. If any were not
performed, select the N/A check box to the left of the field, then select the appropriate reason
from the Censor drop-down list in the right column.
9. Indicate whether or not Were NK cells enumerated by flow cytometry. If yes, enter the
% positive NK marker into the field to the right.
10. Enter comments (optional), the initials of the Assay Tech who performed the run, and the
intials of the person who entered the data into LDMS at the bottom.
11. Click the button from the LDMS toolbar.
4.
5.
6.
7.
8.
To view the NK Patient Report after entering data for the specimens tested, click the
from the LDMS toolbar.
button
After you've finished with the first specimen, click the
button from the LDMS tool bar and
enter the results for the next specimen. Once all specimens have been entered and added, the
data entry is complete. You can now return to the Assay Selection tab to perform more work.
Cryopreservation
The first specimen that was selected on the Assay Selection tab will appear in the Specimen
Info box at the top of the Results tab screen. You can use the database navigation buttons
to switch between specimens that were selected on the Assay Selection tab.
Figure 6.20. The Cryopreservation assay screen
▲ Cryopreservation assay data entry screen.
Procedure 6.24. Entering cryopreservation assay results
1.
2.
Indicate whether or not Were Results obtained on this specimen. If No, select the appropriate option from the Specify reason list.
Complete the remaining fields.
•
Enter the initials for the person who ran the assay into the Assay Tech field and the
initials of the person entering the results into LDMS into the Data Entered by field.
Pharmacology (PK) Assays
113
To enable manual entry into the Total viable cell count per visit field, change the
Method for obtaining cell count to manual.
Click the button from the LDMS toolbar.
•
3.
To view the IQA Cryopreservation Patient Report after entering data for the specimens tested,
click the button from the LDMS toolbar.
After you've finished with the first specimen, click the
button from the LDMS tool bar and
enter the results for the next specimen. Once all specimens have been entered and added, the
data entry is complete. You can now return to the Assay Selection tab to perform more work.
Pharmacology (PK) Assays
Creating PK Templates
PK templates are custom assay configurations that can be setup for the specific analytes that you
are testing. Once created, the same template can be used multiple times. Different templates
are necessary for every unique drug combination being tested at your laboratory.
User created PK templates appear on the Assay Selection tab under PK assays.
Figure 6.21. Select a new or existing PK template
▲ To create a new PK template, select the top-level PK Assays item.
Procedure 6.25. Creating or modifying a PK template
1.
2.
3.
4.
5.
6.
On the Assay Selection tab, find the PK template you want to use from the Assays list
on the left.
•
To create a new template, select PK Assay (the high-level item directly under PK Assays)
•
To edit or create a new template based on an existing template, select it from the Assays list.
Select the Design check box.
Click the
button on the right.
•
If creating a new template from an existing template, click the
button.
•
If editing an existing template, click the
button.
Enter the name for your template as you want it to appear in the list of Assays on the Assay
Selection tab.
Enter the number of drugs to be used. For each drug, a row will be added to the list below.
Select the drug(s) from the Drug drop-down list. Use the Ctrl+H shortcut if you do not know
what a specific drug abbreviation means.
114
Assays
7.
8.
Enter the Replicates, Units, Lower Limit, and Upper Limit.
After every drug has been added, click the button from the LDMS toolbar.
Figure 6.22. Creating an PK assay template
Entering PK Assay Results
In LDMS, PK assays are entered into LDMS through a data entry screen. In order to enter PK
results, you must already have created a PK template for the analyte combination that you are
testing.
Figure 6.23. Entering PK assay results
▲ PK assay results data entry screen in "traditional view".
Procedure 6.26. Entering PK assay results
1.
Add any needed calibration or QC lots to the run.
Do this on the preview screen by clicking the Add Calibration Standard or Add Quality
Controls button. Select the lot, and whether you want to add one, two, or three to the run.
Use the Move Up and Move Down button to arrange the lots in the correction position
on the run.
Note
For instructions on adding calibration standards and QC controls to LDMS, see the
section called “Pharmacology QC and Calibration Lot Entry” on page 122.
Entering PK Assay Results
2.
3.
4.
5.
6.
7.
8.
9.
115
Enter the date that the assay was actually run into the Assay Date field at the top of the
screen.
Select the Detection Platform from the drop-down list.
Click
button.
Enter the results. This is done in either Traditional View or Spreadsheet view. Use the
and
buttons to change between them.
•
In Traditional View (the default view), select each specimen, and then enter the results
for each analyte at the bottom of the screen. This must be done for each specimen.
•
In Spreadsheet View, enter the analyte results into the appropriate column for each
specimen. This is useful if you want copy and past results from a spreadsheet program.
See Procedure 6.27, “Copying results from a spreadsheet program (left) and pasting
them into the appropriate cells in LDMS (center and left).”.
(Optional) If a result was not obtained, click on the cell for the analyte to highlight it, and
then right-click on it and select No Result Obtained. You must highlight the cell before
you right-click on it.
Click the
button.
In the PK Run Limits dialog window, enter your initials into the Tech Initials field, and
enter the Lower Limit and Upper Limit for each analyte.
(If applicable) You may be prompted if you want specimens that were below the lower limit
to be available for future runs. Select Yes or No as appropriate.
Warning
Be careful with using the Right-clickDelete option on individual specimens. It
doesn't matter where you right-click, the highlighted specimen will be the one deleted.
th
rd
▲ Even though this user has right-clicked on the 6 specimen, it will actually be the 3 specimen that will be deleted.
You can copy and paste results from a spreadsheet program, such as LibreOffice Calc [http://
www.libreoffice.org] or Microsoft Excel into LDMS. The file doesn't necessarily have to be native
to the program you are using. For example, you can open a CSV file with Excel, and then copy
the cells to LDMS.
Figure 6.24. Copying and pasting spreadsheet PK results into LDMS
Procedure 6.27. Copying results from a spreadsheet program (left) and pasting them
into the appropriate cells in LDMS (center and left).
1.
Open the file in your spreadsheet program.
116
Assays
2.
3.
4.
5.
6.
7.
If your data does not have rows and columns in the same order as they appear in LDMS,
manually adjust your spreadsheet.
If any cells are N/A, enter -1.
Select the cells that you want to copy.
Copy the selected cells (typically Ctrl+C or Right ClickCopy)
In LDMS, click
(Optional) To change between one analyte per and analytes in separate columns, click the
8.
9.
Select the first destination cell in LDMS.
Click the
button.
LDMS may apply some censor codes based on the analyte results, and the upper and lower limits.
You can apply user censor codes by clicking on the field to censor to select it, and then rightclicking and selecting Assign User Censor.
For more information on censor codes, see the section called “Censor Codes” on page 88.
To view the PK Assay Result Report after entering data for the specimens tested, click the
button from the LDMS toolbar.
Reviewing and Accepting PK Results
If you export pharmacology data to Frontier Scie3nce, you must review and accept the results
after they are entered. This finalizes the results so that they will be appropriately accessioned
into the central LDMS database at Frontier Science.
Procedure 6.28. Reviewing and accepting PK assay results
1.
2.
3.
4.
5.
Open the completed assay run that needs to be reviewed and approved. For instructions,
see the section called “Reviewing Assay Results After They Have Been Read” on page 88.
Review the results by selecting a specimen from the top and checking the results at the
bottom.
(Optional) Correct or censor results as needed.
•
To apply a censor code, right-click on the result in Traditional View (you cannot apply
censors in Spreadsheet View).
Complete the Reviewed by, Reviewed Date, and (optionally) Comments fields at the bottom of the screen.
Click the
button from the LDMS toolbar.
GeneXpert Assay
LDMS currently only supports the Xpert MTB/RIF assay. This assay is used to identify mycobacterium tuberculosis (MTB) resistance to rifampicin (RIF).
Procedure 6.29. Reading a GeneXpert assay result file
1.
Create a new GeneXpert MTB-RIF assay run and add assigned specimens to it. For instructions, see the section called “Creating and Reviewing Assay Runs” on page 84.
The Preview tab will open.
GeneXpert Assay
117
Figure 6.25. GeneXpert preview screen
3.
(Optional) Add or modify the Other Spec[imen] ID for specimens in the right pane. This
can be used to help LDMS automatically match specimens in the result file(s) to specimens
in LDMS.
Click the
button.
4.
LDMS will prompt you if you want to run the assay. Select Yes. A window will open to select
the result file.
Select the GeneXpert result file, and then click the Open button.
2.
After selecting the result file, LDMS will prompt you if you want to load another file. You
can use multiple result files for the same assay run.
5.
6.
Once all result files have been selected, LDMS will attempt to match results to specimens.
Results that it was unable to match will be displayed in the left pane.
Drag and drop unmatched results from the left pane to the specimens in the right pane.
Review the specimens that were automatically matched by LDMS and ensure that they were
matched correctly.
8.
If you find any errors, you can drag and drop the result to a different specimen to correct it.
Enter the initials of the assay technician into the Tech Initials box and your initials into
the Data Transfer Tech Initials box.
After all results have been matched to a specimen, click the
button.
9.
The results screen will open.
Review the assay results.
7.
Figure 6.26. GeneXpert results screen
118
Assays
By selecting a result on the left, details will be displayed on the right. Some of the items
can be expanded to show more information.
10. (Optional) To apply a user censor code to a result, right click on the specimen in the left
pane and select Censor Specimen.
11. Click the
button from the LDMS toolbar.
There are two reports that can be generated from the results screen for the GeneXpert MTBRIF assay:
GeneXpert MTB-RIF Report
Patient Report
This report is generated by clicking the
from the LDMS
toolbar. This report provides an overview of the assay run
and the specimens that were tested.
This report is generated by clicking the Patient Report button at the bottom of the results screen. This report provides
detailed information about one or more specimens on the assay run. You can select which specimens will appear on the
report.
Managing Controls
Setting up Assay Kit Information
When reading certain assays in LDMS, you will be required to select kit lot information. For
some of these assays, you will need to manually enter the kit information into LDMS using the
Kit Entry tool; for newer assays, LDMS will automatically load kit information from your result
file (though you will still need to use the Kit Entry tool to enter a few pieces of information that
are not in assay result files).
Table 6.8 shows which assays require kit information when they are being read. It then breaks
those assays down between those where kit information must have been entered manually prior
to reading the assay and those where kit information can be read automatically from the output
file.
Table 6.8. Assays Requiring Kit Information
Assay
Manual
Automatic
Abbott Realtime HIV-1
●
COBAS TaqMan HCV
●
COBAS TaqMan HIV-1
●
Nuclisens HIV RNA QT
●
Roche Amplicor Monitor HIV RT PCR
●
Roche COBAS Amplicor
●
Roche COBAS UltraSensitive
●
Roche UltraSensitive HIV RT PCR
●
Setting up Assay Kit Information
119
Important
For assays where kit information is pulled from the result file automatically, you still
must use the Kit Entry tool to enter the Date Rec[eived] and Storage Temp[erature]
for the kit, as this information is not in the result file.
Figure 6.27. Kit Lot Entry Screen
▲ The kit entry screen for the Abbott Realtime HIV-1 assay.
Important
The fields available for kits and types of kits will vary, depending on the assay selected.
The process of using the kit entry tool is the same for every assay; it is the fields that
are unique.
Procedure 6.30. Manually creating a new kit lot
1.
2.
3.
4.
5.
Access the Kit Entry tool by clicking QA/QCKit Entry from the LDMS menu bar.
Select the assay for the kit you are creating from the Assay drop-down list.
(If applicable) Select the type of kit from the drop-down list next to the assay. This field
will not be displayed for assays that do not need it.
Complete all of the fields at the bottom of the screen using the information from your kit.
The precise fields that are available will vary from assay to assay.
Click the button from the LDMS toolbar.
Kits can be updated after creating them. If you have read an assay that automatically collects kit
information from the assay output file, modifying the existing kit is how you would complete
the fields that are not read from the output. This update would only need to be done the first
time the kit was used.
Procedure 6.31. Modifying an existing kit
1.
2.
3.
4.
5.
Access the Kit Entry tool by clicking QA/QCKit Entry from the LDMS menu bar.
Select the assay for the kit you are modiying from the Assay drop-down list.
(If applicable) Select the type of kit from the drop-down list next to the assay. This field
will not be displayed for assays that do not need it.
Select the kit that you want to modify from the list of existing kits. The fields at the bottom
of the screen will be populated with the values for the selected kit.
Make the necessary changes to the kit fields.
120
Assays
6.
Click the
button from the LDMS toolbar.
One of the options available when modifying kits is to deactivate them. This prevents them
from being selected when reading an assay without actually removing the kit from LDMS. If a
kit has not yet been used, it can also be deleted by selecting the kit, and then clicking the
button from the LDMS toolbar. Once an assay has been run with a kit, however, that kit cannot
be deleted.
Setting up VQA Kits
Table 6.9. VQA Controls and Assays
VQA RNA Control
Applicable Assay
Abbott VQA Controls
Abbott Realtime HIV-1
COBAS TaqMan VQA Controls
COBAS TaqMan HIV-1
COBAS UltraSensitive VQA Controls
Roche COBAS UltraSensitive HIV-1
Standard VQA Nuclisens Controls
Nuclisens
Standard VQA RNA Controls
Roche Amplicor Monitor HIV RT PCR
UltraSensitive VQA RNA Controls
Roche UltraSensitive HIV RT PCR Assay
▲ This table shows the VQA controls in LDMS and the applicable assays for those controls.
Figure 6.28. VQA Control Login Screen
▲ Creating a new VQA control. This image shows the creation of a VQA200 control.
Procedure 6.32. Creating a new VQA Kit
1.
2.
3.
4.
5.
6.
Access the VQA Control Entry tool by clicking QA/QCVQA Control Login from the LDMS
menu bar.
Select the desired control from the VQA RNA Control list. For an explanation of what
controls match up with what assay, see Table 6.9.
Enter the VQA lot number into the Lot Number field.
Enter the expected value for the control into the Expected value field at the bottom of the
screen, and then click the
button.
Complete the minimum value and maximum value fields.
Click the button from the LDMS toolbar.
VQA controls can be modified by selected the desired VQA RNA Control and Lot Number,
making any changes, and then clicking the
button from the LDMS toolbar.
Pharmacology Control Charting
121
Pharmacology Control Charting
PK control charting is a feature in LDMS that allows you to evaluate your laboratory's control
performance over a specified time, and generate a variety of reports. To access PK control charting reports in LDMS, select QA/QCPK Control Charting from the LDMS menu bar.
1.
2.
3.
4.
5.
6.
From the PK Analytes, Lot Type, and Lot #, select the applicable analyte, lot type, and
lot number.
(Optional) To limit to runs within a specific date, use the Run Date From and To boxes.
Click Search.
Under Rounds found, select the runs that you want to appear on the report, and then click
the
below the list to move it to Runs selected.
In the Reports list, select the report that you want to generate.
Click Generate.
Virology Control Charting
Control charting is a feature in LDMS that allows you to evaluate your laboratory's control performance over a specified time for virology assays. This tool generates Levey-Jennings charts. To
access control charting in LDMS, select QA/QCControl Charting from the LDMS menu bar.
Procedure 6.33. Creating a Levey-Jennings chart in LDMS
1.
2.
3.
4.
Select the virology assay with the control you want to chart from the Assay drop-down list.
Select the date range within which you want to view controls in the Date From and Date
To fields.
(Optional) Select the control that you want to chart from the Control Name list.
(Optional) Select the desired kit and control lots from the Kit Lot Number and Control
Lot fields.
Note
5.
6.
7.
8.
If the Kit Lot Number and Control Lot fields are disabled, no controls were found
within the date range specified. Try broadening your date scope.
Click the button from the LDMS toolbar.
Select desired control from the Search Results listing, and then click the
button
below the list. This will move the control to the Selected Controls list.
Select one or more controls from the Selected Controls list. Hold down the Ctrl or Shift
key to select multiple control.
Click the
button.
Up to seven distinct control lots can be displayed on the Levey-Jennings chart generated by
LDMS. If multiple controls were selected, the chart will display both controls on the same chart.
Use the key to the right to distinguish each control.
122
Assays
Figure 6.29. Control Charting Report
▲ A Levey-Jennings Report generated by the control charting tool in LDMS, showing data for two controls.
Pharmacology QC and Calibration Lot Entry
PK control and calibration lots can be entered into LDMS. This allows you to use lots when
entering PK assay results in LDMS.
1.
2.
From the LDMS menu bar, click QA/QCPK QC Lot Entry or QA/QCPK Callibrator
Lot Entry.
Enter the following information for your lot:
3.
• Lot #
• Creation date
• Expiration date
• Storage temperature (in Celsius)
• Derivative or matrix type
For each control or calibration standard you want to add:
4.
a. Next to the Controls or Calibration Standardsbox, click Add.
b. Select the control or calibration standard from the Control or Calibrator column.
c. Enter a Custom name, if desired.
For each analyte for this lot:
5.
a. Next to the Analytes box, click Add.
b. Select an analyte from the Analyte column.
c. In the Target and Unit columns, select the appropriate target values for the analyte.
From the LDMS tool bar, click the button.
Once the lot has been successfully added, you can modify it by selecting it from the Saved Lots
list, making your changes, and then clicking the
button from the LDMS tool bar. If you want
Using Assay Device Readers
123
to discontinue a lot so that it can no longer be selected when entering PK results in LDMS, select
the Deactivate option for the lot.
Using Assay Device Readers
Associating an Assay with a Reader
For assays in LDMS that read instrument output, you must associate the assay with a reader
device. For a list of reader hardware supported by LDMS, see Table 6.10.
Procedure 6.34. Associating an assay with a reader in LDMS
1.
2.
3.
4.
Click AdministrationSystem Configuration from the LDMS menu bar.
Change to the Assays tab (Figure 6.30).
Select the assay or assay template to be associated with a reader from the Assays list.
Select the reader hardware that you will be using from the Device list.
Note
5.
6.
Devices named Device Name (From Disk) are to be used in conjunction with LDMS Remote Reader. See the section called “LDMS Remote Reader” on page 126.
Select the configuration that you want to use. The available configurations are based on
the device selected. For instructions on creating a configuration for assays that can be read
directly by LDMS, see the section called “Creating a Reader Configuration” on page 124.
Click the
button from the LDMS toolbar. This will add the association to the list at the
bottom of the screen.
Figure 6.30. Assay reader configuration in LDMS
▲ Associating an assay with a reader device in LDMS
124
Assays
Table 6.10. Reader hardware supported by LDMS
Remote Reader
a
Device File
Remote Read- Direct Read
b
er File
Abbott PPC
●
Abbott Quantum II
●
Abbott Quantumatic
●
Abbott Realtime HIV-1 m2000
●
AD 340C Absorbance Detector
●
BioTek EL311
●
BioTek EL312
●
BioTek ELx800
●
BioTek Powerwave XS
●
Chiron Assay Reader
●
COBAS Amplicor Analyzer
●
Coulter MR5000
●
●
Coulter UVMax
●
●
Dupont VMax
●
●
Dynatech MR5000
●
●
●
●
●
●
Molecular Devices
c
●
Molecular Devices UVMax
MultiSkan Ascent
●
NASBA/Nuclisens AXP
●
Organon Teknika 520
Roche AMPLILINK 1.3, 2.41, ●
and 3.2 (for COBAS Amplicor Analyzer)
Roche ELX800 with Gen5
●
SoftMax
●
SoftMax New
●
SoftMax Partial Plate
●
SpectraMax 250
●
Tecan Sunrise
●
a
LDMS can read an output file with the results from the reader device
Output from LDMS Remote Reader
c
LDMS can read output directly from a device reader, without using an output file as an intermediary
b
Creating a Reader Configuration
Before you can use a reader device, you must tell LDMS how you have it setup. This is done on
an individual instrument basis. You can either configure LDMS to read output from the device
directly, or you can utilize LDMS Remote Reader to read the assay output on a different computer
and then manually transfer the output to the computer with LDMS.
Creating a Reader Configuration
125
Figure 6.31. Instrument configuration in LDMS
▲ The configuration screen for the Coulter MR5000. The Read Device Data From Disk option indicates
that LDMS Remote Reader will be used.
Procedure 6.35. Creating or modifying a reader configuration
1.
2.
3.
4.
5.
Click AdministrationInstrument SetupDevice Name from the LDMS menu bar.
Type a name for your configuration into the Configuration Name box or select an existing
configuration from the Configuration Name box to edit.
Change the Read Device Data From Disk option as follows:
•
If you want LDMS to read assay output directly from the device (i.e. it is connected to
the same computer as LDMS), select No.
•
If you want to utilize LDMS Remote Reader, select Yes. You will need to configure
LDMS Remote Reader to read from the device. For more information on LDMS Remote
Reader, see the section called “LDMS Remote Reader” on page 126.
(For direct read only) Complete the appropriate Communication Port Settings and Reader Configuration settings for your setup.
Click the
button.
Once you have created a configuration for a device, that configuration can be selected when
associating the hardware with an assay. For instructions on associating a reader device with an
assay in LDMS, see the section called “Associating an Assay with a Reader” on page 123.
126
Assays
LDMS Remote Reader
What is LDMS Remote Reader
LDMS Remote Reader is a program separate from LDMS that can be used to read assay data
and save it in a format that can be read by LDMS. It is capable of reading assay output directly
from the instrument or device reader, and then generating an output file that can be read by
LDMS. The purpose of LDMS Remote Reader is to read assay data when it is not possible to
connect an instrument directly to the computer that is running LDMS. LDMS Remote Reader
has significantly lower system requirements than LDMS, which makes it suitable for running on
older hardware as well.
For a list of device readers that are compatible with LDMS Remote Reader, see Table 6.10 (page
124).
LDMS Remote Reader creates an output file after reading the assay from the instrument. You
must manually transfer the output file to the computer with LDMS installed.
To obtain LDMS Remote Reader, contact LDMS User Support.
Configuring LDMS to use LDMS Remote Reader
To use LDMS Remote Reader with LDMS, you must first tell LDMS that you want to read an assay
reader device on a remote computer.
Procedure 6.36. Configuring LDMS to read a device using LDMS Remote Reader
1.
(For instruments that can be read directly by LDMS only) Create a new configuration for
the instrument
a.
b.
2.
3.
4.
5.
Click AdministrationInstrument SetupDevice Name from the LDMS menu bar.
Enter a name for your configuration into the Configuration Name field. An easy name
to help remember the purpose of the configuration is REMOTE.
c. Click the OK button.
Click AdministrationSystem Configuration from the LDMS menu bar.
Change to the Assays tab.
Select the assay to be read using LDMS Remote Reader from the Assays list.
Select the reader device from the Device list.
Note
6.
7.
Devices that can only be read using LDMS Remote Reader are labeled as Assay
Name (From Disk).
Select the appropriate configuration from the Configurations list. For instruments that
could be read directly by LDMS, this will be the configuration that you created in Step 1.
Click the button from the LDMS toolbar.
Configuring LDMS Remote Reader
Configuring LDMS Remote Reader
127
When you first start LDMS Remote Reader, it will show you the currently selected device and
configuration. When you read an assay, this is the device reader that will be used. Before using
an reader devices to read an assay, you must configure your hardware.
Figure 6.32. LDMS Remote Reader device menu
Procedure 6.37. Configuring a reader device
1.
2.
3.
4.
5.
From the menu bar, click Device.
Select the device that you want to configure.
Select the configuration that you want to modify. If you are creating a new configuration,
select <Default>.
Change the settings for your device.
Save your configuration by doing one of the following:
•
To save your changes to the configuration that you previously selected, click the OK
button.
•
To save a new configuration, click the Save As button.
Warning
If you selected the <Default> configuration, this saving changes will overwrite the
default settings. You cannot undo this change.
128
Assays
Figure 6.33. Device Configuration screen
▲ Assay configuration screen in LDMS Remote Reader has the same options as LDMS.
After creating or modifying a configuration, that reader device and configuration will automatically become your current reader. This means that when you go to read an assay, these are the
settings that will be used.
If you have more than one reader device connected to the computer (or more than one configuration for a device), you will need to specify which one to use.
Procedure 6.38. Changing the current device and configuration used by LDMS Remote
Reader
1.
2.
3.
From the menu bar, select DeviceSelect Current Device/Configuration....
Select the reader device that you want to read from the Select Device list.
Select the configuration that you want to use from the Select Configuration list.
Reading Assay Output using LDMS Remote Reader
LDMS Remote Reader acts as a go-between when the computer connected to your assay reader
does not have LDMS installer. LDMS Remote Reader reads the device reader output, much like
LDMS would read it, and creates an output file that you can transfer to the computer with LDMS.
Reading Assay Output using LDMS Remote Reader
129
Figure 6.34. LDMS Remote Reader workflow
▲ This diagram shows the basic steps involved in using LDMS Remote Reader to get assay output into
LDMS.
After reading the assay output using a device reader, the output file is transferred to the computer with LDMS. Often, this is as simple as putting the output file on a removable USB drive.
Procedure 6.39. Reading assay output using Remote Reader Software
1.
2.
On the computer with LDMS, setup the assay to be read. For more information on how to
do this, see the section called “Creating a New Assay Run” on page 85.
In LDMS, generate a plate layout report for the assay by clicking the
button from the
LDMS toolbar while on the assay Preview tab.
Important
The plate layout report is required to use LDMS Remote Reader.
3. On the computer with LDMS Remote Reader, start LDMS Remote Reader.
4. Click DeviceRead Device from the menu bar.
5. Verify that the Device is correct. If you need to change the device being used, see the section
called “Configuring LDMS Remote Reader” on page 126.
6. Verify that the Run Date is correct, and adjust it if necessary. See Figure 6.35.
7. In the Run ID field, enter the system generated run ID from the Plate Layout Report.
8. In the Sequence Number field, enter the plate number from your Plate Layout Report.
9. Select the drive where you want the output file to be written from the Output Drive list.
For example, if you have a removable USB drive connected as the E:, select that drive.
10. Click OK to begin reading the assay output.
130
Assays
Figure 6.35. Reading and assay with LDMS Remote Reader
▲ Reading an assay using LDMS Remote Reader.
Once LDMS Remote Reader has finished reading the assay output from your device reader, a
directory called devdata will be created in the drive you selected for the output (e.g. E:\devdata). This directory will contain your assay run data file. Files will be named according to the
run ID and sequence number. These are the files that you will need to transfer to the computer
with LDMS installed.
Now that you have the assay output, you need to read it using LDMS.
Procedure 6.40. Reading assay output captured by LDMS Remote Reader with LDMS
1.
Copy the desired assay output files from the devdata directory to a removable media, then
connect the removable media to the computer running the full version of LDMS.
2. In LDMS, click TasksAssays or the
button from the LDMS toolbar.
3. On the Assay Selection tab, find the assay that you ran in the Assays list on the left.
4. Select the Runs not Performed/Not Terminated radio button.
5. Enter the run ID into the Run ID field. This number is found on the Plate Layout Report
and entered in LDMS Remote Reader.
6. Click the
button. All assay runs that were set up but have not been run will be listed
under Previous Runs Found.
7. Select the assay for which you will be reading data, and then click the
.
8. Change to the Preview tab. (LDMS may change to this tab automatically after selecting an
assay).
9. Enter run information as appropriate, depending on the assay.
•
For some assays, complete fields on the Preview tab, such as Tech Initials and Sample
Prep. Method, then click the
button.
•
For some assays, you don't complete anything on the Preview tab. Instead, click the
button. The Enter Run Information window will appear with the fields that
you must enter to complete the run. After entering this information, click the
button.
10. A window will appear to select the assay output data file. Navigate to the location of your
devdata directory (e.g. a USB drive) and select the appropriate file.
Chapter 7. Reports
LDMS as a Database Front-end
LDMS is a specialized database front-end, and while users can't interact with that data direct
there are several ways to extract it. Virtually any set of data that LDMS stores can be pulled into
a user-friendly report, which can then be printed or exported into a format that can be utilized
by another program—you just need to know how to ask LDMS for it.
One of the most important tools at your disposal for retrieving data is LDMS Reports tool. To
access reports, go to TasksReports, or click the
button from the LDMS toolbar. Another
feature, Data Retrieval, can be used for more customized reports. Data Retrieval is found in
ToolsData Retrieval.
Running LDMS's Built-in Reports
LDMS comes with many reports. To run a report, simply select a category on the left, the name
of the report on the right, and then click the button from the LDMS toolbar. After a short time
(depending on the size of the report), a Crystal Reports® viewer window will appear.
Note
While there are many built-in reports, they may not meet everyone's needs. For instructions of building customized reports, see the section called “Running Custom Data Retrieval Reports” on page 134.
When you attempt to run a report without criteria, LDMS will give you a message that the report
may take a long time to generate. You'll always receive this message if you don't select any
criteria, even if the report you're about to generate won't be very big.
You can reduce the amount of information in your report by creating query criteria to filter it.
For example, a filter of Specimen Date >= 24/Apr/2013 would only include records where the
specimen date is on or after April 24, 2013 in your report.
132
Reports
Figure 7.1. Report generation screen
Procedure 7.1. Creating a report query criteria
1.
2.
Select the field that you want to filter from the Field drop-down.
Select the operator for your filter from the Operator drop-down.
Note
3.
4.
5.
6.
7.
LDMS using the Pascal-like <> to indicate ≠ (not equal).
Enter a value for your filter.
Click the
button.
Add more query criteria.
Enter a query statement, using the numbers assigned to each query criteria. If no query
statement is entered, the default is to use each query criteria separated by AND.
(Optional) To save your query for later use, enter a name into the Previous Queries text
box, then click the button from the LDMS tool bar.
Figure 7.2. Example query statement
#
Field
Operator
Value
1
ACTG Protocol
=
003
2
ACTG Protocol
=
218
3
Specimen Date
>
24/Apr/2013
▲ In this example, a query statement of (1 or 2) and 3 would find results where the ACTG Protocol
is 003 OR 218, and the Specimen Date is after April 24, 2013.
If you choose to save your query for future use, you can select individual query criteria and
modify or delete them using the
and
buttons respectively. Saving a report query is
helpful if you need to run the same report on a regular basis.
Using Crystal Reports® Viewer
Using Crystal Reports® Viewer
133
LDMS uses Crystal Reports to generate and display information retrieved from its database.
Crystal Reports opens in a new window; you cannot return to using LDMS until you close the
Crystal Reports window.
Figure 7.3. SAP Crystal Reports Viewer
The Crystal Report Viewer is similar to many PDF viewers, with pages and the ability to zoom.
Because Crystal Reports is data-aware, however, you have a few more options for exporting data
so that you can use it for other purposes. To export from crystal reports, click the ; you can
select different export formats from the drop-down at the bottom of the Save As window. For a
list of supported export formats, see Table 7.1.
Table 7.1. Available export file formats for Crystal Reports
Format
Extension
Crystal Report
rpt
Portable Document Format
pdf
Comma separated values
csv
Microsoft Excel (97-2003) with headers xls
Microsoft Excel (97-2003) without head- xls
ers
Microsoft Excel (2007+) without headers xlsx
Microsoft Word (97-2003)
doc
Editable Microsoft Word
rtf
Rich Text
rtf
Crystal Reports XML
xml
134
Reports
Format
Extension
Tab separated text
ttx
Warning
While it is possible to export all reports generated by LDMS, not all of them will export
nicely into certain formats (all reports will export just fine into PDF). Some reports will
export with formatting issues that would make the data difficult to use in a program like
Microsoft Excel®. Reports that are in the category Exportable Reports were specifically designed to be export-friendly. If you need to manipulate and analyze data with an
external program, exportable reports should be you first choice.
Running Custom Data Retrieval Reports
In addition to the reports that come with LDMS, you can create your own custom reports.
This allows you to create advanced searches. You can find records based on almost any conceivable search criteria, and also set what information from those records will appear on the
report. If none of the reports described in the section called “Descriptions of Built-in Reports” on page 135 meet your needs, you can probably create your own report that does.
The Data Retrieval tool is accessed by clicking ToolsData Retrieval from the LDMS menu
bar.
Figure 7.4. Data Retrieval Screen
▲ Drag and drop fields on the left into the boxes on the right to add them. To remove a field from the
right side, simply drag it out of the box.
Procedure 7.2. Creating a data retrieval query
1.
2.
3.
4.
Drag a field from the Selectable Fields listing on the left to the Selection Criteria box on
the right.
In the Selection Criteria box, select the Op[erator] and Value that you want to use for
your search.
Enter the logic for your search criteria into the Criteria Sentence box using the numbers
for each field in the Criteria Selection box.
Drag fields that you want to be displayed on your report from the Selectable Fields listing
on the left to the Fields to display box on the right.
Descriptions of Built-in Reports
5.
6.
7.
8.
135
To determine which fields to sort your results by, drag fields from the Fields to display list
to the Sort Results By list.
(Optional) If needed, select the Distinct option. This means that if there are any results in
your report that are identical (meaning all of the displayed fields are the same), the duplicates will be discarded.
(Optional) To save your report for future use, enter a name for your report into the Previous
Queries text box, then click the button from the LDMS toolbar.
Click the button from the LDMS toolbar to generate your report.
Tip
You can save your query so that your report can be quickly run at a later time by typing
a name for your report into the Previous Queries text box, and then click the button
from the LDMS toolbar. To re-run it, just select the report from that drop-down and
click the button. If you make changes to it and want to save them, use the
button.
When you run your report, the results will appear in a table at the bottom of the screen rather
than in a separate window. You can change between the results and the raw SQL statement by
using the Query and Results radio buttons at the bottom of the screen.
To save the results of your report, select the file format that you want to save as from the Export
As drop-down menu beneath the results, then click the
button. If you want (or don't
want) the headers for your columns that shows what data is in that column, toggle the With
headers check box.
Descriptions of Built-in Reports
This section describes the reports available using the LDMS Reports tool, organized by the
categories in which they appear in LDMS. The filtering criteria available varies from report to
report.
Can't find a report you need?
While Frontier Science has attempted to maintain a comprehensive suite of reports, and
the Data Retrieval tool is robust enough for most users, you may find that you are having
difficulty generating a report with the exact information that you need.
Offering robust report options for laboratories is a priority for LDMS development. New
reports (and new features for existing reports) are frequently implemented at the request
of a user. Contact LDMS User Support for assistance; they may be able to help you use
existing tools to get the information you need, and if not, they can initiate the process
of updating LDMS.
Specimen Management Reports
Cell Yield QA/QC Summary
This report provides the user with a summary of the Draw Dates and Times,
Total Cell Counts, Technician initials, Total Volumes, Additive Types and the
calculated cell yield for the Viable PBMC’s that are logged into the lab’s LDMS.
The report also provides the data plotted in a graph for visual representation.
This report would be useful to the user to provide assistance with the Quality
Control and Assurance of the lab by providing the cell yield for specimens in
136
Reports
comparison to other variables which can identify if further investigation may
be needed.
Lab 263 Summary of Specimens
This report provides the user with a summary of the total volume for a given (Group/Primary/Additive/Derivative/Sub Add/Der/Volume Unit) This report
would be useful to the user to identify how much of a particular type of specimen is available for a given group.
Lab 348 Specimen Report
This report provides the user with the primaries for the specimens in a given
Group/ID1 and includes the condition code and an aliquot count as well. A user
would find this useful to generate the specimens for a given group report in a
more consolidated report.
Primary Specimens Received
This report provides the user with a list of all of the primaries that have been
received by a given lab. The report also summarizes some of the primary details
and includes a total primaries received count. The user would find this report
useful when attempting to identify how many primaries that they have received
into their LDMS.
Specimen Count Report
This report provides the user with a summary of the number of specimens that
the lab has logged for a given Group/ID1. The summary also provides the user
with the number of specimens that are stored for the given Group/ID1, as well
as the number of aliquots that have been shipped for the given Group/ID1.
Specimen Log Report
This report provides the user with a list of all of the specimens that the Lab has
logged into their LDMS. The report also provides the primary and associated
aliquot information for a given specimen. The user would find this report useful
when identifying the amount of specimens that have been logged into their
LDMS with selected criteria.
Specimen Processing Report
This report provides the user with a specific set of information for each of their
logged specimens. The report will provide the user with the patient, primary, and aliquot information for each of their specimens. The report also provides the user with the processing information (if available) for the given specimens, specifically the Total Cell Count, Processing Date(Primary and Aliquot),
Processing Time(Primary and Aliquot), Processed By initials, Frozen Date, and
Frozen Time.
Specimens for a Given Group
This report provides the user with specimen details, while grouping the given
specimens by the affiliated group, then ID1 they were assigned when logged.
The user would find this report useful when trying to identify what specimens
they have logged for a given group/ID1.
Specimens for a Given Group 2
This report provides the user with the LDMS specimen ID’s for a given Group/
ID1 and includes an aliquot count. A user would find this useful to generate
the specimens for a given group report in a more consolidated report.
Specimens Missing Group Assignments
This report provides the user with a list of all specimens that do not have a
Group assigned to them.
Time to Freeze QA/QC Summary
This report provides the user with a summary of the Draw Dates and Times,
Frozen Dates and Times, Specimen Types and the calculated amount of time
it took from the time a specimen was drawn to the time the specimen began
the freezing process. The report also provides the data plotted in a graph for
visual representation. This report would be useful to the user to identify how
quickly the specimen goes from unprocessed primary to the freezing process
of the aliquots.
Time to Process QA/QC Summary
This report provides the user with a summary of the Draw Dates and Times,
Process Dates and Times, Frozen Dates and Times, Specimen Types and the calculated amount of time it took from the time a specimen started to be processed
to the time the specimen began the freezing process. The report also provides
the data plotted in a graph for visual representation. This report would be useful to the user to identify how quickly the lab is completing processing to the
freezing process.
Shipping Reports
Ambient Shipments Report
This report provides the user with a summary of all of the primaries that have
been marked for ambient shipment. This report would be useful to the user in
Storage Reports
137
that it provides a summary of all of the sample that have touched the labs LDMS
but was not necessarily processed, and provides information such as specimen
information and intended destinations.
Daily Imported Specimen Log
This report provides the user with a summary of the samples that a lab has imported grouped by Group/ID1, and provides the user with information regarding some of the samples that were imported, when the specimens were imported, what lab the samples came from and sample condition. This report would
be useful to the user in that it will provide a easy means of identifying which
samples have been imported for a given protocol, as well as an idea of when
they have been received.
Detailed Imported Specimen Report
This report provides the user with a detailed summary of all the shipments
that the lab has imported. This report would be useful to the user since it provides relatively detailed information regarding shipments they have imported,
including the specimens that were imported, when they were Imported, who
originally shipped the batch and the batch number.
Imported Specimen Report - Summary
Similar to the Detailed Imported Specimen Report, this report provides the user
with a summary of all the shipments that the lab has imported but in a more
compact nature. This report would be useful to the user since it provides information regarding shipments they have imported, including when it was Imported, who originally shipped the batch, the batch number, and an aliquot
count per specimen type.
Lab 263 Summary Detail of Shipped
Specimens
This report provides the user with a summary of the total volume that has been
shipped to a particular destination for a given (Group/Primary/Additive/Derivative/Sub Add/Der/Volume Unit) This report would be useful to the user to
identify how much of a particular type of specimen has been shipped for a given group and to their destinations.
Pending Specimens Marked for
Shipping Report
This report provides the user with a summary of all the samples that the lab
has marked to ship in the specimen management module, but has yet to ship.
This report would prove useful to labs when trying to organize their shipments,
with the ability to identify specimens that they anticipate on shipping but have
yet to do so.
Shipped Specimen Report - Detail
This report provides the user with a detailed summary of all the shipments
that the lab has completed. This report would be useful to the user since it
provides relatively detailed information regarding their shipments, including
what specimens were shipped, when they were shipped, who they were shipped
to and the batch number.
Shipped Specimen Report - Summary
Similar to the Detailed Shipped Specimen Report, this report provides the user
with a summary of all the shipments that the lab has completed but in a much
more compact nature. This report would be useful to the user since it provides
information regarding shipments they have shipped, including when they were
shipped, the destination, the batch number, and an aliquot count.
Shipping Lab Contact Report
This report provides the user with a detailed summary of all of the contact information for a given lab. This report would be useful to the user when looking
for contact information for a receiving or shipping lab, as well as contacts for
resolving queries for destination labs.
Storage Reports
Inactive Storage
Still In Use
Configurations
This report identifies what storage configurations are no longer active, but are
still being used.
Shipped Samples in Storage
This report provides the user with a location listing of shipped specimens that
are still occupying space in the lab’s storage structure hierarchy.
Shipped Samples in Storage (Export)
This report provides the user with a location listing of shipped specimens that
are still occupying space in the lab’s storage structure hierarchy, in an exportable format.
Specimens in Storage per PID
This report provides the user with a count of all specimens that remain in storage a given Group/ID1. This report is useful for a user who may need to know
how many total specimens are in storage for a given PID.
138
Reports
Specimens Not In Storage Report
This report provides a summary of all of the specimens that are currently
logged into a lab’s LDMS that have yet to be logged into a storage container in
the storage module. This report would prove to be useful in that it would give
the user an idea of what specimen still need to be stored in the storage module.
Specimens Remaining in Storage
This report provides a user with a count of the number of aliquots that are still
in the storage module for a given Group/ID1/ID2 sorted by Group. This report
is useful for a user that may want to determine how many samples remain in
storage for a given PID and where they are stored, especially in cases where
additional aliquots may need to be identified.
Storage Container Location
This report identifies what freezer, shelf, rack a box is on and what position the
box is in. This will allow a lab to easily confirm boxes are in the correct location.
Storage Count Report By Freezer
This report provides a count of specimens that are contained within a given
freezer. This report would be useful in that it provides the user with a summary
of the samples for a given Group/ID1/Specimen Type that a particular Freezer
currently holds.
Storage Detail
This report provides the user with a summary of all the specimens that are
stored in a particular storage container in the Storage module. This report
would be useful to the user in that it provides a detailed summary of the exact
specimens and location of all the aliquots that are stored in a container held
within a lab’s storage structure hierarchy.
P24 Antigen Reports
P24 Results by Study
This report provides the user with a summary of the various P24 assay results
that have been completed in the Results module. This report is grouped by
Group/ID1.
RNA PCR Reports
Abbott Realtime HIV1 Assay Report
This report provides the user with a summary of all the assay results for the
Abbott Realtime HIV1 Assays. The report is grouped by Group/ID1 and also
provides the Runid’s and various censors.
Abbott Realtime HIV1 Patient Report
This report provides the user with a detailed listing of the assay results for the
Abbott Realtime HIV1 Assays for a given patient/run. The report provides the
Runid’s and various censors, calculated results and watermarks
Abbott Repeat and Censored Run/
Samples
This report provides the user with a summary of all the censored and repeated
runs for a particular PID. The report is grouped by Group/ID1. This report would
be useful for a user that wants to identify if there are issues running samples
for a given PID.
Amplicor Repeat and Censored
Run/Samples
This report provides the user with a summary of all the censored and repeated
run for a particular PID. The report is grouped by Group/ID1. This report would
be useful for a user that wants to identify whether they are having issues running samples for a given PID.
Blank Qual Nuclisens Report
This report provides an relatively empty report designed specifically for the
Qual Nuclisens assay. The report would be useful for the user since it provides
a report that can be generated and printed for manual inputs for lab use.
Cobas Amplicor Assay Report
This report provides the user with a summary of all the assay results for the
COBAS Amplicor Assays. The report is grouped by Group/ID1 and also provides
the Runid’s and various censors.
Cobas Amplicor Patient Report
This report provides the user with a detailed listing of the assay results for
the COBAS Amplicor Assays for a given patient/run. The report provides the
Runid’s and various censors, calculated results and watermarks
Cobas Ultrasensitive Assay Report
This report provides the user with a summary of all the assay results for the
COBAS UltraSensitive Assays. The report is grouped by Group/ID1 and also
provides the Runid’s and various censors.
RNA PCR Reports
139
Cobas Ultrasensitive Patient Report
This report provides the user with a detailed listing of the assay results for the
COBAS Ultrasensitive Assays for a given patient/run. The report provides the
Runid’s and various censors, calculated results and watermarks
HIV RNA Assay Control Data
This report provides the user with a summary of all of the control data for a
given run. The report is grouped by assay type and provides a multitude of
different pieces of control data for the associated Runid.
RNA Nuclisens Report
This report provides the user with a summary of all the assay results for the
RNA Nuclisens Assays. The report is grouped by Group/ID1 and also provides
the Runid’s and various censors.
RNA Organon Teknika NASBA Report
This report provides the user with a summary of all the assay results for the
RNA Organaon Teknika Nasba Assays. The report is grouped by Group/ID1 and
also provides the Runid’s and various censors.
RNA Roche Amplicor Line Listing
This report provides the user with a summary of all of the results for a given
PID. The report is grouped by PID/ID1 and also includes some run information,
results, and censors. This report would be useful for a user that wants to identify all of the results that they currently have for a particular PID.
RNA Roche Amplicor Patient Report
This report provides the user with a detailed listing of the assay results for the
RNA Roche Amplicor Assays for a given patient/run. The report provides the
Runid’s and various censors, calculated results and watermarks.
RNA Roche Amplicor Report
This report provides the user with a summary of all the assay results for the
RNA Roche Amplicor Assays. The report is grouped by Group/ID1 and also provides the Runid’s and various censors.
RNA Roche Ultra Lin Listing
This report provides the user with a summary of all of the results for a given
PID. The report is grouped by PID/ID1 and also includes some run information,
results, and censors. This report would be useful for a user that wants to identify all of the results that they currently have for a particular PID.
RNA Roche UltraSensitive Patient
Report
This report provides the user with a detailed listing of the assay results for the
RNA Roche Amplicor Assays for a given patient/run. The report provides the
Runid’s and various censors, calculated results and watermarks.
RNA Roche UltraSensitive Report
This report provides the user with a summary of all the assay results for the
RNA Roche UltraSensitive Assays. The report is grouped by Group/ID1 and also
provides the Runid’s and various censors.
RNA Runs Not Reviewed
This report provides the user with a list of all the different assay runs that have
been resulted but have yet to have been marked to review. This report would
be useful for a user to identify which RNA assays still need to be reviewed.
Roche Amplicor Tech Audit Report
This report provides the user with a list of all the assay runs for the Roche
Amplicor assays, specifically to list the multiple Technician initials associated
with the Run. This report would be useful to the user to identify which technicians were associated with a particular run and/or to list all the runs for a
specified technician.
Roche Ultrasensitive Tech Audit
Report
This report provides the user with a list of all the assay runs for the Roche Ultrasensitive assays, specifically to list the multiple Technician initials associated with the Run. This report would be useful to the user to identify which
technicians were associated with a particular run and/or to list all the runs for
a specified technician.
Taqman HCV Repeat and Censored
Run/Samples
This report provides the user with a summary of all the censored and repeated
runs for a particular PID. The report is grouped by Group/ID1. This report would
be useful for a user that wants to identify if there are issues running samples
for a given PID.
TaqMan Realtime HCV Assay Report
This report provides the user with a summary of all the assay results for the
TaqMan Realtime HCV Assays. The report is grouped by Group/ID1 and also
provides the Runid’s and various censors.
TaqMan Realtime HCV Patient Report
This report provides the user with a detailed listing of the assay results for the
TaqMan Realtime HCV Assays for a given patient/run. The report provides the
Runid’s and various censors, calculated results and watermarks
140
Reports
TaqMan Realtime HIV1 Assay Report
This report provides the user with a summary of all the assay results for the
TaqMan Realtime HIV1 Assays. The report is grouped by Group/ID1 and also
provides the Runid’s and various censors.
TaqMan Realtime HIV1 Patient Report
This report provides the user with a detailed listing of the assay results for the
TaqMan Realtime HIV1 Assays for a given patient/run. The report provides the
Runid’s and various censors, calculated results and watermarks
Taqman Repeat and Censored Run/
Samples
This report provides the user with a summary of all the censored and repeated
runs for a particular PID. The report is grouped by Group/ID1. This report would
be useful for a user that wants to identify if there are issues running samples
for a given PID.
UltraSensitive Repeat and Censored
Run/Samples
This report provides the user with a summary of all the censored and repeated
run for a particular PID. The report is grouped by Group/ID1. This report would
be useful for a user that wants to identify whether they are having issues running samples for a given PID.
RNA Reports
DNA 1.5 Patient Report
This report provides the user with a detailed listing of the assay results for the
DNA PCR 1.5 Assays for a given patient/run. The report provides the Runid’s
and various censors, results and watermarks
DNA 1.5 Tech Audit Report
This report provides the user with a list of all the assay runs technician initials
for the DNA PCR 1.5 assays, specifically to list the multiple Technician initials
associated with the Run. This report would be useful to the user to identify
which technicians were associated with a particular run and/or to list all the
runs for a specified technician.
DNA Patient Report
This report provides the user with a detailed listing of the assay results for the
DNA PCR 1.0 Assays for a given patient/run. The report provides the Runid’s
and various censors, results and watermarks
HIV DNA PCR 1.5 Report
This report provides the user with a summary of all the assay results for the HIV
DNA PCR 1.5 Assays. The report is grouped by Group/ID1 and also provides the
Runid’s and various censors.
HIV DNA PCR Report
This report provides the user with a summary of all the assay results for the HIV
DNA PCR 1.0 Assays. The report is grouped by Group/ID1 and also provides the
Runid’s and various censors.
Unused Pellet Report
This report provides the user with a list of all of the remaining pellets that have
not been used on a given DNA PCR run. This report would be useful to the user
to track how many remaining control pellets that they have remaining.
Culture Reports
Culture Results by Protocol
This report provides the user with a list of all the results for a given culture.
The report then groups these results by Protocol.
Culture Schedule Report
This report provides the user with the various feed and harvest schedules and
groups them based on the type of culture it is defined by. This report would
be useful to identify which harvest feed schedules are available and whether a
new schedule is required.
MT-2 Results Reports
MT-2 Results Report
This report provides the user with a summary of the MT-2 assay results that
have been completed in the Results tab. This report is grouped by Group/ID1.
Patient Summary Reports
Patient Identifiers
This report provides the user with a summary of all the PIDs that have been
“enrolled” into the lab’s database. This report is useful since it provides the
user with the ID2s, ID3s and clinics that have been logged into the lab’s database (grouped by ID1)
Miscellaneous Reports
141
Miscellaneous Reports
Clinic Contact Report
This report provides the user with detailed contact information for all/selected clinics. This report would be useful for the user to print or reference when
trying to identify the clinic that a logged sample may have come from.
LDMS Abbreviated Codes
This report provides the user with a complete list of all of the descriptions of
the various abbreviated values used within the LDMS, such as but not limited to Measurement Units and Visit Units. This report would be useful for the
user to print or reference when trying to identify the abbreviated codes for the
specimens that need to be logged
LDMS Assay Censor Codes
This report provides the user with a complete list of all of the censor codes and
their descriptions used within the LDMS. This report would be useful for the
user to print or reference when trying to identify the censors for the assays that
the lab uses.
LDMS Prim, Add, Der and Sub Add/
Der Codes
This report provides the user with a complete list of all of the coded values and
descriptions for the primaries, additives, derivatives, and sub additives/derivatives used within the LDMS. This report would be useful for the user to print or
reference when trying to identify the code values for the specimens that need
to be logged
Recommended Test Add/Der
This report provides the user with the recommended additives and/or derivatives used when assigning a test to an aliquot. This report would be useful for
the user to print or reference when trying to identify which codes are recommended for a given assay.
Virology and Immunology Assay
Count, By Protocol
This report provides the user with a complete count of how many assays have
been run per Group/ID2 for the Virology and Immunology assays used within
the LDMS. This report would be useful for the user to print or reference when
trying to identify the censors for the assays that the lab uses.
Admin Reports
User Permissions
This report provides the user with a summary of all the users in the LDMS and
lists their current permissions within the LDMS. This report would be useful to
print or reference when trying to track a particular user’s permissions.
Exports Reports
Export Status Report
This report provides the user with a summary of all of the export transactions
that have occurred at the lab. The report provides information such as export
number and its current status. This report would be useful for tracking the exports for the lab.
PK (Pharmacology) Reports
Pharmacology Drug Count
This report provides the user with a count of how many results are available for
a given analyte. The report is then grouped by Group/ID2. This report would
be useful for the user in determining how many results they have for a given
assay to summarize or predict workload.
Pharmacology Drug List
This report provides the user with a list of all of the available drug codes currently in the LDMS and provides the description of what the drug code stands
for. This report would be useful to print or reference when trying to identify
the drugs currently available in the LDMS.
Pharmacology Proficiency Results
This report provides the user with a printable report to summarize the proficiency panel data for a given CPQA PK round. The lab is generally required to
print out and sign off on this report for CPQA record keeping purposes.
PK Drug Limits By Run
This report provides the user with a list of all the PK assay runs that have been
completed in the LDMS, as well as the Limits and Units that were entered for
each run. This report would be useful for the user to reference what Limits have
been used in the past.
142
Reports
PK Summary Report
This report provides the user with a summary of all the assay results for the PK
Assays. The report is grouped by Group/ID1 and provides the Runid’s, Analytes,
and various censors.
PK Summary with Assay Name
This report is identical to the PK Summary Report, but with the addition of the
assay name to the report.
Immunology Reports
Advanced Flow Check Report
This report provides the user with a summary of the results for any completed
Advanced Flow Assay. The report is broken down on a specimen basis for the
user to review.
Advanced Flow Codes
This report provides the user with a printable report that lists the various codes
that would be used with the Advanced Flow assay in the LDMS. These codes
include Anchor Gates, Color Codes, and Subset Marker Codes.
Advanced Flow Count By Protocol
This report provides the user with a simple count of how many Advanced flow
assays have been completed for a given Group/ID2. This report would be helpful to the user to track work flow within the lab.
Advanced Flow Hardcoding Report
This report provides the user with a summary of the various anchors, markers,
and colors that are associated with a given protocol/ID2. These fields were predetermined by the study and what was expected for the study.
Advanced Flow/Tunel Summary Report
This report provides the user with a summary of which samples have Advanced
Flow or TUNEL results completed. It also provides if results were obtained as
well as the test that was completed on the sample. These results are grouped
by Group/ID2.
Apoptosis by P.I. Summary Report
This report provides the user with a summary of which samples have Apoptosis
by P.I. results completed. These results are grouped by Group/ID2.
Blank Advanced Flow Patient Report
This report provides the user with a blank sheet that can be printed out that has
all the necessary fields for a given study with the appropriate hardcoded fields
already completed. The user can print this out and complete for each patient
on the given study.
IQA Cryopreservation Summary Report
This report provides the user with a summary of which samples have IQA Cryopreservation Assay results completed as well as a viral load. These results are
grouped by Group/ID2.
LPA Check Report
This report provides the user with a summary of the results for any completed LPA Assay. The report is broken down on a specimen basis for the user to
review.
LPA Count By Protocol
This report provides the user with a simple count of how many LPA assays have
been completed for a given Group/ID2. This report would be helpful to the user
to track work flow within the lab.
LPA Stimulant Codes
This report provides the user with a printable report that lists the LPA Stimulant codes and descriptions that would be used with the LPA assay in the LDMS.
LPA Summary Report
This report provides the user with a summary of which samples have LPA Assay
results completed. These results are grouped by Group/ID2.
NK Summary Report
This report provides the user with a summary of which samples have NK Assay
results completed. These results are grouped by Group/ID2.
ZEBES Reports
Commented Specimens Report
This report provides a user with a line listing of specimens that have a comment assigned to them. It provides fields such as PID, Additive, Specimen ID,
Specimen Date, Derivative, Global Specimen ID, Primary, Sub Add/Der, Comments, Non ACTG PID/ID1, and Derivative. This report is designed to not include headers or specific formatting for ease of export.
ZEBS Amplicor Report
This report provides a user with a line listing of Primaries that have a completed Roche Amplicor run for a ZEBS specimen and includes information such as
Exportable Reports
143
Patid, VID/Unit, Viral Load, Censors, Specimen Date, and Derivative. This report is designed to not include headers or specific formatting for ease of export.
ZEBS Report
This report provides a user with a line listing of Primaries that include information such as Patid, Specimen Date, Condition, VID, and Primary. This report
is designed to not include headers or specific formatting for ease of export.
ZEBS UltraReport
This report provides a user with a line listing of Primaries that have a completed
Roche Ultrasensitive Assay run for a ZEBS specimen and includes information
such as Patid, VID/Unit, Viral Load, Censors, Specimen Date, and Derivative.
This report is designed to not include headers or specific formatting for ease
of export.
Exportable Reports
A5184 Bayer bDNA HCV RNA Report
Lab 54 was performing three Assays for Protocol A5184 which are not supported in the LDMS. To make data entry easier for this lab when submitting the
data by Excel to the DMC, three templates for this data were added to the LDMS. The lab could generate the Report with the specimen info (Protocol, PID,
Specimen Date, Specimen ID and Visit) loaded onto the template based on the
search criteria selected. The lab can export the report(s) into Excel and manually complete the remaining data portion of the template.
A5184 Bayer TMA HCV RNA Report
Lab 54 was performing three Assays for Protocol A5184 which are not supported in the LDMS. To make data entry easier for this lab when submitting the
data by Excel to the DMC, three templates for this data were added to the LDMS. The lab could generate the Report with the specimen info (Protocol, PID,
Specimen Date, Specimen ID and Visit) loaded onto the template based on the
search criteria selected. The lab can export the report(s) into Excel and manually complete the remaining data portion of the template.
A5184 HCV Genotyping Report
Lab 54 was performing three Assays for Protocol A5184 which are not supported in the LDMS. To make data entry easier for this lab when submitting the
data by Excel to the DMC, three templates for this data were added to the LDMS. The lab could generate the Report with the specimen info (Protocol, PID,
Specimen Date, Specimen ID and Visit) loaded onto the template based on the
search criteria selected. The lab can export the report(s) into Excel and manually complete the remaining data portion of the template.
Aliquot Count by Primary
This report was designed to provide the user with a list of the Primaries in
the LDMS and provide them with a the number of aliquots associated with the
given Primary. This report summarizes the inventory within the local database.
CFAR Export Report
This report provides the user with a list of specimens that are stored within the
local LDMS and provides information regarding the specimens.
CFAR Storage Report
This report was designed based upon a request by lab 15 for a new storage report that would allow them to send their CFAR specimen information to their
data manager at the CFAR Repository. This report is export friendly. The report
provides a summary of the storage locations for specimens in the local lab’s
LDMS.
Database Dump Report
This report provides the user with a complete listing of all of the specimen
information held within a local lab’s database. This report would be useful to
a user if they need to track a complete summary of their database.
Exportable Abbott Assay Report
Similar the RNA Abbott Assay report, this report was designed to be an exportable RNA Assay Result Report with the following fields: PID, Visit Value and Visit Unit, Primary, Specimen ID, Global ID, Specimen Date, Received
Date, Import Date, Assay Date, RunID, Result, System Censor, User Censor,
Run System Censor, and Run User Censor.
Exportable Roche Amplicor Report
Similar to the RNA Abbott Assay report, this report was designed to be an
exportable RNA Assay Result Report with the following fields: PID, Visit value and Visit Unit, Primary, Specimen ID, Global ID, Specimen Date, Received
Date, Import Date, Assay Date, RunID, Result, System Censor, User Censor,
Run System Censor, and Run User Censor.
Exportable Roche Ultra Report
Similar to the RNA Abbott Assay report, this report was designed to be an
exportable RNA Assay Result Report with the following fields: PID, Visit val-
144
Reports
ue and Visit Unit, Primary, Specimen ID, Global ID, Specimen Date, Received
Date, Import Date, Assay Date, RunID, Result, System Censor, User Censor,
Run System Censor, and Run User Censor.
Lab 081 Billing report
This report was designed to provide lab 81 with an exportable report that they
use for billing purposes. The following were the requested fields: Group/Protocol, PID/ID1, Specimen Date, Derivative, and Global Spec ID.
Lab 081 CNICS by Date
This report was designed to provide lab 81 with an exportable report that they
use for billing purposes, the following were the requested fields: Group, Non
ACTG Protocol/ID2, Spec Date, Received Date, Primary, Volume and Volume
Units.
Lab 081 CNICS General
This report was designed to provide lab 81 with an exportable report that they
use for billing purposes. The following were the requested fields: Non ACTG
Protocol/ID2, PID/ID1, Specimen Date and Time, Received Date, Additive, Derivative, Sub Add/Der, Volume and Volume Units.
Lab 188 Storage
This report provides a summary of the samples that are available in the local
LDMS database, as well as provide a summary of what has been stored. The report is sorted by Global Specimen ID and displays “Not Stored” if samples have
yet to be placed in the virtual storage structure. This report would be helpful
for a user in tracking of what has been stored and what still needs to be stored
in their LDMS.
Lab 194 Billing Report
This report provides an exportable friendly repot of a summary of all the specimens within the local LDMS. The report provides the PID/ID1, Specimen ID,
Global Spec ID, other Spec ID, PRI,ADD, DER, Specimen Date, Specimen Time,
VID, VID Unit, Volume, and Volume Units.
Lab 40 LabKey Report
This report is designed to allow the lab to dump data into a specified format
that can be read/imported into their LabKey program for some of their internal
projects. The report provides basic specimen information including processing
information, storage data, and shipping information.
Lab 48 Billing Report
This report was designed to provide the following requested fields: Specimen
ID, group/protocol, PID/ID1, Visit/Visit Unit, Specimen Date, and Additive.
Lab 485 Aliquot Report
This report was designed to mimic the Specimen Export Report but to sort the
results in the following order- Group, Non ACTG Protocol, Non ACTG PID, Visit
Value, Primary, Additive, Derivative.
Lab 485 Specimen Count
This report provides a count for unique Primary/Additive/Derivative/Sub-Derivative combinations that can be ordered by: Group/Protocol/PTID/Visit combinations. The report is then grouped by Group/ID2.
Lab 485 Specimen Count With Volume
Similar to the Lab 485 Specimen Count report, this report was designed to provide a count for unique Primary/Additive/Derivative/Sub-Derivative combinations that can be ordered by: Group/Protocol/PTID/Visit combinations. The report is then grouped by Group/ID2.
Primary Specimen Database
This report provides the user with a list of the Primary LDMS Specimen Numbers and the associated Draw Date and Received Dates.
Quest Import Manifest Report
This report provides a summary of the batches that have been received via the
LDMS Shipping file. The report will not list batches that have been received
via text file.
Sample Counts for Specified Group
This report is designed to allow the lab to view the number of samples that
are available of a given specimen type. The report is grouped by the samples
Group. This would be helpful to a user to view a summary of available samples
for a given group based on their sample type.
SCHARP GSC Assay Results
This report was designed to be used for reporting assay results to SCHARP. The
first group of fields on the report contains basic specimen information that will
be populated by LDMS. This is followed by a second group of fields that LDMS
will leave blank and will be filled in by the lab (these are the assay result fields).
SCHARP GSS Assay Results
This report was designed to be used for reporting assay results to SCHARP. The
first group of fields on the report contains basic specimen information that will
RPID Reports
145
be populated by LDMS. This is followed by a second group of fields that LDMS
will leave blank and will be filled in by the lab (these are the assay result fields).
SCHARP Manifest Assay Results
Tool
This report was designed to provide the labs with an exportable report, that
they will be able to generate and send to SCHARP, which will have the data
used for upload into SCHARP's assay result tool.
SCHARP VGC Assay Results
This report was designed to be used for reporting assay results to SCHARP. The
first group of fields on the report contains basic specimen information that will
be populated by LDMS. This is followed by a second group of fields that LDMS
will leave blank and will be filled in by the lab (these are the assay result fields).
Specimen Export
This report was designed for when a user has logged in non-government group
specimens into the Specimen Management module and has shipped these
specimens via the shipping module.
Storage Export Report
Similar to the CFAR Export report, this report provides the user with a list of
specimens that are stored within the local LDMS and provides information regarding the specimens. The major difference is that this report contains headers and displays the complete storage location.
Westat DNA 1.5 Export Report
Similar to the Westat DNA Export Report, this report is designed to mimic a
DNA 1.5 Assay results by protocol report that was not useful for the folks at
Westat, therefore, this report was created to provide similar DNA 1.5 Assay
result data in a new format.
Westat DNA Export Report
This report is designed to mimic a DNA Results by Protocol Report that was
not useful for the folks at Westat, therefore, this report was created to provide
similar DNA result data in a new format.
Westat Nuclisens Export Report
Similar to the Westat DNA Export Report, this report is designed to mimic a
Nuclisens Assay results by protocol report that was not useful for the folks at
Westat, therefore, this report was created to provide similar Nuclisens Assay
result data in a new format.
Westat PK Export Report
Similar to the Westat DNA Export Report, this report is designed to mimic a
PK Assay results by protocol report that was not useful for the folks at Westat,
therefore, this report was created to provide similar PK Assay result data in a
new format.
Westat Roche Amplicor Export Report
Similar to the Westat DNA Export Report, this report is designed to mimic a
Roche Amplicor Assay Results by Protocol Report that was not useful for the
folks at Westat, therefore, this report was created to provide similar Roche Amplicor Assay result data in a new format.
Westat Roche Ultra Export Report
Similar to the Westat DNA Export Report, this report is designed to mimic a
Roche Ultrasensitive Assay results by protocol report that was not useful for
the folks at Westat, therefore, this report was created to provide similar Roche
Ultrasensitive Assay result data in a new format.
WIHS Nuclisens Control
This report provides the user with a summary of the controls that are currently
available for the Nuclisens Assay.
WIHS Nuclisens Specimen
This report provides the user with a summary of Nuclisens Assay results for
WIHS samples that were completed in the lab’s database.
WIHS Taqman RNA Specimen Export
This report was designed to be similar to the current WIHS Nuclisens RNA
Specimens Export File Report in the Reports Module, but with information
from the Taqman assay. The report contains a summary of the specimen and
run information.
WITS Storage Detail Report
Similar to the Storage Export Report, this report provides the user with a list of
specimens that are stored within the local LDMS and provides information regarding the specimens. The major difference is that this report contains Global
Specimen ID’s as opposed to LDMS Specimen ID’s.
RPID Reports
Discrepancy Report
This report provides the linking of a Specimen ID and Other Specimen ID for
a sample before importing through the RPID program and the corresponding
146
Reports
Specimen ID and other Specimen ID after the sample has been moved through
the RPID program. This report is only available for lab 223.
Lab 223 - LDMS to Oracle Mapping
This report provides the linking of the different Other Specimen ID’s in the
LDMS to their associated RPID based on local LDMS and lab 223’s separate
Oracle database.
Lab 223 Oracle to LDMS Mapping
This report provides the linking of the different codes that are held within lab
223’s separate Oracle database to the associated fields in the LDMS. This provides the user with a sample and code from their separate Oracle database, and
compares it to the currently linked Other Spec ID, and the associated RPID value.
Lab 223 RPID Oracle Merge Report
This report is designed strictly for lab 223 with the use of their local oracle
database that is used to track details about the DNA extraction for the RPID
samples. The data within this database is loaded into a temp table and merged
with the specimens in the LDMS via the Other Specimen ID field and the sample
number held within the oracle table.
Random PID Report
This report provides the user with the linking between the actual PID and the
RPID for a particular specimen. This report would be useful for a user to have
a summary of the confidential linking in one place.
RPID Specimen Request
This report provides lab 223 with a mapping of specimens from a submitted
specimen request that would be dropped down to the labs tableset and provides
the location of the specimens after the RPID program randomizes the information within the request.
Specimens for a given Other Spec ID
This report provides a list of Other Specimen ID’s and their linking to their
associated received Specimens. The report also provides the specimen type, as
well as the receiving information.
Specimens Not Arrived
This report provides lab 223 with a list of specimens that were expected to be
sent to lab 223 (based on a table request that is dropped to their lab) but have
yet to arrive at the lab.
WIHS Reports
Processing Log - Lab 263
This report provides the user with a list of samples that fit a predefined criteria
set by lab 263. When a certain subset of Specimen Type and Other Specimen
ID entries are completed, the specimen appears on this report and provides the
processing instructions based upon the Other Specimen ID code.
Viral Load Results
This report provides the user with a list of the different RNA assay runs that
the lab has preformed, including specific details regarding the run (Test type,
Control Information, Samples (including PID, Specimen/Received Dates, Specimen Type) as well as the results.
WIHS Batch Report
This report provides the user with details regarding assay results that have been
completed for a given lab on. It provides summary information about the specimen as well as summary information about the run itself.
WIHS Visit Report
This report provides the user with a list of the different RNA assay runs that
the lab has preformed, including specific details regarding the run (Test type,
Control Information, Samples (including PID, Date, Specimen Type and Visit)
as well as the results.
VTN Reports
Guspec and Storage Location Report
This report provides the user with a simple linking of all the specimens that are
currently in a local lab’s storage structure. The report provides the user with
the Global Specimen ID and its corresponding Storage location.
SCHARP Export Report
This report provides the user with a summary of all of the specimens in a local
LDMS. The user can export this report and provide a data management center,
such as SCHARP, with a summary of specimens in the local LDMS with specific
fields that make it somewhat different than a specimen log report.
ATN Reports
147
ATN Reports
ATN Repository Report
This report provides the user with a summary of all the ATN assigned samples
that have been imported into the local lab’s LDMS. This report would be useful
to a user to track the inventory of imported ATN samples.
Preload Reports
Preload List
This report provides the user with a list of all of the available preloads that are
present in the local LDMS, including FSTRF-defined preloads. The report also
summarizes all of the details of the preload, including criteria and output.
Anon[ymization] Reports
Anonymous Patient Map
This report shows the relationship between identifying information in an original specimen and anonymized specimens. The fields that are displayed are
the ones relevant to anonymization, such as the original and new PID, and the
original and new global specimen ID.
IQA Reports
IQA Sending Lab Reports
This report provides the IQA lab with a summary of the various cryopreservation fields imported from the processing labs. This report is searchable by Processing Lab or Thaw Date.
Percent Viability-Summary
This report provides the IQA lab with a summary of the Percent Viability at the
IQA after the samples had been thawed for a given month. This report would
be useful for the user to provide a summary of a labs performance in the IQA
in a given timeframe for Percent Viability.
Percent Viable Recovery-Summary
This report provides the IQA lab with a summary of the Percent Viable Recovery
at the IQA after the samples had been thawed for a given month. This report
would be useful for the user to provide a summary of a lab’s performance in the
IQA in a give timeframe for Viable Recovery.
148
Chapter 8. Labels and Printer Configuration
Advanced Label Printing
When you add or modify aliquots in the Specimen Management
task, you will automatically
be prompted to print labels. You can reprint labels in Specimen Management by right-clicking
on an aliquot and selecting Print Labels for Selected Aliquots.
In Specimen Management , you can only generate labels for aliquots that are part of the same
record. In contrast, the Labels task allows you to search for specimens instead, allowing you
to generate multiple labels at once.
Access the Labels task by clicking the
button from the LDMS toolbar.
Figure 8.1. LDMS Labels screen
▲ The labels format screen
Procedure 8.1. Printing labels
1.
2.
3.
Select a Group from the drop-down list in the top-left of the screen.
Select the label Format from the drop-down list the top-right.
Select the label stock (i.e. paper) from the list beneath the Group list. (Stock that is disabled
has too few rows for the label Format selected).
4.
(Optional) If you have a list of global specimen IDs, click the
button. The file must
be a list of Global Specimen IDs, where each line contains exactly one ID.
Select a field from the Field drop-down list.
5.
Note
At least one of the following fields must be part of your search:
150
Labels and Printer Configuration
6.
7.
8.
9.
• Specimen ID
• Global Specimen ID
• Received Date
• Harvest Date (cultures only)
• Received Batch Number
• Ship Batch Number
Select an Operator for the search term.
Select a value to search for in the Value field.
Click the
button. This will add your criteria to the list on the left.
Once you've added all the criteria you want to add, click the button from the LDMS toolbar.
Tip
Were you printing labels and something went wrong? Rather than re-printing all of the
labels, you can start in the middle to avoid re-printing labels that you already printed.
Enter the number of labels that you don't want to print from the beginning of the labels
into the Skip field. These labels won't be added to the labels generated.
Creating a New Label Format
Labels in LDMS are setup like tables. A label consists of an optional barcode, and rows and
columns of fields. Everything on the barcode is center aligned. For each field, you need to select
the row that it will appear in and the column (or position) in that row. You are limited to four
fields per row.
Figure 8.2. Parts of a label
Col 1
Col 2
▲ A typical label, showing how each field corresponds to a row and column. If a barcode is selected, it will
always appear first. Every row is center aligned, so columns may not necessarily be aligned.
Procedure 8.2. Creating a new label format
1.
2.
3.
4.
5.
Select TasksLabels from the LDMS menu bar or click the button from the LDMS toolbar.
Select a group from the Group list.
(Optional) If you want to base your new label on an existing label, select an existing format
from the Format menu, otherwise leave the Format field blank.
Click the button from the LDMS toolbar. You'll be prompted if you want to create a new
label based on the label selected in the Format field (if no format was selected, LDMS will
tell you that you are basing your label on ""). Select Yes or No as appropriate.
Enter the name for your label as you want it to appear in LDMS Specimen Management
into the text box.
Creating a New Label Format
151
Figure 8.3. Label format settings and label output
1
2
1
2
▲ The label formatting settings used to achieve an output label.
This will create a new entry in the Format menu for the selected group. Your new label format
will be blank though, so you need to configure it. This is done on the right side of the screen. To
add a field, select the check box next to it, and then enter the row and col[umn] where the field
should appear. To see how the selection of fields corresponds to an actual label, see Figure 8.3.
Format options
Barcode Content
The barcode for the label; this always appears at the top of the label, if selected.
Col
Enter the position in the row where the item should appear (e.g. 1 for first, 2
for second, etc).
Data Item
Name of the field from LDMS to display; click the check box next to a field to
display it.
Length
The length of a field (in characters). This is how much space the field needs to
appear on the label.
Row
Enter the row on the label where you want the field to appear.
You can see a preview of how your labels will look on a given stock to make sure that there will
be no issues when you print actual labels. To do this, select your label format, then select a label
stock on the left side of the screen. Next click the
button. This will generated labels
without real data so that you can test your printer with the new label format.
Note
The available label stock on the left will automatically reflect the label selected. Each
stock is only capable of displaying so many rows (as shown in the Max Rows column).
To learn more about a stock, select it and click the
button.
Alignment options
Number of sample label rows
Number of labels of display.
Preview
Display the labels; this is the same thing you will see in LDMS Specimen Management when you actually generate the labels.
Show All Positions
This will show used rows as X and unused (but available) space as O.
Show Field Names
Display the name of each field; the extra text may cause readability issues (field
names will never appear on actual labels though).
Once you've finished configuring your label's format, click the
button from the LDMS toolbar.
152
Labels and Printer Configuration
Setting the Default Label Size and Format
When you add or modify specimens in LDMS Specimen Management , you will be prompted
to print new labels for the specimens. You can change the default label size and format selected
for different groups, to avoid needing to select this information every time. You'll still be given
the opportunity before creating the labels, however, to override the default settings.
Procedure 8.3. Setting the default label size and format for a group
1.
2.
Click AdministrationLabel Setup from the LDMS menu bar.
Select the group for which you want to define the default label settings from the Group
drop-down list.
Select the desired label format for new specimen labels for this group from the Label Format drop-down list.
Select the desired label stock size from the Label Size list.
Click the OK button.
3.
4.
5.
This can be done for multiple groups, meaning the default setting for one group can be different than another. If you are printing labels for specimens from different groups (such as coenrollments), you'll be prompted to print labels for each group separately with the appropriate
default label settings selected.
Barcodes
LDMS supports different 2D barcode formats on labels. The barcode (if present) always appears
first on the label, and contains the global specimen ID.
Barcode readers can be used in many different places in LDMS to scan a barcode and quickly do
something with a specimen:
Barcode functions in LDMS
Assays
Scanning on the Assay Selection tab will add the specimen to the Specimens
Found list.
Shipping
Scanning on the Setup Shipment tab will add the specimen to a shipping
batch; scanning on the QA/QC tab will mark that specimen as PASSED of
FAILED, depending on whether or not the global specimen ID matches.
Specimen Management
Scanning a barcode in LDMS Specimen Management
associated with that Global Specimen ID.
Storage
Scanning on the Bulk Add tab will select the specimen for storage; scanning
on the Main View tab will bring up that specimen's storage location.
will jump to the records
To set the default barcode reader for LDMS, go to AdministrationSystem Configuration
and change to the Configuration tab. Look for the Barcode Reader option. For most hardware,
the Code Reader option should suffice.
Setting the Printer Used to Generate Labels and Reports
153
Tip
Here are a few tips for using barcode readers with LDMS:
•
•
•
•
Hold the scanner four to six inches away from the barcode
Don't scan at a 90 degree angle
If a barcode doesn't scan, let go of the trigger before trying to read it again
Verify that a barcode scans before storing or shipping the specimen
If you need assistance getting a barcode reader to work, contact LDMS User Support.
See the section called “Getting Help” on page 10.
Setting the Printer Used to Generate Labels and Reports
When LDMS generates reports or labels, it uses the driver for your printer to determine paper
size and orientation. LDMS needs to know what printer you are using before generating any
labels. If this crucial step is not performed, labels will not be sized correctly for your label printer,
even if you select the correct printer to actually print them.
Important
If you want to modify the paper size or orientation for your printer, this must be done
in your Microsoft Windows® printer settings. If you need assistance setting up printing
hardware, contact LDMS User Support for assistance.
Procedure 8.4. Configuring the printer used to generate labels and reports
1.
2.
3.
4.
Select AdministrationPrinter Configuration from the LDMS menu bar.
From the Report Printer list on the left, select the printer's driver that should be used to
generate reports.
From the Label Printer list on the right, select the printer's driver that should be used to
generate labels.
Click the OK button.
Printing Test Labels
It is possible to print a set of test labels so that you can see how a specific label will appear
when printed with your hardware. This can be done using fake information that takes up the
maximum amount of space, allowing you to see if there are any places on your label where the
text may not fit correctly.
Procedure 8.5. Printing test labels
1.
2.
3.
4.
5.
Open the labels task by clicking the button from the LDMS toolbar.
Select a group from the Group list in the upper-left corner.
Select a label format from the Format box on the right.
Select a label size from the list of label stock on the left.
Click the
button.
154
Labels and Printer Configuration
The Create Alignment Report window will open. The following options can be set:
Number of sample label rows
Preview
This is the number of rows test specimen labels to generate per page.
Whether or not to generate a preview.
Important
Show field names
Do not deselect this option. This option must be
enabled or the test labels will not be generated.
The name of each item on the label will appear next to it.
Warning
6.
This can affect the appearance of the labels, and
should not be used as a representation of what
the labels will actually look like.
Show all positions
Each row will show the amount of space used by the current label format and the amount available space, based
on the label stock size. The X on the label means that
information could be printed there, while O means that
it is free space. For example, if a row has two items and
each has a length of 8, then the row will have 26 X show,
and the rest of the row will show O. This will help you
see if your labels have extra spaced based on the size you
are using.
(Optional) When the SAP Crystal Reports Viewer opens, click the Print button from the
toolbar to print the test labels.
Setting up Specific Printers
Setting up the Brady BBP33 Printer
1.
Install the driver for the printer.
2.
For assistance obtaining and installing the driver, contact your laboratory's IT support staff
or Brady customer support [http://www.bradyid.com].
Open the printer settings from the Windows Start menu.
3.
4.
5.
6.
These are typically found in StartDevices and Printers.
Right click on the BBP33 and select Printing preferences.
Click the Advanced button.
Click the Properties button next to Paper Size.
Select the paper size you are using from the Paper Size box.
7.
8.
For example, if using the label stock B33-179-492, you would select B33-179 from the
Paper Size box.
Set the printer as your label printer in LDMS. For instructions on doing this, see the section
called “Setting the Printer Used to Generate Labels and Reports” on page 153.
Print a set of test labels using the Labels task in LDMS.
Setting up the Brady IP300 Printer
155
For instructions on printing test labels, see the section called “Printing Test Labels” on page 153.
The Brady BBP33 is known to work with the following
label stock
LDMS label
B33-179-492 (1"x1")
Barcodelabel19
Setting up the Brady IP300 Printer
1.
2.
3.
Install the driver for the printer.
For assistance obtaining and installing the driver, contact your laboratory's IT support staff
or Brady customer support [http://www.bradyid.com].
Contact LDMS User Support to obtain a specific update to Crystal Reports. This update is
required to use the IP300 with LDMS.
On the control panel on the front of the printer, change the printer head to +10mm for the
X axis and -3.0mm for the Y axis.
Note
4.
These printer head adjustments have been tested with the label stock THT-183-461.
Other label stocks may require different printer head adjustments settings.
Open the printer settings from the Windows Start menu.
5.
6.
7.
8.
There are typically found in StartDevices and Printers.
Right click on the IP300 and select Printing preferences.
Click the Advanced button.
Click the Properties button next to Paper Size.
Select the paper size you are using from the Paper Size box.
For example, if using the label stock THT-183-461-1, you would select THT-183-461 from
the Paper Size box.
9. Set the printer as your label printer in LDMS. For instructions on doing this, see the section
called “Setting the Printer Used to Generate Labels and Reports” on page 153.
10. Print a set of test labels in LDMS.
For instructions on printing test labels, see the section called “Printing Test Labels” on page 153.
The Brady IP300 is known to work with the following:
Label stock
Stock size in LDMS
THT-183-461
Barcode label 7
Setting up the Brady BMP53 Printer
1.
Install the driver for the printer.
2.
For assistance obtaining and installing the driver, contact your laboratory's IT support staff
or Brady customer support [http://www.bradyid.com].
Open the printer settings from the Windows Start menu.
3.
4.
There are typically found in StartDevices and Printers.
Right click on the BMP51(53) and select Printing preferences.
Click the Advanced button.
156
Labels and Printer Configuration
5.
6.
Click the Properties button next to Paper Size.
Select the paper size you are using from the Paper Size box.
7.
For example, if using the label stock M-156-492, you would select M-156 from the Paper
Size box.
Set the printer as your label printer in LDMS. For instructions on doing this, see the section
called “Setting the Printer Used to Generate Labels and Reports” on page 153.
Print a set of test labels in LDMS.
8.
For instructions on printing test labels, see the section called “Printing Test Labels” on page 153.
The Brady IP300 is known to work with the following
Cartridge
Stock size in LDMS
M-156-492
Barcode Label 16
Setting up the Brady BP-PR 300 Printer
1.
Install the driver for the printer.
2.
For assistance obtaining and installing the driver, contact your laboratory's IT support staff
or Brady customer support [http://www.bradyid.com].
Open the printer settings from the Windows Start menu.
3.
4.
5.
There are typically found in StartDevices and Printers.
Right click on the Brady BP-PR 300 PLUS and select Properties.
On the General tab, click the Preferences button.
In the Size section, change the Width and Height to the size of the label stock you are
using.
6.
For example, if the label stock is 1.75"x1.0", change the Widthto 1.75 and change the
Height to 1.0.
Set the printer as your label printer in LDMS. For instructions on doing this, see the section
called “Setting the Printer Used to Generate Labels and Reports” on page 153.
Print a set of test labels in LDMS.
7.
For instructions on printing test labels, see the section called “Printing Test Labels” on page 153.
Setting up the Brady BBP11-34L Printer
1.
Open the printer settings from the Windows Start menu.
2.
3.
There are typically found in StartDevices and Printers.
Right click on the BBP33 and select Printing preferences.
On the Page Setup tab, click the New button under Stock and enter the dimensions 1.75in
x 1.00in.
4.
These are the dimensions for the THT-183-461-0.5-SC label stock.
Click the Advanced Options button.
5.
Verify that the horizontal and vertical offset options are set to 0in.
Change to the Stock tab.
Enter the following into the Media settings section:
Setting up the LabXpert Printer
6.
157
Field
Value
Method
Thermal transfer
Type
Labels with marks
Mark height
0.08 in
Mark offset
Change to the Options tab.
0.00 in
Set the following in the Printer options section:
7.
8.
Field
Value
Print speed
2.00 in/sec
Darkness
10
Click the OK button.
Set the printer as your label printer in LDMS. For instructions on doing this, see the section
called “Setting the Printer Used to Generate Labels and Reports” on page 153.
The BBP11-34L is known to work with the following:
Label stock
Stock size in LDMS
THT-183-461-0.5-SC
Barcode Label 9
Setting up the LabXpert Printer
1.
2.
3.
4.
5.
6.
7.
8.
Open the printer settings from the Windows Start menu.
There are typically found in StartDevices and Printers.
Right click on the LabXpert and select Printing preferences.
Expand the Paper/Output setting, and click the Properties button next to Paper Size.
Select the paper size that appear on the top of the label cartridge from the Paper Size box,
and then click the OK button.
Click the OK button to close the Printing preferences window.
In the Devices and Printers window, right-click on the LabXpert printer and select Properties
Change to the Ports tab.
Click the Configure Port button.
Enter the following settings:
9.
Field
Value
Bits per second
115200
Data bits
8
Parity
None
Stop bits
1
Flow control
Xon/Xoff
Configure the LabXpert printer to accept input from the LDMS computer.
Important
This must completed every time the printer is turned on.
158
Labels and Printer Configuration
a.
b.
c.
d.
On the LabXpert print, press the Menu button.
Press the Next button three times.
Click the PC button.
Set the printer as your label printer in LDMS. For instructions on doing this, see the
section called “Setting the Printer Used to Generate Labels and Reports” on page 153.
Setting up the Brady MVP 300 Printer
1.
Open the printer settings from the Windows Start menu.
2.
3.
There are typically found in StartDevices and Printers.
Right click on the Brady THT 300 MVP and select Printing preferences.
Expand the Paper/Output setting.
Select User Defined from the Paper Size box.
Click the Customize button.
4.
5.
6.
7.
8.
9.
a. Enter the dimensions of paper into the Width and Height in the Paper Sizes boxes.
b. Select Inches from the Unit of Measurement box.
c. Click the OK button to close the Paper Size Setup window.
Click the OK button to close the Printing preferences window.
In the Devices and Printers window, right-click on the Brady THT 300 MVP printer and
select Properties.
Change to the Printer tab.
Expand Device OptionsHead SettingsPrint Darkness
Change the Print Darkness setting to 22.
Expand the Speed Settings.
Enter the following settings:
Field
Value to enter
Print speed
2.00 in/sec
Slew speed
2.00 in/sec
Back feed speed
2.00 in/sec
10. Change to the Ports tab.
11. Click the Configure Port button.
Enter the following settings:
Field
Value
Bits per second
115200
Data bits
8
Parity
None
Stop bits
1
Flow control
Xon/Xoff
12. Physically configure the printer. (See Procedure 8.6, “Physically configuring the Brady MVP
300”)
13. Set the printer as your label printer in LDMS. For instructions on doing this, see the section
called “Setting the Printer Used to Generate Labels and Reports” on page 153.
Setting up the Brady MVP 300 Printer
159
Procedure 8.6. Physically configuring the Brady MVP 300
1.
Open the printer and remove the protective plate that is covering the ribbon sensor.
Figure 8.4. Removable plate within the MVP 300
2.
Slide the transmissive sensor protector to the outside of the adjustable transmissive sensor.
160
Labels and Printer Configuration
Figure 8.5. Adjustable transmissive sensor and protector
3.
Place the ribbon on the ribbon supply spindle.
The shiny side of the ribbon must be facing up.
Setting up the Brady MVP 300 Printer
161
Figure 8.6. Placing ribbon on spindle
4.
5.
Feed the ribbon through the ribbon sensor and around the print head assembly.
Wrap the ribbon around the ribbon take-up spindle until it is tight.
Tip
6.
You can attach a piece of tape to the end of the ribbon to help keep it tight during
the loading processing.
Place the labels on the media supply spindle. The printable side of the label must be face-up.
162
Labels and Printer Configuration
Figure 8.7. Side view of printer showing media supply spindle
7.
8.
Place the labels through the media guide and align the notch between labels with the tearoff plate of the printer.
Adjust the ribbon sensor so that the notch of the label will cross the ribbon sensor.
The ribbon sensor is the red light under the label.
Setting up the Brady MVP 300 Printer
163
Figure 8.8. MVP 300 ribbon sensor and labels
9.
Close the print head and ensure that the ribbon is aligned with the left side of the label.
Note
This adjustment may require you to slide the ribbon across the print head assembly.
164
Labels and Printer Configuration
Figure 8.9. Front view of MVP 300
10. Close the printer
11. Press the
button on the control pad on the front of the printer.
Figure 8.10. MVP 300 control pad
12. Press the
13. Press the
button until the printer displays Manual Calibrate.
button.
Setting up the Zebra GX 430t printer
14. Press the
165
button.
The printer will re-calibrate its label settings.
15. Press the
button, and then press the
button to save the changes.
Setting up the Zebra GX 430t printer
Before you begin:
• Install the driver for your printer. For assistance obtaining and installing the driver, contact
your laboratory’s local IT department or the manufacturer’s customer support.
• Load the printer with label stock and ribbon according to the printer’s manual.
1.
Open the printer settings from the Windows Start menu.
2.
3.
4.
These are typically found in StartDevices and Printers.
Right click the icon for your printer, and click Printing preferences.
On the Options tab, change the Speed to 2.
Change the Print Darkness to about 27.
5.
6.
7.
8.
9.
This setting should be adjusted up or down, depending on whether labels are too light or
too dark.
In Paper format, select inches.
In Paper Size, set the Width to 4.00 and the Height to 1.75.
On the Advanced Setup tab, click Calibrate.
On the Advanced Setup tab, verify that the Tracking Mode is set to Web Sensing.
In LDMS, set the printer as your label printer.
After the printer is set up, you should print a set of test labels to ensure that it is working correctly.
Setting up other printers
Label printers that do not have specific instructions in this manual may also work with LDMS,
however they have not been tested by LDMS User Support.
For a current list of recommended printers for use with LDMS, contact LDMS User Support.
166
Chapter 9. System Administration and Maintenance
System Configuration
Configuration Tab
The following options are available on the Configuration tab in AdministrationSystem
Configuration:
Auditor Mode
This option is disabled and not available to users.
Barcode Reader
Set the barcode reader used by LDMS. For most hardware, the Code Reader
option will work. For more information on barcodes and labels, see Chapter 8:
“Labels and Printer Configuration” on page 149.
Date Format
This option is disabled and not available to users. LDMS uses the date format
dd/Mon/yyyy (e.g. 09/Apr/2013).
Date Separator
This option is disabled and not available for use.
Idle Time Out
(Default = enabled) If selected, LDMS will automatically lock after the specified
amount of time of inactivity. LDMS will ask for a user name and password (it
need not be the same as the user last using LDMS when it locked) before it will
open again.
Module Login
(Default = disabled) If selected, users will need to re-enter their username and
password to access almost every feature in LDMS. This security feature is useful
if you want to prevent users from using LDMS while another person is logged
in.
Process Tech Initials default to current user
(Default = enabled) The initials for the current user will be entered automatically in fields for the tech's initials throughout LDMS. To set or update a user's
initials, see the section called “Managing Users” on page 168.
Internet Tab
The Internet configuration tab was used back when Frontier Science used a dedicated phone
line to receive exportable data via a dial-up modem. This service is currently not used and these
settings should not be modified.
Storage Tab
By default, if you remove an aliquot from storage, it will be assigned the never store flag.
Never store prevents the aliquot from appearing as available on the Bulk Add tab in storage and
semantically indicates that the specimen does not exist at your laboratory.
If you would rather have LDMS not assign specimens the never store flag when they are
removed from storage, go to AdministrationSystem Configuration, then change to the
Storage tab and deselect the Permanent Delete Default Setting. This feature is enabled by
default.
Note
Contrary to the wording, having this setting enabled does not permanently delete specimens. For example, if you go to LDMS Specimen Management , you will still find
the specimen. When this feature is enabled, removing from storage only adds never
store; the specimen itself is not deleted.
168
System Administration and Maintenance
For more information on never
Store” on page 33.
store, see the section called “Using Never
Assays Tab
The Assays tab is where you go to associate an assay in LDMS with reader hardware. For instructions on doing this, see the section called “Associating an Assay with a Reader” on page 123.
Import Tab
LDMS has an import as is feature that allows you to keep the existing storage structure of specimens that you received in a shipment. For example, suppose specimens came to you in a box
configuration. Rather than importing the specimens and then adding them to storage, you can
import the box, keep the specimens current storage positions, and just add the box to your storage.
Procedure 9.1. Enabling and setting up import as is
1.
2.
3.
4.
Click AdministrationSystem Configuration from the LDMS menu bar.
Change to the Import tab.
Select the Allow automatic storage of imported samples option.
(Optional) To override any setting from the shipping file, select the appropriate Override
option.
For more information on importing specimens from another laboratory, see the section called
“Importing a Shipment from an LDMS Laboratory” on page 77.
Managing Users
Creating New Users
LDMS is a user-based system. LDMS cannot be used without a valid user name and password.
User names and passwords in LDMS are not tied to your computer's login credentials. By using
individual user accounts, it is possible to keep track of who did what in LDMS, and prevent users
from accessing advanced features that they should not be using.
When LDMS is installed, it comes with one default account, ADMIN (the password is also admin). The first time you start LDMS, you should immediately create one or more user accounts,
and then remove the admin account. See the section called “Logging into LDMS for the First
Time” on page 5.
Important
Using the ADMIN account for daily work is strongly discouraged. It should be deleted
as soon as you have added at least one user with system administrative privileges.
Procedure 9.2. Adding a new user account
1.
2.
3.
4.
Click AdministrationUser Configuration from the LDMS menu bar.
On the User Configuration screen, click the
button.
Complete the User Name field. This field must be unique among other user names at your
laboratory.
Enter the user's Real Name. This field can contain spaces.
Adjusting User Permissions
169
Enter the user's Initials.
Enter the password for the new user.
5.
6.
Note
Passwords in LDMS are not case-sensitive.
By default, a user's Initials will be used throughout LDMS to populate fields with the user's
initials when appropriate. This behavior can be changed. See the section called “Configuration
Tab” on page 167.
Adjusting User Permissions
Every user in LDMS is assigned privileges. When you create a new user, you should review the
default privileges that are assigned to all new users and adjust them accordingly.
Every privilege corresponds to a menu item in LDMS. For example, the Kit Entry permission
controls access to QA/QCKit Entry. If you want to know what a particular permission does,
find the LDMS menu item of the same name.
Procedure 9.3. Modifying a user's permissions
1.
2.
3.
Click AdministrationUser Configuration from the LDMS menu bar.
Select the user that you want to modify from the User ID drop-down list.
Select the permissions desired.
•
The View permission allows a user to see the records (e.g. viewing aliquots in Specimen
Management ).
•
The delete permission allows a user to remove records (e.g. deleting an aliquot).
•
The modify permission allows a user to change records (e.g. changing an aliquot's volume); the view permission would also be required separately.
•
The add permission allows a user to create new records (e.g. adding new specimens);
this can be independent of the ability to view records, so a person could enter data
without being able to see existing data.
•
The full permission is the same as giving a user access to view, add, modify, and delete.
(Optional) To make a user a system administrator, select the System Administrator Capabilities option.
Click the
button from the LDMS toolbar.
4.
5.
Tip
Click on a column header to select or unselect all of the permissions in that column. This
is useful if you want to quickly give someone full permission to everything in LDMS.
System Administrator Capabilities
At least one user at your laboratory must have System Administrator Capabilities. This
gives the user access the certain features:
•
•
•
•
Reset and change passwords for other users
Lock out and unlock user accounts
Delete users
Designate other system administrators
By default, the original ADMIN account has system administrator privileges. Before deleting the ADMIN account, make certain that at least one user has system administrator capabilities.
170
System Administration and Maintenance
Modifying Users and Passwords
While a user's login name cannot be modified, their full name and initials can. You would need
to do this, for example, if a user's last name changed.
Procedure 9.4. Updating a user
1.
2.
3.
Click AdministratorUser Configuration from the LDMS menu bar.
Select the user to modify from the User ID drop-down list.
Do one of the following:
•
To update the user's full name or initials, click the
button.
•
To delete the user's account, click the
button.
•
To change the user's password without the current password, click the
ton (requires system administrator capabilities).
•
To prevent the user from logging in without deleting the account, click the
button (requires system administrator capabilities).
but-
Note
4.
The message entered when locking out a user will be displayed if that user
attempts to log in.
•
To change the user's password when you know the current password, click the
button.
Click the
button from the LDMS toolbar.
Tip
If you want to allow users to change their own passwords without being able to make
any other user account changes, give them view access to User Configuration. They
will only be able to access the
button for their own account.
Adjusting Login Security
In addition to adjusting individual user permissions, there are a few security settings that you
can change to help prevent users for using LDMS under another person's user account:
• Require login when trying to use a specific feature. Even if users are logged into LDMS, they
will still be required to provide their password to move between tasks.
• Adjust the time frame when LDMS will automatically lock. A username and password will be
required to access LDMS again.
• Train laboratory staff to lock LDMS manually when leaving a workstation. This is done by
clicking Ctrl+Shift+LAdministrationSession Lock from the LDMS menu bar.
For the first two items, see the section called “Configuration Tab” on page 167.
Group Configuration
LDMS has many hard-coded groups (typically government-sponsored networks like ACTG and
IMPAACT). When one of these groups is selected in LDMS Specimen Management , LDMS
enforces certain rules specific to that network on what fields are required and what are valid
Group Configuration
171
entries. These groups are defined by Frontier Science in collaboration with individual networks,
and cannot be modified by users.
Laboratories can, however, add their own groups for internal use. Internal groups can be modified and used as a laboratory sees fit.
To view groups and add new internal groups, click AdministrationGroup Configuration.
You'll see a list of all groups in your LDMS installation, along with the labels for the ID1, ID2,
and ID3 fields in Specimen Management .
Figure 9.1. Group Configuration
▲ Viewing and configuring groups in LDMS; only internal created by your laboratory can groups can be
modified.
Procedure 9.5. Adding a new internal group to LDMS
1.
2.
3.
4.
5.
6.
Click AdministrationGroup Configuration from the LDMS menu bar.
Click the
button to add a new row to the listing of groups.
Enter the name for the group as you want it to appear throughout LDMS into the Group
field.
Enter a description for your group into the Group Desc[ription] field. This information will
appear if a user presses Ctrl+H with your group selected.
Enter the label that you want to use for the ID1, ID2, and (optionally) ID3 fields in LDMS
Specimen Management into the Patient ID, Study, and Secondary ID fields respectively.
Click the
button from the LDMS toolbar.
You can only modify groups that you have created. If you attempt to modify a group that is hardcoded into LDMS, you will receive an error message.
172
System Administration and Maintenance
Internal Groups and shipping
Since internal groups are created at individual laboratories, only that laboratory has the
group available. If you want to ship specimens in an internal group to another laboratory,
there are a few options:
• The group from the sending laboratory can be mapped to an existing group at the receiving laboratory
• A new group can be created at the receiving laboratory
The receiving laboratory will automatically be prompted to do one of these when the shipping file is imported.
This distinction between internal and government groups prevents the two from be added
to the same shipping file in LDMS.
Backups
When bad things happen, a recent backup can be the difference between simply copying a few
files to re-entering hundreds of specimens. This is not an overstatement. Every year, inevitably,
several laboratories experience a hardware failure and their most recent backup stored off of
the computer is outdated.
To help avoid this painful scenario, LDMS automatically creates a backup of your database once
per day. By default, these backups are generated every day at noon and placed in C:\fstrf
\backup. Since this backup is stored locally on the same computer as LDMS, you'll need to copy
it to another location. If you want to change the time that auto backups are created, contact
LDMS User Support for assistance.
Figure 9.2. LDMS backup file name format
[LabID]_[year][month][day].BK
▲ The format of backup file names in C:\fstrf\backup.
Important
LDMS only keeps its automatic backups files in C:\fstrf\backup for seven days. After that, the oldest backups will be deleted to help conserve hard drive space.
Frontier Science strongly recommends that laboratories copy the latest backup file in C:\fstrf
\backup to a safe location at least once each week. It is a good idea to keep backups on removable media, such as a tape or CD-RW, since backups that are on the same computer as LDMS
will not be helpful if you experience a computer failure.
In addition to back-up files that are automatically generated every day at noon, it is possible
to manually generate a new backup file. This is useful if you performed a significant amount of
work in LDMS in the afternoon and want to ensure that you have a backup file for that work.
Procedure 9.6. Manually generating a backup file
1.
Click AdministrationBackup Tracking from the LDMS menu bar.
Exports and Updates
2.
Click the Create backup button in the upper-right corner.
3.
A Windows command prompt window will open. This is the backup tool in LDMS.
Wait until the backup tool finishes creating the backup.
173
The backup file will appear in the same location as backup files automatically generated by
LDMS.
Procedure 9.7. Verifying the integrity of a backup file
1.
2.
Make a copy of the backup file
Open the backup file with a ZIP archive program.
3.
If you want to open the backup file using Windows, change the file extension of the backup
file from .BK to .ZIP. This will allow you to open it using Windows Explorer.
Open the backup log file.
4.
The log file will have the same names as the backup file, with the file extension .export
added. For example, if you open a backup file named 999_20140418120001.bk, the log
file in it will be named 999_20140418120001.dmp.export.
Look at the last line of the log file.
If the last line reads as follows, the backup was successful:
Job successfully completed at [time backup ran]
If the log file ends with anything else, the backup was a failure and should not be saved.
Important
Do not retain the copy of the backup file that you opened. If the backup is confirmed to
be complete, save the original instead.
LDMS has a mechanism for manually tracking when you have copied a backup file to a safe
location, and will show a list of automatic backups.
Procedure 9.8. Using the Backup Tracking tool
1.
2.
3.
4.
5.
6.
After copying the most recent backup file from C:\fstrf\backup, click AdministrationBackup Tracking from the LDMS menu bar.
Enter the date that the backup was created by LDMS into the Backup Date field.
Enter the initials of the person who copied the backup into the Tech Initials field.
Enter how you copied the database backup into the Method field. This might be an external
filesystem location, removable media, etc.
Enter any additional information into the Comment field. This could be used, for example,
if your laboratory has a system for uniquely identifying backups.
Click the button from the LDMS toolbar.
Exports and Updates
174
System Administration and Maintenance
Data you collect and enter into LDMS at your laboratory exists only in your laboratory's database.
It is not automatically transferred, sent to anyone, or synchronized with other laboratories. For
many research groups, Frontier Science performs data management services and maintains a
central database of specimen information for the group. The process of sending this centrally
managed data from your laboratory to Frontier Science is called exporting.
Exporting does not back up your local LDMS database. Only a portion of your laboratory's data
is sent through an export; it is not possible to reconstruct your laboratory's database using exported data.
When your laboratory performs an export, LDMS will check to see if there are any minor updates
(called deploys) available. If there are updates, LDMS will automatically download and install
them. These updates include changes to laboratory contact information, new preloads, specimen code updates, etc.
Note
The types of updates that LDMS can download automatically are small, incremental
changes. LDMS will not download or install major LDMS upgrades (in other words, if
you are running LDMS 7.2, you will not automatically be upgraded to LDMS 8.0 after
exporting). Larger LDMS updates that require you to download and run an installer are
announced by Frontier Science when they are released.
Figure 9.3. Exporting data to Frontier Science
Procedure 9.9. Exporting data to Frontier Science and downloading LDMS updates
1.
2.
Click TasksExport from the LDMS menu bar or click the button from the LDMS toolbar.
Click the
button. A series of messages will appear as the export is created and then
transferred.
There may be occasions when you cannot perform an export as intended. For example, if your
laboratory is located in a region with sporadic Internet connectivity, it may be difficult to reliably
perform an export. While it is not optimal, it is possible to manually create and send exportable
data to Frontier Science. Before attempting to do this, you should contact LDMS User Support as
they will need to be involved in several steps. See the section called “Getting Help” on page 10.
Procedure 9.10. Manually exporting data to Frontier Science
1.
Click TasksExport from the LDMS menu bar or click the
button from the LDMS toolbar.
Activity Log
175
2.
Generate an export file by clicking the
button. If there is already an existing file in
the Files to Transfer list, skip this step.
Select the export from the Files to Transfer section, and then click the
button. You
will be prompted to save the export file to your computer.
Contact LDMS User support. They will work with you to determine the most convenient
method for transferring the export file to Frontier Science.
After the export file has been acquired by LDMS User Support, LDMS User Support will
provide you with a password. With the export tool open, select the file that was transferred
manually and click the Mark button. You will be prompted to enter the password supplied
by LDMS User Support. The manual export is now complete.
3.
4.
5.
If you perform a manual export, keep in mind that you will not have received any deploy updates. It is possible for LDMS Use Support to manually provide these updates for you. For more
information, contact LDMS User Support.
What is and is not Exported
Exporting is the only process in LDMS where data is transmitted between Frontier Science
and a laboratory. This isn't just a process for sending data to Frontier Science, but also
the easiest way for your laboratory will receive important incremental LDMS updates. For
this reason, it's important for every laboratory to perform regular exports, even if Frontier
Science is not managing your data.
You might be wondering what data is sent when you export. The following information is
exported to Frontier Science from all laboratories:
• All specimen and assay data for the following groups: ANON, ACTG/IMPAACT, VQA,
AIEDRP, HPTN, VTN, ATN, CPQA, CHAVI, VIP, PHACS, MTN, IPREX, WITSRepos,
IRC, SHIMS, AERAS, FACTS, CONTROL, CIPRA, RPID.
• Reagent information
• Oracle database usage statistics (e.g. database size, number of records)
• LDMS user account information, such as names and initials
The following information is not exported:
•
•
•
•
LDMS user passwords
Data for groups not listed above
Data for internal groups that you created at your laboratory
Data and information stored on your computer not related to LDMS.
You can identify if an individual specimen will be exported in Specimen Management
Any primary or aliquot with the Details code E will be exported.
.
Activity Log
LDMS keeps an activity log while the user is working. This log is displayed for the current session
only, and once LDMS is closed, it is no longer accessible to users. This information is always
displayed at the bottom of LDMS, organized by the type of activity.
176
System Administration and Maintenance
Shows all activities
Show only error messages (sometimes referred to as "hard warnings")
Show only warning messages (sometimes referred to as "soft warnings")
Show only informational messages
It is possible to extract and save this information from the current session.
Procedure 9.11. Saving activity log information
1.
2.
3.
Select the type of logs you want to save by clicking the appropriate tab to the left. I you
want all logs, select the
tab.
Right-click anywhere in the log window, then select Export As[Format], where [Format] is the file format to save the logs as.
Follow the prompts on your screen to save the file to your computer.
The Export As menu is actually available in many places throughout LDMS. Because the feature is not context-sensitive (that is, it attempts to pull raw data from LDMS and automatically
format it), the output may not always be optimal. In general, you should utilize the built-in reports and feature-specific reports that are available throughout LDMS instead.
Recovering from an Unexpected Shutdown
While every effort has been made to test LDMS in a variety of working conditions, it is possible
that there may be unexpected behavior in the program that could cause a problem for your
laboratory. It is also possible that an issue unrelated to LDMS may affect how LDMS runs. For
example, an unreliable Internet connection may cause a problem with how LDMS exports data
to Frontier Science. Likewise a power failure at your laboratory during a critical moment could
cause an issue with your laboratory’s database.
If LDMS shuts down unexpectedly, you will see the window displayed in Figure 9.4. Please provide a detailed description of how you were using LDMS at the time that it shut down unexpectedly. For example if LDMS shutdown when you were trying to save a change to an existing
specimen, providing that information can better help LDMS User Support diagnose the issue.
The more details that you can provide about what you were doing, the more likely it will be that
Frontier Science will be able to permanently fix the issue.
Computer requirements and recommendations for LDMS
177
Figure 9.4. System Shutdown Dialog Window
▲ The dialog window that appears if LDMS shuts down unexpectedly. Provide as many details as you can
in the space provided.
If LDMS does shutdown unexpectedly, it will lock. The next time you attempt to start LDMS, you
will be provided with the details of the shutdown and prompted to contact LDMS User Support
to obtain a challenge password. Copy and paste the details of the shutdown and provide them to
LDMS User Support. LDMS User Support needs the details of the shutdown before they can provide
you with a password to unlock LDMS.
Important
Never close LDMS by terminating it using the Windows Task Manager (typically accessed by pressing Ctrl+Alt+Delete). Doing so could cause damage to your LDMS database. If LDMS becomes unresponsive, contact LDMS User Support for assistance instead
of trying to close it on your own.
If you have LDMS installed in a network and one of the client machines shuts down unexpectedly, all LDMS computers on the network will be locked as well. The unlocking process only needs
to be completed on one computer to unlock all of the LDMS machines on the network.
For more information about challenge passwords, see the section called “LDMS and Challenge
Passwords” on page 4.
Computer requirements and recommendations for LDMS
The exact hardware you will need to run LDMS will vary, depending on the work performed at
your laboratory. For example, a large repository will need much more hard drive space since it
will have a larger LDMS database than a smaller laboratory.
178
System Administration and Maintenance
Table 9.1 and Table 9.2 show the computer requirements and recommendations for running
LDMS. The recommendations should be sufficient for most laboratories. If you are unsure if you
meet the system requirements, talk to your laboratory's IT support staff
Table 9.1. LDMS system requirements
Component
Requirement
Operating System
Windows Vista, Windows 7, Windows 8,
Windows 8.1, Windows Server 2008, or
ab
Windows Server 2012 64-bit
Microsoft .NET Framework
Version 4.0 (full profile) or higher
(If you are using Windows 8 or higher,
you already meet this requirement)
Screen Resolution
1024x768
Hard Drive
Size requirements vary by number of
specimens managed
Input
Keyboard and 2-button mouse
Video
Monitor and video card capable of at
least 1024x768 resolution and 16-bit color depth
a
LDMS has been reported to function appropriately on thin clients and virtual machines, but these have not been thoroughly tested and are not supported by Frontier Science.
b
Home editions of Microsoft Windows are not supported.
Table 9.2. LDMS system recommendations
Component
Recommendation
CPU
3.0+ GHz Intel Core 2 or AMD processor
Networking
100/1000 mbps Ethernet card with highspeed Internet connection
Hard drive
100 GB free space (more if managing a
large laboratory)
Removable Storage
High capacity removable storage, e.g.
CD-RW, DVD-RW, USB drive, etc.
Printer
Microsoft Windows compatible printer
Memory
2 GB or more of RAM
Barcode Reader
Microsoft Windows compatible barcode
scanner
Power
An uninterruptible power supply (UPS)
to protect against data loss caused by
power failure.
a
a
Printers and barcode readers may have additional requirements. consult your hardware's documentation for more information.
If you have questions about hardware compatibility or purchasing equipment for your laboratory, contact LDMS User Support. See the section called “Getting Help” on page 10.
Chapter 10. Group-Specific Information
Many features in LDMS are driven by the selected group. For example, in LDMS Specimen Management , many of the fields available for participant entry are different for each group. Other
features behavior differently or are only accessible to certain groups. For example, if you are
creating a shipping file to send to another laboratory and your shipment contains specimens for
certain groups, you'll be prompted to generate a special manifest.
Many groups also want laboratories to use LDMS in a specific way when handling their specimens. For example, if a specimen is destroyed through a laboratory accident, some groups want
the user to delete that specimen from LDMS while others want the specimen to remain in LDMS,
but with the condition code LBE (laboratory error) added.
This section describes some of the group-specific behavior in LDMS. This behavior is determined
by the group itself, and implemented in LDMS at the group's request.
If you are performing work for a group, always defer to documentation and guidelines that are
provided to you for that group. LDMS User Support LDMS usage questions; group-specific questions should be directed to the appropriate contact for that group.
ACTG (AIDS Clinical Trials Group)
• ACTG uses the standard LDMS Shipping File format to ship between ACTG laboratories using LDMS.
• ACTG requires specimens to be labeled with a 2D barcode and label from LDMS; LDMS
comes with label formats for ACTG setup and ready to use.
• ACTG and IMPAACT are listed as a combined group throughout LDMS (i.e. ACTG/IMPACT)
• Preloads are permitted for the ACTG group, but users are not permitted to create their own.
All ACTG preloads are created by Frontier Science in collaboration with network leadership.
For more information about preloads, see the section called “Preloads: Templates for Expected Specimen Collections” on page 21.
Table 10.1. Specimen Management Fields for ACTG
Field
Required?
Note
ID1 (PID)
Required
8 characters long, 7 numbers and one letter between A and L; if the PID does not
have 7 numbers, add leading zeros to the
front of it.
ID2 (Protocol)
Required
Select from the pre-defined list of protocols.
180
Group-Specific Information
Field
Required?
Note
ID3 (SID)
Required
Study Identifier; LDMS will remember
previously entered SIDs and automatically populate ID3 when the same groupPID-protocol combination is entered. If
you do not know the SID or a SID has not
yet been assigned, enter NOSID. For more
information on updating participants entered with NOSID, see the section called
“Finding and Modifying Participant Information” on page 59.
Visit
Required
Select from pre-defined list of visit units.
OPID
Available
Clinic
Required
LDMS will automatically populate the
clinic using one previously entered for
the same PID, protocol, and SID combination.
Specimen Time
Depends
If you do not have a specimen time
recorded on your CRF, contact the clinic
that collected the specimen from the participant. This field is required for specimens with a specimen date of 01 January
2004 or later; it is optional for specimens
prior to that date. This requirement can
be overridden for specimens after this
date, if necessary.
Received Time
Optional
Aeras
Preloads can be utilized for Aeras. For more information about preloads, see the section called
“Preloads: Templates for Expected Specimen Collections” on page 21.
Table 10.2. Specimen Management Fields for Aeras
Field
Required?
Note
ID1 (PID)
Required
11-digits of any combination of letters
and numbers.
ID2 (Study)
Required
Selected from pre-populated list. Once
selected, the LDMS will check that the
PID is associated with the selected protocol.
ID3
Disabled
This field is not used by Aeras
Visit
Required
Select from pre-defined list of visit units.
OPID
Disabled
This field is not used by AERAS
ATN (Adolescent Medicine Trials Network)
181
Field
Required?
Note
Clinic
Required
LDMS will default to the clinic ARSxx,
where xx are the 5th and 6th digits from
the PID
Specimen Time
Required
Received Time
Optional
ATN (Adolescent Medicine Trials Network)
Preloads can be utilized for ATN. For more information about preloads, see the section called
“Preloads: Templates for Expected Specimen Collections” on page 21.
Table 10.3. Specimen Management Fields for ATN
Field
Required?
Note
ID1 (PID)
Required
A 6-digit number between 10001 and
999999. If the PID is less than 6 digits, leading zeros will automatically be
added. LDMS will check that the PID is
valid.
ID2 (Protocol)
Required
Entered manually
ID3 (SID)
Required
An 8-digit number between 40001 and
999999999. If the SID is less than 8-digits, leading zeros will automatically be
added. 7-digit SIDs can still be imported
by LDMS. If the same PID-protocol combination has been entered, LDMS will
automatically default to the previously
used SID. NOSID is a valid entry for ATN.
For more information about NOSID, see
the section called “Finding and Modifying Participant Information” on page 59.
Visit
Required
Select from pre-defined list of visit units.
OPID
Available
Clinic
Optional
Specimen Time
Required
Received Time
Optional
CHAVI (Center for HIV-AIDS Vaccine Immunology)
182
Group-Specific Information
• Barcode labels are required. A CHAVI label format is already configured in LDMS.
• Primary and aliquot volume units will default to ML.
Table 10.4. Specimen Management Fields for CHAVI
Field
Required?
Note
ID1 (PID)
Required
9 numerical digits
ID2 (Study)
Required
Select study from the pre-populated list.
LDMS will check that the PID is associated with the selected study.
ID3
Disabled
This field is not used by CHAVI.
Visit
Required
The visit unit will automatically be set to
VST.
OPID
Depends
This field is not used by CHAVI, unless
ID2 is 008A
Clinic
Optional
The clinic will be automatically populated based on the PID. It will be the letter
C, followed by the first three digits in the
PID (e.g. C452). This value can be overriden if necessary.
Specimen Time
Optional
This field is not required, but recommended
Received Time
Required
CPQA (Clinical Pharmacology Quality Assurance and Quality Control)
•
•
•
•
CPQA uses the standard LDMS Shipping File format.
There are CPQA barcode options available in LDMS.
While preloads can be used for CPQA, users are not expected to use this feature.
The Pharmacology Proficiency Results report can be generated for Clinical Laboratory Improvement Amendments (CLIA). It is found in LDMS Reports , under the PK category.
This is sometimes referred to as the "CLIA Report".
Figure 10.1. CPQA PanelID Format
22A00
[CPQA round number][letter ID for panel][2 numbers]
Table 10.5. Specimen Management Fields for CPQA
Field
Required?
Note
ID1 (PanelID)
Required
Must be five characters in length. See
Figure 10.1.
ID2 (RoundNo)
Required
This is the same as the first 2 digits of the
PanelID. This field will automatically be
populated by LDMS.
FACTS (Follow-on African Consortium for Tenofovir Studies)
Field
Required?
ID3 (ExpDate)
Optional
Visit
Optional
OPID
Optional
Clinic
Optional
Specimen Time
Optional
Received Time
Optional
183
Note
Select from pre-defined list of visit units.
FACTS (Follow-on African Consortium for Tenofovir Studies)
Preloads can be utilized for FACTS. For more information about preloads, see the section called
“Preloads: Templates for Expected Specimen Collections” on page 21.
Table 10.6. Specimen Management Fields for FACTS
Field
Required?
Note
ID1 (PID)
Required
A 7-digit number. LDMS will verify that
the PID is valid.
ID2 (Study)
Required
Select from pre-populated list
ID3
Disabled
This field is not used by FACTS
Visit
Required
Select from pre-defined list of visit units.
OPID
Disabled
This field is not used by FACTS
Clinic
Disabled
This field is not used by FACTS
Specimen Time
Required
Received Time
Optional
HPTN (HIV Prevention Trials Network)
• There are several HPTN label formats available in LDMS.
• Primary and aliquot volumes will default to ML.
• Preloads are not permitted for HPTN.
Table 10.7. Specimen Management Fields for HPTN
Field
Required?
Note
ID1 (PID)
Required
LDMS performs a checks to make sure
the PID is valid. Based on the protocol,
LDMS will determine whether a 9-digit
or 10-digit PID must be used.
184
Group-Specific Information
Field
Required?
Note
ID2 (Protocol)
Required
Special PID checks are enforced if the
protocol is 043.0. For 043.0, the visit will
also be set to 2.0 VST, and the user will
not be able to modify it.
ID3
Depends
This field is disabled for all protocols except 043.0. It allows up to 12 characters,
and should be scanned from the blood ID
number.
Visit
Required
Defaults to the visit unit of VST. Interim,
unscheduled visits should be entered by
incrementing the visit value (e.g. 1.10 for
the first unscheduled visit, 1.20 for the
second, etc). If the protocol is 043.0, the
visit will also be set to 2.0 VST, and the
user will not be able to modify it.
OPID
Disabled
Clinic
Disabled
Specimen Time
Required
Received Time
Optional
You will be warned if received time is
blank
HVTN (HIV Vaccine Trials Network)
•
•
•
•
The HVTN group is listed in LDMS as VTN.
The volume for primaries and aliquots automatically defaults to ML.
The LDMS shipping files are sometimes referred to as the “e-manifest”
If sending a shipment that contains HVTN specimens, LDMS will prompt you whether you
want to print a standard LDMS Shipping Manifest or a SeraCare Shipping Manifest. The LDMS Manifest should be used.
• Barcodes are required to be on labels.
• Preloads are not permitted for HVTN.
Table 10.8. Specimen Management Fields for HVTN
Field
Required?
Note
ID1 (PID)
Required
LDMS checks that the PID is valid. A PID
cannot be corrected in LDMS without approval from HVTN laboratory leadership.
An LDMS challenge code is required to
do this.
ID2 (Protocol)
Required
LDMS checks that the PID and protocol
combination are valid.
ID3
Disabled
IMPAACT (International Maternal Pediatric Adolescent AIDS Clinical
Trials)
185
Field
Required?
Note
Visit unit
Required
Use the visit unit VST for routine HIV diagnostic visits, otherwise use the appropriate visit unit. The visit unit is used by
certain laboratories for driving testing algorithms.
OPID
Disabled
Clinic
Required
The clinic is automatically populated
based on the PID; the same clinical location can be associated with multiple clinic IDs (e.g. for Phase I/II or Phase II/III).
VTN clinics start with the letter V (e.g.
V101 instead of 101). LDMS will verify
that a VTN clinic was selected.
Specimen Time
Required
HVTN requires that laboratories complete the specimen time.
Received Time
Required
IMPAACT (International Maternal Pediatric Adolescent AIDS Clinical
Trials)
• IMPAACT uses the standard LDMS Shipping File format to ship between laboratories using
LDMS.
• IMPAACT requires specimens to be labeled with a 2D barcode and label from LDMS; LDMS
comes with label formats for IMPAACT setup and ready to use.
• Preloads can be used for IMPAACT but users are not permitted to create them. All IMPAACT preloads are created by Frontier Science in collaboration with network leadership.
For more information about preloads, see the section called “Preloads: Templates for Expected Specimen Collections” on page 21.
• ACTG and IMPAACT are listed as a combined group throughout LDMS (i.e. ACTG/IMPAACT)
Table 10.9. Specimen Management Fields for IMPAACT
Field
Required?
Note
ID1 (PID)
Required
8 characters long, 7 numbers and one letter between A and L; if the PID does not
have 7 numbers, add leading zeros to the
front of it.
ID2 (Protocol)
Required
Select from the pre-defined list of protocols.
186
Group-Specific Information
Field
Required?
Note
ID3 (SID)
Required
Study Identifier; LDMS will remember
previously entered SIDs and automatically populate ID3 when the same groupPID-protocol combination is entered. If
you do not know the SID or a SID has not
yet been assigned, enter NOSID. For more
information on updating participants entered with NOSID, see the section called
“Finding and Modifying Participant Information” on page 59.
Visit
Required
Select from pre-defined list of visit units.
OPID
Available
Clinic
Required
LDMS will automatically populate the
clinic using one previously entered for
the same PID, protocol, and SID combination.
Specimen Time
Depends
If you do not have a specimen time
recorded on your CRF, contact the clinic
that collected the specimen from the participant. This field is required for specimens with a specimen date of 01 January
2004 or later; it is optional for specimens
prior to that date. This requirement can
be overridden for specimens after this
date, if necessary.
Received Time
Optional
iPrEx (Pre Exposure Prophylaxis Initiative)
Preloads can be utilized for iPrEx. For more information about preloads, see the section called
“Preloads: Templates for Expected Specimen Collections” on page 21.
• iPrEx uses the standard LDMS Shipping File format.
• When entering seroconversion specimens, the visit unit of SC should be used; the visit week
numbering will be the same as the originally scheduled visit.
• When entering sero-positive visits, the visit unit SP should be used, and the visit number
should be the number of weeks after the seroconversion visit
• NOPID cannot be used in conjunction with NOSID.
MACS (Multicenter AIDS Cohort Study)
187
Table 10.10. Specimen Management Fields for iPrEx
Field
Required?
Note
ID1 (PID)
Required
LDMS will check that the PID is valid.
NOPID may be entered for screening
visits, though the original NOPID entry
should be updated for the participant
once a valid PID has been assigned. See
the section called “Finding and Modifying Participant Information” on page 59.
ID2 (SID)
Required
Screening ID; LDMS will automatically
enter the previously entered SID for a
given participant, though this may be
overridden. SID is 7 digits long, with the
first 2 digits representing the clinic, followed by a 5 digit screening number (e.g.
9080001). When entering specimens for
the ESN protocol, NOSID is a valid entry.
ID3 (Protocol)
Required
Select from a pre-defined list.
Visit
Required
The visit defaults to WK
OPID
Optional
Clinic
Required
The clinic is automatically populated
based on the PID using the first 2 digits
of the PID
Specimen Time
Optional
This field is optional, but recommended.
Received Time
Optional
This field is optional, but recommended.
MACS (Multicenter AIDS Cohort Study)
Preloads can be utilized for MACS. For more information about preloads, see the section called
“Preloads: Templates for Expected Specimen Collections” on page 21.
If sending a shipment that contains MACS specimens, LDMS will prompt you whether you want
to print a standard LDMS Shipping Manifest or a SeraCare Shipping Manifest. The SeraCare
manifest is used to ship specimens to the MACS repository.
Table 10.11. Specimen Management Fields for MACS
Field
Required?
Note
ID1 (MACSID)
Required
MACS Identifier
ID2 (Study)
Required
ID3
Optional
Previously entered ID3s will be automatically populated by LDMS for the MACSID
and study combination
Visit
Optional
Select from pre-defined list of visit units.
188
Group-Specific Information
Field
Required?
OPID
Optional
Clinic
Optional
Specimen Time
Optional
Received Time
Optional
Note
Previously entered clinics will be automatically populated by LDMS for the
MACSID and study combination
MTN (Microbicide Trials Network)
• The primary and aliquot volume will default to ML
• There are two MTN label options, one with a barcode and one without.
• Preloads can be utilized for MTN. For more information about preloads, see the section
called “Preloads: Templates for Expected Specimen Collections” on page 21.
Table 10.12. Specimen Management Fields for MTN
Field
Required?
Note
ID1 (PID)
Required
9 characters long
ID2 (Protocol)
Required
Select from a pre-populated list
ID3
Disabled
Not used for MTN
Visit
Required
Visit unit defaults to VST, but this can be
overridden
OPID
Disabled
Not used for MTN
Clinic
Disabled
Not used for MTN
Specimen Time
Optional
This field is not required, but recommended
Received Time
Optional
This field is not required, but recommended
NICHD-WESTAT
NICHD-WESTAT has identical validation and rules to the ACTG/IMPAACT group.
Table 10.13. Specimen Management Fields for NICHD-WESTAT
Field
Required?
Note
ID1 (PID)
Required
8 characters long, 7 numbers and one letter between A and L; if the PID does not
have 7 numbers, add leading zeros to the
front of it.
PHACS (Pediatric HIV/AIDS Cohort Study)
189
Field
Required?
Note
ID2 (Protocol)
Required
Select from the pre-defined list of protocols.
ID3 (SID)
Required
Study Identifier; LDMS will remember
previously entered SIDs and automatically populate ID3 when the same groupPID-protocol combination is entered. If
you do not know the SID or a SID has not
yet been assigned, enter NOSID. For more
information on updating participants entered with NOSID, see the section called
“Finding and Modifying Participant Information” on page 59.
Visit
Required
Select from pre-defined list of visit units.
OPID
Available
Clinic
Required
LDMS will automatically populate the
clinic using one previously entered for
the same PID, protocol, and SID combination.
Specimen Time
Depends
If you do not have a specimen time
recorded on your CRF, contact the clinic
that collected the specimen from the participant. This field is required for specimens with a specimen date of 01 January
2004 or later; it is optional for specimens
prior to that date. This requirement can
be overridden for specimens after this
date, if necessary.
Received Time
Optional
PHACS (Pediatric HIV/AIDS Cohort Study)
• PHACS uses the standard LDMS Shipping File format
• There are two label options for PHACS, one with a barcode and one without a barcode
• Preloads are permitted for the PHACS group, but users are not permitted to create their
own. All PHACS preloads are created by Frontier Science in collaboration with network
leadership. For more information about preloads, see the section called “Preloads: Templates for Expected Specimen Collections” on page 21.
Table 10.14. Specimen Management Fields for PHACS
Field
Required?
Note
ID1 (PID)
Required
8 characters long, 7 numbers with a letter at the end
190
Group-Specific Information
Field
Required?
Note
ID2 (Protocol)
Required
Select from a pre-populated list; all protocols are in the format PHXXX (e.g.
PH200).
ID3
N/A
Not used by PHACS
Visit
Required
Select from pre-defined list of visit units.
OPID
Optional
Clinic
Required
Will automatically populate using the
previous clinic for the group, PID, and
protocol combination entered; PHACS
clinics range between 1 and 24. LDMS
will check that a valid clinic was selected.
Specimen Time
Optional
This field is optional, but recommended
Received Time
Optional
This field is optional, but recommended
PHIA (Population-Based HIV Impact Assessments)
• User-defined preloads are not permitted for PHIA.
• LDMS shipping files should be used for shipping to LDMS laboratories; CSV files, for nonLDMS laboratories.
• Only the PHIA barcode label can be used for PHIA specimens.
Table 10.15. Specimen Management Fields for PHACS
Field
Required?
Note
ID1 (PTID)
Required
8 characters long, 2 letters followed by 6
numbers
ID2 (Country)
Required
Select from a pre-populated list of country initials (select a code and press
Ctrl+H to see the full name of the country). This will typically match the first two
characters in the PTID.
ID3 (HIVRT)
Required
Select from list (positive, negative, or indeterminate)
Visit
Required
Select from pre-defined list of visit units.
OPID
Optional
Clinic
Required
In the format AABBB, where AA is the
country code and BBB is the clinic number.
Specimen Time
Optional
This field is optional, but recommended
Received Time
Optional
This field is optional, but recommended
REPRIEVE
191
REPRIEVE
REPRIEVE has identical validation and rules to the ACTG/IMPAACT group.
Table 10.16. Specimen Management Fields for REPRIEVE
Field
Required?
Note
ID1 (PID)
Required
8 characters long, 7 numbers and one letter between A and L; if the PID does not
have 7 numbers, add leading zeros to the
front of it.
ID2 (Protocol)
Required
Select from the pre-defined list of protocols.
ID3 (SID)
Required
Study Identifier; LDMS will remember
previously entered SIDs and automatically populate ID3 when the same groupPID-protocol combination is entered. If
you do not know the SID or a SID has not
yet been assigned, enter NOSID. For more
information on updating participants entered with NOSID, see the section called
“Finding and Modifying Participant Information” on page 59.
Visit
Required
Select from pre-defined list of visit units.
OPID
Available
Clinic
Required
LDMS will automatically populate the
clinic using one previously entered for
the same PID, protocol, and SID combination.
Specimen Time
Depends
If you do not have a specimen time
recorded on your CRF, contact the clinic
that collected the specimen from the participant. This field is required for specimens with a specimen date of 01 January
2004 or later; it is optional for specimens
prior to that date. This requirement can
be overridden for specimens after this
date, if necessary.
Received Time
Optional
VQA (Virology Quality Assurance)
192
Group-Specific Information
Preloads can be utilized for VQA. For more information about preloads, see the section called
“Preloads: Templates for Expected Specimen Collections” on page 21.
Figure 10.2. VQA PanelID Format
AAAPPPSS.YYZ
[Assay category][panel #][panel subtype].[00-99][panel config]
Example
DNA001RT.01A
assay categories
panel number
panel sub-type
2 digit string
panel configuration
RNA, DNA, CUL (cultures)
000 to 999
Subtype
Description
UM
Ultrasensitive RNA
SM
Standard RNA
RT
DNA proficiency panel
PQ
DNA pre-qualification panel
CC
Culture panel
01 to 99
A, B, or C
Table 10.17. Specimen Management Fields for VQA
Field
Required?
Note
ID1 (PanelID)
Required
LDMS will determine if this field is valid
based on the logic described in Figure
a
10.2
ID2
N/A
This field is not used by VQA
ID3
N/A
This field is not used by VQA
Visit
N/A
This field is not used by VQA
OPID
N/A
This field is not used by VQA
Clinic
N/A
This field is not used by VQA
Specimen Time
N/A
This field is not used by VQA
Received Time
N/A
This field is not used by VQA
a
This validation check is only performed on specimens entered in LDMS Specimen Management; specimens entered
using the bulk feature available to specific laboratories, or specimens entered or imported prior to 01-July-2007 will
not be validated.
WIHS (Women's Interagency HIV Study)
WIHS (Women's Interagency HIV Study)
193
• If sending a shipment that contains WIHS specimens, LDMS will prompt you whether you
want to print a standard LDMS Shipping Manifest or a SeraCare Shipping Manifest. The SeraCare manifest is used to ship specimens to the MACS repository.
• Preloads are available for WIHS, and laboratories are expected to create and use them for
entering specimens. For more information about preloads, see the section called “Preloads:
Templates for Expected Specimen Collections” on page 21.
• Spec[imen] Date and Rec[eived] Date are automatically populated using your computer's
current system time. For this reason, it is important to verify that your computer's current
date and time are correct prior to entering specimens. LDMS automatically prompts users to
check their system time whenever LDMS is started.
Figure 10.3. WIHS PID Format
SBBPPPPC
[site number][recruitment number][participant number][check digit]
site number
recruitment number
check digit
Site
Description
1
NYC (Bronx)
2
Brooklyn
3
Washington, D.C.
4
Los Angeles
5
San Francisco
6
Chicago
#
Description
2B
New recruit
0B
Original recruit
1B
Original recruit
Any character; an algorithm will determine if the character is valid
Table 10.18. Specimen Management Fields for WIHS
Field
Required?
Note
ID1 (PID)
Required
See Figure 10.3
ID2 (Protocol)
Required
Select from pre-populated list
ID3 (SID)
Optional
Visit
Required
OPID
Optional
Clinic
Optional
Specimen Time
Optional
Received Time
Optional
The visit unit will default to VST, and the
visit number will be automatically populated using on the current date.
194
Chapter 11. Frequently Asked Questions about LDMS
11.1. About LDMS Development and Frontier Science
Q:
A:
Q:
A:
Q:
A:
What is the difference between LDMS and Frontier Science?
LDMS is a computer program; Frontier Science is the company that created and maintains
LDMS.
Can I request a change or new feature for LDMS?
Yes—in fact, many features are added to LDMS specifically at the request of an individual laboratory or group. For more information, see the section called “Getting
Help” on page 10.
How often is LDMS Updated?
New versions of LDMS are released, several times each year. Small incremental updates,
however, are made available to laboratories several times each month. These small updates (sometimes referred to as "deploy files") are downloaded and installed during an export. For more information, see the section called “Exports and Updates” on page 173.
11.2. Administrative Issues
Q:
A:
Q:
A:
Q:
A:
Q:
A:
What are the minimum computer requirements for LDMS?
For guidance on what hardware to select for using LDMS, see the section called “Computer
requirements and recommendations for LDMS” on page 177.
What Operating Systems does LDMS support?
LDMS is only compatibly with Microsoft Windows. LDMS is not compatible with Home
Editions of Windows, OS X, Linux, or other operating systems at this time. For a list of
supported versions, see the section called “Computer requirements and recommendations
for LDMS” on page 177.
How much does LDMS cost?
The support cost for LDMS varies depending on your laboratory's affiliations. For more
information, contact <[email protected]>.
How long are LDMS licenses issued?
LDMS licenses are typically issued for up to one year. When the license expires, you will
be prompted by LDMS to contact LDMS User Support. The re-licensing process will vary,
depending on the research groups with which you are affiliated.
11.3. General LDMS Usage
Q:
A:
Q:
A:
Q:
A:
I received a message telling me to contact LDMS User Support to unlock LDMS. What happened?
LDMS is automatically locks under certain conditions. For example, if you recently performed an upgrade or if LDMS shutdown unexpectedly, LDMS will lock. By calling LDMS
User Support, this allows them to verify that there are no database problems. Certain features are also locked to users and require approval to access. For more information, see
the section called “LDMS and Challenge Passwords” on page 4.
I locked myself out of LDMS on a weekend. How can I unlock LDMS?
While LDMS User Support has regular hours, they are available on-call 24-hours a
day, every day of the week (including all holidays). See the section called “Getting
Help” on page 10.
I made a mistake—does LDMS have an undo button?
No. When you make a change in LDMS and save it, that change is permanent. If you made a
change to a screen but have no yet saved it, you can sometimes clear you entries by clicking
the
button from the LDMS toolbar.
196
Frequently Asked Questions about LDMS
Q:
A:
Q:
A:
I'm creating a query statement or executing a search, and I see <> listed as an operator.
What does this mean?
When generating search in LDMS, you often build the search terms independently. For
example, you might select
Field
Value
Field
Primary Type
Operator
<>
Value
Blood
The operator <> in this case means "not equal to". In other words, this search will find
primaries where the type is not blood. This is Pascal-like syntax, and is used throughout
LDMS.
How can I get help on using LDMS?
Frontier Science offers a number of resources to LDMS users, including trainings, video
tutorials, documentation, and 24-hour user support. You can also request See the section
called “Getting Help” on page 10.
11.4. Specimen Management Questions
Q:
A:
Q:
A:
Q:
A:
Q:
A:
Q:
A:
Q:
A:
What is the difference between a specimen ID and a global specimen ID?
While both can be used to identify a specimen, the global specimen ID will always be unique
for each aliquot. The global specimen ID will also show the relationship between primary
and aliquot, since they will share a predictable ID number. For more information on these
two identifies, see the section called “Specimen Identifiers” on page 12.
How can I ship a primary that hasn't been processed into aliquots?
You have two options: use the ambient ship feature or create a single aliquot that is identical to the primary. For instructions on shipping primaries, see the section called “The
Primary Grid” on page 17.
We need to correct some specimens that we've already entered into LDMS. How do you
make these types of changes?
It can vary. Certain groups want LDMS users to make changes for their data one way; other
groups will want it done another way. Consult with the data center or group for specific
instructions. For general instructions on how to change specimen records in LDMS, see
the section called “Correcting a Specimen Entry Error” on page 28.
What do all those letters on the button in the Details column mean?
They are codes that indicate that certain properties have been set for that specimen row.
If you click on that button, you will see a key that explains what each code means.
I have a specimen that was drawn for two different studies. How do I enter this in LDMS?
This is referred to as a co-enrolled primary. In the participant grid in the top portion of the
Specimen Management screen, enter one enrollment in each row. When you are adding
your aliquots, select the appropriate study from the Group/ID field in the aliquot grid. For
more information, see the section called “The Patient Grid” on page 16.
We have two tubes of blood drawn from a participant with the same additive from the same
visit that were collected at the same time, and both tubes were collected at the same time.
Since they are essentially identical, can we pool them together in LDMS?
Yes. For example, if you have two blood primaries with the same additive, and both tubes
are 10 mL, you can enter one primary with a volume of 20 mL.
11.5. Shipping Questions
Q:
How to I update the shipping information for our laboratory or our shipping contacts?
197
A:
Q:
A:
Q:
A:
Q:
A:
Q:
A:
Q:
A:
You can request a change to your contact information by using the Submit Contact
Changes link on the Frontier Science web portal [http://www.fstrf.org/portal]. You can
use this tool to view and update contact information for your laboratory.
All of the specimens that I want to ship are in the same box, and I already have their storage
location in LDMS. Can I just ship the box?
Yes. In fact, many users find this to be the easiest way to setup shipments in LDMS. For
instructions, see the section called “Finding Containers to Ship” on page 65.
I marked a storage container for shipment, but it was the wrong container. How do I unmark it for shipment?
In Storage , select the storage unit that you need to un-mark and click the
button.
Now, click the Unship button.
I shipped some specimens that were in storage at out laboratory. Those specimens still
appear in storage, even though they are no longer in our possession. How can I remove
them?
There is a special feature in Storage to remove these specimens. See the section called
“How LDMS Storage Handles Shipped Specimens” on page 53.
What is the difference between a shipment batch and an export batch?
A shipping batch refers to a shipment that has been prepared in LDMS, but you have not
yet generated a shipping file to send to another laboratory. An export batch reports to data
that has been sent to Frontier Science for groups that utilize Frontier Science as a central
data management center.
What does it mean when a shipment has the status received disk?
A shipment with the status received disk means that the shipment was imported from
another laboratory.
11.6. Specimen Storage
Q:
A:
Our laboratory performs work for a group that requires all specimens to have a storage
location documented in LDMS. Is there an easy way to find out what specimens were entered into LDMS using Specimen Management, but not Storage?
Yes. LDMS has a built-in report for getting this information. Click button from the LDMS
toolbar, and then run the Specimens Not In Storage report under the Storage Reports
category. For more information about finding these specimens, see the section called “Locating Specimens not in Storage” on page 58.
11.7. Labels and Printing
Q:
A:
Q:
A:
Why do my labels look strange when I create them?
LDMS pulls information about paper size directly from the printer's driver when generating the preview of the labels. Since the preview is pulled directly from the printer, the
preview should look just like the actual results when you print them. However, if you don't
tell LDMS what printer you are using, it will generate labels for the wrong printer. See the
section called “Setting the Printer Used to Generate Labels and Reports” on page 153.
Is it possible to print labels in bulk instead of individually (e.g. printing labels for all of the
specimens for a particular shipment)?
Yes. Use the Labels
feature. For instructions, see the section called “Advanced Label
Printing” on page 149.
11.8. Assaying Specimens
Q:
I've already setup an assay in LDMS to read the output file, but now I see that I missed a
specimen when setting it up in LDMS. How do I add another specimen so that LDMS will
read the output file correctly?
198
Frequently Asked Questions about LDMS
A:
Q:
A:
Q:
A:
Q:
A:
Q:
A:
Q:
A:
Open the assay run, just as you would to run it. Once you have clicked the
button,
change back to the Assay Selection tab. Now, search for the specimens that you need to
add. Once this is done, click the
button and continue to read the assay as normal.
How do I set up the blinded controls on a DNA assay?
In Assays, on the Preview tab, right-click on the control and select Modify Control. For
more information see the section called “Roche HIV DNA PCR” on page 100.
How do I add a VQA200 control to an RNA assay run?
For instructions on how to do this, see the section called “Abbott Realtime and COBAS
TaqMan” on page 90.
When I click the
button to run an assay, I receive the following message: "Please
define a default device for each assay." What does this message mean?
This message will appear if no assay reader device has been associated with the assay.
Without this information, LDMS doesn't know where and how to read your assay. Every
assay that reads an input file must have an associated device. For instructions on associating an assay with a device, see the section called “Associating an Assay with a Reader” on page 123.
I'm trying to add a specimen to an assay run. I know that I entered the specimen in LDMS
Specimen Management
but I don't see it in LDMS Assays . Why can't I find it?
To add a specimen to an assay run, you must assign it the assay first; simply adding the
specimen to LDMS is not enough. For instructions on assigning assays, see the section
called “Assigning Assays to Aliquots” on page 84.
Our laboratory is having trouble adding results for a specific assay to LDMS. What can we
do?
LDMS User Support or the LDMS Training Team can assist you with specific assays. See
the section called “Getting Help” on page 10.
11.9. System Configuration
Q:
A:
When configuring users, what does System Administrator Capabilities give a user?
It allows the user to reset and change passwords for other users, lock out users, delete
users, and designate other administrators. Your laboratory must have at least one user
with these capabilities. See the section called “Adjusting User Permissions” on page 169.
Chapter 12. LDMS Code Abbreviations
Important Note on Code Availability
New codes are often added to LDMS via deploys that are received during the export process. For
this reason, different versions of LDMS (and even different installations of the same version of
LDMS) can have a slightly different set of codes available. To view the absolute latest and most
up-to-date list of codes available at your laboratory, a special report is available within LDMS:
Procedure 12.1. Generating a list of codes and abbreviations from LDMS
1.
2.
3.
4.
Click TasksReports from the LDMS menu bar.
Select the Misc category on the left.
Select the desired code list on the right.
Click the button from the LDMS toolbar.
Codes list in this manual may not represent the full list of codes available at your laboratory.
List of codes used in LDMS
The full list of codes that are used in LDMS can be found in the LDMS for the Web User Manual [https://www.fstrf.org/apps/cfmx/apps/ldms/webldmsManual/webhelp/index.html#topics/
webldms/codes/r_codes.html].
Assay censor codes
Table 12.1. Abbott user censor codes
Code Description
Validity
Numeric Value
F
Invalid Control
Invalid
1000000.000000
G
Result less than lower limit of quan- Valid
tification
0.000100
H
No Result
Invalid
10000000.000000
J
Undetectable
Valid
1.000000
X4
Results greater than upper limit of Valid, but needs 10000.000000
quantification
repeat
Table 12.2. COBAS TaqMan HCV assay censor codes
Code Description
G
Validity
Result less than lower limit of quan- Valid
tification
Numeric Value
0.0001
200
LDMS Code Abbreviations
Code Description
Validity
Numeric Value
J
Undetectable
Valid
1
X4
Results greater than upper limit of Valid
quantification
10000
I
QS Invalid
Invalid
100000
F
Invalid Control
Invalid
1000000
H
No Result
Invalid
10000000
Table 12.3. COBAS TaqMan HIV-1 Qual assay censor codes
Code Description
Validity
Numeric Value
A
0 control not negative
Invalid
1
B
10 control not positive
Invalid
10
C
20 control not positive
Invalid
100
E
Blinded pellet fails validation
Invalid
10000
F
Assay locked
Na
100000
H
No result
Invalid
10000000000
K
Invalid control
Invalid
1000000
L
Low positive control out of range or Invalid
invalid
1E+14
N
Negative control out of range or in- Invalid
valid
10000000
O
Run based validity override
1E+12
P
Insufficient blinded pellets assigned Invalid
to rack
1000000000
Q
Insufficient VQA controls assigned to Invalid
rack
1E+13
R
Re-read
Valid
100000000
S
5 control invalid
Invalid
1E+11
Valid
Table 12.4. HIV DNA PCR (Roche Amplicor Detect)
Code Description
Validity
Numeric Value
A
0 control not negative
Invalid
1
B
10 control not positive
Invalid
10
C
20 control not positive
Invalid
100
D
20 control OD < 2.000
Invalid
1,000
E
Blind pellet invalid
Invalid
10,000
F
Previous runs invalid - assay locked
Descriptive only
100,000
G
Converted from RLMP - Contamina- Invalid
tion
0.010000
H
Converted from RLMP - Clotted
1 × 10
L
Converted from RLMP - Missing well Invalid
Invalid
10
0.100000
Assay censor codes
201
Code Description
Validity
Numeric Value
M
Converted from RLMP - Out of range Invalid
controls
1,000,000
N
Converted from RLMP - Lipemia
Invalid
10,000,000
O
Converted from RLMP - Lab error
Invalid
1 × 10
P
Converted from RLMP - Equipment Invalid
failure
0.001000
Q
Converted from RLMP - QNS
Invalid
1 × 10
R
Re-read
Valid Run
100,000,000
T
Converted from RLMP - Prerequisite Invalid
test failed
1 × 10
U
Converted from RLMP - Unable to Invalid
calculate
1,000,000,000
W
Converted from RLMP - Material Invalid
didn’t amplify
1 × 10
14
Y
Converted from RLMP - No descrip- Invalid
tion available
1 × 10
15
12
13
11
Table 12.5. HIV DNA PCR (Roche Amplicor Detect) 1.5
Code Description
Validity
Numeric Value
A
0 control not negative
Invalid
1
B
10 control not positive
Invalid
10
C
20 control not positive
Invalid
100
D
20 control OD < 2.000
Invalid
1,000
E
Blind pellet invalid
Invalid
10,000
F
Previous runs invalid - assay locked
Descriptive only
100,000
I
Internal Control Invalid
Invalid
1,000,000
R
Re-read
Valid Run
10,000,000
Table 12.6. Reasons why results were not obtained for immunology assays
Code Description
Numeric Value
A
Wrong Anticoagulant
65804
C
Contamination
65800
E
Tech Error/Lab Error
65801
K
Kit/Reagent Problem
65806
P
Results Reported Under A Different Protocol
65807
S
Quantity Not Sufficient
65802
U
Unsatisfactory Sample
65803
V
Poor Viability
65805
202
LDMS Code Abbreviations
Table 12.7. Immunology user censor codes
Code Description
Numeric Value
C
Contamination
10,000.000000
E
Tech error/Lab error
100.000000
K
Kit/Reagent problem
100,000.000000
N
Not done
1.000000
R
Not required
10.000000
S
Quantity not sufficient
1,000.000000
V
Poor viability
1,000,000.000000
Table 12.8. NASBA HIV-1 RNA assay censor codes
Code Description
Validity
Numeric Value
A
Invalid standards - slope negative
Invalid Run
1
B
Controls out of sequence
Invalid Run
10
D
Converted from RLMP - Contamina- Invalid
tion
10,000
E
Converted from RLMP - Poor viability Invalid
1,000,000
F
Converted from RLMP - Incorrect Invalid
tube
.001
G
Converted from RLMP - QNS
.0001
H
Converted from RLMP - Broken tube Invalid
.00001
I
Invalid specimen
Invalid
100
J
WT < LDL, Undetectable
Valid
1,000
K
Converted from RLMP - No sample Valid
received
1 × 10
L
Converted from RLMP - Laboratory Invalid
accident
.01
M
Converted from RLMP - Out of range Invalid
controls
.000001
O
Converted from RLMP - Lab error
1 × 10
P
Converted from RLMP - Equipment Invalid
failure
.1
Q
Converted from RLMP - Improp- Invalid
er/Questionable ID
10,000,000
R
Re-read
100,000,000
T
Converted from RLMP - Prerequisite Invalid
test failed
100,000
U
Converted from RLMP - Unable to Invalid
calculate
1,000,000,000
V
Converted from RLMP - Over ampli- Invalid
fied
10,000,000,000
Invalid
Invalid
Valid Run
13
12
Assay censor codes
203
Code Description
Validity
Numeric Value
11
W
Converted from RLMP - Material Invalid
didn’t amplify
1 × 10
X
Converted from RLMP - Delayed ship- Invalid
ment
1 × 10
14
Y
Converted from RLMP - Missing well Invalid
1 × 10
15
Table 12.9. Nuclisens HIV-1 QT assay censor codes
Code Description
A
Invalid slope
B
Controls out of sequence
I
Invalid specimen
J
WT < LDL, Undetectable
R
Re-read
M
Converted from RLMP - Out of range controls
H
Converted from RLMP - Broken tube
G
Converted from RLMP - QNS
F
Converted from RLMP - Incorrect tube
L
Converted from RLMP - Laboratory accident
P
Converted from RLMP - Equipment failure
D
Converted from RLMP - Contamination
T
Converted from RLMP - Prerequisite test failed
E
Converted from RLMP - Poor viability
Q
Converted from RLMP - Improper/Questionable ID
U
Converted from RLMP - Unable to calculate
V
Converted from RLMP - Over amplified
W
Converted from RLMP - Material didn’t amplify
O
Converted from RLMP - Lab error
K
Converted from RLMP - No sample received
X
Converted from RLMP - Delayed shipment
Y
Converted from RLMP - Missing well
Table 12.10. P24 system censor codes
Code Description
A
Invalid standards - slope negative
B
VQA standards out of sequence
C
Missing media controls
D
Kit controls out of sequence
R
Re-read
204
LDMS Code Abbreviations
Table 12.11. Pharmacology analyte codes
Code
Description
Boc3007
SCH783007
3TC
Lamivudine
3TCDP
3TC diphosphate
3TCDP-PC
3TC diphosphate choline
3TCDP-PE
3TC diphosphate ethanolamine
3TCMP
3TC monophosphate
3TCTP
3TC triphosphate
6BHC
6 Beta Hydroxycortsol
AAG
Alpha-1 Acid Glycoprotein
ABC
Abacavir
ABC-CARB
Abacavir carboxylate
ABC-GLU
Abacavir glucronide
ABT-267
ABT-267
ABT-333
ABT-333
ABT-450
ABT-450
ACL
Acetyl-Isoniazid
ADF
Adefovir
AL
Artemether-lumefantrine
ALB
Albumin
AML
Amlodipine
AMP/DXAMP
Amphetamine/Dextroamphetamine
APV
Amprenavir
ARM
Artemether
ASV
Asunaprevir
ATV
Atazanavir
Atorvast
Atorvastatin
BCV
Becllabuvir
BDQ
Bedaquiline
BDQ-M2
N-monodesmethyl metabolite of Bedaquiline
BLM
Bleomycin Sulfate
BMS-936559
BMS-936559
BZD
Benznidazole
Boc3004
SCH783004
Boc3005
SCH783005
Boc3006
SCH783006
Boc4128
SCH534128
Assay censor codes
205
Code
Description
Boc4129
SCH534129
Bocepvr
Boceprevir
CAB
Cabotegravir
CBVTP
carbovir triphosphate
CLF
Clofazimine
CLQ
Chloroquine
CMS
Colistin Methane Sulfonate
CMS - ColA
ColA metabolite of Colistin Methane Sulfonate
CMS - ColB
ColB metabolite of Colistin Methane Sulfonate
COBI
Cobicistat
CORT
Cortisol
CS
Cycloserine
D4T
Stavudine
DCB
Daclatasvir
DDC
Zalcitabine
DES
Desogestrel
DES - ENG
Etonogestrel metabolite of Desogestrel
DHA
Dihydroartemisinin
DHPG
Ganciclovir
DLT
Diltiazem
DLM
Delamanid
DLM-DM6705
DM6705
DLT- AL
Desacetyldiltiazem metabolite of DLT
DLT- MT
Desmethyldiltiazem metabolite of DLT
DLV
Delavirdine
DMPA
Medroxyprogesterone Acetate
DOX
Doxorubicin (liposomal-encapsulated and free)
DOXOL
Doxorubicinol
DPV
Dapivirine
DRV
Darunavir
DSI
Desipramine
DTG
Dolutegravir
DXAMPS
Dextroamphetamine sulfate
DXM
Dextromethorphan
DXM - DXO
Dextrorphan metabolite of Dextromethorphan
DXMPH
Dexmethylphenidate
E8OH
8-hydroxy efavirenz
206
LDMS Code Abbreviations
Code
Description
EE
Ethinyl Estradiol
EFV
Efavirenz
EMB
Ethambutol HCL
ENF
Enfuvirtide
ET
Etoposide
ETR
Etravirine
EVG
Elvitegravir
FCZ
Fluconazole
FOS
Foscarnet
FTC
Emtricitabine
FTC-TP
Emtricitabine Tri-phosphate
HU
Hydroxyurea
IDV
Indinavir
INH
Isoniazid
IQP-0528
IQP-0528
ISO
Isotretinoin
ISO-4OXO
4-OXO-Isotretinoin Metabolite
ITX 5061
ITX 5061
Ibalzb
Ibalizumab
KAN
Kanamycin
KYN
Kynurenine
LDV
Lepipasvir
LF
Lumefantrine
LF-DBL
Desbutyl Lumefantrine
LPV
Lopinavir
LVF
Levofloxacin
M3
N-didesmethyl metabolite of bedaquiline (TMC207)
M8
NFV Metabolite
MK-3475
MK-3475
MPA
Mycophenolic Acid
MPAF
Free Mycophenolic Acid
MPAG
Mycophenolic Acid Metabolite
MPH
Methylphenidate
MTD
Methadone HCl
MTX
Methotrexate
MVC
Maraviroc
MXF
Moxifloxacin
Assay censor codes
Code
207
Description
Minocyclene/Place- Minocyclene/Placebo
bo
N-DLV
Delavirdine’s Metabolite
NFV
Nelfinavir
NFX
Nifurtimox
NVP
Nevirapine
OFX
Ofloxacin
OXT
Oxytocin
P4
Progesterone
PA824
PA-824
PAS
aminosalicylic acid
PEG-IFN
Pegylated-Interferon alfa 2b
PLD
Pegylated Liposomal Doxorubicin
PMPA
(9 - [2 - (R) - (phosphonomethoxy)propyl] adenine)
PNU -101603
PNU -101603 metabolite of Sutezolid
STZ
Sutezolid
PTX
Paclitaxel
PZA
Pyrazinamide
PZQ
Praziquantel
PZQ-4OH
4-Hydroxy metabolite of Praziquante
RBT
rifabutin
RFP
rifapentine
RGV
Raltegravir
RMD
Romidepsin
RMP
Rifampicin
RPV
Rilpivirine
RTV
Ritonavir
RUX
Ruxolitinib
RV
Ribavirin
RV-TP
Ribavirin Triphosphate
SOF
Sofosbuvir
SOF-GS-331007
GS-331007 metabolite of SOF
SOF-GS-566500
GS-566500 metabolite of SOF
SQ109
SQ109
SQV
Saquinavir
TFV
Tenofovir
TFVDP
Tenofovir Diphosphate
208
LDMS Code Abbreviations
Code
Description
THA
Thalidomide
TPV
Tipranavir
TRP
Tryptophan
VCR
Vincristine Sulfate
VRC01
VRC-HIVMAB060-00-AB
VCV
Vicriviroc
ZDV
Zidovudine
ZDVDP
Zidovudine diphosphate
ZDVMP
Zidovudine monophosphate
ZDVTP
Zidovudine triphosphate
d4TTP
d4T triphosphate
ddATP
dideoxyadenosine triphosphate
ddI
Didanosine
des RBT
des rifabutin
des RFP
des rifapentine
des RMP
des rifampicin
Table 12.12. Pharmacology system censor codes
Code Description
Validity
Numeric Value
A
Invalid. Greater than the upper limit, Invalid
dilute and repeat
256
B
Below quantifiable limit
Valid
8
L
Lower limit adjusted up for this run
Valid
1
R
Repeat (with L system censor only)
Invalid
4
Table 12.13. Pharmacology concentration units
Code
Description
%
percentage
FMOL/10^6 CELLS femtomol per 10^6 cells
FMOL/ML
femtomol per milliliter
FMOLE
femtomol
NG/ML
nanogram per milliliter
NG/SAMPLE
nanogram per sample
NMOL
nanomol
PMOL/10^6 CELLS picomol per 10^6 cells
PMOLE
picomol
UG/ML
microgram per milliliter
UMOL
micromol
Assay censor codes
209
Code
Description
pg/mL
picogram per milliliter
Table 12.14. Pharmacology assay user censor codes
Code Description
B
Validity
Numeric Value
Below Quantifiable Limit or No Peak Valid
2048
a
D
Drug not required to be assayed
Valid
512
O
QC out of range, dilute and repeat
Invalid
4
P
Not Able to Interpret Result
Invalid
8192
S
Quantity not sufficient
Valid
10,000,000
U
Sample Diluted
Valid
1,000,000,000,000
X
Per lab, sample must be repeated
Invalid
1024
Z
No Result, Lab Issue
4096
Invalid
b
a
Results removed from final views
b
This censor code was removed in LDMS version 5.8.1; it can no longer be assigned but is listed here for historical
reference.
Table 12.15. Reasons for not running an assay censor codes
Code Description
Numeric Value
COR
COR Controls Out of Range
10431
CTM
Contaminated
10430
EQF
Equipment Failure
10432
LBA
Laboratory Accident
10434
LBE
Lab Error
10433
MSW Missing Well
10435
NPA
Sample Drawn Without Participant Adherence to 10440
Regimen
OUT
Resulted outside LDMS
PSW
Sample not Drawn Within Protocol Specified Win- 10441
dow
QNS
Quantity Not Sufficient
10436
STO
Specimen too old to run on test
10442
WCT
Wrong Controls
10437
10439
Table 12.16. Roche Amplicor HIV Monitor (RT PCR) assay censor codes
Code Description
Validity
Numeric Value
A
QS wells below lower limit
Invalid
.1
B
QS wells above upper limit
Invalid
.01
C
User re-selected well for algorithm
Valid
.0001
D
OD ratio failure - repeat
Invalid/Invalid
a
Run
1,000,000,000
F
Control out of range
Invalid Run
b
1,000,000
210
LDMS Code Abbreviations
Code Description
Validity
Numeric Value
I
Invalid
100,000
No QS wells in range
c
J
HIV wells below lower limit - no HIV Valid
RNA detected
1
K
HIV wells above upper limit
Invalid
10
L
QS wells out of sequence
Valid with C cen- 100
sor
L
HIV wells out of sequence
Valid with C cen- .001
sor
R
Re-read
Valid Run
100,000,000
d
U
Undetectable sample above cutoff - Valid
repeat
.00001
X2
Invalid standards - slope negative
Invalid Run
1,000
X3
Invalid/Out of sequence control
Invalid Run
10,000,000
X4
Copies greater than upper limit of Valid
quantification - dilute and repeat
10,000
a
If the run is repeated, the censor will be changed to C
If the F censor is used in conjunction with a D or X3 censor on the same control, it can be re-detected and corrected.
c
Specimen should be re-tested, if possible
d
Specimen should be re-tested, if possible
b
Table 12.17. Roche Amplicor HIV-1 Monitor UltraSensitive assay censor codes
Code Description
Validity
Numeric Value
A
QS wells below lower limit
Invalid
.1
B
QS wells above upper limit
Invalid
.01
C
User re-selected well for algorithm
Valid
.0001
D
OD ratio failure - repeat
Invalid/Invalid
a
Run
1,000,000,000
F
Control out of range
Invalid Run
I
No QS wells in range
Invalid
c
b
1,000,000
100,000
J
HIV wells below lower limit - no HIV Valid
RNA detected
1
K
HIV wells above upper limit
Invalid
10
L
QS wells out of sequence
Valid with C cen- 100
sor
L
HIV wells out of sequence
Valid with C cen- .001
sor
R
Re-read
Valid Run
d
100,000,000
U
Undetectable sample above cutoff - Valid
repeat
.00001
X2
Invalid standards - slope negative
Invalid Run
1,000
X3
Invalid/Out of sequence control
Invalid Run
10,000,000
Assay censor codes
211
Code Description
X4
Validity
Copies greater than upper limit of Valid
quantification - dilute and repeat
Numeric Value
10,000
a
If the run is repeated, the censor will be changed to C
If the F censor is used in conjunction with a D or X3 censor on the same control, it can be re-detected and corrected.
c
Specimen should be re-tested, if possible
d
Specimen should be re-tested, if possible
b
Table 12.18. Roche COBAS Amplicor HIV-1 MONITOR assay censor codes
Code Description
Validity
Numeric Value
F
Invalid Control
Invalid
1,000,000
G
Copies less than lower limit of quan- Valid
tification
0.0001
I
No QS wells in range
Invalid
100,000
J
Undetectable
Valid
1
K
wells out of range
Invalid
10
L
HIV wells out of sequence
Invalid
0.001
L
QS wells out of sequence
Invalid
100
R
Re-Read
X3
Invalid/Out of sequence control
X4
Copies greater than upper limit of Valid, but needs 10,000
quantification
repeat
Table 12.19. Roche COBAS Amplicor HIV-1 MONITOR Test, UltraSensitive
Code Description
Validity
Numeric Value
F
Invalid Control
Invalid
1,000,000
G
Copies less than lower limit of quan- Valid
tification
0.0001
I
No QS wells in range
Invalid
100,000
J
Undetectable
Valid
1
K
wells out of range
Invalid
10
L
HIV wells out of sequence
Invalid
0.001
L
QS wells out of sequence
Invalid
100
R
Re-Read
X3
Invalid/Out of sequence control
X4
Copies greater than upper limit of Valid, but needs 10,000
quantification
repeat
Table 12.20. Roche COBAS Ampliprep/COBAS TaqMan HIV-1 assay censor codes
Code Description
Validity
Numeric Value
G
Result less than lower limit of quan- Valid
tification
0.000100
J
Undetectable
1.000000
Valid
212
LDMS Code Abbreviations
Code Description
Validity
Numeric Value
X4
Results greater than upper limit of Valid, but needs 10000.000000
quantification
repeat
I
No QS wells in range
Invalid
100000.000000
F
Invalid control
Invalid
1000000.000000
H
No Result
Invalid
10000000.000000
Code Description
Validity
Numeric Value
B1
BOOM extraction used
Valid
100
C
Control re-run and valid - assay is Valid
valid
1,000
D
Contamination
Invalid
10,000
E
Poor viability
Invalid
1,000,000
K
Kit/Reagent Problem
Invalid
1
O
Lab error/Lab accident
Invalid
100,000,000
P
Equipment failure
Invalid
0.1
Q
Kit QC out of range - repeat
Invalid
10
R
Re-detected
Valid
1,000,000,000,000
V
Over amplified
Invalid
10,000,000
W
Inhibitory/Material didn’t amplify
Invalid
100,000
Z
Per lab - Do not use
Invalid
0.001
Table 12.21. Virology user censor codes
LDMS Software License Agreement
Licensor: Frontier Science And Technology Research Foundation, Inc. (“FSTRF”)
4033 Maple Road, Amherst, New York 14226
The software that you are requesting access to is
the Laboratory Data Management System (“LDMS”). FSTRF authorizes your use of the LDMS only on the terms and conditions contained
herein. It is understood that you are requesting
access to the LDMS as a representative of the
Licensee, and that you are binding the Licensee
and yourself to the terms and conditions herein.
If you are not the Licensee’s authorized representative, or you do not agree to the terms and
conditions herein, then you are not authorized
to use the LDMS. The LDMS and related documentation are protected under applicable copyright laws.
This License is granted with the understanding that you will use the LDMS to track specimens and to track assay results with regard
to Licensee’s clinical trials and its internal
projects, and nothing else. You represent and
warrant you will not use the LDMS to create,
augment or modify competing products, nor assist others to do so.
License: FSTRF grants Licensee a nonexclusive,
nontransferable license during the term of this
Agreement to install and use the LDMS on up
to twenty computers that are under Licensee’s
direct control and supervision. If Licensee desires to install and use the LDMS on more than
twenty computers, the Licensee must contact
FSTRF to seek a different license. This License
Agreement does not permit Licensee to (a) distribute copies of the LDMS or its documentation to others; (b) allow others to use the LDMS;
(c) make derivative works; (d) rent, lease, sublicense, grant or assign Licensee’s rights or delegate its duties with respect to the LDMS; or (e)
translate, reverse engineer, decompile or disassemble, or otherwise alter the LDMS without
the prior written consent of FSTRF. However,
Licensee is permitted to alter the LDMS manual
or other user instructions to suit Licensee’s operations, provided that such modifications are
clearly distinguishable from the original material.
Limited Warranty, Disclaimer, and Limitation
of Liability: The LDMS and accompanying documentation are provided “as is” without warranty of any kind. THERE IS NO OTHER WARRANTY, EXPRESSED OR IMPLIED, WITH RESPECT
TO THE LDMS AND ITS ACCOMPANYING
DOCUMENTATION, THEIR MERCHANTABILITY, OR THEIR FITNESS FOR ANY PARTICULAR
PURPOSE. In no event will FSTRF be liable for
indirect or consequential damages, including,
without limitation, loss of income, profits, use,
information, or economic loss. FSTRF does not
warrant that the operation of the LDMS will be
uninterrupted or error free.
Term: This license remains effective for one
year from the date the LDMS was first licensed
to the Licensee, and may be extended in oneyear increments provided that FSTRF agrees to
such an extension. If Licensee wants to extend
the term, please contact FSTRF in writing. Extensions of the term can be made only by FSTRF
in a written document signed by an officer of
FSTRF. FSTRF retains the right to grant or not
grant such extensions, in its sole discretion.
Licensee’s license will automatically terminate
without notice if it fails to comply with any of
the terms or conditions of this Agreement. Upon
any termination, Licensee must inform FSTRF
in writing and destroy all copies of the LDMS in
any form within 30 days. Licensee can choose
to terminate its license at any other time by destroying the LDMS together with all copies of
the LDMS in any form, and informing FSTRF in
writing of such termination.
Intellectual Property Rights: FSTRF retains all
copyrights, patent rights, trademark rights,
trade secret rights, trade dress rights (including
the “look and feel” of the LDMS) and other intellectual property rights of any nature whatsoever
with respect to the LDMS and the related documentation and any and all modifications, enhancements, and derivative works of any kind.
Waiver: No failure or delay of FSTRF to require
compliance with any requirement of this Agreement shall constitute a waiver of the right to require such compliance, or compliance with any
other requirement of this Agreement. No failure or delay of FSTRF to exercise any right or
remedy under this Agreement shall constitute a
waiver of such right or remedy or any other right
214
or remedy under this Agreement. No waiver by
FSTRF of any such right or remedy shall be effective unless made in writing duly executed by
FSTRF.
Amendments: No course of performance or other conduct hereafter, pursued, accepted or acquiesced in, and no oral agreement or representation hereafter made, by FSTRF or Licensee,
whether or not relied or acted upon, and no usage of trade whether or not relied or acted upon, shall amend this Agreement or impair or
otherwise affect any of the obligations, rights
or remedies under this Agreement. No amendment to this Agreement shall be effective unless
made in a writing duly executed by FSTRF and
Licensee.
U.S. Government Restricted Rights: If Licensee
is the U.S. Government or is acting on behalf of
the U.S. Government, please note that (a) the
software and documentation are provided with
the limited rights identified herein, and no others, and (b) rights in technical data are governed
by that version of DFARS 252.227-7013b which
was in existence on June 1, 2010.
Choice of Law and Courts: This Agreement shall
be governed by and construed in accordance
with the laws of the State of New York without
regard to its choice of law provisions. Any dispute arising in connection with this Agreement
must be resolved by the courts located within
the State of New York. Each party waives any
right to object, whether for inconvenience or
otherwise, to venue for any dispute properly being in such courts.
Entire Agreement: This Agreement is the complete and exclusive statement of the agreement
between Licensee and FSTRF with respect to the
LDMS, and supercedes any earlier proposal or
prior arrangement, whether oral or written, and
any other communication between us, relative
to the license of the software.
Invalid Provisions: If any restriction with respect to the use of the LDMS or remedies of
FSTRF is found to be unreasonable by a court
of competent jurisdiction, LDMS and Licensee
agree and submit to such modification of such
restriction as a court may determine to be reasonable. If any section, subsection, paragraph
or portion of this Agreement shall be determined to be invalid, it shall not affect the re-
LDMS Software License Agreement
mainder of this Agreement, which shall be and
remain binding and effective against all parties
hereto.
Assignment By Licensor: This agreement is assignable by FSTRF without the consent of Licensee.
Headings: Headings and subheadings herein are
for convenience of reference only and are not of
substantive effect.
If you have questions concerning this Agreement, please contact FSTRF at the address given above.
Glossary
aliquot
A smaller specimen derived from a primary,
used for testing purposes; the basic specimen unit used throughout LDMS
ambient shipment
A primary that is marked as shipped in Speicmen Management, but is not shipped as
part of a batch in LDMS
anonymization
The process of creating new aliquots from
existing specimens that are stripped of potentially identifying information like clinic
ID and visit date, for use in blinded studies
batch
A shipment that has been prepared in LDMS
to be shipped to another laboratory
blinded control
A control specimen that is added to an assay in which the user does not know the expected results
censor
A special flag applied to an assay run's results that indicates an issue with the results
See Also system censor, user censor.
client
In LDMS, a computer with LDMS installed
that accesses the shared LDMS database of
an LDMS server
See Also server.
configuration
(in LDMS Storage) a definition for a storage
unit, such as a freezer or box, so that more
than one of that type of storage unit can be
created and used.
container
The smallest storage unit in LDMS, such as
a box; holds individual specimens
culture derivative
A culture harvest that the user has stored
as an aliquot in LDMS and can be viewed,
shipped, etc like any other specimen
deploy
An update containing new specimen codes,
new deploys, etc that is received by a laboratory during the export process
expected value
The results that a user expects to receive
from a control on an assay run
export
Sending some data from your laboratory's
local LDMS database to Frontier Science;
what data is sent varies by network (internal
groups are not exported)
fill order
The method that LDMS will use to add specimens to a container, such as filling from
left-to-right, then from top-to-bottom
See Also sort order.
freezer
The largest storage unit in LDMS, such as a
refridgerator or freezer
ghost aliquot
An aliquot create with the exact specimen
type and volume of its primary for the sole
purpose of shipping a primary that was not
processed into aliquots
global specimen ID
A unique ID that is assigned to each primary
and aliquot in LDMS
internal group
A group that is created locally at your laboratory and is not present in other laboratories' databases; internal group information
is never exported but can be shipped
laboratory ID
A unique, 3-digit number assigned to every
laboratory that uses LDMS that uniquely
identifies that laboratory
level
An intermediate storage unit in LDMS, such
as a shelf in a freezer, which can contain
sub-levels or containers
See Also container, freezer.
manifest
A list of a shipment's contents, printed and
packaged with a shipment of specimens
216
Glossary
marked
A storage unit (or specimen) in LDMS that
has been flagged by the user with the intent
to ship it
OPID
See other participant identifier.
other participant identifier
An identifier for participants in LDMS that
has no logical checks or rules; laboratories
can use this field as needed
other specimen ID
An identifier that can be assigned to primaries and aliquots in LDMS that has no
logical checks or rules; laboratories can use
this field as needed
participant
A person who participants in a study and
has an associated PID
participant identifier
A unique number assigned to every study
participant within LDMS
patient
See participant.
personal identifying information
Information, such as an address or birth
date, that can be used to link a record to an
actual person
PID
See participant identifier.
primary
The specimen that the clinician collects
from a patient and is made into aliquots
protected health information
Health information that is protected by
HIPPA
QA/QC
In LDMS, the process of reviewing a specimen shipment before it is sent and when it
was received to make certain that the physical specimens match what is in the shipping
file
Retrovirus Laboratory Management Program
A legacy laboratory management platform;
many laboratories migrated from this plat-
form to LDMS and as a result there are some
features implemented to ease database migration.
server
In LDMS, an LDMS computer that shares its
database to other computers using LDMS on
the same local network
See Also client.
ship
In LDMS, to create a shipping file that contains specimen information, which can then
be sent to a receiving laboratory where the
file can be imported and the specimens
added to the receiving laboratory's LDMS
database
sort order
The method that LDMS will use to sort specimens in a container, such as by specimen
ID or by network
See Also fill order.
specimen ID
An identifier assigned to every specimen,
which is not necessarily unique
See Also global specimen ID.
study identifier
A unique identification number assigned to
a study, also known as a protocol number
system censor
A censor code applied to an assay run's results automatically by LDMS to indicate an
issue with the results; these censors cannot
be removed by the user
See Also user censor.
terminate
In LDMS, to review and approve the results
of a culture, typically coinciding with the
physical termination and destruction of the
culture
thaw count
The number of times that the specimen has
been removed from storage and thawed;
can be viewed in the Aliquot Details window
in Specimen Management
transaction
(in LDMS Storage) a record of a change
within storage, such as a specimen being
217
added or moved, that can be saved for audit
purposes.
user censor
A censor code applied to an assay run's results manually by the user to indicate an issue with the results
See Also system censor.
218
Index
A
ACTG, 175, 179
activity log, 175
add button, 7
additive, 15
admin account, 5
AERAS, 175
AIEDRP, 175
aliquot, 11
adding, 19
deleting, 19
modifying, 19
aliquot grid, 15, 19
details button, 20
right-click menu, 19
aliquots
finding, 32
ANON group, 35
anonymization, 35
mapping back to original specimen,
assay device readers (see device readers)
assays
Abbott Realtime, 90
assay selection tab, 85
assigning to aliquots, 84
censor codes, 88
COBAS TaqMan, 90
COBAS TaqMan HIV-1 Qualitative, 92
controls (see controls)
correcting data, 89
creating a template, 95
creating new run, 85
culture assays, 101, 101
(see also cultures)
device readers (see device readers)
dilution, correcting, 90
immunology assays (see immunology assays)
importing setup, 77
LDMS Remote Reader (see LDMS Remote Reader)
MT-2 assay, 105, 106
NASBA HIV RNA QT, 98
Nuclisens HIV RNA QT, 98
OD ratio failure, 89
out of sequence errors, 89
overview, 81
p24 antigen assay, 104, 108
pharmacology assays (see pharmacology assays)
pharmacology calibrator lots, 122
pharmacology QC lots, 122
plate layout, 96
plate layout reports, 88
read vs run, 81
recalling a saved assay, 87
reviewing results, 88
Roche Amplicor Monitor HIV RT PCR, 98
Roche COBAS Amplicor, 99
Roche COBAS UltraSensitive, 99
Roche HIV DNA PCR, 100
Roche UltraSensitive HIV RT PCR, 99
running template-based assays, 96
supported assays, 82
templates, 94
testing non-logged specimens and controls, 87
assign tests tool, 84
astro numbering, 40
ATN, 175
audit information, 175
audit trail, 29
auditor mode, 167
B
backups, 172
barcode reader, 167
barcodes, 152
batch (see shipping)
batch number, 64, 77
blind control, 100
Brady BBP11-34L, 156
Brady BBP33, 154
Brady BMP53, 155
Brady BP-PR 300, 156
Brady IP300, 155
Brady MVP 300, 158
bulk add tab (storage), 33, 47, 49, 51, 78
bulk update, 52
C
challenge password, 4
changing users, 6
CHAVI, 175, 181
CIPRA, 175
client-server, 3
clinic, 14
codes
assay censors, 88
generate list from LDMS,
comments, 29, 31, 52
compress tab (storage), 47
compress wells, 96
condition code
bulk update, 52
condition codes, 23, 29, 31, 33
configuration tab (storage), 47
container
adding specimens to, 51
adding to a freezer, 49
configuration, 44
coordinates, 45
deactivating, 45
excluding positions, 44
fill order, 45
labeling method, 44
mark for shipment, 53
modifying, 45
number of rows, 44
resequence, 50
shipping, 53
container view tab (storage), 47, 49
controls, 118
control charting, 121, 121
kit entry, 118
VQA 200, 91
VQA kits, 120
Coulter MR5000, 124
Coulter UVMax, 124
CPQA, 121, 175, 182
Crystal Reports® Viewer (see reports)
cultures, 101
creating, 102
culture derivative, 39
harvest and feed schedules, 102
labels, 104
MT-2 assay, 106
MT-2 supernatant, 105
p24 antigen assay, 104
result logic, 106
specimen derived from, 107
terminating, 105
workflow, 101
D
data corrections, 30
data retreival tool, 134
date and time, 6
date format in LDMS, 167, 167
deploys, 174
derivative, 15
device readers, 123, 126
220
Index
(see also LDMS Remote Reader)
associating an assay with, 123
creating configuration, 124
supported readers, 124
DNA assay (see Roche HIV DNA PCR)
dried blood spot, 47
Dupoint VMax, 124
DynaTech MR5000, 124
E
export, 29
export as, 175
exporting, 173
manual export, 174
extended search, 33
F
FACTS, 175
fill order, 45, 54
freezer
adding and removing, 48
configuration, 46
modifying, 46
temperature, 46
freezer cfg tab (storage), 46, 47
Frontier Science
about, 1
frozen time, 11, 17
G
global specimen ID, 11, 12
(see also specimen ID)
groups, 14
creating, 170
shipping internal, 78, 172
H
help
context sensitive, 11, 14
documentation, 10
training for users, 10
user support, 10
HPTN, 175, 183
HVTN, 175, 184
I
ID1, 14
correcting, 30
ID2, 14
ID3, 14
idle time out, 167
immunology assays, 108
advanced flow, 110
apoptosis by P.I., 109
cryopreservation, 112
LPA (Lymphocte Proliferation Assay), 108
natural killer cell (NK) assay, 111
TUNEL, 110
IMPAACT, 175, 185
import as is, 77, 78
import tab, 77
importing (see shipping)
initials, default to current user, 167
Internet tab, 167
iPrEx, 175, 186
IRC, 175
K
kit entry (see controls)
from assay result file, 92
L
labels, 149
alignment, 151
barcodes, 152
correcting, 29
creating new format, 150
default size, 152
format, 149
format options,
printer setup, 153
printing, 15, 149
printing from IDs, 149
re-printing, 35
stock size, 149
laboratory ID, 2
LabWare, 19, 68, 76
LabXpert, 157
LDMS
about, 1
client-server set up, 3
installing, 2
laboratory ID, 2
license, 213
logging in, 5
overview, 6
requesting new features, 195
shipping capabilities, 63
software updates, 195
supported device readers, 124
system recommendations, 177
system requirements, 177
unlocking, 4
updates, 174
upgrading, 2
LDMS Data Exchange, 76
LDMS Remote Reader, 126
configure LDMS to use, 126
configuring, 126
current device, 128
reading assay output using, 128
LDMS server, 3
LDX (see LDMS Data Exchange)
level
adding to a freezer, 49
configuration, 44
container for level, 45
deactivating, 45
modifying, 45
Levey-Jennings charts, 121
login, individual modules, 167
lost shipment, 74
M
MACS, 76, 187
main view tab (storage), 47, 49, 49, 55
manifest, shipping, 75, 76
mark for shipment, 67
marked box, 53
Molecular Devices UVMax, 124
move tab (storage), 47, 49, 54
MT2 assay (see assays)
MTN, 175, 188
N
NASBA HIV RNA QT, 98
never store, 33, 52, 52, 54, 66, 78
when removing from storage, 167
NICHD-WESTAT, 188
NOSID, 59
Nuclisens HIV RNA QT, 98
O
operating system, 178
OPID (see other patient identifier)
Organon Teknika 520, 124
221
original volume, 18
other patient identifier, 16, 60
other specimen ID, 15, 19
P
participant, 11, 59
adding using Patient Management, 60
co-enrollment, 16
enrolling in specimen management, 15
merging, 60
modifying after adding, 59
viewing information, 59
participant grid (see patient grid)
participant ID, 11
passwords
challenge, 4
changing, 170
patient grid, 14, 16
details button, 14, 16
patient management, 59
PBMC, 31
permanent delete from storage, 52
personal identifying information, 18
PHACS, 175, 189
pharmacology
control charting, 121
entering controls, 39
entering intracellular specimens, 39
entering specimens, 38
pharmacology assays, 113
copying from Excel, 115
entering results, 114
reviewing and accepting results, 116
templates, 113
upper and lower limits, 116
PHI (see protected health information)
PHIA, 189
PID (see participant ID)
PII (see personal identifying information)
preloads, 21
defining, 21
FSTRF vs user defined, 21
list of available,
triggering, 21
viewing, 21
primary, 11
condition code, 18
deleting, 17
shipping, 18
type, 15
primary grid, 15, 17
details button, 18
printer
setup, 6
printers, 154, 155, 155, 156, 156, 157, 158, 165
processing time, 11, 17
protected health information, 18
Q
QA/QC, 70
R
reagent logging, 40
reason sample not collected, 29
received date, 11, 15
(see also specimen date)
received time, 12, 15, 17
reports, 131
Crystal Reports®, 131, 132
custom, 134
descriptions of reports, 135
exporting, 133, 135
pharmacology, 121
requesting new, 135
storage, 56
REPRIEVE, 191
reverse row labeling (for containers), 45
RLMP, 13, 50
Roche Amplicor Monitor HIV RT PCR, 98
Roche COBAS Amplicor, 99
Roche COBAS UltraSensitive, 99
Roche HIV DNA PCR, 100
Roche UltraSensitive HIV RT PCR, 99
RPID, 175
S
screen resolution, 178
search tab (storage), 47, 55
SeraCare, 76
setup shipment tab, 65
SHIMS, 175
shipment
correcting problems, 73
discrepancy, 74
lost shipment, 74
QA/QC, 74
shipment date incorrect, 73
shipment destination incorrect, 73
unsatisfactory shipment, 74
shipping, 63
adding items to, 64
batch, 75, 77
correcting shipped specimens, 29
creating new shipment, 64
cross-LIMS, 76
government vs internal groups, 66
import tab, 77
importing, 77
manifest, 75, 76
mark for shipment, 67
modifying shipments, 72
QA/QC, 77
quality control, 70
remove imported batch, 80
reports, 75
sending, 75
shipment destination, 67
shipping a container from storage, 53
shipping container, 68
shipping container report, 75
shipping file, 63, 75
shipping file format, 76, 76
shipping storage containers, 65
sort order, 70, 76
specimens in storage, 53
temperature, 76, 77
text file format, 78
to LDMS laboratories, 67
to non-LDMS laboratories, 67
un-shipping a batch, 72
viewing shipments, 72
workflow, 63
shipping file
date, 73
destination, 73
SID, 14
sort order (see shipping)
specimen, 12
adding new, 13
adding to storage, 51
anonymization, 35
assigning assay, 34
bulk updating, 52
comments, 31
correcting, 28, 30
culture derivative, 107
destroying, 33
finding in storage, 55
from culture, 39
improper processing, 31
mark for shipment, 34
pooling, 15
removing from storage, 52
storage, 53
thaw count, 87
222
Index
volume, 15
specimen corrections, 30
specimen date, 12, 14
(see also received date)
specimen ID, 12, 12
(see also global specimen ID)
converted from RLMP, 13
manually specifying, 31
options for generating, 13
specimen management, 11
after adding specimen, 16
browse, 32
comments, 18
group-specific behavior, 179
primary grid, 17
restricted scope, 33
specimen time, 12, 15, 17
storage, 43
adding specimens, 51
auditing, 56
bulk add tab, 78
bulk update, 52
configuration, 43, 44
configuration tab, 44
container (see container)
dried blood spot, 47
finding specimens in, 55
freezer (see freezer)
level (see level)
main view vs container view, 48
rearranging, 54
removing specimens from, 52
reports, 56
shipped specimens, 53
storage structure, 49
transactions, 56
tree structure, 43
unusual specimens, 47
study
requesting new studies, 14
sub additive, 15
sub derivative, 15
supported assays, 82
T
Test not run, 32
test setup, 34
text file, for shipping, 78
thaw count, 87
time, 17
transactions tab (storage), 47, 56
U
undo, 29
users
creating, 168
idle time out, 167
modifying, 170
permissions, 169
require login to user features, 167
system administrator capabilities, 169
V
view shipment tab , 64, 65
VIP, 175
visit, 14
visit ID, 12
VQA, 37, 120, 175, 191
VQA 200 control, 91
VTN (see HVTN)
W
WIHS, 76, 192
Z
Zebra GX 430t, 165