1
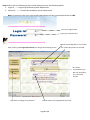
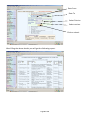
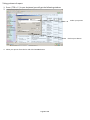
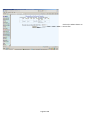
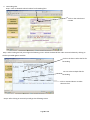
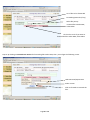
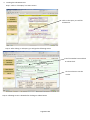
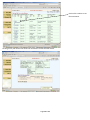
File Tracking System User Manual
1. Starting File Tracking System
Step 1: Click on Start ---- > All Programs ---- > Internet Explorer.
OR
Click on File Tracking System (DDA) shortcut available on the desktop of your computer.
click on the highlighted text
Step 2: After clicking on Internet Explorer, following window will be opened.
Type here: http://dda.org.in/fts
And hit the enter button on your
Keyboard.
Page 1 of 12
Step 3: After that the following screen will be displayed, enter the following details:
1. Login ID ---- > Login ID provided by System Department
2. Password ----- > Password provided by System Department.
Note: If you don’t know your Login ID/Password please call the system department at 1469
Type your Login ID here
Type your password here
Number of pending files in your section
After entering valid Login ID/Password you will get the following screen.
No. of files physically not received.
No. of files
Forwarded by you
But not received by
The concerned
Section.
Click here to change your password
Current status of any file/Movement of file.
Page 2 of 12
2. Working with File Tracking System.
2.1 Creating a new file
Following are the steps to create a new file.
Step 1. Click on File Module.
Step 2. Click on Create Main File in the File Menu.
Step 3. Click on Single File System.
Step 4. Enter the Following details in the form.
1. File No (Required)
2. File Opening Date (Required)
3. File Category
4. File Classification
5. Previous Reference
6. Next Reference
7. Subject (Required)
8. Remarks
9. Review Date
10. Action Completion Date
Click on the circle.
Step 5. Click on “Submit” button and you will get message saying “File Created Successfully”.
Step 6. Click on the “OK” button.
2.2 Editing a file
Note: Files once forwarded to any section can’t be edited.
Step 1. Click on File Module.
Step 2. Click on Edit File in the FileMenu.
Step 3. Enter the File No.(if you know),else click on the “submit” button.You will get all the editable
files on your screen.
Step 4. Select the file which you want to edit from the list.
Step 5. Fill the form with updated details and click on save.
2.3 Taking Printout of reports
Step 1. Click on File Module.
Step 2. Click on Reports from left pane.
Step 3. Select the type of report from the right pane.
Eg. Files Register(Files created in the section)
Files Received(Files Received in the section)
Files forwarded(Files forwarded from the section)
Step 4. Select the division(Eg. Vigilance) and section
Note: This step can only be performed for received and forwarded files.
Step 5. Enter the Date From(starting date of report) and Date To(end date of report).
Step 6. Click on the submit button to get the report.
Page 3 of 12
Date From
Date To
Select Division
Select section.
Click on submit.
After filling the above details you will get the following report.
Page 4 of 12
Taking printout of report:
1. Press ( CTRL + P ) in your keyboard,you will get the following window.
2.
Select your printer
Click on print button.
3. Select your printer from the list and click the Print button.
Page 5 of 12
1. Receiving Files.
Step 1: Click on the blue colored number on the right hand side of “Physically Not Received”
Click on the blue colored
number
Step 2: After that following screen will appear
click on the box to select the file and click on Receive button
You can select multiple
files for receiving
Click on receive button to
select the files.
Step 3: After clicking on Receive Button you will get the following screen
Page 6 of 12
Click on the Submit button to
receive files.
Page 7 of 12
2. Forwarding Files
Step 1: Click on the Red colored number for forwarding files.
Click on the red colored
number
Step 2: After clicking the link you will get the following screen. Select the desired files under Forward column by clicking on
the box provided against each file.
Click on the box to select the file for
forwarding.
You can select multiple files for
forwarding.
Click on Forward button to make
selection final.
Step 3: After clicking on Forward you will get the following screen.
Page 8 of 12
List of files to be forwarded
Forwarding Remarks (If Any)
Select file priority
Forward files outside DDA,
Vikas Sadan
Click on this circle if you want to
forward the files within DDA, Vikas Sadan
Step 4. By Clicking on Forward to A section for forwarding files within DDA, then you will get the following screen.
Select Division/Department
Select section
Click on forward to Forward the
files.
Page 9 of 12
Step 5. If Forward Outside is clicked then you will get the following screen
Enter the address of
concerned office
Click on forward to forward
the files
Page 10 of 12
3. Tracking the File Movements
Step 1. Click on “File Query” on Home screen.
Click on File Query to track file
movements
Step 2: After clicking on File Query you will get the following screen
Enter file number here and click
on submit click.
Click on submit to see the
results
Step 3. Following screen is showed after clicking on submit button
Page 11 of 12
Click on file number to see
file movements
Clicking on any file number will show the movements of that file with details.
Page 12 of 12