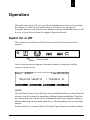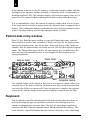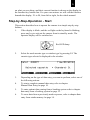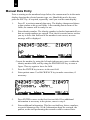
1
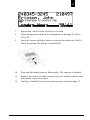
Operator’s Manual
Publication No OM3478
2/99
KODAK
Network ID Camera
Health Imaging
PLEASE NOTE
The information contained herein is based on the experience and knowledge relating to the subject matter
gained by Kodak prior to publication.
No patent license is granted by this information.
Kodak reserves the right to change this information without notice, and makes no warranty, expressed or
implied, with respect to this information. Kodak shall not be liable for any loss or damage, including
consequential or special damages, resulting from the use of this information, even if loss or damage is
caused by Kodak’s negligence or other fault.
© Kodak AG, Germany, 1999
i
Contents
General Information ...................................................................1
Product Description ....................................................................................... 1
Declaration of Conformity ............................................................................. 3
General Warnings ......................................................................................... 3
Installation ..................................................................................5
Operation ....................................................................................7
Switch On or Off ........................................................................................... 7
Patient data entry window.............................................................................. 8
Keyboard ....................................................................................................... 8
Step-by-Step-Operation - Start....................................................................... 9
Manual Data Entry ...................................................................................... 10
Data Entry From a Booking System............................................................. 12
Data Entry From Retake Memory ................................................................ 14
Post Exposure Actions ................................................................................. 15
Operation Details .....................................................................17
Possible Field types...................................................................................... 17
Name Field ....................................................................................... 17
Identity Number................................................................................ 17
Date Field ......................................................................................... 18
Clock Field ....................................................................................... 18
Fixed Text Field................................................................................ 18
Number field..................................................................................... 18
Menu Field ....................................................................................... 18
Text Field ......................................................................................... 19
AP/PA Field ..................................................................................... 19
KODAK Network ID Camera • OPERATOR’S MANUAL
PUBLICATION No. OM3478 • Feb 1999
ii
Keyboard ..................................................................................................... 20
Enter key........................................................................................... 20
Backspace key ................................................................................... 20
Arrow Keys....................................................................................... 21
Shift Key........................................................................................... 21
Caps Lock Key .................................................................................. 22
Escape Key........................................................................................ 22
Control Key....................................................................................... 22
Function keys .................................................................................... 23
Error Messages ....................................................................... 25
Booking list is empty ................................................................................... 25
Illegal password ........................................................................................... 25
The field must not be empty ......................................................................... 25
Incomplete ................................................................................................... 25
Illegal PID number ...................................................................................... 26
Unknown error............................................................................................. 26
No exposures stored ..................................................................................... 26
Remove the cassette and try again ................................................................ 26
Illegal value ................................................................................................. 26
No data available from X-ray unit ................................................................ 27
Failed to calibrate opening mechanism......................................................... 27
The lid of the cassette is stuck.... .................................................................. 27
Specifications.......................................................................... 28
PUBLICATION No. OM3478 • Feb 1999
KODAK Network ID Camera • OPERATOR’S MANUAL
1
General Information
Product Description
The KODAK Network ID Camera, is a new type of X-ray film identifying
device. Identification data is exposed onto the film electronically with a special
built in exposure display, as opposed to older devices where a printed card was
photographed. The marking produced gives an exceptionally high contrast and
makes it considerably easier to read, even at long distances. The KODAK
Network ID Camera will work with almost any type of film cassette using a C1
or a C1N window.
After the picture has been taken on the patient, the cassette with the exposed
film is taken to the ID-camera and the operator enters some form of patient
data into the unit. The cassette is then fed into the entrance slot and the film is
exposed with the respective information. The cassette can then be removed.
KODAK Network ID Camera • OPERATOR’S MANUAL
PUBLICATION No. OM3478 • Feb 1999
2
Patient data can be entered in several ways: manually, by magnetic card or
downloaded from a RIS-system (Radiology Information System).
The KODAK Network ID Camera is prepared to communicate with other
devices such as X-ray stands, dedicated patient displays, patient identification
systems, data collection systems etc. by means of a general purpose standard
communication channel.
For manual data input the KODAK Network ID Camera is equipped with a
full 65-keys QWERTY-keyboard.
The software has numerous checks for preventing manual erroneous data
input, as well as checks for errors on the download data channel.
Design of mechanics and software ensure minimised handling of mistakes and
allows picture salvage operations. All errors are displayed as plain text in the
operators display.
Important:
Please be aware of the fact that this unit may only be used
for exposing patient identification data to X-ray films in film
cassettes (types and sizes as specified under chapter
”Specification” of this Operator’s Manual).
The unit must not be used for any other operations.
PUBLICATION No. OM3478 • Feb 1999
KODAK Network ID Camera • OPERATOR’S MANUAL
3
Declaration of Conformity
We declare our sole responsibility that the product
KODAK Network ID Camera
to which this declaration relates is in conformity with the following standards
and, therefore, bears the CE mark:
EN 55022/Class B/1994, EN 50082-1/1992 and EN 60950/1993
The unit is following the provisions of the applicable directives
89/336/EEC and amendments
73/23/EEC and amendments
General Warnings
Warnings:
Dangerous voltages are present in this equipment
The operator is not allowed to open the unit.
This product does not contain any parts that would have to be
repaired by the operator.
Do not perform repairs yourself, call for a qualified KODAK
Service provider
KODAK Network ID Camera • OPERATOR’S MANUAL
PUBLICATION No. OM3478 • Feb 1999
4
Blank Page
PUBLICATION No. OM3478 • Feb 1999
KODAK Network ID Camera • OPERATOR’S MANUAL
5
Installation
Your camera is unpacked and installed by a Kodak Service Provider..
The camera is not ready for use because it requires a communication and
display set-up otherwise it will not function accordingly.
This set-up and customisation is done by your Kodak Service Provider
during installation.
If you have unpacked the camera please do the following:
The camera should be placed on a steady table or shelf.
If the camera is operated in mobile units like mammography screening buses,
or where there is a risk of the camera falling down, it should be fastened to the
surface. Ask your Kodak Service Provider for correct installation.
The power cord should be connected to the power receptacle on the rear side of
the camera and to wall outlet.
Power receptacle
No voltage selection is necessary, the camera can be operated with any
nominal voltage from 220 VAC to 240 VAC.
KODAK Network ID Camera • OPERATOR’S MANUAL
PUBLICATION No. OM3478 • Feb 1999
6
WARNING
The KODAK Network ID Camera is classified as Information
Technology Equipment according to EN 60950.
According to European Safety Regulations for Medical
Equipments, the following conditions must be fullfilled:
- If the camera is operated within a distance of 1.5 m from the
patient, it must be connected to the equipotential equalization
2
device (E D).
2
E D with cable must be provided by the customer.
2
The purpose of the E D is to ensure that all medical and other
equipments are connected to the same ground potential. If, on
installation, your Kodak Service Provider connected the
camera to the equipotential bushbar using the equipotential
bonding plug, this connection may not be interrupted, i.e. you
are not allowed to pull off the cable coming from the
equipotential bushbar (see illustration below).
- If the camera is connected to a Medical Equipment according
to EN 60601-1( e.g. safety ground or data connections) the
safety standard EN 60601-1-1 has to be met and documented.
E2D plug - Connector for the cable
comming from the equipotential bushbar.
PUBLICATION No. OM3478 • Feb 1999
KODAK Network ID Camera • OPERATOR’S MANUAL
7
Operation
The quick start guide will give you all the information necessary for operating
the camera, in a fast step by step fashion. It will not cover any special
functions, but once you have become familiar with the normal functions, it will
be easy to learn the rest from the chapter Operation Details
Switch On or Off
The camera is switched on with the power switch on the rear side of the
camera.
Power switch
After a short power-up sequence the main window is displayed, and the
camera is ready for use.
NOTE!
The function ‘Cassette Type’(F4-key) can be disabled and the text after ‘Selected
cassette:’may be changed to something different during installation. Therefore
the camera may not respond on the command ‘Cassette type’and may display a
different ‘Selected cassette’-name than above, all depending on the set-up of the
camera.
In this manual it is assumed that the ‘Cassette Type’function is enabled and the
KODAK Network ID Camera • OPERATOR’S MANUAL
PUBLICATION No. OM3478 • Feb 1999
8
If the camera is not in use for 15 minutes, it will enter stand-by mode with the
backlight of the operator display switched of. Stand-by mode is indicated by a
flashing capslock LED. The operator display will switch on again if any key is
pressed or if a connected host sending patient data to the ‘patient data entry
It is recommended to leave the camera in stand-by mode when it is not in use.
If the main switch is used for power down, the internal clock is supported by a
battery. This rechargeble battery can backup the clock for approximately three
weeks. An empty battery will be fully charged within 30 hours.
Patient data entry window
Press F1-key from the main window to enter the ‘Patient data entry window’.
This window is divided into a number of fields, one field for the patient name,
one for the hospital name, one for the date, and so on. Some of the fields are
editable, like the patient name, and some are not, like the date and the hospital
name. The ‘Patient data entry window’on your camera may be different to the
ones shown in this manual because it was designed to the hospital needs
during installation.
Name field
Date field
Hospital name
The editable fields can be edited as free text or as a kind of a menu where you
can pick one of the items in the list. With the arrow keys on the keyboard you
can select the field you want to edit. Once the picture is complete an exposure
can be made, and the image on the operator display is copied onto the film.
Keyboard
The keyboard is used for selecting the fields and entering data into them, as
well as selecting the type of operation to perform, like starting on a new
patient or changing the exposure time. The type of operation to perform is
selected with four software-controlled keys directly beneath the display. The
term ‘software- controlled’means that the function of the key varies depending
PUBLICATION No. OM3478 • Feb 1999
KODAK Network ID Camera • OPERATOR’S MANUAL
9
on what you are doing, and their current function is shown on the display in
the function key bottom line. For your convenience we will call the function
beneath the display F1 to F4, from left to right, for the whole manual.
Step-by-Step-Operation - Start
This section describes how to operate the camera in a simple step-by-step
fashion.
1.
If the display is black, and the red light on the keyboard is blinking,
press any key to activate the camera from its stand-by mode. The
operator display will be switched on.
Red LED-lamp
2.
Select the used cassette type or window type by pressing F4. The
cassette type selected is displayed in the window.
3.
Depending on the type of data entry you want to perform, select one of
the following actions:
4.
To start a complete manual data entry refer to chapter
‘Manual Data Entry’on page 10.
5.
To enter patient data coming from a booking system refer to chapter
‘data entry from a booking system’on page 12.
6.
To reuse data from a previously made exposure, refer to chapter ‘data
entry from retake memory’on page 14.
KODAK Network ID Camera • OPERATOR’S MANUAL
PUBLICATION No. OM3478 • Feb 1999
10
Manual Data Entry
Prior to starting on the numbered steps below, the camera must be in the main
display showing the selected cassette type, etc. Should this not be the case,
press the ESC key -if required, repeatedly -until you read the main display.
1.
Press F1 to activate manual data entry. The display changes and shows
a data window with several fields. After entering data in some of the
fields, the camera will be ready for use.
2.
Enter identity number. The identity number is checked automatically so
that no wrong numbers are entered. This check is carried out as soon as
you try to leave this field and if the number is not correct, an error
message will be displayed.
Correct the number by using the left and right arrows to move within the
identity number field, and by using the BACKSPACE key to erase a
figure. Then try again to leave the field.
3.
Press the ENTER key to move to the next field.
4.
Enter patient name. Use BACKSPACE key to make corrections, if
necessary.
5.
Press ENTER to move to the first free text field. If no additional
information is necessary in the picture, move to step 8.
6.
Enter additional information. This line can hold any letters, numbers,
or special characters like !#%&. Information about the research, the
patient, or the staff performing the research could be entered here.
PUBLICATION No. OM3478 • Feb 1999
KODAK Network ID Camera • OPERATOR’S MANUAL
11
7.
Repeat step 5 and 6 for the second free text field.
8.
Select the projection used for the examination by pressing F1. Select
AP or PA.
9.
Insert the cassette with the window on top into the intake slot. Hold it
firmly in position. The display is switched off.
10.
Wait until the display starts to flash rapidly. The exposure is finished.
11.
Remove the cassette. If further cassettes are to be marked with the same
information, repeat from step 9.
12.
Marking is finished. Go to section p‘ ost exposure actions’on page 15.
KODAK Network ID Camera • OPERATOR’S MANUAL
PUBLICATION No. OM3478 • Feb 1999
12
Data Entry From a Booking System
Prior to starting on the numbered steps below, the camera must be in the main
window showing the selected cassette type, etc. Should this not be the case,
press the ESC key - repeatedly if required - until you read the main window.
1.
Press F2 to select a patient from the booking list. The camera will
automatically search for the patient who has the booking time closest to
the present time received from the built-in real time clock.
2.
Use the up or down arrow to move the inverted select bar to the patient
data you want to mark your cassette with.
Quick search - By pressing any alphbetic key the selection bar will move
to next patient where the first character matches the key pressed.
3.
Press ENTER to select the marked patient. The display will now show
the ‘Patient data entry window’with the data coming from the booking
system filled out. In the sample picture the identity number and the
name is filled out.
4.
Press ENTER to move to the first free text field. If no additional
information is necessary in the picture, move to step 7.
PUBLICATION No. OM3478 • Feb 1999
KODAK Network ID Camera • OPERATOR’S MANUAL
13
5.
Enter additional information. This line can hold any letters, numbers,
or special characters like !#%&. Information about the research, the
patient, or the staff performing the research could be entered here.
6.
Repeat step 4 and 5 for the second free text field.
7.
Select the projection used for the examination by pressing F1. Select
AP or PA.
8.
Insert the cassette with the window on top into the intake slot. Hold it
firmly in position. The display is switched off.
9.
Wait until the display starts to flash rapidly. The exposure is finished.
10.
Remove the cassette. If further cassettes are to be marked with the same
information, repeat from step 8.
11.
Marking is finished. Go to section p‘ ost exposure actions’on page 15.
KODAK Network ID Camera • OPERATOR’S MANUAL
PUBLICATION No. OM3478 • Feb 1999
14
Data Entry From Retake Memory
Prior to starting on the numbered steps below, the camera must be in the main
window showing the selected cassette type, etc. Should this not be the case,
press the ESC key - repeatedly if required - until you read the main window.
1.
Press F3 to select a patient from the retake memory list. The last 20
exposures are saved in the list.
2.
Use the up or down arrow to move the inverted select bar to the old
exposure you want to re-use and mark your cassette with.
3.
Press ENTER to select the marked exposure. The display will now
show the ‘Patient data entry window’with all data from the old exposure
filled out.
4.
If necessary, make corrections to the fields by using the up and down
arrows for moving between the fields and then editing the field.
5.
Insert the cassette with window on top into the intake slot. Hold it
firmly in position. The display is switched off.
6.
Wait until the display starts to flash rapidly. The exposure is finished.
7.
Remove the cassette. If further cassettes are to be marked with the same
information, repeat from step 5.
8.
Marking is finished. Go to following section p‘ ost exposure actions’.
PUBLICATION No. OM3478 • Feb 1999
KODAK Network ID Camera • OPERATOR’S MANUAL
15
Post Exposure Actions
Once the exposure is made the camera can be left as it is for another exposure
with the same patient data, or the data can be edited again as described in the
prior sections. Moreover the marking can be adjusted, if it is too faint or too
black.
If the picture taken on the patient, for some reason, has to be taken once more,
perhaps one hour later, it is very convenient to use the retake memory. The last
20 exposures are stored in the retake memory exactly as they appeared when
the exposure was made. When picked up again in this fashion, all data that
was originally entered will be present. This means that no data has to be
entered again. See the data entry from retake memory on page 14 on how to
use this function. To adjust the marking density hold down the SHIFT key and
at the same time press the F4 key. The exposure settings picture is displayed.
Use the F2 and F3 or the left and right arrows keys to adjust the density. The
density value is displayed in a bar diagram.
Press F4 to return to the data entry picture and insert the cassette to make
another exposure.
To quit the data entry picture at any time, press F4 or the ESC key. The
camera will return to its main picture.
KODAK Network ID Camera • OPERATOR’S MANUAL
PUBLICATION No. OM3478 • Feb 1999
16
Blank page
PUBLICATION No. OM3478 • Feb 1999
KODAK Network ID Camera • OPERATOR’S MANUAL
17
Operation Details
In this section the possible fields of your main window and the special
keyboard keys are explained in detail. It is assumed that the reader of this
section is somewhat familiar with the camera, either by using it or by
previously having read the section 'Operation'.
Possible Field types
Any field types which can be used on the ‘Patient data entry window’will be
explained shortly in this section, (though some of them are not present in all
cameras). The fields to be used and their places on the display are selected on
installation. The actual set-up depends on the individual X-ray department
needs as well as their working routines.
The picture is divided into fields, each field performing a certain kind of
operation. Some of the field types are editable - like the patient name field,
some are not - like the date field. Two font sizes are available for each field, a
large font and a small font (half the large font size).
The following is a description of all field types and how they can be used.
Name Field
The patient name. All characters are allowed. This field must be filled out
with at least one character, otherwise a warning message will be displayed
when leaving the field by pressing ENTER or when trying to make an
exposure.
Identity Number
In some countries every person has a unique number called Identity number,
social security number, CPR-number, etc. (depending on the country). This
number is used for identification of the patient and is often constructed in such
a way that one of the figures in the number is a control figure for checking the
other figures in the number. The calculation of this check figure differs among
the countries. After entering an identity number the field is checked when
trying to leave it, by pressing ENTER for example, and an error message is
displayed. After the error has been corrected a new try can be made.
KODAK Network ID Camera • OPERATOR’S MANUAL
PUBLICATION No. OM3478 • Feb 1999
18
When the patient number is not known, for example, this could be the case
with new-born babies or traffic accidents, any kind of number without any
checks at all can be entered. In order to get to the so-called spare number
mode , press SHIFT and F1 while the cursor is in the identity number field
(that means pressing the SHIFT key and keeping it down while additionally
pressing the F1 key). The spare number mode is indicated by an underscore
line in the identity number field. This line will also be present at the exposed
picture, indicating that a spare number has been entered. In the spare number
mode no checks are made on the identity number when leaving the field.
Therefore, any characters can be used: letters, numbers and special characters.
Date Field
The date field displays the date in a format set up at installation. The field is
not editable so the cursor will not stop at this field when using ENTER or
up/down arrows.
Clock Field
The clock field displays the built-in real time clock in a format set up at
installation. This field is not editable.
Fixed Text Field
This field type, the fixed text field, is used for all texts on the display that are
not editable. Example, the hospital name can be mentioned as a fixed text. But
others can also be present, depending on the local use for example, laboratory
(room) number and units for measuring purposes like kV, mAs, cm or ml. The
fixed text field is not editable and consequently the cursor will not stop at a
fixed text field.
Number field
The number field is a field type used when entering numbers, for example
when entering the amount of contrast given at an examination. This field type
could be combined with a fixed text field in such a way that the fixed text
indicates the units (ml, cm, etc.) for the number entered. No other characters
than the figures 0 to 9 are allowed in a number field.
Menu Field
When the cursor is placed on a menu field it is not possible to enter characters
or numbers. Instead the operator has to make a selection from a list of
predefined items. The selection is done by pressing the right arrow or the F3
button to step forward in the list and by pressing the left arrow or the F2
PUBLICATION No. OM3478 • Feb 1999
KODAK Network ID Camera • OPERATOR’S MANUAL
19
button to step backwards. When the last item in the list is reached it starts over
from the beginning and when moving backwards it starts over from the last
item. Quick search -- By pressing an alphbetic key corresponding to first letter
of a item in menu list, will display this item. By pressing the same key ones
more next item with the same first letter will be selected, if any exist.
Menus are used for certain frequent indications in the picture like the SIN
(sinister, left) and DX (Dexter, right) markings. The items in the list can also
be linked to the AP/PA-field. If so, the AP/PA selection may change when
menu seliction is changed. This can, for example, be useful when making
thorax examinations where it is very common to take a picture from behind
and one from the left side. When taking the picture from behind the menu is
set to BACK, and automatically the projection is set to PA. Then the menu is
changed to SIN, and the projection is set to AP automatically.
A menu list can consist of up to 16 items. Up to five different lists can be used
in the picture. The items can be up to 8 characters in width. All menus are
constructed during set-up and can not be changed during normal operation.
Text Field
The text field is used for all types of free text. All characters are allowed and
no checking is done when leaving the field.
AP/PA Field
The AP/PA field is used to set the display of the markings on the picture. The
marking is mirrored in the PA mode, and this makes it possible to always read
the marking normally.
The AP/PA field can be one or two characters wide, saying either A or P, or
AP or PA.
KODAK Network ID Camera • OPERATOR’S MANUAL
PUBLICATION No. OM3478 • Feb 1999
20
Keyboard
The keyboard is used for all operator interaction. It is built as a so-called
QWERTY-keyboard, in other words, a typewriter-style keyboard. Beside the
normal character keys, a number of keys are used for special functions. These
keys are described below.
Enter key
The ENTER key is pressed whenever the operator wants to finish a field and
move to the next field. When leaving the field a number of checks can be made
depending on the type of the field. If, for example, the cursor was placed in a
patient identification field a calculation of the checksum figure will be made
when leaving the field. If the cursor was placed in a number field, the entered
number is checked for upper and lower limits.
If nothing is to be entered in a field, just press ENTER without writing
anything.
Backspace key
The BACKSPACE key is used when it is necessary to make a correction of a
already written character. When BACKSPACE is pressed the cursor moves
one position to the left and then erases the character on that position. After the
erasure the cursor remains on that position. If several letters have to be erased,
just press BACKSPACE again. If a certain character is to be erased within a
field, place the cursor to the right of the character to be erased, using the left
and right arrows. Then press Backspace.
PUBLICATION No. OM3478 • Feb 1999
KODAK Network ID Camera • OPERATOR’S MANUAL
21
Arrow Keys
The up arrow moves the cursor to the previous field on the operator display.
When the top (first) field is reached, the cursor moves to the bottom (last)
field.
The down arrow moves the cursor to the next field on the operator display.
When the bottom (last) field is reached, the cursor moves to the top (first)
field.
The left arrow moves the cursor one character to the left within the current
field. If the first character is reached, the cursor stops moving.
The right arrow moves the cursor one character to the right within the current
field. If the last character is reached, the cursor stops moving.
Shift Key
The two SHIFT keys are identical, They change the letter keys from lowercase
characters to uppercase, and the number keys and the other special character
keys to the second (top) character written on the buttons. For operations with
the SHIFT key, keep the SHIFT key pressed and then additionally press the
key required for the second function.
The SHIFT keys will also change the F1 to F4 keys to their alternate functions
(see below).
KODAK Network ID Camera • OPERATOR’S MANUAL
PUBLICATION No. OM3478 • Feb 1999
22
Caps Lock Key
It is often desirable to write the whole text in uppercase, but still leave the
number keys and the other special character keys as they are. This can be
achieved by using the CAPS LOCK key. When this key has been pressed the
character keys are locked in uppercase, and this is indicated by the red LEDindicator inside the key. The function will toggle at each press, and hence the
LED will also be toggled on and off.
The red LED in the CAPS LOCK key will also indicate the stand-by mode.
When the camera enters the stand-by mode the operator display backlight is
shut off, and the display becomes almost black. To distinguish the stand by
mode from power down, the CAPS LOCK LED is flashed. The camera will
return to its normal operation when any key is pressed.
Escape Key
The Escape (ESC) key is used as a return key from the currently active
operating mode. For example, if manual entering of patient data is currently
on the screen, the manual mode is active. To leave this manual mode and
return to the main picture, the F4 or the ESC key has to be pressed. This
principle of operation is valid whichever mode is currently active. When
pressing ESC the previous mode is entered. This will be repeated until the
main picture is reached.
Control Key
PUBLICATION No. OM3478 • Feb 1999
KODAK Network ID Camera • OPERATOR’S MANUAL
23
The Control (CTRL) key is used in special set-up procedures and has no
function in normal operating mode.
Function keys
F1
F2
F3
F4
The four function keys are located below the operator display, and for
convenience they are named F1 to F4, from left to right, throughout this
manual. The actual function of the key varies depending on the active
operating mode, and in some modes it also depends on the cursor position.
The current key function for each key is shown in the display at the bottom
line where four inverted character fields are present, one for each key. Each
key can also have an alternative function, which will be active when the shift
key is pressed. These keys are called SHIFT+F1 to SHIFT+F4, and the text in
the fields will change accordingly when the SHIFT key is pressed.
Some of the basic functions in the different pictures or modes are explained
below.
Main window
F1:
Starts the manual patient data editing picture.
F2:
Starts entering data on a patient that have been transferred from a
booking or RIS system.
F3:
Selects an old exposure. All exposures are stored in a memory for
retrieval in case of a retake. The exposure will only be stored in
memory, if something really has changed in the picture, so
repeated exposures of the same picture without changing any
information will not be stored. The memory is capable of storing
20 exposures .
KODAK Network ID Camera • OPERATOR’S MANUAL
PUBLICATION No. OM3478 • Feb 1999
24
F4:
Selects which cassette to use. Two cassettes are available, standard
C1 cassettes and C1N (KODAK Min-R2) cassettes. The C1N
window is smaller. The name of these windows may have been
changed during installation and it is possible to disable one of
them. If one of the windows is disabled, the F4-key has no
function.
SHIFT+F1: Set date and time. Press SF1, and then use the right and left
arrows to position the cursor in the field you want to change. Then
use F2 or F3 (or left/right arrow) to change the value in that
position. The date will be displayed in local country format.
SHIFT+F4: Enter set-up mode. Access to set-up mode is only possible with a
password. Intended for Service Personnel only.
Patient data entry window
When F1 is pressed in the main picture (or after selection of a patient in the
booking list, or after selection of a previous exposure) the patient data picture
is entered. In this picture the following function keys will be available.
F1:
Change projection AP/PA. Toggles AP/PA each time it is pressed
and this function is independent of where the cursor is located in
the picture.
F2:
The function of this button depends on the field in which the
cursor is currently placed. It can have functions like decreasing a
value, or stepping backward in a list.
F3:
The function of this button depends on the field in which the
cursor is currently placed. It can have functions like increasing a
value, or stepping forward in a list.
F4:
Exit to main picture
SHIFT+F2: Set exposure time. A graphic display shows the current density of
the marking, e.g. the exposure time. The buttons F2 and F3 (or the
left/right arrows) are used to decrease/increase the density.
SHIFT+F3: Full display. The bottom line will always display the function of
the four function keys so that the actual picture information is
hidden behind these fields. If SF3 is pressed, the function fields
will disappear, and the display will show exactly what the film
looks like.
Note: The functions of the keys will remain the same, even if not displayed on
the screen.
PUBLICATION No. OM3478 • Feb 1999
KODAK Network ID Camera • OPERATOR’S MANUAL
25
Error Messages
Although most of the error messages are plain text and self explaining, some
guidelines on how to react and handle on these will be appropriate. The error
message is written on one of the lines in the display in such a way that it
doesn’t hide the line on which the error itself occurs, and it disappears when
any key is pressed. The following is a list of all error messages:
Booking list is empty
There is no booking data downloaded to the camera from a booking- or RISsystem. The camera may have been switched off since the last download of
data.
Action: Download (send) data from booking system.
Illegal password
When the set-up mode of the camera is entered. Access to set-up mode is
intended only for service personnel
No action!
The field must not be empty
Some field types, like the name field, are not allowed to be empty.
Action: Enter some characters in the field.
Incomplete
The field containing the personality ID number is not completely filled out,
some digits are missing.
Action: Enter more figures in the personality number field.
KODAK Network ID Camera • OPERATOR’S MANUAL
PUBLICATION No. OM3478 • Feb 1999
26
Illegal PID number
The personality ID is not entered correctly, the calculation of the checksum
does not correspond with the checksum digit.
Action: Check that the number has been correctly entered. If a so-called
spare number has to be entered, press SHIFT-F1. See i‘dentity
number’on page 17 for more details.
Unknown error
Internal error not dependent on user action. Should never occur.
Action: Call your Kodak Service Provider
No exposures stored
If the F3 button is pressed in the main picture and there has not been any
exposures made since the camera was turned on, this message will appear. The
exposure memory is always cleared when the camera is switched off.
Action: Wait to use this function until a new exposure has been made.
Remove the cassette and try again
When starting on operations like a manual data entry or data entry from a
booking list, the cassette slot should be empty to avoid accidental exposures.
Action: Remove cassette from slot and try again with the operation
Illegal value
Some field types, like the number field, may only contain certain characters or
values.
Action: Enter correct value or characters.
PUBLICATION No. OM3478 • Feb 1999
KODAK Network ID Camera • OPERATOR’S MANUAL
27
No data available from X-ray unit
If the camera is set up in such a way that it communicates with external X-ray
equipment, for example mammography units, there could be a demand that
some kind of data has to be transferred from the X-ray unit to the camera prior
to an exposure.
Action: Wait to expose until the external X-ray unit has transferred data to
the camera.
Failed to calibrate opening mechanism
During start-up the opening mechanism tries to calibrate its movement by
running the axis to a an end position. If, for some reason, the axis doesn’t
move, this error message will occur.
Action: Switch the camera on and off a couple of times, if this doesn’t help,
call your Kodak Service Provider.
The lid of the cassette is stuck....
If something should occur during opening of the cassette window so the
window or the opening mechanism gets stuck, this message will occur.
Action: Press F1 a couple of times to try to open the window. If this doesn’t
help the camera has to be opened by a service technician. Call your
Kodak Service Provider.
KODAK Network ID Camera • OPERATOR’S MANUAL
PUBLICATION No. OM3478 • Feb 1999
28
Specifications
Dimensions:
HxWxD, 150x390x348 mm
Weight:
13 kg
Voltage range:
220-240VAC nominal, 50 Hz, single phase
Power consumption:
max. 50 W
Operating environment: 15-35 °C, 25-85 % rel. humidity
Operator display:
LCD-type with white background illumination.
Number of characters: small font 40 char x 8 lines,
big font 20 char x 4 lines.
Keyboard:
Full 64 key QWERTY keyboard.
Film types:
Blue- and green-sensitive films.
Marking types:
Black text on transparent background, or
transparent text on black background.
Cycle time:
Approx. 3 seconds plus time for exposure.
Exposure time:
From 20 ms to several seconds, selectable and user
adjustable.
Cassettes:
Kodak X-Omatic cassettes with C-1 and C-1N
window all sizes
Kodak MIN-R2 cassettes with C-1N window all
sizes
Serial channel 1:
For system communication with external exposure
units, kV/mAs-meter units, patient displays etc.
RS485-interface.
Serial channel 2:
Communication with booking- or RIS-systems,
either stand alone or in a local camera network.
Software selectable RS-232 or RS-485 interface.
Serial channel 3:
Auxiliary channel for program download, external
diagnostics and supervision etc. RS-232 interface.
Specifications given in this manual are subject to change without notice. All
weights and dimensions are approximate.
PUBLICATION No. OM3478 • Feb 1999
KODAK Network ID Camera • OPERATOR’S MANUAL
Kodak AG
Hedelfinger Straße
70327 Stuttgart
Germany
Publication No.
KODAK and MIN-R are trademarks
OM3478
FEB 99