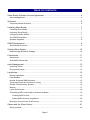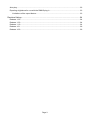
1
Show Control System
for Mac OS X and PC Windows
User Manual – 1.3.0
© 2012-2013 DB AUDIOWARE LTD
Page 1
TABLE OF CONTENTS
Show Buddy Software License Agreement..................................................................... 4
Acknowledgements....................................................................................................................... 5
Welcome!......................................................................................................................... 6
Frequently Asked Questions......................................................................................................... 6
Installing Show Buddy..................................................................................................... 7
Installing Show Buddy.................................................................................................................. 7
Unlocking Show Buddy..................................................................................................................7
Configuring Audio & MIDI ............................................................................................................. 7
The DMXIS footswitch .................................................................................................................. 8
Software upgrades........................................................................................................................ 8
DMXIS background......................................................................................................... 9
Show Buddy Overview.................................................................................................................. 9
Starting Show Buddy..................................................................................................... 10
Media storage & Backup Strategy...............................................................................................10
Preferences................................................................................................................... 11
General tab:................................................................................................................................. 11
Audio/MIDI Devices tab:.............................................................................................................. 12
track Management......................................................................................................... 13
Importing Tracks.......................................................................................................................... 13
Playing back tracks......................................................................................................................13
Lightshows..................................................................................................................... 14
Editing Lightshows.......................................................................................................................14
Fade handles............................................................................................................................... 15
Normal & layered DMXIS presets............................................................................................... 15
Trimming the start & end points of a song...................................................................................16
'Simple' vs 'Momentary' presets.................................................................................................. 16
Memos......................................................................................................................................... 17
Lyrics Quick Import...................................................................................................................... 18
Transmitting MIDI control data to external hardware .................................................................. 19
Creating MIDI Chunks............................................................................................................19
Adding MIDI chunks to a lightshow........................................................................................20
Busking a show from the Track Library....................................................................................... 20
Shows and the Show Library......................................................................................... 21
Playing a show............................................................................................................................ 22
Page 2
Auto-play......................................................................................................................................22
Exporting a lightshow for use with the DMXIS plug-in ................................................................ 23
Limitations of the export feature............................................................................................ 23
Revision History............................................................................................................. 24
Release 1.3.0...............................................................................................................................24
Release 1.2.0...............................................................................................................................24
Release 1.1.0...............................................................................................................................24
Release 1.0.1...............................................................................................................................26
Release 1.0.0...............................................................................................................................26
Page 3
SHOW BUDDY SOFTWARE LICENSE AGREEMENT
Before installing the Show Buddy software, please carefully read and agree to the following legal
agreement. From here on the "Software" refers to the Show Buddy Software product in whole or
in part, including all files, data and documentation. By installing the Software, you are consenting
to be bound by and become a party to this agreement. If you do not agree to all of the terms of
this agreement do not install the Software.
Show Buddy Software
END USER LICENSE AGREEMENT
1. Copyright Notice
The Software is © Copyright 2012-2013 DB AUDIOWARE LIMITED, all rights reserved, and is
protected by United Kingdom copyright laws, international treaties and all other applicable national
or international laws. The sole owner of this software product is DB AUDIOWARE LIMITED.
2. License Agreement
GRANT. With respect to each Show Buddy software license owned by you, DB AUDIOWARE
LIMITED grants you a non-exclusive right to install and use the Software on multiple computers
for use with one specific DMXIS hardware interface. You may copy the Software for personal
archival purposes only.
TITLE. Title, ownership rights, and intellectual property rights in and to the Software shall remain
in DB AUDIOWARE LIMITED. This agreement does not include the right to copy or sublicense
the Software and is personal to you.
DISCLAIMER OF WARRANTY. The Software is provided on an "AS IS" basis, without warranty of
any kind, including without limitation the warranties of merchantability, fitness for a particular
purpose and non-infringement. The entire risk as to the quality and performance of the Software
is borne by you. Should the Software prove defective in any respect, you and not DB
AUDIOWARE LIMITED assume the entire cost of any service and repair.
HIGH RISK ACTIVITIES. The Software is not fault-tolerant and is not designed or intended for
use in environments requiring fail-safe performance. DB AUDIOWARE LIMITED expressly
disclaims any express or implied warranty of fitness where the Software is used in any such
environments.
LIMITATION OF LIABILITY. UNDER NO CIRCUMSTANCES AND UNDER NO LEGAL THEORY,
TORT, CONTRACT, OR OTHERWISE, SHALL DB AUDIOWARE LIMITED OR ITS SUPPLIERS
OR RESELLERS BE LIABLE TO YOU OR ANY OTHER PERSON FOR ANY INDIRECT,
SPECIAL, INCIDENTAL, OR CONSEQUENTIAL DAMAGES OF ANY CHARACTER INCLUDING,
WITHOUT LIMITATION, DAMAGES FOR LOSS OF GOODWILL, WORK STOPPAGE,
COMPUTER FAILURE OR MALFUNCTION, OR ANY AND ALL OTHER COMMERCIAL
DAMAGES OR LOSSES. IN NO EVENT WILL DB AUDIOWARE LIMITED BE LIABLE FOR ANY
DAMAGES IN EXCESS OF THE PURCHASE PRICE OF THE PRODUCT, EVEN IF DB
AUDIOWARE LIMITED OR ANY IF ITS AUTHORIZED RESELLERS SHALL HAVE BEEN
INFORMED OF THE POSSIBILITY OF SUCH DAMAGES, OR FOR ANY CLAIM BY ANY OTHER
PARTY.
Page 4
LIMITATIONS ON USE. You may not use, copy, modify, translate, sell, or transfer the Software or
any copy except as expressly defined in this agreement. You may not attempt to unlock or bypass
any copy-protection or authentication algorithm utilized by the Software. You may not modify,
translate, reverse engineer, decompile or disassemble the software (except and solely to the
extent an applicable statute expressly and specifically prohibits such restrictions), or create
derivative works based on the Software. You may not redistribute the Software without the prior
consent of DB AUDIOWARE LIMITED.
TERMINATION. Either party may terminate this agreement immediately in the event of default by
the other party. Upon any termination of this agreement, you shall immediately discontinue the
use of the Software and shall uninstall the Software and Documentation and all copies thereof.
GOVERNING LAW. The laws of Scotland govern this Agreement, and shall govern any dispute
relating to this Agreement. The application of the United Nations Convention on Contracts for the
International Sale of Goods is expressly excluded.
MISCELLANEOUS. This agreement represents the complete and exclusive statement of the
agreements concerning this license between the parties and supersedes all prior agreements and
representations between them. It may be amended only by a writing executed by both parties. If
any provision of this agreement is held to be unenforceable for any reason, such provision shall
be reformed only to the extent necessary to make it enforceable, and such decision shall not
affect the enforceability (i) of such provision under other circumstances or (ii) of the remaining
provisions hereof under all circumstances. Headings shall not be considered in interpreting this
agreement.
Show Buddy EULA Rev.240212
ACKNOWLEDGEMENTS
•
DMXIS hardware design is copyright © 2009 Enttec Pty Ltd.
•
DMXIS software (including all component programs, plug-ins, graphics) is copyright ©
2009-2013 DB AUDIOWARE LTD.
•
Show Buddy software (including all component programs, plug-ins, graphics and this
documentation) is copyright © 2012-2013 DB AUDIOWARE LTD.
•
db audioware, DMXIS and Show Buddy are trademarks of DB AUDIOWARE LTD.
•
VST is a trademark of Steinberg Media Technologies GmbH
•
Apple, the Apple logo and Mac are trademarks of Apple Computer, Inc., registered in
the U.S. and other countries.
•
The Audio Units logo and the Audio Units symbol are trademarks of Apple Computer,
Inc.
•
Windows is a registered trademark of Microsoft Corporation in the United States and
other countries.
•
All other product and company names are trademarks or registered trademarks of their
respective holders.
Page 5
WELCOME!
Show Buddy is a companion product for our award-winning lighting controller, DMXIS.
Show Buddy gives you fully automated hands-free sound & light, but in an extremely user friendly
interface, customised to the needs of the gigging professional. It's ideal for those wanting the
simplest possible way to create a fully automated sound & light show.
This manual is a reference guide for Show Buddy. We also recommend you watch the Show
Buddy videos available on YouTube – these will show you concisely what Show Buddy is all
about, and how to get started quickly.
FREQUENTLY ASKED QUESTIONS
•
Why should I use Show Buddy instead of something like Ableton Live, Cubase,
SONAR, Logic?
Show Buddy is specifically designed for the job of sequencing backing tracks with a
light show. It integrates more tightly with DMXIS than is possible in a VST/AU
sequencer, resulting in a simpler, more visual, and ultimately more productive
programming experience.
•
Does Show Buddy do audio time-stretching, beat-matching etc?
No. If you need access to more advanced audio features, use an advanced DAW such
as Logic Audio, Cubase or Ableton Live (and use the DMXIS VST plug-in for lighting
support)
•
What audio formats does Show Buddy support?
Show Buddy natively supports wav, AIFF, CAF, Ogg Vorbis and FLAC audio files
formats, along with any audio format supported by the underlying OS X CoreAudio or
Windows DirectShow libraries. At the time of writing, both these libraries support mp3
playback.
Page 6
INSTALLING SHOW BUDDY
Show Buddy requires DMXIS 1.3.0 (or better) to be installed, and your DMXIS hardware interface
to be connected. Your Show Buddy license must be unlocked before use. For this, you need an
internet connection with a web browser, a valid email address, and a connected DMXIS hardware
interface.
INSTALLING SHOW BUDDY
•
First, make sure you have installed DMXIS version 1.3.0 or better (available from
www.dmxis.com/download)
•
Download the Show Buddy installer for Windows or OS X as appropriate (link will be
provided with ShareIt purchase).
•
Run the Show Buddy installer and follow the instructions.
UNLOCKING SHOW BUDDY
•
Connect your DMXIS hardware interface to a USB port on your computer.
•
Make sure you are connected to the Internet.
•
Start the Show Buddy program (located in your main OS X Applications folder, or your
Windows desktop).
•
Follow the instructions on-screen to unlock your software.
CONFIGURING AUDIO & MIDI
Show Buddy works best with a low-latency soundcard. On OS X, the standard CoreAudio drivers
usually work well. On Windows, you may need to experiment with the different available
soundcard drivers to find the most reliable settings.
To modify your audio settings, open the File > Preferences window and go to the Audio/MIDI
Devices tab. You should aim for reliable playback with latency of 20ms or less (the audio buffer
size field). If you use higher latencies, you will find that the timing accuracy of your lighting show
suffers. Sometimes, selecting <<none>> in the input field can significantly improve performance
on Windows machines.
You can use external MIDI controllers to manually control DMXIS during a show (as with the
standard DMXIS product), and also to control playback of a show in DMXIS. Select which MIDI
controllers you wish Show Buddy to react to in the active midi inputs table.
You can transmit MIDI patch changes and other MIDI messages from Show Buddy, to control any
MIDI capable devices in your live rig (e.g. guitar multi-fx pedals, hardware vocal processors,
software instruments). These messages are created via the MIDI Chunk Editor (accessed via the
View menu).
Page 7
THE DMXIS FOOTSWITCH
You can use a standard footswitch connected to the DMXIS hardware interface to control
playback in Show Buddy. For this to work, you must configure the 'Load next preset' footswitch
action (and optionally the 'Load previous preset' action) in your DMXIS show, as the following
DMXIS screen-shot shows:
The 'Load next preset' footswitch action will start & stop playback in Show Buddy.
The 'Load previous preset' action will stop & rewind the current song in Show Buddy.
Remember: each DMXIS show has its own footswitch settings. If you find that the footswitch
works intermittently, first check that you have configured it correctly in every DMXIS show.
SOFTWARE UPGRADES
When Show Buddy starts and an Internet connection is available, it will check to see if a new
release is available, and if so, you will be prompted to download and install it if you wish.
You can disable this feature if required via the Preferences window.
Page 8
DMXIS BACKGROUND
This manual assumes that you are already familiar with the DMXIS product. In order to get the
best out of Show Buddy, we highly recommend that you familiarise yourself with the following
DMXIS techniques:
•
Creating multiple shows (remembering that each show can be configured to use
different lighting fixtures).
•
Creating tempo based presets using the DMXIS Oscillator
•
Creating sound-activated presets using the DMXIS Sound Tracker
•
Creating layered presets using the DMXIS channel masking macros.
All these techniques are described in the DMXIS user manual.
Note that you do NOT need to start from scratch in DMXIS in order to use Show Buddy. Any
existing bank & presets you have already created can be used immediately in Show Buddy.
SHOW BUDDY OVERVIEW
So how does Show Buddy work? The process is very straightforward...
•
Drag & drop your backing tracks into the Track Library.
•
Create one or more lightshows for each track by dragging & dropping DMXIS presets
directly onto the audio waveform. Add lyrics, key change reminders, count-ins or other
visual memos as needed. If you have external MIDI devices (e.g. guitar FX processors
or vocal harmonizers) you can also control these from the lightshow.
•
At this point, simply busk your show by selecting songs as required in the Track Library
and pressing your DMXIS foot switch to start/stop them.
•
Or, go one step more organised and create a show in the Show Library for each gig
you are planning. A show is an ordered playlist of songs. Build your show by dragging in
songs from the Track Library. Use the DMXIS foot switch to play through the songs in
order. Add, remove or re-order songs on-the-fly during your performance in response to
audience requests.
Let's now take a more detailed look at each feature in Show Buddy.
Page 9
STARTING SHOW BUDDY
Show Buddy requires the DMXIS hardware interface to be connected at all times. To start Show
Buddy:
•
•
Windows: double click on the Show Buddy icon on your desktop.
OS X: double click on the Show Buddy icon in the main OS X applications folder.
Note that the DMXIS window also opens alongside the Show Buddy window. Show Buddy is
basically a host audio sequencer that automatically opens the DMXIS plug-in. Like other host
sequencers, you can manually control DMXIS while your show is playing back, via a MIDI
controller. You can also design new DMXIS presets and manage your DMXIS banks without
quitting Show Buddy.
If you want to hide the DMXIS window at show time (it's really not necessary) you can close it
from the View menu or by pressing the 'D' key.
MEDIA STORAGE & BACKUP STRATEGY
Show Buddy stores all your track, lightshow and show information in a single database file. As you
create and edit your tracks & shows, Show Buddy automatically and silently saves your changes
to the database – there is no File Open or Save option as is found in document based programs.
You can create backups of the current database from the File > Backup database menu option.
This will archive the database in a “.dbb” file. It's a good idea to backup your database regularly
while you are editing, and before each live gig (so you can always recover to a known point
should something go wrong).
To restore from a backup, select the File > Restore from backup... menu option and choose a .dbb
backup file.
Note that your actual audio tracks (e.g. wav and mp3 files) are NOT saved & restored as part of
this procedure. When you drag an audio file into Show Buddy, a copy of that file is made in the
Show Buddy media folder. You should separately backup this media folder on a regular basis:
•
•
Windows: C:\ProgramData\Show Buddy\Media Files
OS X: \Library\Application Support\db audioware\Show Buddy\Media Files
You should also backup your DMXIS configuration and banks/presets as well. The DMXIS backup
process is documented here:
•
http://www.enttec.com/support-center/kb/article/000056
Page 10
PREFERENCES
The preferences window (under the File menu) lets you configure various Show Buddy settings.
GENERAL TAB:
•
Audio behaviour – allows you to choose whether two clicks of the space bar / footswitch
are required to stop audio playback. Also allows you to customise the audio fade in &
out time (when starting/stopping playback)
•
Auto updates – when enabled, Show Buddy will check online if a new version of the
software is available for download.
•
Font sizes – allows you to customise the various fonts used in Show Buddy. Larger
fonts are obviously helpful if your computer is at a distance on stage.
•
MIDI CC Commands – the CC controller numbers that are used to remote control
playback of a show.
Page 11
AUDIO/MIDI DEVICES TAB:
•
Allows you to configure the soundcard output device & MIDI input devices. (Note:
currently the input device is unused – it can be set to <<none>> if desired).
Note: the MIDI input devices selected here have no effect on any MIDI output messages being
transmitted by Show Buddy.
Page 12
TRACK MANAGEMENT
IMPORTING TRACKS
There are two ways to import audio tracks into Show Buddy.
You can select any supported audio file in the standard Windows Explorer or OS X Finder window,
and drag it directly into the Show Buddy main window. Multiple files may be dragged in
simultaneously. Those tracks will then immediately appear in the Track Library tree. You can
alternatively select the Tracks > Import Tracks... menu option.
The track appears in the Track Library tree within a category. This category is the name of the
folder that contained the audio file.
Imported audio files are copied to the Show Buddy media folder. This makes it easier to copy your
entire show from one computer to another.
To delete a track, highlight it in the tree, then select Tracks > Delete selected track.
You can overwrite tracks already in the library, simply by dragging the revised audio file into Show
Buddy. This is handy if you need to load a revised mix of an existing song. Note: if the timing of
the song has changed, you will need to edit your existing lightshows to compensate.
PLAYING BACK TRACKS
First, load the track into Show Buddy by double-clicking on it in the Track Library tree. The
waveform of the audio file appears in the timeline.
To play the track, click the space bar , press the Play button or click on the DMXIS footswitch
(assuming it is configured correctly in DMXIS, see page 8).
To stop playback, click the space bar or footswitch twice. This little safety feature prevents you
from accidentally stopping your audio during the show if you bump the footswitch. If you prefer,
you can disable this behaviour from File>Preferences)
When you stop & start audio in the middle of a track, Show Buddy gently fades your music in &
out, for a more professional sound. (The fade time can be customised from the File>Preferences
window.)
Double click on the waveform to move the play-head straight to that point. Or drag the play-head
left/right with the mouse.
To zoom in and out on the waveform, hover over a point in the waveform and move the mouse
scroll wheel. Alternatively, drag the ends of the box in the overview waveform.
By default, the waveform will scroll during playback to keep the play-head visible. To disable this
behaviour, uncheck View > Follow playback.
Page 13
LIGHTSHOWS
A lightshow is a collection of DMXIS preset changes (and their fade times), MIDI output data (to
control external MIDI devices such as guitar FX units & vocal processors) and memos (to store
count-ins, lyrics, chord change or other visual notes). Once a track has a lightshow, you can use
that lightshow to build any number of shows.
Each audio track can have one or more lightshows. Why might you need multiple lightshows? You
might need to create a new show for a particular gig, or you might have several lighting rigs, a
compact rig for pub gigs and a full rig for stage shows.
When you double click a track to load it, the lightshows are shown in the top-right of the main
window.
You can edit the lightshow name by double clicking on its name. Each lightshow can also have a
custom description – again, double-click on the description to edit it.
You can create a new (empty) lightshow by clicking the New button.
You can create a duplicate copy of an existing lightshow using the Copy button (useful for backing
up lightshows before editing, or quickly creating different lightshow variations)
EDITING LIGHTSHOWS
Arguably, the most important screen in Show Buddy! First, highlight the required lightshow then
click Edit. The screen changes to display the available DMXIS shows, banks & presets...
Choose the DMXIS show you want to use for this lightshow from the Use DMXIS show menu.
Page 14
To make the DMXIS oscillators match the song tempo, adjust the Tempo field as necessary – or
repeatedly click the Tap button or press Ctrl-T in time with the song to learn the tempo
automatically.
Note: Show Buddy song tempos override any 'Bank Tempos' defined in DMXIS.
Adding lighting presets to your track is easy - simply select a bank & preset and drag it onto the
waveform. If your presets use DMXIS masking, you can layer multiple presets, quickly building
complex looks. (Please see the DMXIS manual for more information on channel masking).
Once a preset is on the waveform, you can position it by dragging the label or line left/right. For
accurate positioning, right-click to auto-zoom the waveform.
To replace a preset with a different one, just drag the new preset over the label of the old one.
To create a copy of one or more presets, first select the presets, then drag them with the mouse
while holding down <Ctrl> on your keyboard.
When a lightshow is loaded, Show Buddy will immediately load any lighting presets at position
0:00. This gives you a “starting look” and lets you design professional looking transitions between
songs. To do this, simply drag the label of the preset as far left as possible, and add a fade time
by dragging the yellow diamond.
FADE HANDLES
The yellow diamonds on each preset label are fade handles. Drag these handles left & right to set
the fade times. Each preset has its own custom fade time.
Because the fades are displayed directly on the waveform, you can accurately position fades to
start & end right on the beat. No more mucking about with fade times in seconds!
Note: the yellow fade handles overrides the DMXIS 'Fade To Next' settings.
NORMAL & LAYERED DMXIS PRESETS
A normal DMXIS preset will completely replace the current setting of every fixture in your rig.
Thus, the easiest way to use DMXIS is to design a bunch of normal presets (each with a full look
for your entire rig) and step through them, with the footswitch.
This is also the easiest way to design a lightshow in Show Buddy – just drag a number of normal
DMXIS presets into the timeline, position them and add fade times as necessary.
However, DMXIS also has a feature called “channel masking”. This lets you design presets that
only change specific aspects of your rig, while leaving others along (e.g. a preset which changes
the colours of your moving heads without changing the pan/tilt positions).
Show Buddy lets you “stack up” multiple presets at one point in time. So, you can build a full look
by dragging several masked presets to the same position.
Page 15
TRIMMING THE START & END POINTS OF A SONG
You can drag the white markers
at the start & end of each track
to adjust the playback start &
stop point. This is handy for
trimming audio files with long
lead-in & out times (as some
stock backing tracks tend to
have).
This is also handy for making accurate adjustments to the transitions between songs when autoplay is activated, allowing several songs to play as a medley.
'SIMPLE' VS 'MOMENTARY' PRESETS
Say you have a bank of masked presets to control your blinders - “Full ON”, “Strobe” and “Sound
Activated”. Remember, these presets ONLY control the blinders, nothing else.
Show Buddy has a little trick which makes masked presets like this even easier to use. Simply
create an extra preset titled “Off”, which (in this case) switches the blinders off. Show Buddy will
now treat this bank as momentary presets. When you drag a momentary preset to the timeline, it
appears at the bottom of the waveform and has a start AND end position. Your selected preset
(e.g. “Full ON”) is loaded at the start, and the “Off” preset is loaded at the end. You can also set
separate fade times at the start & end of the preset.
In this image, a simple preset Amber Moody Backlit is loaded into the rig, followed by a Full
spotlight on the singer. The spotlight quickly fades up from black, holds for a set time, then fades
out to black again (all without affecting the amber preset).
Page 16
MEMOS
A lightshow can contain a number of memos. Memos are used to display lyrics, chord change
reminders, count-ins, or any other text you need to display clearly during the song playback.
Memos can also transmit MIDI data to external devices – for example, to automatically switch
patches on a guitar FX unit or a vocal processor.
To create a memo, first position the yellow dotted playhead anywhere in the song (by doubleclicking on the waveform, or dragging the playhead). Then click the Add memo button.
A memo has 5 fields:
•
The first field is a short label, displayed on the timeline.
•
The second larger field is the memo text itself. This can consist of multiple lines of text,
which will be displayed in a large font during playback.
•
The count-in field is optional. Normally, memos appear and disappear from the display
as defined by their position and size in the waveform. If you define a count-in, the memo
will count-in a set number of beats. This is great if you need to start singing or playing
after a long intro with no discernible beat.
•
The MIDI chunk sent at start & end fields are also optional. These allow you to
transmit MIDI control data (e.g. patch changes) to external MIDI hardware. This is great
for automating your guitar FX patches or vocal harmoniser settings. We'll go into this
feature in more detail in the next section.
You can select, move, resize and copy/paste memos exactly as for presets.
Page 17
LYRICS QUICK IMPORT
It would be tedious to create lyrics manually using the standard memo feature. The lyrics quick
import function offers a much quicker & easier way to add lyrics to your Show Buddy tracks.
First, load up your lightshow in edit mode.
Then, select Lyrics quick import... in the Tracks
menu.
The quick import window appears. Simply paste
your lyrics for the entire song into the window. Make
sure you have a blank line between each verse,
chorus etc.
Press OK when you're done.
This immediately creates a number of new memos, one for each section of the lyrics. Simply
resize & position these memos as required to match the song.
And you're done!
Page 18
TRANSMITTING MIDI CONTROL DATA TO EXTERNAL HARDWARE
As well as playing your audio and controlling your lighting rig, Show Buddy can also control your
external MIDI devices. If you use devices such as guitar fx pedals, vocal harmoniser or
hardware/software synths, Show Buddy can automatically switch banks, adjust volumes or send
any other control data.
To do this, you first need to define some MIDI chunks. A MIDI chunk is a series of MIDI messages
to control one or more devices. A simple chunk might send a single patch change message to a
guitar pedal. A complex chunk might initialise the patch, pan & volume levels of multiple devices.
Creating MIDI Chunks
To define your MIDI chunks, open the MIDI Chunk Editor from the View menu (or press Ctrl-m)
To create a new chunk, click New Chunk and enter a category (e.g. “Guitar”) and name (e.g.
“Distortion Patch”).
Each chunk can have one or more MIDI messages, shown in the lower table. To add a message
to a chunk, click New Message and then click on each cell to define the target MIDI interface,
channel, message type and associated data. (For example, the above screen-shot shows a single
program change (value 10) being sent to MIDI channel 6 on the ' FastTrack Pro' MIDI interface).
If the “Send to MIDI” button is on, the MIDI chunk will be transmitted whenever it is selected in the
upper table, or its message content is changed in the lower table. This allows you to easily test
that the chunk contains the correct data.
Page 19
Other options in this window allow you to quickly make copies of existing chunks & messages.
Adding MIDI chunks to a lightshow
Once you have defined some MIDI chunks, you can add them to your lightshows via the memo
editor window:
Simply click on the two MIDI chunk buttons, and select which chunk should be transmitted at the
start & end of that memo.
For example, you could create a memo for a guitar solo in a track, which gives you a 4 beat countin, loads the “Guitar:Solo” patch at the start, and loads the “Guitar:Clean” patch at the end.
BUSKING A SHOW FROM THE TRACK LIBRARY
Once you have created your lightshows, it is perfectly possible to run your full live show using only
Track Library. Simply double-click on the songs as you need them, then press space-bar or the
DMXIS footswitch to perform that song.
However, Show Buddy lets you go a step further and organise your songs beforehand into
ordered shows. More in the next chapter...
Page 20
SHOWS AND THE SHOW LIBRARY
A show consists, quite simply, of a list of lightshows in order. A show is a simple mechanism that
lets you prepare in advance for a gig by selecting your songs and lightshows in advance, and
organising them into a running order.
To create a new show, go to the Show Library tab, and select Shows > New show in the menu.
Enter the gig name and an optional category, then press OK. You see the new show appear in the
tree. Highlight it to load the show (which at the moment is an empty timeline).
Now, switch to the Track Library and drag some songs into the timeline to build up your show.
As you build up your show, the total number of songs and run time is updated in the main panel.
For example, in the above show
To change the order of a song in a show, highlight it then drag it up & down.
To remove a song from the show, highlight it and press the Delete key.
Page 21
The show timeline can be zoomed and panned in the same way as the song waveform (using the
scroll wheel etc.)
PLAYING A SHOW
Load a show by clicking it in the Show Library tree. The first song will be automatically loaded,
and the initial lighting presets (at 0:00 position) are automatically loaded. You're ready to play the
first song.
Note that the Estimate finish field shows you a rough estimate of when the gig will finish. This
field will update dynamically as you play your gig, even if you change the contents of the show by
adding, moving or deleting songs as you go.
Press the space bar, or the DMXIS footswitch to start playing the first song. Show Buddy will play
the song (and lightshow), updating the two timelines in real time and displaying any memos and
count-ins.
At the end of the song, Show Buddy will automatically load the next song in the show, load the
initial lighting presets at 0:00 and wait. Press the DMXIS footswitch or space bar to play the next
song.
You can play a show in random order if you wish. To load a different song, just double-click it in
the show timeline, or use the up/down arrow keys to highlight the next song, followed by Enter to
load it.
Note: you can use a MIDI controller to select songs in the show timeline, and start/stop playback.
See page 11 for more information.
You can also add or delete songs from your show as the gig progresses, perhaps in response to
audience requests.
AUTO-PLAY
By default (as described in the previous section) when a song finishes playing, Show Buddy will
Page 22
EXPORTING A LIGHTSHOW FOR USE WITH THE DMXIS PLUG-IN
Under the File menu, you'll find the Export lightshow to MIDI file option. This will create a MIDI
file containing MIDI Note messages (on MIDI channels 15 & 16) to replicate that lightshow within a
VST/AU host such as Ableton Live, Logic or Cubase.
Thus, you can use Show Buddy to create complex light shows which would be difficult if not
impossible to edit in a typical MIDI editor page within a sequencer.
The exported MIDI files are encoded with high resolution (960ppqn) and using the tempo defined
in the Show Buddy lightshow editor page (default 120bpm).
Both simple and momentary DMXIS presets will be exported to the MIDI file.
Limitations of the export feature
•
If your lightshow has multiple presets at the same point in time, the exported MIDI file
will stagger these presets a few milliseconds apart. This is to get round the limitation
whereby the DMXIS plug-in cannot process multiple bank/preset changes
simultaneously.
•
Fade-in & fade-out times defined in your lightshow (via the yellow diamonds) will not be
exported to the MIDI file. The DMXIS plug-in will use the standard Fade To Next
settings defined in the DMXIS Preset Manager page for each preset.
•
MIDI chunks (transmitted via notes) are not included in the MIDI file.
Page 23
REVISION HISTORY
RELEASE 1.3.0
•
Feature: added full undo/redo.
•
Feature: set order can be changed using Ctrl-Up/Down keystrokes.
•
Feature: improved visualisation of set re-ordering.
•
Feature: added menu option to delete song from set.
•
Feature: copy/paste of memos (via <ctrl-drag> mechanism as for copying cues)
•
Bug fix: dialog boxes now display properly in Windows 8
•
Bug fix: set order is reliably maintained when reordering or adding new songs.
•
Bug fix: fixed crash when copying a lightshow containing memos.
RELEASE 1.2.0
•
Fixed intermittent crashes on OS X.
•
Added auto-play option, allowing consecutive songs in a show to play as a medley.
Also allows looped playback of shows (for example, to automatically run music &
lighting pre-show, or during an interval)
•
The start & end play point can now be adjusted for each audio track. Allows slick
transitions between songs - especially useful with the new auto-play feature, or when
using stock audio files with long lead-in/lead-out times. (Can also be used to quickly set
play start & stop markers while editing a lightshow)
•
Fast lyrics import feature. Previously, importing lyrics by manually creating multiple
memos was a tedious task. Fast import lets you import all the lyrics for a song in one
go. Simply paste in the lyrics (with blank lines separating each verse/chorus etc. Fast
import will automatically split the lyrics into multiple memos, which can then be quickly
resized & positioned.
RELEASE 1.1.0
•
Bug fix: audio files containing apostrophes or extended characters can now be imported
correctly.
•
Bug fix: audio files with no parent folder (i.e. files at the root folder of a disk) can now be
imported correctly.
•
Added MIDI output feature (Show Buddy can now send patch changes and other
control messages to external hardware devices and MIDI programs).
•
Added MIDI Chunk Editor (for creating reusable MIDI messages, see previous).
•
Added Export to MIDI file (under File menu). Allows lightshows to be exported for use
with the DMXIS plug-in in an alternative VST/AU host (such as Ableton Live or Logic)
Page 24
•
You can now easily replace audio files already in the track library by drag & drop (for
example, if you need to import a modified mix of a song).
•
Simplified installation process for Windows users. (It is no longer necessary to manually
locate the DMXIS VST plug-in)
•
The Click twice to stop playback (from space bar or footswitch) feature can now be
disabled in Preferences.
•
Audio fade time (when stopping & starting playback) can now be customised in
Preferences.
RELEASE 1.0.1
•
Bug fix: presets selected directly in the DMXIS window were not loading correctly.
•
Fixed crash when no audio output is enabled. Now prompts you to select an output in
the Preferences window.
RELEASE 1.0.0
•
Initial public release
- end of document -
Page 25