1
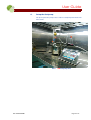
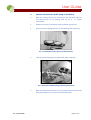
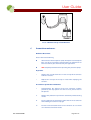
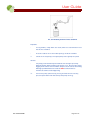
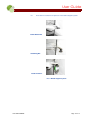
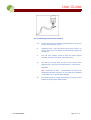
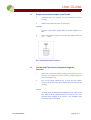
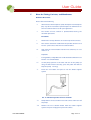
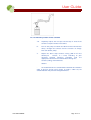
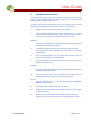
User Guide
mdi Stericheck – PC
for Plastic Containers
Advanced Microdevices Private Ltd.
20-21 Industrial Area, Ambala Cantt - 133006, India
Tel: 0171 - 2699290, 2699274 Fax: 0171 - 2699221
Mail: [email protected] Web: www.mdimembrane.com
UGL SPZZCZZ0945E
Page 1 of 17
User Guide
mdi Stericheck – PC
1.
Introduction
Sterility testing is critical to quality control of sterile pharmaceutical product
manufacture and has become all the more important because of the regulatory
and commercial considerations. International pharmacopoeias recommend use
of procedures that ensure elimination of secondary contamination for accurate
and reproducible results.
As per USP “Pharmacopeial articles are to be tested by the Membrane Filtration
method where the nature of the product permits”. The membrane filtration
method involves filtration of samples drawn from an aseptically manufactured
product lot through the membrane filter followed by washing away of any
growth inhibiting substances, cutting the membrane filter into two equal halves
and incubating these in nutrient media suitable for growth of aerobic and
anaerobic microorganisms.
The sterility of the lot under test is confirmed only if no growth is observed after
the specified number of days of incubation. The USP also states that the
presence or absence of microbial growth observed as turbidity should not be
due to any external contamination (false positives) or presence of any inhibitory
substances (false negatives).
Such situations that compromise the reliability of the test is a serious issue as
retesting has very limited scope and frequent investigations and revalidations is
a highly undesirable activity.
Therefore it is very important for the microbiologist to ensure that no external
contaminants are introduced during the sterility test procedure and that it meets
all the other pharmacopoeia needs.
This guide describes the procedure to use of mdi Stericheck – PC, the closed
sterility-testing device for plastic containers.
UGL SPZZCZZ0945E
Page 2 of 17
User Guide
mdi Stericheck – PC
2.
Closed
Sterility
Testing
Device
Stericheck: Closed Sterility Test System
mdi Stericheck Closed Sterility Test System offers the complete sterility
testing solution. Right from sampling, filtration, media exposure, until
incubation, the entire activity takes place in a closed loop to do away
with the possibility of any extraneous contamination and therefore false
positives. The absence of anti-microbial/ bacteriostatic components,
and complete washing away such substances in the drug product
ensures no false negatives.
Advantages
* Fast
* Pre- sterilized and ready to use
* No membrane handling
* No false positives or negatives
The Stericheck system incorporates disposable Stericheck devices and a
specially designed easy to use Steripump for aseptic transfer of fluids.
UGL SPZZCZZ0945E
Page 3 of 17
User Guide
mdi Stericheck – PC
Specifications
Material of Construction of Stericheck PC
Membrane
Cellulose Nitrate/ Nylon-66/PVDF
Membrane Pore Size
0.45µm
Canisters
Tubing
SAN (Styrene Acrylo Nitrile), , plain
transparent
PVC, plain transparent
Needle
Stainless Steel
Filter on Vented Needle
0.2 µm PTFE Membrane
Filter on Canister Vent
0.2 µm PTFE Membrane
Canister Dimension
Water Flow Rate
51 mm (Diameter) x
120 mm (Height)
> 0.3 lpm @ 10 psi at 25°C
Sterilization
EO Sterilized
Maximum Operating Temperature
45°C continuous
Maximum Operating Pressure
45 psi
Pic. 1: Tubing with Needles Connection for Stericheck-PC
and Vented Needle
UGL SPZZCZZ0945E
Page 4 of 17
User Guide
mdi Stericheck – PC
3.
Procedure of
Use
3.1
Using Stericheck PC: The set-up requirements and steps to be
sequentially followed for using PC Canisters are as below.
Requirements:
a.
mdi Steripump
b.
Stericheck PC Canister pack, presterilized
c.
Product to be tested
d.
Incubators
e.
Sterile Fluid Thioglycollate (FTG) Medium – 100 ml.
f.
Sterile Soybean Casein Digest (SCD) Medium – 100 ml.
g.
Indian/US/European pharmacopoeia
h.
Aseptic laboratory environment
i.
Rinse
solution
as
recommended
pharmacopoeia – USP/EP/IP/Other
in
referred
Steps
A. Set up the Steripump
B.
Position the canisters and the tubing on the pump
C.
Prewet the membranes
D. Prepare the product samples to be tested
E.
Transfer and filter the test sample through the canister
F.
Rinse the tubing, canisters, and membranes
G. Add media to the canisters
H. Incubate the canisters
UGL SPZZCZZ0945E
Page 5 of 17
User Guide
mdi Stericheck – PC
A.
Set up the Steripump:
Set up the peristaltic pump. Please refer to Steripump User Manual for
more details.
Pic.2:
UGL SPZZCZZ0945E
mdi Steripump Unit
Page 6 of 17
User Guide
mdi Stericheck – PC
B.
Position the Canisters and Tubing on the Pump:
•
Open the sterilized plastic tray that contains the Stericheck canisters
and tubing-needle set by peeling back the lid in an aseptic
environment.
•
Remove the canisters and tubing-needle set from the plastic tray.
•
Place the canisters upright into the canister openings of the drain tray.
Pic. 3: Stericheck canisters placed on the drain tray
•
Load the canister tubing into the pump head. Refer installation.
Pic. 4: Placement of PVC tubing in the Steripump head
•
UGL SPZZCZZ0945E
Open the pouch that contains the caps and plugs and place them inside
the blister package or on a surface free of contamination.
Page 7 of 17
User Guide
mdi Stericheck – PC
Pic. 5: Schematic Set-up of Stericheck PC
C.
Prewet the membranes:
Reference Document:
Please refer to the following
United States Pharmacopoeia (USP)/ European Pharmacopoeia
(EP)/ any other international pharmacopeia for information on
the rinse solution you should use for your application.
mdi Steripump User Manual for operating the peristaltic pump
Important:
o
Remove the red caps from the air vents on top of the canisters
to fill the canisters.
o
Replace the red caps on the top air vents while emptying the
canisters.
Procedure to prewet the membranes:
UGL SPZZCZZ0945E
I.
Decontaminate the surfaces of the rinse container carefully,
particularly the top septum area that is to be pierced later in
this process.
II.
Remove the protective cap from the Stericheck product-testing
needle.
III.
Insert aseptically the Stericheck needle into the rinse container
while holding the container upright.
IV.
Insert the vented needle into the rinse container so as to make
an ‘X’ with the Stericheck needle.
Page 8 of 17
User Guide
mdi Stericheck – PC
Pic. 6: Indicative position of rinse container
Important:
-
If using a flame, swiftly flame the needle, allow it to cool and then insert
into the rinse container.
-
Insert the needle to ensure the needle opening is inside the container.
V.
Switch on the Steripump, and adjust pump at the appropriate speed.
Caution:
UGL SPZZCZZ0945E
-
The pump speed should be kept at moderate level as higher speed may
allow the fluid to splash up and wet the canister vent. This may cause water
logging of the canister vent membrane and prevent the canister from filling.
Although special flow directors inside the mdi Stericheck canisters
minimize the chances of this happening.
VI.
Turn on the pump. (Alternatively, if using the foot control accessory,
press the pedal down with foot to keep the pump running.)
Page 9 of 17
User Guide
mdi Stericheck – PC
VII.
Invert the rinse container and place it in the bottle support system.
Bottle Holder Bar
Stabilizing Bar
Bottle Insertion
Pic. 7: Bottle Support System
UGL SPZZCZZ0945E
Page 10 of 17
User Guide
mdi Stericheck – PC
Pic. 8: Indicative position of rinse container
VIII.
Transfer the sterile rinse solution (approximately 25 ml) to pass
on into each Stericheck canister.
IX.
Aseptically place a red cap onto the top of each canister’s air
vent to allow the rinse solution to start filtering through the
membranes.
X.
Take off rinse solution container from the bottle support
assembly and keep it upright on your work surface.
XI.
Take off the red caps from the top of each canister when
approximately 1 cm (0.39 in) of liquid remains in each canister.
Important:
UGL SPZZCZZ0945E
-
mdi recommends to leave a small amount of fluid on the
membrane at the base of canister to ensure that the test product
is suspended in rinse solution before filtration.
XII.
Turn off the pump. (If using the foot control accessory, lift your
foot off the pedal to turn off the pump.)
Page 11 of 17
User Guide
mdi Stericheck – PC
D.
Prepare the Product Samples to be Tested:
I.
Decontaminate the surfaces of each product containers
carefully.
II.
Remove vent needle from the rinse container.
Important:
-
If you are using a flame, quickly flame the needle and allow it to
cool.
III.
Invert the product container and pierce the bottom with the
vent
needle.
Pic. 9: Venting of Product container
E.
Transfer and Filter the Test Sample through the
Canisters:
I.
Remove the Stericheck product testing needle from the rinse
container and aseptically insert it into the product container,
close to the bottle seal.
II.
Turn on the pump. (Alternatively, if using the foot control
accessory, press the pedal down with foot to keep the pump
running.)
Caution:
-
UGL SPZZCZZ0945E
The pump speed should be kept at moderate level as higher speed
may allow the fluid to splash up and wet the canister vent. This
may cause water logging of the canister vent membrane and
prevent the canister from filling.
Page 12 of 17
User Guide
mdi Stericheck – PC
Pic. 10: Indicative position of product container
III.
Aseptically place a red cap onto the top of each canister’s air
vent.
IV.
Allow the liquid in the product container to transfer to the
canisters and filter through.
V.
Turn off the pump.
VI.
Decontaminate the second product container before testing as
earlier.
VII.
Remove the vented needle from the first container and
aseptically insert it into the bottom of the second container.
VIII.
Also remove the Stericheck needle from the first product
container and aseptically insert it into the second product
container, close to the seal.
Important:
-
If you are using a flame, quickly flame the needle and allow it to
cool before inserting it into the next container.
IX.
Turn on the pump. (If you are using the foot control accessory,
press your foot down on the pedal to turn on the pump.) The
pump will return to its preset speed.
X.
Repeat the earlier steps until the last sample in the lot is
transferred and filtered.
XI.
Continue pumping until all residual product clears the tubing
and filters through the canisters. Then turn off the pump.
Important:
-
UGL SPZZCZZ0945E
In order to preserve the sterility of the closed system, keep the
needle in the product container until you are ready to transfer it to
the rinse fluid container.
Page 13 of 17
User Guide
mdi Stericheck – PC
F.
Rinse the Tubing, Canisters, and Membranes:
Reference Document:
Please refer to the following
•
United States Pharmacopoeia (USP)/ European Pharmacopoeia
(EP)/ any other international pharmacopeia for information on
the rinse solution to be used for your application.
•
The volume of rinse solution is predetermined during the
validation procedure.
Procedure:
I.
Remove the red caps from the air vents on top of the canisters.
II.
Take out the Stericheck needle from the product container and
insert it up to its base into the rinse solution bottle.
III.
Also insert the vented needle into the rinse container, so as to
make an ‘X’.
Important:
-
If using a flame, swiftly flame the needle and cool it and then insert
into the rinse solution bottle.
IV.
Set the pump speed at 55 or lower and turn on the pump. (If
using the foot control accessory, press the pedal with foot to
keep the pump running.)
V.
Invert the rinse bottle and place it into the bottle support
system.
Pic. 11: Indicative position of rinse container
UGL SPZZCZZ0945E
VI.
Pump 100 ml of rinse solution into each canister. Now turn off
the pump.
VII.
Remove the rinse solution bottle from the bottle support
system and place it upright on your work surface.
Page 14 of 17
User Guide
mdi Stericheck – PC
Pic. 12: Indicative position of rinse container
VIII.
Aseptically replace the red caps onto the top air vents of the
canisters. Keep the needles in the bottle.
IX.
Turn on the pump and allow the 100 ml of rinse fluid to filter
slowly through the canisters until the canisters are empty.
Then turn off the pump.
X.
Repeat the above steps continue rinsing (100 ml of rinse
solution per
canister, at a time) according to your
validated standard operating procedure until the
appropriate volume of rinse solution filters through the
canisters, tubing, and membranes.
Caution:
The needle from the rinse solution bottle should not be removed in
order to preserve closed system sterility. If needle is taken out, the
contaminated air may enter the tubing and canisters.
UGL SPZZCZZ0945E
Page 15 of 17
User Guide
mdi Stericheck – PC
G.
Add Media to the Canisters:
Sterile Fluid Thioglycollate (FTG) media and sterile Soybean Casein Digest (SCD)
media in separate 100ml bottles with rubber septum caps are to be prepared
and kept ready for transfer to the canisters.
Special pre-installed color coded clamps on the canister tubing will help avoid
mixing of the two different media types in the canisters during transfer.
I.
Remove the red caps from the air vents of the canisters.
II.
Lift one of the canisters from the drain tray. Aseptically place a red plug
into the bottom outlet port of the canister. Place the canister again in
the drain tray and repeat the procedure for the other canister.
Important:
-
Secure the red plug firmly by twisting a half turn while pushing it into place
on the bottom outlet port of the canister.
III.
Clamp off one tubing line by closing the blue clamps (pre-installed).
Place this clamp as close as possible to the Y-connector of the needlespiking device.
IV.
Clean and decontaminate the FTG media bottle septum. Insert the
Stericheck needle into the FTG media bottle.
V.
Also insert the vented needle into the media bottle so as to make an ‘X’
with the Stericheck needle.
Important:
-
If you are using a flame, quickly flame the needle and allow it to cool before
inserting it into the media bottle.
VI.
Turn on the pump. Then invert the media bottle and place it in the
bottle support system. Transfer the media into one canister.
Caution:
Keep the pump speed at 35 - 40 when pumping Fluid Thioglycollate
Medium to reduce aeration.
UGL SPZZCZZ0945E
VII.
Turn off the pump when the tubing is clear of media.
VIII.
Remove the FTG media bottle from the bottle support and set it upright
on your work surface.
IX.
Open the blue clamp from the tubing. Clamp (red clamp) the other
tubing line (where media has just been transferred through) as before.
Page 16 of 17
User Guide
mdi Stericheck – PC
X.
Remove the Stericheck needle and the vented needle from the FTG
media bottle and insert these into the SCD media bottle.
Important:
If you are using a flame, quickly flame the needle and allow it to cool before
inserting it into the second media bottle.
XI.
Turn pump on, invert the media bottle, and place it in the bottle
support system.
XII.
Transfer the media from second bottle into the second canister. Then
turn off the pump when the line is clear of media. Remove the media
container from the bottle support and place it upright on your work
surface.
Caution:
To preserve the sterility of the closed system, do not remove the needle from
the last media bottle, as this can potentially allow contaminated air to
enter the tubing and canisters.
H.
Incubate the Canisters
I.
Clamp off both tubing lines approximately 6 cm from the canister inlets.
II.
Remove the tubing from the pump.
Caution:
UGL SPZZCZZ0945E
-
To preserve the sterility of the closed system, do not remove the needle with
the tubing from the last media bottle. This could allow contaminated air to
enter the tubing and canisters.
III.
Now cut the tubing approximately 2 cm above the clamps with sterile
scissors, so that the canisters remain closed to the environment.
IV.
Fold over and insert the tubing onto the air vents on top of the canisters.
V.
Remove the canisters from the drain tray and incubate for time and
temperature as recommended by the pharmacopoeia being followed.
VI.
Observe for the presence or absence of turbidity to indicate the
presence or absence of microorganisms.
Page 17 of 17


![PCR-258-Tip Kit Manual [110125]](http://vs1.manualzilla.com/store/data/005777628_1-f6da4e9104aae97408b67d66533e329f-150x150.png)