1
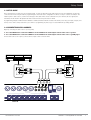
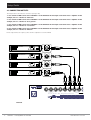
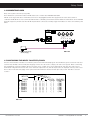
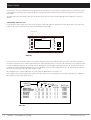
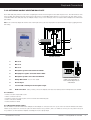
www.altronics.com.au ® A 4470 A 4472 A 4475 A 4476 A 4478 Operating Manual A 4470 4 Input / 8 Output Audio Switcher A 4472 Paging Console A 4475 Music Source Selector Wallplate A 4476 Preset Selector Wallplate A 4478 Local Input Wallplate Redback® Proudly Made In Australia Distributed by Altronic Distributors Pty. Ltd. Phone: 1300 780 999 Fax: 1300 790 999 Internet: www.altronics.com.au IMPORTANT NOTE: Please read these instructions carefully from front to back prior to installation. They include important setup instructions. Failure to follow these instructions may prevent the system from working as designed. User manual revision number: 1.1 14/03/2011 REDBACK is a registered trademark of Altronic Distributors All Australian made Redback products are covered by a 10 year warranty Altronic Distributors Head Office 174 Roe St PERTH Australia 6000 Sydney Office 15 Short St Auburn NSW 2144 Melbourne Office 891 Princess Highway Springvale VIC 3171 Published by Altronic Distributors © 2011 Altronic Distributors 2 Redback® Proudly Made In Australia www.altronics.com.au Contents 1.0 Overview 1.1 Introduction 1.2 Features 1.3 What’s in the box 1.4 Front panel guide 1.5 Rear panel connections 1.6 DIP switch settings 5 6 6 7-8 9-10 10 2.0 Setup Guide 2.1 Setup overview 2.2 Connecting audio sources 2.3 Connecting outputs 2.4 Connecting power 2.5 Configuring the inputs to outputs/zones 2.5.1 Routing audio to a zone 2.6 Adjusting the bass, treble and input volumes 2.7 Adjusting the output volumes 11 11 `12 13 13 14 15 15 3.0 Local Audio & Paging Console Options 3.1 Local audio configuration 3.2 Paging console configuration 3.3 Configuring the paging console lockout on the LCD 16 16 16 4.0 Emergency Overrides & Priorities 4.1 Priorities 4.2 Labelling of input sources, zones & presets 4.2.1 How to label input sources & zones with USB keyboard 4.3 Presets 4.3.1 User defined presets (1 to 4) 4.3.2 Default preset 4.3.3 Last preset setting 4.3.4 Setting up the presets 4.3.5 Modifying presets 4.4 Button lockout feature 4.5 Master reset function www.altronics.com.au 17 17 17 18 18 18 18 18 18 18 18 Redback® Proudly Made In Australia 3 Contents 5.0 Peripheral Connections 5.1 Paging console overview (A 4472) 5.1.1 Features 5.1.2 DIP switch settings 5.1.3 Connections 5.1.4 Connecting the paging consoles 5.1.5 Cascading the paging consoles 5.1.6 Multizone paging 5.1.7 Zone lockout 5.1.8 Store & recall 5.1.9 Emergency override 5.1.10 Paging console busy 5.2 Music source selection wallplate overview (A 4475) 5.2.1 Features 5.2.2 Rotary BCD switch settings 5.3 Local microphone/line input wallplate (A 4478) 5.3.1 Features 5.3.2 Connections 5.4 Preset selector wallplate (A 4476) 5.4.1 Features 5.4.2 DIP switch settings 19 19 19 20 20 21 21 21 21-22 22 22 23 23 23 24 24 25 25 6.0 Troubleshooting 6.1 Symptoms & remedies 6.1.2 Installation of replacement microprocessor card 26 26 7.0 Help 7.1 Help screens 7.1.1 Main screen help 7.1.2 Preset help 7.1.3 PA On/Off help 27 27 27 27 8.0 Specifications 8.1 Specifications 28 9.0 Programming Sheets 9.1 A 4470 programming sheet 9.2 A 4472 programming sheet 29-30 31 10.0 Connection Guide 10.1 Full connection diagram 4 Redback® Proudly Made In Australia 32 www.altronics.com.au Overview 1.0 OVERVIEW 1.1 INTRODUCTION Designed to meet the demands of todays complex installations, this unit is a very versatile cost effective public address/background music control system. In total there are 16 inputs: • 1 emergency paging input • 1 alert/evac input • 4 auxiliary inputs • 2 zone paging inputs • 8 local inputs Operation is as follows: Emergency Paging mutes all other inputs, including alert/evac signals and transmits to all zones. Note: the emergency paging input will accept either a low level balanced mic signal (3mV) or a high level balanced signal (700mV). This enables sources other than a microphone to be used. For example, the output of a building occupancy warning system could feed into this input and transmit either verbal messages from the microphone or the alert & evacuation tones. All on an “all call” basis. Alert/Evac signals mutes all other inputs, except emergency paging and transmits to all zones. Zone Paging (via optional A 4472 paging station) mutes auxiliary signals and transmits to selected zones. Zone paging may be prohibited for each zone from the front panel on the mic console. Local Inputs (1-8 via optional A 4478 wall plate) mutes any auxiliary source selected to that zone. Local inputs can be configured for either balanced mic or line operation. Aux inputs (1-4) can be switched to any zone or combination of zones. Each of the four auxiliary inputs have tamper proof volume, treble and bass controls, plus a signal presence indicator. Volume controls are provided for each zone output. A programmable LCD indicates which input is selected to which outputs. Tamper proof volume controls and signal presence indicators are provided for local microphone paging and emergency microphone paging. Remote selection wallplate (A 4475) may be connected via Cat5e cable to each zone. This wallplate enables selection of any auxiliary input source, volume adjustment of that zone plus the option to connect a local input source (mic or line) via the optional A 4478 wallplate. Memory presets are programmable to provide easy recall of certain system configurations including a default setting, last memory setting and 4 memory presets. This is selected from the front panel, or remotely via the optional A 4476 preset selector wallplate (see 5.4, page 28). System lockout feature to prevent unauthorised adjustment of system settings. WARNING System components are connected using standard “pin to pin” configuration RJ45 data cabling. When installing ensure all connections are verified before switching any system component on. Failure to follow the correct wiring configuration may result in damage to system components. For the correct wiring configuration, see section 6.0 “Troubleshooting”. www.altronics.com.au Redback® Proudly Made In Australia 5 Overview 1.2 FEATURES • 4 Stereo RCA line inputs (internally mono mixed). • Adjustable line input sensitivity 0.3/0.7V. • Individual bass, treble and volume controls of all line inputs. • 8 Balanced 3 pin XLR line outputs. • Individual volume controls of all 8 outputs. • Alert/evacuation/pre chime tone generator included (alert/evac tones comply to AS1670.4). • Emergency balanced input with selectable phantom power and input sensitivity. • Programmable labelling of input sources and output zones via USB keyboard. • Four programmable presets. • Tampering lockout feature. • 240V AC or 24V DC operation. • 19” Rack Mount (2 unit). Optional Features • Zone and emergency over-ride paging via A 4472 paging console. • Remote zone control of volume and music sources via A 4475 wall plate. • Preset selection via A 4476 preset wall plate. • Local microphone or music input connection via A 4478 and A 4475 wall plates. Priority Order Priority 1 is the highest priority and overrides all others priorities. Priority 2 is next, then priority 3 and so on. • Priority 1 - Emergency microphone. • Priority 2 - A 4472 paging consoles 1 & 2 (if fitted, in emergency paging mode). • Priority 3 - Alert/evacuation tones. • Priority 4 - A 4472 paging console (in normal mode). • Priority 5 - Local zone input, if being used. • Priority 6 - Line inputs. 1.3 WHAT’S IN THE BOX A 4470 Audio Switcher 240V AC power lead (suits Australian Standard) Instruction Booklet Warranty Replacement Card 6 Redback® Proudly Made In Australia www.altronics.com.au Overview 1.4 FRONT PANEL GUIDE Fig 1.4A shows the layout of the A 4470 front panel. 5 6 7 8 Presets PA on/off Prog - Isolate Help 1 2 3 4 Input 1 Input 2 Input 3 Input 4 Output 1 + - + - Bass + - Bass + - Bass 4 6 + - Treble + - 0 10 Treble 4 6 0 10 Output 5 4 6 0 10 Output 7 4 6 Treble 8 2 2 8 8 0 10 2 8 Treble A 4470 4 Input - 8 Output Audio Switcher Output 2 Output 4 Output 6 9 Cancel 10 Presets PA on/off Prog - Isolate 3 Help 4 + - REDBACK 1 2 Bass 2 + - Output 3 Confirm Output 8 5 Signal 4 Signal Signal Signal Signal 2 Signal Vol 2 Vol 3 4 8 0 Vol 1 6 10 6 2 4 2 8 0 6 8 0 10 4 10 2 8 0 10 Confirm 6 Power 7 Vol 4 Cancel 8 Emergency Paging Mic Mic 11 - + - 12 + - 13 19 On 6 + - Keyboard USB + 14 15 16 17 18 1 Emergency microphone signal present indicator This LED illuminates to indicate a signal is present at the emergency microphone input. 2 Paging microphone signal present indicator This LED illuminates to indicate a signal is present at the paging microphone input. 3 Inputs 1-4 signal present indicators These LEDs illuminate to indicate a signal is present at the corresponding RCA inputs. 4 Inputs 1-4 bass and treble controls Use these controls to adjust the bass and treble of the 4 input sources as desired. 5 Preset selector button This button is used to select pre-programmed preset configurations. (See section 4.3 Presets). 6 Public address on/off button This button is used to switch on or off the PA to a particular zone. This does not block emergency paging. 7 Program isolate button This option is currently unavailable in this version of the A 4470. 8 Help button Pressing this button provides help on the selected option. (See section 7.0 Help). www.altronics.com.au Redback® Proudly Made In Australia 7 Overview 8 9 Confirm button This button is used to confirm your selected changes. Push “confirm” and “cancel” buttons at the same time to lock and unlock the front panel controls. 10 Cancel button This button is used to exit from the current menu or cancel the selected option. Push “confirm” and “cancel” buttons at the same time to lock and unlock the front panel controls. 11 Emergency microphone volume control Use this control to adjust the volume of the emergency microphone input. 12 Paging microphone volume control Use this control to adjust the volume of the paging microphone input. 13 Inputs 1-4 volume controls Use these to adjust the volumes of the RCA input sources. 14 Output volume controls Use these to adjust the volumes of the outputs. 15 Zone selection buttons These buttons select the output zone. 16 LCD The LCD is used to indicate which inputs are selected to which outputs. 17 On indicator This led indicates the unit has power. 18 Keyboard USB input This USB connection is for a keyboard for programming the LCD. 19 Power switch Use this to switch to turn on mains power 220-240V AC. Redback® Proudly Made In Australia www.altronics.com.au Overview 1.5 REAR PANEL CONNECTIONS Fig 1.5A shows the layout of the A 4470 rear panel. 1 2 3 6 5 4 8 7 9 Output Level Output 8 V/O CH AL/EV Output 7 Output 6 Output 5 Output 4 Output 3 Output 2 Input 4 Output 1 Input 3 Input 2 Input 1 R EV AL CH CANGND L 24VDC 24VDC DC In In Fuse USB Keyboard ON DIP ON DIP 1 2 3 4 1 2 3 4 Zone Wall PLates or Preset Plate Made In Australia by Altronic Distributors PtydLt www.altronics.com.au Earth Lift 8 7 8 5 8 Emergency Emergency Aux Input Input Sensitivity Settings Paging Consoles or Preset Plate 3 2 1 2 1 240V AC (AC Fuse 500mA) Lift/Chassis- + - + (2A M205) 11 12 13 14 10 15 16 17 1 Voice over volume Use this trimpot adjustment to change the output level of the playback message. 2 Chime volume Use this trimpot adjustment to change the output level of the chime tone. 3 Alert and evacuation volume Use this trimpot adjustment to change the output level of the alert and evacuation tone. 4 Alert, Evacuation, chime and cancel contacts Use these contacts to trigger the chime tones, the alert tone, the evacuation tone and to cancel any of the tones once triggered. All tones & cancel function are operated by a closing contact to ground. This could be triggered via building fire indicator board, break glass alarm etc. EV AL CH CAN GND Output Level V/O Fig 1.4B 5 CH AL/EV GND Male XLR balanced line output connectors Connect these outputs (1-8) to the zone amplifiers. Use a 3 pin female XLR connector (pin 1 GND, pin 2 Cold, pin 3 Hot). www.altronics.com.au Redback® Proudly Made In Australia 9 Overview 6 Stereo RCA input connectors Connect these inputs (1-4) to the input audio sources such as a CD player etc. These inputs are converted to mono internally. 7 RCA input sensitivity DIP switches These DIP switches are used to set the input sensitivity of the 4 input sources. See table 1.6A below. 8 Emergency input settings DIP switches Change the sensitivity of the 3 pin emergency XLR from balanced mic level to balanced line level. Also selectes phantom power on or off. See table 1.6B below. 9 Emergency microphone female 3 pin XLR socket Use this input for emergency or “all call” paging. This has overall priority and goes to all zones. This input is suitable for connection to the output of a building EWIS system allowing remote paging and alert/evac tones to be transmitted on an “all call” basis. Sensitivity can be set to mic (0.3V) or line level (0.7V) using the DIP switch. See table 1.6B below 10 240V AC power socket (Australian standard) Connects to 240V AC mains power with the included IEC lead. 11 Earth Lift switch This switch is used to isolate the input earth from the chassis to help eliminate earth loops or hum. 12 2.1mm 24VDC power socket Connects to 24V DC power source. Centre pin positive configuration. This runs parallel with connector 13. 13 Pluggable 24VDC power socket Connects to 24V DC power source via Euroblock screw terminals. Observe correct polarity when connecting. 14 DC fuse (2A M205) This fuse protects the internal power supply. Replace with 2A rated fuse only. 15 USB keyboard connector Connects to a standard USB keyboard for programming the front panel LCD. 16 RJ45 connectors for zone wall plates These RJ45 ports connect to the A 4475 remote zone wallplates, if used. 17 RJ45 connectors for preset plate or paging consoles These RJ45 ports connect to the A 4472 zone paging consoles or one A 4472 zone paging console & one A 4476 preset plate. NOTE: A maximum of two A 4472 mic consoles and a single A 4476 preset plate may be used at a time. In this case only seven A 4475 zone wallplates can be used. The A 4476 will operate in any “Zone wall plate” or “Paging console” RJ45 port. 1.6 DIP SWITCH SETTINGS Table 1.6A & 1.6B show the DIP switch settings for item 7 & 8 on the rear panel. Aux Input Sensitivity DIP Switch Settings SW ON OFF 1 Input 3 0.3V 0.7V 2 Input 4 0.3V 0.7V 3 Input 1 0.3V 0.7V 4 Input 2 0.3V 0.7V TABLE 1.6A 10 Redback® Proudly Made In Australia Emergency Input DIP Switch Settings SW ON OFF 1 Phantom Phantom Power On Power Off 2 Mic Level Line Level 3 not used 4 not used TABLE 1.6B www.altronics.com.au Setup Guide 2.1 SETUP GUIDE This is intended to be a quick setup for a minimal install. Section 3.0 will build on the initial setup and cover the installation of peripheral connections and more in depth detail on programming the unit. In this basic configuration we will use a setup in a bar as an example. The install requires 2 audio sources, a tuner and a dvd player. This audio will be fed to 4 different zones, the main bar, the beer garden, the restaurant, and the kitchen. All adjustments will be made from the front panel of the A 4470. A programming template in PDF format is available to download from the Altronics website. This allows you to map your inputs, outputs, zone names, source names and presets before you commence programming. A printed copy is located within this operating manual. 2.2 CONNECTING AUDIO SOURCES Begin by connecting the audio sources. (see Fig 2.2A). 1 - Use a dual RCA lead to connect the INPUT 1 on the A 4470 to the audio output sockets of the source eg: tuner. 2 - Use a dual RCA lead to connect the INPUT 2 on the A 4470 to the audio output sockets of the source eg: DVD player. If more audio sources are required, connect them to inputs 3 and 4 on the A 4470. REDBACK REDBACK DVD 101.7 FM 10:30 PM Analog Out Analog Out R R L L Audio Output 5 Output 4 Audio Output 3 Output 2 Output 1 R ON L Input 4 7 6 5 4 DIP Input 3 Input 2 ON DIP 1 2 3 4 1 2 3 4 Input 1 Zone Wall PLates or Preset Plate 8 Emergency Emergency Aux Input Input Sensitivity Settings Paging Consoles or Preset Plate 3 2 1 2 1 FIG 2.2A www.altronics.com.au Redback® Proudly Made In Australia 11 Setup Guide 2.3 CONNECTING OUTPUTS The output sources are next to be connected. (see Fig 2.3A) 1 - Use a balanced XLR lead to connect OUTPUT 1 on the A 4470 to the line input socket of the zone 1 amplifier. In this example, zone 1 is labelled as “main bar”. 2 - Use a balanced XLR lead to connect OUTPUT 2 on the A 4470 to the line input socket of the zone 2 amplifier. In this example, zone 1 is labelled as “beer garden”. 3 - Use a balanced XLR lead to connect OUTPUT 3 on the A 4470 to the line input socket of the zone 3 amplifier. In this example, zone 1 is labelled as “restaurant”. 4 - Use a balanced XLR lead to connect OUTPUT 4 on the A 4470 to the line input socket of the zone 4 amplifier. In this example, zone 1 is labelled as “kitchen”. If more output zones are required, connec them to outputs 5 to 8 on the A 4470. Line In Main Bar 5 A 4270 125W REDBACK PHASE Public Address Amplifier Status - GOOD Heatsink Temp : 85.7 Load : GOOD POWER Line In Beer Garden 5 A 4270 125W REDBACK PHASE Public Address Amplifier Status - GOOD Heatsink Temp : 85.7 Load : GOOD POWER Line In Restaurant 5 A 4270 125W REDBACK PHASE Public Address Amplifier Status - GOOD Heatsink Temp : 85.7 Load : GOOD POWER Line In Kitchen 5 A 4270 125W REDBACK PHASE Public Address Amplifier Status - GOOD Heatsink Temp : 85.7 Load : GOOD POWER Output Level Output 8 V/O CH AL/EV Output 7 Output 6 Output 5 Output 4 Output 3 Output 2 Output 1 EV AL CH CANGND Zone Wall PLates or Preset Plate Made In Australia by Altronic Distributors Pty Ltd www.altronics.com.au Earth Lift 24VDC In 24VDC In DC Fuse USB Keyboard 8 7 6 5 4 3 240V AC (AC Fuse 500mA) Lift/Chassis + - + (2A M205) FIG 2.3A 12 Redback® Proudly Made In Australia www.altronics.com.au Setup Guide 2.4 CONNECTING POWER Next, connect power to the unit. (see Fig 2.4A) The A 4470 can be powered from either a 24V DC rated source or mains rated 220-240V AC @ 50Hz. 24V DC can be suppled via either a 2.1mm DC Jack or via a 2 way pluggable terminal. The supply would need to be able to deliver a continuous 24V DC @ 2A. It is not recommended that the unit is continually powered in this manner. Rather the unit should be run of 220-240V AC via the supplied 3 pin mains lead. The 24V DC input should be connected to a backup supply which switches on in the event of mains power failure. Output Level Output 8 V/O CH AL/EV Output 7 Output 6 Output 5 EV AL CH CANGND Made In Australia by Altronic Distributors Pty Ltd www.altronics.com.au Earth Lift 240V AC Earthed Mains Lead 24VDC In 24VDC In DC Fuse USB Keyboard 8 240V AC (AC Fuse 500mA) 24V DC 2A Power Supply (Backup Supply) Lift/Chassis- + - + (2A M205) FIG 2.4A 2.5 CONFIGURING THE INPUTS TO OUTPUTS/ZONES Once the unit is switched on the title screen with the product version will momentarily appear. The unit will then go into a self check mode and search for any externally connected wall plates & paging consoles. Once the check is complete, the main screen appears. Before commencing any programming, ensure the A 4470 is unlocked. To unlock, press “confirm” and “cancel” buttons at the same time. The main screen is shown below in Fig 2.5A. The left side of the screen shows the output zones 1-8, while the input sources are displayed on the top of the screen. There is also a local audio and paging console option shown which will not be discussed in this quick setup section. This will be covered in section 3. I N PU T S Z ON E S 1 2 3 4 5 6 7 8 Z ON E 1 Z O NE 2 Z O NE 3 Z O NE 4 Z O NE 5 Z O NE 6 Z O NE 7 Z O NE 8 ( ( ( ( ( ( ( ( 1 ) ) ) ) ) ) ) ) I NPUT 1 I NPUT 2 I NPUT 3 PA G I N G I NPUT 4 L O CA L CON S OL E 2 3 4 ( ON ) ( )( )( ) ( ) ( ON ) ( )( )( ) ( ) ( ON ) ( )( )( ) ( ) ( ON ) ( )( )( ) ( ) ( ON ) ( )( )( ) ( ) ( ON ) ( )( )( ) ( ) ( ON ) ( )( )( ) ( ) ( ON ) ( )( )( ) ( ) FIG 2.5A www.altronics.com.au Redback® Proudly Made In Australia 13 Setup Guide Zone 1 refers to the zone 1 output which in our example was the main bar. Zone 2 refers to the beer garden and so on. To make these easier to remember the zone names can be labelled via the use of a keyboard. However this will not be covered here. Please refer to section 4.2 for more details. The inputs work in the same manner. Input 1 in our example was the tuner and input 2 was the DVD player. Once again these can also be labelled. 2.5.1 Routing audio to a zone In our example we have 2 input sources and 4 zones we wish to supply with audio. Selecting which zone gets which audio is very simple. The buttons on the left side of the LCD are the zone selection buttons.(see Fig 2.5B) Zone Selection Buttons 1 A 4470 4 Input - 8 Output Audio Switcher REDBACK Presets PA on/off 2 Prog - Isolate 3 Help 4 5 On Confirm 6 Power 7 Cancel 8 Keyboard USB FIG 2.5B For each zone there are 4 possible inputs to select and the off position which is the default. Each time one of these zone selection buttons is pressed the next input source is routed to that particular zone. This is displayed on the screen by an “”. For instance in our example we want to route the DVD player (input 2) to the main bar (zone 1). Pressing zone selection button 1 twice will move the “” 2 positions from the off position to input 2, thus routing the DVD player to zone 1. Continuing to press the zone 1 button will move the “” through all the inputs and then to the off position where the “” will no longer be visible. By pressing the zone 2 selection button twice we can also route the DVD player to zone 2 and so on. In the example below in Fig 2.5C (input 2) is routed to the main bar (zone 1), the beer garden (zone 2) and the restaurant (zone 3). While the tuner (input 1) is routed to the kitchen (zone 4). TUNER DVD I N PU T S Z ON E S 1 2 3 4 5 6 7 8 MAIN BAR BEER GARDN RESTAURANT KITCHEN Z O NE 5 Z O NE 6 Z O NE 7 Z O NE 8 ( ( ( ( ( ( ( ( 1 * ) ) ) ) ) ) ) ) ( ( ( ( ( ( ( ( 2 * )) (( *)( *)( ) ) ) ) ( ( ( ( 3 ) ) ) ) ) ) ) ) I NPUT 3 I NPUT 4 PA G I N G L O CA L CO N S OL E 4 ( ON ) ( ) ( ) ( ON ) ( ) ( ) ( ON ) ( ) ( ) ( ON ) ( ) ( ) ( ON ) ( ) ( ) ( ON ) ( ) ( ) ( ON ) ( ) ( ) ( ON ) ( ) ( ) FIG 2.5C 14 Redback® Proudly Made In Australia www.altronics.com.au Setup Guide 2.6 ADJUSTING THE BASS, TREBLE AND INPUT VOLUMES The system is now setup and ready to run. The four audio inputs all have separate bass, treble and volume controls, which are accessible on the front panel as shown in Fig 2.6A. These tamper proof controls need to be adjusted with a screwdriver and set to your desired levels. A signal present LED on each input provides instant feedback on the presence of audio from the input sources. The emergency microphone and paging microphone controls are also shown below but will be discussed in section 3. Input 1 Input 2 + - Signal Bass + - Treble + - Bass + - Treble Input 4 + - Bass + - + - Bass Input 3 + - Treble Treble Signal Signal Signal Vol 1 Emergency Paging Mic Mic Vol 2 + - Signal - Signal Vol 3 + Vol 4 + - - + FIG 2.6A 2.7 ADJUSTING THE OUTPUT VOLUMES The 8 outputs also each have volume controls which can be set to the desired levels on the front of the unit (see Fig 2.7A) Output 1 4 6 2 4 8 0 Output 3 4 6 0 10 2 8 4 8 0 Output 2 6 2 10 Output 5 4 6 0 10 2 8 0 Output 4 8 6 2 10 Output 7 10 Output 6 4 6 0 10 2 8 4 6 0 10 2 8 Output 8 4 6 0 10 2 8 FIG 2.7A www.altronics.com.au Redback® Proudly Made In Australia 15 Setup Guide 3.0 LOCAL AUDIO & PAGING CONSOLE OPTIONS 3.1 LOCAL AUDIO CONFIGURATION The local audio configuration on the LCD displays zones that have a local audio source connected via the A 4478 local audio wall plate and the A 4475 zone wall plate (see section 5.2 and 5.4 for connection details). If a local audio source is detected on a zone wall plate it is displayed on the LCD via an asterisk () in the local section. For example, if zone 1 had an A 4478 fitted with a live audio source connected, the system would detect the presence and display an “” in zone 1 as shown in fig 3.1A. This automatically overrides any input source selected via the front panel. I N PU T S Z ON E S 1 2 3 4 5 6 7 8 Z ON E 1 Z O NE 2 Z O NE 3 Z O NE 4 Z O NE 5 Z O NE 6 Z O NE 7 Z O NE 8 ( ( ( ( ( ( ( ( 1 ) ) ) ) ) ) ) ) I NPUT 1 I NPUT 2 I NPUT 3 I NPUT 4 PA G I N G 2 3 4 L O CA L CON S OL E ( )( )( ) ( ) ( ON ) ( )( )( ) (*) ( ON ) ( )( )( ) ( ) ( ON ) ( )( )( ) ( ) ( ON ) ( )( )( ) ( ) ( ON ) ( )( )( ) ( ) ( ON ) ( )( )( ) ( ) ( ON ) ( )( )( ) ( ) ( ON ) FIG 3.1A 3.2 PAGING CONSOLE CONFIGURATION The paging console configuration on the LCD is used to display which zones are currently accessible by the paging consoles. All output zones can be programmed to be “locked out” from paging. If a zone is locked out, general paging will not be routed to that zone. However emergency paging will override locked out zones and page all output zones. An example may be an output zone such as a carpark. General paging may not be required but emergency paging would still be required. 3.3 CONFIGURING THE PAGING CONSOLE LOCKOUT ON THE LCD To configure a zone to be locked out from general paging return to the main screen, if not already there. Press the PA on/off button. The screen shown below in fig 3.1B should appear. PA MIC TO ZONE SCREEN Z ON E 1 2 3 4 5 6 7 8 Z ON E 1 Z O NE 2 Z O NE 3 Z O NE 4 Z O NE 5 Z O NE 6 Z O NE 7 Z O NE 8 ( ON ) ( ON ) ( ON ) ( ON ) ( ON ) ( ON ) ( ON ) ( ON ) Use 1 to 8 to turn ZONES ON or OFF . CONFIRM or CANCEL button will EXIT. FIG 3.1B To lock a zone out from the general paging, use the buttons labelled 1-8 left of the LCD. Pressing button 1 will toggle zone 1 ON or OFF depending on its current status. Pressing button 2 will toggle zone 2 ON or OFF etc. If the zone is left in the OFF state, paging to this zone will now be locked out. Note: this lock out will be overriden by emergency paging. 16 Redback® Proudly Made In Australia www.altronics.com.au Setup Guide 4.0 EMERGENCY OVERRIDES & PRIORITIES 4.1 PRIORITIES There are 5 levels of priority in the A 4470. 1. The emergency microphone is a hard wired microphone which connects to the 3 pin XLR connection as shown in fig 1.4A. This has top priority and will override all other inputs. The gain of this microphone is set by the screwdriver adjust controls on the front of the A 4470. A signal presence LED indicates signal being received from the microphone. 2. The A 4472 paging console (optional) has an emergency paging function which will override all other inputs except the emergency microphone. See section 5.1 for details. The gain of this microphone is set by the screwdriver adjust controls on the front of the A 4470. A signal presence LED indicates signal being received from the microphone. 3. The alert/evacuation tones provide the next level of priority and will override all inputs except the emergency paging microphone and the paging consoles (if fitted) when used in emergency paging mode. 4. The A 4472 paging console when operating in standard paging mode has the next level or priority and will override all local zone inputs and line inputs. 5. The A 4478 local input wallplate (optional) will override audio routed to the same zone the A 4478 is connected to. 6. Input audio sources 1-4 have the lowest priority and will not override anything. 4.2 LABELLING OF INPUT SOURCES, ZONES & PRESETS The input audio sources and the output zones can all be labelled using a USB keyboard. Audio source examples might include CD Player, Radio, etc. Output zone examples might include Beer Garden, Foyer, Conf. Room etc. A maximum of ten characters is available for each label. 4.2.1 How to label input sources and zones via USB keyboard Plug a standard USB keyboard into the USB socket on either the front or rear of the A 4470. The keyboard will be automatically detected and navigate the user to the label input screen. There are 3 options available, labelling the input sources, labelling the output zones and labelling the presets. All labels have a maximum of 10 characters consisting of the numbers 0-9 and the letters a-z. To use capital letters hold down the shift key when typing. To label the input sources Press the letter “i” on the keyboard. This will navigate the user to the “label inputs screen”. Press the numbers 1-4 on the keyboard to select the input to label. Type in the label required and press return. Press escape to exit back to the main label input screen. To label the output zones Press the letter “z” on the keyboard. This will navigate the user to the “label zones screen”. Press the numbers 1-8 on the keyboard to select the zone to label. Type in the label required and press return. Press escape to exit back to the main label input screen. To label the presets Press the letter “p” on the keyboard. This will navigate the user to the “label presets screen”. Press the numbers 1-4 on the keyboard to select the preset to label. Type in the label required and press return. Press escape to exit back to the main label input screen. Press escape on the keyboard or the confirm or cancel buttons on the front of the A 4470 to exit the labelling menu. Once the label input screen is exited the unit will perform a system update. This will update all connected wall plates and paging consoles with the new labels. Should you make a mistake or wish to re-label a source, zone or preset, repeat the steps above. Once in the respective labelling screen, the original name may be overwritten. www.altronics.com.au Redback® Proudly Made In Australia 17 Setup Guide 4.3 PRESETS The configurations of the input/output matrix can be saved into memory as presets which can be called up at any time. There are 4 user defined presets, a default preset and last setting preset. Before commencing preset programming, ensure the A 4470 is unlocked. To unlock, press “confirm” and “cancel” buttons at the same time. 4.3.1 User defined presets (1-4) The A 4470 has 4 user defined presets which the user programs to save frequently used configurations. The user defined presets can be labelled via the use of a USB keyboard. This is covered in section 4.2. For instance you may set up the matrix for a wedding. Labelling a preset as “Wedding” would provide an easily recognisable label to be recalled for any wedding functions. Presets numbered 1-4 can be labelled but preset 5 which is the default preset cannot. 4.3.2 Default preset The default preset is designed to be used as the “fall back” setting. For example, if the staff have been making changes to the unit and you need to return it to its standard setting, then the default setting could be used. This might be used as your everyday setup eg: the unit may be setup in a bar which caters to functions. The 4 presets may be all used for 1- “Tues Bingo”, 2- “Sat Night”, 3- “Weddings”, 4- “Band night” and a preset is required for the usual everyday setting of the venue. The default setting could be set to this everyday configuration. 4.3.3 Last setting preset The “last setting” preset or “previous” preset is an automatically saved preset which saves the current configuration before loading a preset i.e. any time a preset is loaded, the settings before it was loaded will be saved into the “last setting” preset. This is particularly useful if the user wants to return to the setup before a preset was loaded, eg: maybe Tuesday night is Bingo night and this has been saved into one of the 4 user defined presets. Before the bingo begins the venue could be setup in any sort of configuration, which is not necessarily going to be known. Tuesday night comes around and the Bingo preset would be loaded for the bingo. Without the “last setting” preset the previous setup would be lost. The bingo night comes and goes and the previous setup can now be loaded by selecting the “previous” preset in the preset screen. 4.3.4 Setting up a user defined preset To set up a user defined preset, configure the audio sources and output zones as per section 2.5. Once you are satisfied with your selections, press the “preset” button. The “preset save and retrieve” screen will be displayed. To save the preset, hold down one of the buttons numbered 1 to 5 for 2-3 seconds until the unit confirms your selection. Remember, presets 1-4 are user defined (these can be custom labelled), whilst preset 5 is the initial default setting. 4.3.4 Retrieving/loading a preset To retrieve a preset from the main screen. Press the preset button and then one of the buttons numbered 1 to 6. Presets 1 to 4 being “user defined”, 5 being “default” and 6 being “last setting”. Once the preset is loaded the label will appear on the LCD in the lower left corner. Presets may also be loaded remotely via the A 4476 wall plate. For more details see section 5.4. 4.3.5 Modifying a preset If you wish to change the configuration of a preset, firstly load the preset you wish to change (as per 4.3.4). Modify any source & output zone selections you require. Once you are satisfied with your selections, press the “preset” button. The “preset save and retrieve” screen will be displayed. To save the new settings, hold down one of the preset buttons (1 to 5) for 2-3 seconds until the unit confirms your selection. Any settings previously stored in the selected preset will be overwritten with the new settings. 4.4 BUTTON LOCKOUT FEATURE The buttons on the front of the unit can be locked out to stop tampering. To activate or de-activate this feature hold down the “confirm” and “cancel” buttons simultaneously. Please note: When a preset is selected the unit will automatically enable the button lockout feature. Preset button is not affected by the button lockout feature. 4.5 MASTER RESET FUNCTION To reset all settings to factory default plug in a USB keyboard. Press “R” on the keyboard, this will navigate to the “reset” screen. The screen will prompt you with “Are you sure you wish to erase ALL settings?”. Select “Y” for Yes, “N” for No. This will erase all settings, including input labels, zone labels, input source settings and presets. 18 Redback® Proudly Made In Australia www.altronics.com.au Peripheral Connections 5.0 A 4472 PAGING CONSOLE The A 4472 paging console is an extremely flexible addition to the A 4470 audio switcher. The consoles can be used for multi zone paging with the facitily to store and recall multiple zones to a single button. The recall functions can also be labelled via a USB keyboard which can be plugged into the rear of the unit. (see section 5.1.4) The labels will then be displayed on the highly functional and attractive LCD. An example might be a label “sales”. An emergency paging over-ride facility is accessed by a combination of an illuminated push button switch and a PTT (push to talk) switch. This combination removes the possibliity of accidentally activating the emergency over-ride facility. When activated, emergency paging will be forced through to all zones regardless of any zones which were set to be locked out. A maximum of 2 paging consoles can be connected to the A 4470 at the same time. These work in a “first in, best dressed” arrangement. The consoles can be cascaded together or both wired back to the A 4470 (see section 5.1.3 to 5.1.5 for details). Each unit must be assigned a ID number through DIP switch settings on the rear of the unit. A pre-announcement chime is available at the paging console and through the PA system. Both of these are set by DIP switches on the rear of the unit. 5.1 PERIPHERAL CONNECTIONS FIG 5.1A USB Keyboard DIP VOLUMES SWITCHES 1 2 3 4 CHIME MIC ON 24VDC In - + Connect to A 4470 paging console input or cascade to another paging console DIP 1 2 3 4 1 2 3 4 5 6 7 1 USB keyboard input. Use the keyboard to record labels for saved store functions. 2 DIP switch options These switches set the chime and emergency paging on or off and also assign a location number to the console. 3 Chime volume Use this volume to adjust the chime level. 4 Microphone volume Use this volume to adjust the microphone level. 5 24V DC connector 2.1mm DC jack (centre pin positive). 6 Cascade paging connector Secondary RJ45 socket for cascading a second console. 7 RJ45 connector For connection back to the A 4470. www.altronics.com.au Redback® Proudly Made In Australia 19 Peripheral Connections 5.1.1 Features • Multi zone paging. • Zone lock out facility. • Recall multiple zones with a single button press. • Keyboard entry labelling of recall zones. • LCD for indicating zone selections. • Pre-announcement chime. • Emergency override paging to all zones. TABLE 5.1A 5.1.2 DIP Switch Settings A series of DIP switches which are accessed on the rear of the unit provide a number of options. Table 5.1A shows the settings available. DIP switch 1 sets the PA system chime on or off. DIP switch 2 sets the internal chime on or off. DIP switch 3 turns the emergency paging on or off. DIP switch 4 is used to select the ID number for the console. A maximum number of 2 consoles can be connected to the A 4470 audio switcher. For console 1 this DIP switch is set to ‘off’. For console 2 this DIP switch is set to ‘on’. A 4472 DIP Switch SW ON 1 PA System Chime On 2 Internal Chime On 3 Emergency Paging On 4 Console 2 OFF PA System Chime Off Internal Chime Off Emergency Paging Off Console 1 5.1.3 Connecting the paging consoles Output 8 Output 7 Output 6 Output 5 Output 4 Output 3 Output 2 Input 4 Input 3 Output 1 Input 2 Input 1 Emergency Emergency Input Aux Input R Sensitivity Settings L 24VDC In Lift/Chassis- + 24VDC DC In Fuse - + USB Keyboard ON 1 2 3 4 1 2 3 4 Zone Wall PLates or Preset Plate Made In Australia by Altronic Distributors Pty Ltd www.altronics.com.au Earth Lift ON DIP 8 7 6 5 DIP Paging Consoles or Preset Plate 4 3 2 1 2 1 (2A M205) Console 2 Console 1 A 4472 8 Zone Communicator REDBACK 1 Emergency Paging (All Zones) 3 Page System Busy 4 6 7 8 Lock On 8 Zone Communicator RECALL ALL CALL CANCEL 3 4 A 4472 5 6 7 8 STORE RECALL ALL CALL CANCEL 8 Zone Communicator Version 1.1 OFF STORE 2 General Paging Block To Fast Flashing Zones REDBACK A 4472 5 1 Emergency Paging (All Zones) Version 1.1 OFF Max 300m. General Paging Block To Fast Flashing Zones REDBACK Lock On 2 A 4472 8 Zone Communicator REDBACK Max 300m. System Busy Page FIG 5.1B The consoles are connected to the A 4470 via standard Cat5e cabling as shown above. The maximum distance between the A 4470 and a paging console is 300m. Note that each paging console must be assigned an ID number before operation (see 5.1.2 DIP switch 4). Maximum of two consoles per system. 20 Redback® Proudly Made In Australia www.altronics.com.au Peripheral Connections 5.1.5 Cascading the paging consoles Output 8 Output 7 Output 6 Output 5 Output 4 Output 3 Output 2 Output 1 Input 4 Input 3 Input 2 Input 1 Aux Input R Sensitivity L ON DIP 1 2 3 4 Zone Wall PLates or Preset Plate Made In Australia by Altronic Distributors Pty Ltd www.altronics.com.au Earth Lift 24VDC In Lift/Chassis- + 24VDC In - + DC Fuse USB Keyboard 8 7 6 5 Emergency Emergency Input Settings ON DIP 1 2 3 4 Paging Consoles or Preset Plate 4 3 2 2 1 1 (2A M205) A 4476 Preset Wallplate CAT5 Cable REDBACK A 4476 PROGRAM PRESET CONFIRM M 9391A 24V DC Power Supply M 9391A 24V DC Power Supply A 4472 8 Zone Communicator REDBACK System Busy Emergency Paging (All Zones) 2 3 Emergency Paging (All Zones) 5 6 7 8 Page Lock On RECALL ALL CALL CANCEL 2 3 4 A 4472 5 6 7 8 STORE RECALL ALL CALL CANCEL 8 Zone Communicator Version 1.1 OFF STORE 1 General Paging Block To Fast Flashing Zones REDBACK A 4472 8 Zone Communicator Version 1.1 OFF System Busy 4 General Paging Block To Fast Flashing Zones REDBACK Lock On 1 A 4472 8 Zone Communicator REDBACK Page FIG 5.1C The situation may arise where all 8 zone wall plates, a preset wallplate and two paging consoles are required. In this case the above configuration may be used. The A 4476 preset wallplate may be connected to either paging console input or any zone wallplate input. Note that each paging console must be assigned an ID number before operation (see 5.1.2 DIP switch 4). In cascade operation, each A 4475 paging console must be powered by individual 24VDC power supplies (Altronics part: M 9391A). 5.1.6 Multi-zone paging Paging is achieved by pressing the numbered button of the zone required. The button will illuminate. Hold down the page switch and speak into the microphone. Note: a zone with a fast flashing LED has general paging blocked. To page to multiple zones, press the buttons for the desired zones. Multiple buttons will illuminate. Hold down the page switch and speak into the microphone. 5.1.7 Zone lock out General paging can be blocked to any zones either at the A 4470 main unit or via the paging consoles. To block paging to a zone from the A 4472, hold down the desired zone button until a message on the LCD indicates the zone is blocked out. Release the button to resume. To unlock the zone, repeat the procedure. 5.1.8 Store & recall groups of zones Two function keys labelled store and recall may be used to program groups of zones into a single number recall, just as your telephone might have a “quick dial” memory function. To store a group of zones First press the store button on the paging console. Then select the zones you wish to group together. Once the desired zones are selected, press store again. You can now assign a group number using the numbered buttons (1 to 8). If you have previously stored a group of zones in the memory, these buttons will illuminate. Press store to complete the process. Note that you may select one of the previously stored group numbers, however this will overwrite the existing stored zone selections. The screen will now prompt you to label your stored group of zones. This allows quick visual feedback to the user when selecting www.altronics.com.au Redback® Proudly Made In Australia 21 Peripheral Connections groups of zones, examples of labels might include: All W/house, Bar&Lobby, Sales&Yard etc. Plug in a standard USB keyboard into the rear of the A 4472 paging console and type in your desired label. The maximum label length is 10 characters. Press backspace to delete letters. Hold down the shift key for capital letters. Press return (enter) when finished. If a zone label is not required, press cancel to complete the process of storing a group of zones. Note: if the keyboard is not operational, it may need to be unplugged and connected again. To recall zones Press the recall button. Any buttons which are programmed with groups of zones will illuminate. If any of these groups were given a label then these will show on the LCD. Select one of the illuminated buttons to recall. The zones stored in this group will then illuminate automatically. Hold down the page (PTT) switch and speak into the microphone. Press cancel when finished or the unit will time out automatically after ≈15 seconds. 5.1.9 Emergency Override The A 4472 is fitted with an emergency paging override which routes paging to all zones even those which are blocked. To initiate the emergency paging press the red emergency paging button. The LCD will display the image shown below and all the zone buttons will illuminate to show that all zones will be paged. FIG 5.1.9A At this stage paging override hasn’t been activated. To activate emergency paging hold down the page (PTT) switch and speak into the microphone. If the pre-annoucement chime DIP switch is set on the chime will sound. The LCD will display the image shown below. FIG 5.1.9B 5.1.10 Paging Console Busy If the system has two A 4472 paging consoles connected there will be times when both units may be needed at the same time. If one of the paging consoles is in use the second console will be notified and the busy LED will illuminate and the LCD will display the image shown below. FIG 5.1.10A 22 Redback® Proudly Made In Australia www.altronics.com.au Peripheral Connections 5.2 A 4475 MUSIC SOURCE SELECTOR WALL PLATE The A 4475 wall plate provides a local means of adjusting the volume and selecting the desired audio input to a zone. The LCD shows the zone name (eg: Bar, Sales, Kitchen) and the current selected input source. A rotary BCD switch which is accessed on the rear of the unit is used to set the ID number of the wall plate. Only one wallplate may be used per zone. A trimpot on the rear sets the VOX sensitivity for the A 4478 wall plate if fitted. Note: Level control only adjusts the volume of the 4 aux input sources, plus local input (when used). General and emergency paging overrides this setting. 1 2 3 4 5 6 8 9 7 10 REAR VIEW 1 Not used. 2 Not used. 3 Not used. MAX e/ REDBACK REDBACK 4 Microphone ground connection from A 4478. ate A 4475 A 4478 L R t. e Mic CONFIRM MUSIC SOURC E Music 4 6 0 10 2 8 VOLUME 5 Microphpone negative connection from A 4478. 6 Microphone positive connection from A 4478. 7 Rotary BCD switch. See 5.2.2 for details. 8 Do not adjust. 9 Sets the VOX sensitivity for the microphone input. 10 RJ45 connection. Cat5e provides power to the wallplate and routes local audio (fed from A 4478) back to the A 4470. 5 plate) MAX 10M For more information on how A 4475 connects to A 4478, see main connection diagram at rear of this manual. 5.2.1 Features • Remote selection of input audio source • Volume control of local zone • Provision for input of local microphone or line level audio via A 4478 wall plate • Cat5e connection to A 4470 • Powered from the A 4470. 5.2.2 Rotary BCD Switch Settings Use this switch to set the ID number of the wallplate. If this wallplate is connected to the zone 1 port on the rear of the A 4470 then this switch must be set to position 1. If connected to port 2 the switch must be set to position 2, and so on. Failure to connect port 1 to position 1 and port 2 to position 2 etc will result in the wallplate controlling the incorrect input/output. www.altronics.com.au Redback® Proudly Made In Australia 23 Peripheral Connections 5.3 A 4478 LOCAL MICROPHONE/LINE INPUT WALL PLATE The A 4478 connects to the A 4475 audio source selector plate to provide the facility to access a local microphone or audio source in the same zone. Examples might include a handheld microphone, laptop or MP3 player. This audio signal is fed into the A 4475 wallplate where it overrides the wallplates current audio source selection from the A 4470 via a VOX circuit. This new status is displayed on the main screen of the A 4470 by an “” in the local input brackets. 3 2 1 REAR VIEW FIG 5.4A MAX 1 Microphone ground connection 2 Microphpone negative connection 3 Microphone positive connection e/ REDBACK REDBACK te A 4475 A 4478 L R t. e Mic 4 6 0 10 2 5 plate) CONFIRM MUSIC SOURC E Music 8 VOLUME MAX 10M For more information on how A 4478 connects to A 4475, see main connection diagram at rear of this manual. 5.3.1 Features • Microphone XLR input • Dual RCA input • 3.5mm jack input. Note: The RCA and 3.5mm jack input are mixed together internally. 5.3.2 Connections Audio is routed back to the A 4475 zone wallplate by connection of twin shielded audio cable (such as Altronics W 3028) to the euroblocks on the rear of both wall plates. 24 Redback® Proudly Made In Australia www.altronics.com.au Peripheral Connections 1 1 3 2 REAR VIEW 1 DIP switch settings. Do not adjust. Leave in default setting. 2 3 4 g Console s eset Plate 1 CAT5 Cable MAX 300M REDBACK PROGRAM PRESET 2 3 RJ45 connection. Cat5e provides power to the wallplate and routes preset information to the A 4470. A 4476 CONFIRM For more information on how A 4476 connects to A 4470, see main connection diagram at rear of this manual.. Do not adjust. 5.4 A 4476 PRESET SELECTOR WALL PLATE The A 4476 wallplate is used to provide local access to presets programmed into the A 4470. The presets are displayed on the LCD and can be cycled through by pressing the program preset button. The A 4476 may be connected to either paging console input or any zone wallplate input on the A 4470. 5.4.1 Features • Remote preset selection • Cat5e connection • LCD indicates presets available 5.4.2 DIP Switch Settings In the current version of the A 4476, the DIP settings are not required for setup. Leave in default setting. www.altronics.com.au Redback® Proudly Made In Australia 25 Troubleshooting 6.0 TROUBLE SHOOTING 6.1 SYMPTOMS AND REMEDIES SYMPTOMS REMEDIES Signal presence leds all come on Check internal fuses Keyboard not detected Remove & reinsert keyboard Try another keyboard Turn A 4470 off and repeat setup None of the buttons work The unit may be locked Hold down confirm & cancel buttons to unlock (and lock) the unit. See section 4.4. 6.1.2 Installation of replacement microprocessor card There may come a time when software updates are required and this will require the replacement of the microprocessor card which is located inside the unit. The card can be replaced by observing the following procedure. 1. Remove power from the unit. 2. Remove the lid. 3. The microprocessor card is located on the main board as shown in fig 6.1A (shown by the dotted line). Remove the board, taking care not to touch the microprocessor itself. Note: the board may be difficult to pull out. FIG 6.1A 4. Insert the new microprocessor card taking note of the orientation. 5. Send the replaced card back to your nearest Altronics branch. 6.1.3 RJ45 cabling configuration for system components (586A ‘Straight through’) System components are connected using “pin to pin” configuration RJ45 data cabling as shown in fig 6.1B. When installing ensure all connections are verified with a LAN cable tester before switching any system component on. Failure to follow the correct wiring configuration may result in damage to system components. 586A Straight Through (both ends) Pins Face Upwards 1 TX+ 2 TX3 RX + 4 5 6 RX7 8 1 TX+ 2 TX3 RX + 4 5 6 RX7 8 FIG 6.1B 26 Redback® Proudly Made In Australia www.altronics.com.au Help 7.0 HELP 7.1 HELP SCREENS Pressing the help button on any screen will provide a quick guide to the selected option/screen. The following is a transcript of each help option available on the A 4470. 7.1.1 Main Screen Help Page This screen sets the input/output matrix. Labels on the left are the output zones. Labels on the top are the input sources. Pressing the zone buttons will change the input to that zone eg: pressing button 1 will change the input to zone 1. Continuing to press button 1 will cycle through all the inputs to the OFF position, then back to input 1 and so on. The paging console settings shown on the right of the LCD are covered in the PA ON/OFF help page. 7.1.2 Preset Help Page CREATE A PRESET To create a preset, set your input to output configuration on the main screen. Press preset button to enter preset page. To save your settings into preset 1 hold button 1 on the left until told to let go. To save preset 2, repeat with button 2 etc. LOAD A PRESET To load a preset, press button 1 to load preset 1. Press button 2 to load preset 2. LABEL A PRESET To label a preset, exit this screen and plug in keyboard. Follow the prompts. 7.1.3 PA ON/OFF Help Page The PA microphone can be disabled from a zone ie: paging will be blocked to that zone if it is set to OFF. To toggle the PA ON or OFF to a zone, press the button number for the zone eg: if you want to toggle zone 1 ON or OFF, press button 1. www.altronics.com.au Redback® Proudly Made In Australia 27 Specifications 8.0 SPECIFICATIONS A 4470 Control Unit Wallplate / paging console inputs: Data transmission: Front panel controls: RJ45 8P8C Cat5e cabling max 300m Individual output level controls, input bass, treble & level controls, paging mic level control emergency mic level control, zone selection buttons Voiceover output level, chime output level, alert & evac output level, earth lift switch Auxiliary inputs (1-4): Dual stereo RCA’s 0.3/0.7V Outputs (1-8): 3 pin XLR balanced line Emergency mic input: 3 pin XLR balanced line Other inputs: USB keyboard (type A socket front & rear) Power: 240V AC / 24V DC Power connection (240V AC): IEC Power connection (24V DC): 2.1mm DC socket / Euroblock terminal Protection (AC): 500mA M205 Protection (DC): 2A M205 Dimensions: 482W x 152D x 88H mm Weight: 4kg A 4475 Music Source Selector Wallplate Output connection: RJ45 8P8C Data transmission: Cat5e cabling max 300m Front panel controls: Local level control, source selector, confirm button Wallplate: HPM® Excel Power: Powered by A 4470 over Cat5e cable. Rear panel controls: A 4472 Paging Console Output connection: 2 x RJ45 8P8C Data transmission: Cat5e cabling max 300m Front panel controls: Zone selection (1-8), store, recall, all call, cancel, emergency paging, PTT switch Rear panel controls: Chime output level, mic output level Other inputs: USB keyboard (type A) Mic frequency response: 100Hz - 10kHz Mic Sensitivity: -76dB ±3dB Mic Polar pattern: Cardioid (unidirectional) Power connection (24VDC): 2.1mm DC socket Mic gooseneck: ≈325mm Dimensions: 235W x 110D x 55H mm (excluding gooseneck) Weight: 0.6kg 28 Redback® Proudly Made In Australia A 4476 Presetπ Selector Wallplate Output connection: RJ45 8P8C Data transmission: Cat5e cabling max 300m Front panel controls: Program preset, confirm button Wallplate: HPM® Excel Power: Powered by A 4470 over Cat5e cable. A 4478 Local Mic/Line Input Wallplate Inputs: 3 pin XLR balanced line, Dual stereo RCA’s, 3.5mm stereo jack Output connection: Screw terminal connection Signal transmission: 2 x twin shielded audio cables (connects to A 4475) Wallplate: HPM® Excel Power: Powered by A 4470 over Cat5e cable. www.altronics.com.au Programming Sheets 9.0 PROGRAMMING SHEETS 9.1 A 4470 Programming Sheet Enter your preset configurations, zone names and source names. Note that zone and audio source names must be the same on all presets. Max 10 characters per zone/source name. Retain for your records. A PDF form version of this is available for download on the A 4470 product page at www.altronics.com.au. INITIAL SYSTEM CONFIGURATION (DEFAULT PRESET) INPUTS ZONES 1 2 3 4 LOCAL PAGING 1 2 3 4 LOCAL PAGING 1 2 3 4 LOCAL PAGING 1 2 3 4 5 6 7 8 PRESET 1 INPUTS ZONES 1 2 3 4 5 6 7 8 PRESET 2 INPUTS ZONES 1 2 3 4 5 6 7 8 www.altronics.com.au Redback® Proudly Made In Australia 29 Programming Sheets PRESET 3 INPUTS ZONES 1 2 3 4 LOCAL PAGING 1 2 3 4 LOCAL PAGING 1 2 3 4 5 6 7 8 PRESET 4 INPUTS ZONES 1 2 3 4 5 6 7 8 PRESET 5 DEFAULT Note that preset 5 is always default. This preset cannot be renamed. INPUTS ZONES 1 2 3 4 LOCAL PAGING 1 2 3 4 5 6 7 8 30 Redback® Proudly Made In Australia www.altronics.com.au Programming Sheets 9.2 A 4472 Programming Sheet Each A 4472 can store 8 groups of zones using the store & recall function. This permits quick selection of multiple paging zones. Use the set up sheet below to select the groups of zones. Group names have a maximum of 10 characters. A PDF form version of this is available for download on the A 4472 product page at www.altronics.com.au. ZONE NAMES 1 2 3 4 5 6 7 8 CONSOLE 1 RECALL 1 RECALL 2 RECALL 3 RECALL 4 1 2 3 4 1 2 3 4 1 2 3 4 1 2 3 4 5 6 7 8 5 6 7 8 5 6 7 8 5 6 7 8 RECALL 5 RECALL 6 RECALL 7 RECALL 8 1 2 3 4 1 2 3 4 1 2 3 4 1 2 3 4 5 6 7 8 5 6 7 8 5 6 7 8 5 6 7 8 CONSOLE 2 RECALL 1 RECALL 2 RECALL 3 RECALL 4 1 2 3 4 1 2 3 4 1 2 3 4 1 2 3 4 5 6 7 8 5 6 7 8 5 6 7 8 5 6 7 8 RECALL 5 RECALL 6 RECALL 7 RECALL 8 1 2 3 4 1 2 3 4 1 2 3 4 1 2 3 4 5 6 7 8 5 6 7 8 5 6 7 8 5 6 7 8 NOTE: Both microphones can be programmed with different recalls and labelling. www.altronics.com.au Redback® Proudly Made In Australia 31 Connection Guide Zone 3 Amplifier Zone 4 Amplifier Zone 5 Amplifier Zone 6 Amplifier Zone 7 Amplifier Zone 8 Amplifier Evacuation tones can be triggered by closing contacts such as switches, from Fire Indicator Boards or the like. R L Music 5 REDBACK PHASE Status - GOOD Heatsink Temp : 85.7 Load : GOOD 5 REDBACK PHASE Status - GOOD Heatsink Temp : 85.7 Load : GOOD 5 REDBACK PHASE Status - GOOD Heatsink Temp : 85.7 Load : GOOD 5 REDBACK PHASE Status - GOOD Heatsink Temp : 85.7 Load : GOOD 5 5 REDBACK PHASE Status - GOOD Heatsink Temp : 85.7 Load : GOOD A 4478 A 4270 125W Public Address Amplifier POWER A 4270 125W Public Address Amplifier POWER A 4270 125W Public Address Amplifier POWER A 4270 125W Public Address Amplifier POWER A 4270 125W Public Address Amplifier POWER A 4270 125W Public Address Amplifier POWER Cancel Trigger Chime Trigger Alert Trigger Evacuation Trigger REDBACK PHASE Status - GOOD Heatsink Temp : 85.7 Load : GOOD REDBACK USB Keyboard Mic MAX 10M 0 4 10 6 8 MUSIC SOURC E 2 Line In Line In Line In Line In Line In Line In CH 4 10 6 8 EV AL CH CANGND CONFIR M A 4475 AL/EV Output Level V/O 240V AC (AC Fuse 500mA) 0 MUSIC SOURCE 2 VOLUME REDBACK CAT5 Cable MAX 300M CONFIRM A 4475 VOLUME REDBACK 24V DC 2A Power Supply (Backup Supply) 240V AC Earthed Mains Lead USB keyboard for programming front panel LCD. Not required once programming completed. A 4478 Local Microphone/ Line input Wallplate (This is connected to the A 4475 zone selector plate to provide a local VOX operated mic or line input. Connection is via a 6 wire shielded cable and euro block connector. Maximum of 1 per A 4475 plate) 4 10 6 8 Output 8 CONFIRM A 4475 VOLUME REDBACK 0 MUSIC SOURC E 2 Output 7 24VDC In 6 8 DC Fuse Output 5 4 10 6 8 8 VOLUME REDBACK 0 MUSIC SOURCE 2 7 Output 4 CONFIR M A 4475 3 Pin Balanced XLR Leads Output 6 24VDC In (2A M205) - CONFIRM USB Keyboard Made In Australia by Altronic Distributors Pty Ltd + 10 A 4475 + www.altronics.com.au Earth Lift Lift/Chassis- 4 VOLUME REDBACK 0 MUSIC SOURCE 2 Output 3 6 4 10 6 8 0 4 10 6 8 3 Input 4 CONFIRM A 4475 VOLUME REDBACK Output 1 4 2 MUSIC SOURCE Zone Wall PLates or Preset Plate Output 2 5 CONFIRM A 4475 VOLUME REDBACK 0 MUSIC SOURCE 2 Input 3 2 www.altronics.com.au Input 2 4 10 6 8 Aux Input DIP 1 2 3 4 ON DIP 1 2 3 4 2 Emergency Line In Line In Audio Analog Out R L Audio Analog Out R L Audio Analog Out R L L R OFF OFF Page Lock On Page Lock On CAT5 Cable MAX 300M Audio Analog Out CAT5 Cable MAX 300M A 4472 Paging Console (Must be connected to paging console inputs. Input 1 must be connected to console 1 and input 2 to console 2. Console number is set by dip switch on rear of paging console. Connection via RJ45. Maximum of 2 consoles per system) 1 Paging Console s or Preset Plate ON R Sensitivity L Emergency Input Settings 2 x RCA Leads Input 1 1 CONFIR M A 4475 VOLUME REDBACK 0 MUSIC SOURCE 2 Zone 2 Amplifier Zone 1 Amplifier 10:30 PM REDBACK 5 REDBACK PHASE Status - GOOD Heatsink Temp : 85.7 Load : GOOD 5 REDBACK PHASE Status - GOOD Heatsink Temp : 85.7 Load : GOOD Input 4 Audio Source 101.7 FM Input 3 Audio Source CD REDBACK Input 2 Audio Source DVD REDBACK DVD REDBACK Input 1 Audio Source A 4472 System Busy REDBACK A 4476 CONFIRM A 4270 125W 7 CANCEL 8 32 Connection Guide Public Address Amplifier POWER A 4270 125W Public Address Amplifier POWER A 4476 Preset Wallplate (Can be connected to either paging console input or any zone wall plate input connector. Connection via RJ45. Maximum of 1 preset plate per system) 8 4 7 PROGRAM PRESET REDBACK 3 A 4472 8 Zone Communicator 6 CANCEL General Paging Block To Fast Flashing Zones 5 ALL CALL A 4472 8 Zone Communicator 3 6 ALL CALL 4 RECALL REDBACK 2 5 RECALL General Paging Block To Fast Flashing Zones STORE 1 STORE 1 2 Local Emergency Paging Microphone Emergency Paging (All Zones) Version 1.1 A 4472 System Busy 8 Zone Communicator REDBACK Emergency Paging (All Zones) 8 Zone Communicator REDBACK Version 1.1 Redback® Proudly Made In Australia