1
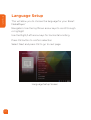
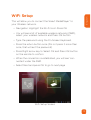
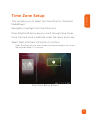
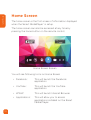
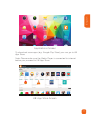
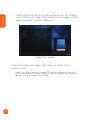
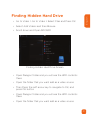
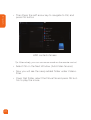
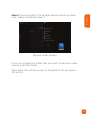
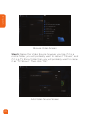
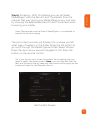
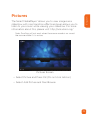
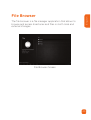
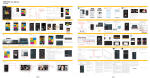
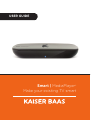
USER GUIDE
Smart | MediaPlayer+
Make your existing TV smart
Languages
English4
English
Community
/kaiserbaas
Register this product for 12 month warranty:
www.kaiserbaas.com/register
Get product updates:
www.kaiserbaas.com/updates
Tech support:
e: [email protected]
w: www.kaiserbaas.com/support
p: Australia 1300 302 306
p: New Zealand 0800 302 306
(business hours, AEST)
4
Safety Precautions
6
What’s in the Box
7
Product Diagram
8
Smart MediaPlayer+ Remote
9
Setting up the Smart MediaPlayer+ 10
Language Setup
12
WiFi Setup
13
Screen Resize Setup
14
Time Zone Setup
15
Home Screen
16
English
Contents
Videos19
Finding Hidden Hard Drive
21
Adding Video Sources and Setup Movie Scraper
23
Music34
Pictures39
File Browser
43
Settings44
Other features
47
Frequently Asked Questions
51
Contact Us
53
5
English
Safety Precautions
Before using the Smart MediaPlayer+, please ensure you read
and understand all the safety precautions below:
•
Do not attempt to open the unit or modify it in any way, as this will void your warranty. Maintenance and repairs should only be performed by Kaiser Baas.
• Keep the Smart MediaPlayer+ away from water and other liquids. Do not use wet hands when using the
Smart MediaPlayer+ as this may cause the unit to malfunction.
•
Keep the Smart MediaPlayer+ away from direct sunlight and heat sources.
•
Smart MediaPlayer+ may become slightly warm during use, this does not indicate malfunction.
•
Do not place heavy objects on the Smart MediaPlayer+, as this may cause it to malfunction.
• Do not dispose of the unit via conventional domestic waste.
•
6
Use the supplied power adapter; do not substitute for another adapter.
English
What’s in the Box
Please ensure the product package has all the following
contents:
A
Smart MediaPlayer+
E
User Guide
B
Power adapter
F
Quick Start Guide
C
Remote control
G
2 x AAA batteries
D
Warranty Card
H
HDMI cable
B
A
C
F
D
G
E
H
7
Product Diagram
English
Warning: Before you connect unit to a power outlet, read the safety
information in this User Manual
1 Power Status
6 HDMI out
Power status light turns blue Connects to the HDMI input when unit is on
on TV (cable provided)
2 SD/MMC reader
7 Ethernet Port
Reads secured digital cards
Connect the network cable
3 Hard Reset
Restore factory defaults
4 2 x USB
8 AV Out
Connects to analog Video & Audio input onTV (cable not provided)
Standard USB 2.0 HOST port 9 Power socket
(Supports FAT32/NTFS/
Connects to the AC pack
EXT3/HFS Storage file systems)
5 S/PDIF
Connect to AV reciever
Front
1
Side
SD/MMC
2
3
Back
Optical
4
8
5
HDMI
6
AV
7
8
9
1 Power button
2 Mute button
3 Applications
1
2
3
4
4 Active Applications
5 Media
6 Settings
7 Previous
8 Next
APPS
7
PREV
8
5
ACTIVE
9
NEXT
6
MEDIA
VOL-
11
SETTINGS
10
VOL+
12
MOUSE
9 Volume Down
13
10 Volume Up
11 Mouse Mode
12 Menu
MENU
14
OK
/
15
16
13 Arrow Keys/Navigation
14 OK/Enter
15 Home
16 Back
17 Number buttons
HOME
17
BACK
1
17
2
3
17
17
4
17
5
6
17
17
7
17
8
9
18 Backspace
19 Return
English
Smart MediaPlayer+ Remote
18
17
0
17
19
9
English
Setting up the Smart MediaPlayer+
TIP: Use the HDMI cable to get the 1080P HD video quality. Video quality for component connection is 1080i and composite is 480i/576i.
Steps to Connect:
Back of TV
HDMI IN
Optical
HDMI
AV
Connect HDMI cable
1
2
• Connect one end of
cable to the back of TV
• Connect the other end
to the ‘HDMI’ port in
Smart MediaPlayer+
Connect Power
• Connect AC pack to ‘Power input’ of Smart
MediaPlayer+
• Connect the wall plug to a power outlet
Warning: The ‘Power socket’ is next to the AV out jack. DO NOT
insert power cord into AV jack (Yellow) by accident.
10
Optical
HDMI
English
3
AV
Connecting External Storage Devices
USB Hard Disk Drives (not included)
• Connect your external HDD to one of the
two ‘USB’ ports in the Smart MediaPlayer+
• Turn on HDD - if required by the HDD
SD/MMC Card (not included)
• Insert appropriate SD card into SD/MMC
reader
4
Turn the Smart MediaPlayer+ on
Note: Please make sure your TV is on and the appropriate
HDMI source is selected.
• ‘Power indicator’ light will turn blue
NOTE: There isn’t an ON/OFF button on Smart MediaPlayer+. If Power status light is Red use Remote control to turn
unit ON/OFF. Power status light then turns blue.
For the first run, it may take up to 10 minutes to
complete initialization process and will take you to the
Start-up wizard.
Note: This wizard will only appear once. You can skip this
wizard by selecting Next on every page and then configure
later from the Settings menu.
Note: Scrolling will not work when the mouse mode is on
so exit the mouse mode if it is active.
11
English
Language Setup
This will allow you to choose the language for your Smart
MediaPlayer+
Navigation: Use the Up/Down arrow keys to scroll through
or highlight
Use the Right/Left arrow keys for horizontal scrolling
Press OK button to confirm selection
Select Next and press OK to go to next page
Language Setup Screen
12
English
WiFi Setup
This will allow you to connect the Smart MediaPlayer+ to
your Wireless network.
• Navigation: Highlight the Wi-Fi Icon> Press OK
• You will see a list of available wireless networks (SSID),
select your wireless network and Press OK button
• Type the password using the On-Screen Keyboard.
• Press the return button once (Do not press it more than
once, that will exit the password)
• Press Right arrow key to Select OK and Press OK button
on the remote to confirm
• When the connection is established, you will see ‘connected’ under the SSID
• Select Next and press OK to go to next page
WiFi Setup Screen
13
English
Screen Resize Setup
This will allow you to adjust the screen size and make it
suitable to your TV Screen.
Navigation: Use Right/Left arrow keys to make the
adjustment.
Once the adjustment is made, Select Next and Press OK
button to go to next page
Movies:
• Displays all the supported video files in current directory.
Photos:
• Displays all the supported image files in the current
directory.
Music:
• Displays all the supported audio files in the current
directory.
Screen Resize Setup Screen
14
English
Time Zone Setup
This will allow you to select the Time Zone for the Smart
MediaPlayer+
Navigation: Highlight the Time Zone icon
Press Right/Left arrow keys to scroll through time zones
Once the time zone is selected, press the down arrow key
Select Next and Press OK button to confirm
Note: Scrolling will not work when the mouse mode is on so exit
the mouse mode if it is active.
Time Zone Setup Screen
15
English
Home Screen
The home screen is the first screen of information displayed
when the Smart MediaPlayer+ is setup.
The home screen can also be accessed at any time by
pressing the home button on the remote control.
Home Screen Screen
You will see following Icons on Home Screen
16
• Facebook : This will launch the Facebook
application
• YouTube : This will launch the YouTube
application
• WWW: This will launch Internet Browser
• Applications: This will allow you to access
applications installed on the Smart Media Player+
English
Applications Screen
To download more apps (e.g. Google Play Store) you can go to KB
App Store.
Note: Please make sure the Media Player is connected to internet
before you proceed to KB App Store.
KB App Store Screen
17
English
• XBMC (Media Player): This will launch the XBMC Media
player
• File Browser: This will take you to the File Manager
• Settings: This will take you to the System Settings
• Power: This will allow you to Power off unit, Restart and
Stand by
XBMC Media Player
It allows you to play and view most videos, music and
images from local and network storage media.
You can get more information about XBMC at:
http://wiki.xbmc.org/
Playing Media Files through XBMC
Connect the External Storage Device to one of the USB
ports.
Note: It may take up to 5 mins for the Smart MediaPlayer+ to scan
and list the hard drive. When the HDD is ready, you will see this
message “USB is mounted” on bottom right corner.
If you still do not find the hard drive, please see below
section for “Finding Hidden Hard Drive” and follow the
procedure.
18
English
Videos
XBMC supports all the main video formats including online
media. It can import, browse and play your Movie collection
with ease. You can also add local and network sources to
the Video library.
Videos Screen
Navigation: Use arrow keys to navigate and OK button to
confirm selection.
• Open the XBMC program from home screen
Tip: Alternatively you can press the Media button on the remote
control to open the XBMC media player
Note: For the first run, it may take few minutes to load.
Note: Scrolling will not work when the mouse mode is on so
exit the mouse mode if it is active.
• Go to Video > Select Files and Press OK
19
English
• Open usbhost0/usbhost1/usbhost2 and you can directly
view the sources there. (You need to know clearly which
drive connects to which USB port).
Video Files Screen
Open the Folder and select the Video file, Press OK to
launch movie.
Note: For various reasons, some HDDs will not appear in the list. If
you do not see them under USB host, Please refer to the following
section “Finding Hidden Hard Drive”.
20
English
Finding Hidden Hard Drive
• Go to Video > Go to Video > Select Files and Press OK
• Select Add Videos and then Browse
• Scroll down and Open SDCARD
Finding Hidden Hard Drive Screen
• Open Paragon folder and you will see the HDD contents
there
• Open the folder that you want add as a video source
• Then Press the Left arrow key to navigate to OK, and
press OK button
• Open Paragon folder and you will see the HDD contents
there
• Open the folder that you want add as a video source
21
English
• Then Press the Left arrow key to navigate to OK, and
press OK button
HDD contents Screen
Tip: Alternatively, you can use mouse mode on the remote control.
• Select OK on the Next Window (Add Video Source)
• Now you will see the newly added folder under VideosFiles.
• Open that folder, select the Movie file and press OK button to play the movie.
22
English
Adding Video Sources and Setup
Movie Scraper
Media sources are the links that tell XBMC where your
content is stored and what type of content is contained
within each one. You can have multiple sources for each
media type.
You can use local media, file shares, removable USB drives,
etc.
Step 1: Go to “Videos” in the main screen
Videos Screen
23
Step 2: Now click “Add Source”.
English
Video Files Screen
Step 3: Then click the “Browse” button.
Add Video Source Screen
24
English
Step 4: Now browse to the storage device where you keep
your videos stored and open it
Browse Video Screen
Once you located the folder that you want to add as a video
source, open the folder.
Then Press the Left arrow key to navigate to OK, and press
OK button.
25
English
Browse Video Screen
Step 5: Name this Video Source however you like. If it is a
movie folder, you will probably want to name it “Movies”, and
if it is a TV Show folder then you will probably want to name
it as “TV Shows”. Then click “OK”.
Add Video Source Screen
26
English
Step 6: Scraping - With this feature you can let Smart
MediaPlayer+ pick the Fan-Art and Thumbnails from the
internet that way giving your Media Player a very nice look
by showing the appropriate Fan-Art and Thumbnails when
browsing your media.
Note: Please make sure the Smart MediaPlayer+ is connected to
internet to do the scraping.
The set content window will display, this is where you tell
what type of media is in the folder. Press the OK button to
go scroll through the Media Type and then Select Movies.
Press the down arrow key and navigate to OK. Press OK
button on the remote control.
Tip: If you do not want to set the content and scraping now, you
need to select the media type as None, you can then Set the Content and Scraping later by selecting the source and bringing up the
contextual menu on the Remote control.
Set Content Screen
27
English
Step 7: Press Yes to scan the content to the library. It will
start scanning all your Movie files from the specified folder.
This process may take a while depending on the number and
size of the movies present.
Video Files Screen
Create a new library called ‘Movies’
Video Files Screen
28
English
You can browse the movies by following categories:
Recently Added Movies, Sets, Title, Genre, Year or Actors.
For example if you select the category ‘Actors’, you will
see the list of Actors name from the Movies stored on your
External Storage Device.
Pick one from the list and press OK.
Browse ‘Actors’ Category Screen
29
English
Browse ‘Actors’ Category Screen
You will now see the movies from the selected actor.
Note: Scraping content is based on the Movies stored on your
External Storage Devices. These categories on the library will not
work if External Storage is removed from Smart MediaPlayer+.
Also, when you reconnect the hard drive, please make sure to
connect it to the same USB port (e.g. USB0 or USB1) when the
scraping is made otherwise it will not find the movies.
Remove a Source: Highlight the Source > Press the
Contextual Menu button. You will have the Remove source
option there. Select and Press OK.
You can also set the Scraper for TV Shows and Music Videos
with the same procedure. If you have those stored on your
storage device, add TV Shows/Music videos folder as a
source and on Step 6.
For TV Shows: Select TV Shows as the Directory Content.
For Music Videos: Select Music Videos as the Directory
Content.
Press the down arrow key and select OK then press the OK
button on the remote control.
30
English
Changing folder views: By default, folder view is set as lists.
To change it, press the left arrow key to launch side bar.
Video Titles Screen
Select the view that you want. For examples Thumbnail
Change Video View Screen
31
Set the content and Scraper after adding the Source:
English
• On the main screen, go to Videos > Files
• Highlight the Movie Source
• Press the Contextual Menu button on the Remote
Control
• Select ‘Set Content’ and Press OK
Video Files Screen
From here, please follow from Step 6 on the above Section
‘Adding Video Sources and Setup Movie Scraper’
Adding a Source from the Network
Note: Make sure the Smart MediaPlayer is connected to the network via either LAN or Wi-Fi.
• On the Main screen, go to Videos > Files
• Add Video Source and then navigate to Browse, press
OK
32
English
• Select ‘Windows Network (SMB)’
• You will see the list of Computers and Network Storage
Devices connected to the same network.
Note: On your PC, you need to share the folders and turn the Password Protected Sharing off.
Video Files Screen
• Open the Workgroup or Domain
• Open the Computer/Network Storage Device
• Once you located the folder that you want to add as a
video source, open the folder
• Then Press the Left arrow key to navigate to OK, and
press OK button
• From here, please follow from Step 6 on the above Section ‘Adding Video Sources and Setup Movie Scraper’.
To Change the Settings for Video: On the XBMC main
screen, go to Settings and then Video
33
English
Music
You can add local and network sources to the Music library.
For more information about this, please visit: http://wiki.
xbmc.org/
Music Screen
Navigation: Use arrow keys to navigate and OK button to
confirm selection.
Note: Scrolling will not work when the mouse mode is on so exit
mouse mode if it is active.
Adding Music Source
Navigation: Use arrow keys to navigate and OK button to
confirm selection.
On the XBMC main screen, Go to Music > Select Files and
press OK.
Click Add Music and then Browse.
34
English
Add Music Screen
• Select the usbhost0/usbhost1/usbhost2 from the list.
(You need to know clearly which drive connects to
which USB port.)
• To add a source from network select Windows network
(SMB)
Add Music Screen
35
• Press OK button to open the USB Drive
English
• Open folder that contains Music and Press Left arrow
key to navigate to OK
Music Files Screen
• Press OK Button or use mouse mode on remote control
• Select OK on the Next Window (Add Music Source)
• Now you will see the newly added folder under Music
Music Files Screen
36
English
• Open that folder, select the music file and press OK button to launch the music.
Note: Due to various reason, some HDDs will not appear in the list.
If you do not see them under USB host, Please follow the Finding
Hidden Hard Drive
Scanning Your Music into the Music Library
• To scan your music collection into the Music Library, go
to Music>File and highlight the Source folder with music
files.
• Press the Contextual Menu button on the remote control
to bring the Context Menu
• Select the option labelled “Scan Item to Library”. XBMC
will then scan the selected music source into the library
database.
Scan Items Screen
37
English
Once the scan is complete, you can browse your collection
by Artist, Albums, Songs etc.
Scan Items Complete Screen
To Remove a Source: Highlight the Source > Press the
Contextual Menu button. You will have the Remove Source
option there. Select and press OK.
To Change the Settings for Music: On the XBMC main
screen, go to Settings and then Music
38
English
Pictures
The Smart MediaPlayer+ allows you to view images as a
slideshow with nice transition effects and even allows you to
listen to your music while viewing your slideshow. For more
information about this, please visit: http://wiki.xbmc.org/
Note: Scrolling will not work when the mouse mode is on so exit
the mouse mode if it is active.
Pictures Screen
• Select Picture and Press OK (Do not click Add on)
• Select Add Picture and then Browse
39
English
Add Picture Screen
• Select the usbhost0/usbhost1/usbhost2 from the list.
(You need to know clearly which drive connects to
which USB port)
• Press OK button to open the USB Drive
• Open folder that contains Images and Press Left arrow
key to navigate to OK
Tip: Alternatively, you can use mouse mode on the remote control.
• Select OK on the Next Window (Add Picture Source)
• Now you will see the newly added folder under Picture
40
English
Add Picture Screen
• Open that folder, select the image file and press OK button to view the image.
Start a Slide show: Open the Image folder and then press
left Arrow key, Select Slideshow.
Start Slideshow Screen
41
English
Note: Due to various reason, some HDDs will not appear in the list.
If you do not see them under USB host, Please follow the Finding
Hidden Hard Drive section of the manual
Playing Music with your SlideShow: In order to play music
with your slideshow, simply start a music source (playlist,
song, etc} and then start the slideshow. The music will play
in the background.
Remove a Source: Highlight the Source > Press the
Contextual Menu button. Select the Remove Source option
and press OK.
Change the Settings for Pictures: On the XBMC main
screen, go to Settings and select Pictures
For all other features on XBMC Media Player, you can find
information on http://wiki.xbmc.org/
42
The file broswer is a file manager application that allows to
browse and access directories and files on both local and
external storages.
English
File Browser
File Browser Screen
43
English
Settings
The Settings menu lets you customize the way you use the
Smart MediaPlayer+ and set preferences for the device.
Tip: This menu can also be accessed by pressing ’Settings’ button
on remote control
Navigation: Use Up/Down arrow keys to scroll through
options.
Press OK button to confirm selection and right left arrow
keys to switch Right and Left panes.
Note: Scrolling will not work when the mouse mode is on so exit
mouse mode if it is active.
Following options are available under Settings Menu:
Wireless & Networks
•
Wi-Fi :
Turn Wi-Fi ON/OFF
•
Data Usage :
Check the data usage
• More :
For advanced Network Configurations. You can also access the Ethernet setup here.
Note: You may need to turn the Wi-Fi off to enable the Ethernet
connection.
Device
44
• Sound :
Adjust system sounds such as volume, audio output etc.
•
Adjust the display settings
Display :
Storage :
• Apps :
Check the storage status
This will allow you to uninstall applications.
Note: You cannot uninstall some apps as it may affect the functionality of the device.
•
User :
English
•
Add users
Personal
•
Location Access :
Change the location settings here
• Security :
Device security settings (Note : recommended default settings)
•
Change the language and
keyboard input methods here
Language & Input :
• Backup & Reset:
Set up Backup & Restore. You can
also do the ‘Factory Reset’ from this option.
Accounts
• Add accounts : Create or delete accounts such as Gmail, Facebook, skype, Google etc.
System
•
Date & Time :
Adjust the time settings
• Accessibility :
Setup the accessibility options such as Magnifications, Text to Speech etc.
• Developer
Options :
Please do not change anything here, it may affect the functionality of the device.
45
English
• About MP :
View information about the Android version, Firmware version etc.
Power off the Smart MediaPlayer+
Click the power icon on the home screen and select Power
Off
Power Off Screen
Alternatively, hold the power button on remote control until
you see the message “shutting down”.
Tip: When the device is turned off, the blue light will turn to red.
46
English
Other features
Kill Apps: To close an application running on the background:
• Press the Active button on the remote control
• Use the Right/Left arrow keys to scroll through and
select the application
• Press the Up arrow key
• You will see a Popup with the question “Are you sure to
close this app?”
• Select Yes and Press OK button
Wallpaper:
• Go to Home screen > Press the Contextual Menu button
on the remote control
• Click ‘Set the Wallpaper’, Press OK
Home Screen Screen
47
English
To use your own image from a storage device, select the first
option; ES File Explorer then browse and locate the image
file from your Storage Device.
To use the preloaded wallpapers, select Live Wallpapers/
Wallpapers.
Select Wallpaper Screen
File Transfer: This will allow you to copy/move files or
folders from one location to another.
• Go to the File Browser Application from the Home
Screen
• Open the Source Storage Device
• Highlight the file/folder
• Press and hold the OK button on the Remote Control
• You will see the popup bar with these options; Sort,
Copy, paste, delete, rename, Make Directory
48
English
File Transfer Screen
• Select Cut or Copy to transfer the file or folder to another location
Note: If you select Cut, it will permanently move the file/folder from
its original location.
• Go to the destination location and press and hold the
OK button
• You will see the popup bar with Paste option, select
Paste and press OK.
File Transfer Screen
49
Firmware Upgrade
English
Firmware is an important set of instructions that tells your
media player how to operate, what the interactive screens
look like etc.
You need to keep the Smart MediaPlayer+ updated. Kaiser
Baas always develops newer, faster and more efficient ways
of doing things that your media player needs to know.
To upgrade the firmware;
• Go to Applications from home screen
• Open the System Update app
Factory Reset
There are two ways to do the Factory Reset.
• Hold the reset button for 10 sec (or until it reboots) on
the Smart MediaPlayer+ while it is ON
Tip: you can use this option if the device doesn’t boot. Make sure
you the device is ON and blue light is up.
• Go to settings > Backup & Reset > Factory data reset
Note: Make sure you tick Erase SD card box before you proceed
to Reset.
50
English
Frequently Asked Questions
Q. There is no picture on the screen?
A. Ensure the power cable, HDMI cable is connected correctly. Ensure your TV source option is selected correctly to display the Smart MediaPlayer+. If there is still no response, disconnect then re-connect the power cable.
Q. A.
Q.
The Smart MediaPlayer is not responding?
It may be loading various tasks. Press the Active button on the remote control, Select the running apps and press Up arrow key to close it.
Why can’t I get to the option I’m trying to select with the remote?
A. Switch to “Mouse” mode for some apps to try and utilize its functionality – keep in mind that some apps are purely designed for touch screen operation and may not function at all on the Smart MediaPlayer+. You may want to try connecting an external mouse, keyboard or joystick to achieve optimum operation.
Q. A1.
The audio is out of sync with the video?
If you have a delay that is consistent regardless of the file, you can manually adjust the delay by following
these steps:
• Open any video that has audio playing
• Bring up the on-screen-display and select the audio
options
• Select Audio offset and then adjust the audio until
the delay is corrected
51
English
52
• Back in the OSD audio settings, scroll down and
select Set as default for all videos.
Q. Where is the Userdata folder for XBMC?
A. The userdata folder is located on the local memory
/Android/data/org.xbmc.xbmc/files/.xbmc/userdata/
/sdcard/Android/data/org.xbmc.xbmc/files/.xbmc/
/data/data/org.xbmc.xbmc/files/.xbmc/
Q. A. Can I launch Android apps from within XBMC?
XBMC can launch other Android apps by going to “Programs” (on the main screen) and selecting the app you want to run.
Q. A. Can I use my Smart Phone to control XBMC?
Yes, XBMC remote control app is available on both Appstore and Google Playstore. Download it to your Smart Phone and then configure it. For more details, please visit http://wiki.xbmc.org/
English
Contact Us
Having trouble setting your Smart MediaPlayer+ up?
Please contact us. No question too big or small and we are
more than happy to help.
Please visit:
www.kaiserbaas.com/support
Or email:
[email protected]
For further information please visit:
www.kaiserbaas.com
Tech support:
e: [email protected]
w: www.kaiserbaas.com/support
p: Australia 1300 302 306
p: New Zealand 0800 302 306
(business hours, AEST)
53