1
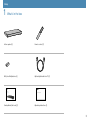
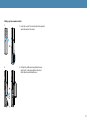
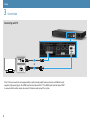
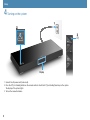
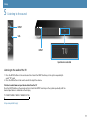
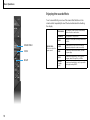
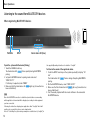
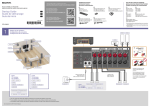
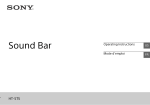
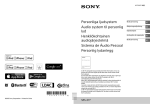
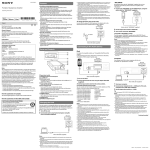
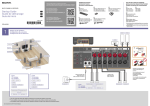
Home Theatre System Startup Guide HT-XT1 Table of contents Setup 1 What’s in the box 2 Installation 3 Connection 4 Turning on the system 5 Listening to the sound 3 4 6 8 9 Basic Operations Enjoying the sound effects 10 Listening to the sound from BLUETOOTH devices 12 Refer to the supplied Operating Instructions for more information on other features. 2 Setup 1 What’s in the box Active speaker (1) Remote control (1) R03 (size AAA) batteries (2) Optical digital cable for a TV (1) Home Theatre System Startup Guide Home Theatre System HT-XT1 Startup Guide (this book) (1) Operating Instructions (1) 3 Setup / Setup / Setup 2Installation Notes •Be careful that the subwoofer does not contact anything. Subwoofer 4 •Place the TV stand at the center of the system so that no part of it protrudes beyond the perimeter of the system. •Do not impart an impact to the glass top of the system. Setting up the remote control 1. 1.Face the rear of the remote control upward and slide down the cover. 2. 2. Pull up the battery compartment cover and insert in the orientation shown in illustration two AAA batteries. 5 Setup / Setup / Setup 3Connection Connecting with TV Or If the TV to be connected is not equipped with an optical audio output terminal, connect an HDMI cable (not supplied, High Speed type) to the HDMI input terminal labeled “ARC.” If the HDMI input terminal labeled “ARC” is connected with another device, disconnect that device and connect this system. 6 When connecting with TV and other devices TV Blu-ray DiscTM player, etc. This is a connection for enjoying surround sound more effectively. HDMI cable (not supplied, High Speed type) If the HDMI input terminal on the TV is not labeled “ARC,” perform connections both and . HDMI cable (not supplied, High Speed type) If it is connected to the TV, disconnect it and connect it to the system. 7 Setup / Setup / Setup 4 Turning on the system Display 1 Connect the AC power cord (mains lead). 2 Press the (on/standby) button on the remote control or touch the (on/standby) touch key on the system. The display of the system lights. 3 Turn on the connected device. 8 Setup / Setup / Setup 5 Listening to the sound INPUT VOL INPUT Input device selected Listening to the audio of the TV 1 Press the INPUT button on the remote control or touch the INPUT touch key on the system repeatedly to select “TV” input. 2 Press the VOL button on the remote control to adjust the volume. To listen to audio from an input device other than the TV Press the INPUT button on the remote control or touch the INPUT touch key on the system repeatedly until the desired input device is indicated on the display. TV HDMI 1 HDMI 2 HDMI 3 ANALOG BT AU Setup completed! Enjoy! 9 Basic Operations Enjoying the sound effects To set a sound effect, press one of the sound effect buttons on the remote control repeatedly to select the desired mode while checking the display. SOUND FIELD VOICE NIGHT 10 SOUND FIELD: Effects to suit to the input sound. CLEARAUDIO+ The suitable sound setting is automatically selected for the sound source. STANDARD Corresponds to every source. MOVIE Dialogue is clear, and sound is powerful and realistic. SPORTS Commentary is clear, cheers are heard as surround-sound, and sounds are realistic. GAME Sounds are powerful and realistic, suitable for game play. MUSIC Sounds are played back to suit to a music program, music Blu-ray Discs, or DVDs. P.AUDIO (Portable audio) Sounds are played back to suit to a portable music player using DSEE*. TYPE1 VOICE: Helps make dialogues clearer. NIGHT: Sound is output at low volume with minimum loss of fidelity and clarity of dialogue. Standard TYPE2 Dialogue range is stressed. TYPE3 Dialogue range is stressed, and the parts of range difficult to be discerned by the elderly are boosted. ON Activates the Night mode function. OFF Inactivates the Night mode function. *DSEE stands for Digital Sound Enhancement Engine, a high range compensation and fine sound restoration technology developed independently by Sony. 11 Basic Operations Listening to the sound from BLUETOOTH devices When registering BLUETOOTH devices PAIRING INPUT Illumination LED (blue) To pair the system with the device (Pairing) 1 Touch the PAIRING touch key. The illumination LED flashes quickly during BLUETOOTH pairing. 2 Set your BLUETOOTH device to pairing mode and select “SONY:HT-XT1.” If a Passkey is requested, enter “0000.” 3 Make sure that the illumination LED lights up. (Connection has been established.) Hint Once the BLUETOOTH connection is established, an indication recommending which application to download will be displayed, according to what equipment you have connected. Following the instructions displayed, an application called “SongPal,” which will enable you to operate this system, can be downloaded. Refer to “Controlling the system using a smartphone or tablet device (SongPal)” in 12 the supplied Operating Instructions for details on “SongPal.” To listen to the sound of the registered device 1 Touch the INPUT touch key on the system repeatedly to display “BT AU.” The illumination LED flashes during attempting BLUETOOTH pairing. 2 On the BLUETOOTH device, select “SONY:HT-XT1.” lights up. (Connection has 3 Make sure that the illumination LED been established.) 4 Start the audio playback with the music software in the connected BLUETOOTH device. When using one-touch connection (NFC) Illumination LED (blue) 1 Download, install, and start the “NFC Easy Connect” app on your smartphone. 2 Touch the N mark of this system with the smartphone. 3 Make sure that the illumination LED (blue) lights up. (Connection has been established.) •Compatible devices Smartphones, tablets, and music players with the NFC function built-in (OS: Android™ 2.3.3 or later, excluding Android 3.x) 13 © 2014 Sony Corporation Printed in Malaysia 4-487-195-22(1)