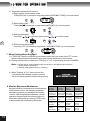
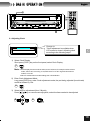
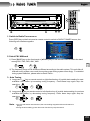
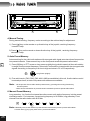
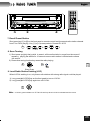
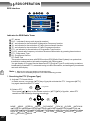
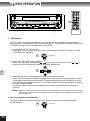
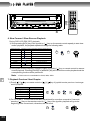
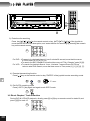
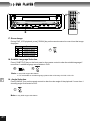
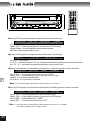
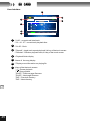
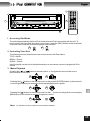
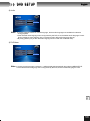
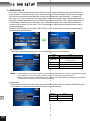
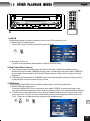
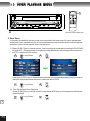
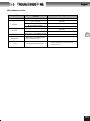
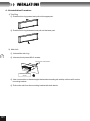
1
CONTENT
1. Safety Precautions
Warning
Precaution
2. Main Features
3. Before User
Front Panel & Monitor
LCD Display
Remote Control For Front Zone
Remote Control for Rear Zone
1
2
3
4
6
7
9
4. Monitor Operation
Open / Close TFT Monitor
TFT Monitor Auto Open
When Reverse Driving
Monitor Tilt Angle Adjustment
Aspect Ratio
Image Setting
When Parking Brake Engaged
Monitor Movement mechanism
11
11
11
12
12
12
13
13
5. Basic Operation
Power On / Off
Muting
Playing Source Selection
Volume Adjustment
Audio Control
Adjusting Clock
System Reset
Auto Brightness Control
Line Mute
6. Touch Screen Operation
Main Menu
Touch operation on DVD Player
Touch operation on Radio
Touch operation on SD card
7. Radio Tuner
User Interface
Info Display on LCD
Operation
Switch Radio Tuner Source
Select FM / AM Band
Auto Tuning
Manual Tuning
Auto Preset Memory
Manual Preset Memory
Recall Preset Station
Scan Tunning
Local Radio Station Seeking (LOC)
8. RDS Operation
RDS Interface
Searching The PTY(Program Type)
PTY Alarm
14
14
14
15
15
18
20
20
20
21
21
21
22
23
23
24
24
24
24
25
25
25
26
26
26
27
27
28
TA Function
Canceling Traffic Anouncements
AF(Alternative Frequency/Auto Following)
Region
CT (Clock Time )
RT(Radio Time)
PI Search
29
29
30
30
30
30
30
9. DVD Player
Info Display on LCD
Insert Disc
Disc Ejection
Pause Playback
Stop Playback
Fast Forward / Fast Reverse Playback
Slow Forward / Slow Reverse Playback
Playback Previous / Next Chapter
Repeat Playback
Repeat A - B
Random Playback
Scan Playback
Alter between 2-Ch. & 6-Ch.
GOTO Search
Direct Chapter/Track Selection
Audio Track Selection
Main Menu / Title menu
Zoom Image
Subtitle Language Selection
Angle Selection
PBC Function
Playback Infomation
MP3 / WMA Playback
10.SD Card
User Interface
Switch to SD card source
Pause Playback
Stop Playback
Repeat Playback
Shuffle Playback
Playback Previous/Next Charpter
Switch the Direction
Previous/Next Page
Audio Track Selection
Direct Chpter/Track Selection
31
31
31
32
32
32
33
33
34
35
35
36
36
38
39
40
40
41
41
41
42
42
44
45
46
46
46
46
46
46
47
47
47
47
11. iPod Connection
Accessing iPod Mode
Controlling Your iPod
Music Playback
Photo Playback
Video Playback
Fast Forward/Fast Reverse
Search Playlist/Artist/Album/Song
48
48
48
49
49
49
50
CONTENT
English
12. System Setup
General Setup Menu
ASP CONFIG
Bass Center Frequency
Treble Center Frequency
SUB.W Filter
SUB.W Phase
Bass Q-Factor
General Setup
Radio
Clock Mode
Parking
TV System
TFT Auto Open
OSD Language
Clock Adjustment
51
52
52
52
52
53
53
54
54
54
54
55
55
55
55
14.Other Playback Modes
Aux In
Rear View Video Camera
RGB Input
Rear Zone
Dolby Digital 5.1 Surround Sound
Useful Information about Disc
Note on playback MP3
DVD Disc Orientation
VCD / CD Disc Orientation
Glossary
Caution of Disc Using
16. Troubleshooting
General
TFT Monitor
Radio Tuner
DVD Player
MP3
Miscellaneous Info
17. Remote Control
13.DVD Setup
Language
Subtilte
Audio
DVD Menu
Video Settings
Aspect Ratio
Angle Mark
View Mode
Audio Settings
Pink Noise
DRC-Dynamic Range Control
CNTR CTRL--Center Speaker Delay
REAR CTRL--Rear Speakers Delay
Down Sampling
SURROUND SETUP
6 Channel Speaker Settings
DownMix-2 Channel Speaker Settings
SURROUND FX
Surround Mode
Panoroma
Dimension Ctrl
Center Width Ctrl
Rating
Setup
Password Changing
Load Factory
15.Miscellaneous
56
57
57
58
59
59
60
60
60
61
61
62
63
63
64
64
64
64
66
69
70
71
71
71
72
Note
Uninstall Battery
Install Battery
18. Electrical Connections
Note
Parking Brake Cable Connections
Reverse Drive Camera Display Cable
Connections
Electrical Connections Overall Diagram
19.Installations
Standard Accessories
Note
Installation Procedure
Uninstallation Procedure
20. Specifications
73
73
75
77
77
77
79
80
81
81
82
82
83
84
84
84
85
86
86
86
87
87
89
90
91
SAFETY PRECAUTIONS
WARNING
WARNING
1. Only connect the unit to a12-volt power
supply with negative grounding.
7. No big impact to the LCD monitor when it is
in open position for preventing the damage
to any mechanism inside.
WARNING
WARNING
2. Never install this unit where the operation will
restrict safe driving .
8. Only replace the fuse with a similar rated
fuse , using a incorrect fuse may cause
damage to the unit .
WARNING
WARNING
3. Never use the video display function in front
when driving . This is a violation of traffic
regulations . The rear view camera display
can be used when reversed gear is engaged.
9. Please power off this unit at once and send
it back to the after-sales service center or
the dealer / distributor you purchased from
if one of the following symptoms is found:
(a). No audio output; (b). No image output;
(c). Water or other obstacle enters the unit;
(d). Smoking; (e). Peculiar smell
WARNING
4. Never disassemble or adjust the unit with
out any professional operation.For details,
please consult any professional car shop /
dealer for inquiry.
WARNING
5. Never expose this unit , amplifier , and
speakers to moisture or water for preventing
electric sparks or fires.
WARNING
6. Never use irregular disc.
1
WARNING
10. The monitor employs auto motorizing
mechanism, please don't push, pull, or
swivel the monitor manually to prevent
damage to the core mechanism.
SAFETY PRECAUTIONS
PRECAUTION
PRECAUTION
1. If the front panel or the monitor is dirty, please
clean with soft cloth and neutral detergent.
Using a rough cloth and non neutral detergent
will result in scratching and discolouration of
the screen.
PRECAUTION
2. If any abnormal behavior of this unit was
found, please refer to troubleshooting guide
of this manual ( please refer to page ) . If no
relevant information was found,please press
the[RESET]key on the front panel to resume
factory default.
PRECAUTION
3. Car parking under direct sunlight dramatically
increases the temperature inside the car in
a moment. Cool down the in-car temperature
by air-conditioning before any operation to
this unit is recommended.
PRECAUTION
English
PRECAUTION
PRECAUTION
1
6. Clean up the laser pickup more often
than the home used counterpart due to
the worse environment to the unit in car.
PRECAUTION
7. To provide a clear demonstration and an
alternative for easy understanding of the
operation of this unit, graphic illustration was
used. However, this illustration is not
necessary printed as the actual image you
may found on the unit.
PRECAUTION
8. During operating this unit, " " is displayed
if that particular operation is not available
nor illegal.
PRECAUTION
9. Operate this unit correctly as the manual
instruction accordingly to prevent unnecessary
problem.Guarantee won't be valid if the
problem is caused by inappropriate operation.
4. Using in - car heater in low temperature
environment may cause bead coagulates
inside the unit , don't use the unit in this
situation, eject the disc and wipe off the bead
on the disc.If the unit still doesn't work after a
few hours,connect after-sales service centre.
PRECAUTION
Manufactured under license from Dolby
Laboratories. “Dolby” , “Pro Logic “ and
the double-D symbol are trademarks of
Dolby Laboratories.
5. To ensure safe driving, please adjust the
volume to a safe & comfort level in case
of emergency situations.
2
MAIN FEATURES
1. 1 DIN Size
14.Dolby Digital 5.1 & Dolby Pro Logic II ready
2. Ultra slim slot-in DVD core mechanism.
15.Dolby Pro Logic II decode settings
①Decode mode:PRO LOGIC,PLL Matrix,
PLL Movie,PLL Music,Hall Effect.
②Sound field effect:natural,jazz club,
concert hall,stadium,4 stereo.
③Dimension control.
④Centre width control.
⑤Panorama setting.
3. 7 inch Grade A TFT monitor.
4. Built-in 4×45W power amplifier & 5.1channel
audio output (RCA).
2
5. Dual zone independent playing mode
This unit provides dual zone independent
playing mode.
6. Built-in FM / AM Tuner
① Auto / Manual search for radio station and
preset station memory.
② 30 preset radio stations (12 AM + 18 FM)
③ Distance / Local radio station seeking
④ Radio station scan tuning.
7. Multi TV video System
Auto / Manual PAL & NTSC video system
selection.
8. Dual LCD Display
Wide screen TFT display & segment LCD
display
9. 4 Different Screen Aspect Ratio
FULL , WIDE , NORMAL , OFF .
10. TFT Automatic Swiveling Mechanism
Simply press a button to adjust the TFT
monitor display angle in full range or step by
step is as easy as clapping your hand. Last
position memory memorize your favorite
viewing position.
11. Auto Activated Rear View Video Camera
Reverse driving automatically activates the
TFT monitor & the rear view video camera,
image captured from the camera is displayed.
12. TFT monitor swiveling mechanism
overloaded protection.
During the TFT movement, once the monitor
was overloaded by blocking or unclear moving
path, its motion is ceased automatically to
protect the mechanism.
13. Fully Compatible with CDDA, VCD, SVCD,
CD - R, CD-RW, DVD, DVD±R, DVD±RW,
MP3, WMA, JPEG, Picture CD.
3
16.Multi-language, Multi-subtitle,Multi-angle
Playback Options.
17.Last Playback Memory
When powering on the unit, every single
setting & playing status remain the same as
that during power off.
18.Making fine adjustment for bass / treble
center frequency、SUB.W filter frequency、
SUB.W phase and bass Q-factor.
19.Mute Function
Auto lower / mute the volume when dedicated
external device such as GPS system or car
phone is active.
20.Joystick (5-way) Control
The joystick provides easy navigation control
via 4-directional control plus a clickable
control.
21.Making fine adjustment for electronic
volume, bass, treble, balance, fader.
22.Ultra slim card size full function IR remote
controls for the front zone and the rear zone
control.
23.Mechanical Anti-Vibration System +
Electronic Shock Protection
Our reputation winning mechanical anti vibration system accompany with 16MB
Electronic Shock Protection promotes the
smoothest disc playback possible even in
the toughest road conditions.
BEFORE USE
English
1. Front Panel & Monitor
24
2
1
23
3
4
5
3
22
21
20
6
7
8
9 10
11
SD Card Slot
12 13 14
15 16 17 18 19
IR Remote Control Receiver
1. [
] Key
● Short press to slide down / up monitor
2.[DISP] Key
●Short press to display info on screen
●Long press to enter / exit MAIN MENU.
5.[
] Key
●Short press to decrease 1 step of tilt angle
●Long press to continuously decrease the tilt
angle
6.[SRC] Key
● Short press select playing mode
3. [WIDE/■PICTURE] Key
7.[VOL/LO/DX] Knob / Key
● Short press to adjust display aspect
● Short press to adjust PICTURE setting
● Long press to enter / exit PICTURE setting
4.[
] Key
●Rotate the knob to adjust volume
●Short press to enter audio setting
●Short press to confirm audio setting
●Long press to toggle Local / Distance for radio
station searching
● Short press to increase 1 step of tilt angle
●Long press to continuously increase the tilt angle
4
BEFORE USE
8.[POWER/MUTE] Key
●Short press to power on the unit
●Short press to mute the volume
●Long press to power off the unit
9. [1∕AUDIO∕DISC-] Key
● Short press select audio language during
playback (in DVD Player,SD CARD source)
● Short press play preset radio station channel 1
● Long press store current radio station to
channel 1
3
10. [2∕SUBTITLE ∕DISC+] Key
● Short press select subtitle language during
playback (in DVD source)
● Short press play preset radio station channel 2
● Long press store current radio station to
channel 2
15. [■AF/BAND/PAUSE] Key
● Short press alter between FM & AM
16.[■TA] Key
● Short press enters slow forward/slow reverse
(in DVD source)
● Short press move cursor down in menu setting
17. [ PLAY / ENTER / SCAN / AME ] Key
● Short press starts a playback(in DVD / SD
CARD source)
● Short press to confirm a selection
● Short press scan playing FM/AM radio station
● Long press auto store FM / AM radio station
18.[RESET] Key
● Short press reset system settings to factory
default(except password & parental lock setting)
11. [3∕SCN] Key
19.[
● Short press start scan playback(in DVD/source)
● Short press play preset radio station channel 3
● Long press store current radio station to
channel 3
12. [4∕RPT] Key
] Key
● Short press enters next chapter / track (in
DVD/SD CARD source)
● Short press move cursor right in menu setting
● Long press increase tuning frequency step
by step (in Tuner source).
20.[■PTY] Key
● Short press start repeat playback(in DVD / SD
CARD source)
● Short press play preset radio station channel 4
● Long press store current radio station to
channel 4
● Short press enters fast forward / fast reverse
(in DVD source)
● Short press move cursor up in menu setting
13. [5∕■2-6CH ∕RDM] Key
21.[
● Short press, random playback(in DVD /SD
CARD source)
● Short press play preset radio station channel 5
● Long press store current radio station to
channel 5
● Long press alter between 2 channel & 6
channel audio output
● Short press playback previous chapter/track
(in DVD / SD CARD source)
● Short press auto search for the previous
available radio station
● Short press move cursor left in menu setting
● Long press decrease tuning frequency step
by step (in Tuner source)
14. [6∕STOP] Key
22.[
● Short press stop a playback (in DVD / SD
CARD source)
● Short press play preset radio station channel 6
● Long press store current radio station to
channel 6
● Short press, disc insertion / ejection
● Long press, reset core mechanism position
] Key
] Key
23.TFT Display
24.LCD Display
5
BEFORE USE
English
2. LCD Display
1
2
3
4
5
6
3
1 Disc indicator
Lit up when disc is inside
Light off when no disc is inside
2 SCN,RPT,RDM,ALL are indicators for
DVD playback. Lit up when the function
is active. Light off when the fuction is
inactive.
SCN : scan playback indicator
RPT : repeat playback indicator
RDM : random playback indicator
ALL : playback all chapters indicator
4 Main display: display time info,tuning
frequency,other text info
5 2 digit 7 segment LCD display for radio
channel no. The LCD lits up when radio
is active.
6 ST : Stereo indicator lit up when radio is
in stereo mode
LOC : Local indicator lit up when local
radio station seeking in active
3 LOUD : Loudness indicator
Lit up when LOUD is active
Light off when LOUD is inactive
6
BEFORE USE
3.Remote Control For Front Zone
Function Description
1[
/EJECT] key
● Open / Close the TFT monitor
3
2
3
1
4
6
5
10
9
14
13
18
17
22
21
26
25
30
29
7
8
11
12
15
16
19
20
23
24
27
28
31
32
34
33
35
2.[SRC] Key
● Select playback source
3.[MUTE] Key
● Toggle on / off volume output
4.[ /POWER] Key
● Turn on / off the power
5.[TITLE] Key
● Enter the title menu of the disc (in DVD source)
6.[MENU] Key
● Enter the main menu of the disc (in DVD source)
● Turn on PBC when playing VCD
7.[AUDIO] Key
● Change the audio track during playback DVD,
VCD or SD Card.
8.[SUBTITLE] Key
● Alter subtitle language during playback a DVD
disc.
9. [ANGLE] key
● Playback DVD disc in different angle on a scene
● Playback Picture CD with different angle of
picture displayed
10.[DISP] Key
● Display playback information
11.[REPT A-B] Key
● Setup to repeat playback from time frame A to
time frame B (in DVD source)
12.[REPT] Key
● Setup to repeat playback each chapter / title /
disc (in DVD source)
7
BEFORE USE
13.[
/OPEN/CLOSE] key
●Open / Close the monitor.
English
25. [
] Key
● Select Aspect Ratio mode
● Select the previous track / chapter for playback
● During menu setup, move to left selection
● Searching an available FM/AM radio station by
decreasing tuning frequency
●Decrease tuning frequency of TV tuner
15. [ ANGLE/
26.[
14.[WIDE] key
]
● Decrease monitor tilt angle position
16.[ ANGLE/
]
] Key
● Pause a playback
● Start playback
● Act as ENTER for menu setup
● Scan tuning FM / AM radio station & play
3
● Increase monitor tilt angle position
27.[
] Key
17.[DISC▼ ] Key
● Select the next disc to playback in DVDC source.
18.[DISC▲] Key
● Select the next track / chapter for playback
● During menu setup, move to the right selection
● Searching an available FM/AM radio station by
increasing tuning frequency
●Increasing tuning frequency of TV tuner
● Select the previous disc to playback in DVDC
source.
28.[SEL] Key
19. [VOL -] key
● Enter/Exit the audio adjustment mode.
● Decrease volume
29. [ GOTO] key
20.[VOL +] key
● Goto specific time frame and playback
● Increase volume
30. [
] Key
21. [■ / BAND] key
● stop playback
● select FM / AM band
● Slow playback disc in DVD source
● Slow rewind playback disc in DVD source)
● During menu setup,move to the lower selection
22. [
31. [ZOOM] key
] Key
● Fast forward the current disc in DVD source
● During menu setup, move to upper selection
●Change to a previous TV channel.
● Zoom in image during playback DVD/VCD
disc.
32.[PIC] key
23. [Scn] Key
● Setup monitor image parameter
● Play the first ten second of each charpter in
CD Changer .
33.Numeric keypad
24.[RDM] Key
34. [DVD SETUP] key
● Play all charpters in random order in CD
Changer orDVD player.
● Setup for DVD player playback function
35.[SYS SETUP] key
● System function setup of the unit
8
BEFORE USE
4. Remote Control for Rear Zone
Function Description
1. [ MUTE] key
● Turn on / off volume output
1
2
4
5
3
5
9
3
7
2.[R.SRC] key
● Playing source selection for rear zone
6
3.[TITLE] key
11
8
10
13
12
● Enter the title menu of the disc (in DVD Player)
4. [MENU] key
● Enter the main menu of the disc(in DVD Source)
● Turn on PBC when playing VCD,
14
5.[AUDIO] key
● Switch the audio language for disc playback
6. [SUBTITLE] key
● Language selection for subtitle (in DVD source)
7.[
] Key
● Select the previous track / chapter for
playback.
● During menu setup,move cursor to left
selection.
● Decrease tuning frequency of TV tuner.
8.[
] Key
● Select the next track / chapter for playback.
● During menu setup,move the right selection.
● Increase tuning frequency of TV tuner.
9.[
] Key
● In DVD source, fast forward the disc content
● During menu setup, move to upper selection
● Change to a previous TV channel.
10.[
] Key
● Slow playback (in DVD source)
● Slow rewind playback (in DVD source)
● During menu setup, move to lower selection
● Change to next stored TV channel.
9
BEFORE USE
11.[
English
] Key
● Pause a playback.
● Start a playback.
● Act as ENTER for menu setup.
12.Numeric keypad
13. [REPT] key
● Setup to repeat playback each chapter / title /
disc
14. [GOTO] Key
3
● Goto specific time frame and playback
10
MONITOR OPERATION
A
B
C
B
1. Open / Close TFT Monitor
4
1) Open TFT Monitor
Short press [ OPEN ] key on the front panel or press the[
zone activate the display to the last viewing position.
]key of the remote control for front
OPEN / CLOSE
A
A
2) Close TFT Monitor
Short press [ OPEN ] key on the front panel or press the[
zone load in the display back to the compartment.
]key of the remote control for front
OPEN / CLOSE
A
A
2. TFT Monitor Auto Open
1) If "TFT Auto Open" is "on", power on the monitor will go to its last position.
2) If "TFT Auto Open" is off, only press [OPEN]or [
] key to open the monitor after power on the unit.
OPEN / CLOSE
A
A
Note:◆ Please refer to<TFT Auto Open>.
If " TFT Auto Open " is off, the monitor will not come out automatically after the unit power on.
[Open] or [ ] button must be pressed to make the monitor out.
OPEN / CLOSE
A
A
3. When Reverse Driving
If the rear view video camera connected and the unit is on, when the monitor was stationed
inside the main compartment of the unit,the monitor automatically move to the last display
position upon reverse driving. When the reverse driving is done,the monitor retreat back to the
main compartment.
When the monitor was in display mode, the monitor automatically switch to CAMERA mode upon
reverse driving.When the reverse driving is done, the monitor switch back to its orginal content.
11
MONITOR OPERATION
English
4. Monitor Tilt Angle Adjustment
By LCD characteristic,different angle different result of display.The monitor angle can be adjust for
better and best view.
1) Continuous Viewing Angle Adjustment
Long press [
][
] key on monitor, monitor tilt angle increases / decreases accordingly
2) Viewing Angle Adjustment By Step
Short press [
][ ] key on remote control / monitor,press once to increase/decrease tilt
angle by one step。
5. Aspect Ratio
Press the[PIC]key on remote control or [WIDE/ ■ PICTURE] key on monitor. The aspect ratio alters
according to the following:
C
FULL
●The screen is extended
horizontally as a whole
to the aspect ratio of 16
to 9
●The extension ratio is the
same at any point of the
screen
WIDE
●The screen is extended
horizontally to the aspect
ratio of 16 to 9
●The extension ratio increases
toward the right and left ends
of the screen
NORMAL
4
OFF
●The conventional display
image has a 4 to 3 ratio
of horizontal to vertical.
● In this case,a blank area
remains on the right and
left sides of the display
6. Image Setting
1) The video output format for the 5 playing sources is listed as below:
Video Output
Format
Playing Source
TUNER
RGB mode
DVD
RGB mode
AUX IN
CVBS mode
CAMERA
CVBS mode
2) Adjustable Parameters
In RGB mode, only BRIGHT is available for adjustment.
In CVBS mode, PICTURE, COLOR,CONTRAST, BRIGHT, and TINT are available for adjustment.
Parameter
Displayed
Parameter
Adjusted
Adjustment
Range
PICTURE
Sharpness
-10 to +10
COLOR
Color
-10 to +10
CONTRAST
Contrast
-10 to +10
BRIGHT
Brightness
-10 to +10
TINT
Tint
-10 to +10
Note :
◆The default adjustment value is 0.
◆In PAL mode, Tint is unavailable
for adjustment.
12
MONITOR OPERATION
3) Parameter Adjustment Procedure
① Enger picture quality setting mode
Press [PIC] key on remote or long press button [WIDE/■PICTURE] on monitor panel.
C
② Select Setting item
Press [ ][ ] on remote,or press button [■PTY][■TA ] on monitor panel.
B
B
③ Setting parameters
Press key [ ][ ] on remote,or press button[
4
B
][
] on monitor panel.
B
④ Exit picture quality setting
Press key [ PIC ] on remote or long press [ WIDE/■PICTURE ] on monitor panel.
C
7. When Parking Brake Engaged
1) If "PRK SW "cable is connected to hand brake switch,the view video to the TFT monitor
will be switched between Normal Display and Caution Sentence by this function.
2) Parking cable function ceases upon "Parking" is " Off " or the playing source is CAMERA.
Note : ◆ Please refer to <Parking Brake Cable Connections> and<Reverse Drive Camera
Display Cable Connections>.
◆ "Parking" setting,Please refer to <Parking > .
3) When "Parking" is "On", the monitor at the
front display the following screen to prevent
the driver watching other content during driving.
8. Monitor Movement Mechanism
Any path blocking / obstruction for the movement
of the monitor occurs, the following protection
executes to prevent any damage to the loader /
monitor. After the protection executed, normal
operation resumed after the following action of
the monitor performed by pressing [ OPEN ] key
or disconnecting & reconnecting the power.
13
ATTENTION:
DO NOT USE THIS FUNCTION
After OPEN
key is
pressed
Disconnect &
reconnect
the power
Monitor
Auto loading Fully
loading out back in to the extended
horizontally mechanism horizontally
Auto loading
back in to the
mechanism
Obstruction / Self
Blocking
protection
Situation
of this unit
Monitor
Stop at the
loading in
obstruction
horizontally point
Fully
Loading back
extended
in to the unit
horizontally
Monitor
loading out
vertically
Stop at the
obstruction
point
Swiveling
back to
the unit
Swiveling
back to
the unit
Monitor
loading
in vertically
Stop at the
obstruction
point
Swiveling
back to
the unit
Swiveling
back to
the unit
BASIC OPERATION
English
C
B
A
C
1. Power On / Off
1) Power Off
Long press [ / MUTE ] key on the front panel or short press[POWER]key on the remote control
to power off the unit,the monitor is drew back to the main compartment, and the LCD screen shows
"BYE-BYE".
MUTE
5
A
A
2) Power On
Short press [ / MUTE] key on front panel or [POWER ] key on remote control to turn on the unit.
LCD display " welcome " then the unit comes back to the status when the unit was power off last
time.
MUTE
A
A
2. Muting
1) Short press [POWER / MUTE] key on front panel or [ MUTE ] key on remote control turns off
volume, press again resume the volume.
MUTE
A
B
2) Volume adjustment or setup audio setting cancel the mute function.(refer to <Audio Control>).
3) Mute indicator
lit up when mute is on.
3. Playing Source Selection
Short press [ SRC / □P.MODE ] key on front panel or [ SRC ] key on remote control to alter
the playing source according to the followings:
SRC
C
SRC
C
Display
TUNER
DVD/SD Card
AUX IN
CAMERA
Playing Source
Radio Tuner
DVD Player/SD Card
Aux In
Rear View Video Camera
Note: ◆ The name of playing source is displayed on TFT & LCD screen.
14
BASIC OPERATION
A
4. Volume Adjustment
1) To increase / decrease volume, rotate the rotary knob on front panel or press [ VOL+] / [ VOL-]
key on remote control.
5
A
A
2) Volume ranges from 0 to 40.
Di!
Di ! Di!
Di !
Di!
Note:
Volume Range : 0 - 40
◆ When volume reaches 0 or 40, a beep
sounded indicating the adjustment limit
is reached.
5. Audio Control
Audio control allows you to easily adjust your audio system to meet the in-car acoustic
characteristics which vary depending on the type of car and its measurement, to get the best
possible sound spaciousness,be sure to make setting for the speakers as well,making setting for
"FADER"and"BALANCE" boots the effects of the cabin equalizer.
1) 2- channel audio control
Each playing mode has 2 channels of audio output
Playing Source
TUNER
DVD
AUX IN
CAMERA
SD Card
Channel
2 -Channels
2 / 6 -Channels
2 -Channels
2 -Channels
2 / 6 -Channels
Note:
◆ please refer to <Alter between 2 Ch. & 6 Ch> .
2) Audio Control Adjustment Method:
① Enter Audio Control mode
Short press [ VOL/ LO/DX ] key on front panel, “AUDIO” menu is displayed.
A
15
BASIC OPERATION
English
B
②Select the Audio item for Adjustment
Rotate the rotary volume knob,or press [
A
B
]/[
] on the remote control/ joystick.
B
③ Adjust the audio item.
Continuously short press[ VOL/ LO/DX ] key, or press [ ] / [ ] key on remote control, or press
[ ■PTY ][ ■TA ] of the joystick, select the audio item for adjustment.
B
A
Item
Adjustable
Range
EQ
User
Flat
Jazz
Pop
Classic
Rock
Vocal
5
B
Item
Adjustable
Range
Bass
Treble
Fader
Balance
SW
Loud
-14 to +14
-14 to +14
-09 to +09
-09 to +09
-7 to +7
Off;1 to 4
Note:◆ Select
EQ according to this sequence : User → Flat →Jazz →Pop →Classic →Rock→Vocal→User.
◆ Different EQ reflects in different Bass level & Treble level, the Bass & Treble level could be
adjusted only in User(user seting) mode.
◆ For Bass,TrebleE adjustment, alter Bass Center Frequency & Treble Center Frequency may
result a better audio output quality(please refer to <ASP CONFIG> ).
◆ The LOUD function compensates for deficiencies in the low and high sound ranges at low volume.
You can select a desired Loudness level. Meanwhile,the " LOUD " light on the LCD will be on.
④ Exit Audio Control mode
Long press [ SEL/■LOC/DX ] key or stop operation for a few seconds exit audio control mode.
A
Long press
16
BASIC OPERATION
3) 6-channel audio control
By adjusting the following speaker volume control to achieve a better audio experience.
Item
Adjustable range
Master Volume
00 to 40
Front Left Channel Volume
-10 to +10
Front Right Channel volume
-10 to +10
Rear Left Channel Volume
-10 to +10
Rear Right Channel Volume
-10 to +10
Center Channel Volume
-10 to +10
Subwoofer Volume
-10 to +10
◆ Due to different setting, no audio output may occur. For details, please refer to"Alter between
2-Ch.& 6-Ch." .
◆ Before adjusting the volume of any speaker, please refer to <speaker configuration> .
5
17
BASIC OPERATION
English
A
B
6. Adjusting Clock
Change to
"Clock adjustment is available when
LCD screen is closed. Adjusting clock
according to the following steps".
5
1) Select Clock Display
Short press [ DISP ] key on the front panel, select Clock Display.
A
Note: ◆ Clock display has two mode as 24hours and 12hours,for example:under 12hours
mode, "AM11:29" is morning 11:29,"PM 10:42" is 10:42 in night.Under 24hours
mode,it is "22:42"
◆ 24hours mode/12hours mode settings,see <Clock Mode>
2) Enter Clock Adjustment Mode
Long press [DISP] key, enter Clock adjustment mode, the part being adjusted (hour/minute)
would be blinked by 1Hz.
A
3) Select item for adjustment (Hour / Minute)
Press [ ] [ ] key on remote control/joystick, select the item needed to be adjusted
B
B
18
BASIC OPERATION
B
4) Adjust Clock
Press [ ] [ ] key on remote control or [■PTY][■TA ] of joystick,to adjust time setting.
and[ ] [■PTY] key increase,[ ][■TA ] key decrease.
5
B
B
5) Set Up Clock
Short press [ DISP ] key on the front panel, confirm setup and exit Clock Setup Mode.
A
Note: ◆ The unit exits clock adjustment mode after no operation for a few seconds.
◆ In any playing mode, long press [ DSP ] key on the front panel to enter Clock
Adjustment mode directly, or proceed step 2 to 5 for clock adjustment.
◆ Clock adjustment also can be made in general setup mode, please refer to <Clock
Adjustment >.
19
BASIC OPERATION
English
[RESET] Button
7. System Reset
1) During system halt or other illegal operation, using a pen tip to press [ RESET ] button on the
front panel resume normal operation.
A
[RESET] Button
2) After system reset, the below setup will restore to the factory default value
① System Setup.
② DVD setup.
③ Clock ,please refer to <Clock Adjustment> and <Adjusting Clock> .
④FM/AM preset radio station (Please refer to "Auto /Manual Preset Memory radio" .)
5
3) If the system is reset during DVD playback, after reset, DVD resume playback.
8. Auto Brightness Control
To avoid the display being too bright at night time,if the cable for headlight is connected to ILLUMI
( for details, please refer to < Electrical Connections Overall Diagram > ), turning on the headlight
dim the backlight of TFT and LCD and vice versa.
9. Line Mute
If the MUTE is connected, other audio output mutes when a telephone call is received by the car
phone or the verbal navigation is performed. Please refer to < Electrical Connections Overall
Diagram >.
20
TOUCH SCREEN OPERATION
1. Main Menu
Press [MENU/SRC] key on the panel to get main menu ,and you can select a playing source
or make setup on system and DVD player by touch key .
MAIN MENU
Multi-ZONE
SETUP
SETUP
DVD/CD
TUNER
SD CARD
AUX IN
iPod
CAMERA
RGB IN
2. Touch Operation During Playing Back Image or Video Files
Positions of touch keys are showed in the screen,it indicate its function on DVD player
operation.
B
A
C
D
6
E
F
A—
B—
C—
D—
E—
F—
Return to MAIN MENU
Function of the [DISP] key ,display playing information
Enter rear zone playing source menu
Select the previous file for playback
Select the next file for playback
Eject these touch key : [ MENU ] ,[
],[
],[
],[
],[
],[
]
3. Touch Operation On Radio
Positions of touch keys are showed in the screen,it indicate their function on radio operations.
Return to
BAND
MAIN MENU
TUNER
FM-1
P1
87.5 Mhz
87.5MHz
87.5MHz
87.5MHz
87.5MHz
87.5MHz
PTY:
None
Long press to to
activate/disactivate
Local function
Press to recall preset station
87.5MHz
PS:
BAND
21
00:58
AS
Radio function key
TOUCH SCREEN OPERATION
English
4. Touch Operation On SD Card
Positions of touch keys are showed in the screen,it indicate their function on SD card
operation.
SD
1/4 0
01:08
00 :00 :27
(R oo t)
MP3
Rep ea t
1
2
3
4
5
*** ***
**** ****
*****
****
****
Ran do m
6
7
8
9
10
***
**
*******
****
** **********
Press to activate/disactivate
repeat/shuffle palyback
Direct press to select track
Son g:
PAGE-
PAGE+
DIR -
DIR +
Function operation key
6
22
RADIO TUNER
User Interface
4
5
TUNER
1
FM-1
2
P1
1
3
87.5 Mhz
FM-1
P1 87.50MHz
LOC
87.5MHz
87.5MHz
87.5MHz
87.5MHz
87.5MHz
PTY:
None
7
6
87.5MHz
ST
P1
87.50MHz
P4 87.50MHz
P2
87.50MHz
P5 87.50MHz
P3 87.50MHz
PS:
BAND
4
00:58
Multi-ZONE
6
2
5
P6
6
87.50MHz
AS
FRONT:TUNER
REAR:DVD
1 .FM1 ― FM Band
2 .87.5MHz ― Current Radio Frequency.
3 .00:34 ― Clock
4 .ST ― a green light indicator for receipt of stereo broadcasting,it is touch key.
5 .LOC ― an indicator for strong signal receipt of local radio station,it is touch key.
6 .P1~P6 ― preset radio stations,they are touch keys.
7 .Touch keys
Info Display on LCD
7
1
1 .FM1 - FM Band
2 .87.50 - Current Radio Frequency
3 .1CH - Current Radio Channel
4 .ST - Stereo Broadcasting indicator
5 .LOC - Strong Signal Local Broadcasting Indicator
23
2
3
4
5
RADIO TUNER
English
A
B
D
C
1. Switch to Radio Tuner source
Press [SRC] key on the front panel or remote control to switch to RADIO TUNNER source, the
following user interface appears.
TUNER
FM-1
P1
87.5 Mhz
00:58
Multi-ZONE
A
87.5MHz
87.5MHz
87.5MHz
87.5MHz
87.5MHz
PTY:
None
87.5MHz
PS:
BAND
AS
2. Select FM / AM band
1) Press [BAND] key on the front panel or [■/BAND] key on the remote control to switch the band
among FM1, FM2, FM3, AM1, AM2.
B
B
7
2) The frequency range of FM & AM are different according to the radio system. This unit offers 6
different tuning system, user could choose the proper tuning system accordingly. For detailed
tuning system selection, please refer to<Radio Field> .
3. Auto Tuning
1) Long press [
] key on remote control or right direction key of joystick starts seeking for next
available radio station by increasing tuning frequency . Press these keys again stop the
searching.
C
C
2) Long press[ ]key on remote control or left direction key of joystick starts seeking for previous
available radio station by decreasing tuning frequency. Press these keys again stop the
searching.
D
D
Note:◆ Once a radio station was searched, the auto seeking stopped and that radio station is
played.
◆ during the auto seeking, press other tuner function key stop the search.
24
RADIO TUNER
A
B
4. Manual Tuning
During manual tunning, frequency varies according to the minimal step for adjustment.
1) Press [ ] key on the remote or up direction key of the joystick ,receiving frequency
increase 1 step.
2) Press [ ] key on the remote or down direction key of the joystick , receiving frequency
decrease 1 step.
5. Auto Preset Memory
Auto searching for the valid radio stations with strongest radio signal,auto store those frequencies
into preset channels. Press numeric key on the front panel recalls the preset radio station.
7
1) Press [AS] key on TFT screen or long press uprightly the joystick to search all the radio station
in range from the current frequency, auto store 6 radio station channels with the strongest radio
signals.According to frequency from low to high and store in P1 to P6 respectively.
B
Long Press uprightly
2) Five radio bands ( FM1, FM2, FM3, AM1, AM2 )are available in this unit, 6 radio stations could
be stored per band, a total of 30 preset radio stations are available.
Note:◆ In the process of auto radio station preset memory, pressing other tuning function key
exit auto preset.
◆ Auto store a radio station in preset channel overwrite the previous preset radio station.
6. Manual Preset Memory
Long press key 1 to 6 on the front panel store the current radio station frequency into the preset
channel pressed. For instances, current tuning frequency is 98.5 MHz, long press key '2' set
channel 2 as the radio station with 98.5 Mhz
A
Note: ◆ Manually store a radio station in preset channel overwrite the previous preset radio station.
◆ In each band, [1] to [ 6] key each store 1 preset radio station.
25
RADIO TUNER
English
B
7. Recall Preset Station
Short press key [1] to [6] on the front panel or remote control load the preset radio station channel
from P1 to P6 for playing. Key [1 ] to [ 6 ]corresponds to Channel P1 to P6.
A
8. Scan Tunning
1) Short press uprightly the joystick to search all the radio station in range from the current f
requency, playing the station for 10 seconds once a radio station is located and continue
the search.
2) Press other tuning function key cease the radio playing.
B
B
7
Short Press
9. Local Radio Station Seeking (LOC)
When LOCAL seeking is on, only those radio stations with strong radio signal could be played.
1) Long press [■LOC/DX] key on the front panel to turn on LOCAL.
2) Long press [■LOC/DX] key again turn off LOCAL.
C
Note:◆LOCAL green indicators on TFT & LCD are lit up when LOCAL is activated and vice versa.
26
RDS OPERATION
RDS Interface
1
2 3 4 5
TUNER
FM-1
P1
6
87.5 Mhz
00:58
Multi-ZONE
8
87.5MHz
87.5MHz
87.5MHz
87.5MHz
87.5MHz
87.5MHz
PTY:
None
7
9
PS:
BAND
AS
10
Indicator for RDS Radio Tuner
1
2
3
4
5
6
7
8
9
10
8
ST - stereo
LOC - indicates if strong radio signal is received
AF - an indicator for the activation of Alternative Frequency function
TA - an indicator for the activation of Traffic Announcement function
TP - an indicator for the activation of Traffic Programme function
PTY - an indicator for the activation of Programme Type function
P1~P6 - preset radio frequency to buttons & restore radio station by pressing these buttons.
PTY - Programme Type
PS - Programme Service
RT- Radio Text
This product features a tuner with RDS functions,RDS (Radio Data System) is a system that
transmits broadcast station information together with FM programs.
You get display of Program Service Name and PTY(Program Type ID code),tuning to stations
broadcasting a desired PTY, automatic tuning to traffic information, and emergency broadcasts
and radio text display.
Note:
◆ RDS service was not available in AM broadcasting
◆ RDS service availability depends on the FM broadcasting provider
1. Searching the PTY (Program Type)
1) Activate PTY Search Mode
In Radio source, Long press [■PTY] key of joysyick activates the PTY. Long press [■PTY]
key again deactivate the PTY mode.
A
Long Press
2) Select a PTY
Short press [ ][ ] key on the remote control or [■PTY][■TA ] of joystick , select PTY
needed and the followings displays accordingly:
A
A
NONE NEWS SPEECH MUSIC DOCUMENT FOCK M OLDIES NATION M
COUNTRY JAZZ LEISURE TRAVEL PHONE IN RELIGION SOCIAL
CHILDREN FINANCE WEATHER OTHER M CLASSICS LIGHT M EASY M
ROCK M POP M VARIED SCIENCE CULTURE DRAMA EDUCATE SPORT
INFO AFFAIRS NEWS
27
RDS OPERATION
English
A
A
B
3) Searching for a PTY
① Auto Searching a PTY
after a PTY is selected, auto searching for next available PTY by increasing tuning frequency
until the programme type of the next station matches the PTY. If no matched was found, the
tuner will return to the original radio station and "NONE" is displayed.
After the searching, no matter if PTY was found, this unit auto exit the searching and PTY OFF
if no any operation in 5s.
② Searching by Category
Supposed the searching category for PTY were "SPEECH" & "MUSIC", the searching ended
and started playback while either criteria was met.
③ PTY Light
During the searching of PTY (PTY is ON), "PTY" was shown & blinked on the TFT & "PTY"
indicator was lit up.
4) Save PTY
When PTY is on, press [1] to [6] key on the remote control store the current program type to the
channel selected & overwrite it. the default preset channel for PTY:P1-DNEWS, P2-DSPEECH,
P3-DSPORT, P4-DPOP M, P5-CLASSIC, P6-DMUSIC.
8
B
5) Searching the PTY quickly
When PTY is on, press [1]to[6] key on the remote control to play the preset station, then choose
other station as needed.
B
6) Quit the PTY mode
During the searching of PTY, press other tuning function key stops the PTY searching, Long
press [
]key or after PTY stations was searched exit the PTY searching mode
2. PTY Alarm
PTY alarm functions automatically during emergency announcement broadcasting such as natural
disaster announcement regardless what media source you are playing. If the tuner receives a radio
alarm code, "ALARM" is displayed, and the tuner switches to receive emergency announcement.
Note: ◆ The system switches back to the original source following emergency announcement reception.
◆ There are not buttons can cancel the announcement during announcem entreception.
28
RDS OPERATION
B
A
3. TA Function
The TA ( Traffic Announcement standby ) function lets you receive traffic announcements
automatically, no matter what source you are listening to. The TA function can be activated for a
TP station (a station that broadcasts traffic information).
1) Turning On / Off The TA Function
Press [■TA ] key of joystick for 2 seconds to activate /deactivate the TA function , and the
TA" indicator is highlighted.
A
Long Press
2) Searching The Traffic Announcements
When TA is activated, pressing the [ ][ ] key on the remote control or the [
joystick ,the radio tuner starts a search for a traffic station else.
8
][
] of
B
3). Searching the traffic announcements in any source other than tuner
When TA is activated and a traffic announcement is received, the current playing source is
overridden by the traffic announcement, if the tuner was last set to the FM band but not if it
was last set to the AM band.And the "TA" indicator lights, indicating that the tuner is waiting
for traffic announcements.
The system switches back to the original playing source when traffic announcement is
finished.
Note: ◆Switch on TA when the tuner is off,the receiver will attempt to seek a TP station all the time.At this
status,if user switch source to tuner,the frequency may differ from the frequency when the tuner
was switched off.
4. Canceling Traffic Announcements
Press [■TA ] key of joystick for seconds to exit TA function and cancel the current traffic
announcement.
A
29
Long Press
RDS OPERATION
English
A
5. AF (Alternative Frequency / Auto Following)
In FM mode, long press [■AF / BAND / PAUSE] key on the front panel activate /deactivate AF
function. When AF is activated & a radio signal is too weak, the tuner automatically switches to
the best alternative channel.
A
Note: ◆ During Auto switching radio frequency, some interference could be heard.Turn off AF
function can cease this issue.
6. Region
When AF is activate and Region is set "On "(Region setting please refer to part "RDS SETUP"
of System Setup), Auto tuning to those stations within the region assigned;When AF is activated
and Region is set to "Off", Auto tuning to those stations without any region boundary.
7. CT (Clock Time)
8
Some stations broadcast the time and date within the encoded RDS signal. The clock time is
automatically adjusted when "CT" is set to " ON". (CT setting please refer to part "RDS SETUP"
of System Setup)
8. RT (Radio Text)
When this function is activated and this tuner displays short message data transmitted from the
provider, such as station information, the name of the current broadcasting song and the name
of the artist.
9. PI Search
When RDS signal is lost for a long period,the radio will automatically search a frequency matching
with current station PI each 2 minutes , to switch to a station playing the same program.
30
DVD PLAYER
Info Display on LCD
3
1
2
1 7---- current playing chapter
2 1:07:50----Current playback time
3 SCN----scan playback; RPT----repeat playback; RDM----random playback; ALL----playback all
disc
1. Insert Disc
1) Once a disc is inserted, DVD mode is then entered,an indicator on LCD lit up.
2) No disc could be inserted when disc was inside the unit or during power off.
Note : ◆ CD-R,CD-RW,DVD±R,DVD±RW without terminated could not be played.
9
◆ For caution for disc using, please refer to "Basic knowledge for disc".
2. Disc Ejection
1). When this unit is power on, press [ ] key to eject disc inside.
2). Eject disc in DVD mode automatically switch to TUNER mode.
3). Eject disc during power off is available and the unit remains power off after the disc was ejected.
A
31
DVD PLAYER
English
D
B
A
A
3. Pause Playback
During DVD,VCD,CD,MP3 playback: press [PAUSE] key on front panel or [ ] key on remote
control pause the playback, press one of these keys again resume normal playback.
A
4. Stop Playback
During DVD,VCD,CD,MP3 playback:
1) Press [ STOP ] key on front panel or [ ■/BAND ] key on remote control once stop the playback
and the relevant location on the disc was saved, press [ ] key on remote control or [PLAY]
key of joystick resumes the playback from the saved disc location.
2) Press [ STOP ] key twice cease the playback. Press [ ] key on remote control or [PLAY] key
of joystick starts the playback from the very beginning - the Title page of the DVD or the first
track of VCD / CD.
C
D
5. Fast Forward / Fast Reverse Playback
During DVD,VCD,CD playback:
1) Short press[■PTY]key of joystick or [ ] key on remote control, each successive press change
the playback speed according to the following:
B
A
×2
×4
×8
×20
×20 ×8 ×4 ×2
B
2) During fast forward and reversing, press [
resume normal playback.
B
9
] key on remote control or [ PLAY ] key of joystick
Press
Note:◆When CD is in fast forward /reverse playback mode, audio output is activated.
◆When MP3 & JPEG is playing, this function is not available.
32
DVD PLAYER
B
C
A
6. Slow Forward / Slow Reverse Playback
During DVD,VCD (PBC OFF) playback:
1) Short pressing [■TA ] key of the joystick or [ ] key on the remote control repeatly to start slow
motion playback, the playback speed will change as following table:
Pressing Times
Display on TFT Playback Speed against Normal
1 time
1/2
1 / 2 times forward
2 times
1/4
1 / 4 times forward
3 times
1/6
1 / 6 times forward
4 times
1/7
1 / 7 times forward
5 times
1/2
1 / 2 times reverse
6 times
1/4
1 / 4 times reverse
7 times
1/6
1 / 6 times reverse
8 times
1/7
1 / 7 times reverse
9 times
Play
1 times forward
A
A
2) During slow motion playback, Press[PLAY]key on joystick, [ ] key on remote control to resume
normal playback. Pressing [PAUSE] or [ ■/BAND ] key will cancel slow motion playback and the
corresponding function will be performed.
Note: ◆This function is not available for CDDA, MP3, JPEG.
9
7. Playback Previous / Next Chapter
1) Press[ ] / [ ]key on remote control or[ ] / [ ]key of joystick to enter previous / next segm
ent for playback.
Disc
DVD
VCD【PBC On】
VCD【PBC Off】
CD
MP3
Segment
Chapte r
Tra ck
Tra ck
File
C
B
A
2) For CD or MP3, if current track has been played back for more than or equal to 5 seconds,
pressing [
] key on the remote control or [
] key of the joystick, playback will go to the
beginning of the current track; otherwise, the next track.
C
33
A
DVD PLAYER
English
A
8. Repeat Playback
Press [RPT] key on front panel or [ REPT ] key on remote control to alter repeat mode as
following:
A
A
1) DVD:“Repeat Title” → “Repeat Chapter” → “Repeat Off”.
2) VCD(PBC Off)/CD:“Repeat Single” → “Repeat Off”.
3) MP3:“Repeat Single” → “Repeat Folder” → “Repeat Off”.
Note:◆No repeat function if PBC is on for VCD.
◆Auto repeat disc playback for CDDA.
◆ Power off or switching modes back to DVD mode will cancel repeat playback.
◆“RPT” indicator lit up when repeat playback is activated.
9
34
DVD PLAYER
A
C
9. Repeat A - B
During DVD, VCD, CD playback, repeat playback for time frame "A "to B is available.
Press [ REPT A-B ] key once on the remote control to setup a starting point" A".
Press this key again to setup an ending point B repeat playback from point"A"to point"B".
Press [REPT A-B] key again to cancel the repeat function and resume normal playback.
Display
repeat playback
Rep A-
Starting point for repeat playback
Rep A-B
Ending point for repeat playback
Rep Off
Cancel repeat playback A-B
A
10. Random Playback
When DVD, VCD, CD is playing, all the chapters / tracks are randomly played back.
1) Activate random playback
Press[RDM]key on the front panel activate random playback,"Shuffle On"is displayed.
B
9
2) Deactivate random playback
Press [ RDM ] key again to deactivate random playback, “Shuffle Off” is displayed.
B
3) Press [
] key to playback the next random chapter / track.
C
Note:◆PBC will be off automatically when random playback is activated if the PCB is on
before random playback is activated.
◆ “RDM” indicator in LCD screen lit up when random playback is activated.
35
DVD PLAYER
English
11. Scan Playback
Scan playback VCD & CD-DA only playbacks the first 10 seconds of all the tracks of the disc.
1) Activate Scan Playback
Pressing [ SCN ] key on the remote control to activate scan playback"Scan On" is displayed
on the TFT screen.
A
2) Deactivate Scan Playback
Press [ SCN ] key resume normal playback and Scan Off is displayed on the TFT screen.
A
Note: ◆ PBC will be off automatically when scan playback is activated if the PCB is on before
scan playback is activated.
◆ When both random playback & scan playback are activated, scan playback randomly.
“SCN” lit up when scan playback is activated.
12. Alter between 2-Ch. & 6-Ch.
1) Long press [ ■2-6CH ] key on the front panel alter audio output between 2-channel and 6channel.
9
B
36
DVD PLAYER
2) according to channel selected and Speaker setup, different audio output varies according
to the following table.(“★” indicates audio output is available)
Description
2-channel mode
Play the 2-channel audio in the 6-ch
annel mode with Dolby Pro-Logic
function off.
Play the 2-channel audio in the 6-ch
annel mode with Dolby Pro-Logic
function on.
Play the 6-channel audio in the
6-channel mode.
Front
Speakers
Rear
Speakers
★
★
Centre
Speaker
Subwoofer
★
★
★
★
★
★
★
★
★
Note:◆The information of the above table is valid only when the setup values of "Front Speaker",
"Centre Speaker" , "Surround Speaker" are all set in low.
◆"2-channel audio" is linear PCM (eg. CD & MP3 audio).
◆ "6-channel audio" for DVD (i.e. 5.1 channel Dolby Digital Audio and DTS audio).
◆ Regarding Dolby Pro-Logic setup, please refer to “Pro Logic II”
9
37
DVD PLAYER
English
B
A
C
13. Goto Search
During DVD, VCD playback, setup GOTO as following:
1) Enter GOTO mode
Press [ GOTO ] key on remote control to enter "GO TO" mode and the menu is displayed on
the screen.
A
2) Select different categories in GOTO mode
Pressing [ ] / [ ] key on the remote control or [■PTY]/[■TA ] key of the joystick to move the
blue cursor.
B
C
D
◆ For DVD, either Time or Title / Chapter is available.
Search
Time
--:--:-Title/Chapter ---/---
“Title”-- Go to specific time of a title
“Title/Chapter”-- Go to specific time of a chapter
◆ For VCD, press [ GOTO ] key to alter among “Track”,“Disc”,“Exit”
Track Search
Time
--:--:-Track
---/---
“Time”-- Go to specific time in the current track
“Track”--Go to specific track in a VCD
Disc Search
Time
--:--:-Track
---/---
“Time”-- Go to specific time in a VCD
“Track”--Go to specific track in a VCD
9
Note:◆ For more info on title/chapter, please refer to“The Structure of DVD Disc” and “The
Structure of VCD / CD Disc”.
38
DVD PLAYER
B
C
D
3). Enter time for searching
Press key [ ][ ][ ][ ] on the remote control or key [■PTY][■TA ][ ][ ] of the joystick to
move the blue cursor to the time option, and enter the time for searching by pressing the numeric
key on the remote control
D
For DVD : ◆To search for playback time at 1 hour 6 minute 28 second,move the blue cursor
to Time, enter [1], [0], [6], [2], [8].
◆To search for title 2,chapter 9 move the blue cursor to"Title / Chapter",enter [2],[9].
For VCD: ◆ To search for playback time at 1 hour 14 minute 7 second Press GOTO key
twice to enter Disc Search, move the blue cursor to Time, enter [1], [1], [4], [0], [7].
4). Execute the searching function
Press [ ] key on the remote control or key "ENTER" of the joystick to enter searching mode.
9
B
A
Press
5). Exit GOTO searching mode
Press [ GOTO ] key again and again to exit GOTO mode.
C
14. Direct Chapter / Track Selection
During DVD & VCD &CD playback, directly press [0] to [9] key on remote control for track0-9,and
press [1][5] for track 15.
D
39
DVD PLAYER
English
B
A
C
15. Audio Track Selection
1) During DVD playback
Press [AUDIO] key on front panel or remote control to alter the audio track selection
(i.e. select different audio language available).
2) During VCD & CD playback
Press [AUDIO] key on front panel or remote control to alter audio channel according
to the followings:- Left Channel → Right Channel → Stereo
A
A
Note:◆Left channel and right channel can not work property when Karaoke is not recorded
in VCD correctly.
16. Main Menu & Title Menu
Only available for DVD with main menu / title menu feature, please according to the
following steps to setup:1) Enter the main menu / title menu
Press[Menu]key on the remote control enter main menu to setup language,subtitle
and etc (depends on the disc). Press [MENU] key again resume normal playback.
B
Press [Title] key on the remote control to enter title menu and select different titles
for playback, Press key "TITLE" again to resume normal playback.
2) Enter a option
Pressing direction keys on the remote control or [■PTY][■TA ][ ] [ ] key of the joystick,
move the cursor to the option you want to select.
C
9
C
3) Confirm Selection
Press[ ]key on the remote control or[ENTER]key of joystick to confirm selection
and start playback.
40
DVD PLAYER
B
C
A
17. Zoom Image
During DVD, VCD playback, press [ ZOOM ] key on the remote control to zoom in/out the image
displayed.
Display
1
2
3
Of f
Function
Zoom in once
Zoom in twice
Zoom in 3 times
Normal Image
A
18. Subtitle Language Selection
Press [ SUBTITLE ] key on the front panel or the remote control to alter the subtitle language if
more than 1 subtitle language are available in DVD.
B
B
Note : ◆ Only DVD support this feature.
◆ For more details on subtitle language, please refer to Glossary for DVD / VCD / CD.
9
19. Angle Selection
Press [ ANGLE ] key on the remote control to alter the view angle of the playback if more than 1
shooting angle is recorded in DVD.
C
Note: ◆ Only DVD support this feature
41
DVD PLAYER
English
A
B
20. PBC Function
For VCD with play back control function, play back control (PBC) provides additional controls
on VCD playback.
1) Press [ MENU ] key on the remote control toggles PBC On / Off
A
2) Once PBC is on, playback starts from the first track of the play list.
Note:◆ When PBC is activated, fast forward, slow playback, previous / next track are all
available. No repeat nor direct track selection is available.
◆ When PBC is activated, if random playback, scan playback, search playback is
selected, PBC automatically deactivated.
21. Playback Information
During DVD & VCD playback
1) Press [ DISP ] key on the remote control, the playback info of the media is displayed on the
screen such as media playing, current time of playback, the following info is displayed at
the bottom of the screen:
9
B
●DVD Information
DVD
T:5/8
C:2/16
00:41:28
2/6
Eng
◆ T-- Title, "5 / 8" indicates that this DVD has 8 titles and the title playing back now is the fifth
title.
◆ C - - Chapter, "2 / 16" indicates that current title has 16 chapters and the chapter playing back
now is the second chapter.
◆ "00∶41∶28" indicates the current playback time of the current title
◆ " 2 / 6 Eng" indicates that the subtitle of this DVD has been recorded in 6 languages and the
language displayed now is the second, which is English.
Note:◆ For more details about Title & Chapter, please refer to “The Structure of DVD Disc”
and “The Structure of VCD/CD Disc”
42
DVD PLAYER
●During DVD playback,the playback status will be shown as following:
Front: DVD
Rear: CDC
Dolby Digital
By Pass
◆ Front: DVD — Current playing source for front zone is DVD
◆ Rear: CDC — Current playing source for rear zone is CD Changer
◆ Dolby Digital: Current playback audio encoding system
◆ By Pass: No pro logic is being used
● During VCD playback,the playback status will be shown as following:
VCD2.0
T:6/18
00:O2:18
◆ VCD2.0 - - Disc format
◆ T: 6/18 - - indicates that this VCD has 18 tracks and the track playing back now is the sixth title.
◆00∶02∶18 - - indicates the current playback time of the current track.
●During VCD playback, the information displayed for 6-channel playback is shown as below:
Front: DVD
9
Rear: CDC
MPEG
PLII Music
◆ Front: DVD — Current playing source for front zone is DVD
◆ Rear: CDC — Current playing source for rear zone is CD Changer
◆ MPEG: The decoding method applied
◆ PLII Music: Pro Logic II Music is applied.
Note: ◆ for 6-channel setup, please refer to "Alter between 2-Ch. & 6-Ch."
●During VCD playback, the information displayed for DownMix playback is shown as below:
Front: DVD
Rear: CDC
EQ: USER
Loud: OFF
◆ Front: DVD — Current playing source for front zone is DVD
◆ Rear: CDC — Current playing source for rear zone is CD Changer
◆ EQ :USER — Current EQ is set to “USER”
◆ Loud: OFF — Current Loud level is set to “OFF”
Note:◆ 2-channel setup, please refer to <Alter between 2-Ch. & 6-Ch> . For details
on loudness, please refer to <Audio Control> .
43
DVD PLAYER
English
D
G
C
F
E
B
2). Press [ DISP ] key on front panel,“Playback Time → Clock → Disc Format → Playback Time”
is sequentially displayed on the LCD screen.
A
22. MP3 / WMA Playback
When playing back a disc with MP3 / WMA files, it will take the sequence of "Root directionary"→
"Folder"→"File" to playback a file. each file contains one song or one picture usually. Please refer
to <Note On Playback MP3>.
1) file search
During the current playback of
Key Pressed
file④, enter file searching.
Current File :
File ④
Key
File ④ →
File ③
Key
File ④ →
File ⑤
Key [1][8]
File ④ →
File
B
18
2) Select play mode
Pressing [RDM] or [SCN] key on the remote control, the play mode will change as following
table:
Play mode
Normal
Repeat Single
Folder Repeat
C
Shuffle
Playback details
Playback all files in a dis and stop in the end
Repeat playback one specific file
Repeat playback all the files in a directory
Randomly playback all the files in a folder
and stop in the end
9
3) Play back files in other folders
Change the folder
① Press [ ]、[ ] key on the remote control to change the folder.
D
② Select a file
Press [ ]、[
F
E
] key on the remote control or numeric keys to select the file you want.
G
44
SD CARD
User Interface
1
SD
4
1/40
1
2
3
4
5
6
7
2
MP3
Repeat
5
01:08
00:00:27
(Root)
*** ***
**** ****
*****
****
****
3
Random
6
7
8
9
10
***
**
*******
****
** **********
Song:
PAGE-
PAGE+
DIR-
DIR+
11 ◇"1/40" - current track /total track
◇"00∶00∶27"- current track playback time
2
3
45
◇"Repeat"― single track repeat playback,it is key of the touch screen
◇"Random"―Random playback track,it is key of the touch screen
4
◇ Playback folder display
5
◇Name of the song display
6
◇"Display some information on playing file
7◇
10
◇"01:08"―Clock
◇Keys of the the touch screen:
" "―Pause playback
" "―Stop payback
"PAGE-"―Previous page file menu
"PAGE-"―Next page file menu
"DIR-"―Previous directory
"DIR-"―Next directory
SD CARD
English
D
E
C
B
F
F
1. Switch To SD Card Source
Select item [SD CARD] in MAIN MENU to enter SD card source mode.
2.Pause Playback
Press [
] key on the touch screen or remote control,or press uprightly the joystick.
B
3. Stop Playback
Press [
] key on the touch screen or [■/BAND ] key on the remote control.
C
4.Repeat Playback
Press [Repeat] key on the touch screen or [REPT] key on the remote control.
D
5.Shuffle Playback
Press [Shuffle] key on the touch screen or [RDM] key on the remote control.
10
E
6.Playback Previous/Next Charpter
Press [
]/[
F
] key on the remote control or [
]/[
] key of the joystick.
F
46
SD CARD
A
B
7. Switch The Direction
Press [ DIR+ /[DIR-]] key on the touch screen to switch previous/next direction.
8. Previous/Next Page
Press [ PAGE+ /[PAGE-]] key on the touch screen to switch previous/next page.
9. Audio Track Selection
Press [AUDIO] key on the remote control to alter audio.
A
10. Direct Chapter / Track Selection
You can use the numeric keypad on the remote control to access a track directly.
By pressing the song name showed on the touch screen directly,you can also access
a track.
B
10
47
iPod CONNECTION
English
A
B
A
B
1. Accessing iPod Mode
The unit will automatically switch to iPod mode when an iPod is connected with the unit. To
return to the iPod menu from any other source menu, press the [SRC] button on the front panel
or remote control until the iPod menu appears on the screen.
A
A
2.Controlling Your iPod
The following remote control buttons are used to access the iPod menus:
TITLE = Music
MENU = Photos
AUDIO = Videos
Use the joystick on the unit or the directional keys on the remote control to navigate the iPod
menus.
3. Music Playback
Pressing the [ ] or [ ] button on remote control or the joystick to move to the next or
previous item on the menu.
B
B
Pressing the [ ] button on the remote control or the joystick [ENTER] button on the head unit
or touching the option you desired to select the highlighted menu option.
B
B
Pressing the [ ] button on the remote control or the [ ] button on the joystick or touching the
[MENU] key on the screen to return to the previous menu.
B
Note:
11
B
◆ In the Music mode, the buttons on the iPod are disabled.
48
iPod CONNECTION
A
B
C
C
4. Photo Playback
While iPod photos can be viewed on the TFT screen, you must use the iPod to control photo
playback options.
Press the [MENU] button on the remote control or the [Photos] key on the screen to access the
iPod PHOTO mode. The unit will release control back to the iPod so you can select pictures to
be displayed on the TFT monitor.
A
To exit PHOTO mode, press the [MENU] button on the iPod.
Note: ◆Pictures can be displayed on the screen just when the picture playback mode of iPod is “slide
show”.
5. Video Playback
While iPod video can be viewed on the TFT screen, you must use the iPod to control video
playback options.
Press the [AUDIO] button on the remote control or [Videos] key on the screen to access the
iPod VIDEO mode. The unit will release control back to the iPod so you can select video media
to be displayed on the TFT monitor.
B
To exit VIDEO mode, press the [MENU] button on the iPod.
Note: ◆To transmit the images (including videos and pictures) from your iPod to the TFT screen, you must
set the following options through the iPod video settings menu: TV Out = On, TV Signal = NTSC,
and Widescreen = On.
11
6. Fast Forward/Fast Reverse
Pressing and holding the [ ] or [ ] buttons on the front panel or the remote control and the
screen for 1 second and continuing to hold for fast forward or fast reverse. To resume normal
play, release them.
C
49
C
iPod CONNECTION
English
A
7. Search Playlist/Artist/Album/Song
To search through Playlists, Artists, Albums and Songs, press the numeric buttons on the
remote control while in one of the following directories: Playlist, Artist, Album or Song. The
selected directory will be accessed with the number of pages and files in that directory
displayed at the top of the page. To access the page or file, enter the page or file number
directly from the remote control keypad. Press the [ ] and [ ] button on the remote control
or the the joystick to select the desired song or track. And you can playback the song or track
by touching the file name directly.
A
11
50
SYSTEM SETUP
System setup is available for adjustment in TUNER, DVD/CD, AUX IN, SD CARD mode.
For system settings,press [MENU/SRC] key on the panel to get ''MAIN MENU'' menu ,and then
enter "SYSTEM SETUP" item.
MAIN MENU
Multi-ZONE
SETUP
SYSTEM SETUP
SETUP
ASP
CONFIG
DVD/CD
TUNER
SD CARD
AUX IN
iPod
CAMERA
GENERAL
SETUP
RDS
SETUP
SCREEN
CAL
RGB IN
1. General Setup Menu
Accessing the General Setup Menu
DIRECTION KEYS
B
B
To access the "GENERAL SETUP" menu,press the direction key on the joystick or remote control
to highlight "GENERAL SETUP" in green.Press the [
] key on the remote control ,or press upright
the joystick to enter the "GENERAL SETUP"menu.A menu appears with the option for the first item,
"Radio",highlight in blue.
GENERAL SETUP
12
51
Radio
China
Clock Mode
24Hr
Parking
Off
Video Format
Auto
TFT Auto Open
Off
OSD Menu
English
Clock
01:06
On
Off
1) Selecting a Feature for Adjustment
Press the [ ][ ] key on the remote control or the [■PTY][■TA ] key on the joystick to select the
feature to be adjusted.
2) Adjust a Feature
①. Enter the option field for the feature you want to adjust by pressing the [ ] on the remote
control or by pressing upright the joystick .A submenu appears in a second row with the
selected option highlight in light blue.
②. Select a new value by pressing the [ ]or[ ] key on the remote control or the [■PTY] or
[■TA ] key on the joystick.
③. Confirm your selecttion by pressing the [ ],[ ],or [ ] key on the remote control,or the
[ ] [ ]key on the joystick.The new value is highlighted in light blue and setup is complete.
SYSTEM SETUP
English
2 . ASP CONFIG
In System Setup Mode, select " ASP CONFIG ". In ASP (Audio Sound Processing) CONFIG
mode,you can make five adjustments for audio.
ASP CONFIG
SYSTEM SETUP
ASP
CONFIG
GENERAL
SETUP
RDS
SETUP
Bass Center Freq
60Hz
Treble Center Freq
15kHz
SUB.W Filter
80Hz
SUB.W Phase
0D
Bass Q-Factor
1.5
SCREEN
CAL
1) Bass Center Frequency
According to the audio source of disc, select the Bass center frequency to achieve the best
Bass effect. 60Hz, 80Hz, 100Hz, 130Hz, 150Hz, 200 Hz is available for selection.
ASP CONFIG
Bass Center Freq
60Hz
Treble Center Freq
15kHz
SUB.W Filter
80Hz
SUB.W Phase
0D
Bass Q-Factor
1.5
60Hz
80Hz
100Hz
130Hz
150Hz
200Hz
2) Treble Center Frequency
According to the audio source of disc, select the Treble center frequency to achieve the best
Treble effect. 10KHz, 12.5KHz, 15KHz, 17KHz is available for selection.
ASP CONFIG
Bass Center Freq
60Hz
Treble Center Freq
15kHz
SUB.W Filter
80Hz
SUB.W Phase
0D
Bass Q-Factor
1.5
10KHz
12.5KHz
15KHz
17KHz
3) SUB.W Filter (Subwoofer Low Pass Filter)
Selecting a crossover frequency is to set a cut-off frequency of the subwoofer's L.P.F( low,
pass, filt ) and that of the "SMALL" speakers' H.P.F(high-pass-filter).Crossover frequency
setting has no effect if the subwoofer is set " OFF " and any other speaker set " LARGE ".
Please refer to <6-Channel Speaker Settings>. 80Hz,120Hz,160Hz is available for selection.
12
ASP CONFIG
Bass Center Freq
60Hz
Treble Center Freq
15kHz
SUB.W Filter
80Hz
SUB.W Phase
0D
Bass Q-Factor
1.5
80Hz
120Hz
160Hz
52
SYSTEM SETUP
4).SUB.W Phase (Phase Selection for Subwoofer)
If trying to boost the BASS output of the subwoofer doesn't do much or rather makes you
feel that BASS gets further murky,this may indicate that the subwoofer's output and BASS
content you hear over other speakers cancel each other out.To remove this problem,try
changing the phase setting for subwoofer.
ASP CONFIG
Display
Phase Setup
0D
Subwoofer Output In Phase
180D
Subwoofer Output Off Phase
Bass Center Freq
60Hz
Treble Center Freq
15kHz
SUB.W Filter
80Hz
SUB.W Phase
0D
Bass Q-Factor
1.5
0D
180D
5).Bass Q-Factor
Once the Bass Center Frequency was selected and adjusting the Q - factor alters the
sharpness of the Bass output, the larger the Q-Factor, the sharper the Bass. Selectable
Bass Q-factor was 1.0, 1.25, 1.5, 2.0
ASP CONFIG
Bass Center Freq
60Hz
Treble Center Freq
15kHz
SUB.W Filter
80Hz
SUB.W Phase
0D
Bass Q-Factor
1.5
1.0
1.25
1.5
2.0
12
53
SYSTEM SETUP
English
3 . General Setup
GENERAL SETUP
SYSTEM SETUP
ASP
CONFIG
GENERAL
SETUP
RDS
SETUP
SCREEN
CAL
Radio
USA
Clock Mode
24Hr
Parking
On
TV System
Auto
TFT Auto Open
On
OSD Menu
English
Clock
01:06
1). Radio
USA1, USA2, Arabia, China, S-America, Europe According to your country, please select
a correct radio system.
GENERAL SETUP
Radio
USA
Clock Mode
24Hr
Parking
On
TV System
Auto
USA
S.Amer1
Arabia
China
S.Amer2
Europe
TFT Auto Open
On
OSD Menu
English
Clock
01:06
Korea
2). Clock Mode
GENERAL SETUP
Display
12Hr
24Hr
Clock Mode
12 hour
24 hour
Note:◆ For details to setup clock,please refer to
Radio
USA
Clock Mode
24Hr
Parking
On
TV System
Auto
TFT Auto Open
On
OSD Menu
English
Clock
01:06
12Hr
24Hr
<Clock Adjustment> .
3). Parking
GENERAL SETUP
Display
setup
On
Image displayed only when
the car is parking
Off
Image displayed anytime
Radio
USA
Clock Mode
24Hr
Parking
On
TV System
Auto
TFT Auto Open
On
OSD Menu
English
Clock
01:06
On
Off
12
Note:◆ Please refer to <When Parking Brake applied>
54
SYSTEM SETUP
4). Video Format
Adjust according to the video system of the attached TV.
Display
Auto
NTSC
PAL
Setting
The color signal output is switched
automatically according to the
recording system of the current disc.
The color signals are output in the
standard NTSC system.
The color signals are output in the
standard PAL system.
GENERAL SETUP
Radio
USA
Clock Mode
24Hr
Parking
On
TV System
Auto
TFT Auto Open
On
OSD Menu
English
Clock
01:06
Auto
NTSC
PAL
5) . TFT Auto Open
GENERAL SETUP
Display
Setup
On
Once the unit is power on,the monitor
automatically switch on
Off
Once the unit is power on,the monitor
switch on only by pressing power on
key
Note:◆
Radio
USA
Clock Mode
24Hr
Parking
On
TV System
Auto
TFT Auto Open
On
OSD Menu
English
Clock
01:06
On
Off
Please refer to <TFT Monitor Auto Open>.
6). OSD(operation system display) Language
GENERAL SETUP
Display
ENGLISH
Setup
Menu Display in English
Radio
USA
Clock Mode
24Hr
Parking
On
TV System
Auto
TFT Auto Open
On
OSD Menu
English
Clock
01:06
English
7) . Clock Adjustment:
Method 1: Touch “+” or ”-” key on the screen to adjust the value of clock.
Method 2: Press [
Press [
]/[
]/ [
] key on the joystick to move the cursor to "Hour" or "Min" option.
] key to adjust the value of Hour or Min.
GENERAL SETUP
12
Radio
USA
Clock Mode
24Hr
Parking
On
TV System
Auto
TFT Auto Open
On
OSD Menu
English
Clock
01:06
Note: ◆All the settings above are set until [ RESET ] button is pressed ( please refer to
"Load factory-Restore Factory Default " )
55
SYSTEM SETUP
English
4 . RDS Setup
SYSTEM SETUP
RDS SETUP
ASP
CONFIG
GENERAL
SETUP
RDS
On
CT
Off
Region
Off
RDS
SETUP
SCREEN
CAL
1). RDS
RDS SETUP
Display
On
Off
Setup
Activate RDS function
Disactivate RDS function
RDS
On
CT
Off
Region
Off
On
Off
2). CT
RDS SETUP
Display
On
Off
Setup
Clock is automatically
adjusted by RDS station
Clock can't be automatically
adjusted
RDS
On
CT
Off
Region
Off
On
Off
3). Region
RDS SETUP
Display
On
Off
setup
automatically switch to RDS
station with the same PI
automatically switch to a good
station
RDS
On
CT
Off
Region
Off
On
Off
5. CAL Screen
When the touch operation is not sensitive or valid, you should calibrate the touch screen through
“CAL Screen” function.
Calibrate the touch screen just following the clew displayed on the screen after entering the “CAL
Screen” mode.
SYSTEM SETUP
12
ASP
CONFIG
GENERAL
SETUP
RDS
SETUP
SCREEN
CAL
56
DVD SETUP
Only in DVD player source,LANGUAGE, AUDIO, VIDEO, SPEAKER, RATING(Parental lock),
and Pro Logic II are available for setup. These operations can be done through remote control or
joystick.Once the DVD function set , the DVD system will be memorized . If you want to resume
the Factory Default,please refer to "Load factory-Restore Factory Default ".
SETUP
DVD SETUP
SYS SETUP
DVD SETUP
LANGUAGE
VIDEO
AUDIO
SPK CONFIG
SURROUND
FX
RATING
1. LANGUAGE
Press [ DVD SETUP ] key on the remote control to enter < DVD SETUP> mode,then select
"LANGUAGE". For details setup procedure ,please refer to the method of System Setup .
LANGUAGE
Subtitle
English
Audio
English
DVD Menu
English
1) Subtitle
LANGUAGE
Note:
13
57
Subtitle
English
Audio
English
DVD Menu
English
English
Auto
Off
◆ If a DVD supports more than 1 subtitle language, all the subtitle languages are available for
selection during playback.
◆ If the selected subtitle language was not supported by the DVD, then the default subtitle
language is used.
◆ During playback, press [ SUBTITLE ] key to alter subtitle language directly.
◆ By using[SUBTITLE]key to alter the subtitle language does not alter the correlated setup.
DVD SETUP
English
2) Audio
LANGUAGE
Note:
Subtitle
English
Audio
English
DVD Menu
English
English
◆ If a DVD supports more than 1 audio language , all the audio languages are available for selection
during playback.
◆ If the selected audio language was not supported by the DVD, then the default audio language is used.
During playback, press [ AUDIO ] key on remote control to alter audio language directly.
◆ By using [ AUDIO ] key to alter the audio language does not alter the correlated setup.
3) DVD Menu
LANGUAGE
Subtitle
English
Audio
English
DVD Menu
English
English
Note: ◆ Once the menu language is selected ,
it will be displayedautomatically when alters to MENU/TITLE.
◆ If the selected menu language was not supported by the DVD, then the default language is used.
13
58
DVD SETUP
2. VIDEO Settings
Press [DVD SETUP] key ,then select "VIDEO". For details setup procedure, please refer to the
method of System Setup.
DVD SETUP
VIDEO
LANGUAGE
VIDEO
TV Shape
AUDIO
SPK CONFIG
SURROUND
FX
RATING
16:9
Angle Mark
On
View Mode
H FIT
1) TV shape
To setup the width / height ratio of the image displayed. Two common aspect ratios are wide
screen (16:9) & normal display (4:3).
VIDEO
Setting
TV Shape
Note:
13
59
16:9
Angle Mark
On
View Mode
H FIT
4:3
Display Mode
4∶3
Normal view with 4:3 aspect ratio
16∶9
Wide view with 16 : 9 aspect ratio
16:9
◆ For normal display, please select 4∶3 , select 16∶9 may result in image distortion.
◆ This function is not available for some discs. For more details, please refer to the disc.
DVD SETUP
English
2) Angle Mark
If multi angle is recorded on a disc, an indicator is displayed on the bottom right corner of the
screen.
VIDEO
TV Shape
Note:
16:9
Angle Mark
On
View Mode
H FIT
On
Off
Display
Setting
On
Off
Angle indicator is shown
No Angle indicator
◆ Press [ Angle ] key on the remote control to change the angle of playback, for details, please refer
to <Angle Selection> .
3) View Mode
VIDEO
Display
TV Shape
FILL
16:9
Angle Mark
On
View Mode
H FIT
Original
FILL
Setting
Image display mode is FILL
Image display mode is Original
Original
H FIT
Image display mode is H FIT
H FIT
W FIT
Image display mode is W FIT
Fit to Scrn
Fit to Screen
Image display mode is Fit to Screen
Pan Scan
Pan & Scan
Image display mode is Pan & Scan
W FIT
13
60
DVD SETUP
3. AUDIO Settings
Press [DVD SETUP] key ,then select "AUDIO". For details setup procedure, please refer to the
method of System Setup.
AUDIO
DVD SETUP
Pink Noise
LANGUAGE
VIDEO
AUDIO
SPK CONFIG
SURROUND
FX
Off
DRC
Off
CNTR CTRL
0ms
REAR CTRL
0ms
Down Sampling
Off
RATING
1) Pink Noise
Use the built in pink noise to adjust each channel output volume,or verify if audio output quality
is normal by adjusting the output volume at the listening position.
AUDIO
Pink Noise
Off
DRC
Off
CNTR CTRL
0ms
REAR CTRL
0ms
Down Sampling
Off
Off
Left
Right
Display
Off
Left
Right
Setting
Stop Output Pink Noise
Left Channel Pink Noise
Right Channel Pink Noise
Note: ◆ adjust the volume for each speaker, please refer to "Alter between 2 Ch. & 6 Ch." .
2) DRC--Dynamic Range Control
Employ the dynamic range control for better playback for low volume playback.
AUDIO
Pink Noise
Off
DRC
Off
CNTR CTRL
0ms
REAR CTRL
0ms
Down Sampling
Off
Off
On
Display
On
Off
Setting
Use Bass to playback a more
dynamic playing
Normal playback
3) CNTR CTRL--Center Speaker Delay
The time difference between center Speaker and front Speakers, a proper adjustment to the
time delay produces a more accurate audio effect for listening.
AUDIO
13
Pink Noise
DRC
Off
CNTR CTRL
0ms
REAR CTRL
0ms
Down Sampling
Display
Setting
0ms
Same time output with front
Speakers
Off
Off
5ms
4ms
3ms
2ms
1ms
0ms
1ms
……
5ms
1 millisecond delay output as
compare to front Speakers
……
5 milliseconds delay output as
compare to front Speakers
Note: ◆ CNTR CTRL is available for adjustment only when center speaker is setted as
refer to SURROUND SETUP.
61
small or large ,please
DVD SETUP
English
4) REAR CTRL--Rear Speakers Delay
Setup rear speaker output delay as compare to front Speaker output,setup this function results
in a better surround sound effect.
AUDIO
Pink Noise
Display
Setting
0ms
Same time output with front
Speakers
Off
DRC
Off
CNTR CTRL
0ms
REAR CTRL
0ms
Down Sampling
Off
15ms
12ms
9ms
6ms
3ms
3ms
……
0ms
15ms
3 milliseconds delay output as
compare to front Speakers
……
15 milliseconds delay output as
compare to front Speakers
Note: ◆ REAR CTRL is available for adjustment only when center speaker is setted as
small or large ,
please refer to SURROUND SETUP.
5) Down Sampling
AUDIO
Pink Noise
Off
DRC
Off
Display
CNTR CTRL
0ms
REAR CTRL
0ms
On
Off
Down Sampling
Off
Setting
audio signal output at 48kHz
Noraml Output
Off
On
Note:
◆ No matter what the sampling frequency is , if the above selection is on , all the signal output is
48kHz , even a 96kHz signal becomes 48kHz.
◆ Non-audio output may be resulted by improper setup, please refer to"Electrical Connections
Overall Diagram" .
13
62
DVD SETUP
A
4. SURROUND SETUP
Press [ DVD SETUP ] key on remote control, then select "SURROUND SETUP" mode .
A
DVD SETUP
SPK CONFIG
LANGUAGE
VIDEO
AUDIO
SPK CONFIG
SURROUND
FX
RATING
1) 6-Channel Speaker Settings
Move the cursor to "FULL 6CH", press [
Multi-CH
Large
Stereo
None
SUB.W
Large
Center
None
] key to enter setup.
① FL/FR- Set up for front speakers
SPK CONFIG
13
63
Multi-CH
Small
Stereo
None
SUB.W
None
Center
None
Display
Setting
Large
suitable for speaker with good bass output
Small
Suitable for speaker with no good bass output
DVD SETUP
English
② RL/RR- Set up for rear speakers
SPK CONFIG
Multi-CH
Small
Stereo
Large
Display
Setting
Large
suitable for speaker with good bass output
Small
suitable for speaker with no good bass output
None
SUB.W
None
Center
None
Rear speaker is not employed
③ SW- Set up for subwoofer
SPK CONFIG
Multi-CH
Small
Stereo
Large
SUB.W
Large
Center
None
Display
Setting
Present
Subwoofer is employed
None
Subwoofer is not employed
④ CT- Set up for center speaker
SPK CONFIG
Display
Multi-CH
Small
Stereo
Large
SUB.W
Large
Center
Small
Large
Small
None
Setting
suitable for center speaker with good bass output
suitable for center speaker with no good bass output
Center speaker is not employed
2) DownMix- 2 Channel Speaker Settings
① Select "DownMix" to setup composite audio output from 2 channel speaker system。
② In multi channel mode and Dolby Pro-Logic was off, during playback PCM,VCD, MP3, audio.
output only come from both front speakers.
Note:◆ Please refer to <Alter between 2 Ch. & 6 Ch.> .
13
64
DVD SETUP
5. SURROUND FX
Pro Logic II is a dramatically improved matrix surround system based on the original Dolby Pro
Logic system. In the case of Pro Logic, there were four channels front left, center, and front right,
plus a mono surround channel that was usually split between two rear Speakers. Compared to
Pro Logic, Pro Logic II offers two full-range stereo surround channels,more sophisticated steering
logic,high channel separation and an exceptionally stable sound field. DPL II uses a simple servo
circuits used to derive the five channels. And, unlike the synthetic Jazz club, Hall and Stadium
modes found on many A/V receivers, DPL II introduces no phony delay-induced echoes, reverb,
or tonal coloration.
Press[DVD SETUP]key ,then select "PRO LOGIC II".For details setup procedure, please refer to
the method of System Setup .
DVD SETUP
SURROUND FX
LANGUAGE
VIDEO
AUDIO
SPK CONFIG
SURROUND
FX
RATING
Surround Mode
SURR Music
Panorama
Off
Dimension Ctrl
3
Center Width Ctrl
3
1) Surround Mode
With DPLII decode technology,you can have different surround sound effect.
Display
Setting
Off
Playback as the original audio output
SURROUND FX
Note:
Pro Logic
Using Dolby Pro-Logic as the
decoding method
3
SURR Matrix
SURR Movie
PLII Matrix
From mono output to surround effect
3
SURR Music
PLII Movie
Enhance movie surround effects
PLII Music
Surround Music Effects
Surround Mode
SURR Music
Panorama
Off
Dimension Ctrl
Center Width Ctrl
Off
Surround I
◆ If the playback is 2-Channel LPCM or 2-channel Dolby Digital disc, Pro Logic II is suggested to be used.
◆ To avoid poor audio output quality, please turn off Pro Logic II during playback DVD
◆ When PLII Music mode is selected,Dimension Control and Center Width are available for fine tuned to
achieve a more realistic surround sound reprocessing.
2) Panorama
Extend the audio from the front to the rear to achieve a better audio surrounding effect.Panorama
is available for adjustment only when PLII Music mode is activated.
SURROUND FX
13
65
Surround Mode
SURR Music
Panorama
Off
Dimension Ctrl
3
Center Width Ctrl
3
Off
On
Display
Setting
On
Panorama is on
Off
Panorama is off
DVD SETUP
English
3) Dimension Ctrl
By adjusting the distribution the front & rear audio output to achieve a better balanced audio
surrounding effect
Dimension Control is available for adjustment only when PLII Music mode is activated. Press
][
] key of the joystick to adjust the dimension
[
][
] key on the remote control or [
control.
SURROUND FX
Surround Mode
SURR Music
Panorama
Off
Dimension Ctrl
3
Center Width Ctrl
3
Setting Range
Effect
0
1
0-6
Audio output shift between front & rear
2
3
4
5
6
4) Center Width Ctrl
The audio output for central may come directly from center Speaker, or from left & right
Speakers-an illusion effect,or from all three Speakers by adjusting the center width. Adjusting
the center width provides a better balance of audio surrounding effect.
Center Width is available for adjustment only when PLII Music mode is activated. Press [
]
][
] key of the joystick to adjust the center width.
[
] key on the remote control or [
SURROUND FX
Surround Mode
SURR Music
Panorama
Off
Dimension Ctrl
3
Center Width Ctrl
3
0
Setting Range
1
2
3
0-6
Effect
Audio Output shift between front
speakers & center speaker.
4
5
6
13
66
DVD SETUP
A
6. RATING
DVD has built in a parental lock feature to prevent unauthorized person to view restricted disc
content
1) Setup
Parental lock is released only by entering the correct password, once the lock is released, the
rating is available for setup, The lock is open for the first time to use, please follow step 3
to 7 to setup the parental lock. To set up this lock again, please follow the steps listed below:
Press [DVD SETUP] key , then select "RATING". For details setup procedure please refer
to the method of System Setup .
DVD SETUP
RATING
LANGUAGE
VIDEO
AUDIO
SPK CONFIG
SURROUND
FX
RATING
① Select Password
Press[
][
] key on the remote control or [
cursor to "Password"
Password
____
Rating
8. Adult
Load Factory
Reset
][
] key of the joystick to move the blue
RATING
13
67
Password
____
Rating
8. Adult
Load Factory
Reset
The
lock
is active.
Theparent
parental
lock
is activate
A
A
DVD SETUP
English
A
② Enter Password to Unlock the Parental Lock
Key in the correct password (4 digit), then press [
joystick to unlock the parental lock.
] key on remote control or [ENTER] key of
RATING
Password
____
Rating
8. Adult
Load Factory
Reset
Parental Lock is Released
A
A
Press uprightly
③ Enter Rating Menu
Move the blue cursor to “Rating”, press the [
joystick, the below submenu appears
] key on remote control or the [ENTER] key of
RATING
1. Kid Safe
Password
____
Rating
8. Adult
Load Factory
Reset
2. G
3. PG
4. PG-13
A
A
5. PG-R
6. R
7. NC-17
Short press uprightly
8. Adult
④ Rating Selection
Press [ ][ ] key of remote control or [■PTY][■TA ] key of joystick to move the blue cursor.
RATING
1. Kid Safe
Password
____
Rating
8. Adult
Load Factory
Reset
2. G
3. PG
4. PG-13
A
A
13
5. PG-R
6. R
7. NC-17
8. Adult
68
DVD SETUP
A
⑤ Confirm Setting
Press [ ][ ][
of parental lock
] key on remote control or [ Enter][
][
] key of jotstick to confirm the rating
RATING
Password
____
Rating
5.PG-R
Load Factory
Reset
A
A
⑥ Apply password to secure the rating
Move the blue cursor to password, press numeric key on remote control to enter password.
RATING
Password
****
Rating
8. Adult
Load Factory
Reset
⑦ Lock up the rate setting
Press [
] key or the [ENTER] key of joystick to finish setup the parental lock.The parental lock
indicator is locked and the whole process is done.
RATING
13
69
A
Password
-----
Rating
8. Adult
Load Factory
Reset
A
Short Press uprightly
DVD SETUP
English
A
B
2) Password Changing
① In Rating menu, move the blue cursor to "Password".
RATING
Password
-----
Rating
8. Adult
Load Factory
Reset
② Press numeric key to enter correct password, press [
] key to release the parental lock.
RATING
Password
-----
Rating
8. Adult
Load Factory
Reset
③ Enter new password and press [
B
A
] key to confirm
RATING
Password
****
Rating
8. Adult
Load Factory
Reset
A
Note : ◆ Record the password and keep it in a safe place for future reference
13
◆ The rating of the disc are marked on disc, disc packing, and documentation. If the rating of
parental lock is not available in disc, no setup of the parental lock is available.
◆ Even some disks are restricted for viewing by parental lock,only portions of the content are
restricted instead of the whole. For details, please refer to disc description.
◆ Even reset factory default is executed , the settings of Password and Rating remain unchanged.
70
DVD SETUP
A
A
3) Load Factory--Restore Factory Default
① In Rating menu, move the blue cursor to"Reset".
RATING
② Press [
A
Password
____
Rating
8. Adult
Load Factory
Reset
] key on remote control or [ ENTER ] key of joystick to restore factory default setup.
A
Short Press uprightly
Note: ◆ Even " DVD setup " has been reset to factory default, " Password " and " Rating " remain unchanged.
13
71
OTHER PLAYBACK MODES
English
1. AUX IN
External peripheral could be connected to this unit via RCA output & Aux-in.
1) Select Aux-In Playback Mode
Press [ SRC ] key to alter the playback mode to AUX IN.
MAIN MENU
Multi-ZONE
A
SETUP
TUNER
SETUP
DVD/CD
SD CARD
AUX IN
iPod
CAMERA
RGB IN
2) Operation for Aux-In
For AUX IN mode details, please refer to <BASIC OPERATION> .
2. Rear View Video Camera
1) This playing mode is available only if the Rear View Video Camera is installed properly.
Reverse driving activates CAMERA playing mode. Connect the video input cable "CAMERA"
to the camera output cable for this function.Please refer to < Electrical Connections Overall
Diagram > .
2) The playing mode switches to CAMERA mode automatically while reverse driving and return
to the previous once the reverse driving is done.
3. RGB Input
This unit can accept RGB video input signal, please refer to the Wiring Illustration.
1) Select RGB video input mode
Press the [ MENU/SRC ] key on the panel, then select “RGB IN” to enter this mode. It can
also be accessed through the remote control by pressing [ SRC ] key until the RGB is selected.
2) If RGB source can output audio (mono) as well, please connect it's audio output to the unit's
audio input port. The unit can also automatically mix that audio together with the audio from
DVD, Tuner, etc. to make them being played back simultaneously.
A
A
MAIN MENU
Multi-ZONE
SETUP
TUNER
SETUP
14
DVD/CD
SD CARD
AUX IN
iPod
CAMERA
RGB IN
72
OTHER PLAYBACK MODES
B
Remote Control for Rear Zone
3. Rear Zone
If a monitor is installed in the rear zone and connected to the rear zone AV output, passengers
at the back seat is capable to enjoy an live entertainment show provided by this unit through the
operation control via the remote control for rear zone.
1) Press [ R.SRC ] key on remote control, rear zone playing mode alter according to:DVD,DVDC,
AUX IN, OFF. During the rear zone playing mode alternation, the playing mode is shown on
the TFT screen and LCD screen.
A
Long Press
B
MAIN MENU
Multi-ZONE
SETUP
Multi - ZONE
SETUP
DVD/CD
DVD
SD CARD
AUX IN
SD CARD
iPod
CAMERA
TUNER
AUX IN
STANDBY
RGB IN
Long press [ SRC ] key on front panel to start rear zone playback(the same playing mode as
the front zone except when the front is radio, the rear is DVD)
A
Long Press
B
2) Turn Off the Rear Zone Playback
Press [R.SRC] key on remote control or long press [SRC] key on front panel turn off the rear
zone playback
A
14
73
Long Press
B
MISCELLANEOUS
English
1. Dolby Digital 5.1 Surround Sound
Dolby Digital 5.1 is a surround sound system that keeps the multiple channels fully separated
throughout the AV encoding and decoding processes. In addition to having Left, Centre, Right,
Left Surround,and Right Surround these 5 channels, Dolby Digital 5.1 soundtracks carry a sixth
channel or a .1 channel that boosts the audio output with very low frequency for theater like
sound effect.
To optimize the output effect of Dolby Digital 5.1 surround sound, the following Speaker allocation
is recommended:
Front Left Speaker
Center Speaker
15
Rear Left Speaker
Front Right Speaker
Rear Right Speaker
Subwoofer
2. Useful Information about Disc
1) The structure of DVD Disc
DVD, VCD and CD disc stated in the following table can be played back with this unit, please
refer to following table for information.
Disc Symbol
DIGITAL AUDIO
TEXT
Disc Physical Properties
Maximum Playback Time
12cm /
Single Side Single Layer (DVD-5)
Single Side Double Layer(DVD-9)
12cm /
Double Side Single Layer(DVD-10)
Double Side Double Layer(DVD-18)
(MPEG 2 Method)
133 minute
242 minute
266 minute
484 minute
VCD Disc
12cm /
Single Side Single Layer(VCD)
(MPEG 1 method)
74 minute
CD Disc
12cm /
Single Side Single Layer
74 minute
2) The structure of VCD / DVD Disc
The following symbols found on DVD label and packing show the functions and options
available in discs.
74
MISCELLANEOUS
Symbol
8
32
15
9
16:9 LB
Meaning
Number of voice languages recorded with the audio function.The number in
the icon indicates the number of voice languages.(Max. 8 languages.)
Number of subtitles languages recorded with the subtitle function.The number
in the icon indicates the number of subtitle languages.(Max.32 languages.)
Number of angles provided by the angle function.The number in the icon
indicates the number of angles.(Max.9 angles.)
Aspect ratios that can be selected."LB"stands for Letter Box and"PS"for
Pan/Scan.In the example on the left,the 16:9 video can be converted into
letter box video.
Indicates the region code where the disc can be played.
75
MISCELLANEOUS
English
3. Note on Playback Mp3
1). Media compatibility
This player allows you to playback MP3 files recorded on CD-ROM,CD-R and CD-RW.For
CD-RW disc format,please make sure it is formatted by full method but not quick method to
prevent illegal disc operation.
2). MP3 format compatibility
(1). All the file naming format listed below are compatible, file and folder naming format is
listed below in the bracket
◆ ISO 9660 Level 1(file name : 12 characters; file extension : 3 characters)
◆ ISO 9660 Level 2(file name : 31 characters; file extension : 3 characters)
◆ Joliet(64 characters)
(2). regarding symbol displayed, please refer to “File & Folder Name Input”.
(3). If file name or folder name does not conform to ISO 9660 file system, it may not be
displayed correctly nor be normally played back.
15
3). Settings for MP3 encoder and CD writer
(1). Do the following seting when compressin g audio data in MP3
◆ Transfer Bit Rate : 8-320kbps;
◆ Sampling Frequency:16,22.05,24,32,44.1,48kHz
(2). when recording MP3 up to maximum disc capacity using CD writer, disable additional
writing. For recording on an empty disc up to maximum disc capacity, use "Disc at once"
setting.
4). File & Folder Name Input
(1). If file name or folder name does not conform to ISO 9660 file system, it may not be
displayed correctly nor be normally played back.If a differen CD recorder engaged,it
may not be displayed correctly.
(2). Only file with "MP3" as the file extension may be played back.
5). Reading MP3 file from media
(1).Too many folders or files other than MP3 recorded on a disc consumes more time to start
a playback of MP3 file. File or folder searching may not be accessible.
(2). Besides,when playback a next MP3 file,it may consumes more time or files and folders
searching may not be accessable.
6). Note on playback MP3
76
MISCELLANEOUS
(1). Never try to rename a non - mp3 file into a file with mp3 name extension. Otherwise, this unit
playback this non-mp3 abnormally.
(2). Never playback non-MP3 files.
7). Note
15
(1). During playback or file searching, playback according to the disc recording sequence.
Sometimes, the predicted playback sequence is not as the actual playback sequence.
(2). Playing list function is not supported. Record files and folders in the order you want them to be
played or using some software to specify the recording order by adding prefix " 01 " to " 99 " to
the file name.
(3). file and folder order and file search
For example,a medium with the following folder / file hierarchy is subject to File Search as
shown below.
Example of a medium's folder/file hierarchy.
(
)
0
Folder
File
1
Root Folder
2
1
2
Searching for another mp3 file when
playing
4
3
Key pressed
3
Key
4
Key
5
6
4
7
5
8
9
6
7
10
Layer 1
77
Layer 3
Layer 5
Layer 4
Layer 2
(Current file in playing:
The beginning of a file
5
6
4
4
)
3
MISCELLANEOUS
English
4.The Structure Of DVD Disc
DVD has different titles and the titles subdivide into different chapters.
For AV program, a single work (such as filming information, the theme of the movie) has a single
TITLE,For Karaoke disc ,each chapter is a single song.But some of the disc are not recognized
as per this method, notice its different when using "search" function.
15
5.The Structure Of VCD / CD Disc
For VCD,CD,MP3 discs, the discs are divided into tracks and each track carries a song. Index
number may be used for each tracks to distinguish each other in some certain discs.
6.Glossary
1)Dolby AC-3 (Dolby Digital)
A true surround sound system that offers up to 6 discrete channels: 2 front(left & right), 2 rear
(surround left & surround right), 1 center,and 1 subwoofer. These Channels are often specified
as 5.1 as subwoofer only count as " 0.1 " channel.The channels are compressed using lossy
audio compression algorithm and then packed into a bitstream.
2 ) Line PCM(LPCM)
Line PCM ( Pulse Code Modulation ) is an uncompressed audio format that is similar to CD
audio, but with higher sampling frequencies and quantizations.LPCM offers up to 8 channels of
48 kHz or 96 kHz sampling frequency and 16 , 20 or 24 bits per sample but not all at the same
time . LPCM provides better audio quality as compare to CD audio using 44. 1kHz and 16 bits.
LPCM offers high quality (similar to DVD-Audio) but its high data rate leaves little bandwidth for
video on a DVD video disc. The audio signal is converted to digital data and recorded in two
channels without and compression.Due to the larger capacity DVD is as compare to CD's,more
data with better accuracy could be stored implies better quality audio DVD may have over CD's.
78
MISCELLANEOUS
15
3) HDCD
High Definition Compatible Digital(HDCD)is a patented encode/decode process for delivering
the full richness and detail of the original microphone feed on Compact Discs and DVD - Audio.
HDCD-encoded CDs sound better because they are encoded with 20 bits of real musical
information,as compared with 16 bits for all other Cds. HDCD overcomes the limitation of the
16-bit CD format by using a sophisticated system to encode the additional 4 bits onto the CD
while remaining completely compatible with the existing CD format. HDCD provides more
dynamic range, a more focused 3-D soundstage,and extremely natural vocal and musical
timbre. With HDCD, you get the body, depth, and emotion of the original performance not a flat,
digital imitation.
4) Pro Logic II
Pro Logic II is a dramatically improved matrix surround system based on the original Dolby
Pro Logic system, In the case of Pro Logic, there were four channels front left, center, and front
right, plus a mono surround channel that was usually split between two rear Speakers.
Compared to Pro Logic, Pro Logic II offers two full-range stereo surround channels, more
sophisticated steering logic, high channel separation and an exceptionally stable sound field.
DPL II uses a simple servo circuits used to derive the five channels. And, unlike the synthetic,
Jazz club, Hall and Stadium modes found on many A/V receivers, DPL II introduces no phony
delay-induced echoes, reverb, or tonal coloration.
5) Multi Angle Playback
DVD may contain scenes that have been shot simultaneously from different angles,a scene
then could be selected for viewing from different angles during its playback.
6) Region Code
Region 1: USA, Canada, East Pacific Ocean Islands;
Region 2: Japan. West Europe. North Europe. Egypt. South Africa. Middle East;
Region 3: Taiwan. Hong Kong. South Korea. Thailand. Indonesia, South East Asia;
Region 4: Australia, New Zealand,Mid, south America,South Pacific Ocean Islands/Oceania
Region 5: Russia. Mongolia. India. Middle Asia. East Europe. North Korea. North Africa.
North West Asia
Region 6: Main Land China.
79
MISCELLANEOUS
English
7. Caution Of Disc Using
1) Avoid using irregular shaped disc
1
15
2) Disc cleaning
Use a dry, soft cloth to wipe the disc from
center outward, only neutral detergent may
be used.
2
3) Preparation for new disc using
Edges of new disc are rough,using pencil edge to clean up those rough spots are recommended.
Rough Edges
Rough Edges
3
80
TROUBLESHOOTING
When problem occurs, please refer to this guide for solution. If the problem is not mentioned here
or the problem still exists, please consult a professional car audio shop.
General
Symptom
16
The unit is not able to
be Power On.
remote control
doesn't work.
Cause
Remedy
Bro ken Fuse.
In sta ll a new fu se with corre ct ra ti ng.
Fuse of car battery broken.
Install a new fuse with correct rating. Check the
connection.
Il legal opera ti on or oth er fa cto r th at
causes th e MCU illegal opera ti on.
Use a pin to press the RESET key located in the
right corner of front panel. Regarding restart the
unit after reset factory default, please refer to
"System Reset " .
Battery is running out.
Replace the empty battery with new ones.For more
details, please refer to "remote control" .
Battery are inserted in improper direction.
Improper Audio Output Connection.
Too low volume adjustment.
Insert battery in correct direction.
Refer to [Equipment connection] of this
manual.
Increase volume adjustment.
No /
Low
audio
output.
Poor Sound quality or
Sound distortion.
“Improper MUTE connection.
Damaged Speakers.
Replace with good Speakers.
Heavily biased volume balance.
Adjust the channel balance (Fader / Balance) to the
center position.please refer to <audio control> .
For some disc, 96KHz Output is not allowed to be
used.
Change th e outp ut to 48KHz (p lease re fe r
to <LPCM 48K DS> ).
Wiring of Speaker is in connect with car.
Use insulati ng ta pe fo r wirin g connecti ons.
Piracy disc is used.
Speaker power rating does not fit into this unit
output power.
Connect to Speakers with appropriate power rating.
Share d Speaker connecti ons.
Speaker is shorted.
Tel-mute malfunction.
The unit reset factory
default itself when the
engine is off.
81
Check the MUTE connection.If a phone is not installed,
please leave the MUTE cable open. Please refer to
<Electrical Connections Overall Diagram> .
MUTE is grounded.
Incorrect connection between ACC and positive
wire of battery.
Use original copy.
In dependent Speaker connecti ons.
Check Speaker contact.
Make sure MUTE connections are not grounded and
are properly insulated. Please refer to < Electrical
Connections Overall Diagram> .
Connect the ACC and B+ leads according to
<Electrical Connections Overall Diagram> .
TROUBLESHOOTING
English
TFT Monitor
Symptom
Monitor cannot be
automatically open.
Cause
Remedy
TFT Auto Open was off.
Set TFT Auto Open to on.For details, please refer
to"TFT Auto Open" .
Wrong connection to parking brake cord.
Connect the parking cable according to <Electrical
Connections Overall Diagram> .
PRK SW is activated and the parking brake is
not engaged.
Stop the car is a safe place, engage the parking
brake to resume display. please refer to"When
Parking Brake Engaged" .
No image.
The TV system of DVD playing and the TV system
setting of this unit is not consistent.
Flashing image and
image interference
apprears on screen.
Wrong video system description of DVD.
Setup according to the Video system of the disc,
please refer to"TV system" .
Improper / Damaged video signal connections.
Check all video signal connections thoroughly,
and connect all the cables according to<Electrical
Connections Overall Diagram> .
Prolonged image,
Invalid Height / Width
Ratio display.
Improper aspect ratio setup.
Use correct aspect ratio for viewing, please refer
to "Aspect Ratio" .
ATTENTION is
displayed continuously
on the monitor screen.
Parking Enable is activated.
Deactivate Parking Enable by select this option
to OFF. For details, please refer to "When
Parking Brake Engaged".
Illegal operation.
Restart this unit.
Monitor Image illegal
display.
Monitor stop at
improper position.
Moving Path is blocked.
16
Setup to the unselected Video system, please
refer to"TV system".
Press key to loading in/out the monitor again to
resume normal mechanical movement. pleaser
refer to" Monitor Movement Mechanism" .
Radio Tuner
Symptom
Too weak radio
station searching.
Cause
Remedy
Auto antenna is not fully extended.
Connect the Auto antenna control cable properly.
Improper connection of auto antenna.
Connect the Auto antenna control cable properly.
LOCAL function is activated.
Switch off LOC function.
82
TROUBLESHOOTING
DVD Player
Symptom
Cause
Remedy
Disc cannot be inserted.
Disc is stationed inside the unit.
Eject the disc and insert again.
Disc is scratched / damaged.
Use disc with good condition.
Disc cannot
be playback.
16
Disc is too dirty / wet.
Clean disc using a soft cloth.
Laser pickup is dirty.
Clean laser pickup by cleaning disc.
Incompatible disc is used.
Use compatible disc.
Disc rating exceeds the parental lock rating limit.
Select the rating of parental lock to proper setting.
Disc is inserted upside down.
Insert the disc in proper face.
The region code of the disc is not compatible
Use only disc with region code the same as of this unit.
with this unit.
No Display Message.
No audio / subtitle
alternation is available.
No angle alternation
is available.
Display message is not available in the disc.
The disc do not have any display message. Please
refer to <Playback Information> .
Only 1 audio / subtitle is available in disc.
Only available to multi language/subtitle disc.
No alternative angle is available for the current
scene of the content.
Only 1 angle was recorded in the disc.
Image blurred,
distorted, dark.
PBC can't be used
in VCD playback.
No repeat, searching
in VCD playing.
Disc is copyright protected.
Alternative angle is not available with the disc,
only can playback with single angle.
Select the alternative angle disc to playback.
Use original disc copy.
No PBC is availiable in that VCD.
PBC operation can not be perform in case the VCD
do not has this function.Please refer to<PBC
Function> .
PBC is on.
Turn off PBC. please refer to <PBC Function> .
MP3
Symptom
Cause
MP3 can't be played
back.
Disc is scratched / too dirty.
Disc is too dirty or scratched.
Interruption occurred
during playback.
83
Remedy
Clean the disc.
Clean the disc.
file is damaged.
Use file in good condition for playback.
Bad recording.
Record again or use file in good condition. please .
Incorrect playback
time displayed.
Depends on the recording.
Incorrect playback
message displayed.
Message is longer than theLCD display
allowed.
TROUBLESHOOTING
English
Miscellaneous Info
Message Displayed
Cause
Remedy
Loading
Disc is being read.
Disc is very dirty
Clean disc
No Disc
Disc is upside down
Place disc where disc symbol face upward
No disc inside the loading
compartment
Insert Disc
Disc is very dirty
Clean disc
Disc is upside down
Place disc where disc symbol face upward
Bad Disc
Unkown Disc
Region Error
Error
Disc format is not compatible with this
unit.
16
The DVD is not compatible to the
region code of this unit
Illegal mechanical operation.
Press the [RESET] Key on the front panel
to restore the unit.
84
REMOTE CONTROL
1. Note
◆Use "button shaped" lithium battery "CR2025" (3V) only .
◆Do not recharge, disassemble, heat or expose the battery in fire.
◆Remove the battery from the remote control or insert a battery insulator if the battery has not
been used for a month or longer
◆Do not store the remote control under direct sunlight or in high temperature environment, the
controller may not function properly.
◆Insert the battery in proper direction according to the (+) and (-) poles.
2. Uninstall Battery
17
Slide out the battery compartment tray at the
bottom on the back of the remote control.
Pull out
85
3. Install Battery
Use only " button shaped " lithium battery
"CR2025" ( 3V ), insert the battery to the
battery tray in proper direction according
to the (+) and (-) poles.
Push in
ELECTRICAL CONNECTIONS
English
Note
●This unit is designed to be used in a vehicle with a 12-volt battery and negative grounding.Before
installing this unit to a recreational vehicle, a bus, or a truck, make sure the battery voltage is
appropriate for this unit to be used, otherwise, install a transformer by professional to convert the
output voltage to 12V
●To avoid short circuit in the electrical system, ensure the negative battery cable is disconnected
before installation.
●To prevent short circuit in the wiring and damaging to this unit,secure all wirings with cable clamp
or adhesive tape. Route the wirings in a secured, out of heat place without touching any moving
parts such as gear shift,handbrake,and seat rails to prevent the wiring insulation being melt/wear
off.
●Never pass the yellow power cord through the installation hole into the engine compartment and
connect to the car battery. Otherwise, a high possibility of serious short circuit to the electrical
system may be occured.
●Replacing a new fuse with 10A rating when the old one is broken, using no fuse or fuse with
improper rating may cause damage to this unit or even fire. If a proper fuse is installed and
electrical problems still occur, please consult any professional car shop for inquiry.
18
●Don't connect other equipments to the car battery to avoid battery overheating
●Please make sure all the wiring connections & the cables of the Speakers are well-insulated.
Otherwise, this unit may be damaged by short circuiting.
●If there is no ACC available,Please connect ACC lead to the power supply with a switch
●If an external power amplifier is connected, please don't connect P.CONT lead to the power lead
of the external power amplifier,otherwise, electric spark or other damage may be resulted.
●Never ground the speaker output to prevent the damage to the built-in power amplifier
●The minimum rating of the speakers connected to this unit is 50W with 4 to 8Ω impedence
86
ELECTRICAL CONNECTIONS
1. Parking Brake Cable Connections
Parking Brake Lead
Green Wire
2A
Battery
Brake Light
Car Frame
Note : For Safety purpose,professional installation for the following connections is
recommended.
18
Parking Brake Switch
Parking Brake Switch
2. Reverse Drive Camera Display Cable Connections
Reverse Driving Signal Light
Car Frame
Pink Cable
Reverse Driving Cable
Car Battery
P
R
N
D
2
L
Gearbox
3. Electrical Connections Overall Diagram
87
Car Frame
INSTALLATIONS
English
1. Standard Accessories
NO.
Item
1
Quantity
NO.
Item
Short Mounting
Bracket
2
6
Screw
M4.0X3.0
4
2
Screw Jacket
1
7
Trim Ring
1
3
Screw
M5.0
2
8
Remote Control
For Front Zone
1
4
Screw
M5.0X5.0
4
9
Remote Control
For Rear Zone
1
5
Bolt
M5.0X24.0
1
10
16 PIN
Harness Cable
1
Diagram
Diagram
Quantity
2. Note
1) Before installation,please make sure proper connections are conducted and the unit operates
normally. please refer to "Electrical Connections Overall Diagram", improper connection may
result in damage to the unit.
2) Use only accessories design & manufacture for this unit, other unauthorized accessories may
damage this unit.
19
3) Before installation, please fasten all the power cables.
4) Never install the unit close to hot area to prevent damage to electrical components such as the
laser head
5) Install the unit horizontally. Install the unit
more than 30 degree vertically may result
worse performance.
30°
(Maximum
Angle)
Installation Angle
6) Connect the unit to the battery negative
pole to prevent electric spark.
Connect to negative pole
7) Do not block the cooling fan exit to ensure
sufficient heat dissipation of this unit, failure
to do this may result in damage to this unit.
No installation where the fan is blocked
88
INSTALLATIONS
3. Installation Procedure
1) Main Unit
Method A: Mounting Bracket
Dashboard
Rubber Sheath
M5 X 24
Mounting Bracket
M2 X 2
Long Assemble Bar
19
(Picture 1)
① Insert mounting bracket into dash board, choose appropriate mounting tab according to the
gap width,bending the mounting tab outwards with a screwdriver to fix the mounting bracket
in place.
②.use 2 pieces of M5×5 cone shaped
screw to fix two assemble bars on
both sides of the unit(see picture 2)
Long Assemble Bar
③.screw in 1 piece of M5×24 to the hole
of the unit back and put on a rubber
sheath over the screw.(see picture 1)
M5 X 5
(Picture 2)
④.insert the unit into the bracket,fasten the M4×6 screw to the fireproofing board available at
the back of the dashboard, and use 4 pieces of M2×2 screw to lock the assemble bars and
the mounting bracket in position.
Note: According to the depth of the opening, use different length of assemble bar accordingly.
If the opening is too shallow,the monitor may be extended out 10mm from the dashboard.
89
INSTALLATIONS
English
Method B:
M5 X 5
1
1
Mounting Frame
Dashboard
①. Insert this unit directly to the opening of the dashboard
②. Place M4 × 3, M5 × 5 cylindrical screw or M5 × 5 cone shaped screw through the holes of the
mounting frame located inside the opening to holes of the unit and fasten the screws to left &
right
2) Trim Ring
Attach the trim ring around the front panel with two indentions on one side facing upwards
19
Indentions face
upwards
Trim Ring Installation
Diagram
90
INSTALLATIONS
4 . Uninstallation Procedure
1) Trim Ring
① Push the trim ring upward and pull out the upper part.
② Push the trim ring downward and pull out the lower part.
2) Main Unit
19
① Uninstall the trim ring.
② Unscrew the 4 pieces M2×2 screws.
Remove the rubber sheath
Unscrew 4 attached
screws
③ Use a screwdriver to bend straight the bended mounting tab and tip out the unit from the
mounting bracket.
④ Pull out the unit from the mounting bracket with both hands.
91
SPECIFICATIONS
English
Audio
General
Operation Voltage:
DC 12V
Operation Voltage Range: 10.8~16.0V DC
Maximum Operation Current:
10A
Grounding System:
Car Battery Negative Pole
Installation Dimension(W×H×D):
178 mm×50mm×(165+25)mm
Installation Angle:
Vertically
0°~+30°
Horizontally ±15°
Net Weight:
2.3 kg
FM
Signal Noise Ratio:
55dB
Residual Noise Sensitivity(S/N 30dB): 20dB
Frequency Response(±3dB):
40Hz~12.5KHz
Station Seeking Level :
20~30 dBuV
Distortion:
1.5%
Stereo Seperation(1 KHz):
20 dB
Antenna Impedence:
75Ω
AM
Residual Noise Sensitivity(S/N 20dB): 40dB
Amplitute(±9KHz):
18dB
Audio Output Impedence:
100Ω
Audio Output Level:
≥2.5Vrms
(uner normal audio input level at maximum
output volume)
Video
Normal Video Input Level:
1.0±0.2V(CVBS),700mV(RGB)
Video Input Impedence:
Video Output Impedence:
Video Output Level:
(under normal video inputlevel)
75Ω
75Ω
1.0±0.2V
TFT Monitor
Screen Diagonal:
7 inch
Usable Display Area: 154.08 (W) × 86.58 (H)
Resolution:
1440 (W) × 234 (H)
Brightness:
350cd/m
(measure the center brightness after 30
minutes)
Contrast:
350( TYP. )
Response Time: Rise=11ms,Decline=22ms
Viewing Angle:
From Top = 30°
From bottom = 60°
Horizontally = +-60°
LCD Life Cycle:
8000 hours(at 25℃)
20
DVD Player
Environment
Signal / Noise Ratio:
Dynamic Range:
Distortion(line out):
Frequency Range(±3dB):
Maximum Output Power:
Loaded Impedence:
90 dB
90 dB
0.1%
20Hz~20KHz
45W×4
4Ω
Operating Temperature:
Storing Temperature:
Operating Humidity:
Storing Humidity:
-20℃~+70℃
-30℃~+80℃
45%~80%RH
30%~90%RH
AUX IN
Distortion:
0.5%
Frequency Response(±3dB): 20Hz~20KHz
Audio Input Level:
1.0 Vrms
※Specifications are subject to possible modifciations for improvement without further notice.
92