1
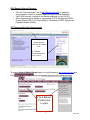
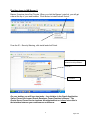
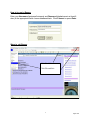
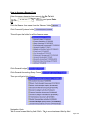
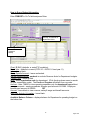
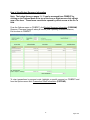
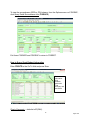
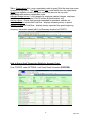
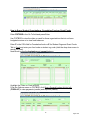
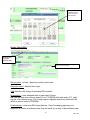
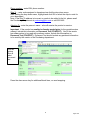
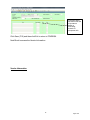
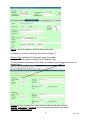
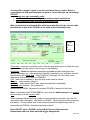
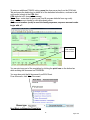
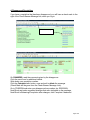
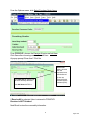
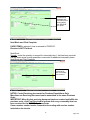
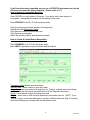
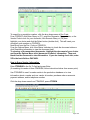
BANNER FINANCE
USER MANUAL
EASTERN KENTUCKY UNIVERSITY
1
April 2011
2
April 2011
TABLE OF CONTENTS
ACCESS TO BANNER PRODUCTION 3
TRAINING INFORMATION 3
SUPPORT (EKU BANNER HELP) 4
BANNER ADDRESS/LOGON/EXIT 4-6
ACCOUNTING/BUDGETING
INTRODUCTION TO BANNER FINANCE 7
HOW TO ACCESS A BANNER FORM - BANNER MAIN MENU 8
CREATING A PERSONAL MENU (MY BANNER) 9
HOW TO QUERY BUDGET INFORMATION - FGIBDST 10-13
FRIGTRD - GRANT TRANSACTION DETAIL 14-15
FGITBSR - TRIAL BALANCE SUMMARY 15
PURCHASING
FPAREQN - CREATING A PURCHASE REQUISITION 16-22
- DOCUMENT TEXT (vendor quote) 17-18
- ITEM TEXT (commodity description) 20
SHARING COST OF COMMODITY ITEM 23
DELETING AN INCOMPLETE REQUISITION 24
COPYING A REQUISITION 24
GUAMESG - DISAPPROVED REQUISITIONS 25
FPARCVD - RECEIVING GOODS 26-28
DELETING INCOMPLETE RECEIVERS 29
CENTRAL STORES
FSAREQN - CREATING A CENTRAL STORES REQ 29-30
LOOKUP TOOLS
HOW TO VIEW DOCUMENTS AND THE HISTORY (FOIDOCH) 30
FTMVEND – VENDOR ID’S 31
FTVACCT – ACCOUNT CODES 32
FTVCOMM - COMMODITY CODES 32
3
April 2011
Access to Banner Production
The Banner Access Form is available on the web at http://www.forms.eku.edu/.
Click
. Complete the Banner access form and mail to Budgeting Office,
Jones 118, CPO 43A, or Fax 2-8294. Budgeting staff will sign and mail the form to Banner
Security, Perkins 345 (or fax to 2-1738).
ITDS Security will email user with access granted and include the Banner username
and generic password. The password can be changed on GUAPSWD and should be at
least 8 characters long. The first character must be a letter and the password must
contain at least one number.
An updated Banner access form signed by your supervisor is required if:
• a user’s job responsibilities have changed
• position or department has changed
• employment status has changed
To update an existing Banner account:
• Fax or mail updated Banner access form
OR
• Submit a request through (Footprints) at http://banweb.eku.edu
Click the footprints login
.
Training Information
Before access to Banner Finance is granted, a user must attend Banner Navigation
101 & F04 - Requisition and Receiving.
Finance EKU Direct Self Serve training is offered; but is not required in order to gain
access. In EKU Direct training, users gain skills to query budget balances, transactions,
purchase order activity, learn how to view and approve documents.
Descriptions for these courses are at: http://www.itds.eku.edu/training/
workshop_info.php.
Where to register for Banner training
•
Go to the banner web page at http://banweb.eku.edu and click the link for
OR
•
Go to http://www.it.eku.edu/training/. Click
Instructions to register
•
Click class link in calendar.
• Use your ekey (i.e. tiptons) to logon.
•
•
Submit a training reservation.
You will get an email confirmation, once
you have registered.
4
April 2011
EKU Banner Help and Support
•
•
•
Click the “Documentation” link at http://banweb.eku.edu to view/print
documentation related to systems supported by the Banner helpdesk.
Call 2-3000 and ask to speak to the Banner helpdesk (or call 2-8101).
Other important phone numbers: Accounting (21810); Budgeting (26260);
Central Stores (23517); ProCard (28246); Purchasing (21482); Sponsored
Programs/Grants (23636).
SCT Banner offers the following help:
Online Help to view
documentation
related to the Banner
form.
SCT Banner
Documentation for
every system.
To access Internet Native Banner open your web browser to http://banweb.eku.edu and
Click
. We recommend going through Internet Explorer.
Click Banner
Production
Logins
5
April 2011
First time logon to INB Banner 8
Banner 8 requires Java Sun Plug-ins. When you click the Banner Login link, you will get
a bar at the top of your web browser. Click the bar to install ActiveX control.
From the IE – Security Warning, click install and click Finish.
1. Check box ‘Always trust
content from this publisher.’
2. Click Run.
On your taskbar you will have two tasks: Java Initiator is the Oracle Application
Server Forms Service and Oracle Developer Forms Runtime is Banner. The
Oracle Server Forms Service task can be minimized but not closed since this is
the interface between your web browser and Banner.
6
April 2011
How to log on to Banner
Enter your Username (lastname firstname) and Password (alpha/numeric at least 8
char) in the appropriate fields. Leave database blank. Click Connect or press Enter.
Ways to exit Banner
Click Black X icon
Click File and Exit
7
April 2011
Introduction to Banner Finance
Welcome to Eastern Kentucky University’s Banner Finance System. The instructions
within this manual are intended to assist you in obtaining budget information, ordering
goods or services from a vendor, receiving delivered goods and ordering stock items
from Central Stores.
Terminology for Finance Users
FOAPAL - Accounting Distribution
Fund -
(Where) Specific source of monies
ex. 110000 – Current Unrestricted E & G (Education & General)
Organization – (Who) Department or Grant (Budget) Code
ex. 100000 – President
Account –
(What) Classification of Expenditures
ex. 710800 - Office Supplies
Program -
Specific purpose
ex. 10 – Instruction
Activity –
Used for reporting; Special Projects
ex. 9XXXXX - Faculty
Location Req – Requisition
PC – ProCard
Physical place or site used by Fixed Assets for inventory
ex. PK301 – Perkins Building, Room 301
PO – Purchase Order
I – Invoice
Direct Pay – Invoice
Y - Receiver
Commodity - a type of good or service purchased from a vendor.
Charts of Accounts
The organization codes reside on the Chart of Accounts (COA). Department, Grant and
Student organization codes are found on Chart E. Most Banner forms have a default of
“E” for COA.
•
•
E
F
Eastern Kentucky University
Foundation
8
April 2011
How to Access a Banner Form
Enter the seven-character form name in the Go To field
and press Enter
OR
Click the Banner form name from the ‘Banner’ folder
.
Click Financial Systems folder
This will open the folder for all the finance areas:
Click General Ledger
Click General Accounting Query Forms
Then you will get a list of forms:
Navigation Hints:
Tab to move forward field by field. Shift + Tab to move backward field by field
9
April 2011
Next Block to see data after key block info has been entered or to display the
continuation of the form. If tabbing does not take you to the desired field, then next
block. Rollback to get back to the top of an inquiry form (i.e. FGIBDST).
Creating a Personal Menu (My Banner)
Enter form name in the Go To box
Right click within the form.
You should receive a box like this:
Click ‘Add to Personal Menu.’
Maintain, add or delete from your ‘My Banner Folder’
Enter GUAPMNU in the Go To field and press Enter.
Enter the Banner Form Name in the first object field
(i.e. FGIBDST).
Press the Down Arrow to add additional forms. The title of the form defaults into the
description field. (To edit the description, click the description and make changes.)
Click save (F10).
Click exit.
10
April 2011
Log off and back on to refresh the “My Banner” folder OR click the menu link on the
right hand side to refresh the list.
.
To access the form, open My Banner folder, double click on the form.
To delete an existing form on GUAPMNU, click the Record menu and click Remove.
11
April 2011
How to Query Budget Information
Enter FGIBDST in Go To field and press Enter.
Normally, unchecked for
department ORGs.
Account Type Column:
R-revenue
E–expense
L-liability
Chart E (EKU) defaults, or enter F (Foundation).
Fiscal Year - defaults to current (07/01/10 – 06/30/11- fiscal year 11).
Index – leave blank.
Query Specific Account – leave unchecked.
Include Revenue Accts - uncheck to exclude Revenue Accts for Department budgets.
Commit Type – leave at Both.
Orgn - enter organization code for department. (Click the drop down menu to search
for your organization code). The Fund and Program will default from org code.
Account - enter 700000 to view operating expenses only for department orgs without
revenue accounts - employee salaries & wages pool account is 610000. Employee
benefits pool account is 620000.
OR
Account - leave blank to view revenue, salary & wage and benefit accounts.
Acct Type, Activity, & Location – leave blank.
Available Balance Column – displays balance for Department’s operating budget on
the bottom line.
12
April 2011
How to View Budget Summary Information
Note: The budget forms on pages 11- 13 can be accessed from FGIBDST by
clicking on the Options Menu at the top of the form or Right-mouse click a blank
area of the form. These forms can also be opened by direct access at the Go To
field.
From the Options menu on FGIBDST, click Budget Summary Information (FGIBSUM)
Revenue, Personnel (wage & salary & benefit) and Operating available balances;
Exit to return to FGIBDST.
To view transactions by account code, highlight a specific account on FGIBDST and
from the Options menu click Transaction Detail Information (FGITRND).
13
April 2011
14
April 2011
To view a requisition, purchase order or an invoice from FGITRND, click Query
Document (by Type) from the Options menu and next block to view information within
the document.
Document codes that are common on the transaction detail information include:
R0000000 - purchase and central stores requisitions
P0000000 - purchase orders
I0000000 - invoices (regular & direct pay)
PC000000 – procard
Transaction types that are common on the detail information include:
HGNL – HR Payroll
REQP – requisition
PORD/POLQ - purchase order
INNI - direct pay invoices
MCST - computer store
MPRT – printing services
The column entitled Fld on FGITRND indicates the money usages by transaction. The
most common codes for the Fld column include:
RSV - reserve - requisition
ENC - encumbrance – requisition or purchase order
YTD - year to date amount for every transaction
OBD - original budget
To view outstanding encumbrances (requisitions and purchase orders) for your
Organization, from the Options menu on FGIBDST, click Organization Encumbrances
(FGIOENC).
15
April 2011
To view the encumbrance (REQ or PO) balance, from the Options menu on FGIOENC,
click Query Detail Encumbrance Info (FGIENCD).
Exit forms FGIENCD and FGIOENC to return to FGIBDST.
How to Query Grant Budget Information
Enter FRIGITD in the Go To field and press Enter.
Fund
Information:
Click
Rollback,
checkmark
Fund
Summary and
Next Block.
Chart of Accounts – defaults to E (EKU).
16
April 2011
Tab to Organization field – enter organization code for grant (Click the drop down menu
to search for org code). The Fund and the Prog codes default from the organization.
Grant code defaults; normally the grant code is the same as the org code.
Next Block after entering organization code.
Adjusted Budget column – pool budgets for employee salaries & wages, employee
benefits, operating expenses & F&A (Facilities & Administrative) cost.
Activity column – money that has been expended for purchases, salaries etc.
Available Balance column/Net Total Row – displays remaining money to spend.
Activity Column/Net Total Row – displays money expended from grant beginning.
Summary information viewed with Fund Summary checked on FRIGITD.
How to Query Grant Transaction Details by Account Codes
From FRIGITD, under OPTIONS - click Grant Detail Information (FRIGTRD).
17
April 2011
How to Query Student Organizations, Foundation Funds or Grant Funds
Enter FGITBSR in the Go To field and press Enter.
Use FGITBSR to view the claim on cash for those organizations that do not have
budgeted monies or to view fund balances.
Enter F in the COA field for Foundation funds or E for Student Orgs and Grant Funds
Tab to Fund and enter your fund code or student org code (click the drop down menu to
search for fund).
Next Block to view the beginning and current balance.
Highlight the Claim on Cash account.
From the Options menu on FGITBSR, click Query General Ledger Activity Info
(FGIGLAC) to view payments (credits) and deposits (debits).
18
April 2011
How to Create a Purchase Requisition
Enter FPAREQN in Go To field and press Enter.
NOTE: Purchase Reqs are not for ordering
paper from Central Stores. Central Stores
Req instructions are on page 29.
On FPAREQN click Next Block for the banner system to generate a requisition number.
NOTE: Do Not Create or Assign your own Requisition Number.
Click ‘Next Block’ for the Banner system to generate a
requisition number OR you can type the word “NEXT” in
the Requisition field; then ‘next block.’
Ctrl PageDown is the keystroke equivalency.
Click the ‘Block’ Menu and click Next for the menu
equivalency.
19
April 2011
Double click the
Calendar icons to
select the date or
enter the date
Header Information
Next Block to
navigate
between tabs.
Enter Area code in the first block; last 7
digits in the second block.
Delivery date - at least 1 week beyond the current date.
Requestor name - defaults from logon.
COA defaults to E; change if necessary F/Foundation.
Organization – enter assigned dept or grant code if known
OR click the drop down menu to search, from FTVORGN click enter query (F7), enter
org title, click execute query (F8) to begin search; highlight desired org code and click
select to retrieve code to FPAREQN.
Email address – enter your EKU email address. Once Purchasing approves your
requisition & creates a purchase order, they will email you a copy of the purchase order.
20
April 2011
Phone number – enter EKU phone number.
Ship To - enter code assigned to department or click the drop down menu.
After clicking the drop down menu, highlight and click OK to select the ship-to-code for
your department.
Note: If the Ship To address is incorrect or needs to be added to the list, please email
the Purchasing Department at [email protected] or call 622-1482.
Attention To - enter the person’s name - who will receive the product or service.
Important: If the vendor has emailed or faxed a quoted price for the goods/services
ordered, include this information on Document Text (FOAPOXT). Also if the vendor
has a fax number to be used with purchase orders, include this information on
Document Text (FOAPOXT). Document Text should include any pertinent information
to be used by the vendor or the Purchasing department.
Click the
Options
Menu &
select
Document
Text
Press the down arrow key for additional blank lines; no word wrapping.
21
April 2011
Leave print option
checked for info that
is important to
vendor or
Purchasing;
uncheck for
unimportant info.
Click Save (F10) and then click Exit to return to FPAREQN.
Next Block to access the Vendor Information.
Vendor Information
22
April 2011
Vendor – enter id number or click the drop down menu.
*To search for a vendor, follow the instructions on page 31.*
Address Type defaults to PO (purchase order) if available;
Exception: Some vendors only have an AP address code.
To verify address information for the vendor id selected, click the drop down menu for
address type.
Contact will only populate if a contact was recorded on the vendor record.
Discount, Tax Group, & Currency are not required and should be left blank.
Important: please READ!
23
April 2011
A commodity is a type of good or service purchased from a vendor. Select a
commodity code that best describes the good or service that you are purchasing.
DO NOT:
• create your own commodity code;
• use Central Stores commodity codes with purchase requisitions;
• use commodity codes that have a termination date.
When a next block is performed after entering commodity info, the account code
that defaults as part of the FOAPAL is the same as the commodity code.
Tab and
Next
Block thru
the
screen.
Commodity – enter the commodity code or click the drop down menu to select the most
appropriate commodity code for the item(s) you are ordering.
Description – Delete the defaulted description and enter the item description from
catalog, web page, etc. If the description field (50 characters) is not sufficient, from the
Options menu go to Item Text. From FOAPOXT (see page 18), next block, enter
description, save and exit back to FPAREQN.
U/M – enter unit of measure or click the drop down menu for values.
Quantity – enter number of item(s).
Unit Price – enter amount (No $ sign; enter decimal/cents if applicable).
Extended (cost) column – tab to populate.
Next Block to FOAPAL, tab across to populate FOAPAL & amount for that item.
Note: If commodity code 743560 (PSC) is used, enter the dollar amount in the quantity
field and enter 1 in the unit price field.
When entering multiple commodity codes on one requisition document, enter the first
commodity code information. Next block to FOAPAL. Tab through and enter necessary
information. Previous block back to the commodity block and repeat steps until all
commodity and FOAPAL information has been entered.
Note: DO NOT enter a FOAPAL string with 0.00 (zero) dollar amounts.
Requisitions with zero dollar amounts will24be disapproved.
April 2011
To enter an additional FOAPAL string, press the down arrow key from the COA field,
Tab and press the delete key to delete all of the defaulted information, continue to tab
until cursor is back at the COA field.
COA defaults to E; change if necessary.
Tab to Orgn - enter dept or grant code (fund & program defaults from org code).
Acct - enter account number or click drop down menu.
An Account number (code) is used to classify expenses; expense account codes
begin with a 7.
Commodity
Code matches
Account Code
You can print any part of the requisition by clicking the print icon on the button bar
while creating the document on FPAREQN.
You may also print the full document from EKU Direct.
From this menu, click ‘View Document.’
Next Block to Balancing/Completion
25
April 2011
Click Complete if the commodity/accounting is balanced. The requisition number is
displayed on the hint line at the bottom or is in the ‘Requisition’ field above the order
date.
If you don’t want to complete the requisition, click the In Process button.
When you are ready to complete, access FPAREQN and enter the req number in the
document field and proceed to completion. If you don’t know the req number, click the
search box from FPAREQN :
click enter query (F7), enter your name in the requestor field (case sensitive), click
execute query (F8) then find the correct req number and click select.
26
April 2011
Sharing the Cost of a Commodity Item Between Multiple Organizations
To split the purchase of a commodity item by a dollar amount between multiple
organizations, tab through the FOAPAL info until the cursor is in the USD column field.
In the USD field, enter the dollar amount to be charged to that organization code.
After the U.S. dollars has been entered for the first FOAPAL string; tab to the COA
(chart of accounts) field and press the down arrow key.
Tab and delete all defaulted FOAPAL info; enter new Orgn code (fund/program
defaults). Enter Acct (account) number (normally same as commodity code) or click
drop down menu to select an account code from list.
Enter dollar amount in the USD column.
To split the purchase of a commodity item by a percentage, tab through the
FOAPAL information that has defaulted until the cursor is at the Extended field. Click to
check mark the Extended field and enter the percentage to be charged to this
organization in the USD column. (ex. 75)
Tab to the COA field; press the down arrow key to enter second FOAPAL string.
Tab; press the backspace key to remove defaulted FOAPAL information.
Enter Orgn (organization) code (fund/program defaults).
Enter Acct (account) number (normally same as commodity code) or click drop down
menu to select an account code from list.
Enter percentage in the USD column.
27
April 2011
How to Delete an Incomplete Requisition
NOTE: Completed requisitions cannot be deleted; however user can contact
Purchasing to request that the requisition be cancelled.
Enter the Requisition number on FPAREQN.
Next Block twice to the Vendor Information.
Click Remove Record from the Button Bar.
The hint line at the bottom will display ‘Press delete record again to delete this record’.
Click Remove Record again.
Pop-up message: All commodity and accounting records will be deleted; click OK.
Hint Line displays: Deletion of requisition is completed.
How to Copy A Requisition
Enter FPAREQN in Go To field and press Enter.
NOTE: A Requisition has to be completed and approved before it can be copied.
Click the Copy Icon (to the right of the drop down menu).
Enter the requisition number you wish to copy or search to find your requisition number.
Tab to populate the Vendor name; Click OK.
You are now at the first block of the Requisition Form (FPAREQN) and a new requisition
number has been assigned.
Tab & Next Block through the form making all necessary changes.
Click Complete if the commodity/accounting is balanced.
28
April 2011
A Disapproved Requisition
If you have a requisition that has been disapproved, you will have a check mark to the
right of the Check Banner Message link, when you log in.
Click for message.
On GUAMESG, read the comments given by the disapprover.
Click the pencil icon for additional details.
Write down your requisition number.
Click the Complete radio button, save and exit to delete the message.
(Check Mark will be gone from the Check Banner Message Link).
Go to FPAREQN and enter your disapproved req number (ex: R0030569).
Next Block and make requested changes that were indicated on the message.
Next Block to Balancing/Completion after changes; click Complete if balanced.
29
April 2011
How to Receive Delivered Item(s) for a Purchase Requisition
Enter FPARCVD in Go To field and press enter.
Check
FOIDOCH to
obtain
Purchase
Order Number.
Receiver Document Code - enter NEXT to generate a Receiving Document Code.
Next Block
Receiving Method – select method from list of values if applicable; not a required field.
Carrier – leave blank; no list of values available; not a required field.
Next Block
Packing Slip – enter packing info; If there is no packing slip, use the Purchase Order
number.
Bill of Lading – leave blank; not a required field.
Next Block
Purchase Order – enter the PO number that reflects the goods/services being received
Radio Button Receive Items is clicked ON by default.
Receiver is not finished: continue receiving instructions on the following pages.
30
April 2011
From the Options menu, click Select Purchase Order Items.
From FPCRCVP, choose the Receive All option or Add Item.
Click Save after choosing receive all or add item.
At popup prompt Close form? Click Yes
Receive All
option: all items
from the
requisition have
been delivered.
Do not use
Receive All with
personal service
contracts (PSC).
Click Add Item to include only
the items actually delivered.
Use Add Item with PSC’s.
If Receive All is selected: User is returned to FPARCVD.
Receiver is NOT finished.
Next Block to view the commodity information.
31
April 2011
Current field is
populated and
Final Received is
check marked
from RECEIVE
ALL option.
Next Block and Click Complete.
If ADD ITEMS is selected: User is returned to FPARCVD.
Receiver is NOT Finished.
Next Block.
Current – enter the quantity or amount for commodity item 1 that has been received.
Use the down arrow to enter quantities or amounts for additional commodity items.
Next Block and Click Complete.
Enter the quantity
or amount for
each commodity
item received.
NOTES: Create Receiving documents for Purchase Requisitions Only.
More than one Receiving Document can be associated to the same Purchase
Order.
IMPORTANT: When the last receiving document has been created and fulfills the
purchase order, click Final Received to indicate that every commodity item has
been received for the ENTIRE Purchase Order.
If user receives vendor invoice, forward to Accounting with receiver number
included on the invoice.
32
April 2011
If call from Accounting regarding receiver, go to FOIDOCH and make sure that the
Receiver document has been completed - (status code of ‘C’).
How to Delete an Incomplete Receiver
View FOIDOCH to verify status of Receiver: if no status code; then receiver is
incomplete. Incomplete documents can be deleted by the user.
Enter FPARCVD in the Go To field and press enter.
Enter the receiving document number in the key block.
Next Block to the Receiving Header.
Click Remove record from the button bar.
Click Remove record again.
Watch the auto/hint line for instructions/comments.
How to Create A Central Stores Requisition
Enter FSAREQN in Go To Field and press enter.
Enter NEXT to generate a request number and Next Block.
Transaction Date defaults as current date.
Delivery Date – enter current or next day’s date.
Requestor – enter your name (If a large item {i.e. Desk} is ordered, enter the building
and room that the item needs to be delivered to in the Requestor field also.).
Phone – enter phone number including area code.
Ship To - enter code or click the drop down menu and select from list. NOTE - If you
want all, or part, of the order delivered to a location different than the ‘Ship To’ location,
enter that building/room number after the Requestor name.
33
April 2011
Address, Building, and Floor will default from ship to code selected (if you do not see
your department listed, please contact the Purchasing office 2-1482.
Next Block.
Commodity – enter CS commodity code (i.e. CS304993) or click the drop down menu
(To search: click enter query (F7), enter keyword for stores item using %, execute query
(F8) then highlight and click Select).
Quantity – enter quantity.
Extended Cost is populated from entered quantity.
Next Block.
Chart of Accounts - E defaults as well as Account 740070 (Central Stores Supplies).
Tab to the Organization field; Fund and Prog will default from org code selection.
Tab to the Percent field – enter 100; Tab to populate the total Amount.
Next Block to Balancing/Completion.
NOTES: Central Stores Requisitions can only be created for Chart E Org Codes.
Foundation (F) chart users should contact the Accounting Department to obtain
an alternate Org code. NO Receivers are created for Central Stores Reqs. Central
Stores creates an Issue Ticket that lists the items ordered and obtains the
requestor’s signature. If CS item needs to be returned, contact Central Stores to
coordinate pickup of item(s).
How to View Documents and the History
Use FOIDOCH to view existing documents (complete and incomplete), check the status
of a document and to find associated documents.
Enter FOIDOCH in GO field and press Enter.
Enter the Doc Type or click the drop down menu to see the available values. The
document type for Purchase Requisitions as well as Central Stores Requisitions is
REQ.
Tab to Doc Code and enter the number of your document, or click the drop down menu
to search for your document.
34
April 2011
To search for a requisition number, click the drop down menu at Doc Code.
From FPIRQST: click Enter Query or (F7), enter the Requestor, Request date, or the
Vendor Code to look for your document, click Execute Query or (F8) then
highlight your choice and click the Select button (double click). This will insert your
document code number on FOIDOCH.
Next Block from the Doc. Code on FOIDOCH.
From the Options Menu, click View Status Indicators to check the document status or
click Requisition information to view the document itself.
To view any of the associated documents, highlight the document of your choice
and from the Options Menu click (document of choice) information. Then next
block thru the document to view information. If you are viewing check info, enter
VE in the bank field on FAICHKH.
How to Query Vendor Information
Enter FTMVEND in the Go To field and press Enter.
(If searching for vendor id from FPAREQN, follow instructions below from screen print.)
Use FTMVEND to see if a vendor exists in the production database or to view
information about a vendor such as: vendor id number, purchase order or accounts
payment address, and/or telephone number.
Click the drop down menu from FTMVEND; opens FTIIDEN.
35
April 2011
Tab to the Last Name field – enter last name and first name if person or enter company
name in the last name field. Note: Use the wildcard % at the beginning & ending of
Capitalized keyword for the company name (i.e. %Accent%).
Click Execute Query or (F8).
Highlight the vendor record and click the Select button or double click the ID Number
field to retrieve selected record back to FTMVEND.
Next Block 4 times to view address information or click the Address Tab
Vendor type codes: PO - Purchase Order; AP - Account Payment.
If you can’t find a vendor after using wildcards(%) and a keyword search, please
email the Purchasing Department ([email protected]) with the vendor
information including name, address, phone and contact information. Also a
Vendor Taxpayer Identification Number Request has to be submitted to the
vendor by the end user before the company/person can be setup with a vendor
record.
How to Query Expense Account Codes
Enter FTVACCT in the Go To field and press Enter.
FTVACCT can also be accessed from FPAREQN on the acct field drop down menu.
Use FTVACCT to identify expense account codes to be used on direct pays.
Click enter query (F7) to clear screen.
Enter E in the COA.
Enter 7% in the Account Code for expense accounts.
Click execute query (F8).
How to Query Commodity Codes
Enter FTVCOMM in the Go To field and press Enter. Pick the commodity code that
closely matches the description of what you are requesting to purchase. Remember:
never create a commodity code!
36
April 2011
37
April 2011