1
VetTracker
User Manual
Version 1.0
VetTracker User Guide!
Page 1
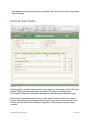
Table of Contents
Introduction
6
Major Features
6
System Requirements
6
Deployment Options
7
Basic Requirements
7
Backup and Data Stability
7
Deployment Option 1: Single User
8
Deployment Option 2: Single Computer Installation with Instant Web
Publishing
8
Sharing VetTracker From a Single Computer Via IWP
8
Opening VetTracker As a Guest Over IWP
9
Deployment Option 3: Single Computer Installation with FileMaker
Network Sharing
9
Sharing VetTracker From a Single Computer Via FileMaker Network
Sharing
10
Opening VetTracker As a Guest Over FileMaker Network Sharing 10
Deployment Option 4: Hosting VetTracker on a Local Server
11
Deployment Option 5: Hosting VetTracker Through an Internet-Based
FileMaker Hosting Service
11
Logging In
12
Logging In Over Instant Web Publishing
12
Logging In Using the FileMaker Client
14
System Conventions
16
Action Icons
16
Direct Data Entry
17
VetTracker User Guide!
Page 2
Click and Select
17
Deleting Items
18
Notes on Using Instant Web Publishing
18
Saving Data
18
Value List Differences
24
Logging Out
24
Emergencies / Getting Stuck
25
Unavailable Features
25
Veteran Data Entry
26
Data Common to Every Tab
27
Quick Reports
28
Event History Tab
29
Creating a New Event
31
Attaching a Document to An Event
35
Inserting an Event Plan Onto a Veteran Record
38
Financial Tab
39
Financial Data Entry By Month
41
Duplicating a Month’s Entries
42
Financial Data Entry by Income Source
43
Financial Data Entry by Individual Item
44
Case Notes Tab
46
Entering A New Case Note
47
Contact Info Tab
48
Entering New Contact Information
49
Advocates Tab
49
VetTracker User Guide!
Page 3
Adding a New Advocate to a Veteran Record
50
Changing or Adding a Type / Function to a Veteran Advocate Entry51
Military Service History Tab
51
Notes Tab
54
Statistics and Reports
54
The Statistics and Reports Screen
55
General Report Information
55
Statistics Tab
55
Standard Reports Tab
56
Custom Reports - Single Event Tab
57
Custom Reports - Days Elapsed Tab
60
Editing System Options
63
Editing Value Lists / Options
63
Editing Income Sources
65
Editing Veteran Advocates
66
Editing Event Categories
66
Creating New Event Categories
72
Creating New Event Types, Event Status Codes, or Organization Codes
From the Event Categories Window
72
Deleting Event Categories
73
Special Cases
74
Editing Event Status Codes
78
Editing Event Types
80
Editing Organizations
81
Editing User Accounts
81
VetTracker User Guide!
Page 4
Creating a New User Account
83
Consideration for Instant Web Publishing
84
Disabling and Re-Enabling User Accounts
86
Updating Account Information
87
Editing Default Information
89
VetTracker User Guide!
Page 5
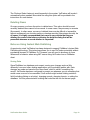
Introduction
VetTracker is a FileMaker Pro database solution specifically designed to assist social
agencies administer the Supportive Services for Veteran Families (SSVF) Program, as
well as veteran programs through HUD, the VA, and other government and nongovernment entities. VetTracker is designed to be flexible, easy to learn and to use, and
to impose little cost on nonprofit and small government organizations, which are
recognized to be funded in an often-limited fashion.
Major Features
• Completely customizable workflow - the agency decides what events to track and how
to track them
• Financial reporting on veterans - allows the agency to determine quickly which
veterans qualify for which programs
• Flexible, user-defined reports - Pull data on any event in the system, including the
ability to compare the elapsed time between two events within any date range
• Notifications through email to veteran advocates
• Configurable to use a variety of deployment options, from single-user through small
workgroup hosted from a single computer (including over web browsers) to using a
server for larger organizations or wider availability
System Requirements
VetTracker is compatible with both Mac OS X and Microsoft Windows operating
systems. It requires FileMaker Pro version 12 or higher to operate; see http://
help.filemaker.com/app/answers/detail/a_id/4701/~/filemaker-pro-operating-systemrequirements---all-versions for specific system requirements.
[Note: Screen shots in this User’s Guide may not exactly match the appearance of the
screens in the actual product.]
VetTracker User Guide!
Page 6
Deployment Options
VetTracker can be deployed to your agency in a variety of ways. Which method you
choose will depend on your number of users, your budget, and the level of convenience
you choose.
Basic Requirements
VetTracker is a solution built using FileMaker Pro (www.filemaker.com). As such, you
have some deployment options for using the software, but there must be a FileMaker
license somewhere in the chain for the package to operate.
Option 1: Local computer hard drive. In this use case, VetTracker requires at least one
client license of FileMaker Pro, which you can purchase from FileMaker, Inc. VetTracker
requires a minimum of version 12 of FileMaker to operate. If your agency is a nonprofit,
or you purchase a minimum of 5 licenses (see below for the option to use FileMaker
clients for the database), a substantial discount is available.
Option 2: Hosting using FileMaker Server. You can use FileMaker Server to host the
database solution. VetTracker is designed to operate using FileMaker’s Instant Web
Publishing technology, which allows you to log into the database with your normal web
browser program (see below for specific requirements). If you host using Server, you
can use strictly web browsers to operate (however, there are some limitations in so
doing; see below). You can either run your own server, if you have an internal IT
department, or make use of a hosting service.
Option 3: Running the software using FileMaker Go. FileMaker Go is a free app for
Apple’s iOS operating system, which runs on the iPad, iPhone and iPod Touch devices.
You can run the software using these devices; however, for this release, the screens are
not optimized for the small device sizes of the iPhone and iPod Touch.
Backup and Data Stability
VetTracker is a database application. Like any other computer application, it is
vulnerable to a variety of environmental and user issues that can cause data loss. Many
of the deployment options available for this software involve users keeping the
VetTracker application on a local hard drive, rather than on a server system. While this
is a convenient option for several reasons, special attention must be taken to ensure
data stability is not compromised.
If you choose to use such an option, it is imperative that periodic backups be kept of the
VetTracker database files. Additionally, you must make backups only when the database
is closed and no users are actively in it at the time. Doing otherwise risks compromising
the database, which can damage it and cause data loss.
VetTracker User Guide!
Page 7
Deployment Option 1: Single User
VetTracker can be used by a single user in your agency. In this configuration, a single
user can become the “data queen” (or king) and take care of all data management in
VetTracker on a single workstation. A license of FileMaker and VetTracker can be
installed on that one computer, and that one computer holds all the information.
This option is attractive from the standpoint of simplicity and configurability. It also
requires only a single license of FileMaker to be purchased. However, it is somewhat
restrictive from an operational standpoint - your data will be accessible only from that
single machine - and carries the risk of a hard drive crash destroying the data. It is
highly recommended that good backups be kept, and an alternate installation plan be in
place.
Deployment Option 2: Single Computer Installation with Instant
Web Publishing
FileMaker has the capability to “publish” a database application to a web browser, a
capability known as Instant Web Publishing (IWP). VetTracker has been designed to
take advantage of this feature. In this deployment option, a single computer “hosts” the
database using FileMaker Pro, and other users access it using the web browsers
(Internet Explorer {version 9 or higher}, Firefox, Google Chrome, and Safari are all
supported) installed on their workstations. The experience over the web is very similar
to the experience through the FileMaker client, albeit with some limitations.
This option can be very attractive to small organizations with limited budgets, since they
can have multiple users (up to 6, one hosting the database and 5 sharing it over IWP)
without purchasing multiple FileMaker licenses. Where resources are tight, and all users
are within the same office (i.e. inside the same intranet), IWP is relatively easy to
configure.
However, this option is usually unsuitable for situations where all the users are not colocated (where they have to communicate through the open Internet), since special
network setup is usually required. In addition, this option carries with it the same risks of
data loss associated with option 1, so stringent backup discipline is strongly
recommended.
Sharing VetTracker From a Single Computer Via IWP
1.
2.
3.
4.
5.
Open VetTracker from your hard drive into FileMaker Pro (see “Logging In” below).
Select File > Sharing > Instant Web Publishing.
Turn on Instant Web Publishing.
Record the IP address of the computer (it will be needed by users wanting to log in).
Click “OK”.
VetTracker User Guide!
Page 8
Opening VetTracker As a Guest Over IWP
1. Open a web browser (Safari, Google Chrome, or Firefox)
2. In the address bar, type “http://[IP address]/fmi/iwp” (the IP address will be the same
as recorded in step 4 above).
3. Click “VetTracker” in the available list of files.
4. When the dialog for user name and password is presented, enter “VetTracker” as the
user name. Leave the password blank. Click “Login”.
5. Log in normally (see “Logging In” below)
Deployment Option 3: Single Computer Installation with
FileMaker Network Sharing
In addition to sharing through Instant Web Publishing, a single computer running
FileMaker Pro can share the database with other computers on the same network. This
is called “network sharing”, and is intended for situations similar to the ones addressed
by IWP. It has certain advantages over IWP, most notably that the VetTracker
experience inside the FileMaker client is far richer than what is possible over IWP (due
mostly to limitations of web browsers). Of course, the major disadvantage with this
model is the need to purchase additional FileMaker licenses, which adds to the cost.
Note that it is possible to “mix and match” options 2 and 3; some users can share the
database using IWP, while others can share using FileMaker Pro. There is no issue with
doing so. Sharing between facilities is often difficult with this method, just as with IWP,
due to network configuration issues.
As you might expect, sharing in this manner carries the same risks as options 1 and 2
with regard to data loss; backup discipline is required to safeguard data.
VetTracker User Guide!
Page 9
Sharing VetTracker From a Single Computer Via FileMaker Network Sharing
1.
2.
3.
4.
Open VetTracker from your hard drive into FileMaker Pro (see “Logging In” below).
Choose File > Sharing > FileMaker Network.
In the FileMaker Network Settings dialog box, set Network Sharing to On.
Click “OK”.
Opening VetTracker As a Guest Over FileMaker Network Sharing
1.
2.
3.
4.
5.
6.
Open FileMaker Pro.
Select File > Open Remote.
Under “View”, choose “Local Hosts”.
The hosting computer should appear in the list. Click it.
VetTracker should appear in the list on the right-hand side. Double-click it.
Log in as normal (see “Logging In” below).
VetTracker User Guide!
Page 10
Deployment Option 4: Hosting VetTracker on a Local Server
Instead of hosting the database using FileMaker Pro, it can be hosted using the
FileMaker Server product. This offers far greater stability, automated backups, and
protection from data loss than hosting on a desktop or laptop computer. Server is
designed specifically to host database solutions, and is the preferred method for
providing access to FileMaker databases.
In this option, the customer installs FileMaker Server (indeed, FileMaker Server
Advanced is required to use the Instant Web Publishing feature) on a server at their
place of business. Such a configuration offers several advantages. The customer
maintains control over the data, the server, and the users’ accesses to both. Backups
can be completely configured as the customer desires. The logs can be freely accessed
by the customers or by their IT departments to troubleshoot any issues that may arise.
And, since the Server product is capable of handling many more connections than the
FileMaker Pro product, there will be an increase from 5 to 100 in the number of possible
IWP connections to the database.
Naturally, there is significantly increased cost with this option. Not only is the purchase
of a Server Advanced license required, but the day-to-day maintenance of a server - its
patching, backups, updates, and so forth - can easily strain a budget. Further, the
customer would be assuming the responsibility for any security on the server itself,
especially if it is exposed to the open Internet. Therefore, this option is recommended
only for organizations with dedicated IT staff who are familiar with the FileMaker product
line.
Deployment Option 5: Hosting VetTracker Through an InternetBased FileMaker Hosting Service
There are a number of companies who provide hosting services for FileMaker
databases, in recognition of the need of trained, dedicated staff to manage servers for
this purpose. Should you decide to consider this option, it carries several benefits. The
database files will be available from any point that has Internet access, just as if you
built and maintained the server yourself. Backups will be taken care of, and the stability
of the Server product is provided. You can use any combination of FileMaker Pro and
Instant Web Publishing clients, at your discretion. And, as with hosting your own server,
the number of available connections will dramatically increase.
Of course, as with all options technical, there are disadvantages as well. With a hosting
service, you lose some measure of control over what’s going on. You may not have
access to server logs without going through the provider. You will most likely not have
access to start and stop databases (which may require developer intervention). Since
you will likely be sharing a server with other customers, you may not have use of all 100
available IWP connections to the server. Finally, hosting through a provider involves a
VetTracker User Guide!
Page 11
monthly cost - which will normally be far less than purchasing your own server, but may
still be a deterrent to using this option.
The developer can assist you with making the appropriate choice for your situation. But
hopefully this information has been of some help.
Logging In
Whichever deployment method you choose for your organization (and you can change
later, if your needs change or if you just decide to try something different), you’ll need to,
at some point, actually log into the system to use the software. (Imagine that.)
VetTracker works like most other database software; each user will have an account in
the system, and you’ll log in using those credentials. (When you initially set up the
system, the developer will assist you in creating your first batch of accounts.)
Logging in is a little bit different on Instant Web Publishing than it is using the FileMaker
client. Basically, there’s an extra step, so we’ll cover the IWP version first.
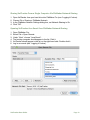
Logging In Over Instant Web Publishing
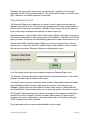
To log into VetTracker over IWP, you’ll first go to a specified web address in your web
browser. It will look something like this:
!
http://[IP address or host name]/fmi/iwp
Your developer or the hosting service can provide you with the IP address or host name.
(Note that you won’t have a host name unless you’re using a dedicated server that has
a DNS entry, or you’re using a hosting service. You’ll have to use an IP address if you’re
hosting VetTracker from a client computer.) Once you enter this address (which you can
bookmark or add to a company web page), you’ll see the FileMaker Instant Web
Publishing Home Page for the server in question:
Some number of databases, including VetTracker, will be listed as links on the left-hand
side of the page. (This will be dependent on what databases are being hosted on that
server via IWP.) If you’re using a single client computer, all you may see might be
VetTracker. If you’re on a hosting company’s server, you may see many databases.
VetTracker User Guide!
Page 12
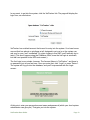
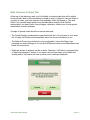
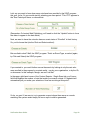
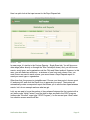
In any event, to get into the system, click the VetTracker link. The page will display the
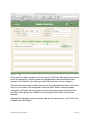
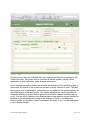
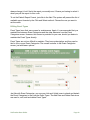
login form, as seen below:
VetTracker has a default account that’s used for entry into the system. It’s a bare bones
account that has almost no privileges at all, designed to get you in so the system can
ask your for your “real” credentials. So, when logging in over IWP, you’ll basically log in
twice. (This won’t happen using the FileMaker client, since the first login is automatic,
but that’s not possible in the IWP environment.)
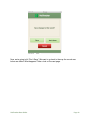
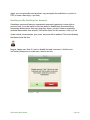
The first login is very simple, however. The Account Name is “VetTracker”, and there is
no password, just as you see here. Once you enter that, click “Login” or press “Return”.
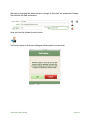
The system will log you into the database, and you’ll be presented with the Login
screen:
At this point, enter your personal account name and password (which your local system
administrator can give you). That gets you into the system.
VetTracker User Guide!
Page 13
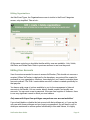
Note: There’s an on screen warning that pressing “Return” will not submit your login
information. This is a limitation of the Instant Web Publishing engine. You’ll have to click
the “Login” button for your changes to be submitted.
Logging In Using the FileMaker Client
Logging in with the FileMaker client is simpler than using IWP in one respect, since
there is only a single login. You can get to the database in one of a few different ways:
• You can use a URL in your web browser to launch the database. That URL will look
something like this: fmp://[IP address or host name]/VetTracker.fmp12. Just as with
IWP, you can get the IP address and / or host name from your hosting company,
server administrator, or the person who’s hosting the database on his or her computer.
• You can use Open Remote in the FileMaker File menu. If your host is on the local
intranet, it will show up under Local Hosts. If not, you can save a Favorite Host that
points to it. See the FileMaker Help for details or contact the developer for assistance.
• Once you have opened VetTracker inside FileMaker, you can save it to your Favorites
menu. Choose File > Open Favorite > Add Current File to Favorites. This will cause
VetTracker, as hosted from its current location, to show up in your Favorites menu and
you can open it by selecting its menu item.
• Also from inside FileMaker, if you want a desktop shortcut into the system, you can
use a feature called Snapshot. From the Main Menu of VetTracker, choose File >
Save / Send Records As > Snapshot Link. This will create a “snapshot” file (with a file
extension of .fmpsl) wherever you want (presumably, your desktop). You can doubleclick it to get yourself back into the system and to the Main Menu. (Note: This feature
will only work with FileMaker clients; getting in through Instant Web Publishing will
require saving a URL shortcut to your desktop, which you can do by dragging the
URL of the system from your browser to your desktop once you’re in.)
VetTracker User Guide!
Page 14
By whatever means you open VetTracker, it will be the same procedure once the file is
open. You’ll automatically be passed through the default account and be presented with
the Login screen:
Just as with the IWP login, enter your personal credentials. In this case, hitting “Return”
does work to submit your input.
Once you have successfully passed the login check, you’ll be directed to the Main
Menu, which basically is the same in IWP or the FileMaker client.
Note: There is a special privilege set called “Restricted Guest”. Users whose accounts
use this privilege set will have a reduced Main Menu, as all they are permitted to do is
run certain reports from the system. Hence, the only button those users will see is the
“Stats / Reports” button.
VetTracker User Guide!
Page 15
System Conventions
There are some commonalities throughout VetTracker that users will want to be familiar
with. Being aware of these conventions will make the users’ experiences much
smoother.
Action Icons
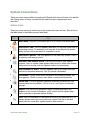
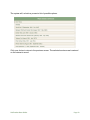
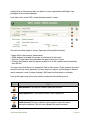
There are some commonly used icons in the system that users will see. Take a look at
the table below to familiarize yourself with them.
Icon
Use
Main Menu: Click this (or the label next to it) to return to the Main Menu.
Add record / item: This icon appears wherever you can add a new item to
an existing record. For example, you’ll see this on the Data Entry screen
when you can add a new event to a veteran’s record.
New record / person: This icon appears on the data entry screen. Click it
to create a new veteran record.
Add data / new domain record: This icon shows up on your options
screens. Use it to create a new domain table record or attach one domain
table record to another (see the Options section for instructions).
Add document to event: This icon appears next to any event that does
not have a document attached. Click it to attach a document.
Documents: On any event where documents are already attached, this
icon appears. Click it to review, edit, delete, or add more documents.
Delete data: This icon appears frequently, basically anywhere you can
remove data from the system. Click it to do so; you’ll get a confirmation
prompt.
Report: Click this icon to generate a report. Exactly what report will
depend on the context. Sometimes, you’ll need to tell the system what
report you want to generate before clicking.
Find: This icon indicates you can perform a find on the field next to it. It’s
usually present when you can’t perform a normal Find due to the field
being used for some other system function (like a button).
VetTracker User Guide!
Page 16
There are some additional icons within the system; these will be explained at the time
their features are covered. In addition, every icon will have a tooltip (pop-up instructions)
that will appear if you hover your mouse over it for a short period.
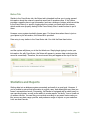
Direct Data Entry
VetTracker is set up for two types of data entry. The first is entering data directly. You
can either click your mouse into a field (the field will acquire a highlighted outline to
indicate it’s the one with focus), or use the Tab key to move from field to field. Type
normally from your computer keyboard. Example below.
Click and Select
The second kind of data entry in VetTracker is called Click and Select. This feature
allows users to pick from established lists of options which are then added to a data
record. You’ll see this throughout the system where the options for data entry are drawn
from a list of established options.
One example is very common, that of entering a new event for a veteran. From the Data
Entry screen, you would click the New Event icon, and the system will present you with
the Select Event screen (partial screen shot shown):
Click the option you want, and VetTracker will automatically insert it on the veteran.
VetTracker User Guide!
Page 17
The Click and Select feature is used frequently in the system. VetTracker will invoke it
automatically when needed. More detail on using this option will be provided in the
instructions for each feature.
Deleting Items
On many screens, you have the option to delete items. This option should be used
carefully; deleted items cannot be recovered. In some cases, they are easy to recreate
(like events). In other cases, recovery of deleted items may be difficult or impossible
without assistance from a hosting service or backup recovery (like veteran records). In
all cases, it is highly recommended that users be very certain that they are
deleting the correct data before confirming the deletion dialog that will be
presented whenever a record deletion is requested!
Notes on Using Instant Web Publishing
As previously noted, VetTracker has been designed to support FileMaker’s Instant Web
Publishing technology. This technology allows you to use VetTracker potentially without
purchasing licenses of FileMaker Pro. However, you will need to be aware of some
differences in behavior when using IWP versus using VetTracker from a FileMaker
client.
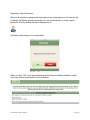
Saving Data
Since FileMaker is a database environment, saving your changes works a little
differently from most other desktop applications you’re probably familiar with. Data
changes are made and saved at the record level, which is called “committing the
record”. VetTracker has been configured to prompt you whenever you do something that
would cause a record to be committed. Such actions might include clicking outside a
field (including clicking on a button), changing records, changing layouts, or exiting the
database. You’ll be presented with a dialog that looks like the one on the next page:
VetTracker User Guide!
Page 18
As you can see, you’ll have three options. They have different functions, which we’ll look
at briefly:
• “Save” means any changes you’ve made to the current record will be saved to the
database.
• “Don’t Save” means any changes you’ve made will be “reverted”, or rolled back to
the way the record was before you edited it.
• “Cancel” means the current action is cancelled and the record will remain open for
editing. Your changes are not committed, but neither are they wiped out.
This action happens when you’ve edited a record and click any button to perform a
function. Your choice will affect how that function works:
• If you choose “Save” or “Don’t Save”, the function will proceed after the record is
either saved or reverted.
• If you choose “Cancel”, the function will be cancelled.
So, unlike most other computer programs, you won’t be manually saving your changes
in VetTracker as you work. Instead, every time you do something that would require
FileMaker to save your change, you’ll be prompted to choose whether you want to save
or not.
VetTracker User Guide!
Page 19
There’s an important concept to understand with regard to related records, as well.
(What’s a “related record”? My uncle’s birth certificate?) Simply put, a “related record” is
a record that exists within the database, but not in the same data table. Let’s look at an
example so it’ll make more sense.
Let’s pretend we’re working on case notes for Mr. Test Veteran, seen here:
Note that Mr. Veteran has two case notes associated with his record. Let’s say we’re
going to do some editing, and we edit both case notes, as seen on the next page:
VetTracker User Guide!
Page 20
Notice that both case notes showing on the screen have new information in them.
They’ve been edited, but not saved (committed) to the database. Also notice we’ve
added some text in the HMIS No field. So we’ve edited two related records (the case
notes) and the main record (also known as the “parent”). What happens when we click
outside a field? We get our confirmation dialog (next page):
VetTracker User Guide!
Page 21
Now, we’re going to hit “Don’t Save”. We want to go back to the way the record was
before we edited. What happens? Take a look on the next page.
VetTracker User Guide!
Page 22
Wow. All of our changes were wiped out. The new information in the HMIS No field is
gone, and all the changes to the case notes are as well. This is how record revert
works. All pending changes, both to the parent record and to the related records, will be
wiped out if you choose “Don’t Save”! So make sure you really don’t want to save the
changes!
Instant Web Publishing works just a little differently, due not so much to limitations in the
IWP engine as to the nature of web browsing. Hence, on every screen, once you have
started editing a record, you will see some buttons appear in the Status Area at the top:
VetTracker User Guide!
Page 23
These buttons are used to compensate for the “stateless” nature of web browsing.
Whenever you are ready to save your changes after editing a record in VetTracker when
using Instant Web Publishing, you’ll need to click the “Submit” button. Alternatively, if
you change your mind, click “Cancel”. Clicking “Revert” will revert any changes you’ve
made to the record since the last commit was performed.
Unlike the FileMaker client, the IWP client has no auto-commit capability. There’s no
way for VetTracker to trigger an automatic dialog when you click away from a field, for
example, so you won’t get a warning dialog if that happens. You will notice that the IWP
engine will not permit you to navigate away from the screen until one of the three
buttons has been clicked. You’ll basically be “stuck” until you tell the system what you
want to do with the record you’re on.
Note that many of the buttons and functions built into VetTracker will compensate for
this limitation automatically. When you click one of those buttons, you will get the
warning dialog; this is built into the VetTracker code. However, in normal editing, you’ll
need to use the native IWP functionality.
Value List Differences
Also affected by the IWP interface are value lists (pull-down menus, pull-down lists). In
the FileMaker client, you can click once in a field equipped with such a list, and it will
automatically drop down. In the IWP client, you’ll need to click twice, once to open the
record for editing, and once to deploy the list. This is normal.
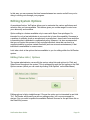
Logging Out
Finally, it’s important not to leave VetTracker by simply closing your browser window.
This leaves your session open with the host; it does not close you out of the database.
This can cause the host (whether it’s another computer or a server) to run out of hosting
options, especially in the case where you’re a guest of a regular desktop computer and
not a FileMaker server. Whenever you leave the system, be sure to go back to the Main
Menu and click on the “Log Out” button:
This terminates your session properly and frees up the session space for another user.
VetTracker User Guide!
Page 24
Emergencies / Getting Stuck
In some cases, you may accidentally find yourself “stuck” in the IWP interface with no
way to escape. This can happen if a scripted function fails, or if the server hangs up
momentarily and some code is left in a suspended state. Should this happen, you may
be unable to discover how to release your session from the server.
In the IWP interface, the Status Area appears at the top of the screen, just as it does in
the FileMaker client. Should you become trapped, you can click the “Log Out” button to
terminate your session. Then, log back into the system and try again.
However, on some screens, the Status Area has been hidden for aesthetic purposes. In
those cases, you’ll need to drop it down to find the Log Out button. Do so using the
small gray triangle on the far left-hand side:
Clicking the triangle will expand the Status Area and give you access to the Log Out
button. From there, you can terminate your IWP session.
Unavailable Features
Although the developer has tried to make as much functionality as possible available in
all environments, certain VetTracker features are not available through the IWP
interface. This is mostly due to limitations of the IWP technology itself. The missing
features are listed below:
• As of this writing, the insertion and viewing of documents attached to veteran event
history records is not available. Documents can only be attached, detached, and
viewed via a FileMaker client.
• Reports cannot be saved to the desktop or viewed in a separate browser tab or
window as they can with the FileMaker client. If you want a copy of an onscreen
report, you’ll need to copy / paste or use a screen shot utility (such as SnagIt on
Windows or GrabIt on the Mac).
• Warning colors on records, such as the “do not delete” highlighting in the Options
screens, does not work on IWP. You will still be warned if you attempt to delete a
record that has been locked.
VetTracker User Guide!
Page 25
• The duplicate record warning feature (see below) does not function when using Instant
Web Publishing.
Veteran Data Entry
Entering data on veterans being served by your agency is at the heart of the VetTracker
system. Without accurate data entry, the system can serve no useful purpose.
Fortunately, VetTracker is specifically designed to make data entry simple and easy.
Data entry is organized around a series of tabs, each of which focuses on an area of
interest. Data common to the veteran across every area can be found at the top of the
screen; you can modify that information regardless of which tab you currently have
selected.
VetTracker User Guide!
Page 26
Data Common to Every Tab
At the top of the data entry area, you’ll find fields for entering data that will be visible
across all tabs. Most of this information is simple to enter; it goes into free text fields. In
a couple of cases, you have selection lists available, either pull-downs or Click and
Select. You can edit these options from the Main Menu using the Edit Options
functionality if you have Super User privileges; otherwise, contact your on site system
administrator to make changes.
A couple of special notes about the common data area:
• The Social Security number has an input mask built into it. All you have to do is enter
the 10 digits; VetTracker will automatically insert the correct formatting for you.
• The Referral Source pop-down list is user-configurable. Users with Super User
privileges can make changes to it from the Edit Options button on the Main Menu (see
below for instructions).
• Duplicate entries of veterans can be an issue. Therefore, VetTracker is equipped with
a “duplicate prevention” feature. If you enter a first and last name of a veteran that
already exists, VetTracker will warn you that you’re creating a duplicate:
VetTracker User Guide!
Page 27
This feature only works if the first and last name are exactly the same, unfortunately. If
you enter “Charlie Brown” and “Charles Brown” on two different records, for example,
the system has no way of knowing those are actually the same person. Therefore, it’s
recommended that you perform a quick Find for any records that may already exist
before entering new veteran data.
Note also that this feature does not work when using VetTracker with Instant Web
Publishing.
Quick Reports
Entering the data on the various tabs ensures that VetTracker can reproduce the data
properly, linking it back to assemble statistics and reports so you have an accurate
picture of what’s going on in your program. However, it can also make it a little difficult if
all you want to do is just read the information, especially if there’s a lot of text involved
(which can happen with entries like Case Notes). To help with this situation, VetTracker
is equipped with a Quick Report feature that allows you to see all the information about
a given veteran for a specific tab on every tab.
For example, if you’re currently looking at the Event History tab, you can click the Quick
Report icon to see a report of the entire Event History of the veteran you’re currently
viewing. The report icon looks like this:
Use it anywhere you see it on a particular tab.
VetTracker User Guide!
Page 28
Event History Tab
The Event History is the heart of data entry for veterans. Many database systems will
have a wide variety of checkboxes, radio buttons, or the like for entering various
information about individuals. VetTracker avoids this convention by use of Event Status
Codes. Whenever a veteran’s status changes, or some information about that veteran is
determined to be in effect, you will usually record that information by entering an event
in the Event History. Some examples of events that are included with the system are:
•
•
•
•
•
•
•
•
•
•
Initial Contact
Initial HCP Needed
Initial HCP Completed
Screened
Referred
Enrolled
Need Identified
Need Filled
Discharged
Starting Employment
These are only examples. As with most such items in VetTracker, the list of events can
be edited by users with Super User privileges (more on this later).
In addition to the simple event itself, events are equipped to carry Event Types as well
as Orgs as further subdivisions of detail. This allows your organization to mix and match
the various combinations in countless ways.
For example, say you have a veteran who has been Screened. Screened for what, you
might say? And by whom? The answer to what would be an Event Type. It might be the
SSVF Program. It might be HUDVASH. By whom might be your organization, SSVF, the
VA, or any other organization.
Another good example might be Need Identified and Need Filled. When you see these,
you may be puzzled. How can I say what sort of need we’re talking about - housing,
financial, employment, what? Those would be the Event Types. So you’ll select Need
Identified for the Event Status Code, and then VetTracker will prompt you to select what
type of need we’re talking about.
VetTracker User Guide!
Page 29
Why do it this way, you might ask? Why not just have a single list with all the
combinations? Let’s take a look at what that might look like, just using the example
above.
•
•
•
•
•
•
Screened for SSVF Program by (your org)
Screened for SSVF Program by SSVF
Screened for SSVF Program by VA
Screened for HUDVASH by (your org)
Screened for HUDVASH by SSVF
Screened for HUDVASH by VA
As you can see, the list grows rapidly. Can you imagine how long the list could get if we
put all the combinations in a single list? Instead, by doing it this way, we can put a huge
number of possible combinations together without creating a data entry nightmare for
the poor person who has to scroll through all those possibilities.
VetTracker User Guide!
Page 30
Creating a New Event
Let’s take a quick look at how this might work in the system. Let’s add an event to a
dummy record and see what happens. We’ll start with this blank, example veteran:
To add an event to a veteran, you click the New icon ->
VetTracker User Guide!
Page 31
VetTracker will automatically present you with the list of possible Event Status Codes:
VetTracker User Guide!
Page 32
We’re going to pick a code that has some Event Types and Orgs associated with it.
We’ll click on “Initiated Enrollment”. When we do, we get the list of Event Types
associated with that Event Status Code:
As you can see, a person can have his enrollment initiated in the SSVF Program or the
VA. (This, of course, can be edited or added to by the on site system administrator - the
person with Super User privileges.) Just for grins, we’ll choose “SSVF Program”. The
system will then give us a list of possible organizations who are responsible for the
initiation of enrollment:
In this particular case, we have three potential organizations. (Again, your administrator
will be able to add more.) We’ll pick the VA.
VetTracker returns us to the Data Entry screen. Let’s take a look at what happens on
the next page.
VetTracker User Guide!
Page 33
A new event has been recorded on the vet’s record. The Event Type and Org are set as
part of the description, and the system has highlighted the date on which the event
occurred. (It will default to the date you create the event, but you can change it.)
Some events have neither an Event Type nor an Org associated with them. Some have
only one or the other. It will all depend on how the Event Status Codes have been
configured. VetTracker will only present you with the screen to select the Event Type
and Org if those options are available for the particular Event Status Code you’ve
selected.
Although this explanation seems complex, after you do it a few times, you’ll find it to be
straightforward and simple.
VetTracker User Guide!
Page 34
Attaching a Document to An Event
NOTE: At present, this capability is not available to clients using Instant Web Publishing.
Only clients using FileMaker Pro and / or FileMaker Go can make use of this feature.
VetTracker has the capability to attach one or more documents to a given event. This
comes in handy when you want to keep electronic copies of your important documents
that are associated with a given event. For example, if you have just finished an intake
of a veteran into a program, you may wish to scan the documents and store them inside
the system, attached to the “Screened” event for later reference. Or you may want to
keep copies of documentation at various stages as the veteran moves through the
system. VetTracker will allow you to attach as many documents or as few as you like to
any given event, making it flexible for your workflow.
Note: For those with privacy or security concerns, the documents are stored in an
encrypted format, accessible only through the VetTracker interface. Additional security
can be provided by hosting VetTracker on a FileMaker server, where access to the
storage directories will be limited to server management personnel.
To attach, review, or delete documents attached to an event, click the “document” icon
next to the event. This icon appears in two forms. If there are no documents currently
attached to the event, it will appear as a single document with a green “+”, like this:
If, on the other hand, one or more documents is already attached to the event, you’ll see
a multiple document icon, like this:
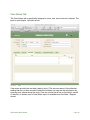
In either case, the user action is the same. Clicking on the icon will bring up the
Documents Data Entry screen, seen on the next page:
VetTracker User Guide!
Page 35
Attaching a document is simple. You enter the text of the document’s description under
“Document Description”. Click “Insert” to insert the document, and “Delete” (the button
that says that) to remove it. The “Delete” icon allows you to remove that document from
the database.
Note the two available fields for documents. One is labeled “Document (images)”, and
the other is labeled “Document (PDFs, movies, sounds)”. This is because one of the
containers is optimized for images, and the other is optimized for active content, such
as movies, sounds, and PDF files. You should use the appropriate container for your
data for maximum effectiveness. The system is programmed only to accept the
appropriate type of content for each container.
When you insert content, a small magnifying glass icon with a “+” symbol will appear.
This is the Zoom icon, as shown on the next page:
VetTracker User Guide!
Page 36
The Zoom icon gives you the capability to view the content in a larger context. If you
click it, the system will present the Document Detail window (see the next page):
VetTracker User Guide!
Page 37
You can resize this window for greater effectiveness if you like. You can also browse
through active content (play movies or audio, or page through a PDF file) directly in this
window. Close the window when done.
When done inserting documents for the current event, simply close the window. You’ll
be returned to the Data Entry screen.
Inserting an Event Plan Onto a Veteran Record
VetTracker is equipped to insert a preplanned set of events onto a veteran’s record.
This allows you to avoid having to create event records one by one for a recurring
series of events that all or most veterans will undergo during their time in the system. At
present, only one plan is supported, the HCP and follow-up review series. Future
releases will support additional configurations.
To insert an event plan on a veteran’s record, click the folder icon on the Event History
tab, as shown below:
VetTracker User Guide!
Page 38
VetTracker will automatically insert the series of events for the plan. At present, this plan
includes:
• Initial HCP Review Needed
• HCP Review Needed (x3, at 30-day intervals)
• Periodic Review Needed (x3, at 30, 60, and 90 days from the preceding review)
The starting point for the review plan is the date the veteran was accepted into the
SSVF program. The system will determine this based on the “Enrolled in SSVF
Program” event date. (You would select the event “Enrolled”, followed by the Event Type
“SSVF Program” to create this event.) If there is no date for this event, the system will
create the plan starting on the current date.
Financial Tab
VetTracker provides the ability for you to record the income sources and amounts
available to veterans. This capability will make it simple and easy to determine the
veterans’ eligibility for the various programs available to them. The data entry
capabilities for financial information are centered around easy entry and retrieval of the
financial information, based on the month and year, the income source, or by the
individual financial entry. Let’s take a look at the screen on the next page:
VetTracker User Guide!
Page 39
As you can see, there are individual tabs that organize the financial information by the
month (and year), the income source, and then all entries together. Here’s a brief
explanation of how VetTracker stores financial information.
Every financial information carries the variables you see above: The month and year of
the income, the source of the income, the amount, and the “amount for total”. That last
item requires a bit of explanation. Income sources are defined in the system options, as
with event source codes and the like. Your system administrator has the capability to
determine whether an income source should be included in financial summary reports
or not. You can tell at a glance on the financial input screen whether a given item will be
included on the summaries by looking at the “Amount for Total”. If it matches the
Amount (which you will enter), then it’s included in the totals. If it’s 0, on the other hand,
it’s not. Simple enough?
VetTracker User Guide!
Page 40
Let’s take a look at data entry on each of the three Financial tabs.
Financial Data Entry By Month
Entering financial data entry by month may be the most convenient way when you
receive data from your veterans once they’re in the program. In all likelihood, veterans
will report their income month by month. In such a case, it’s simplest to set the month
and year and then add each income item without having to set the month and year for
every item. It is this need that the By Month tab was designed to meet.
At the top center of the By Month tab are two pull-down menus, one for Month and one
for Year. Every item you add to a veteran’s record will automatically inherit the month
and year that are shown on these two pull-downs.
Entering a financial item is very similar to entering a new event. You click the New Item
button:
VetTracker presents the list of income sources available, using the Click and Select
method you’ve seen before:
VetTracker User Guide!
Page 41
Pick your income source, and VetTracker inserts it into a new financial line item, as
shown:
All you do now is type in the amount, and you’re done. A couple of hints:
There’s a shortcut within FileMaker that simplifies this kind of data entry. The function is
found under Insert > From Last Visited Record. The keyboard shortcut is Control- (or
Command on the Mac)- ‘ (apostrophe). This will insert the value from the last edited
record into the current field. So if you have the same dollar amount on the current
record as you did on the last, just press Ctrl-’ and FileMaker will insert that amount into
the new record.
Don’t be startled by the Amount for Total. You can’t edit this amount; it’s automatically
calculated. If you expect the amount to be different from what it is (zero rather than
nonzero or vice versa), contact your local site system administrator and check the
“Show in Totals” setting in the Income Sources options.
Duplicating a Month’s Entries
Many times, a veteran’s income is the same from month to month. There’s a special
function available on the By Month tab to make repetitive income entries easier. With
this function, you can copy all the entries from a previous month to the current month,
which will give you a template from which you can work with less effort.
In order to use this function, you start by changing the month and year pull-downs to the
month you want to use as your source (i.e., the month you want to copy). Then, you
click the Duplicate button:
VetTracker will automatically duplicate all line items from the source month (the month
you have selected) and insert them into the current month. This can be done multiple
times, if desired.
VetTracker User Guide!
Page 42
Financial Data Entry by Income Source
Under certain circumstances, it can be easier to enter all the veteran’s financial
information from a single income source at a time (for example, when a veteran first
comes into the program). In such cases, the By Income Source tab should serve well.
Similarly to the By Month tab, you set the Income Source at the top center of the tab.
You’ll use the Click and Select method to do so. Every line item you enter will inherit the
Income Source value at the top of the tab when you create it.
Creating a new line item works just as with other new records. Click the New Item
button:
You’ll be given a new row in which to enter data. In this case, you’ll enter the month,
year, and amount of the item.
VetTracker User Guide!
Page 43
Financial Data Entry by Individual Item
As a third option for financial entry, you can put information in by individual line item.
When you do so, you’ll need to put in every data element - income source, month, year,
and amount - for each entry. As such, you probably won’t want to do this when you have
multiple entries to make of one type or another. However, it can be easier when you
have a scattering of entries to make from different months and income sources than
trying to set the header value for each one. In any event, this option is provided for your
use.
VetTracker User Guide!
Page 44
Creating a new entry on this tab is similar to the others. As before, click the New Item
button:
VetTracker presents the list of income sources available, using the Click and Select
method you’ve seen before:
You’ll then be placed back into the Data Entry view, ready to accept the month, year,
and amount for that line item.
VetTracker User Guide!
Page 45
Case Notes Tab
The Case Notes tab is specifically designed to store, well, case notes on a veteran. The
input is quite simple. Let’s take a look.
Case notes provide free text and a date of entry. (The account name of the individual
making the entry is also recorded, behind the scenes; you can see the information by
hovering your mouse above the entry.) You can use the scroll bar on the field to see all
of the entry, if desired, and a Case Notes report is available from the Stats / Reports
screen.
VetTracker User Guide!
Page 46
Entering A New Case Note
To create a new case note entry, just click the New Item icon. The system will move
your cursor to the last row of the portal. Just start typing.
The date will default to the current date (the date you create the note), but you can
change it if you like. The case notes will sort in descending date order, so you’ll always
see the latest note at the top (as soon as you save the record by clicking outside a field
or pressing the “Enter” key on the numeric keypad).
VetTracker User Guide!
Page 47
Contact Info Tab
In order to assist vets, you’ll need to be able to get in touch with them. That means
recording their addresses, telephone numbers, and / or email addresses. The Contact
Info tab is where you do this. The following screen shot gives you an overview:
You can record any number of addresses, phone numbers, and / or email addresses for
a given veteran. You should mark one of each as the “Primary” contact information; that
entry will sort to the top of the list.
VetTracker User Guide!
Page 48
Entering New Contact Information
Entering a new address, phone, or email is basically the same. You click the New Item
button:
VetTracker will place your cursor in the first blank row, and you just start typing. In each
case (address, phone, and email), you can select from a type of information being
saved, such as home, work, cell (phone), or the like. The lists of available information
types can be edited by your site-specific system administrator.
Some finer points to note:
• There is an input mask on the phone number. You can type either the 7- or 10-digit
phone number directly into the field. VetTracker will then automatically add the proper
formatting for you.
• In the case of the email contact information, depending on your email client, you can
send an email directly to a given address by clicking the email icon:
Assuming your email client is compatible, the system will launch a new email message
to the given address.
Advocates Tab
The Advocates tab allows you to associate a veteran with the veteran advocates who
may be handling various aspects of his or her case. Since advocates can, in some
cases, specialize in different aspects of veteran care, VetTracker has been configured to
allow you to specify a type or function for each advocate for each veteran. You can
choose these various types under the Edit Options area; or, if this does not suit your
business model, you can have a single advocate for each veteran, as desired. Let’s
take a look at the Advocates tab on the next page.
VetTracker User Guide!
Page 49
Adding a New Advocate to a Veteran Record
To add a veteran advocate, click the New Item button:
VetTracker User Guide!
Page 50
The system will, as usual, present a list of possible options.
Click the advocate you would like to add to return to the previous screen. If a default
type or function has been defined for that advocate, then it will automatically be added
to the advocate record. You’ll then be given the opportunity to send a notification to the
new advocate about the change.
Changing or Adding a Type / Function to a Veteran Advocate Entry
The type or function associated with a veteran advocate for a particular veteran can be
changed (or added if it does not exist). This will have no effect on the default type or
function defined for that advocate, nor on any other entry for that advocate on other
veterans. To update the type or function for a veteran advocate, click on the type /
function field on a given record:
The possible options will appear in a new window:
Click your choice and it will be added (or changed) on the advocate record.
Military Service History Tab
On this tab, you can enter the service eras in which the veteran served. (Future
releases of VetTracker may make it possible to expand this functionality to include a
true service history, including dates of service and branches.) The eras in which a
VetTracker User Guide!
Page 51
veteran serves have an impact on programs that veteran may be eligible for; hence, this
information can affect what services you’re able to provide.
Data entry for the Military Service History is very much like data entry for the Event
History, only simplified. Let’s take a look.
There is only one data element to enter on the Military Service History tab, the era of
service. It’s entered using the Click and Select method. To enter a new service era, click
the New Item button:
VetTracker User Guide!
Page 52
The system will, as before, present a list of possible options.
Click your choice to return to the previous screen. The selected service area is entered
on the veteran’s record.
VetTracker User Guide!
Page 53
Notes Tab
Similar to the Case Notes tab, the Notes tab is intended to allow you to enter general
information about the veteran’s case that would not fit anywhere else. If VetTracker
provides a specific place to put information (such as a change of status, which would be
in the Event History, or specific logging about a contact you made with the veteran,
which would more properly belong in the Case Notes), then it would be best to put it
there.
However, every system inevitably leaves gaps. For those times when there is just no
good place to put information, the Notes tab is provided.
Data entry is very similar to the Case Notes tab. You click the New Item button:
and the system will place you in the first blank row. Simply begin typing to enter your
information. As with Case Notes, the Notes will appear in reverse date order(once the
record is committed). Therefore, the most recent entry will appear at the top of the list.
Statistics and Reports
Getting data into a database system accurately and easily is a good goal. However, if
you’re unable to extract that information in a quick, easy, and meaningful way, then you
haven’t accomplished much. Fortunately, VetTracker is equipped with a robust, easy-touse reporting system, as well as the ability to create reports “on the fly” from a found set
of veteran records. You can filter your records according to any event status code you
like, across any date range you like, and produce a range of reports on your selection.
Let’s see how it works.
VetTracker User Guide!
Page 54
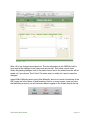
The Statistics and Reports Screen
You have a variety of reporting tools available from this screen, across four distinct tabs.
The data reporting tools are designed to give you quick access to important metrics
about your program, and simultaneously to be flexible to meet changing needs. Let’s
take a look at what’s available, tab by tab.
General Report Information
Reports in VetTracker are produced on screen, using web-standard HTML code. This is
done to maximize compatibility across web browsers and within the FileMaker client
itself. You can print or save the screens (or copy / paste into a word processor) to make
full use of the data.
Statistics Tab
The Statistics tab is designed for basic metrics about your program. Most of them are
counts of various basic metrics since the inception of your program (i.e. all data in the
system). In some cases, you can select subdivisions of the data to get more detail, or to
see data particular to certain kinds of veterans. Here’s a screen shot of the Statistics
tab:
VetTracker User Guide!
Page 55
Whenever you have a pull-down menu, you can choose a variable to fit in that slot
(generally via the Click and Select method). The statistic will be shown in the field to the
right. Otherwise, the statistic collection is automatic.
Standard Reports Tab
The Standard Reports tab is designed for certain “canned” reports that you can pull
without much input from you. The system is preprogrammed to make a determination of
what records to search out and present, although in some cases you may be asked to
input a date range covering the time period you want to report on.
Report generation is quite simple. Select a date range (either by selecting a time period
from the pull-down menu, or by choosing a start and end date), if required, then click the
report you want. The system will automatically generate the report and present it to you.
Note to Instant Web Publishing users: When you choose a time period from the pulldown menu, you must also click the “Update” button (shown below) in order to refresh
the start and end dates. Otherwise, the system will produce an error.
As of this writing, three reports are available through the Standard Reports tab.
The Director’s Summary provides a high-level look at important statistics on the overall
program. No date range is needed for this report.
The Needs report produces a summary of the number of days elapsed between needs
being identified and filled, across a date range you specify, for all records in the
database. It will produce such information for event status codes of “Need Identified”
and “Need Filled”. If those status codes are not used, the system will produce no report.
The Enrolled / Not Housed report produces a summary of all veterans who have been
enrolled in the SSVF program, but have not been stably housed. No date range is
needed for this report, which keys on the event status codes of “Enrolled” (event type
“SSVF Program”) and “Stably Housed”.
Future automatic reports may be made available at user request.
VetTracker User Guide!
Page 56
Custom Reports - Single Event Tab
This is truly the heart of the reporting system in VetTracker. From this tab, you can
generate a variety of reports on your data, encompassing virtually any event status
code you choose across any time period you choose. You also have a variety of report
formats to choose from. Let’s take a look.
Just as with the Standard Reports tab, you choose a date range or time period (from the
pull-down). You can also choose one or all of an event status code, event type, and / or
organization. Then, choose which report you want to generate. (If you make a mistake
and want to start over, just click “Reset All”.)
Confusing? Let’s take an example and help it make more sense.
VetTracker User Guide!
Page 57
Let’s say you want to know how many vets have been enrolled in the SSVF program
this year, so far. So you would start by selecting your time period. “This YTD” appears in
the Time Period pull-down, so choose that:
(Remember: On Instant Web Publishing, you’ll need to click the “Update” button to force
the dates to appear in the date fields.)
Next, we want to know the vets who have an event status of “Enrolled” in their history.
So, you’d choose that (via the Click and Select method):
But enrolled in what? Well, the SSVF program. That’s an Event Type, so select (again,
by Click and Select) the SSVF program:
If you wanted to, you could further narrow the search by looking at only the vets who
were enrolled in the program by a certain entity - say by your organization, or by the VA,
or whomever. In this example, though, we won’t do that.
In the upper right-hand corner of the Custom Reports - Single Event tab, you’ll see a
field that displays the number of vets that match your search criteria. It’ll update itself
automatically as you make your selections. How are we doing at this point?
So far, so good. If we were to try to generate a report where there were no records
matching, the system would simply tell us no report could be generated.
VetTracker User Guide!
Page 58
Okay, so we’ve made all our selections for finding the veteran information we want. All
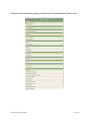
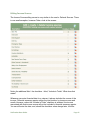
that’s left is to choose a report. We can chose from the following selections:
Report
Name
Report Description
Case Notes Includes First Name, Last Name, HMIS #, Phone #, case notes
Financial
Includes a summary of financial income information by income source
Summary
Found Set Includes first name, last name, gender, HMIS #, primary phone, referral
source, vet advocate
HCP
Includes First Name, Last Name, HMIS #, All HCP Dates (completed &
Needed
needed), Phone #, column for notes
Simple
Includes First Name, Last Name, HMIS #, Phone #, column for notes
SSVF
Includes First Name, Last Name, HMIS #, Date Screened, Date Enrolled,
Date Discharged
Tooltips are available to assist you in choosing the report. When the selection screen
appears for the Click and Select, you can hover your mouse over each report and it will
show you the above descriptions. You can do the same once you’ve made your
selection on the Reports screen.
For this report, let’s choose the Simple format. Here’s what our final selection screen will
look like:
VetTracker User Guide!
Page 59
What’s next? Actually creating the report! Do so by clicking the “Report” icon, which
looks like this:
The system will generate your report and output it to the screen (in a new window, if
you’re using the FileMaker client; otherwise, it will appear in your browser). Here’s a
screenshot of what the report might look like (personal data obscured to protect
privacy):
That’s basically how to create a single event report in VetTracker. You literally can
create a summary of any event in the system, across any time period, using any of the
formats provided.
That said, this is the sort of feature that requires the “play with it” approach. Actually
creating detailed instructions for every possible combination of data would be
impossible, so the best advice for using it is to go into the system and, well, play with it.
See what combinations of reports you can create with your own data. You may be
pleasantly surprised at what’s available.
Custom Reports - Days Elapsed Tab
In many circumstances, the number of days elapsed between two events is an
important metric. It can give you an idea of how efficiently your organization processes
its clients through portions of your workflow. Of course, no such metric is perfect; you’ll
want to review the specifics in order to know what the raw numbers are really telling
you. That’s where the Days Elapsed reports come in. They allow you to choose any two
events and create a report that compares the dates, the number of days elapsed
between them, as well as see a summary of the specific events themselves so you can
judge what the numbers mean.
VetTracker User Guide!
Page 60
Here’s a quick look at the input screen for the Days Elapsed tab.
In many ways, it’s similar to the Custom Reports - Single Event tab. You still choose a
date range (either directly or through the Time Period pull-down). And, you still choose
events, event types, and organizations via the Click and Select method. However, in this
case, you will make two selections - a minimum of one from each column. Also, you
must choose an event in each column; you cannot base a Days Elapsed report on
merely an event type or organization.
Other than that, the process is straightforward. Choose your time period, choose event
#1 and event #2, and click the Report icon to generate your report. The system will
automatically create a comparison report that allows you to see the time span between
events. Let’s do an example and see what we get.
Let’s say we want to know the number of days elapsed between the first contact with a
vet (status code “Initial Contact”) and the time he was enrolled in the SSVF program
(status code “Enrolled”, event type “SSVF Program”), for the current year. Here’s what
our selection screen would look like:
VetTracker User Guide!
Page 61
And here’s what VetTracker produces for us when we click the “Report” button:
...
VetTracker User Guide!
Page 62
In this way, you can measure the time frames between two events and tell how you’re
doing in moving vets through your program.
Editing System Options
As mentioned before, VetTracker allows you to customize the various pull-downs and
selection lists you have available. This feature gives you a wide range of control over
your data entry and workflow.
Option editing is a feature available only to users with Super User privileges. It’s
intended for only a few individuals at your work site to have this capability. Someone in
a position of authority (such as a supervisor) is usually best, since control over workflow
is something that is attached to organization policy. However, it is also recommended
that you not restrict this access to only a single individual, since that can lead to a
complete inability to perform certain functions (such as accounts maintenance) if that
individual is unavailable for some reason.
Let’s take a look at the options that are available to you for editing within the VetTracker
system.
Editing Value Lists / Options
The system administrator can modify the various value lists and options for Click and
Select found throughout the system. This is achieved through the first option on the Edit
Options screen (which you can reach by clicking “Edit Options” on the Main Menu).
Editing options is fairly straightforward. Choose the option you’re interested in and click
“Go”. VetTracker will present you with an editing screen. Let’s use an example for
starters. Say you want to update the available Referral Sources for the pull-down list on
the Data Entry screen.
VetTracker User Guide!
Page 63
You would choose “Edit Referral Sources” and click “Go”. VetTracker will present the
“Edit / create / delete referral sources” window, shown below:
To create a new option, click the New Data button:
You can also edit existing options, or delete them if you like. However, delete with
caution; you may create situations where existing records are tied to the record you
delete and you may end up with erratic behavior as a result. (Although in this case,
Referral Sources, it’s generally safe to remove an option.)
Many of the other available options are very similar to the Referral Sources. You can
freely edit Address Types, EMail Types, and Phone Types. However, there are some
that require some special attention. Let’s look at them.
VetTracker User Guide!
Page 64
Editing Income Sources
The Income Source editing screen is very similar to the one for Referral Sources. There
is one small exception, however. Take a look at the screen:
Notice the additional field - the checkbox - titled, “Include in Totals”. What does that
mean?
Whenever you enter financial data for a veteran, it always includes the source of the
income. Financial summary reports add up the total income, by income source and
month. However, unless the “Include in Totals” checkbox is selected, the income
associated with that income source will not be included in financial summary reports.
You can still enter the data, and, should the checkbox value change later, it will be
VetTracker User Guide!
Page 65
included. So, it’s important to keep in mind that you must accurately record whether an
income source should be included in your summary totals, because this is the one and
only place that determination is made.
Editing Veteran Advocates
This screen is where you create records for the Veteran Advocates in your program.
Whenever a veteran is assigned to a VA, the system looks here to determine not only
what the selection list should consist of, but also what that person’s email address and
gender will be (for purposes of “natural English” prompts). The latter is of minor
importance; if the computer accidentally calls a man “she” or a woman “he”, the damage
is relatively minor. However, it is fairly important that the email addresses be entered
correctly. They will be used to send notifications to the VAs of new assignments to
veterans for case management.
Another caveat with using this screen has to do with deletions. Before deleting an
advocate’s record from this screen, you should go through the system, locate all
veterans currently assigned to that advocate and reassign them to an advocate who is
remaining in the system. Otherwise, erratic behavior from the system may be
experienced when you try to do it later.
Editing Event Categories
This is the most complex area of system option management. The Event Categories
must be managed correctly, or the Event Types and Organizations will not be correctly
tied to the Event Status Codes - which will negatively affect the system’s ability to pull
data based on events and types. Fortunately, VetTracker makes it relatively easy to
keep these data elements straight.
First, a bit of theory on how the system is organized. Event Categories are the parent
grouping. Event Types, Event Status Codes, and Organizations are all attached to
Categories. There are slight differences - for example, an Event Type may be tied to
many Categories, and a Category to many Event Types, but an Event Status can be
tied to one and only one Category. Nevertheless, it is useful to think of the Event
Category as the “big daddy” of all of them.
The Event Category options screen has been designed to allow you to maintain all the
ties between these four items from a single location. It is strongly suggested that you
use it for that purpose. However, you can also make ties between these items from their
respective screens, which will be covered in a moment.
Let’s take a look at the “Edit / create / delete event categories” screen and do a bit of
exploring.
VetTracker User Guide!
Page 66
Wow. That does look nasty. Let’s break it down and see what we have.
At the top of each row is the name of the category. In this screen shot, for example, we
have “Housing” and “Needs”. Those broad groupings tell us what kind of events we
have clustered together. You can see the events in the first portal on each Category that
are associated with that category. For example, for “Housing”, we see “Homeless”,
“Housed at Risk”, and “Stably Housed”. Those represent the event statuses you might
see under the category of “Housing”.
The next portal gives us the types of events. What are the subdivisions of events? Well,
for example, you might be Housed at Risk in a Hotel / Motel. (If the vet has limited
money, a hotel or motel won’t be a permanent situation.)
VetTracker User Guide!
Page 67
The third and final portal gives us the organizations associated with the events - who
might be responsible for the status, or might have initiated it? For example, if the
veteran became Stably Housed, who helped him? Was it the SSVF program, or did he
do it by his own effort? These are the Organizations associated with the Category.
Similarly, the next category is Needs. Two events appear here, Need Filled and Need
Identified. Pretty simple. Then you have the Event Types - Benefits, Housing, Financial.
Those are the types of need a veteran might have.
Hopefully, these examples make it clearer how the various data elements work together.
Now let’s look at how we maintain them and make changes when we need to.
The first thing you’ll need to know is that certain of the event elements are locked by the
developer. These will appear with pinkish or red backgrounds (FileMaker client,
FileMaker Go only), as seen below:
They’re locked because the items are tied directly to hard-coded elements inside the
system. For example, the Housing category is locked because there are reports and
statistics that are tied directly to it. Deleting it would cause malfunction of those features.
Hence, deletion is not allowed.
However, you can make changes. You can add new data elements to a locked category.
You can tie a locked event type to a new category. You can even change their
descriptions or wording. You just can’t delete them.
Next, we need to look at the Link and Unlink buttons. These are new, unique to the
screens that maintain event status and its related elements. They look like this:
Link -->
Unlink -->
These buttons allow you to attach, or detach, the various elements to or from each
other. They do not create or delete actual data; all they do is associate the records with
each other.
Whenever you click the Link button, you’ll be prompted for the appropriate data element
(Event Status, Event Type, or Org) via the Click and Select method. Choose the one
you want, and it will be associated with the Event Category. Let’s take an example.
VetTracker User Guide!
Page 68
Take a look at the Discharge category. It currently has no events associated with it:
We’re going to change that. We’ll click the Link button:
and from the Click and Select list, choose Discharged:
VetTracker inserts “Discharged” into the list of associated Events Statuses for the
Discharge category for us.
Say we make a mistake, though. Let’s see how we go about breaking a link.
VetTracker User Guide!
Page 69
Let’s say that we accidentally attach “Need Filled” to the “Discharge” category.
We need to break the tie. To do so, we click the Unlink icon:
VetTracker prompts us to make sure we want to do that:
Since we’re sure, we click “OK”. VetTracker clears the link between the Category and
the Event Status for us, as seen on the next page.
VetTracker User Guide!
Page 70
The same sort of editing can be done with Event Types and Organization Codes.
However, there’s another element associated with editing these elements. It has to do
with how event status descriptions appear in the descriptions on the Event History tab
on the Veteran Data Entry screen.
You may have noticed that the event history statuses appear more or less using “natural
English”. Let’s take a quick look:
But if you look in the Event Category screen at that event status, what do you see?
Huh. You get the various codes - “Housed at Risk”, “Shelter”, and “Self”, and then you
get the comma and the “via” in separate fields. These are what VetTracker refers to as
“conjunctions”. They allow the system to connect the elements together in a way that
looks natural to the reader. The good news is, you can define these conjunctions so
they make sense for your particular program. Let’s take a look at how that works.
VetTracker User Guide!
Page 71
Whenever you connect an event category to an organization or event type, you can
specify a conjunction value. The system will automatically insert that conjunction
between the event status code and the organization or event type whenever the event
status is inserted into a veteran’s record. (You can hover your mouse over the
conjunction to see a sample of how it might look.) Hint: Put a space before and / or after
the conjunction to keep from running the words together.
This looks like a lot to manage. But it all basically boils down to this:
When you tie an Event Status to an Event Category, all Event Types and Organizations
associated with that Event Category become available for entry on the Event Status.
The converse is also true:
No Event Status can be associated with any Event Type or Organization without first
being tied to an Event Category.
Creating New Event Categories
You can create new event categories. This can be handy when your workflow changes.
New categories can be created when you want to tie a set of event status codes
together, or when you want to subdivide a status code into various event types, or when
you want to allow multiple different organizations to be tracked against an event status.
(Remember, you cannot attach event types or orgs to an event status code unless it is
associated with an event category.)
To create a new event category, click the New Data button, located at the upper righthand corner of the “Edit / create / delete event categories” window:
You’ll be given a new record to write data to. The new category can be associated with
event types, event status codes, and / or organization codes, at your discretion.
Creating New Event Types, Event Status Codes, or Organization Codes From
the Event Categories Window
You can create new entities directly in their own Options screens. However, sometimes
it’s more convenient to do it from the “Edit / create / delete event categories” window.
Imagine, for example, that you try to connect an event status to a new category, only to
find that the event status you want doesn’t exist. It’s much easier to create it right then
than to back out, close the window, go back to the Options screen, edit Event Status
Codes, create the new Event Status, then back out, go back to Event Categories, and
then attach the Event Status. Ugh. No, you’d much rather just create the new Event
Status right away. Here’s how.
VetTracker User Guide!
Page 72
You click the New Data button next to the type of item you want to create - event type,
event status, or organization:
The system will present a New (event status, event type, or organization) window for
you to enter your data. We’ll show the New Event Type window for this example:
When you enter your new data and click “Done”, VetTracker will automatically connect
the new data to the parent event category you had selected when you clicked the New
Data button.
Deleting Event Categories
You can delete event categories you’re no longer using from the “Edit / create / delete
event categories” window. You may be surprised to learn that doing so will not damage
your event histories, as their descriptions are copied into the records as static data. Nor
will deleting an event category remove any of its associated event status codes, event
types, or organizations.
However, deleting an event category will remove your ability to associate any event
types or organizations attached to it with the event statuses attached to it. In other
words, you’ll no longer have the ability to have the subdivisions of that event status
available to you. Hence, be very certain that you no longer want that capability before
deleting.
In many cases, it’s a better idea to relabel the category to a different name rather than
deleting it. This maintains its utility and you can always attach different event types and
organizations if you need to.
Finally, remember the one caveat associated with deleting event categories. Certain
event categories are “locked” by the developer. You will be prevented from deleting
them if you should accidentally attempt to do so.
VetTracker User Guide!
Page 73
Special Cases
There are some special considerations within the Event Categories screen you should
be aware of. One of these is the category called Warnings. That category is tied to code
inside the system that automatically flashes the text of the Event Status Code up on the
Data Entry screen whenever you attach a code that’s associated with the Warning
category to a veteran’s record. Let’s see how that works.
Here’s a shot of John Doe’s record. He has no status codes in his history at the
moment, as you can see.
VetTracker User Guide!
Page 74
Now, let’s say there’s a problem with John. He’s got some issue that someone outside
the agency has to resolve before your agency can continue with his case. So, you want
to warn the other advocates that he’s not to be contacted until the issue is resolved.
Here’s how you do that. You attach a status of “Do Not Contact” to his history. When you
do, his screen will look like this:
Notice what has happened. The “Do Not Contact” banner appears above his tabs. In
addition, the “Do Not Contact” status code in his Event History appears highlighted in
red. (This will not happen if you’re logged in using Instant Web Publishing.) These
changes alert any user that John is not to be contacted.
So how does that work? Let’s take a look at our Event Category screen again:
VetTracker User Guide!
Page 75
Note that, in this example, we have two event statuses, “Do Not Contact” and
“Emergency Contact”, attached to the “Warnings” Event Category. This tells VetTracker,
in essence, that these two event statuses are special - that when either of them is
selected, the system should flash the big warnings up on the screen.
This feature does have a limitation. It will only show one Warning at a time. So what
happens if you have more than one event status on a veteran’s history that ties back to
the Warnings category? Let’s see what happens. Take a look at the next page.
VetTracker User Guide!
Page 76
As you can see, the warning banner now matches the “Emergency Contact” status. The
“Do Not Contact” status is still visible in the Event History, but does not show in the
warning banner. Why?
The basic rule is this: The most recent status code tied to the Warning category will be
the one you see in the warning banner. In this way, you can retain older warnings in the
history as you see fit, and override them by placing a new warning in the history.
VetTracker will automatically place the warning of the most recently created status into
the warning banner for you.
At this point, you may want to know how to get rid of a warning. It’s quite simple: You
just delete the record from the Event History. Let’s see what happens when we do that.
Let’s take out the Emergency Contact status from John Doe’s record.
VetTracker User Guide!
Page 77
As you can see, the “Do Not Contact” warning is restored. Again, it follows the simple
rule that the most recently created warning is displayed. Since the “Emergency Contact”
warning has been removed, VetTracker now only sees the “Do Not Contact” warning
and displays that.
You can create new Event Status Codes and tie them to the Warning Event Category to
take advantage of this functionality, specific to your particular needs. There’s no special
programming tied to the Event Status Codes themselves; only the Event Category.
Editing Event Status Codes
Since the Event History is basically the heart of your workflow in VetTracker, keeping a
good list of Event Status Codes is crucial. An effective list of codes will make your life
simple and easy. A poorly organized or confusing list of codes will make it miserable.
Fortunately, keeping your status codes maintained is really quite easy.
VetTracker User Guide!
Page 78
Event Status Codes are simpler to edit than Event Categories. Since only a single
category can be associated with any given status code, and a status code is only
related back to a category (not to an organization nor to an event type), data entry and
maintenance is considerably easier.
Let’s take a look at the “Edit / create / delete event status codes” screen:
Considerably simpler than the companion screen for Event Categories. In this case, all
we have is a description of the Event Status Code, the Event Category it’s tied to, and a
default report format.
The first one is easy; the description is the name of the event status. It’s what appears
on the list of Event Status Codes when you select one, either when you choose a code
to attach to a veteran’s Event History, or when you’re choosing a code to pull a report.
Nothing fancy.
The second we’ve sort of already covered. It’s the Event Category to which this Event
Status Code is tied. Remember, you can attach an Event Status Code to one and only
one Event Category. You’ll click the Link icon to make the attachment, then use the
Click and Select method to choose the Event Category you want.
Finally, we have a Default Report Format. This is a convenience feature. What this will
do is make it easier to pull a report for this Event Status Code. Say you have a
particular report format you like and want to use most of the time when you pull a report
for this Event Status Code. By setting the Default Report Format, you tell VetTracker
that it should assume you want to use that report format when you do so. You can
VetTracker User Guide!
Page 79
always change it, but if that’s the report you usually use, it’ll save you having to select it
when you pull the report for this code.
To set the Default Report Format, just click in the field. The system will present the list of
available report formats by the Click and Select method. Choose the one you want to
set the value.
Editing Event Types
Event Types have their own screen for maintenance. Again, it’s recommended that you
maintain ties between Event Categories and the other elements from the Event
Categories screen. However, this screen is provided for your use, should you desire to
maintain the Event Types directly.
Event Types are not too difficult to maintain. They have a description, and they can be
tied to one or more Event Categories. The screen is similar to the Event Categories
screen, just with fewer options:
Just like with Event Categories, you use your Link and Unlink icons to attach and detach
the Event Categories to and from the Event Types. The Add Data and Delete Data icons
are used to, well, add and delete Event Types.
VetTracker User Guide!
Page 80
Editing Organizations
Just like Event Types, the Organizations screen is similar to the Event Categories
screen, only simplified. Take a look:
All the same controls you should be familiar with by now are available - Link, Unlink,
Add Data, and Delete Data. Refer to previous sections to see how they work.
Editing User Accounts
User Accounts are needed for users to access VetTracker. (This should not come as a
surprise.) When VetTracker is deployed by the developer, accounts will be created for
personnel in your organization. However, once deployed, you’ll need to maintain those
accounts yourself. The “Edit / create delete accounts” screen is created specifically for
that purpose.
You have a wide range of options available to you for the management of internal
accounts in VetTracker. You can create, delete, disable, enable, and modify user
accounts. You can reset a user’s password, if the user has forgotten it. However, there
is one very significant caveat to which you must adhere:
Only users with Super User privileges can perform user account activities!
If you should delete or disable the last account with that privilege set, or if you are the
only user with those privileges and you forget your password, you will have to call for
developer assistance to restore system functionality in this area! Hence, it is highly
VetTracker User Guide!
Page 81
advised that you have more than one person in your organization with Super User
privileges as an account manager.
Let’s take a look at the “Edit / create delete accounts” screen:
Accounts are fairly simple to set up. Each user will need the following:
•
•
•
•
Name (this is the person’s actual name)
EMail address (to enable the system to send email to that user)
Account / Login Name (the user name the person will use to log in)
Privilege Set (defines what the person is able to do in the system; must be selected
from the list)
You may notice that there’s no “password” field on this screen. That’s because you don’t
need to know the user’s password. (In fact, there’s no way for the developer to know a
user’s password, once it’s been changed.) We’ll see how that works in a minute.
Let’s go through some of the icons on this screen and see what they’re for.
Icon
Use
New account: Click here to create a new user account.
Reset password: Clicking here resets a user’s password.
Lock account: This icon (without a lock symbol) means the user’s
account is enabled. Click it to lock (disable) the user’s account.
VetTracker User Guide!
Page 82
Icon
Use
Unlock account: When this icon appears with a lock symbol, it means the
user’s account is locked (disabled). Click to unlock (enable).
Delete account: Click here to delete the user’s account. Be certain you
want to do this; if you make a mistake, you’ll have to recreate the account
from scratch.
Update account: If you make a change to a user’s account (such as
changing the account’s privilege set), click this icon to refresh the account
information stored in the database’s security tables.
Now that we’re familiar with the icons and what they do, let’s run through some sample
operations and take a look at how VetTracker reacts to account changes.
Creating a New User Account
To create a new user account, we start by clicking the New Account button:
VetTracker creates a new record for us. We’ll fill out the information with some sample
data (just as an example).
Once we’re satisfied with what we’ve typed, we click outside of a field to commit the
changes. (Note: This works differently in Instant Web Publishing; we’ll cover that in a
minute.)
VetTracker User Guide!
Page 83
VetTracker creates the notification of new account for us:
Note that VetTracker has created a temporary password for the user. You should keep
this password secret between yourself and the new user; if you expose it to a third
party, it is theoretically possible for Joe’s account to be compromised.
You can click the “Send EMail” button to send a notification directly to Joe at this point.
However, this will depend on whether your email client (program) is compatible with
VetTracker or not. Many are; some are not. It’s suggested that you try it, because it’s
significantly easier than trying to copy / paste the information. However, you might have
to do that if you have trouble with your email program. (Many web-based email clients,
for example, will not work properly with this function.)
At this point, you have a properly configured new account for your new user.
Consideration for Instant Web Publishing
When creating a new account in the IWP client, clicking outside a field will not
automatically trigger the new account notification. You’ll need to click the Submit New
Account button, which appears below the Refresh Account button:
This icon will only appear when the account is new and in need of being submitted. You
won’t see it otherwise.
VetTracker User Guide!
Page 84
Resetting a User’s Password
We have all forgotten a password at some point in our computing lives. To allow for this
possibility, VetTracker provides a function for a local administrator to reset a user’s
password. Start by clicking the Reset Password icon:
VetTracker will prompt you for confirmation:
When you click “OK”, you’ll be presented with the Password Reset notification, which
looks very similar to the New Account notification:
VetTracker User Guide!
Page 85
Again, you can optionally send an email, copy and paste the notification, or print it to
PDF (or even a hard copy, if you like).
Disabling and Re-Enabling User Accounts
Sometimes, personnel leave an organization temporarily planning to return after a
period of time. It can be useful to have the ability to disable their accounts without
completely deleting them; that way, when they return, you don’t have to completely
recreate the accounts from scratch. VetTracker allows for this scenario. Let’s try it out.
Under normal circumstances, your users’ accounts will be enabled. The icon indicating
that status looks like this:
Normal, happy user. Now, if I want to disable this user’s account, I click the icon.
VetTracker prompts me to make sure I want to do this:
VetTracker User Guide!
Page 86
I confirm by clicking “OK”. Let’s see what Joe’s account record looks like when I do:
The icon now is overlaid with a little padlock, and all the fields have been highlighted in
red. (Note: The highlighting won’t function in the Instant Web Publishing environment.)
At this point, Joe will not be able to log into the system; he’ll get a rejection upon any
attempt.
Let’s say now, Joe comes back from sabbatical. We want to reactivate his account. To
do so, we click the same icon, except now it looks like this:
This time, VetTracker doesn’t ask for confirmation. It just unlocks Joe’s account. His
entry now looks like this:
The fields are all back to normal, and the icon has no more padlock on it.
Updating Account Information
This feature allows you to change the information on a user’s account in the database
without having to delete and recreate it. This can be useful for changing a user’s
privilege set, for example, or when you need to update a user’s account name. (This
isn’t necessary when updating a user’s “real world” name, such as after a name change;
that information isn’t used by the security model, only by VetTracker, so changing it in
the accounts screen is sufficient.)
Let’s take an example of needing to upgrade Joe’s account from Data Entry to Super
User and see how this works.
VetTracker User Guide!
Page 87
We start by changing the data we want to change. In this case, we update the Privilege
Set field with the new information:
Now, we click the Update Account button:
VetTracker warns us that some changes will take place if we proceed:
VetTracker User Guide!
Page 88
We’ll click “OK”. The system presents us with the Notification of the change:
As usual, we have the same options for distributing the information to Joe as we did
before.
Editing Default Information
VetTracker’s Options screens has a few more fields you can enter to personalize the
system. These fields are used as defaults for specific entries to make it a little quicker to
enter data. You can see the options at the bottom of the Options screen:
The name of your organization will be used in emails you send to veterans, in the
subject line. Your home city and state are automatically inserted on any new address
you create for a veteran in the Contact Info tab on the Data Entry screen. By inserting
this information here, you avoid having to do it every time you send an email or create a
new address.
VetTracker User Guide!
Page 89