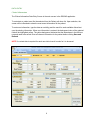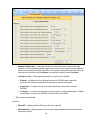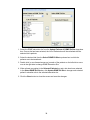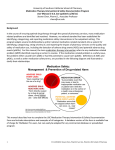
1
U s e r Ma n u a l Version 3.0.2 June 2010 A-1 DISCLAIMER EERC DISCLAIMER LEGAL NOTICE “LEGAL NOTICE: This computer program was prepared by the Energy & Environmental Research Center (EERC), an agency of the University of North Dakota, as an account of the work sponsored by the Department of Health and Human Services Health Resources & Services Administration. The services performed, program, apparatus, product, or process disclosed and accompanying documentation are provided "as is" without warranty of any kind— expressed, implied, or statutory, including warranties of merchantability and fitness for a particular purpose—except as stated herein. Neither the EERC nor any person acting on behalf of the EERC warrants, guarantees, or makes any representations regarding the use, or the results of the use, of the service performed, program, apparatus, product, or process disclosed, or the accompanying documentation, in terms of correctness, accuracy, reliability, currentness, or otherwise, except as stated herein. Nor does the EERC represent that the use of the service performed, program, apparatus, product, or process disclosed, or the accompanying documentation, will not infringe upon privately owned rights, including copyright, patent, and trademark rights. If the services performed, program, or accompanying documentation are defective, you, and not the EERC or its dealers, distributors, agents, or employees, assume the entire cost of all necessary servicing, repair, or correction except as stated herein. The EERC does not warrant that the operation of the program will be uninterrupted or error-free. Reference herein to any specific commercial product, process, or service by the trade name, trademark, manufacturer, or otherwise does not necessarily constitute or imply its endorsement or recommendation by the EERC or any sponsor.” UNITED STATES GOVERNMENT DISCLAIMER LEGAL NOTICE This project is funded in part by Grant No. U32/CCU822743-03 from the Centers of Disease Control and Prevention of the U.S. Department of Health and Human Services and from the Montana Department of Public Health and Human Services. The contents herein do not necessarily reflect the official views and policies of the U.S. Department of Health and Human Services or the Montana Department of Public Health and Human Services. ACKNOWLEDGMENTS The material in this Diabetes Quality Care Monitoring System (DQCMS) user manual was prepared for publication by: Montana Department of Public Health and Human Services Chronic Disease Prevention and Health Promotion Program Marcene Butcher, RD, CDE Susan Day Elizabeth Johnson, RN, CNP Dorothy Gohdes, MD Todd Harwell, MPH Steven Helgerson, MD, MPH Chris Jacoby, RN, BSN Elisabeth Mann, RN, CDE Janet McDowall, RN, BSN Carrie Oser, MPH Wyoming Department of Health Preventive Health and Safety Division Diabetes Prevention & Control Program Joe Grandpre, PhD, MPH Star Morrison, MS, RD Betty Holmes, MS, RD University of North Dakota, Energy & Environmental Research Center Research Information Systems Madhavi Marasinghe Mary McLaughlin Tera Buckley Erin O’Leary University of North Dakota School of Medicine and Health Sciences Department of Community Medicine James Brosseau, MD, MPH Patricia Campbell, MPH, LRD, CDE Richard Clarens, PharmD Melissa Gardner Gregory Holzman, MD, MPH Donna Shuller, PA-C This publication was made possible by Grant No. U32/CCU822743-03 from the Centers of Disease Control and Prevention of the U.S. Department of Health and Human Services and from the Montana Department of Public Health and Human Services. TABLE OF CONTENTS GETTING STARTED ....................................................................................................................... 1 System Requirements .............................................................................................................1 Installing DQCMS ....................................................................................................................1 Previous Users .............................................................................................................. 1 New Users ..................................................................................................................... 5 Quick Tips to Get Started ........................................................................................................7 Shortcut Keys ................................................................................................................ 7 Copy and Paste ............................................................................................................. 7 Using Tabs .................................................................................................................... 8 Viewing Multiple Records .............................................................................................. 8 DATA ENTRY .................................................................................................................................. 9 Clinical Information ..................................................................................................................9 Data Entry Fields ......................................................................................................... 10 Screen Buttons ............................................................................................................ 12 Patient Demographics ...........................................................................................................12 Accessing Patient Demographics Screen .................................................................... 12 Data Entry Fields ......................................................................................................... 13 Saving Patient Demographics...................................................................................... 14 MENU DESCRIPTIONS................................................................................................................. 15 File ........................................................................................................................................15 Patient ......................................................................................................................... 15 Print ............................................................................................................................. 15 Exit Database (db) ....................................................................................................... 16 Current Patient ......................................................................................................................17 Delete Patient .............................................................................................................. 17 Individual Patient Profile (IPP) ..................................................................................... 17 Graphs Lab Values ...................................................................................................... 17 Letters ......................................................................................................................... 17 Updates ....................................................................................................................... 21 Reports..................................................................................................................................22 Graphs Lab Values ...................................................................................................... 22 Individual Patient Profile .............................................................................................. 22 Population Practice Profile (PPP) ................................................................................ 23 Quarterly Summary (QS) ............................................................................................. 24 Other Reports .............................................................................................................. 25 Templates.................................................................................................................... 26 Letters ...................................................................................................................................27 ABC Letter ................................................................................................................... 27 Vaccination Letter ........................................................................................................ 28 Formatting the ABC and Vaccination Letters ............................................................... 29 DSME ....................................................................................................................................29 Data Entry ................................................................................................................... 29 Reports........................................................................................................................ 31 Maintenance ................................................................................................................ 37 DSME Advanced Search ............................................................................................. 41 Continued . . . i TABLE OF CONTENTS (continued) Advanced Search ..................................................................................................................41 Maintenance ..........................................................................................................................44 Find and Replace Patient City ..................................................................................... 44 Primary Physician Conversion ..................................................................................... 45 Modify Templates ........................................................................................................ 46 Update......................................................................................................................... 48 Utilities ...................................................................................................................................49 Backup ........................................................................................................................ 49 Export .......................................................................................................................... 49 Import CSV Data ......................................................................................................... 50 Other ........................................................................................................................... 50 Security ....................................................................................................................... 50 Help .......................................................................................................................................50 About ........................................................................................................................... 50 Support........................................................................................................................ 50 File Paths .................................................................................................................... 50 TECHNICAL SUPPORT ................................................................................................................ 51 FOOT EXAM ASSESSMENT........................................................................................... Appendix A MEDICATION LISTS........................................................................................................ Appendix B ii G E T T ING S T AR T E D S ys tem R equirements Minimum: IBM-compatible personal computer Pentium III processor 128 MB RAM 60 MB disk space Windows OS Printer Ideal: IBM-compatible personal computer Pentium 4 processor 261 MB RAM 100 MB disk space Windows OS CD ROM burner (for backup) Printer NOTE FOR WINDOWS XP USERS: Before installing the most recent version or uninstalling a previous version of DQCMS, make sure that the latest service pack has been installed. In addition to the service pack, all Windows updates, critical as well as regular updates, should have been installed. Ins talling DQC MS P revious Us ers (have a previous version of DQCMS on the computer) NOTE: To upgrade from a previous version to DQCMS v3.0, it is required to have DQCMS v2.1 or higher installed. 1. Open the current version of DQCMS installed on the computer. 2. Back up the data file by going to Utilities on the main menu and selecting Backup. Save the file to a specified location. 3. Close the current version of DQCMS by going to File on the main menu and selecting Exit. 4. Uninstall the previous version of DQCMS by going to Start in the lower left corner of the computer screen, select Control Panel, then Add/Remove Programs. A list of programs installed on the computer will be displayed. Select the DQCMS file and click the Change/Remove button. Follow the uninstall wizard to remove the program by clicking Next until Finished. 1 5. Insert the DQCMS Version 3.0 CD into the CD-ROM drive. 6. Double-click the Installation Package folder 7. Double-click the setup.exe file 8. Follow the instructions in the DQCMS Setup Wizard by clicking Next to go through the setup procedures. Select Typical when the prompt appears to choose setup type. icon. icon. 2 9. Select Finish when the Setup Wizard is finished. The software icon will be saved on the computer desktop as DQCMS v3.0. 10. Data File • Single User: If the software is being used by a single user, copy the DiabData.accdb file located in the Data File folder in the CD to the C:\DQCMS folder. • Multiusers: If the software is being used by multiple users, create a DQCMS folder in a server location and copy the DiabData.accdb file located in the Data File folder in the CD. NOTE: Make sure all DQCMS users have read/write permissions to the folder where the data file is located. 11. Double-click the DQCMS icon to open the new version of DQCMS. • Single User: If the DiabData.accdb file is located in the C:\DQCMS folder, the application will automatically connect to the DiabData.accdb file. • Multiusers: If the DiabData.accdb file is located in a server location, a prompt will appear for the user to locate the DiabData.accdb file. In the dialog box provided, find the server location and select the DiabData.accdb file. 12. A prompt will appear that provides three options for using DQCMS. Select the Upgrade data from DQCMS v.2.1x button to import data from a previous version. 3 13. In the browse window, find the location of the previous data file. During the uninstall of the previous version of DQCMS, the DiabData.mdb file automatically was renamed to DiabDataorg.mdb. Find and select the DiabData-org.mdb file. Click Open. 14. The data will import automatically. A message will appear to confirm completion of the import process. Click OK. 4 New Us ers (no previous version of DQCMS) 1. Insert the DQCMS Version 3.0 CD into the CD-ROM drive. 2. Double-click the Installation Package folder 3. Double-click the setup.exe file icon. 4. Follow the instructions in the DQCMS Setup Wizard by clicking Next to go through the setup procedures. Select Typical when the prompt appears to choose setup type. 5 icon. 5. Select Finish when the Setup Wizard is finished. The software icon will be saved on the computer desktop as DQCMS v3.0. 6. Data File • Single User: If the software is being used by a single user, copy the DiabData.accdb file located in the Data File folder in the CD to the C:\DQCMS folder. • Multiusers: If the software is being used by multiple users, create a DQCMS folder in a server location and copy the DiabData.accdb file located in the Data File folder in the CD. NOTE: Make sure all DQCMS users have read/write permissions to the folder where the data file is located. 7. Double-click the icon to open the new version of DQCMS. • Single User: If the DiabData.accdb file is located in the C:\DQCMS folder, the application will automatically connect to the DiabData.accdb file. • Multiusers: If the DiabData.accdb file is located in a server location, a prompt will appear for the user to locate the DiabData.accdb file. In the dialog box provided, find the server location and select the DiabData.accdb file. 6 8. A prompt will appear providing three options for using DQCMS. Select the Open DQCMS button to start entering patients and their clinical information. 9. New DQCMS users will be required to enter the clinic name upon initial execution of the software. This name will be used as a header in all reports generated by DQCMS. In addition, new users will be asked to enter at least one patient's demographic information once the clinic name has been entered. NOTE: The clinic name can be changed at any time by selecting Maintenance from the main menu and then Clinic Name. E lec tronic Medical R ec ord S ys tem Us ers The Import Data from EMR/CSV button is for users with data in an Electronic Medical Record (EMR) system. The data must be exported from the EMR according to the CSV specifications before importing. Please contact your quality improvement (QI) coordinator for more information. Quic k T ips to G et S tarted S hortc ut K eys • • • • • F1 enters the current date into the current date field. F2 enters the office visit date into the current date field. '+' key adds one day to the date in the current date field. '-' key subtracts one day from the date in the current date field. Esc allows the user to clear the changes in a field on any of the forms. C opy and P as te The copy and paste functions allow for importing or exporting text in DQCMS. Because the software does not have built-in editing functions like word processing software, keyboard shortcuts are needed to copy and paste. To copy, highlight text to be copied by holding down the left button on the mouse while selecting the text, then hold down the Control (Ctrl) key on the keyboard and press the letter C. To paste, highlight text to be copied by holding down the left button on the mouse while selecting the text, then hold down the Control (Ctrl) key on the keyboard and press the letter V. 7 Us ing T abs DQCMS Version 3.0 provides a new way to work with the graphs, reports, and other objects in the database. Instead of opening each object in a separate window, it now places objects in a single pane and separates them with tabs. The tabs help keep open objects visible and accessible. To close tabs, click the black X in the upper right corner of the open object. V iewing Multiple R ec ords When letters or reports are created, multiple pages may appear in the same window. To tab through each page, use the arrow keys in the bottom left of the screen. Last Record First Record Previous Record Page 8 Next Record DAT A E NT R Y C linic al Information The Clinical Information Data Entry Screen is the main screen in the DQCMS application. To enter data, a patient must first be selected from the Patient pull-down list. Upon selection, the screen will be refreshed to show the most recent information for the patient. To enter new information, type the date as mm/dd/yy and the result for each available clinical test over the existing information. When new information is entered, the background color of the updated field will be highlighted yellow. The yellow background indicates that the data shown in the field are new and need to be saved. Enter all relevant information for the patient before clicking Save and Refresh. NOTE: A revised date is required for each new clinical result in order for it to be saved. 9 Data E ntry F ields Most Recent Date • Office Visit – Enter date of office visit. Clinical Exam • Weight – Enter date weight was obtained and the weight in pounds (lb) or kilograms (kg) and the other value will automatically calculate. Validation is required if weight is less than 100 lb or greater than 300 lb. • Height – Enter date height was measured and height in feet and/or inches (without shoes). If inches are equal to zero, leave the field blank. Height is required for the patient’s body mass index (BMI) to calculate. • Blood Pressure – Enter date blood pressure was taken. Enter systolic and diastolic values in the respective fields. Validation is required if the systolic value is <90 or >165 or if the diastolic value is <50 or >100. • Foot Exam: 1. 2. 3. 4. Enter the date the foot exam was completed. Select type of foot exam as Monofilament or Visual. Select the level of risk as High, Low, or Unknown. Select whether a foot problem is currently active or not. If this is unknown or not documented, tab through this field to leave it blank. 5. If the level of risk is High or Low, select a recommendation. If this is unknown or not documented, tab through this field to leave it blank. NOTE: Refer to Appendix A for information on completion of foot exam. Eye and Dental Exams • Dilated Eye Exam – Enter date of dilated eye exam and select the diagnosis as No Retinopathy, Mild Retinopathy, Severe Retinopathy, or Unknown. • Eye Exam Referral – Enter date patient was referred for an eye exam. • Dental Exam Referral – Enter date patient was referred for a dental exam. Laboratory Data • A1C – Enter date A1C test was completed and the resulting value. A validation prompt will appear if the result is <5 or >14. • Lipid Panel – Enter date and result of lipid panel tests. A validation prompt will appear if: HDL is <25 or >60. LDL is >200. 10 Triglyceride is >400. • Creatinine – Enter the date the creatinine test was completed and the result with up to two decimals. A validation prompt will appear if the value is >12. • E-GFR – Enter the date of estimated glomerular filtration rate (GFR) and result with no decimals. A validation prompt will appear if the value is <9 or >186. • Urine ACR – Enter date of the urine creatinine ratio (ACR) and the result with one decimal allowed. A validation prompt will appear if the value is >5000. Once this field is completed, microalbuminuria and proteinuria are automatically populated based on the following criteria: Urine ACR <30, then microalbuminuria = “-” and proteinuria = “-”. Urine ACR = 30 to 299, then microalbuminuria = “+” and proteinuria = “-”. Urine ACR ≥ 300, then microalbuminuria = “+” and proteinuria = “+”. • Proteinuria – Enter date of proteinuria urine test and result of positive (+) or negative (-). • Microalbuminuria – Enter date of microalbuminuria urine test and result of positive (+) or negative (-). Immunization Status • Influenza – Enter date when the influenza vaccination was provided. If declined, check the declined box. • Pneumo – Enter date when the pneumococcal vaccination was provided. If declined, check the declined box. Prevention Services • Tobacco Use – Enter date when the patient was asked about tobacco usage. If the patient is a current tobacco user, select Yes. If not, select No. If the patient is a current smoker, select whether an intervention was provided. • Diabetes Education – Enter the date diabetes education was provided. Once the date is entered, the Education List box appears to the right of the date field and lists several types of education. Select all appropriate types of education from the list box by clicking on each one to highlight it black. Unselect the education by clicking on it again. To enter specific information about the patient’s Diabetes Self-Management Education (DSME), click the DSME button to access the current patient’s DSME Recognition and Behavior Goals screen. • Medications – Enter date diabetes medications were prescribed. Once the date is entered, the Medications List box appears to the right of the date field and lists several types of medications. If the patient was previously prescribed medications at an office visit, the Medications List box will have those medication highlighted. Select all appropriate medications from the list box by clicking on each one to highlight it black. If the patient is currently not on any medications, specify the date and unselect all medications. 11 NOTE: If patient is not on any medications, No Meds will appear on the IPP form for this patient. NOTE: Refer to Appendix B for a complete list of medications. S c reen B uttons • Demographics – Accesses the Patient Demographics screen where the user can view and edit demographic information for the selected patient. • Print IPP – Sends the current patient’s IPP (individual patient profile) form automatically to the default printer. • Other Comments – Add up to 75 characters of text (including spaces) that will appear on the bottom of the printed IPP report. The comment field is not intended for medical charting but could serve as a reminder note for future visits. NOTE: Comments are not saved in the history. • Save and Refresh – Saves newly entered information and refreshes the Clinical Information Data Entry Screen. • Cancel Changes – Disregards all new changes, clears out all yellow background fields, and refreshes the form. • Exit – Closes the DQCMS software. • DSME – Accesses the current patients DSME Recognition and Behavior Goals screen. P atient Demographic s The Patient Demographics data entry screen allows users to enter demographic information about each patient. Ac c es s ing P atient Demographic s S creen • New Patient – Select File on the main menu bar, and select New. • Existing Patient – Select the patient from the patient pull-down list on the Clinical Information Data Entry Screen. Once the patient is selected, there are two options for accessing the patient demographics screen: Option 1: On the main menu bar, click Current Patient and select Demographics. Option 2: Click the Demographics button on the Clinical Information Data Entry Screen. 12 Data E ntry F ields Required fields are noted with a red asterisk sign. If the required fields are not completed, the data will not be saved. • First Office Visit Date – Defaults to today’s date for new patients. The date may be replaced with the date of the first Office Visit if it occurred prior to today’s date. • Last Name* – Enter patient’s last name. • First Name* – Enter patient’s first name. • MI – Enter patient’s middle initial. • Gender – Select Female or Male from the pull-down list. • Address – Enter patient's street address. • City – Enter patient’s city of residence. • State – Select patient’s state/province from the pull-down list. • Zip – Enter patient’s zip code. 13 • Telephone – Enter patient's telephone number. If the state field is completed, the area code for the telephone number automatically displays in the telephone field. • Race – Select the patient’s race from the pull-down list. If AsianPacific Islander is chosen, select the ethnicity from the options provided in the pull-down list. • Medical Record Number* – Enter the patient’s medical record number. A medical record number or social security number is required for every patient. • Social Security Number* – Enter the patient’s social security number. A medical record number or social security number is required for every patient. • Status – Select Active if the patient is considered to be a current patient who either has been treated or is receiving ongoing treatment. Select Inactive if the patient is deceased or no longer a patient of the clinic. • DSME Education Site – Select the site where patient receives DSME from the pull-down list. If the site is not in the list, go to DSME on the main menu, select Education Site, and then select Update Site to add the site to the list. Follow the instructions provided at the top of the screen. • Physician – Select the primary physician from the pull-down list. If the physician's name is not in the list, type the physician’s name in the field and press Enter on the keyboard. The user will be prompted to add the physician’s name to the list. Click Yes to access the Update Physician Information screen and follow the instructions at the top of the screen. • Payor – Select the type of insurance/payor from the pull-down list. • Date of Birth* – Enter the participant’s date of birth manually with two digits in each of the day and month fields and four digits in the year field (mm/dd/yyyy). • Date of Death – Enter the date the patient died. Once a date is entered, deceased patients will be marked as Inactive. • Diagnosis – Four coexisting diagnoses (Coronary Artery Disease, Renal Disease, Hypertension, and Neuropathy) are permanently stored in DQCMS. Site-/provider-specific diagnoses may be added to the list. To add, modify, or delete a diagnosis, click the New button next to the diagnosis and enter the information. NOTE: The new diagnosis will not be listed specifically on the patient’s IPP; rather, it will be listed as Other. • Diabetes Type – Select the type of diabetes (Type 1, Type 2, Prediabetes, GDM, or Unknown) from the pull-down list. S aving P atient Demographic s Remember to click the Save and Close button after all edits to return to the Clinical Information Data Entry Screen. The data will not save if the required fields (noted with a red asterisks * sign) are not completed. 14 ME NU DE S C R IP T IONS F ile File menu options are available by selecting File on the menu bar. P atient • New – Opens a blank Demographics screen to allow the user to enter new patient information. • Find – Searches for a patient by medical record number or social security number. P rint Print menu options are only available when a report or graph is viewed. The print menu will be disabled (not available) when portions of the DQCMS software are viewed that are not printable, such as data entry screens. • Page Setup – Customizes the page setup using the following three tabs: Print Options allows the user to change the page margin sizes. Page allows the user to select the page orientation (portrait or landscape), choose the paper size and source, and select a printer. The printer is already set to the default printer. If a different printer is desired, select Use Specific Printer and click Printer. Select the printer from the pull-down list and click OK. If the printer is not in the pulldown list, click Network to select the printer from the network, and click OK. Columns tab is not used for the DQCMS application. 15 • Print – Prints the active report. Before printing, the user can select the printer, the print range (all pages or a range of pages), and the number of copies to be printed. Clicking the Setup button will open the Page Setup window where page margins can be adjusted. • Quick Print – Automatically sends the print job to the default printer. E xit Databas e (db) Closes the database. Once clicked, the user will be asked if he/she wants to exit the database. Click Yes, and the data will be automatically saved. 16 C urrent P atient Current Patient menu options are available by selecting Current Patient on the menu bar. The Current Patient options apply only to the patient who is selected from the patient drop-down list box on the Clinical Information Data Entry Screen. Delete Patient Removes the current patient and all associated clinical and demographic information from the DQCMS system. Individual Patient Profile (IPP) Accesses the current patient’s IPP form, which can be viewed or printed. The 1-page report provides patient-specific indicators of care and diabetes management. Graphs Lab Values Generates a graph for each selected clinical lab values within a specified period of time for the current patient. The graph can be viewed or printed. Letters The Letters menu allows for temporary modifications to the ABC Letter or to create a one-time customized letter for the patient. Changes to the letters will not be saved. • ABC Letter – Generates a temporary customized letter that lists the current patient’s A1C, blood pressure, and cholesterol values in a table. To make permanent changes to the ABC Letter, go to Maintenance on the main menu and select ABC Letter. Follow the instruction provided to generate a customized ABC letter for the selected patient: 1. Signature – Check the Modify Signatures box to create or modify the physician’s signature (name listed at the bottom of the letter). Follow the instructions at the top of the screen to make changes. 2. Opening and Closing Text – Customize the letter’s opening and closing text by typing in the text boxes. 3. Action Steps – Uncheck any action steps that do not apply. Any of the action steps can be customized for the current session. Up to 60 characters (including spaces) are allowed for each action step. 17 4. Printing Labels – Print Avery brand labels for the mailing envelope by selecting the label size from the pull-down menu. A separate tab will appear with the label displayed in print preview mode. From this screen, the label can be printed. 5. Printing Letter – View the letter in print preview mode by selecting View Letter. Once in print preview mode, the letter can be printed. 6. Close – Click Close when finished. Changes to the letter will not be saved. • Customized Letter – Provides a blank letter template to create a user-specific letter for the current patient only. Follow the instruction provided to generate a customized letter for the selected patient: 1. Signature – Check the Modify Signatures box to create or modify the physician’s signature (name listed at the bottom of the letter). Follow the instructions at the top of the screen to make changes. 2. Text – Type any text into the blank letter Customize text box. Since changes to this letter will not be saved, it is recommended to create the letter text in a Word document that can be saved and copy and paste the text into the text box. To copy, highlight the 18 text to be copied, and hold down the Control key (Ctrl) and the letter C on the keyboard. To paste, hold down the Control key (Ctrl) and press the letter V on the keyboard. 3. Letter Dated – Enter the date (mm/dd/yy) that will appear in the date area of the letter. Today’s date automatically appears in the Letter Dated field, but it can be overwritten. 4. Printing Letter – The letter can be viewed in print preview mode by selecting View Letter. Once in print preview mode, the letter can be printed. 5. Printing Labels – Avery brand labels can be printed for the mailing envelope by selecting the label size from the pull-down menu. A separate tab will appear with the label displayed in print preview mode. From this screen, the label can be printed. 6. Close – Click Close when finished. The letter will not be saved. 19 20 Updates • Demographics – Accesses the Patient Demographics screen where demographic information for the current patient can be modified or viewed. Consult the Patient Demographics section of this user manual for more information on each data entry field on this screen. • Clinical History – Corrects clinical history data entry errors. Select the tab for the clinical information, then modify or delete information according to the instructions provided on the top of the screen. Changes to the clinical history are automatically saved as each field is entered. The Print/Export button generates a clinical history report or graph for selected lab values generated within a specified period of time. The data can also be exported from this screen. Click Close to close the screen. 21 R eports Reports menu options are available by selecting Reports on the menu bar. G raphs L ab V alues Creates a graph for selected lab values generated within a specified period of time for the selected patient. The graph can be viewed or printed. Individual P atient P rofile • Current Patient – Accesses the current patient’s IPP form, which can be viewed or printed. • Last Modified Date – Prints IPP reports for patients whose clinical information was last modified between a specified period of time. • Selected Patients – Prints an IPP report for selected patients or all active patients in the patient population. All Active Patients – To print a report for all active patients, mark the Select All Active Patients check box. Click Print IPPs to print the IPPs for all active patients, and the reports will be automatically sent to the default printer. Selected Active Patients – To select individual patients, double-click on a name in the List of Patients box or select each patient from the list by clicking on the name to highlight it and clicking the forward arrow button >> to transfer them to the Selected Patients box. Patients can be moved back and forth between the two boxes by clicking on the forward arrow >> and back arrow << buttons. Once there is at least one patient in the Selected Patients box, click Print IPPs button, and each report will be automatically sent to the default printer. 22 P opulation P ractic e P rofile (P P P ) Generates a list of services or lab tests based on selected dates, patient demographics and clinical indicators. NOTE: By default, the PPP excludes patients designated with a diabetes type of GDM or Prediabetes. However, the Select Patient Demographic Criteria button allows the user to identify a subset of the population by defining the target population for the PPP. Marking the GDM or Prediabetes box will include these patients in the population. • Customize the PPP report by changing the time periods and values of various clinical indicators. Individual tabs are available for A1C, Blood Pressure, Dilated Eye/Dental Exam, Foot Exam, Kidney, Lipid Profile, Office Visits, Prevention Services, and Tobacco Use. • To create a patient list and PPP summary/report, select the desired patient list and check the box next to the PPP Summary. • Once changes are made, there are two options for generating PPPs. . Clicking the View Report button will show the reports in print preview mode which can be printed. Clicking the Export button will export the list to an Excel or comma-delimited file. • Click Close when finished generating PPP reports. HINT: It may be a good idea to write down the exact steps used to generate each customized PPP report. If you are trending this report over time, it is beneficial to create the report the same way each time in order to identify the exact quality improvement (QI) that was implemented within each time frame and which was the most successful approach. 23 Quarterly S ummary (QS ) QS reports provide an aggregated summary of the clinic’s performance for the previous 3 months. • Preview QS – Generates the current QS report for all active patients if no criteria is selected and displays the report in print preview mode. By default, the QS report excludes patients designated with a diabetes type of GDM or Prediabetes. Depending on the amount of clinical data, it may take a few seconds for DQCMS to complete all the necessary calculations. The QS report can be saved to a specified location as an Excel file or printed. • Select QS Criteria – Allows the user to select specific criteria to stratify the QS data set. Options include Age, Gender, Race, City, Diabetes Type (including GDM and Prediabetes), Diagnoses, Physician, and Payor. Once the criteria are selected, click View QS to save the report to a specified location or print it. 24 Other R eports • Education – The education report provides a percentage of patient’s value for clinical indicators/outcomes for the entire clinic’s population list. This report is generated by checking the Include Education Report box at the top of the screen. Specific patient lists for education provided within a specified time range can be created by checking each individual clinical indicator/outcome check box. Once the criteria are selected, click View Report to view the report in print preview mode, and the report can be printed. 25 • Monthly Collaborative – This report is helpful for clinics who wish to trend information monthly. It is recommended that this report be run each month to update relevant database tables with the previous month's information. The monthly collaborative report can either be saved as an Excel file by selecting Export or printed as a report by selecting Report. • Population Lists – Three separate population list reports are available: Patients – Provides a listing of all patients stored in DQCMS under a specified physician. Not selecting a physician will generate a report for all patients. Physicians – Provides a listing of all current physicians and providers stored in DQCMS. No Height – Provides a list of all active patients without a height measurement. A height measurement is required for DQCMS to calculate the patient’s BMI. Each report can be printed. T emplates • Blank IPP – Displays a blank IPP report that can be printed. • Blank Abstract – Displays a blank form for patient demographics and clinical information that can be printed. 26 L etters Letter menu options are available by selecting Letters on the menu bar. The ABC and Vaccination letters can be customized under this menu. AB C L etter Creates an individualized patient letter that shows the patient's A1C, blood pressure, and LDL values compared with the current ADA clinical practice recommendations. 27 Follow the instruction provided to generate a customized ABC letter: 1. Define the patient demographic criteria (if desired) as follows: Age – Enter the age range in years for patients to be included. Office Visit – Enter a time period for patients who have had one or more office visits. Physician – Select a physician from the pull-down list to include only that physician’s patients in the query. 2. Signature – Select the Modify Signatures button to modify or add the physician’s signature (name listed at the bottom of the letter). Follow the instructions at the top of the screen to make changes. 3. Opening and Closing Text – Customize the letter’s opening and closing text by typing in the text boxes. 4. Action Steps – Uncheck any action steps that do not apply. Any of the action steps can be customized for the current session. Up to 60 characters (including spaces) are allowed for each action step. 5. Printing Labels – Print Avery brand labels for the mailing envelope by selecting the label size from the pull-down menu. A separate tab will appear with the label displayed in print preview mode. From this screen, the label can be printed. 6. Printing Letter – View the letter in print preview mode by selecting View Letter. Once in print preview mode, the letter can be printed. 7. Close – Click Close when finished. Changes to the letter will not be saved. V ac c ination L etter – There are six customizable vaccination letters: • Flu Only – This letter is for patients who have not had the influenza vaccination during the current flu season regardless of the pneumococcal vaccination. • Flu (had pneumococcal) – This letter is for patients who have not had the influenza vaccination during the current flu season but have received the pneumococcal vaccination at any time in the past. • Flu and Pneumococcal – This letter is for patients who have not had a pneumococcal vaccination or the influenza vaccination during the current flu season. If your clinic wants to reach all patients who need both flu and pneumococcal immunization, this option will identify all patients. • Pneumococcal Only – This letter is for patients who are not known to have received the pneumococcal vaccination regardless of the influenza vaccination. • Pneumococcal (had Flu) – This letter is for patients who are not known to have had the pneumococcal vaccination but who have had the influenza vaccination during the current flu season. 28 • Vaccination Clinic – This letter announces the date(s) and time(s) for vaccination clinics. It can be sent to patients who have not had a pneumococcal vaccine and/or the influenza vaccination during the current flu season. Follow the instructions provided to generate a customized vaccination letter: 1. Physician – Select a physician from the pull-down list to include only that physician’s patients in the query. 2. Signature – Select the Modify Signatures button to modify or add the physician’s signature (name listed at the bottom of the letter). Follow the instructions at the top of the screen to make changes. 3. Text – Customize the letter’s text by typing in the text box. 4. Printing Labels – Print Avery brand labels for the mailing envelope by selecting the label size from the pull-down menu. A separate tab will appear with the label displayed in print preview mode. From this screen, the label can be printed. 5. Printing Letter – View the letter in print preview mode by selecting View Letter. Once in print preview mode, the letter can be printed. 6. Close – Click Close when finished. Changes to the letter will not be saved. F ormatting the AB C and V ac c ination L etters The format for these letters can be customized. Instructions for editing letter templates are explained under the Maintenance function. Headings are included with each immunization letter screen specifying the criteria for each patient list. The page margins can be changed by going to File on the main menu and selecting Page Setup. DS ME The DSME menu option was created for sites with a DSME Recognized Education Program. Each education program that is formally recognized by the American Diabetes Association is responsible to collect and trend data. Data E ntry DSME data can be entered from the menu bar by clicking DSME and then Data Entry or by clicking the DSME button on the main clinical form. 29 Use the following steps to collect and enter DSME education: 1. Select the patient who obtained DSME from the drop-down list. 2. Most Recent Contact Date is manually entered to record the most recent patient contact date (mm/dd/yy). 3. Lost to Follow-Up date is manually entered when the educator determines that the patient was not able to be contacted and is considered “lost to follow-up” as according to program policy or practices. The date must be greater than or equal to the most recent contact date. If the most recent contact date is changed to a date later than the lost to follow-up date, then the lost to follow-up date will be cleared out. 4. Total Comp/Initial Hours is automatically updated based on the hours input for the type of comprehensive/initial education received. 5. Comp/Initial Completed is manually checked if comprehensive/initial education has been completed. If this box is checked, any further diabetes education provided will be considered postprogram instruction. 6. To enter Education, click the drop-down box by the word Type. Select if the education provided counts toward the comprehensive/initial education or if the education qualifies as postprogram instruction. 30 7. Enter the date (mm/dd/yy) the patient received the education. 8. Enter the total amount of time spent providing education on the date indicated. Time can be documented in quarter-hour (0.25) increments. 9. When the patient has completed the comprehensive/initial phase, click the check box. This will allow the education program to identify all patients who have completed the Comprehensive/Initial education and who are now eligible for postprogram instruction (formerly known as follow-up education). 10. Comments can be entered for a specific date. Be brief as there are only 50 characters per entry. Previous entries are displayed in descending date order. 11. Behavioral Goals that have NOT been reviewed and scored will be displayed as open goals so as not to be overwhelming to the patient. Only two goals can be open for a patient at one time. The goals can be updated in the Goals for selected date section of the form. 12. Select a goal category, which are based on the AADE 7 Self-Behavior Goals (visit www.diabeteseducator.org for more information), then type in the patient’s actual, individualized goal. Be brief and abbreviate, as there are only 50 characters available. Goals should be realistic and achievable. 13. Follow-Up Date is the expected date that the person is to be contacted to check on his/her goals. 14. Review Date is the date the educator spoke to the patient and discussed goal progress. 15. Score at Latest Review is based on the scoring scale listed below. The score will be linked to a patient population report on overall goal achievement: 1 = not started 2 = started but stopped 3 = doing some 4 = meeting goal 5 = exceeding goal 16. Click the Close button to save data and close the screen. NOTE: To delete information that has been entered incorrectly, select the record by clicking on the leftmost light blue column to highlight the box to black, and press the Delete key on the keyboard. R eports Reports can be run from the DSME/Reports option on the main menu bar. • Individual Patient Profile – The IPP report is described under the Reports section of this manual. Current Patient – Shows the selected patient's DSME IPP report in print preview mode. The report can be printed. 31 Last Modified Date – Prints the DSME IPPs of patients whose DSME information was modified during a specified date range. The reports will be sent to the default printer automatically after clicking Print. • Selected Patients – Prints an IPP report for selected patients or all active patients in the patient population. All Active Patients – To print a report for all active patients, mark the Select All Active Patients check box. Click Print IPPs to print the IPPs for all active patients, and the reports will be automatically sent to the default printer. Selected Active Patients – To select individual patients, double-click on a name from the List of Patients box or select each patient from the list by clicking on the name to highlight it and clicking the forward arrow button >> to transfer them to the Selected Patients box. Patients can be moved back and forth between the two boxes by clicking on the forward arrow >> and back arrow << buttons. Once there is at least one patient in the Selected Patients box, click Print IPPs button, and each report will be automatically sent to the default printer. • Population Practice Profile – The PPP report is described under the Reports section of this manual. DSME PPP reports allow the education program to compare aggregate clinical information of patients who have received education to those who have not. The DSME PPP allows a DSME date range to be entered in the PPP Demographic Criteria screen. The office visit date is entered only if the user wants to limit the criteria by office visit date as well as education date range. The DSME Education tab on the PPP form also offers the opportunity to generate various patient lists for targeted intervention. The report can be printed. • Goal Follow-Up – Generates a list of patients who have goals to follow up on within a certain amount of days. The number of days can be changed, and it will remain the default 32 for future reports. The report can be generated for all patients but can be narrowed down based on physician using the physician pull-down menu. Once the required time frame and optional physician criteria are selected, click List Patients to view the report in print preview mode. The report can be printed. • Lost to Follow-Up – Generates a list of patients who have lost to follow-up status. The report will be generated for all patients but can be narrowed down based on physician using the physician pull-down menu. Click List Patients to view the patients meeting the physician criteria selected. Once List Patients is clicked, the Select Patients for DSME Lost to Follow-Up screen appears. It allows the user to select which patients will receive a letter or be listed in the DSME Lost to-Follow-Up report. All Active Patients – To print a report for all active patients, mark the Select All Active Patients check box. Click View Report to view the lost to follow-up report in print preview mode. The report can be printed from the screen. Selected Active Patients – To select individual patients, double-click on a name from the List of Patients box or select each patient from the list by clicking on the name to highlight it and clicking the forward arrow button >> to transfer them to the Selected Patients box. Patients can be moved back and forth between the two boxes by clicking on the forward arrow >> and back arrow << buttons. Once there is at least one patient in the Selected Patients box, click View Report to view the lost to follow-up report in print preview mode. The report can be printed from the screen. 33 A lost to follow-up letter for patients who have a lost to follow-up date can be created from the Select Patients for DSME Lost to Follow-Up screen by clicking Letter. The letter will be sent to the patients in the Selected Patients box in the screen above, or it can be further limited to the selected physician’s patients. The letter text can be temporarily modified in the Customize text box. To view the letter(s) in print preview mode, select View Letter. The letter can be printed from this screen. Print Avery brand labels for the mailing envelope by selecting the label size from the pulldown menu. A separate tab will appear with the label displayed in print preview mode. From this screen, the labels can be printed. 34 • Open Goals – Generates a list of patients who have behavioral goals that have NOT been reviewed and scored within a certain amount of days. The number of days is required, and once a number is entered, it will remain the default for future reports. The report will be generated for all patients but can be narrowed down based on physician using the physician pull-down menu. Once the criteria are selected, click Report to view the report in print preview mode. The report can be printed. • DSME Recognition Report – The DSME Recognition Report computes DSME education data that have been entered into DQCMS during the specified time frame. It allows the user to gather data related to the National Standards for Diabetes Self-Management Education for the purpose of pursuing or maintaining DSME Education Recognition. 35 Required Criteria: A start and end date are required to create the report, and the behavioral goal criteria can be changed from the number of patients to the number of encounters. The check box to include a patient list for behavior goals is checked by default but can be unchecked. Optional Criteria: Include the diabetes type of GDM or Prediabetes, or select a specific diabetes type. Data can be gathered either by education site or physician. NOTE: By default, this report excludes patients designated with a diabetes type of GDM or prediabetes, but these patients can be included by checking the check boxes associated with each condition. Once the criteria are selected, click the View Report button to generate the DSME Recognition Report in print preview mode. The first page of the report contains statistical data about the clinic’s diabetes education program that is needed for the DSME recognition application (based on the data period entered). The second page is the Behavior Goals Report, which is also needed for DSME recognition and should be addressed at the annual review. Page 2 includes data on how the clinic’s patient population is doing with its overall goal achievement. Values of 4 and 5 indicate that patients are meeting goals, and this is reflected in the overall report. The report can be printed. 36 Maintenance • Education Site 1. Conversion – Allows for a batch change of multiple patients to the desired DSME education site. This option defaults with all patients who are not assigned to an education site. Select desired patients and assign them to the appropriate education site. NOTE: Make sure to enter the education site(s) prior to opening the conversion screen (see Update Site section below on how to add education sites). 37 1. Select the DSME education site from the Update Patients of DSME Ed Site drop-down box. Once a site has been selected, the List of Patients box will be refreshed with the selected site’s patients. 2. Select the desired site from the Select DSME Ed Site drop-down box to which the patients are to be transferred. 3. Double click (or use forward arrows >>) on each of the patients on the left side to move over to the right side to change DSME Education Site. 4. When at least one patient in the Selected Patients box and a site have been selected in the Select DSME Ed Site box, click Update DSME Ed Site to change each selected patient's education site to the selected education site. 5. Click the Close button to close the screen and save the changes. 38 • Update Site – This option allows for the addition, modification, and deletion of education sites. Follow the instructions at the top of the screen to update sites. Click Close to close the screen and save the changes. 39 • Modify Lost to Follow-Up Letter Template – Allows the user to permanently modify the DSME lost to follow-up letter. To modify the template, type the changes to the text and click Close, and the changes will be permanently saved. 40 DSME Advanced Search The Advanced Search tool under DSME on the main menu is slightly different from the Advanced Search tool under Search on the main menu, in that it contains an extra tab for education called DSME Ed. The DSME table allows the user to search for a most recent DSME education date range and the type (comprehensive/initial or postprogram instruction) of education received. See the Advanced Search section of this manual for more information on how to use Advanced Search. Advanced Search The Advanced Search tool is based on most recent lab values and allows the user to select the most recent clinical indicators as well as demographic information to create a customized patient list, a mail merge file in Excel, or a generic letter. The advanced search allows for singular or multiple integrated queries as specified by the user. NOTE: Searching based on DSME education criteria is only available using the Advanced Search tool under DSME on the main menu. 41 Please contact your clinical site coordinator for assistance in developing the queries and accompanying documentation. The following are basic instructions for performing a search: 1. Use the tabs to select various search criteria. 2. Use the Select Patient Demographic Criteria button to narrow down the patient population search criteria based on demographics. 3. In the Between Tabs box, select And to search for patients who meet all of the criteria selected or select Or to search for patients meeting any of the criteria selected. 4. When finished setting the search criteria, click Search. The number of search results will appear in the Number of matching records box. 5. There are three different mechanisms for utilizing the search results. o Click View Report to view the resulting report in print preview mode which can be printed. o Click Export to send the results to an Excel spreadsheet. o Click Generate Letter to create a letter in a blank letter template. Either type directly into the template, or cut and paste text from another document. 6. When finished with the search, click Clear All to refresh the Advanced Search tool and begin a new search, or click Close to exit and return to the Clinical Information Data Entry Screen. 42 43 Maintenanc e Maintenance items are available by selecting Maintenance on the menu bar. NOTE: Changes made under the Maintenance menu are permanent. F ind and R eplac e P atient C ity Allows for a batch change of one or more cities. This menu option is most often used to correct spelling mistakes. 1. Select the city or cities that need to be revised by clicking on them to highlight. 2. Click the Search button to find each patient associated with the highlighted city. 3. Type the desired city in the field Replace with field. 4. Click the Replace button to complete the task. 5. Save and close the form by clicking the Close button. 44 P rimary P hys ic ian Conversion Allows for a batch change of multiple patients to the desired physician(s). This menu option is most often used if a physician leaves a clinic and the patients need to be assigned to new physicians. 1. Select the current physician from the Update Patients of Physician drop-down box, and the List of Patients box will be automatically refreshed with the selected physician's patients. 2. Select the new physician from the Select Physician drop-down box to whom the patients are to be transferred. 3. Double-click on each of the patients on in the List of Patients box (left) to move over to the Selected Patients box (right) to change the primary physician association. 4. Click on the Update Patient Physician button to change each patient's physician to the selected physician. 45 Modify T emplates • AB C Ac tion S teps – Permanently modifies any of the seven available ABC action steps (six default action steps and one blank field). Type up to 60 characters (including spaces) into any field, and click Save and Close. 46 • AB C L etter – Permanently modifies the Opening and Closing text of the ABC letter template. Type any text changes to the letter, and click Save and Close. NOTE: When the ABC letter is first used in DQCMS, the clinic name needs to be revised in the Opening and Closing portions of the letter. 47 • Vac c ination L etters – Permanently modifies any of the six vaccination letter templates. To modify a letter, choose the letter from the pull-down menu, and the preexisting text will appear. Edit the text by typing in the window, and click Save and Close when finished. NOTE: Be sure to enter the appropriate clinic phone number and vaccination clinic date and time in the appropriate section of each letter if applicable. Update NOTE: Instructions for adding, updating or deleting any of the following items are found at the top of each screen. • Diagnoses – Corrects spelling mistakes and adds clinic-specific diagnoses to the diagnoses list. The user will not be able to edit or delete the first four diagnoses in the list: Coronary Artery Disease, Renal Disease, Hypertension, or Neuropathy. • Payor – Corrects spelling mistakes and adds new payors to the list. The user will not be able to edit or delete the first seven items in the list. • Physician Info – Allows for revisions to the physician population list. Only physicians with no assigned patients can be deleted from DQCMS. • Clinic Name – Allows the user to modify the name of the clinic. The name of the clinic is required before the screen is exited. 48 • Quality Improvement (QI) Information – Allows the user to modify and update the two Quality Improvement Support representatives for their site and their associated contact information (these support personnel are different than the technical support contacts). The QI information is accessable to the user by going to Help on the main menu and selecting Support. Utilities Utility functions are available by selecting Utilities on the menu bar. B ac kup • Backup Data – Creates a copy of the DQCMS data file and saves it in a specified location. The software will prompt the user to select the folder and the name of the file to back up the data file. NOTE: Back up the data file on a regular basis to avoid the risk of losing data. • Set Backup Reminder – The automatic backup reminder may be turned off and on. If the computer department has a system in place for consistently backing up the data, the user may want to turn this reminder off. If DQCMS is running in a smaller facility with minimal computer technical staff, it is recommended to turn the reminder on. E xport • Care Profile – Exports patient care profile data as either a comma-delimited text file or an Excel file. • PATIENT DATA – Exports patient data with or without identifiers as either a commadelimited text file or an Excel file. The user can select between exporting all data or only the most recent data. • GENERAL MAIL MERGE – Allows the user to select the patient population to send an outreach letter to by stratifying demographic and office visit date information. Click on each of the criteria to highlight the field to be included in the mail merge. The mail merge can be created in either a comma-delimited text file or an Excel file by selecting the file type from the export pull-down menu. When finished, click generate list to save the mail merge to a specified location. Click close when finished. NOTE: By default, this option excludes patients designated with a diabetes type of GDM and prediabetes. 49 Import C S V Data Imports data from another electronic management system (EMR). A clinic using DQCMS along with another EMR system can upload EMR patient demographic, lab, and DSME education data to DQCMS. EMR data should be gathered according to the specifications outlined. Other • Clear Locks – The clinical information screen is locked for data entry if another user is looking at the information. This prevents users from inadvertently updating each other’s changes. To release all patient locks, all users must exit the program before the DQCMS administrator performs the “clear lock” action. Once the action is performed, the DQCMS administrator must restart the application. • Set Input Mask – Turns the date slash (/) between the date fields (mm/dd/yy) on and off. On will include the slash, and Off will require the user to enter the slash between the month, day, and year fields. S ec urity • S et P as s word P rotection – Allows the site DQCMS administrator to turn the password protection on or off. Before turning the password protection on for the first time, a message will appear to require the input of at least one site administrator. The database must be closed and reopened for the change to take effect. • DQCMS Users – Only users assigned to the “Admin” user group have access to this menu option. It allows the administrator to input, modify, or delete database users and assign them to a user group for access to the database. Help About – Provides info on version number and program. S upport – Provides contact names for QI and technical support. The QI support information is updated by selecting Maintenance on the main menu and then QI Information. F ile P aths – Identifies the path of the application files. 50 T E C HNIC AL S UP P OR T Your username and password are saved only by the DQCMS administrator at your site. Please contact that individual for assistance. For data management and entry support, please contact your DQCMS administrator. For technical DQCMS support, please contact: Mary McLaughlin Energy & Environmental Research Center Phone: (701) 777-5267 E-Mail: [email protected] Tera Buckley Energy & Environmental Research Center Phone: (701) 775-0514 E-Mail: [email protected] 51 APPENDIX A FOOT EXAM ASSESSMENTS A-1 Foot Exam Assessments Item 1: Condition of the Skin, Hair and Toenails Questions: Is the skin thin, fragile, shiny and hairless? Are the nails thick, too long, ingrown, or infected with fungal disease? • Examine each foot between the toes and from toe to heel. Record any problems by drawing or labeling the condition on the foot diagram. Skin that is thin, fragile, shiny, and hairless is an indication of decreased vascular supply. Loss of sweating function may cause cracking of the skin and fissures that can become infected. • Remove any nail polish. Check toenails to see if they are ingrown, deformed, or fungal. Thick nails may indicate vascular or fungal disease. If severe nail or dry skin problems are present, refer the patient to a podiatrist or a nurse foot care specialist. Measure, Draw In, and Label the Patient’s Skin Condition • Measure and draw on the form any corns, calluses, pre-ulcerative lesions (a closed lesion, such as a blister or hematoma), or open ulcers. • Use the appropriate symbol to indicate what type of lesion is present-i.e., callus, ulcer, redness, warmth, maceration, pre-ulcerative lesion, fissure, swelling or dryness. Maceration is present if the tissue is friable, moist, and soft. • Label areas that are significantly dry, red, or warm (warmer than other parts of the foot or the opposite foot). Item 2: Musculoskeletal Deformities • Foot deformities may be the result of diabetic motor neuropathy. The function of intrinsic muscles is lost, causing the toe digits to buckle as other muscles become imbalanced. Muscle wasting occurs. The plantar fat pad becomes displaced and the metatarsal heads become more prominent. Limited joint mobility occurs and contributes to the potential for toe and foot injury. If Charcot foot is present, there are severe bone and joint changes and the foot is swollen and warm to the touch. • Indicate any of the foot deformities listed-i.e., toe deformities, bunions, foot drop, prominent metatarsal heads, or Charcot foot. The more serious deformities are illustrated below. Prominent metatarsal heads are evidence of major deformity such as midfoot collapse. A-1 Item 3: Pedal Pulses Check the pedal pulses (posterior tibial and dorsalis pedis) in both feet and note whether pulses are present or absent. Item 4: Sensory Exam The sensory testing device supplied in the “Feet Can Last A Lifetime” kit is a 5.07 (10-gram) Semmes-Weinstein nylon monofilament mounted on a holder that has been standardized to deliver a 10-gram force when properly applied. Research has shown that a person who can feel the 10-gram filament in the selected sites is at reduced risk for developing ulcers. Because sensory deficits appear first in the most distal portions of the foot and progress proximally in a “stocking” distribution, the toes are the first areas to lose protective sensation. 2 • The sensory exam should be done in a quiet and relaxed setting. The patient must not watch while the examiner applies the filament. • Test the monofilament on the patient’s hand so he/she knows what to anticipate. • The five sites to be tested are indicated on the examination form. • Apply the monofilament perpendicular to the skin’s surface (see diagram A below). • Apply sufficient force to cause the filament to bend or buckle, using a smooth, not a jabbing motion (see diagram B below). • The total duration of the approach, skin contact, and departure of the filament at each site should be approximately 1 to 2 seconds. • Apply the filament along the perimeter and NOT ON an ulcer site, callus, scar or necrotic tissue. Do not allow the filament to slide across the skin or make repetitive contact at the test site. • Press the filament to the skin such that it buckles one or two times as you say “time one” or “time two.” Have patients identify at which time they were touched. Randomize the sequence of applying the filament throughout the examination. • To order additional disposable or reusable monofilaments, see the Resource List at the end of this document. Risk Categorization Based on the foot exam, determine the patient’s risk category. A definition of “low risk” or “high risk” for recurrent ulceration and ultimately, amputation, is provided in the following chart, along with minimum suggested management guidelines. Individuals who are identified as high risk may require a more comprehensive evaluation. See the Resource List of obtaining information about other foot exam forms and risk categorization schemes developed by the Bureau of Primary Health Care’s Lower Extremity Amputation Prevention (LEAP) Program, Health Care Financing Administration, and the Veterans Administration. 3 Once feet are categorized as high risk, it is unlikely that risk status will change unless vascular surgery is performed. At subsequent visits the provider should assess for the development of additional risk factors and focus on maintaining the integrity of the feet and on metabolic control. Patients should be educated about avoidance of injury, use of therapeutic footwear, and preventive self-care. 4 5 Monofilaments for Sensory Testing To order monofilaments, call or write to any of the following organizations: Center for Specialized Diabetes Foot Care P.O. Box 373 - 405 Hayden St. Belzoni, MS 39038 Phone: (800) 543-9055 Connecticut Bioinstruments Inc. P.O. Box 2567 Danbury, CT 06813 Phone: (800) 336-1935 Lower Extremity Amputation Prevention (LEAP) Program HRSA/BPHC/DPSP 4350 East-West Highway, 9th Floor Bethesda, MD 20814 Phone: (888) 275-4772 Internet: http://bphc.hrsa.gov/leap Medical Monofilament Manufacturing, LLC 116 Long Pond Road Plymouth, MA 02360 Phone: (508) 746-7877 Internet: http://www.medicalmonofilament.com North Coast Medical, Inc. 18305 Sutter Blvd. Morgan Hill, CA 95037-2845 Phone: (800) 821-9319 Sensory Testing Systems 1815 Dallas Drive, Suite 11A Baton Rouge, LA 70806 Phone: (225) 923-1297 Smith & Nephew Inc. P.O. Box 1005 Germantown, WI 53022-8205 Phone: (800) 558-8633 6 APPENDIX B MEDICATION LISTS DQCMS Medication List January 23, 2006 Color Code Key Oral Antidiabetes Agents ACE Inhibitors & ARBs Lipid Lowering Agents Antiplatelet Agents Insulin B-1 Oral Antidiabetes Agents Sulfonylureas First-Generation Agents Chlorpropamide .................................................................................................................................. Diabines First-Generation Agents: Now Rarely Used Tolbutamide ........................................................................................................................................... Orinas Tolazamide ........................................................................................................................................... Tolinas Acetohexamide ......................................................................................................................................Dymelo Second-Generation Agents Glyburide ............................................................................................................................. DiaBeta, Micronas Glyburide micronized ...............................................................................................................Glynase, Presta Glipizide................................................................................................................................................Glucotro Glipizide extended release ............................................................................................................. Glucotrol X Glimepiride ..............................................................................................................................................Amary Biguanides Metformin ................................................................................Glucophage, Glucophage XR, Fortamet, Riome Combination agents Glipizide/Metformin XR ......................................................................................................................... Metagli Glyburide/Metformin ........................................................................................................................ Glucovanc Rosiglitazone/Metformin ................................................................................................................... Avandame Pioglitazone/Metformin .................................................................................................................. Actoplus me Alpha-glucosidase inhibitors Acarbose ...............................................................................................................................................Precos Miglitol ......................................................................................................................................................Glyse Thiazolidinediones (TZD) Rosiglitazone ......................................................................................................................................... Avandi Pioglitazone ............................................................................................................................................... Acto Meglitinides Repaglinide ........................................................................................................................................... Prandi Nateglinide ............................................................................................................................................... Starli Incretin Exenatide .................................................................................................................................................Byett B-2 ACE Inhibitors and ARBs ACE Inhibitors (Angiotensin Converting Enzyme) Quinaopril ............................................................................................................................................ Accupril Perindopril .............................................................................................................................................. Aceon Ramipril .................................................................................................................................................. Altace Captopril ..............................................................................................................................................Capoten Benzaepril ............................................................................................................................................Lotensin Trandolapril ..............................................................................................................................................Mavik Fosinopril ............................................................................................................................................ Monopril Lisinopril ..................................................................................................................................... Prinivil, Zestril Moexipril .............................................................................................................................................. Univasc Enalapril............................................................................................................................................... Vasotec Combination ACE Inhibitor/Diuretic Quinapril/HCTZ .................................................................................................................................. Accuretic Captopril/HCTZ .................................................................................................................................. Capozide Benazepril/HCTZ ........................................................................................................................ Lotensin HCT Lisinopril/HCTZ ...................................................................................................................Prinzide, Zestoretic Moexipril/HCTZ ..................................................................................................................................... Uniretic Enalapril/HCTZ .................................................................................................................................. Vaseretic Combination ACE Inhibitor/Calcium Channel Blocker Enalapril/Felodipine ................................................................................................................................Lexxel Benazepril/Amlodipine ............................................................................................................................. Lotrel Trandolapril/Verapamil ............................................................................................................................. Tarka ARB’s (Angiotensin II Receptor Inhibitors) Candesartan ........................................................................................................................................ Atacand Irbesartan ..............................................................................................................................................Avapro Olmesartan ........................................................................................................................................... Benicar Losartan.................................................................................................................................................Cozaar Valsartan ............................................................................................................................................... Diovan Telmisartan .......................................................................................................................................... Micardis Eprosartan ........................................................................................................................................... Teveten Combination ARB/Diuretic Candesartan/HCTZ ...................................................................................................................... Atacand HCT Irbesartan/HCTZ ................................................................................................................................... Avalide Olmesartan/HCTZ .........................................................................................................................Benicar HCT Valsartan/HCTZ .............................................................................................................................Diovan HCT Losartan/HCTZ ...................................................................................................................................... Hyzaar Telmisartan/HCTZ .......................................................................................................................Micardis HCT Eprosartan/HCTZ ......................................................................................................................... Teveten HCT B-3 Lipid Lowering Medications HMG-CoA Reductase Inhibitors Lovastatin/Niacin ................................................................................................................................. Advicor Lovastatin extended release ................................................................................................................. Altocor Rosuvastatin ........................................................................................................................................ Crestor Fluvastatin .............................................................................................................................................Lescol Atorvastatin ........................................................................................................................................... Lipitor Lovastatin ........................................................................................................................... Mevacor, Altoprev Pravastatin ...................................................................................................................................... Pravachol Simvastatin .............................................................................................................................................Zocor Combination Agents Pravastatin + Buffered Aspirin ................................................................................................. Previgard PAC HMG-CoA Reductase Inhibitor + Antiplatelet/salicylate Atorvastatin + Amlodipine .................................................................................................................... Caduet Statin + Calcium Channel Blocker Lovastatin + Niacin .............................................................................................................................. Advicor Statin + Fibrate Simvastatin + Ezetimibe ....................................................................................................................... Vytorin Statin + Cholesterol Absorption Inhibitor Bile Acid Sequestrants Cholestyramine................................................................................................................................. Questran Colestipol Hydrochloride ..................................................................................................................... Colestid Colesevelam ...................................................................................................................................... WelChol Miscellaneous Agents Dextrothyroxine ................................................................................................................................. Choloxin Fenofibrate .............................................................................................................................................Tricor Gemfibrozil ............................................................................................................................................. Lopid Niacin/nicotinic acid .................................................................Niacor, Nicolar, Nico-400, Slo-Niacin, Niaspan Omega-3 Fatty Acids/Fish Oil ..................................... Promega, Cardio-Omega 3, Sea-Omega, Marine Lipid Concentrate, SuperEPA 1200, Omacor Ezetimibe................................................................................................................................................. Zetia B-4 Antiplatelet Agents Aspirin .................................................................... ASA, Ascriptin, Bayer, Bufferin, Ecotrin, Empirin, Halfprin Clopidogrel Bisulfate .............................................................................................................................. Plavix Dipyridamole/ASA ............................................................................................................................ Aggrenox Ticlopidine .............................................................................................................................................. Ticlid Warfarin .......................................................................................................................................... Coumadin Dipyridamole ...................................................................................................................................Persantine Insulin Humalog ................................................................................................................................... Lispro, Lyspro Novolog ................................................................................................................................................ Aspart Regular (R) .................................................................................................................... Humulin R, Novolin R NPH ............................................................................................................................... Humulin N, Novolin N Lente .............................................................................................................................. Humulin L, Novolin L Ultralente ........................................................................................................................................ Humulin U Lantus ................................................................................................................................................ Glargine Lispro-Lispro protamine ................................................................................................ Humalog 75/25, 50/50 NPH-Regular ....................................................................................... Humulin 70/30 & 50/50, Novolin 70/30 B-5