1
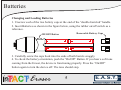
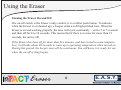
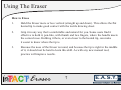
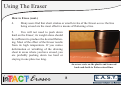
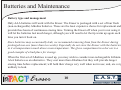
Eraser
User Manual
Thank You from E.A.S.Y. LLC
Hello from E.A.S.Y. LLC. You’re about to use the first product we’ve brought to market
after four years of development and trial use by blind consumers and their teachers and
colleagues. Before the details on how to make best use of the inTACT Eraser, a couple of
sentences about our company. E.A.S.Y. LLC stands for “Engineering to Assist and Support You”. This name really does indicate what we stand for. This product, like those that
will follow, is meant to support your productivity and creativity, and to assist you by
makingsometimes difficult and cumbersome tasks easier.
If you have any ideas for helping future versions of the Eraser live up to the company
name, please let us hear from you. You can always get in touch with us at
[email protected]
To date, most of what we’ve learned has come from users, like you.
Eraser
1
E.A.S.Y.
LLC
ENGINEERING TO ASSIST AND SUPPORT YOU
Table of Contents
Introduction
3
What’s in the Box
4
Familiarization
4
Changing and Loading Batteries
5
Turning Eraser On/Off
6
How To Erase
7
Notes on Erasing Quality
9
Battery Management
Eraser
10
2
E.A.S.Y.
LLC
ENGINEERING TO ASSIST AND SUPPORT YOU
Introduction
The inTACT Eraser is essentially a handheld battery-powered iron; it can be used to
flatten raised lines you’ve scribed on the plastic sheets of your tactile graphics tablet. You
can use this to correct mistakes, change lines when you have new ideas, and generally
edit what you’re drawing – in short all the reasons a sighted person uses a rubber eraser
to fix pencil drawings. You’ll find that you get better with it – i.e. erase more completely,
consistently and selectively – with a little practice.
Warning
!
Do not contact Eyes or Mouth with the Eraser’s Heated
Tip. Do not make prolonged skin contact with the Eraser’s
Heated Tip. Slight burning may occur.
!
Adult Supervision recommended for use by children under
10 years old.
Eraser
3
E.A.S.Y.
LLC
ENGINEERING TO ASSIST AND SUPPORT YOU
What’s in the Box / Familiarization
What’s in the Box?
1 inTACT Eraser
4 Lithium AAA non-rechargeable batteries (packaged outside the Eraser)
Familiarization
When you first hold the Eraser in your hands, before inserting the batteries, handle the
unit sufficiently to become familiar with its shape and feel. Notice in particular the small
flat round metal tip, protruding slightly from the conical nose of the Eraser. When heated
up to operating temperature, this tip flattens raised lines. Familiarization when the unit is
not loaded with its batteries, or at least when it is off and the tip is cooled to room
temperature, is important since you can handle the Eraser without concern of inadvertently contacting the heated tip.
Eraser
4
E.A.S.Y.
LLC
ENGINEERING TO ASSIST AND SUPPORT YOU
Batteries
Changing and Loading Batteries
1. Unscrew each of the two battery caps at the end of the “double-barreled” handle.
2. Insert Batteries as shown in the figure below, using the rubber on/off switch as a
reference.
Removable Battery Caps
ON/OFF Button
3. Carefully screw the caps back into the ends of both barrels snuggly.
4. To check the battery orientation, push the “On/Off” Button. If you hear a soft tone
coming from the Eraser, the device is functioning properly. Press the “On/Off”
button again to turn the device off. The tone should stop.
Eraser
5
E.A.S.Y.
LLC
ENGINEERING TO ASSIST AND SUPPORT YOU
Using the Eraser
Turning the Eraser On and Off
The on-off switch is the Eraser’s only control; it is a rubber push button. To indicate
when the Eraser is on (heated up), a beeper emits a soft high-pitched tone. When the
Eraser is on and working properly, the tone will cycle continually – on for 3 or 5 seconds
and then off for 8 to 10 seconds. This means that if there is no tone for more than 15
seconds, the unit is off.
If the Eraser has been off for more than five minutes, and has cooled to room temperature, it will take about 40 seconds to come up to operating temperature when turned on.
During this period, the beeper tone will be continuous. You will know it is ready for use
when the on-off cycling begins.
Eraser
6
E.A.S.Y.
LLC
ENGINEERING TO ASSIST AND SUPPORT YOU
Using The Eraser
How to Erase
1.
Hold the Eraser more or less vertical (straight up and down). This allows the flat
heated tip to make good contact with the tactile drawing sheet.
2.
Grip it in any way that’s comfortable and natural for you. Some users find it
effective to hold it, pen-like, with thumb and two fingers, where the handle meets
the conical nose. Holding it there, or even closer to the heated tip, can make
it easier to know where the tip is.
3.
Because the nose of the Eraser is round, and because the tip is right in the middle
of it, it should not be hard to learn this skill. As with any new manual tool,
practice will improve results.
Eraser
7
E.A.S.Y.
LLC
ENGINEERING TO ASSIST AND SUPPORT YOU
Using The Eraser
How to Erase (cont.)
4.
Many users find that short strokes or small circles of the Eraser across the line
being erased are the most effective means of flattening a line.
5.
You will not need to push down
hard on the Eraser; its weight alone should
be sufficient to produce the desired flattening. Most of the effect of the Eraser results
from its high temperature. If you notice
deformation or wrinkling of the drawing
sheet in areas where you have erased, you
are probably pushing down too hard or
staying in one place too long.
An eraser rests on the plastic and is moved
back-and-forth to flatten raised-lines
Eraser
8
E.A.S.Y.
LLC
ENGINEERING TO ASSIST AND SUPPORT YOU
Notes on Erasing Quality
1.
Sighted individuals will generally be able to see a residual line, even after erasing has
flattened it to the point where it has nearly or completely vanished to the touch.
2.
How many erasing strokes are needed to flatten a line depends in part on how firmly the
line has been scribed. A thick or high or coarse – highly tactile – line may require
several strokes to erase, much in the same way that heavy pencil lines can be adequately
but not necessarily completely erased.
3.
A very bold raised line may leave a small – though dramatically flattened – residual line
after erasing, even to the touch.
4.
An area where tactile features have been erased can be drawn over again up to 4 times,
with no loss of raised line quality.
5.
Holding the Eraser tip motionless in contact with the tactile graphics plastic sheet
should be avoided; the resulting build-up of heat in one spot can produce local softening
and permanent distortion of the sheet, evident by touch or by eye.
Eraser
9
E.A.S.Y.
LLC
ENGINEERING TO ASSIST AND SUPPORT YOU
Batteries and Maintenance
Battery type and management
Only AAA batteries will work with the Eraser. The Eraser is packaged with a set of four fresh
(non-rechargeable) Alkaline batteries. These are the least expensive choice for replacement and
provide thee hours of continuous erasing time. Turning the Eraser off when you’re not using it
will let the batteries last much longer, although you will need to let the tip warm up again each
time you turn it back on.
Since batteries may occasionally leak, we recommend removing them from the Eraser during
prolonged non-use (more than two weeks). Especially do not store the Eraser with the batteries
in it at temperatures much above room temperature. The glove compartment in a hot car is a
good example of a bad place for storage.
When the first set of Alkalines is used up, you may wish to consider non-rechargeable Lithium
AAA batteries as an alternative. They cost more than Alkalines but they will provide longer
erasing time before replacement; will hold their charge very well when not in use; and, are very
unlikely to leak.
Eraser
10
E.A.S.Y.
LLC
ENGINEERING TO ASSIST AND SUPPORT YOU
E.A.S.Y.
LLC
ENGINEERING TO ASSIST AND SUPPORT YOU
Contact Information
LLC
E.A.S.Y. LLC
210 Colchester Avenue
Burlington, VT 05405
802.549.4707
www.EasyTactileGraphics.com
Product Support
[email protected]