1
Jetson TK1 Development Kit
User Guide
November 2014
DA-07498-001
Version 01
Notice
ALL NVIDIA DESIGN SPECIFICATIONS, REFERENCE BOARDS, FILES, DRAWINGS, DIAGNOSTICS, LISTS, AND OTHER DOCUMENTS (TOGETHER AND
SEPARATELY, "MATERIALS") ARE BEING PROVIDED "AS IS." NVIDIA MAKES NO WARRANTIES, EXPRESS, IMPLIED, STATUTORY, OR OTHERWISE WITH
RESPECT TO THE MATERIALS, AND ALL EXPRESS OR IMPLIED CONDITIONS, REPRESENTATIONS AND WARRANTIES, INCLUDING ANY IMPLIED WARRANTY
OR CONDITION OF TITLE, MERCHANTABILITY, SATISFACTORY QUALITY, FITNESS FOR A PARTICULAR PURPOSE AND ON-INFRINGEMENT, ARE HEREBY
EXCLUDED TO THE MAXIMUM EXTENT PERMITTED BY LAW.
Information furnished is believed to be accurate and reliable. However, NVIDIA Corporation assumes no responsibility for the consequences of use
of such information or for any infringement of patents or other rights of third parties that may result from its use. No license is granted by
implication or otherwise under any patent or patent rights of NVIDIA Corporation. Specifications mentioned in this publication are subject to change
without notice. This publication supersedes and replaces all information previously supplied. NVIDIA Corporation products are not authorized for
use as critical components in life support devices or systems without express written approval of NVIDIA Corporation.
Trademarks
NVIDIA, the NVIDIA logo and Tegra are trademarks or registered trademarks of NVIDIA Corporation in the United States and other countries. Other
company and product names may be trademarks of the respective companies with which they are associated.
Copyright
© 2014 NVIDIA Corporation. All rights reserved.
NVIDIA Corporation | 2701 San Tomas Expressway | Santa Clara, CA 95050 | +1 408 486-2000 | www.nvidia.com
Jetson TK1 Development Kit
User Guide
Contents
Introduction ................................................................................................................ 3
Getting Started ......................................................................................................... 3
Assumptions ........................................................................................................... 3
Powering Up the Tegra Device .................................................................................... 3
Login Credentials .................................................................................................... 4
Installing the Linux Driver Binary ................................................................................. 4
Running Sample Code .................................................................................................. 4
CUDA ................................................................................................................... 4
Multimedia ............................................................................................................ 4
Flashing Jetson............................................................................................................. 5
Before you Begin ........................................................................................................ 5
Downloading L4T Drivers .............................................................................................. 5
JetPack ...................................................................................................................... 7
Before you Begin ........................................................................................................ 7
Installing JetPack TK1 ................................................................................................. 7
Run JetPack TK1 Samples ........................................................................................... 15
Jetson | DA-07498-001v01 | Copyright © 2014 NVIDIA Corporation. All rights reserved.
Page 2 of 16
Jetson TK1 Development Kit
User Guide
Introduction
The NVIDIA® Jetson TK1 developer board is a full-featured device ideal for software development
within the Linux environment. Standard connectors are used to access Tegra ® features and interfaces,
enabling a highly flexible and extensible development platform. Go to
http://developer.nvidia.com/jetson-tk1 for access to software updates and the developer SDK
supporting the OS image and host development platform that you want to use. The developer SDK
includes an OS image that you will load onto your Tegra device, supporting documentation, and code
samples to help you get started.
This section familiarizes you with the Jetson platform; what to do when you get it out of the box, how
to boot into a Graphical User Interface and run basic sample code with the pre-installed software.
Getting Started
Individual development efforts will vary and may result in modifications to the system configuration. It
is recommended that you begin with the basic system configuration (as shipped) to ensure proper
system operation prior to any further development.
Assumptions
> You have a Jetson TK1 Tegra Developer System, equipped with the NVIDIA ® Tegra® K1 processor.
> Your developer system should be cabled as follows:
Serial cable plugged into the serial port J1A2 UART4 on the target connected to your Linux
host directly or through a serial-to-USB converter. (To setup serial console on the Linux
host.)
(Not included in the developer kit) To connect USB peripherals such as keyboard, mouse, and
[optional] USB/Ethernet adapter (for network connection), a USB hub should be connected to
the working USB port (J1C2 USB2) on the Jetson TK1 system.
An HDMI cable plugged into "J1C1 HDMI" on the target which is connected to an external
HDMI display.
An Ethernet cable plugged into the J1D1 on board Ethernet port.
Powering Up the Tegra Device
1. Connect the AC adapter supplied in your kit to the power connector of your device.
2. Plug the power adapter into an appropriately rated electrical outlet.
3. The system should power on, if not, press and release the power button on the device. You
should see a green POWER LED light illuminate and the fan will spin up
Jetson | DA-07498-001v01 | Copyright © 2014 NVIDIA Corporation. All rights reserved.
Page 3 of 16
Jetson TK1 Development Kit
User Guide
Login Credentials
> Username: ubuntu
> Password: ubuntu
Installing the Linux Driver Binary
Instructions on how to install the NVIDIA Linux driver binary release on your target located in:
${HOME}/NVIDIA-INSTALLER
1. Change directories into the NVIDIA installation directory:
cd ${HOME}/NVIDIA-INSTALLER
2. Run the installer script to extract and install the Linux driver binary release:
sudo ./installer.sh
3. Reboot the system
NOTE: the installer.sh should only be run once.
Running Sample Code
CUDA
Download the CUDA SDK Demo Samples from:
http://developer.download.nvidia.com/embedded/jetson/TK1/2014-0324/CUDA_SDK_Samples.tgz
Multimedia
Download the following H.264 video sample:
http://www.bigbuckbunny.org/index.php/download/
Play video in nvgstplayer by:
Nvgstplayer -i <full path to video>
Jetson | DA-07498-001v01 | Copyright © 2014 NVIDIA Corporation. All rights reserved.
Page 4 of 16
Jetson TK1 Development Kit
User Guide
Flashing Jetson
This section steps you through process to re-flash your Jetson TK1 Development Kit.
Before you Begin
> You have a Jetson TK1 Tegra Developer Kit equipped with the NVIDIA Tegra K1 processor.
> You have a host machine that is running Linux.
> Your developer system is cabled as follows:
Serial cable plugged into the serial port J1A2 UART4 on the target connected to your Linux
host directly or through a serial-to-USB converter. (To setup serial console on the Linux
host.)
USB Micro-B cable connecting Jetson TK1 (J1E1 USB0) to your Linux host for flashing.
(Not included in the developer kit) To connect USB peripherals such as keyboard, mouse, and
[optional] USB/Ethernet adapter (for network connection), a USB hub should be connected to
the working USB port (J1C2 USB2) on the Jetson TK1 system.
An HDMI cable plugged into "J1C1 HDMI1" on the target which is connected to an external
HDMI display.
An Ethernet cable plugged into the J1D1 on board Ethernet port.
Downloading L4T Drivers
${RELEASE_NAME} in the following directions refers to the respective package name as follows:
> Jetson TK1: Tegra124_Linux_Rxx.x.x_armhf.tbz2
Download the latest L4T release package for your developer system and the sample file system from
https://developer.nvidia.com/linux-tegra
1. Untar the release package and assemble the sample file system:
sudo tar xpf ${RELEASE_NAME}
cd Linux_for_Tegra/rootfs/
sudo tar xpf ../../Tegra_Linux_Sample-RootFilesystem_Rxx.x.x_armhf.tbz2
cd ../
sudo ./apply_binaries.sh
2. Flash the sample file system onto the system's internal eMMC:
a) Put your system into "reset recovery mode" by holding down the RECOVERY button
while pressing and releasing the RESET button once on the main board.
Jetson | DA-07498-001v01 | Copyright © 2014 NVIDIA Corporation. All rights reserved.
Page 5 of 16
Jetson TK1 Development Kit
User Guide
b) Ensure your Linux host system is connected to the target device through the USB cable
for flashing.
sudo ./flash.sh -S 8GiB ${Jetson-tk1} mmcblk0p1
The target will automatically reboot upon completion of the flash. The command prompt will show up
over the display that you have attached to the target. All actions are completed unless you wish to
configure the graphical desktop on your setup. You now have Linux running on your developer system.
Installing the graphical desktop on your target board (if not already installed):
1. [OPTIONAL] Connect Ethernet to target via a USB-to-Ethernet adapter
2. Use eth0 for the built-in Ethernet port (or find your USB Ethernet port with
'ifconfig -a'):
sudo dhclient eth0
3. Check to see if Ethernet is up and running. You should see an IP address associated with
eth0.
ifconfig
sudo apt-get update
sudo apt-get install ubuntu-desktop
4. Reboot: system will boot to the graphical desktop.
NOTE: the above steps can be used to install other packages with "sudo apt-get install".
Refer to the release notes provided with your software for up-to-date information on platform features
and use.
Jetson | DA-07498-001v01 | Copyright © 2014 NVIDIA Corporation. All rights reserved.
Page 6 of 16
Jetson TK1 Development Kit
User Guide
JetPack
This section is intended to help you get familiar with installing Jetson TK1 Development Pack (JetPack
TK1), using the tools and running sample code.
Before you Begin
> You have a Jetson TK1 Tegra Developer Kit equipped with the NVIDIA Tegra K1 processor.
> You have a host machine that is running Linux.
> Your developer system is cabled as follows:
Serial cable plugged into the serial port J1A2 UART4 on the target connected to your Linux
host directly or through a serial-to-USB converter. (To setup serial console on the Linux
host.)
USB Micro-B cable connecting Jetson TK1 (J1E1 USB0) to your Linux host for flashing.
(Not included in the developer kit) To connect USB peripherals such as keyboard, mouse, and
[optional] USB/Ethernet adapter (for network connection), a USB hub should be connected to
the working USB port (J1C2 USB2) on the Jetson TK1 system.
An HDMI cable plugged into "J1C1 HDMI1" on the target which is connected to an external
HDMI display.
An Ethernet cable plugged into the J1D1 on board Ethernet port.
> Download latest JetPack TK1
The latest version of Jetson TK1 Development Pack (JetPack TK1) is available at NVIDIA
Developer.
All available JetPack TK1 downloads here.
Installing JetPack TK1
Assumes you downloaded the latest JetPack TK1 version, jetpack-${VERSION}.run. ${VERSION}
refers to the version string for the installer you got.
1. Add execute permissions for the jetpack-${VERSION}.run
chmod +x jetpack-${VERSION}.run
Jetson | DA-07498-001v01 | Copyright © 2014 NVIDIA Corporation. All rights reserved.
Page 7 of 16
Jetson TK1 Development Kit
User Guide
2. Run the jetpack-${VERSION}.run by double-clicking on it in the file browser.
3. Accept the license agreement to continue
Jetson | DA-07498-001v01 | Copyright © 2014 NVIDIA Corporation. All rights reserved.
Page 8 of 16
Jetson TK1 Development Kit
User Guide
4. Enter or navigate to desired installation directory.
5. Select installation type.
Jetson | DA-07498-001v01 | Copyright © 2014 NVIDIA Corporation. All rights reserved.
Page 9 of 16
Jetson TK1 Development Kit
User Guide
6. Select components to install.
7. Review Setup and click the Next button proceed with setup or click Back button to return
to the Select Components screen.
Jetson | DA-07498-001v01 | Copyright © 2014 NVIDIA Corporation. All rights reserved.
Page 10 of 16
Jetson TK1 Development Kit
User Guide
8. Click next and follow instructions on popup window to put device into recovery mode, then
begin flashing device.
Sample output when flashing OS on Jetson.
Jetson | DA-07498-001v01 | Copyright © 2014 NVIDIA Corporation. All rights reserved.
Page 11 of 16
Jetson TK1 Development Kit
User Guide
9. After successfully flashing device, enter your device information in the dialog that comes
up.
10. After installing CUDA on the device, the installer will compile CUDA and GameWorks
OpenGL samples. You can choose whether to deploy the compiled binaries to device.
Jetson | DA-07498-001v01 | Copyright © 2014 NVIDIA Corporation. All rights reserved.
Page 12 of 16
Jetson TK1 Development Kit
User Guide
Sample output when compiling CUDA samples.
11. Copy CUDA samples to device. Run matrixMul sample remotely on device.
Jetson | DA-07498-001v01 | Copyright © 2014 NVIDIA Corporation. All rights reserved.
Page 13 of 16
Jetson TK1 Development Kit
User Guide
Compiling
JetPack TK1 automatically compiles all samples if “Compile Samples” was checked during components
selection. If you selected CUDA components, CUDA samples will be found in the following directory:
<JetPack_Install_Dir>/NVIDIA_CUDA-<version>_Samples directory.
You could recompile the samples by running:
OPENMPDIR=/usr/arm-linux-gnueabihf/lib EXTRA_LDFLAGS=--unresolvedsymbols=ignore-in-shared-libs ARMv7=1 GCC=arm-linux-gnueabihf-g++ make
If you selected GameWorks OpenGL samples, GameWorks OpenGL samples will be available in the
following directory:
< JetPack_Install_Dir >/GameWorksOpenGLSamples
You could cross compile them by running the “make” command under the “samples/build/linuxarm32” subfolder.
Jetson | DA-07498-001v01 | Copyright © 2014 NVIDIA Corporation. All rights reserved.
Page 14 of 16
Jetson TK1 Development Kit
User Guide
Run JetPack TK1 Samples
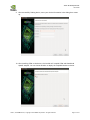
The CUDA samples directory is copied to home directory on the device by JetPack TK1. The built
binaries can be found in the following directory:
/home/ubuntu/NVIDIA_CUDA-6.5_Samples/bin/armv7l/linux/release/gnueabihf/
Run them by calling them in terminal or double clicking on them in the file browser. For example,
when you run the oceanFFT sample, the following screen will be displayed.
Jetson | DA-07498-001v01 | Copyright © 2014 NVIDIA Corporation. All rights reserved.
Page 15 of 16
Jetson TK1 Development Kit
User Guide
GameWorks OpenGL samples will be copied to home directory on device. The built binaries can be
found in the following directory:
/home/ubuntu/GameWorksOpenGLSamples/samples/bin/linux-arm32
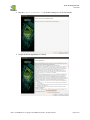
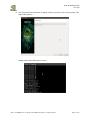
Run them by calling them in terminal or double clicking on them in the file browser. For example,
when you run FeedbackParticlesApp, you will see smoke particles rising.
Jetson | DA-07498-001v01 | Copyright © 2014 NVIDIA Corporation. All rights reserved.
Page 16 of 16