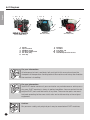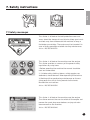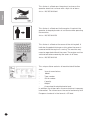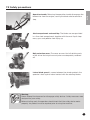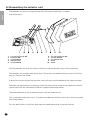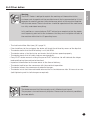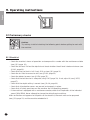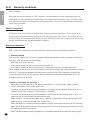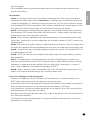
1
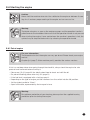
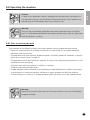
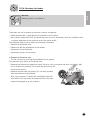
MANUAL E401 English You will find information about the actual use and maintenance of the machine in this manual. Read it carefully and keep it in a safe place. Please also keep your purchasing invoice or the proof of receipt together with this booklet. Register your product online at www.eliet.eu. © ELIET Copyright 2009 ELIET. All rights reserved. All textual material, drawings, figures, diagrams, graphs, etc., included in this ELIET booklet are protected by copyright and also by other intellectual property rights. Nothing from this information may be copied for commercial goals or distributed and/or changed or reposted for other goals. Content has been included at specific places in this 2 ELIET manual of which the copyright is the exclusive property of their respective owners. 1. Introduction English 1.1 Carefully read this user manual ELIET machines are designed for safe and reliable use if they are operated in accordance with the instructions given. Carefully read these operating instructions before using the machine. Failure to observe this may result in personal injury or damage to the equipment. 1.2 Identification Data – ELIET Scarifier E401 Note the identification data relating to your machine in the boxed areas. Stock no. : Engine : Serial number: Year of Manufacture : 2. Warranty 2.1 Warranty Card To be eligible to obtain warranty you must mail the completed warranty card within one month of the date of purchase to the address stated below. European customers : US customers : ELIET EUROPE NV ELIET USA Inc. Diesveldstraat 2 3361 Stafford street (office B) 8553 Otegem 15204 Pittsburgh (PA) Ph (+32)(0)56 77 70 88 - Fax (+32)(0)56 77 52 13 Ph (+001) 412 367 5185 - Fax (+001)412 774 1970 e-mail: [email protected], www.eliet.eu e-mail: [email protected], www.elietusa.com Read the warranty conditions on the attached warranty card. 3 English 3. Welcome Welcome to the family of ELIET users. We would like to thank you for the confidence that you have placed in ELIET and we are convinced that you have purchased the very best machine. The operating life of your ELIET machine depends to a great extent on how you care for your machine. If you follow the instructions and suggestions in these manuals, your ELIET machine will operate for a very long time in optimal condition. Read this instruction manual carefully before operating this machine. This will prevent you from operating the device incorrectly. For your own safety, take into account the safety instructions specified in the relevant chapter. Even if you are thoroughly familiar with operating such equipment, it is still advisable to read these pages carefully. At ELIET all our machines and devices are subjected to a policy of continuous change and therefore, the specification of your machine may differ slightly in terms of shape, technology and accessories. The descriptions and technical data in this manual are accurate at the time of printing. Certain illustrations and descriptions may not be applicable to your specific machine, but instead relate to a different version of the machine. In turn, we trust that you will understand that the texts and illustrations in this manual cannot lead to any claims. If you still have any questions after you have read this manual, please contact your ELIET dealer. Find an official ELIET dealer near you at www.eliet.eu. ELIET AT YOUR SERVICE Diesveldstraat 2 B-8553 Otegem België 4 Tel : (+32) (0)56 77 70 88 Fax : (+32) (0)56 77 52 13 Email: [email protected] 4. Table of contents English 1. Introduction . . . . . . . . . . . . . . . . . . . . . . . . . . . . . . . . . . . . . . . . . . . . . . . . . . . . . . . . . . . . . . 3 1.1 Carefully read this user manual . . . . . . . . . . . . . . . . . . . . . . . . . . . . . . . . . . . . . . . . . . . . . . . . . . . . 3 1.2 Identificationdata- Eliet scarifyer E401. . . . . . . . . . . . . . . . . . . . . . . . . . . . . . . . . . . . . . . . . . . . . . 3 2. Warranty . . . . . . . . . . . . . . . . . . . . . . . . . . . . . . . . . . . . . . . . . . . . . . . . . . . . . . . . . . . . . . . . 3 2.1 Warranty card. . . . . . . . . . . . . . . . . . . . . . . . . . . . . . . . . . . . . . . . . . . . . . . . . . . . . . . . . . . . . . . . . . . 3 3. Welcome. . . . . . . . . . . . . . . . . . . . . . . . . . . . . . . . . . . . . . . . . . . . . . . . . . . . . . . . . . . . . . . . . 4 4. Table of contents. . . . . . . . . . . . . . . . . . . . . . . . . . . . . . . . . . . . . . . . . . . . . . . . . . . . . . . . . . 5 5. Operator safety warnings. . . . . . . . . . . . . . . . . . . . . . . . . . . . . . . . . . . . . . . . . . . . . . . . . . . 6 5.1 For your information . . . . . . . . . . . . . . . . . . . . . . . . . . . . . . . . . . . . . . . . . . . . . . . . . . . . . . . . . . . . . 6 5.2 Caution . . . . . . . . . . . . . . . . . . . . . . . . . . . . . . . . . . . . . . . . . . . . . . . . . . . . . . . . . . . . . . . . . . . . . . . . 6 5.3 Warning. . . . . . . . . . . . . . . . . . . . . . . . . . . . . . . . . . . . . . . . . . . . . . . . . . . . . . . . . . . . . . . . . . . . . . . . 6 6. Main parts. . . . . . . . . . . . . . . . . . . . . . . . . . . . . . . . . . . . . . . . . . . . . . . . . . . . . . . . . . . . . . . 7 6.1 Overall view. . . . . . . . . . . . . . . . . . . . . . . . . . . . . . . . . . . . . . . . . . . . . . . . . . . . . . . . . . . . . . . . . . . . . 7 6.2 Engines . . . . . . . . . . . . . . . . . . . . . . . . . . . . . . . . . . . . . . . . . . . . . . . . . . . . . . . . . . . . . . . . . . . . . . . . 8 7. Safety instructions. . . . . . . . . . . . . . . . . . . . . . . . . . . . . . . . . . . . . . . . . . . . . . . . . . . . . . . . 9 7.1 Safety messages. . . . . . . . . . . . . . . . . . . . . . . . . . . . . . . . . . . . . . . . . . . . . . . . . . . . . . . . . . . . . . . . . 9 7.2 Safety precautions. . . . . . . . . . . . . . . . . . . . . . . . . . . . . . . . . . . . . . . . . . . . . . . . . . . . . . . . . . . . . . . 11 7.3 Safety instructions. . . . . . . . . . . . . . . . . . . . . . . . . . . . . . . . . . . . . . . . . . . . . . . . . . . . . . . . . . . . . . . 12 8. Dealer’s duties. . . . . . . . . . . . . . . . . . . . . . . . . . . . . . . . . . . . . . . . . . . . . . . . . . . . . . . . . . . . 16 8.1 Unpacking the machine. . . . . . . . . . . . . . . . . . . . . . . . . . . . . . . . . . . . . . . . . . . . . . . . . . . . . . . . . . 16 8.2 Positioning the handlebar. . . . . . . . . . . . . . . . . . . . . . . . . . . . . . . . . . . . . . . . . . . . . . . . . . . . . . . . 17 8.3 Assembling the collector unit. . . . . . . . . . . . . . . . . . . . . . . . . . . . . . . . . . . . . . . . . . . . . . . . . . . . 18 9. Operating instructions. . . . . . . . . . . . . . . . . . . . . . . . . . . . . . . . . . . . . . . . . . . . . . . . . . . . 20 9.1 Preliminary checkx. . . . . . . . . . . . . . . . . . . . . . . . . . . . . . . . . . . . . . . . . . . . . . . . . . . . . . . . . . . . . . 20 9.2 Refeulling . . . . . . . . . . . . . . . . . . . . . . . . . . . . . . . . . . . . . . . . . . . . . . . . . . . . . . . . . . . . . . . . . . . . . . 21 9.3 Preparing the work area. . . . . . . . . . . . . . . . . . . . . . . . . . . . . . . . . . . . . . . . . . . . . . . . . . . . . . . . . 22 9.4 Starting the engine. . . . . . . . . . . . . . . . . . . . . . . . . . . . . . . . . . . . . . . . . . . . . . . . . . . . . . . . . . . . . 23 9.5 Operating the machine. . . . . . . . . . . . . . . . . . . . . . . . . . . . . . . . . . . . . . . . . . . . . . . . . . . . . . . . . . 25 9.6 Stopping the engine. . . . . . . . . . . . . . . . . . . . . . . . . . . . . . . . . . . . . . . . . . . . . . . . . . . . . . . . . . . . 28 9.7 After finishing the work. . . . . . . . . . . . . . . . . . . . . . . . . . . . . . . . . . . . . . . . . . . . . . . . . . . . . . . . . 28 9.8 Lawn threathment after dethatching . . . . . . . . . . . . . . . . . . . . . . . . . . . . . . . . . . . . . . . . . . . . . 29 10. Transporting the machine. . . . . . . . . . . . . . . . . . . . . . . . . . . . . . . . . . . . . . . . . . . . . . . . . 30 11. Maintenance . . . . . . . . . . . . . . . . . . . . . . . . . . . . . . . . . . . . . . . . . . . . . . . . . . . . . . . . . . . . . 31 11.1 General. . . . . . . . . . . . . . . . . . . . . . . . . . . . . . . . . . . . . . . . . . . . . . . . . . . . . . . . . . . . . . . . . . . . . . . . . 31 11.2 Maintenance shedule. . . . . . . . . . . . . . . . . . . . . . . . . . . . . . . . . . . . . . . . . . . . . . . . . . . . . . . . . . . 32 11.3 Lubricants. . . . . . . . . . . . . . . . . . . . . . . . . . . . . . . . . . . . . . . . . . . . . . . . . . . . . . . . . . . . . . . . . . . . . 33 11.4 Routine checks before each operation. . . . . . . . . . . . . . . . . . . . . . . . . . . . . . . . . . . . . . . . . . . . 33 11.5 Maintenance after 20 hours of operation. . . . . . . . . . . . . . . . . . . . . . . . . . . . . . . . . . . . . . . . . . 37 12. Storing the machine . . . . . . . . . . . . . . . . . . . . . . . . . . . . . . . . . . . . . . . . . . . . . . . . . . . . . 47 13. Equipment specifications . . . . . . . . . . . . . . . . . . . . . . . . . . . . . . . . . . . . . . . . . . . . . . . . . 48 14. EC Declaration of Conformity. . . . . . . . . . . . . . . . . . . . . . . . . . . . . . . . . . . . . . . . . . . . . . 49 5 English 5. Operator safety warnings A number of symbols (“For your information”, “Caution”, “Warning”) are used in this user manual to provide additional information and to highlight dangers. 5.1 For your information For your information : This symbol is used to draw your attention to specific information and/or actions, or to denote where you can find additional information relating to the subject. 5.2 Caution Caution : This notice identifies safe usage habits. This is done to prevent incorrect actions that can result in personal injury or damage to the machine. 5.3 Warning Warning : This notice is used to warn you about extreme danger that you must be aware of in these specific circumstances. Thus remain alert, in order to ensure your own safety. 6 6. Main parts English To fully understand the content of this operator’s manual you need to be fully conversant with the terminology used for the descriptions. In this chapter you can find a set of parts identified by name. It is a good idea to take time to study the machine beforehand for an improved understanding of the descriptions provided in this user manual. 6.1 Machine Survey 1. Push Bracket 2. Operation Handle 3. Engine 4. Belt protection cover 5. Depth control buttons 6. Mud flap 7. Key 8. Rotating knob for steering attachment 9. Collection bag 7 English 6.2 Engines 1 2-3 8 1 7 2-3 8 1 7 2 7 8 4 4 5 5 3 4 6 BRIGGS & STRATTON Series 500 (4 PS) 1. 2. 3. 4. 5. 6. Choke Speed control ON/OFF switch Oil filler cap/dipstick Oil drain plug Fuel tap HONDA GC 135 (4 PK) 5 HONDA GX 120 (4 PK) 7. 8. 9. 10. 11. Exhaust Air filter Fuel filler cap Condenser Overflow protection device For your information: All references to front, rear/back, left and right in this manual are from the viewpoint of the operator standing behind the machine and facing the direction the machine is travelling. For your information: Your ELIET dealer remains at your service for any maintenance or advice, ensuring your ELIET machine is always in perfect condition. You can contact him for original ELIET parts and lubricants at any time. These service parts are manufactured according to the same strict rules and craftsmanship as the original equipment. Caution: For your own safety, only original parts may be mounted on ELIET machines. 8 7. Safety instructions English 7.1 Safety messages This sticker is affixed on the belt protection cover and warns about the danger of hand injuries. Keep your hands and feet away from underneath the machine as long as the blades are rotating. The engine must be turned off in case of faulty operation or before starting maintenance. Art nr : BQ 505 010 070 This sticker is affixed on the machine near the engine. This sticker provides a summary of the general safety regulations by using icons: 1. Before operating the machine the manual should be read and understood. 2. Suitable safety clothing (gloves, safety goggles, ear defenders) should be worn when operating the machine. 3. Working with or performing maintenance on the machine poses the risk of slicing wounds to the hands. Be attentive and cautious. Art nr : BQ 505 010 050 This sticker is affixed on the machine near the engine. The sticker reminds the user to switch off the engine and remove the spark plug cover before carrying out maintenance work on the machine. Art nr : BQ 505 010 040 9 English This sticker is affixed near the exhaust and warns the operator about hot surfaces with a high risk of burns. Art nr : BQ 505 010 060 This sticker is affixed next to the engine. It reminds the operator to keep bystanders at a distance while operating the machine. Art nr : BQ 505 010 150 This sticker is affixed on the cover of the driving belt. It indicates the potential danger arising when the cover is removed while the engine is running. The machine may never be operated without the cover. The engine must be switched off before removing the cover at all times. Art nr : BQ 505 010 130 This unique sticker contains all machine identification data: • Year of manufacture • Model • Type number • Serial number • Capacity • Weight • Guaranteed A-weighted noise level In addition, the sticker bears the manufacturer’s company information. The sticker bears the seal of conformity with European standards in the form of a CE label. 10 7.2 Safety precautions Steel compartment and mud flap: The blades are encapsulated in a firm steel compartment; together with the mud flap it stops moss, grass and pebbles from flying up. Belt protection cover: The cover ensures that all rotating parts of the driver that might cause injuries are adequately screened off. Lateral blade guard: A screen between the wheels protects the operator’s feet against lateral contact with the rotating blades. Warning: Never attempt to circumvent or disengage safety devices. Safety measures were designed for your safety. Before starting work, the operator should check that the safety device works properly. Any defects must be repaired prior to using the machine. 11 English Operation handle: Releasing the operation handle disengages the blade drive from the engine, causing the blade axle to come to a stop. 7.3 Safety instructions English 7.3.1 General safety regulations Warning: MOST ACCIDENTS ARE CAUSED BY CARELESSNESS OR RECKLESS BEHAVIOUR. • The owner of the machine will keep this manual during its complete service life. A reference guide for the user, it also ensures that the machine is used and maintained correctly at all times. Always refer to this instruction manual if you have any doubts about an operation that you are about to perform. • If the instructions stated in this manual are not clear to you, do not hesitate to contact your ELIET dealer for further explanation. The help desk at NV ELIET is at your service to answer all of your questions on +32 56 77 70 88. For your information: Also read the engine manual supplied with your machine. It contains useful tips about proper use and maintenance of the engine. • Read the chapter meant for the dealer (see § 8; page 16) and verify whether the machine has been delivered in accordance with the instructions. • Carefully observe all safety instructions when using this ELIET machine. Make sure to read all the instructions about how to operate the machine. All these instructions are for your own safety. • Get advice from the dealer or another professional when purchasing the machine. • Read and observe all safety messages stickered on the machine. 7.3.2 Careful and proper use • Think about what you are doing whenever you operate the machine. Do not be tempted to let routine dull your attention. Never act impulsively or on reflex. • Despite the extensive safety features, do not seek out dangerous situations. • This machine is used to rake out the moss and thatch that grows on the base of your lawn and then collect this in a collector unit. This machine must be used for this purpose only. • Dethatching is a surface operation. The blades should only touch the upper surface. The maximum blade depth is 2 millimetres. Too deep a blade setting increases the risk of broken blades and increased wear. • ELIET accepts no liability for damage resulting from improper blade settings. • Dethatching must only be done in a forward travelling direction. In view of general safety, 12 English ELIET advises against dethatching in a backward direction. • Never dethatch when the ground is frozen. • It is recommended to work a dry lawn. Wet lawns increase the risk of accidents; extra care is necessary under these circumstances. • If the lawn is too dehydrated after a period of drought, dethatching is not recommended. The dust generated from the lawn would increase wear of the machine. In addition, dethatching would have a negative effect on the lawn. • Never work when light intensity is below 500 Lux. • Under no conditions whatsoever may the original design of the machine be modified without explicit and written consent of ELIET NV. • The machine may never be used as a means of transport for people or loads. • Make a thorough inspection of the area where the machine is to be used. Remove sticks, stones, wires and debris, but also take account of electric cables, water pipes, sprinkler heads, drain covers, etc. • The blades must be disengaged as soon as the machine is taken off the lawn and pushed across a hard surface. When crossing larger distances on a hard surface, the engine must be turned off as well. • Use the machine in an environmentally safe manner: • Avoid running the machine without actively using it. • Avoid spilling petrol while refuelling. • Service the engine regularly in order to maintain optimum combustion. 7.3.3 Operator’s responsibilities • All persons using the machine are assumed to be fully conversant with the safety instructions. The operator is fully liable for the use of the machine in regard to himself and to third parties. • The operator of this machine is assumed mature enough and with enough common sense to make decisions by himself. • The machine may not be operated by underage persons. However, this does not apply to youths over the age of 16 who are learning to operate the machine under the supervision of an experienced operator. This manual must be read before use. • Children and animals must be kept well away from the machine. • ELIET advises against lending the machine to others but, if this should occur, it should only be lent to persons who are familiar it. Always make sure that the user is aware of the potential hazards and ensure that he/she reads the manual before using the machine. 13 English This machine must only be operated by persons who have a good physical condition. Take a rest if you become tired while operating the machine. Do not operate the machine after alcohol consumption. Warning: YOU COULD END UP REGRETTING ONE MOMENT OF INATTENTION OR CARELESSNESS FOR THE REST OF YOUR LIFE. 7.3.4 Personal Protective Equipment (PPE) For your information: Personal protective equipment reduces the risk run by the operator. • Suitable clothing must be worn when operating this machine, i.e. clothing covering the entire body, protective gloves and closed footwear. • Since your feet run a high risk when operating the machine, sturdy, closed non-slip shoes are a must. Shoes with a steel top are highly recommended. • For protection of the most sensitive senses, ELIET recommends hearing protection and safety goggles. • Dethatching can produce a considerable amount of dust. If it irritates your respiratory airways, ELIET recommends you wear a dust mask (in compliance with the 89/686/EEC standard). 7.3.5 Danger zone The safe position for the operator is behind the machine, with both hands on the handlebar. • Never allow bystanders within the danger zone stretching up to 10 m around the machine during work. • Do not take risks! Stop the blade drive as soon as someone enters the danger zone. • Shut off the engine when leaving the machine unattended. • Once the motor is running, focus all your attention on operating the machine. 14 7.3.6 Periodic maintenance English For your information: For your own safety and in the interest of extending the life of the machine, this machine should undergo regular maintenance. • Periodic maintenance is essential. Strictly follow the maintenance schedule included in this operating manual (see § 11.2; page 32). A maintenance meter helps you keep track of the machine’s hours of operation. • Always request genuine ELIET replacement parts from your ELIET dealer if parts require replacement due to wear or failure. This is of key importance for your own safety. • Repairs, maintenance and cleaning must only be performed with the engine disengaged and the spark plug cap decoupled. 15 English 8. Dealer’s duties 8.1 Unpacking the machine • Set the box on an even surface. Pay attention to the arrows indicating the upper side of the box. • Cut open the side of the box and pull out the flaps. • Pull the machine out of the box 16 8.2 Positioning the handlebar English • Push the handlebar back from its horizontal position until it clicks into the guides on both sides.. • Secure the nuts on either side of the handlebar. 17 8.3Assembling the collector unit English The collector unit that can be purchased with the machine comprises a number of machine parts: 1. 6 x self-locking nut M6 2. 9 x pinion M6 3. 3 x bolt M6x12 4. deflector plate 5. 3 x bolt M6x10 6. 2 x self-locking nut M8 7. 2 x bolt M8x50 8. 2 x support axles 9. Frame 10. Textile Pull the collector unit over the frame so that the nylon base plate hangs on the underside. The collector unit is edged with plastic clips. These clips are hooked onto the frame so that the bag sits firmly on the frame. In order to hang the bag on the machine, two shaft ends must be bolted to the steering handle. Two holes are provided for this purpose. Place the axles on the inside of the steering frame and secure these with the attachment materials supplied (see image above). The metal deflector serves to direct the moss into the collector unit. This is mounted under the chassis. Six holes have been pre-drilled in the chassis for this purpose (see image above). Turn the bolts tightly so that this plate does not come loose while using the machine. 18 8.4 Other duties English Warning: The ELIET Dealer is obliged to explain the workings of themachine to the customer and also point out the possible hazards that are presented by it. He is expected to carefully go over the maintenance points of the machine together with the new owner. These instructions should be repeated until the new owner has fully understood everything. In its position as a manufacturer, ELIET wishes to re-emphasise that the dealer must expressly point out to the customers that they must re-tighten all bolts of the machine within the first 5 operating hours. • The fuel tank will be filled (see § 9.2; page 21) • Prior to delivery to the customer, the dealer will check the oil level by means of the dipstick. • The dealer checks that the RPM setting is at 3,200 RPM. • The dealer makes a final test drive and checks that all devices operate properly. • The dealer checks that all safety features work perfectly. • Every ELIET dealer warrants a long life span of ELIET machines. He will lubricate the hinges before delivering the machine to the client. • Important information for the new owner at the time of delivery: • The dealer familiarizes the new owner with the machine’s operation. • The dealer informs the new owner of potential dangers. • The dealer insists that the machine be returned for first maintenance after 10 hours of service (belt tightening and first oil change are required). Caution: The dealer ensures that the warranty card is filled out and signed The purpose is to avoid warranty disputes. Please read the warranty conditions for more details. 19 English 9. Operating instructions 9.1 Preliminary checks Caution: Try making a habit of checking the following points before getting to work with the machine: 9.1.1 Checklist • Check the machine’s hours of operation and compare this number with the maintenance table (see § 11.2; page 32). • Check the oil level. Pull out the dipstick and check whether the oil level is below minimum (see § 11.4.2, page 33). • Check that the fuel tank is full. If not, fill it up (see § 9.2; page 21). • Check the air filter for excessive dirt (see § 11.4.3, page 33) • Check the blades for wear (see § 11.5.6, page 37). • Check that the belt tension is adequate (see § 11.4.5, page 33). If not, adjust it (see § 11.5.5, page 37). • Check that the depth setting is correct (see § 11.4.4, page 33). • Check that all protection covers are present and properly in place. • Check that all safety provisions on the machine are still operating properly. • If the machine is equipped with a maintenance meter, check that it operates at the indicated speed (3200 RPM). Never attempt to change the default engine settings. After verification and approval of all points on the checklist, the work area can be prepared (see § 9.3, page 22) and the machine wheeled to it. 20 9.2 Refuelling English When petrol in the machine is running low, it must be refuelled. The use of fresh petrol is recommended at all times. Use unleaded petrol, preferably with an octane index of 98 or 99. Warning: Under certain conditions, petrol is extremely flammable and highly explosive. Fires and petrol explosions can inflict severe burns and cause damage to personal property. Consequently, the following points should be observed: • Never refuel with the engine running. Always allow the engine to cool down for several minutes before refuelling. • Use fresh petrol only. ELIET is environmentally conscious and therefore recommends the use of unleaded petrol. Additives may be used for extended fuel freshness. • Store petrol in an approved tank. Keep it out of reach of children. • Never refuel at the location where the machine will be operated. Keep a distance of at least 10 m from the selected work area in view of fire hazard. • Never refuel in a closed area. • Clean the area around the fuel cap and remove it. Don’t fill the tank completely. Fill up to approximately 10 millimetres from the brim. So never fill it up to the brim. • Always use a funnel or a spout for refuelling. Special funnels are available from your ELIET dealer. • Put the cap back on the fuel tank as quickly as possible. Immediately clean up any petrol spilled whilst refuelling. • Also make sure that clothing does not come in contact with the petrol. Should this occur, the clothing must be changed immediately. • It is irresponsible and therefore strictly forbidden to refill the tank around people who are smoking or near open fire. • If fuel is swallowed or comes in contact with the eyes, consult a doctor immediately. 21 9.3 Preparing the work site English • Never work when light intensity is below 500 Lux. • Besides the machine, the work area must also comply with certain conditions; they must be verified prior to starting the work. • Examine the work area and remove any foreign objects from the lawn. • Foreign objects include: metal, stone, plastic, pvc, bones, rope; but also molehills, branches, water hoses, etc. Some of these can cause severe damage to your machine or lead to blade breakage. • Foreign objects that cannot be removed (such as drain covers, built-in power outlets, water sprinklers, tree roots) must be visibly marked. • Always cut the grass before dethatching. Ensure that the grass is shorter than 30 millimetres. • A mowed lawn also displays any foreign objects. • Dethatching a wet lawn is not recommended. • Plan your course so that the wind blows the dust produced by dethatching away from the engine. • Use of the machine on severely dry soil is not recommended for the following reasons: • The grass will recover much slower than usual. • The lawn will be badly damaged. • The blades wear faster and require replacement sooner. • More dust will be produced, soiling the engine more quickly. • Greater dehydration of the soil than was the case already. • We strongly recommend that you treat the grass with an anti-moss herbicide or a weed killer approximately 1 week prior to dethatching so as to ensure that the moss is dead and dry. It will help the grass to thicken more easily after dethatching. 22 9.4 Starting the engine Warning: The blade axle spins as soon as the engine engages and the operation handle is pulled towards the handlebar. Make sure that the operation handle is not pressed when starting the engine. If ever control over the machine’s operation is lost, the quickest way to stop the blade axle is by releasing the operation handle 9.4.1 Petrol engine For your information: The procedure to start the engine can vary per brand. Please check your engine manual. Chapter § 6 (page 7) ‘Main machine parts’, provides the various versions. If this has not been done when going through the checklist, always check the engine for adequate oil and fuel levels before starting it. • Please see § 11.4.2 (page 33) for details about how to check and refill the oil. • For petrol refuelling please refer to § 9.2 (page 21). • If the fuel tank is equipped with a fuel tap, open it. • Depending on the type of engine, put the handle or turn the switch into the ON position. • Set the choke handle to “Close”. • Open full throttle, represented by the image of a hare. Warning: For optimum protection of your hearing, please put on the supplied hearing protection prior to starting the engine 23 English Caution: Never start the machine when dust has settled on the engine or between its cooling fins. It reduces proper cooling of the engine and can cause a fire. English Engage the engine by firmly pulling the starter cord. • The engine running, set the choke handle to “Open”. This prevents the engine from getting too much fuel. Should this be forgotten, the engine will slow down and start to smoke heavily, and eventually come to a stop. Restart the engine without opening the choke if this happens. • Failure to restart the engine points to a greased spark plug which consequently requires cleaning or replacing (see 11.5.2 Checking/replacing spark plug). 24 9.5 Operating the machine English Caution: As long as the operation handle is engaged and the engine has not come to a full stop after turning it off, the blades will continue to spin. Don’t perform any maintenance activities before they have come to a halt. Warning: The mud flap and the belt protection cover offer protection against rotating parts. It is therefore prohibited to reach behind these covers with any body parts while the engine is running. 9.5.1 Prior to starting the work Pay attention to the following safety instructions before starting to operate the machine. • Never run a petrol engine in a closed environment in view of the risk of carbon monoxide poisoning from the exhaust. • The operator must wear clothing, protective gloves and other protective attributes as prescribed in this manual (see § 7.3, page 12). • The operator must be alert while he’s working. As long as he is operating the machine, his full attention must be on the job. • Only ever work with the machine if visibility is sufficient. • There must be adequate light levels. • A good gardener works efficiently and according to a well defined plan. It allows him to keep an overview of his work and prevents accidents or wrong manoeuvres with the machine. • Once the engine is running, it is recommended to allow it to warm up for best performance. Warning: Never tilt the machine forward over the front wheels as this may inadvertently engage the blades. 25 9.5.2 During work English For dethatching, the following procedure must be followed: • Always place the machine on the lawn before engaging the blades. • Push the handlebar down slightly to lift the blades approximately 3 to 4 centimetres from the surface. • Pull the operation handle against the handlebar to engage the blades. • Allow the engine to acquire the proper speed. • Lower the blades. • Push the machine at medium speed. The slower the dethatching process, the better the result. Key issues with regard to dethatching are: • Avoid standing still with the machine as this can cause deep marks in the lawn. • Efficient dethatching involves two runs of the entire surface, the second one perpendicular to the first. • Be advised that dethatching is not the same as cultivating. Both processes have their own specific purpose and are carried out with a specific machine. • Cease the operation immediately when you hear unfamiliar noises. Stop the engine and examine the cause of the noise. Perform any necessary repairs before continuing. • Should any foreign objects have landed under the machine despite proper preparations, immediately switch off the machine. Remove the foreign object and check for damage. Any defects must be repaired before reassuming operation. Follow the procedure below to change direction or to cross small distances (paths or terraces): • Release the operation handle. • Push the handlebar down slightly to lift the blades approximately 3 to 4 centimetres from the surface. When the blades are still, the machine can be lifted a little higher if necessary. • Roll the machine to where dethatching must take place. • Pull the operation handle against the handlebar to engage the blades. • Allow the engine to acquire the proper speed. • Lower the blades. • Push the machine at medium speed. Caution: The blades must be switched off before crossing a paved surface. Lift the front wheels approx. 4 cm by pushing the handlebar down. To cross relatively large distances (> 10 m) over a paved surface the engine must be turned off. 26 9.5.3 Emptying the collector unit There is an opening in the collector unit through which the level of its contents can be seen. English If the unit is full or the machine is losing moss, the unit must be emptied. Release the bracket in front of the blade clutch so that the blades come to a halt. Then take the collector unit by the handle and unhook it from the attachment points. Warning: In many cases, there will be moss in the chassis cavity. Never reach under the protective cover with your hands; if the motor is running, the blades may engage unexpectedly. Continue with the machine in a forwards direction for one metre so that you can gather together the excess moss from the ground. Once the collector unit has been emptied, fold up the dethatching machine’s mudguard and clip the collector unit back onto the hanging points. Caution: If the mudguard is tipped up you must be sure that the blades are not engaged. Only once the collector unit has been replaced correctly and the mud flap is partially covering the collector unit can the blades be engaged as set out above. 27 9.6 Stopping the engine English 9.6.1 Petrol engine • To stop the engine, switch the throttle or turn the knob into the “OFF” position. • If the machine is equipped with a fuel tap, close it. 9.7 After finishing the work 9.7.1 Cleaning the machine • Failure to clean the machine will induce quicker wear. A machine functioning sub-optimally can compromise the operator’s safety. Failure to clean the machine can cause: 1. increased wear of the bearings 2. increased wear of covers 3. reduced cooling 4. fire hazard 5. inability to notice cracks or tears 6. damage to the paint 7. stickers to become illegible • It is therefore recommended to clean the machine after each use. Cleaning the machine can also be regarded as a visual check. It offers an opportunity to promptly notice any breakage or need for lubrication. The following points require special attention: • The engine should be clear of dust and dirt. More in particular the cooling fins and the area around the exhaust must be clean. The area around the fuel cap must be kept clean to avoid dirt entering the fuel tank. • The bushings must be cleaned of sand and dirt that has become stuck in the lubricating grease. Reapply lubricating grease after wiping the bushings (see the list of lubricants in § 11.3, page 33). • Use a dry cloth to remove dirt from the chassis and more specifically from the stickers with safety instructions. 28 Caution: Wear suitable clothing for cleaning activities. Utility gloves are necessary. 9.8 Lawn treatment after dethatching • After dethatching it is essential to thoroughly remove the raked moss to avoid it from reattaching to the soil. • Sowing: To thicken up the lawn after dethatching, new grass must be sown in the open spaces. Working the seed into the soil has preference over sowing on top of the existing grass. It allows faster germination of the seed and quicker thickening of the lawn. Watering the lawn at regular intervals is required. The sowing machine from ELIET’s product range is highly suitable for renovating your lawn. • Fertilising: A balanced fertilising treatment is recommended to help recovery of the existing lawn. It also stimulates growth of the sown grass. The choice of fertiliser depends on the soil, acidity and type of grass. Ask advice from a supplier of fertilising products. • Aeration: Very often the soil under the lawn has been pressed together from walking or driving on it. The grass doesn’t get enough air as a result. It also prevents easy drainage of rain water and fertilisers. These are causes for slow growth of the grass and increased growth of surface parasites such as moss. Opening up the soil requires aeration at a deeper level. • Sanding: Sanding the lawn can help to provide air to the top layer. Sanding can best be done after dethatching or aeration. Sharp sand is the best choice. • Irrigation: Protecting itself from drought, grass will slow down its own growth during continuous sunny weather and high temperatures. Regular watering is recommended if a period of drought starts after dethatching. A humid soil below the grass is of key importance for absorption of fertilisers, continued growth and recovery of the lawn. 29 English • Use a dry cloth or soft brush for any cleaning. Use penetrating oil with MoS2 to remove grease and lubricants. The latter is a lubricant and rust solvent at the same time. • A steamer may be used for cleaning, but the water should not be overly pointed at bearings, protection covers and filler caps. Water is the number one cause of rust and this must be avoided at all times. Allow the engine to cool down properly before treating it with water. English 10. Transporting the machine • To move the machine, push the handlebar down slightly to lift the blades from the surface. • TThe engine must be turned off if the machine is moved for transport. • TOnly adults are permitted to move or transport the machine. • TDuring transport children, unauthorised people or animals must not be allowed within a 3 m radius of the machine. • TCarefully choose a clear and free transport path, preferably one with as few obstructions as possible. The transport route is preferably flat, with an even surface. • TIf the machine topples over for some reason, set it upright as quickly as possible. It prevents oil from the crankcase entering the air filter. It is advisable to avoid this as these filters are not cheap. • TUse non-slip planks for loading the machine into a van or onto a trailer. Ensure that the planks are properly fastened to the vehicle or trailer. Under no circumstances should the upwards slope exceed 25°. • TAttention and care while loading and offloading the machine can prevent it from tipping over and causing an accident. Mount the planks in a forward direction.. Descend the planks in a forward direction. • Make sure the machine is properly attached in the vehicle during transport. Attach ropes to the fixed chassis parts to secure the machine. • The handlebar of the machine folds down for more compact transport. Loosen both nuts on either side of the handlebar; slightly push the arms inwards and fold the handlebar forwards (see § 8.2 page 17, in reverse order). 30 11. Maintenance English 11.1 General For your information: The dealer and his staff are always ready to help and can also rely on the ELIET help desk for support. The combination guarantees you the best joint effort to find a solution for any problems you may have. For repairs or maintenance you can turn to your authorised ELIET dealer or a service centre authorised by the engine manufacturer. Please always submit the model and serial numbers of the machine and the engine, as well as a complete description of the problem. Only use original ELIET replacement parts. These service parts are manufactured according to the same strict quality requirements and craftsmanship as the original equipment. For your own safety, only genuine parts should be mounted on ELIET machines. • Perform maintenance in a room intended for this purpose. The area must meet the following criteria: • Spacious • Easily accessible • Well lit • Dust-free • Clean and tidy • Quiet These characteristics are important to properly carry out maintenance works. Caution: Maintenance performed in an incorrect manner may compromise the operator’s safety. Maintenance should be always carried out with the engine turned off. As a precaution, the spark plug should also be removed or the lead detached. Always wear safety gloves when performing maintenance. Safety goggles may be required for certain operations. • In principle, the maintenance works described may be carried out by any person with technical skills. ELIET recommends, however, that the machine be brought to an official ELIET dealer for a major overhaul each year. • Your ELIET dealer is always ready to carry out maintenance and provide advice. He stocks genuine ELIET replacement parts and lubricants. His staff can always obtain advice and service from ELIET’s help desk in order to provide you with an impeccable after-sales service. 31 11.2 Maintenance schedule English Maintenance after 20 hours of operation Routine check before each operation Description 32 Visual check § 11.4.1 Oil level check § 11.4.2 Cleaning the air filter § 11.4.3 Checking and setting the depth control § 11.4.4 Belt tension check § 11.4.5 Cleaning the machine § 9.7.1 § 9.7.1 Changing the oil § 11.5.1 Checking and/or changing the spark plug § 11.5.2 Changing the air filter § 11.5.3 General lubrication treatment § 11.5.4 Belt tension adjustment § 11.5.5 Changing the blades § 11.5.6 11.3 Lubricants SUNOCO SUPER DENALUBE SAE 20 W 50 API SF / CC Scharnierpunten NOVATIO PTFE OIL Wielassen SUNOCO VET MULTI-PURPOSE LR - EP2 11.4 Routine check before each operation 11.4.1 Visual check Check that no parts have been deformed, that welded seams are not cracked and that parts do not exhibit excess play. If problems are found, carry out the necessary repairs first. 11.4.2 Oil level check Read the ‘General description’ in § 6 Main machine parts (page 7) for the possible positions of the dipsticks and oil drain and filling plugs. • Take a clean cloth. • Pull the dipstick from the filler opening. • The oil level will usually be hard to read immediately. Wipe the dipstick with your clean towel and re-insert it without fastening it. • After pulling it out again you will get an accurate reading of the oil level. • The oil sticking to the dipstick should be between the minimum and maximum mark. If the oil level is too low, it can be filled via the oil filler. Use only recommended oil. Don’t add too much oil at once and check the oil level regularly. 11.4.3 Cleaning the air filter • The type of air filter depends on the engine brand and type. • The air filter is located under the black protection cover next to the fuel reservoir on the engine. • Loosen the black protection cover. • There are two types of filters: the common sponge filter and a paper filter, similar to that of an automobile. • Sponge filters can be cleaned by rinsing them with some petrol and blowing them with compressed air. • Paper filters are cleaned by dusting them down or treating them with compressed air. 33 English Motor (0,75 l) • After cleaning, replace all parts in their original positions. English Caution: In the event the machine has toppled over for some reason, check the air filter immediately. The unusual position of the engine may have caused oil to seep from the crankcase via the carburettor onto the air filter. Oil on the filter paper obstructs the air passage. Soiled filters must be replaced immediately. 11.4.4 Checking and setting the depth control CORRECT DEPTH SETTING = MAXIMUM EFFICIENCY Caution: This maintenance may only be carried out with the engine off and the blades at full stop. Warning: Wear gloves to perform this procedure. Depth adjustment is carried out by positioning the front wheels (continuous – stepless -) and the rear wheels (3 positions) of the scarifier. • Carefully place the scarifier on an even and hard surface. Make sure that the blades don’t get damaged. • Remove the key at the right side of the push bracket. • Loosen the bolt of the left and right frontwheels slightly. This is necessary to unlock the depth control. 34 • Place a level object of approx. 4 mm thick under both front wheels. The key can be used as so. • Turn the blades manually until the tips are as close to the surface as possible. English • If the blades touch the surface they must be lifted by turning the 2 depth adjustment knobs (to the left and right) anticlockwise until they are just above the surface level. • Turn both depth adjustment knobs clockwise evenly. • The depth setting is correct when the blades are only just above the surface. • Check that the front side of the scarifier is horizontal; if not, depth adjustment must be carried out again. • Carefully remove the objects from underneath both front wheels. • Fixen the bolts of the left and right frontwheels to lock the depth control • Place back the key in the rightside of the push bracket. Ter info: If possibilities of front wheel depth adjustment are exhausted, the rear wheel depth setting can be used. Remove both back wheels. Remount the wheels, but this time in the highest (or lowest) bolt holes. Now the blades will touch the surface again, hence the depth setting on the front wheels must be fine-tuned. Per set of blades, the adjustment on the rear wheels can be performed only once. If a new set of blades is applied, the rear wheels must be remounted into the original bolt holes. 35 11.4.5 Belt tension check English Warning: Only check the belt tension with the engine off. Remove the spark plug cap. The scarifier must be tilted to check the belt tension. The air filter must be removed prior to tilting the machine to prevent soiling it with oil. Don’t tilt the machine longer than necessary; place it horizontally again as soon as possible. Should any oil seep back to the air filter compartment, remove it with a dry and totally lint-free cloth and run the scarifier without the air filter for a couple of minutes. Don’t forget to replace the air filter afterwards. Wearing gloves is mandatory. • Tilt the scarifier by pushing the handlebar to the ground. • Remove the four screws and nuts from the belt protection cover. Hold the nuts on the inside of the chassis with a second spanner when loosening the screws. • Press the two free belt parts towards each other. For sufficient belt tension and trouble-free operation of the blades, a one centimetre distance between them should remain when pressing the two belt parts together. No adjustment of the belt tension is required in that case. When replacing the belt protection cover, verify that it doesn’t touch the pulley when the blades are engaged. The slots in the cover provide some play to avoid contact. • If the belt tension proves to be too loose or too tight, it must be adjusted. A loose drive belt will bang against the protection cover (see § 11.5.5, page 41). • Because a new belt will expand somewhat during the first period of operation, it is recommended to adjust the tension after 10 hours of operation (for belt adjustment see § 11.5.5, page 41). • Reposition the machine on all four wheels. 36 11.5 Maintenance after 20 hours of operation 11.5.1 Changing the oil English • Ensure that the engine is on an even surface and turned off. • At the rear of the engine, below the engine foot, a plug is screwed into the crankcase. (See the engine manual.) • Get a one litre collection reservoir before unscrewing the plug. • Empty the full contents (approx. 0.75 l) from the engine. • Replace the plug. Wipe away any spilled oil with a clean cloth. • Refill the engine with fresh 4 stroke oil. ELIET recommends a top quality high-detergent oil: SUNOCO DENALUBE SAE 20W50 API SF / CC. • Fill approx. 0.75 litres of oil into the oil filler opening. Remove any spilled oil after filling. For an accurate dipstick reading of the oil level, allow sufficient time for the oil to settle in the crankcase. • Place the dipstick in the filler opening without fastening it. After pulling it out again, the oil attached to the dipstick should reach the maximum mark. If not, more oil must be added. Warning: Oil shortage causes severe engine damage. Caution: The action described here may slightly differ from what applies to your model. Read the engine manual to be sure. 37 11.5.2Checking and/or changing the spark plug English ELIET suggests the following spark plugs: Briggs & Stratton - 4 HP CV8 Champion Honda GX 120 - 4 HP BPR 6 ES NGK Honda GC 135 - 4 HP BPR 6 ES NGK • Turn off the engine and pull the cable from the spark plug. • Clean the area around the spark plug and remove the spark plug from the cylinder head. • Using a feeler gauge, check whether the distance between electrodes is 0.8 mm. • The spark plug must be replaced if it shows heavy deposits or is very dirty. 0,8 mm • Take the following steps to verify ignition quality: 1. Put the spark plug cap back on. 2.Grab the rubber of the spark plug cap and press the outermost electrode against the mass of the engine. 3.Pull the starter cord. 4.Check for sparks between the electrodes. 5.The spark plug is in good condition if the sparks are clear and neatly centred between the electrodes. 6.Weak, irregular and not well-centred sparks indicate that the spark plug must be changed. Caution: Fitting or changing a spark plug must be done with utmost caution so as not to damage the screw thread in the cylinder head. Secure the spark plug with a torque of 20 Nm. 11.5.3 Changing the air filter This procedure is exactly the same as for cleaning the air filter (see § 11.4.3, page 33). • New, suitable air filters are available from your ELIET dealer or an authorised service centre of the relevant engine brand. 38 11.5.4 General lubrication treatment English ELIET is committed to using high-quality materials that extend the machine’s life cycle despite sometimes dusty work circumstances. For this reason, special lubrication products have already been applied in the factory. ELIET also recommends lubricating all parts on a regular basis: • bearings • hinges a. Lubricating bearings Caution: As applies to all maintenance work, the engine must be turned off here as well. Detach the spark plug cap or lead. Utility gloves are essential. Bearings that are used under dusty circumstances benefit from regular cleaning and lubrication. • Tilt the machine backwards by pushing the handlebar down. It provides easy access to the blade axle. Caution: Tilting the machine can lead to petrol seepage from the tank. Prior to lubricating the bearings they must be cleared of old lubricant and deposits. Cleaning spray aimed at the bearings and in the bearing joints will do the job easily. ELIET recommends NOVATIO KLEENSPRAY-S. • Allow it to work for a few minutes so that it can enter the bearing as well. • Let the bearings run while blowing away all deposits and cleaning agent with compressed air. Repeat the above procedure if not all dirt was removed. • Check that the bearing does not show excessive play. Also check that the bearing runs smoothly. In the event of defects, consult your ELIET dealer for a bearing replacement in order to avoid future inconvenience. • Re-apply a high quality lubricant. Spray NOVATIO NOVA PTFE OIL into the joints of the bearing seal. 39 English • Wipe away any excessive lubricant. • Reposition the machine on all four wheels. b. Lubricating hinges To avoid wear of hinging parts or friction zones, apply lubricant regularly. Pay special attention to the following areas: • The tilting point of the engine’s fixing plate • Attachment points of the starter cord • Hinge of the blade clutch handle Follow this procedure: • First spray the friction zones with cleaner. Allow it to sit for a while. ELIET recommends NOVATIO KLEENSPRAY-S. • Wipe away old lubricant with a cloth or paper tissue. • Once the friction zones are clean, new lubricant can be applied to the contact areas. We recommend NOVATIO PTFE OIL or SUNOCO MULTIPURPOSE LR - EP2. All lubricants indicated are available from your ELIET dealer. 40 11.5.5 Belt tension adjustment English CORRECT TENSION + CORRECT ALIGNMENT => LONG LIFE CYCLE OF THE BELT Caution: When adjusting the belt tension the engine must be turned off and the spark plug cap removed or theplug must have been removed from the socket. Wearing gloves is mandatory whenever contact with the blades could occur. • Tilt the scarifier by pushing the handlebar to the ground. • Remove the four screws and nuts (M6) from the belt protection cover. Hold the nuts on the inside of the chassis with another spanner (10) when loosening the screws. • Check that the operation handle is released. • Press the two free belt parts towards each other. If when squeezed together, the distance between them is considerably less than 1 centimetre, the belt tension will be insufficient in tightened condition and will have to be adjusted. • Loosen both lock nuts. (M10) 41 English • Reposition the machine on all four wheels. • Tighten the two bolts (M10) under the engine plate evenly until the two free belt parts can be pressed together to up to 1 cm from each other in relaxed condition. • Check the alignment of the two brake disks. The brake disks are aligned if a slat, held against the brake disks, touches the four indicated points. • If necessary, alignment can be adjusted via the nuts under the engine plate. The result must be that the engine plate is level with the chassis. Make sure not to disturb the belt tension in the process. Tilt the scarifier by pushing the handlebar to the ground. • Tighten both lock nuts (M10) under the machine. • Place the belt protection cover. When replacing the belt protection cover, verify that it doesn’t touch the pulley when the blades are engaged. The slots in the cover provide some play to avoid contact. • Reposition the machine on all four wheels. 42 11.5.6 Changing the blades English Warning: Wearing gloves is mandatory! The blades are self-sharpening; they don’t require sharpening. • Blade replacement is required when the blades are fully worn. • We strongly recommend NOT to replace only one or just a few blades since this interferes with a uniform operation of the machine across the entire width. The following steps must be taken for changing the blades. • Removal of the blade axle. • Removal of old and placement of new blades • Placement of the blade axle. • Performing checks and finishing a. Removal of the blade axle • Tilt the scarifier by pushing the handlebar to the ground. This provides easy access of the blade axle. • Remove the blade drive protection cover. Do so by fully unscrewing the four fixing bolts (M6). Use a second ring spanner (10) to hold the lock nut on the inside of the chassis. • Remove the belt from the pulley. This can only be done with the blade drive declutched. • With a ring spanner 17, loosen the centre bolt from the axle (M10). Push the pulley off the end of the axle. Now remove the wedge so as not to lose it. 43 English Provide support for the blade axle. • Remove the bolts (M8) that secure the two bearing holders with a ring spanner 13. • Remove the blade axle. For your information: All original parts are available from your authorised ELIET dealer. b. Changing the blades The blades are fed on a hexagonal axle. To replace them, it suffices to remove the bearing at the pulley end. Before sliding the bearing from the axle, slightly sandpaper the tip of the axle to remove any burrs or dirt etc. that may impair easy handling. 44 Pay special attention to the blade axle’s order of assembly: • First, remove the bearing. English • Then remove the bearing holder. • Take the steel intermediate ring from the axle. Pay attention to how it fits on the axle. • Now slide all remaining elements from the axle, one by one. 45 English • Clean the nylon distance collars; they will be put back in place on the axle with the new blades. If the axle shows heavy wear at the location of the blades it must be replaced as well. • Thoroughly clean the bare axle. Use sandpaper if necessary. • Check both bearings for signs of play. Rotating the bearings axles will quickly reveal any bearing noise. If there is any, replace the bearings together with the blades. • Place the new blades on the blade axle in the correct order. • Ensure that the blade points correspond to their spinning direction. • Two adjacent blades are always offset at 60 degrees. c. Placement of the blade axle • Once the blade axle is reassembled it can be replaced into the chassis. The bearing holders must be fitted on the inside of the chassis plate. • The two bolts of each bearing holder are temporarily put in place without securing them tightly. • Replace the pulley on the axle. Don’t forget the intermediate ring and make sure to place the wedge in the axle. Ensure that the seam of the pulley is always at the tip side of the axle. • Tighten the pulley with centre bolt M10. This simultaneously tightens the entire axle-assembly. • Rotate the blades a couple of times. If the axle runs freely without stopping immediately, the bearing holders can be secured tightly. If not, tick the axle tips with a plastic hammer while the axle rotates. Once the axle rotates freely, the bearing holders can be fastened. • Replace the belt on the pulley. d. Performing checks and finishing • Check the depth setting and set it correctly (see § 11.4.4, page 34). Verify that the rear wheels are mounted in the centre bolt holes. After all: the wheels were mounted in the uppermost bolt holes to use up the blades. • Check the belt tension and set it correctly (see § 11.5.5, page 41). • Replace the belt protection cover. • Reposition the machine on all four wheels. 46 12. Storing the machine English Clean the machine (see § 9.7.1, page 28). When storing the machine for an extended period, it is recommended to follow the steps below: • Carry out a major overhaul (see § 11.5, page 37). • Check all nuts and bolts and fasten them where necessary. Most bolts require the use of two spanners of 10, 13 or 17 mm. • Empty the fuel tank either by running the engine until the machine runs out of fuel, or by using a siphon to pump the petrol into a jerry can (see § 9.2, page 21). • Detach the spark plug (see § 11.5.2, page 38). Spray some penetrating oil with MoS2 into the cylinder. Pull the starter cord until the piston is in its uppermost position. Replace the spark plug. • To avoid rust on the machine touch up all chipped areas or treat them with anti-rust grease. Original paints/enamels in the appropriate colours are available from your ELIET dealer. • Store the machine in a cool, dry storage area, away from possible rain. If necessary, cover it with canvas. • Always allow the machine to cool down before storage. • If the machine is stored outdoors, it must be properly covered with canvas. Avoid direct precipitation on the machine. ELIET highly recommends a sheltered storage place. 47 English 13. Equipment specifications Handlebar. . . . . . . . . . . . . . . . . . . . . . . . . . . . . . . . . . . . . . . . . . . . . . . . . . . . . . . . . . . . . . . . . . . . . Foldable Operating width. . . . . . . . . . . . . . . . . . . . . . . . . . . . . . . . . . . . . . . . . . . . . . . . . . . . . . . . . . . . . . . . . . 40 cm Clutch . . . . . . . . . . . . . . . . . . . . . . . . . . . . . . . . . . . . . . . . . . . . . . . . . . . . . . . . . . . . . Vertical Belt Tension Dept adjuster. . . . . . . . . . . . . . . . . . . . . . . . . . . . . . . . . . . . . . . . . . . . . . . . . . . . . . . . . . . . . . . . . steplesss Total weight. . . . . . . . . . . . . . . . . . . . . . . . . . . . . . . . . . . . . . . . . . . . . . . . . . . . . . . . . . . . . . . . . . . . . 40 kg Wheels . . . . . . . . . . . . . . . . . . . . . . . . . . . . . . . . . . . . . . . . . . . . . . . . . . . . . . . . . . . . . . . . . . . Dia. 200 mm Fixed robust blades. . . . . . . . . . . . . . . . . . . . . . . . . . . . . . . . . . . . . . . . . . . 14 pieces - 2,5 mm thickness . . . . . . . . . . . . . . . . . . . . . . . . . . . . . . . . . . . . . . . . . . . . . . . . . . . . . . . . . . . Steel reinforced with hardmetal 48 EC-Declaration Of Conformity - E401 Machine: Type: Model number: SCARIFYER ELIET E401 MA 007 010 121 MA 007 010 201 MA 007 010 203 The previously mentioned machine has been designed and manufactured to comply with the following European CE regulations : EN 13684: Garden equipement - Pedestrian controlled lawn aerators and scarifiers Safety ELIET mfg. cy. hereby declares that after performing a hazard analysis, it is fully aware of the potential hazards and risks associated with the machine. In this knowledge, the necessary steps have been taken in line with Machine Directive 2006/42/EC in order to ensure absolute operator safety for the operator, when the machine is used correctly. The value of the measured sound power level and the guaranteed sound power level were obtained according the procedures set forward in the directive 2000/14/EG annex III/B clause 49 and directive EN 13684. Measured sound power level LwA : 94 dB(A) Guaranteed A-weighted sound power level : 95 dB(A) Date: 01/01/2011 Signature: Frederic LIETAER Managing Director ELIET EUROPE NV Date of birth: 02/01/1975 ELIET EUROPE NV Diesveldstraat 2 BE - 8553 Otegem Belgium Ph. +32 56 77 70 88 - Fax +32 56 77 52 13 [email protected] - www.eliet.eu B 10. Warranty conditions English Dear Customer, We thank you for purchasing an ELIET product. Congratulations on your purchase of this machine which is sure to meet your expectations and needs over the coming years. At Eliet, we do everything to ensure that our products function correctly. That is why your product qualifies for a two year guarantee. What is warranty ? At Eliet, we have strict quality rules on designing and manufacturing products. The priorities given by these rules are to guarantee a long service life and permanent safety. That is why at Eliet, we are willing to repair at no charge hidden defects or faults during the whole run-in period (aka the warranty period), provided the prescribed procedure is followed. Warranty conditions ELIET’s warranty obligations for new machines is governed by the following conditions. I. Warranty period The warranty period starts the day the dealer delivers the machine to the customer (maximum one week after the purchase) and expires : • after two years of private use. • after twelve months or 100 running hours of rental use. • after twelve months or 100 running hours in semi-professional or in professional use. To be eligible to obtain warranty the customer is invited to register the newly purchased machine with ELIET. You should complete the registration card online on Eliet's webiste : www.eliet.eu. If you don't have access to the Internet, please complete the attached registration card in its entirety and return it to ELIET. II.What is covered by the warranty ? • Wear items are not covered by the warranty conditions : (such as blades, bearings, belts, chains, gearwheels, tyres, bulbs, fuses, etc). • If failures are found to be caused by improper use, neglect or consequential damages by an external source (fall, chippings, foreign objects, accident). • If failures are found to be caused by improper maintenance of the machine, that is not in accordance with the prescribed periodic maintenance. • When a defect is caused by improper repair made by anyone other than an authorized ELIET dealer or after using not genuine Eliet service parts. • When the defect is caused by making improper changes to the original design of the machine. • When the fault develops when the machine has been used not in accordance with the instructions contained within this manual. • When the prescribed warranty procedure has not been adhered to or when the warranty pe50 riod has expired. • For all problems relating to the motor, please contact an authorized service centre of the engine manufacturer. • • • • • • completing the registration card at www.eliet.eu. In addition, the enclosed registration card should be completed in its entirety on the day of purchase. The first part of the form should be returned to ELIET within one month. The customer should keep all remaining parts of the card along with the purchase invoice for the duration of the warranty period. Step 2: In the event of a defect becoming apparent, the customer shall have this verified by the authorized ELIET dealer. If the dealer feels that there is a factory defect, the dealer may invoke the warranty, under the terms specified. Step 3 : Every warranty application must be accompanied by a fully completed official application form. Copies of this warranty application are available to dealers at ELIET or even at an importer/agent. Step 4 :The dealer then orders the parts needed to perform the repairs. Next, the dealer faxes the order form together with the completed warranty form and a copy of the registration card. Step 5 : The warranty form should be stapled to the purchase invoice and mailed to ELIET or an importer/agent of ELIET. Step 6 : ELIET will send the parts ordered to the dealer under the regular delivery and payment conditions. Step 7 : The defective part will be examined by the technical department first prior to approving or rejecting the warranty. ELIET reserve the right to solely decide whether or not the customer has complied with the conditions for the validity of this guarantee, i.e. 1 year or 2 years. Faulty components shall become the property of ELIET. • Step 8 : When a warranty claim is found to be valid, ELIET will credit the warranty parts. Customers shall never be entitled to apply for a refund of labour costs. IV.In case of damage caused by transport • All goods are supplied ex factory. Transport risks are borne by the customer. It follows, that ELIET highly recommend to check the goods for damage on arrival. • Any damage found should be stated on the delivery form before signing. Make sure the driver of the haulage company puts his signature next to the damage on your copy. • In the absence of a written and signed declaration on the delivery form, the insurance of the haulage company will not accept any liability. • Damages can be claimed from the hauler using a copy of the delivery form and a covering letter stating your complaint. • The damaged machine should be kept in its original condition until the hauler's insurer has performed any examination. 51 English III.Procedure • Step 1 : On the date of purchase, the customer should register his/her purchase online by