1
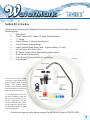
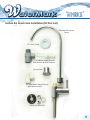
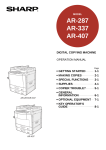
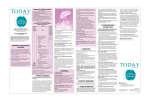
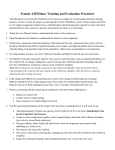
W
aterMark
TM
pH MIRACLE
THE
®
The pH Miracle® WaterMark™
User’s Guide
Congratulations on your purchase of the pH Miracle WaterMark. You will now be able to enjoy
the benefits of drinking water with high levels of antioxidants, free hydroxyl ions, increased pH
as well as an excellent source of magnesium and other alkalizing minerals.
Please take the time to thoroughly read this Users Guide for installation and usage instructions.
Failure to read this guide and comply with instructions could void your warranty.
1
W
aterMark
TM
pH MIRACLE
THE
®
Congratulations on your purchase of the pH Miracle Water Mark perfect water generator.
Please take the time to thoroughly read this users guide for installation and usage instructions.
Failure to read this guide and comply with instructions could void your warranty.
TABLE OF CONTENTS:
Section #1 — Important Safety Precautions (Page 2)
Section #2 — In the Box: Verifying Parts Received (Page 3)
Section #3 — Countertop Installation (Pages 4-5)
Section #4 — Under-Sink Installation (Pages 6-9)
Section #5 — Troubleshooting and Warranty (Pages 10-12)
Section #6 — Usage Instructions (Page 13)
Section #7 — Maintenance and Filter Changes (Pages 14-15)
Section #1: Important Safety Precautions
• Do not allow water pressure to exceed 60 psi. This may cause internal parts to leak or break,
causing damage that cannot be repaired.
• Do not use hot water. The use of hot water will cause damage to the machine and filters and
will void the warranty.
• The use of filters other than those from pH Miracle can cause defects and damage to the unit as
well as not providing proper water.
• This unit was designed to be used with cold tap water. Using other water sources or hot water
could result in damage to the unit and a final product that does not meet pH Miracle’s safety recommendations.
• Avoid areas that have: open flames or high temperatures, excessive moisture or dust, and exposure to freezing temperatures.
• Select an area that is stable and level.
2
W
aterMark
TM
pH MIRACLE
THE
®
Section #2: In the Box
Please start by removing the WaterMark from its box. Inside the box should include the
following parts:
•
WaterMark
•
Faucet Spout with 2 rubber ‘O’ Rings Installed at Base
•
¼” Tubing
•
Faucet Diverter * (chrome metal piece)
•
Faucet Diverter Adapter Rings
•
Faucet Gaskets/Seals (black, blue, or green rubber ‘O’ rings)
•
pH Test Drops with Color Chart
•
900 Quick Connect Stem Elbow (white plastic piece)
•
Quick Connect Release Tool
•
Filter Wrench (housed within the appliance)
¼” Tubing
•
User Manual
Faucet Spout
Adapter Rings
*There are many types of faucets and it is not possible to include a faucet diverter to fit all
faucets. If the diverter that is
included in the box does not fit
your faucet please contact us by
phone for the correct part.
** The WaterMark comes with
the parts needed to install the
unit on the countertop, for under-sink installations you will
need an additional parts kit that
can be ordered by phone or on
the WaterMark page on www.
phmiracleliving.com
Faucet Diverter
Gaskets/Seals
Quick Connect
Release Tool
Stem Elbow
pH Test Drops
Color Chart
If you are missing any parts, please contact the pH Miracle Center at 760-751-8321.
3
W
aterMark
TM
pH MIRACLE
THE
®
Section #3: Countertop Installation
Tools Needed:
•Pliers
•Scissors or Utility Knife
•Standard screwdriver
•Towel
1.Find the Water “Inlet” marked on rear of the WaterMark. Connect the Stem Elbow to the WaterMark
by placing the smallest end into the Water Inlet and pushing until well seated. Make sure that the second hole in the back of the WaterMark labeled as “Outlet” is covered with a plug.
2.Unwind the tubing. Firmly push one end of the tube into the large end of the Stem Elbow until
seated. Do not push tubing so firmly that it bends; bending will cause tubing to crimp.
(If you need to remove the tube, here is a note about Quick Connect Fittings: to remove the
tube from a Quick Connect, water supply must be off and pressure must be relieved from the
WaterMark. You will see a round collar to the outside of the Quick Connect Fitting, this collar
must be pushed in towards the connector and held in as you pull the tubing out. You may use
your fingernail or the Quick Connect Release Tool to push in on the collar. If the collar is not
pressed and held in while pulling on the tubing, the tubing will not be removable.)
3. Remove the aerator (tip of faucet) currently attached to your faucet by turning it counterclockwise.
Most faucets will need a tool to do this, common pliers should work. To avoid scratching your faucet,
use a small towel to wrap around the faucet tip before using the pliers to turn it. If you cannot remove
the faucet tip then you may want to call a handyman to help.
4.Now look at the aerator/faucet tip. Does it have threads on the outside or inside? If outside (a male
end), follow the ‘A’ instructions below. If the threads are on the inside (a female end), follow the ‘B’
instructions below:
A- Locate the Adapter Rings and determine which fits your faucet—which is the same size as you
aerator/faucet tip. Once you’ve identified the right Adapter for your faucet, verify the rubber ‘O’ ring
is placed in the top of the Diverter, then screw the adapter onto the Diverter. Now place a rubber ‘O’
ring in the top of the adapter to prevent any leaks. Screw the Adapter (attached to the Diverter) into
faucet hand tight, no need for tools. (After the final step, if you see a leak then you may use pliers to
turn the Diverter one more half turn until leaking stops.)
B- Make sure there is no threaded Adapter Ring on top of the faucet Diverter; if there is one, remove
by unscrewing it. Once this piece is removed verify there is a rubber ‘O’ ring inside the top of the
4
W
aterMark
TM
pH MIRACLE
THE
®
faucet Diverter, this will prevent leaks. Screw the Diverter onto the faucet hand tight, no need to use
tools. (After the final step, if you see a leak then you may use pliers to turn the Diverter one more
half turn until leak stops.)
5.Place the WaterMark on the level surface where you intend for it to stay. Decide how long the tubing
needs to be to easily reach from the faucet to your WaterMark. You may gather the tubing and hide it
behind the WaterMark or cut the tubing to desired length using scissors or a utility knife. Do not cut the
tubing at an angle. Also be sure to leave enough tubing to allow you to easily swivel your faucet either
direction once attached.
6.Take the free end of the tubing and press it onto the barbed end of the faucet Diverter. Be sure to
push the tubing completely over the barbs. If there is no barbed end but a nut instead, remove the nut on the Diverter. Slip the nut over the end of
the tube and push that end onto the Diverter, over the barb revealed once you removed the nut. When
the tube is well seated, screw the nut back on to hold it in place.
7.Now install the Faucet Spout. Verify that the two rubber ‘O’ rings are on the bottom of the shaft. Use
olive or cooking oil to lightly coat the ‘O’ rings, then press the Spout firmly into the open hole on the
WaterMark until the both ‘O’ rings are concealed.
8.Notice the lever on the side of the Diverter. When the lever is down the water will flow through the
Diverter into your sink. When the lever is turned up, the water is redirected to run through your WaterMark.
Turn on the water at your main faucet. Move the lever on the Diverter up to send the water through
the WaterMark. It may take a few seconds for the water to exit the WaterMark, this is normal as all the
filters fill with water.
9.On first use, allow the water to run through the WaterMark for at least ten minutes to flush the filters
out (the water may appear discolored in the beginning). After the 10 minutes passes the water is ready
for drinking.
CONGRATULATIONS,
YOU HAVE SUCCESSFULLY INSTALLED YOUR WATERMARK.
10. Go to Section #6 for Usage Instructions. Refer to Section #5 for Troubleshooting if you have any
problems or if the unit is not working correctly.
5
W
aterMark
TM
pH MIRACLE
THE
®
Section #4: Under-Sink Installation (Kit Part List)
Gooseneck Accessory
Faucet
1 ⅜” Hole Flange
½” Cold Water Supply Diverter
with Reducer & Quick Connect
Faucet Collar
⅜” Cold Water Supply Diverter with Quick Connect
Faucet Accessory Kit
6
W
aterMark
TM
pH MIRACLE
THE
®
Section #4: Under-Sink Installation (Continued)
This installation method requires a hole in the sink or counter to mount an accessory faucet. If you do
not have an existing hole to use you will need to drill a hole. The hole needs to be at least ¾ inch to no
more than 1-⅜ inch in size.
Under-sink installation means the WaterMark will be under constant water pressure. Be sure your home
is in compliance with the National Plumbing Code and the water pressure does not exceed 60psi. Installing the WaterMark in a home with high water pressure can result in leaks or a blown connection. The pH
MIRACLE CENTER IS NOT LIABLE FOR UNDER-COUNTER LEAKS. If unsure of your water pressure, contact a
plumber or handyman to verify your pressure is within legal limits. If your pressure is over 60psi, contact
technical support to order a regulator. All under-sink water filters have several connections where leaks
can occur. For the first week after installation, check for leaks daily. If you plan to be gone for more than
one day, it is recommended that you turn off the main water supply under the sink.
The WaterMark rarely leaks; however, for peace of mind, we do offer a product called the Leak Controller that senses water leaks and will shut off the water supply to prevent water damage. For those with
wooden kitchen floors or a higher-level kitchen this may be a good investment. Contact technical support
to order the Leak Controller (Price: $49.95).
Tools Needed:
•Pliers
•Scissors or Utility Knife
•Towel
•Possibly a 1 ⅜” hole saw with drill
1.Be sure you have ordered and received the “Under The Counter Kit” before attempting an underthe-sink install of the WaterMark. The needed parts kit for this install is not included and must be
ordered via phone or website:
The Kit Includes: Accessory Gooseneck Faucet, Water Supply Diverter for both ½ and ⅜ inch
threads, Faucet Collar, Hole Flange, and Accessory Kit. (Image shown on previous page.)
2.Unpack your WaterMark and Under the Counter Installation Kit.
3.Locate cold water shut off valve under sink, this is usually the valve to the right and the hot water
valve will be the one to the left. Sometimes plumbers reverse this so when you locate the shut off
valve on the right, shut it off, then test it by turning on your faucet—no cold water should come out.
If cold water is coming out then switch by turning of the other valve under the sink. Again be sure
the valve you have shut off is the cold supply.
7
W
aterMark
TM
pH MIRACLE
THE
®
(Some homes have very old and even rusty cold water shut off valves; in this case it may be necessary to install a new cold water shut off valve to assure a leak proof installation; this should
be done by a licensed plumber if you are not able. The pH Miracle is not liable for poor quality
installs using old unstable parts.)
4.Now take your pliers and loosen the nut on top of the cold shut off valve, this is where the hose
from the faucet above is attached to the valve, unscrew with a counter clockwise motion. Unscrew
and move the hose to the side.
5.Locate the white plastic Quick Connect Water Supply Diverter, there should be two sizes one is
for ½ inch thread and the other is for ⅜ inch thread. Locate the piece that fits onto your cold water
shut off valve, the piece should screw on easily, do not force it, hand tighten only. It isn’t necessary
to use tools to install this piece. If the part is leaking after install then try to snug a little tighter by
hand until leak stops.
6.Now re-connect the main faucet hose to the new plastic water supply fitting, use pliers to tighten
just more than hand tight. Do not over tighten.
7.Take one end of the plastic tubing and insert it into the plastic faucet supply piece you just installed, be sure to push tubing all the way in. You may choose to cut the plastic tube to the appropriate length or gather the extra tube under the sink. If you cut it, be sure it’s long enough to reach
the WaterMark where it will sit under the sink. Do nothing with the other end of the tube for now.
8.Locate Accessory Faucet and install at hole on sink or counter top. Use the instructions printed
on the Accessory Faucet box to install the faucet. The Accessory Faucet comes as four parts: 1) Main
spout, 2) Body, 3) Base collar, and 4) Accessory Kit which includes washers and nuts. (See labeled
image of contents on page 6.)
Once the Accessory Faucet is installed, then you will need to connect the plastic tubing to the bottom of the faucet shaft. Use directions on back of faucet box to connect tubing.
At this point you should have 2 tubes with 2 loose ends, one coming from the cold water shut off
valve, the other coming from the new accessory faucet shaft under the sink.
9. Position the WaterMark under the sink where it will stay, and connect the end of the plastic tube
coming from the cold water shut off valve into the ‘Inlet” connector on the back of the WaterMark;
be sure to push in the tube all the way.
10. Connect the tube from the Accessory Faucet shaft to the “Outlet” connector on back of Wa-
8
W
aterMark
TM
pH MIRACLE
THE
®
terMark. Be sure to push in the tube all the way. Also be sure any cut ends of the tubing are cut
square and not flattened. If fitting leaks once water is turned on then remove tubing, re-cut end
and re-insert.
11. The under sink installation of the WaterMark is now complete. Before turning on the water
supply, make sure the faucet on the WaterMark and the Accessory Faucet are in the off position—
handle pointing up.
12. Now turn on the water supply at the cold water shut off valve. At this time, if any water is coming from either the WaterMark faucet or the new accessory faucet turn them off. Dry any water that
has leaked or splashed. Inspect all connections for leaks, if unsure about a possible leak, dry the
area with a paper towel and inspect again.
13. If you see any leaks shut off the water supply at the cold water shut off valve.
Open Accessory Faucet to relieve any pressure in the unit. Remove leaking tube and inspect end is
cut square and not at an angle. If cut at an angle, re-cut it square and be sure the end is round when
inserting tube into connector.
(If you need to remove the tube, here is a note about Quick Connect Fittings: to remove the
tube from a Quick Connect, water supply must be off and pressure must be relieved from
the WaterMark. You will see a round collar to the outside of the Quick Connect Fitting, this
collar must be pushed in towards the connector and held in as you pull the tubing out. You
may use your fingernail or the Quick Connect Release Tool to push in on the collar. If the collar is not pressed and held in while pulling on the tubing, the tubing will not be removable.)
14. Once you confirm there are no leaks on the back of WaterMark and at the Accessory Faucet
connection where tube enters faucet, then you may open the Accessory Faucet above the sink and
let water run through the WaterMark.
15. On first use, allow the water to run through the WaterMark for at least ten minutes to flush
the filters out (the water may appear discolored in the beginning). After the 10 minutes passes the
water is ready for drinking.
16. Ensure that the faucet on the actual WaterMark appliance stays closed or water will be dispensed below your sink. You may want to tape the handle of the WaterMark faucet closed so it
cannot be opened accidentally.
17. Go to Section #6 for Usage Instructions. Refer to Section #5 for Troubleshooting if you have any
problems or if the unit is not working correctly.
9
W
aterMark
TM
pH MIRACLE
THE
®
Section #5: Troubleshooting and Warranty
In this section we will cover most potential issues with the WaterMark installation and usage. If this section does not cover your issue then please call us at the pH Miracle technical support line (949) 215-2330
(this number is for tech support only).
For parts or customer service needs, please call (760) 751-8321.
Question: My WaterMark will not release water. What should I do?
Answer: Be sure the main water supply is on and is sending water to the unit. Do this by removing the tube
from the inlet valve and turn water on. Does water come out of the tube? If yes, then water is getting to the
unit. If no, check for bent tubes and ensure the Diverter is in the correct position. If water is getting to unit
and faucet is fully open then it is possible one of the filters is blocked and needs to be replaced. In this case,
please call customer service to request a replacement filter.
Question: Why is the water coming from my WaterMark so slow?
Answer: The normal flow rate should be about 1-2 liters per minute. This may seem slow, but keep in mind
the water is going through 5 cartridges before coming out. If the unit is producing less than 1 liter per minute, try loosening the screw on the bottom of the unit. Use a large standard flat head screwdriver to prevent
stripping the fitting. Turn ½ a turn clockwise and retest. Repeat this process until desired flow is obtained. If
this does not work then you may have a blocked or partially blocked filter that will need to be replaced. To
request a replacement filter please call customer service.
Question: Why is the pH of the WaterMark water the same as the tap water?
Answer: Most tap water in the U.S. and other countries is alkaline. When testing the pH use the supplied
drops in 1 ounce of water. Add 2-3 drops of reagent and mix well. Your tap water will read green or blue,
mostly blue. If the WaterMark water is also blue, this is normal. A blue can range from 8.5 to 9.5. The tap
water blue may be 8.5 and the WaterMark blue may be 9.5. Purple can be over 9.5 and high as 10.5. The
main goal of the WaterMark is to provide energized water. The change in pH occurs as a result of this energizing. Also, it is dependent upon your water source and water flow. In every case, the water will be energized.
Question: When I add drops to the test the water, it turned purple. Is the pH too high?
Answer: It is normal for the WaterMark to create a higher pH in the first 1-2 weeks of use. This is due to the
filters being new. It is perfectly safe to drink. If after 2 weeks of use, the pH is still high, loosen the screw on
the bottom of the unit. Use a large standard screwdriver to prevent stripping the fitting. Turn clockwise ½
turn and retest the water. Continue this until desired pH is obtained.
Question: Why does the WaterMark water taste different?
Answer: If you skipped the 10 minute flush during install, flush the filters now. If you are new to alkaline
water, the taste may seem foreign. This is normal and will dissipate after the first week of use. WaterMark
water is considered among the best tasting waters of the world. If after the flush, and a few days of drinking
the water it still tastes different, call technical support.
Question: Why has my water flow slowed significantly after a few weeks of use?
Answer: If source water is extremely dirty and filled with sediment, the filters can become prematurely
clogged. In this case a filter or filters need to be replaced. Please call customer services to request the replacement filters.
10
W
aterMark
TM
pH MIRACLE
THE
®
Question: Can the WaterMark be used with a salt-based water softener and a Reverse Osmosis (RO) unit?
Answer: It is not suggested that you connect your WaterMark directly to a water supply that comes from
a salt base softener system as this will damage the unit. If you have a salt softener water system make sure
you have an RO system or a Nano System connected to the water outlet that will be connected to your WaterMark. If you need to get an RO system or a Nano system please contact customer service.
The watermark can be used with an RO system. You might need to do an under counter installation in this
case. This installation should be very simple as most RO systems in the market use ¼” tubing and very similar
to the under sink installation of the WaterMark, but much simpler since you will not need any additional
parts. First make sure that the water supply to the RO system is closed. Now disconnect the tubing from the
RO system that goes to your RO faucet and connect this tubing to the back of the WaterMark to the fitting
labeled “Outlet.” Then, using the ¼” tubing provided with your WaterMark connect the water outlet from
the RO system to the back of the WaterMark to the fitting labeled “Inlet” Make sure the WaterMark faucet is
closed to prevent any water from coming out and any leaks. Turn the water supply on and now your WaterMark is installed and you will get your water from the RO faucet. Make sure you follow the flushing instructions before you start drinking the water.
Question: Can the WaterMark be used in conjunction with a pre-filter? Answer: Yes.
Question: Can the WaterMark be hooked up and left outside for use?
Answer: Yes, contact technical support for the quick connect adapter for use on an outside faucet. Keep the
unit out of direct sunlight to avoid fading of the color finish or cover with a towel to protect.
Question: Can I send bottled spring water through the unit?
Answer: Yes, it will require a pump. Please contact customer service to order a water bottle pump.
Question: Can I use lake water?
Answer: Even though the WaterMark is antibacterial, we recommend using biologically safe water as a
source. In an emergency, lake water could be used with the WaterMark but should not be done on a regular
basis.
Question: I was away for a week. Why does my WaterMark water smell like rotten eggs?
Answer: If left full of water and not used, the mineral filter can develop sulfur. The mineral filter contains
magnesium that is used to naturally increase the pH and reduce the ORP and when combined with sulfites
in your source water when water is not running will create a chemical reaction that will release sulfur. This is
a harmless nutrient. Simply flush your filters for 5 minutes and all odors will be gone. If sulfur smell continues after flushing, you can open the housing for the 3rd filter (use the filter wrench provided) and add one
teaspoon of vinegar, let it sit for 10 minutes and then flush for 5 minutes. Also it is recommended that if you
are going away for several days to remove the 3rd filter, put in a Ziploc bag and store in the refrigerator. After
you come back, just reinstall and flush for 10 minutes.
Question: My WaterMark is broken. What do I do?
Answer: The unit is covered by one of the industry’s best warranties, please call customer service to obtain
warranty service.
Question: Where can I get new WaterMark filters? Answer: Visit phmiracleliving.com or Call 760-751-8321
11
W
aterMark
TM
pH MIRACLE
THE
®
WARRANTY:
We are so confident in the WaterMark that we offer the industry’s first limited lifetime (lifetime
of the product is estimated at 10 years) warranty on this product. Even in the water filter industry this is the first product to ever have a such a warranty.
The warranty coverage is simple, for the first 60 days The pH-Miracle Center will replace any
defective product including shipping both ways. After the first 60 days and for the first 5 years,
the customer is responsible for shipping fee to The pH-Miracle Center, but we will repair or replace any manufacturers defect at 0 cost to the customer and pay the return shipping fee to the
customer. For the final 5 years, the pH-Miracle Center will cover the cost of parts for any manufacturers defect, customer will pay a maximum labor fee of $35.00 for any repair needed, plus
shipping both ways.
CUSTOMER SERVICE 760-751-8321
TECHNICAL SUPPORT 949-215-2330
WARRANTY NEEDS OR SERVICE 760-751-8321
EMAIL/WEB SUPPORT www.phmiracleliving.com
12
W
aterMark
TM
pH MIRACLE
THE
®
Section #6: Usage Instructions
It is important to note that the pH Miracle WaterMark is a natural product designed to improve the
characteristics of dead Tap or bottled water. Its focus is to first clean the water and then to “energize”
the water. The energizing of the water is done through natural chemical reaction between minerals
and by passing water through a vortex energy field. This process produces a superior water that should
be part of your daily health routine. (Keep in mind that non-WaterMark water ice cubes will dilute the
WaterMark water.)
If you are new to energized alkaline water then it is a good idea to start slow, drink 1-3 glasses only
your first day, 2-4 your second and third day and 4-6 your fourth and fifth day. After that go to your full
amount which for men should be no less than 3-4 liters and woman 2-3 liters. If you have used alkaline
water or practice the alkaline diet then you may start drinking your full amount from the first day. If you
are active in sports or exercise and perspire a lot, you can add 2-4 liters per day to the numbers above.
Possible negative side effects for new users are due to detox symptoms which could include headaches,
fever, runny nose, or body aches. If you experience any of these please do not stop drinking the water,
this is a positive benefit of detox and will not last more than a day or two.
It is normal to have to urinate more while using the WaterMark, you may have very urgent needs to
urinate in the first few weeks of use; this is normal and will soon subside.
All persons should be urinating at least 6-8 times per day, if you have been used to urinating less than
that you are most likely dehydrated and need to get used to urinating more often.
When you take WaterMark water with you in bottles like BPA free plastics or glass, the water will hold
its energy from 14 to 36 hours.
Avoid drinking WaterMark water 30 minutes prior to or after taking prescription medications, as this
may cause them to break down faster than normal.
Using WaterMark water is beneficial for cooking, soaking fruits and vegetables, growing or sprouting
food, and for giving to pets. Enjoy.
13
W
aterMark
TM
pH MIRACLE
THE
®
Section #7: Maintenance and Filter Changes
The WaterMark requires no maintenance other than annual filter changes. It is also recommended that if you are going away for a few days to remove the 3rd filter from the unit and store
in the refrigerator in a Ziploc bag.
To change the filters on the WaterMark, remove the round chrome nut on top of the case and
lift the case cover off of the WaterMark.
You will see a filter wrench located next to the filters. Remove the wrench.
Be sure water supply is shot off and WaterMark is not holding pressure; to verify this, open the
WaterMark Faucet Spout or Accessory Faucet and allow any residual pressure to drain.
Take the filter wrench and remove the filter caps
by rotating counterclockwise. Lift the old filter
cartridge out and press the new cartridge
in. Filters 1, 3, and 4 will have a small cap
installed when they are packaged, make
sure you remove it before you install
them. Be sure to press the new cartridge completely into place and
replace the filter cap, then tighten
with the filter wrench. Tightness
level should be snug; do not over
tighten. Do this one filter at a
time to avoid placing filter cartridges and/or filter caps in the
wrong order.
Wrench
Put filter wrench back in place,
replace the case cover, and reinstall round nut to hand tight.
All WaterMark filters will expire
and need to be replaced every 6
months, even if usage has been low.
The filters cannot last under water for
more than 6 months, at which point
they will actually start to release into the
water what they had once cleaned out.
14
W
aterMark
TM
pH MIRACLE
THE
®
Replace the filters by
inserting the new filter
with the rubber O-ring
towards the bottom.
Turn the chrome cap located on
top of the machine counterclockwise.
Remove the top cover
to reveal the filter
housings within.
Use the included wrench
by placing it above the
filter cap and turning
counterclockwise
to
loosen and then remove
the filter cap.
Remove the filters by
pulling up on the filter
itself.
Finish the installation by
placing filter caps back
on and tightening with
the included wrench
then placing the unit’s
cover back into place.
Replace one filter at a
time.
FILTERS:
#1 ̶ Sediment Filter
#2 ̶ Ultra Filtration Filter
#3 ̶ Ceramic Filter
#4 ̶ Post Carbon Filter
Filters are numbered clockwise starting
at the filter closest to the chrome water
spout.
Filter #2 may have a flat top, this is
the same filter and fits all WaterMark models.
Reference for filter appearances.
The bottom end of all the filters has a rubber
O-ring.
Top view of WaterMark.
New filters come with a cap at the bottom.
Simply pull the cap to remove.
A general rule of thumb: for a family of two using the daily recommended amount of water, replace filters every 6 months. For a family of four or larger all using more than the recommended
amount of water, filters might need to be replaces sooner than the recommended 6 months.
For very dirty water or water with lots of sediment, filter #1 may need to be replaced sooner
than the rest of the filters. The need for this will be indicated if the WaterMark water flow becomes very slow before the time to change the filters is up. If this is the case, then replace only
filter #1.
For best results combine WaterMark water usage with pH Miracle supplements and dietary lifestyle. Remember, good health comes from a multifaceted approach of diet, exercise, and emotional health. Good water is the foundation of any health routine and now you have the best!
15