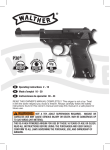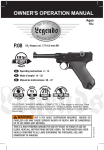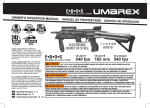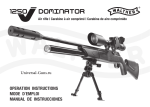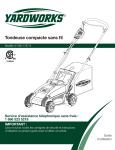
1
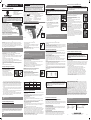
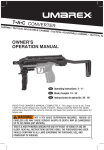
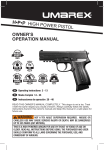
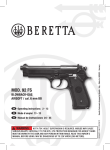
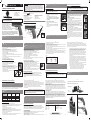
Ages
16+
CO2 BB Air Pistol
OWNER’S OPERATION MANUAL
• .177 Caliber (4.5 mm)
• CO2 Powered
• Shoots steel BBs
• Velocity up to 480 fps
WARNING: This airgun is not a toy. this airgun is recommended for
adult use only. misuse or careless use may cause serious injury or
death. adult supervision required.
YOU AND OTHERS WITH YOU
SHOULD ALWAYS WEAR SHOOTING
GLASSES TO PROTECT YOUR
EYES. READ ALL INSTRUCTIONS
BEFORE USING. BUYER AND USER
HAVE THE DUTY TO OBEY ALL LAWS ABOUT THE
USE AND OWNERSHIP OF THIS AIRGUN.
-1-
-2-
WARNING: This AIR pistol can cause serious injury or death. Read and
follow the instructions carefully. Do not load a PROJECTILE into the AIR Pistol
until you are ready to shoot. If you do load a PROJECTILE and then decide not to
shoot, remove it by shooting the AIR pistol at a safe target. An unloaded AIR pistol
which is “ON SAFE” is safest. Accidents happen fast, FATALLY WOUNDING someone is a
terrible thing. Please shoot safely.
CAUTION: Failure to follow the instructions and recommendations in this owner’s manual may result
in bodily injury including face, eye, and ear injury, blindness, or deafness.
Air Pistols differ in their operation and you are never ready to fire any airgun until you are
thoroughly familiar with it. Read the following operating instructions thoroughly prior to operating.
These symbols, , mark warnings and cautions in this operation manual. Carefully follow
them for your own safety and the safety of others.
Operating Procedures
1. Learning the Parts of Your Air Pistol
2. Operating the Safety
3. Installing and Removing CO2 Cylinders
4. Loading and Unloading Projectiles
5. Aiming and Firing Safely
Slide (fixed)
Front Sight
Rear Sight
BB Follower
CO2
Compartment
Accessory Rail
Trigger
Guard
May be dangerous up to 350 yards or the distance of over three football fields. Think
about what you might hit if you miss your target.
Trigger
2A. To Put the S&W M&P “ON SAFE”
• Locate the safety on the right side of the airgun above
the trigger.
• Push the safety forward (toward “S”) until no red is
showing (illustration 2A). The safety is not “ON SAFE”
unless it is pushed all the way forward and the RED is
NOT showing.
illustration 2a
Safety
-5-
Keep hands and face away from escaping CO2 gas. Escaping CO2 gas is very cold
and can cause serious injury to you or others. Always wear eye and hand protection when inserting or
removing CO2 cylinders.
3B. Removing a CO2 Cylinder
• Put the air pistol “ON SAFE” (see Step 2. Operating the Safety).
• Remove the magazine.
• Make sure the airgun is unloaded (see Step 4. Unloading Projectiles).
• Point the airgun in a SAFE DIRECTION.
• Put the air pistol “OFF SAFE” (see Step 2. Operating the Safety).
• Fire the air pistol until it will not fire, indicating the CO2 cylinder is empty.
• Put the air pistol “ON SAFE”.
• Pull the pistol grip rearward exposing the CO2 cylinder.
• Use one hand to hold the air pistol at the top of the slide. Be sure to keep the muzzle pointed
in a safe direction.
• Slowly turn the piercing knob counterclockwise (down) until it stops turning; allowing any
remaining CO2 gas to escape.
• Remove the empty CO2 cylinder and discard.
4. Loading and Unloading Projectiles
4A. Loading Projectiles
• Put the air pistol “ON SAFE” (see Step 2. Operating the Safety).
• Always point the air pistol in a SAFE DIRECTION.
• Hold the air pistol upright.
• Remove the magazine by pressing the magazine release button
(illustration 4a) and pulling the magazine from the bottom of the grip frame.
• Pull the BB follower down and hold it. (illustration 4b).
• Load up to 19 (.177 caliber) steel BBs through the magazine loading
port (illustration 4c). We recommend RWS Match-Grade BBs.
illustration 4a
• Gently release the follower.
• Insert the loaded magazine back into the bottom of the
grip frame until it locks in place.
Loading
Port
illustration 4b
illustration 4c
-8-
7. Maintenance, Cleaning, and Storage
caution:
Before any care, cleaning, or maintenance, always be sure your airgun is “ON SAFE”
and unloaded. It is important to maintain your airgun properly.
With care and routine inspections your air pistol will provide many sessions of shooting enjoyment.
Abuse, neglect and continued exposure to the elements will impair the performance of any airgun.
To ensure continued proper function, apply 2 to 3 drops of RWS Spring Cylinder oil onto all moving
parts such as the BB follower, gas cylinder piercing screw and the trigger hinge.
caution: Always check to make sure the air pistol is unloaded when getting from storage or
from another person.
caution:
Always point the muzzle in a safe direction. Never place your hand in front of the muzzle.
caution: Use only flawless .177 caliber BBs. Do not attempt to use deformed, used, or soiled
projectiles. Projectiles other than .177 caliber BBs can cause injury to you or someone else or may damage
and/or jam the air pistol. Use of anything other than .177 caliber BBs will void the warranty.
4B. Unloading Projectiles from the Air Pistol
• Always point the air pistol in a SAFE DIRECTION.
• Make sure the air pistol is “ON SAFE” (see Step 2. Operating the Safety).
• Remove the magazine by pressing the magazine release button
(illustration 4a) and pulling the magazine from the bottom of the grip frame.
• Point the air pistol in a SAFE DIRECTION.
• Put the air pistol “OFF SAFE” (see Step 2. Operating the Safety).
• Pull the trigger to fire until the air pistol no longer shoots projectiles.
• Put the air pistol “ON SAFE”.
Note: The air pistol must be charged with CO2 when following these steps, but remember, do not
store your air pistol with a CO2 cylinder in it.
4C. Unloading Projectiles from the Magazine
• Always point the air pistol in a SAFE DIRECTION.
• Make sure the air pistol is “ON SAFE” (see Step 2. Operating the Safety).
• Remove the magazine by pressing the magazine release button
(illustration 4a) and pulling the magazine from the bottom of the grip frame.
• Locate the BB release button on the magazine (illustration 4d).
• Hold magazine so that the top (opening) is pointed away from your face.
It is best to wear shooting glasses to protect your eyes and to place it over
a trash can or other container.
• Press down on the BB release button until all of the BBs have been ejected illustration 4d
from the magazine. Do not have magazine pointed towards the face.
5. Aiming and Firing Safely
• You and others with you should always wear shooting glasses to protect your eyes.
• Always aim your air pistol in a SAFE DIRECTION. When you are sure of your target and
backstop, and the area around the target is clear then you are ready to fire.
• Take “OFF SAFE” (see Step 2) and squeeze the trigger with steady pressure until the air
pistol fires.
-9• Do not shoot at fragile objects such as windows.
• Place the backstop in a location that will be safe should the backstop fail.
• Your backstop should be checked for wear before and after each use. All backstops are subject
to wear and will eventually fail. Replace your backstop if the surface is worn or damaged or if a
ricochet occurs.
• Do not attempt to disassemble or tamper with your airgun. Unauthorized repairs or modifying the
function of your airgun in any way may be unsafe and will void your warranty.
• Before you store your airgun, make sure it is unloaded, the CO2 cylinder is removed,
and is “ON SAFE.”
WARNING: AN AIR PISTOL THAT IS NOT OPERATING PROPERLY MAY BE DANGEROUS. IT
SHOULD BE KEPT SAFELY FROM USE BY ANYONE UNTIL REPAIRED OR DESTROYED. DO NOT TRY
TO TAKE THE AIR PISTOL APART. IT IS DIFFICULT TO REASSEMBLE AND IMPROPER DISASSEMBLY
OR REASSEMBLY CAN CAUSE SERIOUS INJURY OR DEATH.
Low velocity
CO2 cylinder is empty
CO2 cylinder is defective
Extreme temperature
Incorrect projectiles
caution:
The components of this air pistol were engineered and manufactured to deliver
optimum performance. Any modification or tampering with an air pistol may cause a malfunction, void your
warranty, and may make it unsafe to use. Any change in performance (such as a lowered trigger pull force
and shortened trigger travel) indicates possible modification, tampering and/or wear. Such airgun should be
inspected, replaced, or properly repaired by only qualified Umarex USA personnel. Any airgun that has been
dropped should be checked by qualified personnel to ensure that its function has not been affected.
9. Reviewing Safety
• Never point the airgun at anything you do not intend to shoot.
• Always treat the airgun as though it is loaded and with the same respect you would a firearm.
• Always aim in a SAFE DIRECTION. Always keep the muzzle of the airgun pointed in a
SAFE DIRECTION.
• Never look down the barrel of an air pistol.
• Always keep the airgun “ON SAFE” until you are ready to shoot.
• Always check to see if the airgun is “ON SAFE” and unloaded when getting it from another
person or from storage.
• Always keep your finger off the trigger and out of the trigger guard until ready to shoot.
• Use the proper size projectile for your airgun.
• Never reuse ammunition.
• Do not shoot at hard surfaces or at the surface of water. The projectile may bounce off or
ricochet and hit someone or something you had not intended to hit.
Note: Never try to force any CO2 cylinder into or out of place. Do not
store your air pistol with a CO2 cylinder in it. If you know you will not be
using your air pistol for more than 24 hours, empty the CO2 cylinder and
remove it from the airgun. (see step 3B. Removing CO2 cylinders). This
is very important to remember, as it will prolong the longevity of your air
pistol seals.
CAUTION: Like all mechanical devices, an airgun safety can fail. Even when the safety is “ON
SAFE”, you should continue to handle the airgun safely. NEVER point the airgun at anything you do not
intend to shoot.
Magazine
illustration 1
-6• After all projectiles have been fired, repeat loading (see Step 4).
• Never aim at pets, water, or people.
• Do not shoot at hard surfaces or the surface of water. Projectiles may bounce off or ricochet and
hit someone or something you had not intended to hit.
• Do not shoot at fragile surfaces such as glass or mirrors.
• Always choose your target carefully. Only targets which cannot be penetrated or which will not
cause ricochets should be used.
• Your backstop should be checked for wear before and after each use. Replace your backstop if
the surface is worn or damaged, or if a ricochet occurs.
• The air pistol is correctly aimed when the white dot on the front sight blade is positioned exactly
in the notch and even with the green dots of the rear sight. The top of the front sight blade
should be even with the top of the notch in the rear sight. The bullseye should appear to rest on
the top of the front sight (illustration 5).
illustration 5
Too High
Too Low
caution: Your backstop should be inspected for wear before and after each use. Discontinue use
if the backstop surface shows signs of failure. Always place the backstop in a location that will be safe should
the backstop fail. Discontinue the use of a backstop if the projectile rebounds or ricochets. Never aim at pets
or water. Never aim at people when they're not involved in a gaming or training situation.
illustration 3b
illustration 3c
-7Always follow warnings listed on propellant source for handling and storage.
It is possible that certain conditions may affect a CO2 cylinder, which can impact its proper
performance. These conditions include the usage, maintenance and storage at temperatures
that are higher or lower than normal outdoors temperatures (59°F/15°C to 69.8°F/21°C). Another
condition may be when the gun is fired rapidly.
1. High temperatures can increase pressure in the CO2 cylinder and also within
the gun, leading to higher than standard operating pressure. This excess pressure
could cause the gun to malfunction or be permanently damaged. Maximum
storage or operation temperature should never exceed 122°F (50°C). This
temperature can be reached if you leave the gun under direct sunlight on a bright
day. Thus, to ensure proper gun operation, do not expose it to high temperatures
or direct sunlight for long periods of time. Otherwise, the CO2 cylinder could
overheat and explode, which could damage the airgun and cause injuries or death
to people around it.
3. During rapid fire, the muzzle velocity of each shot will diminish. This can affect
shooting accuracy and you will get fewer shots per CO2 cylinder.
4. Care should be exercised to ensure that the gun is not shot with a CO2 cylinder
that is low in pressure. Here are some indicators of insufficient pressure:
A) The sound of the shot is not as loud as when the cylinder is full.
B) The projectile hits the target, but in a lower position than it would with a full CO2 cylinder (that is, the shooting speed has dropped).
6. Use and Handling of CO2 Cylinders
caution: Never attempt to reuse a CO2 cylinder for any purpose.
WARNING:
A CO2 CYLINDER CONTAINS GAS UNDER PRESSURE, WHETHER OR NOT
IT HAS BEEN INSERTED INTO A GUN. IF EXPOSED TO HIGH TEMPERATURES (SUCH AS INSIDE A
CLOSED CAR AND/OR IN DIRECT SUNLIGHT, IT COULD EXPLODE. STORE ALL CYLINDERS IN A
COOL PLACE.
- 10 caused by abuse or failure to perform normal maintenance as well as any other expense.
Consequential damages, or incidental expenses, including damage to property. Some states do
not allow the exclusion or limitation of incidental or consequential damages, so the above limitation
or exclusion may not apply to you.
WARRANTY CLAIMS: Warranty Claims and Repair for U.S. and Canadian customers only. Call
Umarex USA (479) 646-4210 and ask for the Service Department. If it is determined a return is
necessary, you will be issued a Return Authorization Number. Write this number boldly on the
box and return the product prepaid to Umarex USA. Your name, address, phone number, and a
note explaining the defect found must be included in the package. A copy of the original purchase
receipt must accompany the return. Include a check made to Umarex USA in the amount of $9.95
to cover shipping and handling.
IMPLIED WARRANTIES
Any implied warranties, including the implied warranties of merchantability and fitness for a
particular purpose, are limited in duration to 90 days from date of retail purchase. Some states do not allow limitations on how long an implied warranty lasts, so the above limitations may not apply to you. To the extent any provision of this warranty is prohibited by federal, state, or municipal law which cannot be preempted, it shall not be applicable. This warranty gives you specific legal rights and you may also have other rights which vary from state to state and country to country.
- 11 -
Ask for these and other airgun products at your favorite retailer.
Walther® Shot Spot™ universal laser sight:
• Fits both Picatinny or
Weaver rail systems.
Item:
2252541
with cord switch
RWS Match-Grade BBs:
CAUTION: Unauthorized modifications of your airgun my result in a different classification and are
therefore not permitted. The manufacturer’s warranty will become null and void in such cases.
Smith & Wesson M&P Specifications
Do not return defective or damaged product to the dealer. If your airgun needs repair, call
Umarex USA (479) 646-4210 and ask for the Service Department or visit www.umarexusa.com.
DO NOT ATTEMPT TO DISASSEMBLE IT! Your airgun requires special tools and fixtures to repair
it. Any disassembly or modification not performed by Umarex USA will void the warranty.
System:
Caliber:
Projectiles:
Length:
Barrel Lgth:
Weight:
Smith & Wesson air pistols are warranted to the retail consumer for 90 days from date of purchase
against defects in material and workmanship and is not transferable.
WHAT IS COVERED: Replacement parts and labor.
WHAT IS NOT COVERED: Shipping charges to Umarex USA for defective product and damages
illustration 3a
2. Fast consecutive shooting may produce a decrease of temperature in the gun,
as well as the CO2 cylinder. This could result in lower projectile velocities and
may even lower gas pressure enough so that the pistol will not fire. This condition
can be especially apparent when shooting in cold weather and can be avoided by
allowing more time between shots. This permits the gas to increase in temperature
and pressure and produce normal velocities.
Perfect
10. Repair / Service / Warranty
90 DAY LIMITED WARRANTY
caution: NEVER INSERT THE MAGAZINE UNTIL YOU HAVE VERIFIED THE AIR PISTOL
WILL DISCHARGE CO2 PROPERLY.
3A. Installing a New CO2 Cylinder
•Put the air pistol “ON SAFE” (see Step 2. Operating the Safety).
• Remove the magazine.
•Make sure a projectile is not loaded (see Step 4. Unloading Projectiles).
• If it contains CO2 (see Step 3B. Removing CO2 Cylinders).
• Pull the pistol grip rearward exposing the CO2 housing (illustration 3a).
•Before installing a 12g CO2 cylinder, place one drop of RWS Chamber
lube on the top of the small end of the 12g CO2 cylinder.
• Insert the 12g CO2 cylinder, with the small neck of the cylinder pointing
upward into the grip, and turn the piercing knob clockwise until it pierces
the CO2 cylinder. (illustration 3b)
• Push the pistol grip forward to close (illustration 3c).
• Make sure the cylinder has been punctured. With the air pistol unloaded,
pointed in a SAFE DIRECTION, take “OFF SAFE” (see Step 2B) and
pull the trigger to fire. If it does not fire, tighten the piercing knob some
more and repeat this step.
illustration 2b
Magazine
Release Button
WARNING: USE ONLY CO2 GAS. ANY ATTEMPT TO USE OTHER TYPES OF GAS COULD BE
EXTREMELY DANGEROUS AND COULD RESULT IN SERIOUS INJURY OR DEATH. GASSES OTHER
THAN CO2 COULD RESULT IN AN EXPLOSION OR RUPTURE OF THE AIR PISTOL.
The Smith & Wesson M&P air pistol is powered by one 12 gram CO2
cylinder. We recommend the use of Walther CO2 cylinders for a
proper seal.
Loading
Port
-4-
caution:
Air Pistol does
not function
WARNING: Be sure the AIRgun is always pointed in a safe direction. Never
point the AIRGUN at anything YOU DON'T INTEND TO SHOOT. Always assume and handle
the AIRGUN as if it were loaded and ready to fire.
BB Magazine
CAUTION:
Poor firing
performance
2. Operating the Safety
2B. To Take the S&W M&P “OFF SAFE”
• Locate the safety on the right side of the airgun above
the trigger.
• Pull the safety rearward (toward “F”) (illustration 2B).
When you can see the RED the airgun is “OFF SAFE”
and can be fired.
1. Learning the Parts of Your Air Pistol
Muzzle
Please read this owner‘s manual completely. Treat this pistol
with the same respect you would a firearm. Always carefully
follow the safety instructions found in this owner‘s manual and
keep this manual in a safe place for future use.
Trouble
8.
Shooting
6.Use and Handling of CO2 Cylinders
7.Maintenance, Cleaning, and Storage
8.Troubleshooting
9.Reviewing Safety
10.Repair / Service / Warranty
-3-
3. Installing and Removing CO2 Cylinders
© 2008
CO2
.177
BBs
7.5 in.
4.25 in.
1 lb.
Smith & Wesson CO2 Revolvers:
Item:
2255000
586 - 4-inch Black*
Action:
Double
Velocity: Up to 480 feet per second
Safety:
Manual
Magazine Capacity: 19 shots
Danger Distance: 350 yards
6007 South 29th Street, Fort Smith, Arkansas 72908 USA
Phone: 1-479-646-4210 www.UmarexUSA.com
Item:
2252539
.177 cal - 5000 ct.
02R08
Item:
2255003
686 - 6-inch Nickel
Item:
2252538
.177 cal - 1500 ct.
*Also available in a 6- or 8-inch barrel.
16 ans
et +
Pistolet À Air CO2 BB
MANUEL DU PROPRIÉTAIRE
• Calibre 0,177 (4,5 mm)
• Alimenté par CO2
• Utilise des projectiles “BB” d’acier
• Vélocité jusqu’à 480 pi/s
AVERTISSEMENT: CETTE ARME À AIR N’EST PAS UN JOUET. CETTE ARME
À AIR EST CONSEILLÉE POUR UNE UTILISATION PAR DES ADULTES SEULEMENT.
UN MAUVAIS USAGE OU UN MANQUE DE PRUDENCE PEUVENT AVOIR COMME
RÉSULTAT DES BLESSURES GRAVES OU LA MORT. LA SUPERVISION D’UN ADULTE
EST NÉCESSAIRE.
VOUS ET CEUX QUI VOUS
ACCOMPAGNENT DEVRIEZ
TOUJOURS PORTER DES LUNETTES
DE TIR POUR PROTÉGER VOS YEUX.
LISEZ TOUTES LES INSTRUCTION
AVANT L’UTILISATION. L’ACHETEUR ET
L’UTILISATEUR ONT LE DEVOIR D’OBÉIR À TOUTES
LES LOIS CONCERNANT L’UTILISATION ET LA
POSSESSION DE CE PISTOLET À AIR.
-1-
-2-
AVERTISSEMENT: CETTE PISTOLET À AIR PEUT CAUSER DES BLESSURES GRAVES OU LA
MORT. LISEZ ET SUIVEZ BIEN LES INSTRUCTIONS. NE PLACEZ PAS UN PROJECTILE DANS LE PISTOLET
AVANT D’ÊTRE PRÊT À FAIRE FEU. SI VOUS PLACEZ UN PROJECTILE DANS LE PISTOLET ET QUE VOUS
DÉCIDEZ DE NE PAS FAIRE FEU, ENLEVEZ-LE SOIT MANUELLEMENT, SOIT EN FAISANT FEU SUR UNE
CIBLE SÉCURITAIRE. PISTOLET À AIR NON CHARGÉE DONT LE CRAN DE SÛRETÉ EST EN POSITION
“ON SAFE” EST PLUS SÉCURITAIRE. LES ACCIDENTS SE PRODUISENT RAPIDEMENT. BLESSER
QUELQU’UN GRAVEMENT EST TERRIBLE. S.V.P., UTILISEZ CETTE PISTOLET À AIR AVEC PRUDENCE.
MISE EN GARDE: Si vous ne suivez pas les instructions et les recommandations contenues
dans ce manuel, il pourrait en résulter des blessures aux yeux, au visage et aux oreilles, la cécité ou la surdité.
Le fonctionnement de chaque type de pistolets est différent et vous n’êtes jamais prêt à faire feu
si vous n’êtes pas familier avec le fonctionnement de l’arme utilisée. Lisez bien les instructions qui
suivent concernant l’utilisation de cette arme avant de vous en servir.
Ces symboles indiquent des avertissements et des mises en garde dans le manuel du
propriétaire. Tenez-en bien compte pour votre propre sécurité et celle des autres.
Consignes d’utilisation
1. Connaître les pièces de votre pistolet à air
2. Utiliser le cran de sûreté
3. Insérer et enlever les bouteilles de CO2
4. Charger et décharger les projectiles
5. Viser et tirer en toute sécurité
1. Connaître Les Pièces De Votre Pistolet À Air
Bouche
Glissière (fixed)
Guidon
2. Utiliser le Cran de Sûreté
Avertissement: ASSUREZ-VOUS QUE LE PISTOLET EST TOUJOURS POINTÉ DANS
UNE DIRECTION SÉCURITAIRE. NE POINTEZ JAMAIS L’ARME VERS UNE PERSONNE MÊME SI CETTE
ARME N’EST PAS CHARGÉE. MANIPULEZ TOUJOURS L’ARME COMME SI ELLE ÉTAIT CHARGÉE ET
PRÊTE À FAIRE FEU.
2A.
Pour placer le S&W M&P dans la position” ON SAFE”
•Trouvez le cran de sûreté sur le côté droit de l’arme à air
au-dessus de la détente.
•Poussez le cran vers l’avant (vers le “ S”) jusqu’à ce que vous
ne voyez plus de couleur rouge (illustration 2A). Le cran de
sûreté n’est pas dans la position “ON SAFE” à moins qu’il ne
soit poussé complètement vers l’avant et que la couleur
ROUGE ne soit PAS visible.
Chargeur
du BB
Compartiment
pour le CO2
Rail Auxiliaire
Orifice de
Chargement
Pontet
MISE EN GARDE: Cette arme peut être dangereuse jusqu’à une distance de 300 verges ou une
distance de plus de trois terrains de football. Pensez à ce que vous pourriez atteindre si vous manquiez votre cible. Détente Bouton de
Déblocage du
Chargeur
MISE EN GARDE: Comme tous les appareils mécaniques, un pistolet à air peut avoir une
défaillance. Même lorsque le cran de sûreté est dans la position “ON SAFE”, vous devriez continuer de
manipuler votre pistolet de façon sécuritaire. Ne pointe JAMAIS le pistolet vers une personne. Ne pointez
JAMAIS le pistolet vers un objet sur lequel vous n’avez pas l’intention de tirer. Chargeur
illustration 1
-4-
-5-
NOTEZ BIEN: Ne tentez jamais d’insérer ou d’enlever la bouteille de CO2 en la forçant. Ne
rangez pas votre pistolet à air avec une bouteille de CO2 à l’intérieur de celui-ci. Si vous savez
que vous n’utiliserez pas votre pistolet à air durant une longue période, videz la bouteille de
CO2 et enlevez-la du pistolet à air. (voir étape 3B). Il est important de vous en souvenir, car cela
prolongera la durée des joints d’étanchéité de votre pistolet à air.
MISE EN GARDE: Gardez les mains et le visage loin de la bouteille de CO2. Le gaz CO2
s’échappant est très froid et peut vous causer des blessures graves. Portez toujours des lunettes et des
gants de protection lorsque vous insérez ou enlevez une bouteille de CO2.
3B. Enlever une bouteille de CO2
• Placez le pistolet à air dans la position “ON SAFE” ( voir étape 2).
• Enlever le chargeur.
• Assurez-vous que l’arme à air est déchargée (voir étape 4. Décharger des projectiles).
• Pointez l’arme à air dans UNE DIRECTION SÉCURITAIRE.
• Placez le pistolet à air dans la position “OFF SAFE” (voir étape 2. Utilisation du cran de sûreté).
• Tirez à l’aide du pistolet à air jusqu’à ce qu’il ne fasse plus feu indiquant que la bouteille de
CO2 est vide.
• Placez le pistolet à air dans la position “ON SAFE”.
• Tirez la crosse du pistolet vers l’arrière pour exposer le rangement pour le CO2.
• Utilisez une main pour tenir le pistolet à air en haut du système de glissière. Assurez-vous de
garder le canon pointé dans une direction sécuritaire.
• Tournez le bouton de perforation lentement dans le sens contraire des aiguilles d’une montre
(vers le bas) jusqu’à ce qu’il ne puisse plus tourner et ainsi permettre au CO2 restant d’être
évacué. • Enlevez la bouteille de CO2 vide et jetez-la.
4. Charger et Décharger les Projectiles
votre main devant le canon.
illustration 4c
Pointez toujours le canon dans une direction sécuritaire. Ne placez jamais
MISE EN GARDE:
Utilisez seulement des projectiles d’acier de calibre .177. Ne faites aucune
tentative de réutiliser des projectiles déjà utilisés ou déformés. N’utilisez pas des projectiles de plomb, de la
chevrotine, des dards, des roulements à billes ou d’autres objets, car ils peuvent vous causer ou causer à
d’autres personnes des blessures ou endommager/enrayer l’arme. L’utilisation de tout autre projectile que
ceux d’acier de calibre .177 annule la garantie.
4B. Décharger des Projectiles du Pistolet à Air
• Pointez toujours le pistolet à air dans une DIRECTION SÉCURITAIRE.
• Assurez-vous que le pistolet à air est dans la position “ON SAFE” (voir étape 2.
Fonctionnement du cran de sûreté).
• Enlevez le chargeur en enfonçant le bouton de déblocage du chargeur (illustration 4a) et en
tirant le chargeur vers le bas de la structure de la crosse.
• Pointez le pistolet à air dans une DIRECTION SÉCURITAIRE.
• Placez le pistolet à air dans la position “OFF SAFE” (voir étape 2. Fonctionnement du cran
de sûreté).
• Tirez la détente pour faire feu jusqu’à ce que le pistolet ne tire plus de projectiles.
• Placez le pistolet à air est dans la position “ON SAFE”
NOTEZ BIEN: Le pistolet à air doit contenir une bouteille de CO2 lorsque
vous suivez ces étapes, mais souvenez-vous bien de ne pas ranger votre
pistolet à air avec une bouteille de CO2 à l’intérieur de l’arme.
Orifice de
Chargement
illustration 4a
illustration 4b
4C. Décharger des Projectiles du Chargeur
• Pointez toujours le pistolet à air dans une DIRECTION SÉCURITAIRE.
• Assurez-vous que le pistolet à air est dans la position “ON SAFE”
(voir étape 2. Fonctionnement du cran de sûreté).
• Enlevez le chargeur en enfonçant le bouton de déblocage du chargeur
(illustration 4a) et en tirant le chargeur vers le bas de la structure de la
crosse.
-82.Un tir nourri peut provoquer une diminution de température à l’intérieur de l’arme
comme dans la bouteille de CO2. Cela pourrait avoir comme conséquence une diminution
de vélocité du projectile et peut même diminuer la pression du gaz suffisamment pour que
le pistolet ne fasse pas feu. Cette condition se présente surtout lorsque vous utilisez le
pistolet par temps froid et elle peut être évitée en laissant plus de temps entre chaque tir. Cela permet au gaz d’augmenter de température et de pression et permet une vélocité
normale.
3.Lors d’un tir nourri, la vélocité du projectile au niveau de la bouche de l’arme diminuera. Cela peut affecter la précision de l’arme et vous pourrez tirer moins de projectiles avec
chaque bouteille de CO2.
4.Il faut vous efforcer de ne pas tirer avec le pistolet si la pression de la bouteille de CO2
est basse. Voici quelques indices d’une pression insuffisante :
A)Le son produit lorsque vous tirez n’est pas aussi fort que lorsque la bouteille est pleine.
B)Le projectile frappe la cible, mais plus bas qu’il ne le ferait si la bouteille de CO2 était
pleine (donc, la vitesse du projectile a diminué).
MISE EN GARDE: Ne tentez jamais de réutiliser une bouteille de CO2 pour aucune raison.
7. Entretien, Nettoyage et Remisage
MISE EN GARDE:
Avant tout entretien ou nettoyage, assurez-vous toujours que le cran
de sûreté de votre pistolet à air est dans la position “ON SAFE” et le pistolet déchargé. Il est important
d’entretenir votre pistolet à air de la bonne manière. Grâce à un bon entretien et à des inspections régulières, votre pistolet à air vous fournira de
nombreuses heures de tir remplies de plaisir. Un usage abusif, de la négligence et une exposition
au soleil et à la pluie affecteront la performance de tout pistolet à air. Pour vous assurer d’un bon
fonctionnement, appliquez 2 ou 3 gouttes d’huile “RWS Spring Cylinder Oil” sur toutes les pièces
mobiles comme le levier et la vis servant à transpercer la bouteille de gaz et la charnière de la
détente.
MISE EN GARDE: Effectuez toujours une vérification pour vous assurer que votre pistolet
à air est déchargé lorsque vous le sortez du remisage ou qu’une autre personne vous le remet.
• Trouvez le bouton de déblocage des projectiles BB sur le chargeur
(illustration 4d).
• Tenez le chargeur pour que la partie supérieure (l’ouverture) pointe dans une autre direction que
votre visage. Il est préférable de porter des lunettes de tir pour protéger vos yeux et de le placer
au-dessus d’une poubelle ou d’un autre contenant. • Enfoncez le bouton de déblocage des projectiles BB jusqu’à ce que tous les projectiles aient été
éjectés du chargeur. Ne pointez pas le chargeur en direction de votre visage.
Mauvaises Le pistolet à air
performances de tir ne fonctionne pas
MISE EN GARDE: N’INSÉREZ JAMAIS LE CHARGEUR AVANT D’AVOIR VÉRIFIÉ QUE LE
PISTOLET À AIR PEUT DÉCHARGER LE CO2 DE LA BONNE FAÇON.
3A. Insérer une nouvelle bouteille de CO2
•Placez le pistolet à air à la position “ON SAFE” (voir étape 2).
•Enlevez le chargeur.
•Assurez-vous qu’un projectile n’est pas chargé (voir étape 4. Déchargement des projectiles).
•S’il contient du CO2 (voir étape 3B. Enlever les bouteilles de CO2).
•Tirez la crosse du pistolet vers l’arrière pour exposer le rangement pour
le CO2 (illustration 3a)
•Avant de mettre en place une bouteille de CO2, mettez une goutte de
lubrifiant “RWS Chamber Lube” sur le dessus de la partie étroite de la
bouteille de CO2.
•Insérez la bouteille de CO2 de 12 g en plaçant la partie mince de la
bouteille vers le haut dans la crosse et tournez le bouton de perforation
dans le sens des aiguilles d’une montre jusqu’à ce qu’il perce la
bouteille de CO2. (illustration 3b)
•Poussez la crosse vers l’avant pour la refermer (illustration 3c).
•Assurez-vous que la bouteille a été percée. En utilisant le pistolet à air
non chargé, pointé dans une DIRECTION SÉCURITAIRE, mettez l’arme
dans la position “OFF SAFE” (voir étape 2B) et tirez sur la détente pour
faire feu. Si l’arme ne fait pas feu, serrez le bouton de perforation un
peu plus et répétez cette procédure.
illustration 3a
illustration 3b
illustration 3c
-7-
mise en garde: Votre pare-balles devrait être inspecté pour y déceler de l’usure avant et
après chaque session de tir. N’utilisez pas un pare-balles si sa surface semble en mauvais état. Placez
toujours votre pare-balles dans une zone qui demeurera sécuritaire si le pare-balles est défectueux. N’utilisez plus votre pare-balles si un projectile dévie ou s’il se produit un ricochet. NE VISEZ JAMAIS DES
PERSONNES, DES ANIMAUX DE COMPAGNIE OU L’EAU.
5. Viser et Tirer en Toute Sécurité
• Vous et les autres tireurs devriez toujours porter des lunettes de tir lorsque vous utilisez le
pistolet.
• Pointez toujours votre pistolet à air dans UNE DIRECTION SÉCURITAIRE. Lorsque vous êtes
certain que votre cible et votre pare-balle sont sécuritaires et que la zone entourant la cible est
libre, vous êtes prêt à faire feu. • Placez l’arme “OFF SAFE” (voir étape 2) et pressez la détente avec une pression constante
jusqu’à ce que le pistolet à air fasse feu.
• Lorsque tous les projectiles ont été tirés, rechargez (voir étape 4).
• Ne visez jamais des personnes, des animaux de compagnie ou l’eau.
• Ne tirez pas vers des surfaces dures ou vers la surface de l’eau. Le projectile peut rebondir ou
effectuer un ricochet et frapper une personne ou quelque chose que vous ne vouliez pas
atteindre.
• Ni tirez pas vers les surfaces fragiles comme le verre ou les miroirs.
• Choisissez toujours votre cible avec prudence. Seules des cibles qui ne peuvent être pénétrées
ou qui ne causeront pas de ricochets devraient être utilisées.
• Votre pare-balles devrait être inspecté pour y déceler de l’usure avant et après chaque session
de tir. Remplacez votre pare-balles si sa surface est usée ou endommagée ou s’il se produit un
ricochet.
• Vous visez correctement avec votre pistolet à air lorsque la lame du guidon est exactement au
centre du cran de mire. La partie supérieure de la lame du guidon devrait être égale à la partie
supérieure de l’encoche du cran de mire. La cible devrait sembler reposer sur le dessus du
guidon (illustration 5).
illustration 5
Trop haut
Trop bas
Parfait
6. Utiliser et Manipuler les Bouteilles de CO2
avertissement: UNE BOUTEILLE DE CO2 CONTIENT DU GAZ SOUS PRESSION.
QU’ELLE SOIT OU NON INSÉRÉE DANS UNE ARME, SI ELLE EST EXPOSÉE À DE HAUTES
TEMPÉRATURES (COMME DANS UNE AUTO CLOSE ET/OU DIRECTEMENT SOUS LES RAYONS
DU SOLEIL), ELLE POURRAIT EXPLOSER. RANGEZ TOUTES LES BOUTEILLES DE CO2 DANS UN
ENDROIT FRAIS.
Tenez toujours compte des avertissements inscrits sur les bouteilles de gaz propulseur lors de la
manutention et du remisage.
Il est possible que certaines conditions affectent une bouteille de CO2, ce qui peut avoir un impact
sur le rendement de celle-ci. Ces conditions comprennent l’utilisation, l’entretien et le remisage à
des températures plus élevées ou plus basses que les températures normales que l’on retrouve
en plein air (de 59o F/15o C à 69,8o F/21o C). Une autre de ces conditions survient lorsque le
pistolet est déchargé rapidement.
1.Une très haute température peut faire augmenter la pression à l’intérieur de la bouteille de CO2 et aussi dans le pistolet, ce qui a comme résultat une pression
d’utilisation trop élevée. Cet excès de pression pourrait causer un mauvais
fonctionnement ou des dommages permanents. La température maximale durant le
remisage ou l’utilisation ne devrait jamais dépasser 122o F (50oC). Cette température
peut être atteinte si vous laissez le pistolet au soleil durant une journée ensoleillée. Alors,
pour être certain que le pistolet fonctionne bien, ne l’exposez pas à des températures
élevées ou au soleil durant de longues périodes de temps. Sinon, la bouteille de CO2
peut surchauffer et exploser, ce qui pourrait endommager le pistolet à air et blesser ou
causer la mort des personnes à proximité. illustration 4d
-9-
8.
DÉPANNAGE
Avertissement: TOUTE TENTATIVE D’UTILISER D’AUTRES SORTES DE BOUTEILLES
DE GAZ PEUT ÊTRE EXTRÊMEMENT DANGEREUSE ET POURRAIT AVOIR COMME RÉSULTAT
DES BLESSURES GRAVES OU LA MORT. LES GAZ AUTRES QUE LE CO2 PEUVENT CAUSER UNE
EXLOSION OU UN BRIS DU PISTOLET.
-6-
• Tirez le chargeur de projectiles vers le bas et tenez-le
en position. (illustration 4b).
• Chargez jusqu’à 19 (calibre 0,177) projectiles BB en acier dans l’orifice
de chargement (illustration 4c). Nous vous suggérons des projectiles
RWS Match-Grade BBs.
• Relâchez le chargeur doucement.
• Réinsérez le chargeur rempli de projectiles dans le bas de la structure de
la crosse jusqu’à ce qu’il se bloque en position.
MISE EN GARDE:
illustration 2a
illustration 2b
Sûreté
3. Enlever Et Insérer Les Bouteilles De CO2
Le pistolet à air Smith & Wesson M&P utilise une bouteille de 12
grammes de CO2. Nous vous suggérons d’utiliser les bouteilles de
CO2 Walther pour obtenir un joint étanche.
2B. Pour placer le S&W M&P dans la position “OFF SAFE”
• Trouvez le cran de sûreté sur le côté droit de l’arme à air
au-dessus de la détente.
• Poussez le cran vers l’arrière (vers le “F”) (illustration 2B). Lorsque vous voyez la couleur ROUGE, l’arme à air est
“OFF SAFE” et vous pouvez tirer.
Cran de Mire
BB Levier
Lisez complètement ce manuel du propriétaire.
Traitez-le avec le même respect que celui attribué à une arme à feu.
Suivez toujours avec soin les instructions concernant la sécurité
contenues dans le manuel du propriétaire et conservez ce manuel dans un
endroit sûr pour vous y référer dans l’avenir.
4A. Charger des Projectiles
• Placez le cran de sûreté du pistolet à air est dans la
position “ON SAFE” (voir étape 2).
• Pointez toujours le pistolet à air dans UNE
DIRECTION SÉCURITAIRE.
• Tenez le pistolet à air en position verticale.
• Enlevez le chargeur en enfonçant le bouton de
déblocage du chargeur (illustration 4a) et en tirant le
chargeur vers le bas de la structure de la crosse.
6.Utiliser et manipuler les bouteilles de CO2
7.Entretien, Nettoyage et Remisage
8.Dépannage
9.Révision des règles de sécurité
10.Réparation / Service / Garantie
-3-
- 10 Manque de vélocité
Bouteille de CO2 vide
Bouteille de CO2 défectueuse
Températures extrêmes
Mauvais projectiles
9. Révision des Règles de Sécurité
• Ne pointez jamais votre pistolet vers une personne ou vers un objet sur lequel vous n’avez pas
l’intention de tirer.
• Manipulez toujours votre pistolet à air comme s’il était chargé et avec le même respect pour la
sécurité que si c’était une arme à feu.
• Visez toujours dans une DIRECTION SÉCURITAIRE. Gardez le canon pointé dans une
DIRECTION SÉCURITAIRE.
• Ne regardez jamais dans le canon d’un pistolet à air.
• Maintenez toujours le cran de sûreté dans la position “ON SAFE” jusqu’à ce que vous soyez
prêt à tirer. • Vérifiez toujours si le cran de sûreté du pistolet est dans la position “ON SAFE” et déchargé
lorsque vous le recevez d’une autre personne ou le sortez du remisage.
• Utilisez des projectiles du bon format convenant à votre pistolet à air.
• Ne réutilisez jamais des munitions.
• Ne tirez pas vers des surfaces dures ou vers la surface de l’eau. Le projectile peut rebondir ou
effectuer un ricochet et frapper une personne ou quelque chose que vous ne vouliez pas
atteindre.
• Ni tirez pas vers les surfaces fragiles comme des fenêtres.
• Placez toujours votre pare-balles dans une zone qui sera sécuritaire si le pare-balles est
défectueux.
• Votre pare-balles devrait être inspecté pour y déceler de l’usure avant et après chaque session
de tir. Tous les pare-balles peuvent s’user et éventuellement devenir défectueux. Remplacez
votre pare-balles si sa surface est usée ou endommagée ou s’il se produit un ricochet. • Ne tentez pas de démonter ou de faire des altérations à votre pistolet à air. Des réparations non
autorisées ou des modifications quelles qu’elles soient au fonctionnement de votre pistolet à air
peuvent être non sécuritaires et annulent la garantie.
• Avant de remiser votre pistolet à air, assurez-vous qu’il est déchargé, que la bouteille de CO2
est retirée et que le cran de sûreté est à la position “ON SAFE”.
Avertissement: UN PISTOLET QUI NE FONCTIONNE PAS BIEN PEUT ÊTRE DANGEREUX.
IL DEVRAIT ÊTRE RANGÉ DE FAÇON SÉCURITAIRE AFIN QUE PERSONNE NE L’UTILISE JUSQU’À CE
QU’IL SOIT RÉPARÉ OU DÉTRUIT. NE TENTEZ PAS DE DÉMONTER LE PISTOLET. IL EST DIFFICILE
DE LE RÉASSEMBLER ET UN PISTOLET MAL DÉMONTÉ OU MAL ASSEMBLÉ PEUT CAUSER DES
BLESSURES GRAVES OU LA MORT.
MISE EN GARDE: Les pièces de cette arme ont été conçues et fabriquées pour vous offrir des
performances optimales. Toute modification ou altération du pistolet peut causer un mauvais fonctionnement,
annuler la garantie et le rendre dangereux à utiliser. Tout changement dans les performances de cette arme
(comme une détente nécessitant moins de force et une distance plus courte de la détente pour tirer) signifie
que le pistolet a possiblement été modifié, altéré et/ou a de l’usure. Un pistolet qui montre ces signes devrait
être inspecté, remplacé ou réparé par le personnel qualifié de Umarex U.S.A. Un pistolet qui subit une chute
devrait être inspecté par une personne qualifiée afin de s’assurer que son fonctionnement n’a pas été altéré.
10. Réparation / Service / Garantie
Ne retournez pas un produit défectueux ou endommagé chez le détaillant. Si votre pistolet à air a besoin d’être réparé, appelez Umarex USA au
(479) 646-4210 et demandez le service ou visitez le site:
www.UmarexUSA.com. NE TENTEZ PAS DE DÉMONTER VOTRE PISTOLET! Des outils et des
accessoires particuliers sont nécessaires pour réparer votre pistolet à air. Tout démontage ou toute
modification qui n’est pas entrepris par Umarex USA annule la garantie. GARANTIE LIMITÉE DE 90 JOURS
Pour l’acheteur au détail, ce produit est garanti pour une période de 90 jours à partir de la date
d’achat contre tout défaut de matériau ou de fabrication. Cette garantie n’est pas transférable. CE QUI EST COUVERT PAR LA GARANTIE
Les pièces de remplacement et la main-d’œuvre.
CE QUI N’EST PAS COUVERT
Les frais de transport pour envoyer le produit défectueux à Umarex U.S.A. et les dommages
causés par un usage abusif ou par un manque d’entretien en plus de toute dépense
supplémentaire ou fortuite, tout dommage indirect comprenant le dommage à la propriété. Certains états ne permettent pas ces exclusions ou ces limites pour les dommages directs et
indirects, donc les exclusions et les limites mentionnées peuvent ne pas s’appliquer. - 11 DEMANDES DE RÉPARATION SOUS GARANTIE
Demandes de réparation sous garantie et réparation pour les clients des U.S.A et du Canada
seulement. Communiquez par téléphone avec Umarex U.S.A. au (479)-646-4210 et demandez
le service. Si nous jugeons qu’un retour du produit est nécessaire, vous obtiendrez un numéro
d’autorisation de retour. Écrivez ce numéro en gros caractères sur le colis et retournez-nous le
produit port payé à Umarex USA. Incluez votre nom, votre adresse, votre numéro de téléphone
et une note expliquant la défectuosité dans l’envoi. Une copie de la facture originale doit aussi
accompagner l’envoi. Ajoutez un chèque au nom de Umarex USA au montant de 9,95$ pour les
frais de transport et de manutention.
GARANTIE TACITE - Toute garantie tacite, comprenant la garantie tacite de qualité marchande
et de convenance pour une utilisation particulière est limitée à une durée de 90 jours à partir
de la date d’achat. CERTAINS ÉTATS NE PERMETTENT PAS DE LIMITE SUR LA DURÉE
D’UNE GARANTIE TACITE, DONC LA LIMITE MENTIONNÉE PEUT NE PAS S’APPLIQUER. SI
UNE PARTIE DE CETTE GARANTIE EST INTERDITE PAR UNE LOI FÉDÉRALE, DE L’ÉTAT
OU MUNICIPALE QUE L’ON N’A PAS PU ANTICIPER, ELLE NE S’APPLIQUE PAS. CETTE
GARANTIE VOUS DONNE DES DROITS LÉGAUX PRÉCIS ET VOUS POUVEZ AUSSI AVOIR
D’AUTRES DROITS QUI VARIENT D’UN ÉTAT À UN AUTRE ET D’UN PAYS À UN AUTRE.
MISE EN GARDE: Des modifications non-autorisées de votre arme à air peuvent la placer
dans une classe différente et ne sont donc pas permises. La garantie du manufacturier s’annule dans des
cas semblables.
Caractéristiques du Smith & Wesson M&P
Système: CO2
Calibre:
0,177
Projectiles: projectiles d’acier
Longueur: 7,5 pouces
Longueur du canon: 4,25 pouces
Poids:
1 livre
© 2008
Action:
Double
Vélocité:
jusqu’à 480 PPS
Sûreté:
manuel
Chargeur du Capacité: 19 coups
Distance Dangereuse: 350 verges
6007 South 29th Street, Fort Smith, Arkansas 72908 USA
Phone: 1-479-646-4210 www.UmarexUSA.com
02R08