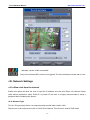
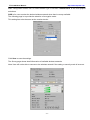
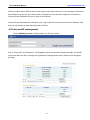
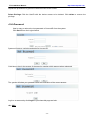
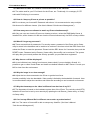
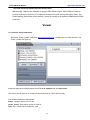
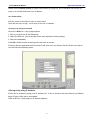
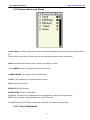
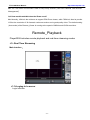
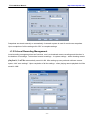
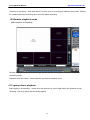
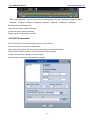
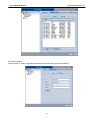
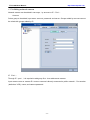
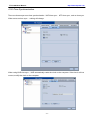
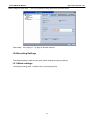
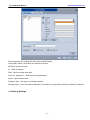
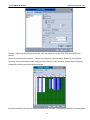
1
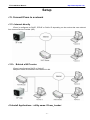
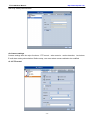
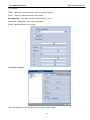
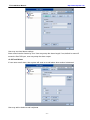
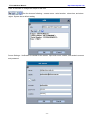
TT IP CAM User Manual
http://www.ttipcam.com
Declaration
Welcome to use TT IP CAM
Please do read all data or manual of the camera carefully before installing and using it first time
in PC, it will help you better understand and employ IP CAM well. TT INT'L will not responsible
for any expenses due to actions not following instructions of this manual.
As we can not assure user's full understand of manual's content, TT INT'L will not responsible
for any spoilage or arosing expenses caused by user or user-agreed professional maintaining
staff (not TT's)
in installing and operation course.
The software interface of this manual is sketch map, please refer to the actual one as standard.
Please forgive not other informing of any changes of manual's content. Contact us for support at
[email protected] if any problems in using IP CAM.
-2-
TT IP CAM User Manual
http://www.ttipcam.com
Contents
Setup
<1> Connect IPcam to a network---------------------------------------------------------------------8
<1.1> Internet directly--------------------------------------------------------------------------------------8
<1.2> Behind a NAT Router.------------------------------------------------------------------------------8
<2> Install Applications(utility name: IPcam_Loader)-------------------------------------8
<3> Configuration (utility name: Setup) -----------------------------------------------------------10
<3.1> System Tool------------------------------------------------------------------------------------------11
<3.2>Camera Control -------------------------------------------------------------------------------------12
<3.3>Video Control ----------------------------------------------------------------------------------------13
<3.4> PTZ Control -----------------------------------------------------------------------------------------14
<3.5>PMS Media Server ---------------------------------------------------------------------------------15
<3.6>Record Settings -------------------------------------------------------------------------------------17
<4> Network Settings -----------------------------------------------------------------------------------19
<4.1>Allow visit from the internet ----------------------------------------------------------------------19
<4.2> Network Type ---------------------------------------------------------------------------------------19
<4.3> Wireless Settings ----------------------------------------------------------------------------------22
<5> Account Management -----------------------------------------------------------------------------24
<5.1> Registration
---------------------------------------------------------------------------------------24
<5.2>AccountID management --------------------------------------------------------------------------26
<5.3>Sub-Account (User ID) Management ----------------------------------------------------------27
<5.4>Password ----------------------------------------------------------------------------------------------28
<6>Q/A---------------------------------------------------------------------------------------------------------29
Viewer
<1> Software Utility Installation ---------------------------------------------------------------------30
<2> Viewer utility -----------------------------------------------------------------------------------------31
<3> User Interface (UI) ----------------------------------------------------------------------------------32
<3.1>Camera Data ---------------------------------------------------------------------------------32
<3.2>Camera Name and Status ----------------------------------------------------------------33
<3.3> Color Adjustment ---------------------------------------------------------------------------33
-3-
TT IP CAM User Manual
http://www.ttipcam.com
<3.4> PTZ ---------------------------------------------------------------------------------------------34
<3.5> Icons
-----------------------------------------------------------------------------------------35
<4>Settings --------------------------------------------------------------------------------------------------36
<4.1>Camera settings ------------------------------------------------------------------------------36
<4.2>Local Recording ------------------------------------------------------------------------------37
<4.3>Other settings ---------------------------------------------------------------------------------38
<4.4>Parameters ------------------------------------------------------------------------------------39
<4.5>Video Qualities: ------------------------------------------------------------------------------40
<5> Q&A ------------------------------------------------------------------------------------------------------41
Playback
<1> Real Time Streaming -----------------------------------------------------------------------------43
<1.1>Loging in to server ------------------------------------------------------------------------------43
<1.2> System Settings ---------------------------------------------------------------------------------44
<1.2.1>Basic Settings ----------------------------------------------------------------------------------44
<1.2.2>Local Recording Management -------------------------------------------------------------44
<2>Remote playback mode -------------------------------------------------------------------------46
<2.1>group direct playback ---------------------------------------------------------------------------46
<2.2>Search playback ---------------------------------------------------------------------------------47
<2.3>AVI Conversion -----------------------------------------------------------------------------------48
<3>Other -------------------------------------------------------------------------------------------------50
NVR 2008
<1> Group Management.................................................................................................53
<1.1> Adding Groups.................................................................... .............................53
<1.2> Adding local cameras........................................................................................53
<1.3>Adding network camera.....................................................................................55
<1.4>Attributes............................................................................................................56
<2>Camera settings........................................................................................................58
<2.1>PTZ control........................................................................................................58
-4-
TT IP CAM User Manual
http://www.ttipcam.com
<2.2>Other controls....................................................................................................59
<2.3>Motion Detector.................................................................................................60
<2.4>Local Alarm.......................................................................................................60
<2.5>E-mail Alarm......................................................................................................60
<2.6>Time Synchronization.............................................................................. .........63
<3>Recording Settings...................................................................................................64
<3.1>Basic settings....................................................................................................64
<3.2>Group Settings...................................................................................................65
<4>Authorization Management......................................................................................67
<4.1>Add account.......................................................................................................67
<4.2>Account Attributes..............................................................................................67
<4.3>Authorization......................................................................................................68
<4.4>Authorization Control.........................................................................................69
<5>System Settings........................................................................................................70
<5.1>NVR Password...................................................................................................70
<5.2>Launch Settings.................................................................................................70
<5.3>NVR Configuration.............................................................................................71
<6>Playback.....................................................................................................................72
<6.1>Group Playback............................................................................................... ..73
<6.2>Search playback.................................................................................................75
<7> VI Conversion...........................................................................................................75
<8>Others.........................................................................................................................76
Snapshot.....................................................................................................................81
Icon definition:............................................................................................... ...........82
-5-
TT IP CAM User Manual
http://www.ttipcam.com
Before You Use
1.>Different IPcams feature different functions. This manual is ONLY for
the IPcams from us.
2.>This IPcam is a high performance surveillance camera. Please ensure
that the operation of such device is legal in your country or area before
installing.
Limited Liability
We cannot be held responsible for any technical or typographical errors
and reserves the right to make changes to the product and manuals without
prior notice. We make no warranty of any kind with regard to the material
contained within this document, including but not limited to the implied
warranties of merchantability and fitness for a particular purpose.
-6-
TT IP CAM User Manual
http://www.ttipcam.com
● Features:
- H.264 compression, best for Internet video Streaming
- No Static IP address required, No DDNS service needed.
- D1 Resolution.
- Support Win CE based PDA and Mobile Phone local and remote viewing.
- Support SD/SDHC card recording, NAS recording, NVR recording, and remote view and
recording.
- Multi-streaming capability.
-
Support UPNP protocol.
-
Support DHCP, Static IP, PPPOE internet enviroments.
- NVR support 128 cameras' D1 video recording in LAN. Can manage numerous IP cameras
depending on the NVR PC's ability.
- 3 Level (High, Middle, Low) user priority management.
- Two-way audio function: audio in and audio out for speaker with amplifier
- With BNC connector for composite video output as normal camera.
-7-
TT IP CAM User Manual
http://www.ttipcam.com
Setup
<1> Connect IPcam to a network
<1.1> Internet directly
IPcam is configured as DHCP, PPPoE or Public IP depending on the service that user ordered
from Internet Service Provider (ISP).
<1.2>
Behind a NAT router.
IPcam is configured as DHCP or Static IP.
Multiple IPcams are allowed to be installed in LAN.
<2>Install Applications(utility name: IPcam_Loader)
-8-
TT IP CAM User Manual
http://www.ttipcam.com
Download “IPcam_Loader” utility from http://www.ttipcam.com , double click on it when finished.
The IPcam_Loader GUI pops up.
Select the application utilities needed from File to be updated and click Download.
the IPcam can be used as an IPcam (IPcam mode) itself or a NVR (NVR mode).
The software utilities are listed below.
Setup: configure and/or view in LAN
Viewer: view and/or record on Internet
NVR: view, assign users, system management, record and playback.
Remote_Playback: view and playback online.
-9-
TT IP CAM User Manual
http://www.ttipcam.com
Double click on Setup to run the utility and setup your IPcam.
Updating file list:List of all available applications to be upgraded.
Update: Click Update to update list.
Download: Click Download to download the selected files.
Delete icon: Click on that icon will delete the downloaded files.
Total Progress:Shows the total download progress.
Current Progress:Shows the download progress of the current file.
Modify Account:Link to account management database.
New Account:Link to registration database.
.
<3>Configuration (utility name: Setup)
The IPcam is a Plug-and-Play device. Without any network settings, all the IPcams connected in LAN will
be listed on the Camera Name area. Different colors indicate different function modes.
Select the IPcam to be setup by double-clicking on its name. The streaming video of selected IPcam will
be displayed and its name will be changed to a red color. The current status and data of that IPcam will
show on screen.
- 10 -
TT IP CAM User Manual
http://www.ttipcam.com
<3.1>System Tool
- 11 -
TT IP CAM User Manual
http://www.ttipcam.com
*Click on “System Tool” and select a function mode.
<A> Don’t connect to server: This mode is for applications in LAN or fixed IP environments.
<B> Connect to D-Server: This mode is for users who do not have a fixed IP on Internet.
<C> Connect to Record-Server: This mode connects IPcam to a specified remote server that can
record and transmit the streaming video.
Click on System Tool and get the UI page as left:
Update Password:To setup/ change password.
Reset Camera:Click to restart the IPcam.
Modes:3 available function modes*.
Camera Name:The name can be changed by clicking the pencil icon after typing in a new name.
volume control:Move the bar to adjust the volume of the microphone on the IPcam.
Display time on video:Check this feature to display the current time on the video. The time of the
IPcam can be changed by clicking the pencil icon after typing in the new time.
<3.2>Camera Control
- 12 -
TT IP CAM User Manual
http://www.ttipcam.com
Cameras are designed by different technologies of sensors. Some models behave different from others.
User is to adjust the video quality to the best to his/her application.
Click on Camera to get to the UI page shown on the left side.
Indoor/ Outdoor Mode:Select this mode if hardware installed indoor/ outdoor. The maximum of FPS
will be 15/ 30.
Night Mode: The maximum FPS of this mode is only 10. Used to support dark environments.
Auto Mode: Select this mode to fit into the environment automatically.
Banding Filter:Check this feature to eliminate bandings.
Zoom: Available for special models only.
Sharpness:Move the bar to change the sharpness of the video source.
Brightness:Move the bar to adjust the brightness of the video source.
Gain: Move the bar to change the gain The bigger gain the brighter the video, yet more noises.
Special:Different color-filters can be selected.
<3.3>Video Control
The IPcam supports different resolution of video from QVGA to D1.
- 13 -
TT IP CAM User Manual
http://www.ttipcam.com
User will select the most suitable one for application. For example, to record video in LAN (NVR mode)
will require better video quality if storage capacity is not concerned. To view from the internet will require
the selection of a lower resolution depending on the network bandwidth.
The default settings are 15FPS, QVGA and 200Kbits. User should adjust the settings according to the
application requirement and network environments.
Click on Video and get the GI page:
Brightness:Adjust the bar to change the brightness.
Contrast:Adjust the bar to change the Contrast.
HUE:Adjust the bar to change the HUE.
Saturation:Adjust the bar to change the saturation.
FPS: Click the list icon and select the frame-rate.
RES: Click the list icon and select the resolution.
Fixed Quality/ Bitrate: User is able to fix the quality of video or the bitrate.
BPS:Move the bar to change the bitrate.
<3.4> PTZ Control
Click on PTZ to get to the PTZ control UI page shown as below.
- 14 -
TT IP CAM User Manual
http://www.ttipcam.com
<3.5>PMS Media Server
- 15 -
TT IP CAM User Manual
http://www.ttipcam.com
What is PMS Port ?
A router with Network Address Translation (NAT) allows a local network to use private IP
addresses communicate out to the Internet. In other words, connections may be established outbound to
the Internet, but connections arriving from the Internet are not allowed.
By using port mapping however, services like an IP camera and NVR server running on your private
network may become accessible from the Internet.
So, Port Mapping is a feature that allows devices behind router to be accessed on Internet.
Click on PMS and get the GI page:
This feature is for user to view the camera on a webpage. There’s an embedded MS in the camera. User
is allowed to setup online.
Enable MS:enable the Media Server.
Name Map Server:This server is provided by your dealer and functioning as DDNS.
Name:give the camera a name for logon.
- 16 -
TT IP CAM User Manual
http://www.ttipcam.com
PMS Port:Defaul as 9000.
FPS:
Click the list icon and select the frame-rate.
RES:
Click the list icon and select the resolution.
BPS:Move the bar to change the bitrate.
Click on Save when done.
<3.6>Record Settings
Click on Record and get the GI page:
Boot Recording:Recording when boot up.
Key Recording:User has to push the button on camera to start/ stop recording.
Audio Recordation:check to include the audio when recording.
Normal Recordation:Keep recording when started.
Event Recordation: Recording only when an event is triggered.
- 17 -
TT IP CAM User Manual
http://www.ttipcam.com
Check the motion detection area and DI when required.
Overwrite:overwrite the harddisk when assigned capacity is fulled.
Full Stop: stop recording when the assigned capacity is full.
Enable Sch.: check to define the recording schedule
Video Quality Setting:
User is able to setup the video quality for recording purpose.
FPS:
select the frame-rate.
RES:
select the resolution.
BPS: Move the bar to change the bitrate.
It is recommended to preview the settings before save and record.
Motion Detection (MD):
Check the box to enable MD function. User is able to define MD up to 3 areas. MD area can be defined
by key-in axis numbers, too.
- 18 -
TT IP CAM User Manual
:
http://www.ttipcam.com
Indicates 3 areas of MD are enabled.
: Gray color indicates MD is set but not triggered. The box indicates the audio alarm is set.
<4> Network Settings
<4.1>Allow visit from the internet
Enable this option will allow the user to input the IP address and view this IPcam via software Viewer
utility without registration, either Public IP or private IP will work. It is highly recommended to setup a
password before enabling this feature.
<4.2> Network Type
This is a Plug-and-play device. No network setting needed when used in LAN.
Skip the rest of this manual and refer to “DVR User’s Manual” if the IPcam is used in DVR mode.
- 19 -
TT IP CAM User Manual
http://www.ttipcam.com
Click on Network and select a Connection Type according to the user’s network environment.
<A>Obtain an IP Automatically (DHCP)
DHCP is the most popular connection type. DHCP usually requires no setup.
Listen Port can be changed for special network requirement.
Key-in the DNS address if necessary.
Click “Save” when finished.
The IPcam will link to the network automatically.
- 20 -
TT IP CAM User Manual
http://www.ttipcam.com
<B>PPPoE (Use a broadband connection)
- 21 -
TT IP CAM User Manual
http://www.ttipcam.com
The IPcam is able to connect to DSL ISP without any other equipment.
Connect it directly to the DSL modem and select PPPoE.
Listen Port can be changed for special network requirement.
Click “Save” after typing in the user name and password given by DSL ISP.
<C>Use the following IP Address ( Static IP)
An IP address is required if Static IP is set. Consult your ISP or network administrator to get the IP, Mask,
Gateway and DNS addresses.
Listen Port can be changed for special network requirement.
Click “Save” when finished.
The IPcam will link to the network automatically according to the configuration just set.
<4.3> Wireless Settings
Wireless configuration interface is only available when the wireless camera is selected.
Click Wireless on Network page will pop up the wireless setup pages.
- 22 -
TT IP CAM User Manual
http://www.ttipcam.com
Basic configuration allows user to select Network type of wireless. Infrastructure is the most popular
selections.
SSID is for user to select the desired wireless network when there’re many available.
The following page is to provide the selection of encryption mode.
This setting has to be the same as the receiver device.
Click Save to save the settings.
The Survey page shows detail information of available wireless networks.
Note: User will not be able to connect to the wireless network if the setting or security mode is incorrect.
- 23 -
TT IP CAM User Manual
http://www.ttipcam.com
The system provides Advanced settings as following page.
It is recommended to keep the default settings unless user is familiar with them.
<5> Account Management
<5.1> Registration
User can view the IPcam by either entering the IP address or Account name.
Registration is required for viewing on the Internet, unless the IPcam was set to Static IP with a fixed
Public IP.
- 24 -
TT IP CAM User Manual
http://www.ttipcam.com
Device ID
Device ID is unique and can be copied from the user interface of Setup utility. It can be used for only one
registration. User has to delete previous registration before registering a new account.
DServer
DServer is provided by manufacturer or distributor. It is used to find the IPcam on Internet if user has no
fixed public IP for it.
Click “Update” to get a list of available DServers. Select the one that is suitable for future registration.
This DServer has to be the same one selected when user registered its account.
User has to select the same DServer in three places.
(1) When setting up the IPcam hardware (Setup utility).
(2) Registration of AccountID. (New Account webpage).
(3) Log-in UI (Remote_Viewer)..
Copy the Device ID and click “New Account” to register an account if needed.
- 25 -
TT IP CAM User Manual
http://www.ttipcam.com
Select a location and a DServer that will be used to login with in the future. It is necessary to select the
same DServer as the one set in Setup utility. Complete the form and click “Register” to activate an
Account ID and Password for user to view on the Internet.
Account ID and Password are created by user. Log-in with the correct Account ID and Password, and
then you will be able to view the video/audio of IPcam.
<5.2>AccountID management
Click on Modify Account on Setup utility or on IPcam_Loader.
Key in “AccountID” and “Password”. Click Login to get an AccountID management table. AccountID
owner can add user name, change user’s password, change device name, delete device and grant
privilege.
- 26 -
TT IP CAM User Manual
http://www.ttipcam.com
Add Device Key-in the new Device Name and Serial Number. Click Add Device to add this device.
Repeat this procedure to add more devices.
Multiple devices (device names) can be added to one AccountID.
Multiple users (User ID) can be set under one AccountID.
Any User ID can be assigned to view one or multiple Device Names by AccountID.
Delete Device Click the device name to be deleted. Click delete to remove that device from list.
Change Device Name Click the Device Name List icon and select the device name to be changed.
Key-in a new name and click change to change that device name.
<5.3>Sub-Account (User ID) Management
It is recommended that users should not share their ID and Password with others. Every AccountID is
able to create one or multiple Sub-Account (UserID).
Add user Key-in the new UserID and Password. Click Add User to add that user.
Repeat this
procedure to add more users.
Delete UserID Click the UserID to be deleted. Click delete to remove that UserID from that UserID list.
Change User’s password Click the User ID List icon and select the UserID to be changed. Key-in a
new password for it and click change to change its password. Note: Only AcoountID owners can change
the password of UserIDs.
Grant Privilege Every userID can be granted to view single or multiple devices by AccountID owner.
Click the UserID List icon and select the UserID to be granted. Click the Device Name list icon and
select the device to be granted its access to the UserID. Click Grant privilege to set that privilege.
- 27 -
TT IP CAM User Manual
http://www.ttipcam.com
Repeat the procedures to grant more device access to the UserID.
Delete Privilege Click the UserID with the device access to be deleted. Click delete to remove the
privilege.
<5.4>Password
User is easy to retrieve the lost password of AccountID from the system.
Click Get it! from the Login window.
System will pop up a window and asks for Account ID.
Click Next to key-in the answer of the security question which was set when registered.
The system will show your password after the verification of the correct answer.
Login to an account by click Login or just close this page and exit.
<6> Q&A
- 28 -
TT IP CAM User Manual
http://www.ttipcam.com
Q1. What kind of cable do I need to connect the IPcam to the network?
A1. The cable used for your PC will work for the IPcam, too. Technically, it’s a category 5 UTP
cable with RJ-45 plug-in connectors.
Q2. How do I keep my IPcam as private as possible?
A2. Do not share your AccountID/ Password with others. It is recommended to setup multiple
Sub-Account for different viewers. (See User’s Manual “Sub-Account Management”)
Q3. How many users are allowed to watch my IPcam simultaneously?
A3. Only one user can view the IPcam over Internet at a time, unless the PMS Media Server is
installed. But, all the viewers in LAN can view the IPcam simultaneously via DVR or Setup utilities.
Q4. What if I forgot my password?
A4. There are two kinds of passwords. For security reason, password of the IPcam set by Setup
utility is stored in the hardware and is unable to be retrieved. User has to hold the REC button and
reboot the IPcam to erase the password. Please hold the REC button for 5 seconds, then push the
RESET button. Password set by Remote_Viewer utility (AccountID) can be retrieved. The system
will reply after you correctly answer the security question you provided when registered.
Q5. Why there’s no Video displayed?
A5. As an individual user viewing from internet, please check if you are behind a firewall. It’s
possible to get no video if both IPcam and viewer are behind firewalls or NAT Router. Consult your
MIS to view from this environment.
Q6. Why the image is not clear enough?
A6. Adjust the lens that connected to the IPcam to get the best focus.
Another possibility is the low bandwidth. Video quality is limited by the bandwidth of network. User
is recommended to adjust the resolution and frame-rate according to user’s network environment.
Q7. Why the timestamp on the video is different from the time of my PC?
A7. The timestamp is based on the hardware system time of the IPcam. The real-time clock (RTC)
inside the IPcam can be set by user remotely by updating the via Remote_Viewer utility, or locally
via Setup utility.
Q8. Can I set up different IDs for different users under my authorization?
A8. Yes. The owner of AccountID is able to setup many UserIDs. (See User’s Manual
“Sub-Account Management”)
- 29 -
TT IP CAM User Manual
http://www.ttipcam.com
Q9. How much bandwidth does the IPcam need?
A9. Normally, 16kb/s is the minimum to support PDA-Phone viewer, while 750kb/s is ideal to
provide VGA at the resolution of 30 frames/s continuous motion and a good quality video. The
default setting (Auto mode) of the Remote_Viewer is running at the speed of 200kb/s and QVGA
resolution.
Viewer
<1> Software Utility Installation
Download “IPcam_Loader” utility from http://www.ttipcam.com , double click on it when finished. The
IPcam_Loader GUI pops up.
Select the application utilities needed from File to be updated and click Download.
The IPcam can be used as an IPcam (IPcam mode) itself or a DVR (DVR mode).
The software utilities are listed below:
Setup: configure and/or view in LAN
emote_Viewer: view and/or record on Internet
DVR: view, record and/or playback in LAN
- 30 -
TT IP CAM User Manual
http://www.ttipcam.com
Double click on Remote_Viewer, a viewer User Interface (UI) pops up. The UI will allow user to log-in by
using an AccountID/ Password or an IP address.
<2> Viewer utility
Remote_Viewer is the utility for users to view IPcams.
There are two ways to login, <A>Account ID and <B> IP Address.
<A>Log-in by using Account ID
Click on the SVR icon, a log-in page appears.
1. Key-in your Account ID and Password.
2. Select the DServer. (the server that IPcam was registered to during setup).
3. Select the bandwidth.
Click OK to finish and the streaming video will show on screen.
IPcam(s) that are registered to this Account ID will show on a list. Double click the IPcam you want to
view its real-time streaming video.
<B>Log-in by using IP Address
IPcam can be viewed by typing in its IP address, too. To do so, Allow to visit from Internet (on Network
page of Setup utility) has to be enabled.
Click on IP icon, a login page for IP address appears.
- 31 -
TT IP CAM User Manual
http://www.ttipcam.com
1.Key-in the IP Address. It can be either a Public IP or a local IP.
Note: Allow to visit from Internet feature (on Network page of Setup utility) has to be enabled .
2.Give a name. Or the IP Address will be used as its name to be shown on list
3.Key-in the password if there’s one set on Setup utility. Skip if not.
Click OK to finish and the streaming video will be displayed on screen.
<3> User Interface (UI)
<3.1>Camera Data
- 32 -
TT IP CAM User Manual
http://www.ttipcam.com
<3.2>Camera Name and Status
Camera Name: IPcam(s) registered to this AccountID will display their names with current status on the
list.
Double click on any online IPcam’s name to see its streaming video on the display area.
Status: Indicates the IPcam is online, working, recording or off-line.
Click CAMERA to get to the page shown on the left side.
CAMERA NAME: The name user sets for the IPcam.
IP UDP: The IP address and communication protocol.
FPS: Frames-Per-Second
BITRATE: Bits-Per-Second
RESOLUTION: From D1 to QQVGA.
Brightness, Contrast, Hue and Saturation are all adjustable to get the best output video.
PTZ is only functional if the selected IPcam has PTZ function.
Click PTZ and get a PTZ basic control page as like the one shown on the left side.
<3.3> Color Adjustment
- 33 -
TT IP CAM User Manual
http://www.ttipcam.com
<3.4> PTZ
Click the PTZ in the center of the basic control page, the advanced PTZ control menu will pop up.
- 34 -
TT IP CAM User Manual
http://www.ttipcam.com
<3.5> Icons
- 35 -
TT IP CAM User Manual
http://www.ttipcam.com
Microphone Control
Click on speaker icon to turn on/ off the microphone of selected IPcam. The volume can be
controlled by moving the position of the control bar.
Start/ Stop Streaming
The video is streaming after the selected IPcam is connected. It can be stopped when by clicking on
the View/ Stop toggled icon.
Mostly, users stop some video because the Internet bandwidth is too
limited.
Start/ Stop Recording
This icon is to start or stop recording the streaming video of selected IPcam. The path of recording
file is to be set in the “Settings” icon.
Snap Shot
Click this icon to get a picture of the video from the selected IPcam.
User can print the picture or save the picture into the local computer.
Display Layout Selection
Click on this icon to pop out a list of display area layout options. User can select different designs of
display area from one to sixteen channels any time.
Full-screen is available, too. Press the Esc key or double-click on it will return it back to normal.
<4>Settings
Click on this icon will pop up a settings page as following.
<4.1>Camera settings
- 36 -
TT IP CAM User Manual
http://www.ttipcam.com
Banding Filter:Check this feature to eliminate banding.
Zoom:Available for certain items only.
Sharpness:Move the bar to change video sharpness.
Brightness:Move the bar to adjust the brightness of video.
Gain:Move the bar to change the gain of the video source. The bigger gain the brighter the video, yet
more noises.
Special mode:Different color-filters can be selected.
Click the Camera Name List icon to get a list of online IPcams. Select the IPcam to be setup by clicking
on its name.
Indoor/ Outdoor Mode:Select this mode if installed indoor/ outdoor. The maximum FPS will be 15/ 30.
Night Mode: The maximum FPS of this mode is only 10. Used to support dark environments.
Auto Mode: Select this mode to fit into the environment automatically.
<4.2>Local Recording
- 37 -
TT IP CAM User Manual
http://www.ttipcam.com
Rec. Content: Select Video and/ or Audio to be recorded.
Recording Path: This is the path where recoding files were saved into.
User can browse the system by click the browser icon and select a proper path.
Rec. Time Table: User is able to pre-set the recording time table. Just set the start-time and stop-time of
recording then click Add to add this pre-set event. Repeat this procedure and pre-set more events.
<4.3>Other settings
- 38 -
TT IP CAM User Manual
http://www.ttipcam.com
Display time on video: Enable this feature to display time on video.
DVIP Time: User is able to change the time of selected IPcam by clicking the pencil icon after typing
In the time wanted.
Volume: Move the bar to adjust the volume of the microphone in IPcams.
Video Source: Select the video source.
TV Standard: Select the video type.
System Control: Click on Reset Camera to restart the selected IPcam.
Default Partition: User is able to select the display layout. Or, set to Auto Channel to display all
devices.
<4.4>Parameters
- 39 -
TT IP CAM User Manual
http://www.ttipcam.com
Parameters: Parameters are very useful when calling for technical support.
Serial Number: is the device ID. It’s the same number shown on Setup utility.
<4.5>Video Qualities:
- 40 -
TT IP CAM User Manual
http://www.ttipcam.com
The quality of a streaming video is the combination of resolution, frame-rate and bit-rate. To get the best
quality of real-time streaming, it’s important to select the suitable one according to the user’s internet
bandwidth.
It’s recommended to select Auto mode. The system will automatically adjust the bandwidth according to
the current network status.
Advance mode is for the users who are familiar with the
<5> Q&A
Q1. What kind of cable do I need to connect the IPcam to the network?
- 41 -
TT IP CAM User Manual
http://www.ttipcam.com
A1. The cable used for your PC will work for the IPcam, too. Technically, it’s a category 5 UTP cable with
RJ-45 plug-in connectors.
Q2. How do I keep my IPcam as private as possible?
A2. Do not share your AccountID/ Password with others. It is recommended to setup multiple
Sub-Account for different viewers. (See User’s Manual “Sub-Account Management”)
Q3. How many users are allowed to watch my IPcam simultaneously?
A3. Only one user can view the IPcam over Internet at a time, unless the PMS Media Server is installed.
But, all the viewers in LAN can view the IPcam simultaneously via DVR or Setup utilities.
Q4. What if I forgot my password?
A4. There are two kinds of passwords.
For security reason, password of the IPcam set by Setup utility is stored in the hardware and is unable to
be retrieved. User has to hold the REC button and reboot the IPcam to erase the password. Please hold
the REC button for 5 seconds, then push the RESET button.
Password set by Remote_Viewer utility (AccountID) can be retrieved. The system will reply after you
correctly answer the security question you provided when registered.
Q5. Why there’s no Video displayed?
A5. As an individual user viewing from internet, please check if you are behind a firewall. It’s possible to
get no video if both IPcam and viewer are behind firewalls or NAT Router. Consult your MIS to view from
this environment.
Q6. Why the image is not clear enough?
A6. Adjust the lens that connected to the IPcam to get the best focus.
Another possibility is the low bandwidth. Video quality is limited by the bandwidth of network. User is
recommended to adjust the resolution and frame-rate according to user’s network environment.
Q7. Why the timestamp on the video is different from the time of my PC?
A7. The timestamp is based on the hardware system time of the IPcam. The real-time clock (RTC) inside
the IPcam can be set by user remotely by updating the via Remote_Viewer utility, or locally via Setup
utility.
Q8. Can I set up different IDs for different users under my authorization?
- 42 -
TT IP CAM User Manual
http://www.ttipcam.com
A8. Yes. The owner of AccountID is able to setup many UserIDs. (See User’s Manual “Sub-Account
Management”)
Q9. How much bandwidth does the IPcam need?
A9. Normally, 16kb/s is the minimum to support PDA-Phone viewer, while 750kb/s is ideal to provide
VGA at the resolution of 30 frames/s continuous motion and a good quality video. The default setting
(Auto mode) of the Remote_Viewer is running at the speed of 200kb/s and QVGA resolution.
Remote_Playback
Player2008 includes remote playback and real-time streaming modes
<1> Real Time Streaming
Main Interface:
<1.1>Loging in to server
Login Interface:
- 43 -
TT IP CAM User Manual
http://www.ttipcam.com
Enter account number, password, the server address, and port, then click the "Login" log server.
Account number, password, the server address and port come from two sources. One from NVR
authorized management, where NVR player is a client, the account is authorized by management
settings. Another is from the PMS functions, the default account is "guest", and the password is the
same as the camera's, the server address and port will be the name and port used in PMS registration.
After logging in successfully, you will obtain lists of cameras from the server.
<1.2> System Settings
System settings include basic settings and local recording settings. This also includes communication
protocols and buffer.
<1.2.1>Basic Settings
Media data reception includes both UDP and TCP, default reception as UDP. When
When reception set as UDP is unable to connect, Player automatically tries TCP connection;In addition,
TCP supports multiple channel streaming. This can increase the speed of data transmission, reducing
buffer period.
Local buffer settings allow you to adjust with or without buffer, buffer is set up when the network is
unstable, enhances the broadcast of continuous images, but the images will be delayed for a period of
time (usually about 10 seconds); The greater the buffer the stronger the continuity of images, at the
same time buffer time and delay time will increase; if network conditions are good, the system can be
set to no buffer, not only to maintain image but to also ensure the continuity of the real-time image.
- 44 -
TT IP CAM User Manual
http://www.ttipcam.com
Snapshots are stored manually or automatically. Automatic system is used for continuous snapshots.
Upon completion of all the settings click "OK" to complete settings.
<1.2.2>Local Recording Management
Local recording management has two functions, one is to download remote recordings and the other is
the deletion of recordings. To download remote recordings:In system settings,when choosing remote
playback, it will be automatically saved in LAN. After setting up save path and minimum reserve
space, click “save settings”. Upon completion of all the settings,when playing remote playback it will be
saved in LAN.
- 45 -
TT IP CAM User Manual
http://www.ttipcam.com
Deletion of recordings:click“start search” to show a list of recordings in different save paths. Choose
the camera name and recording date, then click delete recording.
<2>Remote playback mode
Main interface as following:
Remote playback mode has the same login servers and the same system settings with real-time
streaming mode.
Playback have two modes,direct playback and search playback mode.
<2.1>group direct playback
After logging in successfully,double click the camera icon on the right side of the interface to play
recording. User may adjust the time and progress.
- 46 -
TT IP CAM User Manual
http://www.ttipcam.com
<2.2>Search playback
Click
icon,to search.
Add path:Add recording save path.
Add NAS:Save NAS to LAN
Delete:Delete recording save path
- 47 -
TT IP CAM User Manual
http://www.ttipcam.com
start:Start searching recording files
Select save path,then click start,after finding recording files,the list will display at the bottom.
Add NAS
Set NAS IP,path,NAS account and password to add to save path.
After searching, click ok to display results on playback list, double click the camera icon to play.
- 48 -
TT IP CAM User Manual
http://www.ttipcam.com
When single playback,user is able to use the quick playback function.Switchable playback speed:
Standard,2xSpeed,3xSpeed,4xSpeed,6xSpeed,8xSpeed,12xSpeed,16xSpeed。
Blue bar states broadcast time
Green bar states the motion detection
Yellow bar states normal recording
Drag in the blue bar to adjust the time
<2.3>AVI Conversion
AVI Conversion is for recording files to convert to AVI format.
Choose camera to convert from camera list.
Video time-frame shows the start and end of recording of selected camera.
Select the time-frame wished to be converted from the recording.
Change the save path settings to AVI save path
Click convert,process bar will show the progress.
- 49 -
TT IP CAM User Manual
http://www.ttipcam.com
<3>Other
Video Split Screens:User can chose any format anytime.Press “esc” to quit full screen.
Split screens:User can choose up to 28, 36, 49 or even 64 split screens.
Mode switch:Click icon to switch
preview mode or play mode. Preview mode displays one image per a
few seconds,to save PC performance.
Volume Adjustment:User can adjust volume or mute.
- 50 -
TT IP CAM User Manual
http://www.ttipcam.com
Color Adjustments:User can adjust viewage effects by adjusting the color adjustment.
1. Brightness:Brightness adjustment of image
2. Contrast:Contrast adjustment of image.
3. Color:Color ajustment of image
4. Saturation:Saturation ajustment of image.
PTZ control:when selected camera have PTZ functions included,then“PTZ controls”can be used.
Click“PTZ controls”to maximize PTZ interface.
Click“PTZ” located in the center of the circle to access advanced PTZ control.
- 51 -
TT IP CAM User Manual
http://www.ttipcam.com
start and stop recording,
Stop recording is used to stop all cameras from real-time streaming.
Start recording is used to save real-time streaming in LAN.
PTZ Controls
Zoom Adjustment
Focus Adjustment
Iris Adjustment
Prefabricated selection box
- 52 -
TT IP CAM User Manual
http://www.ttipcam.com
NVR 2008
NVR 2008 includes group management, real time monitoring, recording, playback, and
authorized remote playback via age.
<1> Group Management
Before using NVR functions, user must add cameras, and manage them into groups.
Group management allows users to add group, add local camera, add network camera, and change
attributes of group. (Camera and account attributes)
<1.1> Adding Groups
Before adding cameras, you must add a group first. Put group name into name column,
then click add.
<1.2> Adding local cameras
Local camera can be added in two ways, by search or adding the static IP.
By Search:
Click Search,NVR will search for all cameras in LAN, user can add camera in specific group
one by one or all at once.
- 53 -
TT IP CAM User Manual
http://www.ttipcam.com
By adding static IP:
Input camera IP, name, and camera password and select the group to be added in.
- 54 -
TT IP CAM User Manual
http://www.ttipcam.com
<1.3>Adding network camera
Network camera can be added in two ways,by account or IP(Port).
Account:
Select group to be added, input name,account,password,and server. Groups added by account can not
be mixed with groups added by IP.
IP(Port):
Through IP(port), it is required to add group first,then add remote camera.
Input remote router or camera IP(router or camera is directly connected to public network)
,Port number
(default as 3478), name, and camera password.
- 55 -
TT IP CAM User Manual
http://www.ttipcam.com
<1.4>Attributes
User may modify local groups, local cameras, account, and network cameras.
User may modify group names; delete groups, and clear camera operations.
User may modify camera name, delete camera, or move camera to another group.
- 56 -
TT IP CAM User Manual
http://www.ttipcam.com
User may modify account name,server, or delete account.
- 57 -
TT IP CAM User Manual
http://www.ttipcam.com
User may modify camera name
<2>Camera settings
Camera settings have six major functions:PTZ control,other controls,motion detection,local alarm,
E-mail alarm and synchronization. Before setup, user must select camera wished to be modified.
<2.1>PTZ control
- 58 -
TT IP CAM User Manual
http://www.ttipcam.com
PTZ control:
Mode:User may choose out of the four environment modes.
Zoom:User may adjust the zoom of the image
Banding Filter:User may choose between 50Hz or 60Hz。
Sharpness,brightness,gain may be adjusted.
Effect:Special effects for the image
<2.2>other controls
User may switch on or switch off the timer on the camera screen.
- 59 -
TT IP CAM User Manual
http://www.ttipcam.com
Video input source:User may choose between Composite or S-Video. This is not needed for 100B
series.
Standard mode:User may choose between NTSC or PAL。
System control: User may reboot camera.
Vertical and Horizontal mirror:User may adjust image.
<2.3>Motion Detector
Regional Choice:User may choose up to three regions,use the mouse to select region.
Opening motion detector:Check the region wished to open.
Sensitivity:user may adjust the sensitivity of the motion detector.
Regional name:User may have a name for a regional motion detector, that name will be used on e-mail
alarm.
If user wishes to do the same for other cameras, user may use the “apply to…” function.
After Setup, selected camera will show three little men at the bottom-left corner.
:represents all regions are detecting motion,different colors represent different regions.
:When the all lights go off, that means no motion is detected.
<2.4>Local Alarm
- 60 -
TT IP CAM User Manual
http://www.ttipcam.com
User may use local alarm settings.
Alarm sound can be chosen by user. User may setup the alarm length, if not, default is around 5
seconds. After DO input, user may setup the alarm output.
<2.5>E-mail Alarm
If user uses e-mail alarm, then system will send an e-mail alarm when motion is detected.
User may add or delete e-mail recipients.
- 61 -
TT IP CAM User Manual
http://www.ttipcam.com
Click “E-mail edit” to change the subject of the mail.
The four icons as following:camera name,serial number,alarm time, and alarm
region. System has a default setting
Server Settings:Verification is needed for the sender. Input mail server, sender, and sender’s account
and password.
- 62 -
TT IP CAM User Manual
http://www.ttipcam.com
<2.6>Time Synchronization
There are three ways to set time synchronization:NVR time sync.,NTP time sync., and no time sync.
When set as no time sync.,nothing will change.
When using NVR time sync.,NVR automatically reads the clock on the computer. If the time is still not
correct, modify the clock on the computer.
- 63 -
TT IP CAM User Manual
http://www.ttipcam.com
When using NTP time sync.,it is only required to setup time zone and time server.
After setup,use” Apply to…”to apply to another camera.
<3>Recording Settings
Recording settings is split into two parts: basic settings and group settings.
<3.1>Basic settings
Including recording path,retention time, and storage policy.
- 64 -
TT IP CAM User Manual
http://www.ttipcam.com
Recording paths are divided into local paths and NAS paths.
Local path is when it is saved in the local drive directly.
NAS path needs to be set.
IP:NAS IP address
Path:NAS recording save path.
Account,password: NAS account and password.
Name:Input chosen name.
Retention time:the days of recording retention
Storage policy:User may choose between to overwrite or to stop when maximum capacity is reached.
<3.2>Group Settings
- 65 -
TT IP CAM User Manual
http://www.ttipcam.com
Choose a camera group from the group list, user may adjust the audio, FPS, RES, and BPS of the
camera.
Always record have two functions:Regular recording and event recording. Default is set as regular
recording. Event recording requires setting motion detection, when detected, camera starts recording.
scheduled recording requires schedule settings.
Regular recording:Select the time-frame wished to be recorded. The selected ones will turn bright green.
- 66 -
TT IP CAM User Manual
http://www.ttipcam.com
Event recording:Select the detection region, then select the time-frame wished to be recorded. The
selected region will turn into different colors of blue.
If user wishes to cancel the time-frame, user must select no recording first.
Recording schedule chart shows the a week(7 days) and time(24 hours).
User can choose to include audio or not.
When recording quality and screen size is set,and the camera is recording, you may not modify camera
settings. You must stop recording, then modify.
“Apply to…”allows user to use this camera settings on others.
<4>Authorization Management
Authorization management is used for user authorization to visit NVR.
<4.1>Add account
Before client visits NVR, it is required to add account in the authorization management,like below,insert
account and password to finish.
<4.2>Account Attributes
Select added account; user may change the password in account attributes.
- 67 -
TT IP CAM User Manual
http://www.ttipcam.com
<4.3>Authorization
Click the authorize button, select group,then select the authority of the client.
Selected group will show a list of authorities. User may modify the authorities.
- 68 -
TT IP CAM User Manual
http://www.ttipcam.com
<4.4>Authorization Control
Authorization Control sets account limitations online at once,cameral limitations, and media server port.
Port range is around 10000~11000.
- 69 -
TT IP CAM User Manual
http://www.ttipcam.com
<5>System Settings
System settings include NVR password,launch settings,and NVR configurations.
<5.1>NVR Password
Input old and new password to change passwords.
User may also lock the software, a password is required when opening or closing software.
<5.2>Launch Settings
Launch settings selects the default each time NVR launches.
- 70 -
TT IP CAM User Manual
http://www.ttipcam.com
User can choose to auto run NVR when windows start.
User can choose to set camera audio on each time NVR runs.
User can choose to set preview mode as default.
Time of auto flip:The time gap between the flip of pages, default is set as 10 seconds。
<5.3>NVR Configuration
NVR Configuration has two functions:export and inport.
After the completion of configuration settings, export function can be used for backup configuration file.
To restore the original configuration, Import function can be used to backup the original configuration
file.。
- 71 -
TT IP CAM User Manual
http://www.ttipcam.com
<6>Playback
There are two types of playback: group direct playback and search playback.
<6.1>Group Playback
After recording setup,double click the camera icon on the right side of the interface to play recording.
User may adjust the time and progress.
- 72 -
TT IP CAM User Manual
http://www.ttipcam.com
<6.2>Search playback
- 73 -
TT IP CAM User Manual
Click
http://www.ttipcam.com
icon,to search
Add path:add recording save path.
Add NAS:save NAS to LAN
Delete:delete recording save path
start:start searching recording files
Select save path,then click start,after finding recording files,the list will display at the bottom.
Add NAS
Set NAS IP,path,NAS account and password to add to save path.
After searching, click ok to display results on playback list, double click the camera icon to play.
- 74 -
TT IP CAM User Manual
http://www.ttipcam.com
When single playback,user is able to use the quick playback function.Switchable playback speed:
Standard,2xSpeed,3xSpeed,4xSpeed,6xSpeed,8xSpeed,12xSpeed,16xSpeed。
Blue bar states broadcast time
Green bar states the motion detection
Yellow bar states normal recording
Drag in the blue bar to adjust the time
<7> AVI Conversion
AVI Conversion is for recording files to convert to AVI format.
Choose camera to convert from camera list.
Video time-frame shows the start and end of recording of selected camera.
Select the time-frame wished to be converted from the recording.
Change the save path settings to AVI save path
- 75 -
TT IP CAM User Manual
http://www.ttipcam.com
Click convert,process bar will show the progress.
<8>Others
The right list shows all groups and account,double click group or account to see all the camera icons of
this group. At the same time, the left side will show all cameras within the group.
For normal groups,when you right click the group icon, four shortcuts appear,replace,add,close,info.
The replace shortcut is used replace the camera group playing now with the selected camera group. The
- 76 -
TT IP CAM User Manual
http://www.ttipcam.com
add shortcut is to add selected group into list. The close shortcut is to close selected group. The info
shortcut is allows user to check group name, type, number of cameras, and status of cameras.
When user right clicks account group, five shortcuts appear as the following,replace,add,close,
reconnect,info. Reconnect is used when account is snatched,it connects directly to account group
without the requirement to reboot NVR.
Right click any camera icon to show camera information. The information shows camera IP address,
series,serial number,status,group, and image quality. Other
format anytime.Press “esc” to quit full screen.
- 77 -
Video Split Screens:User can chose any
TT IP CAM User Manual
http://www.ttipcam.com
Page/Group flip:This function includes flipping upwards, downwards, or auto-flip.
Mode switch:Click icon to switch preview mode or play mode. Preview mode displays one image per a
few seconds,to save PC performance.
Volume Adjustment:User can adjust volume or mute.
Split screens:User can choose up to 28, 36, 49 or even 64 split screens.
Color Adjustments:User can adjust viewage effects by adjusting the color adjustment.
1. Brightness:Brightness adjustment of image
2. Contrast:Contrast adjustment of image.
3. Color:Color adjustment of image
4. Saturation:Saturation adjustment of image.
PTZ control:when selected camera have PTZ functions included,then“PTZ controls”can be used.
Click“PTZ controls”to maximize PTZ interface.
Click“PTZ” located in the center of the circle to access advanced PTZ control.
- 78 -
TT IP CAM User Manual
http://www.ttipcam.com
PTZ controls
Zoom in
Zoom out
Focus near
Focus Far
Open Iris
- 79 -
TT IP CAM User Manual
http://www.ttipcam.com
Close Iris
Prefabricated selection box
Preset point management:User can add preset points, delete preset points, or clear all preset points.
- 80 -
TT IP CAM User Manual
http://www.ttipcam.com
Screen lock:Unlocking requires NVR password. If there is no password, system will remind you to set
one.
Stop recording:When setting image quality, user can stop recording, then modify.
Snapshot
- 81 -
TT IP CAM User Manual
http://www.ttipcam.com
User can use cameras to take pictures
Click the snapshot icon to take a photo of the current screen of selected camera.
The picture can be either printed or be saved on the hard disk of the computer.
Icon definition:
From left to right
1.
Camera is recording
2. Schedualed recording, not now.
3. recording error
4. unknown status
5. offline
6. password error
7. connecting
8. connection failure
9. connection error
10. Connected, awaiting data
11. Normal status
12. Account snatched
13. Camera deleted
From left to right
1. Account group
2. Regular group
3. Cameras in account
4. Cameras added by IP(Port)
5. local cameras(added by IP and search)
From left to right
1. This is an account group
2. Account snatched
3. Connection failure
4. Camera error in group(connection error or recording error.)
- 82 -
TT IP CAM User Manual
http://www.ttipcam.com
1, 2,3 are specialized for group accounts, 4 is for all accounts.
- 83 -