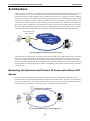
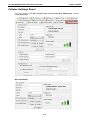
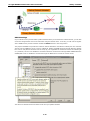
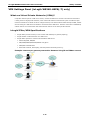
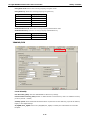
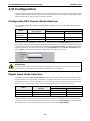
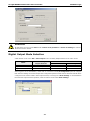
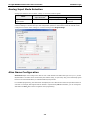
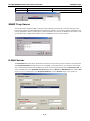
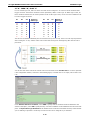
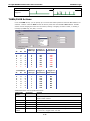
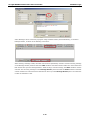
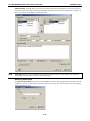
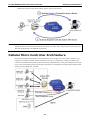
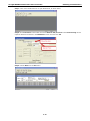
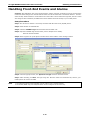
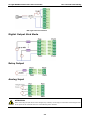
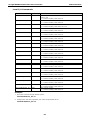
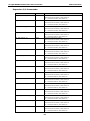
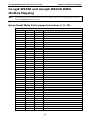
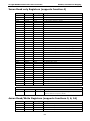
1
ioLogik W5300 Cellular Micro RTU Controller User’s Manual Eighth Edition, December 2013 www.moxa.com/product © 2013 Moxa Inc. All rights reserved. ioLogik W5300 Cellular Micro RTU Controller User’s Manual The software described in this manual is furnished under a license agreement and may be used only in accordance with the terms of that agreement. Copyright Notice © 2013 Moxa Inc., All rights reserved. Trademarks The MOXA logo is a registered trademark of Moxa Inc. All other trademarks or registered marks in this manual belong to their respective manufacturers. Disclaimer Information in this document is subject to change without notice and does not represent a commitment on the part of Moxa. Moxa provides this document as is, without warranty of any kind, either expressed or implied, including, but not limited to, its particular purpose. Moxa reserves the right to make improvements and/or changes to this manual, or to the products and/or the programs described in this manual, at any time. Information provided in this manual is intended to be accurate and reliable. However, Moxa assumes no responsibility for its use, or for any infringements on the rights of third parties that may result from its use. This product might include unintentional technical or typographical errors. Changes are periodically made to the information herein to correct such errors, and these changes are incorporated into new editions of the publication. Technical Support Contact Information www.moxa.com/support Moxa Americas Moxa China (Shanghai office) Toll-free: 1-888-669-2872 Toll-free: Tel: +1-714-528-6777 Tel: +86-21-5258-9955 Fax: +1-714-528-6778 Fax: +86-21-5258-5505 800-820-5036 Moxa Europe Moxa Asia-Pacific Tel: +49-89-3 70 03 99-0 Tel: +886-2-8919-1230 Fax: +49-89-3 70 03 99-99 Fax: +886-2-8919-1231 Moxa India Tel: +91-80-4172-9088 Fax: +91-80-4132-1045 Table of Contents 1. Introduction ...................................................................................................................................... 1-1 Architecture ....................................................................................................................................... 1-2 Resolving the Dynamic and Private IP Issue with Active OPC Server .................................................. 1-2 Resolving the Dynamic and Private IP Issue with DDNS .................................................................... 1-3 Overview ........................................................................................................................................... 1-4 Product Features ................................................................................................................................ 1-4 Appearance........................................................................................................................................ 1-5 Package Checklist ............................................................................................................................... 1-6 Product Selection Guide ....................................................................................................................... 1-6 Product Specifications ......................................................................................................................... 1-7 Common Specifications ................................................................................................................ 1-7 ioLogik W5312/W5312-T Specifications .......................................................................................... 1-8 ioLogik W5340/W5340-T/W5340-HSPA Specifications ...................................................................... 1-9 2. Getting Started.................................................................................................................................. 2-1 Cellular Micro RTU Controller Flowchart ................................................................................................. 2-2 Before Testing .................................................................................................................................... 2-2 Installing the ioAdmin Utility ................................................................................................................ 2-2 Laboratory Testing .............................................................................................................................. 2-3 Grounding the Unit ...................................................................................................................... 2-3 Connecting the Power .................................................................................................................. 2-3 Connecting to ioAdmin via Ethernet ...................................................................................................... 2-4 Configuring the Computer’s IP Address .......................................................................................... 2-4 Activating ioAdmin and connecting to the ioLogik ............................................................................ 2-4 Configuring the DIO Channels .............................................................................................................. 2-7 Connecting the I/O Devices and Sensors ........................................................................................ 2-7 Testing the I/O Device ................................................................................................................. 2-9 DIN Rail / Wall Mounting ............................................................................................................ 2-10 Installing/Removing the SIM Card and SD Card ............................................................................. 2-11 Connecting the Cellular Micro RTU Controllers over a Cellular Network ............................................. 2-12 Installing Active OPC Server on a Host that has a Public Static IP Address ........................................ 2-14 Import/Export Configuration File ......................................................................................................... 2-15 Using ioAdmin to Import/Export the Configuration ......................................................................... 2-15 3. Utility: ioAdmin ................................................................................................................................. 3-1 ioAdmin System Requirements ............................................................................................................. 3-2 Features of ioAdmin ..................................................................................................................... 3-2 ioAdmin Basic Functions ............................................................................................................... 3-3 ioAdmin Administrator Functions ................................................................................................. 3-12 Server Settings Panel................................................................................................................. 3-12 LAN Settings Panel .................................................................................................................... 3-13 I/O Configuration Panel .............................................................................................................. 3-14 I/O Expansion Panel .................................................................................................................. 3-24 Active Tags Panel....................................................................................................................... 3-27 Cellular Settings Panel ............................................................................................................... 3-31 VPN Settings Panel (ioLogik W5340-HSPA(-T) only) ....................................................................... 3-35 VPN System Log Events and Error Codes ...................................................................................... 3-38 Cellular Reconnection................................................................................................................. 3-39 Meter/Sensor ............................................................................................................................ 3-41 Network Statistics ..................................................................................................................... 3-42 Watchdog Panel ........................................................................................................................ 3-42 Click&Go Logic Panel .................................................................................................................. 3-43 4. Click&Go Logic .................................................................................................................................. 4-1 Quick Start Guide ............................................................................................................................... 4-2 Overview ........................................................................................................................................... 4-3 Features ..................................................................................................................................... 4-3 Click&Go Logic Basics .................................................................................................................. 4-4 Working with Rules ...................................................................................................................... 4-5 Click&Go Development Process ............................................................................................................. 4-5 I/O Configuration ................................................................................................................................ 4-6 Configurable DIO Channel Mode Selection ...................................................................................... 4-6 Digital Input Mode Selection ......................................................................................................... 4-6 Digital Output Mode Selection ....................................................................................................... 4-7 Analog Input Mode Selection......................................................................................................... 4-8 Alias Name Configuration ............................................................................................................. 4-8 Testing the I/O Channels .............................................................................................................. 4-9 Defining Global Variables ................................................................................................................... 4-10 Internal Register (Integer) Settings ............................................................................................. 4-10 Timer Settings .......................................................................................................................... 4-10 SNMP Trap Server...................................................................................................................... 4-11 E-Mail Server ............................................................................................................................ 4-11 Active Message Server ............................................................................................................... 4-13 SMS Phone Book ....................................................................................................................... 4-13 Working/Off Working Days .......................................................................................................... 4-14 FTP Settings ............................................................................................................................. 4-14 Data Logging Profile List............................................................................................................. 4-15 Internal Register (Float) Settings................................................................................................. 4-17 Working with Logic ........................................................................................................................... 4-18 Click&Go Logic Basics ................................................................................................................ 4-18 IF Conditions ............................................................................................................................ 4-20 More Information about Repeat Interval vs. Edge Detection ............................................................ 4-25 THEN/ELSE Actions .................................................................................................................... 4-27 Activating the Rule-set ...................................................................................................................... 4-37 Upload, Restart, and Run ........................................................................................................... 4-37 Rule-set Management Bar .......................................................................................................... 4-37 Import/Export Configuration .............................................................................................................. 4-37 5. Planning and Assistance.................................................................................................................... 5-1 Known Issues of Cellular Monitoring Systems ......................................................................................... 5-2 Configuring a Static IP Address for Active OPC Server ............................................................................. 5-3 Cellular Micro Controller Architecture..................................................................................................... 5-4 Using ioAdmin to Perform Simple Data Monitoring from a Remote Site ...................................................... 5-5 Expanding Input/Output Channels ........................................................................................................ 5-7 Using Modbus/TCP Protocol with Your Program ....................................................................................... 5-9 Using Counter to Get Meter Readings and Statistics .............................................................................. 5-11 Record your I/O Data in the Data Log File ............................................................................................ 5-13 Connecting a Modbus/RTU Serial Device Attached to the ioLogik over a Cellular Network ........................... 5-19 Connecting to a SCADA System .......................................................................................................... 5-19 Updating Serial Tags to SCADA System with Active OPC Server over a Cellular Network ............................ 5-21 Handling Front-End Events and Alarms ................................................................................................ 5-23 SMS Escalation and Acknowledgement ................................................................................................ 5-24 SMS Commands for Monitoring and Control ......................................................................................... 5-26 Enabling the Power Saving Function and Secure Wake on Call ................................................................ 5-28 Enabling Ethernet and Cellular Redundancy.......................................................................................... 5-29 A. Pin-outs and Cable Wiring ................................................................................................................. A-1 Pinouts .............................................................................................................................................. A-2 CN1: SMA, Cellular Antenna Connector .......................................................................................... A-2 CN2: DB9, Male, RS-232 Connector ............................................................................................... A-2 CN3: RJ-45, Ethernet Connector.................................................................................................... A-2 TB1: Power Input Terminal Block ................................................................................................... A-3 TB2: I/O Terminal Block (W5340) .................................................................................................. A-3 TB3: 5-pin, 4-wire/2-wire RS-422/485 Terminal Block...................................................................... A-3 TB2: I/O Terminal Block (W5312) .................................................................................................. A-4 Cable Wiring ...................................................................................................................................... A-4 Digital Input Dry Contact.............................................................................................................. A-4 Digital Input Wet Contact ............................................................................................................. A-4 Digital Output Sink Mode .............................................................................................................. A-5 Relay Output .............................................................................................................................. A-5 Analog Input ............................................................................................................................... A-5 B. SMS Commands ................................................................................................................................. B-1 SMS Command Syntax: ....................................................................................................................... B-2 SMS Command Table .......................................................................................................................... B-2 C. Modbus/TCP Address Mapping .......................................................................................................... C-1 ioLogik W5340 and ioLogik W5340-HSPA Modbus Mapping.......................................................................C-2 0xxxx Read/Write Coils (support functions 1, 5, 15) ........................................................................ C-2 1xxxx Read only Coils (supports function 2) ................................................................................... C-6 3xxxx Read only Registers (supports function 4) ............................................................................. C-7 4xxxx Read/Write Registers (supports functions 3, 6, 16) ................................................................. C-7 5xxxx Write Registers (supports function 8).................................................................................. C-18 ioLogik W5312 Modbus Mapping ......................................................................................................... C-19 0xxxx Read/Write Coils (supports functions 1, 5, 15) ..................................................................... C-19 1xxxx Read only Coils (supports function 2) ................................................................................. C-24 3xxxx Read only Registers (supports function 4) ........................................................................... C-24 4xxxx Read/Write Registers (supports functions 3, 6, 16) ............................................................... C-26 5xxxx Write Registers (supports function 8).................................................................................. C-38 D. SNMP Agents with MIB II, RS-232-like Groups ................................................................................. D-1 E. Factory Default Settings .................................................................................................................... E-1 F. Troubleshooting the Cellular I/O Connection .................................................................................... F-1 G. FAQ ................................................................................................................................................... G-1 1 1. Introduction Moxa’s ioLogik Cellular Micro RTU Controllers are highly integrated, stand-alone solutions designed for remote monitoring applications, and are especially well suited for cellular communications. Using push technology and Active OPC server solves the problems associated with using dynamic IP addresses in cellular communications. The following topics are covered in this chapter: Architecture Resolving the Dynamic and Private IP Issue with Active OPC Server Resolving the Dynamic and Private IP Issue with DDNS Overview Product Features Appearance Package Checklist Product Selection Guide Product Specifications Common Specifications ioLogik W5312/W5312-T Specifications ioLogik W5340/W5340-T/W5340-HSPA Specifications ioLogik W5300 Cellular Micro RTU Controller Introduction Architecture Cellular networks usually run in a dynamic IP environment with private IP addresses assigned by the cellular service provider. To cope with issues related to using dynamic IP addresses in cellular communications, traditional solutions use high-cost public, static IP addresses for each device, with IPs provided by a DDNS or VPN service purchased from an MVNO (Mobile Virtual Network Operator). Even with DDNS technology, SCADA systems need to assign resources to manage the DDNS servers. As an alternative, Moxa’s Cellular Micro RTU Controllers use Moxa’s proprietary “push” technology, called Active OPC Server. With Moxa’s powerful Active OPC Server support, Cellular Micro RTU Controllers can easily connect to your SCADA system. Moxa’s Active OPC Server with non-polling architecture supports the standard OPC protocol, but also offers active (or “push”) communication between Cellular Micro RTU Controllers and HMI/SCADA systems with instant I/O status. Active OPC Server with Fixed IP Internet GPRS/EDGE/3G/ HSPA Network Host Actively Registering with an Active OPC Server Unlike the static IP requirements of remote devices for Ethernet I/O with a traditional OPC server, Active OPC Server and ioLogik products deliver the flexibility of using dynamic IP addresses. The ioLogik can connect directly to the Active OPC Server instead of being polled, which makes dynamic IP configuration and WAN Access of the cellular I/O possible. As far as traditional data acquisition applications are concerned, I/O devices are not capable of using this approach. In addition, the flexibility of being able to connect through a firewall is a useful feature. Resolving the Dynamic and Private IP Issue with Active OPC Server Since Moxa’s Active OPC Server supports push technology, the Active Cellular Micro Controller family of products creates a software-based gateway that makes communications easier. By using a static IP address with the Active OPC Server, the Cellular I/O device can connect to the Cellular network and Active OPC Server without needing to worry about the IP address issue. The topology is illustrated below: 1-2 ioLogik W5300 Cellular Micro RTU Controller Introduction The ioLogik W5300 is likely to get a different IP address from the carrier each time it is connected to a cellular network. Active OPC Server plays the role of a cellular gateway by managing the ioLogik W5300’s IP. All remote ioLogik W5300 devices automatically initiate communication with Active OPC Server regardless of whether they use a public IP or private IP, and can be managed by one centralized Active OPC Server, which itself has a static IP address. Therefore, all I/O data can be read or written through one, powerful cellular device gateway for IP address management. The ioLogik W5300 allows you to use a variety of methods to connect with your application software, including Modbus protocol, OPC Client/Server protocol, and SNMP protocol, and you can send alarms by TCP/UDP, SMS, and email. For example, if you are using a SCADA application to monitor your system, you can use OPC Client/Server protocol. Active OPC Server and ioLogik W5300 series products offer “Auto Tag Generation” to eliminate the headache of specifying target IP addresses, I/O channels, and data formats one by one or editing and importing configuration text files. Instead, Active OPC Server creates the tags for the target ioLogik automatically. All you need to do is select the channels to be updated to Active OPC Server. Generally speaking, tag generation is 50 times faster on Active OPC Server compared to a traditional OPC server package. In another words, training for installation and configuration of OPC is no longer required. The traditional “polling” architecture occupies more network bandwidth and results in a longer response time. In comparison, the ioLogik Cellular Micro RTU Controllers use “push” technology and can report active messages when predefined events occur. This event-driven logic successfully improves I/O response time, and allows for more precise I/O access and puts less of a burden on network bandwidth. This innovative push-based architecture not only accommodates lower level hardware devices, but also reduces CPU loading and maintenance. Resolving the Dynamic and Private IP Issue with DDNS In addition to using Active OPC Server as middleware to access the ioLogik W5300 via a dynamic or a private IP over the cellular network, you may also use the more traditional DDNS. The ioLogik W5300 Micro RTU Controller series also supports DDNS conversion from a dynamic or private IP to a DNS hostname (also called URL), so that the central software will be able to connect to the remote ioLogik W5300 without applying for a fixed IP or VPN service from a network provider. NOTE The function is dependent on the firmware version. Be sure to use firmware version V1.3 or above for the ioLogik W5312 series, and V1.5 or above for the ioLogik W5340 series. 1-3 ioLogik W5300 Cellular Micro RTU Controller Introduction Overview The ioLogik W5300 combines a cellular modem, a data logger, and an I/O controller in one compact box, dramatically reducing the amount of effort required to integrate devices from multiple vendors. The cellular interface supports tri-band HSPA/UMTS and quad-band GSM/GPRS/EDGE frequencies, offering a full spectrum of 3G mobile communication services. The cellular RTU provides I/O and serial device data logging with one expandable SD card slot that can support up to 32 GB of storage space. Multiple options are available to remotely retrieve data logs, such as FTP, e-mail, and Moxa’s DA-Center™. In addition, this cellular RTU is a programmable controller that supports Click&Go™ or C/C++ logic programming languages to construct customized control systems. The ioLogik W5300 is a rugged, wide temperature RTU well suited for hard-to-wire remote monitoring and alarm applications such as the monitoring of unmanned sites such as riversides and pipelines. with with with with Cellular Communication Front-end Intelligence Front-end Data Logging Serial Tunnel Product Features • Trouble-free connections to cellular networks • Automatic data update from SD cards following network failure • Front-end intelligence for event handling • Intelligent SMS alarms and SMS commands • Friendly serial device connectivity • Network redundancy • WAN-to-LAN extension with port forwarding • Secure wake on call • I/O expansion capability 1-4 ioLogik W5300 Cellular Micro RTU Controller Introduction Appearance NOTE The reset button restarts the server and resets all settings to factory defaults. Use a pointed object such as a straightened paper clip to hold the reset button down for 5 sec. The RDY LED will turn red as you are holding the reset button down. The factory defaults will be loaded once the RDY LED turns green again. You can then release the reset button. LED Indicators Function Description Mark Power Input OFF: No Power PWR Connection Status OFF: Disconnected or in “On Demand” Mode Green: Power On GPRS or LINK Amber: Connected and “Always ON” Blinking: Connected with Active OPC Server System Status Green: System Ready READY Ready LED is blinking and Fault LED is not lit: Click&Go is running Ready LED is blinking and Fault LED is blinking: Safe Mode Communication Activity OFF: No communication (ioLogik W5312, DATA Green: Cellular modular sending/receiving serial TX/RX ioLogik W5340 only) command signal System Fault Status RED: I/O out of work FAULT OFF: Function Normal Blinking: Safe Mode Signal Status OFF: No signal, or No SIM Card 1 Green LED: Weak or insufficient (SMS only) 2 Green LEDs: Average (good for cellular connections) 3 Green LEDs: Excellent Signal 1-5 SIGNAL ioLogik W5300 Cellular Micro RTU Controller Introduction Physical Dimensions (unit = mm) Package Checklist The ioLogik W5300 is shipped with the following items: Standard Accessories • ioLogik W5300 • 3-pin screw terminal block x 1 (for power input) • 12-pin screw terminal blocks x 2 (for I/O) • 5-pin screw terminal block x 1 (for RS-485) • Documentation and software CD • Antenna NOTE: Notify your sales representative if any of the above items are missing or damaged. Product Selection Guide The Cellular Micro RTU Controller product family includes the ioLogik W5340, ioLogik W5340-T, and ioLogik W5312, as described in the following table. Model I/O Combination Operating Temp. AI DI DO W5300 Series DIO Relay Serial Ethernet Ports Ports Data Logger OPC Server Common Specification W5312 -10 to 55°C 0 8 8 4 0 W5340 -10 to 55°C 4 0 0 8 2 W5340-HSPA -10 to 55°C 4 0 0 8 2 1, RS-232/ 1, RJ45 Yes, with an W5312-T -30 to 70°C 0 8 8 4 0 422/485 additional SD W5340-T -30 to 70°C 4 0 0 8 2 W5340-HSPA-T -20 to 70°C 4 0 0 8 2 Note: Click on a model name to see specifications relevant to that particular model. 1-6 card Yes ioLogik W5300 Cellular Micro RTU Controller Introduction Product Specifications Common Specifications Computer CPU: ARM9 based CPU, 32-bit/160 MHz SDRAM/Flash: • ioLogik W5312: 4 MB • ioLogik W5340: 2 MB Storage Expansion Slot: Up to 32 GB SD™ memory card (SD 2.0 compatible) Note: For units operating in extreme temperatures, industrial grade, wide-temperature SD cards are required. Cellular Network: ioLogik W5312/W5340: Quad-band GSM/GPRS/EDGE 850/900/1800/1900 MHz ioLogik W5340-HSPA: Five band UMTS/HSPA+ 800/850/AWS/1900/2100 MHz Internet: HSPA+: • Up to 5.76 Mbps upload speed. • Up to 14.4 Mbps download speed. UMTS: • Up to 384k bps upload/download speed. GPRS/EDGE: • Multi-slot class: Class 12 • Coding schemes: CS1 to CS4 • Terminal device class: Class B SMS: Point-to-Point Text/PDU mode SIM Control Voltage: 3 V / 1.8 V LAN Ethernet: 1 x 10/100 Mbps, RJ45 Protection: 1.5 kV magnetic isolation Protocols: Modbus/TCP, TCP/IP, UDP, DHCP, Bootp, SNMP, SNTP Serial Communication Interface: 1 x RS-232/422/485, software selectable (9-pin D-Sub male, or 5-contact terminal block) Baudrate: 300, 1200, 2400, 4800, 9600, 19200, 38400, 57600, 115200 bps Power Requirements Power Input: 24 VDC nominal, 12 to 36 VDC Physical Characteristics Dimensions: 46.8 x 135 x 105 mm (1.84 x 5.31 x 4.13 in) Weight: 495 g Mounting: DIN-rail (standard), wall (optional) Environmental Limits Operating Temperature: Standard Models: -10 to 55°C (14 to 131°F) Wide Temp. Models: -30 to 70°C (-22 to 158°F) Storage Temperature: -40 to 85°C (-40 to 185°F) Ambient Relative Humidity: 5 to 95% (non-condensing) Altitude: Up to 2000 m Note: Please contact Moxa if you require products guaranteed to function properly at higher altitudes. Standards and Certifications 1-7 ioLogik W5300 Cellular Micro RTU Controller Introduction Safety: UL 508, EN 60950-1, NCC EMI: EN 55022; EN 61000-3-2; EN 61000-3-3; FCC Part 15, Subpart B, Class A EMS: EN 55024, EN 61000-4-2, EN 61000-4-3, EN 61000-4-4, EN 61000-4-5, EN 61000-4-6, EN 61000-4-8, EN 61000-4-11, EN 61000-6-2 Shock: IEC 60068-2-27 Freefall: IEC 60068-2-32 Vibration: IEC 60068-2-6 Green Product: RoHS, CRoHS, WEEE Note: Please check Moxa’s website for the most up-to-date certification status. Warranty Warranty Period: • ioLogik W5312: 5 years • ioLogik W5340/W5340-HSPA: 2 years* *Because of the limited lifetime of power relays, products that use that component are covered by a 2-year warranty. Details: See www.moxa.com/warranty ioLogik W5312/W5312-T Specifications Inputs and Outputs Digital Inputs: 8 channels Digital Outputs: 8 channels Configurable DIOs: 4 channels Isolation: 3K VDC or 2K Vrms Digital Input Sensor Type: Wet Contact (NPN or PNP) and Dry Contact I/O Mode: DI or Event Counter Dry Contact: • On: short to GND • Off: open Wet Contact (DI to GND): • On: 0 to 3 VDC • Off: 10 to 30 VDC Common Type: 6 points per COM Counter Frequency: 900 Hz, power off storage Digital Filtering Time Interval: Software selectable Digital Output Type: Sink I/O Mode: DO or Pulse Output Pulse Output Frequency: 1 kHz Over-voltage Protection: 45 VDC Over-current Protection: 2.6 A (4 channels @ 650 mA) Over-temperature Shutdown: 160°C (min.) Current Rating: 200 mA per channel DIO Output Leakage Current: 3.6 mA @ 24 VDC Power Requirements Power Consumption: • Always on: 156 mA @ 24 VDC • On demand: 138 mA @ 24 VDC MTBF (mean time between failure) 1-8 ioLogik W5300 Cellular Micro RTU Controller Introduction Time: 407,406 hrs Database: Telcordia (Bellcore) ioLogik W5340/W5340-T/W5340-HSPA Specifications Inputs and Outputs Analog Inputs: 4 channels Configurable DIOs: 8 channels Relay Outputs: 2 channels Isolation: 3K VDC or 2K Vrms Analog Input Type: Differential input Resolution: 16 bits I/O Mode: Voltage / Current Input Range: 0 to 10 V, ±10 V, ±5 V, 0 to 20 mA, 4 to 20 mA Accuracy: • ±0.1% FSR @ 25°C • ±0.3% FSR @ -30 and 70°C Sampling Rate: • All channels: 25 samples/sec • Per channel: 6.25 samples/sec • Only one channel enabled: 100 samples/sec Input Impedance: 200K ohms (min.) Built-in Resistor for Current Input: 102 ohms Digital Input Sensor Type: Wet Contact (NPN or PNP) and Dry Contact I/O Mode: DI or Event Counter Dry Contact: • On: short to GND • Off: open Wet Contact (DI to GND): • On: 0 to 3 VDC • Off: 10 to 30 VDC Common Type: 4 points per COM Counter Frequency: 900 Hz, power off storage Digital Filtering Time Interval: Software selectable/Programmable Digital Output Type: Sink I/O Mode: DO or Pulse Output Pulse Output Frequency: 1 kHz Over-voltage Protection: 45 VDC Over-current Protection: 2.6 A (4 channels @ 650 mA) Over-temperature Shutdown: 160°C (min.) Current Rating: 200 mA per channel DIO Output Leakage Current: 3.6 mA @ 24 VDC Relay Output Type: Form A (N.O.) power relay Contact Current Rating: • Resistive Load: 1 A @ 30 VDC, 250 VAC, 110 VAC Initial Insulation Resistance: 1000 m ohms (min.) @ 500 VDC Mechanical endurance: 5,000,000 operations Electrical endurance: 600,000 operations @ 1 A resistive load Contact Resistance: 100 m ohms (max.) Pulse Output: 0.3 Hz at rated load 1-9 ioLogik W5300 Cellular Micro RTU Controller Introduction Power Requirements Power Consumption: ioLogik W5340: • Always on: 195 mA @ 24 VDC • On demand: 178 mA @ 24 VDC ioLogik W5340-HSPA: • Always on: 196 mA @ 24 VDC • On demand: 189 mA @ 24 VDC MTBF (mean time between failure) Time: ioLogik W5340: 196,561 hrs ioLogik W5340-HSPA: 280,739 hrs Database: Telcordia (Bellcore) 1-10 2 2. Getting Started This chapter describes how to install the ioLogik W5300. The following topics are covered in this chapter: Cellular Micro RTU Controller Flowchart Before Testing Installing the ioAdmin Utility Laboratory Testing Grounding the Unit Connecting to ioAdmin via Ethernet Configuring the Computer’s IP Address Activating ioAdmin and connecting to the ioLogik Configuring the DIO Channels Connecting the I/O Devices and Sensors Testing the I/O Device DIN Rail / Wall Mounting Installing/Removing the SIM Card and SD Card Connecting the Cellular Micro RTU Controllers over a Cellular Network Installing Active OPC Server on a Host that has a Public Static IP Address Import/Export Configuration File Using ioAdmin to Import/Export the Configuration ioLogik W5300 Cellular Micro RTU Controller Getting Started Cellular Micro RTU Controller Flowchart ioAdmin Utility Installation Laboratory Test System Planning Other Software Installation See Chapter 3 See Chapter 4, 6, 7 ioLogik Configuration See Chapter 4 Click&Go Programming See Chapter 5 Field Site Deployment Before Testing Prepare the following items before testing the ioLogik W5300. 1. Set up the Active OPC server environment, including network settings. 2. Install ioAdmin on the same PC as Active OPC server. Installing the ioAdmin Utility ioAdmin is a Windows utility provided for the configuration and management of the ioLogik W5300. ioAdmin can be used from anywhere on the network to monitor and configure the ioLogik W5300. Installing from the CD: Insert the Document and Software CD into the host computer. In the Software\ioAdmin directory of the CD, locate and run SETUP.EXE. The installation program will guide you through the installation process and install the ioAdmin utility. After the installation is finished, run ioAdmin from the Windows Start menu. You can also download ioAdmin from Moxa’s website. Click on the link below and select the model name. Under Software: Utilities you will see ioAdmin configuration utility for the ioLogik I/O Server series. Click, download, and install. http://www.moxa.com/support/download.aspx?type=support&id=1149 2-2 ioLogik W5300 Cellular Micro RTU Controller Getting Started Laboratory Testing Grounding the Unit The ioLogik is equipped with one grounding point located on the top of the device next to the Power Input Terminal Block. To provide better stability for both power and signal transmission, we recommend wiring the grounding point to a suitable grounded contact, such as the power supply or a cabinet enclosure. WARNING This equipment is intended to be used in Restricted Access Locations. External metal parts are hot! Before touching it, special attention or protection is necessary. Connecting the Power Connect the 12 to 36 VDC power line to the ioLogik’s Power Input Terminal Block. If power is properly supplied, the PWR LED will glow a steady GREEN color; the READY LED will glow a steady GREEN when the system is ready. ATTENTION Determine the maximum possible current for each power wire and common wire. Observe all electrical codes dictating the maximum current allowable for each wire size. If the current exceeds the maximum rating, the wiring could overheat, causing serious damage to your equipment. For safety reasons, we recommend an average cable size of 22 AWG. However, depending on the current load, you may want to adjust your cable size (the maximum wire size for power connectors is 2 mm). 2-3 ioLogik W5300 Cellular Micro RTU Controller Getting Started Connecting to ioAdmin via Ethernet Configuring the Computer’s IP Address 1. For initial configuration, we recommend using a direct connection through the RJ45 Ethernet console port to a host computer, rather than remotely over the cellular network. Connect the ioLogik to the host PC with an Ethernet cable. 2. Set the host PC’s IP address to 192.168.127.xxx. (where xxx can range from 001 to 253). In Windows, you can adjust this setting through the Control PanelNetwork and Internet. The default ioLogik device settings are: Default IP Address Default Netmask Default Gateway 192.168.127.254 255.255.255.0 None Example IP: 192.168.127.200 Activating ioAdmin and connecting to the ioLogik 1. Open ioAdmin: Click Start Program Files MOXA IO Server Utility ioAdmin. 2. Search the network for the ioLogik: When ioAdmin is started, it will automatically run the auto search program. You may also click System Auto Scan ioLogik device on the menu bar. A dialog window will appear. Click Start Search to begin searching for your unit. Once the ioLogik has been detected, modify the settings as needed for your network environment, and then restart the device. NOTE The best approach to setting up a previously configured ioLogik is to first reset it to the factory default using the reset button (see Chapter 1 for details). You can then use ioAdmin to configure the ioLogik. 2-4 ioLogik W5300 Cellular Micro RTU Controller Getting Started 3. If the host computer has multiple interfaces, be sure to select the correct one before searching. NOTE If multiple ioLogik W5300 units with same default IP address are installed on the same network, you will need to assign a different IP address to each unit to avoid IP conflicts. ioAdmin automatically detects IP conflicts and gives you a chance to modify each unit’s IP address in the IP Address column. Click the Set button to reboot the corresponding unit with its new IP address. Click the Re-Search button to refresh the list of units found by ioAdmin. 4. Login as administrator: For full access to all configuration options, log in as administrator from the Server Settings panel. This is required whenever you start ioAdmin, or boot up or restart the ioLogik. When you install the ioLogik for the first time, the password will be blank and you can simply click Login. If a password has already been set, hold down the reset button to clear the password and load factory defaults. 2-5 ioLogik W5300 Cellular Micro RTU Controller Getting Started 5. Monitoring and Testing I/O status: Once your unit has been found by ioAdmin, you can view the status of all attached I/O on ioAdmin’s main screen. NOTE ioAdmin supports four viewing options for the navigation panel. If you select “sort by Active OPC server,” the ioLogik W5300 will appear in the Active OPC server group. Simultaneously, the same devices will be shown under the <LAN> group if you connect to the W5300 with Ethernet cables instead of over the cellular network. You can test each DO channel by opening the channel’s configuration window and selecting the Test tab. After clicking the Test tab, you can see how a channel’s status affects or is affected by the attached device. For DO channels, you can set the on/off status or start and stop pulse output. For DI channels, you can monitor the attached device’s on/off status, or monitor the counter. You can now use ioAdmin to set up or configure your unit. Refer to Chapter 3 for additional information on using ioAdmin. 2-6 ioLogik W5300 Cellular Micro RTU Controller Getting Started Configuring the DIO Channels The ioLogik W5300 product family is equipped with different I/O types, including analog inputs, digital inputs, digital outputs, relay outputs, and software configurable DIOs, offering great flexibility for connecting I/O devices such as software configurable DIO channels. Before you connect I/O devices and sensors, you should configure the DIO channels as DI or DO. The W5340 for example comes with 4 DI channels and 4 DO channels. However, the user has the option of redefining the function of these channels. Each DIO channel is configured to act as either a DI or DO channel, according to the Power On Settings. To switch between DI and DO channel operation, select the desired mode in the I/O Direction field under Power on Settings. After clicking Apply, you will need to restart the ioLogik W5300 for the new setting to take effect. Connecting the I/O Devices and Sensors Unlike traditional Ethernet controller products, the ioLogik W5300 can connect to analog sensors, dry contact, PNP, and NPN sensors at the same time. The sensor type determines your wiring approach, as shown in the following examples (this example shows the pin numbers for an ioLogik W5340 unit): Analog Input Digital Input Dry Contact: 2-7 ioLogik W5300 Cellular Micro RTU Controller Getting Started Digital Input Wet Contact (Connect to NPN-type Sensor) Digital Input Wet Contact (Connect to PNP-type Sensor) Digital Output (Sink Type) Relay Output 2-8 ioLogik W5300 Cellular Micro RTU Controller Getting Started ATTENTION When connecting the I/O device to the ioLogik’s dry contacts, we strongly recommended connecting DI.Com to the power of the external sensor to avoid affecting other channels. DI.Com input power should be limited at 12 to 36 VDC. ATTENTION Sensor types are arranged in groups, with DIO-0 to DIO-3 forming one group and DIO-4 to DIO-7 forming another group. If an NPN sensor is connected to DI-0, then only NPN sensors can be connected to the other DI channels in that group (i.e., DIO-1, DIO-2, and DIO-3). Likewise, if a PNP sensor is connected to DIO-4, then only PNP sensors can be connected to the other DI channels in that group (i.e., DIO-5, DIO-6, and DIO-7). Testing the I/O Device Power on the ioLogik W5300, try changing the I/O status, and then use ioAdmin to determine if the status has changed under the I/O Configuration bar. (Refer to the figure below) 2-9 ioLogik W5300 Cellular Micro RTU Controller Getting Started DIN Rail / Wall Mounting The ioLogik W5300’s built-in mounting appendages are suitable for mounting on a flat wall or installing on a DIN rail. Follow the instructions in the figures below to install the W5300 on a DIN rail. STEP 1: Insert the top of the DIN rail into the slot. STEP 2: The DIN rail attachment unit will snap into place as shown below. To remove the ioLogik W5300 from the DIN rail, insert a flat-blade screw driver horizontally into the DIN rail kit under the ioLogik, and then pry it upwards to release the ioLogik W5300 towards and you away from the DIN rail. 2-10 ioLogik W5300 Cellular Micro RTU Controller Getting Started Installing/Removing the SIM Card and SD Card The ioLogik is equipped with two slots; one is for SIM cards and the other is for SD cards. The card reader slots are protected inside the ioLogik device. You will need to unscrew and remove the card cover to install your SIM and SD cards. When inserting a SIM card or SD card, remember to keep the front edge of the card facing down. Follow these steps to remove or install a SIM or SD card: 1. Remove the screw holding the card cover in place. ATTENTION We strongly recommend using the following SD cards, which have been tested in our laboratory: • Kingston SDHC 4/16/32 GB • Transcend SDHC 4/8/32 GB • Innodisk SD6 2/4/8 GB (These Innodisk SD cards are classified as wide-temperature products.) The function is dependent on the firmware version. Be sure to use firmware version V1.3 or above for the ioLogik W5312 series, and V1.5 or above for the ioLogik W5340 series. 2. (a) Insert the SIM/SD card into the SIM/SD card slot, or (b) Remove the SIM/SD card from the SIM/SD card slot 2 3. Open the card cover and insert the SIM/SD card. The card reader will release the SIM/SD card, after which you can pull the card out. The SIGNAL LEDs on the front panel provide a convenient way of checking if the SIM card is installed properly. If the antenna is installed and the network is operating normally, then at least one of the three SIGNAL LEDs should be illuminated at all times. If none of the LEDs are illuminated, then the SIM card may not be installed properly. This is because the PIN code is stored on the SIM card; if the PIN code cannot be accessed, then the modem will not be accessible over the network. If the LED is not illuminated, check the Error message shown on the ioAdmin “cellular settings” panel. 2-11 ioLogik W5300 Cellular Micro RTU Controller Getting Started Connecting the Cellular Micro RTU Controllers over a Cellular Network When the environment is ready, follow these steps to test the ioLogik W5300 (refer to the figure below). Step 1: Connect directly from the PC to the W5300 and use ioAdmin to configure the W5300’s cellular settings. Step 2: For the ioLogik W5300, enter the user name, password, SIM Pin, APN, and define the Active OPC server IP on the cellular settings page. Make sure the Operation Mode is correctly selected. Step 3: Remove the cable connecting the PC and Controller, re-open ioAdmin, and then add Active OPC server manually. The checkmarked PC will receive Internet access first. 2-12 ioLogik W5300 Cellular Micro RTU Controller Getting Started Detailed instructions: 1. Power off the ioLogik W5300. 2. Insert a SIM card that can connect to the cellular network. 3. Connect to ioAdmin via the Ethernet port of the ioLogik. 4. Power on the ioLogik and start ioAdmin. 5. After connecting ioAdmin and the ioLogik W5300, log in with the administrator password. 6. To set up your cellular connection, click the Cellular Settings tab and enter your User name, Password, SIM pin code, and APN of your Cellular Provider (contact your local Cellular Service Provider for assistance) than click Update. When you click Update, the system will prompt you to restart to activate the new settings. 7. The Operation Mode must also be correctly selected for your application. (Default Operation Mode: Cellular Always On) 8. After rebooting, the W5300 will try to connect to the Cellular network, with the connection status shown in the Cellular Status column. If the connection is established, the IP address will appear in this column. If the connection is not successful, you will receive an Error message. Additional details can be found in Appendix F. 9. For testing, Once you have obtained the public IP address for the ioLogik W5300, try to PING from the DOS shell (e.g., type C\:>ping 61.56.74.10). If the W5300 is using a private IP, you can skip this step. NOTE Be sure to configure the LAN settings first to make sure the LAN IP Address is on the same subnet as the PC running ioAdmin. Follow the instructions to restart the ioLogik and then proceed with the settings on the Cellular Settings page. NOTE Be sure to select the Cellular Setting Operation Mode Cellular Always ON when performing the connection test. 2-13 ioLogik W5300 Cellular Micro RTU Controller Getting Started Installing Active OPC Server on a Host that has a Public Static IP Address Moxa’s Active OPC Server™ is a software package operating as an OPC driver of an HMI or SCADA system. It seamlessly connects Moxa’s ioLogik products to a wide variety of SCADA systems, including the most popular: Wonderware, Citect, and iFix. Active OPC Server™ conforms to the OPC Foundation’s latest data access standard, DA 3.0, to connect with other standards-compliant devices and host OPC machines. Active OPC server uses an IP address that is both public and static. 1. To install Active OPC Server, insert the Document and Software CD into the host computer. In the Software\AOPC directory of the CD, locate and run INSTALL.EXE. The installation program will guide you through the installation process and install the Active OPC Server utility. The OPC Core Components will be installed as well. Active OPC Server can be downloaded from the Moxa Website, and may be found from the support page, www.moxa.com/support/. After downloading the AOPC software, unzip it and run Install.exe. The installation program will guide you through the installation process and install the Active OPC Server Utility. For more details on AOPC installation and use, refer to Chapter 6 or the Active OPC User’s Manual. 2. Start the ioAdmin utility and set up the Active OPC Server IP address on the Active Tags panel. ioAdmin will prompt you to reboot the ioLogik W5300 after clicking the Update button. Click yes to restart the ioLogik. 3. Start Active OPC Server; a new ioLogik W5300 will be created. 4. In ioAdmin’s search menu, manually add the IP address for Active OPC Server. The ioLogik W5300 will appear under Active OPC Server. The ioAdmin search menu is set by default to sort by Active OPC. 5. You can now test and monitor the I/O status in ioAdmin. NOTE In this scenario, Active OPC Server is acting as middleware between the configuration utility (or central software) and the remote ioLogik W5300 Micro RTU Controllers over the cellular network. To minimize bandwidth usage, click the Refresh button manually to retrieve the settings. 2-14 ioLogik W5300 Cellular Micro RTU Controller Getting Started Import/Export Configuration File Using ioAdmin to Import/Export the Configuration To import or export a system configuration right click on the I/O model name and then selection Import System Config or Export System Config. You must be logged in as an administrator to use this command. Export System Config Select this command to export the selected ioLogik’s configuration to a text file. We recommend using this method to back up your configuration after you have finished configuring the ioLogik for your application. ATTENTION Since there are major functional differences between firmware versions, exporting the configuration file requires a longer processing time. Adjust the TCP Socket Timeout Interval to 30 seconds when using ioAdmin 3.10 or above, especially if earlier versions of ioAdmin have been installed and then removed. Import System Config Select this command to load a configuration for the selected ioLogik from a configuration text file. The new configuration will not take effect until the ioLogik has been restarted. This command can be used to restore a configuration after loading the factory defaults, or to duplicate a configuration to multiple ioLogik units. ATTENTION Since there are major function differences between firmware versions, the configuration file is not compatible if using firmware V1.3 or above for the ioLogik W5312 series, and V1.5 or above for the ioLogik W5340 series. The configuration file cannot be imported into firmware versions earlier than the above versions. Be sure to check your firmware version carefully before importing/exporting and upgrading firmware. 2-15 3 3. Utility: ioAdmin In this chapter, we explain how to use ioAdmin to configure your ioLogik product. The following topics are covered in this chapter: ioAdmin System Requirements Features of ioAdmin ioAdmin Basic Functions ioAdmin Administrator Functions Server Settings Panel LAN Settings Panel I/O Configuration Panel I/O Expansion Panel Active Tags Panel Cellular Settings Panel VPN Settings Panel (ioLogik W5340-HSPA(-T) only) VPN System Log Events and Error Codes Cellular Reconnection Meter/Sensor Network Statistics Watchdog Panel Click&Go Logic Panel ioLogik W5300 Cellular Micro RTU Controller Utility: ioAdmin ioAdmin System Requirements ioLogik Cellular Micro RTU Controllers can be managed and configured over the Ethernet or Cellular network with ioAdmin, a Windows utility provided with your ioLogik. ioAdmin’s graphical user interface gives you easy access to all status information and settings. ioAdmin can also be used to configure Click&Go rules to provide front-end event handling capabilities. Hardware Requirements CPU Intel Pentium (Pentium 4 and above) RAM 512 MB (1024 MB recommended) Network Interface 10/100Mb Ethernet Software Requirements NOTE Operating System Microsoft Windows 2000, XP or later Editor(Not necessary) Microsoft Office 2003 (Access 2003) or later In this chapter, all of the descriptions are based on ioAdmin 3.10. The function, however, is dependent on the firmware version. Use firmware version V1.3 or above for the ioLogik W5312 series, and V1.5 or above for the ioLogik W5340 series. Features of ioAdmin Remote Management Over the Ethernet or Cellular network, ioAdmin allows users to: • Search and configure multiple ioLogiks. • Perform I/O status monitoring and control • Use active message monitoring • Use Click&Go local logic control configuration • Use the firmware upgrade interface • Restart the ioLogik • Reset to factory defaults On-line Wiring Guide A wiring guide can be opened from within ioAdmin. Configuration File ioAdmin allows the entire configuration of the ioLogik W5300 series to be saved as a file. The file is viewable in text format and serves three purposes: • As a record or backup of your configuration. • As a template for configuring other ioLogik W5300 units. • As a quick reference guide for you to configure Modbus drivers in a SCADA system. The file includes the following information: • File title, Date, and Time • Model Information • System Configuration • Modbus Address Device Management List ioAdmin can import and export a list of ioLogik devices that are being managed. This file can make it easier to manage all devices on the network, and includes the following information: • Device name • Module • IP address • Unit ID 3-2 ioLogik W5300 Cellular Micro RTU Controller Utility: ioAdmin ioAdmin Basic Functions Main Screen Overview This is ioAdmin’s main screen. The main window defaults to the I/O Configuration panel, which displays a figure of your unit with the status of every I/O channel. The other tabs in the main window take you to device and network settings, and further functions are available when you log onto the ioLogik. Note that configuration options are not available until you log in as administrator. 1. Title 2. Menu bar 3. Quick link 5. Main window 6. Sync. rate status 7. Status bar 4. Navigation panel Title The Title shows you which program is opened. In this case, it indicates that Moxa ioAdmin is running. Menu Bar The Menu bar has four items: 1. File 2. System 3. Sort 4. Help Menu Bar: File From the File menu, you can export a list of ioLogiks that are currently displayed in the navigation panel. You also can import a list into ioAdmin. 3-3 ioLogik W5300 Cellular Micro RTU Controller Utility: ioAdmin When importing/exporting a device list, you will be prompted to select which ioLogik on the list needs to be imported or exported. When a popup window appears, click the “folder” icon to select/key-in the file name to save/import a specific file. The file will have an .SLT extension and can be opened as a text file. The server list will provide the basic information for each server, such as Device Name, Model, IP address, and Unit ID. Menu Bar: System Several operations can be accessed from the System menu. The Auto Scan ioLogik Devices function searches for ioLogiks on the network. When connecting for the first time, or when recovering from a network disconnection, you can use this command to find any ioLogik that is connected to the physical network. The auto scan function allows you to search for ioLogik devices automatically. You can search for these devices by Type, Range, or Model. By Type: Search for an ioLogik device by Ethernet micro controller or Remote I/O type. By Range: You can define a range for searching by defining a starting IP address and an ending IP address, or by using the netmask. By Model: Search for selected models The device that was found will be shown at the bottom of the window. 3-4 ioLogik W5300 Cellular Micro RTU Controller Utility: ioAdmin Click Start Search to start searching. Network Interface allows you to select a network to use (if the PC has multiple network adaptors installed). The default network interface will be the same as the Windows’ setting. Make sure the interface is correct when connecting to the ioLogik device; otherwise, no devices will be found. I/O Status Refresh Rate is used to adjust how often the ioLogik is polled for device status by the ioAdmin utility. The current rate is displayed on the status bar at the bottom of the window. Note: Higher sync rates result in higher loads on the network. TCP Socket Timeout Interval allows you to select the preferred timeout value for TCP socket communication. When the ioLogik’s RTU connection to the server exceeds a specified time period the device will automatically release its modbus/TCP connection to the server to free up the port for the next connection. (Default: 30 seconds) 3-5 ioLogik W5300 Cellular Micro RTU Controller Utility: ioAdmin COM Port Setting is used to set the default parameters for the ioAdmin utility to establish a Modbus connection, such as baudrate, data bits, and timeout interval. For most applications, this will involve connecting to ioLogik R-series devices. Active Message Listen Port specifies the port number to use for Active Messages. If your network uses a firewall, you can coordinate this setting with your firewall settings to ensure that active messages get through. Reset NA4010 Network Adaptor IP is used to re-assign an IP address to the NA-4010 network as reported by the ioLogik W5300 series adapter. 3-6 ioLogik W5300 Cellular Micro RTU Controller Utility: ioAdmin Menu Bar: Sort The Sort menu allows the Devices list in the navigation panel to be sorted by connection, model, location, or Active OPC. Quick Links Quick links are a collection of commonly used functions, including the search and the sort function. Search the network for ioLogik devices “Auto Scan ioLogik devices” allows users to search and locate an ioLogik on the same physical network, or specify a remote IP address to connect to a remote ioLogik. Sorting method: ICON Function Name Navigation Panel View Sort by ioLogik Device Connection Sort by ioLogik Device Type Sort by ioLogik Device Location Sort by Active OPC NOTE The default location is “Empty.” If you do not set the location in the ioLogik W5300, the navigation panel will group all “Empty” locations together. The navigation panel shows an overview of the ioLogik device in the network as defined by the sorting method. The default sorting view is “By Connection”. You can choose a different sorting method by clicking the quick link buttons. This panel also includes many functions, such as connect and disconnect. More advanced functions require the administrator’s password. A function menu is accessed by right clicking on the server model name in the navigation panel. The menu lists both basic functions and advanced functions: 3-7 ioLogik W5300 Cellular Micro RTU Controller Utility: ioAdmin Menu Bar: Help ioAdmin provides a wiring guide for the ioLogik W5300 series. You can access the wiring guide by right-clicking the ioLogik figure in the I/O Configuration panel, or select “Wiring Guide” in the submenu to open a help file showing the unit’s wiring information and electrical characteristics. You can also access the On-line Wiring Guide through the Help menu on the menu bar. 3-8 ioLogik W5300 Cellular Micro RTU Controller Utility: ioAdmin Navigation Panel A function menu is accessed by right clicking on the server model name in the navigation panel. The menu lists both basic functions and advanced functions: Basic Functions: Add, Connect, and Disconnect Add ioLogik ioLogik device: Select ioLogik tag and right click the tag. Select the “Add ioLogik device” command to add an ioLogik device or Active OPC server manually. Connect: Select the “Connect” command to try connecting over the network to the selected ioLogik. Disconnect: Select the “Disconnect” command to drop the network connection with the selected ioLogik. Advanced Functions: Delete, Restart, Reset, Import/Export Config File You must be logged in as administrator to use these commands. Delete ioLogik device: Select this command to remove the selected ioLogik. Note: The target must be disconnected first to use this command. Restart System: Select this command to restart the selected ioLogik. Reset to Default: Select this command to reset all settings on the selected ioLogik, including console password, to factory default values. Export System Config: Select this command to export the selected ioLogik’s configuration to a text file. We strongly recommend that you use this method to back up your configuration after you have finished configuring the ioLogik for your application. Import System Config: Select this command to load a configuration for the selected ioLogik from a configuration text file. The new configuration will not take effect until the ioLogik has been restarted. This command can be used to restore a configuration after loading the factory defaults, or to duplicate a configuration to multiple ioLogik units. 3-9 ioLogik W5300 Cellular Micro RTU Controller Utility: ioAdmin Main Window The Main Window allows users to view the I/O status, ioLogik system information, and check the Message Monitor, without needing to log in to the ioLogik. However, you will need to log in to perform configuration and operation tasks. I/O Configuration Panel (General) The I/O Configuration panel shows the status of every I/O channel. This is the default panel when you first open ioAdmin. Input channels are listed on the left and output channels are listed on the right. This information is easy to find in ioAdmin. Server Info Panel Server information, such as Product name, LAN IP address, and firmware version, is displayed on the Server Info panel. This panel allows you to look up the Cellular IP address whenever you need it. Server Settings Panel (General) Click the Server Settings tab to log in as an ioAdmin administrator, which is required to gain access to the ioLogik configuration options. If a password has not been set up, simply click Login and leave the Password entry field blank. 3-10 ioLogik W5300 Cellular Micro RTU Controller Utility: ioAdmin Message Monitor Panel (General) The Message Monitor panel will display any TCP/UDP Active Messages reported by the ioLogik W5300. When you install the unit for the first time, the ruleset will not have been defined yet, so there will be no messages on the Message Monitor Panel. When a ruleset has been defined and activated, any TCP/UDP messages that have been triggered by sensor events will be shown on the Message Monitor panel. Messages can be displayed in ASCII, HEX, or UCS2. To display messages in HEX, make sure the “HEX” button at the bottom of the window is checked. UCS2 stands for “Unicode System,” which supports multiple languages. Sync. rate status The current sync rate is displayed on the bar at the bottom of the window. The number shows how often the ioLogik is polled for device status from the ioAdmin utility. The rate can be adjusted by clicking Menu Bar System I/O Status Refresh Rate Note: The higher sync rates result in higher loads on the network. Status bar The status bar shows ioAdmin status information, such as program ready, searching ioLogik I/O, time, etc. 3-11 ioLogik W5300 Cellular Micro RTU Controller Utility: ioAdmin ioAdmin Administrator Functions For full access to all configuration options, log in as administrator from the Server Settings panel. This is required whenever you start up ioAdmin or boot up or restart the ioLogik. When you install the ioLogik for the first time, the password will be blank; in this case, just click Login. Additional functions are available after logging in, including the following tabs: When making configuration changes, you will need to click Update or Apply to save the changes. Some changes will require that the unit be restarted in order to take effect. ATTENTION You MUST log in to access administrator functions, including Network, Communication Watchdog Timer, and Firmware Update panels. If you forget the password, hold down the reset button to clear the password and load factory defaults. This will result in the loss of all configuration settings and your Click&Go logic rules that have already been configured. Server Settings Panel Under Server Settings you can configure your Management Settings, such as, password, server name, and server location. ioAdmin supports long server names and a location description of up to 58 chars. You can also configure Time Settings under the Server Setting, such as, Local date and time, Time Zone, and time server. For example, you can use “tock.stdtime.gov.tw” time server for Taiwan. 3-12 ioLogik W5300 Cellular Micro RTU Controller NOTE Utility: ioAdmin The server also relates to the node created in the Active OPC Server. LAN Settings Panel The LAN Settings panel is available after you log in as administrator. You will be able to configure IP settings, Modbus/TCP Alive Check Timeout settings, DNS settings, and SNMP settings. IP Settings You can set up a static or dynamic IP address for the ioLogik, as well as the subnet mask and gateway address. Click Accessible IP if you wish to allow only certain IP addresses to have network access to the ioLogik and attached sensors. Access will be granted only to the IP addresses that you list in the Accessible IP screen. Any requests from sources that are not on the accessible IP list will be unable to use Modbus/TCP or ioAdmin to access the ioLogik. Modbus/TCP Alive Check Timeout Settings The Modbus/TCP Alive Check Timeout is designed to avoid TCP connection failure. If the network host is unable to respond due to hardware failure or a network problem, the ioLogik will continue to wait for a response from the host. This will cause the TCP port to be occupied indefinitely by the host. On the other hand if Modbus/TCP idle connection timeout interval is enabled, when the ioLogik’s connection to the server exceeds a specified time period the device will automatically release its modbus/TCP connection to the server to free up the port for the next connection. 3-13 ioLogik W5300 Cellular Micro RTU Controller Utility: ioAdmin DNS Settings Use this field to specify the IP addresses of one or two DNS servers. DNS servers can be used to find available e-mail addresses when setting up Click&Go rules. (By default the DNS setting is set to automatic. If you want to configure a specific setting, contact your local cellular provider for details.) SNMP Settings The ioLogik W5300 provides SNMP v2 (Simple Network Management Protocol) to monitor network and I/O devices with SNMP Network Management software. It is useful for building automation and telecom applications. Use these fields to enable SNMP and set the read and write community strings. I/O Configuration Panel When logged in as administrator, double click on a channel on the I/O Configuration panel to configure that channel’s settings. A window will open with configuration options for that channel. After the channel has been configured, click Apply to implement the new settings. NOTE Right click the window to change the view to show or not show the product picture. “Horizontal View” includes the product picture, whereas “Vertical View” does not show the product picture. Configuring AI Channels The ioLogik W5340 and W5340-HSPA are both equipped with 4 AI (analog input) channels that can be set individually to ±5 V, ±10 V, 0 to 10 V, 0 to 20 mA, and 4 to 20 mA. You may also set all channels at once using the “Apply to all channels” check box. Alias Name helps users configure the alias of an AI channel. The alias can be monitored by the ioAdmin utility, or can be queried using a user-defined program based on the Moxa MXIO library, or a standard Modbus/TCP protocol. 3-14 ioLogik W5300 Cellular Micro RTU Controller Utility: ioAdmin Users can disable the unused AI channel by un-checking the Enable checkbox to increase the sampling rate. Enabling the Auto Scaling function will linearly convert the actual current or voltage value into other user defined units, such as percentage or ppm (parts per million) Two scaling methods are available; the slope formula method, and the slope-intercept method: Auto Scaling with the point-slope formula can help to eliminate high end and low end extremes. For example, if 17 mA represents the highest allowable temperature, then it is not necessary to allow higher temperature values, and you can cut off values beyond 17 mA and convert it to a proprietary danger level, such as Level 5. Auto Scaling by slope-intercept formula provides linear conversion with one ratio (M) and offset (D). Offset can be an initial value of field device. Ratio can help enlarge or reduce the scale by specifying a proportion. It is also easy to modify the values in the database if we need to use new ratio and offset values in the future. 3-15 ioLogik W5300 Cellular Micro RTU Controller Utility: ioAdmin The Reset Min and Reset Max buttons will clear the minimum or maximum values recorded and displayed in the ioAdmin main window. Configuring Virtual Channels The ioLogik W5300 has 10 internal virtual channels to support front-end statistics functions, such as Max, Min, Average, Accumulation, Instantaneous, and Incremental. The data source is the real I/O channel, such as AI and DI counters, some of which need to be converted to the appropriate time unit. The operation is illustrated below. 3-16 ioLogik W5300 Cellular Micro RTU Controller Display in ioAdmin Utility: ioAdmin Update to AOPC Use Virtual Channel to get the value, such as Max, Min, Average, Accumulation, Instantaneous, and Incremental Convert to New Unit by Scaling functions. (This step can be skipped.) AI Data Counter Value After double-clicking on a virtual channel a popup window will appear (see below). First select the physical source I/O. There are three types: AI, Counter, and I/Os from expansion modules. Next, choose the statistics function and time interval. There are six functions: Max, Min, Average, Accumulation, Instantaneous, and Incremental. The time unit can be set to minutes or hours, with a maximum value of 1440. For example, if you want to know the daily flow at a monitoring point in the pipeline, you can use the pulse output flow meter, for which 1 pulse output stands for 5 ml. We can set 1 count to 5 ml in the Scaling Function of the Counter Input channel. Next, we set the ACCUMULATION function in Virtual Channel and Time Interval to 24 hours. The virtual channel value will show the total water flow volume within the past 24 hours. NOTE Virtual channels are required to work with AI or counter channels. For Counter channels, configure the Counter Scaling function on the I/O Configuration panel before using those operations in the virtual channels. 3-17 ioLogik W5300 Cellular Micro RTU Controller Utility: ioAdmin Configuring DIO Channels Channels DIO-0 to DIO-7 support both DI and DO channel operations. When the ioLogik W5300 is turned on, each DIO channel will be configured to act as either a DI or DO channel, according to the Power On Settings. To switch between DI and DO channel operation, select the desired mode in the I/O Direction field under Power On Settings. After clicking Apply, you will need to restart the ioLogik W53400 for the new setting to take effect. The default setting is DIO-0 to DIO-3 for DI channels; DIO-4 to DIO-7 for DO channels. Configuring Digital Input Channels The ioLogik W5300 can provide up to 12 digital input (DI) channels. Under 1. Mode Settings Filter, software filtering is used to control switch bounces. The filter is configurable in multiples of 0.5 ms and accepts values between 1 and 65535. For example, a setting of 100 would mean a 50 ms filter (100 × 0.5 ms). A DI channel can be set to “DI” or “Event Counter” mode. In DI mode, the specifications are as follows: 3-18 ioLogik W5300 Cellular Micro RTU Controller Utility: ioAdmin Type On Off Dry contact Short to GND Open Wet contact 0 to 3 VDC 10 to 30 VDC In Event Counter mode, the channel accepts limit or proximity switches and counts events according to the ON/OFF status. When Lo to Hi is selected, the counter value increases when the attached switch is pushed. When Hi to Lo is selected, the counter value increases when the switch is released. When Both is selected, the counter value increases when attached the switch is pushed or released. Counter Scaling After configuring the DI channels to Event Counter mode, an additional “Counter Scaling” tab will show the most recent change during the basic time unit used for the virtual channels. For example, if “Update every 5 sec” is configured in Counter Scaling, then the “Time Interval = 1 min” setting in the virtual channel with the operation “Accumulation” means this virtual channel will add the last 12 updates every minute from the Counter Scaling function. 3-19 ioLogik W5300 Cellular Micro RTU Controller Utility: ioAdmin By default, the Event Counter value will be reset to zero if power is disconnected. If you select Save status on power failure, the Event Counter value will be saved when power is disconnected. When power is reconnected, the value will be as you left it. You can set Power On Settings to resume counting immediately. The Event Counter starts counting events when specified by a Modbus command or a Click&Go Logic rule. You can also specify counting to begin automatically when the ioLogik is powered on. To activate this function, select Start under Counter mode parameter in the Power On Settings. You can control how an Event Counter channel behaves during a network disconnection with the Safe Status Settings and the Host Connection Watchdog in the Watchdog. When the Host Connection Watchdog is enabled, a network disconnection will activate the Safe Status Settings. The Event Counter channel can be configured to continue counting by selecting Start/Continue under Counter mode parameter. If Start/Continue is not selected, the Event Counter channel will suspend counting. If the Host Connection Watchdog is not enabled, then the Safe Status Settings will be ignored and the Event Counter channel will continue counting during a network disconnection. ATTENTION The Host Connection Watchdog is disabled by default and must be enabled for Safe Status Settings to take effect. The Apply to all channels option applies all settings to DI channels. Configuring Digital Output / Relay Output Channels The ioLogik W5340 and W5340 HSPA can also be configured to provide up to 8 digital output channels and 2 relay output channels. The ioLogik W5312 provides up to 12 digital output channels. All of the channels can be treated as DO channels. A DO channel can be set to “DO” or “Pulse Output” mode. 3-20 ioLogik W5300 Cellular Micro RTU Controller Utility: ioAdmin In DO mode, the specifications are as follows. Type OFF ON DO mode Open Short In Pulse Output mode, the selected digital output channel will generate a square wave as specified in the pulse mode parameters. The low and high level widths are specified in multiples of 0.5 ms for Digital Output (1.5 s for Relay output), with a maximum setting of 65,535. For digital output, you would enter 1000 for a width of 500 ms. If the OFF width value is 5000 and the ON width value is 5000, the pulse output would be a square wave with a 5-second pulse cycle. You can specify between 1 and 4,294,967,295 pulses or enter “0” for continuous pulse output. When the ioLogik is first powered on, the status of each DO channel is set to “OFF” by default. This behavior can be modified using the Power On Settings. You can set a DO channel to turn “ON” when the ioLogik is powered on, or to commence pulse output. Relay Count Monitoring Two types of relay counts can be recorded in the ioLogik W5340: Total Counts and Current Counts. Relay Total Counts records how many times a Relay Output channel has been used. In general, each relay output channel can be used an average of 100,000 times. Users can monitor these counts to see when the module should be replaced, or to switch to a different channel if the total count approaches the upper limit. Relay Current Counts can be reset to zero to record the usage of the external device by monitoring the counts. For example, if RLY-0 is connected to an external relay control board, you can monitor the current counts to see when to replace the external relay component in advance before it fails. Last Reset Time records the time when Current Counts was reset. Both Relay Total Counts and Relay Current Counts will be saved when there is a power failure. The Last Reset Time will be saved only when the user manually presses the Reset to Zero button. 3-21 ioLogik W5300 Cellular Micro RTU Controller Utility: ioAdmin You can control how a DO/Relay output channel acts when the network is disconnected by using the Safe Status Settings and the Host Connection Watchdog. When the Host Connection Watchdog is enabled, a network disconnection will activate the Safe Status Settings. The DO channel can be configured to turn on, turn off, or commence pulse output. If the Host Connection Watchdog is not enabled, then the DO/Relay Output channel status will remain unchanged during a network disconnection. ATTENTION The Host Connection Watchdog is disabled by default and must be enabled for Safe Status Settings to take effect. Testing DI and DO Channels You can test each channel by opening the channel’s configuration window and selecting the Test tab. DI TEST: 3-22 ioLogik W5300 Cellular Micro RTU Controller Utility: ioAdmin DO TEST: Use the Test panel to see how a channel’s status affects or is affected by the attached device. For DO/Relay Output channels, you can set the on/off status or start and stop pulse output. For DI channels, you can monitor the attached device’s on/off status, or monitor the counter. Alias Name Alias Name helps users configure the alias of a DI or DO/Relay Output channel and define the status for On/Off to be Open/Close or vice versa. The Alias can be monitored by the ioAdmin utility, or can be queried using a user-defined program based on the Moxa MXIO library, or a standard TCP/Modbus protocol. 3-23 ioLogik W5300 Cellular Micro RTU Controller Utility: ioAdmin I/O Expansion Panel The ioLogik W5300 allows you to install Three additional ioLogik E1200 I/O expansion modules. The expansion modules can be used for Click&Go, Active Tags, and Data Logging. To use this function, you need to setup the ioLogik E1200 expansion modules using the ioLogik E1200 utility, such as WEB or ioSearch (ioAdmin cannot be used to configure the E1200 or fixed modules). The micro controller allows you to use the E1200’s two Ethernet ports to connect to expansion modules with an Ethernet cable. When you export the expansion module’s configuration files, the files are saved on your desktop. To do this, start ioAdmin and click the “I/O Expansions” tab. Import the saved E1200 configuration file by pressing the “Add” button. The maximum number of expansion modules allowed is three. The expansion module’s Modbus Address can be seen on this panel and exported to a file by clicking the “Export” button. ATTENTION The expansion module should be installed on the same network segment or the ioLogik W5300 will not be able to detect it. This is the only limitation. You do not need to connect them directly, and they can also be connected through the network switch. • The sequence is indicated in the Slot# column. • To activate the function, restart the ioLogik W5300 after adding expansion modules. • The following ioLogik E1200 models are supported for the I/O expansion: E1210 (16 DIs), E1211 (16 DOs), E1212 (8 DIs and 8 DIOs), E1214 (6 DIs and 6 Relays), E1240 (8 DIs), E1241 (4 AOs), E1242 (4 AIs, 4 DIs, and 4 DIOs), E1260 (6 RTDs), and E1262 ( 8TCs). (And ALL T models) • • The expansion support models are firmware version dependant. Versions earlier than V1.3-W5312, V1.5-W5340, and V1.2-W5340-HSPA only support the following 5 models: E1210, E1211, E1212, E1214, and E1240. I/O Expansions Step-by-Step Step 1: Configure the expansion module and Export its Configuration File. Use the ioSearch utility, the ioLogik E1200’s configuration utility, or the web console to configure the target E1200 modules and export the E1200’s configuration files. Note that all expansion modules should reside on 3-24 ioLogik W5300 Cellular Micro RTU Controller Utility: ioAdmin the same network segment as the ioLogik W5300. Step 2: Import the configuration file to the ioLogik W5300. Open ioAdmin and choose the “I/O Expansions” tab. Import these saved E1200 configuration files by pressing the “Add” button. Step 3: Connect the ioLogik W5300 and E1200. The W5300 micro controller allows you to connect the first expansion module with an Ethernet cable through the RJ45 port, and daisy chain to the second and third expansion modules using the E1200’s embedded Ethernet switch ports. 3-25 ioLogik W5300 Cellular Micro RTU Controller Utility: ioAdmin Step 4: Restart the ioLogik W5300. Use the last E1200 module’s RJ45 port to connect to the Host PC and then restart the ioLogik W5300. Open ioAdmin and log in. The ioLogik W5300 and expansion modules will be shown on the screen, with the IP address of a device listed above the device. When you add an I/O expansion module, such as the ioLogik E1210 or E1211, additional tabs will appear, as shown below. Step 5: Start Configuring expansion modules. Double-click the expansion I/O tab (for example, for the E1210) to check the I/O status and set the alias name of the selected I/O channel. NOTE You cannot configure the expansion module’s operation mode with ioAdmin. The configuration must be done with the E1200 configuration tool (Web and ioSearch). 3-26 ioLogik W5300 Cellular Micro RTU Controller Utility: ioAdmin Active Tags Panel When logged in as administrator, fill in the fixed IP address on the Active Tags panel to configure the Active OPC Address and Port settings. The Active OPC Server Address can be filled in using the IP or DNS format. The default port number is 9900. The port number should be the same as the setting in Active OPC Server’s “Active Tag Listen Port.” After the OPC setting and Channel Tags have been configured, click Create Tags. The ioLogik W5300 must be rebooted in order for the settings to take effect. The Heartbeat Interval can be used to determine the connection status between the ioLogik and Active OPC Server, and to ensure that the ioLogik is connected and alive. Set the heartbeat interval to “0” to disable the heartbeat. When the heartbeat is disabled, the SysConnect tag on the Active OPC Server will always be 1, which means that the Active OPC Server will not be notified if a remote ioLogik is disconnected from the network. If the heartbeat interval is set and the network between the ioLogik and Active OPC Server is down, Active OPC Server will detect the stopped heartbeat and the Quality column in the Active OPC will display BAD to indicate the loss of connectivity 3-27 ioLogik W5300 Cellular Micro RTU Controller Utility: ioAdmin Active OPC: Redundancy Mode Active Tag offers three Active OPC redundancy Modes: Normal, Synchronicity, and Change while failed. Normal Active OPC Connects with Active OPC Servers 1 Synchronicity and 2 at the same time. Tries to connect with the first Active OPC Server IP. If it cannot connect, Change while it will automatically connect with the failed second IP, and when the connection to the second IP fails, it will switch back to the first IP. Heartbeat Interval Tags are event-driven and updated only when the status of an I/O channel changes, so when the status remains unchanged, they will not be updated to Active OPC Server. The Heartbeat Interval can be used to determine the connection status between the ioLogik and Active OPC Server, and to ensure that the ioLogik is connected and live. If the heartbeat interval is set and the network between the ioLogik and Active OPC Server is down, Active OPC Server will detect the stopped heartbeat and the Quality column will show BAD to indicate the loss of the connection. The ioLogik W5300 uses a heartbeat signal to monitor the connection quality between Active OPC server and the device. When the Cellular connection experiences low bandwidth, Active OPC server will lose the heartbeat signal if the “Heartbeat Interval” is exceeded. For the W5300 series, we suggest using a value greater than 60 seconds. 3-28 ioLogik W5300 Cellular Micro RTU Controller Utility: ioAdmin Read/Write Privilege An input channel can only be read while an output channel is shown as read/write acceptable in Active OPC Server. Note that a channel is read only if an output channel was used in the Click&Go logic tag of that channel. Active Tags A tag selection table shown in the right panel of the browser window shows the details of your selection. The I/O status of a channel can be updated to the Active OPC Server once it is changed, or updated periodically. 1. Check the “On Change” checkbox to force an update when there is a signal change for that channel (On to Off or Off to On for digital channels, or percentage change for analog channels). 2. To periodically update the status of the Active OPC Server, specify a time interval after the “Update per:” checkbox. 3-29 ioLogik W5300 Cellular Micro RTU Controller Utility: ioAdmin NOTE: 1. The Virtual Channel is updated periodically, the time interval unit can be set to sec, min, hour, or day, with values ranging from 1 to 65535. 2. If AI is configured to update on change, the percentage settings represent the percentage of the full analog range. For example, if the AI is configured to 0 to 10 V, On Change 1% means the ioLogik will update the Active OPC Server every time there is a change of 0.1 V. 3. Expansion modules added to the system are displayed in the modules list. Select a module to see detailed tags in the right panel of the browser window. After selecting the needed tags click the Create Tags button. The Active OPC server will receive these updated tags the next time you use Active OPC server. Refer to the Active OPC Server section for more details about how to use Active OPC server. 1. The RSSI and Internal Registers tags are a new feature that requires the latest firmware version. Be sure to use firmware version V1.3 or above for the ioLogik W5312 series, and V1.5 or above for the ioLogik W5340 series. ATTENTION Active OPC Setting should be configured before connecting to the Cellular network. If the settings are not configured, the ioLogik W5300 won’t connect. When the ioLogik W5300 is in sleep mode, the Heartbeat signal will be disabled. 3-30 ioLogik W5300 Cellular Micro RTU Controller Utility: ioAdmin Cellular Settings Panel The Cellular Setting includes Dial-up Setting, Caller IDs, Operation Mode, DDNS Setting, and Port Forwarding Setting. Dial-up Setting 3-31 ioLogik W5300 Cellular Micro RTU Controller Utility: ioAdmin *APN is a very important factor when connecting to a Cellular network. Check with your Cellular service provider for details, some cellular connections require more detailed setups, such as PPP Authentication, TCP/IP Compression, and Link Quality Report. If you already have a SIM PIN, make sure it is correct because you will be locked out after three failed attempts. To avoid this problem, the ioLogik W5300 will try to connect to the Cellular network one time only. If it fails, then the W5300 will stop trying to connect to the Cellular network. You can leave the username, password, and SIM PIN fields blank for most cases because they are seldom used. After all information has been configured correctly, click Update. The ioLogik W5300 must reboot in order for the settings to take effect. Connection information is displayed on the right side of the block, such as Signal Strength (RSSI), Cellular Status, which includes the device’s IP address for the Cellular Network, and Cellular Error. NOTE Band, PPP authentication, TCP/IP Compression and Link Quality Report are only supported on the ioLogik W5340-HSPA. Caller IDs In order to wake up the ioLogik W5300, the caller ID setting must be configured. When the ioLogik W5300 is in Sleep Mode, it switches to GSM standby mode. When the ioLogik receives a phone call from an authorized caller ID, the ioLogik W5300 will hang up the phone and switch to Cellular mode to automatically connect to the Cellular network. After connecting to the Cellular network successfully, Active OPC Server will obtain the device’s IP address. Operation Mode Setting The ioLogik W5300 provides two operation modes to connect to a Cellular network, and a network redundancy mode (Ethernet WAN: Cellular Backup). 1. Cellular Always ON: The ioLogik W5300 is connected to the Cellular network at all times. 2. Cellular On Demand: The ioLogik W5300 is working at a very low power consumption status (sleep mode). When in Sleep Mode, the ioLogik W5300 disables the Cellular connection and stays in GSM standby mode, and all I/O status records are saved in the data log file on the SD card. The ioLogik W5300 will only wake up when (1) it receives active messages from Click&Go, or (2) it receives a call from an authorized caller ID. 3. Ethernet WAN (Cellular Backup): The ioLogik W5300 can be configured with redundant network interfaces. When this mode is selected, the Ethernet connection will serve as the primary interface to connect to the Internet via the local router. Once the primary interface fails, the ioLogik W5300 micro RTU controller will switch to the backup cellular interface automatically, and then will switch back to the primary Ethernet interface when it becomes available. Note the Dest. IP/URL must be specified. 3-32 ioLogik W5300 Cellular Micro RTU Controller Utility: ioAdmin DDNS Settings If your cellular service provider offers a public IP address after you connect to the cellular network, you can also access the ioLogik W5300 micro RTU controllers using the domain name. To do this, you will need to register with a DDNS service provider and then enable the DDNS function in the ioLogik 5300. The purpose of DDNS is to provide the customer with an alternative cost effective cellular plan. The customer will not need to establish a server or pay for a Static IP. Setting up DDNS allows the ioLogik W5300 to behave like a server and perform functions such as email, ftp, etc. Regardless of whether the device has a floating IP or a private IP, the user can establish a connection with their remote device through DDNS. DDNS allows the SCADA/HMI server to establish a connection through the DDNS server to find the remote device. The above screenshot shows how DHCP can be set up to update the DNS. 3-33 ioLogik W5300 Cellular Micro RTU Controller Utility: ioAdmin • Server address (default=DynDns.org): Currently, DynDns.org is the only option available for Server • Host name: Enter the name you created on www.dyndns.com in this field. The ioLogik W5300 will address. update the DynDNS server with this host name. NOTE • Username: This is the user name used for updating DDNS Server authentication. • Password: This is the password used for updating DDNS Server authentication. Currently, the ioLogik W5300 supports DNS service as provided by DynDNS. For detailed information on this option, please visit https://www.dyndns.com. Port Forwarding With the 3G antenna and RJ45 connector the cellular W5300 RTU supports port forwarding technology that enables WAN-to-LAN communication with port redirection settings. Through port forwarding, the ioLogik W5300 allows external WAN hosts such as SCADA/HMI systems to connect to specific field devices within the LAN by linking with the ioLogik W5300. Settings Setting Description Factory Default Active Click here to activate a specific Index Channel Unchecked Protocol Choose between TCP and UDP protocols TCP Public Port Internal IP Refer to the following example Internal Port 3-34 IP: 0 Port: 0 ioLogik W5300 Cellular Micro RTU Controller Utility: ioAdmin VPN Settings Panel (ioLogik W5340-HSPA(-T) only) What are Virtual Private Networks (VPNs)? Computers that are part of a VPN use a second, “virtual” IP address to connect to the Internet. Instead of running across a single private network, some of the links between nodes that are part of a VPN use open network connections or virtual circuits on a larger network, such as the Internet. With the help of VPNs, cellular devices acting as a VPN client can initiate a connection with a VPN server. Once the connection is established, cellular devices can communicate with other network devices on the same private network. ioLogik IPSec/VPN Specifications • ioLogik IPSec provides security in one scenario with Gateway-to-gateway topology • ioLogik initiates a VPN connection to a VPN server • ioLogik IPSec operates in Tunnel mode with IPsec VPN tunnel Manual Key/ESP, IKE/PSK DES/3DES/AES128/AES192/AES256 encryption MD5/SHA1 authentication IPsec NAT traversal, Anti-Replay, and PFS (Perfect Forwarding Secrecy). Example: Gateway to gateway connection between ioLogik and IPSec servers 3-35 ioLogik W5300 Cellular Micro RTU Controller Utility: ioAdmin ioAdmin VPN Settings Tab General Settings VPN Tunnel Mode: Manual Key/ESP or ISAKMP/PSK selection Remote Endpoint IP: Enter the WAN IP of the remote VPN server endpoint Remote Subnet IP: Enter the remote VPN server subnet (LAN) IP of the remote network Remote Subnet netmask: Enter the remote VPN server subnet netmask of the remote network Local subnet IP: Enter the ioLogik W5300-HSPA subnet (LAN) IP Local Subnet netmask: Enter the ioLogik W5300-HSPA subnet netmask Manual Key/ESP SPI: Sets the VPN manual key incoming/outgoing SPI between 257 and 4294967295 3-36 ioLogik W5300 Cellular Micro RTU Controller Utility: ioAdmin Encryption mode: Selects the incoming/outgoing encryption mode Encryption key: Enters the incoming/outgoing encryption key Encryption mode Length (Bytes) DES 8 3DES 24 AES 128bit 16 AES 192bit 24 AES 256bit 32 Authentication mode: Select the incoming/outgoing authentication mode Authentication key: Enter the incoming/outgoing authentication key Authentication mode Length (Bytes) MDS 16 SHA1 20 ISAKMP/PSK Local Identify Pre-Share Key (PSK): Sets the VPN ISAKMP Pre-Shared key settings Perfect forward secrecy (PFS): Enable or disable Perfect Forward Secrecy. PFS is an additional security protocol (default = disable) Identity option: Select additional ID authentication requirements for the VPN using a specific IP Address, FQDN, or User FQDN settings IP/FQDN/User_FQDN: Enter an ID (IP/FQDN/User_FQDN) to identify and authenticate the local VPN Endpoint 3-37 ioLogik W5300 Cellular Micro RTU Controller Utility: ioAdmin ISAKMP phase 1 Operation Mode: Select main mode or aggressive mode to configure the standard negotiation parameters for IKE Phase 1 of the VPN Tunnel NAT traversal (NAT-T): Enabling this option will allow IPSec traffic from this endpoint to traverse through the translation process during NAT. The remote VPN endpoint must also support this feature and it must be enabled to function properly over the VPN (default = disable) Encryption mode: Select the VPN ISAKMP phase 1 encryption mode Authentication mode: Select the VPN ISAKMP phase 1 authentication mode Diffie-Hellman group: Select the VPN ISAKMP phase 1 DH group. Increasing the DH Group number increases the level of encryption implemented for PFS. SA life time (default = 86400): Enter the number of seconds for the VPN ISAKMP phase 1 Lifetime, which is the period of time to pass before establishing a new IPSec security association (SA) with the remote endpoint. ISAKMP phase 2 Encryption mode: Select the VPN ISAKMP phase 2 encryption mode. Authentication mode: Select the VPN ISAKMP phase 2 authentication mode. Diffie-Hellman group: Select the VPN ISAKMP phase 2 DH group. Increasing the DH Group number increases the level of encryption implemented for PFS. SA life time (default = 28800): Enter the number of seconds for the VPN ISAKMP phase 2 Lifetime, which is the period of time that passes before establishing a new IPSec security association (SA) with the remote endpoint. Advanced Settings Anti-replay: Anti-replay is the method of not allowing an intercepted packet message to be sent to the recipient multiple times without the original sender knowing (default = Disable). Dead Peer Detection (DPD): Enable or disable the Dead Peer Detection. DPD is a method of detecting a dead Internet Key Exchange (IKE) peer. It sends a DPD packet to the peer every 60 seconds with no traffic and attempts to connect normally. If the DPD packet fails 5 times the VPN will continuously re-establish a connection (default = Disable). VPN System Log Events and Error Codes VPN system log Description UNLINK_TIME_REACH SA Lifetime timeout UNLINK_TIME_OUT No response from remote VPN server UNLINK_NO_PROPASOL The remote VPN server does not have matched VPN settings(proposal) UNLINK_DPD DPD detecting IKE_PHASE1_MAIN_START IKE phase1 Main mode starts IKE_PHASE1_AGGR_START IKE phase1 Aggressive mode starts IKE_PHASE1_ENCRY_START IKE phase1 VPN tunnel encrypting IKE_PHASE1_OK Passing the VPN tunnel phase1 IKE_PHASE2_OK Passing the VPN tunnel phase2 IKE_RENEW_START Rekeying IKE_RENEW_OK Rekey successfully PHASE1_TIME_REACH Phase1 SA lifetime timeout OLD_SA_TIME_REACH Earlier SA lifetime is deleted by the ioLogik REMOTE_DEL_ISAKMP Key of VPN tunnel phase1 is deleted by the remote REMOTE_DEL_ESP Key of VPN tunnel phase2 is deleted by the remote REMOTE_DEL_ESP_OLD Earlier SA lifetime is deleted by the remote VPN Server 3-38 ioLogik W5300 Cellular Micro RTU Controller Utility: ioAdmin Cellular Reconnection Carriers disconnect idle mobile device connections in order to save bandwidth for other on-line users and applications. To keep the ioLogik W5300 Always On, the ioLogik W5340 must not only have the capability to detect the cellular connection and reconnect to the network once it is disconnected, but also needs to send out signals (ICMP package) to notify carriers that the ioLogik W5340 is still alive. NOTE The default setting of the Cellular Reconnection function is disabled, which prevents it from producing extra packets. If the Cellular Operation Mode is set to On-Demand, we recommended NOT activating the Cellular Reconnection function. Carrier Check before system restart: Carrier Check settings define the timeout for detecting the physical cellular connection. Once the ioLogik reaches the timeout, it will perform a system restart. • GSM Timeout: When you turn on the ioLogik W5300, the device will continue to connect to the GSM for a period of 60 seconds (the default setting). If it fails to connect, the device will automatically restart the modem board after sixty seconds. • GPRS Retry: After the connection between the device and GSM (carrier) has been made. The device will try to connect with the Internet. After XX time of failed retry, the W5300 will restart the modem board. The Chart below shows the Carrier Check behavior: 3-39 ioLogik W5300 Cellular Micro RTU Controller Utility: ioAdmin PING Check before system restart: A remote destination is used in this setting to indicate if the Internet connection is still alive. The user can specify a public IP or URL and the number of retries that are allowed. • Dest IP/URL: Can either be an AOPC server IP or any public URL for the device to check its connection with • Auto Retry: Will be activated when the AOPC can’t connect with the AOPC server. The W5300 will tell the the internet. machine to ping the Dest IP/URL to check for an Internet connection. • Continuous Check Until 3 failures: The W5300 continuously check its connection with the IP/URL to ensure that it is constantly connected to the internet (could incur a high cose, depending on your cellular plan). • Network Log: The Network Log records the activity of the cellular connections. Click the Export Log button to retrieve the log file. System Reconnect after ____ hours • If Carrier Check before system restart or PING Check before system restart is selected, the system • If the wireless signal is unstable and disconnects, the ioLogik W5300 will first reboot the modem to restore will check if there is still a wireless connection. the physical layer connection. Enable System Reconnect to reinitiate the W5300. If rebooting the modem does not recover your connection, the disconnection may be caused by a higher layer communication problem. You may select a System Reconnect interval from 1 to 24 hours. NOTE Since there is a limit to the number of times you can write to system memory, we strongly recommend installing at least a 1 GB SD that the ioLogik W5300 can use for logging. 3-40 ioLogik W5300 Cellular Micro RTU Controller Utility: ioAdmin Meter/Sensor OP Mode The ioLogik W5300 supports four OP modes, Transparent Serial Tunnel (TCP Server and TCP Client), Modbus TCP <-> Modbus RTU Gateway, and Modbus Serial Tags. • Transparent Serial Tunnel: Transparent Serial Tunnel mode creates a TCP socket to a remote host program and transparently sends and receives data to attached legacy serial devices. • Modbus RTU Gateway: This function allows users to attach a serial Modbus/RTU meter to the ioLogik W5300’s serial port; in this case, the ioLogik W5300 will act as a Modbus/RTU to Modbus/TCP gateway. • Modbus Serial Tags: This function allows users to attach a serial Modbus/RTU meter to the ioLogik W5300’s serial port and create the serial tags in the Active OPC Server so that a SCADA system can access this serial data directly via OPC connections. In this case, the Modbus/RTU serial devices will appear to be embedded in the ioLogik W5300 micro RTU Controller. ATTENTION If the Serial Tunnel setting is used, Cellular Setting Operation Mode Cellular should be set to “Cellular Always On.” Otherwise, the Cellular connection will disconnect and a serial tunnel will not be created. ATTENTION Because there are major structural differences between firmware versions, you should upgrade from earlier versions to firmware V1.3 or above for the ioLogik W5312 series, and V1.5 or above for the ioLogik W5340 series to reset all settings to the factory defaults. You should NOT perform the upgrade remotely over the Internet. 3-41 ioLogik W5300 Cellular Micro RTU Controller Utility: ioAdmin Network Statistics Network Statistics help monitor the usage of all applications’ network flow. The applications include Active OPC server, active message server, serial TCP, SNMP trap, Email, FTP, Modbus, DA Center, Event Log, and ICMP. The Network Statistics Page will help you understand the overall usage of the network. Watchdog Panel The Watchdog panel is available after you log in as administrator. When enabled, the Host Connection Watchdog monitors the network connection. If the connection is lost for the specified Timeout value, the Watchdog will display a warning and activate the Safe Status settings for each DO channel and Event Counter channel. By default, the Watchdog is disabled. To enable the Watchdog, make sure that Enable Host Connection Watchdog is checked, set the Timeout value, and then click Update. 3-42 ioLogik W5300 Cellular Micro RTU Controller Utility: ioAdmin After the Watchdog is enabled, a warning will be displayed on the Watchdog panel if the network connection is lost. After you restore the network connection, click Clear Alarm to reset the Watchdog and return to normal operation. Click&Go Logic Panel The Click&Go Logic panel is available after logging in as an administrator. This is where the ioLogik’s Cellular Micro RTU Controller system is configured. With a set of rules (known as a ruleset) defined through Click&Go, the ioLogik can report I/O status to a host as soon as user-defined I/O conditions have been met. Refer to Chapter 4 for more detailed information on defining rules. Changes on the Click&Go Logic panel are not effective until the ioLogik W5300 is restarted, as is true with changes made on other panels. After logging back in as administrator and returning to the Click&Go Logic panel, click Download to view the current ruleset. Click Run to activate the ruleset and Stop to deactivate it. NOTE Refer to the following website to learn more about Click&Go: http://www.moxa.com/remote_io/ClicknGo.htm ATTENTION I/O channels used by Click&Go Logic cannot be controlled externally using ioAdmin’s “Test” function, other Modbus/TCP master software, SCADA software, or SMS commands. 3-43 4 4. Click&Go Logic Click&Go Logic was developed by Moxa to provide an easy way to program your ioLogik W5300 product for Cellular Micro RTU Controller operation. In this chapter, we explain how Click&Go Logic works and how to use it to develop your Cellular Micro RTU Controller. The following topics are covered in this chapter: Quick Start Guide Overview Features Click&Go Logic Basics Working with Rules Click&Go Development Process I/O Configuration Configurable DIO Channel Mode Selection Digital Input Mode Selection Digital Output Mode Selection Analog Input Mode Selection Alias Name Configuration Testing the I/O Channels Defining Global Variables Internal Register (Integer) Settings Timer Settings SNMP Trap Server E-Mail Server Active Message Server SMS Phone Book Working/Off Working Days FTP Settings Data Logging Profile List Internal Register (Float) Settings Working with Logic Click&Go Logic Basics IF Conditions More Information about Repeat Interval vs. Edge Detection THEN/ELSE Actions Activating the Rule-set Upload, Restart, and Run Rule-set Management Bar Import/Export Configuration ioLogik W5300 Cellular Micro RTU Controller Click&Go Logic Quick Start Guide Overview • Software Overview • Utility Features • Working with the Rules Getting Started Quickly set up your I/O and global variables so you can start working with rules: • I/O configuration • Defining Global Varibles Start Working with Logic Learn the basics of Click&Go’s If-Then-Else Logic: • If Logic • Then and Else Logic • Active Rule Set • Import and Export Your Configuration 4-2 ioLogik W5300 Cellular Micro RTU Controller Click&Go Logic Overview The ioLogik W5300 series system eliminates the need for host computers to continually poll I/O devices for their status. Instead, the server itself is able to monitor the status of each I/O device and take the appropriate action when the I/O status satisfies a user-defined condition. For example, the ioLogik could be configured to send a TCP/UDP message only when the switch attached to DI-0 is turned on. This event-based structure results in a much improved response time and a much reduced load on the host computer’s CPU and network bandwidth. Cellular Micro RTU Controllers are easily configured using Moxa’s Click&Go Logic. With Click&Go Logic, you can easily and intuitively configure when and how I/O information is transmitted over the network. Simple IF-Then-Else statements are used to specify conditions that are required for certain actions to take place. Up to three conditions and three actions can be combined in a rule, and you can define up to 24 rules. Supported actions include sending SNMP traps or TCP/UDP messages to up to 10 hosts at a time. Click&Go Function Comparison Table by Product Line Click&Go Function ioLogik E2000 ioLogik W5300 Peer-to-Peer Yes No Remote Action Yes No CGI Command Yes No IF-Then-Else rule 24 rules 24 rules Internal Register 24 24 + 28 float points Timer 24 24 Schedule Yes Yes TCP/UDP Active Message Yes Yes, Unicode support SNMP Traps Yes Yes E-Mail Yes Yes, Unicode support SMS No Yes, Unicode support Trigger Logic Alarms Features Click&Go Logic has the following key features: • NOTE Easy local logic control using intuitive IF-Then-Else style construction. • Up to 24 user-defined rules. • Up to 3 I/O-based conditions and 3 DO or network actions per rule. • Choice of email, TCP, UDP, SNMP trap, and SMS for active I/O messaging. • Customizable message content with dynamic fields for time, date, IP address, and more. • Up to 10 simultaneous IP destinations for TCP/UDP messaging. • Internal register function for remote output control when Click&Go is running. • Timer Delay function for timing events. • Configurable interval for time-triggered events. In this chapter, all the descriptions are based on the ioAdmin 3.10. Be sure to use firmware V1.3 or above for the ioLogik W5312 series, firmware V1.5 or above for the ioLogik W5340 series, and Active OPC Server V1.11 or above. 4-3 ioLogik W5300 Cellular Micro RTU Controller Click&Go Logic Click&Go Logic Basics To use Click&Go Logic, start ioAdmin and log on as an ioLogik administrator on the Server Settings panel. Once you are logged on, go to the Click&Go Logic panel. It should appear as below: Click&Go Logic Panel 1. Global Variable: In this field, you can assign a Global Variable for the set of rules. 2. Logic Name: In this field, you can assign a name for the set of rules. 3. Rules List: In this area, each rule’s conditions, actions, and status are displayed. 4. Ruleset Management Bar: In this area, you manage the ruleset. 4-4 ioLogik W5300 Cellular Micro RTU Controller Click&Go Logic Working with Rules Rules are the building blocks of your ioLogik Cellular Micro RTU Controller. With rules, you define the exact trigger conditions for transmission of I/O information as well as the content and destination of that information. A DO’s reaction can also be automated through DI trigger conditions. In the main screen, you will see a list of the rules in the current rule set. Double click on a rule to open that rule’s configuration window, or double click on an empty rule to start a new rule. The Equivalent Logic Statement at the bottom shows a real-time text-based summary of the rule that you are defining, and provides a useful means of making sure that the rule is designed as you intended. ATTENTION When configuring input and output control and response values, you must select the unit of measurement before entering a value. If you select a unit of measurement after entering a value, the value will not be retained. In addition, when an I/O channel is being used in a Click&Go Logic rule, the channel’s range and units cannot be modified. Click&Go Development Process After searching and setting up the IP address of an ioLogik Ethernet I/O server, Click&Go logic can be developed by following the procedures below: I/O Define Global Work with Configuration Variables Logic Import/Export Activate Configuration Rule-set 4-5 ioLogik W5300 Cellular Micro RTU Controller Click&Go Logic I/O Configuration ioLogik products are embedded with various types of I/O channels, and the mode of each input/output channel must be configured before using the channels. Channels are divided into five categories: digital inputs, digital outputs, analog inputs, analog outputs, and virtual channels. Configurable DIO Channel Mode Selection For models that support the configurable DIO channels, configure the specific DIO to DI or DO to meet the requirements. Model ioLogik Mode Settings Number of Configurable DIO Channels Digital Input 8 Digital Output W5340-HSPA ioLogik W5340 8 ioLogik W5312 4 When logged in as an administrator, double click on a channel in the I/O Configuration panel to configure that channel’s settings. A window will open with configuration options for the channel. Each DIO channel will be configured to act as either a DI or DO channel, according to the Power On Settings. To switch between DI and DO channel operation, select the desired mode in the I/O Direction field under Power On Settings. After clicking Apply, you will need to restart the ioLogik for the new setting to take effect. ATTENTION Switching between DI and DO channel requires restarting the ioLogik for the new setting to take effect. You must restart the ioLogik before proceeding with configuration or programming. Digital Input Mode Selection A DI channel can be set to DI or Event Counter mode. In DI mode, the channel connects to wet/dry contacts. In Event Counter mode, the channel accepts limit or proximity switches and counts events according to the ON/OFF status. When “Lo to Hi” is selected, the counter value increases when the attached switch is pushed. When “Hi to Lo” is selected, the counter value increases when the switch is pushed and released. Model Mode Settings Number of Digital Input Channels DI Event Counter ioLogik W5340-HSPA 8 ioLogik W5340 8 ioLogik W5312 8 DIs+4 DIOs When logged in as administrator, double click on a channel in the I/O Configuration panel to configure that channel’s settings. A window will open with configuration options for that channel. Each DI channel will be configured to act as either a DI or Event Counter channel, according to the Mode Settings. To switch between DI and Event Counter channel operation, select the desired mode under Mode Settings. 4-6 ioLogik W5300 Cellular Micro RTU Controller Click&Go Logic ATTENTION On this panel, be sure to select Start under Counter mode parameter on Power On Settings to activate the Event Counter channel. Digital Output Mode Selection A DO channel can be set to DO or Pulse Output mode. The Relay Output behavior is the same as DO. Model Mode Selection Number of Digital Output Channels DO Pulse Output ioLogik W5340-HSPA 8 DIOs + 2 Relays ioLogik W5340 8 DIOs + 2 Relays ioLogik W5312 8 DOs + 4 DIOs When logged in as an administrator, double click on a channel on the I/O Configuration panel to configure that channel’s settings. A window will open with configuration options for that channel. Each DO channel will be configured to act as either a DO or Pulse Output channel, according to the Mode Settings. To switch between DO and Pulse Output channel operation, select the desired mode under Mode Settings. 4-7 ioLogik W5300 Cellular Micro RTU Controller Click&Go Logic Analog Input Mode Selection Analog input channels can use either voltage or current to transmit signals. ioLogik W5340-HSPA Mode Selection Number of Analog Model Input Channels 4 Voltage ±5 V, ±10 V, 0-10 V ioLogik W5340 Current 0 to 20 mA, 4 to 20 mA When logged in as administrator, double click on a channel on the I/O Configuration panel to configure that channel’s settings. A window will open with configuration options for that channel. Each AI channel will be configured to measure either voltage or current according to the Range Settings. Alias Name Configuration Alias Name helps users configure the alias of a DI or DO channels and define the logic level (0 or 1) for the ON/OFF status. The Alias can be monitored by the ioAdmin utility, or queried by using a user-defined program based on the Moxa MXIO library or standard Modbus/TCP protocols. For Click&Go programming, the Alias Name will display the user-defined name when the specified channel is selected. For example, although the fist DI channel is represented by DI-0 in Click&Go, you can change the Alias Name to Door_0 for easier recognition when programming. 4-8 ioLogik W5300 Cellular Micro RTU Controller Click&Go Logic When logged in as administrator, double click on a channel on the I/O Configuration panel to configure that channel’s settings. A window will open with configuration options for that channel. The Alias name of each input/output channel can be configured by selecting the Alias Name panel. ATTENTION We strongly recommend configuring the alias name for the I/O channel being used before performing any further configuration or programming. Testing the I/O Channels Each I/O channel can be tested and monitored individually. When logged in as administrator, double click on a channel from the I/O Configuration panel to configure that channel’s settings. A window will open with configuration options for the channel. Tests can be done by opening the channel’s configuration window and selecting the Test panel. The Test panel shows how a channel’s status affects, or is affected by, the attached device. For output channels, you can set the on/off status, start and stop a pulse, or output a voltage or current. For input channels, you can monitor the attached device’s on/off status, counter, or input voltage/current. 4-9 ioLogik W5300 Cellular Micro RTU Controller Click&Go Logic Defining Global Variables Global Variables include Internal Register Settings, Timer Settings, SNMP Trap Server, E-Mail Server, Active Message Server and SMS Phone Book. If these functions will be used in a Click&Go V2 rule-set, the default configuration must first be set from the Global Variable Menu Bar. The following global variables are only supported by ioLogik W5300 micro RTU controllers: SMS Phone Book, Working/Off Working Day, FTP, Data Logging Profile List, and Internal Register(Float). Internal Register (Integer) Settings Internal Register (Integer) is a flag that can be used with the Click&Go logic internally or externally. The 24 sets of internal registers can be polled and controlled by SCADA software using standard Modbus/TCP format, or implemented to redirect the result of one Click&Go logic to another. The default value of an internal register is “0”. Internal Register Register Number Initial Value Reg-0 to Reg-23 *0 to 255 Timer Settings The Timer function allows users to delay an action, trigger an action to run, or repeat an action. A timer is activated by a change of the logic event. After the timed interval has expired, the output will be performed. The 24 timers that can be implemented with Click&Go V2 logic have the default time interval set to “5 seconds” in the “STOP” state. Be sure to configure the interval before using a timer. With the default state set to “START” the timer will start when the Click&Go logic is activated. 4-10 ioLogik W5300 Cellular Micro RTU Controller Timer Click&Go Logic Timer Number Initial State Configuration Timer-0 to Timer-23 START, *STOP SNMP Trap Server The ioLogik W5300 supports SNMP v2 (Simple Network Management Protocol) to allow monitoring of the network and I/O devices with SNMP Network Management software. It is useful for building automation and telecom applications. Before monitoring the system information of an ioLogik via SNMP trap, first define a rule in Click &Go logic to update the I/O status (up to 10 SNMP trap servers can be defined). E-Mail Server The E-mail Server configures the parameters of the target e-mail servers and the recipient e-mail addresses. The Recipient Database should contain a list of available e-mail addresses for your network environment. The e-mail message defined in the Click&Go logic will be sent to all addresses listed in the Receiver(s) list. To add e-mail addresses to the Available receiver(s) list, enter the Name and Mail Address and click the Add finger icon to move addresses to the Recipient Database; use the Remove finger icon to remove it. 4-11 ioLogik W5300 Cellular Micro RTU Controller Click&Go Logic Under Mail Server Settings, you must configure the address of the SMTP server with your username and password. When using an FQDN (Fully Qualified Domain Name) address, such as ms.moxa.com, you must specify the ioLogik’s DNS settings or check the Cellular Settings to see if the DNS settings were retrieved by the cellular connection. 4-12 ioLogik W5300 Cellular Micro RTU Controller Click&Go Logic Active Message Server The Active Message Server configures one or more destination IP addresses of the Message Servers that receive event messages generated by the Click&Go logic. The message protocol (TCP or UDP) and the message socket port must also be configured. The active message defined in the Click&Go logic will be sent to all addresses listed in the Message Recipient List. Message Port(TCP/UDP): The Port the computer uses to communicate with the device; the default port for TCP/UDP is 9000 SMS Phone Book The SMS Phone Book configures one or more destination phone numbers that will receive SMS (Short Message Servers) event messages generated by the Click&Go logic. The SMS defined in the Click&Go logic will be sent to all mobile phones listed in the Phone Book. A total of 20 receivers can be configured in the phonebook. 4-13 ioLogik W5300 Cellular Micro RTU Controller Click&Go Logic Working/Off Working Days The Working/OffWorking Days defines the workweek days, hours, and off days to be used in the Click&Go Schedule function. Specify the work days and hours first, double click to select the date in the calendar, and then click the Replace button to update the selected entry of the off days. FTP Settings The FTP Settings dialog defines the target FTP server’s IP and user accounts to allow the ioLogik W5300 to upload log files. Specify the FTP Server’s IP address and accounts and press the Add button to create a new entry in the list. 4-14 ioLogik W5300 Cellular Micro RTU Controller Click&Go Logic Data Logging Profile List The Data Logging Profile List defines how to log the I/O data into the SD card. A total of 5 profiles can be created, and multiple/duplicate channels can be included in different profiles. Take the following steps to create a profile: 1. Click the New button to create a new profile. 2. Click Enable and specify a name for the profile. In addition, specify the Initial State and capacity of a log file. If you select Start as the initial state, logging will start immediately once the profile is established. If you select Stop, a Click&Go logic must be performed to start the logging. 3. Define how to log the data by specifying the Logging Type. Users can choose to log when the I/O status changes (On Change), to log periodically (Periodical), or by pre-configured schedule (Schedule). 4-15 ioLogik W5300 Cellular Micro RTU Controller Click&Go Logic The Schedule settings are extremely flexible and can log by day, week, or month. Specify the hours and then click the Add button to add a setting of the schedule to the list. Click Next to proceed. 4. Specify the channels to be logged. The percentage indicates the change of an analog channel when choosing the On Change logging type. Specify the percentage for an analog channel before selecting the channel in the right column. 5. Click Finish. 4-16 ioLogik W5300 Cellular Micro RTU Controller Click&Go Logic 6. Click Save. Internal Register (Float) Settings Internal Register(Float) can be used as an analog comparison (dynamic throughput setting) and flag with the Click&Go logic internally or externally. The 28 sets of internal registers (float) can be polled and controlled by SCADA software using the standard Modbus/TCP format, or implemented to redirect the result of one Click&Go logic to another. The default value of an internal register is 0. Internal Register Register Number Initial Value FloatReg-0 to FloatReg-27 0.000 (4-byte float point) 4-17 ioLogik W5300 Cellular Micro RTU Controller Click&Go Logic Working with Logic Click&Go Logic Basics The Click&Go Logic panel is available after logging in as administrator. This is where Click&Go logic is configured. With a set of rules (known as a rule-set) defined through Click&Go, the ioLogik can perform local and remote I/O control, report I/O status, and actively send out messages, e-mails, or SNMP traps to a host as soon as the user-defined I/O conditions have been met. To use Click&Go Logic, start ioAdmin and log in as ioLogik administrator from the Server Settings panel. Once you are logged in, go to the Click&Go Logic panel. The following screen should appear: Click&Go Logic Panel 1. Global Variable: In this field, you can configure global variable rules. 2. Logic Name: In this field, you can assign a name to the set of rules. 3. Rule-set: In this area, each rule’s conditions, actions, and status are displayed. 4. Rule-set Management Bar: In this area, you manage the rule-set. Rules are the building blocks of your ioLogik system. With rules, you define the exact trigger conditions for transmission of I/O information as well as the content and destination of that information. Click&Go Logic can be defined in the following ways: 4-18 ioLogik W5300 Cellular Micro RTU Controller Click&Go Logic IF “A” THEN “B”, ELSE “C” For one control logic rule, there are three “A’s” that can be configured. “A” refers to the IF conditions that trigger an action. These three conditions can be operated by “AND” or “OR” logic. If “AND” logic is used, all three conditions must be true to create a positive result. If “OR” logic is used, one or more true conditions must be met to trigger the action. Result of Result of A1 A2 A3 0 0 0 0 0 0 0 0 1 1 0 0 0 1 0 1 1 1 0 0 1 1 1 0 0 1 1 0 0 1 1 0 1 1 1 0 1 1 1 1 0 1 0 0 0 1 1 1 1 1 1 1 1 1 A1 A2 A3 0 0 0 0 0 1 0 1 0 1 AND Logic OR Logic The 24 rules are defined individually and are executed one by one in a loop. The 2nd rule can only be processed after running the 1st rule, and the entire rule-set will start running from the beginning after the last rule is processed. You will see a list of the rules in the current rule-set on the main screen. Double Click on a rule to open that rule’s configuration window, as shown in the following figure, or double click on an empty rule to start a new rule. Under Relation between conditions, select AND to specify that all conditions must be satisfied for the actions to take place; select OR to specify that any one of the conditions can be satisfied for the actions to take place. The Equivalent Logic Statement at the bottom shows a real-time text-based summary of the rule that you are defining. It provides a useful way to make sure the rule is designed as you intended. 4-19 ioLogik W5300 Cellular Micro RTU Controller Click&Go Logic IF Conditions IF conditions are events that trigger THEN/ELSE actions. Under the IF column, you can set up to 3 conditions that must be satisfied for the actions under the THEN/ELSE column to take place. As soon as the IF conditions are satisfied, the specified THEN/ELSE action is performed. For example, an alarm can be activated when a door is opened. Use the pull downs to specify the conditions and units of measurement (e.g., DI-0=OFF). IF conditions can be specified as follows: IF Conditions Operators Remark DI ON, OFF, ON to OFF, OFF to ON, Change DI-x represents the channel number Counter =, >, <, >=, <=, Change Counter-x represents the channel number. Max Counter Value: 4,294,967,295 AI =, >, <, >=, <= AI-x represents the number of the channel. Max Value: Depends on the analog modes or the result of scaling. Internal Register(Float) can be used as the comparison or throughput setting controlled by remote SCADA or a Modbus/TCP program. Relay =, >, <, >=, <= CurRelayCNT-x represents the current relay counts for the channel. Max Value: 4,294,967,295 Internal Register = Reg-x represents the number of the internal register. x = 00 to 23 / Trigger Value: 0 to 255 Timer TIMEOUT Timer-x, x = 00 to 23 Max value: 4,294,967,295 seconds Schedule Expansion Module Time, Range and Recurrence 0, 1 Connection Failure Virtual Channel =, >, <, >=, <= VC-x represents the channel number System Start up N/A Activate when the system is starting up at System Start NOTE The following IF Conditions are only supported by ioLogik W5300 micro RTU controllers: Expansion Module Connection Failure, Virtual Channel, and System Start-up. 4-20 ioLogik W5300 Cellular Micro RTU Controller Click&Go Logic DI DI refers to the status of a digital input channel. Edge detection can be used to refine the conditions. For example, the condition DI-0=OFF is satisfied for as long as DI-0 remains off. The condition DI-0=ON to OFF, however, is only satisfied the instant the DI-0 turns off. The transition of the status change can also be handled using “Change” operator so it will trigger the related action whether it is ON-to-OFF or OFF-to-ON. Scroll to select DI and click on the property ( ) button to enter the DI Settings window. Counter Counter refers to the counts of an Event Counter channel. The counts are stored in the ioLogik internally. Specifying the counts with a proper operator will lead to triggering the action. For example, if 10 items should be packed in a box, the Counter-x should be reset every 10 counts (Counter-1=10). Select the IF condition to Counter and click on the property button ( ) to enter the Counter Settings window. 4-21 ioLogik W5300 Cellular Micro RTU Controller Click&Go Logic AI AI refers to the readings of an analog input channel. An analog input value is specified to trigger an action. Units of the value are defined by the selected analog modes (voltage or current), or the scaling results. For example, AI-0 > 15 mA represents the high level of a water tank. Virtual Channel VC refers to the readings of a statistics channel. The value can be recorded in the data log file, or specified to trigger an action. Units for the value are determined by the user defined unit, or the scaling results. For example, VC-0 > 15 ml/s represents a water flow amount greater than 15 ml/s. Relay (Counter) Relay refers to the current counts of the relay usage. For ioLogik E2214, the counts of the relay usage are stored inside the ioLogik. Checking the current counts of a relay will produce the action. For example, if the average life-cycle of a relay is 25,000 times, an alarm e-mail may be generated when the counter reaches 20,000 times (CurRelayCNT-0 > 20000) to report the need for a replacement. 4-22 ioLogik W5300 Cellular Micro RTU Controller Click&Go Logic Internal Register (Integer) Internal Register (Integer) represents a status flag to link the status of the first logic to the second one. It is used most often with the Timer function, or to combine other input statuses together. The Internal Register function also allows a PC to control the ioLogik’s local output when the remote output is controlled by a Click&Go log (e.g., digital output, active message, e-mail, or SNMP Trap). Select the IF condition for the Internal Register and click on the property button ( ) to enter the Set Internal Register window. In the above figure, the “Used in:” column indicates that this Internal Register is also used with Rule-0, which helps the user identify the relationship between the rules. Also, the Set Internal Register button ( ) will help to define the default values of all Internal Registers. NOTE Internal Registers can be controlled by Modbus/TCP protocol. Refer to the appendix for the address list for all Internal Registers. Timer The Timer function can be used to control the timing of a logic rule in the IF conditions. “TIMEOUT” is the only operator here. For example, you can delay the triggering of an action or repeat an action periodically. Select the IF condition for Timer and click on the property button ( 4-23 ) to enter the Timer Settings window. ioLogik W5300 Cellular Micro RTU Controller Click&Go Logic In the above figure, the “Used in:” column indicates this Timer is also used in Rule-0, which helps the user indentify the relationship between rules. In addition, the Set Timer button ( ) will help define the default value for the Timer. Schedule The Schedule function allows users to set a starting point or time period for a task. For example, the Schedule function could be used if a pump needs to start at 9:00 PM and stop at 11:00 PM every Monday, Wednesday, and Friday. Select the IF condition for Schedule and click on the property button ( ) to enter the setting window. For recurrent actions, select the Recurrence checkbox and select the relevant weekdays. If a time period needs to be defined, specify the stop date in the range column. Expansion Module Connection Fail The slot you select in the “Expansion Module Connection Fail” window will monitor while Click&Go is running. The monitored target is specified for these expansion modules. 4-24 ioLogik W5300 Cellular Micro RTU Controller Click&Go Logic System Start-up The Click&Go logic provides the IF condition to perform an action, such as triggering the local output or SMS alarm to indicate that the system is restarting. More Information about Repeat Interval vs. Edge Detection Combining the Timer function with other IF conditions allows actions to be repeated when the specified logic is sustained over a period of time. However, if a condition is based on edge detection (i.e., ON to OFF or OFF to ON), it can only be triggered once. The following scenarios illustrate how edge detection affects the Timer = N sec. In each diagram, the statuses of three sensors are shown over a period of time, with a high signal corresponding to a “true” condition. The green shaded area shows the duration of time that the IF conditions have been met. No Edge Detection In this scenario, the rule checks each sensor for “on” status, so edge detection is not involved. As long as the sensors remain on, the required conditions are satisfied, and the THEN actions will repeat at interval N. DI-0 = ON DI-1 = ON DI-2 = ON Relation between AND OR “Timer = N sec” “Timer = N sec” conditions “IF” conditions satisfied Repeat interval “THEN” action triggered Edge Detection for All Conditions In this scenario, the rule checks each sensor for a change from “off” to “on” status, meaning only edge detection conditions are used. As soon as a sensor changes from “off” to “on”, the condition is satisfied, but only for that instant. Right after that instant, the condition is no longer satisfied because it is no longer changing from “off” to “on”. The repeat interval will have no effect, since edge conditions cannot be sustained over a period of time. 4-25 ioLogik W5300 Cellular Micro RTU Controller Click&Go Logic DI-0 = OFF to ON DI-1 = OFF to ON DI-2 = OFF to ON Relation between AND OR N/A N/A conditions “IF” conditions satisfied Repeat interval “THEN” action triggered Edge Detection for Two Conditions In this scenario, the rule checks DI-0 and DI-1 for a change in status and DI-2 for status only. The repeat interval will not have an effect if the AND relationship is used, because the two edge conditions can never be sustained over a length of time. With the OR relationship, the IF conditions will be satisfied as long as DI-2 is “on”, and the THEN actions will be triggered over interval N. DI-0 = OFF to ON DI-1 = OFF to ON DI-2 = ON Relation between AND OR N/A N/A conditions “IF” conditions satisfied Repeat interval “THEN” action triggered Edge Detection for One Condition In this scenario, the rule checks DI-0 for a change in status and DI-1 and DI-2 for status only. The repeat interval will not have an effect if the AND relationship is used, because the edge condition for DI-0 can never be sustained over a length of time. With the OR relationship, the IF conditions will be satisfied as long as DI-1 or DI-2 is “on”, and the THEN actions will be triggered over interval N. DI-0 = OFF to ON DI-1 = ON DI-2 = ON Relation between AND OR conditions “IF” conditions satisfied 4-26 ioLogik W5300 Cellular Micro RTU Controller Repeat interval Click&Go Logic N/A “Timer = N sec” “THEN” action triggered THEN/ELSE Actions Under the THEN column, you can specify up to 3 actions that will be performed when the IF conditions are satisfied. 3 actions under the ELSE column will also be performed when the IF is NOT satisfied. Possible actions include changing the status of a DO channel, starting or stopping an Event Counter, or sending a message by SNMP trap, TCP, UDP, or e-mail. If Conditions Result of Trigger of Trigger of A1 A2 A3 AND Logic Then Actions ELSE Actions 0 0 0 0 NO YES 0 0 1 0 NO YES 0 1 0 0 NO YES 0 1 1 0 NO YES 1 0 0 0 NO YES 1 0 1 0 NO YES 1 1 0 0 NO YES 1 1 1 1 YES YES Result of Trigger of Trigger of Then Actions ELSE Actions If Conditions A1 A2 A3 OR Logic 0 0 0 0 NO YES 0 0 1 1 YES NO 0 1 0 1 YES NO 0 1 1 1 YES NO 1 0 0 1 YES NO 1 0 1 1 YES NO 1 1 0 1 YES NO 1 1 1 1 YES NO THEN/ELSE actions can be specified as follows: THEN/ELSE Operators Remark Actions Counter RESET Counter-x represents the number of the Event Counter channel DO ON, OFF DO-x represents the number of the channel. Pulse Output STOP, START Pulse Output-x represents the number of the channel AO Relay Built-in or Expansion RESET ResetCNT-x represents the number of the relay channel. Internal Reg-x represents the number of the internal register. Register x = 00 to 23 / Trigger Value: 0 to 255 4-27 ioLogik W5300 Cellular Micro RTU Controller Timer STOP, START, RESTART SNMP Trap Active Message Click&Go Logic Timer-x, x = 00 to 23 Max value: 4,294,967,295 seconds I/O Status Bindings: 3 sets ID / Source IP Unicode supported e-Mail Create the contents of the e-Mail Short Message Select recipients from the phone book, define the content, and configure Service Data Log the escalation Start, Stop Select which profile to start or stop Start/Stop FTP Service NOTE Select which profile and FTP server to upload the log file The following THEN Actions are only supported by ioLogik W5300 micro RTU controllers: Short Message Service, Data Log Start/Stop, and FTP Service. Counter In this THEN/ELSE action, the only operator for the Counter function is “RESET”, which clears the counts of an Event Counter channel. This function is often used in a charging system to clear the readings of a meter. Select the THEN/ELSE action to Counter and click on the property button ( window. 4-28 ) to enter the Counter Settings ioLogik W5300 Cellular Micro RTU Controller Click&Go Logic DO DO refers to the action of controlling the local digital output channels that react to the IF conditions. Select the THEN/ELSE action to DO and click on the property button ( NOTE ) to enter the DO Settings window. A Relay output channel is also referred to as a DO channel in the THEN/ELSE action fields. Pulse Output Pulse Output starts or stops a pulse. It is usually used to create the flash for an alarm light. Select the THEN/ELSE action to Pulse Output and click on the property button ( Settings window. 4-29 ) to enter the Pulse Output ioLogik W5300 Cellular Micro RTU Controller Click&Go Logic AO Analog Output (AO) refers to the action of controlling the local Analog Output channels that react to the IF conditions. Select the THEN/ELSE action to AO and click on the property button ( ) to enter the AO Settings window. NOTE AO Channels are only built-in for the ioLogik W5340 and W5340 HSPA models. Relay (Counts) In the THEN/ELSE action, Relay refers to the current counts specifying how many times a relay has been triggered. The counts are stored internally and can be cleared. “RESET” is the only operator. Select the THEN/ELSE action to Relay and click on the property button ( 4-30 ) to enter the Relay Settings window. ioLogik W5300 Cellular Micro RTU Controller Click&Go Logic Internal Register (Integer) Internal Register (Integer) represents a status flag to link the status of the first logic to the second one by specifying other actions in the THEN/ELSE fields. Values from 0 to 255 can be used here. Select the THEN/ELSE action for Timer and click on the property button ( ) to enter the Internal Register Settings window. In the above figure, the “Used in:” column indicates that this Internal Register is also used in Rule-0, which helps the user identify the relationship between the rules. In addition, the Set Internal Register button ( ) can be used to define the default values of all registers. NOTE Internal Register can be controlled by Modbus/TCP protocol. Refer to the appendix for the address list of all Internal Registers. Timer The Timer function can be used to control the time settings of a logic rule. Actions such as “START”, “STOP”, and “RESTART” can be configured here. Select the IF condition for Timer and click on the property button ( window. 4-31 ) to enter the Timer Settings ioLogik W5300 Cellular Micro RTU Controller Click&Go Logic In the above figure, the “Used in:” column indicates this Timer is also used in Rule-0, which helps the user identify the relationship between the rules. In addition, the Set Timer button ( ) can be used to define the default value of the Timer. NOTE The “STOP” operator stops the timer and returns to “0”, and the “RESTART” operator clears and restarts the timer. ATTENTION The STOP or RESTART operator should always be used to reset or to restart the timer. If you do not use these operators, the Timer function can only be triggered once. SNMP Trap The SNMP Trap function sends an SNMP trap to one or more IP destinations. The trap number can be any number between 1 and 20. (You may need to consult with your network administrator to determine how trap numbers will be used and defined on your network.) Select the THEN/ELSE action for SNMP Trap and click the property button ( ) to enter the SNMP Settings window. You can also bind the status of up to three I/O channels within each trap. Click the Set SNMP button ( ) to specify up to 10 recipients for the SNMP trap. Active Message In response to a proper IF condition, the Active Message function sends a customized message to one or more IP destinations by TCP or UDP packets. Select the THEN/ELSE action for Active Message and then click the property button ( ) to enter the Message Content Settings window. Enter your desired message in the Message Content column. Dynamic fields such as time, date, IP address, and I/O status can be inserted in your message by clicking Keyword Lookup. Messages are sent in ASCII by default, but can be sent in HEX by selecting the “Send as HEX (separated by “,”)” checkbox. Click the Set Active Message button ( ) to configure the default parameters such as the messaging protocol (TCP or UDP), socket port (9000 by default), and the up to 10 target message servers. 4-32 ioLogik W5300 Cellular Micro RTU Controller Click&Go Logic Active Messages can be received by a program using standard sockets, Moxa MXIO library, or ioAdmin’s Message Monitor, as shown in the following screen shot: When sending a message in HEX, each HEX value must be separated by commas. View the incoming message on the Message Monitor panel and select the HEX checkbox. Note that certain numbers are control characters that will not show up in the Message Monitor. When sending a unicode message, the UCS2 checkbox must be selected. View incoming messages on the Message Monitor panel and select the UCS2 checkbox. Note that certain numbers are control characters that will not show up on the Message Monitor panel. The maximum number of characters is 200. 4-33 ioLogik W5300 Cellular Micro RTU Controller Click&Go Logic E-mail The E-mail function sends a customizable e-mail to one or more mail boxes or Blackberry devices. Select the THEN/ELSE action to e-mail and click the property button ( ) to enter the Mail Settings window. After entering the subject of an e-mail, enter the message in the Mail Content area. Dynamic fields such as time, date, IP address, and I/O status can be inserted in your message by clicking Keyword Lookup. NOTE Content in the same logic entry can be sent by either Active Message or e-mail, in which case the content of the messages will be the same. If you would like to send an Active Message and e-mail based on the same event but with different content, you will need to use two separate logic entries—one for the Active Message and one for the e-mail. SMTP server information including username/password, and the recipient database can be configured by clicking the Set Mail Address button ( ). Click the finger icon ( ) to move the selected address from the Recipient Database to the Recipient List. To manually add e-mail addresses to the Recipient Database, enter the Name and Mail Address and click Add. Once the address has been added to the Recipient Database, use the finger icons to move it to or from the Recipient List. Select Attach data log to specify that the log profile and period will be attached to the email. Set Hours to 24 if you would like to receive all logs generated in the past 24 hours. Short Message Service The Short Message Service function allows the user to configure the SMS in detail, including selecting recipients from the phone book, defining the escalation and acknowledgements, and defining the content of the SMS. If you select Send every__sec, the SMS will be sent to all the recipients at the same time; if you select 4-34 ioLogik W5300 Cellular Micro RTU Controller Click&Go Logic SMS Escalation, the SMS will be sent out in the sequence listed in the recipient list, and using the timeout interval. A recipient will stop receiving the SMS alarm when the preset maximum repeat times is reached, or when one receiver acknowledges receiving the SMS. NOTE Send every means to send the SMS to all the recipients; SMS Escalation will send SMS to the recipients sequentially and wait for the response (acknowledgement). Data Log Start/Stop The Data Log Start/Stop function provides the capability to start or stop logging based on a specific event (IF Conditions), such as to start logging when the pressure (AI) reaches the maximum limit and to stop logging when it returns to normal. 4-35 ioLogik W5300 Cellular Micro RTU Controller Click&Go Logic FTP Service The FTP Service function provides upload service for data log files stored on the SD card. Combining this function with Schedule or Timer in the IF condition will create periodical or scheduled uploads of the log file. Profile: Select a pre-configured FTP server. Hours: The ioLogik W5300 micro RTU Controller will send all the log files containing all the entries within this specified time period. Send Every: The datalogging file will be sent every this number of seconds. The following diagram gives an example. Log_01 to Log_05 were created by the same profile. If configuring the Hours to 24, the ioLogik will upload the entire Log_01, Log_02, and Current Log_03. In the Next 24 hrs, the ioLogik will upload the entire Log_03, Log_04, and Current Log_05. On the FTP Server, the Current Log_03 will be overwritten by the entire Log_03 when an additional 24 hrs has passed. 4-36 ioLogik W5300 Cellular Micro RTU Controller Click&Go Logic Activating the Rule-set Upload, Restart, and Run The rules that are displayed on the Click&Go Logic panel include the current rule-set, which acts as the brain of your ioLogik system. The rule-set must be activated as follows for the ioLogik to commence local control operation: 1. The rule-set must first be downloaded from ioAdmin to the ioLogik. To download the rule-set, click Upload to ioLogik from the Rule-set Management bar. 2. After the rule-set has been downloaded, ioAdmin will prompt to restart the ioLogik automatically after clicking “yes” to confirm. Do not use the reset button, since doing so will load all factory defaults and erase your rule-set from memory. 3. After the ioLogik has been restarted, the rule-set must be activated. Log in to ioAdmin as administrator, go to the Click&Go Logic panel and click Run in the Rule-set Management bar. The rules in the rule-set will now be active. When the rule-set has been activated, it will remain active even when the ioLogik is disconnected from the host computer or from the network. If the ioLogik is turned off, Cellular Micro RTU Controller operation will resume when it is turned back on, allowing you to use the ioLogik W5300 for PC-independent automation. Rule-set Management Bar When the rule-set has been activated from the Click&Go panel it will remain active even when the ioLogik is disconnected from the host computer or from the network. If the ioLogik is turned off, Cellular Micro RTU Controller operation will resume when it is turned back on, allowing you to use the ioLogik W5300 for PC-independent automation. • Clear: Erases the rule-set in both ioAdmin and the ioLogik W5300 series. • Retrieve: Copies the rule-set from the ioLogik W5300 into ioAdmin. • Upload to ioLogik: Copies the rule-set from ioAdmin to the ioLogik W5300. • Run: Activates the rule-set that the ioLogik booted up with. • Stop: De-activates the Click&Go rule-set and returns the ioLogik to normal, passive operation. Import/Export Configuration The ioLogik’s system configuration, including the current Click&Go rule-set, can be imported and exported. As you make changes to a rule-set, you can export the system configuration in order to save that rule-set. Details can be found in Chapter 2. Log in as ioAdmin administrator from the Server Settings panel. You must log in as administrator to gain access to the ioLogik’s configuration options. If a password has not been configured, simply click Login and leave the Password entry field blank. NOTE Since there are major structural changes between firmware versions, configuration files generated by firmware versions preceding V1.2 (included) for the ioLogik W5312 series, and firmware V1.4 (included) for the ioLogik W5340 series, cannot be imported to the latest version of the firmware. 4-37 ioLogik W5300 Cellular Micro RTU Controller Click&Go Logic 4-38 5 5. Planning and Assistance In this chapter, we will provide variety of real-life scenarios to help explain to you how to use the ioLogik W5300 to configure your system. The following topics are covered in this chapter: Known Issues of Cellular Monitoring Systems Configuring a Static IP Address for Active OPC Server Cellular Micro Controller Architecture Using ioAdmin to Perform Simple Data Monitoring from a Remote Site Expanding Input/Output Channels Using Modbus/TCP Protocol with Your Program Using Counter to Get Meter Readings and Statistics Record your I/O Data in the Data Log File Connecting a Modbus/RTU Serial Device Attached to the ioLogik over a Cellular Network Connecting to a SCADA System Updating Serial Tags to SCADA System with Active OPC Server over a Cellular Network Handling Front-End Events and Alarms SMS Escalation and Acknowledgement SMS Commands for Monitoring and Control Enabling the Power Saving Function and Secure Wake on Call Enabling Ethernet and Cellular Redundancy ioLogik W5300 Cellular Micro RTU Controller Planning and Assistance Known Issues of Cellular Monitoring Systems Cellular technology is well-suited for remote monitoring and alarm systems that cover a wide area, such as pipeline monitoring of public water supplies or natural gas systems. Using cellular technology to implement a remote monitoring system can save development, deployment, and maintenance time. However, problems such as dynamic IPs, low bandwidth, and unexpected disconnections must be overcome for the cellular monitoring system to achieve greater stability. Known Issue 1: Dynamic or Private IP over a Cellular Network Although cellular technology can make device communication easier, cellular networks were not designed for industrial devices, but for mobile phones. Since mobile phones only need a temporary IP to connect to the Internet, cell phones get a different temporary IP each time the mobile phone accesses the Internet. This is referred to as the Dynamic IP issue. Most telecom service providers assign temporary IPs when a mobile phone requests access to the Internet. A remote monitoring system using a cellular controller such as the ioLogik W5300 series should request a permanent IP to ensure stable bidirectional communications. For this reason, you may need to apply for a special data plan from the service providers or the mobile virtual network providers (MVNOs). As opposed to using the so-called “pull” or “passive” architecture, Moxa’s ioLogik W5300 Cellular Micro RTU Controllers are based on “active” technology, which works with the powerful cellular device management middleware, Active OPC Server. Active OPC Server runs on a central network computer that uses a static IP. Even if the Cellular Micro RTU Controllers work in a dynamic or private IP environment with a general data plan that is for a mobile phone, since the ioLogik W5300 micro RTU controllers contact the Active OPC Server (and not the other way around), once a connection is established the two sides of the connection can proceed with bi-directional communication. In addition, the built-in front-end intelligence called Click&Go control logic enables the ioLogik to report its I/O status, and send alarms and log data actively. Centralized software such as a SCADA system is now able to leverage this technology by connecting the Active OPC Server using Modbus/TCP or OPC Client Drivers instead of connecting to the remote ioLogik's IP address directly. Known Issue 2: Low Bandwidth and slow response time Cellular networks provide only low bandwidth transmission compared with wired CAT-5 Ethernet networks. Generally speaking, the response time of the GPRS network is about 4 to 10 seconds, and 1 to 3 seconds for 3G/HSPA networks. This means that the latency of data for one round trip is much slower than a millisecond level Ethernet network, resulting in system overload or shutdown when a large number of remote sites and large amount of information need to be exchanged. A better approach is to use an “active” architecture such as the ioLogik, and the Active OPC Server to reduce traffic and improve response time and decrease the use of the bandwidth. Another factor that could cause unexpected disconnection is the cellular signal strength. In some places, several communication channels could exist simultaneously, with each device accessing a different channel and using a different signal strength. This kind of random signal strength could result in unexpected disconnection. SMS (short messages) will not respond in time as expected, especially when using a data plan that is only for data transmission or at specific times, such the end of the year, when traffic volume is much higher. Known Issue 3: Unexpected Disconnection from Cellular Networks (Carriers) Although cellular network transmissions are charged by number of packets and not connection time, most vendors still refer to their service as “Always On.” However, a better description might be “always accessible” since in reality, cellular carriers optimize their IP resources, time slots, and the base station capacity by disconnecting connections that have been idle for a certain period of time. During this period, the mobile devices will not be aware of the disconnection, and this lapse in the actual connection could introduce a certain amount of unreliability in your remote monitoring and alarm system. If using “Always On” to keep your connection alive is not stable enough for your purposes, you must configure additional “Cellular Reconnection” settings to prevent being kicked off the network accidentally or without notification. See Chapter 4 for detailed settings. 5-2 ioLogik W5300 Cellular Micro RTU Controller Planning and Assistance Known Issue 4: Large Power Consumption when Attached to Base Stations There will be a peak power usage when attaching to base stations (900 mA @ 12 VDC). Although the ioLogik uses a low amount of power during normal usage (3-4 watts), we still recommend using a power supply that is greater than 5 watts. Configuring a Static IP Address for Active OPC Server When using an ioLogik W5000 cellular micro controller, one of the most important tasks is choosing a static IP host PC to run Active OPC Server. A proper setup will ensure that the ioLogik W5300 works properly in the following environments: 1. Virtual Private Network A VPN (Virtual Private Network) is a service that groups all related devices into one network, but users need to purchase cellular on-line services and apply for VPN membership. When the Cellular device dials up, it will get a private static IP assigned by the telecom service provider (Carrier or MVNO). The private IP is on the same network segment as the host. The host and devices can communicate bi-directionally using a polling architecture. Most telecom service providers will not offer small volume service packages to enterprise clients. A mobile virtual network operator (MVNO) is a company that provides cellular services but does not have its own licensed frequency allocation of the radio spectrum, and does not necessarily have the infrastructure needed to provide mobile telephone services. An MVNO subscribes to several cellular services and then rents the services out to customers who only need a small quantity of IP service. Normally, the MVNO also builds up a VPN server to separate their groups, and in effect provide the same services provided by a VPN. 2. Network with Public Static IP Devices A Public Static IP can be accessed anywhere and anytime, such as over the Internet. Although most carriers use private dynamic IPs for mobile phones, some carriers will provide Public Static IPs for specific applications. The downside of Public Static IP service is that it comes at a much higher price. Some telecom service providers can assign a fixed IP to one specific SIM card. While all I/O devices have their own fixed IP address, the entire system will run as a traditional monitoring system with physical wires. This solution has the benefit exhibiting the same behavior as a wired solution. However, not all telecom service providers offer this kind of service, and those that do offer it at a relatively high cost. 3. New Cellular Network with Active Architecture A new type of cellular network based on push technology is now available. This type of service requires a host PC with a public static IP, allowing all remote cellular devices to connect to the host PC, regardless of whether or not the device has a public or private IP. The Active OPC Server software running on a PC with a static IP is required to update the devices’ IP and the fixed device name. After connecting to the cellular network, all operations can follow the original infrastructure of the mobile phone provider. Moxa’s ioLogik W5000 series Cellular Micro RTU Controllers are based on push technology with Active OPC Server. Active OPC Server, which runs on a PC with static IP, will receive and register the Cellular Micro RTU Controller’s IP and create a connection while the Cellular Micro RTU Controller is on line. Once the connection has been created, bi-directional communication can ensue. The built-in front-end intelligence, Click&Go logic, 5-3 ioLogik W5300 Cellular Micro RTU Controller Planning and Assistance enables the ioLogik to report its I/O status, alarms, and log data actively. NOTE If the Active OPC Server is installed in the DMZ or even the LAN, be sure to configure the router or firewall settings to allow and redirect those necessary TCP ports such 9300, 9900, 9500, and 502 for remote access from the ioLogik W5300. See Appendix F for details. Cellular Micro Controller Architecture The following diagram illustrates the overall architecture of the ioLogik 5300 series cellular controller. The ioLogik 5300 controller supports remote monitoring, and you can configure the machine via ioAdmin and connect to a SCADA system through an OPC client/server or Modbus/TCP. You can push datalog files to the FTP server, and connect field serial devices through a serial tunnel. In addition, the ioLogik W5300 supports event alarms by email, SNMP Trap, and SMS. 5-4 ioLogik W5300 Cellular Micro RTU Controller Planning and Assistance In the following sections, we illustrate how to set up an environment for the ioLogik W5300. Using ioAdmin to Perform Simple Data Monitoring from a Remote Site Scenario: Users would like to check the I/O status at the central site. The ioAdmin monitoring and configuration utility will be used to monitor the remote site I/O status. The related network structure and diagram are shown below. Environment: 1. Active OPC server: Public Static IP: 59.124.42.169 Internal Static IP: 192.168.19.19 2. Central site: Internal Static IP: 192.168.19.207 Diagram: Implementation: Step 1: Following Chapter 2 instructions, insert the SIM card in the W5340 and connect it to the sensors. Step 2: Install ioAdmin in the host and run ioAdmin. Step 3: Connect to the host and ioLogik W5340 via the Ethernet Console. Step 4: Configure the “Cellular settings,” including the Dial-up setting and Operation Modes. Step 5: Input the Active OPC Server address on the “Active Tags” panel. Step 6: Install the Active OPC Server on a PC with static IP address and ensure the IP address of the Active OPC Server is available and accessible from the remote ioLogik. Step 7: Before starting use Active OPC server, make sure TCP ports 9900, 9500, 9300, and 502 are available by configuring the local router or firewall in the IP address is located in the LAN. 5-5 ioLogik W5300 Cellular Micro RTU Controller Planning and Assistance Step 8: Start ioAdmin and add Active OPC server manually. Note: Selecting “AOPC” from the broadsearch menu is also OK if the AOPC and the ioAdmin are installed on the same PC or the same local network. Step 9: After adding Active OPC Server you should see the following screen. Click the “Refresh” button to use ioAdmin to monitor and configure the ioLogik W5300. 5-6 ioLogik W5300 Cellular Micro RTU Controller Planning and Assistance Expanding Input/Output Channels Scenario: A monitoring system for a pumping station does not have enough I/O channels, and the user would like to add more I/O channels to meet system requirements. In addition to the existing 4 AIs, 8 DIOs, and 2 Relay Outputs, they are using the ioLogik E1210 and E1211 to add an additional 16 DIs and 16 DOs. Implementation: Step 1: Connect to the ioLogik E1210 and E1211 and start the Web Consoles for these two products. Step 2: Configure and export the configuration files of these two models. The file names will be ik1210.txt and ik1211.txt. Step 3: Use Ethernet cables to daisy-chain the W5340, E1210, and E1211, and connect to the host PC through the E1211’s Ethernet port. Step 4: Start ioAdmin with the selected W5340 and choose “I/O expansion.” Step 5: Click the “Expansion Modules” row and then click the “ADD” button. ioAdmin will prompt you to import the E1200 series configuration. Step 6: In the open file window, choose the configuration file for the E1210 (e.g., ik1210.txt). Step 7: You can find the E1210 in the “Expansion Modules” table. Repeat steps 5 and 6 to add the E1211. Step 8: After adding the E1210 and E1211, reboot the W5340 to activate this function. 5-7 ioLogik W5300 Cellular Micro RTU Controller Planning and Assistance Step 9: After rebooting, log in to ioAdmin as Administrator and choose “I/O Configuration.” You will see the following screen, which indicates that the additional I/O channels were successfully installed. Step 10: Click&Go will continue running when the connection between the ioLogik W5300 and expansion modules is down,. You can use the trigger condition “Expansion module connection fail” to let Click&Go warn you when the connection is down. To do this, choose the Click&Go Tab, adding the rules as shown in the following figure. Step 11: Save the logic settings and restart the system. After restarting, click the “Run” button on the Click&Go panel to make sure the Click&Go rule is running. Step 12: When a disconnection occurs, an SMS alarm message will be sent to the predefined mobile phone. NOTE Three devices can be added to the “Expansion Modules” table in any order. The slot No. is based on the order of the list, and does not depend on the order in the which the expansion modules were added. 5-8 ioLogik W5300 Cellular Micro RTU Controller NOTE Planning and Assistance The following ioLogik E1200 models are supported for the I/O expansion: E1210 (16 DIs), E1211 (16 DOs), E1212 (8 DIs and 8 DIOs), E1214 (6 DIs and 6 Relays), E1240 (8 DIs), E1241 (4AOs), E1242(4AI, 4DIs, and 4DIOs), E1260(6RTDs), and E1262(8TCs). ( Plus all Wide-Temperature ioLogik 1200 models) Using Modbus/TCP Protocol with Your Program Scenario: Most customers would like to use their own HMI program to collect relevant information from different remote sites. The most common way of doing this is to use Modbus/TCP. The following example illustrates the procedure: Environment: 1. Active OPC server: Public Static IP: 59.124.42.169 Internal Static IP: 192.168.19.19 2. Central site: Internal Static IP: 59.124.42.169 3. W5300 IP: 116.59.60.232 (a public IP is required) Diagram: Internet Active OPC Server CELLULAR Network IP: 59.124.42.169 W5300 Central Host IP: 116.59.60.232 IP: 59.124.42.169 We use ModScan32 to illustrate (ModScan32 is a product of WinTech, and can be downloaded from the WinTech website). Step 1: Install ModScan32 on your central host, with IP address 59.124.42.169. Step 2: Set up your ioLogik W5300 Micro RTU Controller as follows: • Connect DO-4 to DI-0 and DI-1 • Set DO-4 as 1Hz pulse output. Step 3: Power on the W5300 and check the I/O status in ioAdmin. The status of DI-0 and DI-1 should have changed to 1 Hz frequency. Step 4: Configure the cellular settings on the Cellular Settings panel and the Active OPC Server’s IP Address on the Active Tags panel, and then restart the ioLogik W5300. After restarting the system, the ioLogik W5300 should be assigned an IP address. Step 5: If step 4 was completed successfully, remove the Ethernet console cable to force the W5300 get a response from the cellular network. Step 6: From your computer’s command line mode, ping IP address 116.59.60.232. If the ping is successful, proceed to the next step. NOTE Some service providers (carriers) forbid and will filter this actiion. 5-9 ioLogik W5300 Cellular Micro RTU Controller Planning and Assistance Step 7: Click on the ModScan32 icon to open ModScan32, as shown below. Step 8: Click Connection on the toolbar and choose Remote TCP/IP server in the Connect Using column. Input the W5300’s IP address in the IP Address column and then click OK. Step 9: Choose New from the File menu. 5-10 ioLogik W5300 Cellular Micro RTU Controller Planning and Assistance Step 10: Look up the DI-0 and DI-1 Modbus addresses in the user’s manual, as shown below. Step 11: Input relevant information. Step 12: Choose the Setup option from the toolbar and click on Data definition. Next, change the Scan Rate value from 1000 ms to 200 ms. Step 13: You should now be able to see the DI-0 and DI-1 real time status. Using Counter to Get Meter Readings and Statistics Scenario: In water pipeline monitoring applications, water flow volume is a very important monitoring factor, since it can be used as an indication of leaking. The sensor used to monitor water flow volume is called a flow meter. Most flow meters have a pulse output of 4 to 20 mA signal output, which the user needs to convert to water flow in their own PC software. In this case, we will show you how to use the ioLogik W5300’s virtual channel function to convert the counter input signal to the actual flow volume. 5-11 ioLogik W5300 Cellular Micro RTU Controller Planning and Assistance Setup Procedure: Step 1: Open ioAdmin and set up your micro controller as follows: • Connect DO-4 to DI-0. • 1.2. Configure DO-4 for 1 Hz pulse output. • 1.3. Configure DI-0 for counter input mode. Step 2: We assume that DI-0 is already connected to the flow meter. Step 3: Right click on DI-0 from the I/O Configuration panel. Step 4: Select the Counter Scaling tab in the popup window. Step 5: Configure the scaling formula and update the sampling time. Step 6: Close the popup window. Step 7: Choose virtual channel (shown as VC-00), and select the source channel. We use DI-00 for this example. Step 8: Select the operation mode from Max, Min., Average, Accumulation, Instantaneous, and Incremental. Step 9: Close the popup window. Step 10: Check the value on the I/O configuration Panel. The virtual channel value can be updated to AOPC with the Active Tags function. 5-12 ioLogik W5300 Cellular Micro RTU Controller Planning and Assistance Record your I/O Data in the Data Log File Scenario: A cellular communication system has lost its connection unexpectedly. If the user stores data in a PC database, the database may lose data when the cellular network is disconnected. For this reason, the ioLogik W5300 provides a front-end data logging function with its own built-in SD slot for storing the I/O data. The data file can be uploaded to the host PC via the FTP protocol and Click&Go logic. By using the SD card solution, users can avoid the “missing data” problem that plagues traditional solutions. Log Profile Creation Step 1: Insert a 2 GB or smaller SD card into the SD slot, and insert a SIM card. Step 2: Start ioAdmin in administrator mode. Configure the Cellular Settings first. Step 3: Go to the Click&Go tab and click on the Data logging icon on the Global Variable Toolbar. Step 4: Click the New button to create a new log profile. 5-13 ioLogik W5300 Cellular Micro RTU Controller Planning and Assistance Step 5: In the new profile, click Enable to activate the profile, specify the settings, and then click Next to proceed. Step 6: Select the channels that needed to be logged, and then click the Finish button. 5-14 ioLogik W5300 Cellular Micro RTU Controller Planning and Assistance Step 7: Click the Save button. If you select Start for the initial state in Step 5, data logging will start immediately when the profile is created. Log File upload with FTP Step 1: Click the FTP settings icon on the Click&Go Global Variables toolbar. Step 2: Specify the FTP server address and account, and then click Add. 5-15 ioLogik W5300 Cellular Micro RTU Controller Planning and Assistance Step 3: Double click on the Click&Go rule entry. Step 4: In the IF Condition, select Schedule and then configure its properties to upload every midnight 00:00 to 00:15. NOTE The Timer function can also be used for other applications. 5-16 ioLogik W5300 Cellular Micro RTU Controller Planning and Assistance Step 5: In the THEN Action, select FTP Service and specify which profile’s log files will be uploaded. Step 6: On the Click&Go panel, click Upload to ioLogik to upload to the ioLogik W5300. Click Yes to restart the ioLogik system. 5-17 ioLogik W5300 Cellular Micro RTU Controller Planning and Assistance Step 7: On the Click&Go panel, click Run to activate the logic. The Log file will be uploaded based on the current settings. NOTE The function is dependent on the firmware version. Be sure to use firmware V1.3 or above for the ioLogik W5312 series, and firmware V1.5 or above for the ioLogik W5340 series. 5-18 ioLogik W5300 Cellular Micro RTU Controller Planning and Assistance Connecting a Modbus/RTU Serial Device Attached to the ioLogik over a Cellular Network Scenario: In the water industry, warning systems use both IOs and serial meters to get complete status information. The ioLogik W5300 has built-in serial ports that support attaching Modbus/RTU serial meters with RS-232 or RS-485. Setup Procedure: Step 1: Start ioAdmin as administrator. Step 2: Choose the Meter/Sensor tab. Step 3: Set the serial port parameters: RS-232, RS-485, Baudrate, Stop Bits, etc. Step 4: Click Modbus TCP Modbus RTU Gateway to choose the operation mode. There are two modes to choose from: transparent mode and Modbus/RTU mode. Step 5: Connect the field serial device via the serial port, making sure that the signal wiring is correct. Step 6: By specifying the W5340’s IP address and the ID of the attached serial devices, you can use the Modbus/TCP master to query the remote serial device. NOTE The Modbus Slave ID for the ioLogik W5300 is fixed at 1, which means that the ID of the Modbus/RTU meters attached to the ioLogik should start from 2 to 247. Connecting to a SCADA System Scenario: Most control centers use SCADA systems, such as InTouch, to monitor the status of their entire system. The ioLogik W5300 with Active OPC server can feed data into the SCADA system. In this situation, the SCADA system can use its built-in OPC Client/Server architecture to control the system. Environment SCADA System and Active OPC Server: Public Static IP: 59.124.42.169 Internal Static IP: 192.168.19.19 Central site: Internal Static IP: 192.168.19.19 5-19 ioLogik W5300 Cellular Micro RTU Controller Planning and Assistance Diagram Internet Cellular Network Central Host with SCADA Active OPC Server W5300 IP: 116.59.60.232 IP: 59.124.42.169 Setup Procedure Step 1: Install the SCADA system and Active OPC server on the same host PC with IP address 59.124.42.169. Step 2: Open ioAdmin as administrator. Step 3: Choose Active Tags and input the host PC IP address in the Active OPC Server Address column. Step4: Select 4 AIs for update tags and then click the Create Tags button. Step 5: ioAdmin will prompt you to restart the device. Step 6: Open Active OPC server. You will see the device and data for 4 AIs in the display window. Step 7: Connect to the SCADA system and choose the OPC server as Moxa Active OPC Server. Step 8: Follow SCADA instruments to create data tags for these 4 analog inputs. Step 9: After creating these 4 tags, place them in a suitable position on the SCADA screen. You can find these values in the SCADA display. 5-20 ioLogik W5300 Cellular Micro RTU Controller Planning and Assistance Updating Serial Tags to SCADA System with Active OPC Server over a Cellular Network Scenario: For many applications, a remote site not only needs to be monitored for physical IOs that measure environmental or facility conditions, but must also coordinate data output from serial meters. The ioLogik W5300 has a 3-in-1 serial port built in that supports attaching field serial Modbus/RTU meters (either RS-232 or RS-485), and allows the integration of this serial data so that it can be uploaded to the SCADA system via the Moxa Active OPC Server software. Setup Procedure Step 1: Start ioAdmin as administrator. Step 2: Choose the Meter/Sensor tab. Step 3: Set the serial port parameters: RS-232, RS-485, Baudrate, Stop Bits, etc. Step 4: Click Modbus Serial Tags to choose the operation mode. Step 6: Click on the Tag Settings button at the right. Step 7: Add the serial Tags. Refer to the attached serial device’s Modbus Address table for further details. 5-21 ioLogik W5300 Cellular Micro RTU Controller Planning and Assistance Step 8: After clicking OK, restart the ioLogik by right clicking the selected ioLogik from ioAdim. Step 9: On the Active Tags panel, specify the Active OPC Server’s IP Address, and then click the Update button. Repeat Step 8 to restart the ioLogik. Click on Slot#04 Serial Tag and specify which tags need to be created for the Active OPC server. Next, click the Create button. Step 10: The new serial tags will be created under the S04-Serial node in Active OPC Server. NOTE The function is dependent on the firmware version. Be sure to use firmware V1.3 or above for the ioLogik W5312 series and firmware V1.5 or above for the ioLogik W5340 series. 5-22 ioLogik W5300 Cellular Micro RTU Controller Planning and Assistance Handling Front-End Events and Alarms Scenario: This application uses many unmanned sites, and the customer would like to receive an alarm if the monitored status changes. We assume that the water level of the water tank is measured with DI-1. The DI-1 starts as OFF, which indicates a normal water level. If the water’s level reaches the high limit, the DI-1 status will change to ON. In addition, the SMS alarm will be initiated and sent directly to your mobile phone. Setup Procedure Step 1: We will assume that DI-1 is already connected with the water level (On/Off) sensor. Step 2: Start ioAdmin as administrator. Step 3: Click the Click&Go Logic tab and double click the blank rule. Step 4: Input the Click&Go logic shown below (refer to Chapter 4 for details). If DI=On Then Send SMS Step 5: Don’t forget to set up the phone number shown at the bottom of the message window. Step 6: Close the popup window, click Upload to ioLogik, and then reboot the device. Step 7: After rebooting, click Run. The logic will go live. Once the water level is detected by a sensor, your mobile phone will receive the SMS. NOTE 1. The above procedure can be handled over the LAN or from a remote location. 2. The E-Mail, SNMP Trap, and TCP/UDP alarm can be configured in the same way. 5-23 ioLogik W5300 Cellular Micro RTU Controller Planning and Assistance SMS Escalation and Acknowledgement Scenario: In this example we describe how to use the SMS alarm function to configure escalation and acknowledgement. Setup Procedure Step 1: First specify the SMS Phone Book on the Click&Go Logic panel. Step 2: Double click the 1st rule to configure the logic to send out an SMS. In this example, DI = Off-to-On triggers the SMS. 5-24 ioLogik W5300 Cellular Micro RTU Controller Planning and Assistance Step 3: In the THEN settings, select Short Message Service and click the Properties button to see detailed settings. On the SMS Content panel, select the receivers from the phone book. Note that multiple receivers can be selected. Select SMS Escalation to activate this function. Step 4: Click Upload to ioLogik and Run to activate the logic. 5-25 ioLogik W5300 Cellular Micro RTU Controller Planning and Assistance Step 5: If the SMS alarm is triggered, an alarm message will be received with the reply notice. Step 6: Follow this example’s settings. If the 1st receiver does not acknowledge with an SMS reply within 15 minutes, the ioLogik will send an alarm to the 2nd receiver. This loop will be repeated a total of 3 times. For more SMS commands please refer to Appendix C NOTE When using the SMS related function, be sure to get an appropriate data plan from your cellular provider. For example, a SIM card that only supports data service has the lowest priority to send or receive an SMS. In such cases, users must activate the voice service on this SIM to ensure faster response for the SMS. We strongly recommend checking with your service provider for details. NOTE The function is dependent on the firmware version. Be sure to use firmware V1.3 or above for the ioLogik W5312 series and firmware V1.5 or above for the ioLogik W5340 series. SMS Commands for Monitoring and Control Scenario: In this example we specify how to use SMS commands to monitor the status and provide an ioLogik W5300 Micro RTU Controller with output control. 5-26 ioLogik W5300 Cellular Micro RTU Controller Planning and Assistance Setup Procedure Step 1: The SMS command starts and ends with a # sign, and is divided into get and set commands. Refer to the appendix for details. Multiple commands can be integrated with an ampersand (&) sign. SMS commands are not case sensitive. Step 2: Wait for the SMS message to return. The ioLogik W5300 Micro RTU Controller will always reply to a correct command. Step 3: Syntax and examples: For more SMS commands please refer to Appendix C NOTE Output control via SMS is forbidden if the output channel is currently in use by the Click&Go logic. Integrate the Internal Register function for output control. NOTE When using the SMS related function, be sure to get an appropriate data plan from your cellular provider. For example, a SIM card that only supports data service has the lowest priority to send or receive an SMS. In such cases, users must activate the voice service on this SIM to ensure faster response for the SMS. We strongly recommend checking with your service provider for details. NOTE The function is dependent on the firmware version. Be sure to use firmware V1.3 or above for the ioLogik W5312 series and firmware V1.5 or above for the ioLogik W5340 series. 5-27 ioLogik W5300 Cellular Micro RTU Controller Planning and Assistance Enabling the Power Saving Function and Secure Wake on Call Scenario: In this example we describe how to use the ioLogik W5300’s power management function. Setup Procedure Step 1: Start ioAdmin as administrator. Step 2: Select the Cellular Settings tab and set the operation mode to On Demand. The Cellular will remain in GSM standby mode. The I/O function, Click&Go, and Data Logging functions will continue to work properly. Step 3: Checkmark the “Wake on Call” checkbox. Step 4: Input the appropriate phone numbers in the Caller ID column. You may input a maximum of 5 phone numbers. Step 5: After restarting the system, you can use your cell phone to connect the device to the Cellular network. 5-28 ioLogik W5300 Cellular Micro RTU Controller Planning and Assistance Enabling Ethernet and Cellular Redundancy Scenario: In this example we describe how to enable the Ethernet port as the primary interface and use the cellular interface as backup. Setup Procedure Step 1: On the Cellular Settings tab, select Ethernet Wan (Cellular Backup) as the Operation Mode. Step 2: Specify the Dest.IP/URL for the alive check for the Ethernet interface. Click Update and restart the ioLogik to activate this function. NOTE The Dest.IP/URL must be specified so the Ethernet port will detect and switch to the backup cellular interface when the primary Ethernet Interface fails. 5-29 A A. Pin-outs and Cable Wiring The following topics are covered in this appendix: Pinouts CN1: SMA, Cellular Antenna Connector CN2: DB9, Male, RS-232 Connector CN3: RJ-45, Ethernet Connector TB1: Power Input Terminal Block TB2: I/O Terminal Block (W5340) TB3: 5-pin, 4-wire/2-wire RS-422/485 Terminal Block TB2: I/O Terminal Block (W5312) Cable Wiring Digital Input Dry Contact Digital Input Wet Contact Digital Output Sink Mode Relay Output Analog Input ioLogik W5300 Cellular Micro RTU Controller Pin-outs and Cable Wiring Pinouts CN1: SMA, Cellular Antenna Connector CN2: DB9, Male, RS-232 Connector PIN RS-485 Signals 1 DCD 2 RxD 3 TxD 4 DTR 5 Signal GND 6 DSR 7 RTS 8 CTS 9 N.C. CN3: RJ-45, Ethernet Connector PIN Signals 1 TxD+ 2 TxD- 3 RxD+ 4 – 5 – 6 RxD- 7 – 8 – A-2 ioLogik W5300 Cellular Micro RTU Controller Pin-outs and Cable Wiring TB1: Power Input Terminal Block TB2: I/O Terminal Block (W5340) Terminal Block (Left) Terminal Block (Right) PIN Signals PIN Signals 1 VINO+ 13 VIN2+ 2 VINO- 14 VIN2- 3 VIN1+ 15 VIN3+ 4 VIN1- 16 VIN3- 5 DI_COM1 17 DI_COM2 6 DIO0 18 DIO4 7 DIO1 19 DIO5 8 DIO2 20 DIO6 9 DIO3 21 DIO7 10 GND 22 GND 11 R0_NO 23 R1_NO 12 R0_C 24 R1_C TB3: 5-pin, 4-wire/2-wire RS-422/485 Terminal Block Pin RS-422/485(4W) RS-485(2W) 1 Signal GND GND 2 TxD-(A) – 3 TxD+(B) – 4 RxD-(A) Data-(A) 5 RxD+(B) Data+(B) A-3 ioLogik W5300 Cellular Micro RTU Controller Pin-outs and Cable Wiring TB2: I/O Terminal Block (W5312) Terminal Block (Left) Terminal Block (Left) Pin Signals Pin Signals 1 DI_COM0 13 DI_COM1 2 DI0 14 DI4 3 DI1 15 DI5 4 DI2 16 DI6 5 DI3 17 DI7 6 DIO8 18 DIO10 7 DIO9 19 DIO11 8 GND 20 GND 9 DO0 21 DO4 10 DO1 22 DO5 11 DO2 23 DO6 12 DO3 24 DO7 Cable Wiring Digital Input Dry Contact Digital Input Wet Contact NPN Type Sensors Connection A-4 ioLogik W5300 Cellular Micro RTU Controller Pin-outs and Cable Wiring PNP Type Sensors Connection Digital Output Sink Mode Relay Output Analog Input ATTENTION When connecting the I/O device to the ioLogik’s dry contacts, we strongly recommended connecting DI.Com to the power of the external sensor to avoid affecting other channels. A-5 B B. SMS Commands SMS commands help users use short messages to monitor or control the I/O status of an ioLogik W5300 Micro RTU Controller system. The following topics are covered in this appendix: SMS Command Syntax: SMS Command Table ioLogik W5300 Cellular Micro RTU Controller SMS Commands SMS Command Syntax: #GetSMS?command_channel=?&command_channel=?...# #SetSMS?command_channel=X&command_channel=X...# Details: 1. SMS commands start and end with a “#” sign. 2. Multiple commands can be integrated using an “&” sign. 3. No space or carriage return/linefeed (enter) are allowed between characters. 4. Commands are NOT case sensitive. 5. To query status, use “GetSMS?” after the 1st “#” sign. a. Use “=?” after a query command (Read, or Read/Write privilege) 6. To control an output, use “SetSMS?” after the 1st “#” sign. a. Use “=X” after a control command (Read/Write privilege), where X means the actual command parameters such as 0 (On), 1 (Off), or value (expansion AO channels). b. The ioLogik will response with the current output status if the commands are received and processed correctly. c. Output control is forbidden if the target channel is currently in use by the Click&Go logic. Integrate the Internal Register function in the Click&Go logic to perform such tasks by controlling the Internal Registers. 7. The ioLogik will not respond to illegal commands or wrong control parameters. 8. Only the first 140 characters of a response will be kept; the rest will be discarded. 9. SMS message content: a. Format: ASCII b. Maximum number characters: 140 SMS Command Table System Information Commands: SMS Command Attribute Note DATE Read Current Date TIME Read Current Time IP Read Current LAN IP address WIP Read Current WAN(Cellular) IP address LOC Read Server Location DESC Read Server Description FWR_V Read Current Firmware Version MOD_NAME Read Model Name SN_NUM Read Serial Number MAC_ADDR Read MAC Address EXP_MOD_NUM Read Number of attached E1200 modules EXP_DEV_MOD_TYPE Read Expansion ioLogik E1200 Type DEV=Device slot number, start index:01 Example: 1. Query ioLogik W5300 system date: #GetSMS?DATE=?# 2. Query the ioLogik W5300 Server Location: #GetSMS?LOC=?# 3. Query the ioLogik W5300 Server Time and LAN IP: #GetSMS?TIME=?&IP=?# B-2 ioLogik W5300 Cellular Micro RTU Controller SMS Commands Local I/O Commands: SMS Command Attribute AIEnable_CH Read Note AI channel is enabled or not 0=Off, 1=On CH = Channel number, start index:00 AIValue_ CH Read AI Value CH = Channel number, start index:00 AI_ CH Read Scaled AI value AIRange_ CH Read Current AI mode, +/-5V, 0-10V, +/-10V、0-20mA, or 4-20mA AIMin_CH Read Minimal AI Value CH = Channel number, start index:00 to 04 CH = Channel number, start index:00 CH = Channel number, start index:00 AIMax_CH Read Maximal AI Value DIO_DIRECT_CH Read DIO Direction, DI or DO DIMode_CH Read DI Mode, DI or Counter CH = Channel number, start index:00 CH = Channel number, start index:00 CH = Channel number, start index:00, DIStatus_CH Read DI Status, ON or OFF CH = Channel number, start index:00 DIFilter_CH Read DITrigger_CH Read DICntStart_CH Read DI Filter, unit: ms CH = Channel number, start index:00, DI Trigger, LtoH, or HtoL CH = Channel number, start index:00 DO Counter is started or not, 0=OFF, 1=ON CH = Channel number, start index:00 DICNT_CH Read DI Counts. CH = Channel number, start index:00 DOMode_CH Read DO Mode, DO or PWM(pulse output) DOStatus_CH Read/Write CH = Channel number, start index:00 DO Status, 0=OFF, 1=ON. CH = Channel number, start index:00 DOLowWidth_CH Read DO Low Width, unit: ms CH = Channel number, start index:00 DOHighWidth_CH Read DOPulseStart_CH Read/Write DO High Width, unit: ms CH = Channel number, start index:00 DO Pulse is started or not, 0=OFF, 1=ON CH = Channel number, start index:00 DOTotalRelayCNT_CH Read Relay Total Counts CH = Channel number, start index:00 DOCurrentRelayCNT_CH Read Relay Current Counts. CH = Channel number, start index:00 Example: 1. Query the 1st DI the ioLogik W5300 system: #GetSMS?DIStatus_00=?# 2. Configure the 2nd relay output(DO_09) of the ioLogik W5340 to On: #SetSMS?DOStatus_09=1# B-3 ioLogik W5300 Cellular Micro RTU Controller SMS Commands Expansion I/O Commands: SMS Command Attribute EXP_DEV_AIValue_CH Read Note Expansion AI Value DEV=Device slot number, start index:01 CH = Channel number, start index:00 EXP_DEV_AI_CH Read Scaled Expansion AI Value DEV=Device slot number, start index:01 CH = Channel number, start index:00 EXP_DEV_AIRange_CH Read Expansion AI Range, 4-20mA or 0-10VDC DEV=Device slot number, start index:01 CH = Channel number, start index:00 EXP_DEV_AIMin_CH Read , Expansion Minimal AI Value. DEV=Device slot number, start index:01 CH = Channel number, start index:00 EXP_DEV_AIMax_CH Read Expansion Maximal AI Value DEV=Device slot number, start index:01 CH = Channel number, start index:00 EXP_DEV_AOMode_CH Read Expansion AO Mode, 4-20mA or 0-10VDC DEV=Device slot number, start index:01 CH = Channel number, start index:00 EXP_DEV_AOValue_CH Read/Write Expansion AO Value, 12 bit, Range=0-4095 DEV=Device slot number, start index:01 CH = Channel number, start index:00 EXP_DEV_AO_CH Read Expansion Scaled AI Value DEV=Device slot number, start index:01 CH = Channel number, start index:00 EXP_DEV_DIO_DIRECT_CH Read Expansion DIO Direction, DI or DO. DEV=Device slot number, start index:01 CH = Channel number, start index:00 EXP_DEV_DIMode_CH Read Expansion DI Mode, DI or Counter DEV=Device slot number, start index:01 CH = Channel number, start index:00 EXP_DEV_DIStatus_CH Read Expansion DI Status. ON or OFF DEV=Device slot number, start index:01 CH = Channel number, start index:00 EXP_DEV_DICNT_CH Read Expansion DI Counts DEV=Device slot number, start index:01 CH = Channel number, start index:00 EXP_DEV_DOMode_CH Read Expansion DO Mode, DO or PWM(pulse output) DEV=Device slot number, start index:01 CH = Channel number, start index:00 EXP_DEV_DOStatus_CH Read/Write Expansion DO Status, 0=OFF, 1=ON DEV=Device slot number, start index:01 CH = Channel number, start index:00 EXP_DEV_DOPulseStart_CH Read/Write Expansion DO Pulse is started or not, 0=OFF, 1=ON DEV=Device slot number, start index:01 CH = Channel number, start index:00 EXP_DEV_DOTotalRelayCNT_CH Read Expansion Relay Total Counts DEV=Device slot number, start index:01 CH = Channel number, start index:00 EXP_DEV_RTDValue_CH Read Expansion RTD Value DEV=Device slot number, start index:01 CH = Channel number, start index:00 B-4 ioLogik W5300 Cellular Micro RTU Controller EXP_DEV_RTDType_CH SMS Commands Read Expansion RTD Type DEV=Device slot number, start index:01 CH = Channel number, start index:00 EXP_DEV_RTDUnit_CH Read Expansion RTD Unit, C/F or Ohm DEV=Device slot number, start index:01 CH = Channel number, start index:00 EXP_DEV_TCValue_CH Read Expansion TC Value DEV=Device slot number, start index:01 CH = Channel number, start index:00 EXP_DEV_TCType_CH Read Expansion TC Type DEV=Device slot number, start index:01 CH = Channel number, start index:00 EXP_DEV_TCUnit_CH Read Expansion TC Unit, C/F, or mV. DEV=Device slot number, start index:01 CH = Channel number, start index:00 Example: 1. Query 1st AI channel of the expansion iologik E1240(8AI) in the 1st slot of the ioLogik W5300 system: #GetSMS?EXP_01_AIValue_00=?# 2. Configure the output of the expansion ioLogik E1241(4AO) in the 3rd slot of the ioLogik W5300 system: #SetSMS?EXP_03_AOValue_00=1023# Internal Registers (Integer): SMS Command Attribute Note IR_CH Read/Write Internal Registers, CH= Channel Number, Range: 00 to 23. Content: 0 to 255 Example: 1. Configure the 1st internal register (IR_00) to 128: #SetSMS?IR_00=128# Option Commands: SMS Command Attribute Note pwd=”password” Attach Console Password Due=Date Attach an expiration date, format: Date Format: YYYYMMDDHHMM Details: 1. Option commands should be combined with the GetSMS?, SetSMS? Commands, and “<””>” signs at the beginning of the entire command line.. 2. Console passwords should be included with double quotation marks (“) 3. Multiple Option commands can be integrated using a “:” sign Example: 1. Attaching the console password: #SetSMS<pwd=”admin”>?DOStatus_03=1# 2. Attaching an expiration date: #SetSMS<DUE=201102180955>?DOStatus_03=1# 3. Attaching the console password and an expiration date: #SetSMS<DUE=201102180955:pwd=”admin”>?DOStatus_03=1# B-5 C C. Modbus/TCP Address Mapping There are two kinds of Modbus Address mapping for ioLogik cellular micro RTU controllers: one for the main system and the other for the expansion modules. This appendix provides the Modbus Address tables for the ioLogik W5300 series micro RTU controllers. Modbus Address maps for the expansion modules can be exported from the I/O Expansion tab in ioAdmin. The following topics are covered in this appendix: ioLogik W5340 and ioLogik W5340 HSPA Modbus Mapping 0xxxx Read/Write Coils (support functions 1, 5, 15) 1xxxx Read only Coils (supports function 2) 3xxxx Read only Registers (supports function 4) 4xxxx Read/Write Registers (supports functions 3, 6, 16) 5xxxx Write Registers (supports function 8) ioLogik W5312 Modbus Mapping 0xxxx Read/Write Coils (supports functions 1, 5, 15) 1xxxx Read only Coils (supports function 2) 3xxxx Read only Registers (supports function 4) 4xxxx Read/Write Registers (supports functions 3, 6, 16) 5xxxx Write Registers (supports function 8) ioLogik W5300 Cellular Micro RTU Controller Modbus/TCP Address Mapping ioLogik W5340 and ioLogik W5340-HSPA Modbus Mapping NOTE For Modbus addresses of the ioLogik E1200 expansion modules attached to the ioLogik W5340, check the ioAdmin I/O Expansion tabs for details. 0xxxx Read/Write Coils (support functions 1, 5, 15) DIO Channels Reference Address Data Type Description 00001 0x0000 1 bit CH0 DO Value 0: Off 1: On 00002 0x0001 1 bit CH1 DO Value 0: Off 1: On 00003 0x0002 1 bit CH2 DO Value 0: Off 1: On 00004 0x0003 1 bit CH3 DO Value 0: Off 1: On 00005 0x0004 1 bit CH4 DO Value 0: Off 1: On 00006 0x0005 1 bit CH5 DO Value 0: Off 1: On 00007 0x0006 1 bit CH6 DO Value 0: Off 1: On 00008 0x0007 1 bit CH7 DO Value 0: Off 1: On 00009 0x0008 1 bit CH8 DO Value 0: Off 1: On (Relay) 00010 0x0009 1 bit CH9 DO Value 0: Off 1: On (Relay) 00013 0x000C 1 bit CH0 DO Power On Value 00014 0x000D 1 bit CH1 DO Power On Value 0: Off 1: On 00015 0x000E 1 bit CH2 DO Power On Value 0: Off 1: On 00016 0x000F 1 bit CH3 DO Power On Value 0: Off 1: On 00017 0x0010 1 bit CH4 DO Power On Value 0: Off 1: On 00018 0x0011 1 bit CH5 DO Power On Value 0: Off 1: On 00019 0x0012 1 bit CH6 DO Power On Value 0: Off 1: On 00020 0x0013 1 bit CH7 DO Power On Value 0: Off 1: On 00021 0x0014 1 bit CH8 DO Power On Value 0: Off 1: On (Relay) 00022 0x0015 1 bit CH9 DO Power On Value 0: Off 1: On (Relay) 00037 0x0024 1 bit CH0 DO Pulse Operate Status 0: Off 1: On 00038 0x0025 1 bit CH1 DO Pulse Operate Status 0: Off 1: On 00039 0x0026 1 bit CH2 DO Pulse Operate Status 0: Off 1: On 00040 0x0027 1 bit CH3 DO Pulse Operate Status 0: Off 1: On 00041 0x0028 1 bit CH4 DO Pulse Operate Status 0: Off 1: On 00042 0x0029 1 bit CH5 DO Pulse Operate Status 0: Off 1: On 00043 0x002A 1 bit CH6 DO Pulse Operate Status 0: Off 1: On 00044 0x002B 1 bit CH7 DO Pulse Operate Status 0: Off 1: On 00045 0x002C 1 bit CH8 DO Pulse Operate Status 0: Off 1: On (Relay) 00046 0x002D 1 bit CH9 DO Pulse Operate Status 0: Off 1: On (Relay) 00049 0x0030 1 bit CH0 DO PowerOn Pulse Operate Status 0: Off 1: On 00050 0x0031 1 bit CH1 DO PowerOn Pulse Operate Status 0: Off 1: On 00051 0x0032 1 bit CH2 DO PowerOn Pulse Operate Status 0: Off 1: On 00052 0x0033 1 bit CH3 DO PowerOn Pulse Operate Status 0: Off 1: On 00053 0x0034 1 bit CH4 DO PowerOn Pulse Operate Status 0: Off 1: On 00054 0x0035 1 bit CH5 DO PowerOn Pulse Operate Status 0: Off 1: On 00055 0x0036 1 bit CH6 DO PowerOn Pulse Operate Status 0: Off 1: On 00056 0x0037 1 bit CH7 DO PowerOn Pulse Operate Status 0: Off 1: On 00057 0x0038 1 bit CH8 DO PowerOn Pulse Operate Status 0: Off 1: On (Relay) 00058 0x0039 1 bit CH9 DO PowerOn Pulse Operate Status 0: Off 1: On (Relay) C-2 0: Off 1: On ioLogik W5300 Cellular Micro RTU Controller 1 bit Modbus/TCP Address Mapping 00061 0x003C CH0 DO Safe Pulse Operate Status 0: Off 1: On 00062 0x003D 1 bit CH1 DO Safe Pulse Operate Status 0: Off 1: On 00063 0x003E 1 bit CH2 DO Safe Pulse Operate Status 0: Off 1: On 00064 0x003F 1 bit CH3 DO Safe Pulse Operate Status 0: Off 1: On 00065 0x0040 1 bit CH4 DO Safe Pulse Operate Status 0: Off 1: On 00066 0x0041 1 bit CH5 DO Safe Pulse Operate Status 0: Off 1: On 00067 0x0042 1 bit CH6 DO Safe Pulse Operate Status 0: Off 1: On 00068 0x0043 1 bit CH7 DO Safe Pulse Operate Status 0: Off 1: On 00069 0x0044 1 bit CH8 DO Safe Pulse Operate Status 0: Off 1: On (Relay) 00070 0x0045 1 bit CH9 DO Safe Pulse Operate Status 0: Off 1: On (Relay) 00073 0x0048 1 bit CH0 DI Counter Status 0: Off 1: On 00074 0x0049 1 bit CH1 DI Counter Status 0: Off 1: On 00075 0x004A 1 bit CH2 DI Counter Status 0: Off 1: On 00076 0x004B 1 bit CH3 DI Counter Status 0: Off 1: On 00077 0x004C 1 bit CH4 DI Counter Status 0: Off 1: On 00078 0x004D 1 bit CH5 DI Counter Status 0: Off 1: On 00079 0x004E 1 bit CH6 DI Counter Status 0: Off 1: On 00080 0x004F 1 bit CH7 DI Counter Status 0: Off 1: On 00085 0x0054 1 bit CH0 DI Clear Count Value read aways :0 Write: 1 : Clear counter value 0 : return Illegal Data Value 00086 0x0055 1 bit CH1 DI Clear Count Value read aways :0 Write: 1 : Clear counter value 0 : return Illegal Data Value 00087 0x0056 1 bit CH2 DI Clear Count Value read aways :0 Write: 1 : Clear counter value 0 : return Illegal Data Value 00088 0x0057 1 bit CH3 DI Clear Count Value read aways :0 Write: 1 : Clear counter value 0 : return Illegal Data Value 00089 0x0058 1 bit CH4 DI Clear Count Value read aways :0 Write: 1 : Clear counter value 0 : return Illegal Data Value 00090 0x0059 1 bit CH5 DI Clear Count Value read aways :0 Write: 1 : Clear counter value 0 : return Illegal Data Value 00091 0x005A 1 bit CH6 DI Clear Count Value read aways :0 Write: 1 : Clear counter value 0 : return Illegal Data Value 00092 0x005B 1 bit CH7 DI Clear Count Value read aways :0 Write: 1 : Clear counter value 0 : return Illegal Data Value 00097 0x0060 1 bit CH0 DI OverFlow Status Read : 0 : Normal 1 : Overflow Write : 0 : clear overflow status 1 : return Illegal Data Value 00098 0x0061 1 bit CH1 DI OverFlow Status Read : 0 : Normal 1 : Overflow Write : 0 : clear overflow status 1 : return Illegal Data Value 00099 0x0062 1 bit CH2 DI OverFlow Status Read : 0 : Normal C-3 ioLogik W5300 Cellular Micro RTU Controller Modbus/TCP Address Mapping 1 : Overflow Write : 0 : clear overflow status 1 : return Illegal Data Value 00100 0x0063 1 bit CH3 DI OverFlow Status Read : 0 : Normal 1 : Overflow Write : 0 : clear overflow status 1 : return Illegal Data Value 00101 0x0064 1 bit CH4 DI OverFlow Status Read : 0 : Normal 1 : Overflow Write : 0 : clear overflow status 1 : return Illegal Data Value 00102 0x0065 1 bit CH5 DI OverFlow Status Read : 0 : Normal 1 : Overflow Write : 0 : clear overflow status 1 : return Illegal Data Value 00103 0x0066 1 bit CH6 DI OverFlow Status Read : 0 : Normal 1 : Overflow Write : 0 : clear overflow status 1 : return Illegal Data Value 00104 0x0067 1 bit CH7 DI OverFlow Status Read : 0 : Normal 1 : Overflow Write : 0 : clear overflow status 1 : return Illegal Data Value 00109 0x006C 1 bit CH0 DI Count Trigger 00110 0x006D 1 bit CH1 DI Count Trigger 00111 0x006E 1 bit CH2 DI Count Trigger 00112 0x006F 1 bit CH3 DI Count Trigger 00113 0x0070 1 bit CH4 DI Count Trigger 00114 0x0071 1 bit CH5 DI Count Trigger 00115 0x0072 1 bit CH6 DI Count Trigger 00116 0x0073 1 bit CH7 DI Count Trigger 00121 0x0078 1 bit CH0 DI Power On Status 0: Off 1: On 00122 0x0079 1 bit CH1 DI Power On Status 0: Off 1: On 00123 0x007A 1 bit CH2 DI Power On Status 0: Off 1: On 00124 0x007B 1 bit CH3 DI Power On Status 0: Off 1: On 00125 0x007C 1 bit CH4 DI Power On Status 0: Off 1: On 00126 0x007D 1 bit CH5 DI Power On Status 0: Off 1: On 00127 0x007E 1 bit CH6 DI Power On Status 0: Off 1: On 00128 0x007F 1 bit CH7 DI Power On Status 0: Off 1: On 00133 0x0084 1 bit CH0 DI Safe Pulse Operate Status 0: Off 1: On 00134 0x0085 1 bit CH1 DI Safe Pulse Operate Status 0: Off 1: On 00135 0x0086 1 bit CH2 DI Safe Pulse Operate Status 0: Off 1: On 00136 0x0087 1 bit CH3 DI Safe Pulse Operate Status 0: Off 1: On 00137 0x0088 1 bit CH4 DI Safe Pulse Operate Status 0: Off 1: On 00138 0x0089 1 bit CH5 DI Safe Pulse Operate Status 0: Off 1: On 00139 0x008A 1 bit CH6 DI Safe Pulse Operate Status 0: Off 1: On 00140 0x008B 1 bit CH7 DI Safe Pulse Operate Status 0: Off 1: On 00145 0x0090 1 bit CH0 DI set channel C-4 ioLogik W5300 Cellular Micro RTU Controller Modbus/TCP Address Mapping Power-off storage enable ON/OFF 1:ON 0:OFF 00146 0x0091 1 bit CH1 DI set channel Power-off storage enable ON/OFF 1:ON 0:OFF 00147 0x0092 1 bit CH2 DI set channel Power-off storage enable ON/OFF 1:ON 0:OFF 00148 0x0093 1 bit CH3 DI set channel Power-off storage enable ON/OFF 1:ON 0:OFF 00149 0x0094 1 bit CH4 DI set channel Power-off storage enable ON/OFF 1:ON 0:OFF 00150 0x0095 1 bit CH5 DI set channel Power-off storage enable ON/OFF 1:ON 0:OFF 00151 0x0096 1 bit CH6 DI set channel Power-off storage enable ON/OFF 1:ON 0:OFF 00152 0x0097 1 bit CH7 DI set channel Power-off storage enable ON/OFF 1:ON 0:OFF 00157 0x009C 1 bit DIO 00 1: OUTPUT 0: INPUT 00158 0x009D 1 bit (Default: INPUT) DIO 01 1: OUTPUT 0: INPUT 00159 0x009E 1 bit (Default: INPUT) DIO 02 1: OUTPUT 0: INPUT 00160 0x009F 1 bit (Default: INPUT) DIO 03 1: OUTPUT 0: INPUT 00161 0x00A0 1 bit (Default: INPUT) DIO 04 1: OUTPUT 0: INPUT 00162 0x00A1 1 bit (Default: OUTPUT) DIO 05 1: OUTPUT 0: INPUT 00163 0x00A2 1 bit (Default: OUTPUT) DIO 06 1: OUTPUT 0: INPUT 00164 0x00A3 1 bit DIO 07 1: OUTPUT C-5 (Default: OUTPUT) ioLogik W5300 Cellular Micro RTU Controller Modbus/TCP Address Mapping 0: INPUT (Default: OUTPUT) AI Channels Reference Address Data Type Description 00257 0x0100 1bit Reset CH0 AI Min Value Read: always 0 Write : 1: reset AI Min value 0: return Illegal Data Value 00258 0x0101 1bit Reset CH1 AI Min Value Read: always 0 Write : 1: reset AI Min value 0: return Illegal Data Value 00259 0x0102 1bit Reset CH2 AI Min Value Read: always 0 Write : 1: reset AI Min value 0: return Illegal Data Value 00260 0x0103 1bit Reset CH3 AI Min Value Read: always 0 Write : 1: reset AI Min value 0: return Illegal Data Value 00265 0x0104 1bit Reset CH0 AI Max Value Read: always 0 Write : 1: reset AI Max value 0: return Illegal Data Value 00266 0x0105 1bit Reset CH1 AI Max Value Read: always 0 Write : 1: reset AI Max value 0: return Illegal Data Value 00267 0x0106 1bit Reset CH2 AI Max Value Read: always 0 Write : 1: reset AI Max value 0: return Illegal Data Value 00268 0x0107 1bit Reset CH3 AI Max Value Read: always 0 Write : 1: reset AI Max value 0: return Illegal Data Value 1xxxx Read only Coils (supports function 2) Reference Address Data Type Description 10001 0x0000 1 bit CH0 DI Value 10002 0x0001 1 bit CH1 DI Value 10003 0x0002 1 bit CH2 DI Value 10004 0x0003 1 bit CH3 DI Value 10005 0x0004 1 bit CH4 DI Value 10006 0x0005 1 bit CH5 DI Value 10007 0x0006 1 bit CH6 DI Value 10008 0x0007 1 bit CH7 DI Value C-6 ioLogik W5300 Cellular Micro RTU Controller Modbus/TCP Address Mapping 3xxxx Read only Registers (supports function 4) Reference Address Data Type Description 30001 0x0000 word CH0 DI Counter Value Hi- Word 30002 0x0001 word CH0 DI Counter Value Lo- Word 30003 0x0002 word CH1 DI Counter Value Hi- Word 30004 0x0003 word CH1 DI Counter Value Lo- Word 30005 0x0004 word CH2 DI Counter Value Hi- Word 30006 0x0005 word CH2 DI Counter Value Lo- Word 30007 0x0006 word CH3 DI Counter Value Hi- Word 30008 0x0007 word CH3 DI Counter Value Lo- Word 30009 0x0008 word CH4 DI Counter Value Hi- Word 30010 0x0009 word CH4 DI Counter Value Lo- Word 30011 0x000A word CH5 DI Counter Value Hi- Word 30012 0x000B word CH5 DI Counter Value Lo- Word 30013 0x000C word CH6 DI Counter Value Hi- Word 30014 0x000D word CH6 DI Counter Value Lo- Word 30015 0x000E word CH7 DI Counter Value Hi- Word 30016 0x000F word CH7 DI Counter Value Lo- Word 30017 0x0010 word CH8 DO Totoal Relay Count Value Hi-Byte (Relay) 30018 0x0011 word CH8 DO Totoal Relay Count Value Lo-Byte (Relay) 30019 0x0012 word CH9 DO Totoal Relay Count Value Hi-Byte (Relay) 30020 0x0013 word CH9 DO Totoal Relay Count Value Lo-Byte (Relay) 30025 0x0018 word CH0 Read AI Value 30026 0x0019 word CH1 Read AI Value 30027 0x001A word CH2 Read AI Value 30028 0x001B word CH3 Read AI Value 30033 0x001C word CH0 Read AI Min Value 30034 0x001D word CH1 Read AI Min Value 30035 0x001E word CH2 Read AI Min Value 30036 0x001F word CH3 Read AI Min Value 30037 0x0020 word CH0 Read AI Max Value 30038 0x0021 word CH1 Read AI Max Value 30039 0x0022 word CH2 Read AI Max Value 30040 0x0023 word CH3 Read AI Max Value 30041 0x0024 word CH0 Relay Totoal Relay Count Value (Relay) 30042 0x0025 word CH1 Relay Totoal Relay Count Value (Relay) 30043 0x0026 word CH0 Relay Last Reset Time for Current Relay Count(Relay) 30044 0x0027 word CH1 Relay Last Reset Time for Current Relay Count(Relay) Virtual Channel Reference Address Data Type Description 0x30AE-0x30C1 2x10 words W5340 virtual channel value (in floating format) Each VC channel occupies 2 words 4xxxx Read/Write Registers (supports functions 3, 6, 16) Reference Address Data Type Description 40001 0x0000 1 word CH0 DO Pulse Output Count Value Hi-Word 40002 0x0001 1 word CH0 DO Pulse Output Count Value Lo-Word 40003 0x0002 1 word CH1 DO Pulse Output Count Value Hi-Word 40004 0x0003 1 word CH1 DO Pulse Output Count Value Lo- Word C-7 ioLogik W5300 Cellular Micro RTU Controller Modbus/TCP Address Mapping 40005 0x0004 1 word CH2 DO Pulse Output Count Value Hi- Word 40006 0x0005 1 word CH2 DO Pulse Output Count Value Lo- Word 40007 0x0006 1 word CH3 DO Pulse Output Count Value Hi- Word 40008 0x0007 1 word CH3 DO Pulse Output Count Value Lo- Word 40009 0x0008 1 word CH4 DO Pulse Output Count Value Hi- Word 40010 0x0009 1 word CH4 DO Pulse Output Count Value Lo- Word 40011 0x000A 1 word CH5 DO Pulse Output Count Value Hi- Word 40012 0x000B 1 word CH5 DO Pulse Output Count Value Lo- Word 40013 0x000C 1 word CH6 DO Pulse Output Count Value Hi- Word 40014 0x000D 1 word CH6 DO Pulse Output Count Value Lo- Word 40015 0x000E 1 word CH7 DO Pulse Output Count Value Hi- Word 40016 0x000F 1 word CH7 DO Pulse Output Count Value Lo- Word 40017 0x0010 1 word CH8 DO Pulse Output Count Value Hi- Word (Relay) 40018 0x0011 1 word CH8 DO Pulse Output Count Value Lo- Word (Relay) 40019 0x0012 1 word CH9 DO Pulse Output Count Value Hi- Word (Relay) 40020 0x0013 1 word CH9 DO Pulse Output Count Value Lo- Word (Relay) 40025 0x0018 1 word CH0 DO Pulse Low Signal Width Hi- Word 40026 0x0019 1 word CH0 DO Pulse Low Signal Width Lo- Word 40027 0x001A 1 word CH1 DO Pulse Low Signal Width Hi- Word 40028 0x001B 1 word CH1 DO Pulse Low Signal Width Lo- Word 40029 0x001C 1 word CH2 DO Pulse Low Signal Width Hi- Word 40030 0x001D 1 word CH2 DO Pulse Low Signal Width Lo- Word 40031 0x001E 1 word CH3 DO Pulse Low Signal Width Hi- Word 40032 0x001F 1 word CH3 DO Pulse Low Signal Width Lo- Word 40033 0x0020 1 word CH4 DO Pulse Low Signal Width Hi- Word 40034 0x0021 1 word CH4 DO Pulse Low Signal Width Lo- Word 40035 0x0022 1 word CH5 DO Pulse Low Signal Width Hi- Word 40036 0x0023 1 word CH5 DO Pulse Low Signal Width Lo- Word 40037 0x0024 1 word CH6 DO Pulse Low Signal Width Hi- Word 40038 0x0025 1 word CH6 DO Pulse Low Signal Width Lo- Word 40039 0x0026 1 word CH7 DO Pulse Low Signal Width Hi- Word 40040 0x0027 1 word CH7 DO Pulse Low Signal Width Lo- Word 40041 0x0028 1 word CH8 DO Pulse Low Signal Width Hi- Word (Relay) 40042 0x0029 1 word CH8 DO Pulse Low Signal Width Lo- Word (Relay) 40043 0x002A 1 word CH9 DO Pulse Low Signal Width Hi- Word (Relay) 40044 0x002B 1 word CH9 DO Pulse Low Signal Width Lo- Word (Relay) 40049 0x0030 1 word CH0 DO Pulse High Signal Width Hi- Word 40050 0x0031 1 word CH0 DO Pulse High Signal Width Lo- Word 40051 0x0032 1 word CH1 DO Pulse High Signal Width Hi- Word 40052 0x0033 1 word CH1 DO Pulse High Signal Width Lo- Word 40053 0x0034 1 word CH2 DO Pulse High Signal Width Hi- Word 40054 0x0035 1 word CH2 DO Pulse High Signal Width Lo- Word 40055 0x0036 1 word CH3 DO Pulse High Signal Width Hi- Word 40056 0x0037 1 word CH3 DO Pulse High Signal Width Lo- Word 40057 0x0038 1 word CH4 DO Pulse High Signal Width Hi- Word 40058 0x0039 1 word CH4 DO Pulse High Signal Width Lo- Word 40059 0x003A 1 word CH5 DO Pulse High Signal Width Hi- Word 40060 0x003B 1 word CH5 DO Pulse High Signal Width Lo- Word 40061 0x003C 1 word CH6 DO Pulse High Signal Width Hi- Word 40062 0x003D 1 word CH6 DO Pulse High Signal Width Lo- Word 40063 0x003E 1 word CH7 DO Pulse High Signal Width Hi- Word 40064 0x003F 1 word CH7 DO Pulse High Signal Width Lo- Word 40065 0x0040 1 word CH8 DO Pulse High Signal Width Hi- Word (Relay) C-8 ioLogik W5300 Cellular Micro RTU Controller Modbus/TCP Address Mapping 40066 0x0041 1 word CH8 DO Pulse High Signal Width Lo- Word (Relay) 40067 0x0042 1 word CH9 DO Pulse High Signal Width Hi- Word (Relay) 40068 0x0043 1 word CH9 DO Pulse High Signal Width Lo- Word (Relay) 40073 0x0048 1 word CH0 DO Mode 0: DO 40074 0x0049 1 word CH1 DO Mode 0: DO 40075 0x004A 1 word CH2 DO Mode 0: DO 1: Pulse 1: Pulse 1: Pulse 40076 0x004B 1 word CH3 DO Mode 0: DO 40077 0x004C 1 word CH4 DO Mode 0: DO 40078 0x004D 1 word CH5 DO Mode 0: DO 1: Pulse 1: Pulse 1: Pulse 40079 0x004E 1 word CH6 DO Mode 0: DO 1: Pulse 40080 0x004F 1 word CH7 DO Mode 0: DO 40081 0x0050 1 word CH8 DO Mode 0: DO 40082 0x0051 1 word CH9 DO Mode 0: DO 1: Pulse (Relay) 1: Pulse (Relay) 1: Pulse 40085 0x0054 1 word CH0 DI Count Filter 40086 0x0055 1 word CH1 DI Count Filter 40087 0x0056 1 word CH2 DI Count Filter 40088 0x0057 1 word CH3 DI Count Filter 40089 0x0058 1 word CH4 DI Count Filter 40090 0x0059 1 word CH5 DI Count Filter 40091 0x005A 1 word CH6 DI Count Filter 40092 0x005B 1 word CH7 DI Count Filter 40097 0x0060 1 word CH0 DI Mode 0: DI 1: Count Others : return Illegal Data Value 40098 0x0061 1 word CH1 DI Mode 0: DI 1: Count Others : return Illegal Data Value 40099 0x0062 1 word CH2 DI Mode 0: DI 1: Count Others : return Illegal Data Value 40100 0x0063 1 word CH3 DI Mode 0: DI 1: Count Others : return Illegal Data Value 40101 0x0064 1 word CH4 DI Mode 0: DI 1: Count Others : return Illegal Data Value 40102 0x0065 1 word CH5 DI Mode 0: DI 1: Count C-9 ioLogik W5300 Cellular Micro RTU Controller Modbus/TCP Address Mapping Others : return Illegal Data Value 40103 0x0066 1 word CH6 DI Mode 0: DI 1: Count Others : return Illegal Data Value 40104 0x0067 1 word CH7 DI Mode 0: DI 1: Count Others : return Illegal Data Value 40109 0x006C 1 word CH0 AI set/get Enable 1:Enable , 0: Disable 40110 0x006D 1 word CH1 AI set/get Enable 1:Enable , 0: Disable 40111 0x006E 1 word CH2 AI set/get Enable 1:Enable , 0: Disable 40112 0x006F 1 word CH3 AI set/get Enable 1:Enable , 0: Disable 40285 0x011C 1 word AI Channel 0 Scaling Enable 40286 0x011D 1 word AI Channel 1 Scaling Enable 40287 0x011E 1 word AI Channel 2 Scaling Enable 40288 0x011F 1 word AI Channel 3 Scaling Enable 40289 0x0120 1 word AI Channel 0 RAW Min Value 40290 0x0121 1 word AI Channel 1 RAW Min Value 40291 0x0122 1 word AI Channel 2 RAW Min Value 40292 0x0123 1 word AI Channel 3 RAW Min Value 40293 0x0124 1 word AI Channel 0 RAW Max Value 40294 0x0125 1 word AI Channel 1 RAW Max Value 40295 0x0126 1 word AI Channel 2 RAW Max Value 40296 0x0127 1 word AI Channel 3 RAW Max Value 40297 0x0128 1 word AI Channel 0 Scale Min Value 40298 0x0129 1 word AI Channel 1 Scale Min Value 40299 0x012A 1 word AI Channel 2 Scale Min Value 40300 0x012B 1 word AI Channel 3 Scale Min Value 40301 0x012C 1 word AI Channel 0 Scale Max Value 40302 0x012D 1 word AI Channel 1 Scale Max Value 40303 0x012E 1 word AI Channel 2 Scale Max Value 40304 0x012F 1 word AI Channel 3 Scale Max Value 40305 0x0130 1 word AI Channel 0 Scale Value Hi-Word (float) 40306 0x0131 1 word AI Channel 0 Scale Value Lo-Word (float) 40307 0x0132 1 word AI Channel 1 Scale Value Hi-Word (float) 40308 0x0133 1 word AI Channel 1 Scale Value Lo-Word (float) 40309 0x0134 1 word AI Channel 2 Scale Value Hi-Word (float) 40310 0x0135 1 word AI Channel 2 Scale Value Lo-Word (float) 40311 0x0136 1 word AI Channel 3 Scale Value Hi-Word (float) 40312 0x0137 1 word AI Channel 3 Scale Value Lo-Word (float) 40337 0x0150 1 word Initial Internal Register 00 Value 40338 0x0151 1 word Initial Internal Register 01 Value 40339 0x0152 1 word Initial Internal Register 02 Value 40340 0x0153 1 word Initial Internal Register 03 Value 40341 0x0154 1 word Initial Internal Register 04 Value 40342 0x0155 1 word Initial Internal Register 05 Value 40343 0x0156 1 word Initial Internal Register 06 Value 40344 0x0157 1 word Initial Internal Register 07 Value 40345 0x0158 1 word Initial Internal Register 08 Value 40346 0x0159 1 word Initial Internal Register 09 Value 40347 0x015A 1 word Initial Internal Register 10 Value C-10 ioLogik W5300 Cellular Micro RTU Controller Modbus/TCP Address Mapping 40348 0x015B 1 word Initial Internal Register 11 Value 40349 0x015C 1 word Initial Internal Register 12 Value 40350 0x015D 1 word Initial Internal Register 13 Value 40351 0x015E 1 word Initial Internal Register 14 Value 40352 0x015F 1 word Initial Internal Register 15 Value 40353 0x0160 1 word Initial Internal Register 16 Value 40354 0x0161 1 word Initial Internal Register 17 Value 40355 0x0162 1 word Initial Internal Register 18 Value 40356 0x0163 1 word Initial Internal Register 19 Value 40357 0x0164 1 word Initial Internal Register 20 Value 40358 0x0165 1 word Initial Internal Register 21 Value 40359 0x0166 1 word Initial Internal Register 22 Value 40360 0x0167 1 word Initial Internal Register 23 Value 40361 0x0168 2 word Time Init 00 Value 40362 0x0169 2 word Time Init 01 Value 40363 0x016A 2 word Time Init 02 Value 40364 0x016B 2 word Time Init 03 Value 40365 0x016C 2 word Time Init 04 Value 40366 0x016D 2 word Time Init 05 Value 40367 0x016E 2 word Time Init 06 Value 40368 0x016F 2 word Time Init 07 Value 40369 0x0170 2 word Time Init 08 Value 40370 0x0171 2 word Time Init 09 Value 40371 0x0172 2 word Time Init 10 Value 40372 0x0173 2 word Time Init 11 Value 40373 0x0174 2 word Time Init 12 Value 40374 0x0175 2 word Time Init 13 Value 40375 0x0176 2 word Time Init 14 Value 40376 0x0177 2 word Time Init 15 Value 40377 0x0178 2 word Time Init 16 Value 40378 0x0179 2 word Time Init 17 Value 40379 0x017A 2 word Time Init 18 Value 40380 0x017B 2 word Time Init 19 Value 40381 0x017C 2 word Time Init 20 Value 40382 0x017D 2 word Time Init 21 Value 40383 0x017E 2 word Time Init 22 Value 40384 0x017F 2 word Time Init 23 Value 40385 0x0180 1 word Timer Interval 00 Value 40386 0x0181 1 word Timer Interval 01 Value 40387 0x0182 1 word Timer Interval 02 Value 40388 0x0183 1 word Timer Interval 03 Value 40389 0x0184 1 word Timer Interval 04 Value 40390 0x0185 1 word Timer Interval 05 Value 40391 0x0186 1 word Timer Interval 06 Value 40392 0x0187 1 word Timer Interval 07 Value 40393 0x0188 1 word Timer Interval 08 Value 40394 0x0189 1 word Timer Interval 09 Value 40395 0x018A 1 word Timer Interval 10 Value 40396 0x018B 1 word Timer Interval 11 Value 40397 0x018C 1 word Timer Interval 12 Value 40398 0x018D 1 word Timer Interval 13 Value 40399 0x018E 1 word Timer Interval 14 Value 40400 0x018F 1 word Timer Interval 15 Value C-11 ioLogik W5300 Cellular Micro RTU Controller Modbus/TCP Address Mapping 40401 0x0190 1 word Timer Interval 16 Value 40402 0x0191 1 word Timer Interval 17 Value 40403 0x0192 1 word Timer Interval 18 Value 40404 0x0193 1 word Timer Interval 19 Value 40405 0x0194 1 word Timer Interval 20 Value 40406 0x0195 1 word Timer Interval 21 Value 40407 0x0196 1 word Timer Interval 22 Value 40408 0x0197 2 word Timer Interval 23 Value 40409 0x0198 10 word Timer Description 00 Value 40410 0x0199 10 word Timer Description 01 Value 40411 0x019A 10 word Timer Description 02 Value 40412 0x019B 10 word Timer Description 03 Value 40413 0x019C 10 word Timer Description 04 Value 40414 0x019D 10 word Timer Description 05 Value 40415 0x019E 10 word Timer Description 06 Value 40416 0x019F 10 word Timer Description 07 Value 40417 0x01A0 10 word Timer Description 08 Value 40418 0x01A1 10 word Timer Description 09 Value 40419 0x01A2 10 word Timer Description 10 Value 40420 0x01A3 10 word Timer Description 11 Value 40421 0x01A4 10 word Timer Description 12 Value 40422 0x01A5 10 word Timer Description 13 Value 40423 0x01A6 10 word Timer Description 14 Value 40424 0x01A7 10 word Timer Description 15 Value 40425 0x01A8 10 word Timer Description 16 Value 40426 0x01A9 10 word Timer Description 17 Value 40427 0x01AA 10 word Timer Description 18 Value 40428 0x01AB 10 word Timer Description 19 Value 40429 0x01AC 10 word Timer Description 20 Value 40430 0x01AD 10 word Timer Description 21 Value 40431 0x01AE 10 word Timer Description 22 Value 40432 0x01AF 10 word Timer Description 23 Value 40433 0x01B0 10 word Inernal Register Description 00 Value 40434 0x01B1 10 word Inernal Register Description 01 Value 40435 0x01B2 10 word Inernal Register Description 02 Value 40436 0x01B3 10 word Inernal Register Description 03 Value 40437 0x01B4 10 word Inernal Register Description 04 Value 40438 0x01B5 10 word Inernal Register Description 05 Value 40439 0x01B6 10 word Inernal Register Description 06 Value 40440 0x01B7 10 word Inernal Register Description 07 Value 40441 0x01B8 10 word Inernal Register Description 08 Value 40442 0x01B9 10 word Inernal Register Description 09 Value 40443 0x01BA 10 word Inernal Register Description 10 Value 40444 0x01BB 10 word Inernal Register Description 11 Value 40445 0x01BC 10 word Inernal Register Description 12 Value 40446 0x01BD 10 word Inernal Register Description 13 Value 40447 0x01BE 10 word Inernal Register Description 14 Value 40418 0x01BF 10 word Inernal Register Description 15 Value 40419 0x01C0 10 word Inernal Register Description 16 Value 40420 0x01C1 10 word Inernal Register Description 17 Value 40421 0x01C2 10 word Inernal Register Description 18 Value 40422 0x01C3 10 word Inernal Register Description 19 Value 40423 0x01C4 10 word Inernal Register Description 20 Value C-12 ioLogik W5300 Cellular Micro RTU Controller Modbus/TCP Address Mapping 40424 0x01C5 10 word Inernal Register Description 21 Value 40425 0x01C6 10 word Inernal Register Description 22 Value 40426 0x01C7 10 word Inernal Register Description 23 Value 40427 0x01C8 1 word Message Retry Times 40428 0x01C9 1 word Message Retry Interval 40429 0x01CA 1 word Mail Retry Times 40430 0x01CB 1 word Mail Retry Interval 40431 0x01CC 1 word SMS Retry Times 40432 0x01CD 1 word SMS Retry Interval 40577 0x0240 20 word Message Server Address 00 40578 0x0241 20 word Message Server Address 01 40579 0x0242 20 word Message Server Address 02 40580 0x0243 20 word Message Server Address 03 40581 0x0244 20 word Message Server Address 04 40582 0x0245 20 word Message Server Address 05 40583 0x0246 20 word Message Server Address 06 40584 0x0247 20 word Message Server Address 07 40585 0x0248 20 word Message Server Address 08 40586 0x0249 20 word Message Server Address 09 48962 0x2301 2 word CH8 DO Current Relay Count Value 48963 0x2302 2 word CH9 DO Current Relay Count Value Reference Address Data Type Description 40513 0x0200 1 word CH0 AI Range 00: +/-150mV 01: +/-500mV 02: +/-5V 03: +/-10V 04: 0-20mA 05: 4-20mA 06: 0 -150mV 07: 0 - 500mV 08: 0 - 5V 09: 0 -10V Others: return Illegal Data Value 40514 0x0201 1 word CH1 AI Range 00: +/-150mV 01: +/-500mV 02: +/-5V 03: +/-10V 04: 0-20mA 05: 4-20mA 06: 0 -150mV 07: 0 - 500mV 08: 0 - 5V 09: 0 -10V Others: return Illegal Data Value 40515 0x0202 1 word CH2 AI Range 00: +/-150mV 01: +/-500mV 02: +/-5V 03: +/-10V 04: 0-20mA 05: 4-20mA 06: 0 -150mV C-13 ioLogik W5300 Cellular Micro RTU Controller Modbus/TCP Address Mapping 07: 0 - 500mV 08: 0 - 5V 09: 0 -10V Others: return Illegal Data Value 40516 0x0203 1 word CH3 AI Range 00: +/-150mV 01: +/-500mV 02: +/-5V 03: +/-10V 04: 0-20mA 05: 4-20mA 06: 0 -150mV 07: 0 - 500mV 08: 0 - 5V 09: 0 -10V Others: return Illegal Data Value 40517 0x0204 1 word Virtual CH4 AI Range 00: +/-150mV 01: +/-500mV 02: +/-5V 03: +/-10V 04: 0-20mA 05: 4-20mA 06: 0 -150mV 07: 0 - 500mV 08: 0 - 5V 09: 0 -10V Others: return Illegal Data Value 40518 0x0205 1 word Virtual CH5 AI Range 00: +/-150mV 01: +/-500mV 02: +/-5V 03: +/-10V 04: 0-20mA 05: 4-20mA 06: 0 -150mV 07: 0 - 500mV 08: 0 - 5V 09: 0 -10V Others: return Illegal Data Value 40519 0x0206 1 word Virtual CH6 AI Range 00: +/-150mV 01: +/-500mV 02: +/-5V 03: +/-10V 04: 0-20mA 05: 4-20mA 06 : 0 -150mV 07 : 0 - 500mV 08: 0 - 5V 09: 0 -10V Others: return Illegal Data Value 40520 0x0207 1 word Virtual CH7 AI Range 00 : +/-150mV C-14 ioLogik W5300 Cellular Micro RTU Controller Modbus/TCP Address Mapping 01: +/-500mV 02: +/-5V 03: +/-10V 04: 0-20mA 05: 4-20mA 06 : 0 -150mV 07 : 0 - 500mV 08: 0 - 5V 09: 0 -10V Others: return Illegal Data Value Internal Register (Integer) Reference Address Data Type Description 412840 0x3227 Word Get/Set Current Internal Registers 00 Value 412841 0x3228 Word Get/Set Current Internal Registers 01 Value 412842 0x3229 Word Get/Set Current Internal Registers 02 Value 412843 0x322A Word Get/Set Current Internal Registers 03 Value 412844 0x322B Word Get/Set Current Internal Registers 04 Value 412845 0x322C Word Get/Set Current Internal Registers 05 Value 412846 0x322D Word Get/Set Current Internal Registers 06 Value 412847 0x322E Word Get/Set Current Internal Registers 07 Value 412848 0x322F Word Get/Set Current Internal Registers 08 Value 412849 0x3230 Word Get/Set Current Internal Registers 09 Value 412850 0x3231 Word Get/Set Current Internal Registers 10 Value 412851 0x3232 Word Get/Set Current Internal Registers 11 Value 412852 0x3233 Word Get/Set Current Internal Registers 12 Value 412853 0x3234 Word Get/Set Current Internal Registers 13 Value 412854 0x3235 Word Get/Set Current Internal Registers 14 Value 412855 0x3236 Word Get/Set Current Internal Registers 15 Value 412856 0x3237 Word Get/Set Current Internal Registers 16 Value 412857 0x3238 Word Get/Set Current Internal Registers 17 Value 412858 0x3239 Word Get/Set Current Internal Registers 18 Value 412859 0x323A Word Get/Set Current Internal Registers 19 Value 412860 0x323B Word Get/Set Current Internal Registers 20 Value 412861 0x323C Word Get/Set Current Internal Registers 21 Value 412862 0x323D Word Get/Set Current Internal Registers 22 Value 412863 0x323E Word Get/Set Current Internal Registers 23 Value Internal Register (Float) Reference Address 419413 0x4BD4 Data Type word Get/Set Initial Internal Register(Float)_00 Hi-word Description 419414 0x4BD5 word Get/Set Initial Internal Register(Float)_00 Lo-word 419415 0x4BD6 word Get/Set Initial Internal Register(Float)_01 Hi-word 419416 0x4BD7 word Get/Set Initial Internal Register(Float)_01 Lo-word 419417 0x4BD8 word Get/Set Initial Internal Register(Float)_02 Hi-word 419418 0x4BD9 word Get/Set Initial Internal Register(Float)_02 Lo-word 419419 0x4BDA word Get/Set Initial Internal Register(Float)_03 Hi-word 419420 0x4BDB word Get/Set Initial Internal Register(Float)_03 Lo-word 419421 0x4BDC word Get/Set Initial Internal Register(Float)_04 Hi-word 419422 0x4BDD word Get/Set Initial Internal Register(Float)_04 Lo-word 419423 0x4BDE word Get/Set Initial Internal Register(Float)_05 Hi-word 419424 0x4BDF word Get/Set Initial Internal Register(Float)_05 Lo-word 419425 0x4BE0 word Get/Set Initial Internal Register(Float)_06 Hi-word C-15 ioLogik W5300 Cellular Micro RTU Controller Modbus/TCP Address Mapping 419426 0x4BE1 word Get/Set Initial Internal Register(Float)_06 Lo-word 419427 0x4BE2 word Get/Set Initial Internal Register(Float)_07 Hi-word 419428 0x4BE3 word Get/Set Initial Internal Register(Float)_07 Lo-word 419429 0x4BE4 word Get/Set Initial Internal Register(Float)_08 Hi-word 419430 0x4BE5 word Get/Set Initial Internal Register(Float)_08 Lo-word 419431 0x4BE6 word Get/Set Initial Internal Register(Float)_09 Hi-word 419432 0x4BE7 word Get/Set Initial Internal Register(Float)_09 Lo-word 419433 0x4BE8 word Get/Set Initial Internal Register(Float)_10 Hi-word 419434 0x4BE9 word Get/Set Initial Internal Register(Float)_10 Lo-word 419435 0x4BEA word Get/Set Initial Internal Register(Float)_11 Hi-word 419436 0x4BEB word Get/Set Initial Internal Register(Float)_11 Lo-word 419437 0x4BEC word Get/Set Initial Internal Register(Float)_12 Hi-word 419438 0x4BED word Get/Set Initial Internal Register(Float)_12 Lo-word 419439 0x4BEE word Get/Set Initial Internal Register(Float)_13 Hi-word 419440 0x4BEF word Get/Set Initial Internal Register(Float)_13 Lo-word 419441 0x4BF0 word Get/Set Initial Internal Register(Float)_14 Hi-word 419442 0x4BF1 word Get/Set Initial Internal Register(Float)_14 Lo-word 419443 0x4BF2 word Get/Set Initial Internal Register(Float)_15 Hi-word 419444 0x4BF3 word Get/Set Initial Internal Register(Float)_15 Lo-word 419445 0x4BF4 word Get/Set Initial Internal Register(Float)_16 Hi-word 419446 0x4BF5 word Get/Set Initial Internal Register(Float)_16 Lo-word 419447 0x4BF6 word Get/Set Initial Internal Register(Float)_17 Hi-word 419448 0x4BF7 word Get/Set Initial Internal Register(Float)_17 Lo-word 419449 0x4BF8 word Get/Set Initial Internal Register(Float)_18 Hi-word 419450 0x4BF9 word Get/Set Initial Internal Register(Float)_18 Lo-word 419451 0x4BFA word Get/Set Initial Internal Register(Float)_19 Hi-word 419452 0x4BFB word Get/Set Initial Internal Register(Float)_19 Lo-word 419453 0x4BFC word Get/Set Initial Internal Register(Float)_20 Hi-word 419454 0x4BFD word Get/Set Initial Internal Register(Float)_20 Lo-word 419455 0x4BFE word Get/Set Initial Internal Register(Float)_21 Hi-word 419456 0x4BFF word Get/Set Initial Internal Register(Float)_21 Lo-word 419457 0x4C00 word Get/Set Initial Internal Register(Float)_22 Hi-word 419458 0x4C01 word Get/Set Initial Internal Register(Float)_22 Lo-word 419459 0x4C02 word Get/Set Initial Internal Register(Float)_23 Hi-word 419460 0x4C03 word Get/Set Initial Internal Register(Float)_23 Lo-word 419461 0x4C04 word Get/Set Initial Internal Register(Float)_24 Hi-word 419462 0x4C05 word Get/Set Initial Internal Register(Float)_24 Lo-word 419463 0x4C06 word Get/Set Initial Internal Register(Float)_25 Hi-word 419464 0x4C07 word Get/Set Initial Internal Register(Float)_25 Lo-word 419465 0x4C08 word Get/Set Initial Internal Register(Float)_26 Hi-word 419466 0x4C09 word Get/Set Initial Internal Register(Float)_26 Lo-word 419467 0x4C0A word Get/Set Initial Internal Register(Float)_27 Hi-word 419468 0x4C0B word Get/Set Initial Internal Register(Float)_27 Lo-word 419469 0x4C0C word Get/Set Current Internal Register(Float)_00 Hi-word 419470 0x4C0D word Get/Set Current Internal Register(Float)_00 Lo-word 419471 0x4C0E word Get/Set Current Internal Register(Float)_01 Hi-word 419472 0x4C0F word Get/Set Current Internal Register(Float)_01 Lo-word 419473 0x4C10 word Get/Set Current Internal Register(Float)_02 Hi-word 419474 0x4C11 word Get/Set Current Internal Register(Float)_02 Lo-word 419475 0x4C12 word Get/Set Current Internal Register(Float)_03 Hi-word 419476 0x4C13 word Get/Set Current Internal Register(Float)_03 Lo-word 419477 0x4C14 word Get/Set Current Internal Register(Float)_04 Hi-word 419478 0x4C15 word Get/Set Current Internal Register(Float)_04 Lo-word C-16 ioLogik W5300 Cellular Micro RTU Controller Modbus/TCP Address Mapping 419479 0x4C16 word Get/Set Current Internal Register(Float)_05 Hi-word 419480 0x4C17 word Get/Set Current Internal Register(Float)_05 Lo-word 419481 0x4C18 word Get/Set Current Internal Register(Float)_06 Hi-word 419482 0x4C19 word Get/Set Current Internal Register(Float)_06 Lo-word 419483 0x4C1A word Get/Set Current Internal Register(Float)_07 Hi-word 419484 0x4C1B word Get/Set Current Internal Register(Float)_07 Lo-word 419485 0x4C1C word Get/Set Current Internal Register(Float)_08 Hi-word 419486 0x4C1D word Get/Set Current Internal Register(Float)_08 Lo-word 419487 0x4C1E word Get/Set Current Internal Register(Float)_09 Hi-word 419488 0x4C1F word Get/Set Current Internal Register(Float)_09 Lo-word 419489 0x4C20 word Get/Set Current Internal Register(Float)_10 Hi-word 419490 0x4C21 word Get/Set Current Internal Register(Float)_10 Lo-word 419491 0x4C22 word Get/Set Current Internal Register(Float)_11 Hi-word 419492 0x4C23 word Get/Set Current Internal Register(Float)_11 Lo-word 419493 0x4C24 word Get/Set Current Internal Register(Float)_12 Hi-word 419494 0x4C25 word Get/Set Current Internal Register(Float)_12 Lo-word 419495 0x4C26 word Get/Set Current Internal Register(Float)_13 Hi-word 419496 0x4C27 word Get/Set Current Internal Register(Float)_13 Lo-word 419497 0x4C28 word Get/Set Current Internal Register(Float)_14 Hi-word 419498 0x4C29 word Get/Set Current Internal Register(Float)_14 Lo-word 419499 0x4C2A word Get/Set Current Internal Register(Float)_15 Hi-word 419500 0x4C2B word Get/Set Current Internal Register(Float)_15 Lo-word 419501 0x4C2C word Get/Set Current Internal Register(Float)_16 Hi-word 419502 0x4C2D word Get/Set Current Internal Register(Float)_16 Lo-word 419503 0x4C2E word Get/Set Current Internal Register(Float)_17 Hi-word 419504 0x4C2F word Get/Set Current Internal Register(Float)_17 Lo-word 419505 0x4C30 word Get/Set Current Internal Register(Float)_18 Hi-word 419506 0x4C31 word Get/Set Current Internal Register(Float)_18 Lo-word 419507 0x4C32 word Get/Set Current Internal Register(Float)_19 Hi-word 419508 0x4C33 word Get/Set Current Internal Register(Float)_19 Lo-word 419509 0x4C34 word Get/Set Current Internal Register(Float)_20 Hi-word 419510 0x4C35 word Get/Set Current Internal Register(Float)_20 Lo-word 419511 0x4C36 word Get/Set Current Internal Register(Float)_21 Hi-word 419512 0x4C37 word Get/Set Current Internal Register(Float)_21 Lo-word 419513 0x4C38 word Get/Set Current Internal Register(Float)_22 Hi-word 419514 0x4C39 word Get/Set Current Internal Register(Float)_22 Lo-word 419515 0x4C3A word Get/Set Current Internal Register(Float)_23 Hi-word 419516 0x4C3B word Get/Set Current Internal Register(Float)_23 Lo-word 419517 0x4C3C word Get/Set Current Internal Register(Float)_24 Hi-word 419518 0x4C3D word Get/Set Current Internal Register(Float)_24 Lo-word 419519 0x4C3E word Get/Set Current Internal Register(Float)_25 Hi-word 419520 0x4C3F word Get/Set Current Internal Register(Float)_25 Lo-word 419521 0x4C40 word Get/Set Current Internal Register(Float)_26 Hi-word 419522 0x4C41 word Get/Set Current Internal Register(Float)_26 Lo-word 419523 0x4C42 word Get/Set Current Internal Register(Float)_27 Hi-word 419524 0x4C43 word Get/Set Current Internal Register(Float)_27 Lo-word 419525 0x4C44 10 word Get/Set Internal Register(Float)_00 Description 419526 0x4C45 10 word Get/Set Internal Register(Float)_01 Description 419527 0x4C46 10 word Get/Set Internal Register(Float)_02 Description 419528 0x4C47 10 word Get/Set Internal Register(Float)_03 Description 419529 0x4C48 10 word Get/Set Internal Register(Float)_04 Description 419530 0x4C49 10 word Get/Set Internal Register(Float)_05 Description 419531 0x4C4A 10 word Get/Set Internal Register(Float)_06 Description C-17 ioLogik W5300 Cellular Micro RTU Controller Modbus/TCP Address Mapping 419532 0x4C4B 10 word Get/Set Internal Register(Float)_07 Description 419533 0x4C4C 10 word Get/Set Internal Register(Float)_08 Description 419534 0x4C4D 10 word Get/Set Internal Register(Float)_09 Description 419535 0x4C4E 10 word Get/Set Internal Register(Float)_10 Description 419536 0x4C4F 10 word Get/Set Internal Register(Float)_11 Description 419537 0x4C50 10 word Get/Set Internal Register(Float)_12 Description 419538 0x4C51 10 word Get/Set Internal Register(Float)_13 Description 419539 0x4C52 10 word Get/Set Internal Register(Float)_14 Description 419540 0x4C53 10 word Get/Set Internal Register(Float)_15 Description 419541 0x4C54 10 word Get/Set Internal Register(Float)_16 Description 419542 0x4C55 10 word Get/Set Internal Register(Float)_17 Description 419543 0x4C56 10 word Get/Set Internal Register(Float)_18 Description 419544 0x4C57 10 word Get/Set Internal Register(Float)_19 Description 419545 0x4C58 10 word Get/Set Internal Register(Float)_20 Description 419546 0x4C59 10 word Get/Set Internal Register(Float)_21 Description 419547 0x4C5A 10 word Get/Set Internal Register(Float)_22 Description 419548 0x4C5B 10 word Get/Set Internal Register(Float)_23 Description 419549 0x4C5C 10 word Get/Set Internal Register(Float)_24 Description 419550 0x4C5D 10 word Get/Set Internal Register(Float)_25 Description 419551 0x4C5E 10 word Get/Set Internal Register(Float)_26 Description 419552 0x4C5F 10 word Get/Set Internal Register(Float)_27 Description 5xxxx Write Registers (supports function 8) Sub-function Data Field Data Field (Response) Description (Request) 0x0001 0xFF00 Echo Request Data Reboot 0x0001 0x55AA Echo Request Data Reset with Factory default C-18 ioLogik W5300 Cellular Micro RTU Controller Modbus/TCP Address Mapping ioLogik W5312 Modbus Mapping NOTE For Modbus addresses of the ioLogik E1200 expansion modules attached to the ioLogik W5312, check the ioAdmin I/O Expansion tabs for details. 0xxxx Read/Write Coils (supports functions 1, 5, 15) DIO Channels Reference Address Data Type Description 00001 0x0000 1 bit CH0 DO Value 0: Off 1: On 00002 0x0001 1 bit CH1 DO Value 0: Off 1: On 00003 0x0002 1 bit CH2 DO Value 0: Off 1: On 00004 0x0003 1 bit CH3 DO Value 0: Off 1: On 00005 0x0004 1 bit CH4 DO Value 0: Off 1: On 00006 0x0005 1 bit CH5 DO Value 0: Off 1: On 00007 0x0006 1 bit CH6 DO Value 0: Off 1: On 00008 0x0007 1 bit CH7 DO Value 0: Off 1: On 00009 0x0008 1 bit CH8 DO Value 0: Off 1: On (DIO) 00010 0x0009 1 bit CH9 DO Value 0: Off 1: On (DIO) 00011 0x0010 1 bit CH10 DO Value 0: Off 1: On (DIO) 00012 0x0011 1 bit CH11 DO Value 0: Off 1: On (DIO) 00013 0x000C 1 bit CH0 DO Power On Value 0: Off 1: On 00014 0x000D 1 bit CH1 DO Power On Value 0: Off 1: On 00015 0x000E 1 bit CH2 DO Power On Value 0: Off 1: On 00016 0x000F 1 bit CH3 DO Power On Value 0: Off 1: On 00017 0x0010 1 bit CH4 DO Power On Value 0: Off 1: On 00018 0x0011 1 bit CH5 DO Power On Value 0: Off 1: On 00019 0x0012 1 bit CH6 DO Power On Value 0: Off 1: On 00020 0x0013 1 bit CH7 DO Power On Value 0: Off 1: On 00021 0x0014 1 bit CH8 DO Power On Value 0: Off 1: On (DIO) 00022 0x0015 1 bit CH9 DO Power On Value 0: Off 1: On (DIO) 00023 0x0016 1 bit CH10 DO Power On Value 0: Off 1: On (DIO) 00024 0x0017 1 bit CH11 DO Power On Value 0: Off 1: On (DIO) 00037 0x0024 1 bit CH0 DO Pulse Operate Status 0: Off 1: On 00038 0x0025 1 bit CH1 DO Pulse Operate Status 0: Off 1: On 00039 0x0026 1 bit CH2 DO Pulse Operate Status 0: Off 1: On 00040 0x0027 1 bit CH3 DO Pulse Operate Status 0: Off 1: On 00041 0x0028 1 bit CH4 DO Pulse Operate Status 0: Off 1: On 00042 0x0029 1 bit CH5 DO Pulse Operate Status 0: Off 1: On 00043 0x002A 1 bit CH6 DO Pulse Operate Status 0: Off 1: On 00044 0x002B 1 bit CH7 DO Pulse Operate Status 0: Off 1: On 00045 0x002C 1 bit CH8 DO Pulse Operate Status 0: Off 1: On (DIO) 00046 0x002D 1 bit CH9 DO Pulse Operate Status 0: Off 1: On (DIO) 00047 0x002E 1 bit CH10 DO Pulse Operate Status 0: Off 1: On (DIO) 00048 0x002F 1 bit CH11 DO Pulse Operate Status 0: Off 1: On (DIO) 00049 0x0030 1 bit CH0 DO PowerOn Pulse Operate Status 0: Off 1: On 00050 0x0031 1 bit CH1 DO PowerOn Pulse Operate Status 0: Off 1: On 00051 0x0032 1 bit CH2 DO PowerOn Pulse Operate Status 0: Off 1: On 00052 0x0033 1 bit CH3 DO PowerOn Pulse Operate Status 0: Off 1: On 00053 0x0034 1 bit CH4 DO PowerOn Pulse Operate Status 0: Off 1: On 00054 0x0035 1 bit CH5 DO PowerOn Pulse Operate Status 0: Off 1: On C-19 ioLogik W5300 Cellular Micro RTU Controller Modbus/TCP Address Mapping 00055 0x0036 1 bit CH6 DO PowerOn Pulse Operate Status 0: Off 1: On 00056 0x0037 1 bit CH7 DO PowerOn Pulse Operate Status 0: Off 1: On 00057 0x0038 1 bit CH8 DO PowerOn Pulse Operate Status 0: Off 1: On (DIO) 00058 0x0039 1 bit CH9 DO PowerOn Pulse Operate Status 0: Off 1: On (DIO) 00059 0x003A 1 bit CH10 DO PowerOn Pulse Operate Status 0: Off 1: On (DIO) 00060 0x003B 1 bit CH11 DO PowerOn Pulse Operate Status 0: Off 1: On (DIO) 00061 0x003C 1 bit CH0 DO Safe Pulse Operate Status 0: Off 1: On 00062 0x003D 1 bit CH1 DO Safe Pulse Operate Status 0: Off 1: On 00063 0x003E 1 bit CH2 DO Safe Pulse Operate Status 0: Off 1: On 00064 0x003F 1 bit CH3 DO Safe Pulse Operate Status 0: Off 1: On 00065 0x0040 1 bit CH4 DO Safe Pulse Operate Status 0: Off 1: On 00066 0x0041 1 bit CH5 DO Safe Pulse Operate Status 0: Off 1: On 00067 0x0042 1 bit CH6 DO Safe Pulse Operate Status 0: Off 1: On 00068 0x0043 1 bit CH7 DO Safe Pulse Operate Status 0: Off 1: On 00069 0x0044 1 bit CH8 DO Safe Pulse Operate Status 0: Off 1: On (DIO) 00070 0x0045 1 bit CH9 DO Safe Pulse Operate Status 0: Off 1: On (DIO) 00071 0x0046 1 bit CH10 DO Safe Pulse Operate Status 0: Off 1: On (DIO) 00072 0x0047 1 bit CH11 DO Safe Pulse Operate Status 0: Off 1: On (DIO) 00073 0x0048 1 bit CH0 DI Counter Status 0: Off 1: On 00074 0x0049 1 bit CH1 DI Counter Status 0: Off 1: On 00075 0x004A 1 bit CH2 DI Counter Status 0: Off 1: On 00076 0x004B 1 bit CH3 DI Counter Status 0: Off 1: On 00077 0x004C 1 bit CH4 DI Counter Status 0: Off 1: On 00078 0x004D 1 bit CH5 DI Counter Status 0: Off 1: On 00079 0x004E 1 bit CH6 DI Counter Status 0: Off 1: On 00080 0x004F 1 bit CH7 DI Counter Status 0: Off 1: On 00081 0x0050 1 bit CH8 DI Counter Status 0: Off 1: On (DIO) 00082 0x0051 1 bit CH9 DI Counter Status 0: Off 1: On (DIO) 00083 0x0052 1 bit CH10 DI Counter Status 0: Off 1: On (DIO) 00084 0x0053 1 bit CH11 DI Counter Status 0: Off 1: On (DIO) 00085 0x0054 1 bit CH0 DI Clear Count Value read aways :0 Write: 1 : Clear counter value 0 : return Illegal Data Value 00086 0x0055 1 bit CH1 DI Clear Count Value read aways :0 Write: 1 : Clear counter value 0 : return Illegal Data Value 00087 0x0056 1 bit CH2 DI Clear Count Value read aways :0 Write: 1 : Clear counter value 0 : return Illegal Data Value 00088 0x0057 1 bit CH3 DI Clear Count Value read aways :0 Write: 1 : Clear counter value 0 : return Illegal Data Value 00089 0x0058 1 bit CH4 DI Clear Count Value read aways :0 Write: 1 : Clear counter value 0 : return Illegal Data Value 00090 0x0059 1 bit CH5 DI Clear Count Value read aways :0 Write: 1 : Clear counter value 0 : return Illegal Data Value 00091 0x005A 1 bit CH6 DI Clear Count Value read aways :0 Write: 1 : Clear counter value 0 : return Illegal Data Value 00092 0x005B 1 bit CH7 DI Clear Count Value read aways :0 Write: 1 : Clear counter value C-20 ioLogik W5300 Cellular Micro RTU Controller Modbus/TCP Address Mapping 0 : return Illegal Data Value 00093 0x005C 1 bit CH8 DI Clear Count Value read aways :0 Write: 1 : Clear counter value (DIO) 0 : return Illegal Data Value 00094 0x005D 1 bit CH9 DI Clear Count Value read aways :0 Write: 1 : Clear counter value 0 : return Illegal Data Value (DIO) 00095 0x005E 1 bit CH10 DI Clear Count Value read aways :0 Write: 1 : Clear counter value 0 : return Illegal Data Value (DIO) 00096 0x005F 1 bit CH11 DI Clear Count Value read aways :0 Write: 1 : Clear counter value 0 : return Illegal Data Value (DIO) 00097 0x0060 1 bit CH0 DI OverFlow Status Read : 0 : Normal 1 : Overflow Write : 0 : clear overflow status 1 : return Illegal Data Value 00098 0x0061 1 bit CH1 DI OverFlow Status Read : 0 : Normal 1 : Overflow Write : 0 : clear overflow status 1 : return Illegal Data Value 00099 0x0062 1 bit CH2 DI OverFlow Status Read : 0 : Normal 1 : Overflow Write : 0 : clear overflow status 1 : return Illegal Data Value 00100 0x0063 1 bit CH3 DI OverFlow Status Read : 0 : Normal 1 : Overflow Write : 0 : clear overflow status 1 : return Illegal Data Value 00101 0x0064 1 bit CH4 DI OverFlow Status Read : 0 : Normal 1 : Overflow Write : 0 : clear overflow status 1 : return Illegal Data Value 00102 0x0065 1 bit CH5 DI OverFlow Status Read : 0 : Normal 1 : Overflow Write : 0 : clear overflow status 1 : return Illegal Data Value 00103 0x0066 1 bit CH6 DI OverFlow Status Read : 0 : Normal 1 : Overflow Write : 0 : clear overflow status 1 : return Illegal Data Value 00104 0x0067 1 bit CH7 DI OverFlow Status Read : 0 : Normal 1 : Overflow Write : 0 : clear overflow status 1 : return Illegal Data Value 00105 0x0068 1 bit CH8 DI OverFlow Status C-21 ioLogik W5300 Cellular Micro RTU Controller Modbus/TCP Address Mapping Read : 0 : Normal 1 : Overflow Write : 0 : clear overflow status 1 : return Illegal Data Value 00106 0x0069 1 bit (DIO) CH9 DI OverFlow Status Read : 0 : Normal 1 : Overflow Write : 0 : clear overflow status 1 : return Illegal Data Value 00107 0x006A 1 bit (DIO) CH10 DI OverFlow Status Read : 0 : Normal 1 : Overflow Write : 0 : clear overflow status 1 : return Illegal Data Value 00108 0x006B 1 bit (DIO) CH11 DI OverFlow Status Read : 0 : Normal 1 : Overflow Write : 0 : clear overflow status 1 : return Illegal Data Value 00109 0x006C 1 bit CH0 DI Count Trigger 00110 0x006D 1 bit CH1 DI Count Trigger 00111 0x006E 1 bit CH2 DI Count Trigger 00112 0x006F 1 bit CH3 DI Count Trigger 00113 0x0070 1 bit CH4 DI Count Trigger 00114 0x0071 1 bit CH5 DI Count Trigger 00115 0x0072 1 bit CH6 DI Count Trigger 00116 0x0073 1 bit CH7 DI Count Trigger 00117 0x0074 1 bit CH8 DI Count Trigger (DIO) 00118 0x0075 1 bit CH9 DI Count Trigger (DIO) (DIO) 00119 0x0076 1 bit CH10 DI Count Trigger (DIO) 00120 0x0077 1 bit CH11 DI Count Trigger (DIO) 00121 0x0078 1 bit CH0 DI Power On Status 0: Off 1: On 00122 0x0079 1 bit CH1 DI Power On Status 0: Off 1: On 00123 0x007A 1 bit CH2 DI Power On Status 0: Off 1: On 00124 0x007B 1 bit CH3 DI Power On Status 0: Off 1: On 00125 0x007C 1 bit CH4 DI Power On Status 0: Off 1: On 00126 0x007D 1 bit CH5 DI Power On Status 0: Off 1: On 00127 0x007E 1 bit CH6 DI Power On Status 0: Off 1: On 00128 0x007F 1 bit CH7 DI Power On Status 0: Off 1: On 00129 0x0080 1 bit CH8 DI Power On Status 0: Off 1: On (DIO) 00130 0x0081 1 bit CH9 DI Power On Status 0: Off 1: On (DIO) 00131 0x0082 1 bit CH10 DI Power On Status 0: Off 1: On (DIO) 00132 0x0083 1 bit CH11 DI Power On Status 0: Off 1: On (DIO) 00133 0x0084 1 bit CH0 DI Safe Pulse Operate Status 0: Off 1: On 00134 0x0085 1 bit CH1 DI Safe Pulse Operate Status 0: Off 1: On 00135 0x0086 1 bit CH2 DI Safe Pulse Operate Status 0: Off 1: On 00136 0x0087 1 bit CH3 DI Safe Pulse Operate Status 0: Off 1: On 00137 0x0088 1 bit CH4 DI Safe Pulse Operate Status 0: Off 1: On 00138 0x0089 1 bit CH5 DI Safe Pulse Operate Status 0: Off 1: On 00139 0x008A 1 bit CH6 DI Safe Pulse Operate Status 0: Off 1: On 00140 0x008B 1 bit CH7 DI Safe Pulse Operate Status 0: Off 1: On 00141 0x008C 1 bit CH8 DI Safe Pulse Operate Status 0: Off 1: On (DIO) 00142 0x008D 1 bit CH9 DI Safe Pulse Operate Status 0: Off 1: On (DIO) C-22 ioLogik W5300 Cellular Micro RTU Controller Modbus/TCP Address Mapping 00143 0x008E 1 bit CH10 DI Safe Pulse Operate Status 0: Off 1: On (DIO) 00144 0x008F 1 bit CH11 DI Safe Pulse Operate Status 0: Off 1: On (DIO) 00145 0x0090 1 bit CH0 DI set channel Power-off storage enable ON/OFF 1:ON 0:OFF 00146 0x0091 1 bit CH1 DI set channel Power-off storage enable ON/OFF 1:ON 0:OFF 00147 0x0092 1 bit CH2 DI set channel Power-off storage enable ON/OFF 1:ON 0:OFF 00148 0x0093 1 bit CH3 DI set channel Power-off storage enable ON/OFF 1:ON 0:OFF 00149 0x0094 1 bit CH4 DI set channel Power-off storage enable ON/OFF 1:ON 0:OFF 00150 0x0095 1 bit CH5 DI set channel Power-off storage enable ON/OFF 1:ON 0:OFF 00151 0x0096 1 bit CH6 DI set channel Power-off storage enable ON/OFF 1:ON 0:OFF 00152 0x0097 1 bit CH7 DI set channel Power-off storage enable ON/OFF 1:ON 0:OFF 00153 0x0098 1 bit CH8 DI set channel (DIO) Power-off storage enable ON/OFF 1:ON 0:OFF 00154 0x0099 1 bit CH9 DI set channel (DIO) Power-off storage enable ON/OFF 1:ON 0:OFF 00155 0x009A 1 bit CH10 DI set channel (DIO) Power-off storage enable ON/OFF 1:ON 0:OFF 00156 0x009B 1 bit CH11 DI set channel (DIO) Power-off storage enable ON/OFF 1:ON 0:OFF 00165 0x00A4 1 bit DIO 8 Set DIO direction 1: OUTPUT 0: INPUT 00166 0x00A5 1 bit (Default: INPUT) DIO 9 Set DIO direction C-23 ioLogik W5300 Cellular Micro RTU Controller Modbus/TCP Address Mapping 1: OUTPUT 0: INPUT 00167 0x00A6 1 bit (Default: INPUT) DIO 10 Set DIO direction 1: OUTPUT 0: INPUT 00168 0x00A7 1 bit (Default: INPUT) DIO 11 Set DIO direction 1: OUTPUT 0: INPUT (Default: INPUT) 1xxxx Read only Coils (supports function 2) Reference Address Data Type Description 10001 0x0000 1 bit CH0 DI Value 10002 0x0001 1 bit CH1 DI Value 10003 0x0002 1 bit CH2 DI Value 10004 0x0003 1 bit CH3 DI Value 10005 0x0004 1 bit CH4 DI Value 10006 0x0005 1 bit CH5 DI Value 10007 0x0006 1 bit CH6 DI Value 10008 0x0007 1 bit CH7 DI Value 10009 0x0008 1 bit CH8 DI Value (DIO) 10010 0x0009 1 bit CH9 DI Value (DIO) 10011 0x000A 1 bit CH10 DI Value (DIO) 10012 0x000B 1 bit CH11 DI Value (DIO) 3xxxx Read only Registers (supports function 4) Reference Address Data Type Description 30001 0x0000 word CH0 DI Counter Value Hi- Word 30002 0x0001 word CH0 DI Counter Value Lo- Word 30003 0x0002 word CH1 DI Counter Value Hi- Word 30004 0x0003 word CH1 DI Counter Value Lo- Word 30005 0x0004 word CH2 DI Counter Value Hi- Word 30006 0x0005 word CH2 DI Counter Value Lo- Word 30007 0x0006 word CH3 DI Counter Value Hi- Word 30008 0x0007 word CH3 DI Counter Value Lo- Word 30009 0x0008 word CH4 DI Counter Value Hi- Word 30010 0x0009 word CH4 DI Counter Value Lo- Word 30011 0x000A word CH5 DI Counter Value Hi- Word 30012 0x000B word CH5 DI Counter Value Lo- Word 30013 0x000C word CH6 DI Counter Value Hi- Word 30014 0x000D word CH6 DI Counter Value Lo- Word 30015 0x000E word CH7 DI Counter Value Hi- Word 30016 0x000F word CH7 DI Counter Value Lo- Word 30017 0x0010 word CH8 DI Counter Value Hi- Word (DIO) 30018 0x0011 word CH8 DI Counter Value Lo- Word 30019 0x0012 word CH9 DI Counter Value Hi- Word (DIO) 30020 0x0013 word CH9 DI Counter Value Lo- Word 30021 0x0014 word CH10 DI Counter Value Hi- Word (DIO) 30022 0x0015 word CH10 DI Counter Value Lo- Word 30023 0x0016 word CH11 DI Counter Value Hi- Word (DIO) 30024 0x0017 word CH11 DI Counter Value Lo- Word C-24 ioLogik W5300 Cellular Micro RTU Controller Modbus/TCP Address Mapping System Information (read) 34097 0x1000(4096) 1 word Vendor ID=0x1393 34098 0x1001(4097) 1 word Unit ID (Ethernet=1) 34099 0x1002(4098) 1 word Product Code=0x5312 34100 0x1003 20 word Vendor name string=“Moxa Technologies Inc.,” Word 0 Hi byte = ‘M’(0x4D) Word 0 Lo byte = ‘o’ (0x6F) Word 1 Hi byte = ‘x’ (0x78) Word 1 Lo byte = ‘a’ (0x61) … Word 10 Hi byte = ‘c’ Word 10 Lo byte = ‘.’ Word 11 Hi byte = ‘,’ Word 11 Lo byte = ‘\0’ … String ending next byte value is 0 34101 0x1004 20 word Product name string=“W5312 Cellular Micro RTU Controllers” Word 0 Hi byte = ‘W’ (0x57) Word 0 Lo byte = ‘5’ (0x35) Word 1 Hi byte = ‘3’ (0x33) Word 1 Lo byte = ‘1’ (0x34) … Word 10 Hi byte = ‘v’ Word 10 Lo byte = ‘e’ Word 11 Hi byte = ‘r’ Word 11 Lo byte = ‘\0’ … 34102 0x1005 2 word Product serial number (decimal) 34103 0x1006 2 word Firmware revision: Word 0 Hi byte = major (A) Word 0 Lo byte = minor (B) Word 1 Hi byte = release (C) Word 1 Lo byte = build (D) format is A.B.C.D 34104 0x1007 2 word Firmware release date Ex. High word = 0x2009 Low word = 0x1231 firmware release date is Dec. 31, 2009 34105 0x1008 1 word Number of TCP connected 34106 0x1009 1 word Ethernet Interface speed, 0x10(10Mbps) or 34107 0x100A 3 word 0x100(100Mbps) Ethernet physical address(MAC-ID) Word 0 Hi byte = 0 Word 0 Lo byte = 1 Word 1 Hi byte = 2 Word 1 Lo byte =3 Word 2 Hi byte = 4 Word 2 Lo byte = 5 MAC-ID is 00-01-02-03-04-05 34111 0x100E 2 word System Elapsed Time (in sec) (ULONG) 34113 0x1010 1 word Click&Go Ready to Run Flag 34114 0x1011 16 word Get DI channels that are locked by Click&Go C-25 ioLogik W5300 Cellular Micro RTU Controller Modbus/TCP Address Mapping 34115 0x1012 16 word Get DO channels that are locked by Click&Go 34117 0x1014 2 word Get Click&Go revision 34118 0x1015 2 word Get MOS revision 34119 0x1016 1 word Modbus/RTU Unit ID=1 34121 0x1018 1 word MIB Date Value 34122 0x1019 1 word GSM/Cellular signal strength value 34123 0x101A 2 word Cellular IP 34125 0x101C 1 word GSM/Cellular error message code 34126 0x101D 1 word GSM/Cellular status 4xxxx Read/Write Registers (supports functions 3, 6, 16) Reference Address Data Type Description 40001 0x0000 1 word CH0 DO Pulse Output Count Value Hi-Word 40002 0x0001 1 word CH0 DO Pulse Output Count Value Lo-Word 40003 0x0002 1 word CH1 DO Pulse Output Count Value Hi-Word 40004 0x0003 1 word CH1 DO Pulse Output Count Value Lo- Word 40005 0x0004 1 word CH2 DO Pulse Output Count Value Hi- Word 40006 0x0005 1 word CH2 DO Pulse Output Count Value Lo- Word 40007 0x0006 1 word CH3 DO Pulse Output Count Value Hi- Word 40008 0x0007 1 word CH3 DO Pulse Output Count Value Lo- Word 40009 0x0008 1 word CH4 DO Pulse Output Count Value Hi- Word 40010 0x0009 1 word CH4 DO Pulse Output Count Value Lo- Word 40011 0x000A 1 word CH5 DO Pulse Output Count Value Hi- Word 40012 0x000B 1 word CH5 DO Pulse Output Count Value Lo- Word 40013 0x000C 1 word CH6 DO Pulse Output Count Value Hi- Word 40014 0x000D 1 word CH6 DO Pulse Output Count Value Lo- Word 40015 0x000E 1 word CH7 DO Pulse Output Count Value Hi- Word 40016 0x000F 1 word CH7 DO Pulse Output Count Value Lo- Word 40017 0x0010 1 word CH8 DO Pulse Output Count Value Hi- Word (DIO) 40018 0x0011 1 word CH8 DO Pulse Output Count Value Lo- Word 40019 0x0012 1 word CH9 DO Pulse Output Count Value Hi- Word (DIO) 40020 0x0013 1 word CH9 DO Pulse Output Count Value Lo- Word 40021 0x0014 1 word CH10 DO Pulse Output Count Value Hi-Word (DIO) 40022 0x0015 1 word CH10 DO Pulse Output Count Value Lo- Word 40023 0x0016 1 word CH11 DO Pulse Output Count Value Hi-Word (DIO) 40024 0x0017 1 word CH11 DO Pulse Output Count Value Lo- Word 40025 0x0018 1 word CH0 DO Pulse Low Signal Width Hi- Word 40026 0x0019 1 word CH0 DO Pulse Low Signal Width Lo- Word 40027 0x001A 1 word CH1 DO Pulse Low Signal Width Hi- Word 40028 0x001B 1 word CH1 DO Pulse Low Signal Width Lo- Word 40029 0x001C 1 word CH2 DO Pulse Low Signal Width Hi- Word 40030 0x001D 1 word CH2 DO Pulse Low Signal Width Lo- Word 40031 0x001E 1 word CH3 DO Pulse Low Signal Width Hi- Word 40032 0x001F 1 word CH3 DO Pulse Low Signal Width Lo- Word 40033 0x0020 1 word CH4 DO Pulse Low Signal Width Hi- Word 40034 0x0021 1 word CH4 DO Pulse Low Signal Width Lo- Word 40035 0x0022 1 word CH5 DO Pulse Low Signal Width Hi- Word 40036 0x0023 1 word CH5 DO Pulse Low Signal Width Lo- Word 40037 0x0024 1 word CH6 DO Pulse Low Signal Width Hi- Word 40038 0x0025 1 word CH6 DO Pulse Low Signal Width Lo- Word 40039 0x0026 1 word CH7 DO Pulse Low Signal Width Hi- Word C-26 ioLogik W5300 Cellular Micro RTU Controller Modbus/TCP Address Mapping 40040 0x0027 1 word CH7 DO Pulse Low Signal Width Lo- Word 40041 0x0028 1 word CH8 DO Pulse Low Signal Width Hi- Word (DIO) 40042 0x0029 1 word CH8 DO Pulse Low Signal Width Lo- Word 40043 0x002A 1 word CH9 DO Pulse Low Signal Width Hi- Word (DIO) 40044 0x002B 1 word CH9 DO Pulse Low Signal Width Lo- Word 40045 0x002C 1 word CH10 DO Pulse Low Signal Width Hi- Word (DIO) 40046 0x002D 1 word CH10 DO Pulse Low Signal Width Lo- Word 40047 0x002E 1 word CH11 DO Pulse Low Signal Width Hi- Word (DIO) 40048 0x002F 1 word CH11 DO Pulse Low Signal Width Lo- Word 40049 0x0030 1 word CH0 DO Pulse High Signal Width Hi- Word 40050 0x0031 1 word CH0 DO Pulse High Signal Width Lo- Word 40051 0x0032 1 word CH1 DO Pulse High Signal Width Hi- Word 40052 0x0033 1 word CH1 DO Pulse High Signal Width Lo- Word 40053 0x0034 1 word CH2 DO Pulse High Signal Width Hi- Word 40054 0x0035 1 word CH2 DO Pulse High Signal Width Lo- Word 40055 0x0036 1 word CH3 DO Pulse High Signal Width Hi- Word 40056 0x0037 1 word CH3 DO Pulse High Signal Width Lo- Word 40057 0x0038 1 word CH4 DO Pulse High Signal Width Hi- Word 40058 0x0039 1 word CH4 DO Pulse High Signal Width Lo- Word 40059 0x003A 1 word CH5 DO Pulse High Signal Width Hi- Word 40060 0x003B 1 word CH5 DO Pulse High Signal Width Lo- Word 40061 0x003C 1 word CH6 DO Pulse High Signal Width Hi- Word 40062 0x003D 1 word CH6 DO Pulse High Signal Width Lo- Word 40063 0x003E 1 word CH7 DO Pulse High Signal Width Hi- Word 40064 0x003F 1 word CH7 DO Pulse High Signal Width Lo- Word 40065 0x0040 1 word CH8 DO Pulse High Signal Width Hi- Word (DIO) 40066 0x0041 1 word CH8 DO Pulse High Signal Width Lo- Word 40067 0x0042 1 word CH9 DO Pulse High Signal Width Hi- Word (DIO) 40068 0x0043 1 word CH9 DO Pulse High Signal Width Lo- Word 40069 0x0044 1 word CH10 DO Pulse High Signal Width Hi- Word (DIO) 40070 0x0045 1 word CH10 DO Pulse High Signal Width Lo- Word 40071 0x0046 1 word CH11 DO Pulse High Signal Width Hi- Word (DIO) 40072 0x0047 1 word CH11 DO Pulse High Signal Width Lo- Word 40073 0x0048 1 word CH0 DO Mode 0: DO 40074 0x0049 1 word CH1 DO Mode 0: DO 1: Pulse 1: Pulse 40075 0x004A 1 word CH2 DO Mode 0: DO 40076 0x004B 1 word CH3 DO Mode 0: DO 40077 0x004C 1 word CH4 DO Mode 0: DO 1: Pulse 1: Pulse 1: Pulse 40078 0x004D 1 word CH5 DO Mode 0: DO 1: Pulse 40079 0x004E 1 word CH6 DO Mode 0: DO 40080 0x004F 1 word CH7 DO Mode 0: DO 40081 0x0050 1 word CH8 DO Mode 0: DO 1: Pulse 1: Pulse (DIO) 1: Pulse 40082 0x0051 1 word CH9 DO Mode 0: DO 1: Pulse C-27 (DIO) ioLogik W5300 Cellular Micro RTU Controller Modbus/TCP Address Mapping 40083 0x0052 1 word CH10 DO Mode 0: DO 40084 0x0053 1 word CH11 DO Mode 0: DO (DIO) 1: Pulse (DIO) 1: Pulse 40085 0x0054 1 word CH0 DI Count Filter 40086 0x0055 1 word CH1 DI Count Filter 40087 0x0056 1 word CH2 DI Count Filter 40088 0x0057 1 word CH3 DI Count Filter 40089 0x0058 1 word CH4 DI Count Filter 40090 0x0059 1 word CH5 DI Count Filter 40091 0x005A 1 word CH6 DI Count Filter 40092 0x005B 1 word CH7 DI Count Filter 40093 0x005C 1 word CH8 DI Count Filter (DIO) 40094 0x005D 1 word CH9 DI Count Filter (DIO) 40095 0x005E 1 word CH10 DI Count Filter (DIO) 40096 0x005F 1 word CH11 DI Count Filter (DIO) 40097 0x0060 1 word CH0 DI Mode 0: DI 1: Count Others : return Illegal Data Value 40098 0x0061 1 word CH1 DI Mode 0: DI 1: Count Others : return Illegal Data Value 40099 0x0062 1 word CH2 DI Mode 0: DI 1: Count Others : return Illegal Data Value 40100 0x0063 1 word CH3 DI Mode 0: DI 1: Count Others : return Illegal Data Value 40101 0x0064 1 word CH4 DI Mode 0: DI 1: Count Others : return Illegal Data Value 40102 0x0065 1 word CH5 DI Mode 0: DI 1: Count Others : return Illegal Data Value 40103 0x0066 1 word CH6 DI Mode 0: DI 1: Count Others : return Illegal Data Value 40104 0x0067 1 word CH7 DI Mode 0: DI 1: Count Others : return Illegal Data Value 40105 0x0068 1 word CH8 DI Mode (DIO) 0: DI 1: Count Others : return Illegal Data Value 40106 0x0069 1 word CH9 DI Mode 0: DI C-28 (DIO) ioLogik W5300 Cellular Micro RTU Controller Modbus/TCP Address Mapping 1: Count Others : return Illegal Data Value 40107 0x006A 1 word CH10 DI Mode (DIO) 0: DI 1: Count Others : return Illegal Data Value 40108 0x006B 1 word CH11 DI Mode (DIO) 0: DI 1: Count Others : return Illegal Data Value For SCADA 40129 0x0080 1 word CH0 DO set/get wordvalue 40130 0x0081 1 word CH1 DO set/get wordvalue 40131 0x0082 1 word CH2 DO set/get wordvalue 40132 0x0083 1 word CH3 DO set/get wordvalue 40133 0x0084 1 word CH4 DO set/get wordvalue 40134 0x0085 1 word CH5 DO set/get wordvalue 40135 0x0086 1 word CH6 DO set/get wordvalue 40136 0x0087 1 word CH7 DO set/get wordvalue 40137 0x0088 1 word CH8 DO set/get wordvalue (DIO) 40138 0x0089 1 word CH9 DO set/get wordvalue (DIO) 40139 0x008A 1 word CH10 DO set/get wordvalue (DIO) 40140 0x008B 1 word CH11 DO set/get wordvalue (DIO) 40141 0x008C 1 word CH0 DO set/get poweron wordvalue 40142 0x008D 1 word CH1 DO set/get poweron wordvalue 40143 0x008E 1 word CH2 DO set/get poweron wordvalue 40144 0x008F 1 word CH3 DO set/get poweron wordvalue 40145 0x0090 1 word CH4 DO set/get poweron wordvalue 40146 0x0091 1 word CH5 DO set/get poweron wordvalue 40147 0x0092 1 word CH6 DO set/get poweron wordvalue 40148 0x0093 1 word CH7 DO set/get poweron wordvalue 40149 0x0094 1 word CH8 DO set/get poweron wordvalue (DIO) 40150 0x0095 1 word CH9 DO set/get poweron wordvalue (DIO) 40151 0x0096 1 word CH10 DO set/get poweron wordvalue (DIO) 40152 0x0097 1 word CH11 DO set/get poweron wordvalue (DIO) 40153 0x0098 1 word CH0 DO set/get safe mode wordvalue 40154 0x0099 1 word 0: Off 1: On CH1 DO set/get safe mode wordvalue 0: Off 1: On 40155 0x009A 1 word CH2 DO set/get safe mode wordvalue 40156 0x009B 1 word CH3 DO set/get safe mode wordvalue 40157 0x009C 1 word CH4 DO set/get safe mode wordvalue 0: Off 1: On 0: Off 1: On 0: Off 1: On 40158 0x009D 1 word CH5 DO set/get safe mode wordvalue 0: Off 1: On 40159 0x009E 1 word CH6 DO set/get safe mode wordvalue 40160 0x009F 1 word CH7 DO set/get safe mode wordvalue 40161 0x00A0 1 word CH8 DO set/get safe mode wordvalue (DIO) 0: Off 1: On 0: Off 1: On 0: Off 1: On C-29 ioLogik W5300 Cellular Micro RTU Controller 40162 0x00A1 1 word 40163 0x00A2 1 word Modbus/TCP Address Mapping CH9 DO set/get safe mode wordvalue (DIO) 0: Off 1: On CH10 DO set/get safe mode wordvalue (DIO) 0: Off 1: On 40164 0x00A3 1 word CH11 DO set/get safe mode wordvalue (DIO) 40165 0x00A4 1 word CH0 DO set/get pwm start wordvalue 40166 0x00A5 1 word CH1 DO set/get pwm start wordvalue 40167 0x00A6 1 word CH2 DO set/get pwm start wordvalue 40168 0x00A7 1 word CH3 DO set/get pwm start wordvalue 40169 0x00A8 1 word CH4 DO set/get pwm start wordvalue 40170 0x00A9 1 word CH5 DO set/get pwm start wordvalue 40171 0x00AA 1 word CH6 DO set/get pwm start wordvalue 40172 0x00AB 1 word CH7 DO set/get pwm start wordvalue 40173 0x00AC 1 word CH8 DO set/get pwm start wordvalue (DIO) 40174 0x00AD 1 word CH9 DO set/get pwm start wordvalue (DIO) 40175 0x00AE 1 word CH10 DO set/get pwm start wordvalue (DIO) 40176 0x00AF 1 word CH11 DO set/get pwm start wordvalue (DIO) 40177 0x00B0 1 word CH0 DO set/get pwm poweron wordvalue 0: Off 1: On (Pulse Operate Status) 0: Stop 1: Start 0: Stop 1: Start 40178 0x00B1 1 word CH1 DO set/get pwm poweron wordvalue 40179 0x00B2 1 word CH2 DO set/get pwm poweron wordvalue 40180 0x00B3 1 word CH3 DO set/get pwm poweron wordvalue 40181 0x00B4 1 word CH4 DO set/get pwm poweron wordvalue 40182 0x00B5 1 word CH5 DO set/get pwm poweron wordvalue 40183 0x00B6 1 word CH6 DO set/get pwm poweron wordvalue 40184 0x00B7 1 word CH7 DO set/get pwm poweron wordvalue 40185 0x00B8 1 word CH8 DO set/get pwm poweron wordvalue (DIO) 40186 0x00B9 1 word CH9 DO set/get pwm poweron wordvalue (DIO) 40187 0x00BA 1 word CH10 DO set/get pwm poweron wordvalue (DIO) 40188 0x00BB 1 word CH11 DO set/get pwm poweron wordvalue (DIO) 40189 0x00BC 1 word CH0 DO set/get pwm safe mode wordvalue 40190 0x00BD 1 word CH1 DO set/get pwm safe mode wordvalue 40191 0x00BE 1 word CH2 DO set/get pwm safe mode wordvalue 40192 0x00BF 1 word CH3 DO set/get pwm safe mode wordvalue 40193 0x00C0 1 word CH4 DO set/get pwm safe mode wordvalue 40194 0x00C1 1 word CH5 DO set/get pwm safe mode wordvalue 40195 0x00C2 1 word CH6 DO set/get pwm safe mode wordvalue 40196 0x00C3 1 word CH7 DO set/get pwm safe mode wordvalue 40197 0x00C4 1 word CH8 DO set/get pwm safe mode wordvalue (DIO) 40198 0x00C5 1 word CH9 DO set/get pwm safe mode wordvalue (DIO) 40199 0x00C6 1 word CH10 DO set/get pwm safe mode wordvalue (DIO) 40200 0x00C7 1 word CH11 DO set/get pwm safe mode wordvalue (DIO) 40201 0x00C8 1 word CH0 DI set/get counter start word 40202 0x00C9 1 word CH1 DI set/get counter start word 40203 0x00CA 1 word CH2 DI set/get counter start word 40204 0x00CB 1 word CH3 DI set/get counter start word 40205 0x00CC 1 word CH4 DI set/get counter start word 40206 0x00CD 1 word CH5 DI set/get counter start word 40207 0x00CE 1 word CH6 DI set/get counter start word Safe Mode Pulse Operate Status 0: Stop 1: Start Counter Operate Status 0: Stop 1: Start C-30 ioLogik W5300 Cellular Micro RTU Controller Modbus/TCP Address Mapping 40208 0x00CF 1 word CH7 DI set/get counter start word 40209 0x00D0 1 word CH8 DI set/get counter start word (DIO) 40210 0x00D1 1 word CH9 DI set/get counter start word (DIO) 40211 0x00D2 1 word CH10 DI set/get counter start word (DIO) 40212 0x00D3 1 word CH11 DI set/get counter start word (DIO) 40213 0x00D4 1 word CH0 DI set/get counter clear word Read: always return: 0 Write: 1 : Clear counter value 0 : Return illegal data value(0x03) 40214 0x00D5 1 word CH1 DI set/get counter clear word 40215 0x00D6 1 word CH2 DI set/get counter clear word 40216 0x00D7 1 word CH3 DI set/get counter clear word 40217 0x00D8 1 word CH4 DI set/get counter clear word 40218 0x00D9 1 word CH5 DI set/get counter clear word 40219 0x00DA 1 word CH6 DI set/get counter clear word 40220 0x00DB 1 word CH7 DI set/get counter clear word 40221 0x00DC 1 word CH8 DI set/get counter clear word (DIO) 40222 0x00DD 1 word CH9 DI set/get counter clear word (DIO) 40223 0x00DE 1 word CH10 DI set/get counter clear word (DIO) 40224 0x00DF 1 word CH11 DI set/get counter clear word (DIO) 40225 0x00E0 1 word CH0 DI clear/get overflow word Read : 0 : Normal 1 : Overflow Write : 0 : Clear overflow status 1 : Return illegal data value (0x03) 40226 0x00E1 1 word CH1 DI clear/get overflow word 40227 0x00E2 1 word CH2 DI clear/get overflow word 40228 0x00E3 1 word CH3 DI clear/get overflow word 40229 0x00E4 1 word CH4 DI clear/get overflow word 40230 0x00E5 1 word CH5 DI clear/get overflow word 40231 0x00E6 1 word CH6 DI clear/get overflow word 40232 0x00E7 1 word CH7 DI clear/get overflow word 40233 0x00E8 1 word CH8 DI clear/get overflow word (DIO) 40234 0x00E9 1 word CH9 DI clear/get overflow word (DIO) 40235 0x00EA 1 word CH10 DI clear/get overflow word (DIO) 40236 0x00EB 1 word CH11 DI clear/get overflow word (DIO) 40237 0x00EC 1 word CH0 DI set/get trigger word 40238 0x00ED 1 word CH1 DI set/get trigger word 40239 0x00EE 1 word CH2 DI set/get trigger word 40240 0x00EF 1 word CH3 DI set/get trigger word 40241 0x00F0 1 word CH4 DI set/get trigger word 40242 0x00F1 1 word CH5 DI set/get trigger word 40243 0x00F2 1 word CH6 DI set/get trigger word 40244 0x00F3 1 word CH7 DI set/get trigger word 40245 0x00F4 1 word CH8 DI set/get trigger word (DIO) 40246 0x00F5 1 word CH9 DI set/get trigger word (DIO) 40247 0x00F6 1 word CH10 DI set/get trigger word (DIO) 40248 0x00F7 1 word CH11 DI set/get trigger word (DIO) 40249 0x00F8 1 word CH0 DI set/get power on start word 0=Low to High, 1=High to Low (PowerOn Counter Operate Status) 0: Stop 1: Start 40250 0x00F9 1 word CH1 DI set/get power on start word C-31 ioLogik W5300 Cellular Micro RTU Controller Modbus/TCP Address Mapping 40251 0x00FA 1 word CH2 DI set/get power on start word 40252 0x00FB 1 word CH3 DI set/get power on start word 40253 0x00FC 1 word CH4 DI set/get power on start word 40254 0x00FD 1 word CH5 DI set/get power on start word 40255 0x00FE 1 word CH6 DI set/get power on start word 40256 0x00FF 1 word CH7 DI set/get power on start word 40257 0x0100 1 word CH8 DI set/get power on start word (DIO) 40258 0x0101 1 word CH9 DI set/get power on start word (DIO) 40259 0x0102 1 word CH10 DI set/get power on start word (DIO) 40260 0x0103 1 word CH11 DI set/get power on start word (DIO) 40261 0x0104 1 word CH0 DI set/get safe start word (Safe Mode Counter Operate Status) 0: Stop 1: Start 40262 0x0105 1 word 40263 0x0106 1 word CH1 DI set/get safe start word CH2 DI set/get safe start word 40264 0x0107 1 word CH3 DI set/get safe start word 40265 0x0108 1 word CH4 DI set/get safe start word 40266 0x0109 1 word CH5 DI set/get safe start word 40267 0x010A 1 word CH6 DI set/get safe start word 40268 0x010B 1 word CH7 DI set/get safe start word 40269 0x010C 1 word CH8 DI set/get safe start word (DIO) 40270 0x010D 1 word CH9 DI set/get safe start word (DIO) 40271 0x010E 1 word CH10 DI set/get safe start word (DIO) 40272 0x010F 1 word CH11 DI set/get safe start word (DIO) 40273 0x0110 1 word CH0 Power-off storage enable (DI count value recorded when power-off) 1:ON 0:OFF 40274 0x0111 1 word CH1 Power-off storage enable 40275 0x0112 1 word CH2 Power-off storage enable 40276 0x0113 1 word CH3 Power-off storage enable 40277 0x0114 1 word CH4 Power-off storage enable 40278 0x0115 1 word CH5 Power-off storage enable 40279 0x0116 1 word CH6 Power-off storage enable 40280 0x0117 1 word CH7 Power-off storage enable 40281 0x0118 1 word CH8 Power-off storage enable (DIO) 40282 0x0119 1 word CH9 Power-off storage enable (DIO) 40283 0x011A 1 word CH10 Power-off storage enable (DIO) 40284 0x011B 1 word CH11 Power-off storage enable (DIO) 40337 0x0150 1 word Internal Register 00 Value 40338 0x0151 1 word Internal Register 01 Value 40339 0x0152 1 word Internal Register 02 Value 40340 0x0153 1 word Internal Register 03 Value 40341 0x0154 1 word Internal Register 04 Value 40342 0x0155 1 word Internal Register 05 Value 40343 0x0156 1 word Internal Register 06 Value 40344 0x0157 1 word Internal Register 07 Value 40345 0x0158 1 word Internal Register 08 Value 40346 0x0159 1 word Internal Register 09 Value 40347 0x015A 1 word Internal Register 10 Value 40348 0x015B 1 word Internal Register 11 Value 40349 0x015C 1 word Internal Register 12 Value 40350 0x015D 1 word Internal Register 13 Value 40351 0x015E 1 word Internal Register 14 Value C-32 ioLogik W5300 Cellular Micro RTU Controller Modbus/TCP Address Mapping 40352 0x015F 1 word Internal Register 15 Value 40353 0x0160 1 word Internal Register 16 Value 40354 0x0161 1 word Internal Register 17 Value 40355 0x0162 1 word Internal Register 18 Value 40356 0x0163 1 word Internal Register 19 Value 40357 0x0164 1 word Internal Register 20 Value 40358 0x0165 1 word Internal Register 21 Value 40359 0x0166 1 word Internal Register 22 Value 40360 0x0167 1 word Internal Register 23 Value 40361 0x0168 2 word Time Init 00 Value 40362 0x0169 2 word Time Init 01 Value 40363 0x016A 2 word Time Init 02 Value 40364 0x016B 2 word Time Init 03 Value 40365 0x016C 2 word Time Init 04 Value 40366 0x016D 2 word Time Init 05 Value 40367 0x016E 2 word Time Init 06 Value 40368 0x016F 2 word Time Init 07 Value 40369 0x0170 2 word Time Init 08 Value 40370 0x0171 2 word Time Init 09 Value 40371 0x0172 2 word Time Init 10 Value 40372 0x0173 2 word Time Init 11 Value 40373 0x0174 2 word Time Init 12 Value 40374 0x0175 2 word Time Init 13 Value 40375 0x0176 2 word Time Init 14 Value 40376 0x0177 2 word Time Init 15 Value 40377 0x0178 2 word Time Init 16 Value 40378 0x0179 2 word Time Init 17 Value 40379 0x017A 2 word Time Init 18 Value 40380 0x017B 2 word Time Init 19 Value 40381 0x017C 2 word Time Init 20 Value 40382 0x017D 2 word Time Init 21 Value 40383 0x017E 2 word Time Init 22 Value 40384 0x017F 2 word Time Init 23 Value 40385 0x0180 1 word Timer Interval 00 Value 40386 0x0181 1 word Timer Interval 01 Value 40387 0x0182 1 word Timer Interval 02 Value 40388 0x0183 1 word Timer Interval 03 Value 40389 0x0184 1 word Timer Interval 04 Value 40390 0x0185 1 word Timer Interval 05 Value 40391 0x0186 1 word Timer Interval 06 Value 40392 0x0187 1 word Timer Interval 07 Value 40393 0x0188 1 word Timer Interval 08 Value 40394 0x0189 1 word Timer Interval 09 Value 40395 0x018A 1 word Timer Interval 10 Value 40396 0x018B 1 word Timer Interval 11 Value 40397 0x018C 1 word Timer Interval 12 Value 40398 0x018D 1 word Timer Interval 13 Value 40399 0x018E 1 word Timer Interval 14 Value 40400 0x018F 1 word Timer Interval 15 Value 40401 0x0190 1 word Timer Interval 16 Value 40402 0x0191 1 word Timer Interval 17 Value 40403 0x0192 1 word Timer Interval 18 Value 40404 0x0193 1 word Timer Interval 19 Value C-33 ioLogik W5300 Cellular Micro RTU Controller Modbus/TCP Address Mapping 40405 0x0194 1 word Timer Interval 20 Value 40406 0x0195 1 word Timer Interval 21 Value 40407 0x0196 1 word Timer Interval 22 Value 40408 0x0197 2 word Timer Interval 23 Value 40409 0x0198 10 word Timer Description 00 Value 40410 0x0199 10 word Timer Description 01 Value 40411 0x019A 10 word Timer Description 02 Value 40412 0x019B 10 word Timer Description 03 Value 40413 0x019C 10 word Timer Description 04 Value 40414 0x019D 10 word Timer Description 05 Value 40415 0x019E 10 word Timer Description 06 Value 40416 0x019F 10 word Timer Description 07 Value 40417 0x01A0 10 word Timer Description 08 Value 40418 0x01A1 10 word Timer Description 09 Value 40419 0x01A2 10 word Timer Description 10 Value 40420 0x01A3 10 word Timer Description 11 Value 40421 0x01A4 10 word Timer Description 12 Value 40422 0x01A5 10 word Timer Description 13 Value 40423 0x01A6 10 word Timer Description 14 Value 40424 0x01A7 10 word Timer Description 15 Value 40425 0x01A8 10 word Timer Description 16 Value 40426 0x01A9 10 word Timer Description 17 Value 40427 0x01AA 10 word Timer Description 18 Value 40428 0x01AB 10 word Timer Description 19 Value 40429 0x01AC 10 word Timer Description 20 Value 40430 0x01AD 10 word Timer Description 21 Value 40431 0x01AE 10 word Timer Description 22 Value 40432 0x01AF 10 word Timer Description 23 Value 40433 0x01B0 10 word Internal Register Description 00 Value 40434 0x01B1 10 word Internal Register Description 01 Value 40435 0x01B2 10 word Internal Register Description 02 Value 40436 0x01B3 10 word Internal Register Description 03 Value 40437 0x01B4 10 word Internal Register Description 04 Value 40438 0x01B5 10 word Internal Register Description 05 Value 40439 0x01B6 10 word Internal Register Description 06 Value 40440 0x01B7 10 word Internal Register Description 07 Value 40441 0x01B8 10 word Internal Register Description 08 Value 40442 0x01B9 10 word Internal Register Description 09 Value 40443 0x01BA 10 word Internal Register Description 10 Value 40444 0x01BB 10 word Internal Register Description 11 Value 40445 0x01BC 10 word Internal Register Description 12 Value 40446 0x01BD 10 word Internal Register Description 13 Value 40447 0x01BE 10 word Internal Register Description 14 Value 40418 0x01BF 10 word Internal Register Description 15 Value 40419 0x01C0 10 word Internal Register Description 16 Value 40420 0x01C1 10 word Internal Register Description 17 Value 40421 0x01C2 10 word Internal Register Description 18 Value 40422 0x01C3 10 word Internal Register Description 19 Value 40423 0x01C4 10 word Internal Register Description 20 Value 40424 0x01C5 10 word Internal Register Description 21 Value 40425 0x01C6 10 word Internal Register Description 22 Value 40426 0x01C7 10 word Internal Register Description 23 Value 40427 0x01C8 1 word Message Retry Times C-34 ioLogik W5300 Cellular Micro RTU Controller Modbus/TCP Address Mapping 40428 0x01C9 1 word Message Retry Interval 40429 0x01CA 1 word Mail Retry Times 40430 0x01CB 1 word Mail Retry Interval 40431 0x01CC 1 word SMS Retry Times 40432 0x01CD 1 word SMS Retry Interval 40577 0x0240 20 word Message Server Address 00 40578 0x0241 20 word Message Server Address 01 40579 0x0242 20 word Message Server Address 02 40580 0x0243 20 word Message Server Address 03 40581 0x0244 20 word Message Server Address 04 40582 0x0245 20 word Message Server Address 05 40583 0x0246 20 word Message Server Address 06 40584 0x0247 20 word Message Server Address 07 40585 0x0248 20 word Message Server Address 08 40586 0x0249 20 word Message Server Address 09 Data Type Description Internal Register (Float) Reference Address 419413 0x4BD4 word Get/Set Initial Internal Register(Float)_00 Hi-word 419414 0x4BD5 word Get/Set Initial Internal Register(Float)_00 Lo-word 419415 0x4BD6 word Get/Set Initial Internal Register(Float)_01 Hi-word 419416 0x4BD7 word Get/Set Initial Internal Register(Float)_01 Lo-word 419417 0x4BD8 word Get/Set Initial Internal Register(Float)_02 Hi-word 419418 0x4BD9 word Get/Set Initial Internal Register(Float)_02 Lo-word 419419 0x4BDA word Get/Set Initial Internal Register(Float)_03 Hi-word 419420 0x4BDB word Get/Set Initial Internal Register(Float)_03 Lo-word 419421 0x4BDC word Get/Set Initial Internal Register(Float)_04 Hi-word 419422 0x4BDD word Get/Set Initial Internal Register(Float)_04 Lo-word 419423 0x4BDE word Get/Set Initial Internal Register(Float)_05 Hi-word 419424 0x4BDF word Get/Set Initial Internal Register(Float)_05 Lo-word 419425 0x4BE0 word Get/Set Initial Internal Register(Float)_06 Hi-word 419426 0x4BE1 word Get/Set Initial Internal Register(Float)_06 Lo-word 419427 0x4BE2 word Get/Set Initial Internal Register(Float)_07 Hi-word 419428 0x4BE3 word Get/Set Initial Internal Register(Float)_07 Lo-word 419429 0x4BE4 word Get/Set Initial Internal Register(Float)_08 Hi-word 419430 0x4BE5 word Get/Set Initial Internal Register(Float)_08 Lo-word 419431 0x4BE6 word Get/Set Initial Internal Register(Float)_09 Hi-word 419432 0x4BE7 word Get/Set Initial Internal Register(Float)_09 Lo-word 419433 0x4BE8 word Get/Set Initial Internal Register(Float)_10 Hi-word 419434 0x4BE9 word Get/Set Initial Internal Register(Float)_10 Lo-word 419435 0x4BEA word Get/Set Initial Internal Register(Float)_11 Hi-word 419436 0x4BEB word Get/Set Initial Internal Register(Float)_11 Lo-word 419437 0x4BEC word Get/Set Initial Internal Register(Float)_12 Hi-word 419438 0x4BED word Get/Set Initial Internal Register(Float)_12 Lo-word 419439 0x4BEE word Get/Set Initial Internal Register(Float)_13 Hi-word 419440 0x4BEF word Get/Set Initial Internal Register(Float)_13 Lo-word 419441 0x4BF0 word Get/Set Initial Internal Register(Float)_14 Hi-word 419442 0x4BF1 word Get/Set Initial Internal Register(Float)_14 Lo-word 419443 0x4BF2 word Get/Set Initial Internal Register(Float)_15 Hi-word 419444 0x4BF3 word Get/Set Initial Internal Register(Float)_15 Lo-word 419445 0x4BF4 word Get/Set Initial Internal Register(Float)_16 Hi-word 419446 0x4BF5 word Get/Set Initial Internal Register(Float)_16 Lo-word 419447 0x4BF6 word Get/Set Initial Internal Register(Float)_17 Hi-word C-35 ioLogik W5300 Cellular Micro RTU Controller Modbus/TCP Address Mapping 419448 0x4BF7 word Get/Set Initial Internal Register(Float)_17 Lo-word 419449 0x4BF8 word Get/Set Initial Internal Register(Float)_18 Hi-word 419450 0x4BF9 word Get/Set Initial Internal Register(Float)_18 Lo-word 419451 0x4BFA word Get/Set Initial Internal Register(Float)_19 Hi-word 419452 0x4BFB word Get/Set Initial Internal Register(Float)_19 Lo-word 419453 0x4BFC word Get/Set Initial Internal Register(Float)_20 Hi-word 419454 0x4BFD word Get/Set Initial Internal Register(Float)_20 Lo-word 419455 0x4BFE word Get/Set Initial Internal Register(Float)_21 Hi-word 419456 0x4BFF word Get/Set Initial Internal Register(Float)_21 Lo-word 419457 0x4C00 word Get/Set Initial Internal Register(Float)_22 Hi-word 419458 0x4C01 word Get/Set Initial Internal Register(Float)_22 Lo-word 419459 0x4C02 word Get/Set Initial Internal Register(Float)_23 Hi-word 419460 0x4C03 word Get/Set Initial Internal Register(Float)_23 Lo-word 419461 0x4C04 word Get/Set Initial Internal Register(Float)_24 Hi-word 419462 0x4C05 word Get/Set Initial Internal Register(Float)_24 Lo-word 419463 0x4C06 word Get/Set Initial Internal Register(Float)_25 Hi-word 419464 0x4C07 word Get/Set Initial Internal Register(Float)_25 Lo-word 419465 0x4C08 word Get/Set Initial Internal Register(Float)_26 Hi-word 419466 0x4C09 word Get/Set Initial Internal Register(Float)_26 Lo-word 419467 0x4C0A word Get/Set Initial Internal Register(Float)_27 Hi-word 419468 0x4C0B word Get/Set Initial Internal Register(Float)_27 Lo-word 419469 0x4C0C word Get/Set Current Internal Register(Float)_00 Hi-word 419470 0x4C0D word Get/Set Current Internal Register(Float)_00 Lo-word 419471 0x4C0E word Get/Set Current Internal Register(Float)_01 Hi-word 419472 0x4C0F word Get/Set Current Internal Register(Float)_01 Lo-word 419473 0x4C10 word Get/Set Current Internal Register(Float)_02 Hi-word 419474 0x4C11 word Get/Set Current Internal Register(Float)_02 Lo-word 419475 0x4C12 word Get/Set Current Internal Register(Float)_03 Hi-word 419476 0x4C13 word Get/Set Current Internal Register(Float)_03 Lo-word 419477 0x4C14 word Get/Set Current Internal Register(Float)_04 Hi-word 419478 0x4C15 word Get/Set Current Internal Register(Float)_04 Lo-word 419479 0x4C16 word Get/Set Current Internal Register(Float)_05 Hi-word 419480 0x4C17 word Get/Set Current Internal Register(Float)_05 Lo-word 419481 0x4C18 word Get/Set Current Internal Register(Float)_06 Hi-word 419482 0x4C19 word Get/Set Current Internal Register(Float)_06 Lo-word 419483 0x4C1A word Get/Set Current Internal Register(Float)_07 Hi-word 419484 0x4C1B word Get/Set Current Internal Register(Float)_07 Lo-word 419485 0x4C1C word Get/Set Current Internal Register(Float)_08 Hi-word 419486 0x4C1D word Get/Set Current Internal Register(Float)_08 Lo-word 419487 0x4C1E word Get/Set Current Internal Register(Float)_09 Hi-word 419488 0x4C1F word Get/Set Current Internal Register(Float)_09 Lo-word 419489 0x4C20 word Get/Set Current Internal Register(Float)_10 Hi-word 419490 0x4C21 word Get/Set Current Internal Register(Float)_10 Lo-word 419491 0x4C22 word Get/Set Current Internal Register(Float)_11 Hi-word 419492 0x4C23 word Get/Set Current Internal Register(Float)_11 Lo-word 419493 0x4C24 word Get/Set Current Internal Register(Float)_12 Hi-word 419494 0x4C25 word Get/Set Current Internal Register(Float)_12 Lo-word 419495 0x4C26 word Get/Set Current Internal Register(Float)_13 Hi-word 419496 0x4C27 word Get/Set Current Internal Register(Float)_13 Lo-word 419497 0x4C28 word Get/Set Current Internal Register(Float)_14 Hi-word 419498 0x4C29 word Get/Set Current Internal Register(Float)_14 Lo-word 419499 0x4C2A word Get/Set Current Internal Register(Float)_15 Hi-word 419500 0x4C2B word Get/Set Current Internal Register(Float)_15 Lo-word C-36 ioLogik W5300 Cellular Micro RTU Controller Modbus/TCP Address Mapping 419501 0x4C2C word Get/Set Current Internal Register(Float)_16 Hi-word 419502 0x4C2D word Get/Set Current Internal Register(Float)_16 Lo-word 419503 0x4C2E word Get/Set Current Internal Register(Float)_17 Hi-word 419504 0x4C2F word Get/Set Current Internal Register(Float)_17 Lo-word 419505 0x4C30 word Get/Set Current Internal Register(Float)_18 Hi-word 419506 0x4C31 word Get/Set Current Internal Register(Float)_18 Lo-word 419507 0x4C32 word Get/Set Current Internal Register(Float)_19 Hi-word 419508 0x4C33 word Get/Set Current Internal Register(Float)_19 Lo-word 419509 0x4C34 word Get/Set Current Internal Register(Float)_20 Hi-word 419510 0x4C35 word Get/Set Current Internal Register(Float)_20 Lo-word 419511 0x4C36 word Get/Set Current Internal Register(Float)_21 Hi-word 419512 0x4C37 word Get/Set Current Internal Register(Float)_21 Lo-word 419513 0x4C38 word Get/Set Current Internal Register(Float)_22 Hi-word 419514 0x4C39 word Get/Set Current Internal Register(Float)_22 Lo-word 419515 0x4C3A word Get/Set Current Internal Register(Float)_23 Hi-word 419516 0x4C3B word Get/Set Current Internal Register(Float)_23 Lo-word 419517 0x4C3C word Get/Set Current Internal Register(Float)_24 Hi-word 419518 0x4C3D word Get/Set Current Internal Register(Float)_24 Lo-word 419519 0x4C3E word Get/Set Current Internal Register(Float)_25 Hi-word 419520 0x4C3F word Get/Set Current Internal Register(Float)_25 Lo-word 419521 0x4C40 word Get/Set Current Internal Register(Float)_26 Hi-word 419522 0x4C41 word Get/Set Current Internal Register(Float)_26 Lo-word 419523 0x4C42 word Get/Set Current Internal Register(Float)_27 Hi-word 419524 0x4C43 word Get/Set Current Internal Register(Float)_27 Lo-word 419525 0x4C44 10 word Get/Set Internal Register(Float)_00 Description 419526 0x4C45 10 word Get/Set Internal Register(Float)_01 Description 419527 0x4C46 10 word Get/Set Internal Register(Float)_02 Description 419528 0x4C47 10 word Get/Set Internal Register(Float)_03 Description 419529 0x4C48 10 word Get/Set Internal Register(Float)_04 Description 419530 0x4C49 10 word Get/Set Internal Register(Float)_05 Description 419531 0x4C4A 10 word Get/Set Internal Register(Float)_06 Description 419532 0x4C4B 10 word Get/Set Internal Register(Float)_07 Description 419533 0x4C4C 10 word Get/Set Internal Register(Float)_08 Description 419534 0x4C4D 10 word Get/Set Internal Register(Float)_09 Description 419535 0x4C4E 10 word Get/Set Internal Register(Float)_10 Description 419536 0x4C4F 10 word Get/Set Internal Register(Float)_11 Description 419537 0x4C50 10 word Get/Set Internal Register(Float)_12 Description 419538 0x4C51 10 word Get/Set Internal Register(Float)_13 Description 419539 0x4C52 10 word Get/Set Internal Register(Float)_14 Description 419540 0x4C53 10 word Get/Set Internal Register(Float)_15 Description 419541 0x4C54 10 word Get/Set Internal Register(Float)_16 Description 419542 0x4C55 10 word Get/Set Internal Register(Float)_17 Description 419543 0x4C56 10 word Get/Set Internal Register(Float)_18 Description 419544 0x4C57 10 word Get/Set Internal Register(Float)_19 Description 419545 0x4C58 10 word Get/Set Internal Register(Float)_20 Description 419546 0x4C59 10 word Get/Set Internal Register(Float)_21 Description 419547 0x4C5A 10 word Get/Set Internal Register(Float)_22 Description 419548 0x4C5B 10 word Get/Set Internal Register(Float)_23 Description 419549 0x4C5C 10 word Get/Set Internal Register(Float)_24 Description 419550 0x4C5D 10 word Get/Set Internal Register(Float)_25 Description 419551 0x4C5E 10 word Get/Set Internal Register(Float)_26 Description 419552 0x4C5F 10 word Get/Set Internal Register(Float)_27 Description C-37 ioLogik W5300 Cellular Micro RTU Controller Modbus/TCP Address Mapping 5xxxx Write Registers (supports function 8) Sub-function Data Field Data Field (Request) (Response) 0x0001 0xFF00 Echo Request Data Reboot 0x0001 0x55AA Echo Request Data Reset with Factory default C-38 Description D D. SNMP Agents with MIB II, RS-232-like Groups The ioLogik Cellular Micro RTU Controller has SNMP (Simple Network Management Protocol) agent software built in. The software supports SNMP traps, RFC1317 RS-232-like groups, and RFC 1213 MIB-II. The following table lists the standard MIB-II groups, as well as the variable implementation for the ioLogik Cellular Micro RTU Controller. RFC1213 MIB II Supported SNMP Variables System MIB Interfaces MIB IP MIB ICMP MIB SysDescr ifNumber ipForwarding IcmpInMsgs SysObjectID ifIndex ipDefaultTTL IcmpInErrors SysUpTime ifDescr ipInreceives IcmpInDestUnreachs SysContact ifType ipInHdrErrors IcmpInTimeExcds SysName ifMtu ipInAddrErrors IcmpInParmProbs SysLocation ifSpeed ipForwDatagrams IcmpInSrcQuenchs SysServices ifPhysAddress ipInUnknownProtos IcmpInRedirects SysServices ifAdminStatus ipInDiscards IcmpInEchos ifOperStatus ipInDelivers IcmpInEchoReps ifLastChange ipOutRequests IcmpInTimestamps ifInOctets ipOutDiscards IcmpTimestampReps ifInUcastPkts ipOutNoRoutes IcmpInAddrMasks ifInNUcastPkts ipReasmTimeout IcmpOutMsgs ifInDiscards ipReasmReqds IcmpOutErrors ifInErrors ipReasmOKs IcmpOutDestUnreachs Interfaces MIB IP MIB ICMP MIB ifInUnknownProtos ipReasmFails IcmpOutTimeExcds ifOutOctets ipFragOKs IcmpOutParmProbs ifOutUcastPkts ipFragFails IcmpOutSrcQuenchs ifOutNUcastPkts ipFragCreates IcmpOutRedirects ifOutDiscards ipAdEntAddr IcmpOutEchos ifOutErrors ipAdEntIfIndex IcmpOutEchoReps ifOutQLen ipAdEntNetMask IcmpOutTimestamps ifSpecific ipAdEntBcastAddr IcmpOutTimestampReps ipAdEntReasmMaxSize IcmpOutAddrMasks ioLogik W5300 Cellular Micro RTU Controller SNMP Agents with MIB II, RS-232-like Groups ipRouteDest IcmpOutAddrMaskReps ipRouteIfIndex ipRouteMetric1 ipRouteMetric2 ipRouteMetric3 ipRouteMetric4 ipRouteNextHop ipRouteType ipRouteProto ipRouteAge ipRouteMask ipRouteMetric5 ipRouteInfo IpNetToMediaIfIndex IpNetToMediaPhysAddress IpNetToMediaNetAddress IpNetToMediaType IpRoutingDiscards UDP MIB TCP MIB SNMP MIB UdpInDatagrams tcpRtoAlgorithm snmpInPkts UdpNoPorts tcpRtoMin snmpOutPkts UdpInErrors tcpRtoMax snmpInBadVersions UdpOutDatagrams tcpMaxConn snmpInBadCommunityNames UdpLocalAddress tcpActiveOpens snmpInBadCommunityUses UdpLocalPort tcpPassiveOpens snmpInASNParseErrs tcpAttempFails snmpInTooBigs tcpEstabResets snmpInNoSuchNames Address Translation MIB tcpCurrEstab snmpInBadValues AtIfIndex tcpInSegs snmpInReadOnlys AtPhysAddress tcpOutSegs snmpInGenErrs AtNetAddress tcpRetransSegs snmpInTotalReqVars Address Translation MIB TCP MIB SNMP MIB AtNetAddress tcpConnState snmpInTotalSetVars tcpConnLocalAddress snmpInGetRequests tcpConnLocalPort snmpInGetNexts tcpConnRemAddress snmpInSetRequests tcpConnRemPort snmpInGetResponses tcpInErrs snmpInTraps tcpOutRsts snmpOutTooBigs snmpOutNoSuchNames D-2 ioLogik W5300 Cellular Micro RTU Controller SNMP Agents with MIB II, RS-232-like Groups snmpOutBadValues snmpOutGenErrs snmpOutGetRequests snmpOutGetNexts snmpOutSetRequests snmpOutGetResponses snmpOutTraps snmpEnableAuthenTraps Private MIB File and SNMP Variables Moxa also provides an SNMP for the I/O MIB file to help you monitor I/O status with SNMP software. You can find the MIB file on the Document and Software CD. The ioLogik W5312 does not have an Analog Input (AI). ioLogik W5340/W5340-HSPA Moxa-IO-MIB Moxa-IO-MIB Moxa-IO-MIB totalChannelNumber dio05-Index AI01-Index serverMode dio05-Type AI01-Type systemTime dio05- Mode AI01-Range firmwareVersion dio05- Status AI01-Value dio00-Index dio05- Filter AI01-Min dio00-Type dio05- Trigger AI01-Max dio00- Mode dio05- CntStart AI02-Index dio00- Status dio05- PulseStart AI02-Type dio00- Filter dio05- LowWidth AI02-Range dio00- Trigger dio05- HighWidth AI02-Value dio00- CntStart dio06-Index AI02-Min dio00- PulseStart dio06-Type AI02-Max dio00- LowWidth dio06- Mode AI03-Index dio00- HighWidth dio06- Status AI03-Type dio01-Index dio06- Filter AI03-Range dio01-Type dio06- Trigger AI03-Value dio01- Mode dio06- CntStart AI03-Min dio01- Status dio06- PulseStart AI03-Max dio01- Filter dio06- LowWidth VC00-Index dio01- Trigger dio06- HighWidth VC00-Value dio01- CntStart dio07-Index VC01-Index dio01- PulseStart dio07-Type VC01-Value dio01- LowWidth dio07- Mode VC02-Index dio01- HighWidth dio07- Status VC02-Value dio02-Index dio07- Filter VC03-Index dio02-Type dio07- Trigger VC03-Value dio02- Mode dio07- CntStart VC04-Index dio02- Status dio07- PulseStart VC04-Value dio02- Filter dio07- LowWidth VC05-Index dio02- Trigger dio07- HighWidth VC05-Value dio02- CntStart relay00-Index VC06-Index dio02- PulseStart relay00-Type VC06-Value dio02- LowWidth relay00- Mode VC07-Index dio02- HighWidth relay00- Status VC07-Value dio03-Index relay00- LowWidth VC08-Index D-3 ioLogik W5300 Cellular Micro RTU Controller SNMP Agents with MIB II, RS-232-like Groups dio03-Type relay00- HighWidth dio03- Mode relay00- PulseStart VC09-Index dio03- Status relay00- IRelayCNT VC09-Value dio03- Filter relay00- TotalRelayCNT dio03- Trigger relay01-Index dio03- CntStart relay01-Type dio03- PulseStart relay01- Mode dio03- LowWidth relay01- Status dio03- HighWidth relay01- LowWidth dio04-Index relay01- HighWidth dio04-Type relay01- PulseStart dio04- Mode relay01- IRelayCNT dio04- Status relay01- TotalRelayCNT dio04- Filter AI00-Index dio04- Trigger AI00-Type dio04- CntStart AI00-Range dio04- PulseStart AI00-Value dio04- LowWidth AI00-Min dio04- HighWidth AI00-Max D-4 VC08-Value E E. Factory Default Settings The factory default settings for firmware V1.3 for the ioLogik W5312 series, V1.5 for the ioLogik W5340 series, and V1.2 for the ioLogik W5340-HSPA series, are as follows: IP address: 192.168.127.254 Netmask: 255.255.255.0 Gateway: None Communication Watchdog: Disable Modbus/TCP Alive Check: ON Modbus/TCP Timeout Interval: 60 sec Server Address None Server Port 0 Baud Rate 9600 Data Bit 8 Stop Bit 1 Parity None Mode RS-485, 2- Wire Cellular Band Auto Cellular Operation Mode On-Demand Caller IDs None DI Mode: DIO-0 to DIO-5 (W5340), DI Safe Status: Off Filter Time for Counter: 10 × 0.5mS Counter Trigger Type: Lo to Hi Counter Status: Stop AI Mode: AI-0 to AI-3, +/- 10V DO Mode: DIO-6 to DIO-11(W5340), DI-0~DI-7, DIO8~11(W5312) DO-0~DO-7(W5312) DO Safe Status: Off Pulse Low Width: 1 Pulse Hi Width: 1 No. of Pulses: 0 (continuous) Filter Time for Counter: 10 × 0.5mS Counter Trigger Type: Lo to Hi Counter Status: Stop Counter status: Stop Password: “empty” ioLogik W5300 Cellular Micro RTU Controller Factory Default Settings Module Name: “empty” Module Location: “empty: SNMP: Enable Community: Public Contact: “empty” Location: “empty” Data Logging – AI Channel Logging Per 1min TFTP Server Address None TFTP Server Port 0 Active OPC Server Address None Active OPC Server Port 9900 ioLogik Cellular Micro RTU Controller Network Port Usage Port Type Usage 68 UDP BOOTPC 68 UDP DHCP 69 UDP Export/import file 161 TCP SNMP 502 TCP Modbus Communication 500 UDP IPSec VPN, NAT-T disabled 4500 UDP IPSec VPN, NAT-T enabled 4800 UDP Auto search 9000 TCP Active Message (Default) 9000 UDP Active Message (Default) 9300 TCP ioAdmin 9500 TCP Active OPC server 9900 TCP Active OPC server E-2 F F. Troubleshooting the Cellular I/O Connection Moxa provides the following checklist as a step-by-step troubleshooting guide. If you still can’t solve the problem, please complete the checklist and mail it to Moxa. We will do a further analysis and then contact you with the results. Type the IP addresses in the spaces provided. Internet SCADA/ioAdmin IP:_____________ Active OPC Server IP:_____________ Cellular Network W5300 IP:_____________ Problem Description: • Can’t Power On • The W5300 always reboots • Can’t connect to the Cellular network • ioAdmin can’t find the device • Received error message “Failed to execute OPCENUM” • SCADA cannot connect to Active OPC Server Self Checklist: Power: 1. Is the power connector connected to a power supply? □ Yes: __V, __A □ No 2. Does power LED show a steady green? □ Yes □ No 3. What color is the READY LED? □ Green □ Blinking □ OFF 4. What color is the FAULT LED? □ Red □ Blinking □ OFF SIM card settings: 1. Is the antenna connected properly? □ Yes □ No 2. Is the SIM card inserted correctly? □ Yes □ No 3. Does the SIM card have the capability to connect to a Cellular network? □ Yes □ If No, contact your carrier ioAdmin 1. Is the AOPC IP Address correc? □ Yes, IP:_________________ □ No 2. Is the GPRS/Link LED a steady green? □ Yes □ No ioLogik W5300 Cellular Micro RTU Controller Troubleshooting the Cellular I/O Connection 3. What status is shown on ioAdmin’s Cellular Dial Up setting tab? ____________ 4. Check the RSSI Level: _______________ 5. Where ioAdmin show an error code? □ If yes, _______________ □ No 6. Does ioAdmin show the Cellular IP address? □ If yes, IP: __________ □ If No, contact your carrier 7. Operation Mode: □ Always On □On Demand Active OPC server (AOPC): 1. Check the Firewall. Port 9900 (AOPC), 9500, 9300, 502 should be open 2. Is the AOPC IP address on the Cellular dial up setting Tab correct? □ Yes, IP:_________ □ No 3. Check the AOPC log window. Do you see a message? □ Yes, _____________ □ No, nothing special 4. Does AOPC’s tree view show the device? □ Yes □ No 5. Does ioAdmin show the AOPC after adding AOPC manually? □ Yes □ No 6. Choose “sort by AOPC” in ioAdmin. Does ioAdmin show the AOPC? □ Yes □ No 7. Does ioAdmin show the device in the AOPC list? □ Yes □ No 8. Can you ping the AOPC IP address? □ Yes, Time:___________ms □ No. How to ping AOPC? Client Test: 1. Did you install OPC core components in your PC? □ Yes □ No 2. Were AOPC and the Client tested on the same PC? □ Yes □ No, please install them 3. Did you create an Active Tag in ioAdmin? □ Yes, □ No 4. Does Client test connect to AOPC? □ Yes □ No. Error Message:________________ Remote Client test: 1. Are the AOPC PC and Client test PC on same Domain? □ Yes □ No 2. Are the AOPC PC’s firewall, security, and authorization settings set? □ Yes, check the port setting and user group settings □ No 3. What kind of Error Message is displayed when you use Client test? ___________________ 4. Please return the completed form to Moxa. Cellular modem error codes: Error Code Phenomena Display Message 0 Cellular Module_OK No Error 1 Cellular Module without SIM Card No SIM Card Installed 2 Cellular_Module with Error PIN Code PIN Code Error 3 Cellular_Module can’t detected Error Code 3 4 Can’t registration Cellular Network Error Code 4 5 Cellular_Module Parameters Incorrectly Error Code 5 6 Cellular_Module Busy Error Code 6 7 APN incorrectly Wrong APN Setting 8 Dial to Cellular fail dial to Cellular fail 9 PPP Connect fail PPP connect fail 10 Cellular_Module is not Ready Error Code 10 11 Initiate UART port error Error Code 11 12 No any incoming call in Queue Error Code 12 13 Communication Timeout between CPU and Module Error Code 13 14 Unknown Fail Error Code 13 F-2 G G. FAQ The following information is provided as a guide that you can refer to when troubleshooting. If you still can’t solve your problem, please email the details of the problem to Moxa’s tech support engineers. We will do further analysis and then contact with a solution. How to set Active OPC to get better connection quality iThe oLogik W5300 uses a Heartbeat signal to check the connection quality between Active OPC server and the device. In the event of a low bandwidth cellular connection, Active OPC will lose the heartbeat signal of the “Heartbeat Interval.” We suggest using a value greater than 60 seconds. For Active OPC server, the time out value of the Modbus gateway function should be greater than the heartbeat interval setting. Service delay time Based on our own testing results, the delay time should be less than 3 seconds. Which TCP ports should Initial open? Four ports should be opened: 9900, 9500, 9300, and 502. Note that 9900 is definable; please make sure that the port numbers are defined correctly.