1
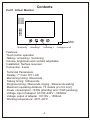
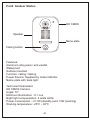
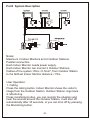
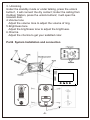
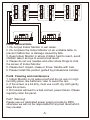
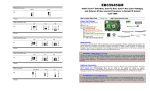
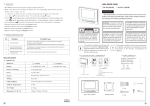
User Manual for 2 Wires Villa Kit
Contents
Part1 Indoor Monitor
MIC
Monitoring
Unlocking 1
Unlocking 2
Calling/on or off
Features:
Touch button operation
Talking / unlocking / monitoring
Volume, brightness and contrast adjustable
Installation: Surface mounted
Connection: 2-wire
Technical Parameters:
Display: 7" Color TFT LCD
Monitoring timing: 30seconds
Talking timing: 120seconds
Ringtone timing: 30seconds ringing , 90seconds waiting
Maximum operating distance: 70 meters (2 x 0.5 mm²)
Power consumption: <0.5W (standby) and <10W (working)
Voltage input of adapter: AC100~240V – 50/60Hz
Voltage output of adapter : DC18V – 1500mA
Working temperature: -25℃~65℃
-1-
Part2 Outdoor Station
HD CMOS
Speaker
Name plate
Calling button
Features:
Aluminum alloy panel, anti-vandal
Waterproof
Surface mounted
Function: calling / talking
Power Source: Supplied by Indoor Monitor
Name plate with back light
Technical Parameters:
HD CMOS Camera
Angle: 72°
Minimum Illumination : 0.1 Lux
Night light compensation: 4 white LEDs
Power consumption : <0.1W (standby) and <3W (working)
Working temperature: -25℃~ 65℃
-2-
Part3 System Description
2C
2C
2C
2C
2C
2C
2C
2C
Dry Contact
Dry Contact
Dry Contact
Outdoor station1
Dry Contact
Outdoor station 2
Notes:
Maximum 3 Indoor Monitors and 2 Outdoor Stations.
Parallel connection.
Each Indoor Monitor needs power supply.
Each Indoor Monitor can monitor 2 Outdoor Stations.
Cables of the system: Wire≥0.5mm², from Outdoor Station
to the farthest Indoor Monitor distance≤70m.
User Operation:
1. Calling
Press the calling button, Indoor Monitor shows the visitor's
image from the Outdoor Station. Outdoor Station rings back..
2. Monitoring
Press monitoring button, you can monitor the situation and
hear the sounds around the Outdoor Station, it will shut off
automatically after 30 seconds, or you can shut off by pressing
the Monitoring button.
-3-
3. Unlocking
Under the standby mode or under talking, press the unlock
button1, it will connect the dry contact; Under the calling from
Outdoor Station, press the unlock button2, it will open the
relevant door.
4.Volume tone
Adjust the volume tone to adjust the volume of ring.
5.Brightness tone
Adjust the brightness tone to adjust the brightness.
6.Chorma
Adjust the chorma to get your satisfied color.
Part4 System Installation and connection
-4-
Bell
Indoor2 Indoor1
CN2A CN1A CN5
nonpolar nonpolar
Outdoor2 Outdoor1
CN3
CN1
CN2
Bell
Indoor2 Indoor1
Volume
unlock
unlock
NC
COM
Volume
NO
CN2A CN1A CN5
nonpolar nonpolar
Outdoor2 Outdoor1
CN3
CN1
CN2
Bell
Indoor2 Indoor1
unlock
NO
COM
unlock
CN2A CN1A CN5
nonpolar nonpolar
Outdoor2 Outdoor1
NC
_
CN3
_
_
+
CN1
_
_
+
+
CN2
_
Terminal
1
2
+
+
Terminal
1
2
1
2
+
1
1
2
1
2
1
2
︷ ︷
Terminal
1
2
1
2
1 B+
2 GND
︷ ︷
︷ ︷
1
2
1
2
1
2
︷ ︷
1
2
1
2
1 B+
2 GND
︷ ︷
1
2
1
2
︷ ︷
1 B+
2 GND
1
Part5 General Note
1. Do not put Indoor Monitor in wet areas.
2. Do not place the Indoor Monitor on an unstable table, to
prevent malfunction or damage caused by falls.
3. Keep Indoor Monitor in where children hard to reach, avoid
children take it as toys to avoid a bad result.
4. Please do not use needles and other sharp things to click
the screen of Indoor Monitor.
5. Please don't impact, shake or throw. Handle with care.
6. Please install this product guided by professional installer.
Part6 Cleaning and maintenance
1. Indoor Monitor is not water-proof and do not use it in high
humidity place, like bathroom, also to avoid the rain.
2. If the screen is a bit dirty, must use a soft, dry cloth gently
wipe the screen.
3. Dirt socket will lead to a bad contact, power failure. Please
regularly clean the panel.
Part7 Warning!
Please use our dedicated power supply provide by BPQ,
otherwise we will not be responsible for any bad result which
may caused.
-5-